MD SPORTS (MEDALSPORTS) Air Hockey Manual L1001068
User Manual: MD MD SPORTS (MEDALSPORTS) Air Hockey Manual MD SPORTS (MEDALSPORTS) Air Hockey Owner's Manual, MD SPORTS (MEDALSPORTS) Air Hockey installation guides
Open the PDF directly: View PDF ![]() .
.
Page Count: 15
]]]]]iii]]iii]]iii]]iii]]iii]]iii]]iii]]iii]]iii]]iii]]iii]]iii]]iiii]]iiii]]iiii]]iiii]]iiii]]iiii]]iiii]]iiii]]iiii]]iiii]]iiiiiiiiiiiiiiiiiiiiiiiiiiiiiiiiiiii]]]iiiiiiiiiiiiiiiiiiiiiiiii¸i¸i_iiiiiiii¸iiiiiiiiiYiiiiiiiYiiiiiiiYiiiiiiiYiiiiiiiYiiiiiiiYiiiiiiiYiiiiiiiYiiiiiiiYiiiiiiiYiiiiiiiYiiiiiiiYiiiiiiiYiiiiiiiYiiiiiiiYiiiiiiiYiiiiiiiYiiiiiiiYiiiiiiiYiiiiiiiYiiiiiiiYiiiiiiiYiiiiiiiYiiiiiiiYIIII_DD_Y___iii__ii_
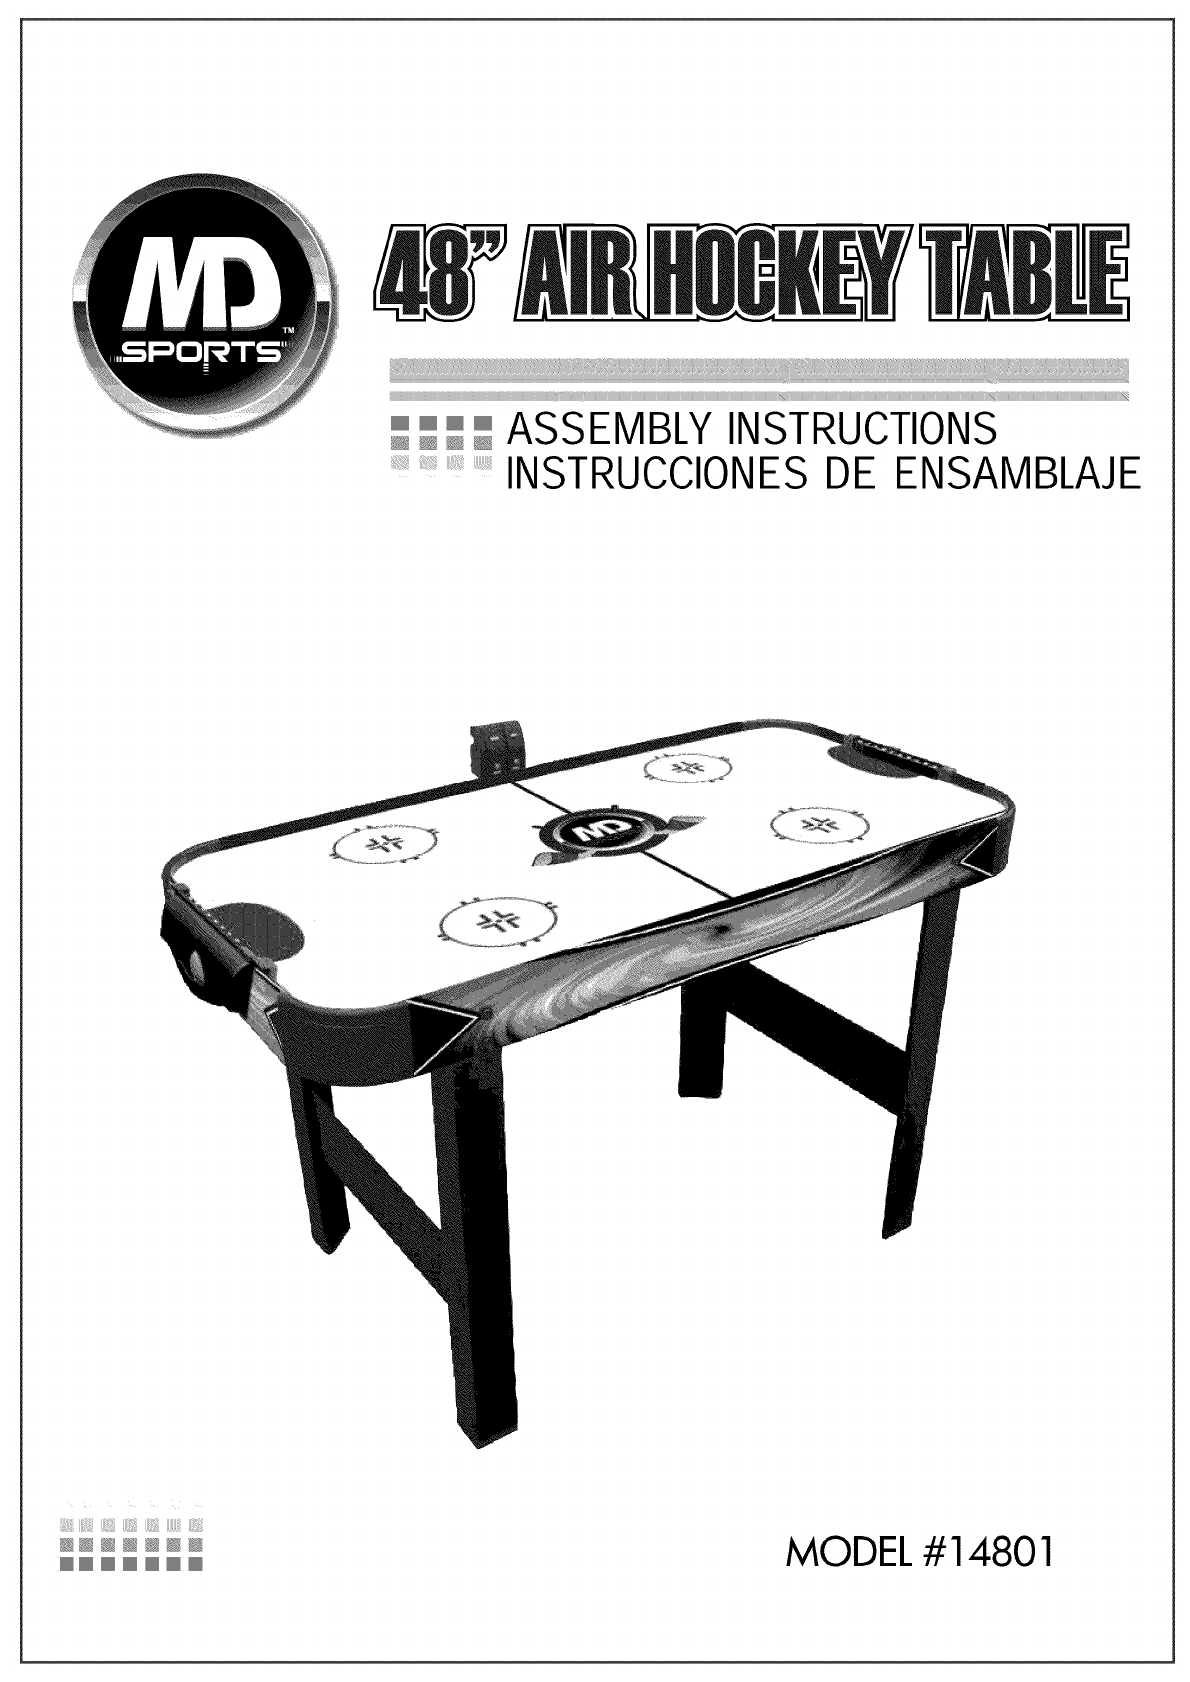
__ _ ASSEMBLY INSTRUCTIONS
INSTRUCClONES DE ENSAMBLAJE
@@NNNNN MODEL #14801
LiMiTED 90 DAYS WARRANTY
This Product will be provided a limited warranty for a period of
90 Days from the date of purchase, be free of defects in parts
and workmanship.
During the limited warranty period if, in normal use, a part is
found to be defective or breaks that will be offered repair or
replacement part (at our option, either the same or an equiva-
lent model) at no additional charge. The only exceptions to the
limited warranty are such as main frames, table top, playing
surfaces, batteries, tools. The above warranties do not apply in
case of defects caused from improper usage, alteration,
misuse, abuse, accidental damage or neglect of the parts
affected.
A purchase receipt or other proof of the date of purchase will
be required before warranty service is performed. Requests for
warranty service can be provided by e-mail, send request in
writing or call our Consumer Service Department at:
Toll Free •877-885-1635
tablegame@medalsports.com.tw
www.medalsports.com.tw
This Limited Warranty gives you specific legal rights and you
may also have other rights that vary from one state (province)
to another.
iMPORTANT NOTICE! Do Not Return This Product To The Store.
Please Keep Your Instructions! Your Model number is necessary should you need to contact us.
Please read through this instruction manual book to familiarize yourself wkh all parts and assembly
steps, kindly refer to the parts identifier below and be sure that all parts have been included.
Although we are dedicated to giving our customers the best product possible, a question may arise
or parts may be missing. If you are missing parts, or, if you have any questions, please contact our
fast and friendly service centre on: 877-885-1635
TOOLS REQUIRED:
Phillips Screwdriver- Not Included
Standard (Flat Head Screwdriver) - Not Included
Allen Wrench - Included
Electric Screwdrivers may be helpful during assembly; however, please
set a low torque and use extreme caution because screws may be high.
stripped or overtightened if the electric screwdriver's torque is set too high.
2_
ASSEMBLY TIPS:
When installing parts that have more than one bolt, hand
tighten all bolts before tightening individual bolts with a
screwdriver or allen key.
Some figures or drawings may not look exactly like your
product. Please read and understand the text before
beginning each assembly step.
WARNINGS!
READ AND FOLLOW ALL ASSEMBLY, OPERATION, AND SAFETY
INSTRUCTIONS CAREFULLY. AT LEASTTWO ADULTS ARE NEEDED
FOR THE ASSEMBLY OF THIS TABLE.
THIS IS NOT A CHILD'S TOY. ADULT SUPERVISION IS REQUIRED
FOR CHILDREN PLAYING THIS GAME. PLEASE READ INSTRUCTIONS
CAREFULLY. PROPER USE OF THIS SET CAN AVOID DAMAGE OR
INJURY.
CHOKING HAZARD--
Table contains small parts or small balls. Not for children under 3 yrs.
2
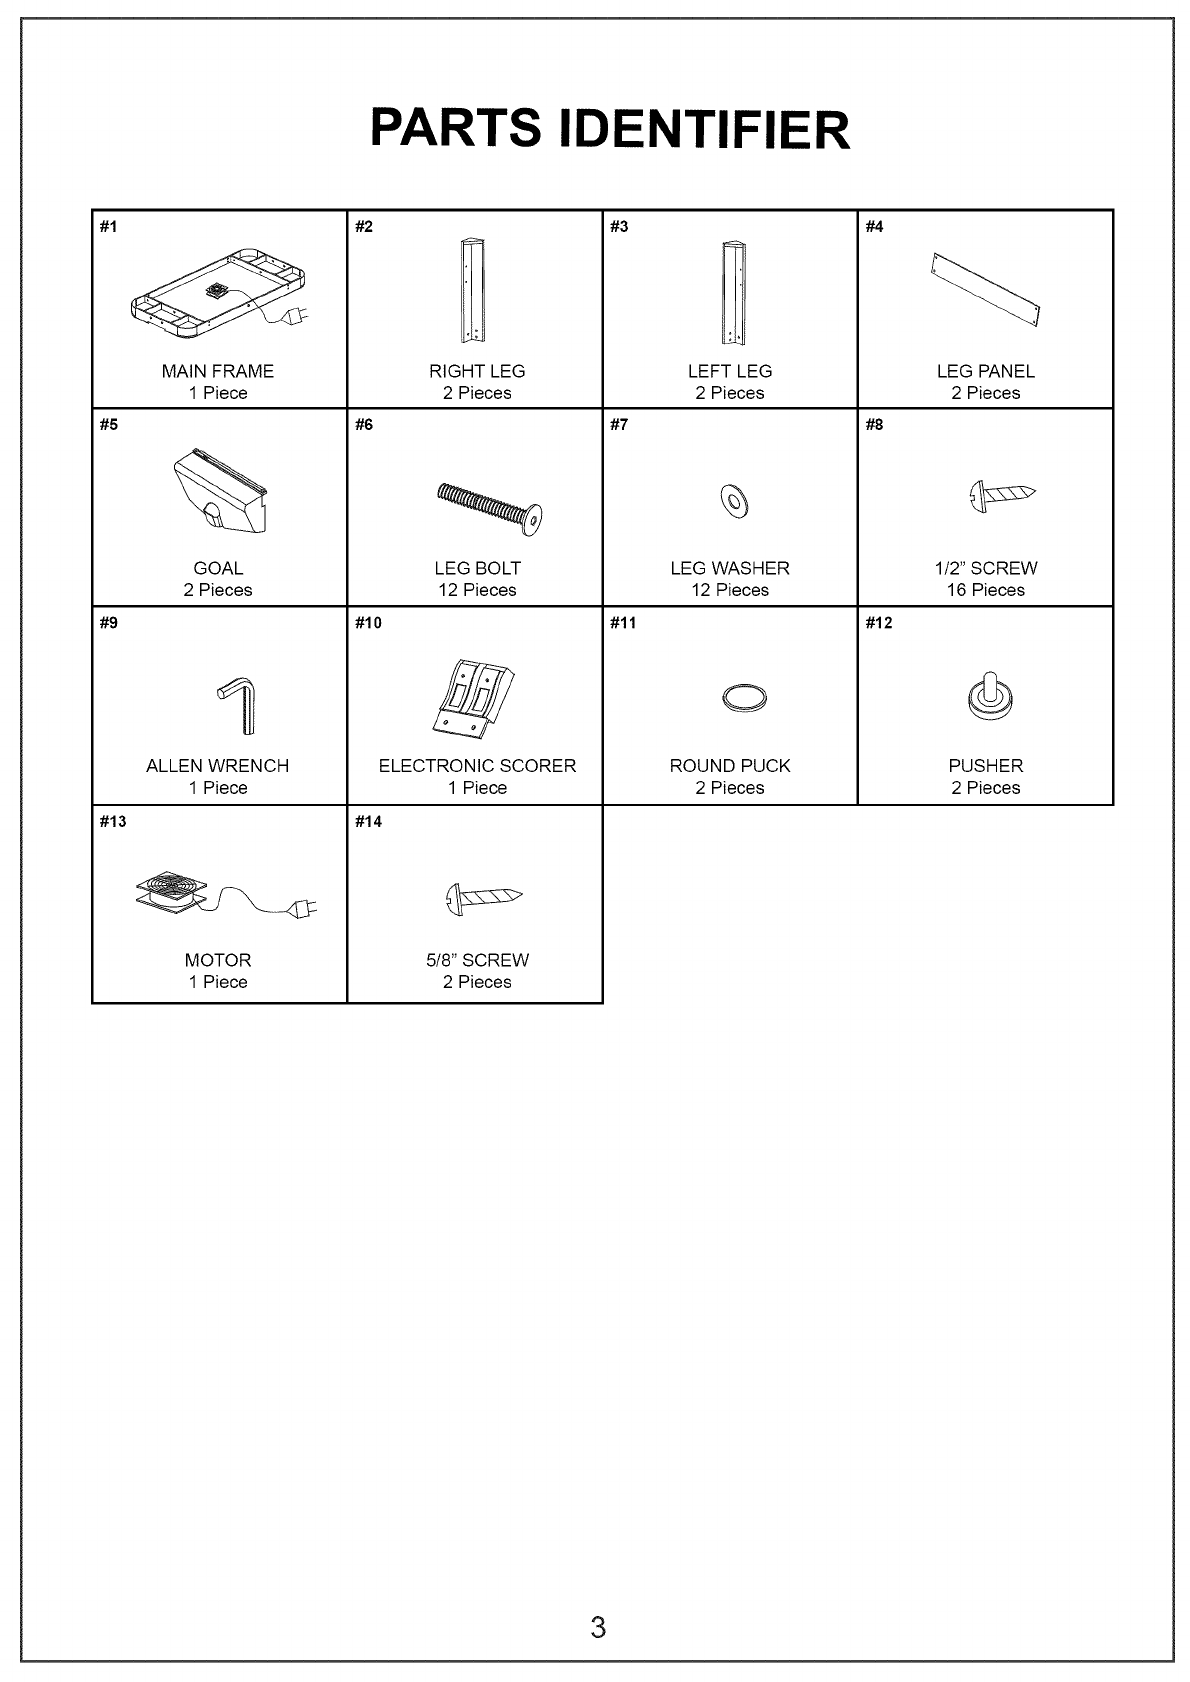
PARTS IDENTIFIER
#1
#5
#9
#13
MAIN FRAME
1 Piece
%
GOAL
2 Pieces
ALLEN WRENCH
1 Piece
MOTOR
1 Piece
#2
#6
#10
#14
RIGHT LEG
2 Pieces
LEG BOLT
12 Pieces
ELECTRONIC SCORER
1 Piece
5/8" SCREW
2 Pieces
#3
#7
#11
LEFT LEG
2 Pieces
LEG WASHER
12 Pieces
C)
ROUND PUCK
2 Pieces
#4
#8
#12
LEG PANEL
2 Pieces
1/2" SCREW
16 Pieces
PUSHER
2 Pieces
3
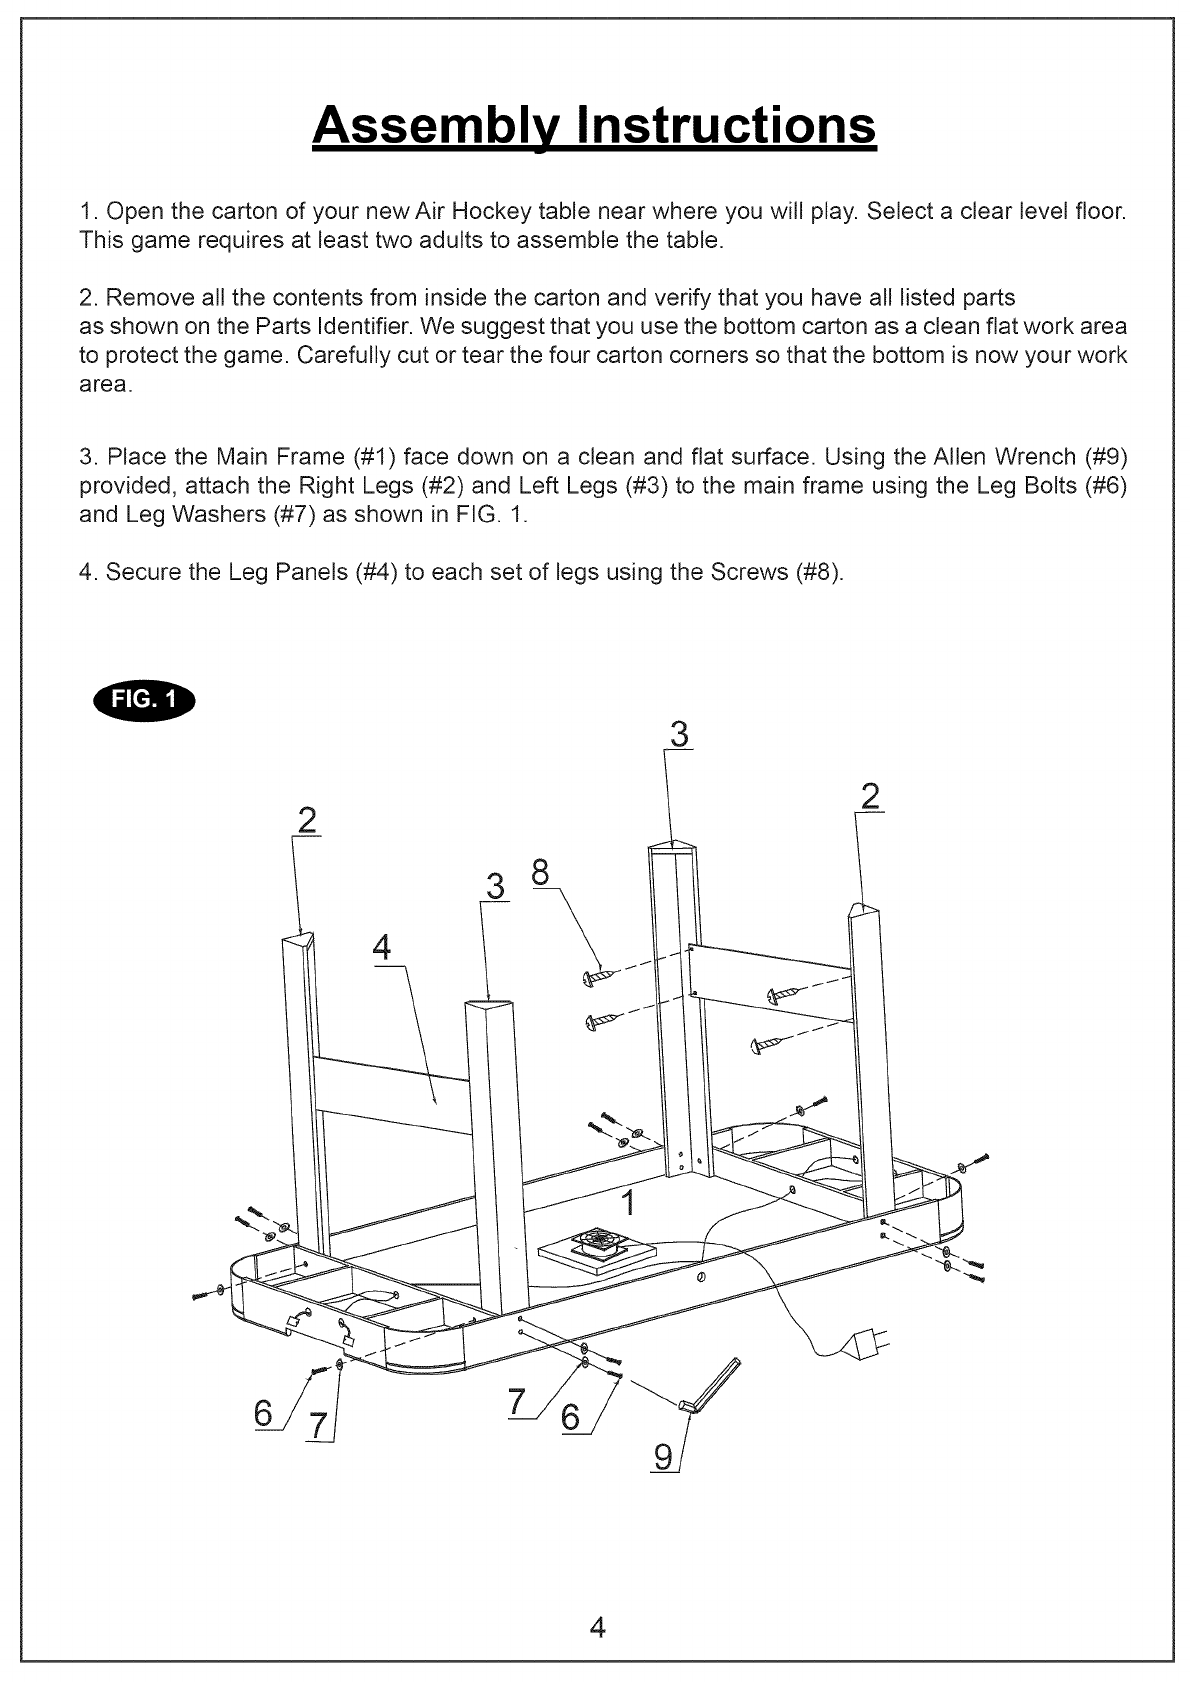
Assembl Instructions
1. Open the carton of your new Air Hockey table near where you will play. Select a clear level floor.
This game requires at least two adults to assemble the table.
2. Remove all the contents from inside the carton and verify that you have all listed parts
as shown on the Parts Identifier. We suggest that you use the bottom carton as a clean flat work area
to protect the game. Carefully cut or tear the four carton corners so that the bottom is now your work
area.
3. Place the Main Frame (#1) face down on a clean and flat surface. Using the Allen Wrench (#9)
provided, attach the Right Legs (#2) and Left Legs (#3) to the main frame using the Leg Bolts (#6)
and Leg Washers (#7) as shown in FIG. 1.
4. Secure the Leg Panels (#4) to each set of legs using the Screws (#8).
2
4
38
3
2
67
4

5. Lift the table assembly from the floor with two strong adults, turn it over, and set table on its legs
in the location where you will play. Go back and make sure that all connections are tight.
CABINET DO NOT HOLD THE LEGS
HOLD TAB L__
i J
DO NOT LEAN THE
TABLE ON ITS LEGS
Caution :
Two strong adults are recommended to turn the table over as shown.
1.Lift the table off the ground.
2. Turn the table over.
3. Place it on all four feet at the same time on the ground.
6. Attach the Goals (#5) to each end of the table using the Screws (#8) as shown in FIG 2. Affix the
Electronic Scorer (#10) to the Main Frame (#1) in the pre-drilled holes using the Screws (#14).
Extend the wires found under the main frame to the Electronic Scorer (#10) and connect them in
appropriate acceptors as shown in FIG. 2A.
7. Plug in the power cord, and you are now ready to play.
14
5
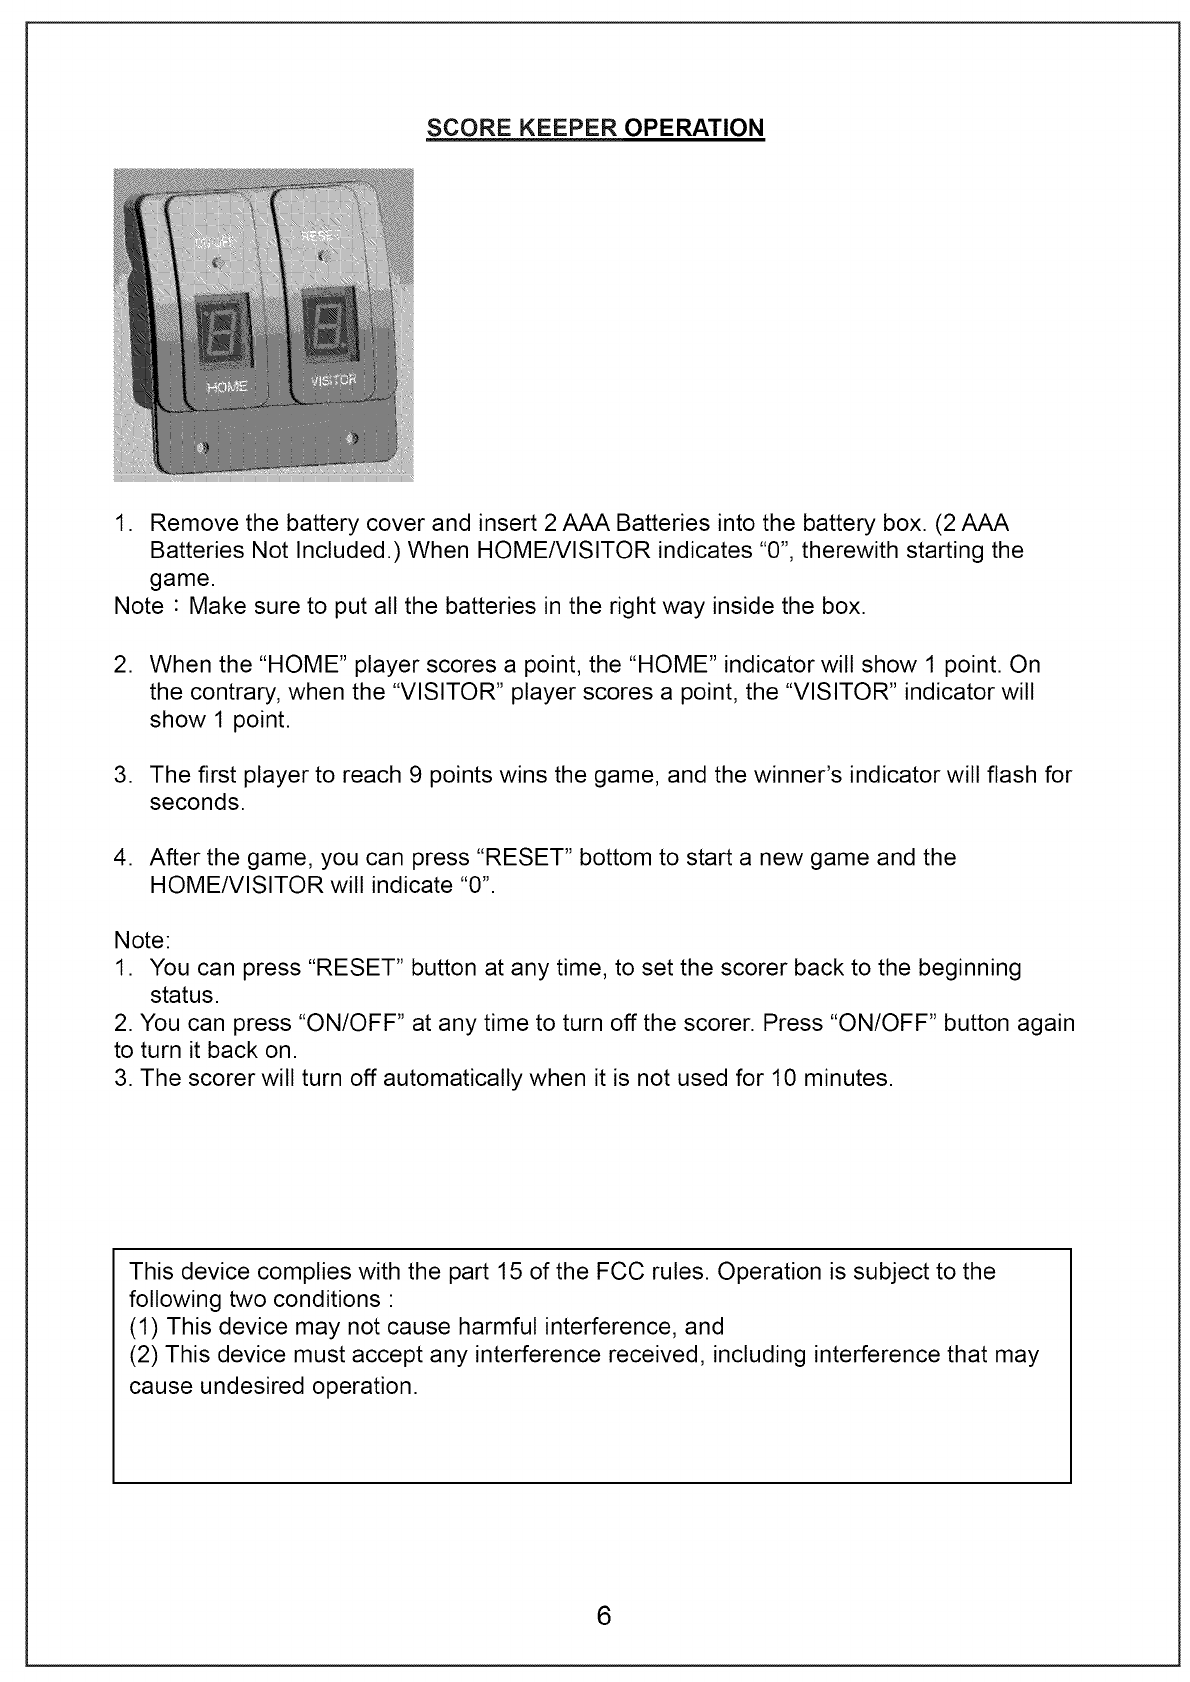
SCORE KEEPER OPERATION
1. Remove the battery cover and insert 2 AAA Batteries into the battery box. (2 AAA
Batteries Not Included.) When HOME/VISITOR indicates "0", therewith starting the
game.
Note : Make sure to put all the batteries in the right way inside the box.
.When the "HOME" player scores a point, the "HOME" indicator will show 1 point. On
the contrary, when the "VISITOR" player scores a point, the "VISITOR" indicator will
show 1 point.
3. The first player to reach 9 points wins the game, and the winner's indicator will flash for
seconds.
4. After the game, you can press "RESET" bottom to start a new game and the
HOME/VISITOR will indicate "0".
Note:
1. You can press "RESET" button at any time, to set the scorer back to the beginning
status.
2. You can press "ON/OFF" at any time to turn off the scorer. Press "ON/OFF" button again
to turn it back on.
3. The scorer will turn off automatically when it is not used for 10 minutes.
This device complies with the part 15 of the FCC rules. Operation is subject to the
following two conditions :
(1) This device may not cause harmful interference, and
(2) This device must accept any interference received, including interference that may
cause undesired operation.
6
Power Glide Hocke Rules of Pla
The Object of the Game
The object of Power Glide Hockey is to be the first player to score 10 goals against
the opposing player.
Beginning the Game
A coin toss is used to determine which player starts with the puck ("serve"). The
player winning the coin toss gets the puck and begins play by striking the puck with
his/her pusher onto the opponent's side.
During Play
Players can strike the puck anywhere on their half of the playing surface. Players
cannot cross the centerline to strike the puck. If a goal is scored when a player
strikes the puck over the centerline, it does not count.
A player may stand anywhere around the table on his/her side of the centerline. Play-
ers may not stand past that line.
When the puck contacts any part of the centerline, either player may strike the puck to
score.
Scoring
A goal is scored when the puck enters and drops inside the opponent's goal.
The player scored upon receives possession of the puck for the next serve.
What Counts as a Goal?
If the puck stops in the goal and has tilted into the goal drop, it counts as a goal.
If the puck stops in the goal and has not tilted into the goal, it does not count as a
goal. Player can move the puck out of the goal area with his/her hand or pusher.
If the puck rebounds out of the goal, the point does not count.
Winning
The first player to score 10 points is declared the winner.
7
f
GA T LI ITA IAS
Este producto tiene una garantia limitada por un periodo de
90 dias a partir de la fecha de compra, las partes y la mano
de obra estan libres de defectos.
Durante el periodo de garantia limitada, si bajo condiciones
de uso normal, una parte se encuentra defectuosa o rota,
esta ser,_ reparada o reemplazada (a nuestra opcion, con la
misma parte o con una parte de un modelo equivalente) sin
costo adicional. Las Qnicas excepciones de la garantia limi=
tada son: la mesa, la superficie de la mesa, las areas de
juego, las pilas y las herramientas. La garantia mencionada
no tendra efecto en caso de defectos causados por uso ina-
decuado, alteraciones, mal uso, abuso, y dafios accidentales
o descuido de las partes afectadas.
Un recibo de compra u otra prueba de la fecha de compra
sera requerido antes de que el servicio de garantia sea real-
izado. La solicitud del servicio de garantia puede hacerse por
correo electr6nico, enviando una solicitud escrita o Ilamando
a nuestro Departamento de Servicio al Consumidor.
N mero telef6nico gratis: 877-885-1635
tablegame@medalsports.com.tw
www.medalsports.com.tw
Esta garantia limitada le da a usted derechos legales especifi-
cos, usted tambien puede tener otros derechos que varian de
un estado (provincia) a otro/a.
8
iAviso Importante! No devuelva este producto a su local de venta°
iPor favor guarde las instrucciones! Esnecesario el nOmero de modelo para contactarse con nosotros. Por
favor I_a las instrucciones para poder familiarze con las piezas y los pasos para ensamblar. Corrobore que
todas las piezas que aparecen en el "tdentificador de Partes" se encuentren en el paquete. A pesar de que
nos dedicamos a dar los mejores productos posibles para nuestros clientes, pueden ocurrir problemas o
faltar piezas. Si le faltan piezas 6si tiene alguna inquietud, por favor cont_ctenos Io antes posible a nues-
tro cordial centro de atencidn: 877-885-1635
Herramientas Necesarias:
Destornillador Phillips - No incluido
Destornillador de Cabeza Plana - No incluido
Llave Allen - lncluido
Los destornilladores el_ctricos pueden ser de gran ayuda durante el
ensamblado; sin embargo, por favor ajuste el par de giro bajo y sea
extremadamente precavido porque las tuercas pueden ser barridas o
sobreajustadas si el destornillador el_ctrico est_ establecido muy alto.
CONSEJOS PARA EL ENSAMBLADO
1- Cuando se instalen partes con m_s de un tornillo, aj0stelo
manualmente primero y luego con un atornillador o Llave Allen.
2- Aigunos dibujos o figuras no se ver_n exactamente igual al
producto. Por favor lea y comprenda el texto antes de empezar
los pasos de ensamblado.
PRECAUClON
LEA YSIGA CUIDADOSAMENTE TODAS LAS INSTRUCClONES DE EN-
SAMBLAJE, OPERAClON YSEGURIDAD. SENECESITANCOMO MINIMO
DOS ADULTOS FUERTESPARA ELMONTAJE DE ESTA MESA.
ESTE NO ES UN JUGUETE PARA NINOS. LA SUPERVISION ADULTA ES
NECESARIA DURANTE EL JUEGO CON NINOS. POR FAVOR LEA LAS
INSTRUCClONES CUIDADOSAMENTE. EL USO APROPIADO DEL JUEGO
EVlTARA DANOS O HERIDAS.
PELIGRO DE ASFIXIO ==
La mesa contiene pequeEas partes o pequeEas pelotas
No apto para menores de 3 aEos
9
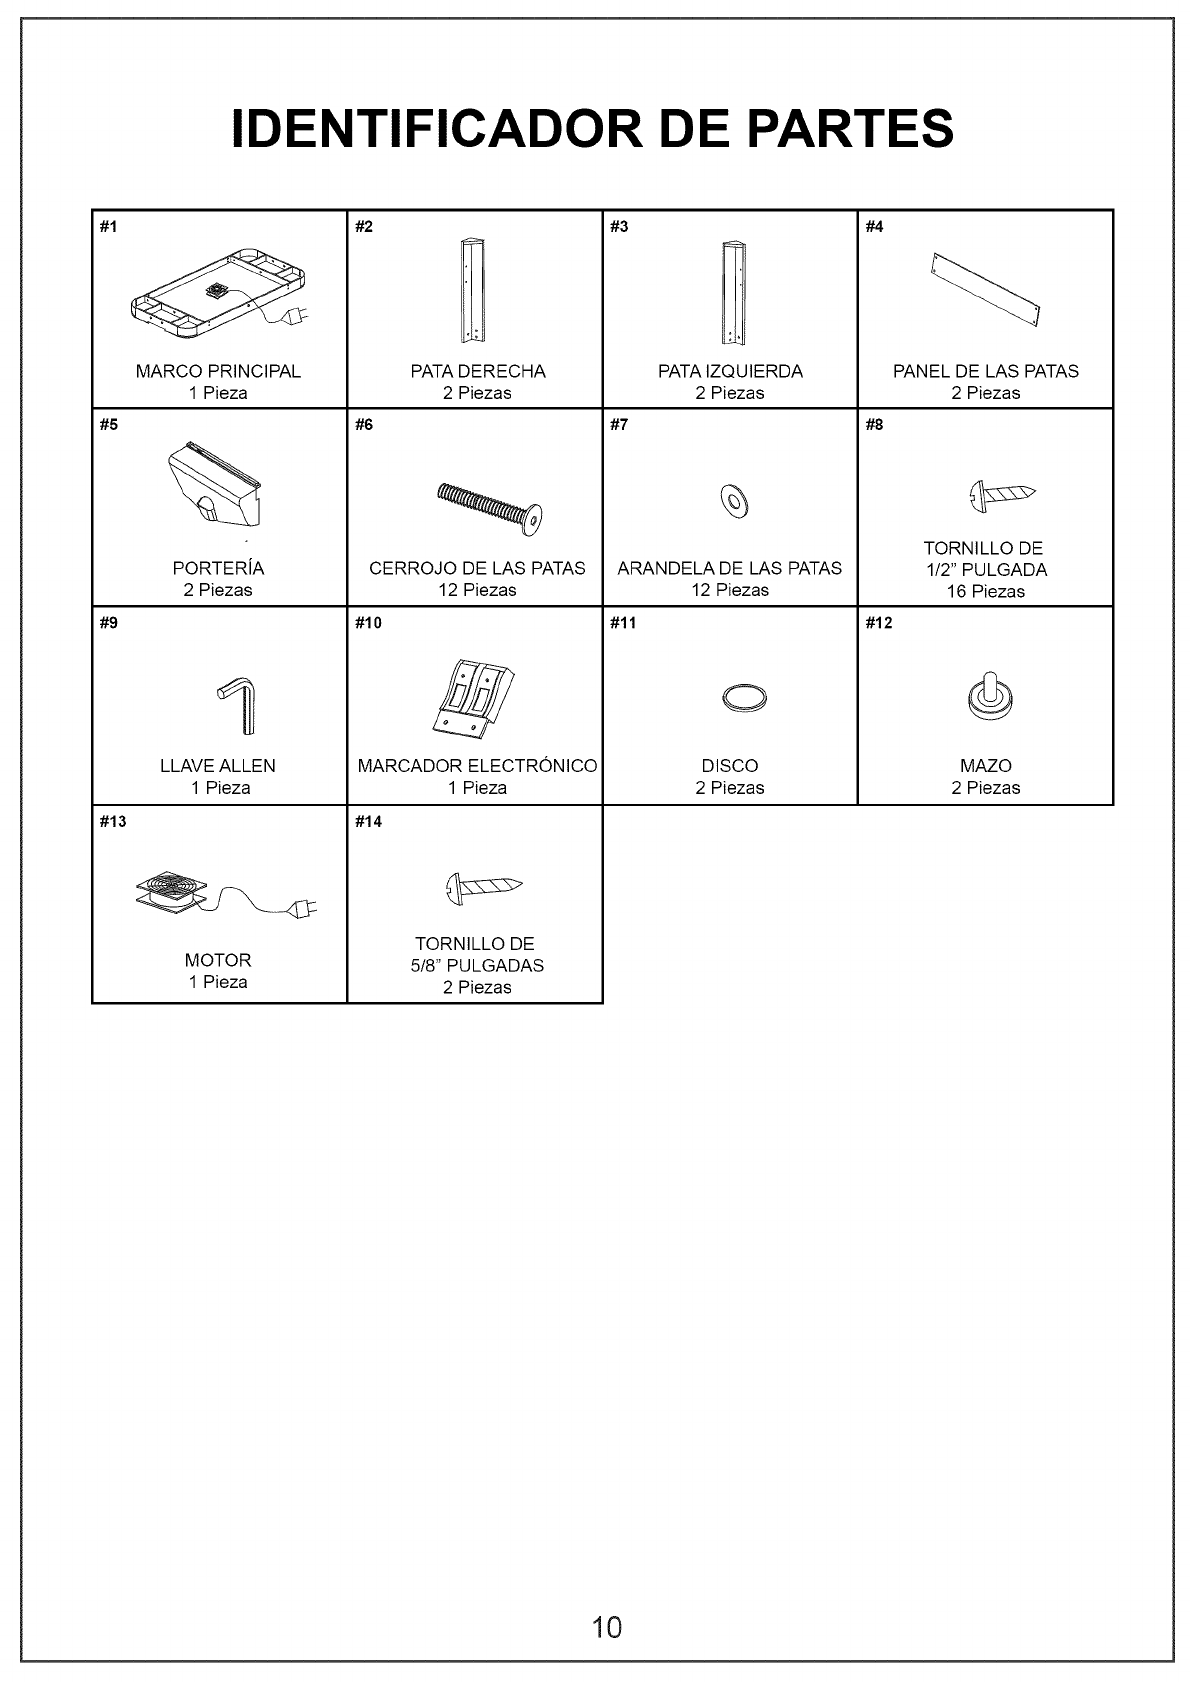
IDENTIFICADOR DE PARTES
#1
#5
#9
#13
MARCO PRINCIPAL
1 Pieza
#2
PATA DERECHA
2 Piezas
#3
PATA IZQUIERDA
2 Piezas
#4
%
PORTERiA
2 Piezas
LLAVE ALLEN
1 Pieza
MOTOR
1 Pieza
#6 #7 #8
CERROJO DE LAS PATAS
12 Piezas
#10
MARCADOR ELECTRONICO
1 Pieza
#14
TORNILLO DE
5/8" PULGADAS
2 Piezas
ARANDELA DE LAS PATAS
12 Piezas
#11
O
DISCO
2 Piezas
#12
PANEL DE LAS PATAS
2 Piezas
TORNILLO DE
1/2" PULGADA
16 Piezas
MAZO
2 Piezas
10
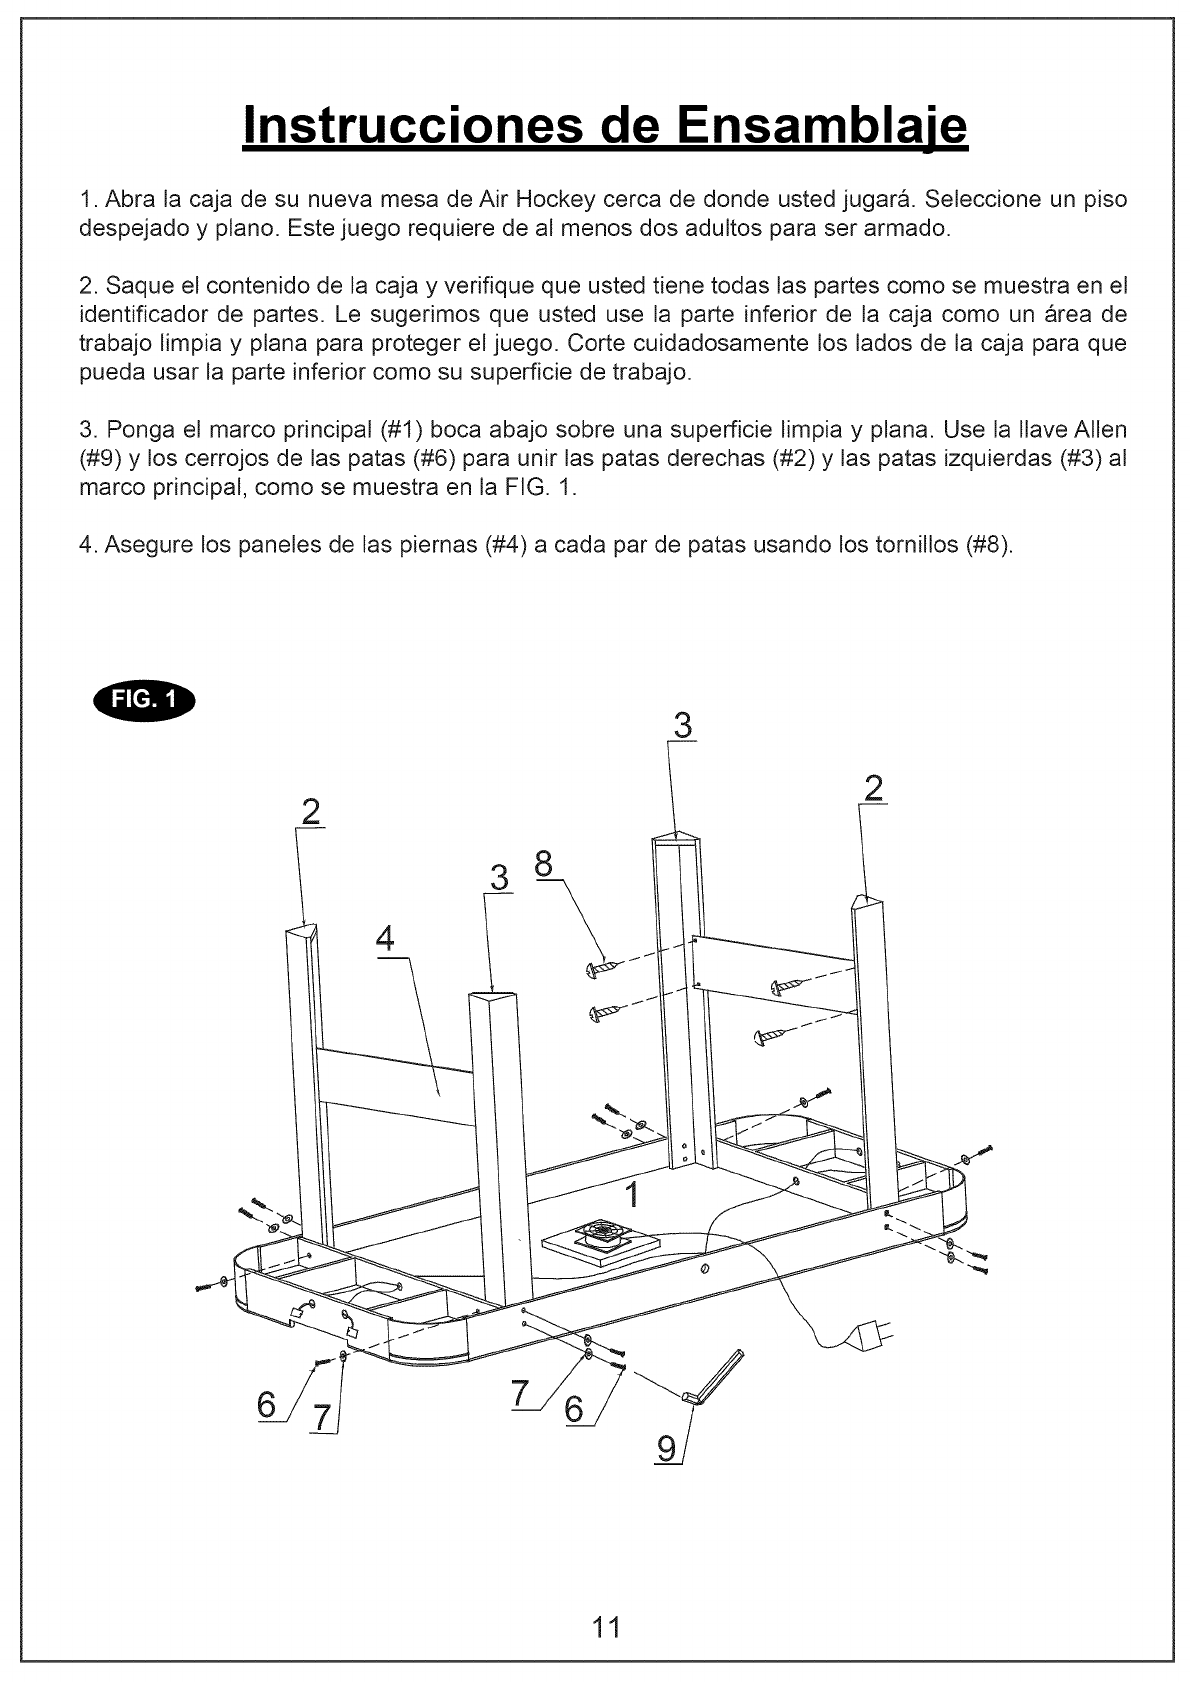
Instrucciones de Ensamblaje
1. Abra la caja de su nueva mesa de Air Hockey cerca de donde usted jugar&. Seleccione un piso
despejado y piano. Este juego requiere de al menos dos adultos para ser armado.
2. Saque el contenido de la caja y verifique que usted tiene todas las partes como se muestra en el
identificador de partes. Le sugedmos que usted use la parte inferior de la caja como un area de
trabajo limpia y plana para proteger el juego. Corte cuidadosamente los lados de la caja para que
pueda usar la parte inferior como su superficie de trabajo.
3. Ponga el marco principal (#1) boca abajo sobre una superficie limpia y plana. Use la lave Allen
(#9) y los cerrojos de las paras (#6) para unir las paras derechas (#2) y las paras izquierdas (#3) al
marco principal, como se muestra en la FIG. 1.
4. Asegure los paneles de las piernas (#4) a cada par de patas usando los tornillos (#8).
2
4
38
3
2
11
5. Dos adultos fuertes levantan la mesa del suelo, le dan la vuelta, y la ponen de pie sobre sus
propias patas en el lugar donde usted jugara. Repita los pasos y asegQrese de que las conexiones
estan bien.
NO COJA LA MESA
MARCO PRINCIPAL POR LAS PATAS
COJA LA MES__
i i
NO INCLINE LA MESA
SOBRE SUS PATAS
Advertencia:
Serecomienda que dos adultos fuertes le den la vuelta ala mesa como se muestra.
1. Levante la mesa del suelo.
2. Dele la vuelta ala mesa.
3. Pdngala en el suelo sobre sus cuatro paras al mismo dempo.
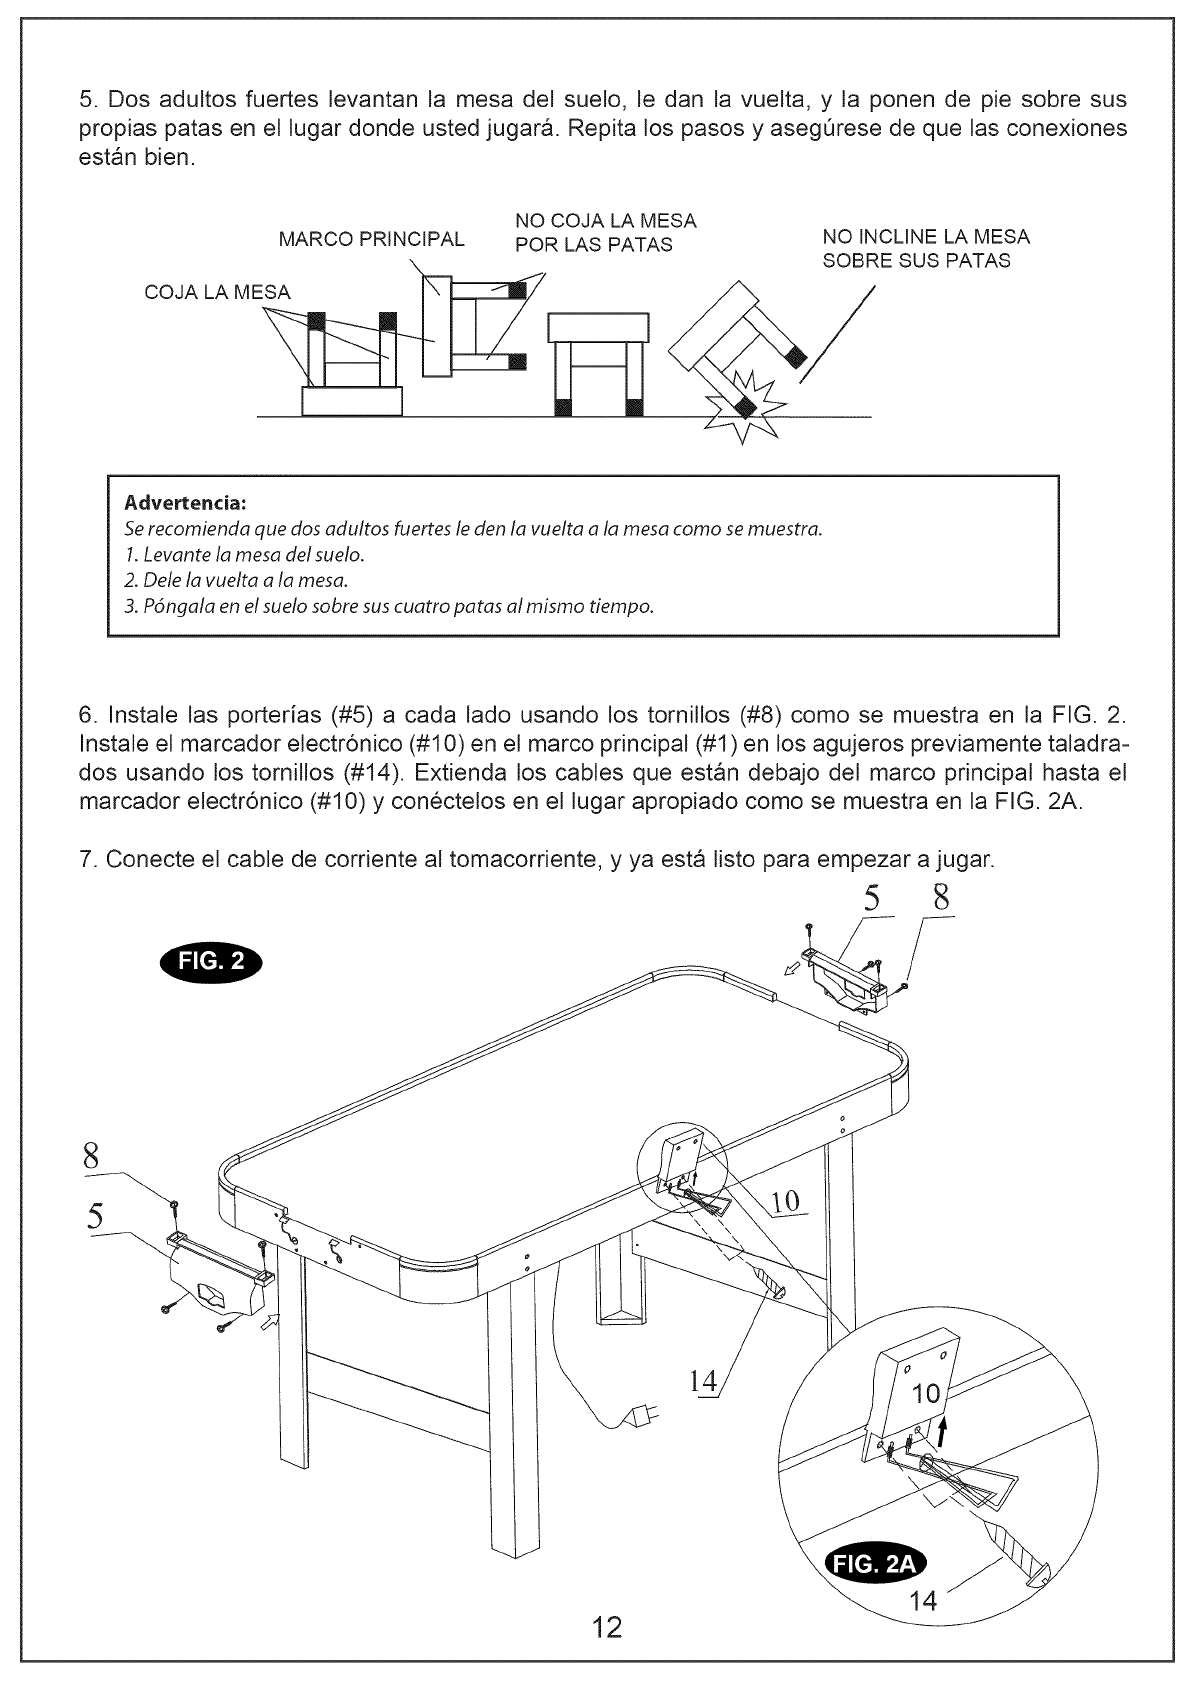
6. Instale las porterias (#5) a cada lado usando los tornillos (#8) como se muestra en la FIG. 2.
Instale el marcador electr6nico (#10) en el marco principal (#1) en los agujeros previamente taladra-
dos usando los tornillos (#14). Extienda los cables que estan debajo del marco principal hasta el
marcador electr6nico (#10) y con6ctelos en el lugar apropiado como se muestra en la FIG. 2A.
7. Conecte el cable de corriente al tomacorriente, y ya esta listo para empezar a jugar.
5g
J
8
5
14
12
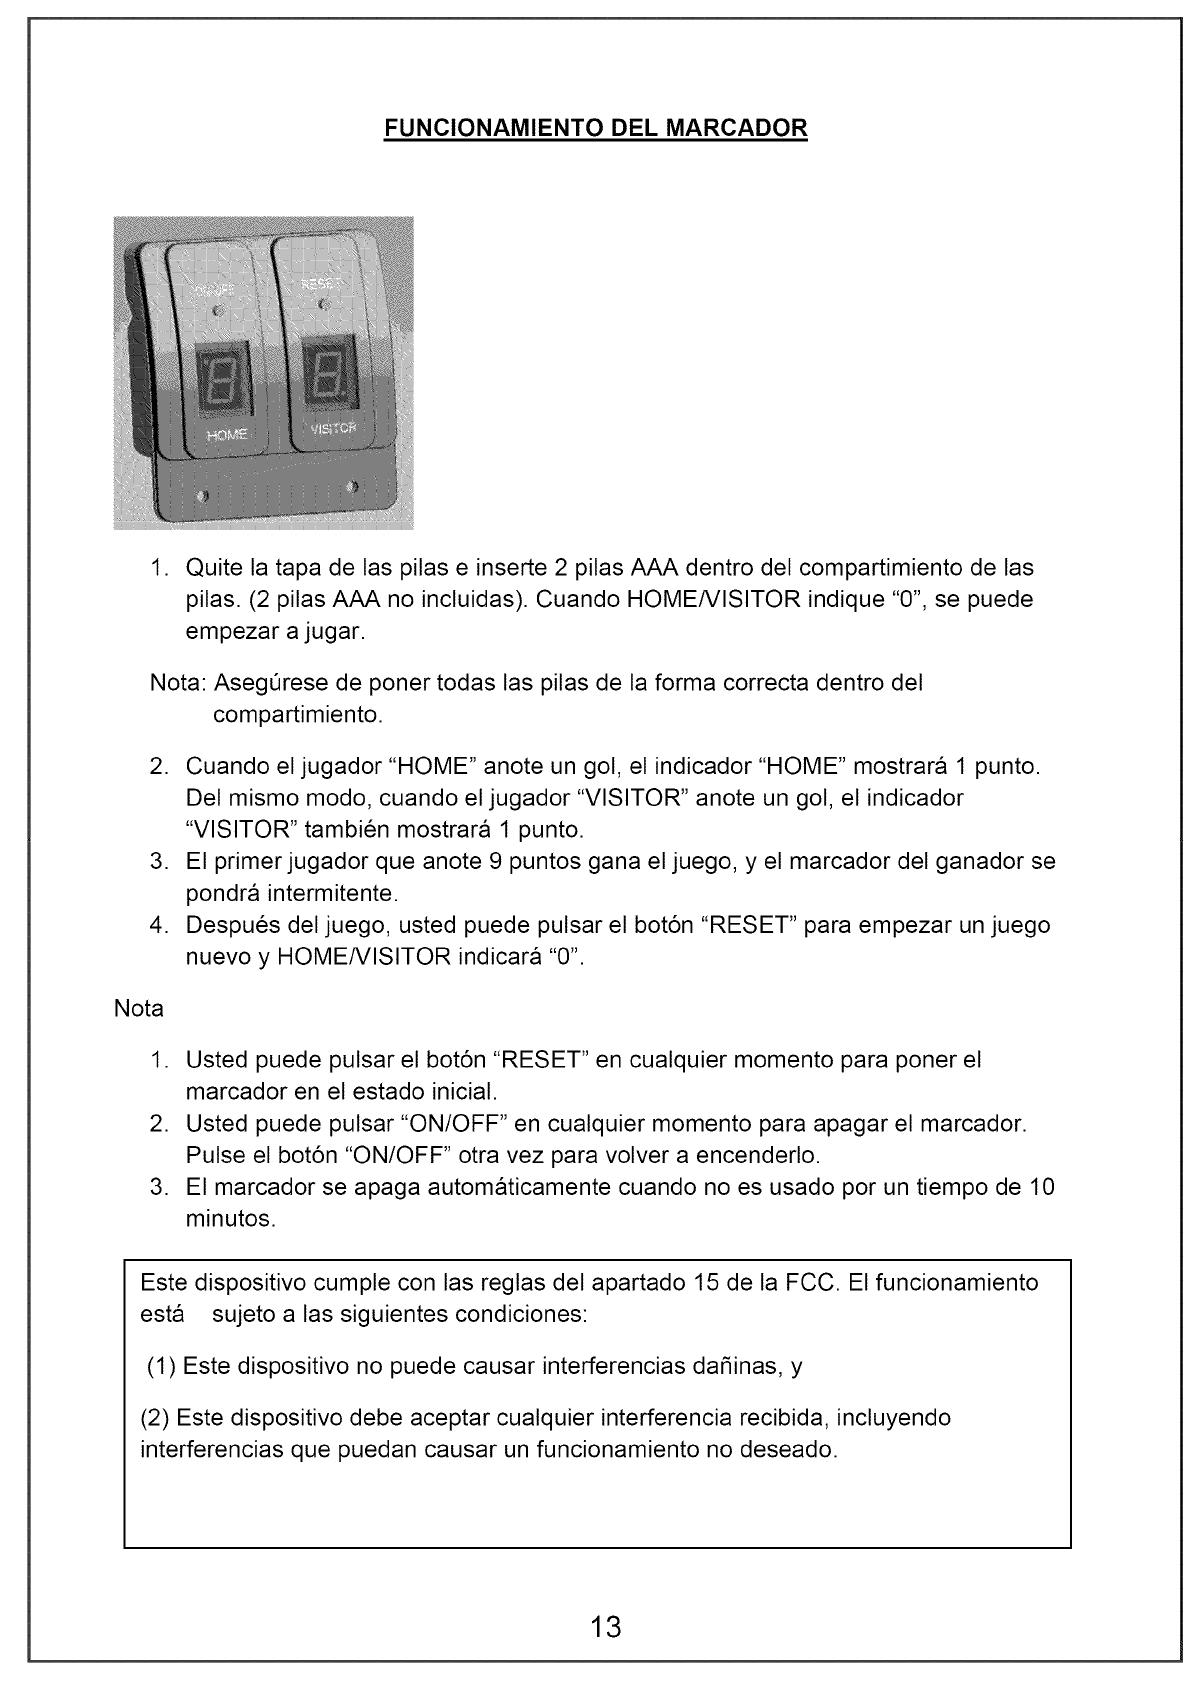
FUNCIONAMIENTO DEL MARCADOR
,Quite la tapa de las pilas e inserte 2 pilas AAA dentro del compartimiento de las
pilas. (2 pilas AAA no incluidas). Cuando HOME/VISITOR indique "0", se puede
empezar a jugar.
Nota: AsegOrese de poner todas las pilas de la forma correcta dentro del
compartimiento.
,
,
Nota
1
Cuando el jugador "HOME" anote un gol, el indicador "HOME" mostrar& 1 punto.
Del mismo modo, cuando el jugador "VISITOR" anote un gol, el indicador
"VISITOR" tambien mostrar& 1 punto.
El primer jugador que anote 9 puntos gana el juego, y el marcador del ganador se
pondra intermitente.
Despues del juego, usted puede pulsar el bot6n "RESET" para empezar un juego
nuevo y HOME/VISITOR indicara "0".
Usted puede pulsar el bot6n "RESET" en cualquier momento para poner el
marcador en el estado inicial.
Usted puede pulsar "ON/OFF" en cualquier momento para apagar el marcador.
Pulse el bot6n "ON/OFF" otra vez para volver a encenderlo.
El marcador se apaga autom&ticamente cuando no es usado por un tiempo de 10
minutos.
Este dispositivo cumple con las reglas del apartado 15 de la FCC. El funcionamiento
est& sujeto alas siguientes condiciones:
(1) Este dispositivo no puede causar interferencias daSinas, y
(2) Este dispositivo debe aceptar cualquier interferencia recibida, incluyendo
interferencias que puedan causar un funcionamiento no deseado.
13
Re las ara "u ar al Air Hocke
El objetivo del juego
El objetivo del Hockey de mesa es ser el primero en anotar diez goles contra el juga-
dor adversario.
Empezando el juego
Se lanza una moneda para determinar el jugador que empieza con el disco ("saque").
El jugador que gana el lanzamiento de la moneda recibe el disco y golpea el disco
con su mazo hacia el lado contrario para empezar a jugar.
Durante el juego
Los jugadores pueden golpear el disco en cualquier lugar sobre la mitad de su super-
ficie de juego. Los jugadores no pueden cruzar la linea central para golpear el disco.
Si se anota un gol cuando un jugador cruza la linea central y golpea el disco, este gol
no ser& v&lido.
Un jugador puede ponerse de pie en cualquier lugar alrededor de la mesa sobre su
lado de la linea central. Los jugadores no pueden ponerse m&s all& de la linea cen-
tral.
Cuando el disco hace contacto con cualquier parte de la linea central, cualquier
jugador puede golpear el disco para anotar gol.
Anotando goles
Se anota un gol cuando el disco entra y cae dentro de la porteria del jugador con-
trario.
AI jugador que se le meta el gol recibe el disco para el pr6ximo saque.
Z,Qu_ se cuenta como un gol v_lido?
Si el disco se para en la porteria yse inclina hacia dentro de la porteria, se cuenta
como un gol v&lido.
Si el disco se para en la porteria pero no se inclina hacia dentro de la porteria, no se
cuenta como un gol v&lido, el jugador puede mover el disco fuera de la porteria con
su mano o con el mazo.
Si el disco rebota y sale de la porteria, no se cuenta como un gol v&lido.
Ganar un juego
El primer jugador que anote 10 goles es declarado ganador.
14
