Contents
- 1. User manual
- 2. User Manual
User Manual
- 9 -
Language
Language
Language
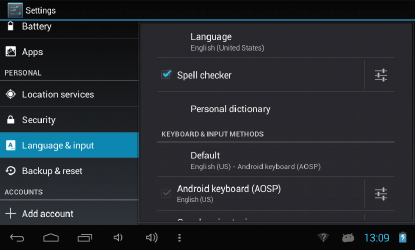
Language : Choose your preferable language.
Keyboard
Keyboard
Keyboard
Keyboard &
&
&
& input
input
input
input method
method
method
method : Change keyboard & keyboard settings.
On Language & input settings, if you need other languages besides English on
keyboard, press the relevant keyboard and enter the chosen Keyboard settings, select
Keyboards, press the language you need.
1.11
1.11
1.11
1.11 Date
Date
Date
Date &
&
&
& time
time
time
time
Set date & time and format
1.12
1.12
1.12
1.12 Developer
Developer
Developer
Developer options
options
options
options
Set options for application development
1.13
1.13
1.13
1.13 About
About
About
About tablet
tablet
tablet
tablet
See status, legal information, ETC
- 10 -
5.
5.
5.
5. How
How
How
How to
to
to
to connect/disconnect
connect/disconnect
connect/disconnect
connect/disconnect the
the
the
the device
device
device
device with/from
with/from
with/from
with/from the
the
the
the computer
computer
computer
computer
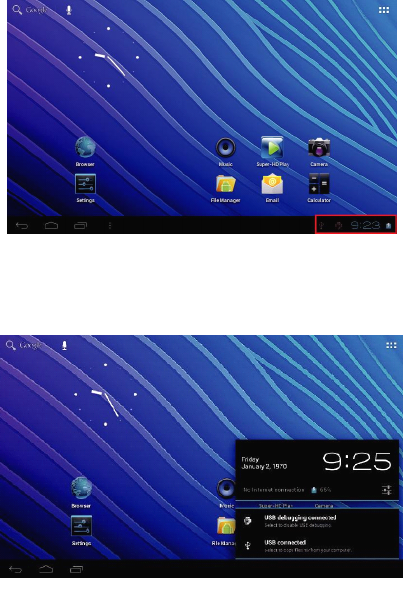
On main desktop, connect the device with the PC, touch right side of the status bar
on the bottom of desktop
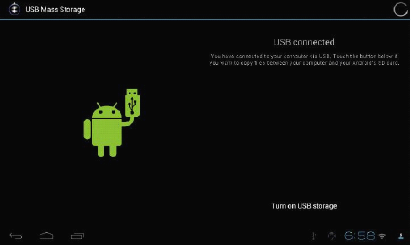
Press “ USB connected ” , select “ Turn on USB storage ” . The device is recognized at
Explorer of the computer. Now you can use it as an external storage
- 11 -
After finishing your work, press “ Turn off USB stotage ” to unmount it.
6.
6.
6.
6. How
How
How
How to
to
to
to install
install
install
install Applications(.apk
Applications(.apk
Applications(.apk
Applications(.apk file)
file)
file)
file) into
into
into
into the
the
the
the device
device
device
device
Method
Method
Method
Method 1.
1.
1.
1.
1. Connect the device with internet. See above [1.Wireless & networks] in order
to connect internet.
2. Run “ Getjar ” and search the applications you want to install.
3. Follow the instruction on the screen for installation.
Method
Method
Method
Method 2.
2.
2.
2.
1. On your computer, search application file(.apk)that you want to install into the
device
2. Download the file(.apk) into your computer
3. Connect the device with your computer.
- 12 -
See above [How to connect/disconnect the device with/from the computer.]
4. Copy and paste .apk file into the device and disconnect it from your computer.
5. Run “ File browser ” and .apk file that was copied into the device.
6. Press the file to install and follow the instruction on the screen.
7.
7.
7.
7. How
How
How
How to
to
to
to make
make
make
make desktop
desktop
desktop
desktop icons
icons
icons
icons
Press the upper right side icon of desktop, the pop-up displays.
Shortcuts
Shortcuts
Shortcuts
Shortcuts
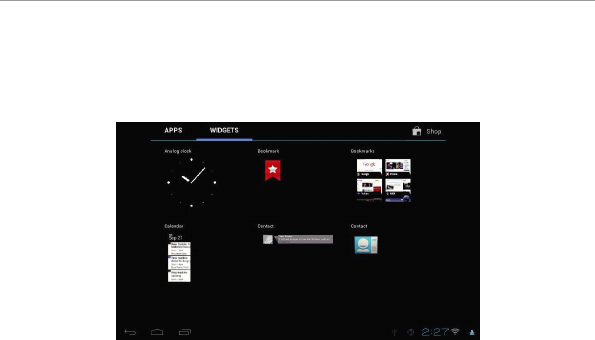
- 13 -
Long press your desired APK icon and put it on the desktop.
Widgets
Widgets
Widgets
Widgets
Press Widgets and press your desired icon to put it on the desktop.
Wallpaper
Wallpaper
Wallpaper
Wallpaper
Long press the desktop, press Wallpapers and select one of categories of
wallpaper.
Select one you desire and press Set wallpaper.
8.
8.
8.
8. Change
Change
Change
Change Input
Input
Input
Input Method
Method
Method
Method
If your device was installed with other more input method, long press setting icon
of keyboard, and the pop-up displays.
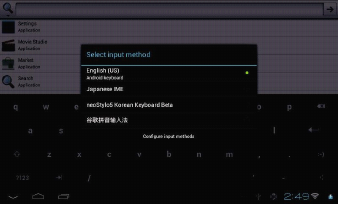
- 14 -
Select the installed keyboard, then the keyboard will appear with your desired
language you installed.
- 15 -
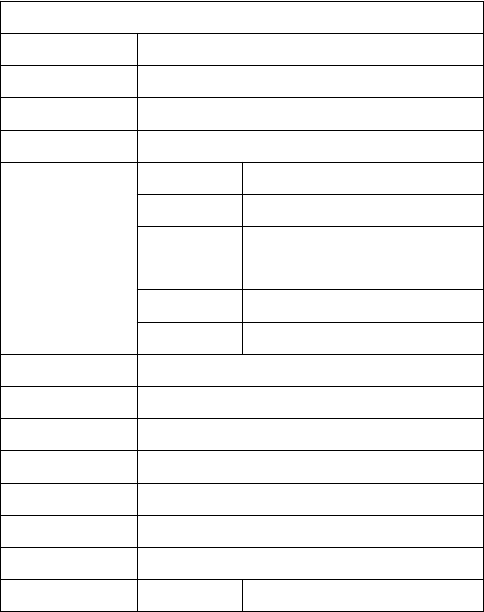
Specification
Specification
Specification
Specification
O / S Android 4. 2 Jelly Bean
CPU BOXCHIP A13 Cortex A8 1.2GHz
RA M & Flash DDR3 512MB , 4GB flash
Display 7" LCD 800*480 Capacitive multi- touch panel
IO PORTS
Micro SD shot 2 / 4 / 8 / 16GB
Audio port 3.5 ø earphones
USB port
1 x 5pin micro USB port (support
USB host and OTG)
OTG port Same with USB port
Button Power, VOL-, VOL+, reset,
Speaker 1.5W, Frequency response : 20Hz – 20k Hz, N/S : >85%
G-sensor
Yes
Camera Front 0.3M pixel , Rear 2.0MP pixel
Wi-Fi 802.11b/g/n
Power Adaptor 5V -2A
Battery 3.7V Li-Polymer
Dimension 192 x 117 x 1 1.5 mm
Charging time by charger approx. 3~4hours
-16-
FCC warning statement.
This device complies with part 15 of the FCC Rules. Operation is subject to the following two conditions: (1)
This device may not cause harmful interference, and (2) this device must accept any interference received,
including interference that may cause undesired operation.
Any Changes or modifications not expressly approved by the party responsible for compliance could void
the user's authority to operate the equipment.
Note: This equipment has been tested and found to comply with the limits for a Class B digital device,
pursuant to part 15 of the FCC Rules. These limits are designed to provide reasonable protection against
harmful interference in a residential installation. This equipment generates uses and can radiate radio
frequency energy and, if not installed and used in accordance with the instructions, may cause harmful
interference to radio communications. However, there is no guarantee that interference will not occur in a
particular installation. If this equipment does cause harmful interference to radio or television reception,
which can be determined by turning the equipment off and on, the user is encouraged to try to correct the
interference by one or more of the following measures:
-Reorient or relocate the receiving antenna.
-Increase the separation between the equipment and receiver.
-Connect the equipment into an outlet on a circuit different from that to which the receiver is connected.
-Consult the dealer or an experienced radio/TV technician for help.
RF warning statement:
The device has been evaluated to meet general RF exposure requirement. The device can be
used in portable exposure condition without restriction. ”。