MEILOON RCS123A Wireless speaker system User Manual
Meiloon Industrial Co., Ltd. Wireless speaker system
MEILOON >
User manual

3502 WOODVIEW TRACE, INDIANAPOLIS, IN, USA
klipsch.com
©2014, Klipsch Group, Inc.
Klipsch Group, Inc. is a wholly-owned
subsidiary of Voxx International Corporation.
v03
CONTENTS
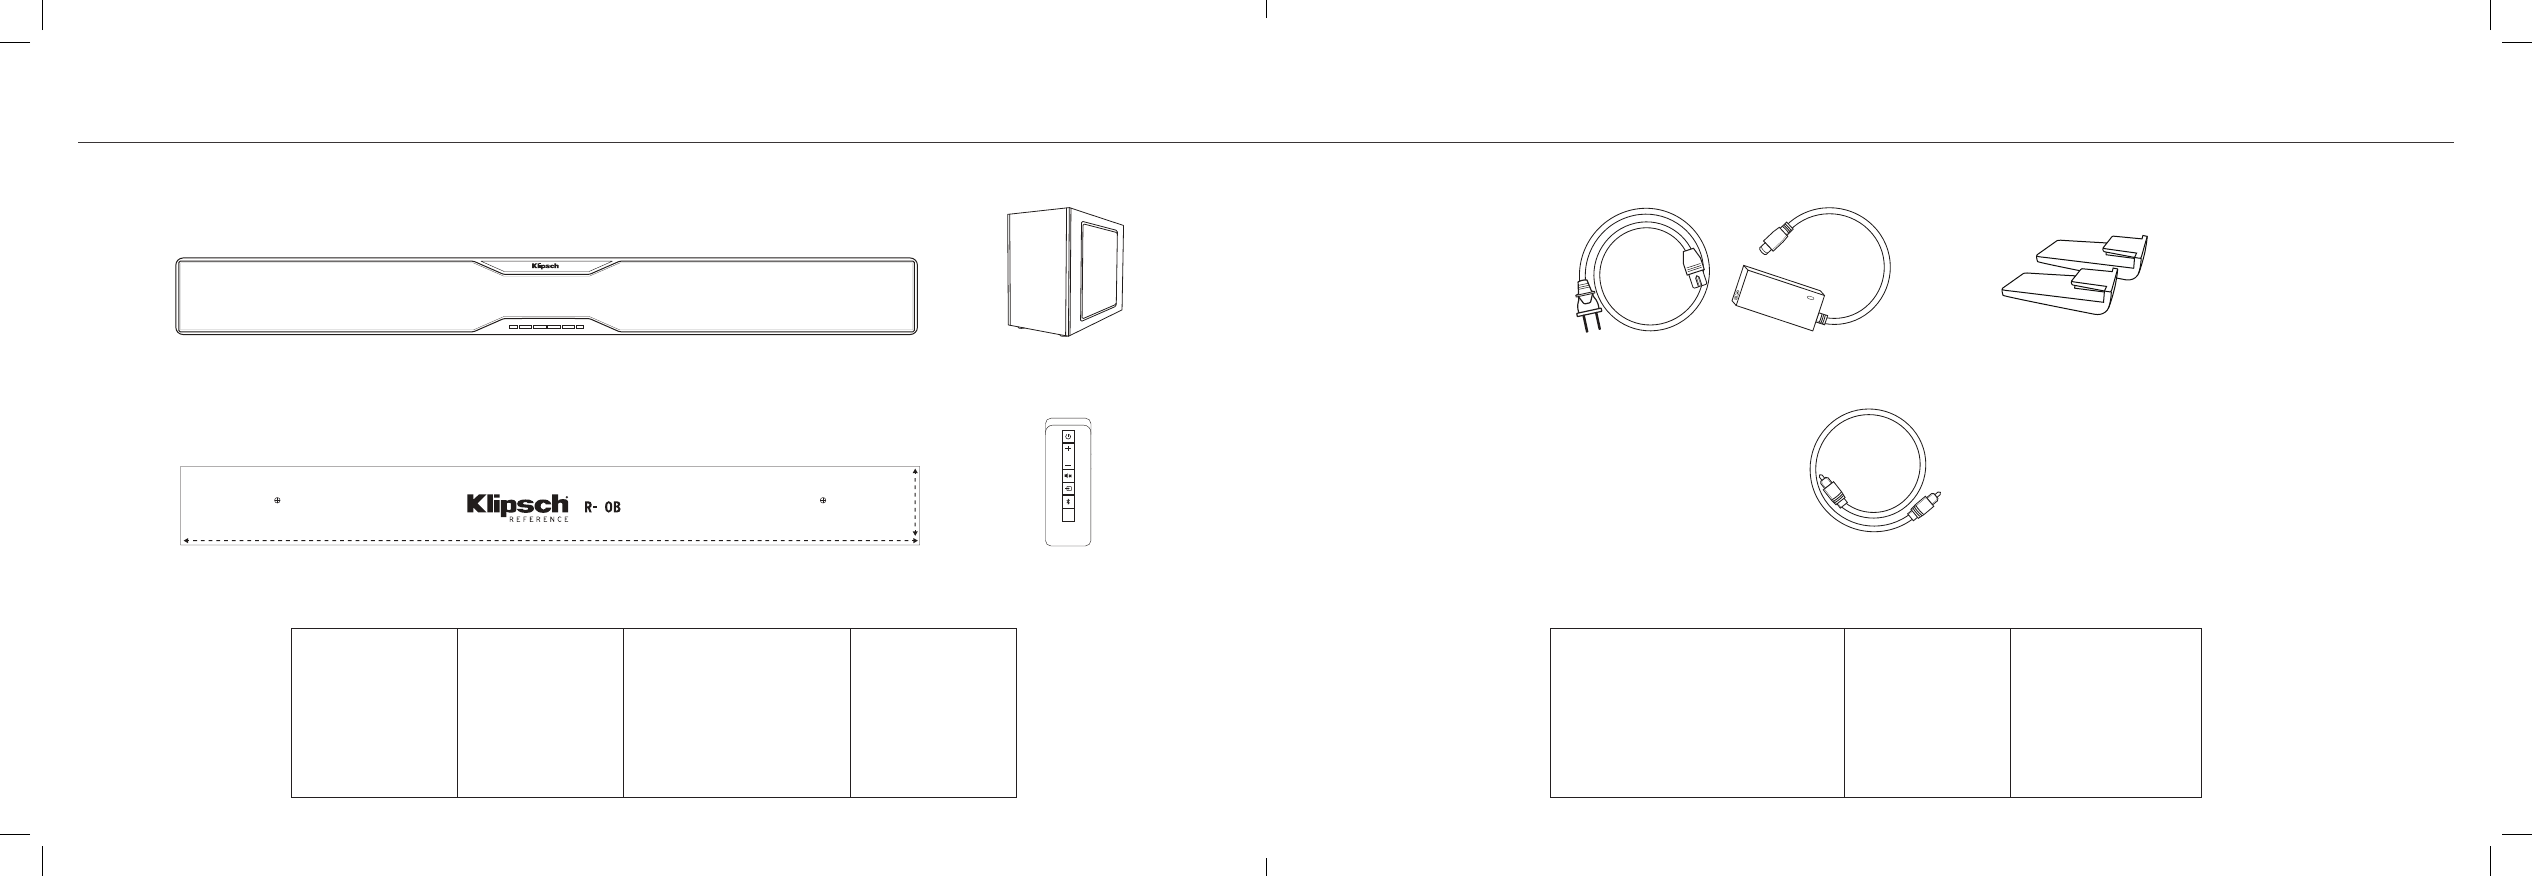
Soundbar Subwoofer
RemoteWall-Mount Template
WALL MOUNT TEMPLATE
MAKE SURE TEMPLATE IS LEVEL BEFORE DRILLING PILOT HOLES!
Pilot
Hole
Pilot
Hole 2
3D
WALL MOUNT TEMPLATE
MAKE SURE TEMPLATE IS LEVEL BEFORE DRILLING PILOT HOLES!
Pilot
Hole
Pilot
Hole 2
3D
AC Adapter / Power Cord
Digital Optical Cable
Rubber Feet
CONTENU • CONTENIDO • INHALT • CONTENUTO • CONTEÚDO • 目录
Soundbar
Barre de son
Barra de sonido
Soundbar
SoundBar
Barra sonora
条形音箱
Subwoofer
Caisson de graves
Subwoofer
Subwoofer
Subwoofer
Subwoofer
低音炮
Wall-Mount Template
Gabarit de montage mural
Plantilla de montaje en la pared
Wandbefestigungsschablone
Dima per il fissaggio a parete
Modelo para instalação na parede
挂壁模板
Remote
Télécommande
Control remoto
Fernbedienung
Telecomando
Controle remoto
遥控器
AC Adapter / Power Cord
Adaptateur CA / Cordon d’alimentation
Adaptador de CA y cordón de alimentación
Netzteil/Netzkabel
Cavo di alimentazione e adattatore di corrente
Cabo de alimentação / adaptador de CA
交流适配器/电源线
Rubber Feet
Pieds en caoutchouc
Patas de goma
Gummifüßchen
Piedini di gomma
Pés de borracha
橡胶支脚
Digital Optical Cable
Câble optique numérique
Cable óptico digital
Optisches Digitalkabel
Cavo ottico digitale
Cabo ótico digital
光纖線
WALL MOUNT TEMPLATE
MAKE SURE TEMPLATE IS LEVEL BEFORE DRILLING PILOT HOLES!
Pilot
Hole
Pilot
Hole 2
3D
WALL MOUNT TEMPLATE
MAKE SURE TEMPLATE IS LEVEL BEFORE DRILLING PILOT HOLES!
Pilot
Hole
Pilot
Hole 2
3D
WALL MOUNT TEMPLATE
MAKE SURE TEMPLATE IS LEVEL BEFORE DRILLING PILOT HOLES!
Pilot
Hole
Pilot
Hole 2
3D
WALL MOUNT TEMPLATE
MAKE SURE TEMPLATE IS LEVEL BEFORE DRILLING PILOT HOLES!
Pilot
Hole
Pilot
Hole 2
3D
WALL MOUNT TEMPLATE
MAKE SURE TEMPLATE IS LEVEL BEFORE DRILLING PILOT HOLES!
Pilot
Hole
Pilot
Hole 2
3D
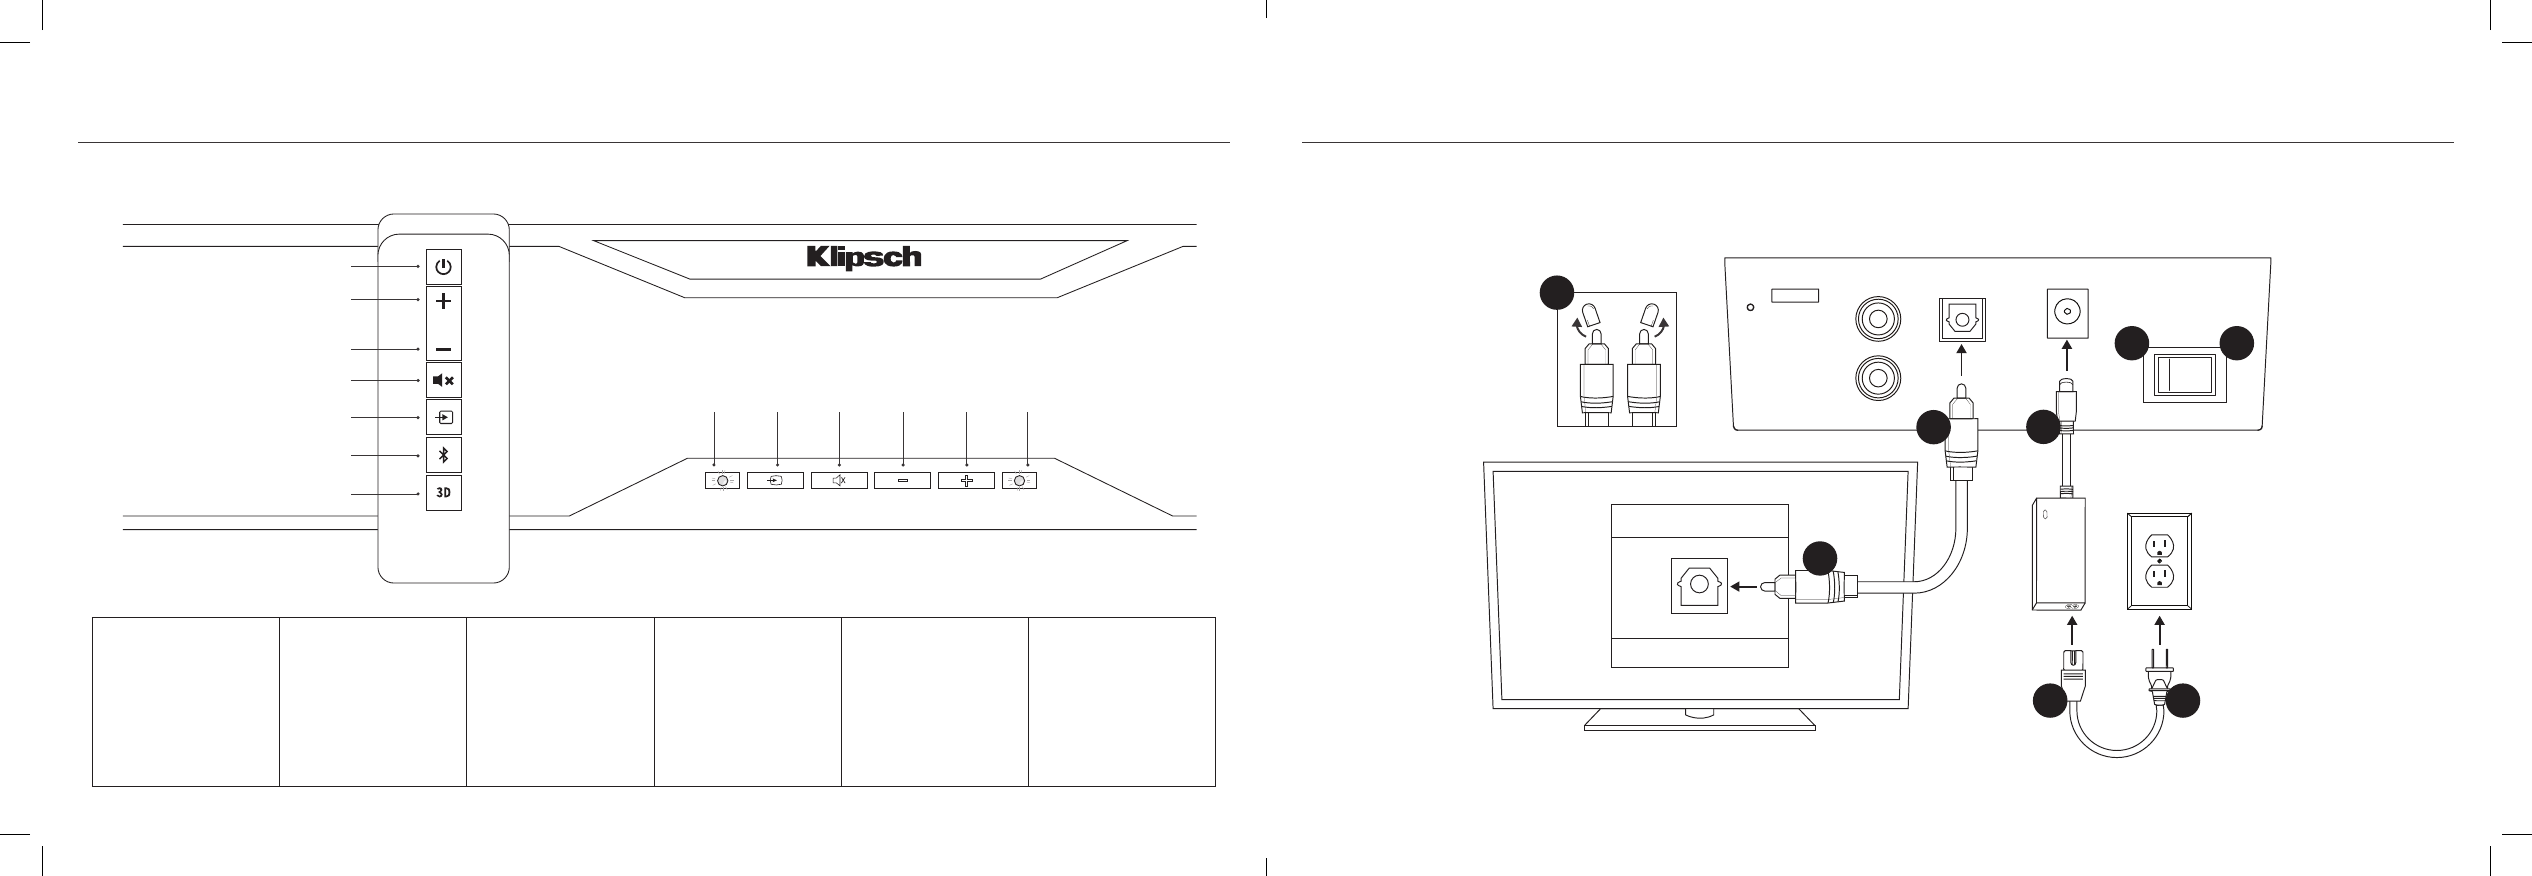
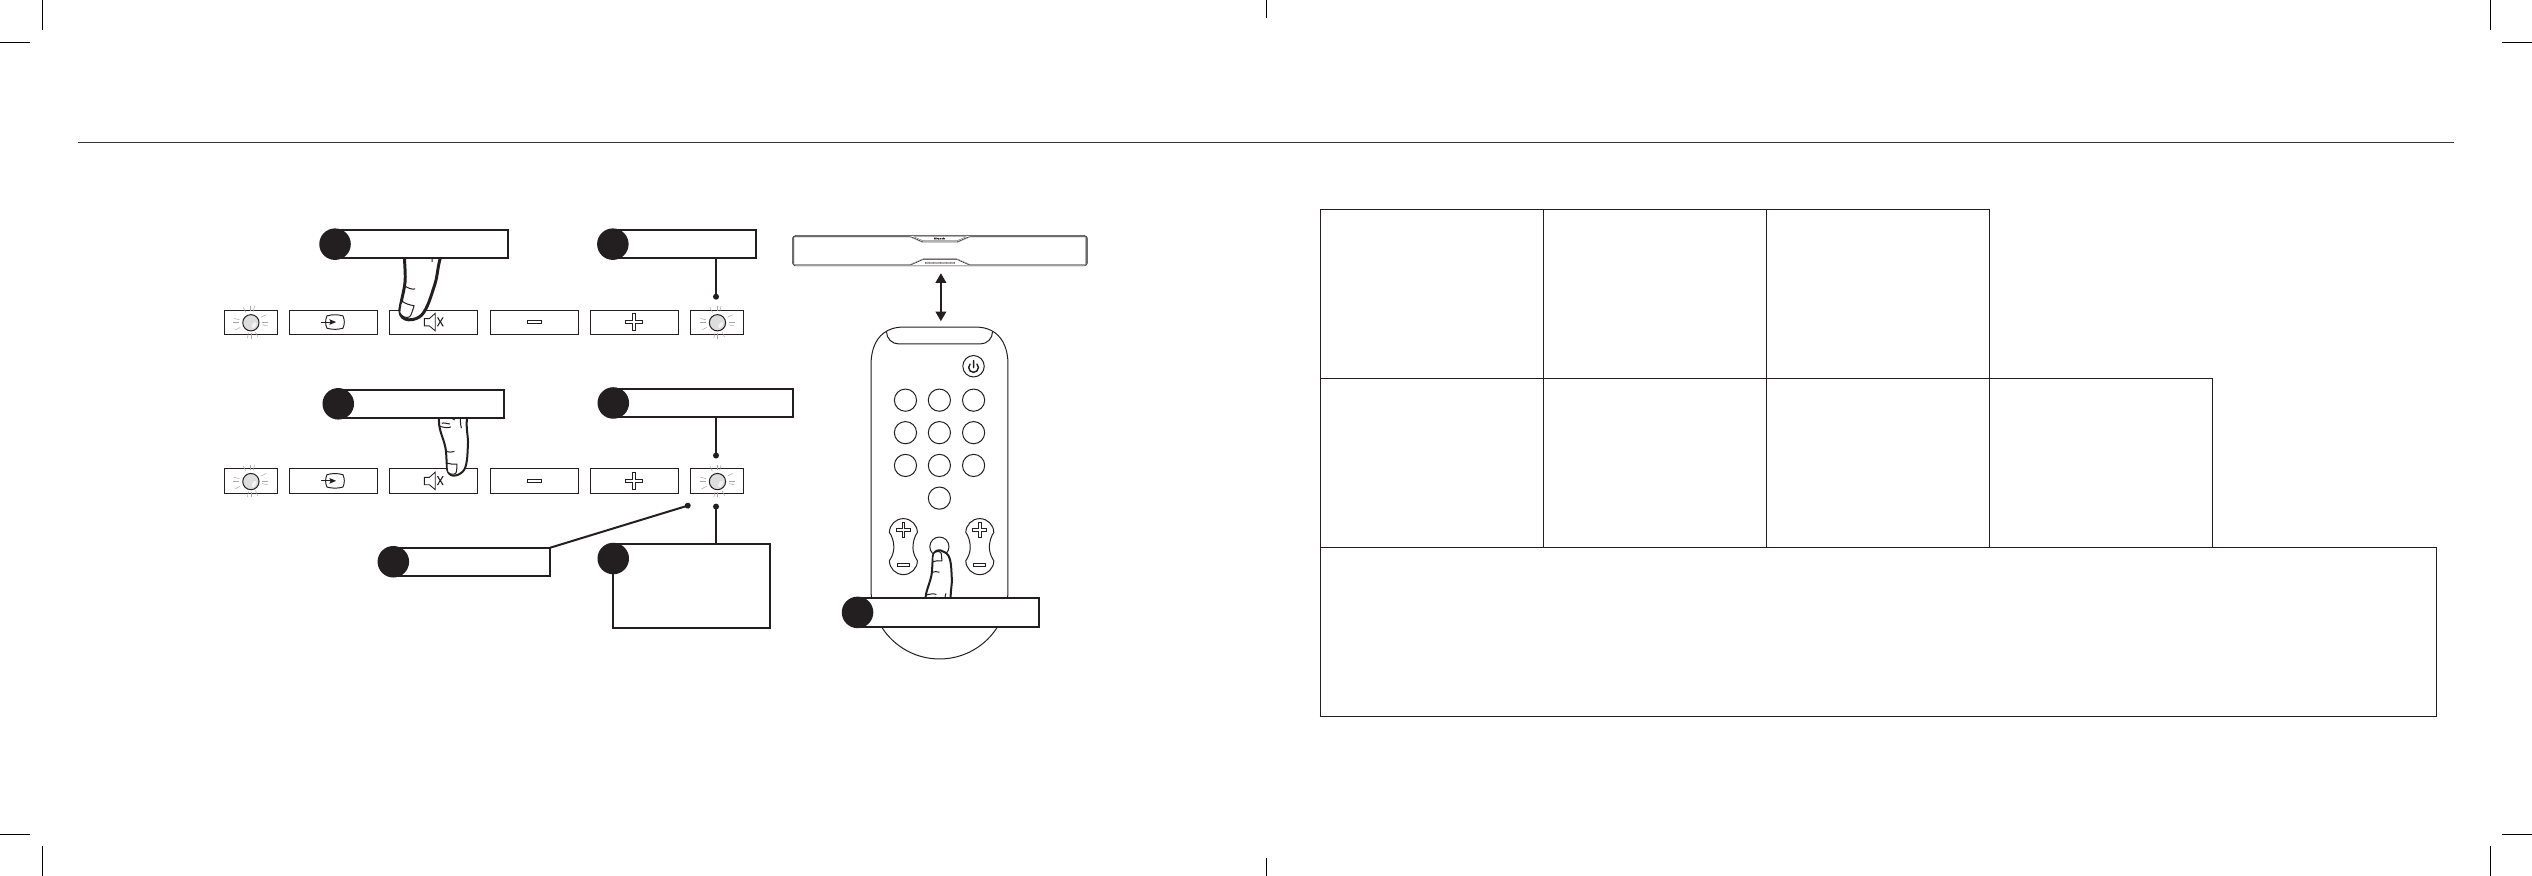
BUTTONS
On /Off
Sous tensio / Hors tension
Encendido / Apagado
Ein / Aus
Acceso / Spento
Ligar / Desligar
开/关
Mute
Sourdine
Silenciador
Stummschaltung
Disattivazione audio
Desativar áudio
静音
3D Surround
Ambiophonie 3D
Surround 3D
3D-Surround
Surround 3D
Surround 3D
3D 环绕
Source
Source
Fuente
Quelle
Sorgente
Fon te
輸入源的切換
Volume Up
Volume haut
Subida de volumen
Lauter
Aumento volume
Aumentar o volume
音量增大
Volume Down
Volume bas
Bajada de volumen
Leiser
Riduzione volume
Diminuir o volume
音量减小
Touches • Botones • Tasten • Pulsanti • Botões • 按钮
ONOFF
Power
DC IN
Optical
R
L
Headphone
Audio Out
R
L
ONOFF
Power
DC IN
Optical
R
L
ONOFF
Power
DC IN
Optical
R
L
Factory
Use Only
6 7
2
2
3
3
Optical
Soundbar
TV
Digital Audio Out
4
8
5
1 71 71
5 6
Soundbar
TV 4
2
3
5 6
Soundbar
TV 4
DIGITAL OPTICAL CONNECTION (PREFERRED - IF TV HAS NO OPTICAL OUT SEE NEXT PAGE)
CONNEXION OPTIQUE NUMÉRIQUE • CONEXIÓN ÓPTICA DIGITAL • OPTISCHE DIGITALVERBINDUNG • CONNESSIONE OTTICA DIGITALE • CONEXÃO ÓTICA DIGITAL • 数字光纤连接
On / Off
Volume Up
Volume Down
Mute
Source
Bluetooth
®
3D Surround
Status
Light
Status
Light
Source Mute
Volume
Down
Volume
Up
ONOFF
Power
DC IN
Optical
R
L
Headphone
Audio Out
R
L
ONOFF
Power
DC IN
Optical
R
L
ONOFF
Power
DC IN
Optical
R
L
Factory
Use Only
6 7
2
2
3
3
Optical
Soundbar
TV
Digital Audio Out
4
8
5
1 71 71
5 6
Soundbar
TV 4
2
3
5 6
Soundbar
TV 4
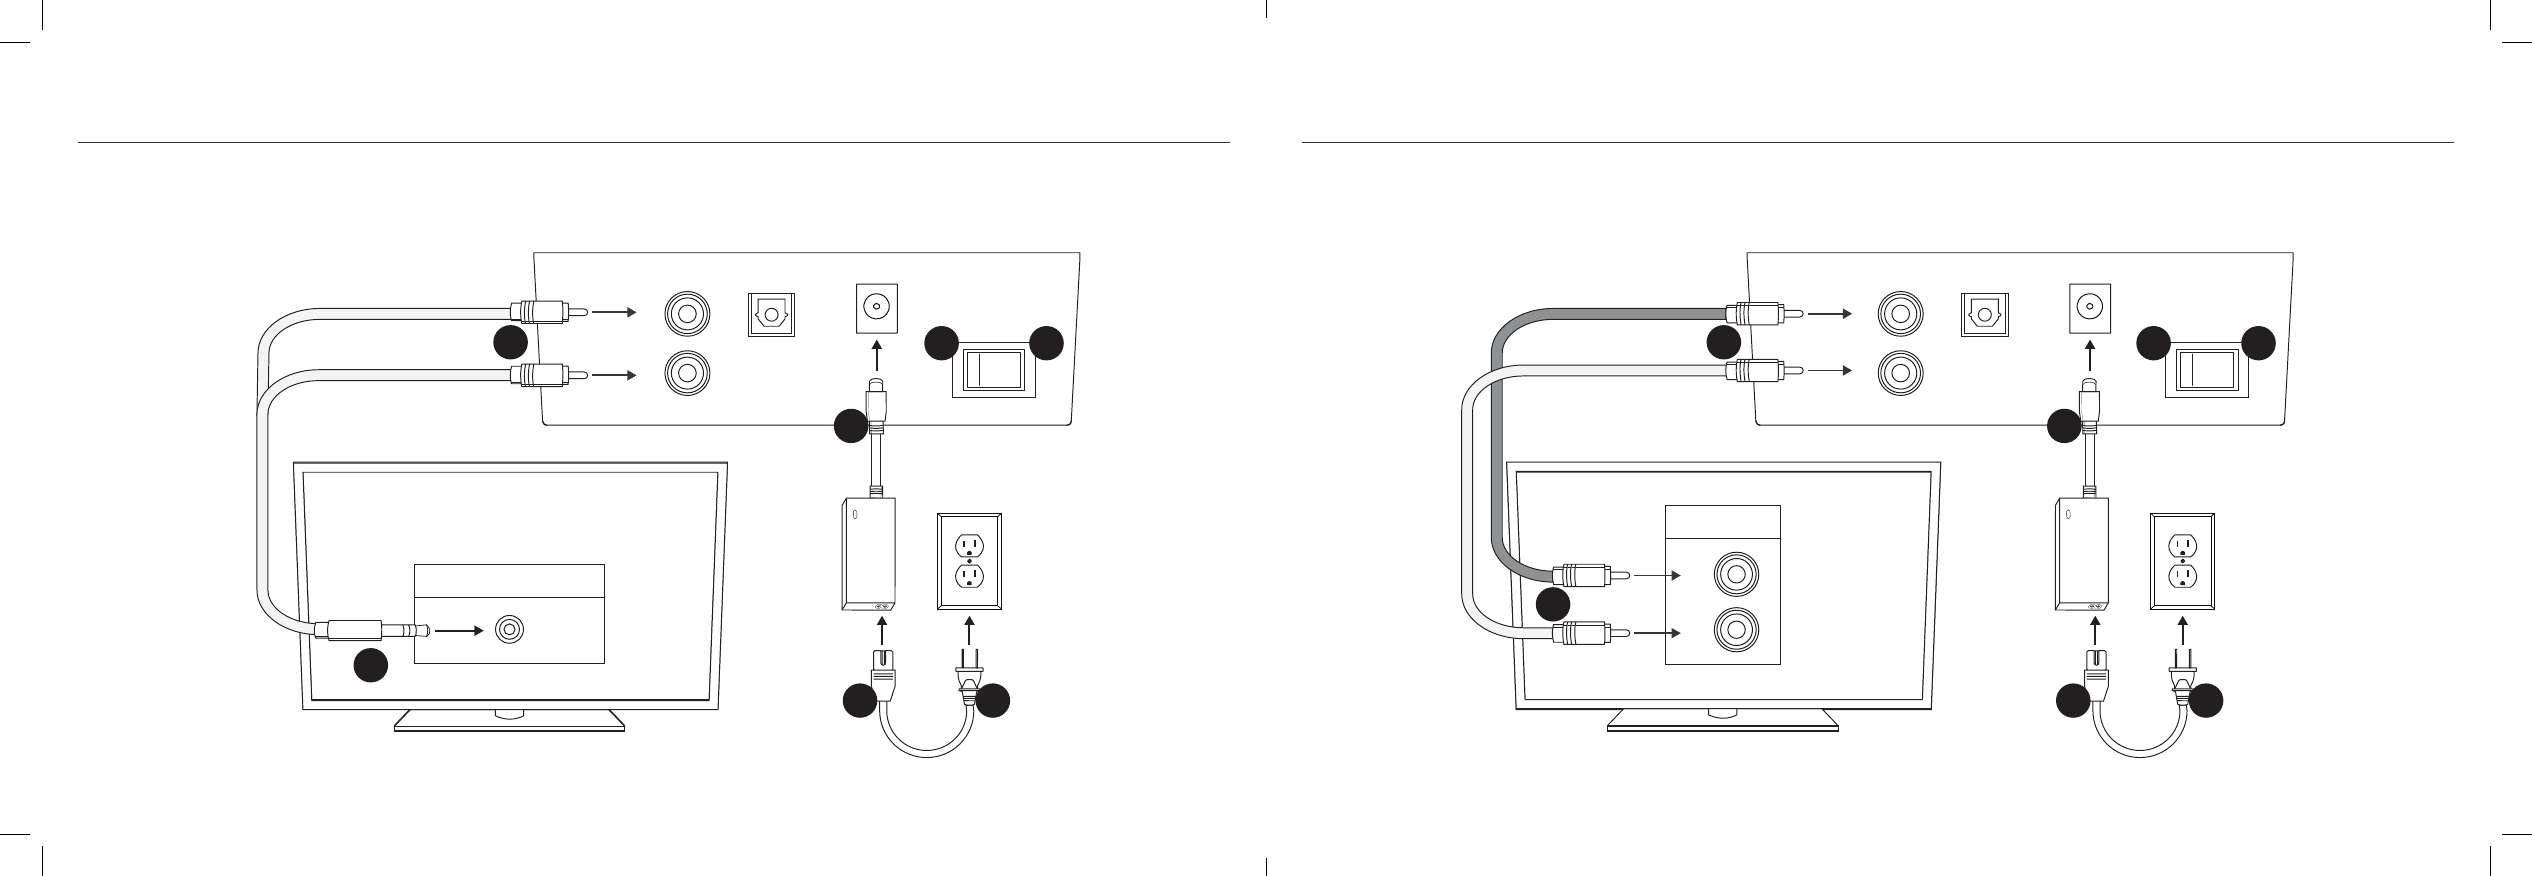
3.5mm TO DUAL RCA ANALOG CONNECTION (IF TV HAS NO HEADPHONE OUT SEE NEXT PAGE)
CONNEXION ANALOGIQUE 3,5 MM VERS DOUBLE FICHE RCA • CONEXIÓN ANALÓGICA RCA DE 3.5 MM A DOS RCA • 3,5 MM ZU DOPPEL-CINCH-ANALOGKABEL • CONNESSIONE ANALOGICA CON JACK DA 3,5 MM A DOPPIO JACK RCA CONEXÃO ANALÓGICA DE 3,5 MM • PARA RCA
DUPLO • 3.5MM 转双 RCA 模拟连接
CABLE NOT INCLUDED
DUAL RCA TO DUAL RCA ANALOG CONNECTION
ONOFF
Power
DC IN
Optical
R
L
Headphone
Audio Out
R
L
ONOFF
Power
DC IN
Optical
R
L
ONOFF
Power
DC IN
Optical
R
L
Factory
Use Only
6 7
2
2
3
3
Optical
Soundbar
TV
Digital Audio Out
4
8
5
1 71 71
5 6
Soundbar
TV 4
2
3
5 6
Soundbar
TV 4
CONNEXION ANALOGIQUE DOUBLE FICHE RCA VERS DOUBLE FICHE RCA • CONEXIÓN ANALÓGICA DE DOS RCA A DOS RCA • ANALOGVERBINDUNG (DOPPEL-CINCH ZU DOPPEL-CINCH)
CONNESSIONE ANALOGICA DA DOPPIO JACK RCA A DOPPIO JACK RCA • CONEXÃO ANALÓGICA DE RCA DUPLO PARA RCA DUPLO • 双 RCA 转双 RCA 模拟连接
CABLES NOT INCLUDED
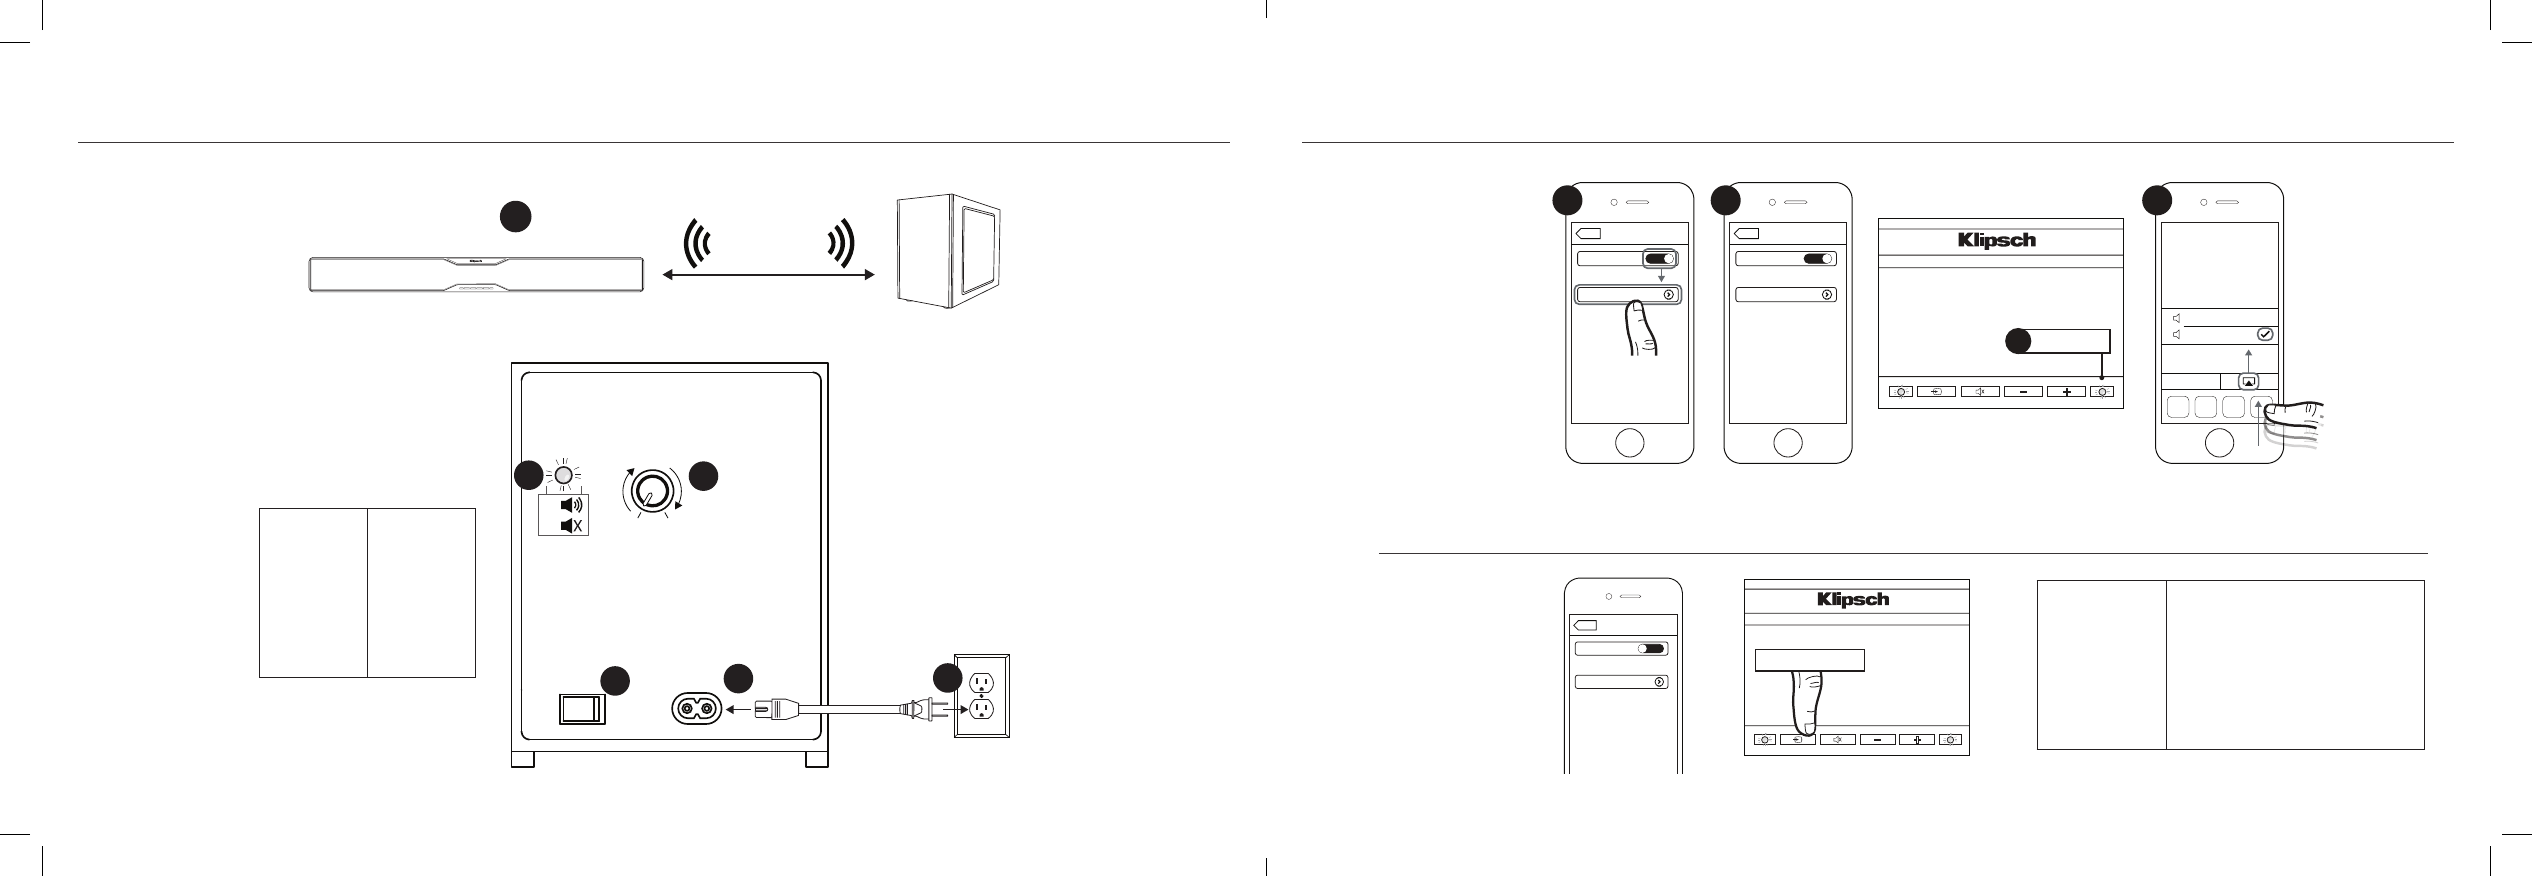
SUBWOOFER WIRELESS CONNECTION
23
4
Subwoofer
Volume
MIN MAX
ONOFF
Power
Soundbar - Power On
Subwoofer Rear
50 ft. (15m)
1
56
Blue
Red
Blue
Bleu
Azul
Blau
Blu
Azul
蓝色
Red
Rouge
Rojo
Rot
Rosso
Vermelho
红色
Connexion sans fil du caisson de graves • Conexión inalámbrica del subwoofer • Drahtlose Verbindung zum Subwoofer • Connessione wireless con il subwoofer • Conexão sem fio do subwoofer • 低音炮无线连接
BLUETOOTH
® WIRELESS TECHNOLOGY
*Example only. Your device may differ. • *À titre d’exemple seulement. Votre appareil peut être différent. • *Este es solo un ejemplo. Es posible que su
dispositivo sea diferente. • *Nur als Beispiel. Ihr Gerät kann anders aussehen • *Solo a titolo esemplificativo. Lo specifico dispositivo può essere diverso. •
*Apenas para exemplo. O dispositivo pode ser diferente. • *仅为示例。实际设备可能有所不同
Bluetooth
Bluetooth
ON
24
Devices
Settings
Bluetooth
Bluetooth
ON
1
R-20B R-20B
Devices
Not Paired Connected
Settings
Solid Blue
3
OR
Bluetooth
Bluetooth
OFF
Devices
Settings
R-20B Connected
Hold 3 Seconds
Klipsch R-20B
Phone
Bluetooth
Bluetooth
ON
24
Devices
Settings
Bluetooth
Bluetooth
ON
1
R-20B R-20B
Devices
Not Paired Connected
Settings
Solid Blue
3
OR
Bluetooth
Bluetooth
OFF
Devices
Settings
R-20B Connected
Hold 3 Seconds
Klipsch R-20B
Phone
CONNECT
CONNEXION
CONEXIÓN
VERBINDEN
COLLEGAMENTO
CONECTAR
连接
DISCONNECT
DÉCONNEXION
DESCONEXIÓN
TRENNEN
SCOLLEGAMENTO
DESCONECTAR
断开连接
Solid Blue
Bleu continu
Azul continuo
Dauerhaft blau
Blu a luce fissa
Azul constante
纯蓝色
Hold 3 Seconds
Appuyer pendant 3 secondes
Mantenga oprimido durante 3 segundos
3 Sekunden gedrückt halten
Tenere premuto per 3 secondi
Manter pressionado por 3 segundos
保持 3 秒
23
4
Subwoofer
Volume
MIN MAX
ONOFF
Power
Soundbar - Power On
Subwoofer Rear
50 ft. (15m)
1
56
Blue
Red
23
4
Subwoofer
Volume
MIN MAX
ONOFF
Power
Soundbar - Power On
Subwoofer Rear
50 ft. (15m)
1
56
Blue
Red

SOUNDBAR PLACEMENT
.25” (6.35mm) .25” (6.35mm)
TV
POSITIONNEMENT DE LA BARRE DE SON • UBICACIÓN DE LA BARRA DE SONIDO • SOUNDBAR-PLATZIERUNG • COLLOCAZIONE DEL SOUNDBAR • POSIÇÃO DA BARRA SONORA • 条形音箱布置
SUBWOOFER PLACEMENT
POSITIONNEMENT DU CAISSON DE GRAVES • UBICACIÓN DEL SUBWOOFER • SUBWOOFER-PLATZIERUNG • COLLOCAZIONE DEL SUBWOOFER • POSIÇÃO DO SUBWOOFER • 低音炮布置
A
A
BB
TV
TV
TV
TV REMOTE PROGRAMMING
To program Volume Up and Volume Down buttons repeat the steps shown and replace
steps 4 and 6 with the button you want to program.
TV REMOTE PROGRAMMING • PROGRAMMATION À DISTANCE DU TÉLÉVISEUR • PROGRAMACIÓN DEL CONTROL REMOTO DEL TELEVISOR • PROGRAMMIEREN DER TV-FERNBEDIENUNG
PROGRAMMAZIONE CON IL TELECOMANDO TV • PROGRAMAÇÃO DO CONTROLE REMOTO DA TV • 电视机遥控器编程
1Solid Green
2Press and Hold
Solid Yellow
12 in. (25cm)
1 2 3
4 5 6
7 8
0
Mute
ChVol
9
Press Slowly x4
6
3Flashes Yellow
5Flashing
Green to
Solid Green
7
Press Once x1
4
Press and Hold
Appuyer sans relâcher
Oprima y mantenga oprimido
Gedrückt halten
Tenere premuto
Pressionar e manter pressionado
按住
Flashes Yellow
Clignotement Jaune
Destella Amarillo
Blinkt Gelb
Giallo lampeggiante
Amarela intermitente
黄色闪烁
Solid Yellow
Jaune continu
Amarillo continuo
Dauerhaft Gelb
Giallo a luce fissa
Amarela constante
黄色固体
Press x1
Appuyer 1 fois
Oprima 1 vez
1x drücken
Premere 1 volta
Pressionar uma vez
按 1 次
Flashing Green
Vert clignotant
Destello verde
Blinkt grün
Verde lampeggiante
Verde intermitente
绿色闪烁
Solid Green
Vert continu
Verde continuo
Dauerhaft grün
Verde a luce fissa
Verde constante
纯绿色
Press Slowly x4
Appuyer lentement 4 fois
Oprima lentamente 4 veces
Langsam 4x drücken
Premere lentamente 4 volte
Pressionar lentamente 4 vezes
慢按 4 次
To program Volume Up and Volume Down buttons repeat the steps shown and replace steps 4 and 6 with the button you want to program.
Pour programmer les boutons Volume haut et Volume bas, répétez les étapes indiquées et remplacez les étapes 4 et 6 par le bouton que vous voulez programmer.
Para programar los botones de subida y bajada de volumen, repita los pasos indicados poniendo el botón que desea programar en los pasos 4 y 6
Um die Lauter- und Leiser-Tasten zu programmieren, wiederholen Sie die aufgeführten Schritte und wählen in Schritt 4 und 6 die zu programmierenden Taste.
Per programmare i pulsanti di Aumento volume e Riduzione volume, ripetere i passaggi illustrati e sostituire i passaggi 4 e 6 con il pulsante che si desidera programmare.
Para programar os botões de aumentar/diminuir o volume, repita os passos indicados e substitua as etapas 4 e 6 com o botão que deseja programar.
要对“调高音量”与“调低音量”按钮进行编程,请重复所示步骤,然后用您想编程的按钮替换第 4 步和第 5 步。
REMOTE CONTROL CODES
STATUS LIGHTS
TURN OFF TV SPEAKERS
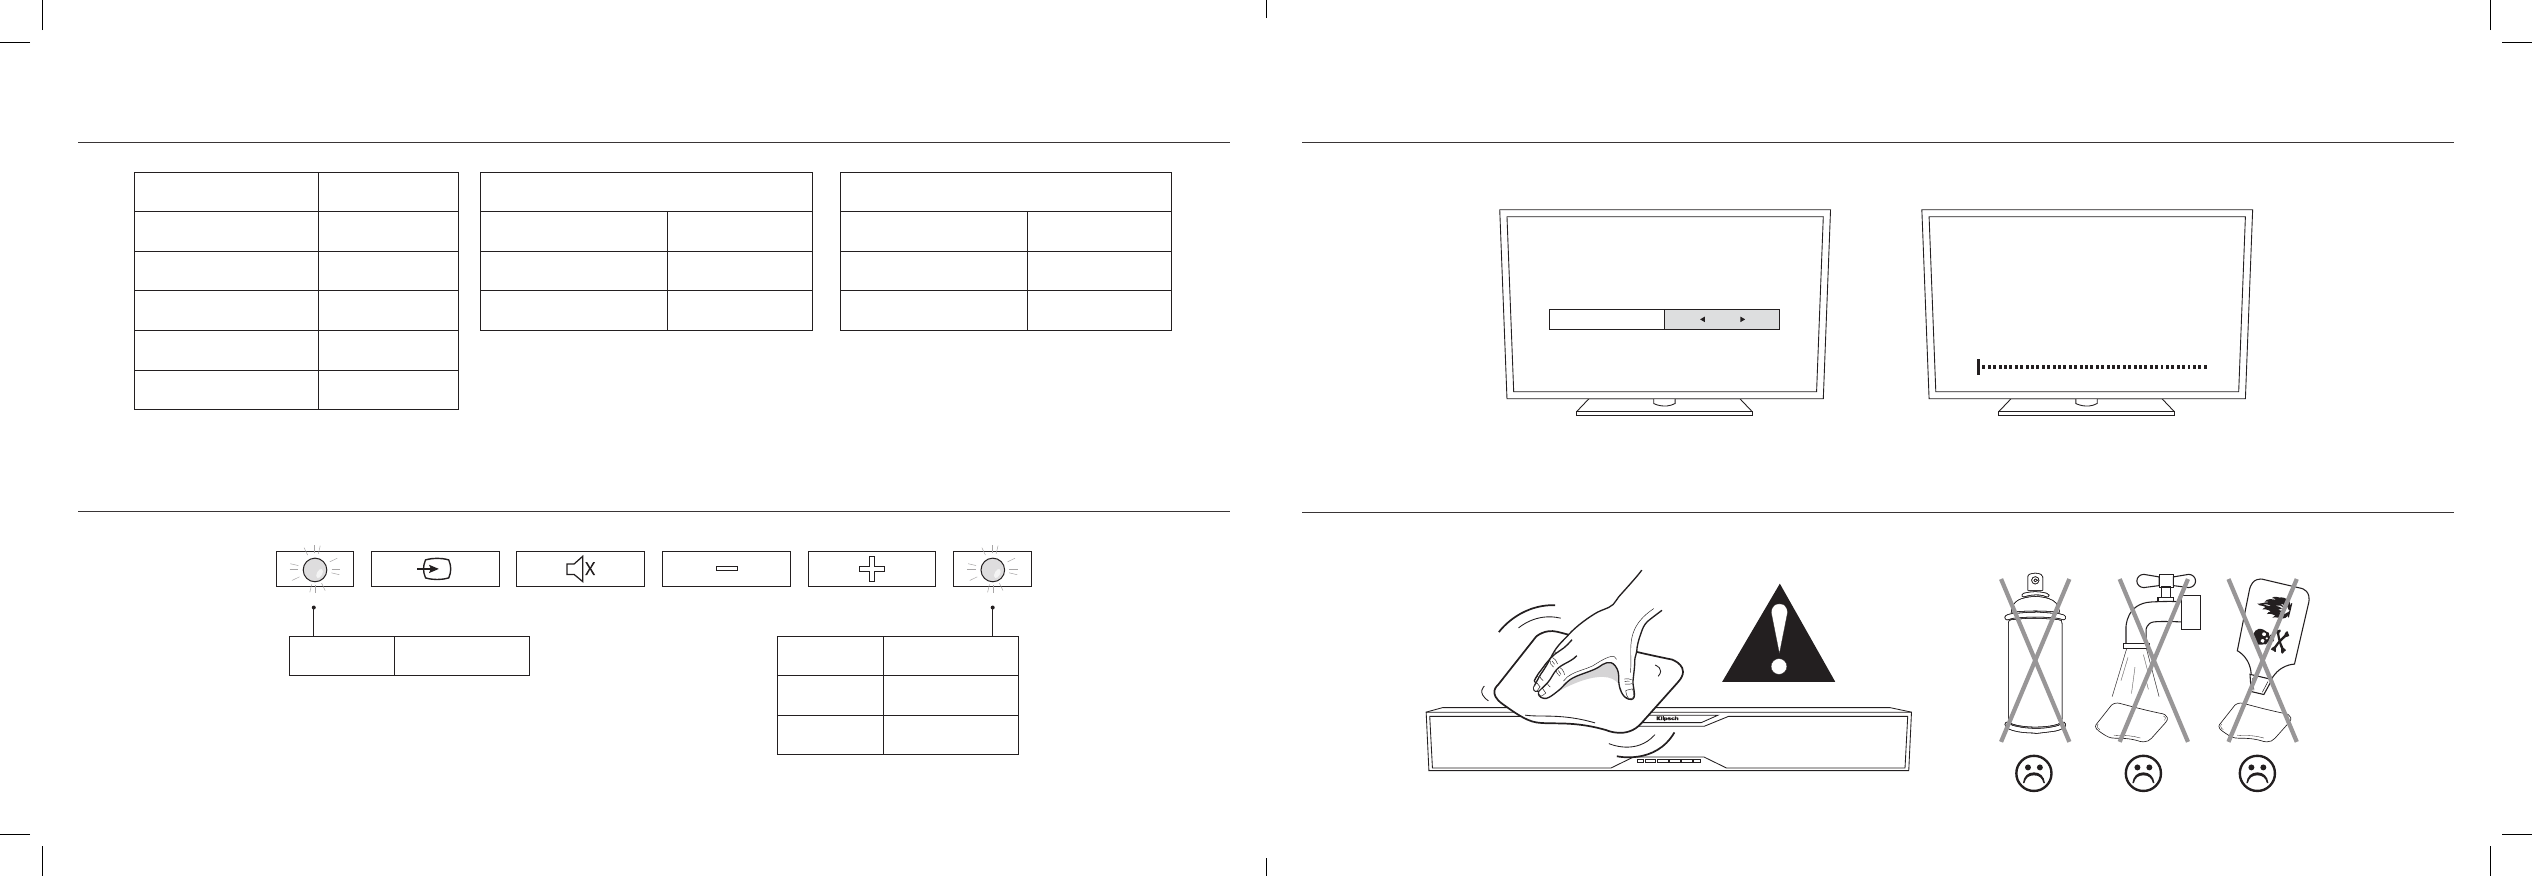
CARE AND CLEANING
TV Audio Settings Menu
(Recommended)
OR Volume
TV Speakers Off
MISE HORS TENSION DES HAUT-PARLEURS DU TÉLÉVISEUR • APAGADO DE LOS ALTAVOCES DEL TELEVISOR • TV-LAUTSPRECHER DEAKTIVIEREN • SPEGNIMENTO DEGLI ALTOPARLANTI DEL TELEVISORE
DESLIGUE OS ALTO-FALANTES DA TV • 关闭电视机扬声器
ENTRETIEN ET NETTOYAGE • CUIDADO Y LIMPIEZA • PFLEGE UND REINIGUNG • CURA E PULIZIA • CUIDADOS E LIMPEZA • 保养与清洁
RCA*41609
ONE FOR ALL 1609 OR 0531
DIRECTV 31609 OR 30531
XFINITY** 30531
BRIGHT HOUSE 048
AT&T 5144
HEX CODES - SET 1
VOLUME UP 0x 856A 9F60
VOLUME DOWN 0x 856A 9E61
MUTE 0x 856A 9966
HEX CODES - SET 2
VOLUME UP 0x 02A1 DF3B
VOLUME DOWN 0x 02A1 DF3F
MUTE 0x 02A1 DF5F
GREEN OPTICAL
BLUE BLUETOOTH
YELLOW RCA
WHITE 3D SOUND
*MUST HAVE AUDIO/AUX BUTTON
** RED CENTER BUTTON
FCC Information and Copyright
This equipment has been tested and found to comply with the limits for a Class B digital device,
pursuant to part 15 of the FCC Rules.
These limits are designed to provide reasonable protection against harmful interference in a residential
installation. This equipment generates,
uses and can radiate radio frequency energy and, if not installed and used in accordance with the
instructions, may cause harmful interference
to radio communications. However, there is no guarantee that interference will not occur in a particular
installation. If this equipment does
cause harmful interference to radio or television reception, which can be determined by turning the
equipment off and on, the user is
encouraged to try to correct the interference by one or more of the following measures:
—Reorient or relocate the receiving antenna.
—Increase the separation between the equipment and receiver.
—Connect the equipment into an outlet on a circuit different from that to which the receiver is
connected.
—Consult the dealer or an experienced radio/TV technician for help.
This device complies with part 15 of the FCC Rules. Operation is subject to the
following two conditions:
(1)This device may not cause harmful interference, and
(2) this device must accept any interference received, including interference that may
cause undesired operation.
changes or modifications not expressly approved by the party responsible for compliance could
void the user's authority to operate the equipment.
This equipment complies with FCC radiation exposure limits set forth for an uncontrolled
environment .This equipment should be installed and operated with minimum distance 20cm
between the radiator& your body. This transmitter must not be co-located or operating in
conjunction with any other antenna or transmitter.

IC warning
This device complies with Industry Canada licence-exempt RSS standard(s).
Operation is subject to the following two conditions: (1) This device may not cause
interference, and (2) This device must accept any interference, including interference
that may cause undesired operation of the device.
Le présent appareil est conforme aux CNR d'Industrie Canada applicables aux
appareils radio exempts de licence. L'exploitation est autorisée aux deux conditions
suivantes:
(1) l'appareil ne doit pas produire de brouillage, et
(2) l'utilisateur de l'appareil doit accepter tout brouillage radioélectrique subi, même si
le brouillage est susceptible d'en compromettre le fonctionnement
changes or modifications not expressly approved by the party responsible for compliance could
void the user's authority to operate the equipment.
This equipment complies with IC radiation exposure limits set forth for an uncontrolled
environment .This equipment should be installed and operated with minimum distance 20cm
between the radiator& your body. This transmitter must not be co-located or operating in
conjunction with any other antenna or transmitter.