MGA Entertainment 337966F7 Mobile Handset User Manual 337966F7 MS MBHS IM 1 8
MGA Entertainment (HK) Ltd. Mobile Handset 337966F7 MS MBHS IM 1 8
User Manual
5 6 7 8
1 2 3 4
MESSAGES
• In Mode “B,” access the Menu, highlight the
envelope diagram, then press “OK”.
NOTE: You can save 9 Inbox messages and 8 messages in the Sent Folder.
CONTACTS
In Mode “B,” press the and keys until the “CONTACTS” icon is highlighted
(Fig. 7). Press “OK”.
QUICK START
IMPORTANT NOTE WHEN REPLACING BATTERIES:
If batteries are removed and replaced within a ONE MINUTE TIME SPAN,
SAVED messages in both the INBOX and SENT area and messages in the
phone book will be retained. (Clock will need to be reset and To-Do List
messages and Notepad messages will be lost.)
If the unit loses power for more than one minute due to battery change or
static shock, ALL messages will be lost.
OTHER NOTES
• Each Mobile Handset’s preset ID number is 0000 0000.
• To TEXT message another Mobile Handset, an ID number must be set in
each unit.
• To set or change an ID number see page 12.
• To see the ID number of your Mobile Handset see page 3.
• To enter/store ID numbers of other units to your contact list, see “functions”
on page 5.
• For VOICE chat, there is no need to know the ID of the unit with which you
are chatting.
• To turn your unit on and off, press and HOLD the ON/OFF button for several
seconds.
• Before using the unit, turn the volume control on the side of the unit to
mid-range.
• Before text messaging it’s best to set up an ID number for each unit. To do so:
1. In Text Mode with no icons highlighted on the Menu, press **00000000##
and “OK” to confirm.
2. Press 9, then “OK” to confirm.
3. Enter a new 8 digit ID number and press “OK” to confirm.
4. To check that your number is entered correctly, go to Menu and, with no
icons highlighted, press the ID key on the side of the unit.
INTRODUCTION
These single channel FRS Mobile Handsets allow friends to talk or text message
up to 2 miles! Mobile Handset units also include a clock, note pad, alarm and
phone book.
CONTENTS
• 2 SMS Mobile Handsets
BEFORE YOU BEGIN
Get ready to talk and text to friends by first installing batteries in your
Mobile Handsets.
1. Using a Phillips screwdriver (not included) remove the
screw and battery compartment cover from the back
of the Mobile Handset. (Fig. A)
2. Install four (4) AAA alkaline batteries (not included)
making sure the (+) and (-) ends face the proper
direction as indicated inside the battery
compartment.
3. Replace the compartment cover and tighten
the screw.
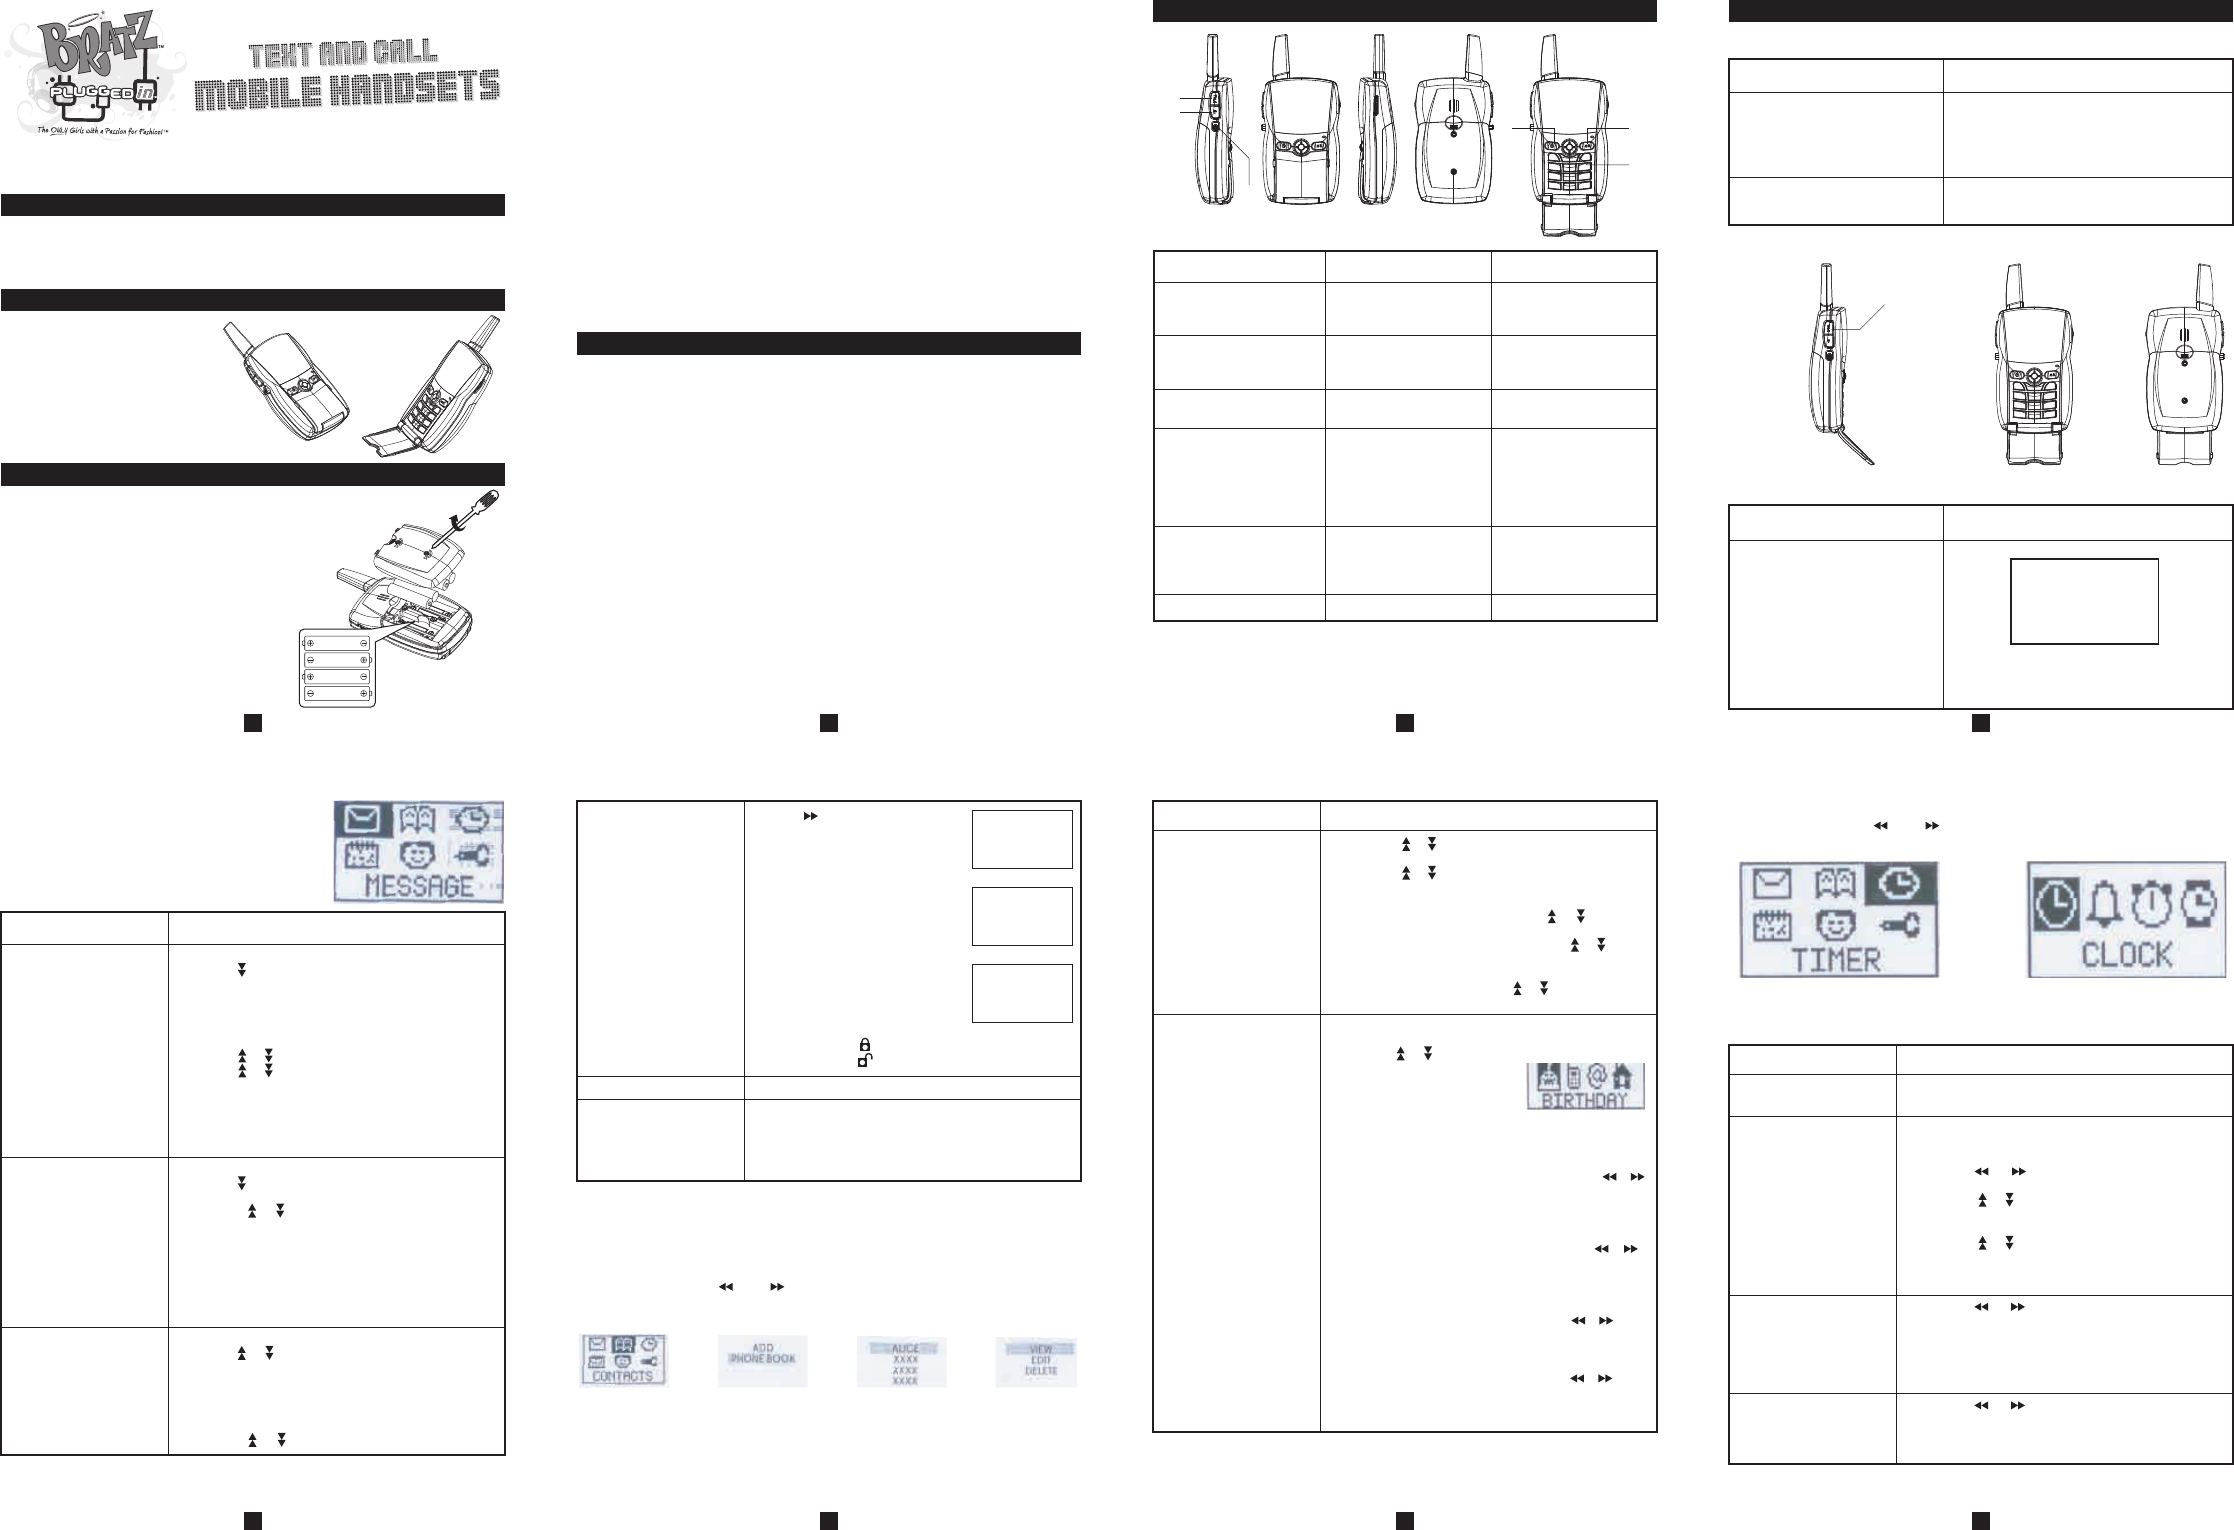
KEY LAYOUTS AND FUNCTIONS
Keypad
Item no. 337966F7, 337966F7C ADULT BATTERY INSTALLATION
AAA/1.5V/LR03
AAA/1.5V/LR03
AAA/1.5V/LR03
AAA/1.5V/LR03
Fig. A
4 6
5
1
2
3
Slide switch, which allows
you to select Talk mode or
Text mode.
Mode “A” is Talk mode.
Mode “B” is Text mode.
Key
1. Talk/Text switch
Go to Menu. With no icons
highlighted, press to see
your current ID number.
To view your ID the unit
must be in “B” (Text)
Mode.
2. ID
Press to talk, release to
listen.
To transmit your voice, unit
must be in “A” Talk Mode.
3. Talk
Press and HOLD to switch
the unit ON or OFF.
(Welcome Screen and ID
number will appear,
followed by the Menu
screen.)
To switch ON and OFF
unit can be in either “A”
(Talk) Mode or “B” (Text)
Mode.
4. Power
Highlights and selects
menu and other items.
(Center “OK” key
confirms selection.)
5. Four Direction Keys
and “OK” key.
Cancels your selection.
6. Cancel
Functions Notes
Symbol Screen in Text (“B”) mode.
To switch from upper to lower case,
Press * (or the Shift Key) Example: ABC, or abc
# * , . ? ! ; @ + - /
= : _ \ / $ % ^ ( )
< > { } [ ]
To access symbols:
1. Highlight Message Mode
(envelope) on Menu and press
“OK” to confirm.
2. Highlight “New”, then press “OK”
to confirm.
3. Press #, rapidly until you reach
the desired symbol.
NOTES: Use directional keys to go back.
Use the #1 Key for Commas and Periods.
MAIN FEATURES
TALKING FUNCTION
Talking and Listening In “A” Mode, (the screen will say
Talk/Listen) press and hold the Talk button
and speak into the unit. Release the button
to listen.
Adjusting the Volume
Function Step
Adjust the volume using control dial on side
of unit.
Press “Talk” to talk with
the other Mobile Handset
user.
Release “Talk” to listen
to the other user voice.
In Mode A
1. Highlight the “envelope” on the menu and press “OK”.
2. Press to highlight “NEW” then Press “OK”
3. Type your message using the keypad. Press “OK”.
4. Use the or to highlight “NEW NUMBER” then
press “OK”.
5. Input the new ID number, then press “OK”.
6. A new menu will appear.
7. Select “SEND ONLY” to send the message only.
8. Select “SAVE” to save the message only.
9. Select “SAVE SEND” to save and send the message.
NOTE: Number will NOT be saved to your address book.
To create a message to
be sent to a Mobile
Handset which has
already had its ID
number saved on your
contact list.
To create a message to
a Mobile Handset which
has NOT had its ID
saved to your contact
list.
To check the messages
in your “Inbox”.
Function Step
1. Highlight the “envelope” on the menu and press “OK”.
2. Press or to highlight “INBOX” (Fig. 1) then
press “OK”.
3. The sender of your first message will be shown.
4. Press “OK” to read the message. Press “OK” again to
see time and date sent.
5. Press Cancel to return to beginning of message.
6. Use the or keys to scroll to the next message.
1. Highlight the “envelope” on the menu and press “OK”.
Press to highlight “NEW”, then Press “OK”.
2. Type your message using the keypad by pressing the
keys quickly until you reach the desired letter, then
press OK.
3. When finished, press “OK” and the CONTACT screen
will appear.
4. Press or to highlight CONTACT. Press “OK”.
5. Using or to select the message recipient.
Press “OK”.
6. A new menu will appear.
7. Select “SEND ONLY” to send the message but not
save it. Select “SAVE” to save the message only.
Select “SAVE SEND” to save and send the message.
Similar to the steps in “Check Inbox.”
7. Press to go to the screen shown in
Fig. 6.
8. Select “SAVE” and Press “OK” to
save the message.
9. Select “DELETE” and Press “OK” to
delete the message.
10. Select “FORWARD” and Press “OK”
to forward the message to others.
11. Select “REPLY” , write a message,
and Press “OK” to reply the sender.
NOTE: A maximum of 9 messages can
be saved.
They will be numbered from 1 to 9 on the
screen.
A “closed lock” icon means the message was saved.
An “open lock” icon means the message was NOT saved.
The Mobile Handset can receive messages in SMS (text)
model. A text cycle is 30 seconds long. Once you type in
and send a message, your unit will stay in send mode for
the remainder of the 30 second cycle. During that time
you will not be able to receive messages.
Check Sentbox
Receiving messages
SAVE
DELETE
FORWARD
REPLY
Fig. 6
WRITE A
Fig. 6A
SEND SMS...
Fig. 6B To save information
regarding a contact, first.
Fig. 11
1. Highlight the “Contacts” icon from the Menu and press
“OK".
2. Use the or keys to highlight “ADD.” (Fig. 8) and
press “OK”.
3. Input your friend’s ID number and Press “OK”.
4. Input your friend’s name and press “OK”.
5. A new menu (Fig. 11) will appear.
6. To input a friend’s birthday information, use the or
keys to highlight the “BIRTHDAY” cake icon and press
“OK”.
7. Use the keypad to input the information, then press
“OK”.
8. To input a friend’s cell phone number, use the or
keys to highlight the “CELL PHONE” icon and press
“OK”.
9. Use the keypad to input the information, then press
“OK”.
10. To input a friend’s email address, use the or keys
to highlight the “@” sign, then press “OK”.
11. Use the keypad to input the information, then press
“OK”.
12. To input a friend’s home address, use the or keys
to highlight the “HOUSE” icon and press “OK”.
13. Use the keypad to input the information, then press
“OK”.
Search
Function Step
1. Use the or keys to highlight “PHONE BOOK”.
(Fig. 8) Press “OK”.
2. Use the or keys to reach the contact name you
wish. Press “OK”.
3. A new menu (Fig. 10) will appear.
4. To see the contact’s record, use the or keys to
highlight “VIEW” and press “OK”.
5. To edit information on the entry, use the or keys to
highlight “EDIT.” Press “OK,” then use the keypad to
update the information.
6. To remove a contact, use the or keys to highlight
“DELETE” and press “OK”.
Fig. 7 Fig. 8 Fig. 9 Fig. 10
Fig. 14 Fig. 15
TOOLS
In Mode “B,” press the and keys to highlight the “CLOCK” icon on the
menu. (Fig. 14)
Press “OK” and a new screen (Fig. 15) will appear.
To see the time and date CURRENTLY displayed on the unit:
Setting the alarm.
Setting the countdown
function.
Using the stopwatch.
Setting the time.
Function Step
See “To Adjust the Time Setting” on page 11 for complete
instructions as to how to set the correct time.
1. Use the and keys to highlight the
“COUNTDOWN” icon and press “OK”.
2. Use the keypad to set the time you wish to countdown
from and press “OK”.
3. Press “OK” to start the countdown.
4. Press “OK” again to stop the countdown.
1. Use the and keys to highlight “STOPWATCH”
and press “OK”.
2. To start the stopwatch, press “OK”.
3. To stop the stopwatch, press “OK" again.
To set the Alarm, Countdown and Stopwatch functions: 1.
1. First access the “Clock” icon from the Main Menu
then follow directions below.
2. Use the and keys to highlight the “ALARM” icon
and press “OK”.
3. Use the or to highlight “SET” and press “OK”.
4. Use the keypad to input the alarm time you wish and
press “OK”.
5. Use the or to highlight ALARM, then press “OK”
to toggle between ALARM ON and ALARM OFF
until you reach the desired setting then press
CANCEL.
1. Highlight SET-UP on the
Menu.
2. Using the and keys,
highlight “TIME” and
press “OK”.
3. Use the keypad to adjust
the time and date.
EXAMPLE:
To set the time to
12:34 PM, press 1, 2,
3, 4, and press “OK”.
www.bratz.com
TM & © MGA Entertainment, Inc.
BRATZ™, BRATZ PETZ™, LIL’ BRATZ™,
BRATZ BABYZ™, BRATZ KIDZ™ and all
related logos, names, characters,
distinctive likenesses and slogans,
as well as the packaging and images
appearing thereon, are the
exclusive property of MGA.
16300 Roscoe Blvd.
Van Nuys, CA 91406 USA
(800) 222-4685
Printed in China.
0507-0 E
The preferred method of contact for
Customer Service is through our e-mail
contact form at www.mgae.com
Please keep this manual as it contains important information.
13 14 15 16
9 10 11 12
FCC WARNING STATEMENT
FCC Compliance
NOTE: This equipment has been tested and found to comply with the limits for
Class B digital device, pursuant to Part 15 of FCC Rules. These limits are
designed to provide reasonable protection against harmful interference in a
residential installation. This equipment generates, uses and can radiate radio
frequency energy and, if not installed and used in accordance with the
instructions, may cause harmful interference to radio communications. However,
there is no guarantee that interference will not occur in a particular installation.
If this equipment does cause harmful interference to radio or television reception,
which can be determined by turning the equipment off and on, the user is
encouraged to try to correct the interference by one or more of the following
measures:
• Reorient or relocate the receiving antenna.
• Increase the separation between the equipment and receiver.
• Connect the equipment into an outlet on a circuit different from that to
which the receiver is connected.
• Consult the dealer or an experienced radio/TV technician for help.
This device complies with Part 15 of the FCC Rules. Operation is subject to the
following two conditions: (1) This device may not cause harmful interference, and
(2) this device must accept any interference received, including interference that
may cause undesired operation.
Warning: Modifications not authorized by the manufacturer may void users
authority to operate this device.
IC RSS210 WARNING STATEMENT
This device complies with RSS-210 of Industry Canada. Operation is subject to
the following two conditions: (1) this device may not cause interference, and (2)
this device must accept any interference, including interference that may cause
undesired operation of the device.
Operation temperature
The product can only be operated from 0 degrees centigrade to 35 degrees
centigrade.
Warning: Changes or modifications to this equipment not expressly approved by
the party responsible for compliance could void the user's authority to operate the
equipment.
Warning: Any adjustment to this equipment is recommended to be performed by
or under the immediate supervision and responsibility of a person certified as
technically qualified to perform transmitter maintenance and repair duties in the
private land mobile services and fixed services by an organization or committee
representative of users of those services.
Warning: Replacement of any transmitter component (crystal, semiconductor,
etc.) for this equipment could result in violation of FCC rules.
SAFETY INFORMATION
Your wireless hand-held portable transceiver contains a low power transmitter.
When the Push-to-Talk (PTT) button is pushed it sends out radio frequency (RF)
signals. The device is authorized to operate at a duty factor not to exceed 50%.
In August 1996, the Federal Communications Commissions (FCC) adopted RF
exposure guidelines with safety levels for hand-held wireless devices.
CAUTION: To maintain compliance with the FCC's RF exposure guidelines hold
the transmitter and antenna at least 1 inch (2.5 centimeters) from your face and
speak in a normal voice, with the antenna pointed up and away from the face.
Use only the supplied antenna. Unauthorized antennas, modifications, or
attachments could damage the transmitter and may violate FCC regulations.
This Class B digital apparatus complies with Canadian ICES-003.
SAFE BATTERY USAGE
• Use alkaline batteries for best performance and longer life
• Use only the type battery recommended for the unit.
• Batteries should be replaced only by an adult.
• Insert batteries with the correct polarity ( + and – ).
• Do not mix different types of batteries or old and new batteries.
• Do not short-circuit batteries.
• When not used for an extended time, remove batteries to prevent possible
leakage and damage to the unit.
• Do not mix rechargeable and non-rechargeable batteries.
• Rechargeable batteries are to be removed from the toy before charging.
• Rechargeable batteries are to be recharged only under adult supervision.
• Do not recharge non-rechargeable batteries.
• Exhausted batteries are to be removed from the units.
• Do not dispose of batteries in fire as they may leak or explode.
DISPOSAL OF BATTERIES: Do not treat old batteries as household waste.
Take them to a designated recycling facility.
NOTE: The voltage of a fully-charged, rechargeable battery is often lower than
that of a fresh alkaline battery. Therefore, it is recommended that alkaline
batteries be used instead of rechargeable batteries for best performance and for
longest play time.
SETTINGS
• In Mode “B”, press the and keys to highlight the “SETTINGS’ menu.
(Fig. 20)
• Press “OK”.
CHECKING YOUR ID NUMBER
• To check your ID number, go to “B” Mode, press the CANCEL key until no
icons are highlighted, then press the “ID” key on the side of your Mobile
Handset.
TO CHANGE ID NUMBER OR ERASE ALL DATA
• To change your ID number, go to “B” Mode, press the CANCEL key until no
icons are highlighted, then press **00000000## then press “OK".
To adjust any of the 2 items below, first go to “B” Mode, press the CANCEL key
until no icons are highlighted, then press **00000000## and “OK” then press 0
or 9.
Fig. 19
• Press “OK” to move to the next note.
NOTE: You can save a maximum of 8 notes.
APPLICATIONS
• In Mode “B”, press the and keys to highlight the “EXTRAS” menu.
(Fig. 19)
• Press “OK”.
• Use the keypad to Input any notes you wish and press .
• A new menu (Fig. 18) will appear.
• To save your notes, use the or keys to highlight “SAVE” and press “OK”.
• To erase your notes, use the or keys to highlight “DELETE” and press
“OK”.
Fig. 16 Fig. 17
NOTE 1 A
Fig. 18
SAVE
DELETE
NOTES
• In Mode “B,” use the and keys to highlight“ the “NOTEPAD” icon on the
menu (Fig. 16).
• Press “OK” and a new menu (Fig. 17) will appear.
Go to movies with
Jimmy
TASK A
TASK TIME
12:34 PM
To do list
Function Step
1. Use the or keys to highlight
“TO DO LIST” then press “OK”.
2. The current month and year will
be shown.
3. Use the or keys to scroll
through the “TO DO LIST”.
4. Press the key to highlight the
date you want select
e.g. 2007 Jan 2nd
5. Press the key to select
2007 Jan 2nd
6. Select “EDIT” to input a To-Do List
message
e.g. “Go to movies with Jimmy”
7. Use the keypad to input your
message.
8. After you have input your
message, press “OK”. “TASK
TIME” will appear.
9. To set the time to 12:34 PM,
press 1 2 3 4 and to
select “PM”.
10. Once you have set the “time” on
the To-Do List message, press
“OK” to save it.
11. To Delete a saved message,
highlight the date of the message
then press the right arrow.
12. Select “DELETE” to delete the
message, then press “OK”.
EDIT
DELETE
1
01-2007 <>
2
3
1
01-2007
2
3
Fig. 20 Fig. 21
To select a Ring Tone.
To adjust the Ring
Volume.
Function Step
1. Highlight SET-UP on the Menu.
2. Using the and keys, highlight “RING TONE” and
press “OK”.
3. Using the and keys, highlight the ring tone you
desire and press “OK”.
NOTE: Five pre-set ring tones are available and a sample of
each will play when highlighted.
1. Highlight SET-UP on the Menu.
2. Using the and keys, highlight “RING VOL” and
press “OK”.
NOTE: Eight pre-set volume settings are available and a
sample of each will play when highlighted.
To adjust the Time
Setting.
NOTE: After you change your batteries, the Mobile Handset
will automatically be reset. The initial setting of time and
date will revert to 12:00 AM, 2007 Jan 1st
12:00 AM
2007.01.02
12:34 PM
2007.01.02
In Text Mode with no icons highlighted on the Menu, press
**00000000## and “OK” to confirm.
1. Press “0”
2. Press Cancel
To erase the data in your
mailbox, to-do list, and
phone book
In Text Mode with no icons highlighted on the Menu, press
**00000000## and “OK” to confirm.
1. Press 9, then “OK” to confirm.
2. Enter a new 8 digit ID number and press “OK” to
confirm.
3. Press Cancel
To change the ID
‘Let’s care for the environment!’
The wheelie bin symbol indicates that the product must not be disposed of with
other household waste. Please use designated collection points or recycling
facilities when disposing of the item