MOTREX MTXNC10BD Smart display User Manual
MOTREX CO., LTD. Smart display
UserManual.wiki
>
MOTREX
>
MTXNC10BD User Manual
User Manual
Navigation menu
Upload a User Manual
Namespaces
Wiki Guide
HTML
PDF
Info
Views
User Manual
Discussion / Help
Navigation
![10 Using the System for the First TimeTurning the System On/OffTurning the System OnPress the engine start button. If the brakes are not pressed, then the ACC and system will turn on. If the brakes are pressed, then the IGN and system will turn on and the ignition will start. In both instances, the following safety warning will be displayed.Pressing the PWR key on the head unit will dis-play the safety warning page. Press the [Confirm] button to display the most recent mode.Turning the System OffPress the engine start button again or press and hold the power key on the head unit to turn the system off.NOTE• If the system is turned off while the Handsfree is being used, then the call will automatically switch back to the mobile phone. AV On/OffPress the PWR key on the head unit when the AV is on. Press the PWR key or press the menu key to turn on AV.While AV is turned off, the TUNE / ENTER knob will be disabled. Resetting the SystemThis feature is used to reset the system in the occurrence of an unforeseen error or problem.Press the reset hole using a clip or pin.](https://usermanual.wiki/MOTREX/MTXNC10BD/User-Guide-3920746-Page-10.png)
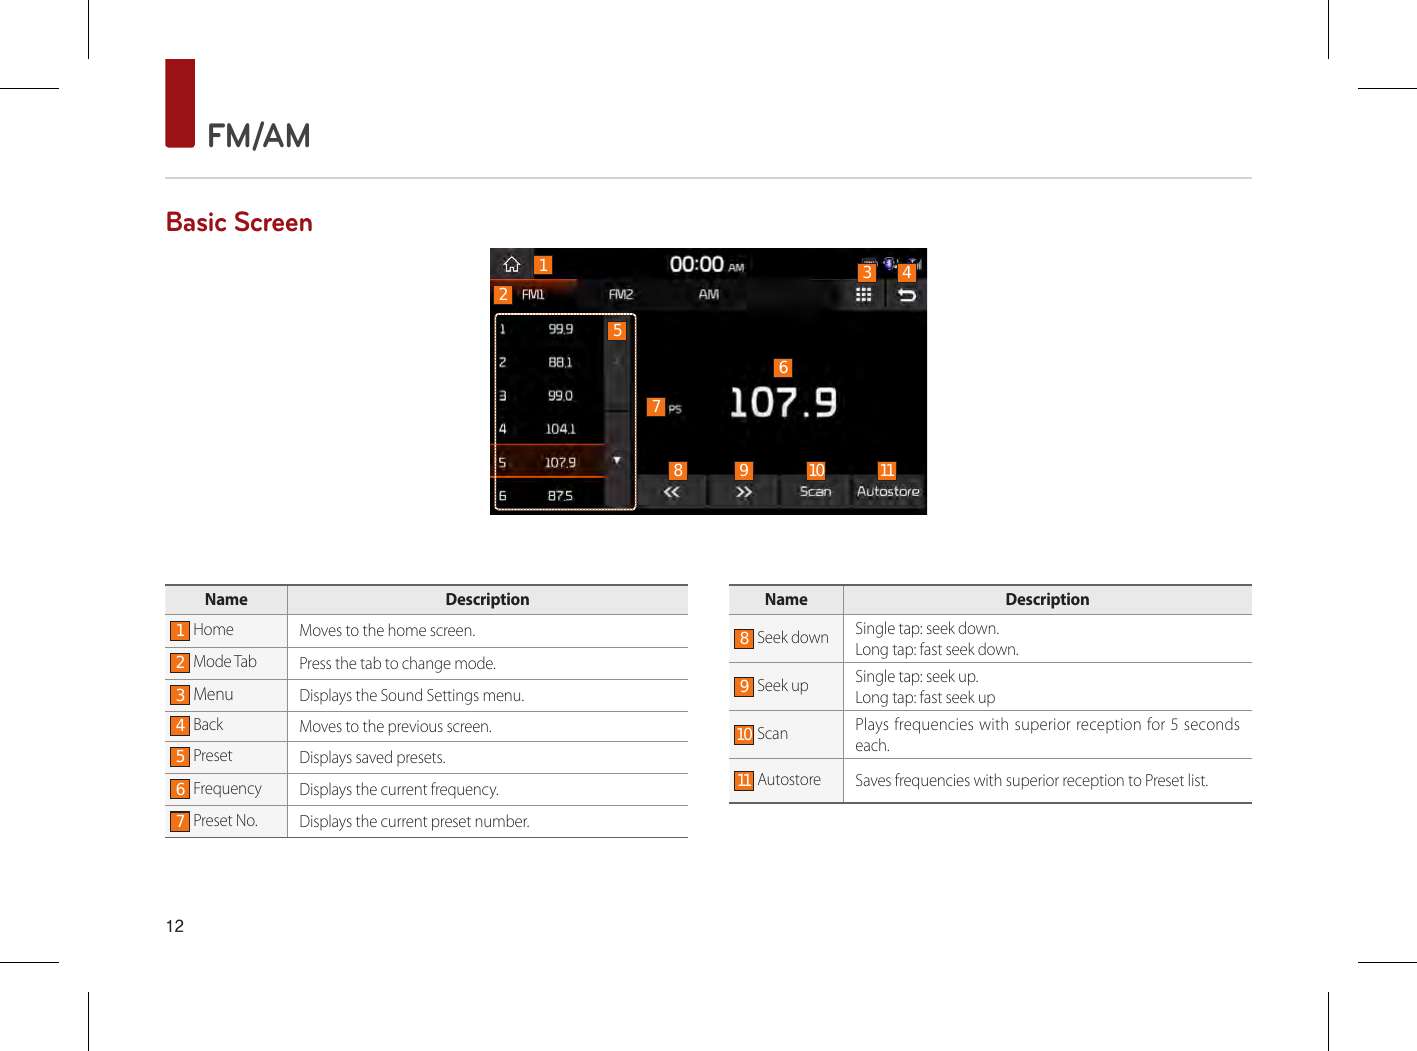
![13FM/AMENGLISHListening to FM/AM radioPress the RADIO key to change the mode in order of FM1 ▶ FM2 ▶AM ▶ FM1 .Auto TuningPress the button to automatically search for frequencies. Manual TuningTurn the TUNE / ENTER knob to manually select the frequency. The stations move up and down step by step.Selecting preset listsFrom the lists, select the frequency you want to listen to. ScanPress the [Scan] button to save frequencies. Plays frequencies saved to presets for 5 seconds and moves to the next saved frequency.AutostorePress the [Autostore] button to save frequencies with superior reception.Sound SettingsPress ▶ [Sound Settings].For details, refer to the “Sound” on the page 30.](https://usermanual.wiki/MOTREX/MTXNC10BD/User-Guide-3920746-Page-13.png)
![15USB MusicENGLISHPlaying USB Music Once a USB is connected, USB Music mode will operate automatically.Press ▶[Media] ▶[USB Music].••Press ▶ to play files.••Press ll to pause the file. NOTE• If the USB is not connected, or there is no media file in USB then the USB media button will be disabled. Searching USB Music FilesWhile playing ▶ Press to play the previous/next file. ••Pressing and holding will rewind or fast forward the current file.••While is being pressed, the track will rewind or fast-forward at high speeds. Once the key is released, the USB Music will begin playing at normal speed.RepeatPress [Repeat].Each time the button is pressed, the option is changed from Repeat Folder ( ) ▶ Repeat All ( ) ▶Repeat One( ).ShufflePress [Shuffle].Each time the button is pressed, the option is changed from Shuffle On ( ) ▶ Off.ListPress to display USB Music list screen.It is possible to search files by touching the screen. Sound SettingsPress ▶ [Sound Settings].For details, refer to the “Sound” on the page 30.](https://usermanual.wiki/MOTREX/MTXNC10BD/User-Guide-3920746-Page-15.png)
![16 USB VideoPlaying USB VideoOnce a USB is connected, USB Video mode will operate automatically. Press ▶[Media] ▶[USB Video]. ••Press ▶ to play files.••Press ll to pause the file.NOTE• If the USB is not connected, or there is no media file in USB then the USB media button will be disabled. Searching USB Video FilesWhile playing ▶ Press to play the previous/next file. ••Pressing and holding will rewind or fast forward the current file.••While is being pressed, the track will rewind or fast-forward at high speeds. Once the key is released, the USB Video will begin playing at normal speed.RepeatPress [Repeat].Each time the button is pressed, the option is changed from Repeat Folder ( ) ▶ Repeat All ( ) ▶Repeat One( ).NOTE• Press the [Info] button to display the file information.ListPress to display USB Video list screen. It is possible to search files by touching the screen. Sound SettingsPress ▶ [Sound Settings].For details, refer to the “Sound” on the page 30.Display SettingsPress ▶ [Display Settings].For details, refer to the "Display" on the page 31.](https://usermanual.wiki/MOTREX/MTXNC10BD/User-Guide-3920746-Page-16.png)
![18 iPod® MusicPlaying iPod® Music Press ▶[Media] ▶ [iPod].••Press ▶ to play files.••Press ll to pause the file.NOTE• If the iPod® is not connected, or there is no media file in iPod® then the iPod® Music button will be disabled. Searching iPod® Music FilesWhile playing ▶ Press to play the previous/next file. ••Pressing and holding will rewind or fast forward the current file.••While is being pressed, the track will rewind or fast-forward at high speeds. Once the key is released, the iPod® Music will begin playing at normal speed.RepeatPress [Repeat].Each time the button is pressed, the option is changed from Repeat All( ) ▶ Repeat One ( ) ▶Off ( ).ShufflePress [Shuffle].Each time the button is pressed, the option is changed from Shuffle On ( ) ▶ Off.ListPress the button to display iPod® list screen. It is possible to search by Playlists, Artists, Albums, Songs and Others. Sound SettingsPress ▶ [Sound Settings].For details, refer to the “Sound” on the page 30.](https://usermanual.wiki/MOTREX/MTXNC10BD/User-Guide-3920746-Page-18.png)
![19AUXENGLISHPlaying an AUX sourceIf an external device connector is connected with the AUX terminal, then AUX mode will auto-matically operate. Press ▶[Media] ▶[AUX] button to play auxiliary device while a different source is play-ing.Using the Menu ButtonsPress the button to set Sound.For details, refer to the “Sound” on the page 30.](https://usermanual.wiki/MOTREX/MTXNC10BD/User-Guide-3920746-Page-19.png)
![20 Bluetooth® AudioBefore playing the Bluetooth® audio••Music saved in the mobile phone can be played in the car through Bluetooth® audio streaming. ••Bluetooth® audio can be played only when a Bluetooth® phone or Bluetooth® audio device has been connected. To play Bluetooth® audio, connect the Bluetooth® phone to the car system. For more information on connecting Bluetooth®, please refer to the user’s manual [Bluetooth® Connection] on page 22. ••If Bluetooth® is disconnected while playing Bluetooth® audio, the audio stream will be inter-rupted. ••The audio streaming function may not be sup-ported in some mobile phones. Only one func-tion can be used at a time, either the Bluetooth® handsfree or the Bluetooth® audio function. For example, if you convert to the Bluetooth® handsfree while playing Bluetooth® audio, the music stream is interrupted. ••Playing music from the car is not possible when there are no music files saved in the mobile phone. Playing Bluetooth® audioPress ▶ [Media] ▶[Bluetooth Audio].••Press to play/pause files.Searching Bluetooth® audio FilesWhile playing ▶ Press to play the previous/next file. NOTE• The title/artist info may not be supported in some mobile phones. When it is not supported, only the symbol will be displayed. • The play/pause feature may operate differently depending on the mobile phone. Connection SettingsPress ▶ [Connections Settings].For details of Connections Settings, refer to the "Bluetooth® connection" on the page 22. Sound SettingsPress ▶ [Sound Settings].For details, refer to the “Sound” on the page 30.](https://usermanual.wiki/MOTREX/MTXNC10BD/User-Guide-3920746-Page-20.png)
![22 Bluetooth® ConnectionWhen no Phones Have Been PairedPress on the steering wheel or press PHONE ▶ [Add New].When searching from the Bluetooth® device, the car name is ‘KIA MOTORS’ and the default pass-key is ‘0000’.When a Phone is Already PairedPress on the steering wheel or press PHONE ▶ [Connect].NOTE• When a Bluetooth® device is connected, a new device cannot be paired. If you want to pair a new phone, first disconnect the connected Bluetooth® device.When your phone is connectedPress on the steering wheel or press PHONE to display the following screen.NOTE• Once Bluetooth® connection is successful, the name of the connected mobile phone will be displayed on the phone screen and Bluetooth® handsfree functions will be ready to be operated. • Some functions may not be supported due to limited Bluetooth® compatibility between the car system and mobile phone.](https://usermanual.wiki/MOTREX/MTXNC10BD/User-Guide-3920746-Page-22.png)
![23Bluetooth® PhoneENGLISHMaking/Answering CallsCalling by Dialing a NumberEnter number on the Dial Pad ▶ Press or on the steering wheel.NOTE• If you press the wrong number, press to delete one digit of the entered number. Press and hold the dial pad 0 "+" to enter a "+".Answering a CallIncoming call notice ▶ Press [Accept] or on the steering wheel. Rejecting a CallIncoming call notice ▶ Press [Reject] or on the steering wheel.Switching to Call Waiting If there is a waiting call, the following screen is displayed. : Holds current call and answers new call. : Ends current call and answers new call. : Rejects new call and maintains current call.](https://usermanual.wiki/MOTREX/MTXNC10BD/User-Guide-3920746-Page-23.png)
![24 Bluetooth® PhoneOperating Menus during a CallButton Description1 Turns the Mic On/Off. 2 Display dial pad screen for enter-ing ARS numbers.3 Switches a voice call from the car handsfree to the mobile phone.4 Ends a call.Ending a CallWhile on a call ▶ Press [End] or the key on the steering wheel.Switching Call to Bluetooth® PhoneDuring handsfree call ▶ Press [Use Private] or press and hold on the steering wheel.Switching Call to HandsfreeDuring call on mobile phone ▶ Press [Use Handfree] or press and hold on the steering wheel.ContactsIn Phone screen ▶ Press [Contacts].Downloading ContactsUp to 2,000 mobile phone contacts can beupdated.In Contacts screen ▶ Press ▶[Download].123 4](https://usermanual.wiki/MOTREX/MTXNC10BD/User-Guide-3920746-Page-24.png)
![25Bluetooth® PhoneENGLISHMaking a Call from ContactsIn Contacts screen ▶ Press the contact you want to call.Searching for ContactsIn Contacts screen ▶ Press ▶ [Search] ▶Enter the name or number ▶ [OK] ▶ Press the contact you want to call.Call HistoryViewing Call HistoryIn Phone screen ▶ Press [Call History].Button Description1 All Displays all calling list.2 Dialed Displays the outgoing callinglist.3 Received Displays the incoming callinglist.4 Missed Displays the missed calling list.NOTE• To download or update the call history, press ▶ [Download].Bluetooth settingsIn Phone screen ▶ Press .For details, refer to the "Bluetooth" on the page 33.1 2 3 4](https://usermanual.wiki/MOTREX/MTXNC10BD/User-Guide-3920746-Page-25.png)
![26 Android Auto™About Android Auto™Android Auto™ brings the most useful apps from your phone to your vehicle´s screen, optimized for easy glancing and control while driving. You will be able to control things like navigation, maps, calls, text messages, and music, all from your vehicle´s screen.To learn about Android Auto™ and its features, visit the Android website at http://www.android.com/auto/What you need?1. An Android phone running Android 5.0 (Lollipop) or higher with a data plan.2. A vehicle that’s compatible with Android Auto™.3. A genuine USB cable.Before starting Android Auto™Installing the Android Auto™ ApplicationInstall Android Auto™ Application into your mobile phone.Setting the systemBefore connecting your mobile phone, check whether Android Auto™ is set to be used in Setup ▶ [Connectivity].Starting modeConnect your phone to your car using a USB cable ▶ Press ▶ [Media] ▶ [Android Auto].Home ScreenNo Description1Microphone2Navigation suggestions and recent places3Reminders, messages, calls, and other alerts4Maps and navigation5Calls and messages6Home screen7Music and audio8Exits Android Auto142365 7 8](https://usermanual.wiki/MOTREX/MTXNC10BD/User-Guide-3920746-Page-26.png)
![27Apple CarPlayENGLISHAbout Apple CarPlay••CarPlay puts key iPhone apps - the ones you want to use while driving - on your vehicle’s built-in display. With CarPlay, you can get turn-by-turn directions, make phone calls, exchange text messages, listen to music, and more. Apple CarPlay is available on select automobiles navigation systems, and works with iPhone 5 or higher with iOS 7.1 or higher.••You can operate CarPlay using your vehicle’s built-in controls - a touchscreen, a rotary knob controller, or both. To learn how to operate your display, refer to the user guide that came with your vehicle. Or just use Siri voice control to tell CarPlay what you want. In fact, Siri often steps in automatically to help you, depending on the app you’re using.••For more information & troubleshooting, refer to the iPhone manual or visit the Apple website.What you need?1. An iPhone5 or higher.2. A car that’s compatible with iPhone.3. A Genuine USB cable from Apple.Before starting Apple CarPlaySetting Siri on the iPhoneSiri must be enabled on your iPhone. If Siri is turned off, a notice will be displayed.Go to Settings ▶ Siri & Search ▶ Turn on Siri.Setting the systemBefore connecting your mobile phone, check whether Apple CarPlay is set to be used in Setup ▶ [Connectivity].Starting modeConnect your phone to your car using a USB cable. The CarPlay Home screen will be displayed automatically.When in a different mode, Press ▶ [Media] ▶ [Apple CarPlay].Home ScreenNo Description1Displays the 3 most recently used menus.2Home button3Displays current audio source4Returns to your car’s Home screen123 4](https://usermanual.wiki/MOTREX/MTXNC10BD/User-Guide-3920746-Page-27.png)
![28 WebLinkAbout WebLinkThe WebLink Host app turns your vehicle into a connected car by letting you easily enjoy your favorite apps on the go. Once you’ve down-loaded the app, simply use your smartphone to connect to your car’s WebLink-compatible multimedia receiver, and then launch popular navigation, media, weather, and even calendar apps.What you need?1. A smart phone with a data plan.2. A vehicle that’s compatible with WebLink.3. A USB cable.Before Using WebLinkInstalling the WebLink ApplicationInstall the WebLink Host application and the applications supported by WebLink Host appli-cation into your mobile phone. NOTE• For details, visit the Abalta website (http://www.abaltatech.com).Setting the systemBefore connecting your mobile phone, check whether WebLink is set to be used in Setup ▶ [Connectivity].](https://usermanual.wiki/MOTREX/MTXNC10BD/User-Guide-3920746-Page-28.png)
![29WebLinkENGLISHStarting ModeConnect your mobile phone to your vehicle using a USB cable. In your phone, touch [Accept]. Press ▶ [WebLink] ▶ Yes.Home ScreenNo Description1Displays the WebLink Home screen2Available applications3Returns to the system Home screen4Displays the WebLink Home screen5Displays the Waze Home screen6Minimizes the menu bar123456](https://usermanual.wiki/MOTREX/MTXNC10BD/User-Guide-3920746-Page-29.png)
![30 SetupStarting modePress SETUP to display the Setup screen.SoundThis menu is used to adjust the sound effects for the whole system.Press SETUP ▶ [Sound].PositionIn the Sound Settings screen ▶ Press [Position] ▶ Set the desired sound position.Use the , , , buttons to adjust set-tings.Press to restore sound to the center position. EqualizerIn the Sound Settings screen ▶ Press [Equalizer] ▶ Set the desired sound balance . Use the , buttons to adjust settings. Press [Center] to restore sound to the center position.](https://usermanual.wiki/MOTREX/MTXNC10BD/User-Guide-3920746-Page-30.png)
![31SetupENGLISHPriorityIn the Sound Settings screen ▶ Press [Priority] ▶ Set the desired option.Resetting Sound SettingsIn the Sound Settings screen ▶ Press [Default] ▶ [Default] ▶ [Yes].BeepIn the Sound Settings screen ▶ Press the [Beep] to turn on/off.DisplayThis menu allows you to set the display settings for the whole system. Press SETUP ▶ [Display].](https://usermanual.wiki/MOTREX/MTXNC10BD/User-Guide-3920746-Page-31.png)
![32 SetupDimmingIn the Display Settings screen ▶ Press [Dimming] ▶ Set the desired mode.BrightnessIn the Display Settings screen ▶ Press [Brightness] ▶ Select the mode ▶ Set the desired brightness . Press [Center] to restore brightness to the center position. Resetting Display SettingsIn the Display Settings screen ▶ Press [Default] ▶ [Default] ▶ [Yes].Display OffIn Display Setting screen ▶ Press [Display Off ] to turn display off. Touch anywhere on the screen to turn display on.](https://usermanual.wiki/MOTREX/MTXNC10BD/User-Guide-3920746-Page-32.png)
![33SetupENGLISHBluetooth® This menu allow you to set Bluetooth® settings.Press SETUP ▶ [Bluetooth].Bluetooth® ConnectionsIn the Bluetooth® Settings screen ▶ Press [Bluetooth Connections].Name Description1 Connect/DisconnectConnect /disconnect a Bluetooth® device.2 Add New Pair a new Bluetooth® device.3 Delete ItemsDelete a paired Bluetooth®device.4 Delete All Delete all paired Bluetooth®device.Auto Connection PriorityIn the Bluetooth® Settings screen ▶ Press [Auto Connection Priority] ▶ Select the Bluetooth® device you wish to set priority connection.If you press [No Phone Selected] button, the most recently connected Bluetooth® phone will connect automatically.12 3 4](https://usermanual.wiki/MOTREX/MTXNC10BD/User-Guide-3920746-Page-33.png)
![34 SetupSystem Bluetooth® InfoChanging Vehicle NameIn the Bluetooth® Settings screen ▶ Press [System Bluetooth Info] ▶ [Vehicle name:KIA MOTORS] ▶ Enter the name ▶ [OK].NOTE• The default device name is KIA MOTORS. Changing Passkey In the Bluetooth® Settings screen ▶ Press [System Bluetooth Info] ▶ [Passkey:0000] ▶ Enter the passkey ▶ [OK].NOTE• The default passkey is 0000. Resetting Bluetooth® Settings In the Bluetooth® Settings screen ▶ Press [Default] ▶ [Default] ▶ [Yes].](https://usermanual.wiki/MOTREX/MTXNC10BD/User-Guide-3920746-Page-34.png)
![35SetupENGLISHConnectivityThis menu allows you to set the car connectivityof your system.Press SETUP ▶ Press [Connectivity].Date and TimePress SETUP ▶ [Date/Time] ▶ Adjust the date and time.24-hour : Converts the digital clock display to 24 hours. LanguageThis menu allows you to set the language of the system.Press SETUP ▶ [Language] ▶Select the desired language.](https://usermanual.wiki/MOTREX/MTXNC10BD/User-Guide-3920746-Page-35.png)
![36 SetupSystemThis menu allows you to view system informa-tion and reset settings specified by the user.Press SETUP ▶ [System].System UpdateDownload the latest update file onto a USB device and connect the device to the USB termi-nal. In the System Info screen ▶ Press [Version Info] ▶ [Update] ▶ [YES] ▶ The system will then reboot automatically.Resetting the SystemIn the System Info screen ▶ Press [Default] ▶ [Default] ▶ [Yes] ▶ All settings and data will be initialized to the factory default state.](https://usermanual.wiki/MOTREX/MTXNC10BD/User-Guide-3920746-Page-36.png)
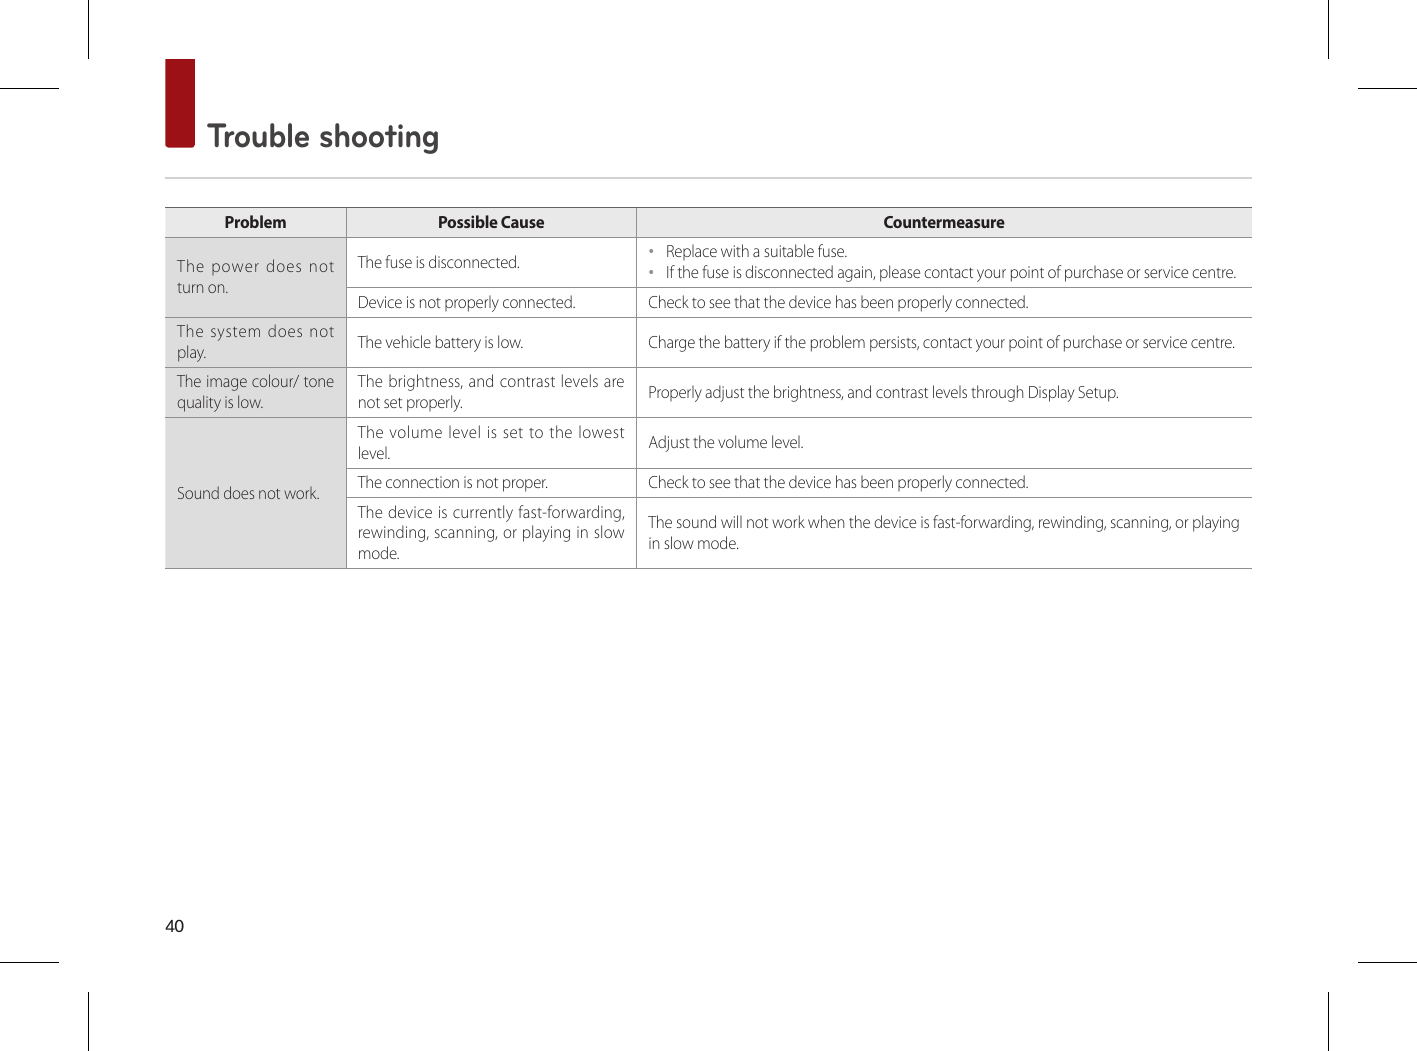
![39Trouble shootingENGLISH1. Errors which occur during the operation or installation of the device may be mistaken as a malfunction of the actual device.2. If you are having problems with the device, try the suggestions listed below.3. If the problems persist, contact your dealerProblem Possible CauseThere are small red, blue, or green dots on the screenBecause the LCD is manufactured with technology requiring high point density, a pixel or lighting deficiency may occur within 0.01% of total pixels.The sound or image is not working ••Has the Switch for the vehicle been turned to [ACC] or [ON]?••Has the SYSTEM been turned OFF?The screen is being displayed but sound is not working••Has the volume been set to a low level?••Has the volume been muted?When the power is turned on, the corners of the screen are dark••The display appearing somewhat dark after prolonged periods of use is normal with LCD panels. It is not a malfunction.••If the screen is very dark, contact your nearest dealer for assistance.Sound is working from only one speaker Are the positions of Fader or Balance sound controls adjusted to only one side?Sound does not work in AUX mode Are the audio connector jacks fully inserted into the AUX terminal?The external device is not working Is the external device connected with a standard connector cable?When turning power on, the most recent mode screen is not displayedWithin modes that play files by reading external sources, such as USB, iPod®, or Bluetooth® streaming mode, the most recently played mode screen prior to turning off power may not properly load.••If the corresponding device is not connected, the mode operated prior to the most recent mode will operate.••If the previous mode still cannot be properly played, the mode operated prior to that will operate.](https://usermanual.wiki/MOTREX/MTXNC10BD/User-Guide-3920746-Page-39.png)