User Manual
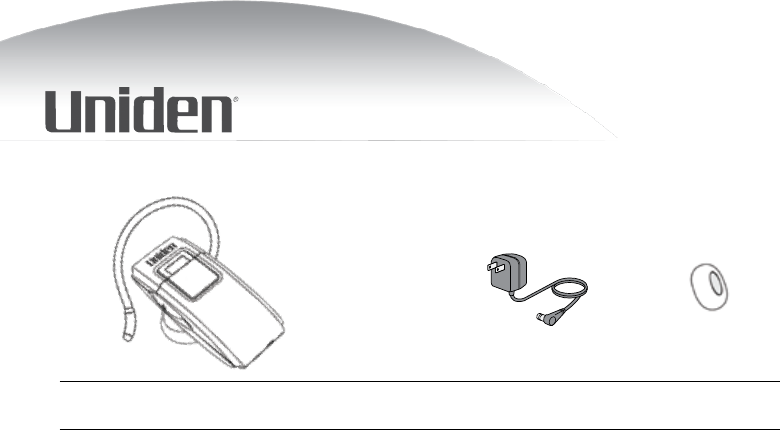
BT229 Bluetooth® Headset User’s Guide
Also in this package:
AC (indoor) power adapter
Questions? Problems? Get help on the web at www.uniden.com
or call our Customer Service line at 800-292-2294.
Extra ear cushion

2
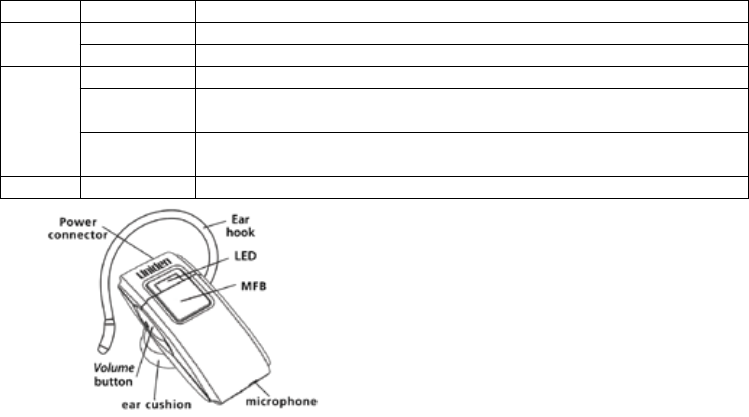
Getting to Know the Headset
What the buttons do
Button Action HEADSET STATUS
Standby (No Calls Active) Incoming Call 1 Call Active
Multifunction
(MFB)
Quick Press (1 Beep) Last number redial Answer Call Close Call
2 seconds (2 Beeps) Initiate Voice Dialing Reject Call Transfer Active Call to/
from Phone
4 Seconds (3 Beeps) Turn Headset OFF Turn Headset OFF Turn Headset OFF
Volume UP (+)
Quick Press (1 Beep) Increase Volume Increase Volume Increase Volume
2 Seconds (2 Beeps) - - -
4 Seconds (3 Beeps) - - Hold/Resume Call
Volume DOWN (-)
Quick Press (1 Beep) Decrease Volume Decrease Volume Decrease Volume
2 Seconds (2 Beeps) - - Microphone Mute
4 Seconds (3 Beeps) - - Close/Resume Call
Note: The headset initiates the function only after the button is released.
* Specications and features are subject to change without notice.
3
What the LED colors mean
Color State Meaning
Red Steady The headset is currently charging. When the battery is fully charged, the LED turns o.
Flashing The headset is turned o. If the headset is also beeping, the battery is low.
Blue
Flashing The headset is turned on.
One ash
every 5 seconds The headset is in standby and not paired to a Bluetooth device.
Two ash
every 5 seconds The headset is currently paired to a Bluetooth device.
Red & blue Alternating ash The headset is in pairing mode.

4
Setting Up Your Headset
Charge the battery
Before using your headset, charge the battery for at least 8 hours. Charging the battery
completely (and keeping it charged) will help you get the longest possible talk and standby
time out of the battery.
Connect the adapter to the Power connector on the top of the headset, then plug it into
any standard 120 V AC (regular indoor) AC outlet.
Make sure that your headset is fully charged before you start using it. When your headset is
charged, the red light is solid.
When the battery needs to be recharged, you will hear warning beeps every 20 seconds
and see the red light (depending on your headset status).
Use ONLY the AC adapter supplied with the headset! Using any other adapter could
damage your headset, create a re hazard, or cause a risk of electric shock!
5
Pair the headset to your Bluetooth phone
Pairing is like “introducing” two Bluetooth devices and giving them permission to connect
to each other. If you want to use the headset with more than one phone, you need to pair
it with each phone separately. Once you pair a phone to the headset, the two devices can
connect automatically whenever they can detect each other.
Before you can use your headset, you must pair it with a Bluetooth-enabled device (such as
Bluetooth mobile phone).
1: Make sure the headset is powered o and the power adapter is not connected (you
can’t use the headset while it’s charging).
2: Press and hold MFB until the LED ashes alternating red and blue (approximately 6
seconds), then release. The headset is in pairing mode and should be visible to other
Bluetooth devices.
3: Set your Bluetooth phone into discover mode. (Check the manual that came with your
phone for instructions.)
4: When your phone asks if you want to pair with the headset, conrm this by pressing “yes”
or “ok”.
5: When the phone asks for a passkey or PIN, enter 0000 (4 zeros).
6
IMPORTANT!
When the headset successfully pairs with a device, the red light ashes twice every 5
seconds. If pairing failed, the blue light ashes once every 5 seconds.
Connecting to your phone
Most phones connect to the headset as soon as you pair it; if yours won’t, turn the headset
o and back on. If headset still won’t connect, check your phone’s owner’s manual for
additional Bluetooth information.
Once the headset is paired:
Whenever you turn the headset on, it will automatically try to connect to whatever device
►
it was connected to last.
If the headset loses the connection (e.g., if your phone is out of range), it should reconnect
►
automatically. To manually reconnect, press MFB.
If the headset goes more than 1 hour with no connection, it automatically turns o.
►

7
Using Your Headset
Turning headset on/o
To: Follow these steps:
Turn the headset on Press and hold the MFB for about 4 seconds. When you see the blue light
ashing and hear the turn-on melody, release the button.
Turn the headset o Press and hold the MFB for about 4 seconds. When you see the red light
ashing and hear the turn-o melody, release the button.
8
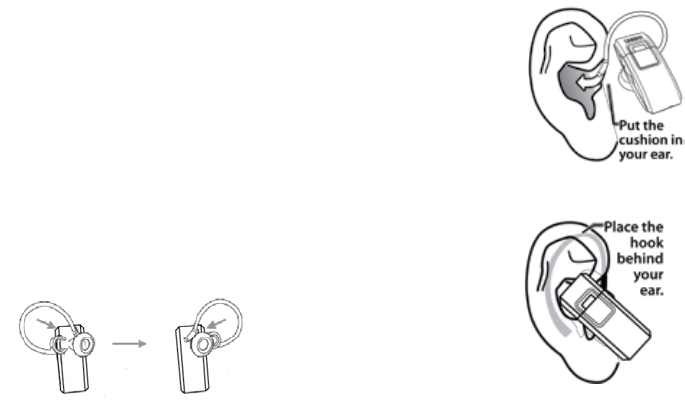
Put your headset on
Insert the ear cushion, then wrap the earhook behind your ear.
Everyone’s ear has a sweet spot, a particular angle of the speaker where
the audio comes in loud and clear. Take a few minutes to move the
headset around until you nd the best angle for the ear cushion.
Wearing the headset on your left ear
If you want to wear the headset on your left ear, take the earhook
o and turn it over.

9
Available Features
After the headset is connected, you can use the following features:
Make a call
Just make the call from your mobile phone as usual; your phone should automatically send the
call to the headset. If your phone doesn’t, press and hold MFB for 2 seconds to send the call to the
headset manually.
Answer a call While the phone is ringing, press MFB.
Ending a call Press MFB
Reject an incoming
call
While the phone is ringing, press and hold MFB for at least 2 seconds. Wait until you hear a beep
before you release the button.
Transferring a call Press and hold MFB for 2 seconds to transfer the current call from your phone to headset (and
back).
Last number dialing With the phone in standby, press MFB. The headset automatically dials the last number you dialed
from your phone.
Using voice-activated
dialing
Note: Your phone must support voice dialing, and all voice commands must already be
programmed. With the mobile phone in standby, press and hold the MFB for 2 seconds.
When you hear beep, release the button. Start using your phone’s voice commands.
NOTE: For best results, try recording your voice tags through your headset.
10
Call-Waiting
Note: To use this feature, you must subscribe to Call Waiting through your service provider,
and your phone must support the hands-free prole.
• To put your current call on hold and switch to a waiting call, press and hold Volume Up for
about 4 seconds. Wait until you hear 3 beeps, then release the button; you’ll be connected
to the waiting call. Press and hold Volume Up again to switch back to the current call.
• To hang up your current call and switch to a waiting call, press and hold Volume Down for
about 4 seconds. Wait until you hear 3 beeps, then release the button.
Volume control & Mute function
Use Volume Up and Volume Down to adjust the volume.
To mute the microphone so the caller can’t hear you, press and hold Volume Down for 2 seconds.
The headset plays a melody every 10 seconds to remind you the microphone is muted.
To turn the microphone back on, press either Volume Up or Volume Down.
11
Multipoint Function
The headset supports simultaneous connection with 2 mobile phones with full control of
each one.
Note: This feature may not be compatible with certain mobile phones.
Pairing to more than one phone
Pair the headset to the rst phone following the instructions on page 6. When you hear a
high-pitched, short double-beep, pair the headset to the second phone.
Using both phones
• The headset stays connected to both phones until a call comes in. If you answer the call,
the headset automatically disconnects from the other phone while the call is active. When
you hang up, the headset automatically reconnects to the other phone.
Only one phone at a time can be on an active call.
• The headset plays a dierent ring tone for each phone so you know which one is ringing.
To answer the incoming call, press MFB as usual.
All the button functions remain the same for the rst phone (the one you paired rst).

12
• To use last number redial on the second phone, press and hold Volume Down for about 2
seconds. (When you hear a beep, release the button.)
• To activate voice dialing on the second phone, press and hold Volume Up for about 2 seconds.
(When you hear a beep, release the button.)
Troubleshooting and Maintenance
If you have problems with the headset, see the suggestions in the table below. If these
suggestions don’t help, contact customer support (see the cover for contact information).
If... Try...
The headset won’t turn on. Charging the battery completely. -
The headset won’t pair with
my phone.
Making sure your phone is in pairing mode. Check your phone’s manual for instructions on -
Bluetooth device pairing.
Turning the headset o. Wait at least 10 seconds, then try again. -
Making sure your phone supports the -Bluetooth Headset or Hands Free Prole.
The headset paired with
my phone, but I can’t hear
anything through it.
Making sure the call connected and is still active. -
Making sure the phone transferred the call to the headset. Press and hold -MFB for two
seconds to transfer the call.

13
The headset keeps beeping,
and I don’t know why.
The battery may be getting low. If the LED is blinking red, charge the battery. -
Seeing if your phone has lost the network signal. If your phone sounds an alert when it -
can’t connect to the network, the headset passes on this alert by beeping every 5 seconds.
I can hear the caller, but the
audio is very weak or soft.
Turning the speaker volume up. -
Moving closer to your phone (if you aren’t carrying it). -
Keeping the battery fully charged; As the battery starts to run out, the speaker gets softer. -
General Information
You cannot use the headset while it is recharging.•
Bluetooth• wireless devices have a maximum range of 30 feet
(10 m); the actual range will vary depending on current
conditions (obstacles, battery power, interference, etc.).
The headset can be connected only to devices that support •
the Bluetooth headset or hands-free prole. This product is not
compatible with standard cordless phones.
Battery life
With average use, the battery should provide about 9 hours of
talk time and 8 days of standby time. A battery that is new or left
unused for long periods of time can have reduced capacity the rst
few times it is used. For maximum battery life, keep your battery
charged.
•Whenthebatteryonlyhasenoughchargeforabout15minutes
of talk time, the headset triggers a low battery alert: you’ll hear
a periodic beep, and the LED changes from blue to red.
When the battery no longer has enough charge to operate the •
headset, the headset will power o; you won’t be able to turn it
back on until you connect the charger or charge the battery.
Noise or Static on the Headset
The most common cause of noise or static on any wireless device is
interference. Bluetooth devices operate in the ISM band
(2.402 GHz ~ 2.480 GHz); any equipment operating in this
frequency range might interfere with the headset. Some common
sources of interference in this range are
Equipment that uses microwaves, especially microwave ovens•
Wireless LAN equipment or WiFi connections•

14
Other • Bluetooth devices or computers
Certain cordless telephones•
Certain medical equipment and appliances•
If you have problems with static during calls, look for one of these
interference sources. Try moving away from the suspected source.
If the noise continues, there may be interference on your phone
itself, and any noise in the phone’s connection will come through
on the headset, too. Transfer the call to your phone and see if the
audio quality improves. If it doesn’t, check around for things that
might interfere with your phone.
Safety and Handling Information
For maximum product life, do not drop, throw, or crush the
headset. Do not expose it to humidity, dust, or temperatures
above 125 F.
Cleaning the headset
If necessary, remove the earhook. Dampen a lint-free cloth with •
water or a cleaner specially designed for electronics, and gently
wipe the headset clean.
Do not expose this product to liquid (water, alcohol, etc.) or •
submerse in liquid for any reason.
Important Safety Instructions
UnidenAmericaCorporationDOESNOTrepresentthisproducttobe
waterproof.Toreducetheriskofre,electricalshock,ordamageto
theproduct,DONOTexposethisproducttorainormoisture.
When using the headset, always follow basic safety precautions
to reduce the risk of re, electric shock and injury to persons,
including the following:
Do not use this product near water, for example, near a bath tub, •
wash bowl, kitchen sink or laundry tub, in a wet basement or
near a swimming pool.
Use only the power cord and batteries indicated in this manual. •
Do not expose the battery (or the device) to ames or dispose of
it in a re: the battery may explode. Check with local authorities
for possible battery disposal instructions.
Do not disassemble, modify, or attempt to repair any component •
of this product.
Check the laws and regulations on the use of mobile phones and •
hands-free equipment in the areas where you drive. Always give
full attention to driving and pull o the road and park before
making or answering a call if driving conditions require.
Do not allow children to play with your headset since it contains •
small parts that could become detached and create a choking
hazard.

15
Turn o your headset when pumping gas, handling ammable •
materials, or in any area with a risk of explosion. In rare
occurrences, this product could generate sparks which can
cause an explosion or re. Follow all warning notices in your
immediate area!
•
SAVE THESE INSTRUCTIONS!
FCC Notice
This device complies with part 15 of the FCC rules. Operation is
subject to the following two conditions: (1) This device may not
cause harmful interference, and (2) This device must accept any
interference received, including interference that may cause
undesired operation. Privacy of communications may not be
ensured when using this product.
To insure the safety of users, the FCC has established criteria for
the amount of radio frequency energy various products may
produce depending on their intended usage. This product has
been tested and found to comply with the FCC’s exposure criteria.
For body worn operation, the FCC RF exposure guidelines were
also met when used with the Uniden accessories supplied or
designed for this product. Use of other accessories may not ensure
compliance with FCC RF exposure guidelines and should be
avoided.
Industry Canada statement
This device complies with RSS-210 of the Industry Canada Rules.
Operation is subject to the following two conditions: (1) This
device may not cause harmful interference, and (2) this device
must accept any interference received, including interference that
may cause undesired operation.
IMPORTANT NOTE: Radiation Exposure Statement
This equipment complies with IC radiation exposure limits set forth
for an uncontrolled environment. End users must follow the specic
operating instructions for satisfying RF exposure compliance. To
maintain compliance with IC RF exposure compliance requirements,
please follow operation instruction as documented in this manual.
Lithium-polymer battery information
This device contains a lithium-polymer battery. The headset
and battery must be recycled or disposed of properly. Contact
your local waste management oce for information on battery
recycling or disposal.
CAUTION: Changes or modifications not expressly approved
by the party responsible for compliance could void the user's
authority to operate the equipment.

16
Two-Year Limited Warranty
Important:Evidenceoforiginalpurchaseisrequiredforwarranty
service.
WARRANTOR: UNIDEN AMERICA CORPORATION (“Uniden”)
ELEMENTS OF WARRANTY: Uniden warrants, for two years, to the
original retail owner, this Uniden Product to be free from defects
in materials and craftsmanship with only the limitations or
exclusions set out below.
WARRANTY DURATION: This warranty to the original user shall
terminate and be of no further eect 24 months after the date of original
retail sale. The warranty is invalid if the Product is a) damaged or not
maintained as reasonable or necessary, b) modied, altered, or used as
part of any conversion kits, subassemblies, or any congurations not sold
by Uniden, c) improperly installed, d) serviced or repaired by someone
other than an authorized Uniden service center for a defect or malfunction
covered by this warranty, e) used in any conjunction with equipment or
parts or as part of any system not manufactured by Uniden, or f) installed
or programmed by anyone other than as detailed by the owner’s manual
for this product.
STATEMENT OF REMEDY: In the event that the product does not conform
to this warranty at any time while this warranty is in eect, warrantor will
either, at its option, repair or replace the defective unit and return it to you
without charge for parts, service, or any other cost (except shipping and
handling) incurred by warrantor or its representatives in connection with
the performance of this warranty. Warrantor, at its option, may replace the
unit with a new or refurbished unit.
THE LIMITED WARRANTY SET FORTH ABOVE IS THE SOLE AND ENTIRE
WARRANTY PERTAINING TO THE PRODUCT AND IS IN LIEU OF AND EXCLUDES
ALL OTHER WARRANTIES OF ANY NATURE WHATSOEVER, WHETHER
EXPRESS, IMPLIED OR ARISING BY OPERATION OF LAW, INCLUDING, BUT
NOT LIMITED TO ANY IMPLIED WARRANTIES OF MERCHANTABILITY OR
FITNESS FOR A PARTICULAR PURPOSE. THIS WARRANTY DOES NOT COVER
OR PROVIDE FOR THE REIMBURSEMENT OR PAYMENT OF INCIDENTAL OR
CONSEQUENTIAL DAMAGES. Some states do not allow this exclusion or
limitation of incidental or consequential damages so the above limitation
or exclusion may not apply to you.
LEGAL REMEDIES: This warranty gives you specic legal rights, and you
may also have other rights which vary from state to state. This warranty is
void outside the United States of America and Canada.
PROCEDURE FOR OBTAINING PERFORMANCE OF WARRANTY: If, after
following the instructions in the owner’s manual you are certain that the
Product is defective, pack the Product carefully (preferably in its original
packaging). The Product should include all parts and accessories originally
packaged with the Product. Include evidence of original purchase and a
note describing the defect that has caused you to return it. The Product
should be shipped freight prepaid, by traceable means, to warrantor at:
Uniden America Service
4700 Amon Carter Blvd.
Fort Worth, TX 76155