MPOW TECHNOLOGY BH286A 2-in-1 Bluetooth Transmitter/Receiver User Manual BT4852B V01
MPOW TECHNOLOGY CO., LIMITED 2-in-1 Bluetooth Transmitter/Receiver BT4852B V01
user manual
B
Specifi
c
Bluetoot
h
Output Po
Bluetoot
h
Bluetoot
h
Battery:
Charge Vo
Product
B
luetoo
t
c
ations:
h
Version:
wer Cate
g
h
Protocol
h
Range:
u
Li-Polym
e
ltage: D
C
Diagram
t
h SPDI
3.0
g
ory: Cla
s
: A2DP/A
V
u
p to 30
f
e
r 450mAh
C
5.0V
F & Au
x
Us
e
s2
V
RCP/APTX
/
f
eet
x
Trans
m
e
r Man
u
/
APTX-LL
m
itter
al
and Re
c
c
eiver
2
2
-in-1

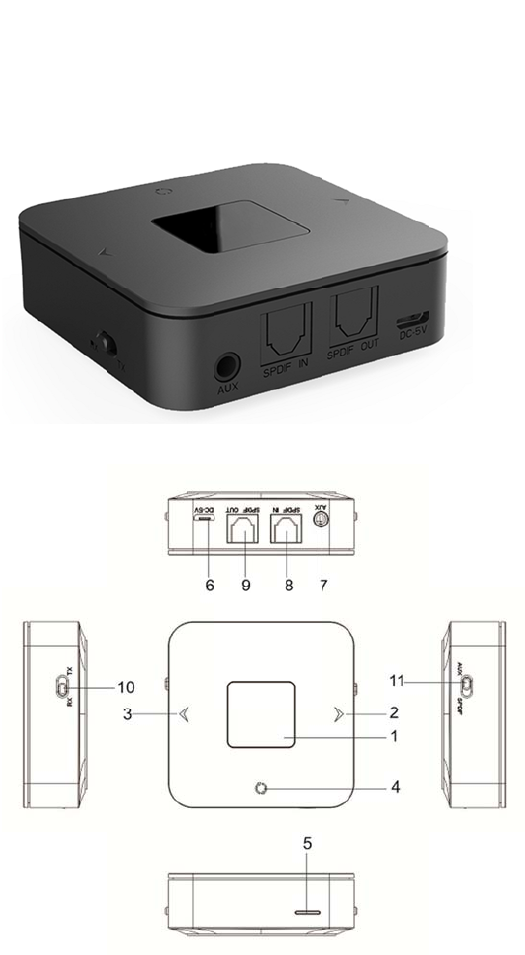
1. Multifunction Button:Power ON/OFF; Pause/Play
2. Next Song/Volume Up
3. Previous Song /Volume Down
4. Pairing Switch
5. Indicator Light
6. USB Charge
7. Audio Output/In
8. SPDIF In
9. SPDIF Out
10. Receiver/Transmitter Switch
11. SPDIF /Aux Audio Switch
Power On
Long press the Multifunction button about for 3 seconds, the blue light will flash in
receiver mode; green light will flash in transmitter mode.
Power Off
Long press the Multifunction button about 3 seconds.
TX & RX
TX : Transmitter mode, work as Bluetooth Transmitter. In transmitter mode, it can only
pair with your Bluetooth headsets or speakers. It can’t pair with Bluetooth enable phones,
MP3, tablets, etc.
RX : Receiver mode, work as Bluetooth Receiver. In receiver mode, it can only pair with
your Bluetooth enable phones, MP3, tablets, etc.
Note: Please select the mode first and then turn on the product.
Mode Switch:
You can switch the TX Mode to RX mode or the other way around, the bluetooth adapter
will reboot automatically, to finish the RX/TX Mode Switching.
SPDIF & AUX
SPDIF: Stereo Digital Audio.
AUX: Stereo Analog Audio.

Rec
e
Pai
r
Con
n
Audio Swi
You c
a
will auto
e
iver Mo
Make
it will
w
Instruc
t
1. Connec
with 3.
with op
2. Pair t
3. Now yo
u
Stereo
r
to you
1. Turn t
2. Long p
r
it will e
3. Turn o
4. Searc
h
5. Enter
6. If it
n
ect Two
1. Pair t
2. After
p
state ag
a
3. Turn o
4. Searc
h
5. Two s
m
tch:
a
n switch
maticall
y
de
sure you
h
w
ork as Bl
t
ion
t the dev
i
5mm audio
tical fi
b
he recei
v
u
can enj
o
System.
r smart
he switc
h
r
ess the M
u
nter pai
r
n the Bl
u
h
for the
the code
pairs su
c
Smart
D
he Bluet
o
p
airing s
u
a
in, the
b
n the Bl
u
h
for the
m
art devi
c
the SPDIF
y
finish
t
h
ave turn
e
uetooth
r
i
ce to au
d
cable; o
r
b
er cable.
v
er to yo
u
o
y your mu
device:
h
to the
u
ltifunct
i
r
ing mode.
u
etooth f
u
Bluetoot
h
"0000" i
f
c
cessfull
y
D
evices
o
oth recei
u
ccessful
l
b
lue ligh
t
u
etooth f
u
Bluetoot
h
c
es will
p
Mode to A
u
he SPDIF
/
e
d the sw
i
r
eceiver.
d
io port
o
r
connect
u
r smart
d
sic throu
g
‘RX’ si
d
i
on butto
n
u
nction o
f
h
device
"
f
needed.
y
, the bl
u
ver to t
h
l
y, short
will fl
a
u
nction o
f
h
device
"
p
air to i
t
u
x Mode or
/
AUX Mode
i
tch to t
h
o
f your he
the SPDI
F
d
evice.
g
h your H
e
d
e.
n
for abou
t
f
your sm
a
"
BH286A
"
u
e indica
t
h
e first
s
press th
e
a
shs quic
k
f
your se
c
"
BH286A
"
t
simulta
n
the othe
r
Switchin
g
h
e ‘RX’
adphone/H
F
out por
t
e
adphone,
t
3 secon
d
a
rt devic
e
"
and conn
e
t
or will
s
s
mart dev
i
e
button
k
ly.
c
ond smar
t
"
and conn
e
n
eously.
r
way arou
n
g
.
side befo
ome Speak
e
t
of devi
c
Speakers,
s, the bl
u
e
.
e
ct.
s
tay on.
i
ce.
“”, i
t
t
device.
e
ct.
n
d, the bl
u
re you po
w
ers or Ca
r
c
e to you
r
Home Ste
r
u
e light f
l
t
will en
t
u
etooth a
d
w
er it on.
r
Stereo
S
r
Home Sp
e
r
eo Syste
m
l
ashes qu
i
t
er the p
a
d
apter
Then
S
ystem
e
akers
m
/ Car
i
ckly,
a
iring

Pla
y
Tra
n
Pai
r
Note:
1. The re
c
(Please m
on the re
2. If you
can long
p
light wil
y
Music
1. Play/P
2. Next S
3. Previo
4. Volume
5. Volume
n
smitter
Make
it will
w
Instructi
1. Pair t
2. Connec
(Such as
C
3. Now yo
non-Bluet
r
to you
1. Turn t
h
about 3 s
2. After
p
c
eiver wi
l
m
ake sure
ceiver.)
want to d
p
ress the
l flash
q
P
ause: Sh
o
ong: Sho
r
us Song:
Up: Lon
g
Down: L
o
Mode
sure you
h
w
ork as a
on:
he devic
e
t the aud
i
C
D/DVD pla
u can enj
ooth medi
r Bluet
o
h
e switch
econds t
o
p
ower it
o
l
l connec
t
enable th
isconnect
button”
q
uickly.
o
rt press
r
t press
t
Short pr
e
g
press t
h
o
ng press
h
ave turn
e
Bluetoot
h
e
to your
i
o port o
r
yer, TVs,
oy your
m
a device!
o
oth spe
a
to the
o
power i
t
o
n, short
p
t
to the l
a
e
Bluetoo
t
the pair
e
” abou
t
the Multi
he butto
n
e
ss the b
u
h
e button
the butt
o
e
d the sw
i
h
transmi
t
Bluetoot
h
r
SPDIF i
n
etc) via
3
m
usic via
a
kers/Bl
‘TX’ sid
e
on.
p
ress the
a
st conne
c
th functi
o
e
d smart d
t
3 secon
d
i
function
n
“>”
u
tton “<
”
“>”
o
n “<”
i
tch to t
h
t
ter.
h
headpho
n
n
port of
3
.5mm aud
i
Bluetoot
h
uetooth
e
, and th
e
button
“
c
ted devi
c
o
n of you
r
e
vice and
d
s, it wil
l
button
”
h
e ‘TX’
n
es or Bl
u
device to
i
o cable o
r
h
speaker
s
headset
e
n long p
r
“
”. It
c
e automat
r
device
i
connect
a
l
turn in
t
side befo
u
etooth S
p
your non
-
r
RCA cabl
e
s
/Bluetoo
t
s:
r
ess the
M
will ent
e
t
ically w
h
i
s turned
a
nother sm
t
o pairin
g
re you po
w
p
eakers.
-
Bluetoot
h
e or opti
c
t
h headse
t
M
ultifunc
t
e
r pairin
g
en it tur
n
on befor
e
a
rt devic
e
g
mode, th
e
w
er it on,
h
media d
e
c
al fiber
c
t
s from y
o
t
ion butt
o
g
state, a
n
n
s on.
e
turn
e
, you
e
blue
then
e
vices
c
able.
o
ur
o
n for
n
d the

Pai
r
Pla
y
Low
green li
g
3. Turn o
n
meter to
4. If pai
r
to Two
1. Pair i
2. After
s
again, t
h
3. Turn o
n
1 meter t
4. Two Bl
Note:
1. If suc
c
when you
p
speaker/B
2. If you
another B
3 seconds
y
Music
1. Mute o
2. Volume
3. Volume
Note:In
o
but
Battery
When
t
g
ht will
f
n your Bl
u
the trans
ring suc
c
Blueto
o
t to the
s
uccessfu
l
h
e green l
n
your sec
o
o the tr
a
uetooth s
c
essfully
p
ower on
t
B
luetooth
want to
d
luetooth
, it will
n/off: S
h
Up: Lon
g
Down: L
o
o
ptical f
i
ton.
warnin
g
t
he devic
e
f
lashs qui
u
etooth s
p
mitter,
w
c
essfully,
o
th spea
k
first Bl
u
l
pairing,
ight will
o
nd Bluet
o
a
nsmitter,
peakers/
B
paired t
o
t
he devic
e
headset
a
d
isconnec
t
speaker/
B
turn in
t
h
ort pres
s
g
press o
r
o
ng press
i
ber tran
s
g
e
is in lo
w
ckly.
p
eaker or
w
ait for 1
the gre
e
k
ers/Bl
u
u
etooth S
p
short pr
e
flashs
q
o
oth speak
e
wait fo
r
B
luetooth
o
the Blu
e
e
next ti
m
a
utomatic
a
t
the pai
r
luetooth
o pairin
g
the but
t
r
Short p
r
or Short
s
mission
m
w
battery
s
Bluetoot
h
1
0-15 sec
o
e
n indica
t
u
etooth
h
p
eaker/Bl
u
e
ss the bu
t
q
uickly.
e
r or Blue
r
10-15 s
e
headsets
e
tooth spe
m
e, it wil
a
lly.
r
ed Bluet
o
headset,
g
mode, t
h
t
on Multi
f
r
ess the
b
press th
e
m
ode, the
v
state, it
h
headset
,
o
nds, it
w
t
or will
s
h
eadsets
u
etooth h
e
t
ton “
tooth hea
d
e
conds, i
t
will pai
r
aker/Blu
e
l reconne
o
oth spea
k
you can l
h
e green
l
f
unction
b
b
utton “
e
button
v
olume ca
n
will alar
m
,
make su
r
w
ill pair
s
tay on.
:
e
adset;
”, it wil
d
set, mak
e
t
will pa
i
r
to it s
i
tooth hea
c
t with t
h
k
er/Bluet
o
ong press
l
ight wil
l
b
utton
”
“”
n
not be co
m
automat
i
r
e the ra
n
automati
c
l
l enter t
h
e
sure the
i
r automa
t
i
multaneo
u
a
dset for
t
h
e last p
a
o
oth head
s
s
the but
t
l
flash q
u
o
ntrolled
b
i
cally th
a
n
ge is wi
t
c
ally.
h
e pairing
range is
w
t
ically.
u
sly.
t
he first
a
ired Blu
e
s
et and c
o
on” ”
u
ickly.
b
y pressi
n
a
t the red
t
hin 1
state
w
ithin
time,
e
tooth
o
nnect
about
n
g the
light

Cle
a
Cha
r
Tro
u
will flas
a
r Bluet
Long
twice. Af
t
will tur
n
r
ge the
1. When t
USB charg
e
on. When
2. Please
Note:
1. Please
2. If you
normally
u
ble Sho
Q1: The
p
1. Please
2. Clear
Q2: The
p
1. Please
2. Make s
u
3. Clear
Q3: The
B
1. Blueto
please pu
t
devices).
2. Clear
hing qui
c
ooth Co
n
press the
ter power
e
n
into pai
device
he device
e
port wi
t
charging
use the
charge i
don’t u
s
y
or dama
g
oting:
p
roduct c
a
make sur
e
the pari
n
p
roduct c
a
make sur
e
u
re there
the pari
n
B
luetooth
oth signa
t
it in th
e
the pari
n
c
kly it wi
n
nection
Pairing
S
e
d on, it
ring mod
e
is in lo
w
t
h DC 5V p
o
finished,
micro US
B
t in tim
e
s
e it reg
u
g
e the ba
t
a
n’t pai
r
e
you hav
e
n
g list o
f
a
n’t pai
r
e
you hav
e
is only o
n
n
g list o
f
range or
l can be
b
e
right po
s
n
g list o
f
ll power
List
S
witch “
will clea
e
.
w
battery
o
wer supp
l
the red
B
cable t
o
e
when in
larly, pl
tery.
r
with yo
u
e
turned t
h
f
your Bl
u
r
with yo
u
e
turned t
h
n
e Bluetoo
t
f
the pro
d
the soun
d
b
locked b
y
s
ition wi
t
f
the pro
d
off auto
m
” for
a
r the pai
r
state or
l
y input,
d
indicato
r
o
charge
t
low batt
e
ease char
g
u
r Blueto
o
h
e switch
u
etooth e
n
u
r Blueto
o
h
e switch
th speake
r
d
uct, the
n
d
quality
y
surroun
d
t
hout barr
d
uct, the
n
m
atically
about 8 s
e
r
ing list
s
lack of
b
d
uring ch
a
r
will go
t
he devic
e
e
ry state.
g
e it eve
r
o
th enabl
e
to the
‘
n
abled ph
o
o
th speak
e
to the
‘
r
or Bluet
n
try aga
i
is not g
o
d
ing obje
c
ier betwe
e
n
pair ag
a
if the p
o
e
conds ti
l
s
that hav
b
attery,
p
a
rging th
e
off.
e
.
r
y 3 mont
h
e
d phone,
RX’ sid
e
o
ne, MP3,
e
rs/Bluet
o
TX’ sid
e
o
oth head
s
i
n.
o
od.
c
ts and r
e
e
n adapte
r
a
in.
o
wer runs
ll the re
d
v
e paired
b
p
lease ch
a
e
red indi
h
s, in cas
MP3, etc
e
before y
etc. the
n
o
oth head
e
before y
s
et turne
d
e
duce the
r
and your
out.
d
light f
l
b
efore, t
h
a
rge it t
h
cator wil
l
e it won'
t
.
ou power
i
n
try aga
i
sets.
ou power
i
d
on aroun
d
audio qu
a
phone (or
l
ashes
h
en it
h
rough
l
stay
t
work
i
t on.
i
n.
i
t on.
d
you.
a
lity,
other

FCC Warning
This device complies with Part 15 of the FCC Rules. Operation is subject to the following
two conditions:
(1) This device may not cause harmful interference, and (2) this device must accept any
interference received, including interference that may cause undesired operation.
NOTE 1: This equipment has been tested and found to comply with the limits for a Class B
digital device, pursuant to part 15 of the FCC Rules. These limits are designed to provide
reasonable protection against harmful interference in a residential installation. This
equipment generates, uses and can radiate radio frequency energy and, if not installed and
used in accordance with the instructions, may cause harmful interference to radio
communications. However, there is no guarantee that interference will not occur in a
particular installation. If this equipment does cause harmful interference to radio or
television reception, which can be determined by turning the equipment off and on, the user
is encouraged to try to correct the interference by one or more of the following measures:
- Reorient or relocate the receiving antenna.
- Increase the separation between the equipment and receiver.
-Connect the equipment into an outlet on a circuit different from that to which the receiver
is connected.
-Consult the dealer or an experienced radio/TV technician for help.
NOTE 2: Any changes or modifications to this unit not expressly approved by the party
responsible for compliance could void the user's authority to operate the equipment.