MTD 12AE997E099 User Manual LAWN MOWER Manuals And Guides L0804274
CRAFTSMAN Walk Behind Lawnmower, Gas Manual L0804274 CRAFTSMAN Walk Behind Lawnmower, Gas Owner's Manual, CRAFTSMAN Walk Behind Lawnmower, Gas installation guides
User Manual: MTD 12AE997E099 12AE997E099 MTD LAWN MOWER - Manuals and Guides View the owners manual for your MTD LAWN MOWER #12AE997E099. Home:Lawn & Garden Parts:MTD Parts:MTD LAWN MOWER Manual
Open the PDF directly: View PDF ![]() .
.
Page Count: 64

Operator's Manual
R 0 F E S S I 0 N A
21" SELF PROPELLED MOWER
Model No. 247.889210
CAUTION: Before using
this product, read this
manual and follow all
safety rules and operating
instructions.
• SAFETY
ASSEMBLY
OPERATION
MAINTENANCE
PARTS LIST
ESPAIqOL
Sears, Roebuck and Co., Hoffman Estates, IL 60179, U.S.A.
Visit our website: www.craftsman.com FORMNO.769-03698A
1/21/2008
WarrantyStatement..................................Page2
SafeOperationPractices..........................Pages3-4
SlopeGuide..............................................Page5
SafetyLabels............................................Page7
Assembly..................................................Pages8-11
Operation..................................................Pages12-13
ServiceandMaintenance.........................Pages14-19
Off-SeasonStorage..................................Page20
TroubleShooting.......................................Page21
PartsList...................................................Page22-37
Espa_ol.....................................................Page41
ServiceNumbers......................................BackCover
Craftsman Professional Full Warranty
If thisCraftsmanproductfailsdueto a defectin materialor workmanshipwithintwoyearsfromthedate of purchase,returnit to any Searsstore,
SearsServiceCenter,orotherCraftsmanoutletinthe UnitedStatesfor free repair(or replacementif repairprovesimpossible).
Thiswarrantyappliesfor only oneyearif this productisever usedfor commercialor rentalpurposes.
ThiswarrantycoversONLYdefects in materialand workmanship.Sears will NOTpayfor:
,Expendableitemswhichcanwearout fromnormaluse withinthe warrantyperiod,suchas rotarymowerblades,bladeadapters,belts,
filters,or sparkplugs.
•Repairsnecessarybecauseof accident,suchas bentcrankshafts,or failureto operateor maintainthe productaccordingto all supplied
instructions.
Preventativemaintenanceor repairsnecessarydue to improperfuel mixture,contaminatedor stalefuel.
This warrantygivesyou specificlegalrights,andyou mayalsohaveotherrightswhichvaryfromstateto state.
Sears, Roebuckand Co.,NoffmanEstates,IL 60179
EngineOilType: SAE30
EngineOilCapacity: 18ounces
Fuel: UnleadedGasoline
SparkPlug: BPR5ES(NGK)
Engine: Kawasaki
Model Number.................................................................
Serial Number .................................................................
Dateof Purchase.............................................................
Recordthe modelnumber,serialnumber
anddate of purchaseabove
©SearsBrands,LLC 2
Thissymbolpointsout importantsafetyinstructions
which,if not followed,couldendangerthe personal
safetyand/orpropertyof yourselfandothers.Read
andfollowall instructionsin thismanualbefore
attemptingto operatethismachine.Failureto complywiththese
instructionsmayresultin personalinjury.Whenyousee thissymbol,
HEEDITSWARNING!
Thismachinewasbuilt to beoperatedaccordingto the rulesfor
safeoperationinthis manual.As withanytype of powerequipment,
carelessnessorerroronthe part of the operatorcan resultin serious
injury.Thismachineis capableof amputatinghandsandfeetand
throwingobjects.Failureto observethefollowingsafetyinstructions
could resultinseriousinjuryordeath.
Engine Exhaust, some of its constituents, and certain vehicle
components contain or emit chemicals known to State of California to1cause cancer and birth defects or other reproductive harm.
CHILDREN
Tragicaccidentscan occurif operatoris notalert to presenceof children.Chil-
drenareoftenattractedto mowerandmowingactivity.They donotunderstand
thedangers.Neverassumethat childrenwillremainwhereyoulast sawthem.
• Keepchildrenoutof the mowingareaand underwatchfulcareof a
responsibleadult otherthanthe operator.
• Bealert andturnmower off if a child entersthe area.
Beforeandwhile movingbackwards,look behindand downfor small
children.
• Useextremecare whenapproachingblindcorners, doorways,shrubs,
trees,or otherobjectsthat mayobscureyour vision of a childwho may
run intothe mower.
,, Keepchildrenawayfrom hotor runningengines.They cansufferburns
froma hot muffler.
,, Neverallowchildrenunder 14years oldto operatea powermower.
Children14years oldand overshouldreadand understandoperation
instructionsand safetyrulesin this manualand shouldbetrainedand
supervisedbya adult.
GENERAL OPERATION
•Readthis operator'smanualcarefullyin its entiretybefore attempting
to assemblethis machine.Read,understand,andfollow allinstructions
onthe machineand inthe manual(s)beforeoperation.Becompletely
familiarwiththe controlsand the properuse of this machinebefore
operatingit. Keepthis manualin a safeplaceforfuture and regular
referenceandfor orderingreplacementparts.
,, Be familiarwith allcontrolsandtheir properoperation.Knowhowto stop
the machineanddisengagethem quickly.
,, Thismachineis a precisionpieceof powerequipment,not a plaything.
Therefore,exerciseextremecautionat alltimes.Yourunit hasbeen
designedto performonejob: to mowgrass. Do notuseit for any other
purpose.
• Neverallowchildrenunder 14years oldto operatethis machine.Chil-
dren14years old and overshouldreadand understandthe instructions
inthis manualand shouldbetrainedand supervisedby a parent.
,, Only responsibleindividualswho arefamiliarwiththese rulesof safe
operationshouldbe allowedto usethis machine.
,, Thoroughlyinspectthe areawherethe equipmentisto beused. Remove
allstones, sticks,wire,bones,toys andotherforeignobjectswhichcould
betrippedover orpickedup and thrownby the blade.Thrownobjects
cancauseseriouspersonalinjury.
,, Planyourmowingpatternto avoiddischargeof materialtowardroads,
sidewalks,bystandersandthe like.Also,avoiddischargingmaterial
againsta wall orobstructionwhich maycause dischargedmaterialto
ricochetbacktowardthe operator.
,, To helpavoidbladecontactor a thrownobjectinjury,stayin operator
zone behindhandlesandkeepchildren,bystanders,helpers,and petsat
least75feetfrom mowerwhile itis inoperation.Stopmachineif anyone
entersarea.
,, Alwayswearsafetyglassesor safetygogglesduringoperationandwhile
performingan adjustmentor repairto protectyour eyes.Thrown objects
which ricochetcan causeserious injuryto the eyes.
,, Wearsturdy,rough-soledworkshoesandclose-fittingslacksandshirts.
Shirts andpantsthat coverthe arms and legs andsteel-toedshoes
are recommended.Neveroperatethis machinein barefeet, sandals,
slippery orlight weight(e.g.canvas) shoes.
,, Donot puthandsor feet nearrotatingpartsor undercuttingdeck.
Contactwith bladecanamputatehandsandfeet.
,, A missingor damageddischargecovercan causebladecontact or
thrownobjectinjuries.
,, Manyinjuriesoccuras a result ofthe mowerbeing pulledoverthefoot
duringa fall causedby slippingortripping.Do notholdon to the mowerif
youare falling;releasethe handleimmediately.
,, Neverpull the mowerbacktowardyou whileyouarewalking.If you must
back the mowerawayfroma wall or obstructionfirst look downand
behindto avoid trippingandthenfollow these steps:
a. Step backfrom mowerto fully extendyourarms.
b. Be sureyouarewell balancedwithsure footing.
c. Pull backslowly,no morethan halfwaytowardsyou.
d. Repeatthesestepsas needed.
,, Donotoperatethe mowerwhile underthe influenceof alcoholordrugs.
,, Donotengagethe self-propelledmechanismonunitsso equippedwhile
startingengine.
,, The blade controlhandleis a safetydevice.Neverattemptto bypassits
operation.Doingso makesthe safetydeviceinoperativeand mayresult
in personalinjurythroughcontactwiththe rotatingblade.The blade
controlhandlemustoperateeasily in bothdirectionsand automatically
returnto thedisengagedpositionwhen released.
,, Neveroperatethe mowerin wet grass.Alwaysbesureof yourfooting. A
slip andfall cancauseseriouspersonalinjury.If you feelyou are losing
your footing,releasethe bladecontrolhandleimmediatelyandthe blade
will stoprotatingwithinthreeseconds.
,, Mowonly in daylightorgood artificiallight. Walk,neverrun.
,, Stopthe blade whencrossing graveldrives,walksor roads.
•If the equipmentshouldstartto vibrate abnormally,stoptheengine and
checkimmediatelyfor the cause.Vibrationisgenerallyawarningof
trouble.
,, Shutthe engineoff andwait untilthe bladecomesto a completestop
beforeremovingthegrass catcheror uncloggingthe chute.
The cuttingblade continuesto rotatefor a fewseconds afterthe engine
isshut off.Neverplaceany partof the bodyinthe blade areauntilyou
are surethe bladehasstoppedrotating.
,, Neveroperatemowerwithoutpropertrailshield,dischargecover,grass
catcher,blade controlhandle,or othersafetyprotectivedevicesin place
andworking. Neveroperatemowerwithdamagedsafety devices.Failure
to do so can resultin personalinjury.
,, Mufflerandenginebecomehotand can causea burn.Do nottouch.
,, Only usepartsand accessoriesmadefor this machinebymanufacturer.
Failureto doso can resultin personalinjury.
,, Whenstartingengine,pull cordslowly until resistanceis felt,then pull
rapidly.Rapid retractionof starter cord (kickback)willpull handand
armtoward enginefasterthan youcan let go. Brokenbones,fractures,
bruisesor sprainscouldresult.
,, If situationsoccurwhich are notcoveredinthis manual,use careand
goodjudgment.Contactyour SearsServiceCenterfor assistance.
SLOPE OPERATION
Slopesarea majorfactorrelatedto slipandfall accidentswhichcan resultin
severeinjury.Operationon slopesrequiresextracaution.Ifyoufeel uneasyon
a slope,do notmow it.Foryoursafety,usethe slopegaugeincludedas part
of this manualto measureslopesbeforeoperatingthis unit ona slopedor hilly
area.Ifthe slopeis greaterthan 15degrees,do notmowit.
Do:
•Mowacrossthe faceof slopes;neverup anddown.Exerciseextreme
cautionwhenchangingdirectiononslopes.
•Watchfor holes,ruts, rocks,hiddenobjects,or bumpswhich can cause
youto slipor trip.Tallgrasscan hideobstacles.
•Alwaysbe sureof your footing.A slipandfall cancauseseriouspersonal
injury.If you feelyouare losingyour balance,releasethe bladecontrol
handleimmediately,andthe bladewill stop rotatingwithin 3 seconds.
Do Not:
,, Donot mow neardrop-offs, ditchesor embankments,whereyou could
loseyour footingor balance.
,, Donot mow slopesgreaterthan 15degrees as shownonthe
slopegauge.
,, Donot mow onwetgrass. Unstablefootingcouldcauseslipping.
SERVICE
Safe Handling Of Gasoline:
•Toavoidpersonalinjuryor propertydamage useextremecare in
handlinggasoline.Gasolineis extremelyflammableandthe vaporsare
explosive.Seriouspersonalinjurycan occurwhengasolineis spilledon
yourselfor yourclotheswhichcan ignite.Washyour skinand change
clothesimmediately.
,, Useonly an approvedgasolinecontainer.
,, Neverfill containersinsidea vehicle or ona truckor trailerbedwith a
plastic liner.Alwaysplacecontainerson theground awayfrom your
vehiclebeforefilling.
,, Removegas-poweredequipmentfromthetruck ortrailerand refueliton
theground.If this isnot possible,then refuelsuch equipmenton a trailer
witha portablecontainer,ratherthanfrom a gasolinedispensernozzle.
,, Keepthe nozzleincontact withthe rimof thefuel tank orcontainer
openingat alltimesuntil fuelingis complete.Donot usea nozzle
lock-opendevice.
,, Extinguishall cigarettes,cigars,pipesand othersources
of ignition.
,, Neverfuel machineindoorsbecauseflammablevaporswillaccumu-
late inthe area.
,, Neverremovegascapor addfuel whileengineis hotor running.
Allowengine to cool at leasttwo minutesbefore refueling.
,, Neveroverfill fuel tank. Filltank to no morethan 1 inchbelow bottom
of filler neckto providefor fuel expansion.
,, Replacegasolinecapandtightensecurely.
,, Ifgasoline is spilled,wipeit off the engineand equipment.Moveunit
to anotherarea.Wait5 minutesbeforestarting engine.
,, Neverstorethe machineorfuelcontainer nearan openflame,spark
or pilot light as on a waterheater,spaceheater,furnace,clothesdryer,
or othergasappliances.
,, To reducefire hazard,keepmowerfree of grass,leaves,orother
debrisbuild-up.Cleanup oilor fuelspillageand removeany fuel
soakeddebris.
,, Allowa mowerto cool at least 5 minutesbeforestoring.
General Service:
•Neverrun an engineindoorsor ina poorly ventilatedarea.Engine
exhaustcontainscarbon monoxide,an odorlessand deadlygas.
,, Beforecleaning,repairing,or inspecting,makecertainthe blade and
all movingparts havestopped.Disconnectthe sparkplugwire and
ground againsttheengine to preventunintendedstarting.
,, Checkthe blade andenginemountingboltsat frequentintervals
for propertightness.Also,visuallyinspect bladefor damage(e.g.,
bent,cracked,worn) Replacebladewith theoriginal equipment
manufacture's(O.E.M.)bladeonly,listed inthis manual."Use of parts
which donot meetthe originalequipmentspecificationsmay leadto
improperperformanceand compromisesafety!"
,, Mowerbladesare sharpandcan cut.Wrapthe bladeorwear gloves,
and useextra cautionwhenservicingthem.
,, Keepall nuts,bolts,andscrewstightto besure theequipmentis in
safeworkingcondition.
,, Nevertamperwith safetydevices.Check their properoperation
regularly.
,, Afterstrikinga foreignobject, stoptheengine,disconnectthe spark
plugwire and groundagainstthe engine.Thoroughlyinspectthe
mowerfor anydamage.Repairthe damagebeforestartingand
operatingthe mower.
,, Neverattemptto make a wheelor cuttingheight adjustmentwhilethe
engineis running.
,, Grasscatchercomponents,dischargecover,andtrailshieldare
subjectto wear anddamagewhichcould exposemovingparts or
allowobjectsto be thrown.Forsafetyprotection,frequentlycheck
componentsand replaceimmediatelywithoriginalequipment
manufacturer's(O.E.M.)partsonly,listedin this manual."Useof parts
which donot meetthe originalequipmentspecificationsmay leadto
improperperformanceand compromisesafety!"
,, Donotchangethe enginegovernorsettingor overspeedthe engine.
The governorcontrolsthe maximumsafeoperatingspeedof the
engine.Do notcrankenginewithspark plugremoved.
,, Checkfuel line,tank, cap,andfittingsfrequentlyfor cracksor leaks.
Replaceif necessary.
,, Maintainor replacesafetyand instructionlabels,as necessary.
,, Observeproperdisposallawsand regulations.Improperdisposalof
fluids and materialscan harmtheenvironment.
Your Responsibility: Restrictthe useof this powermachineto personswho read,understand,and followthe warningsand instructionsin this manualandonthe
machine. 4

g3
C3_
C_
o3
g3
"5
o3
g)
.o3
g)
o3
OperateWALK-BEHNDmowersacrossthe faceof s opes,neverup anddowns opes,
Sight and h01dthis levelwith a vertical tree...
I
15°

This page left intentionallyblank.
6

READ OPERATOR'SMANUAL. KEEPBAFETYDEVICES(BLADECONTROL,TRAILINGSHIELD,
DISCHARGECOVER,ETC.)INPLACEAND WORKING. IFDAMAGED, REPLACEIMMEDIATELY.
7
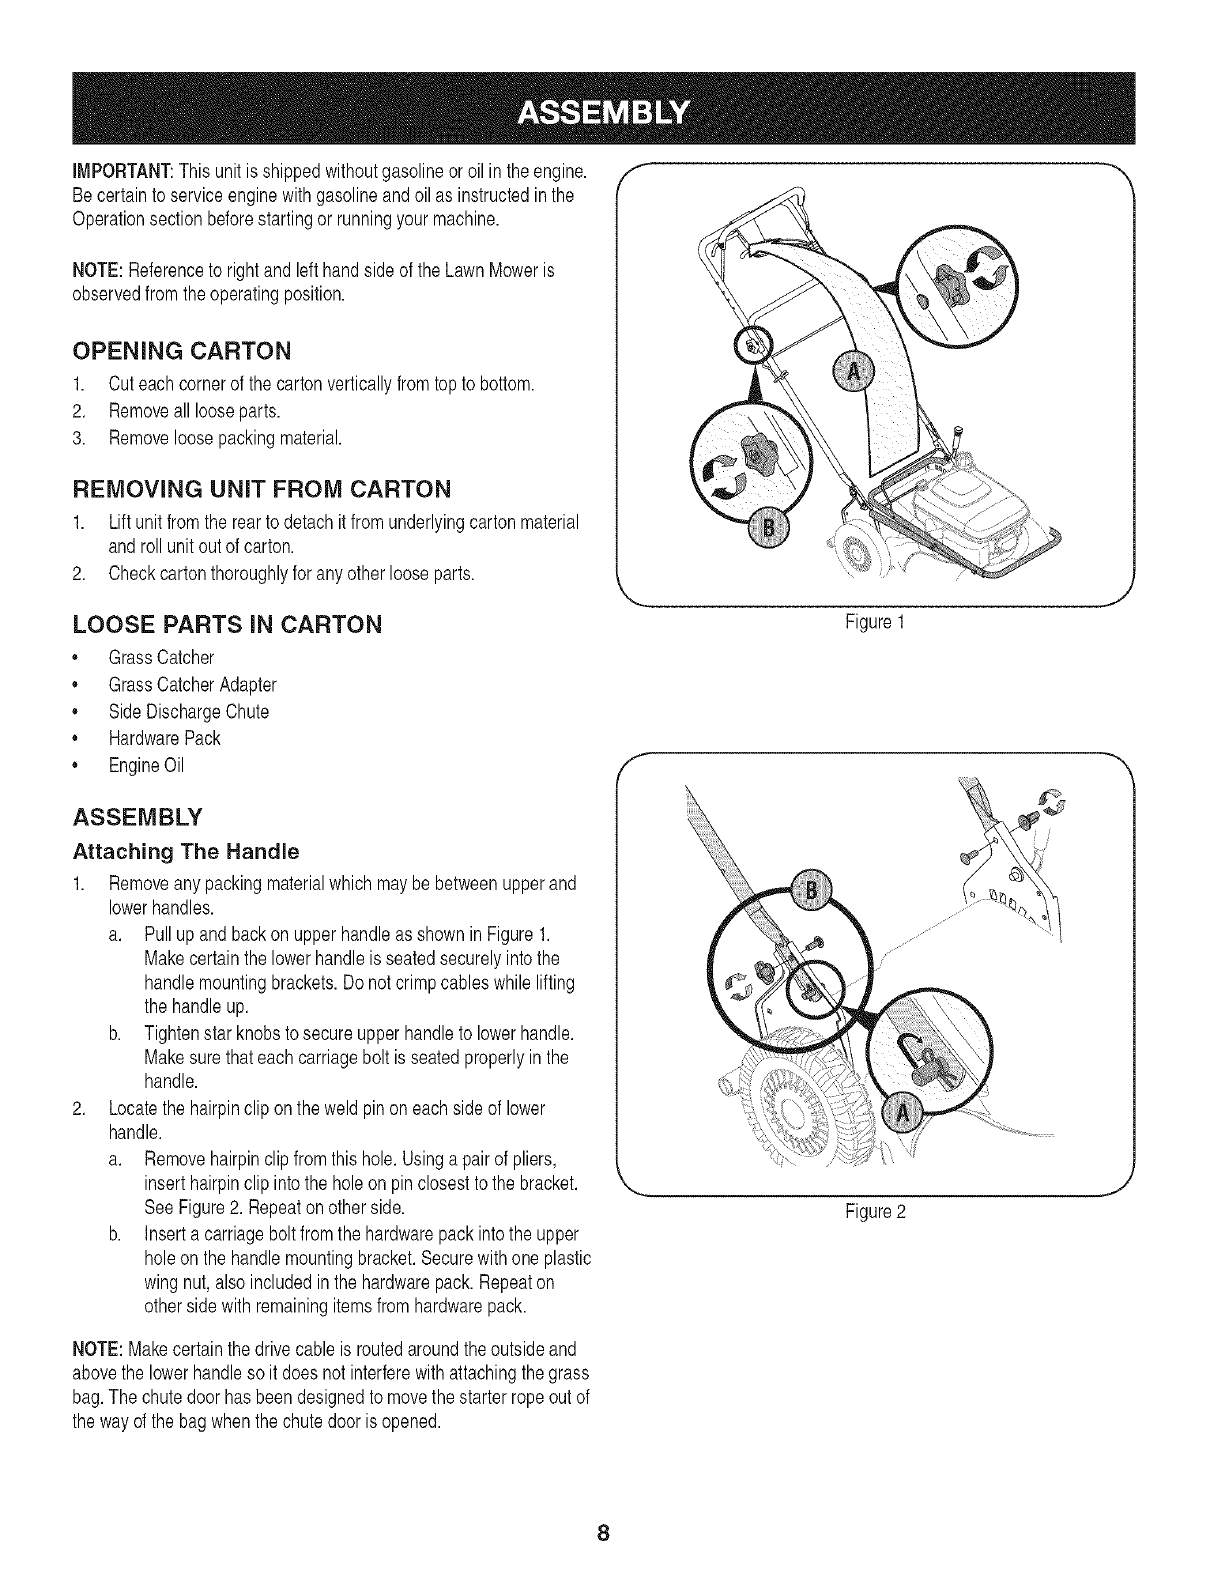
IMPORTANT:Thisunit is shippedwithoutgasolineoroil in theengine.
Becertainto serviceenginewithgasolineandoilas instructedinthe
Operationsectionbeforestartingor runningyourmachine.
NOTE:Referenceto rightand lefthandsideof the LawnMoweris
observedfromthe operatingposition.
OPENING CARTON
1. Cuteachcornerof the cartonverticallyfromtopto bottom.
2. Removeall looseparts.
3. Removeloosepackingmaterial.
REMOVING UNiT FROM CARTON
1. Liftunit fromthe rearto detachit fromunderlyingcartonmaterial
androll unit outof carton.
2. Checkcartonthoroughlyfor anyotherloose parts.
LOOSE PARTS iN CARTON
,, GrassCatcher
,, GrassCatcherAdapter
,, SideDischargeChute
,, HardwarePack
,, EngineOil
Fm
Figure1
f--.,
ASSEMBLY
Attaching The Handle
1. Removeany packingmaterialwhichmaybebetweenupperand
lowerhandles.
a. Pullupand backon upperhandleas showninFigure1.
Makecertainthelowerhandleis seatedsecurelyintothe
handlemountingbrackets.Do notcrimp cableswhile lifting
the handleup.
b. Tightenstar knobsto secureupperhandleto lowerhandle.
Makesurethateach carriagebolt is seatedproperlyin the
handle.
2. Locatethe hairpinclip onthe weldpinon eachsideof lower
handle.
a. Removehairpinclipfromthis hole.Usinga pairof pliers,
inserthairpinclip intothe holeonpinclosesttothe bracket.
SeeFigure2. Repeaton otherside.
b. Inserta carriagebolt fromthe hardwarepackintothe upper
holeonthe handlemountingbracket.Securewithone plastic
wingnut,also includedin the hardwarepack.Repeaton
othersidewith remainingitemsfromhardwarepack.
NOTE:Makecertainthe drivecable is routedaroundthe outsideand
abovethe lowerhandleso it doesnot interferewithattachingthe grass
bag.The chutedoorhasbeendesignedto movethe starterropeout of
the wayof the bagwhenthe chutedooris opened.
j/i/
t/
Figure2
_J
8
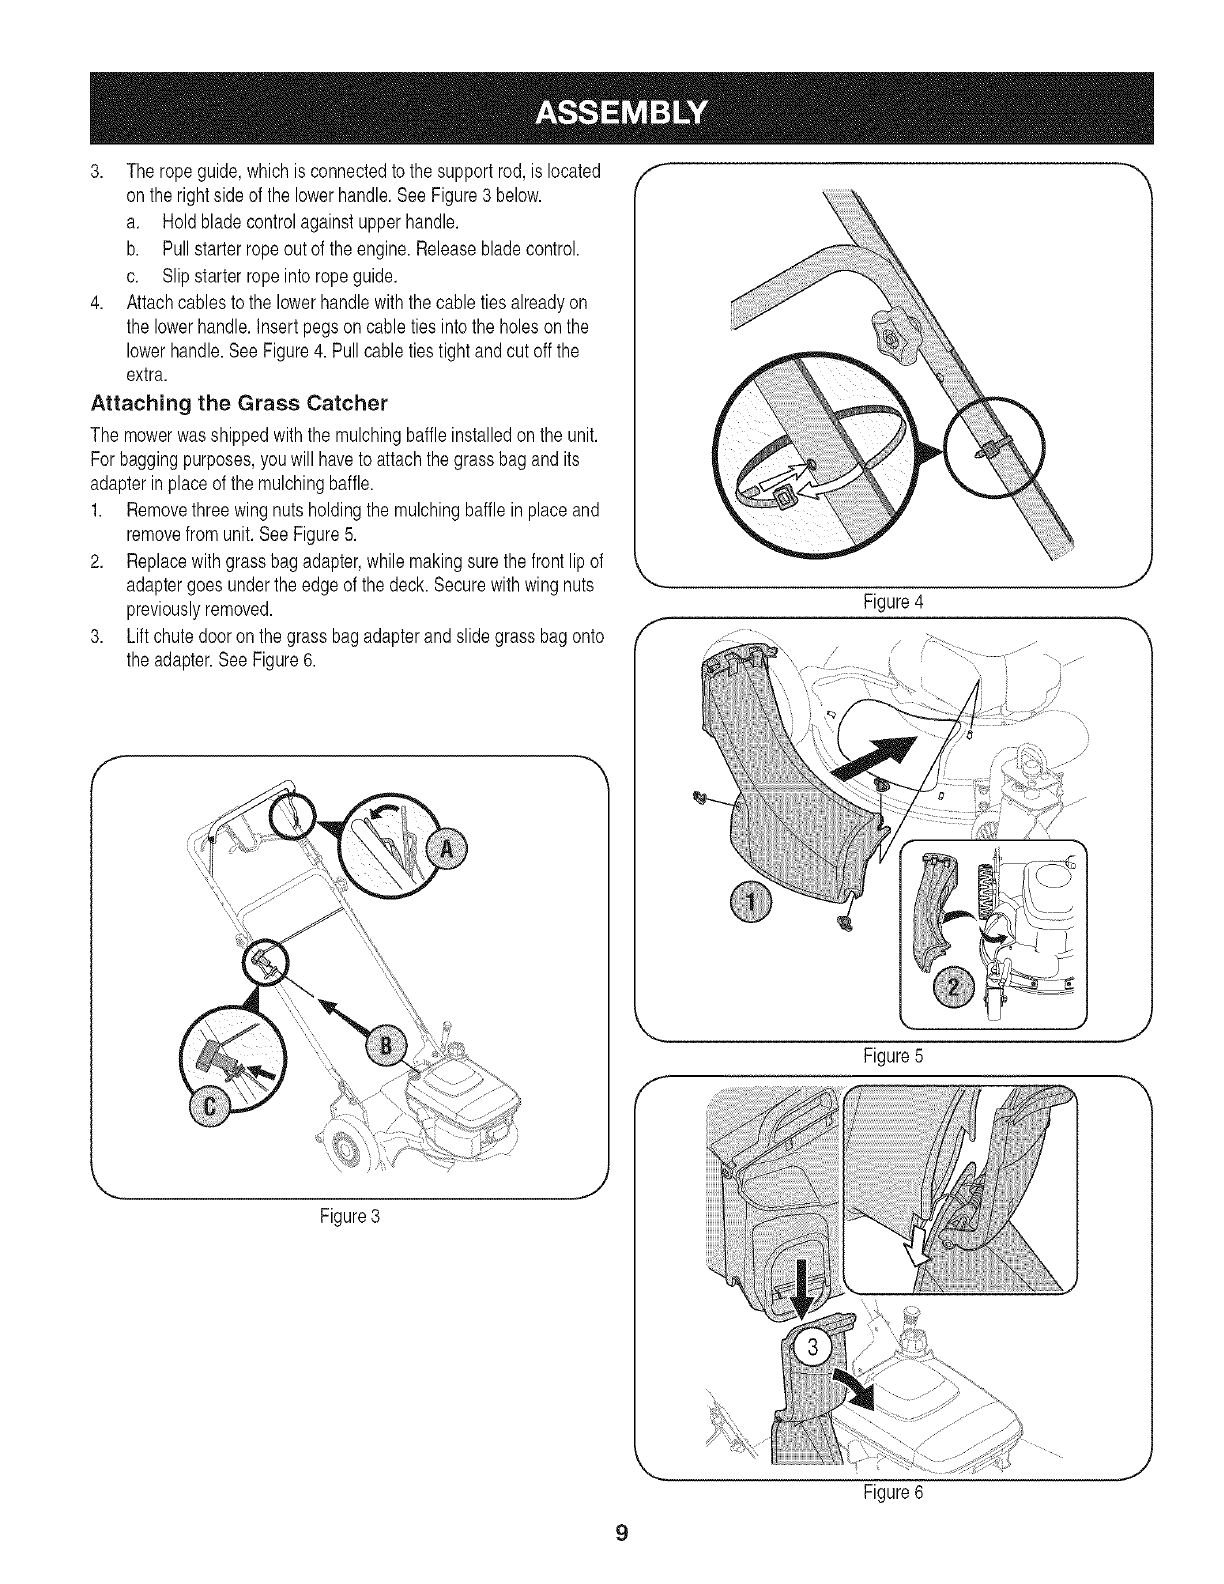
3. The ropeguide,whichis connectedto the supportrod,is located
onthe rightside of the lowerhandle.SeeFigure3below.
a. Holdbladecontrolagainstupperhandle.
b. Pullstarterropeout of the engine.Releasebladecontrol.
c. Slipstarterropeintoropeguide.
4. Attachcablesto the lowerhandlewiththe cabletiesalreadyon
the lowerhandle.Insertpegson cabletiesintothe holeson the
lowerhandle.SeeFigure4. Pullcabletiestightandcutoff the
extra.
Attaching the Grass Catcher
The mowerwasshippedwiththe mulchingbaffleinstalledonthe unit.
Forbaggingpurposes,youwill haveto attachthegrassbagandits
adapterin placeof the mulchingbaffle.
1. Removethree wingnutsholdingthe mulchingbafflein placeand
removefromunit.SeeFigure5.
2. Replacewithgrassbagadapter,whilemakingsurethe frontlipof
adaptergoes undertheedgeof the deck. Securewithwingnuts
previouslyremoved.
3. Liftchutedooronthe grassbagadapterand slidegrassbagonto
the adapter.SeeFigure6.
Figure3
f --,,
fFigure5
Figure6
J
9
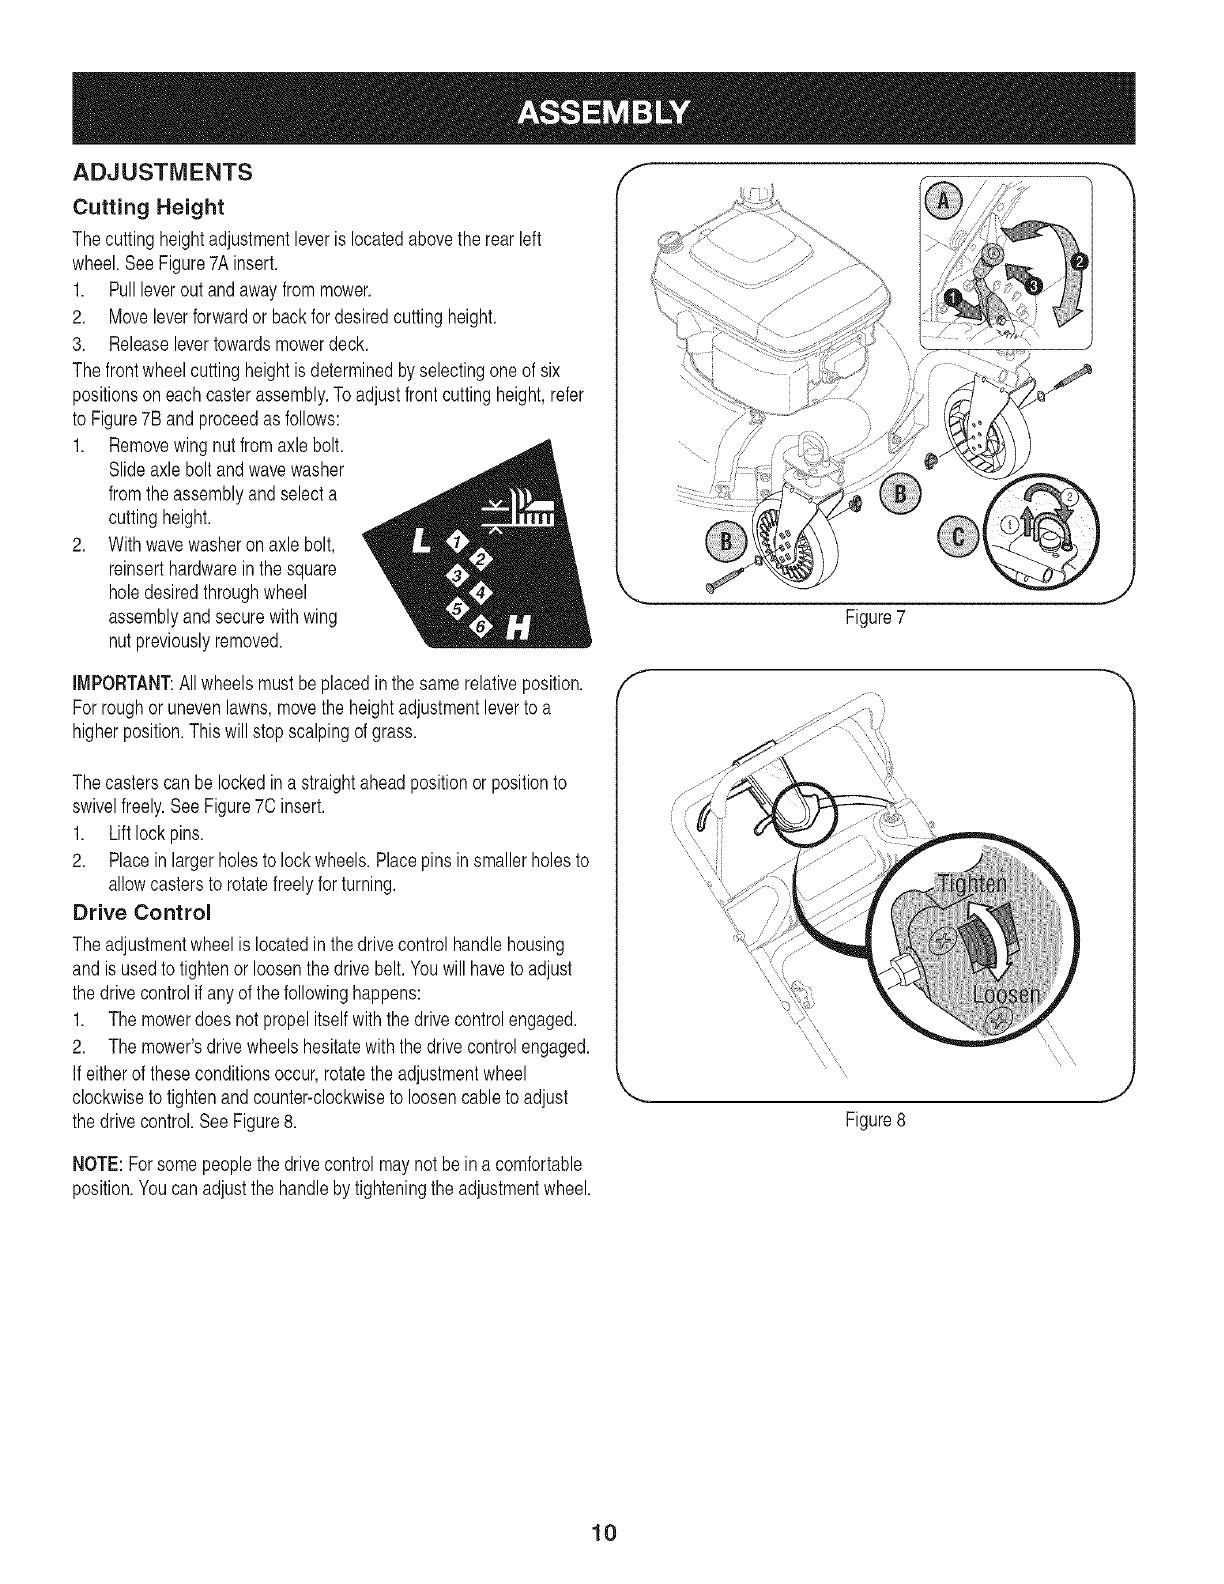
ADJUSTMENTS
Cutting Height
Thecutting heightadjustmentleveris locatedabovethe rearleft
wheel.SeeFigure7Ainsert.
1. Pullleveroutandawayfrommower.
2. Moveleverforwardorbackfor desiredcutting height.
3. Releaselevertowardsmowerdeck.
Thefrontwheelcuttingheightis determinedbyselectingoneof six
positionsoneach casterassembly.Toadjustfrontcuttingheight,refer
to Figure7B andproceedas follows:
1. Removewing nut fromaxle bolt.
Slideaxle boltandwavewasher
fromtheassemblyandselecta
cuttingheight.
2. Withwavewasheron axle bolt,
reinserthardwareinthe square
holedesiredthroughwheel
assemblyandsecurewithwing
nutpreviouslyremoved.
IMPORTANT:Allwheelsmustbeplacedinthe samerelativeposition.
Forroughor unevenlawns,movethe heightadjustmentleverto a
higherposition.Thiswill stopscalpingof grass.
Thecasterscan be lockedina straightaheadpositionorpositionto
swivelfreely.SeeFigure7C insert.
1. Liftlock pins.
2. Placein largerholesto lockwheels.Placepins insmallerholesto
allowcastersto rotatefreelyfor turning.
Drive Control
Theadjustmentwheelis locatedin thedrive controlhandlehousing
andis usedto tightenor loosenthe drivebelt.Youwill haveto adjust
the drivecontrolif any of thefollowinghappens:
1. The mowerdoes notpropelitselfwiththe drivecontrolengaged.
2. The mower'sdrivewheelshesitatewiththe drivecontrolengaged.
If eitherof theseconditionsoccur,rotatethe adjustmentwheel
clockwiseto tightenandcounter-clockwiseto loosencableto adjust
the drivecontrol.SeeFigure8.
NOTE:Forsomepeoplethe drivecontrolmaynotbe ina comfortable
position.Youcan adjustthe handleby tighteningthe adjustmentwheel.
Figure7
f
Figure8
J
10
f
Control
Drive Control ........Electric Start ignition Key
Shift Lever
Recoil Starter
Cutting Height
Adjustment Lever
Oil Cap/Dil
Side Discharge_e
Plug
Muffler
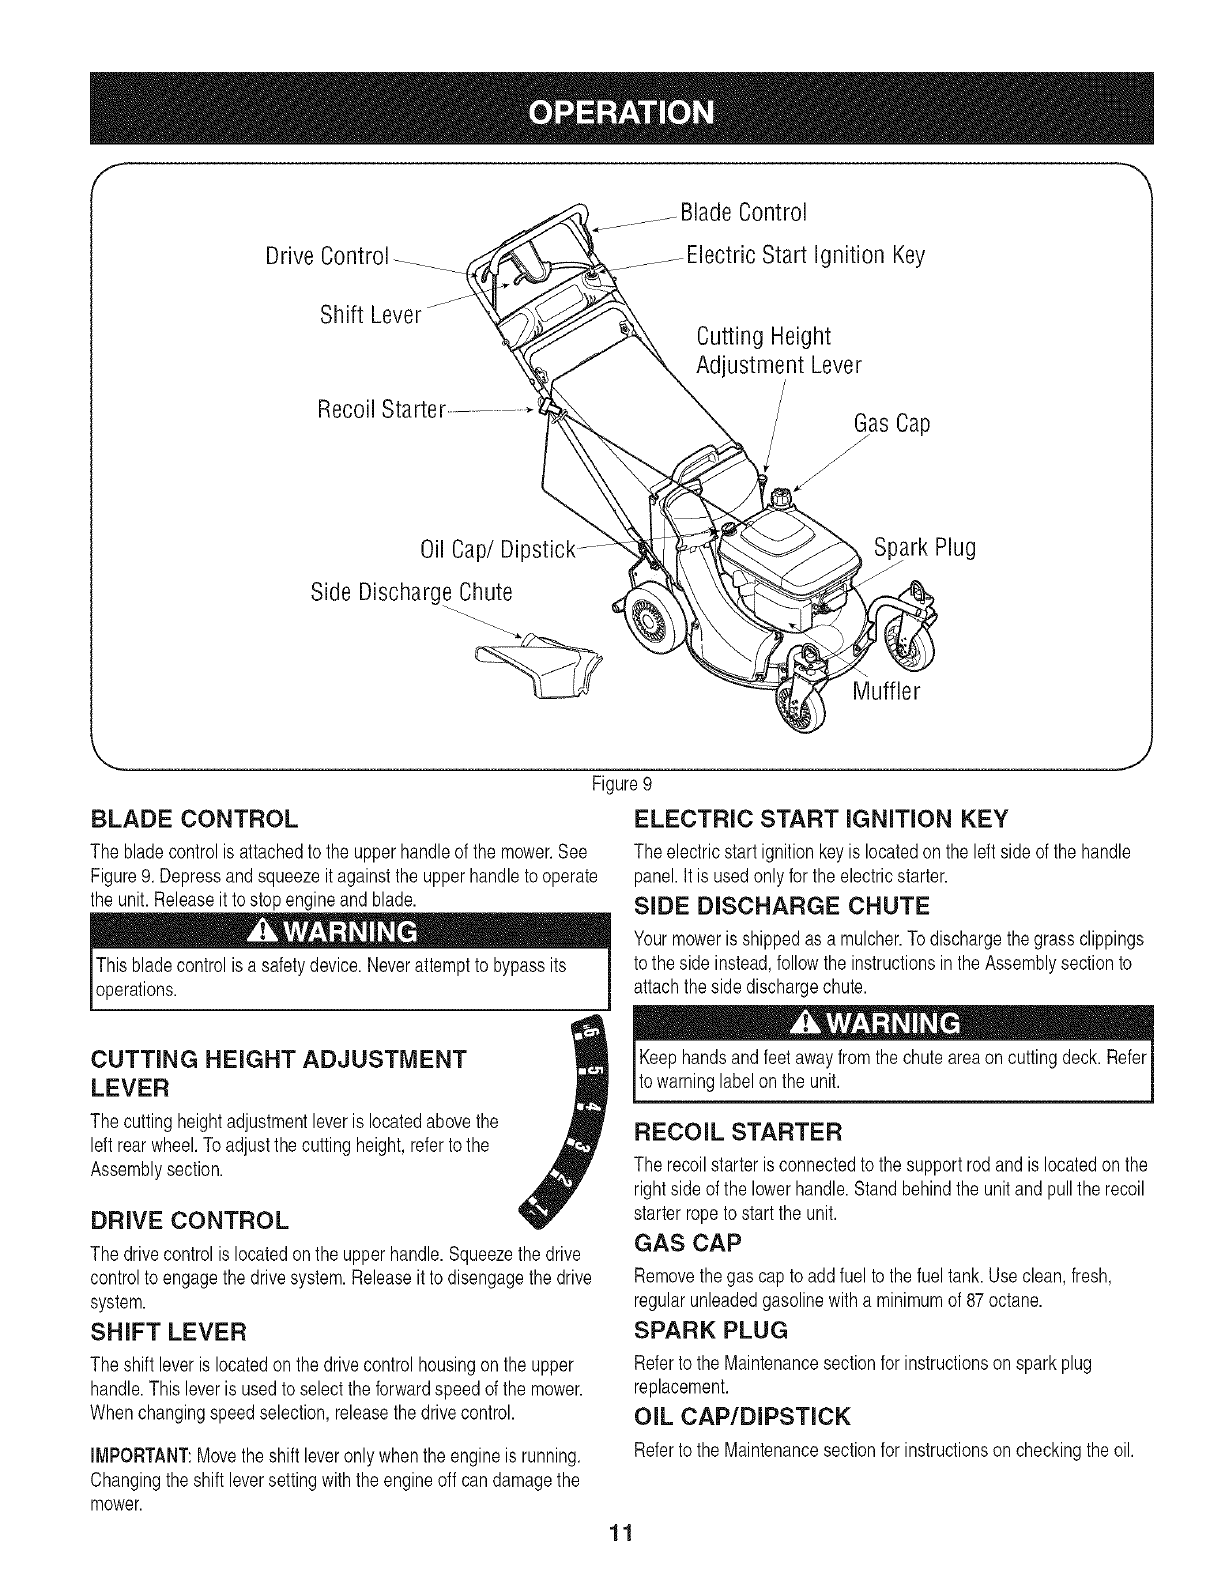
BLADE CONTROL
The bladecontrolis attachedto the upperhandleof the mower.See
Figure9. Depressand squeezeit againstthe upperhandleto operate
the unit.Releaseit tostopengineand blade.
Thisbladecontrolisa safetydevice.Neverattemptto bypassits
operations.
J
Figure9
ELECTRIC START IGNITION KEY
The electricstartignitionkeyis locatedonthe leftside of the handle
panel.It is usedonly for theelectricstarter.
SIDE DISCHARGE CHUTE
Yourmoweris shippedas a mulcher.Todischargethegrassclippings
to the side instead,followthe instructionsinthe Assemblysectionto
attachthe sidedischargechute.
CUTTING HEIGHT ADJUSTMENT
LEVER
The cuttingheightadjustmentleveris locatedabovethe
left rearwheel.Toadjustthecutting height,refertothe
Assemblysection.
DRIVE CONTROL
The drivecontrolis locatedonthe upperhandle.Squeezethe drive
controlto engagethe drivesystem.Releaseit to disengagethe drive
system.
SHIFT LEVER
The shift leveris locatedon thedrivecontrolhousingonthe upper
handle.Thisleveris usedto selectthe forwardspeedof the mower.
When changingspeedselection,releasethe drivecontrol.
IMPORTANT:Movethe shift leveronly whenthe engineis running.
Changingthe shift leversettingwiththe engineoff can damagethe
mower.
Keephandsandfeetawayfromthe chuteareaoncuttingdeck. Refer
to warninglabel onthe unit.
RECOIL STARTER
The recoilstarteris connectedto the supportrodandis locatedon the
rightsideof the lowerhandle.Standbehindthe unit andpullthe recoil
starter ropeto start the unit.
GAS CAP
Removethe gas capto addfuel to the fueltank. Useclean,fresh,
regularunleadedgasolinewitha minimumof 87 octane.
SPARK PLUG
Referto the Maintenancesectionfor instructionsonsparkplug
replacement.
OIL CAP/DIPSTICK
Referto the Maintenancesectionfor instructionsoncheckingthe oil.
11
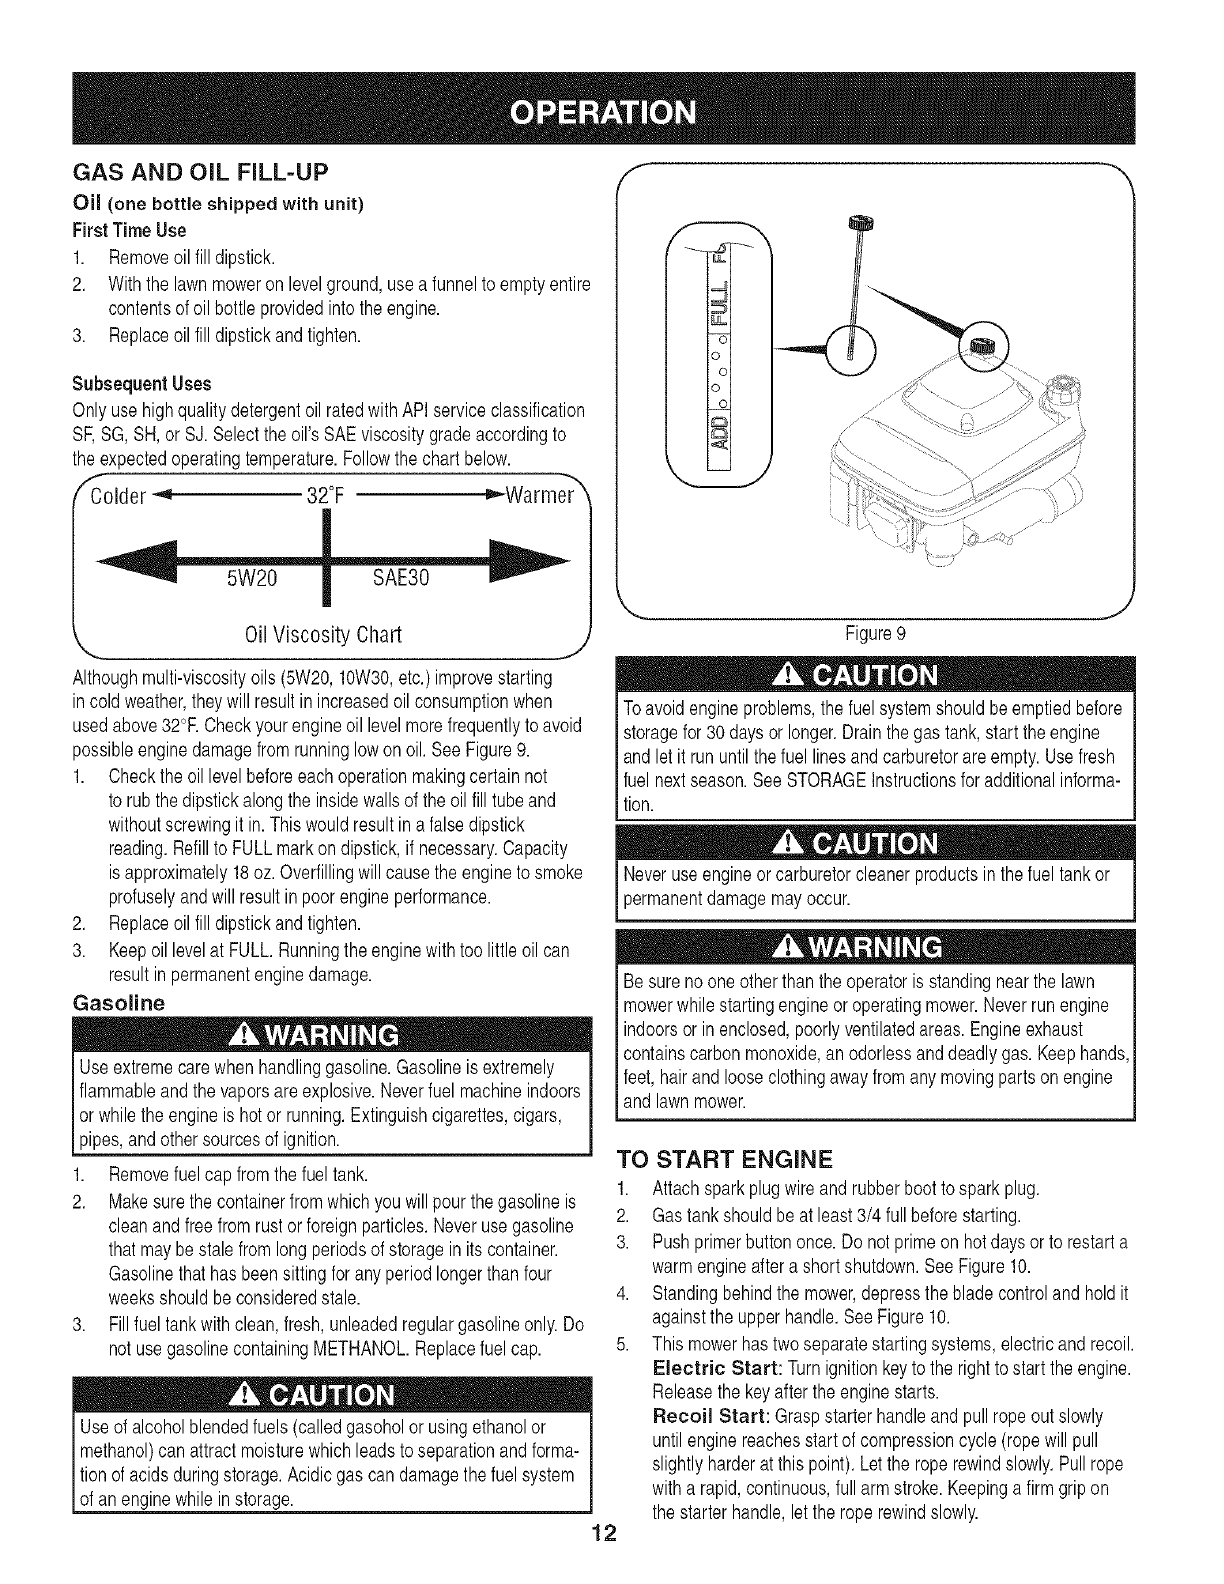
GAS AND OIL FILL=UP
Oil (one bottle shipped with unit)
FirstTimeUse
1. Removeoil fill dipstick.
2. Withthe lawnmoweron levelground,use afunnelto emptyentire
contentsof oil bottleprovidedintothe engine.
3. Replaceoil fill dipstickandtighten.
Subsequent Uses
Onlyuse highqualitydetergentoil ratedwithAPIserviceclassification
SE SG, SH,or SJ.Selectthe oil's SAEviscositygradeaccordingto
the expectedoperatingtemperature.Followthe chartbelow.
/Colder _ 32°F _--Warrner_
Oil Viscosity Chart
Althoughmulti-viscosityoils (5W20,10W30,etc.)improvestarting
incold weather,theywill resultinincreasedoil consumptionwhen
usedabove32°R Checkyour engineoil levelmorefrequentlyto avoid
possibleenginedamagefromrunninglowon oil.SeeFigure9.
1. Checktheoil levelbeforeeach operationmakingcertainnot
to rubthe dipstickalongthe insidewallsof the oilfill tube and
withoutscrewingit in.Thiswouldresultina falsedipstick
reading.Refillto FULLmarkon dipstick,if necessary.Capacity
is approximately18oz.Overfillingwillcausetheengineto smoke
profuselyandwill resultin poorengineperformance.
2. Replaceoil fill dipstickandtighten.
3. Keepoil levelat FULL.Runningthe enginewithtoo littleoil can
resultinpermanentenginedamage.
Gasoline
Useextremecare whenhandlinggasoline.Gasolineis extremely
flammableandthe vaporsareexplosive.Neverfuel machineindoors
or whilethe engineis hotor running.Extinguishcigarettes,cigars,
pipes,andothersourcesof ignition.
Removefuel cap fromthefuel tank.
2. Makesurethe containerfromwhichyouwill pourthegasolineis
cleanandfreefromrustor foreignparticles.Neveruse gasoline
thatmaybestalefromlongperiodsof storagein itscontainer.
Gasolinethathasbeensittingfor anyperiodlongerthanfour
weeksshouldbe consideredstale.
3. Fill fueltankwithclean,fresh, unleadedregulargasolineonly.Do
not usegasolinecontainingMETHANOL.Replacefuel cap.
Useof alcoholblendedfuels(calledgasoholor usingethanolor
methanol)can attractmoisturewhichleadsto separationandforma-
tionof acidsduringstorage.Acidicgas candamagethe fuelsystem
[of anengnewh e n storage.
f --,,
_,, J
Figure9
Toavoidengineproblems,thefuel systemshouldbeemptiedbefore
storagefor 30daysorlonger.Drainthe gas tank,start theengine
andlet it run untilthe fuel linesandcarburetorare empty.Usefresh
fuel nextseason.SeeSTORAGEInstructionsforadditionalinforma-
tion.
Neveruse engineorcarburetorcleanerproductsinthe fuel tankor
permanentdamagemayoccur.
Be surenooneotherthan the operatoris standingnearthe lawn
mowerwhilestartingengineoroperatingmower.Neverrunengine
indoorsor inenclosed,poorlyventilatedareas.Engineexhaust
containscarbonmonoxide,an odorlessanddeadlygas.Keephands,
feet, hairand looseclothingawayfromany movingpartson engine
and lawnmower.
TO START ENGINE
1. Attachsparkplugwireandrubberboot to sparkplug.
2. Gastankshouldbeat least3/4 full beforestarting.
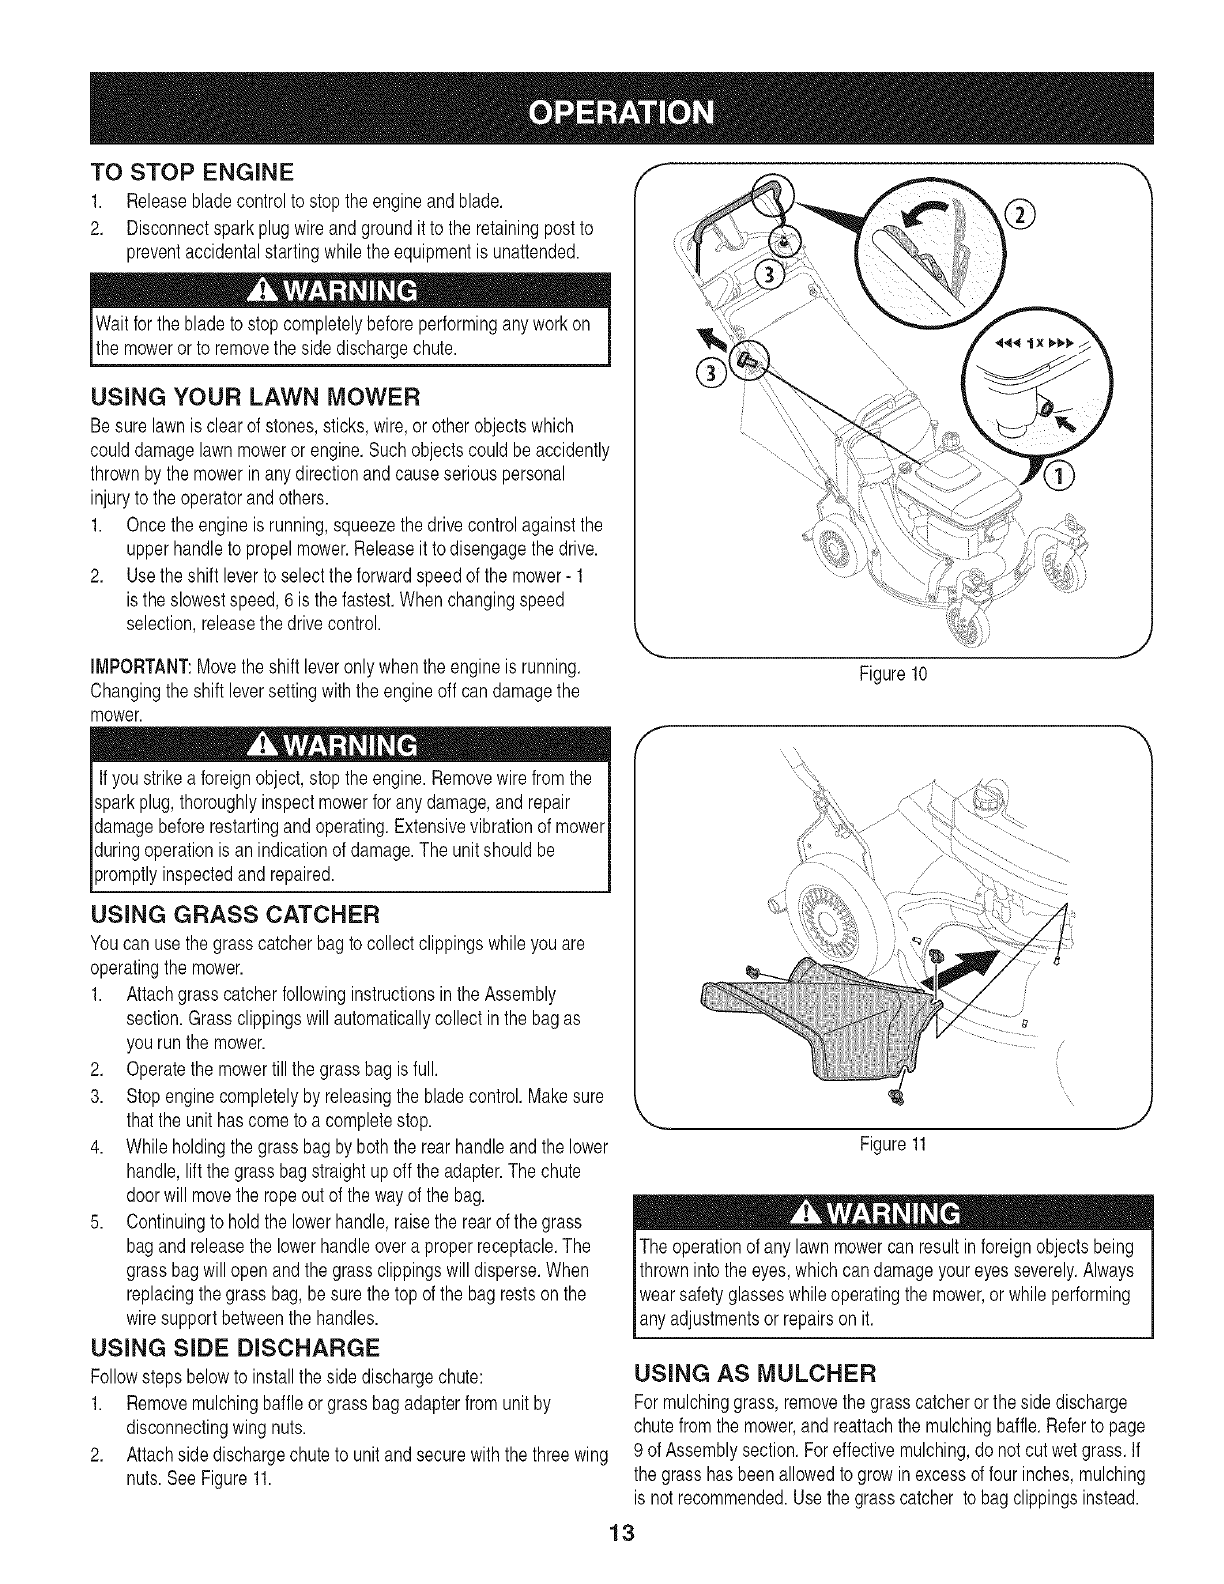
3. Pushprimerbuttononce.Do notprime onhot daysor to restarta
warmengineaftera shortshutdown.SeeFigure10.
4. Standingbehindthe mower,depressthe bladecontroland holdit
againstthe upperhandle.SeeFigure10.
5. This mowerhas twoseparatestartingsystems,electricand recoil.
Electric Start: Turnignitionkeyto the right to startthe engine.
Releasethe keyaftertheenginestarts.
Recoil Start: Graspstarterhandleandpullropeout slowly
untilenginereachesstartof compressioncycle(ropewillpull
slightlyharderat this point).Let the roperewindslowly.Pullrope
witha rapid,continuous,full armstroke.Keepingafirm gripon
thestarter handle,let theroperewindslowly.
TO STOP ENGINE
1. Releasebladecontrolto stopthe engineandblade.
2. Disconnectsparkplugwireandgroundit to the retainingpostto
preventaccidentalstartingwhiletheequipmentis unattended.
Waitfor the bladeto stopcompletelybeforeperforminganyworkon
the moweror to removethe side dischargechute, j
USING YOUR LAWN MOWER
Besure lawnis clearof stones,sticks,wire,orother objectswhich
coulddamagelawnmoweror engine.Suchobjectscouldbeaccidently
thrownby the mowerinanydirectionandcauseseriouspersonal
injuryto the operatorandothers.
1. Oncethe engineis running,squeezethedrivecontrolagainstthe
upperhandleto propelmower.Releaseit to disengagethe drive.
2. Usetheshift leverto selectthe forwardspeedof the mower- 1
is the slowestspeed,6 is the fastest.Whenchangingspeed
selection,releasethe drivecontrol.
IMPORTANT:Movethe shift leveronly whenthe engineis running.
Changingthe shift leversettingwiththe engineoff can damagethe
mower.
If youstrikea foreignobject,stopthe engine.Removewirefromthe
sparkplug,thoroughlyinspectmowerforany damage,and repair
damagebeforerestartingandoperating.Extensivevibrationof mower
duringoperationis an indicationof damage.The unitshouldbe
promptlyinspectedand repaired.
USING GRASS CATCHER
Youcan usethe grasscatcherbagto collectclippingswhileyouare
operatingthe mower.
1. Attachgrasscatcherfollowinginstructionsinthe Assembly
section.Grassclippingswill automaticallycollectinthe bagas
yourun the mower.
2. Operatethe mowertill thegrassbagis full.
3. Stopenginecompletelyby releasingthe bladecontrol.Makesure
thatthe unithas cometo a completestop.
4. Whileholdingthe grassbagby boththe rearhandleandthe lower
handle,liftthe grassbagstraightupoff the adapter.The chute
doorwill movethe ropeout of the wayof the bag.
5. Continuingto holdthe lowerhandle,raisethe rearof the grass
bagandreleasethe lowerhandleovera properreceptacle.The
grassbagwill openandthe grassclippingswill disperse.When
replacingthegrassbag, besurethe top of the bagrestsonthe
wiresupportbetweenthe handles.
USING SIDE DISCHARGE
Followstepsbelowto installthe sidedischargechute:
1. Removemulchingbaffleorgrassbagadapterfromunitby
disconnectingwingnuts.
2. Attachside dischargechuteto unit andsecurewiththe threewing
nuts.SeeFigure11.
f --,,
Figure10
J
f --,,
,,, x
Figure11
J
The operationof any lawn mowercan resultin foreignobjectsbeing
throwninto theeyes,whichcandamageyour eyesseverely.Always
wearsafetyglasseswhileoperatingthe mower,or whileperforming
anyadjustmentsor repairsonit.
USING AS MULCHER
Formulchinggrass,removethegrasscatcheror the sidedischarge
chutefromthe mower,andreattachthe mulchingbaffle.Referto page
9 of Assemblysection.Foreffectivemulching,donot cutwetgrass.If
the grasshasbeenallowedto growin excessof fourinches,mulching
is notrecommended.Usethe grasscatcher to bagclippingsinstead.
13
Alwaysstopengine,disconnectsparkplugwire,andgroundagainst /
_engnebeforeperformngany typeof ma ntenanceonyourmachne.
GENERAL RECOMMENDATIONS
• Alwaysobservesafetyruleswhenperformingany maintenance.
,, Thewarrantyon thislawnmowerdoesnot coveritemsthathave
beensubjectedto operatorabuseor negligence.To receivefull
valuefromwarranty,operatormust maintaintheequipmentas
instructedhere.
,, Changingof engine-governedspeedwill voidenginewarranty.
,, Alladjustmentsshouldbecheckedat leastonceeach season.
,, Periodicallycheckall fastenersand makesure thesearetight.
ENGINE MAINTENANCE
Checking the Spark Plug
Cleansparkplugandresettheelectrodegapto 0.030"at leastoncea
season;replaceevery100hoursof operation.
• Cleanareaaroundthe sparkplugbase.Do notsandblastspark
plug.Sparkplugshouldbecleanedbyscrapingorwire brushing
andwashingwitha commercialsolvent.
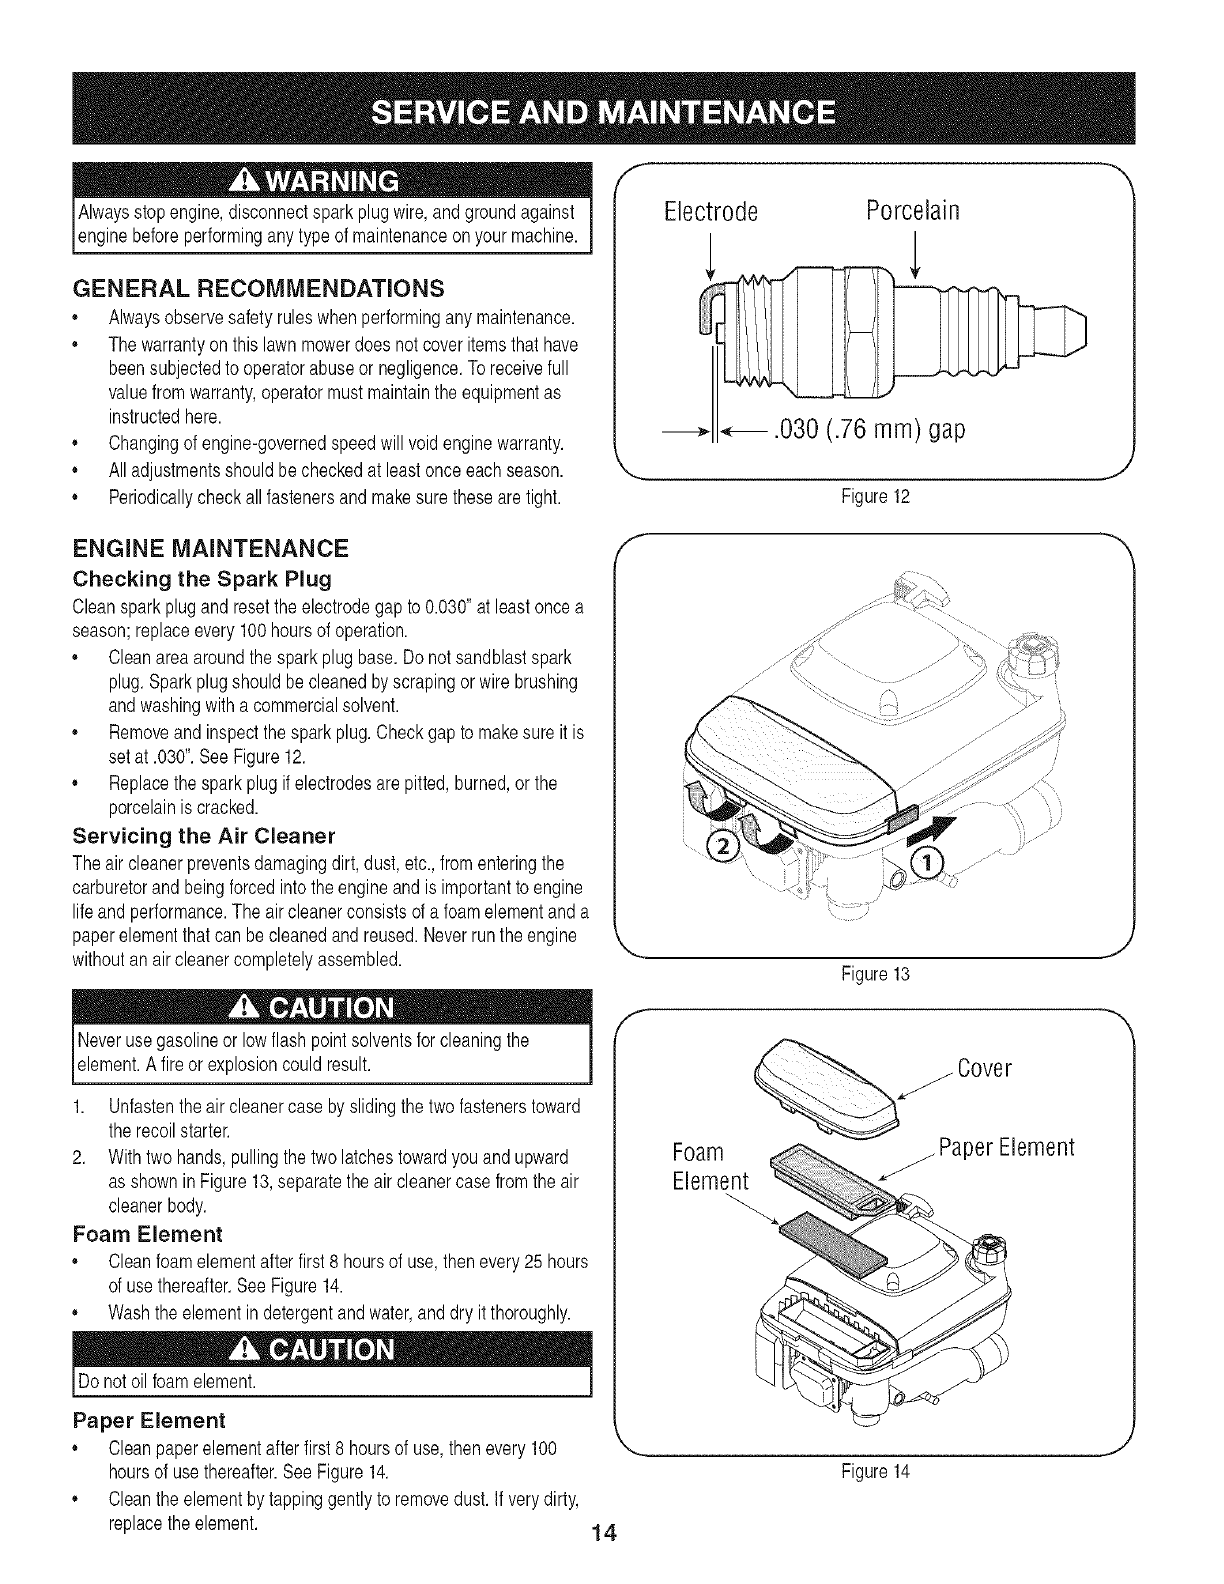
,, Removeand inspectthe sparkplug.Checkgap to makesureit is
setat .030".SeeFigure12.
,, Replacethe sparkplugif electrodesarepitted,burned,or the
porcelainis cracked.
Servicing the Air Cleaner
Theair cleanerpreventsdamagingdirt, dust,etc.,fromenteringthe
carburetorandbeingforcedintothe engineandis importantto engine
lifeand performance.The air cleanerconsistsof a foamelementand a
paperelementthatcan becleanedand reused.Neverrunthe engine
withoutan aircleanercompletelyassembled.
Neverusegasolineor lowflashpointsolventsfor cleaningthe I
R
e ement.A f re orexpos on coud resut.
1. Unfastenthe aircleanercasebyslidingthe twofastenerstoward
the recoilstarter.
2. Withtwohands,pullingthe twolatchestowardyou andupward
as shownin Figure13,separatetheair cleanercasefromthe air
cleanerbody.
Foam Element
• Cleanfoamelementafterfirst8 hoursof use,thenevery25hours
of usethereafter.SeeFigure14.
• Washthe elementindetergentandwater,anddry it thoroughly.
Do notoil foamelement.
Paper Element
,, Cleanpaperelementafterfirst8 hoursof use,thenevery100
hoursof usethereafter.SeeFigure14.
,, Cleantheelementby tappinggentlyto removedust. If verydirty,
replacethe element.
f --,,
Electrode Porcelain
14
.030(.76 mm) gap
Figure12
,,.. J
Figure13
f
Cover
Foam PaperElement
Element
Figure14
•Replacepaperelementyearlyorevery300hours.
Do notwashpaperelement.Do not usepressurizedairto clean or I
dry papereement.
R
NOTE:Operatingina dustyconditionmayrequiremorefrequent
maintenancethan above.
1. Reinstallthe foamelementandthenthe paperelementonthe air
cleanerbody.
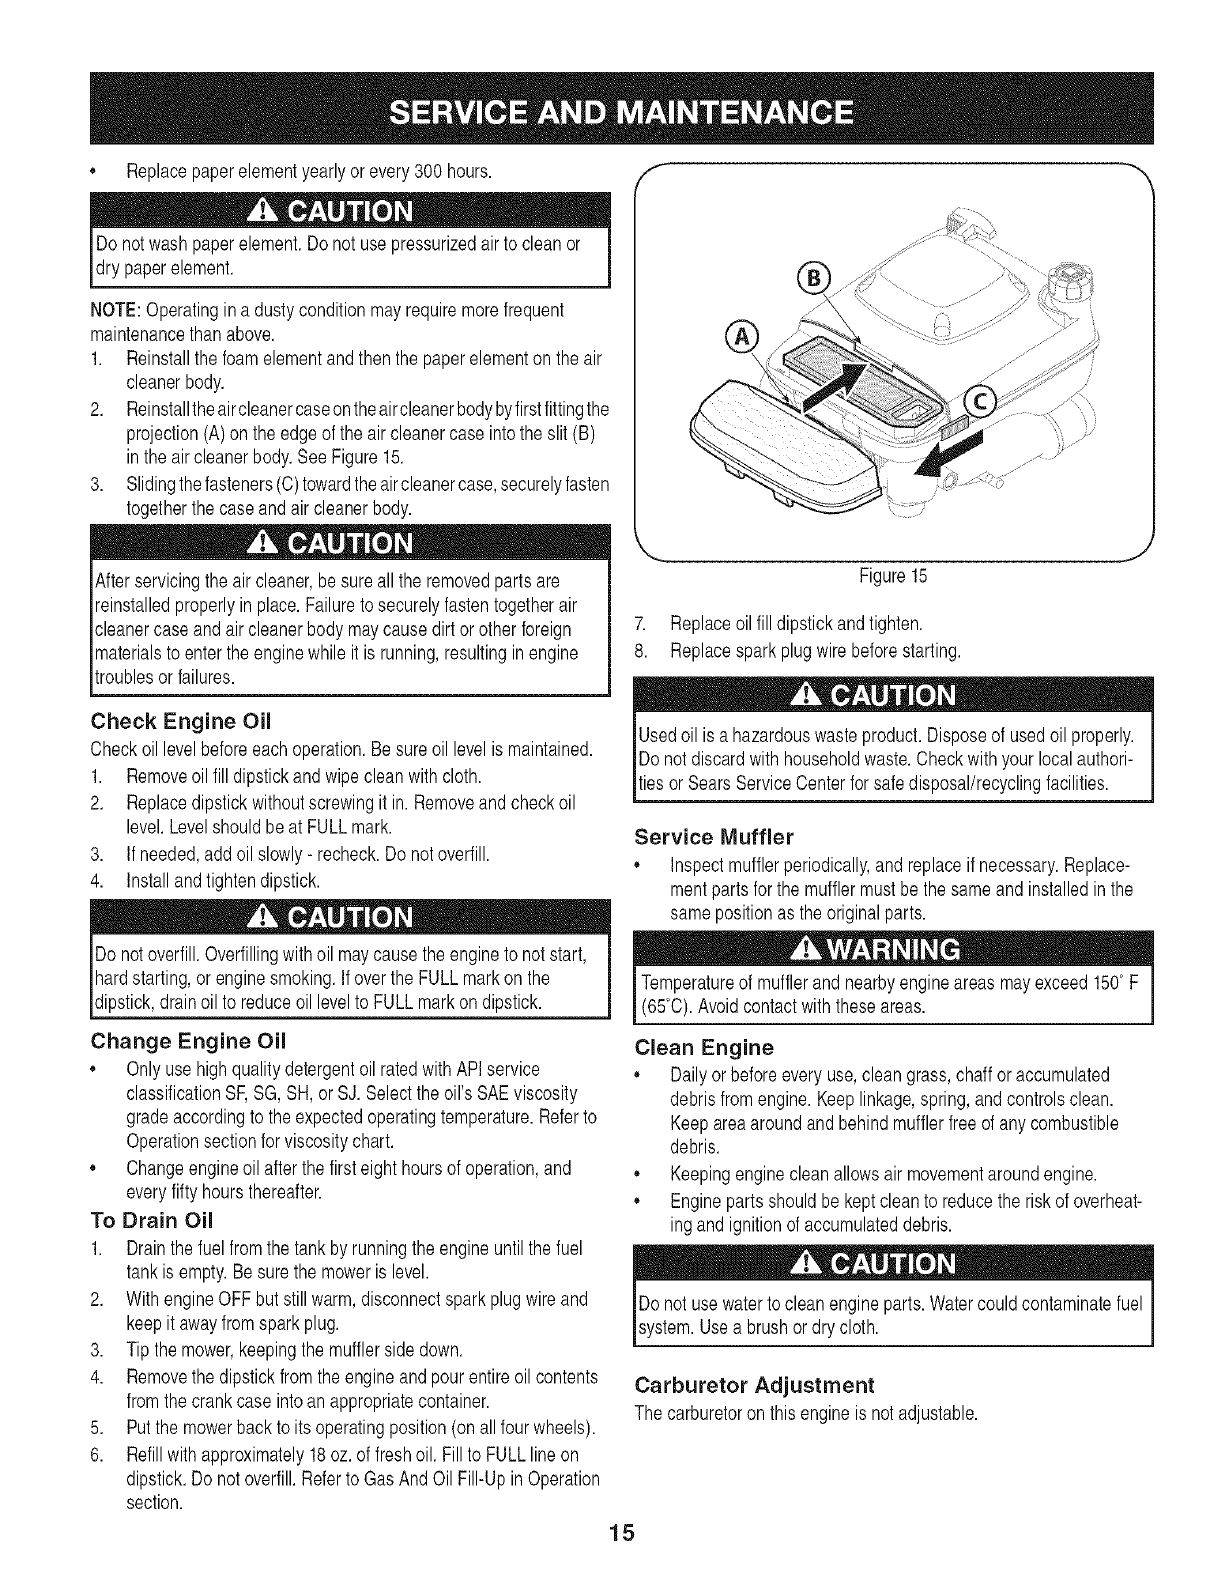
2. Reinstalltheaircleanercaseontheaircleanerbodybyfirstfittingthe
projection(A)on the edgeof the air cleanercaseintothe slit (B)
in theair cleanerbody.SeeFigure15.
3. Slidingthefasteners(C)towardtheaircleanercase,securelyfasten
togetherthe caseandair cleanerbody.
Afterservicingthe aircleaner,besureall the removedpartsare
reinstalledproperlyinplace.Failuretosecurelyfastentogetherair
cleanercaseandair cleanerbody maycausedirt or otherforeign
materialsto enterthe enginewhileit is running,resultinginengine
troublesorfailures.
Check Engine Oil
Checkoillevelbeforeeachoperation.Besureoil levelis maintained.
1. Removeoil fill dipstickandwipe cleanwithcloth.
2. Replacedipstickwithoutscrewingit in. Removeandcheckoil
level.Levelshouldbeat FULLmark.
3. If needed,addoil slowly- recheck.Do notoverfill.
4. Installandtightendipstick.
Do not overfill.Overfillingwithoil maycausetheengineto notstart,
hardstarting,orenginesmoking.If overthe FULLmarkon the
dipstick,drainoil to reduceoillevelto FULLmarkon dipstick.
Change Engine Oil
,, Onlyuse highqualitydetergentoil ratedwithAPIservice
classificationSF,SG,SH,or SJ.Selectthe oil'sSAEviscosity
gradeaccordingto theexpectedoperatingtemperature.Referto
Operationsectionfor viscositychart.
,, Changeengineoil afterthe first eight hoursof operation,and
everyfifty hoursthereafter.
To Drain Oil
1. Drainthe fuelfromthe tankby runningthe engineuntilthefuel
tankis empty.Besurethe moweris level.
2. WithengineOFFbut stillwarm,disconnectsparkplugwire and
keepit awayfromsparkplug.
3. Tip the mower,keepingthe mufflersidedown.
4. Removethe dipstickfromthe engineandpourentireoilcontents
fromthecrankcaseintoan appropriatecontainer.
5. Putthe mowerbackto itsoperatingposition(onall fourwheels).
6. Refillwithapproximately18oz.of freshoil. Fillto FULLlineon
dipstick.Do not overfill.Referto GasAndOilFill-Upin Operation
section.
f
Figure15
7. Replaceoil fill dipstickandtighten.
8. Replacesparkplugwirebeforestarting.
Usedoil is a hazardouswasteproduct.Disposeof usedoil properly.
IDo notdiscardwithhouseholdwaste.Checkwithyour localauthori-
Ities or SearsServiceCenterfor safedisposal/recyclingfacilities.
Service Muffler
,, Inspectmufflerperiodically,andreplaceif necessary.Replace-
mentpartsfor the mufflermustbe the sameand installedinthe
samepositionas the originalparts.
of mufflerandnearbyengineareasmayexceed150° F ITemperature B
1(65C).Avod contactwth theseareas.
Clean Engine
,, Dailyor beforeevery use,clean grass,chaff oraccumulated
debris fromengine.Keeplinkage,spring,andcontrolsclean.
Keepareaaroundandbehindmufflerfreeof anycombustible
debris.
,, Keepingenginecleanallowsair movementaroundengine.
,, Enginepartsshouldbe keptcleanto reducethe riskof overheat-
ingandignitionof accumulateddebris.
Do notuse waterto cleanengineparts.Watercouldcontaminatefuel
system.Usea brushordry cloth.
Carburetor Adjustment
The carburetoronthis engineis notadjustable.
15
Engine Speed
Donottamperwiththegovernorsettingor thecarburetorsettingto
ncreasethe enginespeed.Eachcarburetorisadjustedat the factory
Nitheitheracap or stopplateinstalledon the mixturescrew.Any
adjustmentsmustbeperformedby a Searsorotherqualifiedservice
Jealer.
LUBRICATION
Alwaysstopengine,disconnectsparkplug,andgroundagainst /
_engnebeforeperformngany typeof mantenanceon yourmachne.J
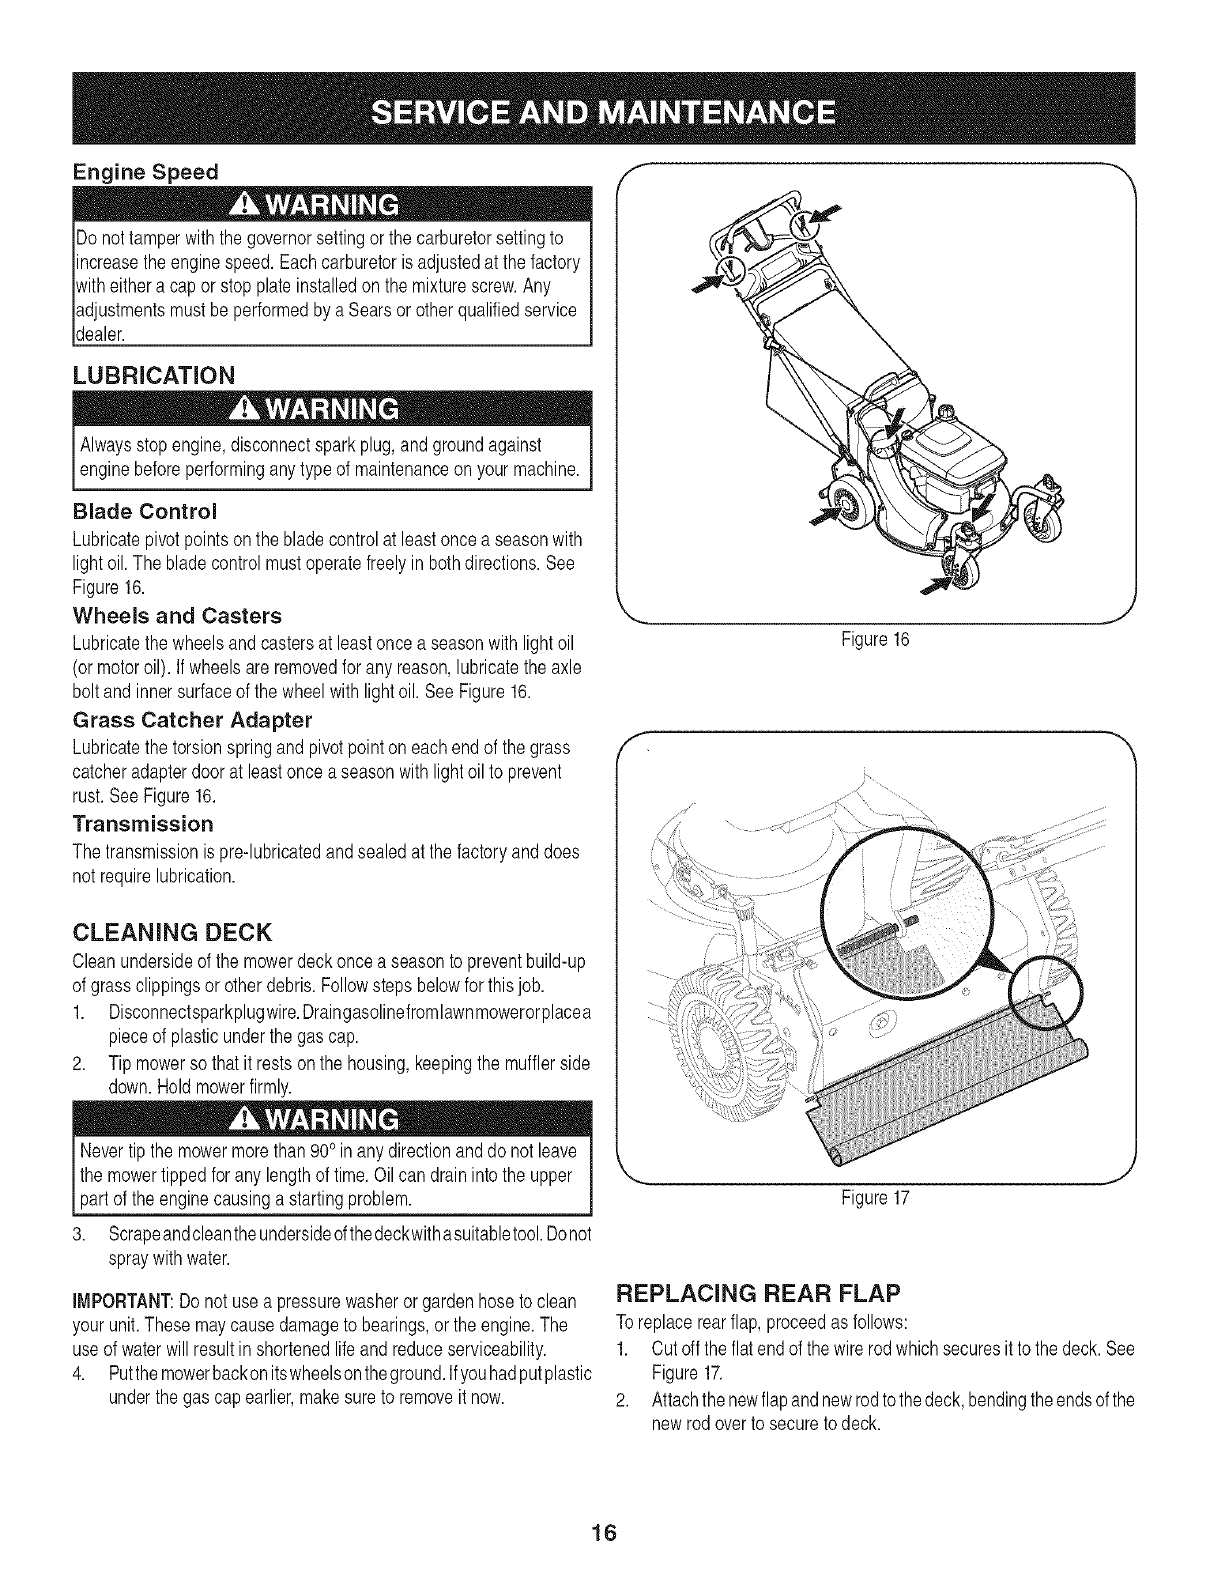
Blade Control
Lubricatepivotpointsonthe bladecontrolat leastoncea seasonwith
lightoil. The bladecontrolmustoperatefreelyin bothdirections.See
Figure16.
Wheels and Casters
Lubricatethe wheelsandcastersat leastoncea seasonwithlightoil
(ormotoroil). Ifwheelsare removedforany reason,lubricatethe axle
boltand innersurfaceof the wheelwithlightoil. SeeFigure16.
Grass Catcher Adapter
Lubricatethe torsionspringandpivotpoint oneachendof thegrass
catcheradapterdoorat leastoncea seasonwithlightoil to prevent
rust. SeeFigure16.
Transmission
Thetransmissionis pre-lubricatedandsealedat the factoryanddoes
not requirelubrication.
CLEANING DECK
Cleanundersideof the mowerdeckoncea seasonto preventbuild-up
of grassclippingsor otherdebris.Followstepsbelowforthisjob.
1. Disconnectsparkplugwire.Draingasolinefromlawnmowerorplacea
pieceof plasticunderthe gas cap.
2. Tip mowersothat it restsonthe housing,keepingthe mufflerside
down.Hold mowerfirmly.
)art of the enginecausinga startingproblem.
3. Scrapeandcleantheundersideofthedeckwithasuitabletool.Donot
spraywithwater.
IMPORTANT:Do not usea pressurewasheror gardenhoseto clean
yourunit.Thesemaycausedamageto bearings,orthe engine.The
useof waterwill resultin shortenedlife andreduceserviceability.
4. Putthemowerbackonitswheelsontheground.Ifyouhadputplastic
underthe gas capearlier,makesureto removeit now.
Figure16
Figure17
REPLACING REAR FLAP
To replacerearflap,proceedas follows:
1. Cutoffthe flatendof thewire rodwhichsecuresit to thedeck.See
Figure17.
2. Attachthe newflapandnewrodtothe deck,bendingtheendsofthe
newrodoverto secureto deck.
16

ADJUSTING SHIFT LEVER CABLE
Periodicadjustmentof thesix speedshiftcable maybe necessarydue
to normalwearon the cable.Adjustmentis neededif all sixspeedsdo
not work.The adjustablecable bracketis locatedonthe leftside of the
mowerbesidethe engine.SeeFigure18.
1. Startengineandplaceshift leverinthe sixth speedposition.
2. Stopengineanddisconnectsparkplugwireandgroundit against
engine.
3. Loosenhexnutwhichsecuresthe adjustablecablebracket.See
Figure18.
4. Pushbackon the adjustablecablebracket.
5. Tightenhexnut.
BLADE CARE
When removingthecutting bladefor sharpeningor replacement,
protectyour handswitha pairof heavyglovesor usea heavyragto
holdthe blade. Figure18
Periodicallyinspectthe bladeadapterforcracks,especiallyif you
strikea foreignobject.Replacewhen necessary.Followthesteps
belowforbladeservice.
1. Disconnectsparkplugbootfromsparkplug.Turnmoweronitsside
makingsurethatthe airfilterandthe carburetorarefacingup.
2. Removethe boltandthe bladebellsupportwhichholdthe blade
andthe bladeadapterto the enginecrankshaft.SeeFigure19.
NOTE: Whenremovingthe blade,bladeadapter,etc.,becarefulnot
to removeor losepartsaboveit associatedwiththe enginepulley.
3. Removebladeandadapterfromthe crankshaft.SeeFigure19.
4. Removebladefrom the adapterfortesting balance.Balancethe
bladeon a roundshaftscrewdriverto check.Removemetalfrom
the heavyside untilit balancesevenly.Whensharpeningthe
blade,followtheoriginalangleof grind.Grindeachcuttingedge
equallyto keepthe bladebalanced.
Anunbalancedbladewillcauseexcessivevibrationwhenrotatingat
highspeeds.It maycausedamageto mowerandcouldbreakcausin(
personalinjury.
•//
"BladeBell j
Support Bolt
_,, ,J
Figure19
5. Lubricatethe enginecrankshaftandthe innersurfaceof the blade
adapterwithlightoil. Slidethe bladeadapteronto the engine
crankshaft.Placethebladeonthe adaptersuchthatthe side of
the blademarked"Bottom"(orwith partnumber)facesthe ground
whenthe moweris inthe operatingposition.Makesurethat the
bladeis alignedand seatedon the bladeadapterflanges.
6. Placebladebellsupportontheblade.Alignnotchesonthebladebell
supportwithsmallholesinblade.
7. Replacehexboltandtightenhexbolttotorque:450in.Ibs.min.,600
in. Ibs.max.
To ensuresafeoperationof yourmower,periodicallycheckthe blade
bolt forcorrecttorque.
BELT CARE
NOTE:Severalcomponentsmustberemovedinorderto changethe
mower'sself-propulsiondrivebelt. Seean authorizedSearsService
Centerto haveyourbelt replaced.
17
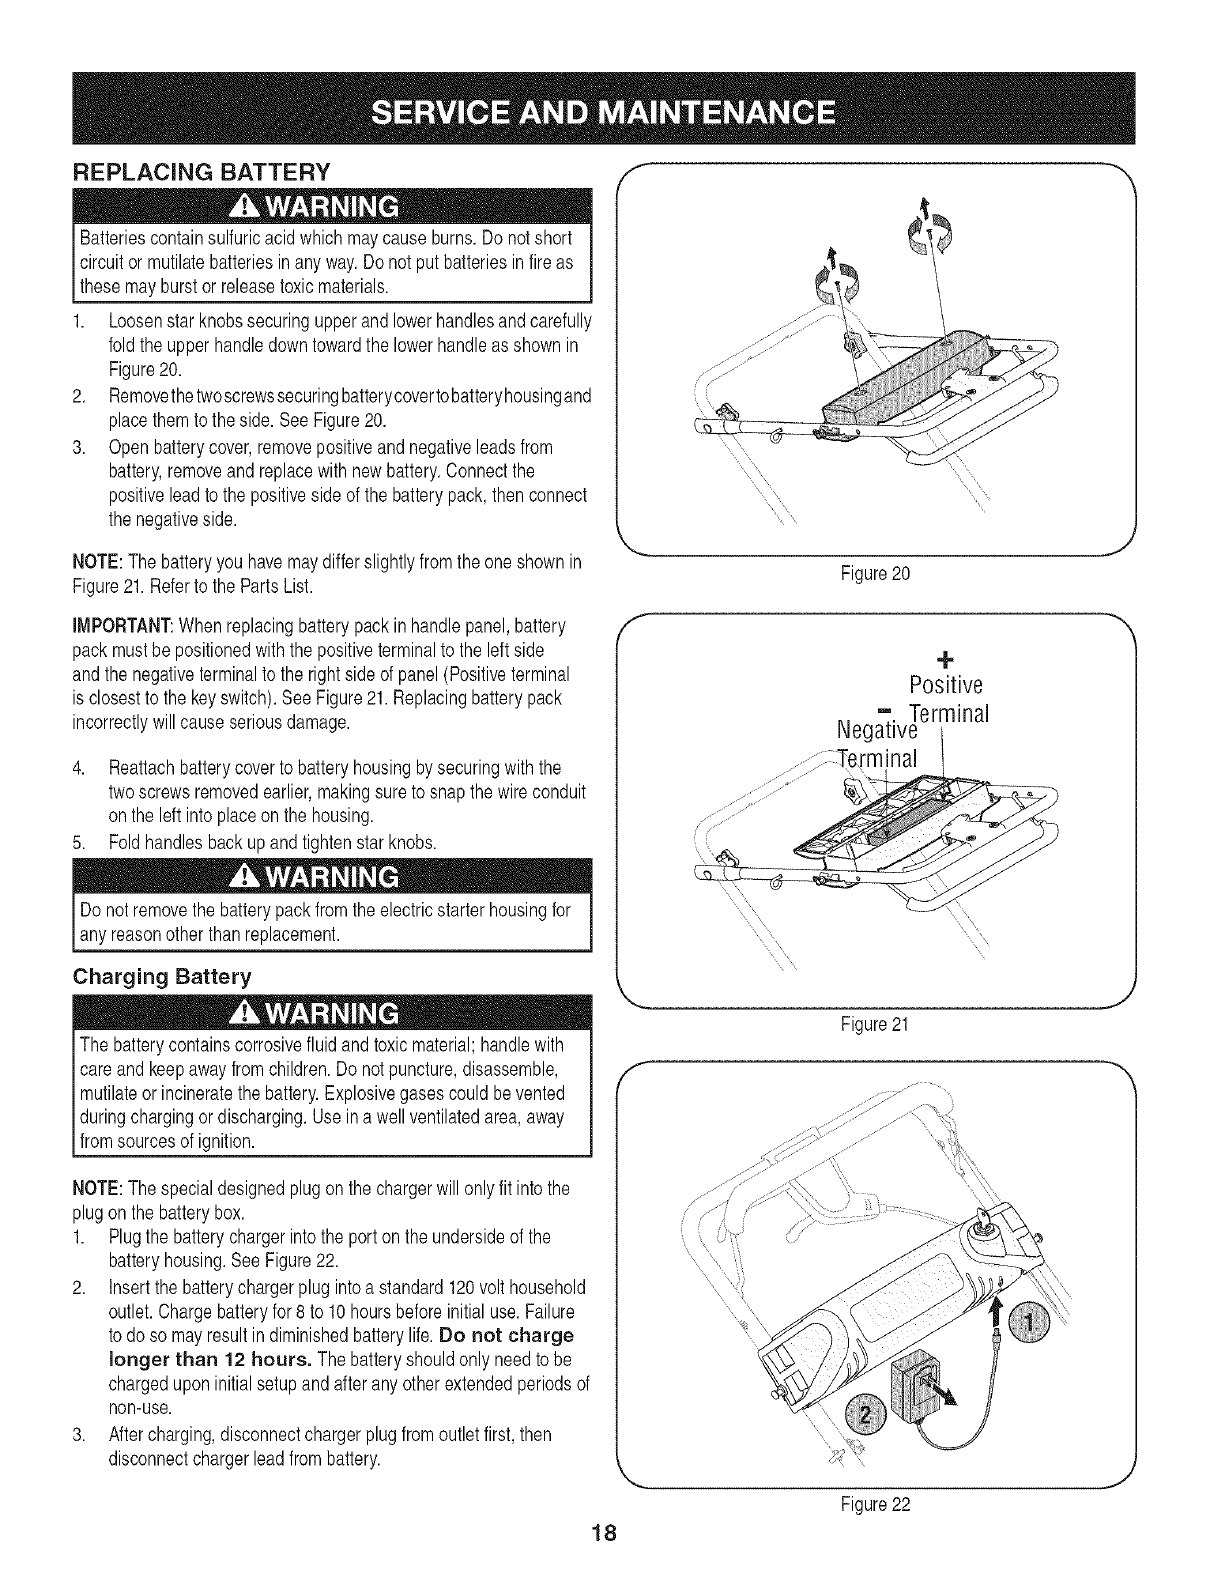
REPLACING BATTERY
Batteriescontainsulfuricacid whichmaycauseburns.Do notshort
I circuitor mutilatebatteriesinany way.Do notput batteriesinfireas
[these mayburstorreleasetoxic materials.
1. Loosenstarknobssecuringupperandlowerhandlesandcarefully
foldthe upperhandledowntowardthe lowerhandleas shownin
Figure20.
2. Removethetwoscrewssecuringbatterycovertobatteryhousingand
placethemtothe side.SeeFigure20.
3. Openbatterycover,removepositiveandnegativeleadsfrom
battery,removeandreplacewith newbattery.Connectthe
positiveleadto the positiveside of the batterypack,then connect
the negativeside.
NOTE:The batteryyou havemaydifferslightlyfromthe oneshownin
Figure21. Referto the PartsList.
IMPORTANT:Whenreplacingbatterypackin handlepanel,battery
packmustbepositionedwith the positiveterminalto the leftside
andthe negativeterminalto the rightside of panel(Positiveterminal
is closestto the keyswitch).SeeFigure21.Replacingbatterypack
incorrectlywill causeseriousdamage.
4. Reattachbatterycoverto batteryhousingbysecuringwiththe
twoscrewsremovedearlier,makingsureto snap thewire conduit
onthe left intoplaceonthe housing.
5. Foldhandlesbackup andtightenstarknobs.
lDo not the fromthe electricstarter for /
remove batterypack housing
anyreasonother thanreplacement, j
Charging Battery
The batterycontainscorrosivefluidandtoxic material;handlewith
careandkeepawayfromchildren.Do notpuncture,disassemble,
mutilateor incineratethe battery.Explosivegasescouldbevented
duringchargingordischarging.Useina wellventilatedarea,away
fromsourcesof ignition.
NOTE:The specialdesignedplugon the chargerwill onlyfit intothe
plugonthe batterybox.
1. Plugthe batterychargerintothe porton the undersideof the
batteryhousing.SeeFigure22.
2. Insertthe batterychargerplugintoa standard120volthousehold
outlet.Chargebatteryfor 8to 10hoursbeforeinitial use.Failure
to doso mayresultindiminishedbatterylife.Do not charge
longer than 12 hours. The batteryshouldonly needto be
chargeduponinitialsetupand afterany otherextendedperiodsof
non-use.
3. Aftercharging,disconnectchargerplugfromoutletfirst,then
disconnectchargerleadfrombattery.
18
Figure20
+
Positive
h -. Terminal
egat,ve /
........::Term inal_ I
J
Figure21
f
Figure22
iMPORTANT:Alwaysplugchargerleadintobatterypackleadfirst,
andtheninsertbatterychargerpluginto120voltstandardhousehold
outlet.Followthisorderofactioneverytimeyouchargethebattery.
Useonlythebatterychargersuppliedwiththismower.
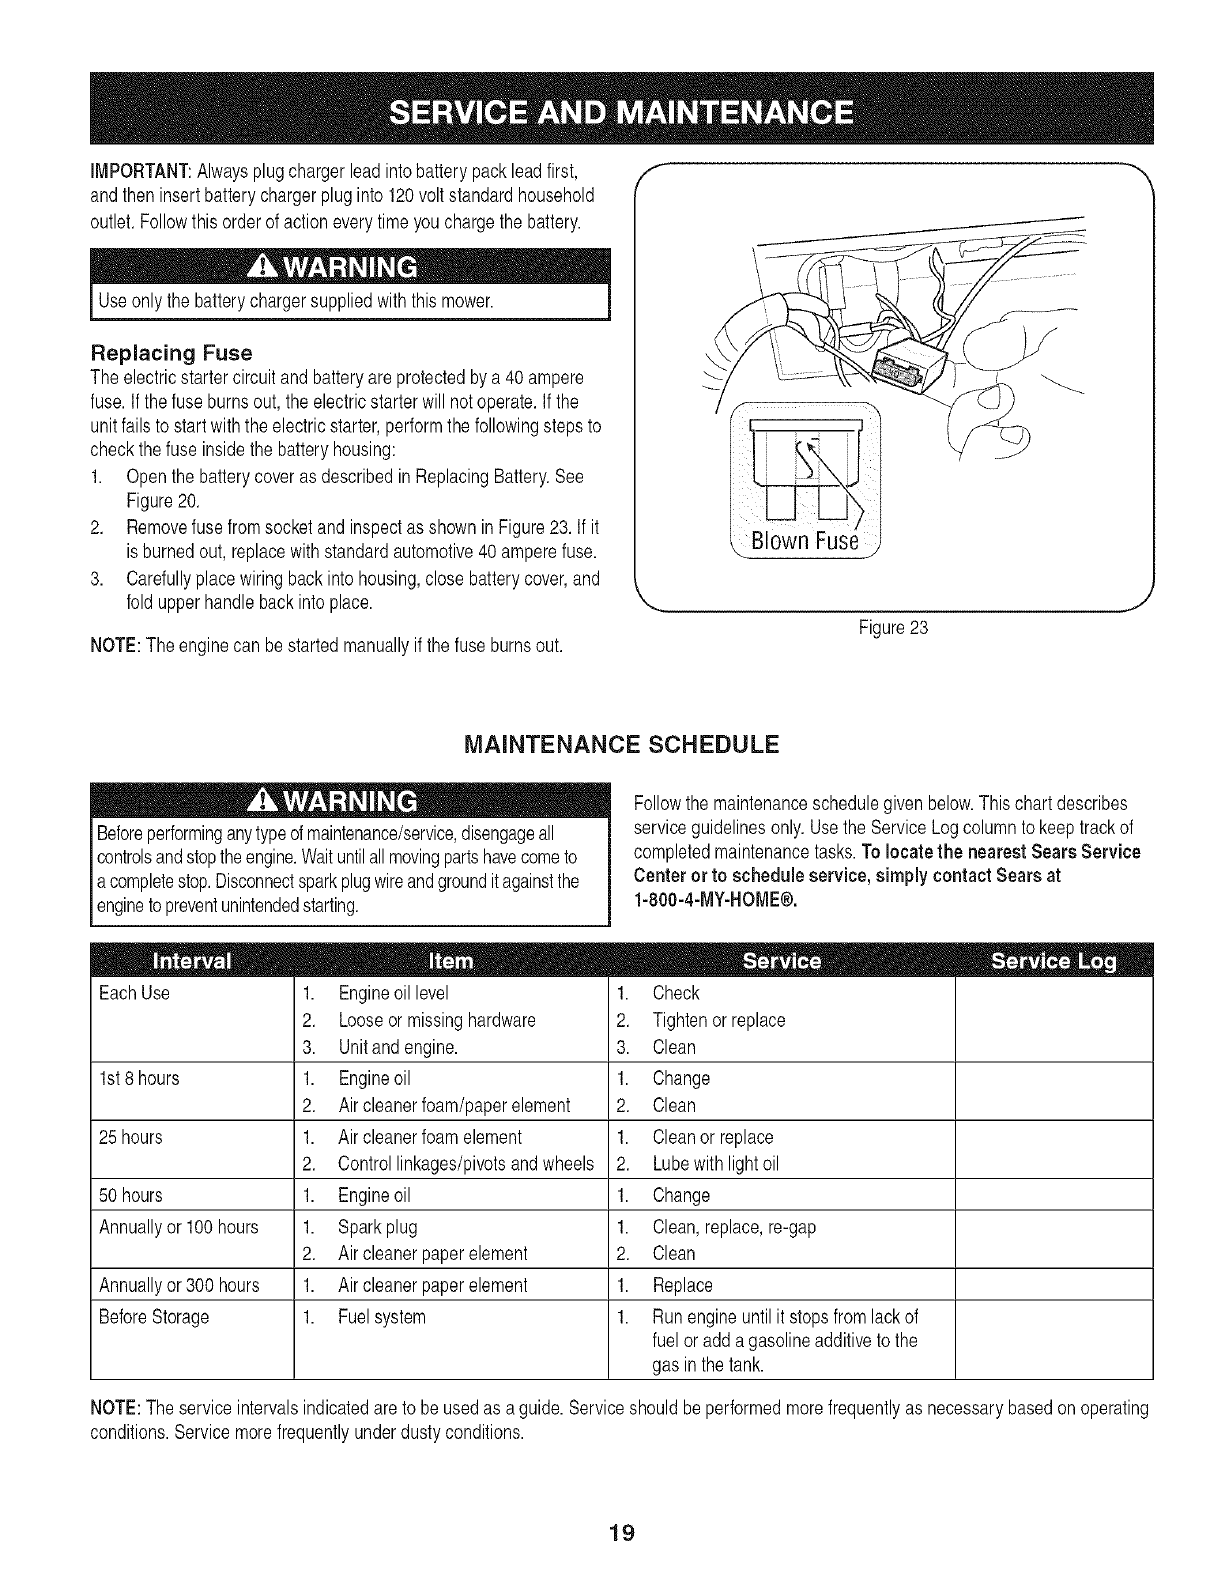
Replacing Fuse
The electricstartercircuitandbatteryareprotectedbya 40 ampere
fuse.If thefuseburnsout,the electricstarterwill notoperate.Ifthe
unitfailsto start withthe electricstarter,performthe followingstepsto
checkthefuse insidethe batteryhousing:
1. Openthe batterycoveras describedinReplacingBattery.See
Figure20.
2. Removefusefromsocketand inspectas shownin Figure23. If it
is burnedout, replacewithstandardautomotive40amperefuse.
3. Carefullyplace wiringbackinto housing,closebatterycover,and
fold upperhandlebackinto place.
NOTE:The enginecan be startedmanuallyif the fuseburnsout.
f
.... J
Figure23
MAINTENANCE SCHEDULE
Beforeperforminganytypeofmaintenance/service,disengageall
controlsandstoptheengine.Waituntilallmovingpartshavecometo
a completestop.Disconnectsparkplugwireandgroundit againstthe
enginetopreventunintendedstarting.
Followthe maintenanceschedulegivenbelow.Thischartdescribes
serviceguidelinesonly.Usethe ServiceLogcolumnto keeptrackof
completedmaintenancetasks.To locatethe nearest Sears Service
Center or to schedule service, simply contactSears at
1-800-4-MY-HOME®.
EachUse
1st8 hours
25 hours
50 hours
Annuallyor 100hours
Annuallyor 300hours
BeforeStorage
1. Engineoil level
2. Looseormissinghardware
3. Unitandengine.
1. Engineoil
2. Aircleanerfoam/paperelement
1. Aircleanerfoamelement
2. Controllinkages/pivotsandwheels
1. Engineoil
1. Sparkplug
2. Aircleanerpaperelement
1. Aircleanerpaperelement
1. Fuelsystem
= =
1. Check
2. Tightenor replace
3. Clean
1. Change
2. Clean
1. Cleanor replace
2. Lubewith lightoil
1. Change
1. Clean,replace,re-gap
2. Clean
1. Replace
1. Runengineuntil it stopsfromlackof
fuelor adda gasolineadditiveto the
gas inthe tank.
NOTE:The serviceintervalsindicatedare to beusedas a guide.Serviceshouldbeperformedmorefrequentlyas necessarybasedon operating
conditions.Servicemorefrequentlyunderdustyconditions.
19
Neverstorelawnmowerwithfuel intank indoorsor inpoorly
ventilatedareaswherefuel fumesmayreachan openflame,spark,
or pilot lightas ona furnace,waterheater,clothesdryer,or gas
appliance.
PREPARING THE ENGINE
Engineto be storedover30daysshouldbecompletelydrainedof fuel
(gasoline)to preventgumdepositsformingon essentialcarburetor
_artsandfuel system.
Gasolineis extremelyflammableandcan beexplosiveundercertain
conditions.Draingasolinebeforestoringthe equipmentfor extended
)eriods.Draingasolinein awell-ventilatedareaawayfromany
;ourceof flameorsparks,includingany applianceswitha pilotlight.
Storegasolinein anapprovedcontainerin safelocation.
1. Removethe sparkplugcap fromsparkplugto preventaccidental
startingthe engine.
2. Emptythe fuelfromthe fueltankwitha pumpor siphon.
3. Fitthe plugcap onthe sparkplugsecurely
4. Startand runtheengineat idlespeedto usedupthe fuel inthe
fuel system.
Beforemaintainingengine,stopthe engineandallowit cool. I
5. Removethe sparkplugandpourapprox.1-2mL(0.06-0.1cu.in)
of newengineoilthroughthe plughole.Slowlypullthe recoil
startergripseveraltimesandreinstallthesparkplug.
6. Slowlypullthe recoilstartergrip untilyoufeel compressionand
leaveit there.
7. Cleaneverypartof the engine.
8. Afterperiodof storage,changeengineoil. (Referto "OilChange"
sectionin "MAINTENANCE"section).
l Gasolineis a toxicsubstance.Disposeof gasolineproperly.Contact
yourlocal authoritiesfor approveddisposalmethods. J
PREPARING THE LAWN MOWER
,, Cleanand lubricatemowerthoroughlyas describedin the lubrica-
tion instructions.
,, Donot usea pressurewasheror gardenhoseto cleanyour unit.
,, Coatmower'scuttingbladewithchassisgreaseto prevent
rusting.
,, Referto PREPARINGTHEENGINEfor correctenginestorage
instructions.
,, Storemowerin a dry,cleanarea. Do notstorenextto corrosive
materials,suchas fertilizer.
Whenstoringany typeof powerequipmentina poorlyventilatedor
metalstorageshed,careshouldbetakento rust-prooftheequipment.
Usinga lightoil orsilicone,coatthe equipment,especiallycablesand
all movingpartsofyour lawnmowerbeforestorage.
Battery
The batterymustbestoredwitha full charge.Extendedstorageof a
dischargedbatterywill reducelifeandcapacityof the battery.
20
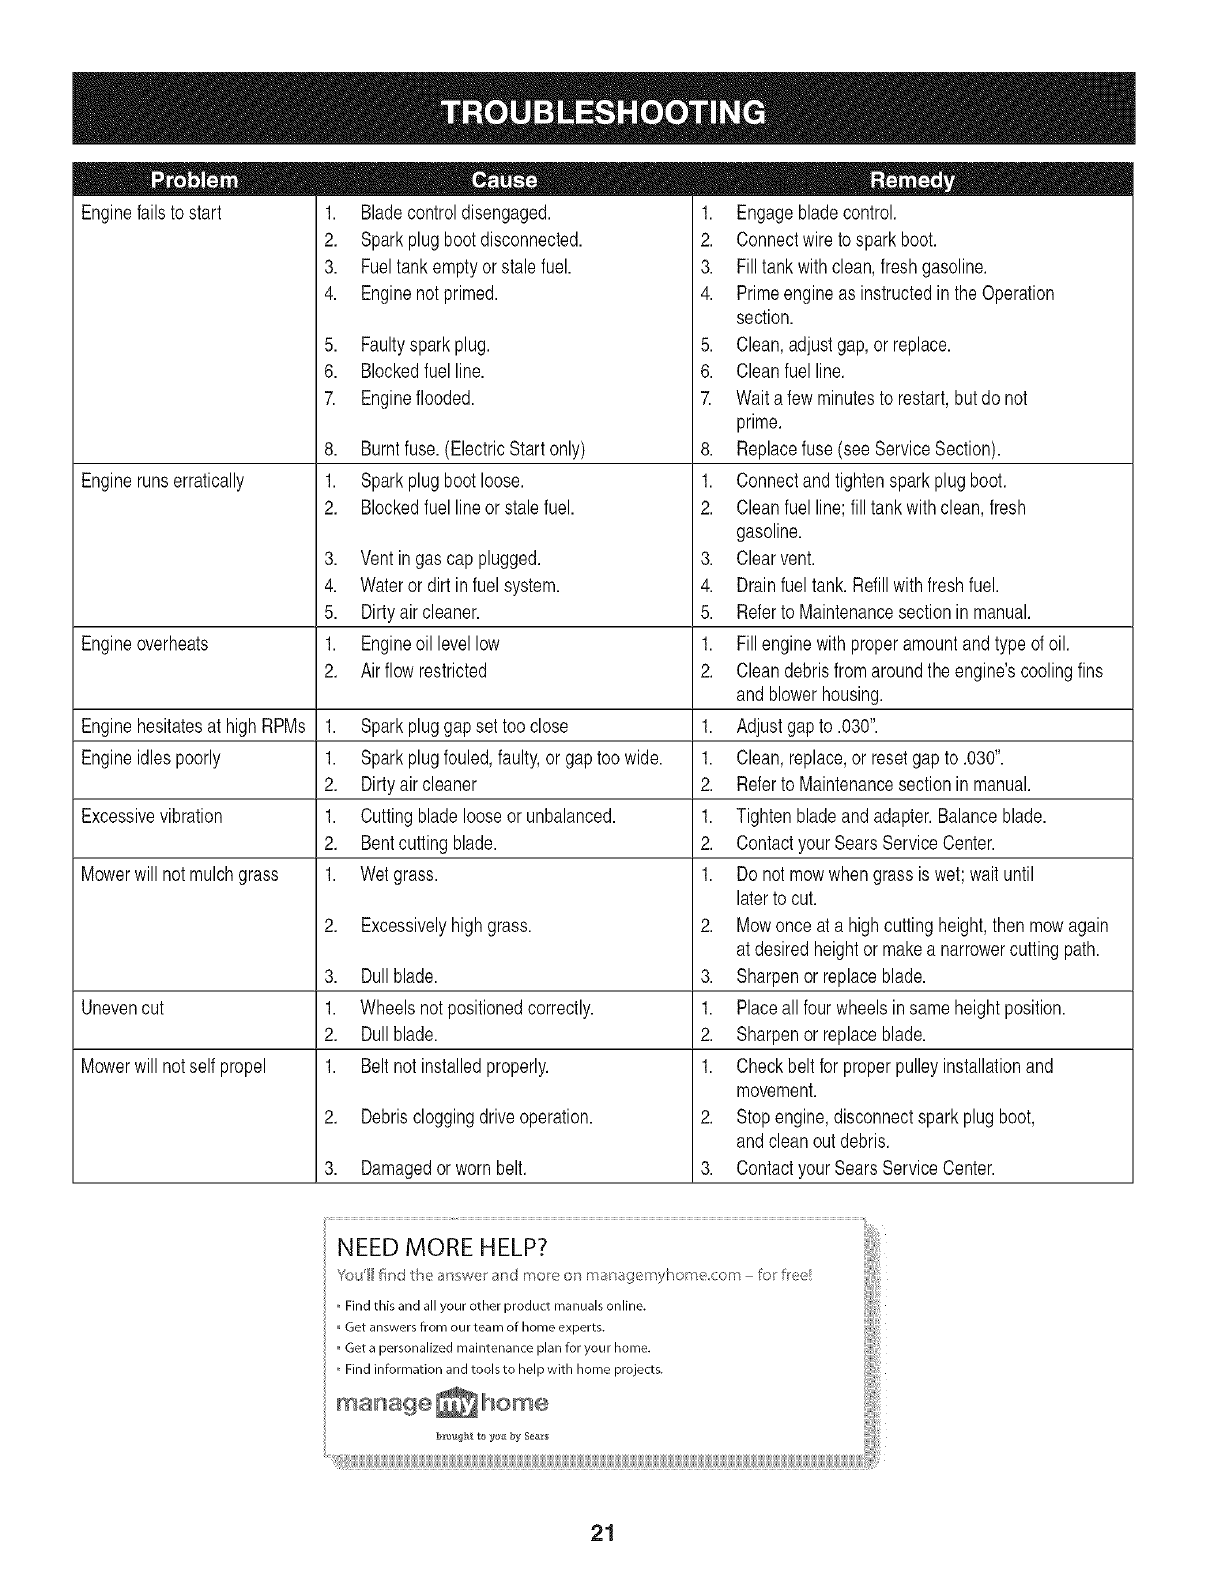
Enginefailsto start
Enginerunserratically
1. Bladecontroldisengaged.
2. Sparkplugbootdisconnected.
3. Fueltankemptyorstalefuel.
4. Enginenotprimed.
5. Faultysparkplug.
6. Blockedfuel line.
7. Engineflooded.
8. Burntfuse.(ElectricStartonly)
1. Sparkplugbootloose.
2. Blockedfuel lineor stalefuel.
3. Ventingas cap plugged.
4. Wateror dirt in fuelsystem.
5. Dirtyair cleaner.
1. Engineoil levellow
2. Airflowrestricted
Engineoverheats
Enginehesitatesat highRPMs 1. Sparkpluggapset tooclose
Engineidles poorly 1. Sparkplugfouled,faulty,or gaptoo wide.
2. Dirtyair cleaner
Excessivevibration 1. Cuttingbladelooseor unbalanced.
2. Bentcuttingblade.
Mowerwill not mulchgrass 1. Wetgrass.
2. Excessivelyhighgrass.
3. Dullblade.
Unevencut 1. Wheelsnotpositionedcorrectly.
2. Dullblade.
Mowerwill notself propel 1. Beltnot installedproperly.
2. Debriscloggingdriveoperation.
3. Damagedorworn belt.
1. Engagebladecontrol.
2. Connectwireto sparkboot.
3. Filltankwithclean,freshgasoline.
4. Primeengineas instructedinthe Operation
section.
5. Clean,adjustgap,or replace.
6. Cleanfuel line.
7. Waita fewminutesto restart,butdo not
prime.
8. Replacefuse(see ServiceSection).
1. Connectandtightensparkplugboot.
2. Cleanfuel line; fill tankwithclean,fresh
gasoline.
3. Clearvent.
4. Drainfueltank. Refillwithfreshfuel.
5. Referto Maintenancesectionin manual.
1. Fillenginewithproperamountand typeof oil.
2. Cleandebrisfromaroundthe engine'scoolingfins
andblowerhousing.
1. Adjustgapto .030".
1. Clean,replace,or resetgap to .030".
2. Referto Maintenancesectionin manual.
1. Tightenbladeandadapter.Balanceblade.
2. Contactyour SearsServiceCenter.
1. Do notmowwhengrassis wet;waituntil
laterto cut.
2. Mowonce at a highcutting height,then mowagain
at desiredheightor makea narrowercuttingpath.
3. Sharpenor replaceblade.
1. Placeall fourwheelsinsameheightposition.
2. Sharpenor replaceblade.
1. Checkbelt for properpulleyinstallationand
movement.
2. Stopengine,disconnectsparkplugboot,
andcleanoutdebris.
3. Contactyour SearsServiceCenter.
N EED M 0 RE H EL P?
Yc_'H fired he _:_ w_r arid more o_l mar/,_fj/_rnyhome_c-om for fr_,e
°Find this and all your other product manuals online.
Get answers from our team of home experts.
Get a personalized maintenance plan for your home.
oFind information and tools to help with home projects.
b_ugl_t l_ y_a by Sear_
21
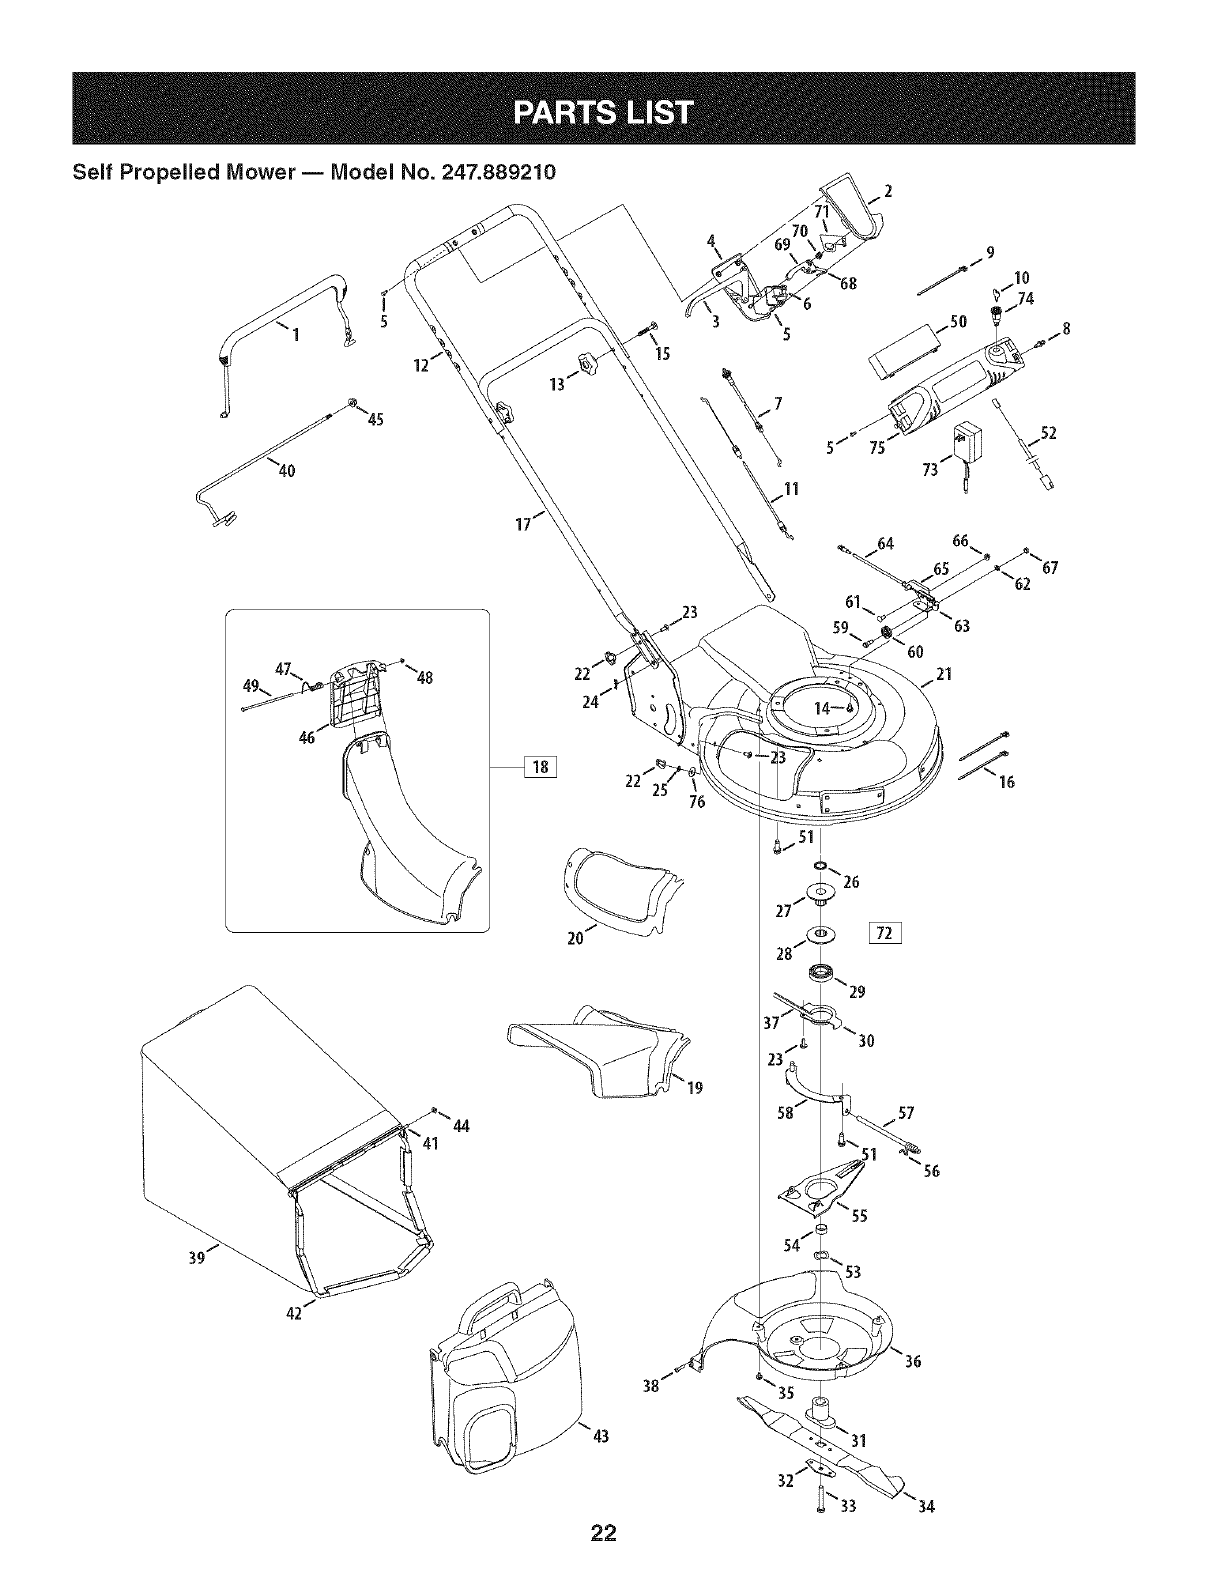
Self Propelled Mower- Model No. 247.889210
20
42/
38/
53
22
34

Self Propelled Mower- Model No. 247.889210
m
1
2
3
4
5
6
7
8
9
10
11
12
13
14
15
16
17
18
19
2O
21
22
23
24
25
26
27
28
29
30
31
32
33
34
35
36
37
38
647-0004
731-0904A
731-0620A
731-0905A
710-1667A
731-0906
746-0711B
728-0199
726-0240
725-0201
746-04357
749-04354A
720-04072
710-1652
710-1174
726-0240
749-0907B
631-0066
731-1832
731-1833A
782-0078B
712-0397
710-0703
714-0104
726-0233
750-1071
756-0612A
756-0613
741-0545
682-7527
748-0377C
736-0524B
710-1257
742-0741
710-0653
731-1828
754-0460
710-0895
D _ Q I
BladeControl
UpperControlHousing
DriveControl
LowerControlHousing
C SunkTapScrew,#10x.75Lg
CableMountingCap
DriveCable- 51"
Rivet
CableTie
Key
ControlCable- 40"
UpperHandle
Star Knob
Screw,1/4-20x .625
CarriageBolt,5/16-18x 2.0
CableTie
LowerHandle
AdapterAssembly
SideDischargeChute
MulchCover
Deck21"
Wing Nut
CarriageBolt,1/4-20x .75"
CotterPin
PushNut, .25x IDx .50OD
SleeveSpacer,.881Dx 1.130D
HalfPulley:2.62OD
HalfPulley:2.62OD x 1.61
BallBearing
Cup
BladeAdapter
BladeBellSupport
HexBolt,3/8-24 x 2.5
21"MulchingBlade
Screw,1/4-20x 3.75
Baffle
Belt,3/8 x 39.24
Screw,1/4-15x .750
m
39
4O
41
42
43
44
45
46
47
48
49
5O
51
52
53
54
55
56
57
58
59
60
61
62
63
64
65
66
67
68
69
70
71
72
73
74
75
76
664-04093
747-0940A
747-0939
747-0937
631-0071
726-0106
712-04063
731-1874
732-0819
726-0111
747-0965
725-04323
710-0654A
725-04310
736-0526
750-1070
782-7596A
732-0807
711-1114
782-7597
738-0924A
756-0625
710-0134
736-0329
782-7575A
746-0939A
782-7574A
712-04064
712-0138
732-0627
731-0924
713-0397
16864
656-0613
725-04329
725-04347
625-04029
736-3090
D_ J a
GrassCatcher
SupportRodw/Rope Guide
PivotRod
GrassCatcherFrame
GrassCatcherCover
Cap Nut
FlangeLockNut,5/16-18
ChuteDoor
TorsionSpring
PushCap
PivotRod
12VBattery
SemsScrew,3/8-16x 1.00
ExtensionHarness
WaveWasher,1.38IDx.88OD
SlveSpacer,.88 IDx 1.00OD
ControlArm
TorsionSpring
PivotShaft
PivotBracket
ShlderScrew,.375IDx 1/4-14
Cable Roller
CarriageScrew,1/4-20x .62
LockWasher,1/4
Cable MountingBracket
6 SpeedCable
CableAdjustmentBracket
HexNut 1/4-20
HexNut 1/4-28
ShiftLeverSpring
6 SpeedShiftLever
GearInsert
6 Spd.RackCableBracket
PulleyAssembly
12VBatteryCharger
KeySwitch
HarnessAssembly
Washer,Flat,.260x .720x .060
23
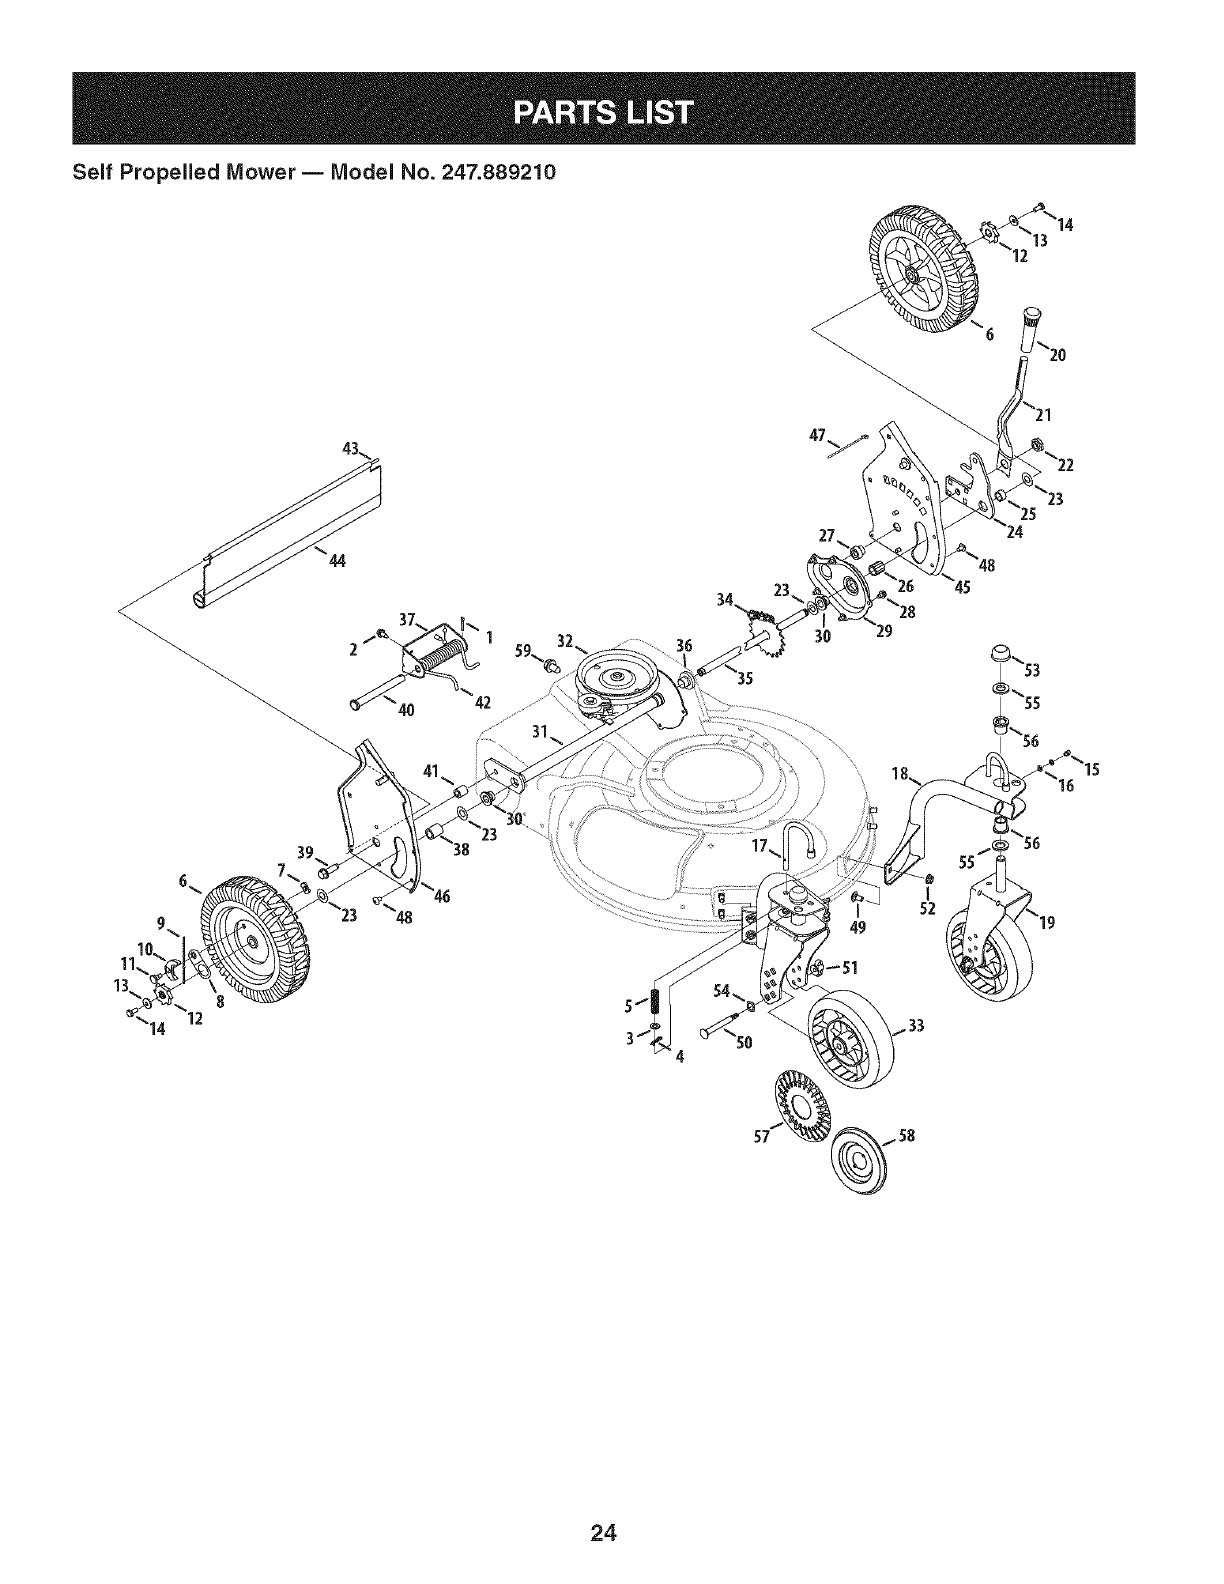
Self Propelled Mower- Model No. 247.889210
4
24

Self Propelled Mower- Model No. 247.889210
m
1
2
3
4
5
6
7
8
9
10
11
12
13
14
15
16
17
18
19
20
21
22
23
24
25
26
27
28
714-0474
710-1652
736-0264
714-0104
732-0306
734-2010
712-0414
16855
10622B
748-0381
748-0188B
738-0137A
748-0318
736-0270
710-0751
737-3000
736-0931
747-0924
682-9020A
682-9021A
682-9024
682-9026
720-0223
732-0803A
738-0529
736-0369
782-0566B
750-0515
741-0978
750-1056
710-0653
D _¸ m m
CotterPin
Screw1/4-14x .825
FlatWasher.330IDx.630OD
CotterPin
CompressionSpring
Wheel,9 x 2.125
Top LockTabWeldNut1t4-20
RatchetPawlPlate
PlasticSpringRatchet
PawlRH
PawlLH
ShlderScrew.340ID x.285OD
Wheel Ratchet
BellWasher.265IDx.75OD
HexCapScrew1/4-20x.620
GreaseFitting
FlatWasher.203IDx.403OD
Wheel PinLock
CasterAssemblyRH
CasterAssemblyLH
CasterBracketAssemblyRH
CasterBracketAssemblyLH
Grip
SpringLever
ShoulderNut.825x .165Lg.
FlatWasher.508 IDx 1.00D
PivotArm Assembly
Spacer.510IDx .70OD
Slv Bearing.504IDx .830OD
ShlderSpacer,.3851Dx .715Lg
Tap Screw1/4-20x .375
m
29
3O
31
32
33
34
35
36
37
38
39
4O
41
42
43
44
45
46
47
48
49
5O
51
52
53
54
55
56
57
58
59
682-7528
741-0324A
682-7526
618-0263A
734-1857
713-0453
638-0012
741-0522
782-0568
750-0151
710-1315
711-0835
750-0807
732-0832
732-0842
731-1901A
682-3053
682-3052
725-0157
710-1348
710-0260A
711-1146
712-0397
712-04063
726-0214
736-0232
736-0366
741-0685
731-1887
731-0981A
710-0604A
D _ J a
ChainCoverAssembly
FIgeBearing.506IDx .590Lg
TransmissionAxle Assembly
TransmissionAss'yComplete
Wheel7 x 2
Chain
RearAxleAssembly
FlgeBearing.506IDx .715Lg
HeightAdjustmentSpringBrkt.
Spacer.550 IDx .750OD
Screw3/8-16x .25
ClevisPin.50 Diax 4.82 Lg.
Spacer.385 IDx .624OD
TorsionSpring
TrailShieldWire
TrailShield
HandleBracketAssembly-LH
HandleBracketAssembly-RH
CableTie
Screw1/4-14x.500
CarriageBolt5/16-18x.62
CasterAxle
Wing Nut
FlangeLockNut5t16-18
PushCap
WaveWasher.531ID x.781OD
FlatWasher.640IDx 1.12OD
FlangeBearing
Hubcap-Spokewt Hole
Hubcap- RadialSpoke
Screw,5/16-18x.625
25
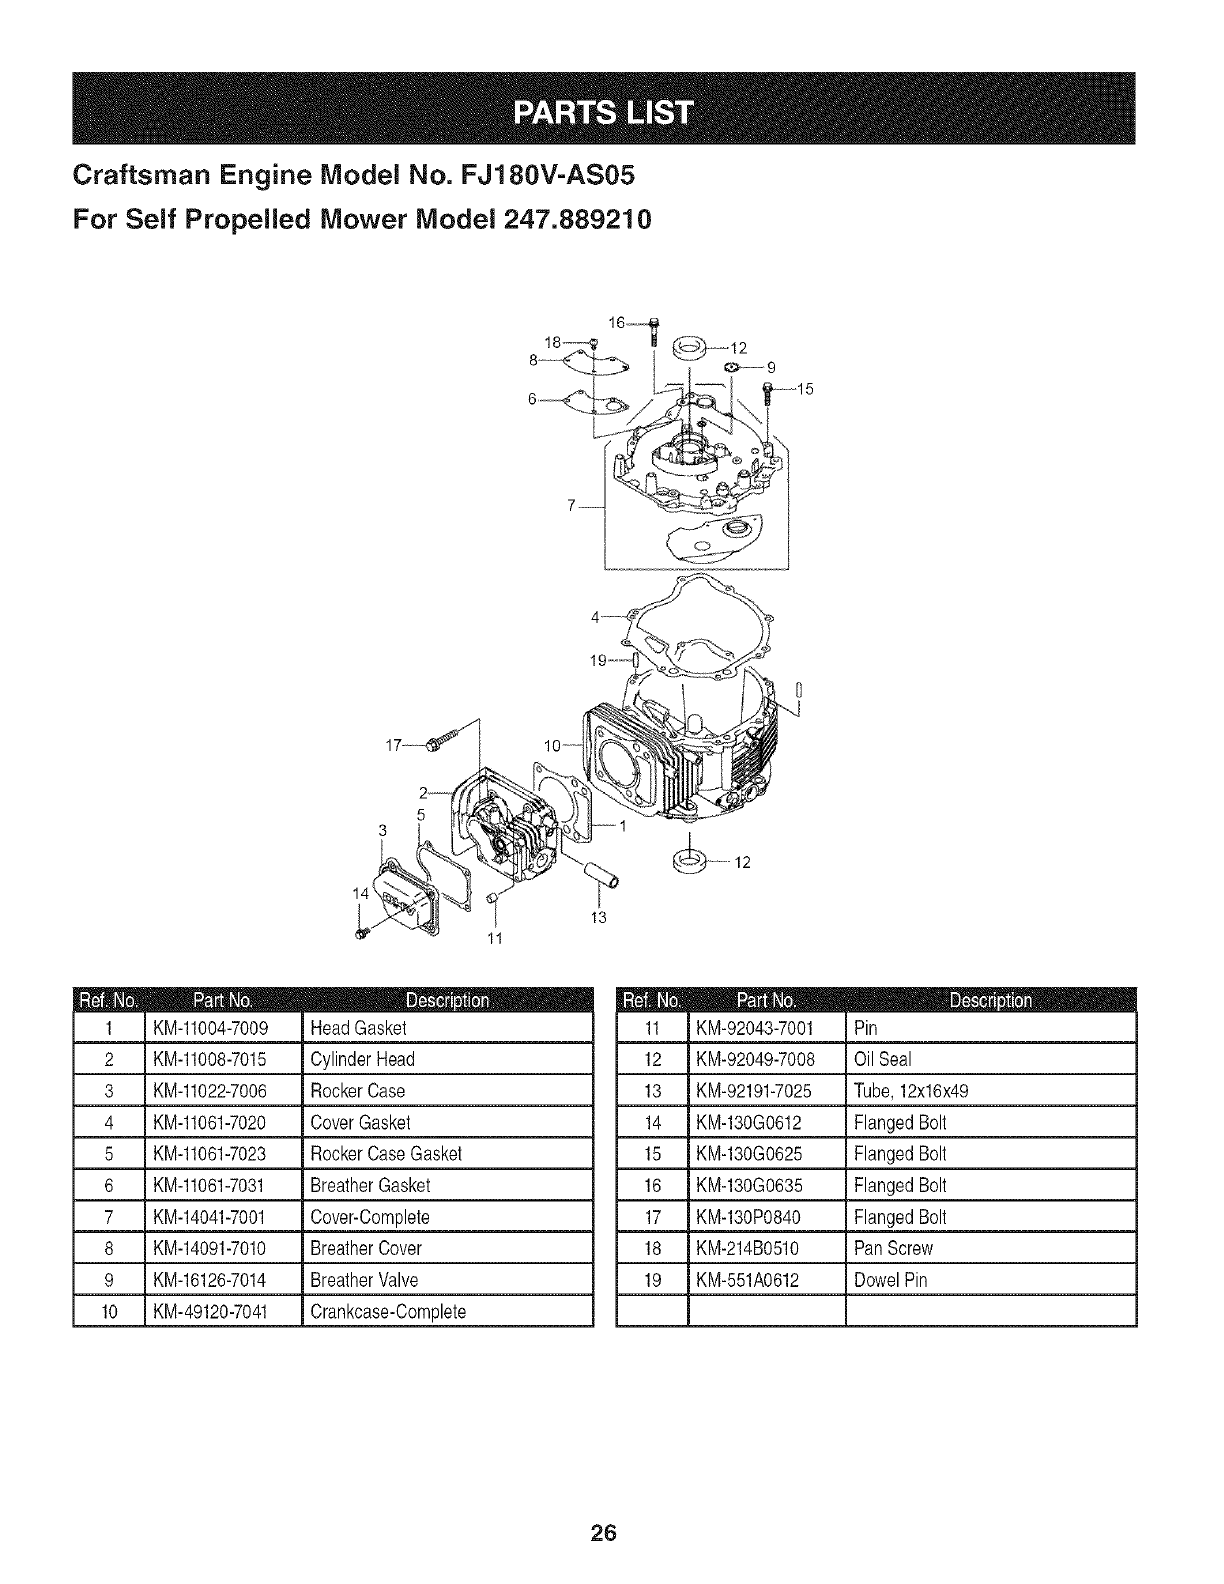
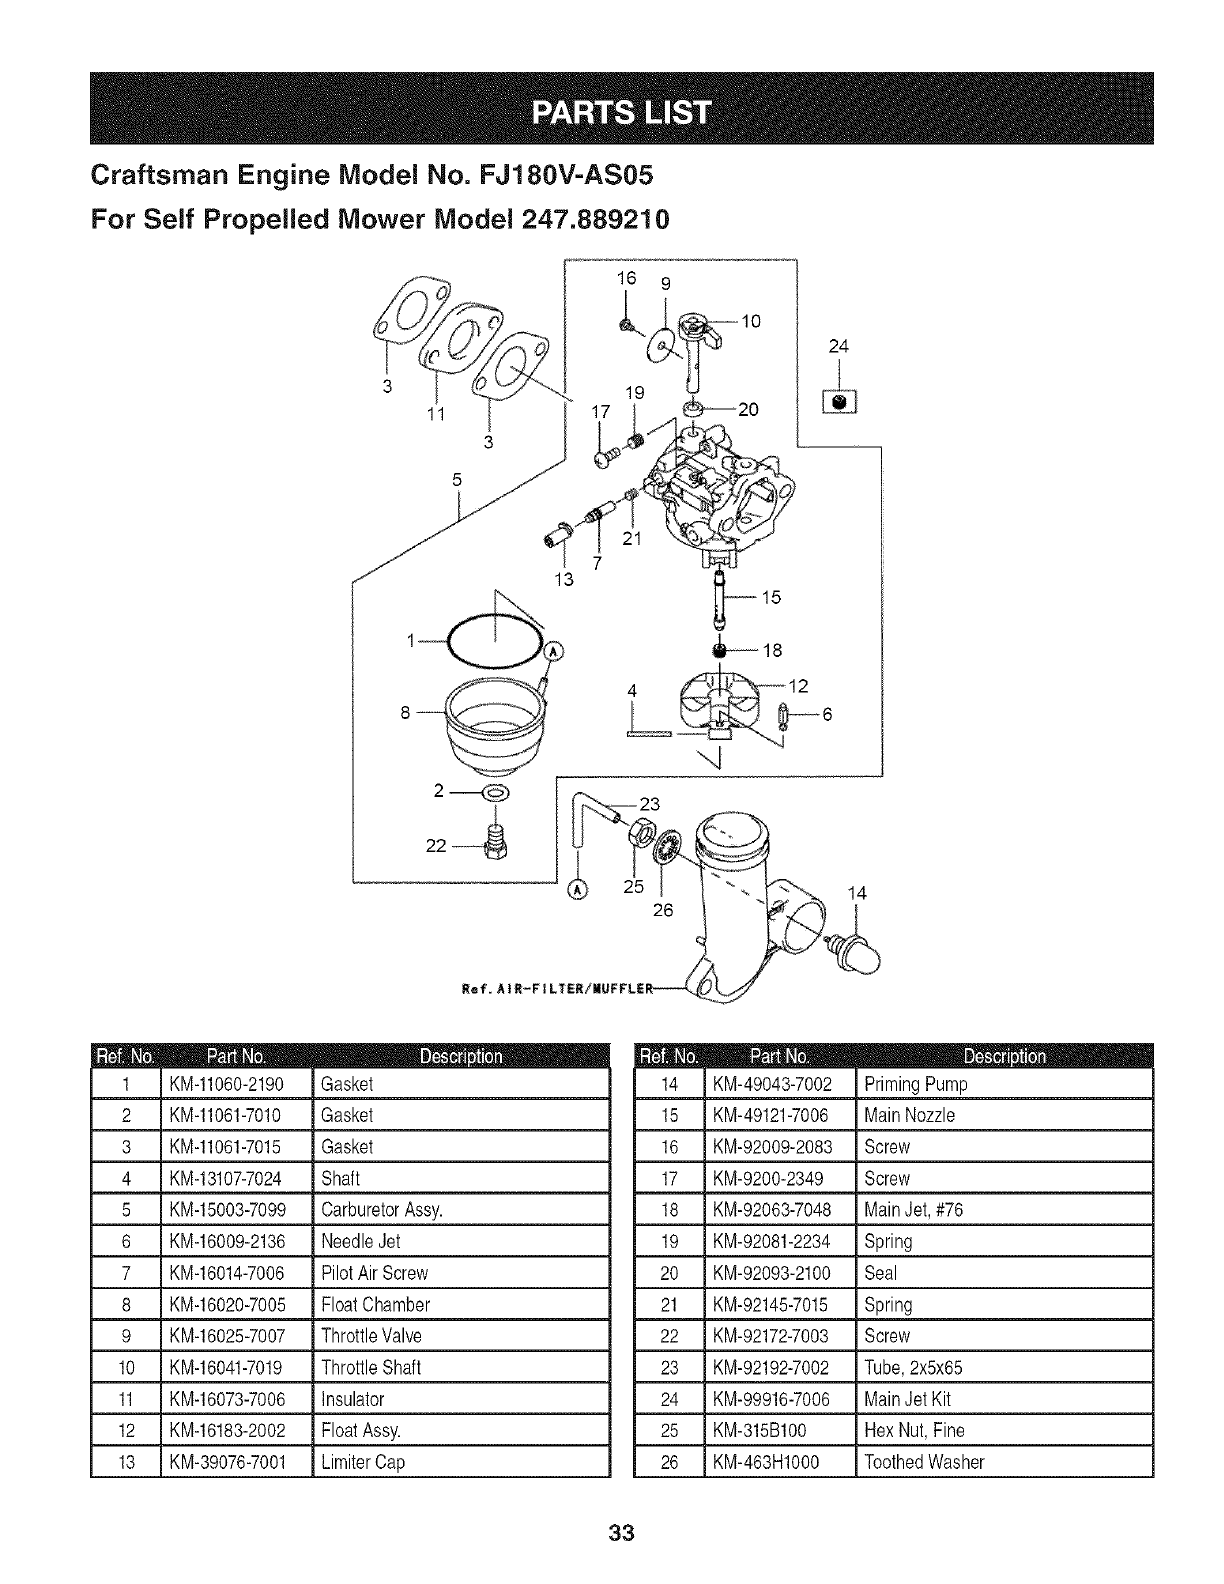
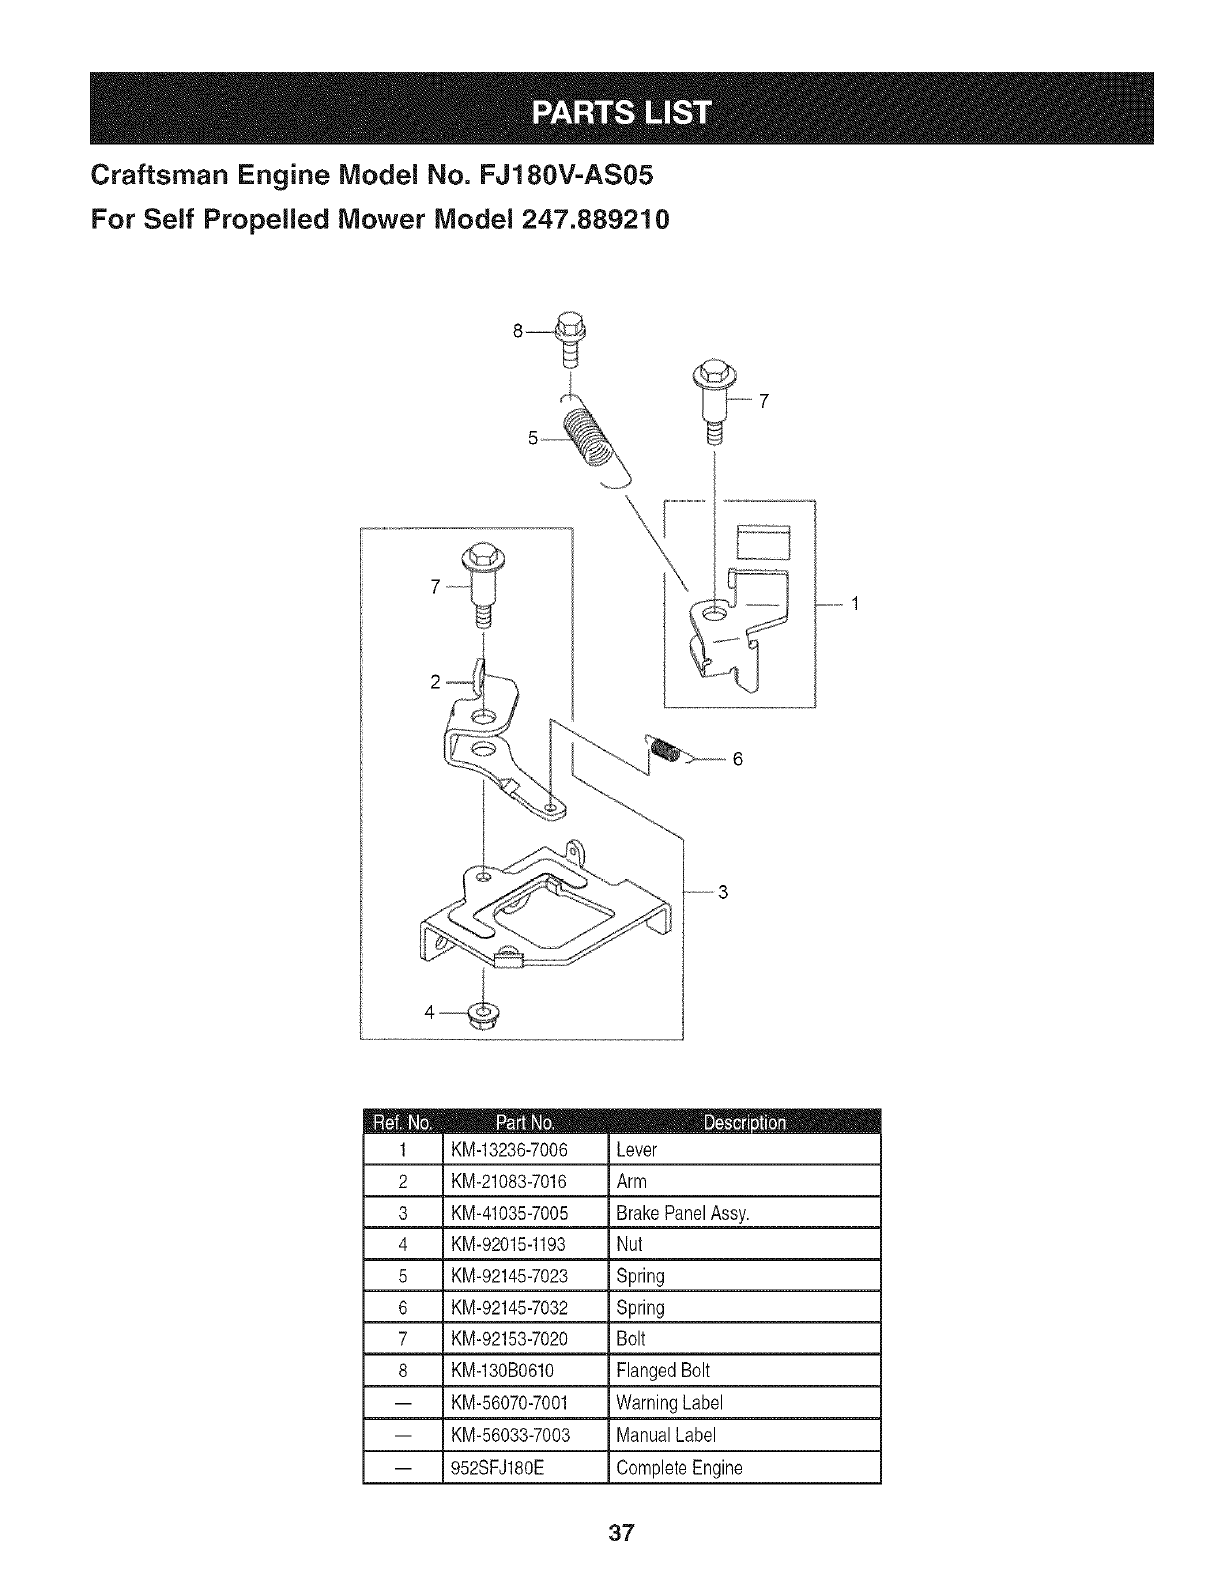
Craftsman Engine Model No. FJ180V=AS05
For Self Propelled Mower Model 247.889210
5
3
D _ 0 O
KM-11004-7009 HeadGasket
2 KM-11008-7015 CylinderHead
3 KN-11022-7006 RockerCase
4 KN-11061-7020 CoverGasket
5 KN-11061-7023 RockerCaseGasket
6 KM-11061-7031 BreatherGasket
7 KN-14041-7001 Cover-Complete
8 KN-14091-7010 BreatherCover
9 KM-16126-7014 BreatherValve
10 KN-49120-7041 Crankcase-Complete
13
KM-92043-7001 Pin
12 KM-92049-7008 Oil Seal
13 KM-92191-7025 Tube,12x16x49
14 KM-130G0612 FlangedBolt
15 KM-130G0625 FlangedBolt
16 KM-130G0635 FlangedBolt
17 KM-130P0840 FlangedBolt
18 KM-214B0510 PanScrew
19 KN-551A0612 DowelPin
26
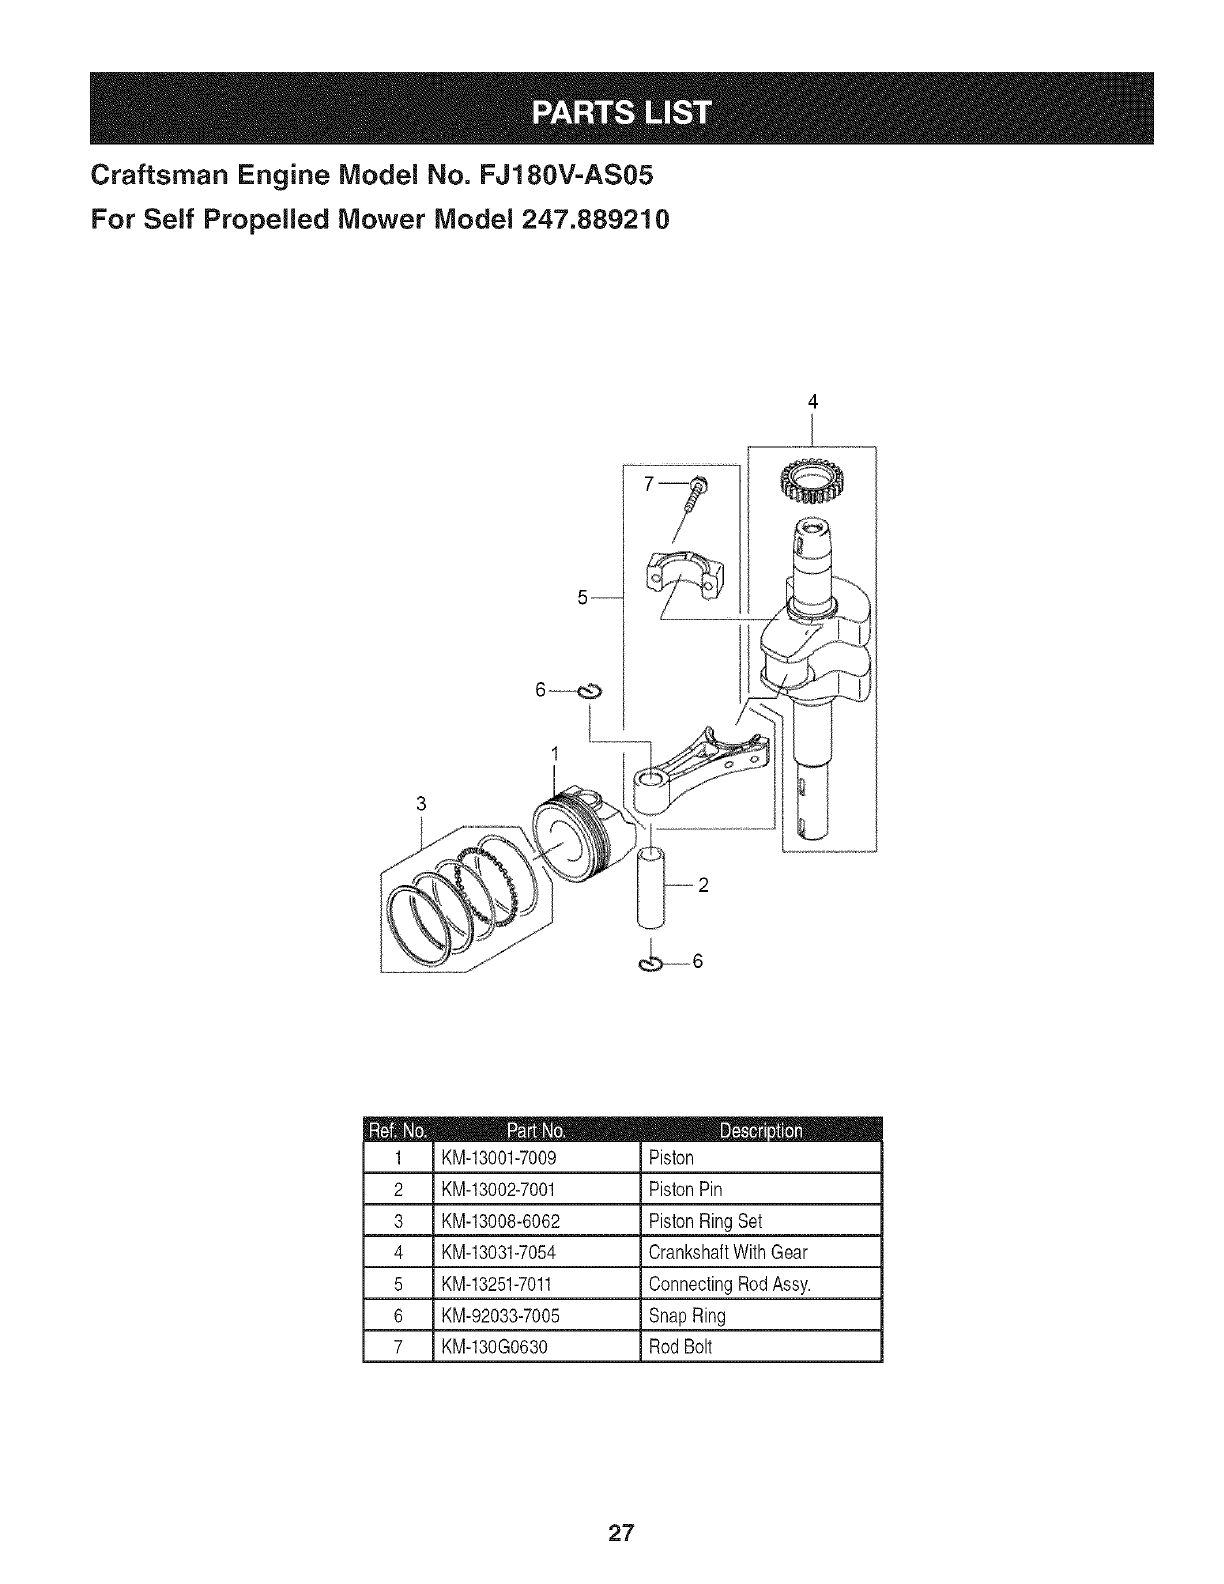
Craftsman Engine Model No. FJ180V=AS05
For Self Propelled Mower Model 247.889210
4
!
KM-13001-7009
2 KM-13002-7001
3 KM-13008-6062
4 KM-13031-7054
5 KM-13251-7011
6 KM-92033-7005
7 KM-130G0630
Piston
PistonPin
PistonRingSet
CrankshaftWithGear
ConnectingRodAssy.
SnapRing
Rod Bolt
27
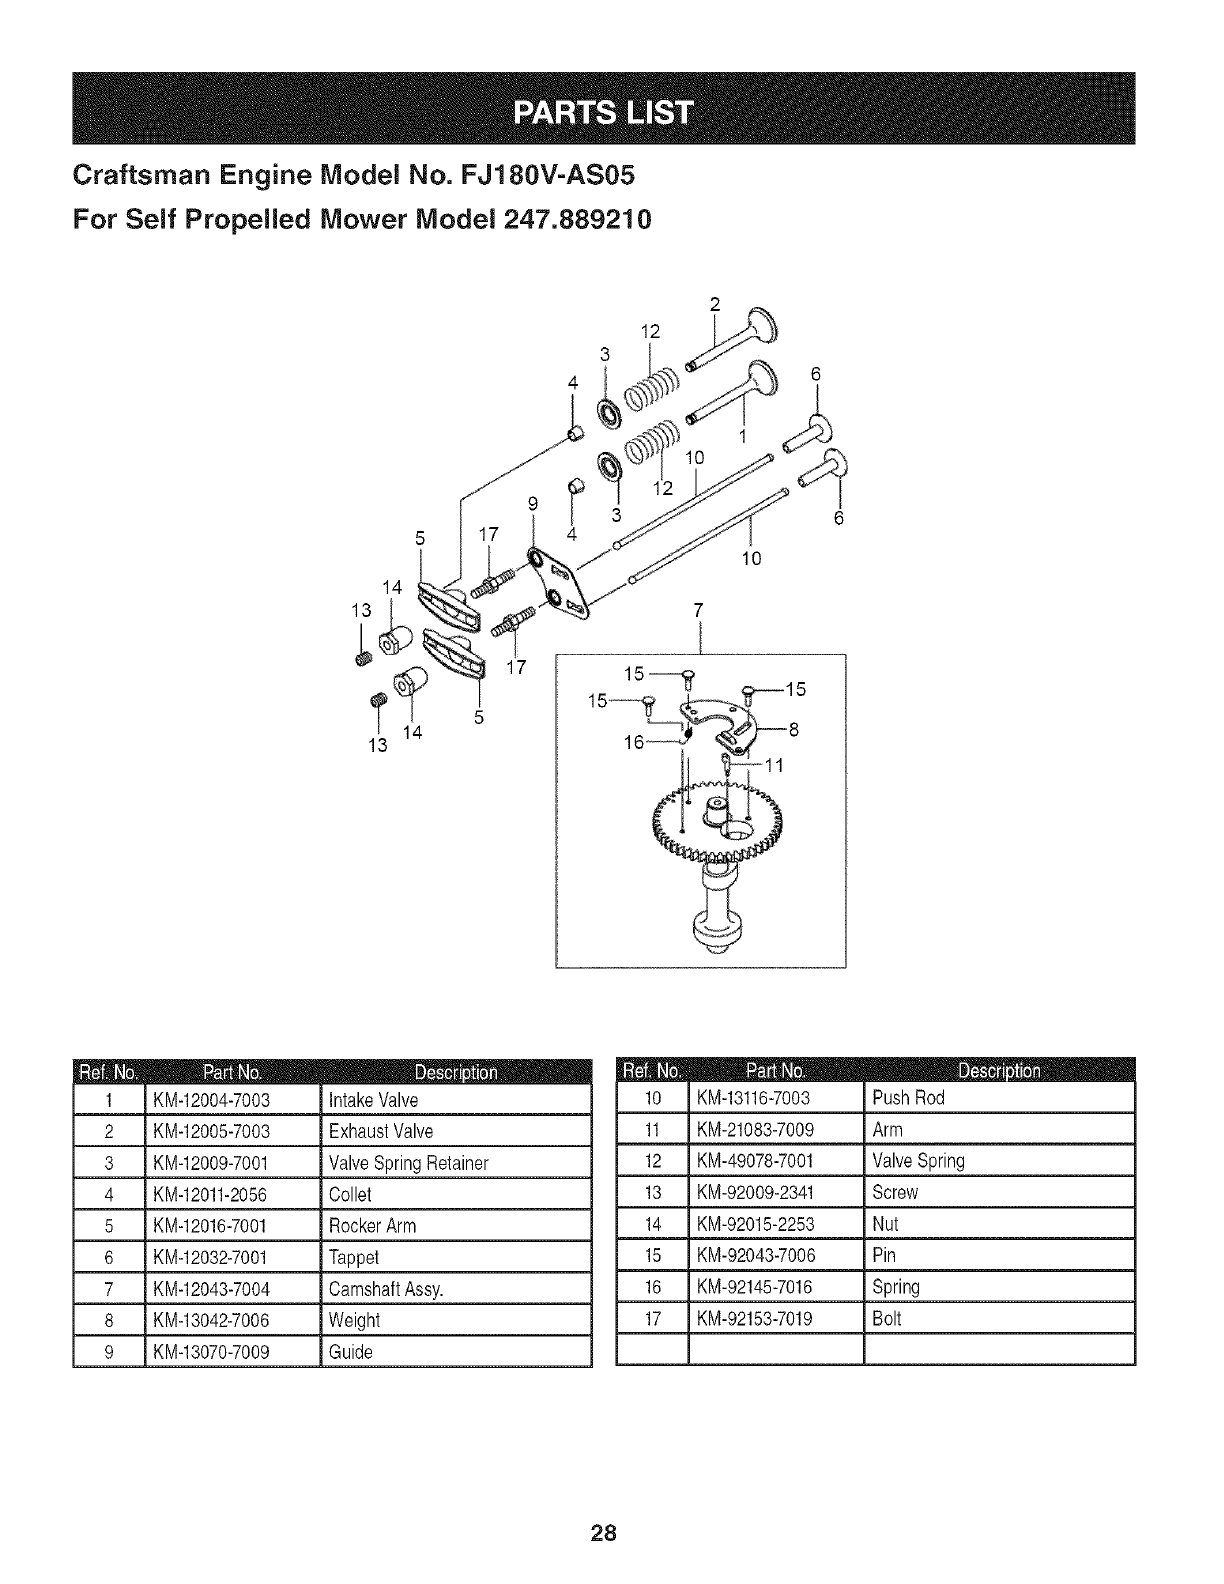
Craftsman Engine Model No. FJ180V-AS05
For Self Propelled Mower Model 247.889210
5
14
13
14
13
17
4
2
12
3
1
10
3
10
7
I
15 15
16 8
D _ ! Q
KM-12004-7003 IntakeValve
2 KM-12005-7003 ExhaustValve
3 KM-12009-7001 ValveSpringRetainer
4 KM-12011-2056 Collet
5 KM-12016-7001 RockerArm
6 KM-12032-7001 Tappet
7 KM-12043-7004 CamshaftAssy.
8 KM-13042-7006 Weight
9 KM-13070-7009 Guide
KM-13116-7003
11 KM-21083-7009
12 KM-49078-7001
13 KM-92009-2341
14 KM-92015-2253
15 KM-92043-7006
16 KM-92145-7016
17 KM-92153-7019
D _ O i
PushRod
Arm
ValveSpring
Screw
Nut
Pin
Spring
Bolt
28
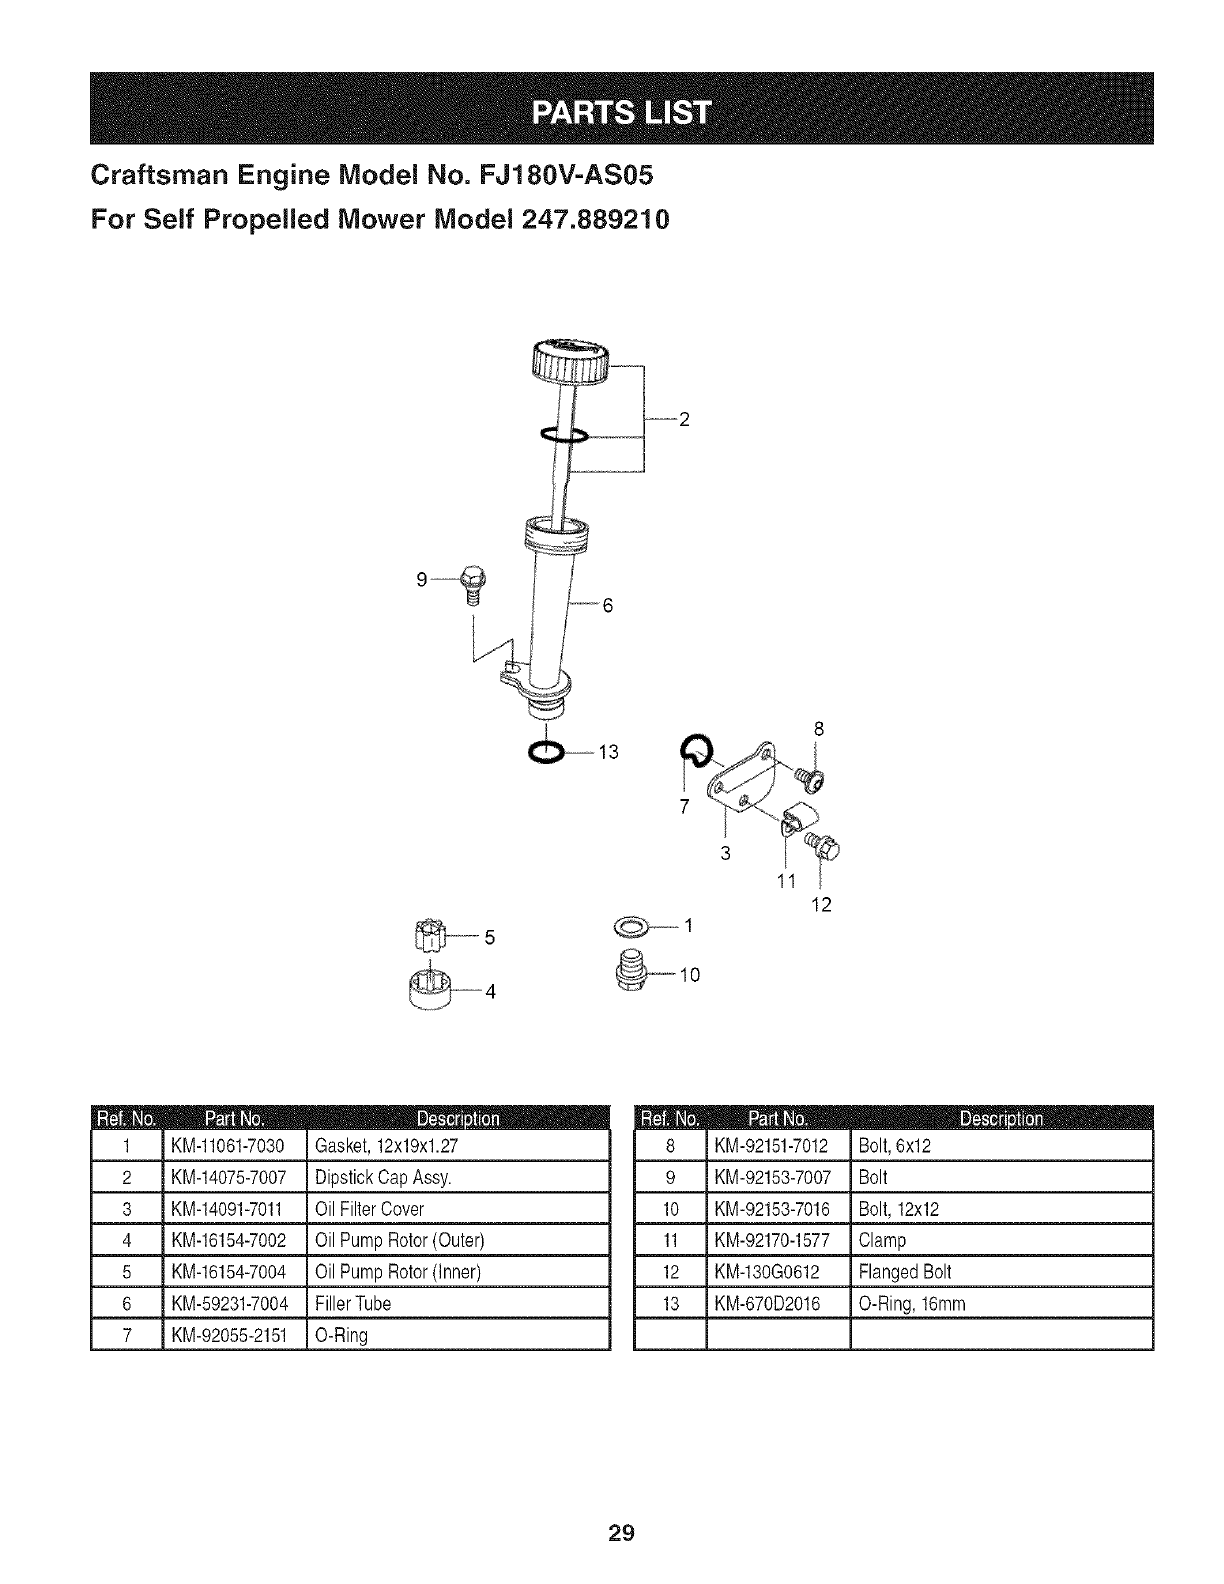
Craftsman Engine Model No. FJ180V=AS05
For Self Propelled Mower Model 247.889210
5
13
7
3
11
12
D _ e e
KM-11061-7030 Gasket,12x19x1.27
2 KM-14075-7007 DipstickCap Assy.
3 KM-14091-7011 Oil FilterCover
4 KM-16154-7002 Oil PumpRotor(Outer)
5 KM-16154-7004 Oil PumpRotor(Inner)
6 KM-59231-7004 FillerTube
7 KM-92055-2151 O-Ring
D _ O i
KM-92151-7012 Bolt,6x12
9 KM-92153-7007 Bolt
10 KM-92153-7016 Bolt,12x12
11 KM-92170-1577 Clamp
12 KM-130G0612 FlangedBolt
13 KM-670D2016 O-Ring,16mm
29

Craftsman Engine Model No. FJ180V=AS05
For Self Propelled Mower Model 247.889210
2
1
=. e
KM-11053-7009
2 KM-13280-7001
3 KM-14037-7017
4 KM-16146-7012
5 KM-59041-7009
6 KM-59066-7016
7 KM-130G0612
FanBracket
Holder
Screen
Cover
Fan
FanHousing
FlangedBolt
3O
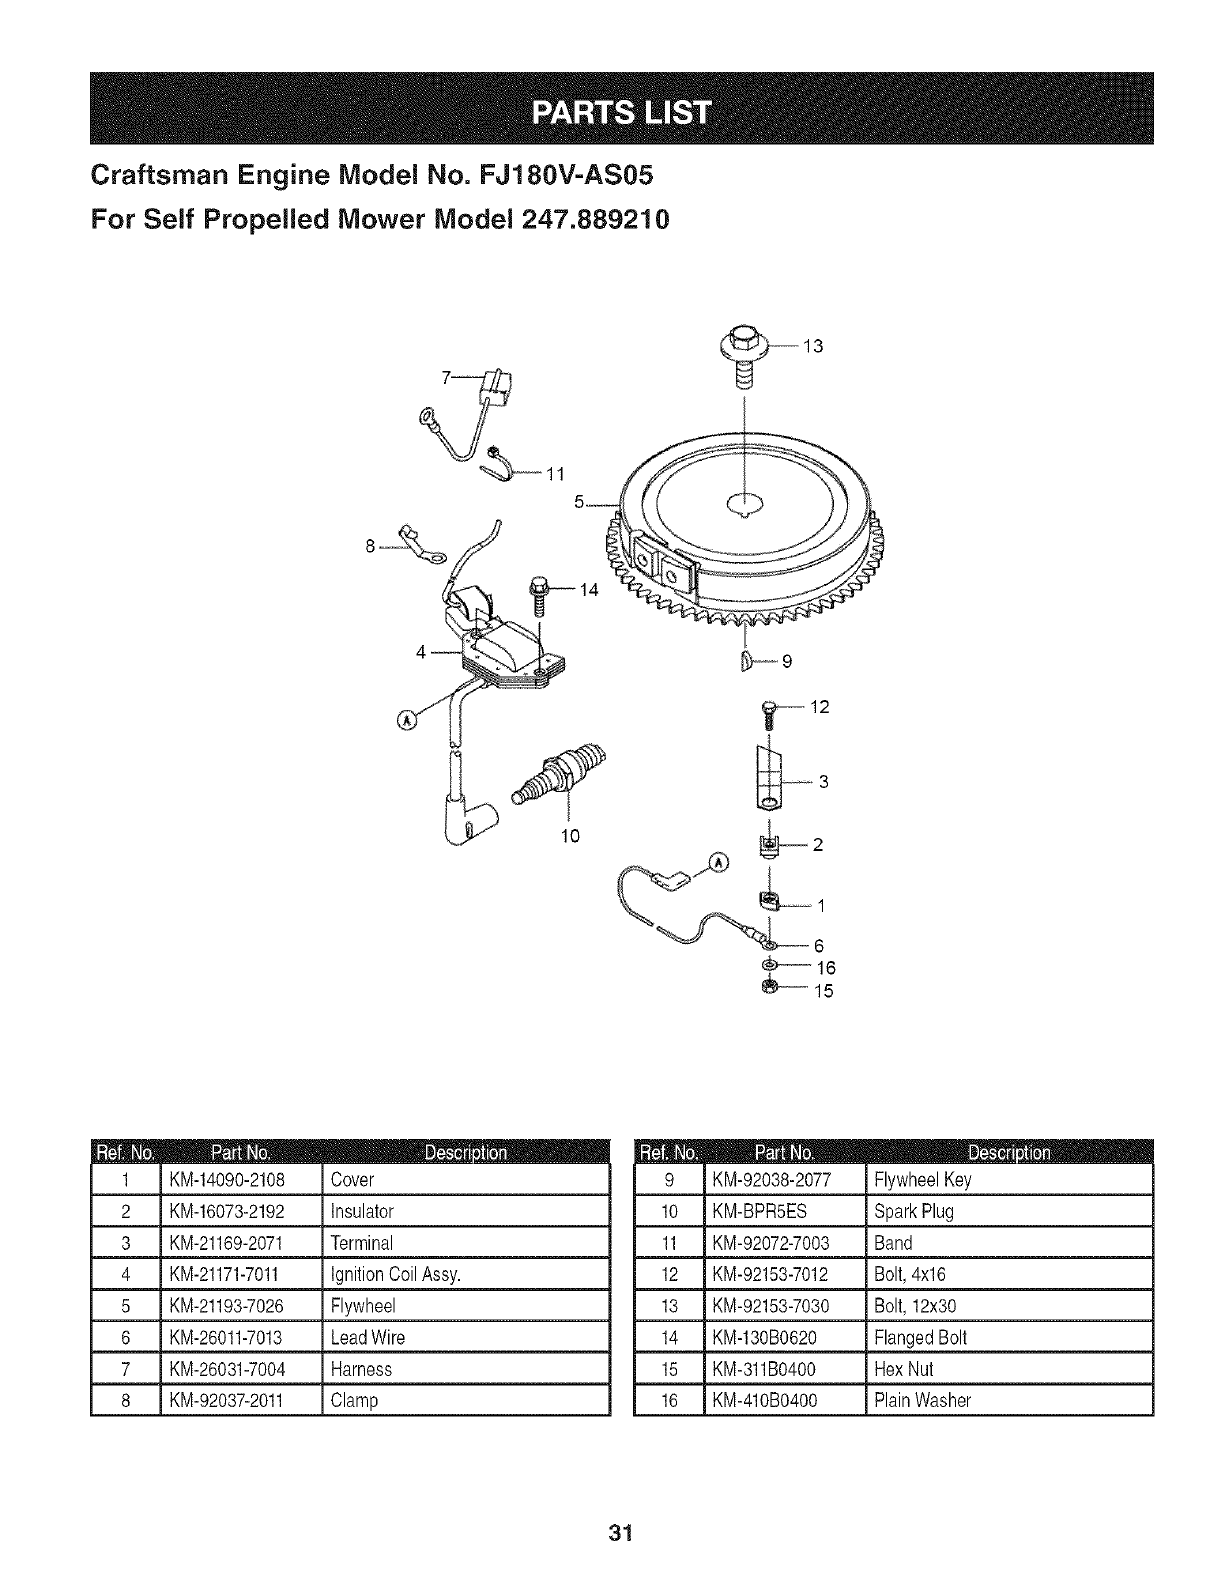
Craftsman Engine Model No. FJ180V=AS05
For Self Propelled Mower Model 247.889210
_9
6
_16
_15
D _ ee
KM-14090-2108 Cover
2 KM-16073-2192 Insulator
3 KM-21169-2071 Terminal
4 KM-21171-7011 IgnitionCoilAssy.
5 KM-21193-7026 Flywheel
6 KM-26011-7013 LeadWire
7 KM-26031-7004 Harness
8 KM-92037-2011 Clamp
D _ O i
KM-92038-2077 FlywheelKey
10 KM-BPR5ES SparkPlug
11 KM-92072-7003 Band
12 KM-92153-7012 Bolt,4x16
13 KM-92153-7030 Bolt,12x30
14 KM-130B0620 FlangedBolt
15 KM-311B0400 HexNut
16 KM-410B0400 PlainWasher
31
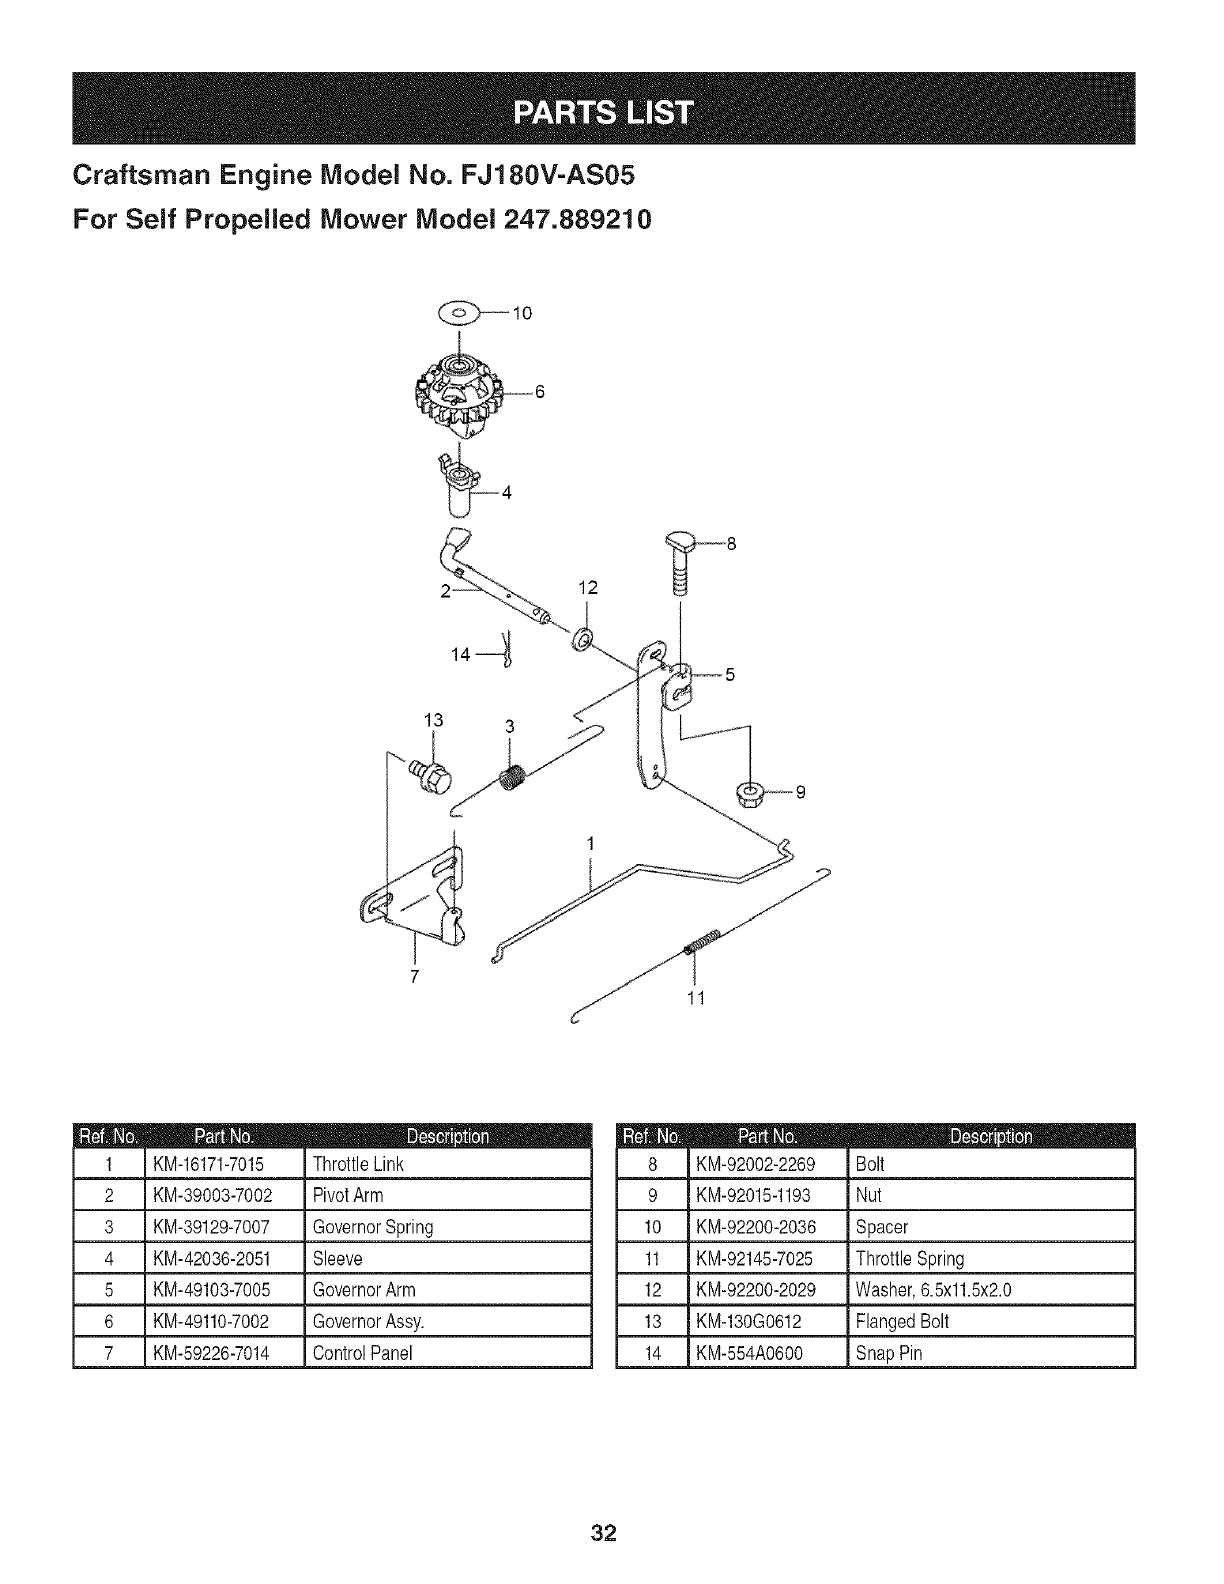
Craftsman Engine Model No. FJ180V=AS05
For Self Propelled Mower Model 247.889210
_-= 10
0
12
13
7
11
D _ Q e
KM-16171-7015 ThrottleLink
2 KM-39003-7002 PivotArm
3 KM-39129-7007 GovernorSpring
4 KM-42036-2051 Sleeve
5 KM-49103-7005 GovernorArm
6 KM-49110-7002 GovernorAssy.
7 KM-59226-7014 ControlPanel
D _ O e*
KM-92002-2269 Bolt
9 KM-92015-1193 Nut
10 KM-92200-2036 Spacer
11 KM-92145-7025 ThrottleSpring
12 KM-92200-2029 Washer,6.5x11.5x2.0
13 KM-130G0612 FlangedBolt
14 KM-554A0600 I SnapPin
32
Craftsman Engine Model No. FJ180V=AS05
For Self Propelled Mower Model 247.889210
11
3
5
24
13 7
15
4
26 14
D _ ! O
KM-11060-2190 Gasket
2 KM-11061-7010 Gasket
3 KM-11061-7015 Gasket
4 KM-13107-7024 Shaft
5 KM-15003-7099 CarburetorAssy.
6 KM-16009-2136 NeedleJet
7 KM-16014-7006 I PilotAir Screw
8 KM-16020-7005 FloatChamber
9 KM-16025-7007 ThrottleValve
10 KM-16041-7019 I ThrottleShaft
11 KM-16073-7006 Insulator
12 KM-16183-2002 i FloatAssy.
13 KM-39076-7001 LimiterCap
KM-49043-7002 PrimingPump
15 KM-49121-7006 MainNozzle
16 KM-92009-2083 Screw
17 KM-9200-2349 Screw
18 KM-92063-7048 MainJet,#76
19 KM-92081-2234 Spring
20 KM-92093-2100 Seal
21 KM-92145-7015 Spring
22 KM-92172-7003 Screw
23 KM-92192-7002 Tube,2x5x65
24 KM-99916-7006 MainJetKit
25 KM-315B100 HexNut,Fine
26 KM-463H1000 ToothedWasher
33
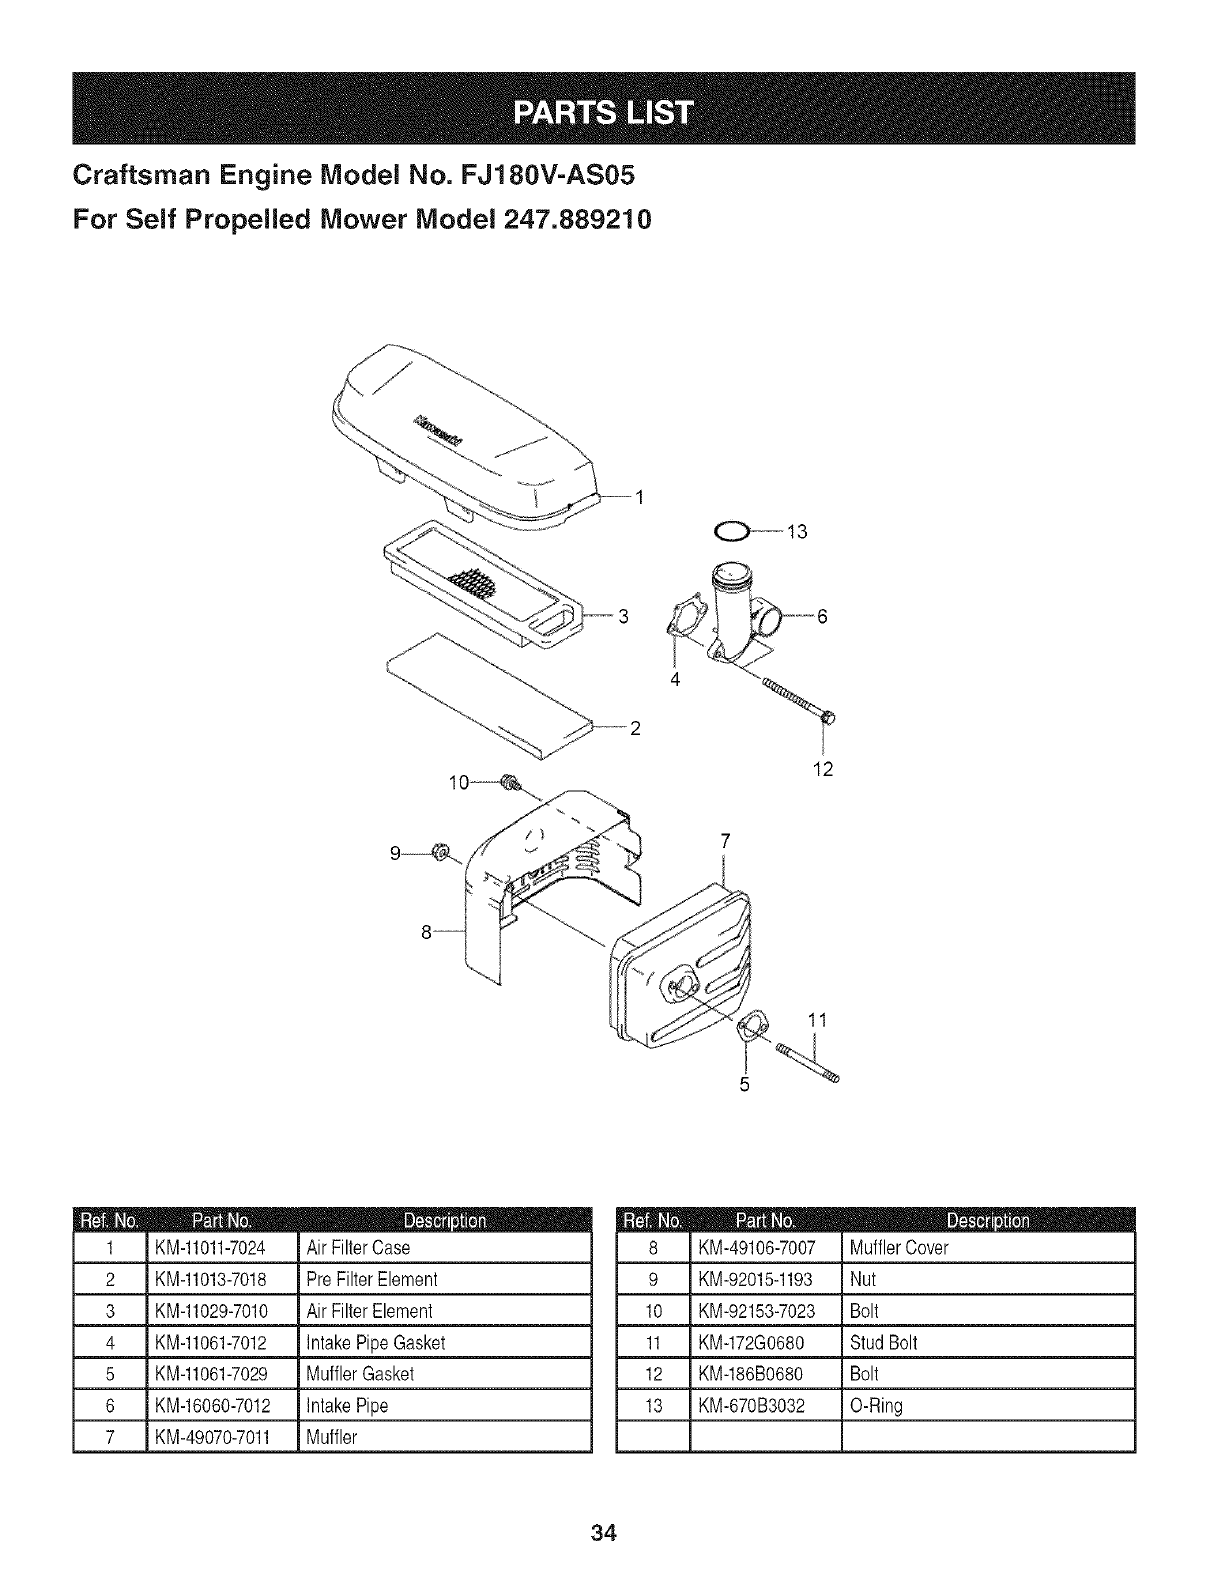
Craftsman Engine Model No. FJ180V=AS05
For Self Propelled Mower Model 247.889210
1
0-,--. 13
12
11
D _ e e*
KM-11011-7024 AirFilterCase
2 KM-11013-7018 PreFilterElement
3 I KM-11029-7010 AirFilterElement
4 KM-11061-7012 IntakePipeGasket
5 KM-11061-7029 MufflerGasket
6 KM-16060-7012 IntakePipe
7 KM-49070-7011 Muffler
D _ O II
KM-49106-7007 MufflerCover
9 KM-92015-1193 Nut
10 KM-92153-7023 Bolt
11 KM-172G0680 StudBolt
12 KM-186B0680 Bolt
13 KM-670B3032 O-Ring
34
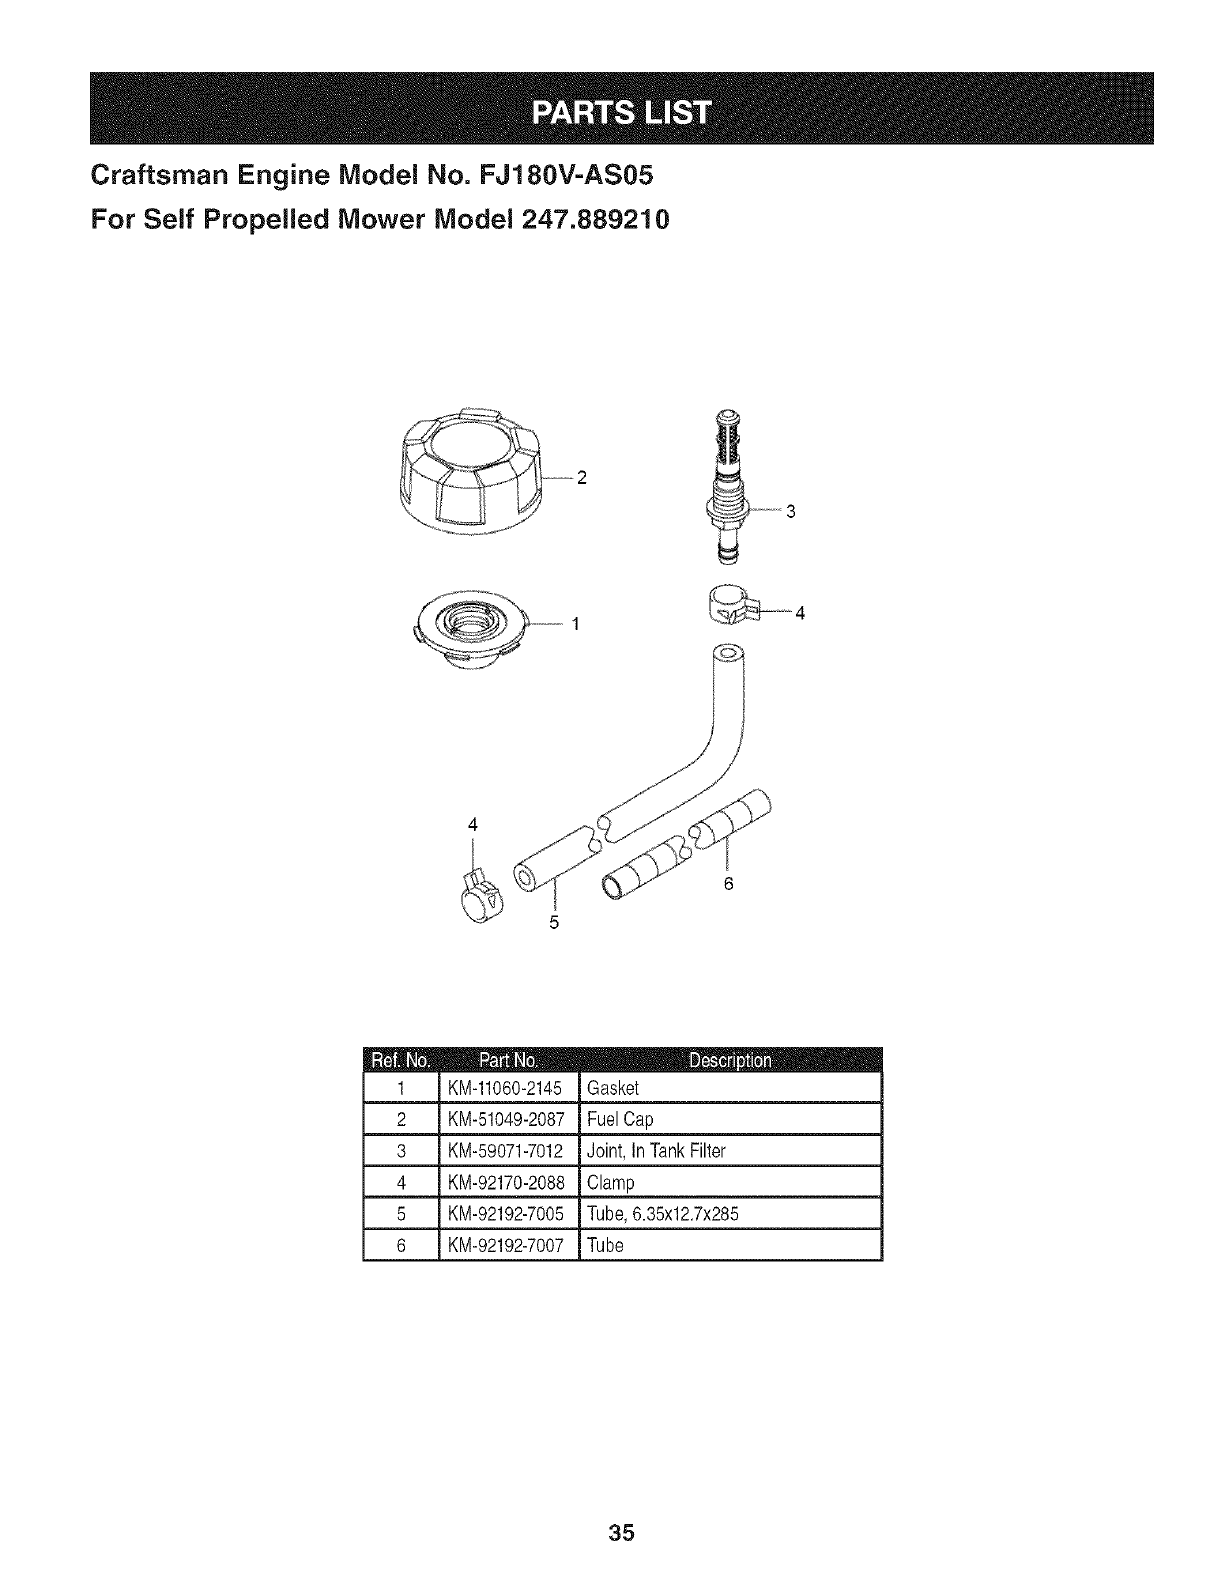
Craftsman Engine Model No. FJ180V=AS05
For Self Propelled Mower Model 247.889210
D _ Q e
KM-11060-2145 Gasket
2 KM-51049-2087 FuelCap
3 KM-59071-7012 Joint,InTank Filter
4 KM-92170-2088 Clamp
5 KM-92192-7005 Tube,6.35x12.7x285
6 KM-92192-7007 Tube
35
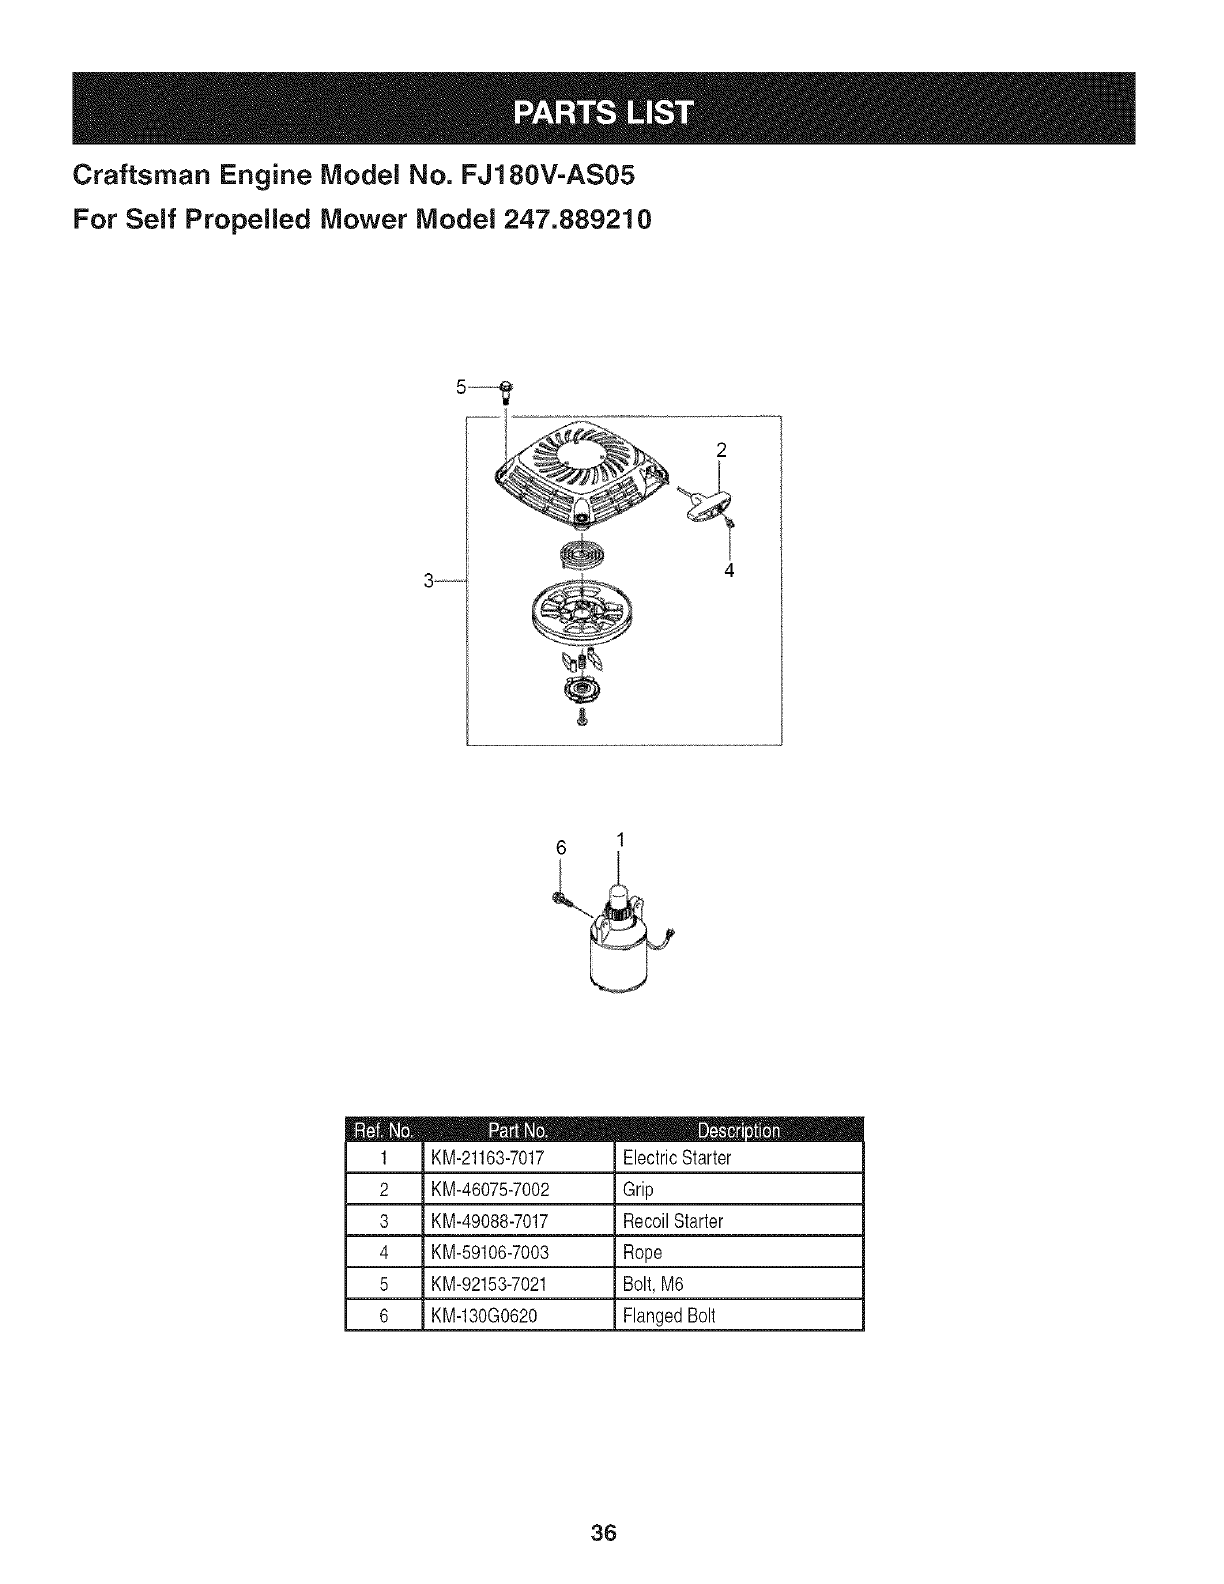
Craftsman Engine Model No. FJ180V=AS05
For Self Propelled Mower Model 247.889210
__
6 1
KM-21163-7017 ElectricStarter
2 KM-46075-7002 Grip
3 KM-49088-7017 RecoilStarter
4 KM-59106-7003 Rope
5 KM-92153-7021 Bolt,M6
6 KM-130G0620 FlangedBolt
36
Craftsman Engine Model No. FJ180V=AS05
For Self Propelled Mower Model 247.889210
I _¸ J Q
KM-13236-7006 Lever
2 KM-21083-7016 Arm
3 KM-41035-7005 BrakePanelAssy.
4 KM-92015-1193 Nut
5 KM-92145-7023 Spring
6 KM-92145-7032 Spring
7 KM-92153-7020 Bolt
8 KM-130B0610 FlangedBolt
-- KM-56070-7001 WarningLabel
-- KM-56033-7003 ManualLabel
-- 952SFJ180E CompleteEngine
37
(Thispageapplicableinthe U.S.A.andCanadaonly.)
Sears, Roebuck and Co., U.S.A. (Sears), the California Air Resources Board (CARB)
and the United States Environmental Protection Agency (U.S. EPA)
Emission ControJ System Warranty Statement (Owner's Defect Warranty Rights and ObJigations)
EMISSIONCONTROLWARRANTYCOVERAGEISAPPLICABLETOCERTI- YEAR1997AND LATERENGINESWHICHARE PURCHASEDANDUSED
FlEDENGINESPURCHASEDINCALIFORNIAIN 1995ANDTHEREAF- ELSEWHEREINTHE UNITEDSTATES(ANDAFTERJANUARY1,2001 IN
TER,WHICHARE USEDINCALIFORNIA,ANDTOCERTIFIEDMODEL CANADA).
California and United States Emission Control Defects Warranty Statement
The CaliforniaAir ResourcesBoard(CARB),U.S.EPAandSearsare pleased
to explainthe EmissionControlSystemWarrantyon your modelyear2000and
latersmalloff-roadengine(SORE).In California,newsmall off-roadengines
mustbe designed,builtand equippedto meettheState'sstringentanti-smog
standards.Elsewhereinthe UnitedStates,newnon-road,spark-ignition
enginescertifiedfor modelyear 1997and latermustmeetsimilarstandardsset
forthbythe U.S.EPA.Searsmustwarranttheemissioncontrolsystemonyour
enginefor the periodsof timelistedbelow,providedtherehas beenno abuse,
neglector impropermaintenanceof your smalloff-roadengine.Youremis-
sion controlsystemincludespartssuch as thecarburetor,air cleaner,ignition
system,mufflerand catalyticconverter.Also includedmaybeconnectorsand
otheremissionrelatedassemblies.Wherea warrantableconditionexists,Sears
will repairyour smalloff-roadengine at nocost to you includingdiagnosis,parts
and labor.
Sears Emission Control Defects Warranty Coverage
Smalloff-roadenginesarewarrantedrelativeto emissioncontrolpartsdefects
fora periodof oneyear,subjectto provisionsset forth below.Ifany covered
Owner's Warranty
Asthe smalloff-roadengineowner,you are responsiblefor theperformanceof
therequiredmaintenancelistedinyour Operatingand MaintenanceInstruc-
tions.Searsrecommendsthatyou retainallyour receiptscoveringmaintenance
on yoursmall off-roadengine,butSearscannot denywarrantysolelyforthe
lackof receiptsorfor yourfailureto ensuretheperformanceof allscheduled
maintenance.Asthe smalloff-roadengineowner,you shouldhoweverbe
awarethat Searsmaydenyyouwarrantycoverageifyour smalloff-roadengine
ora part hasfaileddueto abuse,neglect,impropermaintenanceor unap-
part onyour engineisdefective,the part willbe repairedor replacedbySears.
Responsibilities
provedmodifications.Youare responsiblefor presentingyour smalloff-road
engineto anAuthorizedSearsService Dealeras soonas a problemexists.The
undisputedwarrantyrepairsshouldbecompletedina reasonableamountof
time,notto exceed30 days.Ifyou haveanyquestionsregardingyour warranty
rightsand responsibilities,you shouldcontacta SearsServiceRepresentative
at 1--800--469--4663.Theemissionwarrantyisa defectswarranty.Defectsare
judgedon normalengineperformance.Thewarrantyis notrelatedto an in-use
emissiontest.
Sears Emission Control Defects Warranty Provisions
ThefollowingarespecificprovisionsrelativetoyourEmissionControlDefectsWarrantyCoverage.Itisinadditionto theSearsenginewarrantyfornon-regulated
enginesfoundin theOperatingandMaintenanceInstructions.
1. WarrantedParts
Coverageunderthis warrantyextendsonly to the parts listedbelow (the
emissioncontrol systemsparts)to the extentthese partswere presenton
theenginepurchased.
a. FuelMeteringSystem
,,Coldstart enrichmentsystem
,,Carburetorand internalparts
•FuelPump
b. Airlnduction System
,,Air cleaner
•Intakemanifold
c. IgnitionSystem
,,Sparkplug(s)
•Magnetoignitionsystem
d. CatalystSystem
,,Catalyticconverter
•Exhaustmanifold
,,Air injectionsystemor pulsevalve
e. MiscellaneousItemsUsed inAboveSystems
•Vacuum,temperature,position,timesensitivevalves
andswitches
•Connectorsand assemblies
2. Lengthof Coverage
Searswarrantsto the initialownerand eachsubsequentpurchaserthat
theWarrantedParts shallbefree from defectsin materialsandworkman-
ship whichcausedthefailure of theWarrantedPartsfor a periodof one
yearfromthe datethe engineis deliveredto a retailpurchaser.
3. NoCharge
Repairor replacementof anyWarrantedPartwill beperformedat no
chargeto the owner,includingdiagnosticlaborwhich leadsto the
determinationthata WarrantedPart is defective,ifthe diagnosticwork is
performedat an AuthorizedSearsService Dealer.Foremissionswarranty
servicecontact your nearestAuthorizedSearsServiceDealeras listed in
the "YellowPages"under"Engines,Gasoline,""GasolineEngines,""Lawn
Mowers,"or similarcategory.
4. Claimsand CoverageExclusions
Warrantyclaimsshall be filed in accordancewith the provisionsof the
SearsEngineWarrantyPolicy.Warrantycoverageshall beexcludedfor
failures of WarrantedPartswhichare notoriginal Sears partsor because
of abuse,neglector impropermaintenanceas setforth inthe Sears
EngineWarrantyPolicy.Searsis notliable to coverfailuresof Warranted
Partscausedby the useof add-on,non-original,or modifiedparts.
5. Maintenance
AnyWarrantedPartwhich is netscheduledfor replacementas required
maintenanceor which is scheduledonly for regularinspectionto the effect
of "repairor replaceas necessary"shall bewarrantedas to defectsfor the
warrantyperiod.AnyWarrantedPartwhich is scheduledfor replacement
as requiredmaintenanceshallbe warrantedasto defectsonly forthe
periodof time upto thefirst scheduledreplacementforthat part. Any
replacementpartthat is equivalentin performanceand durabilitymay
be usedinthe performanceof any maintenanceor repairs.The owneris
responsibleforthe performanceof all requiredmaintenance,as definedin
the SearsOperatingandMaintenanceInstructions.
6. ConsequentialCoverage
Coveragehereundershallextend to thefailure of anyengine components
caused bythefailure of anyWarrantedPartstill underwarranty.
Inthe USAand Canada,a 24 hourhotline, 1=800-469-4663,has a menuof pre-recordedmessagesofferingyou enginemaintenanceinformation.
38
Look For Relevant Emissions Durability Period and
Air index information On Your Engine Emissions Label
Engines that are certified to meet the California Air Resources Board (CARB) Tier 2 Emission Standards must
display information regarding the Emissions Durability Period and the Air Index. Sears, Roebuck and Co., U.S.A.
makes this information available to the consumer on our emission labels.
The Emissions Durability Period describes the number of hours of actual running time for which the engine is
certified to be emissions compliant, assuming proper maintenance in accordance with the Operating & Mainte-
nance instructions. The following categories are used:
Moderate: Engine is certified to be emission compliant for 125 hours of actual engine running time.
intermediate: Engine is certified to be emission compliant for 250 hours of actual engine running time.
Extended: Engine is certified to be emission compliant for 500 hours of actual engine running time.
For example, a typical walk-behind lawn mower is used 20 to 25 hours per year. Therefore, the Emissions
Durability Period of an engine with an intermediate rating would equate to 10 to 12 years.
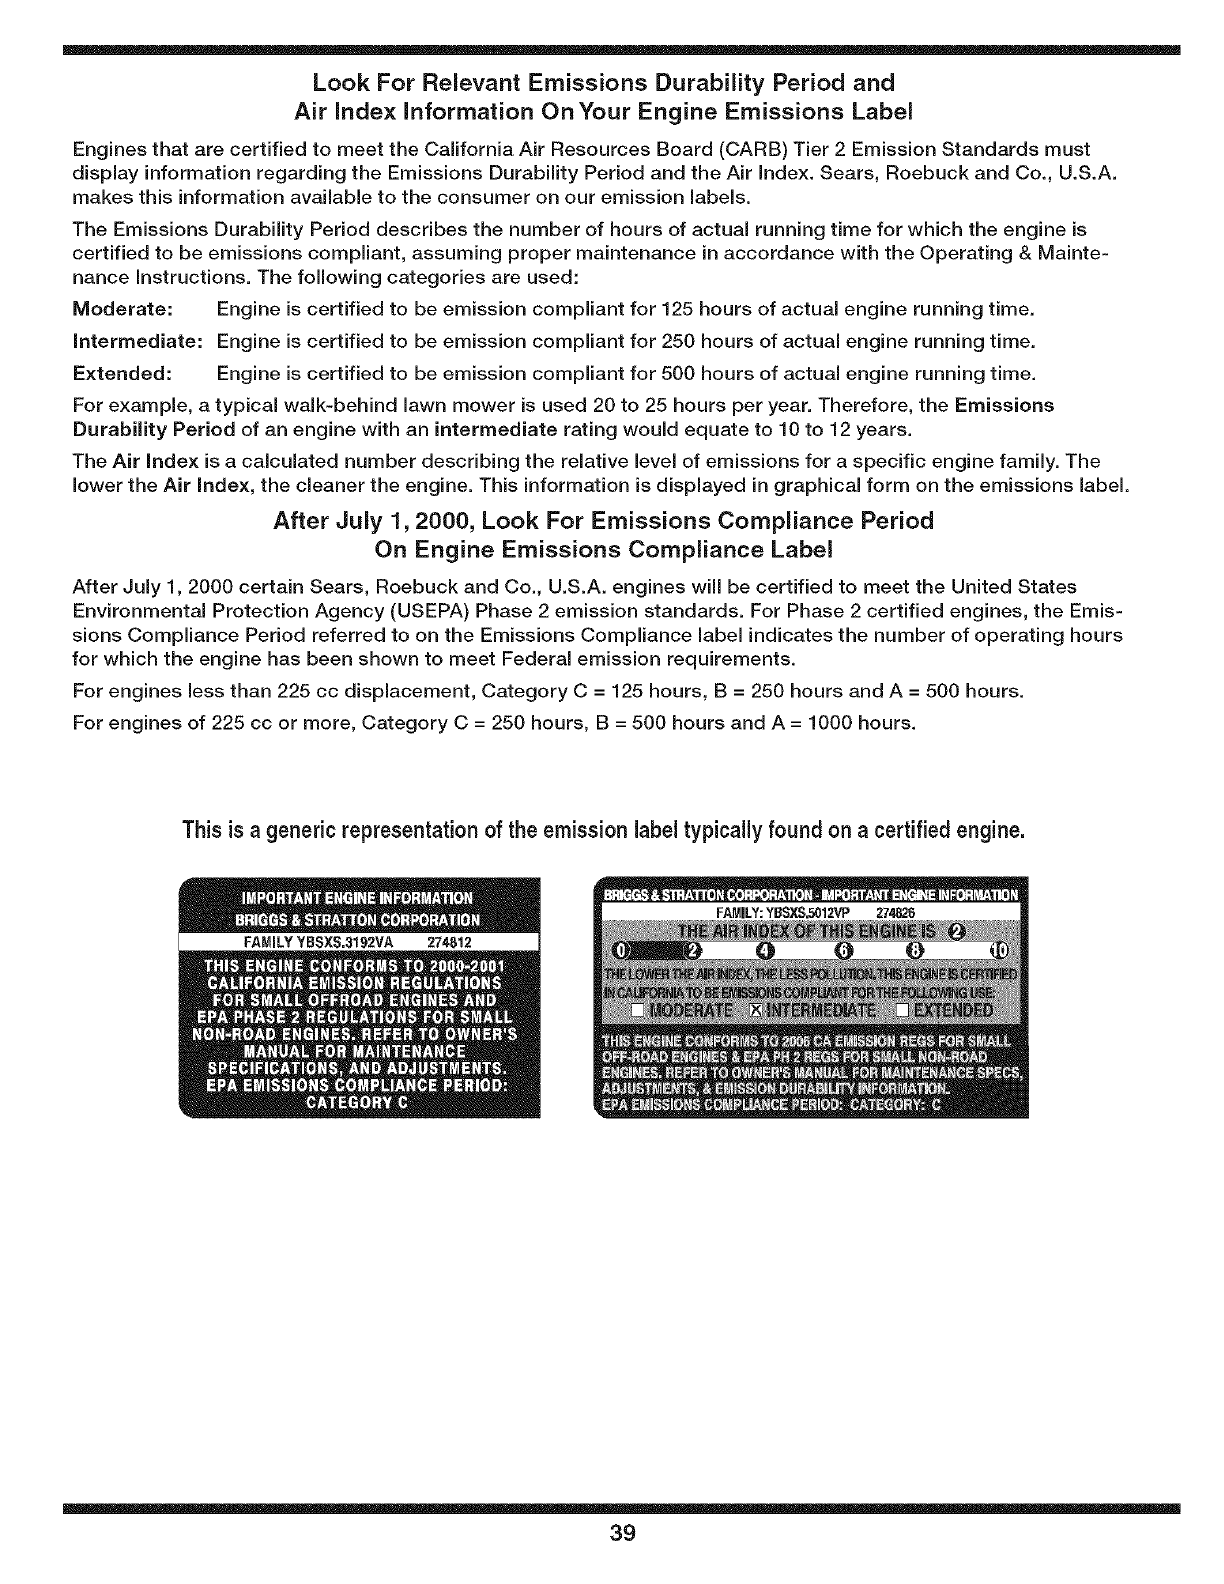
The Air index is a calculated number describing the relative level of emissions for a specific engine family. The
lower the Air index, the cleaner the engine. This information is displayed in graphical form on the emissions label.
After July 1,2000, Look For Emissions Compliance Period
On Engine Emissions Compliance Label
After July 1, 2000 certain Sears, Roebuck and Co., U.S.A. engines will be certified to meet the United States
Environmental Protection Agency (USEPA) Phase 2 emission standards. For Phase 2 certified engines, the Emis-
sions Compliance Period referred to on the Emissions Compliance label indicates the number of operating hours
for which the engine has been shown to meet Federal emission requirements.
For engines less than 225 cc displacement, Category C = 125 hours, B = 250 hours and A = 500 hours.
For engines of 225 cc or more, Category C = 250 hours, B = 500 hours and A = 1000 hours.
This is ageneric representationof the emission labeltypically found on a certified engine.
39
Congratulationson makinga smartpurchase.YournewCraftsman®
Professionalproductis designedandmanufacturedfor yearsof
dependableoperation.Butlike allproducts,it mayrequirerepairfrom
timeto time.That'swhen havinga RepairProtectionAgreementcan
saveyou moneyandaggravation.
Here'swhatthe RepairProtectionAgreement*includes:
,, Expertserviceby our 10,000professionalrepairspecialists
,, Unlimitedserviceand nochargefor partsandlaboronall covered
repairs
,, Productreplacementupto $1500if yourcoveredproductcan't be
fixed
,, Discountof 10%fromregularpriceof serviceandservice-related
partsnotcoveredby the agreement;also,10%off regularpriceof
preventivemaintenancecheck
,, Fasthelpby phone- wecall it RapidResolution- phonesupport
froma Searsrepresentative.Thinkof usas a "talkingowner's
manual."
Onceyou purchasethe Agreement,a simplephonecall is all thatit
takesfor you toscheduleservice.Youcan call anytimedayor night,or
schedulea serviceappointmentonline.
The RepairProtectionAgreementis a risk-freepurchase.Ifyou cancel
for any reasonduringthe productwarrantyperiod,wewill provideafull
refund.Or,a proratedrefundanytimeafterthe productwarrantyperiod
expires.PurchaseyourRepairProtectionAgreementtoday!
Some limitationsand exclusionsapply. For pricesand additional
informationinthe U.S.A.call1-800-827-6655.
*Coverage inCanadavarieson someitems.Forfull detailscall
Sears Canada at 1-800-361-6665.
Sears Installation Service
ForSearsprofessionalinstallationof homeappliances,garagedoor
openers,waterheaters,andothermajorhomeitems,in the U.S.A.or
Canadacall 1-800-4-MY-HOME®.
4O
Declaraci6n de garanfia .................................................. 41
Instrucciones de seguridad ....................................... 42-43
Guia de cuesta ................................................................ 44
Etiquetas de seguridad ................................................... 45
Montaje ..................................................................... 46-49
Operaci6n .................................................................. 50-51
Servicio y Mantenimiento .......................................... 52-57
Almacenamiento fuera de temporada ............................ 58
Soluci6n de problemas ................................................... 59
N6mero de servicio ............................... Cubierta posterior
Garantia Profesional de Craftsman
SiesteproductoCraftsmanfalla debidoa undefectoen los materialeso la manodeobradentrodelos dosahos dela fechadecompra,sirvase
devolverloacualquiertienda Sears,Centrode servicioSears,uotro puntodeventaCraftsmanen los EstadosOnidosparasu reparaci6nsin
cargo(o reemplazosi la reparaci6ndemuestraimposible).
Estagaranfias61otendr_tvalidezduranteunoahosi este productose utilizaen cualquiermomentoparafinescomercialeso dealquiler.
EstagaranfiacubreSOLOdefectos en materialy habilidad.Searsno pagar_para:
=Articulosde duraci6nlimitadaquepuedendesgastarsebajocondicionesnormalesdeuso duranteel periododegaranfia,talescomo
cuchillasdecortadorarotativas,adaptadoresparacuchillas,correas,filtrosde aire,y bujiasde encendido.
Las reparacionesrequeridasdebidoa abusoo negligenciadel operador,incluiyendoabolladurasdel cigOehaly nooperaro mantenerel
equipode acuerdocon lasinstruccionessuministradas.
Mantenimientopreventivoo reparacionesnecesariasdebidoa mezclade combustibleimpropia,combustiblecontaminadoo ahejo.
Estagaranfialeotorgaderechoslegalesespecificos,peroustedpodriagozarde otrosderechosen raz6nde su lugarde residencia.
Sears, Roebuckand Co., HoffmanEstates,IL 60179
Aceitedel motor: SAE30
Capacidaddeaceitedel motor: 18onzas
Combustible: Gasolinasin plomo
Bujia: BPR5ES(NGK)
Motor: Kawasaki
N_merode modelo ..........................................................
Numerode serie ..............................................................
Fechade compra.............................................................
Registreel nOmerodemodelo,nOmerodeseriey fechade compra
m_tsarriba.
© SearsBrands,LLC 41
La presencia de este simbolo indica que se trata de instrucciones
importantesde seguridad que se deben respetar para evitar poner
en peligro su seguridad personal y/o material y la de otras personas.
Lea y siga todas las instrucciones de este manual antes de poner en
funcionamientoesta maquina. Si no respeta estas instrucciones puede
provocar lesiones personales. Cuandoyea este simbolo, iTENGAEN
CUENTALA ADVERTENCIA!
Estamaquinarueconstruidaparaseroperadadeacuerdoconlas
reglasdeseguridadcontenidasenestemanual.AIigualquecon
cualquiertipodeequipomotorizado,undescuidooerrorperparte
deloperadorpuedeproducirlesionesgraves.Estamaquinaescapaz
deamputarmanesy piesy dearrojarobjetoscongranfuerza.Deno
respetarlasinstruccionesdeseguridadsiguientesse puedenproducir
lesionesgravesola muerte.
Losbomesdelabateriay losaccesoriosalinescontienenplomoy
compuestosdeplomo,sustanciasqufmicasquesegLinIoestablecido
perel EstadodeCaliforniacausancancery dafiosenel sistema
I reproductive.Laveselasmanesdespuesdeestarencontactoconestos
[componentes.
Elescapedelmotordeesteproducto,algunosdesuscomponentes
y algunoscomponentesdelvehiculocontieneno liberansustancias
quimicasqueelestadodeCaliforniaconsideraquepuedenproducir
cancer,defectosdenacimientouotrosproblemasreproductivos.
NIQOS
Pueden ocurrir accidentes tragicos si el operador no estA atento a la presencia de
niflos. Por Io generala los nifios les atraen las cortadoras y la actividad de cortar
el cesped. No entienden los riesgos ni los peligros. Nunca supongaque los nifios
permanecerAn en el mismo lugar donde los vio por ultima vez.
, Mantenga a los nifios fuera del Area de corte de cesped y bajo estricta
vigilancia de un adulto responsable ademAs del operador.
, Este alerta y apague la cortadora si un niflo ingresa al Area.
, Antes y mientras se esta moviendo hacia atrAs, mire hacia atras y hacia
abajo y verifique que no haya nifios.
, Tenga extrema precauci6n cuando se aproxime a esquinas ciegas, entradas
de puertas, arbustos, arboles u otros objetos que puedan obstaculizarle la
vista de un nifio que pudiese correr hacia la cortadora de cesped.
, Mantenga a los nifios alejados de los motores en marcha o calientes.
Pueden sufrir quemaduras con un silenciador caliente.
, Nunca permita que nifios menores de 14aflos operen una cortadora
de cesped. Los nifios mayores de 14 afios deben leer y entender las
instrucciones de operaci6n y las reglas de seguridad contenidas en este
manual y deben ser entrenados y supervisados por un adulto.
FUNCIONAMIENTO GENERAL
, Lea cuidadosamente todas las instrucciones contenidas en este manual
antes de intentar realizar el montaje de la maquina. Lea, comprenda y
respete todas las instrucciones que figuran en la mAquinayen el(los)
manual(as) antes de hacerla funcionar. Antes de operar este equipo,
familiaricese totalmente con los controles y el uso correcto del mismo.
Guarde este manual en un lugar seguro para consultas futuras y peri6dicas,
asi como para solicitar repuestos.
, Familiaricese con todos loscontroles y su operaci6n correcta. Sepa cdmo
detener la maquina y desactivar los controles rapidamente.
, Esta maquina es un equipo de precisi6n, no un juguete. Por Io tanto, tenga
mucho cuidado en todo momento. Esta unidad fue diseflada para realizar
una tarea: cortar el cesped. No la utilice para ningun otro fin.
, No permita nunca que los niflos menores de 14 afios utilicen esta maquina.
Los nifios mayores de 14 aflos deben leer y entender las instrucciones
de operacidn contenidas en este manual, y deben ser entrenados y
supervisados por sus padres.
, $61ose debe permitir usar esta mAquina a individuos responsables que
esten familiarizados con sus reglas de seguridad.
, Revise minuciosamenteel Area donde se utilizarAel equipo. Retire todas las
piedras, palos, Ilantas, huesos,juguetes y otros objetos extrafios que podrian
hacer tropezar o ser recogidosy arrojados por la accidn de las cuchillas. Los
objetos arrojados por la maquina pueden producir lesiones graves.
, Planifique el patr6n de corte para evitar que la descarga de material se
realice hacia los caminos, las veredas, los observadores, etc. Evite ademAs
descargar material contra las paredes u obstrucciones que podrian hacer
que el material descargado rebote contra el operador.
, Para ayudar a evitar el contacto con la cuchilla o una lesi6n por un objeto
arrojado, mantengase en la zona del operador detras de las manijas y 42
mantenga a los nifios, observadores, ayudantes y mascotas apartados
al menos 75 pies de la cortadora mientras esta en operaci6n. Detenga la
maquina si alguien entra en la zona.
, Para protegerse los ojos, utilice siempre gafas oanteojos de seguridad
mientras opera la maquina o mientras la ajusta o repara. Los objetos
arrojados que rebotan pueden producir lesiones oculares graves.
, Utilice zapatos de trabajo resistentes, de suela fuerte, y pantalonesy camisas
ajustados. Se recomienda vestir camisa y pantal6n para cubrir brazos y
piernas y usar zapatos con puntera de acero. Nunca opere esta maquina
descalzo, con sandalias, zapatos resbalosos o livianos (por ej. de Iona).
, No ponga las manos o los pies cerca de las piezas rotatorias ni debajo
de la plataforma de corte. El contacto con las cuchillas puede producir la
amputaci6n de manos y pies.
, Una cubierta de descarga que falte o este dafiada puede provocar lesiones
por contacto con la cuchilla o por objetos arrojados.
, Muchas lesiones ocurren como resultado de pasar la cortadora sobre los
pies durante una caida provocada al patinarse o tropezarse. No se sostenga
de la cortadora si se estA cayendo, suelte la manija inmediatamente.
, Nuncajale hacia usted la cortadora mientras camina. Si debe retroceder
con la cortadora para evitar una pared u obstaculo, mire primero abajo y
atras para evitar tropezarse y luego siga estos pasos:
a. Retroceda de la cortadora hasta estirar completamente sus brazos.
b. Asegt_resede que estA en equilibrio y bien parado.
c. Tire lentamente hacia atrAs, no mAs alia de la mitad de la distancia entre
usted y la cortadora.
d. Repita estos pasos segt_n sea necesario.
, No opere esta maquina estando bajo los efectos del alcohol o de drogas.
, En las unidades que disponen de mecanismo de autopropulsi6n no
embrague dicho mecanismo mientras arranca el motor.
, La manija de control de la cuchilla es un dispositivo de seguridad. Nunca
intente evitar su funcionamiento. De hacerlo no funcionarian los dispositivos
de seguridad y podrian producirse lesiones personales por el contacto con
lascuchillas rotatorias. La manija de control de la cuchilla debe funcionar
bien en ambas direcciones y regresar automaticamente a la posici6n
desengranada cuando se la suelta.
, Nunca opere la cortadora sobre cesped humedo. Siempre este seguro de
estar bien parado. Si tropieza y cae puede lesionarse gravemente. Si siente
que pierde el equilibrio, suelte inmediatamente la manija de control de la
cuchilla y la misma dejara de rotar en tres segundos.
, Corte el cesped solamente con luz de dia o con buena luz artificial. Camine,
nunca corra.
, Detenga la cuchilla cuando cruce caminos de gravilla, sendas o senderos.
, Si la maquina comenzara a vibrar de manera anormal, detenga el motor
y busque inmediatamente la causa. La vibracidn por Io general es una
advertencia de algt_nproblema.
, Apague el motor y espere hasta que lacuchilla se detenga completamente
antes de retirar el colector de cesped o de desbloquear el canal. La cuchilla
contint_arotando por unos cuantos segundos despues que el motor se ha
apagado. Nunca coloque ninguna parte del cuerpo en el Area de la cuchilla
hastaqueestesegurodequelamismahadetenidosumovimientorotatorio.
, Nuncaoperelacortadorasinotienecolocadosyfuncionandoelescudo
posteriorapropiado,lacubiertadedescarga,elcolectordecesped,
lamanijadecontroldelacuchillayotrosdispositivosdeseguridady
protecci6n.NuncaoperelacortadorasilosdispositivosdeseguridadestAn
dafiados.SinoIohace,puedenproducirselesionespersonales.
, Elsilenciadoryelmotorsecalientanypuedencausarquemaduras.Nolos
toque.
, Utilicesolamentepiezasyaccesoriosoriginalesdefabrica.SinoIohace,
puedenproducirselesionespersonales.
, Paraencenderelmotor,jaledelacuerdalentamentehastaquesienta
resistencia,luegojalerapidamente.Elreplieguerapidodelacuerdade
arranque(tensi6nderetroceso)lejalaralamanoyelbrazohaciaelmotor
masrapidodeIoqueustedpuedesoltar.Elresultadopuedenserhuesos
rotos,fracturas,hematomasoesguinces.
, Sisepresentansituacionesquenoestanprevistasenestemanual,sea
cuidadosoyuseelsentidocomun.Comuniqueseconsucentrodeservicio
Searsparaobtenerayuda.
FUNCIONAMIENTO EN PENDIENTES
Las pendientesson un factor importante en los accidentesocasionadospor derrapes
y caidas y pueden producirlesiones graves.La operacidn en pendientes requiere
mucha precauci6n.Si no se siente seguro en una pendiente, no realice el corte de
cesped.Para su seguridad, useel indicadorde pendientesque se incluyecomo
partede este manual paramedir la pendiente antes de operar la unidaden una zona
inclinada.Si la pendiente superalos 15 grados,no realice elcorte de cesped.
Haga Io siguiente:
, Corte el cesped de la pendiente en sentido transversal, nunca hacia arriba y
abajo. Tenga mucho cuidado al cambiar de direccidn en pendiente.
, Este atento a los agujeros, surcos, rocas, objetos ocultos o bultos que
puedan provocar que se resbale o se tropiece. El cesped alto puede ocultar
obstaculos.
Siempre este seguro de que esta bien parado. Si tropieza y cae
puede lesionarse gravemente. Si siente que pierde el equilibrio, suelte
inmediatamente la manija de control de la cuchilla y la misma dejara de rotar
en 3 segundos.
No haga Io siguiente:
, No corte el cesped cerca de hundimientos, zanjas o terraplenes, podria
perder el equilibrio.
No corte el cesped en pendientes que superen los 15grados como Io indica
el medidor de pendientes.
No corte el cesped homedo.Si no esta firmemente parado, puede resbalarse.
SERVlClO
Manejo seguro de la gasolina:
, Para evitar lesiones personales o dahos materiales sea sumamente
cuidadoso al manipular la gasolina. La gasolina es sumamente inflamable
y sus vapores pueden causar explosiones. Si se derrama gasolina encima
o sobre la ropa se puede lesionar gravemente ya que se puede incendiar.
Lavese la piel y cambiese de ropa de inmediato.
Utilice s61orecipientes para gasolina aprobados.
, Nunca Ilene los recipientes en el interior de un vehiculo ocamidn o caja de
remolque con recubrimientos plasticos. Coloque siempre los recipientes en
el piso y lejos del vehiculo antes de realizar la carga.
, Retire el equipo a gasolina del camidn o remolque y Ilenelo en el suelo. Si
esto no es posible, Ilene el equipo en un remolque con un recipiente portAtil,
en vez de hacerlo con una boquilla dispensadora de gasolina.
, Mantenga la boquilla en contacto con el borde del dep6sito de combustible
o con la abertura del recipiente en todo momento, hasta terminar de cargar.
No utilice un dispositivo de boquilla de apertura/cierre.
, Apague todos los cigarrillos, cigarros, pipas y otras fuentes de combustidn.
Nunca cargue combustible en la maquina en interiores porque los vapores
inflamables podrian acumularse en el Area.
, Nunca saque la tapa de la gasolina ni agregue combustible mientras el
motor esta caliente o en marcha. Deje que el motor se enfrie por Io menos
dos minutos antes de volver a cargar combustible.
,Nunca Ilene en exceso el depdsito de combustible. Llene el tanque a no
mas de 1 pulgada por debajo de la base del cuello del tap6n de carga, para
permitir la expansi6n del combustible.
, Vuelva a colocar la tapa de la gasolina y ajt_stelabien.
, Limpie la gasolina que se pueda haber derramado sobre el motor y el
equipo. Traslade la maquina a otra zona. Espere 5 minutos antes de
encender el motor.
, Nunca almacene la maquina o el recipiente de combustible en un espacio
cerrado donde haya fuego, chispas o aparatos con piloto como por ejemplo,
calentadores de agua, calefactores, hornos, secadores de ropa u otros
aparatos a gas.
, Para reducir el riesgo de incendio mantenga la maquina limpia de pasto,
hojas y de acumulacidn de otros escombros. Limpie los derrames de aceite
o combustible y saque todos los residuos embebidos en combustible.
, Dejeque la maquina se enfrie por Io menos 5 minutosantes de almacenarla.
Servicio general:
,Nunca encienda el rnotor en espacios cerrados o en una zona con poca
ventilaci6n. El escape del motor contiene mon6xido de carbono, un gas
inodoro y letal.
, Antes de limpiar, reparar o inspeccionar la mAquina, compruebe que la
cuchilla y todas las partes que se mueven se hayan detenido. Desconecte el
cable de la bujia y p6ngalo haciendo masa contra el motor para evitar que
se encienda accidentalmente.
, Revise los pernos de montaje de la cuchilla y del motor a intervalos
frecuentes para verificar que esten bien apretados. Inspeccione ademAs
visualmente la cuchilla en busca de da_os (por ejemplo, abolladuras,
desgaste, roturas). Reemplace la cuchilla unicamente con equipo original
del fabricante (OEM) listado en este manual. "La utilizaci6n de piezas que
no cumplen con las especificaciones de equipos originales puede tener
como resultado un rendimiento inadecuado y puede poner en riesgo la
seguridad".
, Las cuchillas de las cortadoras son muy afiladas y podrian cortarlo.
Envuelva la cuchilla o use guantes y extreme las precauciones cuando
efectue mantenimiento.
, Mantenga todas las tuercas, pernos y tornillos bien ajustados para
asegurarse de que la maquina se encuentra en condiciones seguras de
operaci6n.
, Nunca intente alterar los dispositivos de seguridad. Controle peri6dicamente
que funcionen correctamente.
, Despues de golpear algun objeto extra,o, detenga el motor, desconecte el
cable de la bujia y col6quelo haciendo masa contra el motor. Inspeccione
minuciosamente la maquina para determinar siestA da_ada. Repare el da_o
antes de encenderla y operarla.
, Nunca trate de ajustar una rueda o la altura de corte mientras el motor esta
en marcha.
, Loscomponentes del colector de cesped, la cubierta de descarga y el escudo
posterior, estansujetos a desgaste y da_os que podrian dejar expuestas
las piezas mdviles o permitir que se arrojen objetos. Para proteger su
seguridad, verifique frecuentemente todos los componentes y reemplacelos
inmediatamente s61ocon piezas de los fabricantes de equipos originales
(O.E.M.) listadas en este manual. "La utilizaci6n de piezasque no cumplen
con las especificaciones de equipos originales puedetener como resultado un
rendimiento inadecuado y puede poner en riesgo la seguridad".
, No cambie la configuraci6n del regulador del motor ni acelere demasiado
el mismo. El regulador del motor controla la velocidad maxima de
funcionamiento seguro del motor. No de arranque al motor si no esta la bujia
de encendido.
, Verifique frecuentemente la linea de combustible, el tanque, el tap6n y
los accesorios para ver si hayrajaduras o perdidas. Reemplace de ser
necesario.
, Mantenga o reemplace las etiquetas de seguridad e instrucciones segon
sea necesario.
, Respete las leyes y normas aplicables para disponer adecuadamente de los
desechos. La eliminaci6n inapropiada de liquidos o materiales puede dahar
el medio ambiente.
Su responsabilidad: S61opermita que usen esta maquinaelectrica las personas que lean,comprendan y respeten lasadvertencias y las instrucciones que aparecen en
este manual yen la mAquina. 43

(1)
(1)
0
0
z
(1)
03
c
"0
(1)
0
c
c
0
c
o5
0
co
c
co
CD
c
O-
co
-0
c
0
c
c
co
E
12D
Nd
_R25
_x
_ O
.c :_
_X
,_ No podeen inclinacionesmayoresa 15grades(elevaci6naproximadade2 1/2pies percada 10pies). Unapodadoraen
m0vimientepodrfaveltearsey causarlesi0nesseveras.Sien unapendienteoperaunapodaderaubicadedetrasdela misma,es
extremadamentediffcilmantenerel equilibrioy podrfaresbalarsey sufrirlesionesgraves.
I _ Alinee y sostenga este nivel con un _rbol vertical...
!
15

READ OPERATOR'SMANUAL. KEEP SAFETYDEVICES(BLADECONTROL,TRAILINGSHIELD,
DISCHARGECOVER,ETC.)INPLACEAHD WORKING. IFDAMAGED, REPLACEIMiV]EDIATELY.
45
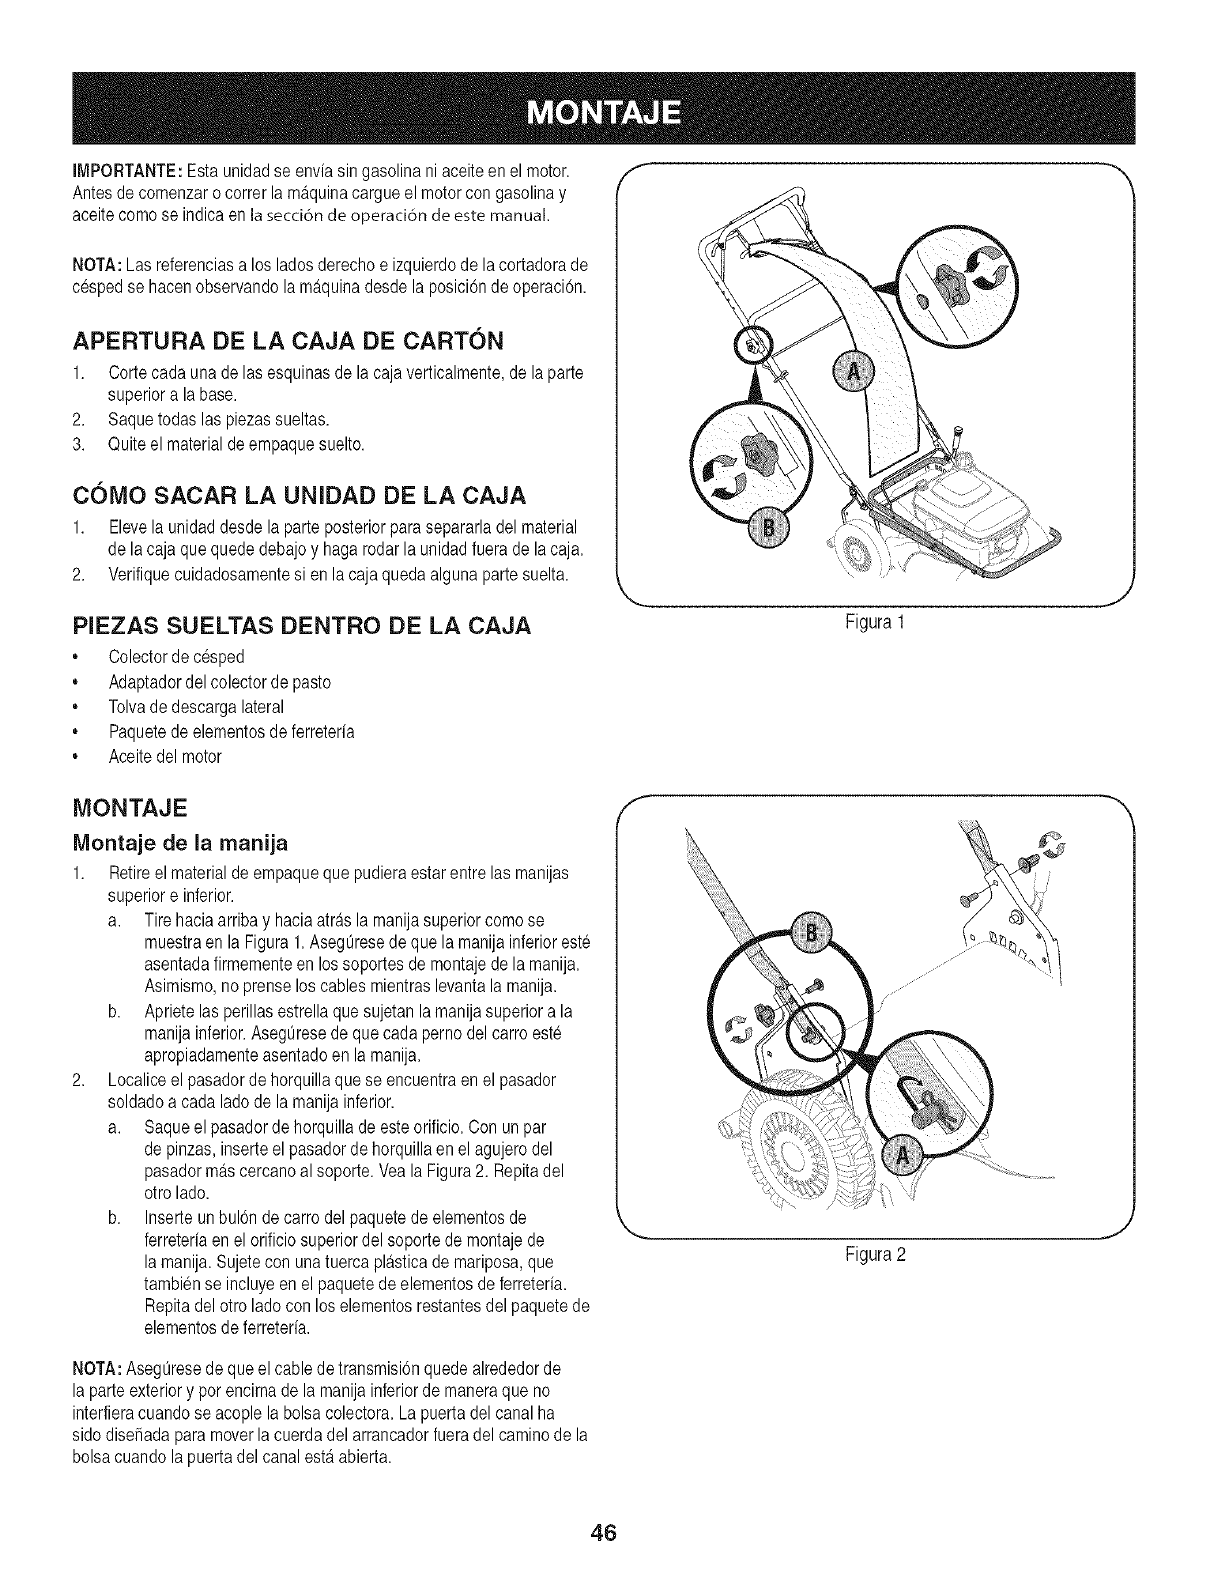
IMPORTANTE: Esta unidad se envia sin gasolina ni aceite en el motor.
Antes de comenzar o correr la maquinacargue el motor con gasolina y
aceite come se indica en la secci6n de operaci6n de este manual,
NOTA:Lasreferenciasalos ladosderechoe izquierdodelacortadorade
cespedse hacenobservandola maquinadesdelaposici6ndeoperaci6n.
APERTURA DE LA CAJA DE CARTON
1. Cortecadaunadelasesquinasdelacajaverticalmente,delaparte
superiora labase.
2. Saquetodaslas piezassueltas.
3. Quiteelmaterialdeempaquesuelto.
C6MO SACAR LA UNIDAD DE LA CAJA
1. Elevelaunidaddesdela parteposteriorparasepararladelmaterial
delacajaquequededebajoy hagarodarla unidadfueradelacaja.
2. Verifiquecuidadosamentesi enlacajaquedaalgunapartesuelta.
PIEZAS SUELTAS DENTRO DE LA CAJA
=Colectordecesped
•Adaptadordelcolectordepasto
•Tolvadedescargalateral
• Paquetedeelementosdeferreteria
•Aceitedelmotor
F
Figura1
MONTAJE f
IVlontaje de la manija
1. Retireelmaterialdeempaquequepudieraestarentrelasmanijas
superioreinferior.
a. Tirehaciaarribay haciaatraslamanijasuperiorcomese
muestraen laFigura1.Aseg0resedequelamanijainferioreste
asentadafirmementeenlossoportesdemontajedelamanija.
Asimismo,noprenseloscablesmientraslevantalamanija.
b. Aprietelasperillasestrellaquesujetanlamanijasuperiora la
manijainferior.Aseg0resedequecadapernodelcarroeste
apropiadamenteasentadoen lamanija.
2. Localiceelpasadordehorquillaquese encuentraenelpasador
soldadoacadaladedelamanijainferior.
a. Saqueelpasadordehorquilladeesteorificio.Conunpar
depinzas,inserteelpasadordehorquillaenel agujerodel
pasadormascercanoalsoporte.VealaFigura2. Repitadel
otrolado.
b. Inserteunbulondecarrodelpaquetedeelementosde
ferreteriaenel orificiosuperiordelsoportedemontajede
lamanija.Sujeteconunatuercaplasticademariposa,que
tambiense incluyeenelpaquetedeelementosdeferreterfa.
Repitadelotroladoconloselementosrestantesdelpaquetede
elementosdeferreteria.
Figura2
NOTA:AsegOresedequeelcabledetransmisi6nquedealrededorde
laparteexteriory porencimadela manijainferiordemaneraqueno
interfieracuandoseacoplelabolsacolectora.Lapuertadelcanalha
sidodise_adaparamoverlacuerdadelarrancadorfueradelcaminode la
bolsacuandolapuertadelcanalestaabierta.
46
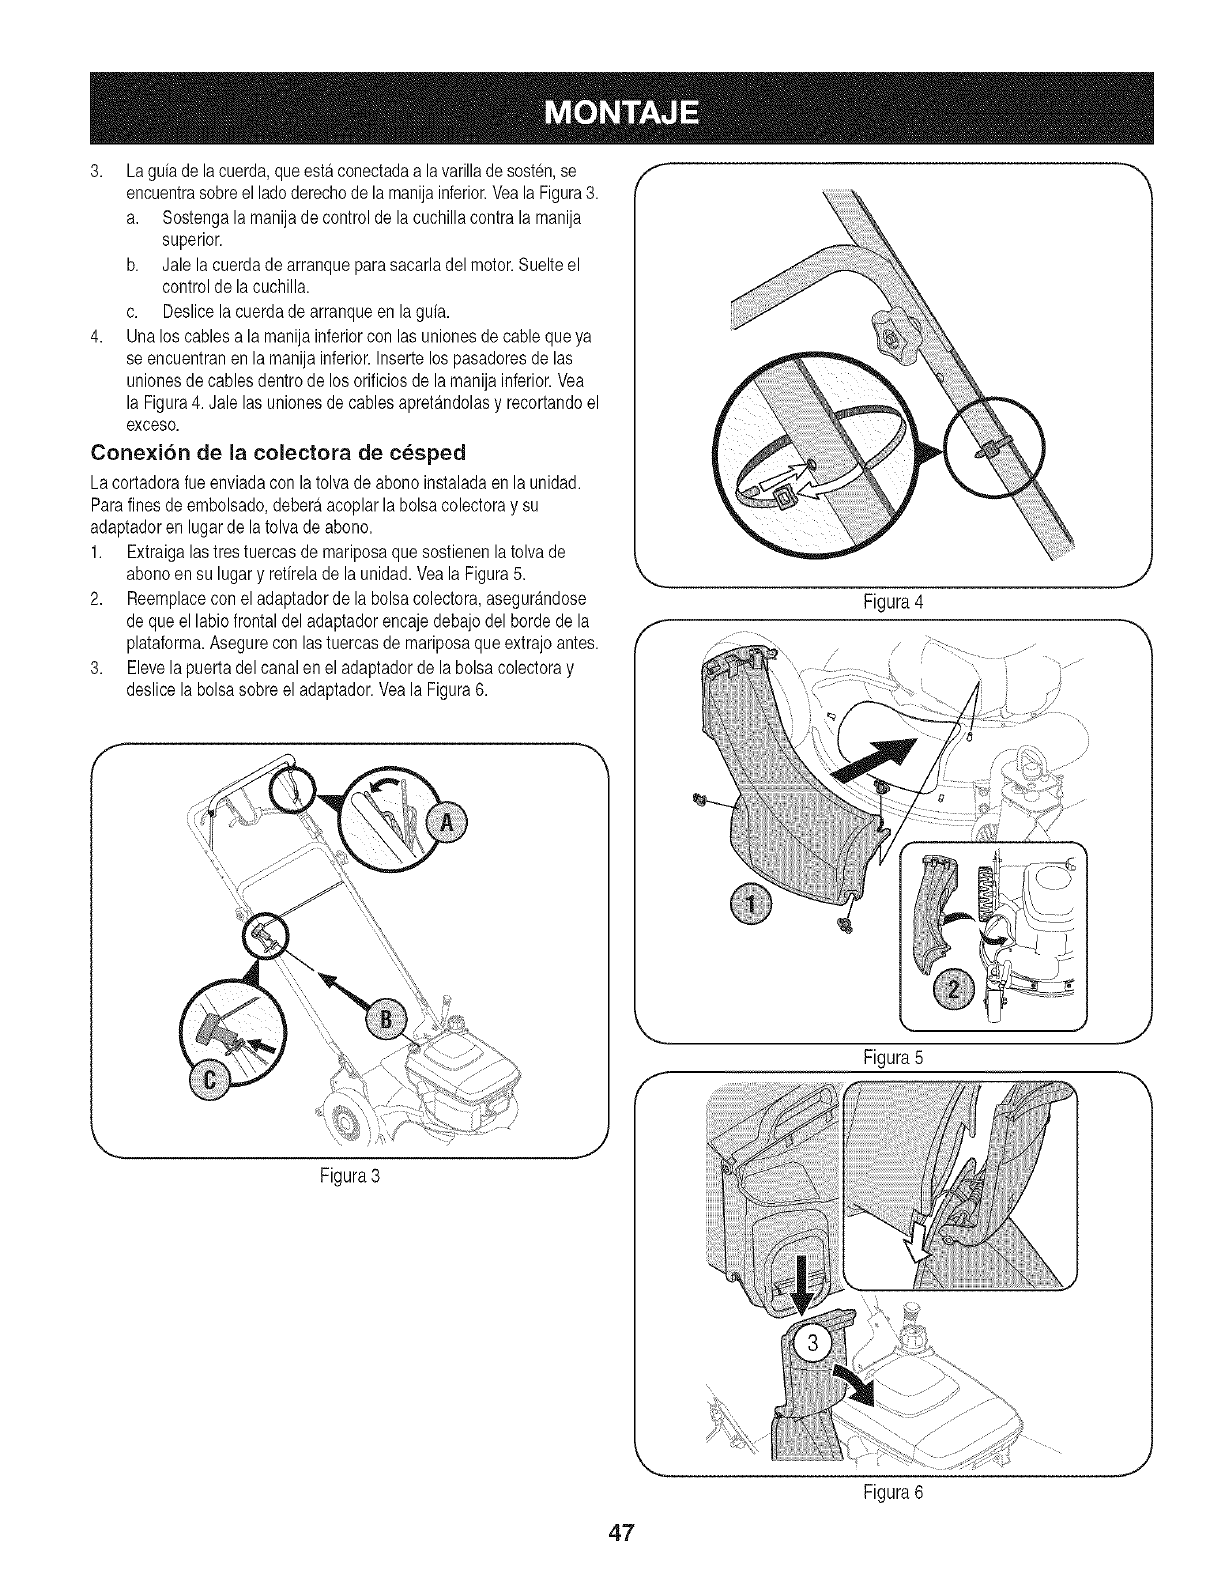
3. Laguiadelacuerda,queestaconectadaa lavarilladesosten,se
encuentrasobreel ladoderechodelamanijainferior.VealaFigura3.
a. Sostengala manijadecontroldelacuchillacontralamanija
superior.
b. Jalelacuerdadearranqueparasacarladelmotor.Suelteel
controldelacuchilla.
c. Deslicelacuerdadearranqueenlagufa.
4. Unaloscablesala manijainferiorconlasunionesdecablequeya
seencuentranenlamanijainferior.Insertelospasadoresdelas
unionesdecablesdentrodelosorificiosde lamanijainferior.Vea
la Figura4. Jalelasunionesdecablesapretandolasy recortandoel
exceso,
Conexion de la colectora de cesped
Lacortadorafueenviadacon latolvadeabonoinstaladaenlaunidad.
Parafinesdeembolsado,deberaacoplarlabolsacolectoray su
adaptadoren lugardelatolvadeabono.
1. Extraigalastrestuercasdemariposaquesostienenlatolvade
abonoensulugary retirelade launidad.VealaFigura5.
2. Reemplaceconeladaptadordelabolsacolectora,asegurandose
dequeellabiofrontaldeladaptadorencajedebajodelbordedela
plataforma.Asegureconlastuercasdemariposaqueextrajoantes.
3. Elevela puertadelcanaleneladaptadordelabolsacolectoray
deslicelabolsasobreeladaptador.VealaFigura6.
f m
f
J
Figura4
fFigura5
Figura3
47
Figura6
J

AJUSTES
Altura de corte
Lapalancadeajustedealturadecortese ubicaporencimadelarueda
izquierdatrasera.Veael recuadrodelafigura7A.
1. Tirede lapalancahaciaafueradelacortadora.
2. Muevalapalancahaciaadelanteo haciaatrasparalaalturadecorte
deseada.
3. Liberelapalancahaciala plataformadelacortadora.
Laalturadecortede laruedafrontalsedeterminaseleccionandounade
lasseisposicionesenelmontajedecadaruedita.Paraajustarlaaltura
decortefrontal,consultelaFigura7By realiceIosiguiente:
1. Extraigalatuercademariposadel
pernodeleje.Desliceelpernodel
ejey laarandelaonduladafuera
delmontajey seleccionelaaltura
decorte.
2. Conlaarandelaonduladasobre
elpernodeleje,reinsertelos
elementosdeferreteriaenelorificio
cuadradodeseadoatravesdel
montajedelarueday asegurecon
latueramariposapreviamenteextraida.
IMPORTANTE:Todaslasruedasdebensercolocadasenlamisma
posici6nrelativa.Cuandoelterrenoesagresteoirregularcambiela
palancadeajustedelaalturaa unaposici6nmasalta.Deestamanerase
cuidamaselcesped.
Lasrueditaspuedenasegurarseen posici6ndirectamentehaciaadelante
oparaquegirenlibremente.Veaelrecuadrode lafigura7C.
1. Levantelospasadoresdefijacion.
2. Coloquelosen losagujerosmasgrandesparatrabarlasruedas.
Coloquelospasadoresenlosorificiosmaspeque_osparapermitir
quelas ruedasgirenlibremente.
Control de la transmision
Laruedadeajusteestaubicadaenelalojamientodelamanijadecontrol
detransmisiony se utilizaparaajustaroaflojarlacorreadetransmisi6n.
Deberaajustarelcontroldetransmisionencasodeque:
1. Lacortadoranoseautopropulsaraconelcontroldetransmisi6n
engranado.
2. Lasruedasdetransmisiondelacortadoratemblaranconelcontrol
detransmisi6nengranado.
Siocurrieraalgunadeestascondiciones,girelaruedadeajusteenel
sentidode lasagujasdelrelojparaajustaryen sentidocontrarioalas
agujasdelrelojparaaflojarel cableparaajustarel controldetransmisi6n.
VealaFigura8.
Figura7
f
\\
J
Figura8
NOTA:Paraalgunaspersonas,elcontroldetransmisionpuedeno
encontrarseenunaposici6nc6moda.Puedeajustarlamanijaapretando
laruedadeajuste.
48
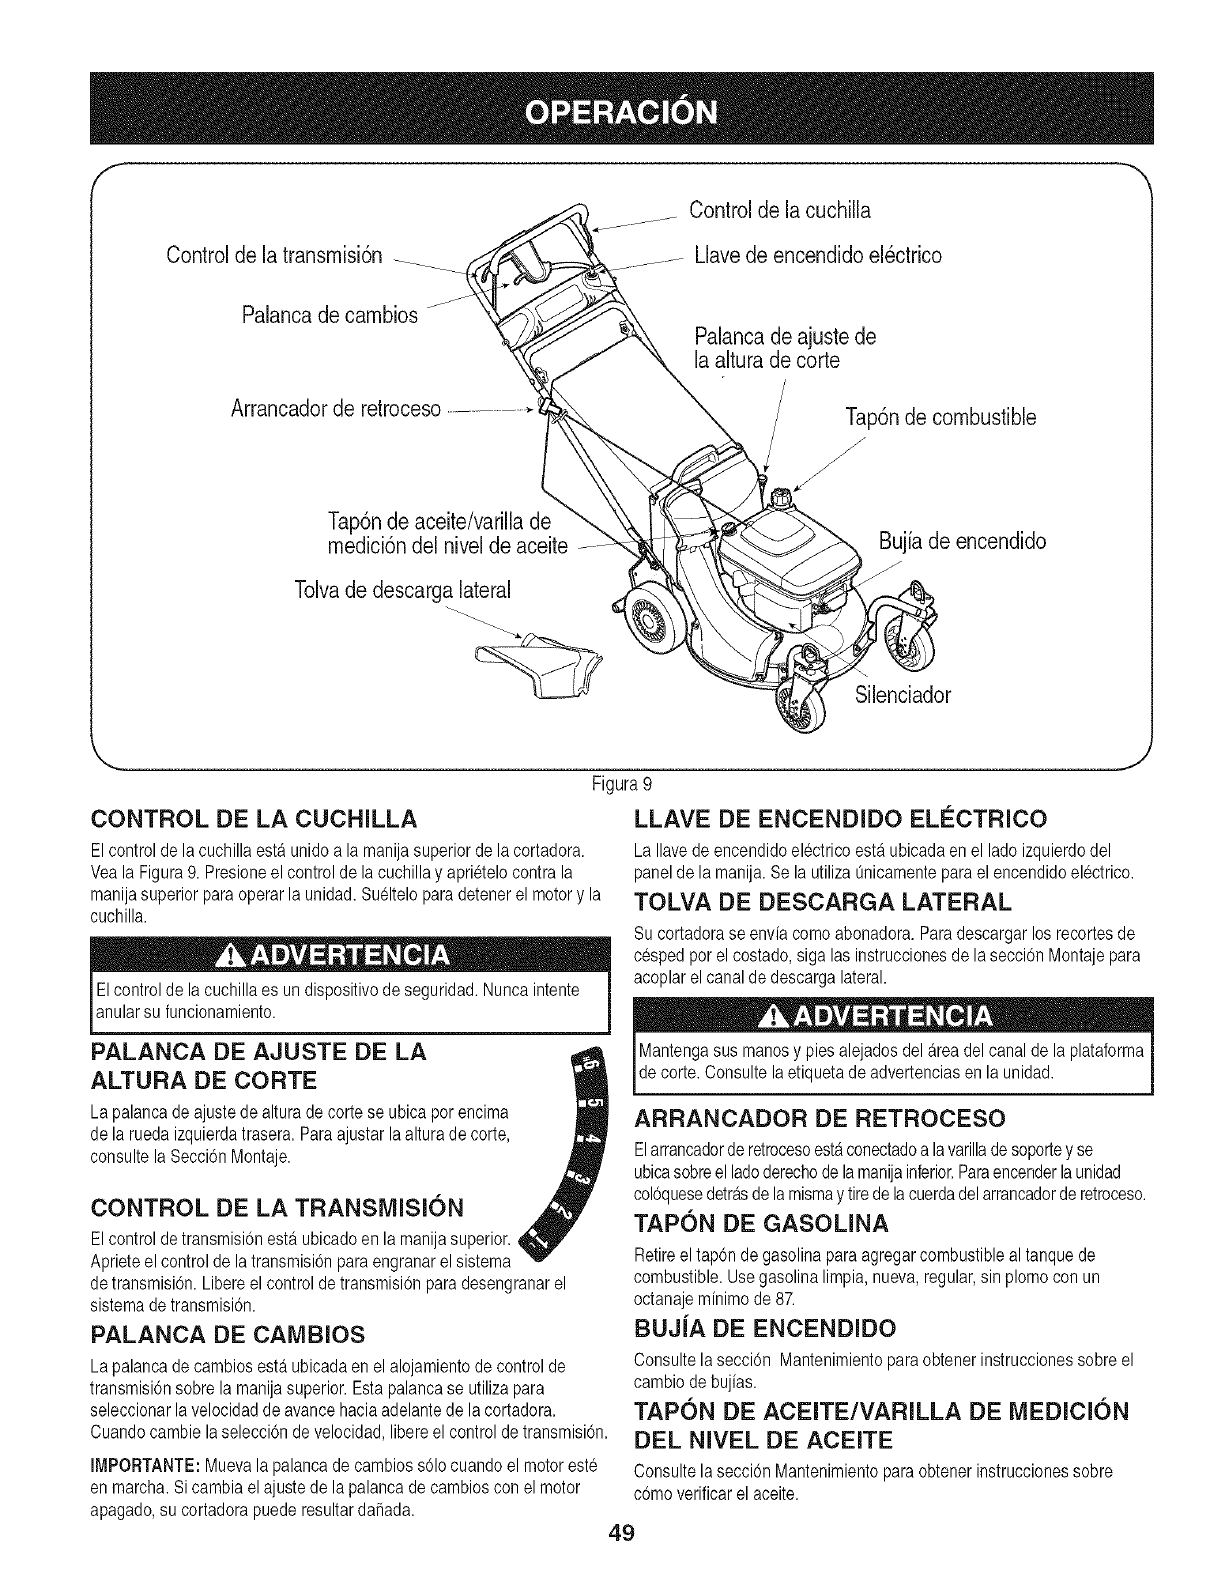
f
Control de la cuchilla
Control de la transmisidn Llavede encendido electrico
Palancade cambios Palanca de ajuste de
la altura de corte
Arrancadorde retroceso
Tap6n de aceite/varilla de
medici6ndel nivelde aceite
Tolvade descarga lateral
Tap6n de combustible
J
J
J
J
Bujfa de encendido
Silenciador
CONTROL DE LA CUCHILLA
Elcontroldelacuchillaestaunidoa lamanijasuperiordelacortadora.
VealaFigura9. Presioneelcontroldelacuchillay aprietelocontrala
manijasuperiorparaoperarlaunidad.Suelteloparadetenerel motory la
cuchilla.
El controlde la cuchillaes un dispositivo de seguridad. Nunca intente
anular su funcionamiento.
PALANCA DE AJUSTE DE LA
ALTURA DE CORTE
Lapalancadeajustedealturadecortese ubicaporencima
delaruedaizquierdatrasera.Paraajustarlaalturadecorte,
consultelaSecci6nMontaje.
CONTROL DE LA TRANSMISl6N
Elcontroldetransmisi6nestAubicadoenla manijasuperior.
Aprieteelcontroldelatransmisionparaengranarelsistema
detransmisi6n.Libereel controldetransmisi6nparadesengranarel
sistemadetransmisi6n.
PALANCA DE CAlVlBIOS
Lapalancadecambiosestaubicadaenelalojamientodecontrolde
transmisionsobrelamanijasuperior.Estapalancase utilizapara
seleccionarlavelocidaddeavancehaciaadelantede lacortadora.
Cuandocambielaselecciondevelocidad,libereelcontroldetransmisi6n.
mMPORTANTE:Muevalapalancadecambioss61ocuandoelmotoreste
enmarcha.Sicambiaelajustede lapalancadecambiosconelmotor
apagado,sucortadorapuederesultardafiada.
J
Figura9
LLAVE DE ENCENDIDO ELECTRICO
LaNavedeencendidoelectricoestaubicadaenelladoizquierdodel
paneldelamanija.SelautilizaOnicamenteparaelencendidoelectrico.
TOLVA DE DESCARGA LATERAL
Sucortadoraseenvfacomoabonadora.Paradescargarlosrecortesde
cespedporel costado,sigalasinstruccionesdelasecci6nMontajepara
acoplarelcanaldedescargalateral.
Mantengasusmanosy piesalejadosdelareadelcanaldelaplataforma
decorte.Consultelaetiquetadeadvertenciasenlaunidad.
ARRANCADOR DE RETROCESO
Elarrancadorderetrocesoestaconectadoa lavarilladesoportey se
ubicasobreelladoderechodelamanijainferior.Paraencenderlaunidad
col6quesedetrasdelamismay tiredelacuerdadelarrancadorderetroceso.
TAPON DE GASOLINA
Retireeltap6ndegasolinaparaagregarcombustiblealtanquede
combustible.Usegasolinalimpia,nueva,regular,sinplomoconun
octanajemfnimode87.
BUJ|A DE ENCENDIDO
Consultelasecci6nMantenimientoparaobtenerinstruccionessobreel
cambiodebujias.
TAPON DE ACEITE/VARILLA DE MEDICI6N
DEL NIVEL DE ACEITE
Consultelasecci6nMantenimientoparaobtenerinstruccionessobre
c6moverificarelaceite.
49
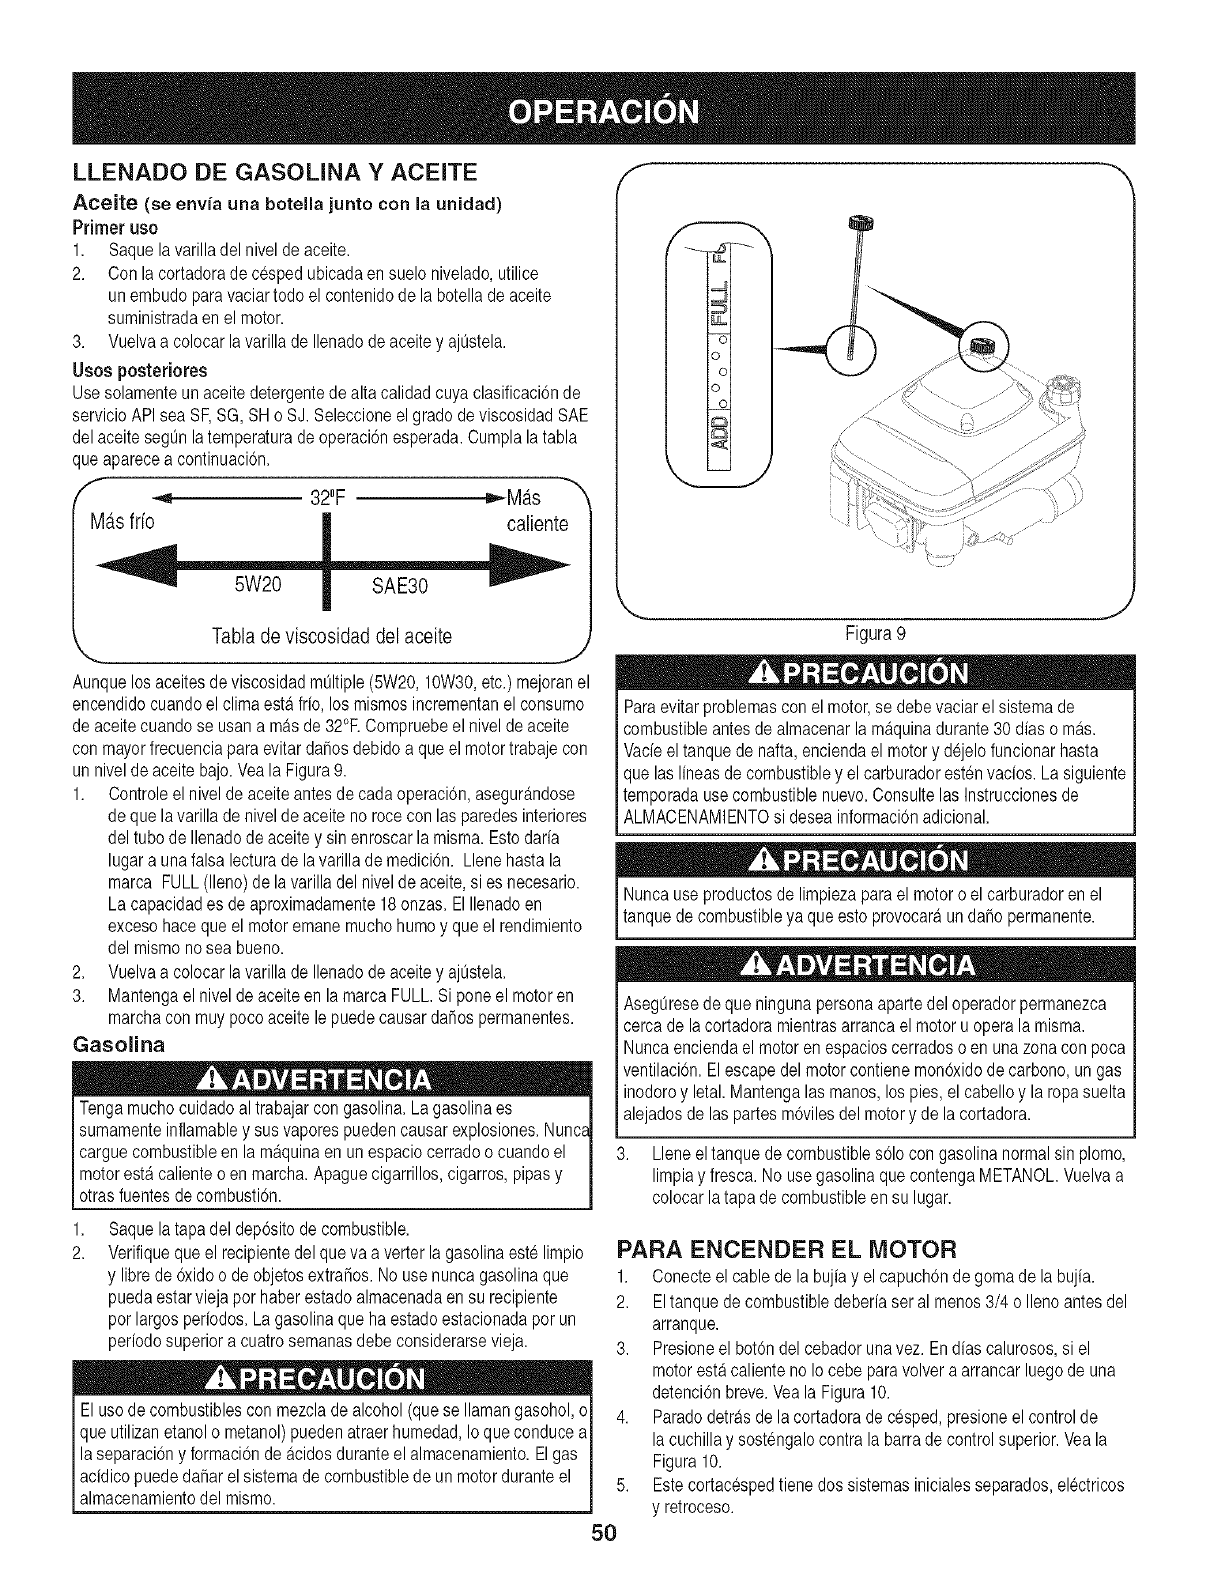
LLENADO DE GASOLJNA Y ACEJTE
Aceite (se envia una botelma junto con la unidad)
Primer uso
1. Saque la varilla del nivel de aceite.
2. Con la cortadorade cesped ubicada en suelo nivelado, utilice
un embudo paravaciar todo el contenido de la botellade aceite
suministrada en el motor.
3. Vuelva a colocar la varilla de Ilenado deaceite y ajListela.
Usos posteriores
Use solamente unaceite detergente de alta calidad cuya clasificaci6n de
servicio API sea SF,SG, SH o SJ. Seleccione el grado de viscosidad SAE
del aceite segLinlatemperatura de operaci6n esperada. Cumpla la tabla
que aparece a continuaci6n.
Tabla de viscosidad del aceite
Aunque los aceites de viscosidad mLiltiple(5W20, 10W30,etc.) mejoranel
encendido cuando el clima esta frio, los mismos incrementanel consumo
o
de aceite cuando se usan amas de 32 F.Compruebe el nivel de aceite
con mayorfrecuencia para evitar dafios debido a que el motor trabaje con
un nivel de aceite bajo. Vea la Figura 9.
1. Controle el nivel de aceite antes de cada operaci6n, asegurandose
de que la varilla de nivel de aceite no roce con las paredes interiores
del tubo de Ilenadode aceite y sin enroscar la misma. Esto daria
lugar a una falsa lectura de la varilla de medici6n. Llene hasta la
marca FULL(lleno) de la varilla del nivel de aceite, si es necesario.
La capacidad es de aproximadamente 18onzas. El Ilenadoen
exceso hace que el motor emane mucho humoy que el rendimiento
del mismo no sea bueno.
2. Vuelva a colocar la varilla de Ilenado deaceite y ajListela.
3. Mantenga el nivel de aceite en la marca FULL. Si pone el motor en
marcha con muy poco aceite le puede causar da_os permanentes.
Gasolina
Tenga mucho cuidado al trabajar con gasolina. La gasolinaes
sumamente inflamabley sus vapores pueden causar explosiones. Nunc_
cargue combustible en la maquina en un espacio cerrado o cuando el
motoresta caliente o en marcha. Apague cigarrillos, cigarros, pipas y
otras fuentes de combusti6n.
Saque la tapa del dep6sito de combustible.
2. Verifique que el recipiente del que va a verter la gasolina este limpio
y libre de 6xido o de objetos extra_os. No usenunca gasolina que
pueda estar vieja por haber estado almacenada en su recipiente
por largos periodos. La gasolina que ha estadoestacionada por un
periodo superior a cuatro semanas debe considerarse vieja.
El usode combustibles con mezcla de alcohol (que se Ilamangasohol, c
que utilizan etanol o metanol) pueden atraer humedad, Io que conduce a
la separaci6ny formacion de acidos duranteel almacenamiento.El gas
acidico puede dafiar el sistema de combustible de un motor durante el
almacenamientodel mismo.
f --,,
Figura9
Paraevitar problemas con el motor, se debe vaciar el sistema de
combustible antes de almacenar la maquina durante 30 dias o mas.
Vacie el tanque de nafta,encienda el motor y dejelo funcionar hasta
que las lineas decombustible y el carburador esten vacios. La siguiente
temporada use combustible nuevo. Consulte las Instrucciones de
ALMACENAMIENTOsi desea informaci6n adicional.
Nuncauseproductosdelimpiezaparaelmotoroel carburadorenel
tanquedecombustibleya queestoprovocaraundafiopermanente.
AsegLiresede que ninguna persona aparte del operador permanezca
cerca de la cortadora mientras arranca el motor u opera la misma.
Nunca encienda el motor en espacios cerrados o en una zona con poca
ventilaci6n. El escape del motor contiene mon6xido de carbono, un gas
inodoro y letal. Mantenga las manos, los pies, el cabello y la ropa suelta
alejados de las partes m6viles del motor y de la cortadora.
3. Llene el tanque de combustible s61ocon gasolina normal sin plomo,
limpiay fresca. No use gasolina que contenga METANOL Vuelva a
colocarla tapa de combustible en su lugar.
PARA ENCENDER EL MOTOR
1. Conecteel cable de la bujia y el capuch6n de gomade la bujfa.
2. Eltanque de combustible deberia ser al menos 3/4 o Ileno antes del
arranque.
3. Presione el bot6n del cebadoruna vez. Endias calurosos, si el
motor esta caliente no Io cebe paravolver a arrancar luego de una
detenci6n breve. Vea la Figura 10.
4. Paradodetras de la cortadora de cesped, presione el controlde
la cuchilla y sostengalo contra la barra de control superior.Vea la
Figura 10.
Estecortacesped tiene dos sistemas iniciales separados, electricos
y retroceso.
5.
5O
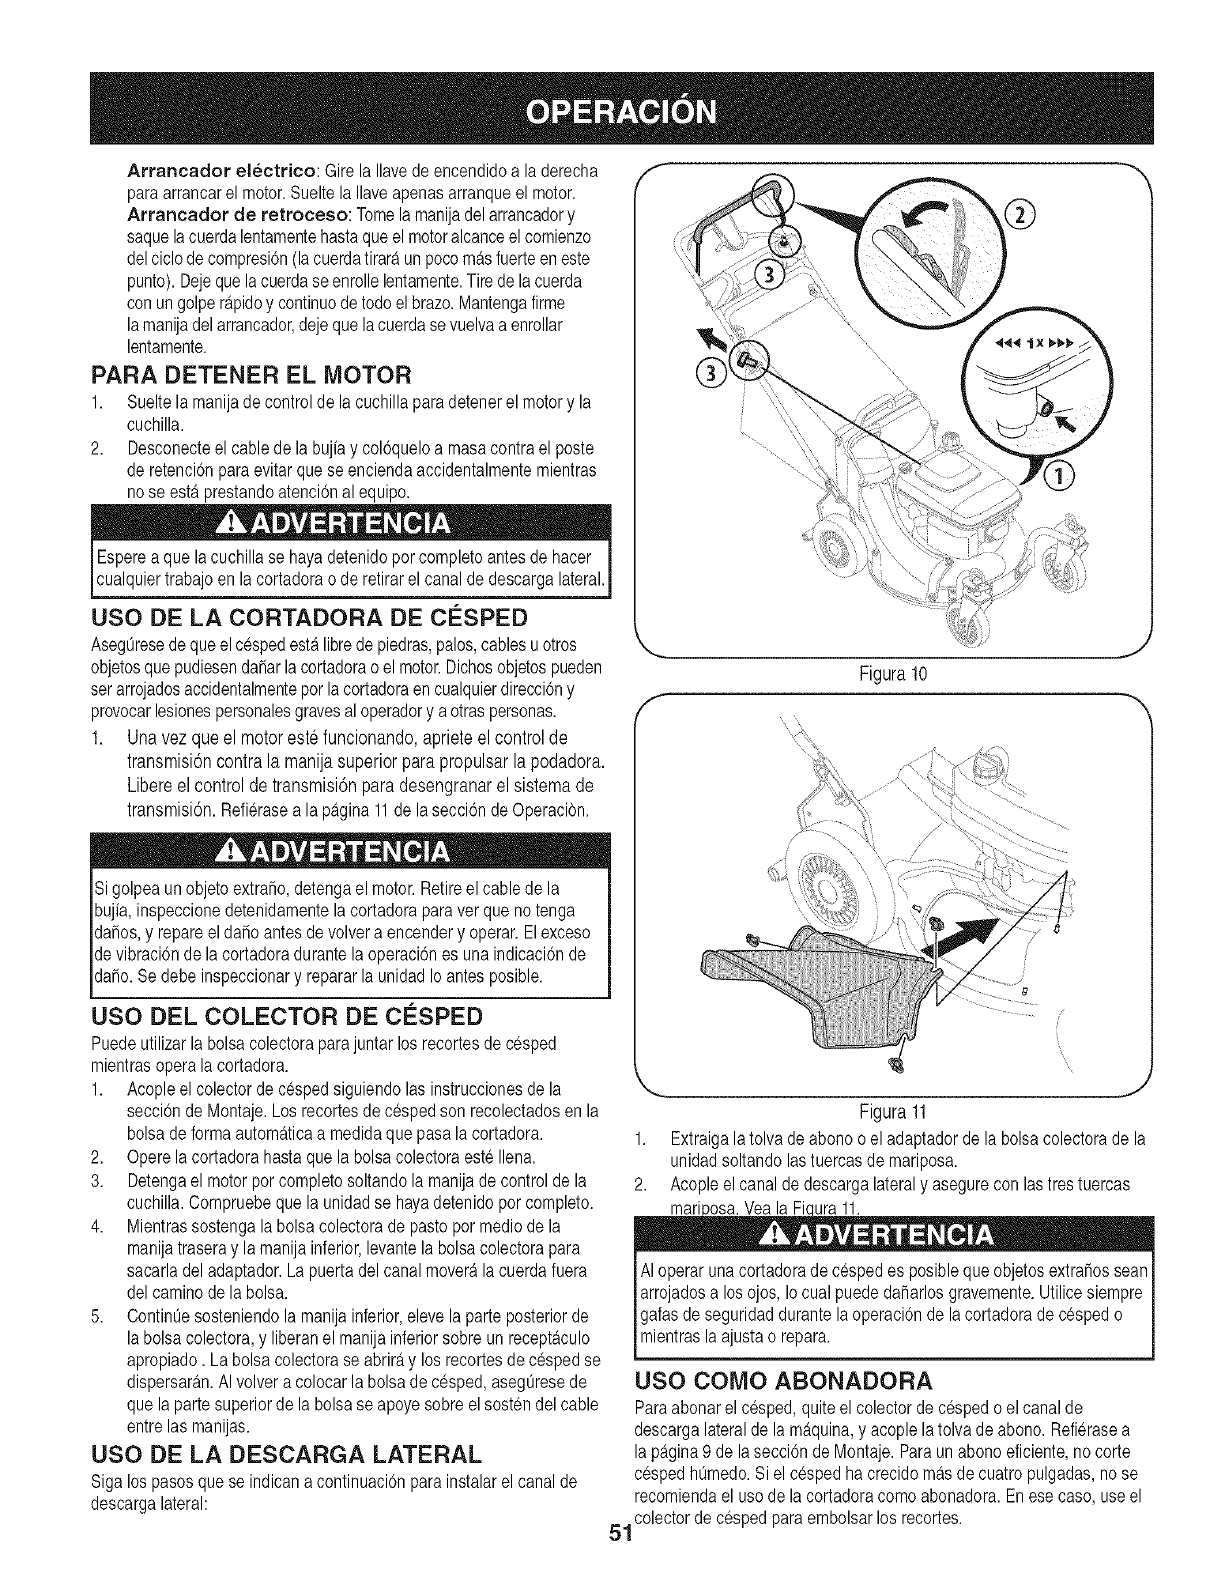
Arrancador electrico: Girela Ilavedeencendidoa laderecha
paraarrancarel motor.Sueltela Ilaveapenasarranqueel motor.
Arrancador de retroceso: Tomelamanijadelarrancadory
saquelacuerdalentamentehastaqueelmotoralcanceelcomienzo
delciclodecompresi6n(lacuerdatiraraunpocomasfuerteeneste
punto).Dejequelacuerdaseenrollelentamente.Tiredelacuerda
conungolperapidoy continuodetodoelbrazo.Mantengafirme
lamanijadelarrancador,dejequelacuerdasevuelvaaenrollar
lentamente.
PARA DETENER EL MOTOR
1. Sueltelamanijadecontroldelacuchillaparadetenerel motory la
cuchilla.
2. Desconecteelcablede labujiay coloqueloa masacontraelposte
deretenci6nparaevitarqueseenciendaaccidentalmentemientras
noseestaprestandoatenci6nalequipo.
Espereaquelacuchillasehayadetenidoporcompletoantesde hacer
[cuaquertrabaoen a cortadorao deretrare cana dedescargaatera.j
USO DE LA CORTADORA DE C¢:SPED
AsegLiresedequeelcespedestalibredepiedras,palos,cablesuotros
objetosquepudiesenda_arlacortadoraoelmotor.Dichosobjetospueden
serarrojadosaccidentalmenteporlacortadoraencualquierdirecci6ny
provocarlesionespersonalesgravesaloperadory aotraspersonas.
1. Unavezqueel motorestefuncionando,aprieteel controlde
transmisi6ncontrala manijasuperiorparapropulsarla podadora.
Libereel controlde transmisi6nparadesengranarelsistemade
transmisi6n.Refieraseala pagina11de lasecci6ndeOperaci6n.
Sigolpeaunobjetoextrafio,detengael motor.Retireel cabledela
bujia,inspeccionedetenidamentelacortadoraparaverquenotenga
da_os,y repareel dafioantesdevolvera encendery operar.Elexceso
devibraci6nde lacortadoradurantela operaci6nes unaindicaci6nde
da_o.Sedebe nspecconary reparara undad o antesposb e.
USO DEL COLECTOR DE C#SPED
Puedeutilizarlabolsacolectoraparajuntarlosrecortesdecesped
mientrasoperalacortadora.
1. Acopleel colectordecespedsiguiendolasinstruccionesdela
secciondeMontaje.Losrecortesdecespedsonrecolectadosenla
bolsadeformaautomaticaa medidaquepasalacortadora.
2. Operelacortadorahastaquela bolsacolectoraesteIlena.
3. Detengaelmotorporcompletosoltandola manijadecontroldela
cuchilla.Compruebequelaunidadse hayadetenidoporcompleto.
4. Mientrassostengalabolsacolectorade pastopormediodela
manijatraseray lamanijainferior,levantela bolsacolectorapara
sacarladeladaptador.Lapuertadelcanalmoveralacuerdafuera
delcaminodela bolsa.
5. ContinLiesosteniendolamanijainferior,elevelaparteposteriorde
labolsacolectora,y liberanelmanijainferiorsobreunreceptaculo
apropiado.Labolsacolectorase abriray losrecortesdecespedse
dispersaran.AIvolveracolocarla bolsadecesped,asegOresede
quelapartesuperiorde labolsaseapoyesobreelsostendelcable
entrelas manijas.
USO DE LA DESCARGA LATERAL
Sigalos pasosqueseindicanacontinuaci6nparainstalarelcanalde
descargalateral:
f@
J
Figura10
\\
,.. j
Figura11
1. Extraigalatolvadeabonooel adaptadorde labolsacolectoradela
unidadsoltandolastuercasdemariposa.
2. Acopleelcanaldedescargalateraly asegureconlastrestuercas
AIoperarunacortadoradecespedes posiblequeobjetosextra_ossean
arrojadosa losojos,Iocualpuededafiarlosgravemente.Utilicesiempre
gafasdeseguridaddurantelaoperaci6ndelacortadoradecespedo
mientraslaajustao repara.
USO COMO ABONADORA
Paraabonarelcesped,quiteelcolectordecespedoel canalde
descargalateraldelamaquina,y acoplelatolvadeabono.Refierasea
lapagina9delasecci6ndeMontaje.Paraunabonoeficiente,nocorte
cespedhLimedo.Sielcespedhacrecidomasdecuatropulgadas,nose
recomiendael usodelacortadoracomoabonadora.Enesecaso,useel
colectordecespedparaembolsarlosrecortes.
51
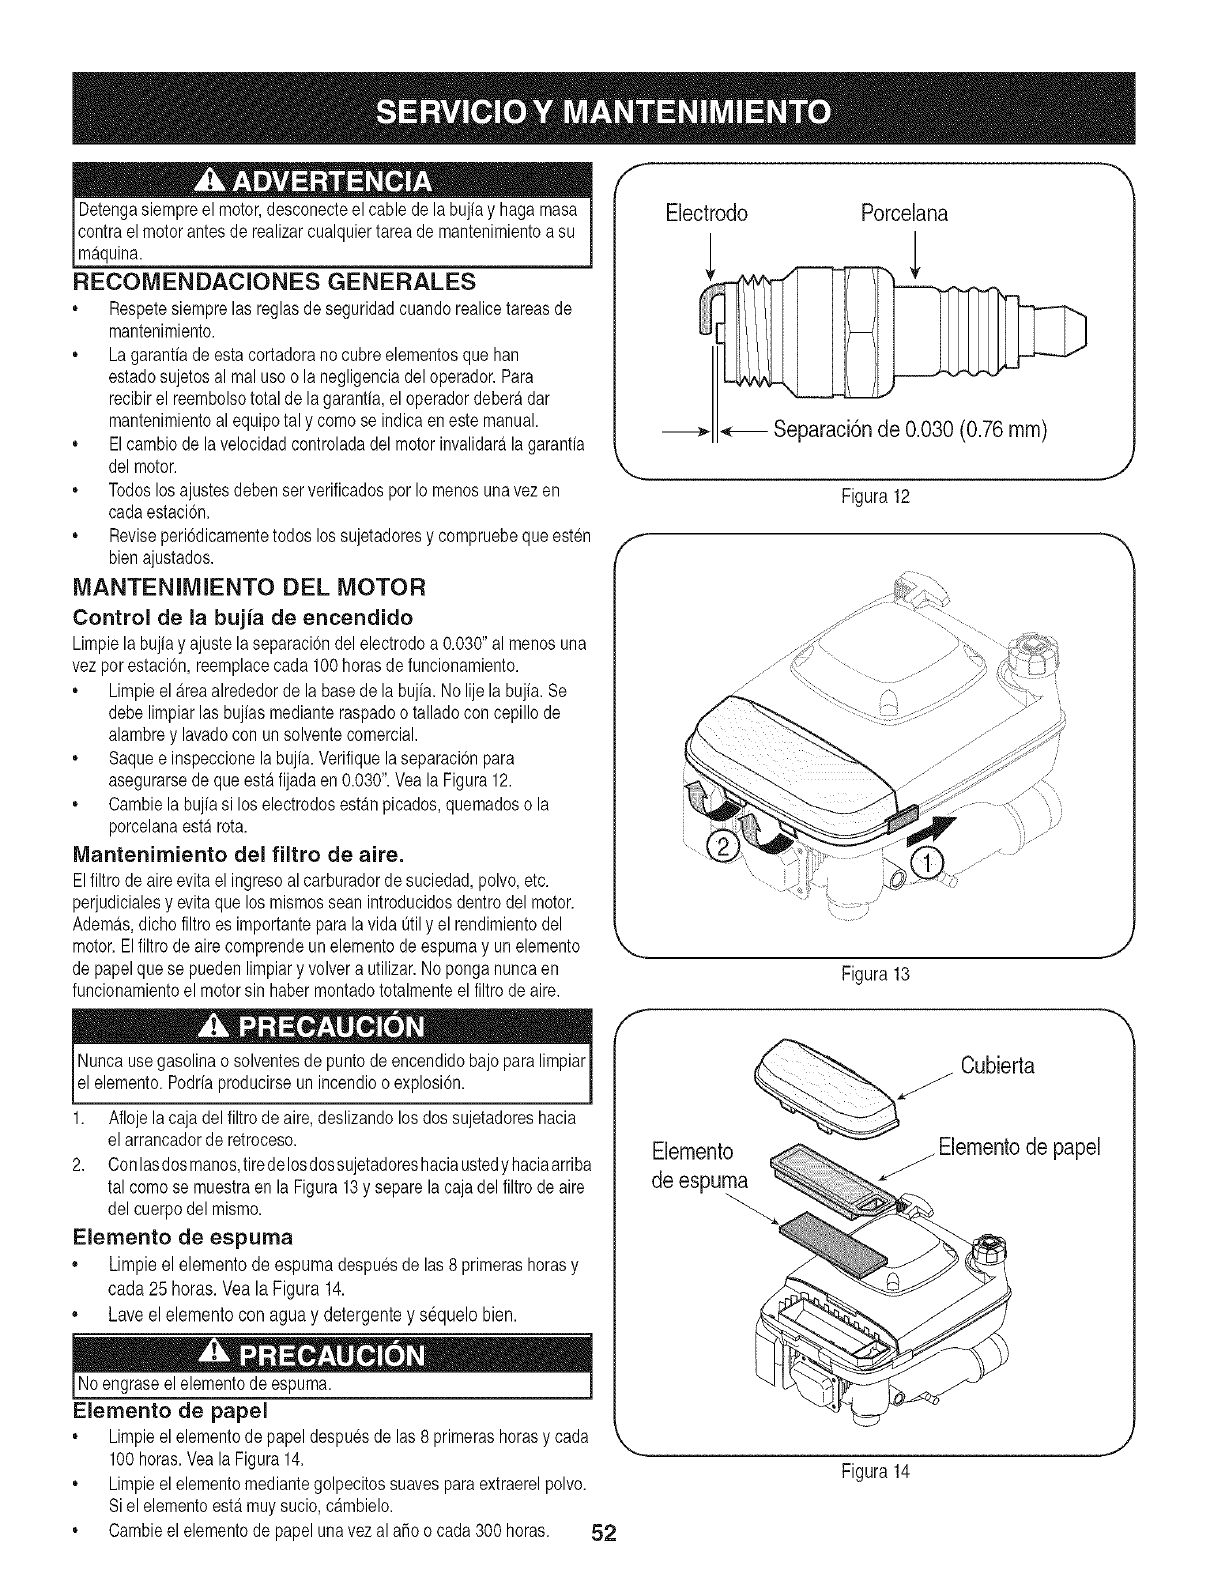
Detengasiempreelmotor,desconecteel cabledelabujiay hagamasa
contraelmotorantesde realizarcualquiertareademantenimientoa su
maquina.
RECOMENDAClONES GENERALES
• Respetesiemprelasreglasdeseguridadcuandorealicetareasde
mantenimiento.
• Lagarantiadeestacortadoranocubreelementosquehan
estadosujetosalmalusoola negligenciadeloperador.Para
recibirelreembolsototaldelagarantia,el operadordeberadar
mantenimientoal equipotal y comoseindicaenestemanual.
• ElcambiodelavelocidadcontroladadelmotorinvalidaralagarantJa
delmotor.
• TodoslosajustesdebenserverificadosporIo menosunavezen
cadaestaci6n.
• Reviseperiodicamentetodoslossujetadoresy compruebequeest@
bienajustados.
MANTENIMIENTO DEL MOTOR
Control de la bujJa de encendido
Limpiela bujiay ajustelaseparaciondelelectrodoa 0.030"al menosuna
vezporestaci6n,reemplacecada100horasdefuncionamiento.
• Limpieel areaalrededordelabasedela bujia.Nolijelabujia.Se
debelimpiarlasbujiasmedianteraspadoo talladoconcepillode
alambrey lavadoconunsolventecomercial.
• Saqueeinspeccionelabujia.Verifiquelaseparacionpara
asegurarsedequeestafijadaen0.030".VealaFigura12.
• Cambielabujiasi los electrodosestanpicados,quemadoso la
porcelanaestarota.
MantenimJento del filtro de aire.
Elfiltrodeaireevitaelingresoalcarburadordesuciedad,polvo,etc.
perjudicialesy evitaquelos mismosseanintroducidosdentrodelmotor.
Ademas,dichofiltroes importanteparalavida Litily el rendimientodel
motor.Elfiltrodeairecomprendeunelementodeespumay unelemento
depapelquese puedenlimpiary volvera utilizar.Noponganuncaen
funcionamientoel motorsinhabermontadototalmenteel filtrodeaire.
Nuncausegasolinaosolventesdepuntodeencendidobajoparalimpiar
e eemento.Podra producrseun ncendooexpos6n.
1. Aflojelacajadelfiltrodeaire,deslizandolosdossujetadoreshacia
elarrancadorde retroceso.
2. Conlasdosmanos,tiredelosdossujetadoreshaciaustedyhaciaarriba
tal comosemuestraenla Figura13y separela cajadelfiltrodeaire
delcuerpodelmismo.
Elemento de espuma
,Limpieel elementode espumadespuesdelas8primerashorasy
cada25 horas.Veala Figura14.
,Laveelelementoconaguay detergentey sequelobien.
Noengraseelelementodeespuma.
Elemento de papel
= Limpieel elementodepapeldespuesde las8primerashorasy cada
100horas.VealaFigura14.
= Limpieel elementomediantegolpecitossuavesparaextraerelpolvo.
Sielelementoestamuysucio,cambielo.
o
f
Electrodo Porcelana
--_ <-_ Separaci6n de 0.030 (0.76 rnrn)
Figura12
,J
Cambieelelementodepapelunavezala_oo cada300horas. 52
F-
,,.. J
Figura13
_ Cubierta
Elemento _ Elementode papel
de espurna
Figura14
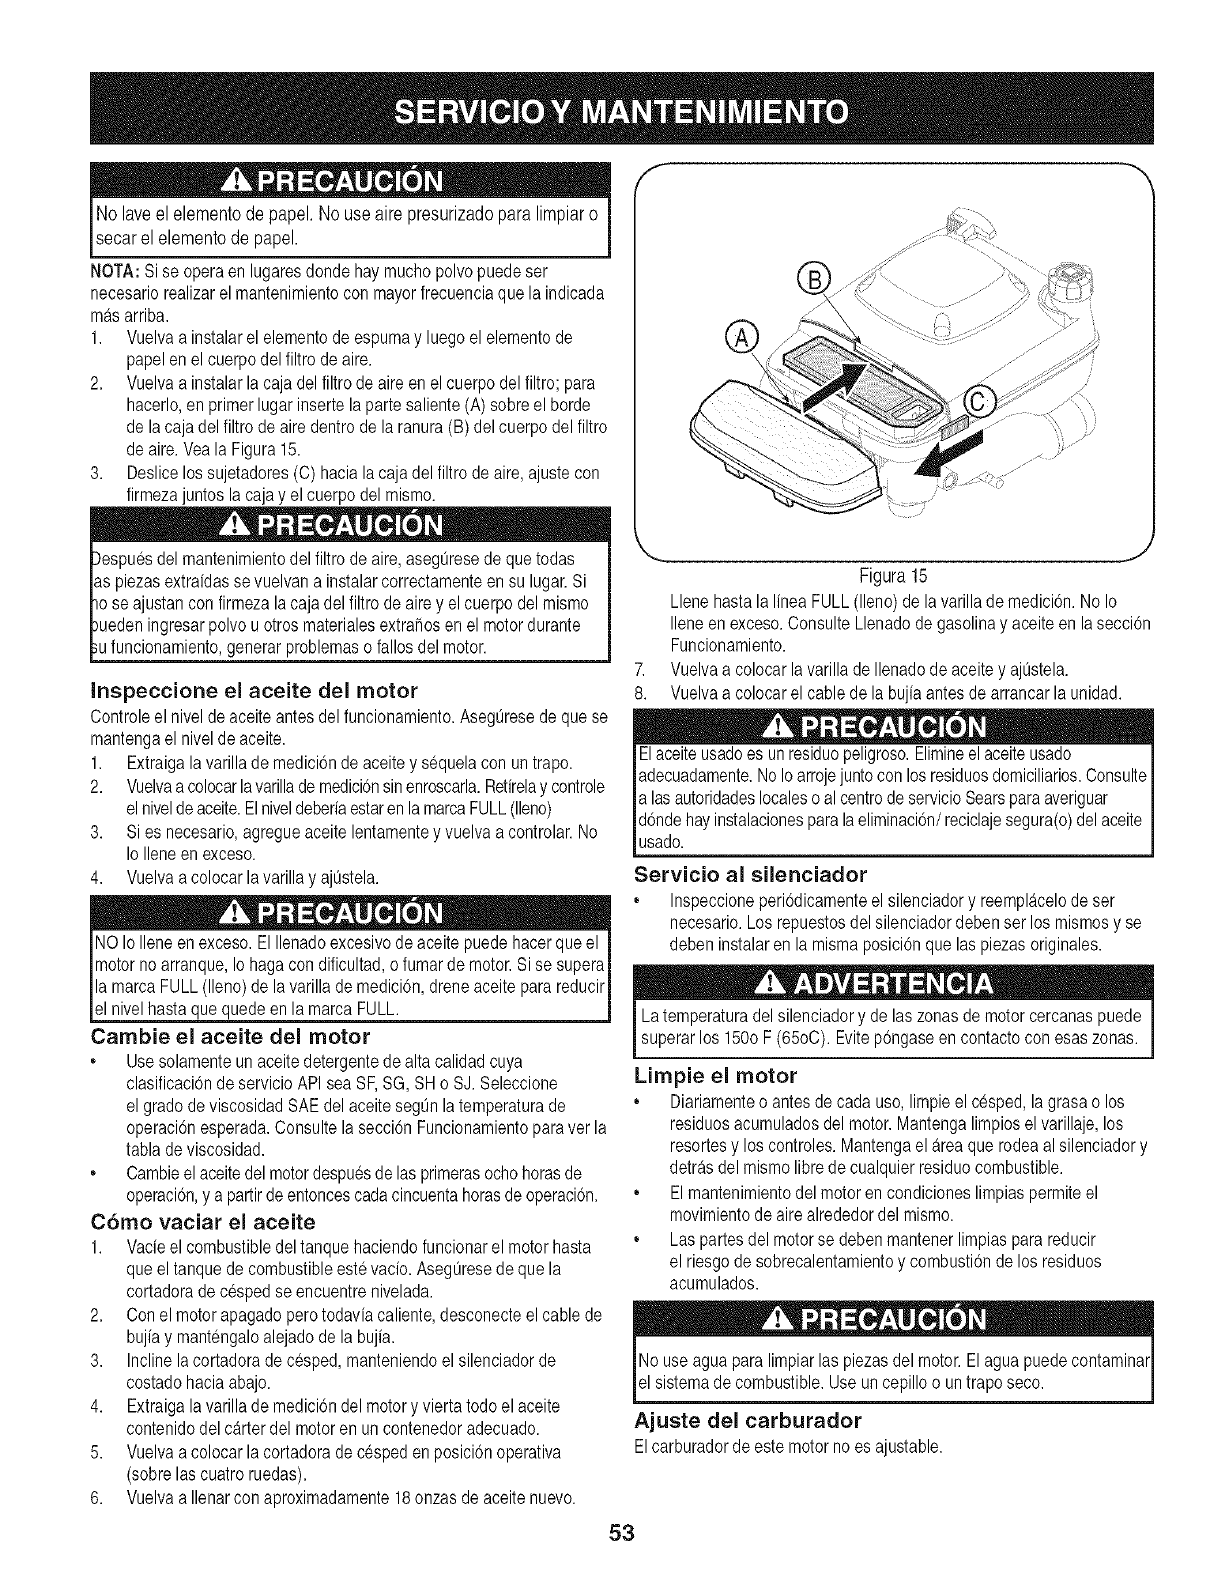
Nolaveelelementodepapel.Nouseairepresurizadoparalimpiaro
secare eementode pape.
NOTA:Siseoperaenlugaresdondehaymuchopolvopuedeser
necesariorealizarelmantenimientoconmayorfrecuenciaquelaindicada
masarriba.
1. Vuelvaainstalarelelementodeespumay luegoel elementode
papelenelcuerpodelfiltrodeaire.
2. Vuelvaainstalarlacajadelfiltrodeaireenelcuerpodelfiltro;para
hacerlo,enprimerlugarinsertelapartesaliente(A)sobreel borde
delacajadelfiltrodeairedentrodela ranura(B)delcuerpodelfiltro
deaire.Veala Figura15.
3. Deslicelossujetadores(C) hacialacajadelfiltrodeaire,ajustecon
firmezajuntoslacajay elcuerpodelmismo.
f
o seajustanconfirmezalacajadelfiltrodeairey elcuerpodelmismouedeningresarpolvouotrosmaterialesextra_osenelmotordurante
ufuncionamiento,generarproblemaso fallosdelmotor.
Despuesdel mantenimientodel filtro de aire, asegLiresede que todas
as piezas extraidas se vuelvan a instalar correctamente en su lugar. Si
Jnspeccione el aceite del motor
Controle el nivel de aceite antes del funcionamiento. Aseg@esede que se
mantenga el nivel de aceite.
1. Extraiga lavarilla de medici@ de aceite y sequela con un trapo.
2. Vuelvaa colocar lavarillade medici@sin enroscarla.RetJrelay controle
el niveldeaceite.Elniveldeberia estaren lamama FULL(lleno)
3. Si es necesario,agregue aceite lentamente y vuelva a controlar. No
Io Ileneen exceso.
4. Vuelva a colocar la varilla y ajListela.
NO Io Ilene en exceso. ElIlenado excesivode aceite puede hacerque el
motor no arranque, Iohaga con dificultad, o fumar de motor.Si se supera
la mama FULL (lleno) de la varilla de medici6n, drene aceite para reducir
el nivel hasta que quede en la mama FULL.
Cambie el aceite del motor
• Use solamente un aceite detergente de alta calidad cuya
clasificacion de servicio API sea SF,SG, SH o SJ. Seleccione
el grado de viscosidad SAEdel aceite segLinla temperatura de
operaci6n esperada. Consulte la secci6n Funcionamiento paraver la
tabla de viscosidad.
• Cambieel aceite delmotor despuesde las primerasochohoras de
operaci6n,y a partir deentonces cadacincuenta horasde operaci6n.
Como vaciar el aceite
1. Vacfeel combustibledel tanque haciendo funcionarel motor hasta
que el tanque de combustible este vacio. AsegLiresede que la
cortadora de cesped se encuentre nivelada.
2. Conel motor apagado perotodavia caliente, desconecteel cable de
bujia y mant@galo alejado de la bujia.
3. Incline la cortadora de cesped, manteniendoel silenciador de
costado hacia abajo.
4. Extraiga lavarilla de medici6n del motor y vierta todo el aceite
contenido del carter del motor en un contenedor adecuado.
5. Vuelva a colocar la cortadora de cesped enposici6n operativa
(sobre las cuatro ruedas).
6. Vuelva a Ilenarcon aproximadamente 18onzas de aceite nuevo.
Figura 15
Llene hasta la linea FULL (lleno) de la varillade medici6n. No Io
Ileneen exceso. Consulte Llenado de gasolina y aceite en la secci6n
Funcionamiento.
7. Vuelva a colocar la varilla de Ilenadode aceite y ajListela.
8. Vuelva a colocar el cable de la bujiaantes de arrancar la unidad.
Elaceite usado es un residuopeligroso. Elimineel aceite usado
adecuadamente.No Io arrojejunto con los residuosdomiciliarios.Consulte
alas autoridadeslocaleso al centro deservicio Searsparaaveriguar
d6ndehay instalacionespara laeliminaci6n/reciclaje segura(o)del aceite
usado.
Servicio al silenciador
•Inspeccione peri6dicamente el silenciador y reemplacelo de ser
necesario. Los repuestosdel silenciador deben ser los mismos y se
deben instalar en la misma posici6n que las piezasoriginales.
La temperatura delsilenciador y de las zonas de motor cercanas puede I
m
I superar os 150oF (65oC). Evte p6ngase en contacto con esaszonas.
Limpie el motor
• Diariamenteo antes de cada uso, limpie el cesped, la grasa o los
residuos acumulados del motor. Mantenga limpios el varillaje, los
resortes y los controles. Mantenga el area que rodea al silenciador y
detras del mismo librede cualquier residuo combustible.
• Elmantenimiento del motor en condiciones limpias permite el
movimientode aire alrededordel mismo.
• Las partes del motor se deben mantener limpias para reducir
el riesgode sobrecalentamiento y combusti6n de los residuos
acumulados.
Nouseaguaparalimpiarlaspiezasdelmotor,Elaguapuedecontaminar
elsistemadecombustible.Useuncepilloo untraposeco.
Ajuste del carburador
Elcarburadordeestemotornoesajustable.
53
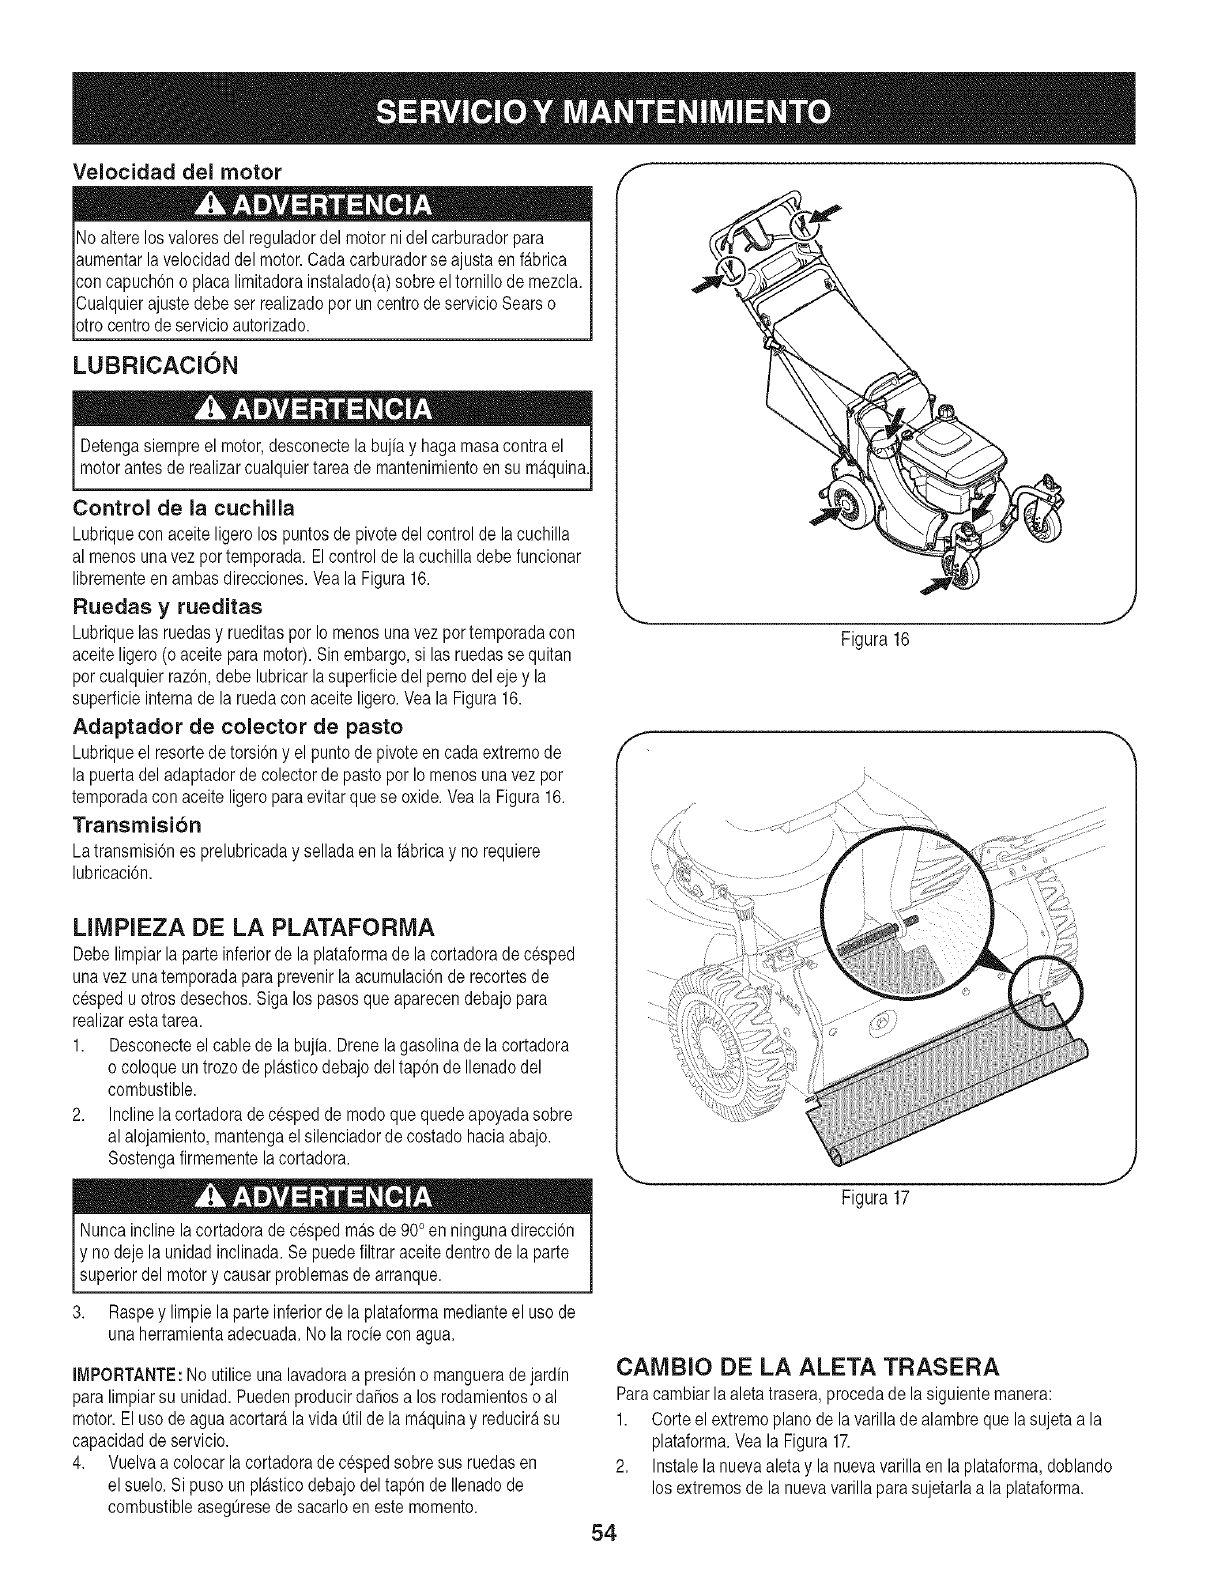
Velocidad del motor f "_
No altere los valores del reguladordel motor ni del carburador para
aumentar la velocidad del motor. Cada carburador se ajusta en fabrica
con capuch6n o placa limitadora instalado(a) sobre el tomillo de mezcla.
ICualquier ajuste debe ser realizado por un centrode servicio Searso
[otrocentro de servicio autorizado.
LUBRICACION
Detenga siempre el motor, desconecte la bujfa y haga masa contra el I
motor antes de realizar cualquier tarea de mantenimientoen su maquinat
Control de la cuchilla
Lubriquecon aceite ligero los puntosde pivote del control de la cuchilla
al menos una vez por temporada. Elcontrol de la cuchilla debe funcionar
libremente en ambasdirecciones. Vea la Figura 16.
Ruedas y rueditas
Lubrique las ruedas y rueditas por Io menos unavez por temporada con
aceite ligero (o aceite para motor). Sin embargo, si las ruedas se quitan
por cualquier raz6n,debe lubricar la superficie del perno del eje y la
superficie interna de la rueda con aceite ligero. Vea la Figura 16.
Adaptador de colector de pasto
Lubrique el resorte detorsi6n y el punto de pivote en cada extremo de
la puerta del adaptadorde colector de pasto por Io menos una vez por
temporada con aceite ligero para evitar que se oxide. Vea la Figura 16.
Transmisi6n
Latransmisi6n es prelubricaday sellada en la fabrica y no requiere
lubricaci6n.
LIMPIEZA DE LA PLATAFORMA
Debe limpiar la parte inferior de la plataforma de la cortadora de cesped
una vez una temporada para prevenir la acumulaci6n de recortesde
cesped u otros desechos. Siga los pasos que aparecen debajo para
realizar estatarea.
1. Desconecteel cable de la bujia. Drene lagasolina de la cortadora
o coloque untrozo de plasticodebajo del tap6n de Ilenado del
combustible.
2. Incline la cortadora de cesped de modoque quede apoyadasobre
al alojamiento, mantenga el silenciador de costado hacia abajo.
Sostengafirmemente la cortadora.
Nunca incline lacortadora de cesped mas de 900en ninguna direccion
y no deje la unidad inclinada. Se puedefiltrar aceite dentro de la parte
|super or de motor y causar prob emas de arranque.
3. Raspey limpie la parte inferior de la plataforma medianteel uso de
una herramientaadecuada. No la rode con agua.
IMPORTANTE: No utilice una lavadora a presi6no manguera dejardin
para limpiar su unidad. Pueden producirda_os a los rodamientos o al
motor. El uso de aguaacortara la vida Litilde la maquinay reducirasu
capacidad de servicio.
4. Vuelva a colocar la cortadora de cesped sobre sus ruedas en
el suelo. Si puso unplastico debajo del tap6n de Ilenado de
combustible asegLiresede sacarlo en este momento.
Figura16
Figura17
CAMBIO DE LA ALETA TRASERA
Paracambiar la aleta trasera, proceda de la siguientemanera:
1. Corte el extremo piano de lavarilla de alambre que la sujeta a la
plataforma.Vea la Figura 17.
2. Instale la nueva aleta y la nueva varilla en la plataforma, doblando
los extremosde la nueva varilla parasujetarla a la plataforma.
54
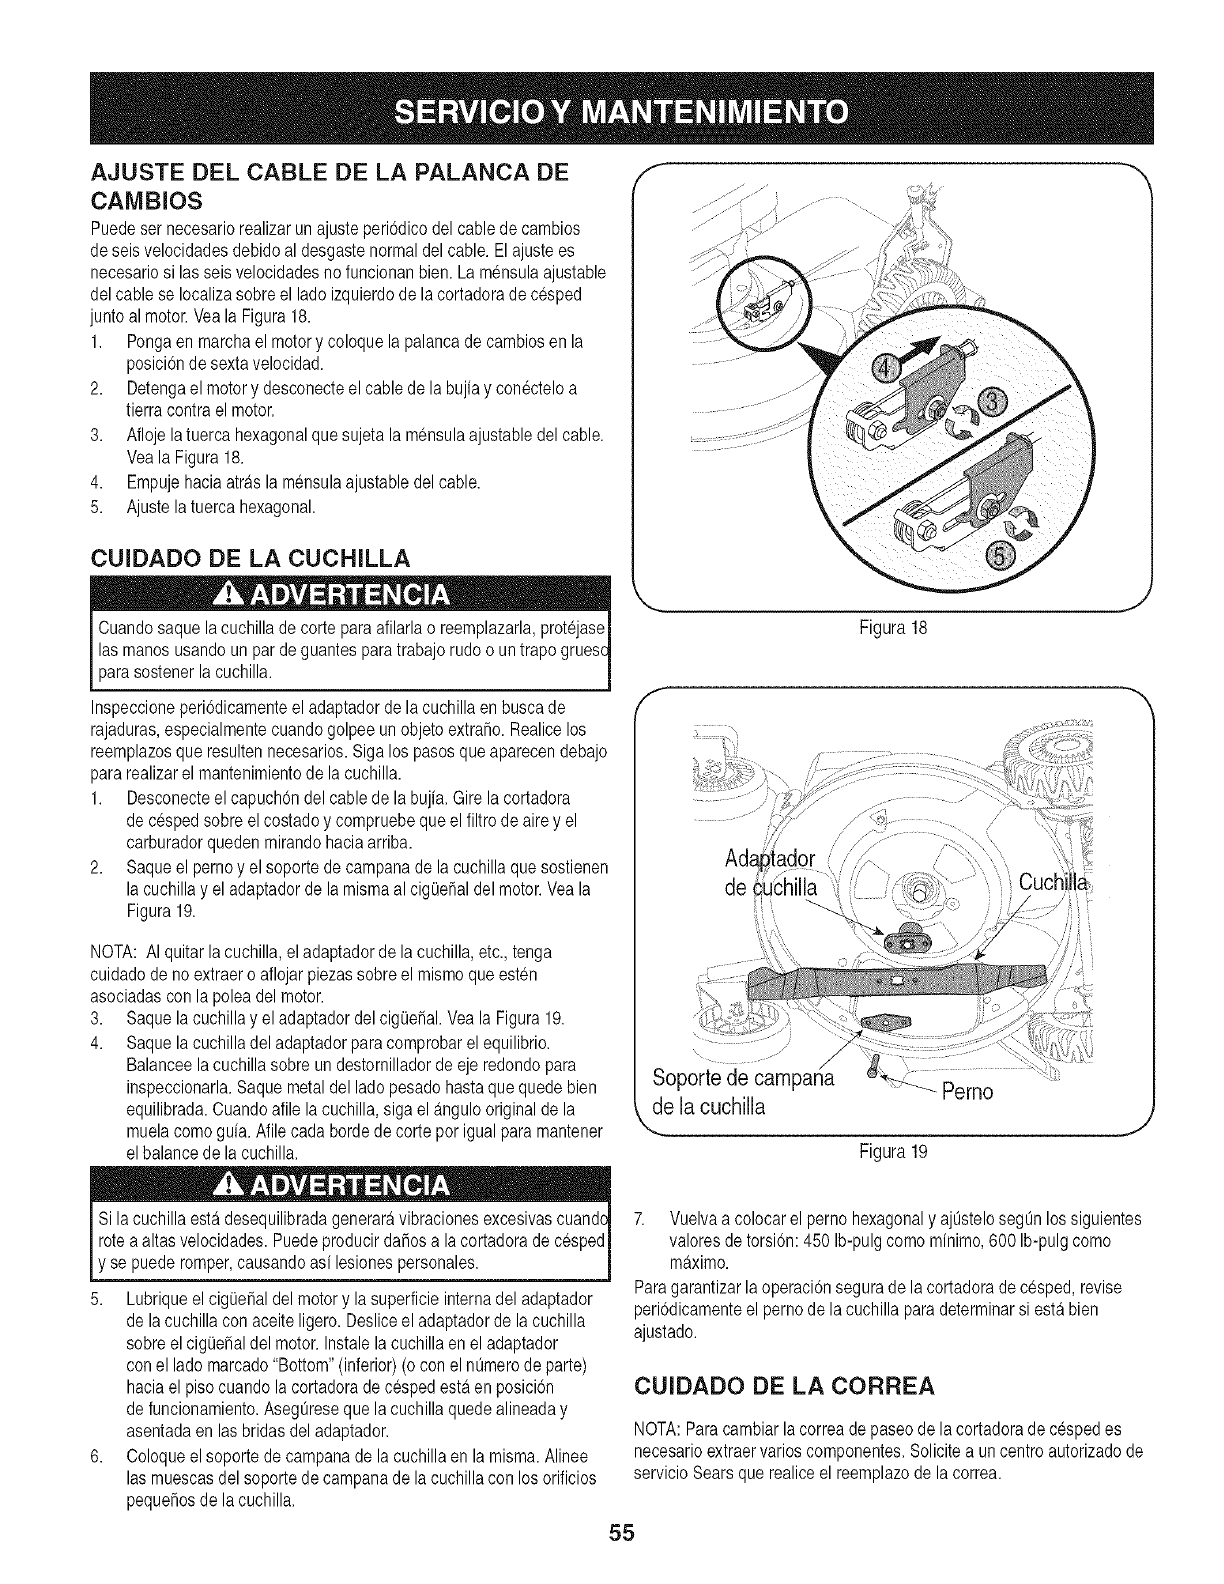
AJUSTE DEL CABLE DE LA PALANCA DE
CAMBIOS
Puede ser necesario realizar un ajuste perbdico del cable de cambios
de seis velocidades debido al desgaste normal del cable, El ajuste es
necesario si las seis velocidades no funcionan bien. La mensula ajustable
del cable se Iocaliza sobreel lado izquierdo de la cortadora de cesped
junto al motor. Vea la Figura 18.
1. Ponga en marcha el motor y coloque la palanca de cambiosen la
posici6n de sexta velocidad.
2. Detenga el motor y desconecte el cable de la bujia y conectelo a
tierra contra el motor.
3. Afloje la tuerca hexagonalque sujeta la mensulaajustable del cable.
Vea la Figura 18.
4. Empuje hacia atras la mensulaajustable del cable.
5. Ajuste latuerca hexagonal.
CUIDADO DE LA CUCHILLA
Cuandosaque la cuchilla de corte para afilarla o reemplazarla, protejase
las manos usando un par de guantes para trabajo rudo o untrapo grues(
para sostener la cuchilla.
Inspeccione peri6dicamente el adaptador de la cuchilla en busca de
rajaduras, especialmente cuando golpee un objeto extrafio. Realice los
reemplazos que resulten necesarios. Siga los pasos que aparecen debajo
para realizar el mantenimientode la cuchilla.
1. Desconecte el capuchon del cable de la bujia. Gire la cortadora
de cesped sobre el costado y compruebe que el filtro de aire y el
carburador queden mirando hacia arriba.
2. Saque el perno y el soporte de campana de la cuchilla que sostienen
la cuchilla y el adaptador de la misma al cig_)e_aldel motor. Vea la
Figura 19.
NOTA: AI quitar la cuchilla, el adaptador de la cuchilla, etc., tenga
cuidado de no extraero aflojar piezas sobre el mismo que esten
asociadas con la polea del motor.
3. Saque la cuchilla y el adaptador del cig(Je_al.Vea la Figura 19.
4. Saque la cuchilla del adaptador para comprobar el equilibrio.
Balancee la cuchilla sobre un destornilladorde eje redondo para
inspeccionarla. Saque metal del lado pesado hasta que quede bien
equilibrada. Cuandoafile la cuchilla, siga el angulo original de la
muelacomo guia. Nile cada bordede corte por igual para mantener
el balance de la cuchilla.
Si la cuchilla esta desequilibradagenerara vibraciones excesivas cuand4
rotea altasvelocidades. Puedeproducir da_os a la cortadora de cespedI
y se puede romper,causando asi lesiones personales, j
5. Lubrique el cigQedaldelmotor y la superficie internadel adaptador
de la cuchilla con aceite ligero. Desliceel adaptadorde la cuchilla
sobre el cig(Je_aldel motor. Instale la cuchilla en el adaptador
con el lado marcado "Bottom" (inferior) (ocon el nLimerode parte)
hacia el piso cuando la cortadora de cesped esta enposici6n
de funcionamiento.AsegLireseque la cuchilla quedealineada y
asentadaen las bridas del adaptador.
6. Coloque el soporte de campana de la cuchilla en la misma. Alinee
las muescas del soporte de campana de la cuchilla con los orificios
pequedosde la cuchilla.
Figura18
f
Ads
de
Soporte de carnpana
de la cuchilla
Figura19
Perno
_J
7. Vuelvaa colocarel pernohexagonaly ajListelosegLinlossiguientes
valoresdetorsi6n:450Ib-pulgcomominimo,600Ib-pulgcomo
maximo.
Paragarantizarlaoperaci6nsegurade lacortadoradecesped,revise
periodicamenteel pernodelacuchillaparadeterminarsiesta bien
ajustado.
CUIDADO DE LA CORREA
NOTA:Paracambiarlacorreadepaseodelacortadoradecespedes
necesarioextraervarioscomponentes.Solicitea uncentroautorizadode
servicioSearsquerealiceel reemplazodela correa.
55
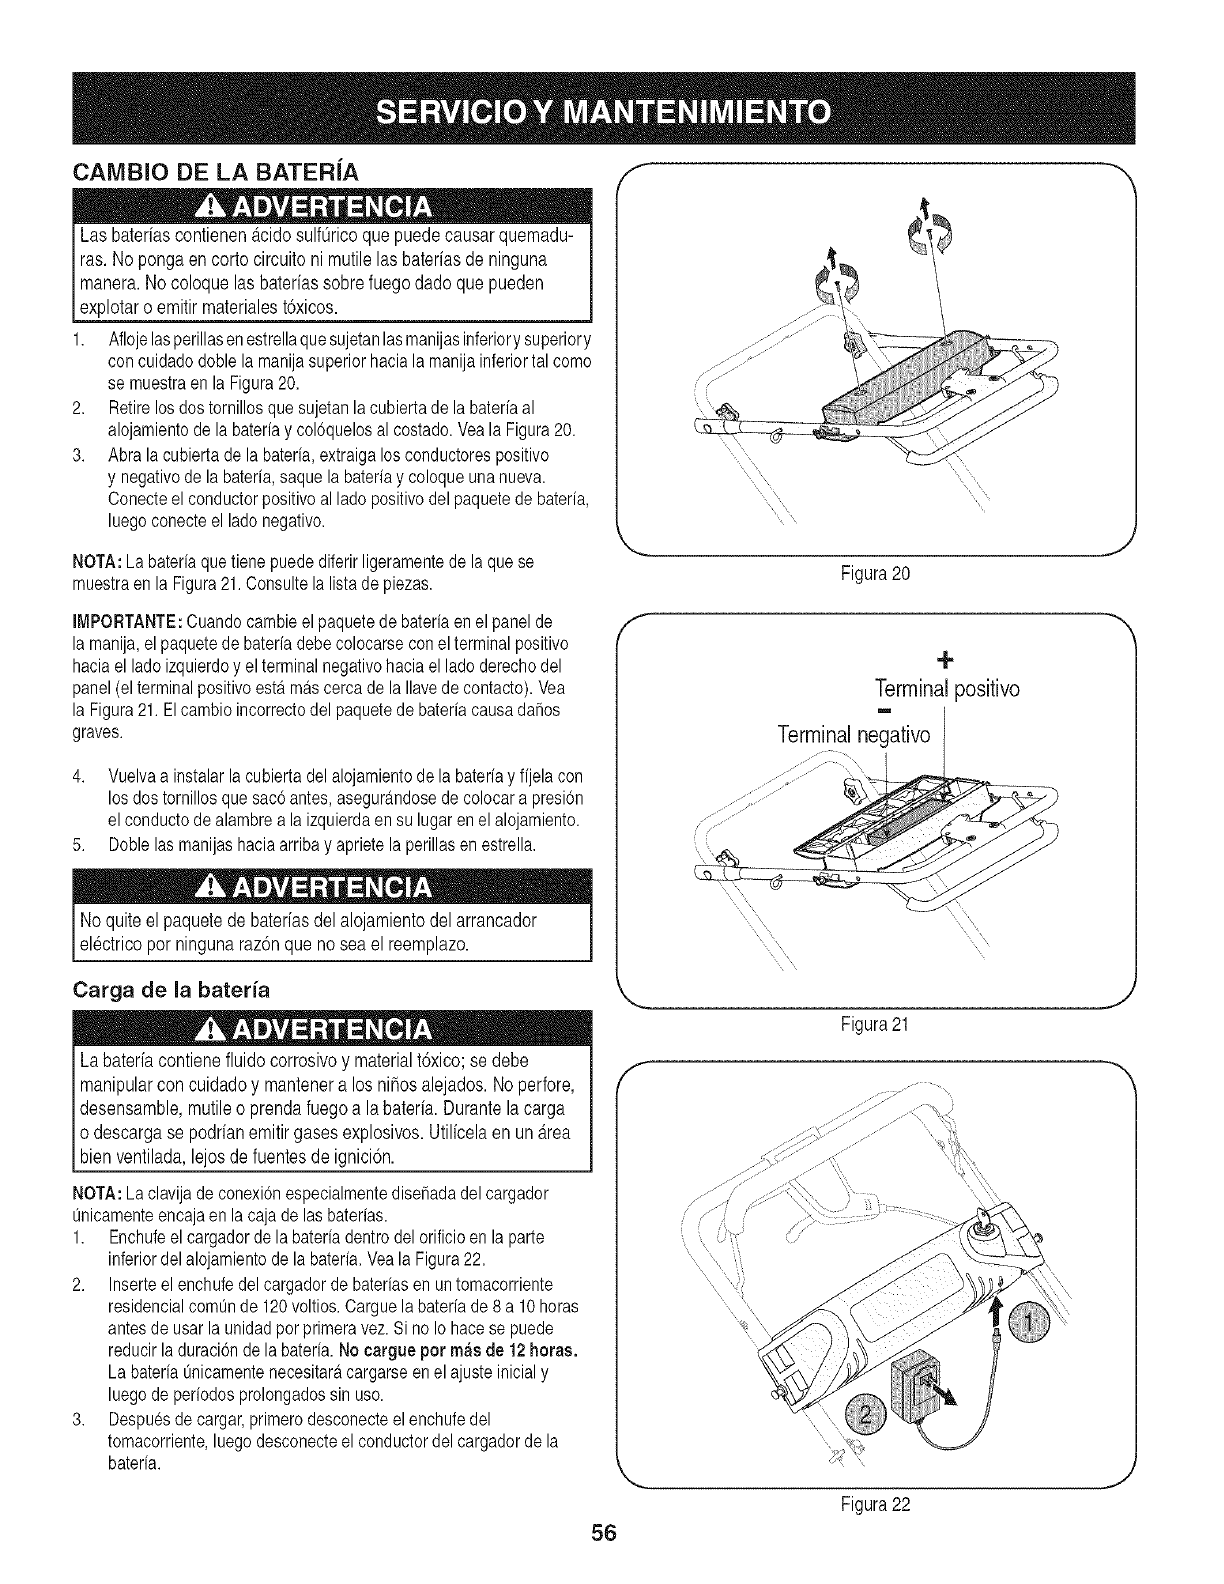
CAMBIO DE LA BATERiA
Las bateriascontienen_.cidesulf5ricoquepuedecausarquemadu-
ras.No pongaeneortocircuitoni mutilelas bateriasde ninguna
manera.No coloquelasbaterfassobrefuegodadoquepueden
explotaro emitirmaterialest6xiees.
Aflojelasperillasenestrellaquesujetanlasmanijasinferiorysuperiory
concuidadodonela manijasuperiorhacialamanijainferiortal come
semuestraenla Figura20.
2. Retirelosdostornillosquesujetanlacubiertadelabateriaal
alojamientodela bateriay cobquelosalcostado.Veala Figura20.
3. Abralacubiertadelabateria,extraigalosconductorespositive
y negativedelabateria,saquela bateriay coloqueunanueva.
Conecteel conductorpositivealladepositivedelpaquetedebateria,
luegoconecteel ladenegative.
NOTA: La bateria que tiene puede diferir ligeramentede la que se
muestraen la Figura 21.Consulte la lista de piezas. Figura20
IMPORTANTE:Cuandocambieelpaquetedebateriaenelpanelde
lamanija,elpaquetede bateriadebecolocarseconelterminalpositivo
haciaelladeizquierdoy elterminalnegativohaciaelladederechodel
panel(elterminalpositiveestamascercadela Ilavedecontacto).Vea
la Figura21.Elcambioincorrectodelpaquetedebateriacausadafios
graves.
4. Vuelvaainstalarlacubiertadelalojamientodelabateriay fijelacon
losdostornillosquesac6antes,asegurandosedecolocara presion
elconductodealambrea laizquierdaensulugarenelalojamiento.
5. Doblelasmanijashaciaarribay aprietela perillasenestrella.
Noquite elpaquetede bateriasdel alojamientodel arrancador /
|e ectrco por nngunaraz6nquenosea e reempazo. J
Carga de la bateria
Labateriacontienefhido corrosivoy materialt6xico;sedebe
manipularcon cuidadoy mantenera losnihosalejados.Noperfore,
desensamble,mutileoprendafuegoa labateria.Durantelacarga
odescargase podrianemitirgasesexplosivos.Utilicelaen un_trea
[b en vent ada, eos de fuentesde gnc 6n.
NOTA:Laclavijadeconexi6nespecialmentedise_adadelcargador
Linicamenteencajaenlacajadelasbaterias.
1. Enchufeelcargadordela bateriadentrodelorificioenla parte
inferiordelalojamientodela bateria.VealaFigura22.
2. Inserteelenchufedelcargadordebateriasenuntomacorriente
residencialcomLinde120voltios.Carguelabateriade8a 10horas
antesdeusarlaunidadperprimeravez.Sino Iohacese puede
reducirladuraciondelabateria.No carguepot m_sde 12horas.
LabateriaLinicamentenecesitaracargarseenel ajusteinicialy
luegodeperiodosprolongadossinuso.
3. Despuesdecargar,primerodesconecteelenchufedel
tomacorriente,luegodesconecteel conductordelcargadordela
bateria.
56
f
+
Terminalpositivo
\\_\ \\
\\
Figura21
Figura22
,J
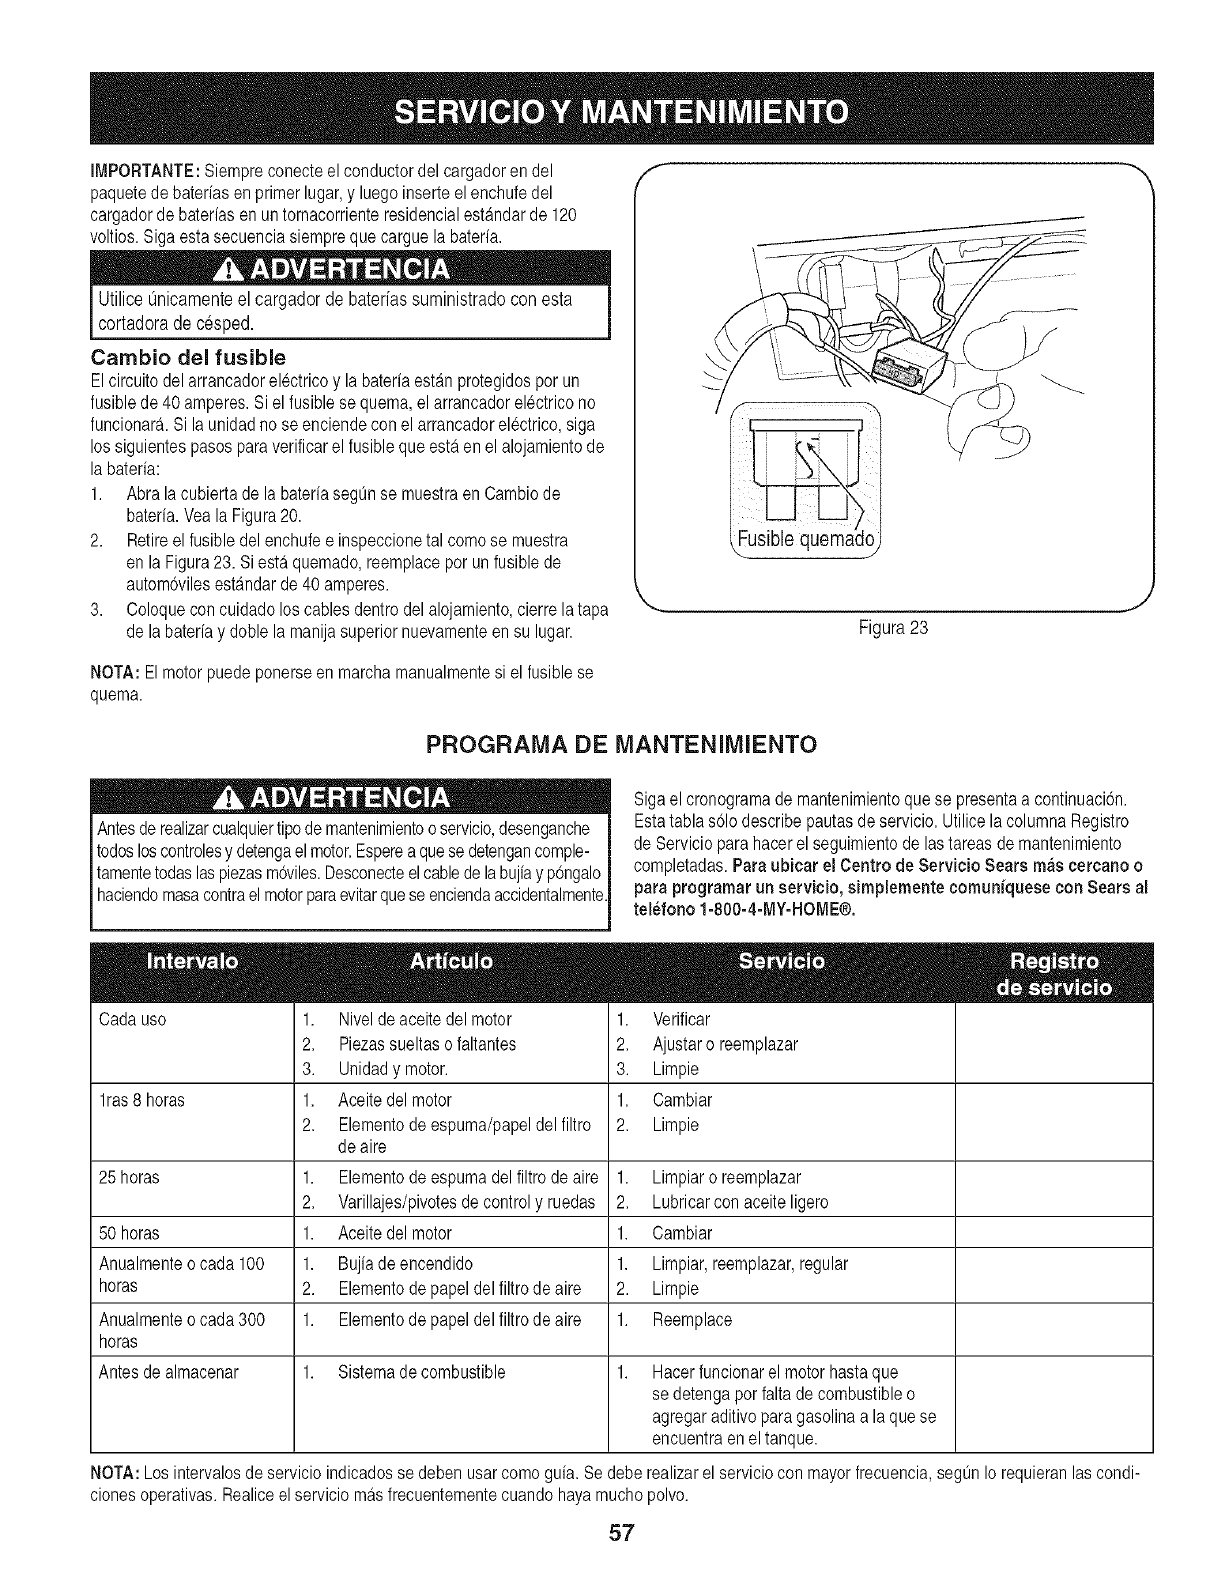
IMPORTANTE:Siempreconecteelconductordelcargadorendel
paquetedebateriasenprimerlugar,y luegoinserteelenchufedel
cargadordebateriasenuntomacorrienteresidencialestandarde 120
voltios.Sigaestasecuenciasiemprequecarguela bateria.
Cambio del fusible
Elcircuitodelarrancadorelectricoy labateriaestanprotegidosporun
fusiblede40amperes.Sielfusiblese quema,elarrancadorelectricono
funcionara.Si launidadnose enciendeconelarrancadorelectrico,siga
lossiguientespasosparaverificarel fusiblequeestaenelalojamientode
labaterfa:
1. Abralacubiertade labateriasegLinse muestraenCambiode
bateria.Veala Figura20.
2. Retireelfusibledelenchufee inspeccionetal comose muestra
enla Figura23. Siestaquemado,reemplaceporunfusiblede
autom6vilesestandarde40amperes.
3. Coloqueconcuidadolos cablesdentrodelalojamiento,cierrelatapa
delabateriay doblela manijasuperiornuevamenteensu lugar.
f
.... J
Figura23
NOTA:Elmotorpuedeponerseenmarchamanualmentesi elfusiblese
quema.
PROGRAMA DE MANTENIMIENTO
Antesderealizarcualquiertipodemantenimientoo servicio,desenganche
todosloscontrolesy detengaelmotor.Espereaquesedetengancomple-
tamentetodaslaspiezasm6viles.Desconecteelcabledelabujiay p6ngalo
haciendomasacontraelmotorparaevitarqueseenciendaaccidentalmente
Sigael cronogramademantenimientoquese presentaacontinuacion.
Estatablas61odescribepautasdeservicio.UtilicelacolumnaRegistro
de Servicioparahacerelseguimientodelastareasdemantenimiento
completadas.Paraubicar elCentrode ServicioSearsm_iscercanoo
paraprogramarun servicio,simplementecomuniquesecon Searsal
tel_fono1-800-4-MY-HOME®.
Cadauso 1,
2.
3.
1.
2.
Niveldeaceitedelmotor
Piezassueltasofaltantes
Unidady motor.
Aceitedelmotor
Elementodeespuma/papeldelfiltro
deaire
Elementodeespumadelfiltrodeaire
Varillajes/pivotesdecontroly ruedas
Aceitedelmotor
Bujiadeencendido
Elementodepapeldelfiltrodeaire
Elementodepapeldelfiltrodeaire
1. Verificar
2. Ajustaroreemplazar
3. Limpie
1. Cambiar
2. Limpie
lras 8 horas
25horas 1. 1. Limpiaroreemplazar
2. 2. Lubricarconaceiteligero
50horas 1. 1. Cambiar
Anualmenteocada100 1. 1. Limpiar,reemplazar,regular
horas 2. 2. Limpie
Anualmenteocada300 1. 1. Reemplace
horas
Antesdealmacenar 1. Sistemadecombustible 1. Hacerfuncionarelmotorhastaque
sedetengaporfaltadecombustibleo
agregaraditivoparagasolinaa laquese
encuentraeneltanque.
NOTA:Losintervalosdeservicioindicadosse debenusarcomoguia.Sedeberealizarelservicioconmayorfrecuencia,segOnIorequieranlascondi-
cionesoperativas.Realiceelserviciomasfrecuentementecuandohayamuchopolvo.
57
Nuncaalmacenelacortadoradecespedconcombustibleeneltanque
en unespaciocerradooenareasconpocaventilaci6n,dondelos
gasesdelcombustiblepuedanalcanzarel fuego,chispasounaluz
pilotocomolaquetienenalgunoshornos,calentadoresdeagua,
secadoresderopaoalgOnotrodispositivoagas.
PREPARACION DEL MOTOR
Siel motorseva aalmacenarpormasde30dfasse debevaciar
totalmenteelcontenidodecombustible(gasolina)a losefectosdeevitar
queseformendep6sitosdegomaenpartesesencialesdelcarburadory
delsistemadecombustible.
Lagasolinaessumamenteinflamabley puedeser explosivaenciertas
condiciones.Vacielaantesdealmacenarel equipoduranteperiodos
prolongados.Madelagasolinaen unareabienventilada,lejosde
cualquierfuentedellamao chispas,incluidocualquierartefactocon
luzpiloto.Almacenelagasolinaen unrecipienteaprobado,enunlugar
seguro.
Extraigaelcapuch6ndela bujiaparaevitarel encendidoaccidental
delmotor.
2. Vacieelcombustibledeltanqueconunabombaosif6n.
3. Coloqueel capuchonenla bujiaasegurandoloconfirmeza.
4. Arranquey hagafuncionarelmotorenvelocidadderalentihastaque
seagoteelcombustibledelsistema.
l Antesde realizarelmantenimient°delm°t°r' detengael m°t°rY dejel° 1enfriar.
5. Extraigalabujiay viertaaproximadamente1-2ml (0.06-0.1pulgadas
cObicas)deaceitenuevodemotoratravesdelorificiodelabujia.
Lentamentetiredelarrancadorderetrocesovariasvecesy vuelvaa
instalarlabujia.
6. Lentamentetiredelarrancadorderetrocesohastaquesientaque
haycompresiony dejeloenesaposici6n.
7. Limpiecadapartedelmotor,
8. Despuesdecadaperiododealmacenamiento,cambieel
aceitedemotor.(Consulte"Cambiodeaceite"enlasecci6n
"MANTENIMIENTO").
PREPARACION DE LA CORTADORA DE
C¢:SPED
• Limpiey lubriquelacortadoracomosedescribeenlas instrucciones
delubricaci6n.
• Noutiliceunalavadoraa presi6nni unamangueradejardinpara
limpiarsu unidad.
• Cubralacuchilladelacortadoracongrasaparachasisparaimpedir
laoxidacion.
• Refierasea laPREPARACIONDELMOTORparainstruccionesde
almacenajedemotorcorrectas.
• Almacenelaunidadenunazonalimpiay seca.Nolaalmacene
cercadematerialescorrosivoscomoporejemplofertilizantes.
Cuandoalmacenecualquiertipo deequipomotorizadoen ungalp6n
dedep6sitometalicooconpocaventilacion,tengaespecialcuidado
de realizarleuntratamientoantioxidantealequipo.Useaceiteligeroo
siliconapararecubrirelequipo,especialmenteloscablesy partesm6viles
desu cortadoraantesdealmacenarla.
Bateda
Labateriadebeguardarseconcargacompleta.Elalmacenamiento
prolongadodeunabateriadescargadareduciralavidaLitily lacapacidad
de labateria.
La gasolina es una sustancia t6xica. Eliminela gasolina
adecuadamente. Comuniquese con las autoridades locales para
averiguar cuales son los metodos adecuados para eliminar la gasolina,
58
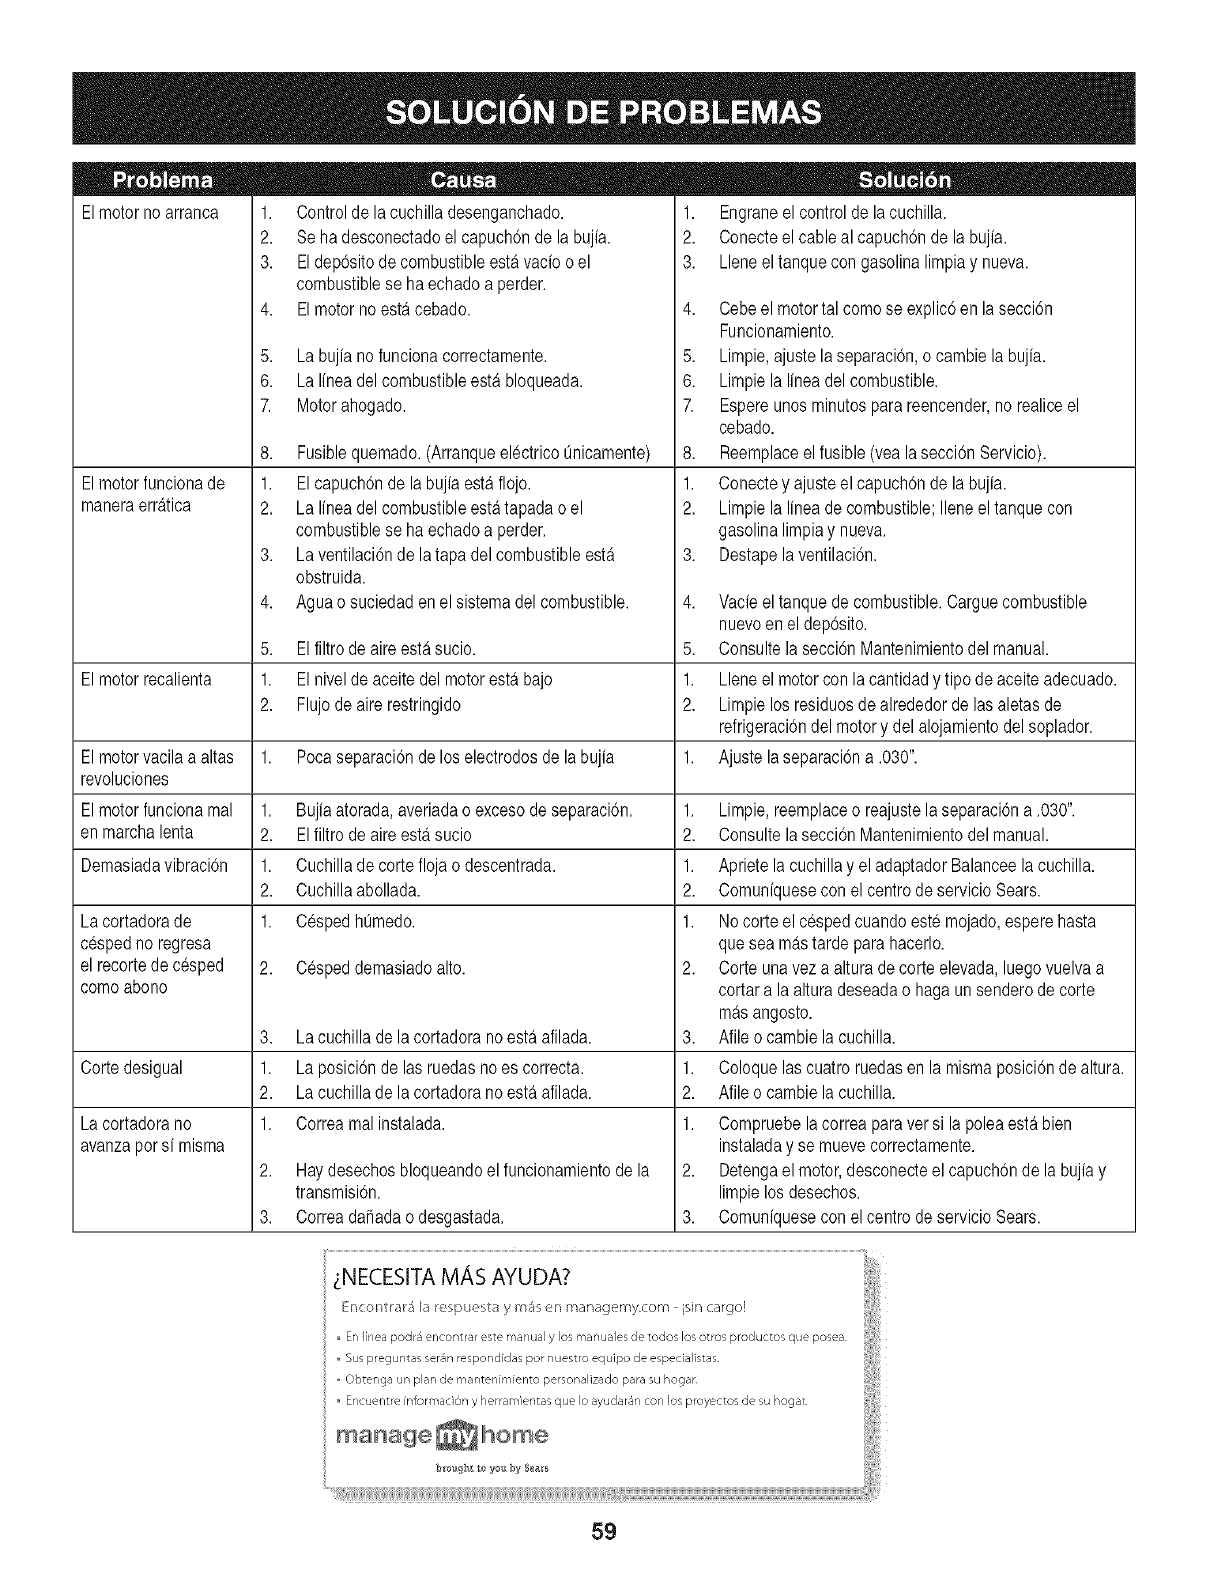
Elmotor no arranca
Elmotorfuncionade
maneraerratica
1. Controldelacuchilla desenganchado.
2. Seha desconectado el capuch6n de la bujia.
3. El deposito de combustible esta vacio o el
combustible se ha echado a perder.
El motor no esta cebado.
5. La bujia no funciona correctamente.
6. La linea delcombustible esta bloqueada.
7. Motor ahogado.
8. Fusiblequemado. (ArranqueelectricoLinicamente)
1. El capuch6n de la bujia esta flojo.
2. La linea delcombustible estatapada o el
combustible se haechado a perder.
3. Laventilaci6n de latapa del combustible esta
obstruida.
4. Agua o suciedad en el sistema del combustible.
1. Engraneel control de la cuchilla.
2. Conecteel cable al capuch6n de la bujia.
3. Llene el tanque con gasolina limpiay nueva.
4. Cebe el motor tal como se explic6en la secci6n
Funcionamiento.
5. Limpie,ajuste la separacion, o cambie la bujia.
6. Limpie la linea del combustible.
7. Espereunos minutes para reencender,no realice el
cebado.
8. Reemplaceel fusible (vea la secci6n Servicio).
1. Conectey ajuste el capuch6n de la bujia.
2. Limpie la linea de combustible; Ileneel tanque con
gasolina limpia y nueva.
3. Destape laventilaci6n.
4.
5.
1.
2.
1.
5. El filtro de aire esta sucio.
El motor recalienta 1. El nivel de aceite del motor esta bajo
2. Flujodeairerestringido
El motor vacila a altas 1. Poca separaci6n de los electrodes de la bujia
revoluciones
El motor funciona mal 1. Bujia atorada, averiadao exceso de separaci6n. 1.
en marcha lenta 2. Elfiltro de aire esta sucio 2.
Demasiada vibraci6n 1. Cuchilla de corte floja o descentrada. 1.
2. Cuchilla abollada. 2.
1. Cesped hLimedo. 1.
2. Cesped demasiado alto.
Lacuchilla de la cortadora no esta afilada.
La posici6n de las ruedas noes correcta.
Lacuchilla de la cortadora no esta afilada.
Correa mal instalada.
Haydesechosbloqueandoelfuncionamientodela
transmisi6n,
Cerreadafiadae desgastada.
Lacortadorade
cespedno regresa
elrecortedecesped
comeabono
Corte desigual
La cortadora no
avanza per si misma
3.
1.
2.
1.
2.
3.
Vacie el tanque de combustible. Carguecombustible
nuevoen el deposito.
Consulte la secci6n Mantenimientodel manual.
Llene el motor con la cantidady tipo de aceite adecuado.
Limpie los residuesde alrededor de las aletas de
refrigeraci6n del motor y del alojamientodel soplador.
Ajuste la separaci6n a .030".
Limpie, reemplaceo reajuste la separacion a .030".
Consulte la secci6n Mantenimiento del manual.
Apriete la cuchillay el adaptador Balancee la cuchilla.
Comuniquese con el centre de servicio Sears.
No corte el cesped cuando este mojado, espere hasta
que sea mastarde para hacerlo.
2. Corte unavez a altura de corte elevada, luego vuelva a
cortar a la altura deseadao haga unsendero de corte
mas angosto.
3. Afile o cambie la cuchilla.
1. Coloque lascuatro ruedas en la misma posici6n de altura.
2. Afileo cambiela cuchilla.
1. Compruebela correa para versi la polea esta bien
instaladay se muevecorrectamente.
2. Detengael motor, desconecteel capuch6n de la bujiay
limpie los desechos.
3. Comuniquese con el centre de servicio Sears.
59
(Esta p_.ginase aplica s61oen EE.UU. y Canada.).
Sears, Roebuck and Co, U.S.A. (Sears), el Consejo de Recursos Ambientales de California (CARB)
y ia Agencia de Protecci6n Ambiental de los Estados Unidos (EPA)
Declaraci6n de garantia del sistema de control de emisiones (derechos y obligaciones de la garantia de defectos del propi-
etario)
LACOBERTURADELA GARANTiADE CONTROLDEEMISIONESES
APLICABLEA LOSMOTORESCERTIFICADOSCOMPRADOSENCALIFOR-
NIAEN 1995Y POSTERIORMENTE,QUE SE UTILIZANENCALIFORNIA,
Declaraci6n de garantia sobre defectos en el control
ElConsejodeRecursosAmbientalesde California(CARB),la EPA(Agencia
deProteccionAmbientaldelos EE.UU.)y Searstienen el gustodeexplicarla
garantiadel sistemade controlde emisionespara motoresdel ado2000y para
elfuturo con relaciona motorespequehostodo terreno(SORE).En California,
los nuevosmotorespequ@ostodo terrenodebenestar dis@ados,construidos
yequipadosparacumplircon lasrigurosasnormasanti-smogdelestado.En
el restode losEstadosUnidos,losmotoresnuevostodoterrenode encendido
porchispacertificadosparael aSo1997debencumplirest&ndaressimilares
establecidospor la EPA.Searsdebegarantizarel sistemadecontrolde emis-
Y PARALOSMODELOSCERTIFICADOSDELAiqO1997YPOSTERIORES,
QUESE COMPRENY UTILICENENCUALQUIERPARTEDE LOSESTADOS
UNIDOS(Y A PARTIRDEL 1 DEENERODE2001 ENCANAD,_).
de emisiones para California y los Estados Unidos
ionesdesu motorparalosperiodosdetiempoenumeradosa continuaci6n,
siemprequenohayaabuso,negligenciao mantenimientoindebidodesu
motortodoterrenopequ@o.Su sistemadecontroldeemisionespuedeincluir
piezastales comoel carburador,el filtrodeaire, elsistemade encendido,el
silenciadory elconversorcatalitico.Tambienpuedeincluirconectoresy otras
unidadesrelacionadascon las emisiones.Dondeexistaunacondicioncubierta
porla garantia,Searsrepararasu pequeSomotortodo terrenosincostoalguno
incluyendodiagnostico,piezasy manode obra
Cobertura de la garantia Sears para defectos en el control de emisiones
Losmotorestodo terrenopequ@osestangarantizadosen Io relativoalcontrol alas disposicionesque se indiquena continuacion.Siuna partede su motor
deemisionesparadefectosenpiezasduranteunperiododedosahos,sujeto cubiertapor la garantiaesdefectuosa,Searsrepararao sustituiradichaparte.
Responsabilidades del propietario en relaci6n con la garantia
Comopropietariodel motortodo terrenopequ@o,Ud.es responsablede la
realizaciondel mantenimientorequeridoquese incluyeenlas instrucciones
deoperaciony mantenimiento.Searsrecomiendaquese conserventodoslos
recibosrelativosal mantenimientode su motortodoterrenopequeSo,pero
nopude denegarlagarantiasimplementeporla faltade losmismos,o por su
incumplimientodel mantenimientoprogramado.Comopropietariodel motor
peque_otodoterrenodebesaberque, sinembargo,Searslepuedenegar
lacoberturade lagarantiasi su motortodoterrenopequeSoo una piezadel
mismohanfalladodebidoa abuso,negligencia,mantenimientoindebidoo
a modificacionesno aprobadas.Ud.es responsablede presentarsu motor
todoterrenopequehoa undistribuidordeserviciosSearsautorizadotan pronto
comoaparezcaunproblema.Lasreparacionesdela garantiasinconflicto
debencompletarseenun plazodetiemporazonable,nosuperiora 30dias. Si
tienealgunapreguntarespectoa sus derechosy responsabilidadesreferen-
tes a la garantia,debe contactarcon un representantede serviciosSears al
1--800--469--4663.La garantiadeemisioneses unagarantiapor defectos.Los
defectossejuzgan deacuerdoconelfuncionamientonormalde un motor.La
garantianoestArelacionadacon unapruebade emisionesen uso.
Disposiciones de la garantia Sears para defectos en el control de emisiones
Lassiguientessondisposicionesespecificasrelacionadasconla coberturade la garantiaparadefectosenel controlde emisiones.Esunadadidoa lagarantiade
motorSearsparamotoresnoreguladosque seencuentraen lasinstruccionesdefuncionamientoy mantenimiento.
1. Piezascongarantia
Lacoberturade estagarantiase extiende@icamentea laspiezas
que aparecena continuacion(las partesde los sistemasdecontrolde
emisiones),siemprequedichaspiezasestuvieranya en el motoren el
momentode su compra.
a. Sistemademedici@de combustible
,,Sistemade enriquecimientoparaarranqueen frio
,,Carburadory partesinternas
,,Bombade combustible
b. Sistemadeinduccionde aire
,,Filtrode aire
,,Colectordeadmision
c. Sistemadeencendido
,,Bujia(s)de encendido
,,Sistemade encendidomagneto
d. Sistemadelcatalizador
,,Convertidorcatalitico
,,Colectordeescape
,,Sistemade inyecci6nde aireo valvula deimpulsos
e. Elementosvariadosusadosenlos sistemasanteriores
,,Valvulasdevacio, sensiblesa temperatura,posiciony tiempo
e interruptores
,,Conectoresy montajes
2. Alcancedela cobertura
Searsgarantizaal poseedorinicialy a loscompradoressubsiguientes
que laspiezascon garantianotendrAndefectosen materialesni mano
deobraque provoquenla falla delas mismasduranteunperiodo de
dosahosa partirdela fechaen queel motorse entregaa un comprador
particular.
3. Sincargo
Lareparaciono reemplazode cualquierpartecon garantiase realizara
sin cargoalgunoparael pose@or, incluyendotareasdediagn6sticoque
permitandeterminarsiuna partecon garantiaes defectuosa,siempreque
dicho diagnosticose realiceenun distribuidorde serviciosSearsautoriza-
do. Parael serviciode lagarantia deemisiones,contacteal distribuidorde
serviciosSears autorizadomascercanoincluidoen las"PAginasamarillas"
en lascatego@s"Motores,gasolina","Motoresdegasolina","Podadoras
decesped",o similares.
4. Reclamacionesy exclusionesa la cobertura
Lasreclamacionesde lagarantiadebenenviarsedeacuerdocon las
disposicionesdela politicade garantiaparamotoresSears.La cobertura
de la garantiaexcluiradefectosenpiezascongarantia queno seanpartes
originalesSears,o abuso,negligenciao mantenimientoincorrecto,tal y
como se estableceen lapoliticade garantiaparamotoresSears.Sears no
es responsablede lasfallas en piezascongarantiaprovocadaspor el uso
de partesadadidas,que nosean originaleso quese hayan modificado.
8. Mantenimiento
Cualquierpartecongarantiaque no esteprogramadaparaserreem-
plazadacomomantenimientorequerido,o que s61odeba inspeccionarse
regularmenteal efectode"inspeccioneo reemplacesegt]nseanecesario",
estaragarantizadacontradefectosduranteel periodode la garantia.Todas
las piezasgarantizadasqueest@ programadasparasu reemplazopara
cumplircon los requisitosdemantenimientoestarangarantizadassolo
por el periodoanterioral primerreemplazoprogramadoparadicha pieza.
Cualquierpiezade recambioqueseaequivalenteen funcionamientoy
durabilidadpuedeusarsepararealizarmantenimientoo reparaciones.El
propietarioes responsablede realizartodo elmantenimientorequerido,tal
y como sedefineen las instruccionesde funcionamientoy mantenimiento
Sears
6. Coberturaindirecta
Porla presente,la coberturase extiendea lafalla de cualquiercomponente
de motorprovocadapor lafalla de unapiezacongarantia queestetodavia
en periododegarantia.
Enlos EstadosUnidosy CanadahayunaIineade atenci6nde24 horas,1-800-469--4668,quecuentacon unment]con mensajespre-grabadosquecontienen
informacionparael mantenimientode motores.
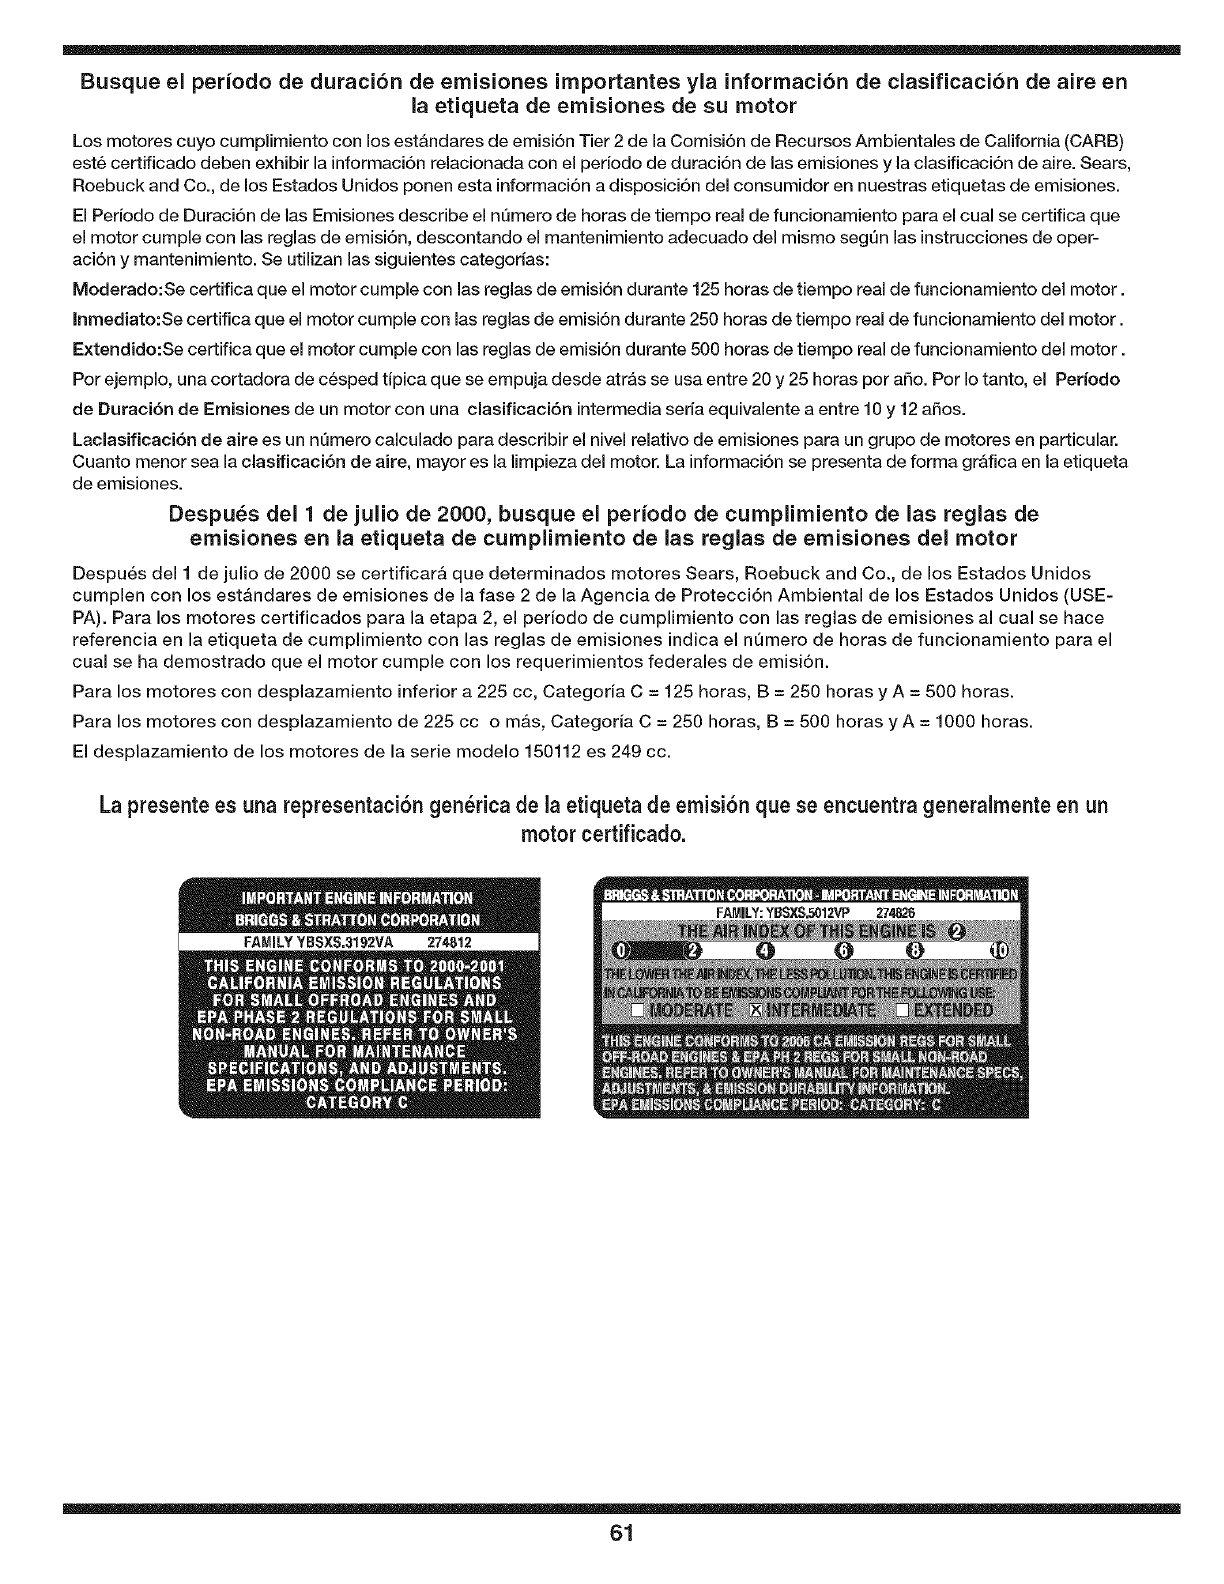
Busque el periodo de duraci6n de emJsiones Jmportantes yla informaci6n de clasificaci6n de aire en
Ja etiqueta de emisiones de su motor
Los motores cuyo cumplimJento con los est&ndares de emJsJ6nTier 2 de la ComJsJ6n de Recursos Ambientales de California (CARB)
est6 certJficado deben exhibir la informacJ6n relacJonada con el perJodo de duracJ6n de las emJsJones y la clasifJcacJ6n de aJre. Sears,
Roebuck and Co., de los Estados Unidos ponen esta Jnformaci6n a disposici6n del consumidor en nuestras etJquetas de emisJones.
El PerJodo de Duraci6n de las EmisJones describe eJnQmero de horas de tiempo real de funcionamiento para el cual se certJfJca que
el motor cumple con las regias de emJsJ6n, descontando eJmantenimiento adecuado del mismo segQn las instrucciones de oper-
aci6n y mantenJmiento. Se utilizan las siguientes categorias:
Moderado:Se certJfica que el motor cumple con las reglas de emisJ6n durante 125 horas de tJempo real de funcionamiento deJ motor.
Inmediato:Se certifica que el motor cumpJe con las reglas de emisJ6n durante 250 horas de tJempo real de funcionamJento deJ motor.
Extendido:Se certifica que el motor cumpie con las reglas de emisJ6n durante 500 horas de tiempo real de funcionamJento del motor.
Por ejemplo, una cortadora de c6sped tipica que se empuja desde atr&s se usa entre 20 y 25 horas por afio. Por Io tanto, el Periodo
de Duraci6n de Emisiones de un motor con una clasificaci6n intermedia serJa equJvalente a entre 10 y 12 afios.
Laclasificaci6n de aire es un n_mero calculado para describJr el niveJrelativo de emisiones para un grupo de motores en particular.
Cuanto menor sea la clasificaci6n de aire, mayor es la limpieza del motor. La informaci6n se presenta de forma gr&fica en la etiqueta
de emisiones.
Despu_s del 1 de julio de 2000, busque el perJodo de cumpiimiento de las reglas de
emisiones en la etiqueta de cumplimiento de las regias de emisiones del motor
Despu6s del 1 de julio de 2000 se certificar& que determinados motores Sears, Roebuck and Co., de los Estados Unidos
cumplen con los est&ndares de emisiones de la fase 2 de la AgencJa de Protecci6n Ambiental de los Estados Unidos (USE-
PA). Para los motores certificados para la etapa 2, el perJodo de cumplimiento con las reglas de emisiones al cual se hace
referencia en la etiqueta de cumplimiento con las reglas de emisiones indica el nemero de horas de funcionamiento para el
cual se ha demostrado que el motor cumple con los requerimientos federales de emisi6n.
Para los motores con desplazamiento inferior a 225 cc, Categoria C = 125 horas, B = 250 horas y A = 500 horas.
Para los motores con desplazamiento de 225 cc o re&s, Categoria C = 250 horas, B = 500 horas yA = 1000 horas.
El desplazamiento de los motores de la serie modelo 150112 es 24g cc.
Lapresente es una representaci6n gen_rica de Jaetiqueta de emisi6n que se encuentra generalmenteen un
motor certificado.
61
Felicitacionespor haberrealizadounaadquisici6ninteligente.El
productoCraftsman@Profesionalque haadquiridoest,.disehadoy
fabricadoparabrindarmuchosahos defuncionamientoconfiable.Pero
comotodoslos productosa vecespuederequerirde reparaciones.
Es enese momentocuandoeldisponerde unAcuerdodeprotecci6n
parareparacionesle puedeahorrardineroy problemas.
Acontinuaci6nse detallanlos puntosincluidosen elAcuerdo:
•Servicio experto prestadopor nuestros10,000especialistasen
reparacionesprofesionales
Servicio ilimitadosin cargo paralas piezasy la manodeobraen
todaslas reparacionescubiertas
•Reemplazodel productohasta1500d61aressi noes posible
repararelproductocubierto
Descuentode 10%del precionormaldelservicioy delas piezas
relacionadascon el mismoquenoestencubiertasporel acuerdo;
adem_ts,10%delprecionormalde laverificaci6nde manten-
imientopreventivo
• Ayuda r&pida por tel_fono- IoIlamamosResoluci6nR_.pida-el
apoyotelef6nicode unChamuscaal representante.Pienseen
nosotroscomoel manual"de unduehohablador."
Unavezadquiridoel Acuerdo,puedeprogramarelserviciocon
tan s61orealizarunaIlamadatelef6nica.PuedeIlamarencualquier
momentodeldia o dela nocheo programarunservicioen line&
ElAcuerdode Protecci6ndeReparaci6nes unacomprasin riesgo.
Siustedanulaporalgunaraz6nduranteel periodode garanfiade
producto,proporcionaremosun reembolsoIleno.O, un reembolso
prorrateadoencualquiermomentodespuesdelperiodode garantia
de productoexpira,iAdquierahoysu acuerdode protecci6npara
reparaciones!
Se aplican determinadaslimitacionesy exclusiones.Paraobtener
informaci6nadicional y preciosen losEstados UnidosIlameal
1-800-827-6655.
El*Coverage enCanadavar{aen algunos art{culos. Paradetalles
llenos la llamada ChamuscaCanad_en 1-800-361-6665.
Servicio de instalaci6nde Sears
Sideseasolicitarla instalaci6nprofesionalde Searsde aparatos
dom_sticos,dispositivosparaabrirportones,calentadoresde agua
y otrosarticulosdom_sticosimportantes,en los EstadosUnidoso
CanadaIlameal 1-800-4-MY-HOME@.
62

63

Your Home
For expert troubleshooting and home solutions advice:
I
www.managemyhome.com
For repair- in your home - of all major brand appliances,
lawn and garden equipment, or heating and cooling systems,
no matter who made it, no matter who sold it!
For the replacement parts, accessories and
owner's manuals that you need to do-it-yourself.
For Sears professional installation of home appliances
and items like garage door openers and water heaters.
1-800-4-MY-HOME ®(1-800-469-4663)
Call anytime, day or night (U.S.A. and Canada)
Our Home
For repair of carry-in items like vacuums, lawn equipment,
and electronics, call anytime for the location of your nearest
Sears Parts & Repair Service Center
1-800-488-1222 (U.S.A.) 1-800-469-4663 (Canada)
To purchase a protection agreement on a product serviced by Sears:
1-800-827-6655 (U.S.A.) 1-800-361-6665 (Canada)
Para pedir servicio de reparaci6n Au Canada pour service en fran_ais:
a domicilio, y para ordenar piezas: 1-800-LE-FOYER M°
1-888-SU-HOGAR ® (1-800-533-6937)
(1-888-784-6427) www.sears.ca
,SeSL
® Registered Trademark /_Trademark / ' Service Mark of Sears Brands, LLC
SM
® Marca Registrada /TMMarca de F_brica /_ Marca de Servicio de Sears Brands, LLC
_TD
Mc Marque de commerce /' Marque d_pos_e de Sears Brands, LLC ® Sears Brands, LLC
