MTD 12AV55DQ713 User Manual LAWN MOWER Manuals And Guides 1108100L
User Manual: MTD 12AV55DQ713 12AV55DQ713 MTD LAWN MOWER - Manuals and Guides View the owners manual for your MTD LAWN MOWER #12AV55DQ713. Home:Lawn & Garden Parts:MTD Parts:MTD LAWN MOWER Manual
Open the PDF directly: View PDF ![]() .
.
Page Count: 16

Safety • Assembly • Operation • Adjustments • Maintenance • Troubleshooting • Parts Lists • Warranty
OF AOA AL
21" Self-Propelled Mulching Mower- Model Series V550
iMPORTANT
READ SAFETY RULES AND iNSTRUCTiONS CAREFULLY BEFORE OPERATION
Warning: Thisunit is equippedwithan internalcombustionengineandshouldnot beusedon or nearany unimprovedforest-covered,brush-
coveredor grass-coveredlandunlesstheengine'sexhaustsystemisequippedwitha sparkarrestermeetingapplicablelocalor statelaws(if any).
If a sparkarresteris used,it shouldbemaintainedineffectiveworkingorderby the operator.In theStateof Californiathe aboveis requiredbylaw
(Section4442of the CaliforniaPublicResourcesCode).Otherstatesmayhavesimilarlaws.Federallawsapplyonfederallands.A sparkarrester
for the muffleris availablethroughyour nearestengineauthorizedservicedealeror contactthe servicedepartment,RO.Box361131Cleveland,
Ohio44136-0019.
PRINTEDIN U.S.A MTD PRODUCTS LLC, P.O. BOX 361131 CLEVELAND, OHIO 44136-0019
FORMNO.769-02830
11/2/2006

This Operator's Manual is an important part of your new lawn mower, it will help you assemble,
prepare, and maintain the unit for best performance. Please read and understand what it says.
Table of Contents
Slope Gauge ........................................................ 3
Safe Operation Practices ................................... 4
Setup and Adjustment ....................................... 6
Operating Your Lawn Mower .............................. 8
Maintaining Your Lawn Mower ......................... 10
Troubleshooting ................................................ 12
Off-Season Storage and Safety Labels .......... 13
Parts List ........................................................... 14
MTDLLCreservesthe rightto changeproductspecifications,designs,andequipmentwithoutnoticeandwithoutincurringobligation.
Finding and Recording Model Number
BEFOREASSEMBLINGYOUR NEW EQUIPMENT,
pleaselocatethe modelplateon the equipmentand
copythe informationto the samplemodel plate pro-
videdto the right.Youcan locatethe modelplate by
standingat the operatingpositionand lookingdown
at the rearof the deck.This informationwill be neces-
sary to use the manufacturer'sweb site, to obtain
assistancefrom the CustomerSupport Department,
or when contactingan authorizedservice dealer.
Model Number
www.mtdproducts.com
Serial Number
MTD LLC
PoO= BOX 361131
CLEVELAND, OH 44136
330-220-4683
800-800-7310
Customer Support
Please do NOT return the unit to the retailer from which it was purchased, without first
contacting Customer Support.
Ifyou have difficulty assemblingthis product or have any questions regardingthe controls, operation,or maintenanceof this
unit, you can seek help from the experts. Choosefrom the options below:
• Visit www.mtdproducts.com
• Call a Customer Support Representativeat 1-800-800-7310.
• The engine manufacturer is responsiblefor all engine-relatedissues with regardsto performance,power-rating,specifica-
tions, warranty and service. Pleasereferto the engine manufacturer'sOwner's/Operator's Manual,packed separatelywith
your unit, for moreinformation.
2
z_
d_
o9
_D
_D
O
O
E
=5
O
d_
o6
d_ o3
o -5
O9 C5
d_ O3
C
_ o
_D o_
E
O
_D
C5
c_ 0
o3
c_ _,_
c'_ _
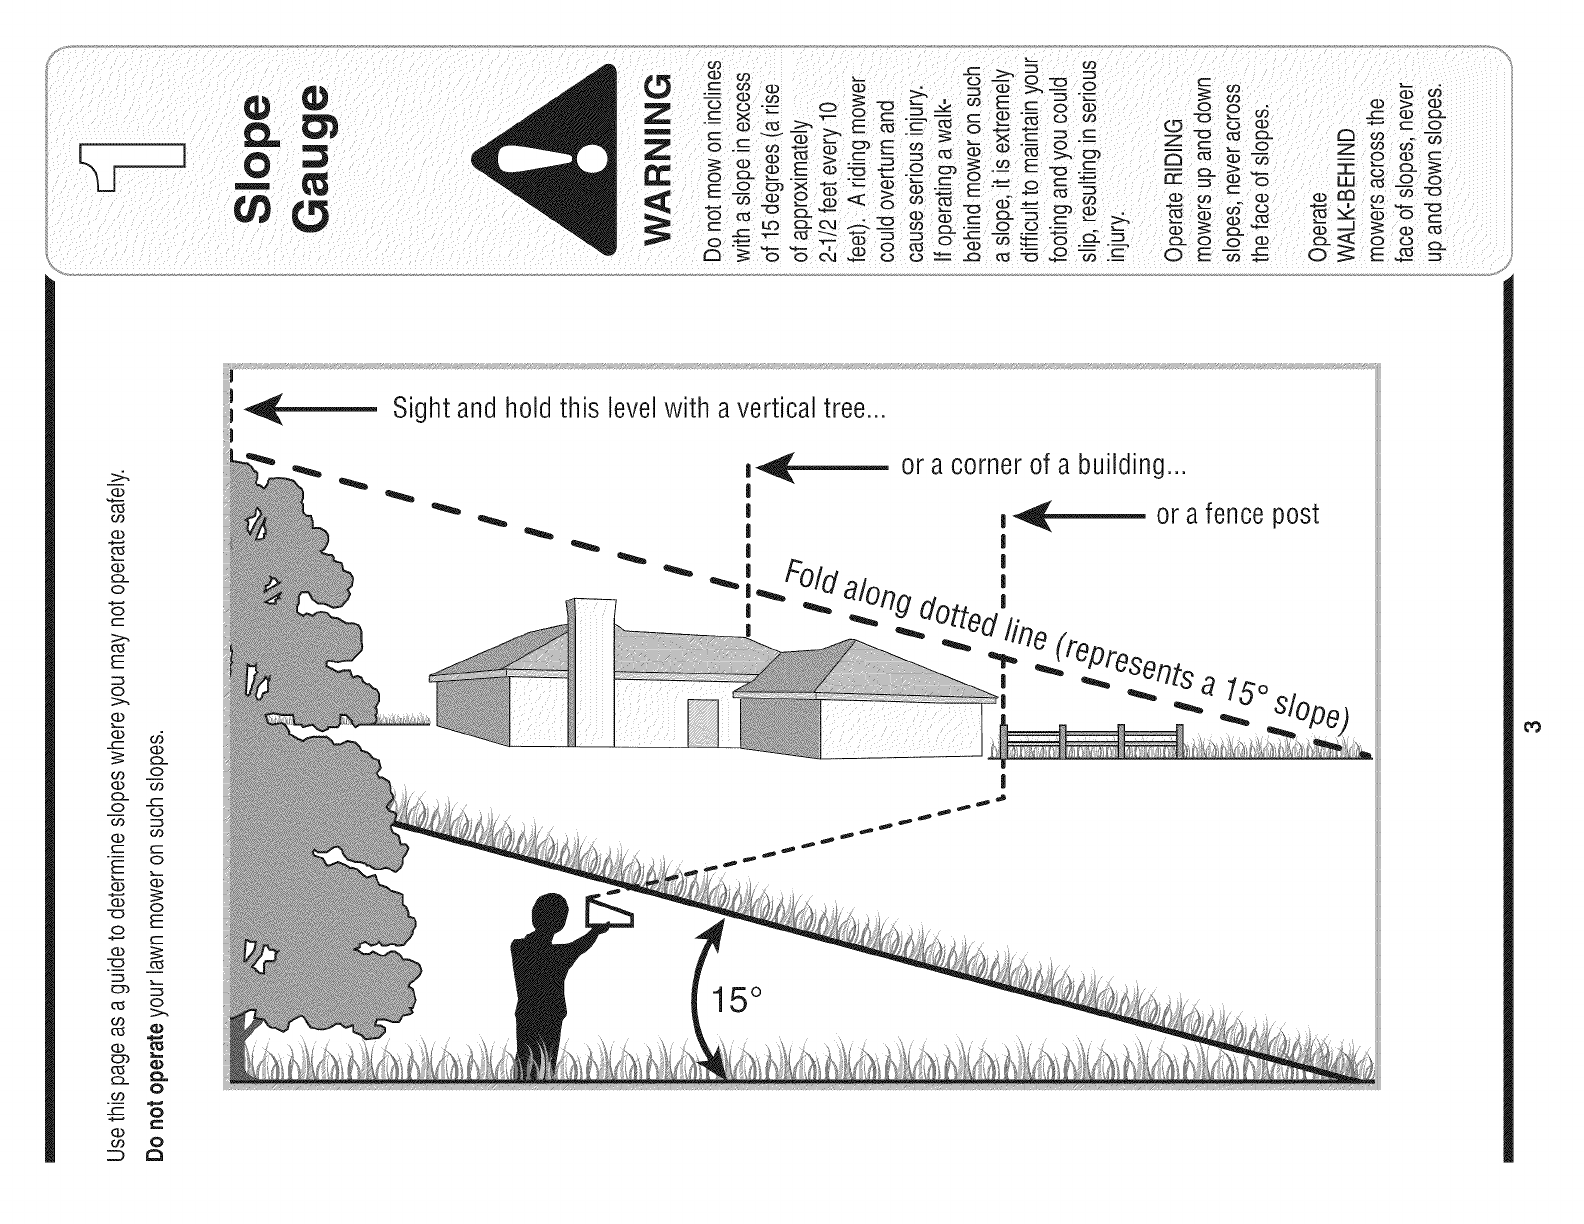
!i!_i!il< Sight and hold this levelwith a verticaltree...
_ or a corner of a building...
I
I__ or a fence post
I
I I
-- fir_e (repros
_ _ er_ts a 15o
15°
_0
WARNING
This symbolpoints
out importantsafety
instructionswhich, if
notfollowed,could
endangerthe personal
i safetyand/or property
I ofyourselfand others.
Readandfollow all
instructionsinthis
manualbeforeat-
temptingto operate
i this machine.Failure
I to complywith these
instructionsmay result
i in personalinjury.When
you see this symbol.
i HEED ITS WARNING!
i Your Responsibility
Restrictthe use
of this power machine
to personswho read.
i understand
andfollow the warnings
and instructions
I. =nthis manual
and on the machine.
WARNING: Engine Exhaust,some of its constituents, and certain vehicle compo-
nentscontain or emit chemicals known to State of Californiato cause cancer and
birth defects or other reproductiveharm.
DANGER: This machine was built to be operated according to the rulesfor safe operation in this
manual.As with any type of powerequipment, carelessness or error on the part of the operator
can result in serious injury.This machine is capable of amputating hands and feet and throwing
objects. Failureto observe the following safety instructions could result in serious injury or death.
Children
Tragicaccidentscanoccur ifoperatorisnotalert to presence
of children.Childrenare oftenattractedto mowerand mowing
activity.Theydonot understandthe dangers.Neverassume
thatchildrenwill remainwhereyou lastsawthem.
1. Keepchildrenoutof the mowingareaand underwatchful
careof a responsibleadultotherthanthe operator.
2. Be alert andturnmoweroff if a childentersthearea.
3. Beforeand whilemovingbackwards,look behindanddown
forsmallchildren.
4. Useextremecare whenapproachingblindcorners,
doorways,shrubs,trees,or otherobjectsthat mayobscure
yourvisionof a child whomayrun intothe mower.
5. Keepchildrenawayfromhotor runningengines.Theycan
sufferburnsfroma hotmuffler.
6. Neverallowchildrenunder14yearsoldto operatea power
mower.Children14yearsoldand overshouldreadand
understandoperationinstructionsandsafetyrulesinthis
manualandshouldbetrainedandsupervisedbya parent.
General Operation
1. Readthis operator'smanualcarefullyin its entiretybefore
attemptingto assemblethis machine.Read,understand,
andfollowall instructionsonthe machineandin the
manual(s)beforeoperation.Becompletelyfamiliarwith
thecontrols andthe proper useof this machinebefore
operatingit. Keepthis manualin a safeplaceforfuture
and regularreferenceand for orderingreplacementparts.
2. Thismachineis a precisionpieceof powerequipment,
nota plaything.Therefore,exerciseextremecautionat all
times.Yourunithas beendesignedto performonejob: to
mowgrass. Do notuseit for any otherpurpose.
3. Neverallow childrenunder 14yearsold to operatethis
machine.Children 14yearsold and overshould readand
understandthe instructionsinthis manualandshould
betrainedand supervisedby a parent.Onlyresponsible
individualswho arefamiliar withthese rulesof safe
operationshould be allowedto usethis machine.
4. Thoroughlyinspectthe areawherethe equipmentis to
beused. Removeall stones,sticks,wire,bones,toys
andotherforeignobjects, whichcouldbetrippedover or
pickedup andthrownbythe blade.Thrownobjects can
causeseriouspersonalinjury.Planyour mowingpattern
to avoiddischargeof materialtoward roads,sidewalks,
bystandersandthe like.Also,avoiddischargingmaterial
againsta wall or obstruction,whichmaycausedischarged
materialto ricochetback towardthe operator.
5. Tohelpavoidbladecontact ora thrownobjectinjury,
stay inoperatorzone behindhandlesand keepchildren,
bystanders,helpersand petsat least 75feetfrom mower
whileit is inoperation.Stop machineifanyoneenters
area.
6. Alwayswearsafetyglassesor safetygogglesduringopera-
tion andwhile performinganadjustmentor repairto protect
youreyes.Thrownobjectswhich ricochetcan causeserious
injuryto the eyes.
7. Wearsturdy,rough-soledworkshoesand close-fitting
slacksandshirts. Shirtsand pantsthatcoverthe arms and
legs andsteel-toedshoesare recommended.Neveroperate
this machinein barefeet,sandals,slipperyor light-weight
(e.g.canvas)shoes.
8. Do notputhands orfeet nearrotatingparts or undercutting
deck.Contactwithblade can amputatehands andfeet.
9. A missingor damageddischargecovercancause blade
contactor thrownobject injuries.
10.Manyinjuriesoccuras a resultof the mowerbeing pulled
overthefoot duringa fall causedby slippingor tripping.
Do notholdon to the mower ifyou are falling;releasethe
handleimmediately.
11.Neverpullthe mowerback towardyouwhileyou are
walking.If youmust backthe mowerawayfroma wall or
obstructionfirstlook downand behindto avoidtrippingand
thenfollowthese steps:
a. Stepback frommowerto fully extendyourarms.
b. Be sure youare wellbalancedwithsurefooting.
c. Pullthe mowerbackslowly,no morethan halfway
towardyou.
d. Repeatthesestepsas needed.
12.Do notoperatethe mowerwhileunderthe influenceof
alcoholordrugs.
13.Do notengagetheself-propelledmechanismon unitsso
equippedwhilestartingengine.
14.The bladecontrol handleis a safetydevice.Neverattempt
to bypassits operation.Doingso makesthe safetydevice
inoperativeandmayresult in personalinjurythrough
contactwiththe rotatingblade.The bladecontrolhandle
mustoperateeasily in bothdirectionsandautomatically
returnto the disengagedpositionwhenreleased.
15.Neveroperatethe mowerinwet grass. Alwaysbesure of
yourfooting. A slipand fall cancauseseriouspersonal
injury.If you feelyou are losingyourfooting,releasethe
bladecontrolhandleimmediatelyand the bladewillstop
rotatingwithinthreeseconds.
16.Mowonly in daylightor good artificiallight. Walk,neverrun.
17.Stopthe bladewhencrossinggraveldrives, walksor roads.
18.If the equipmentshouldstartto vibrateabnormally,stopthe
engineand checkimmediatelyfor the cause.Vibrationis
generallya warningof trouble.
4
19.Shutthe engine offand waituntil the bladecomesto a
completestopbeforeremovingthe grasscatcherorunclog-
gingthe chute.
Thecutting bladecontinuesto rotatefora few secondsafter
the engineisshutoff. Neverplaceany partofthe body in
the bladeareauntil youare surethe bladehasstopped
rotating.
20.Neveroperatemowerwithoutpropertrailshield,discharge
cover,grasscatcher,bladecontrolhandleorothersafety
protectivedevicesin placeand working.Neveroperate
mowerwith damagedsafetydevices.Failureto do so can
result in personalinjury.
21.Mufflerand enginebecomehotandcancausea burn.Do
nottouch.
22.Only use partsandaccessoriesmadeforthis machineby
manufacturer.Failureto do so can resultin personalinjury.
23. Ifsituationsoccur whichare notcoveredinthis manual,
usecare and goodjudgment.Contactyour dealerfor
assistance.
Slope Operation
Slopesare a majorfactor relatedto slip andfall accidents,which
canresult insevereinjury.Operationonslopesrequiresextra
caution.If youfeeluneasyona slope,do notmowit. Foryour
safety,usetheslopegaugeincludedas partof this manualto
measureslopesbeforeoperatingthis uniton a slopedorhilly
area.Ifthe slopeis greaterthan 15 degrees,donotmowit.
Do:
1. Mow acrossthefaceof slopes;neverupand down.Exercise
extremecautionwhenchangingdirectiononslopes.
2. Watchfor holes,ruts, rocks,hidden objects,or bumps
which cancauseyouto slipor trip. Tallgrasscan hide
obstacles.
3. Alwaysbe sure of yourfooting.A slip and fallcan cause
serious personalinjury.If youfeel you are losingyour
balance,releasethe bladecontrolhandleimmediately,and
the bladewill stoprotatingwithin3 seconds.
Do Not:
1. Do notmowneardrop-offs,ditchesor embankments,you
could loseyourfootingor balance.
2. Do notmowslopesgreaterthan 15degreesas shownon
the slopegauge.
3. Do notmowon wet grass.Unstablefootingcouldcause
slipping.
Service
Safe Handling Of Gasoline:
1. Toavoidpersonalinjuryor propertydamageuseextreme
care in handlinggasoline.Gasolineis extremelyflammable
and thevaporsare explosive.Seriouspersonalinjury can
occur whengasolineisspilled onyourselfor your clothes,
which canignite.Washyourskin andchangeclothes
immediately.
2. Use onlyan approvedgasolinecontainer.
3. Neverfill containersinside a vehicleor ona truck ortrailer
bed witha plasticliner.Alwaysplacecontainersonthe
groundawayfromyourvehicle beforefilling.
4. Removegas-poweredequipmentfromthe truckor trailer
and refueliton theground.If this is not possible,then refuel
suchequipmenton atrailer witha portablecontainer,rather
than froma gasolinedispensernozzle.
5. Keepthe nozzlein contactwiththe rimof the fueltankor
containeropeningat all times untilfueling is complete.Do
not use a nozzlelock-opendevice.
6. Extinguishallcigarettes,cigars, pipesand othersources
of ignition.
7. Neverfuel machineindoorbecauseflammablevaporswill
accumulatein thearea.
8. Neverremovegascap oradd fuel whileengineis hot or
running. Allowengineto cool at least two minutesbefore
refueling.
9. Neveroverfill fuel tank. Filltankto no morethan Y2inch
below bottomof filler neckto providefor fuel expansion.
10.Replacegasolinecapandtightensecurely.
11.If gasolineis spilled,wipe itoff theengineand equipment.
Moveunit to anotherarea.Wait 5 minutesbeforestarting
engine.
12.Neverstorethe machineorfuel containernearanopen
flame,sparkor pilot light as on a water heater,space
heater,furnace,clothesdryeror othergas appliances.
13.Toreducefire hazard,keepmowerfree of grass, leaves,
orother debrisbuild-up.Clean upoil orfuelspillageand
removeanyfuel soakeddebris.
14.Allowa mowerto cool at least5 minutesbeforestoring.
GeneralService:
1. Neverrun an engineindoorsorin a poorlyventilatedarea.
Engineexhaustcontainscarbonmonoxide,anodorless
anddeadlygas.
2. Beforecleaning,repairing,or inspecting,makecertainthe
bladeandall movingpartshavestopped.Disconnectthe
sparkplugwire andgroundagainstthe engineto prevent
unintendedstarting.
3. Checkthe bladeandenginemountingbolts atfrequent
intervalsfor propertightness.Also,visuallyinspectblade
fordamage(e.g.,bent,cracked,worn)Replacebladewith
theoriginalequipmentmanufacture's(O.E.M.)bladeonly,
listedin this manual."Useof partswhichdo notmeetthe
originalequipmentspecificationsmayleadto improper
performanceand compromisesafety!"
4. Mowerbladesare sharpandcan cut.Wrapthebladeor
weargloves,anduseextracautionwhenservicingthem.
5. Keepallnuts,bolts,andscrewstightto besurethe equip-
mentis insafeworkingcondition.
6. Nevertamperwithsafetydevices.Checktheir proper
operationregularly.
7. Afterstrikinga foreignobject,stopthe engine,discon-
nectthesparkplugwire andgroundagainsttheengine.
Thoroughlyinspectthe mowerfor anydamage.Repairthe
damagebeforestartingandoperatingthe mower.
8. Neverattemptto makea wheelor cuttingheightadjust-
mentwhilethe engineisrunning.
9. Grasscatchercomponents,dischargecover,andtrail
shield aresubjectto wear anddamagewhichcould
exposemovingparts or allowobjectsto be thrown.For
safetyprotection,frequentlycheckcomponentsand re-
placeimmediatelywithoriginal equipmentmanufacturer's
(O.E.M.)partsonly, listedin this manual."Use of parts
whichdo notmeetthe originalequipmentspecifications
mayleadto improperperformanceand compromise
safety!"
10.Do notchangetheenginegovernorsettingor over-revthe
engine.Thegovernorcontrolsthe maximumsafeoperating
speedof the engine.
11.Maintainor replacesafetylabels,as necessary.
12.Observeproperdisposallawsand regulations.Improper
disposalof fluidsand materialscan harmtheenvironment.
Practices
WARNING
This symbol points
out importantsafety
instructions, which if
not followed,could
endangerthe personal
safety and/or property
of yourselfand others.
Readand follow all
instructions inthis man-
ual before attempting to
operate this machine.
Failureto comply with
these instructionsmay
result in personal injury.
When you see this
symbol.
HEED iT'S WARNING!
Your Responsibility
Restrictthe use
of this power machine
to personswho read.
understand
and followthe warnings
and instructions
in this manua
and on the machine.
5
NOTE:Standbehind
themowerasifyou
weregoingtooperate
it.Yourrighthandcor-
respondstotheright
sideofthemower;your
lefthandcorresponds
totheleftsideofthe
mower.
iMPORTANT
DO NOTcrimp the
cables when lifting the
handle up. Make sure
to routethe cables
insidethe lowerhandle.
iMPORTANT
This unit is shipped
i without gasoline or
oil inthe engine. Fill
up gasolineand oil
as instructed in the
accompanyingengine
manual BEFORE
operatingyour mower.
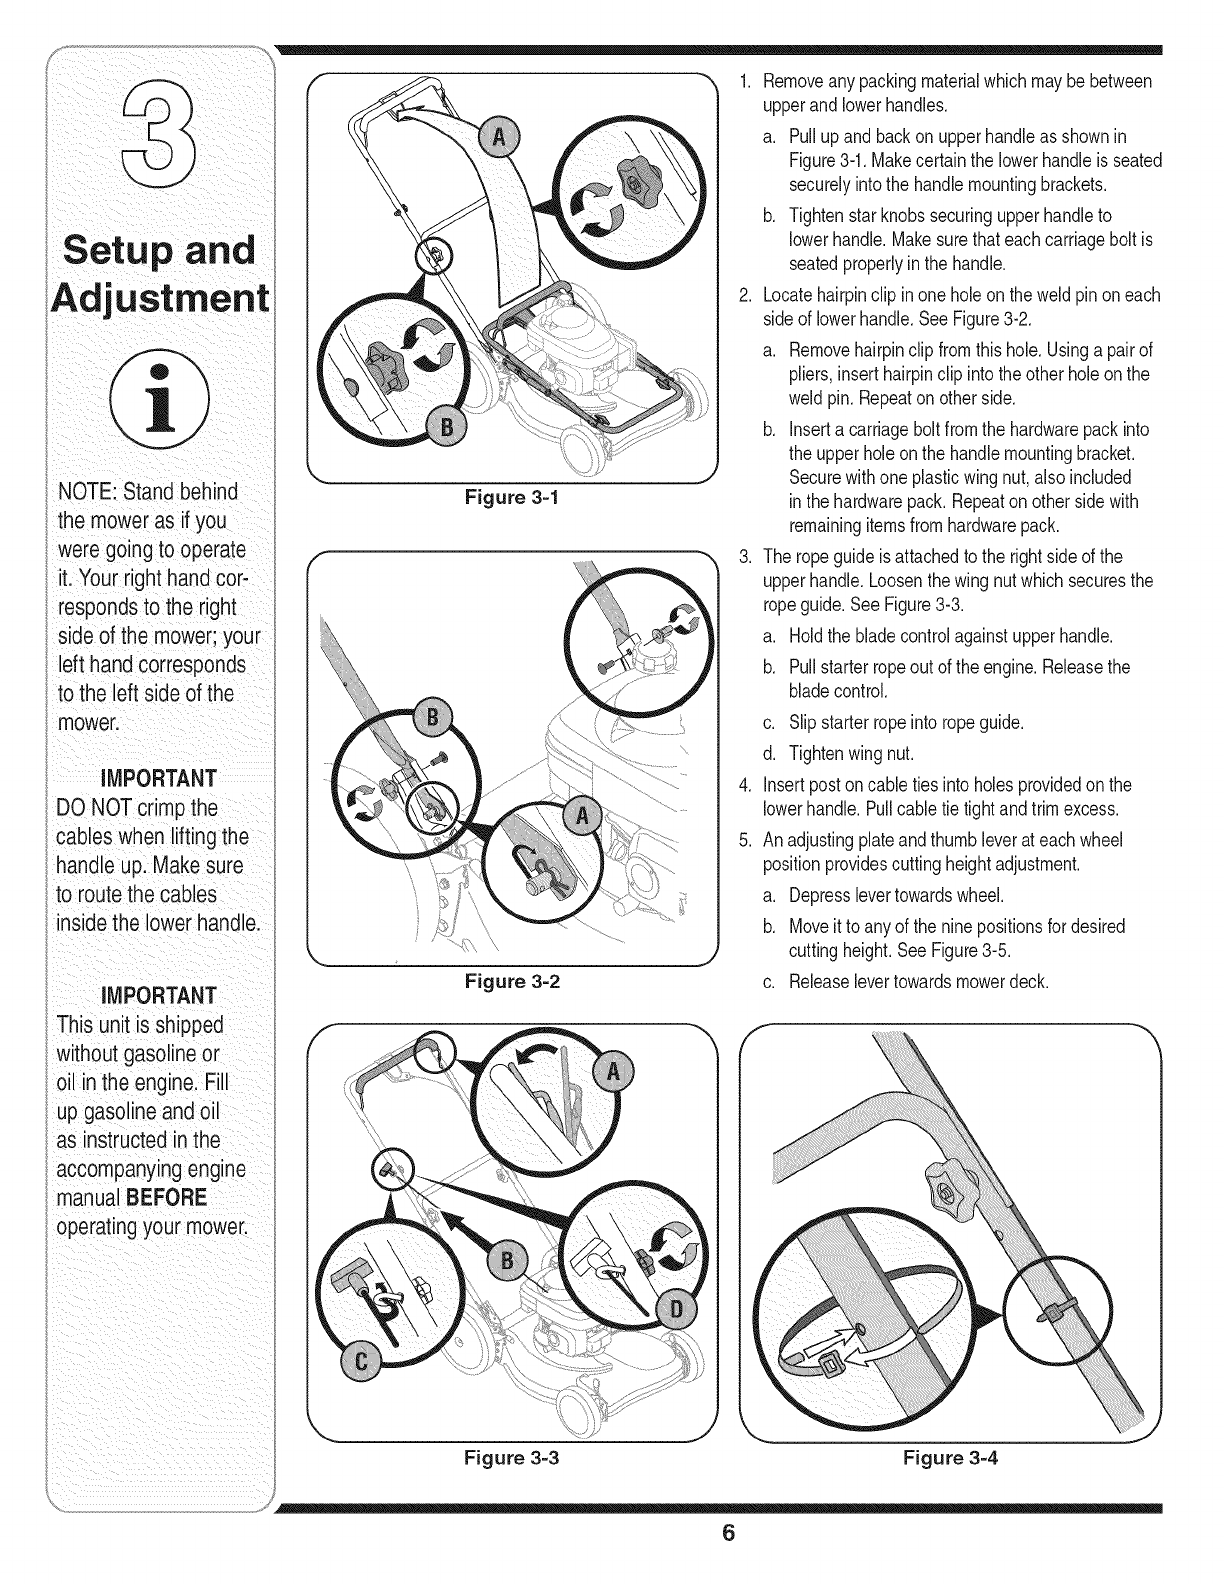
Figure 3=1
Figure 3=2
1. Removeanypackingmaterialwhichmaybebetween
upperandlowerhandles.
a. Pullupand backon upperhandleas shownin
Figure3-1.Makecertainthe lowerhandleis seated
securelyintothe handlemountingbrackets.
b. Tightenstarknobssecuringupperhandleto
lowerhandle.Makesurethateachcarriagebolt is
seatedproperlyin the handle.
2. Locatehairpinclip inone holeon the weldpinon each
sideof lowerhandle.SeeFigure3-2.
a. Removehairpinclipfromthis hole.Usinga pairof
pliers,inserthairpinclip intothe other holeon the
weldpin. Repeaton otherside.
b. Inserta carriagebolt fromthe hardwarepackinto
the upperholeonthe handlemountingbracket.
Securewithone plasticwing nut,also included
inthe hardwarepack.Repeatonother sidewith
remainingitemsfromhardwarepack.
3. The ropeguideis attachedto the right sideof the
upperhandle.Loosenthe wingnut whichsecuresthe
ropeguide.SeeFigure3-3.
a. Holdthe bladecontrolagainstupperhandle.
b. Pullstarterropeout of the engine.Releasethe
bladecontrol.
.
5.
c. Slipstarterropeinto ropeguide.
d. Tightenwingnut.
Insertpostoncable tiesintoholes providedon the
lowerhandle.Pullcabletie tightandtrimexcess.
Anadjustingplateandthumbleverat eachwheel
positionprovidescuttingheightadjustment.
a. Depresslevertowardswheel.
b. Moveit to anyof the ninepositionsfor desired
cuttingheight.SeeFigure3-5.
c. Releaselevertowardsmowerdeck.
f
Figure 3=3 Figure 3=4
6
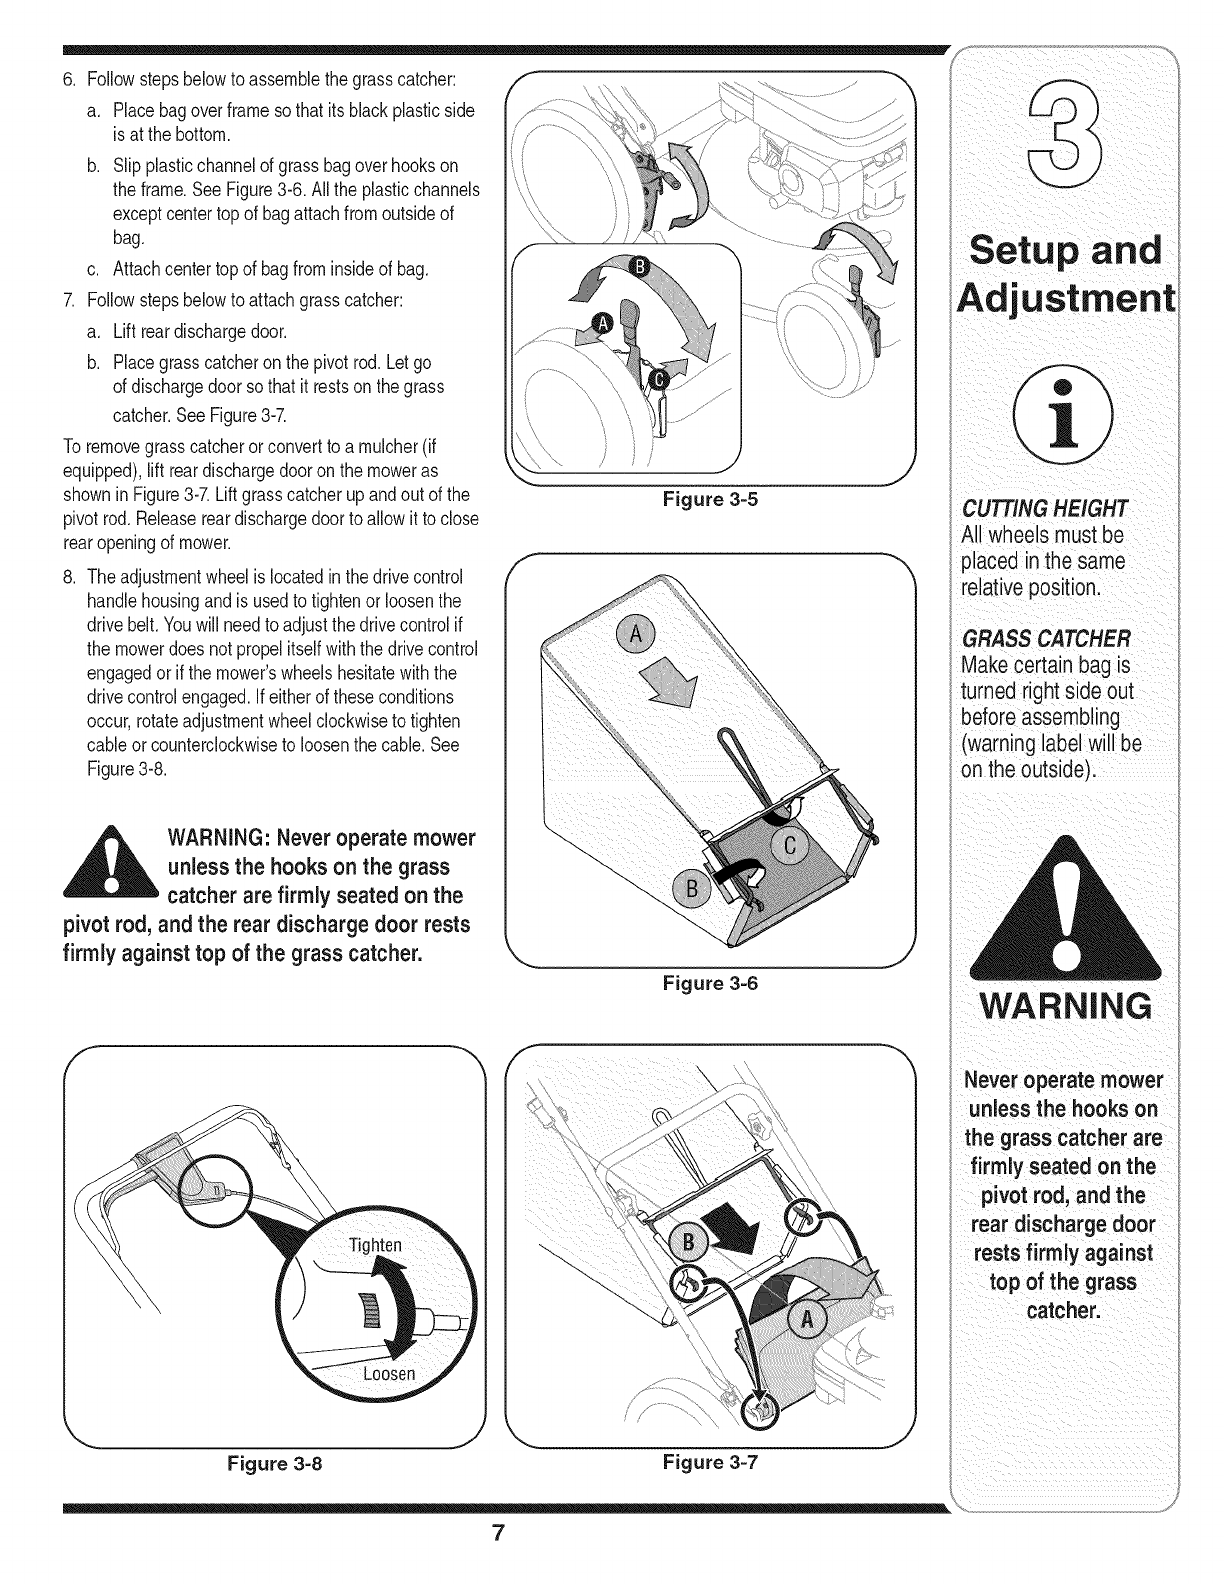
6. Followstepsbelowto assemblethe grasscatcher:
a. Placebagoverframesothat itsblackplasticside
is at the bottom.
b. Slip plasticchannelof grassbagoverhookson
the frame.SeeFigure3-6. All the plasticchannels
exceptcentertop of bagattachfromoutsideof
bag.
c. Attachcentertop of bagfrominsideof bag.
7. Followstepsbelowto attachgrasscatcher:
a. Liftreardischargedoor.
b. Placegrasscatcheron thepivotrod. Letgo
of dischargedoorsothat it restson thegrass
catcher.SeeFigure3-7.
To removegrasscatcherorconvertto a mulcher(if
equipped),lift reardischargedooronthe moweras
showninFigure3-7.Liftgrasscatcherupandout of the
pivotrod. Releasereardischargedoorto allowit to close
rearopeningof mower.
8. The adjustmentwheelis locatedinthe drivecontrol
handlehousingandis usedto tightenor loosenthe
drive belt.Youwill needto adjustthedrivecontrolif
the mowerdoesnot propelitselfwith thedrive control
engagedor if the mower'swheelshesitatewiththe
drivecontrolengaged.Ifeitherof theseconditions
occur,rotateadjustmentwheelclockwiseto tighten
cable orcounterclockwiseto loosenthe cable.See
Figure3-8.
,L_hlL WARNING: Never operate mower
unlessthe hookson the grass
catcher are firmly seated on the
pivot rod, and the rear discharge door rests
firmly against top of the grass catcher.
Figure 3=5
J
Figure 3-6
\ Y J
Figure 3-8 Figure 3-7
7
setupand
cuTnNGHEIGHT
All Wheelsmust be
plaCedin thesame
relative positionl
GRASS CATCHER
Makecertain bag is
turned right side out
before assembling
(warning label Willbe
on the outside)i
Never operate mower
the hooks on
the grass catcherare
firmly seated on the
pivot rod, and the
reardischarge door
rests firmly against
top of the grass
Catcherl
WARNING
The blade control
mechanism is a
safety device. Never
attempt to bypassits
operations.
; Use extreme care
when handling
gasoline. Gasoline is
extremely flammable
and the vapors are
explosive. Never fuel
the machine indoors
or while the engine
is hot or running.
I Extinguish cigarettes,
cigars, pipes and
other sources of
ignition.
Keep hands and feet
away from the chute
area on cutting deck.
Referto warning
label on the unit.
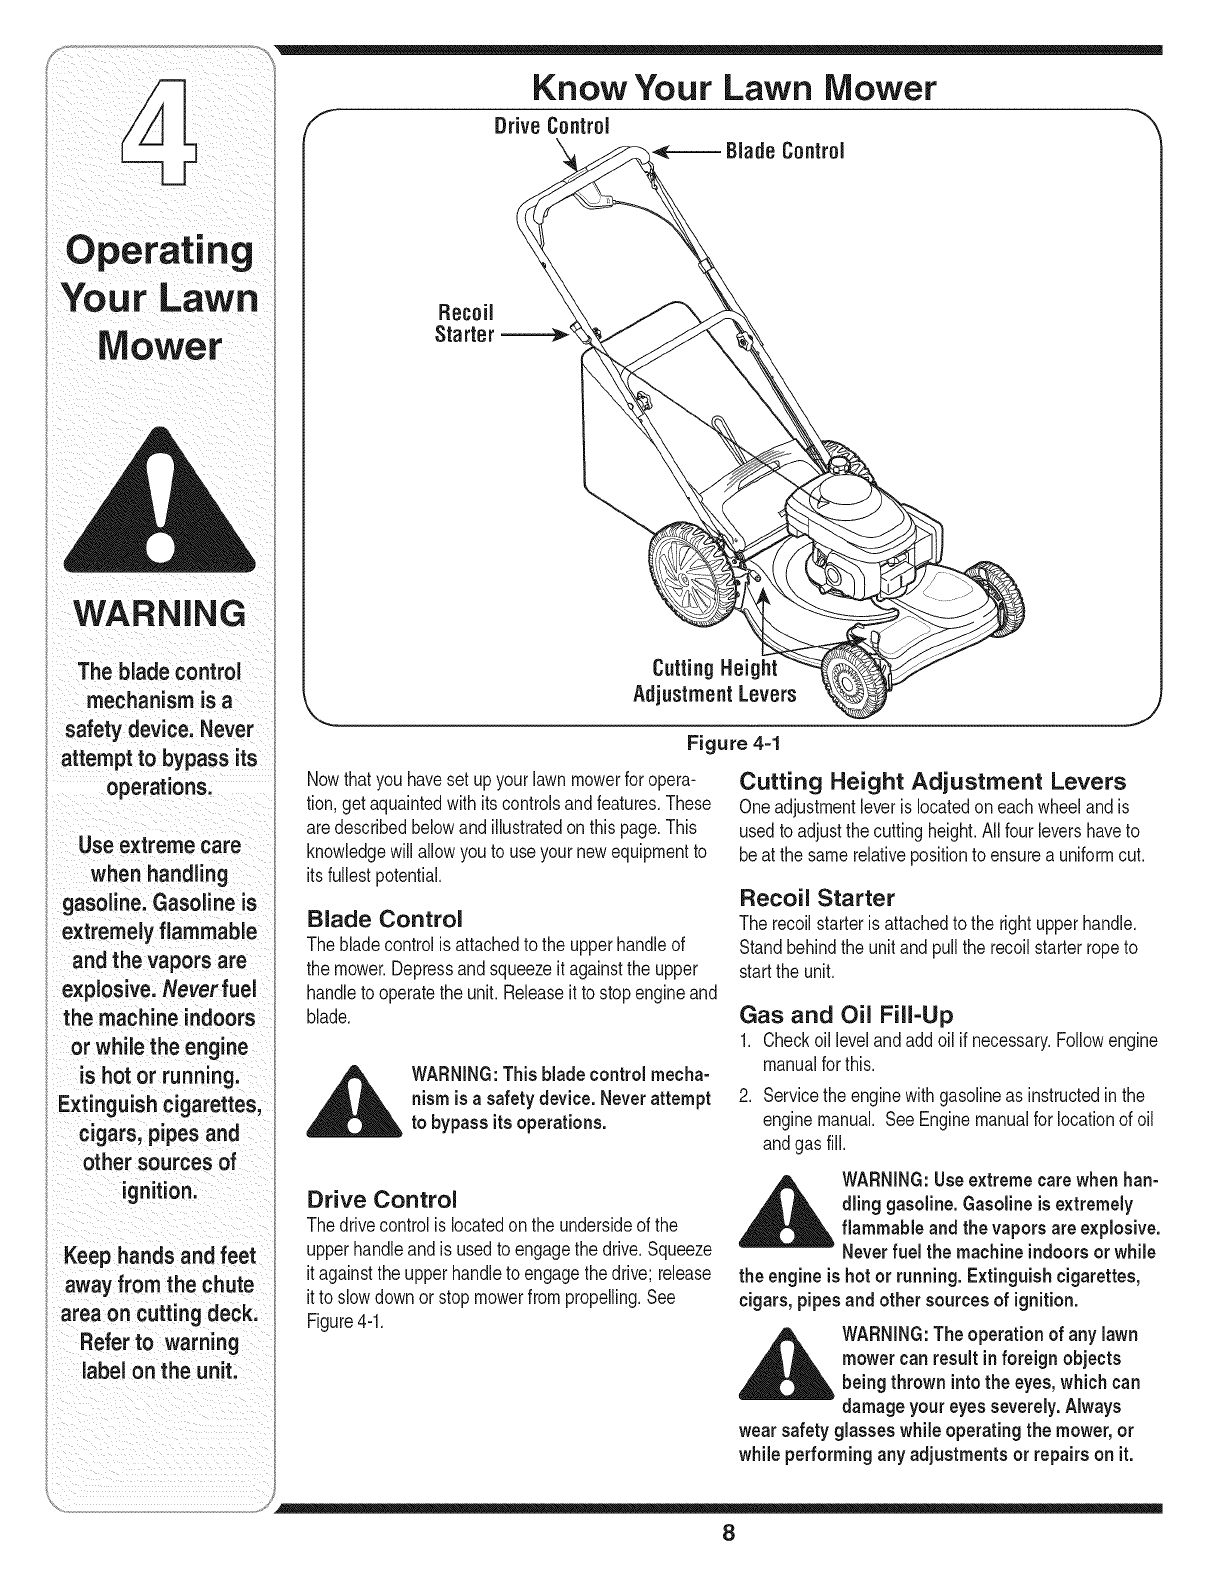
Know Your Lawn Mower
Drive Control
X, ._--- BladeControl
Recoil
Starter
Cutting Height
AdjustmentLevers
Figure 4-1
Nowthatyou havesetupyour lawnmowerfor opera-
tion,get aquaintedwithits controlsandfeatures.These
aredescribedbelowandillustratedonthis page.This
knowledgewill allowyou to use yournewequipmentto
itsfullestpotential.
Blade Control
Thebladecontrolis attachedto the upperhandleof
the mower.Depressand squeezeit againstthe upper
handleto operatethe unit. Releaseit to stopengineand
blade.
,_ WARNING:Thisblade control mecha-
nism is asafetydevice. Neverattempt
to bypass its operations.
Cutting Height Adjustment Levers
Oneadjustmentleveris locatedon eachwheelandis
usedto adjustthe cuttingheight.All fourlevershaveto
beat the samerelativepositionto ensurea uniformcut.
Recoil Starter
The recoilstarteris attachedto the rightupperhandle.
Standbehindthe unitand pullthe recoilstarterropeto
startthe unit.
Gas and Oil Fill-Up
1. Checkoillevelandaddoil if necessary.Followengine
manualfor this.
2. Servicethe enginewithgasolineas instructedinthe
enginemanual. SeeEnginemanualfor locationof oil
andgas fill.
Drive Control
Thedrivecontrolis locatedonthe undersideof the
upperhandleand is usedto engagethe drive.Squeeze
it againstthe upperhandleto engagethedrive; release
it to slowdownor stopmowerfrompropelling.See
Figure4-1.
,_ WARNING:Useextremecare when han-
dling gasoline.Gasoline is extremely
flammable and the vapors are explosive.
-- Neverfuel the machineindoorsor while
the engine is hot or running.Extinguish cigarettes,
cigars, pipesand other sources of ignition.
,_ WARNING:Theoperation of any lawn
mower can result inforeign objects
being thrown intothe eyes,which can
damage your eyesseverely. Always
wear safety glasses while operating the mower, or
while performingany adjustments or repairson it.
8
u
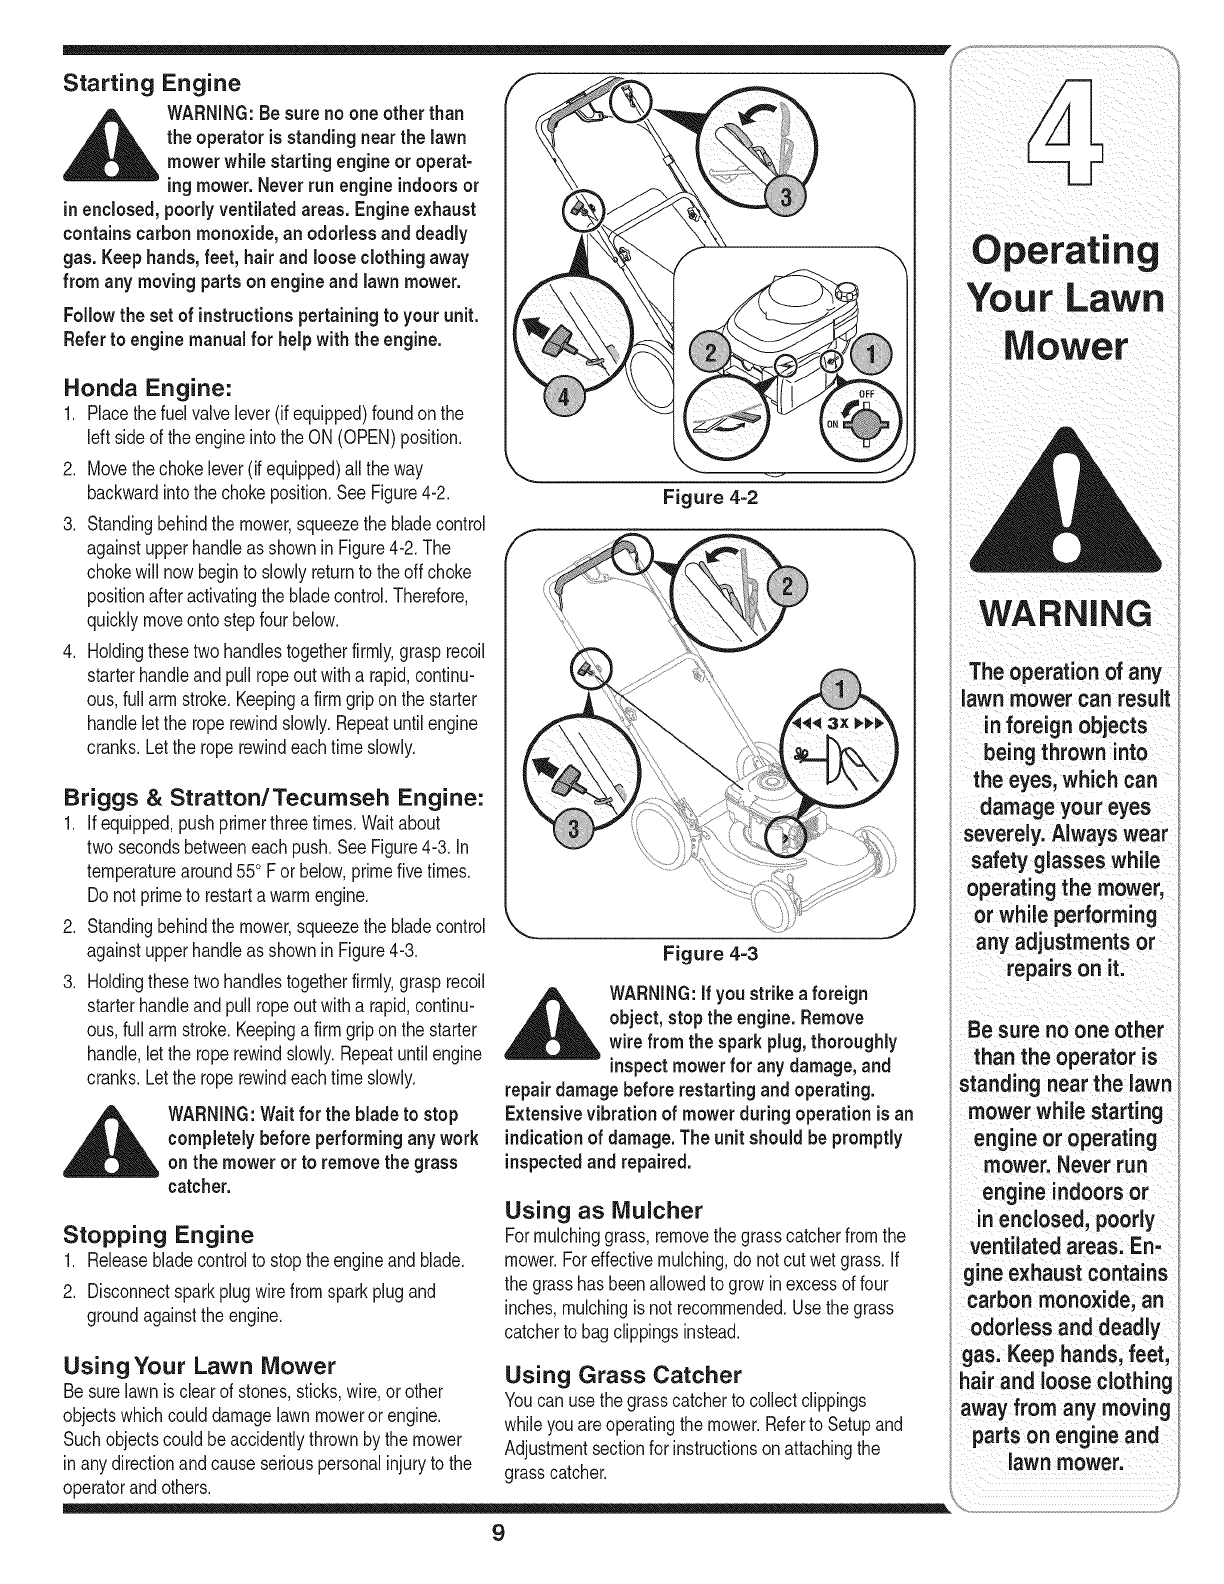
Starting Engine
__k ARNING:Be surenoone otherthan
the operatoris standingnearthe lawn
mower whilestarting engineor operat-
ing mower.Neverrun engineindoorsor
in enclosed,poorly ventilatedareas.Engineexhaust
contains carbon monoxide, an odorlessand deadly
gas. Keephands,feet, hairand looseclothing away
from any moving partsonengine and lawnmower.
Followthe set of instructionspertainingto your unit.
Referto enginemanual for helpwith the engine.
Honda Engine:
1. Placethe fuel valvelever(if equipped)foundon the
left sideof theengineintothe ON(OPEN)position.
2. Movethechokelever(if equipped)all the way
backwardintothe chokeposition.SeeFigure4-2.
3. Standingbehindthe mower,squeezethe bladecontrol
againstupperhandleas shownin Figure4-2. The
chokewill nowbeginto slowlyreturnto the offchoke
positionafteractivatingthe bladecontrol.Therefore,
quicklymoveonto stepfour below.
4. Holdingthesetwo handlestogetherfirmly,grasp recoil
starterhandleand pullropeout witha rapid,continu-
ous,full arm stroke.Keepingafirm griponthe starter
handleletthe roperewindslowly.Repeatuntil engine
cranks.Letthe roperewindeachtimeslowly.
Briggs & Stratton/Tecumseh Engine:
1. ifequipped,pushprimerthreetimes.Waitabout
two secondsbetweeneach push.SeeFigure4-3. In
temperaturearound550F or below,primefivetimes.
Donot primeto restarta warmengine.
2. Standingbehindthe mower,squeezethe bladecontrol
againstupperhandleas shownin Figure4-3.
3. Holdingthesetwo handlestogetherfirmly,grasp recoil
starterhandleand pullropeout witha rapid,continu-
ous,full arm stroke.Keepingafirm griponthe starter
handle,let the roperewindslowly.Repeatuntil engine
cranks.Letthe roperewindeachtimeslowly.
_ARNING:Waitfor the bladeto stop
completelybeforeperforming any work
on the mower or to remove the grass
catcher.
Stopping Engine
1. Releasebladecontrolto stoptheengineand blade.
2. Disconnectsparkplugwirefromsparkplugand
groundagainstthe engine.
Figure 4=2
,,\
Figure 4-3
_ARNING:If you strikeaforeign
object, stopthe engine.Remove
wire from the sparkplug,thoroughly
respect mower for any damage,and
repairdamage before restarting andoperating.
Extensive vibration of mowerduring operation is an
indicationof damage.The unit should be promptly
inspectedand repaired.
Using as Mulcher
Formulchinggrass,removethe grasscatcherfromthe
mower.Foreffectivemulching,do notcutwet grass.If
the grasshas beenallowedto growinexcessof four
inches,mulchingis not recommended.Usethe grass
catcherto bagclippingsinstead.
UsingYour Lawn Mower
Besurelawnis clearof stones,sticks,wire,or other
objectswhichcoulddamagelawnmowerorengine.
Such objectscouldbe accidentlythrownby the mower
in anydirectionandcauseseriouspersonalinjuryto the grasscatcher.
operatorandothers.
9
Using Grass Catcher
Youcan usethe grasscatcherto collectclippings
whileyouareoperatingthe mower.Referto Setupand
Adjustmentsectionfor instructionson attachingthe
perating
MoWer
The operation of any
lawn mower can result
inforeign objects
being thrown into
the eyes, which can
damage your eyes
severely. Always wear
safety glasseswhile
operatingthe mower,
or while performing
any adjustments or
repairs on it.
Be sure no one other
than the operator is
standing near the lawn
mower while starting
engine or operating
mower. Never run
engine indoors or
in enclosed, poorly
ventilated areas. En-
gine exhaust contains
carbon monoxide, an
odorless and deadly
;tas.Keep hands, feet,
lair and loose clothing
_way from any moving
partson engine and
lawn mower.
Your Lawn
WARNING
A vaysstopeng,"e;
disconnectspark
plug, andground
against engine before
cleaning, lubricating
of
maintenance onyour
I ii i i
We do notrecommend
the use of pressure
washers or garden
hose to clean your
unitl Thesemay cause
damage to electric
compOnentsi SpindleS;
i'
pulleys,bea ings, or
the eng ne:The use
of WaterWillresult in
shortened lifeand
i reduceserViceabilityl
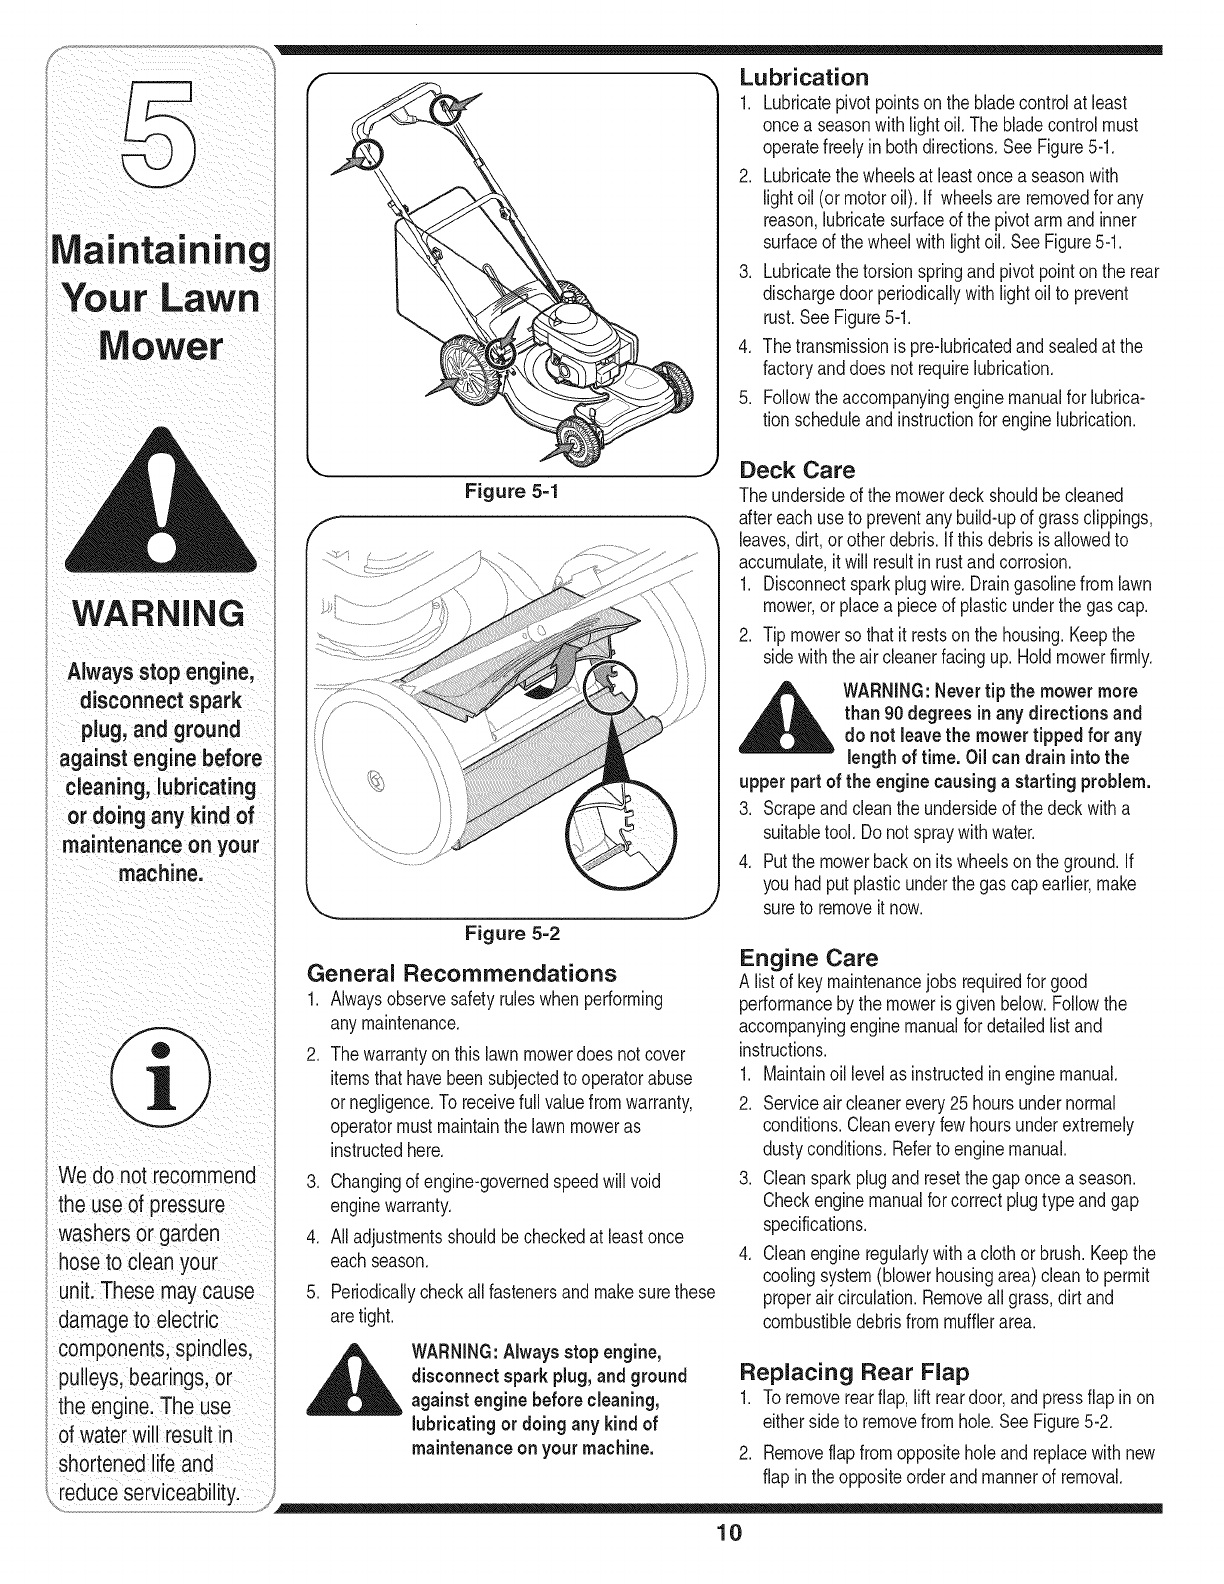
Figure 5-1
Figure 5=2
General Recommendations
1. Alwaysobservesafetyruleswhen performing
anymaintenance.
2. Thewarrantyon thislawnmowerdoesnot cover
itemsthathavebeensubjectedto operatorabuse
ornegligence.To receivefull valuefromwarranty,
operatormustmaintainthelawn moweras
instructedhere.
3. Changingof engine-governedspeedwill void
enginewarranty.
4. Alladjustmentsshouldbecheckedat leastonce
eachseason.
5. Periodicallycheckallfastenersand makesurethese
aretight.
Lubrication
1. Lubricatepivotpointson thebladecontrolat least
oncea seasonwithlightoil. The bladecontrolmust
operatefreelyinboth directions.SeeFigure5-1.
2. Lubricatethe wheelsat leastoncea seasonwith
lightoil (ormotoroil). If wheelsareremovedfor any
reason,lubricatesurfaceof the pivotarm andinner
surfaceof thewheelwithlightoil. SeeFigure5-1.
3. Lubricatethe torsionspringandpivotpointonthe rear
dischargedoorperiodicallywithlightoil to prevent
rust.See Figure5-1.
4. Thetransmissionis pre-lubricatedand sealedat the
factoryanddoes not requirelubrication.
5. Followtheaccompanyingenginemanualfor lubrica-
tion scheduleandinstructionfor enginelubrication.
Deck Care
Theundersideof the mowerdeckshouldbecleaned
aftereachuseto preventany build-upof grassclippings,
leaves,dirt,or otherdebris.Ifthisdebrisis allowedto
accumulate,it will resultinrustandcorrosion.
1. Disconnectsparkplugwire.Draingasolinefromlawn
mower,or placea pieceof plasticunderthe gas cap.
2. Tip mowersothat itrestsonthe housing.Keepthe
sidewiththe air cleanerfacingup. Hold mowerfirmly.
_L WARNING:Nevertip the mowermore
than 90degreesinany directionsand
do not leavethe mowertipped for any
lengthof time. Oil can draininto the
upper partof the enginecausingastartingproblem.
3. Scrapeand cleanthe undersideof the deckwitha
suitabletool.Do notspraywithwater.
4. Putthe mowerbackonitswheelsonthe ground.If
youhad putplasticunderthe gas capearlier,make
sureto removeit now.
Engine Care
A listof keymaintenancejobs requiredfor good
performanceby the moweris given below.Followthe
accompanyingenginemanualfor detailedlistand
instructions.
1. Maintainoil levelas instructedinenginemanual.
2. Serviceaircleanerevery25 hoursundernormal
conditions.Cleaneveryfewhoursunderextremely
dustyconditions.Referto enginemanual.
3. Cleansparkplugand resetthegaponce a season.
Checkenginemanualfor correctplugtype andgap
specifications.
4. Cleanengineregularlywitha clothorbrush.Keepthe
coolingsystem(blowerhousingarea)cleanto permit
properaircirculation.Removeall grass,dirt and
combustibledebrisfrommufflerarea.
_ WARNING:Alwaysstopengine,
disconnect sparkplug,and ground
against enginebefore cleaning,
lubricating ordoing any kindof
maintenanceonyour machine.
Replacing Rear Flap
1. Toremoverearflap,lift reardoor,and pressflap inon
eithersideto removefromhole.SeeFigure5-2.
2. Removeflapfromoppositeholeand replacewithnew
flap inthe oppositeorderandmannerof removal.
10
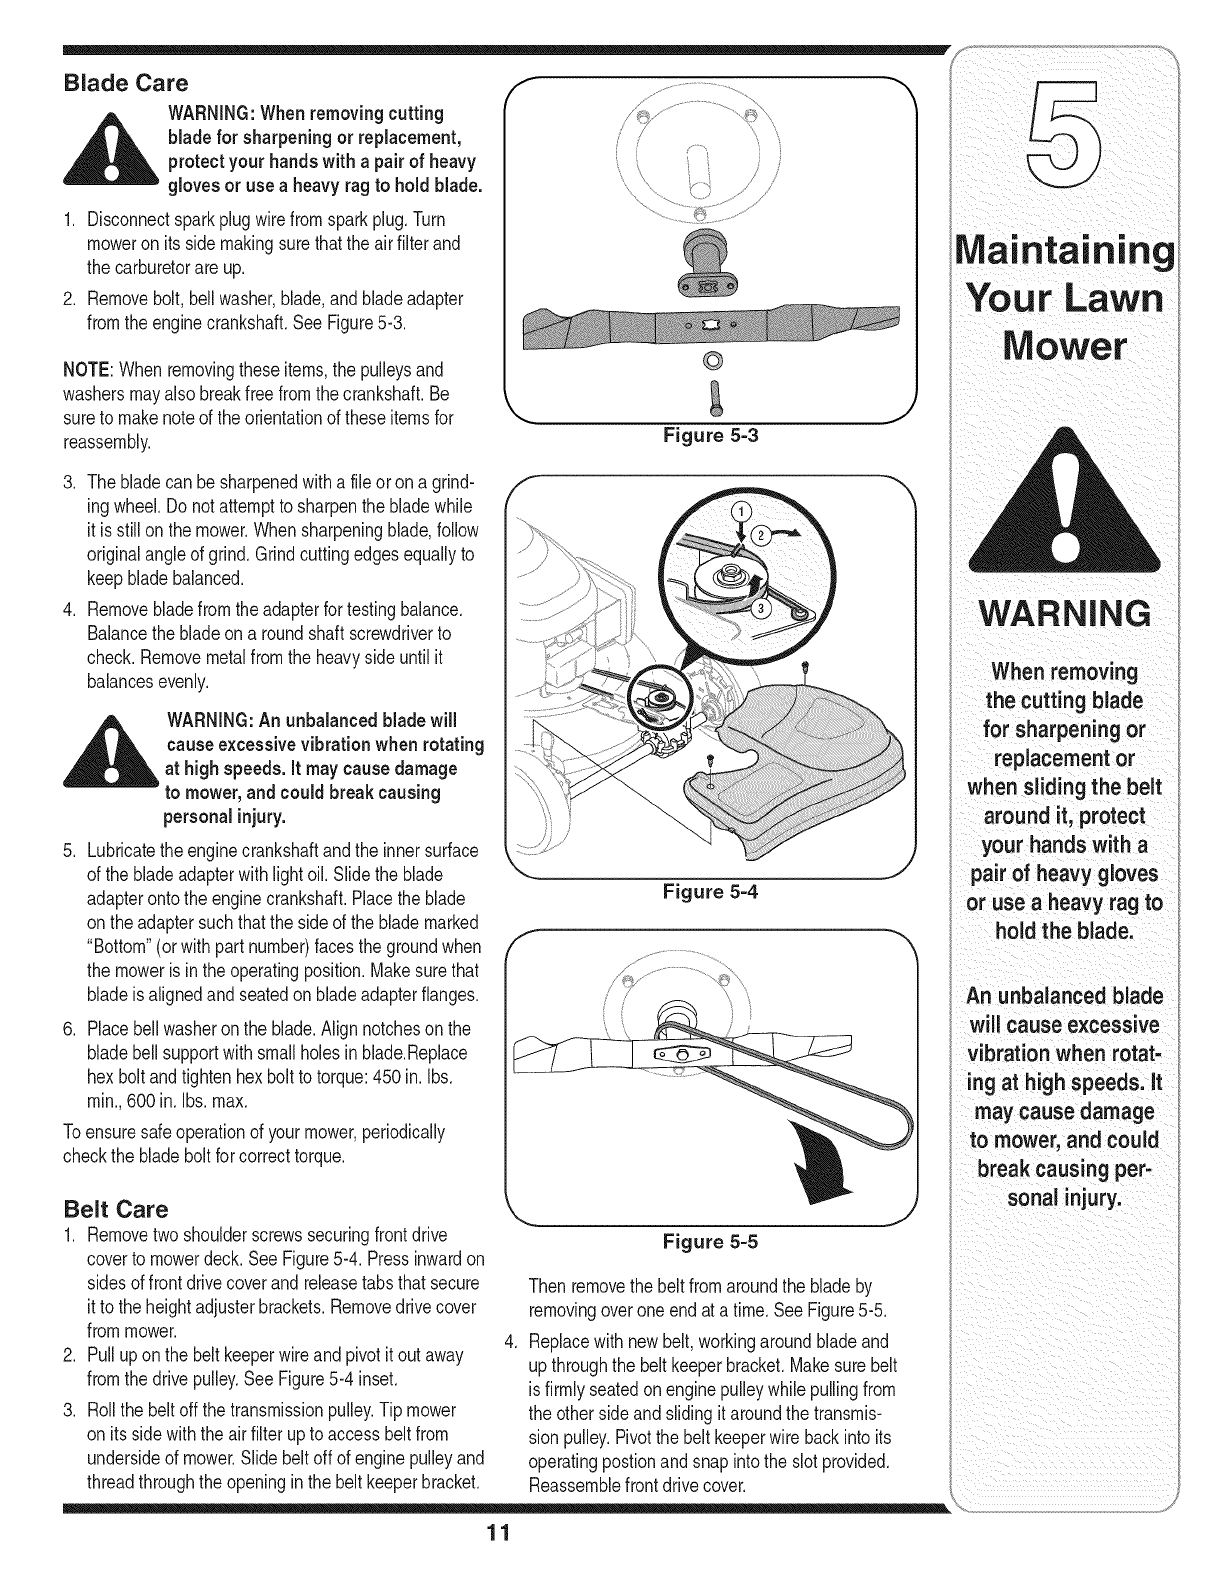
Blade Care /
WARNING:Whenremovingcutting
blade for sharpeningor replacement,
protectyourhandswitha pairof heavy
glovesor useaheavyragto holdblade.
1. Disconnectsparkplugwirefromsparkplug.Turn
moweron itsside makingsurethatthe airfilterand
the carburetorareup.
2. Removebolt,bellwasher,blade,andbladeadapter
fromthe enginecrankshaft.SeeFigure5-3.
NOTE:When removingtheseitems,the pulleysand
washersmayalso breakfree fromthe crankshaft.Be
sureto makenoteof the orientationof theseitemsfor
reassembly.
©
Figure 5-3 J
3. The bladecan be sharpenedwitha fileor on a grind-
ing wheel.Do notattemptto sharpenthe bladewhile
it is stillon the mower.Whensharpeningblade,follow
originalangleof grind.Grindcuttingedgesequallyto
keep bladebalanced.
4. Removebladefromthe adapterfor testingbalance.
Balancethe bladeona roundshaftscrewdriverto
check.Removemetalfromthe heavysideuntil it
balancesevenly.
__IL WARNING:An unbalanced bladewill
causeexcessive vibrationwhen rotating
at highspeeds.It maycausedamage
to mower, and couldbreakcausing
personalinjury.
.Lubricatetheenginecrankshaftandthe innersurface
of the bladeadapterwithlightoil. Slidethe blade
adapteronto the enginecrankshaft.Placethe blade
on theadaptersuchthatthe sideof the blademarked
"Bottom"(orwithpart number)facesthe groundwhen
the mowerisin the operatingposition.Makesurethat
bladeis alignedandseatedon bladeadapterflanges.
6. Placebellwasheronthe blade.Alignnotchesonthe
bladebellsupportwithsmallholesinblade.Replace
hex boltandtightenhexbolt to torque:450in.Ibs.
rain.,600 in.Ibs.max.
Toensuresafeoperationof yourmower,periodically
checkthe bladeboltfor correcttorque.
Belt Care
1. Removetwoshoulderscrewssecuringfrontdrive
coverto mowerdeck.SeeFigure5-4. Pressinwardon
sidesof frontdrivecoverand releasetabsthat secure
it to the heightadjusterbrackets.Removedrivecover
frommower.
2. Pulluponthe belt keeperwireand pivotit out away
fromthe drivepulley.SeeFigure5-4 inset.
3. Rollthe beltoff the transmissionpulley.Tip mower
on its sidewiththe airfilterupto accessbeltfrom
undersideof mower.Slidebeltoff of enginepulleyand
threadthroughthe openinginthe beltkeeperbracket.
f
Figure 5-4
Figure 5-5
Thenremovethe belt fromaroundthe bladeby
removingoveroneendat a time.SeeFigure5-5.
4. Replacewith newbelt,workingaroundbladeand
upthroughthe beltkeeperbracket.Makesurebelt
is firmlyseatedonenginepulleywhile pullingfrom
the othersideandslidingit aroundthe transmis-
sion pulley.Pivotthe belt keeperwire backinto its
operatingpostionandsnapintothe slotprovided.
Reassemblefrontdrivecover.
WARNING
When removing
the cutting blade
for sharpening or
replacementor
when sliding the belt
around it, protect
your hands with a
pair of heavy gloves
or use a heavy rag to
hold the blade.
An unbalanced blade
will cause excessive
vibration when rotat-
ing at high speeds. It
may cause damage
to mower, and could
break causing per-
sonal injury.
11
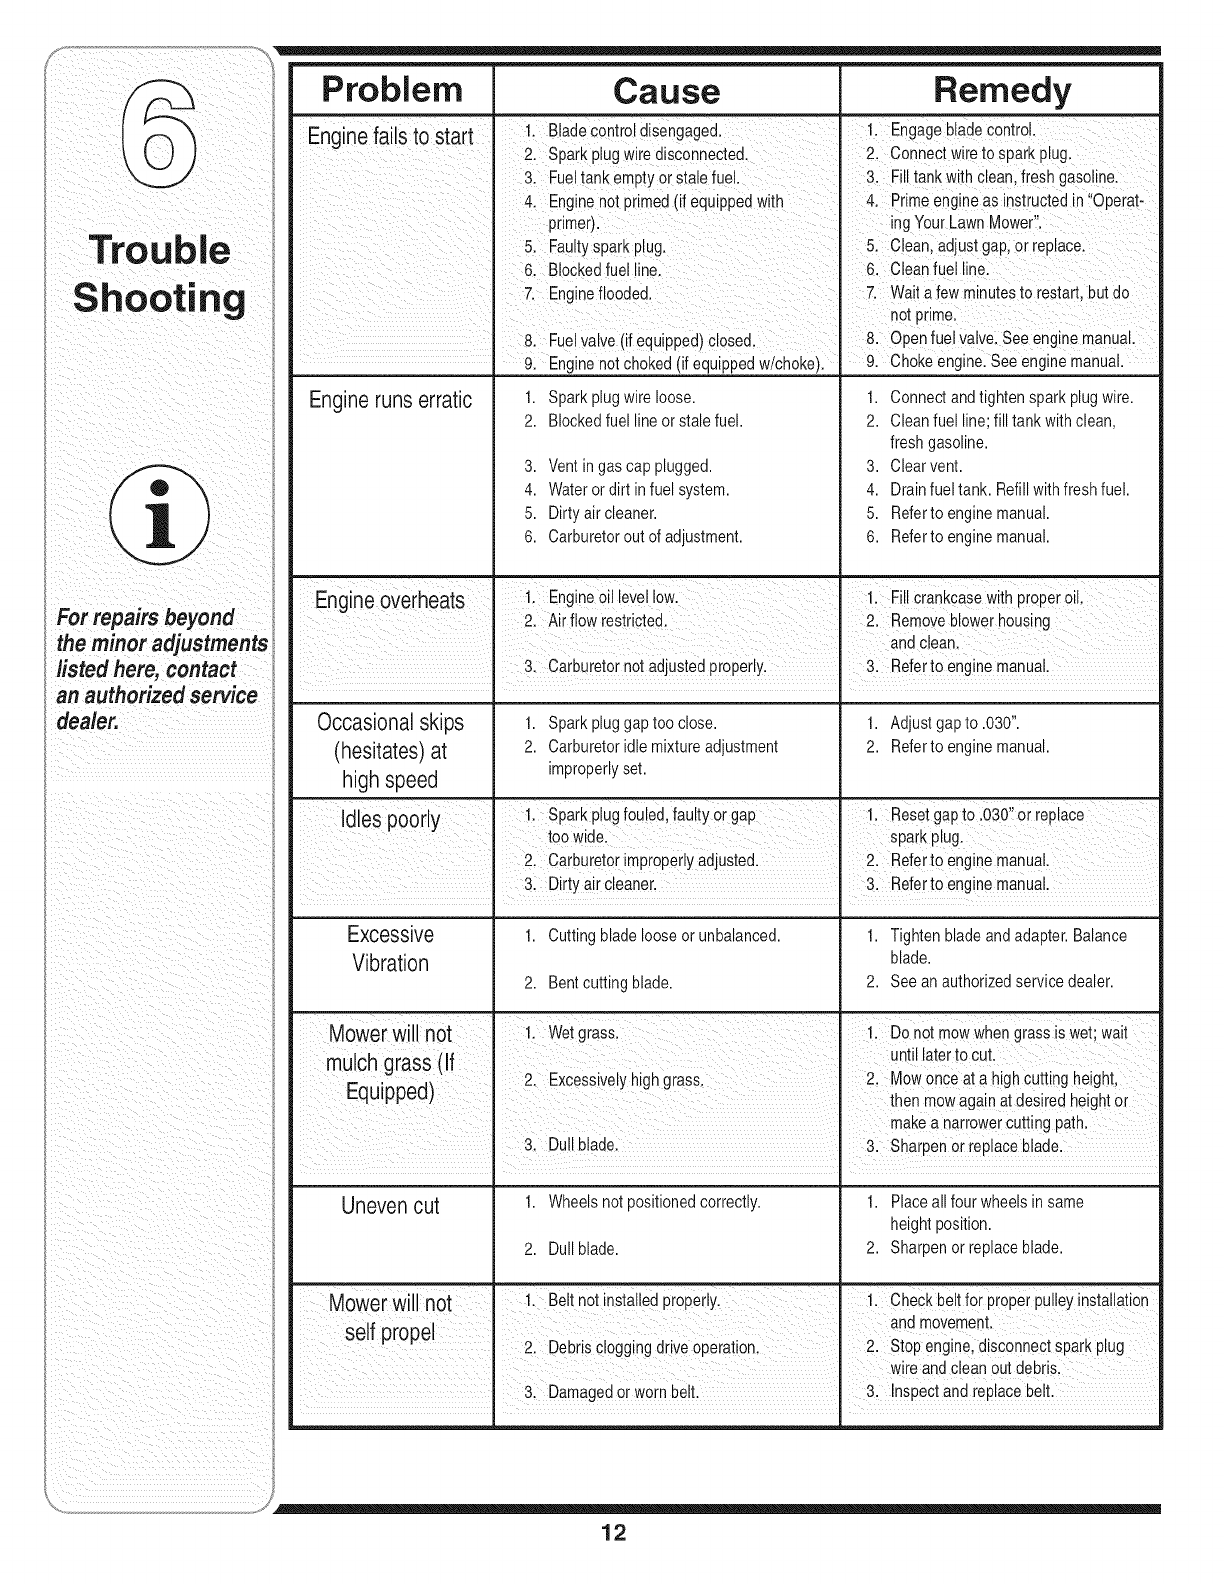
Problem Cause Remedy
Ena ne fa sto start 1. Bladecontroldisengaged, i. Engagebladecontro!.
sParkPiugwiie disconnected: conneO!wiretOspark plugl
3. Fueltankempty orstale fuel. & Filltankwith clean,fresh gasolinel
4. Enginenot piimed(if equippedwth 4. primeengineaSinstr,u,ctedin Operat,
primer)i ing YourLawnMower.
Faultyspark p ugl c ean adjustgap or repiacel
61 BloCked fuel linel clean fuellinel
7: Engineflooded. 7. Wait a few minutesto restait,but do
I notprimel
" 8. Fue!valve(if equipped)closed, & Open fuelva!ve: See enginemanuaI.
........... 91 Enginenotchoked (if equippedw/choke). 9. Chokeengine:Seeengine manual.
For repairsbeyond
minor adjustments
listed here, contact
an authorized service
dealer.
Engineruns erratic 1. Sparkplugwire loose.
2. Blockedfuel lineor stalefuel.
3. Ventingascap plugged.
4. Wateror dirt infuel system.
5. Dirtyair cleaner.
6. Carburetorout of adjustment.
1. Connectandtightensparkplugwire.
2. Clean fuelline; fill tank withclean,
freshgasoline.
3. Clearvent.
4. Drainfueltank. Refillwithfreshfuel.
5. Referto enginemanual.
6. Referto enginemanual.
Engne overheats 1. Engineoil levellow. 1. Fillcrankcasewith properoil.
2. Air flow restricted. 2. Removeblowerhousing
and c ean.
3. Carburetornotadjustedproperly. 3. Referto enginemanual.
I
Occasionalskips 1. Sparkpluggap tooclose. 1. Adjustgap to .030".
(hesitates)at 2. Carburetoridlemixtureadjustment 2. Referto enginemanual.
high speed improperlyset.
Idles poorly 1. Sparkplugfouled,faultyor gap 1. Resetgapto .030"or replace
--too wide. _ spark plug.
I 2. Carburetorimproperlyadjusted. 2. Referto enginemanual.
3 Dirtyair cleaner. 3. Referto enginemanual.
Excessive 1. Cuttingbladelooseor unbalanced. 1. Tighten bladeandadapter.Balance
Vibration blade.
2. Bentcutting blade. 2. See anauthorizedservicedealer.
Mower will not 1. Wetgrass. 1. Donot mowwhengrass Lswet; walt
mulch clrass/If I I untillater to cut.
._ ,_" I 2 Excessve y h ghgrass 2. Mowonce at a highcutting height
_-qulppea_ then mowagainat desiredheight 'or
I makea narrowercutting path.
I 3. Dullblade. I 3. Sharpenor replaceblade.
H
Unevencut 1. Wheelsnotpositionedcorrectly. 1. Placeallfour wheelsin same
heightposition.
2. Dullblade. 2. Sharpenor replaceblade.
1. Belt notinsialled properly. 1. Check belt for properpulleyinstallation
Mower will not
seIfpropeI ' , and movement.
2. Debrsclogg ngdriveoperation 2. Stop engine,disconnectsparkplug
wire and cleanoutdebris.
3. Damagedor wornbelt. 3. Inspectand replacebelt.
M
12

S".............
Off=Season Storage 4. Coatmower'scuttingbladewithchassisgreaseto
The followingstepsshouldbetakento prepareyour lawn
mowerfor storage.
1. Cleanandlubricatemowerthoroughlyas describedin
the lubricationinstructions.
2. We donot recommendthe useof a pressurewasher
or gardenhoseto cleanyour unit.
3. Referto enginemanualfor correctengine
storageinstructions.
preventrusting.
5. Storemowerina dry,cleanarea. Donot storenext
to corrosivematerials,suchas fertilizer.
Whenstoringanytypeof powerequipmentin a poorly
ventilatedor metalstorageshed,careshouldbetaken
to rust-prooftheequipment.Usinga lightoil or silicone,
coattheequipment,especiallycablesandall moving
partsof yourlawnmowerbeforestorage.
Safety Labels Found On Your Lawn Mower
WARNING
DO NOT remove safety
(or any) labels from
mower for any reason.
13
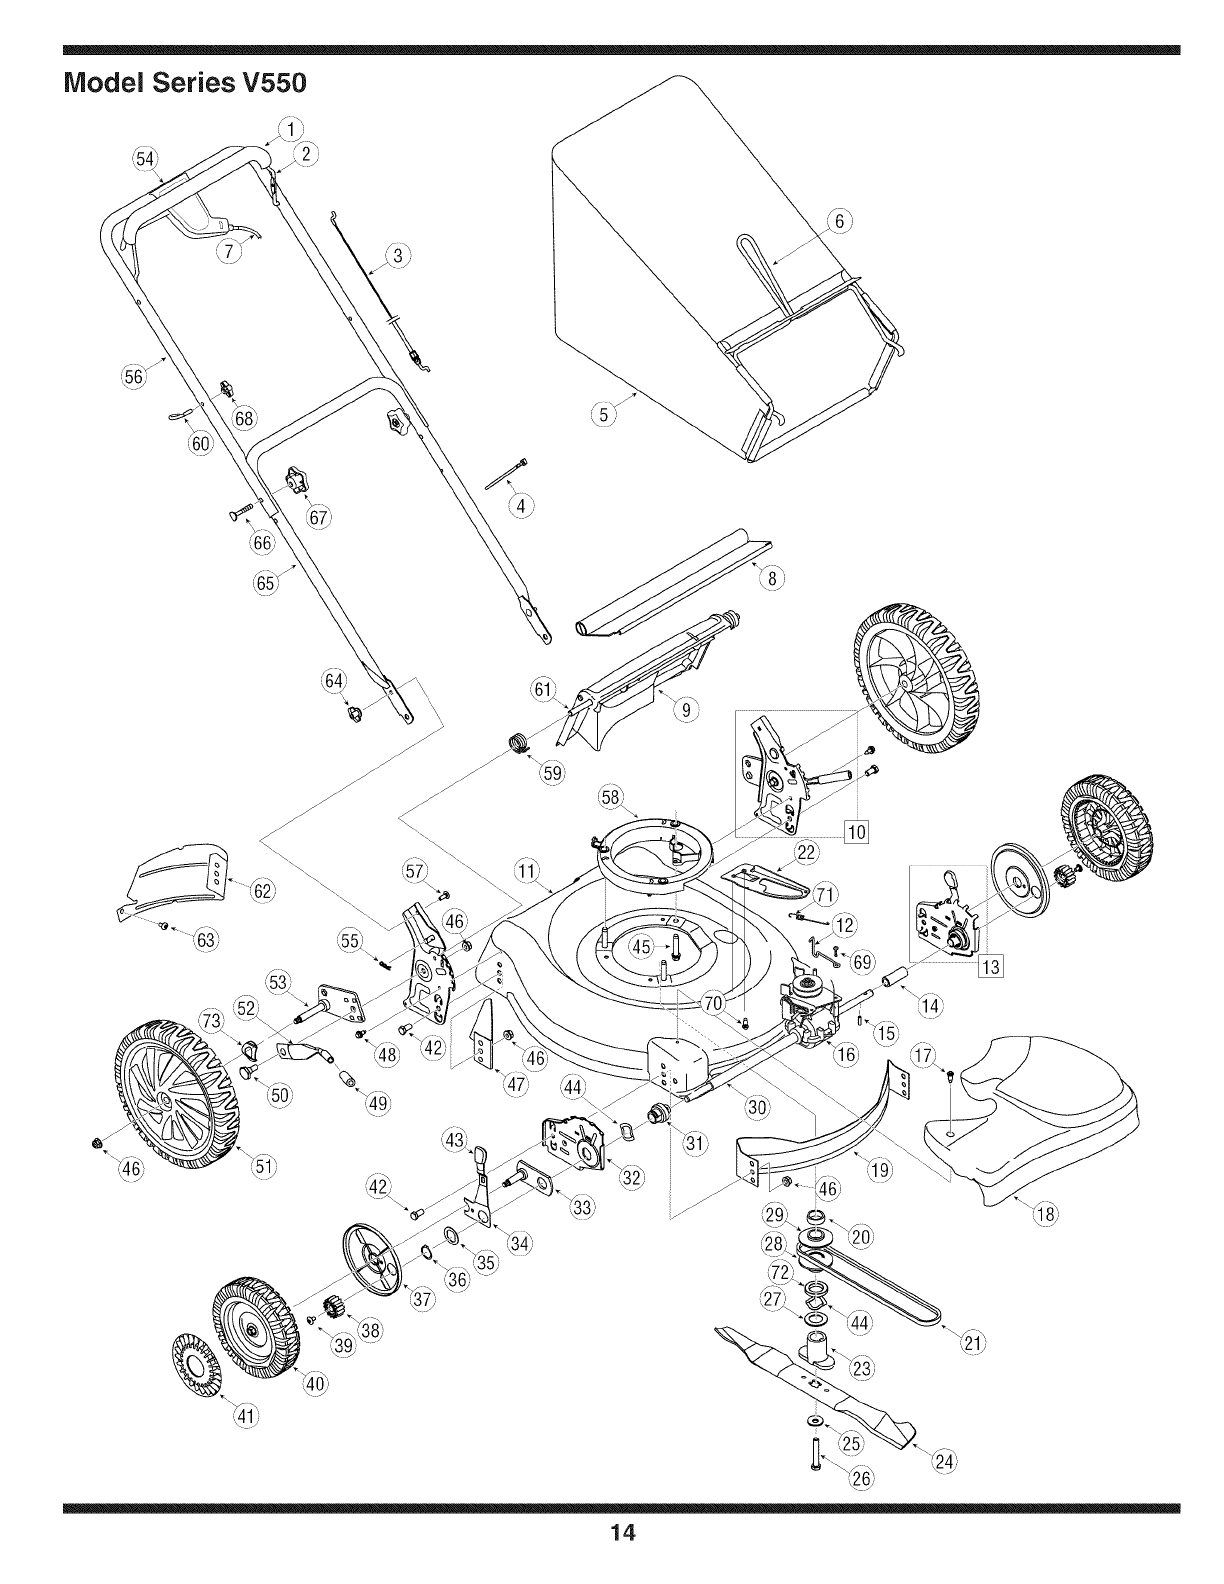
Model Series V550
)
14
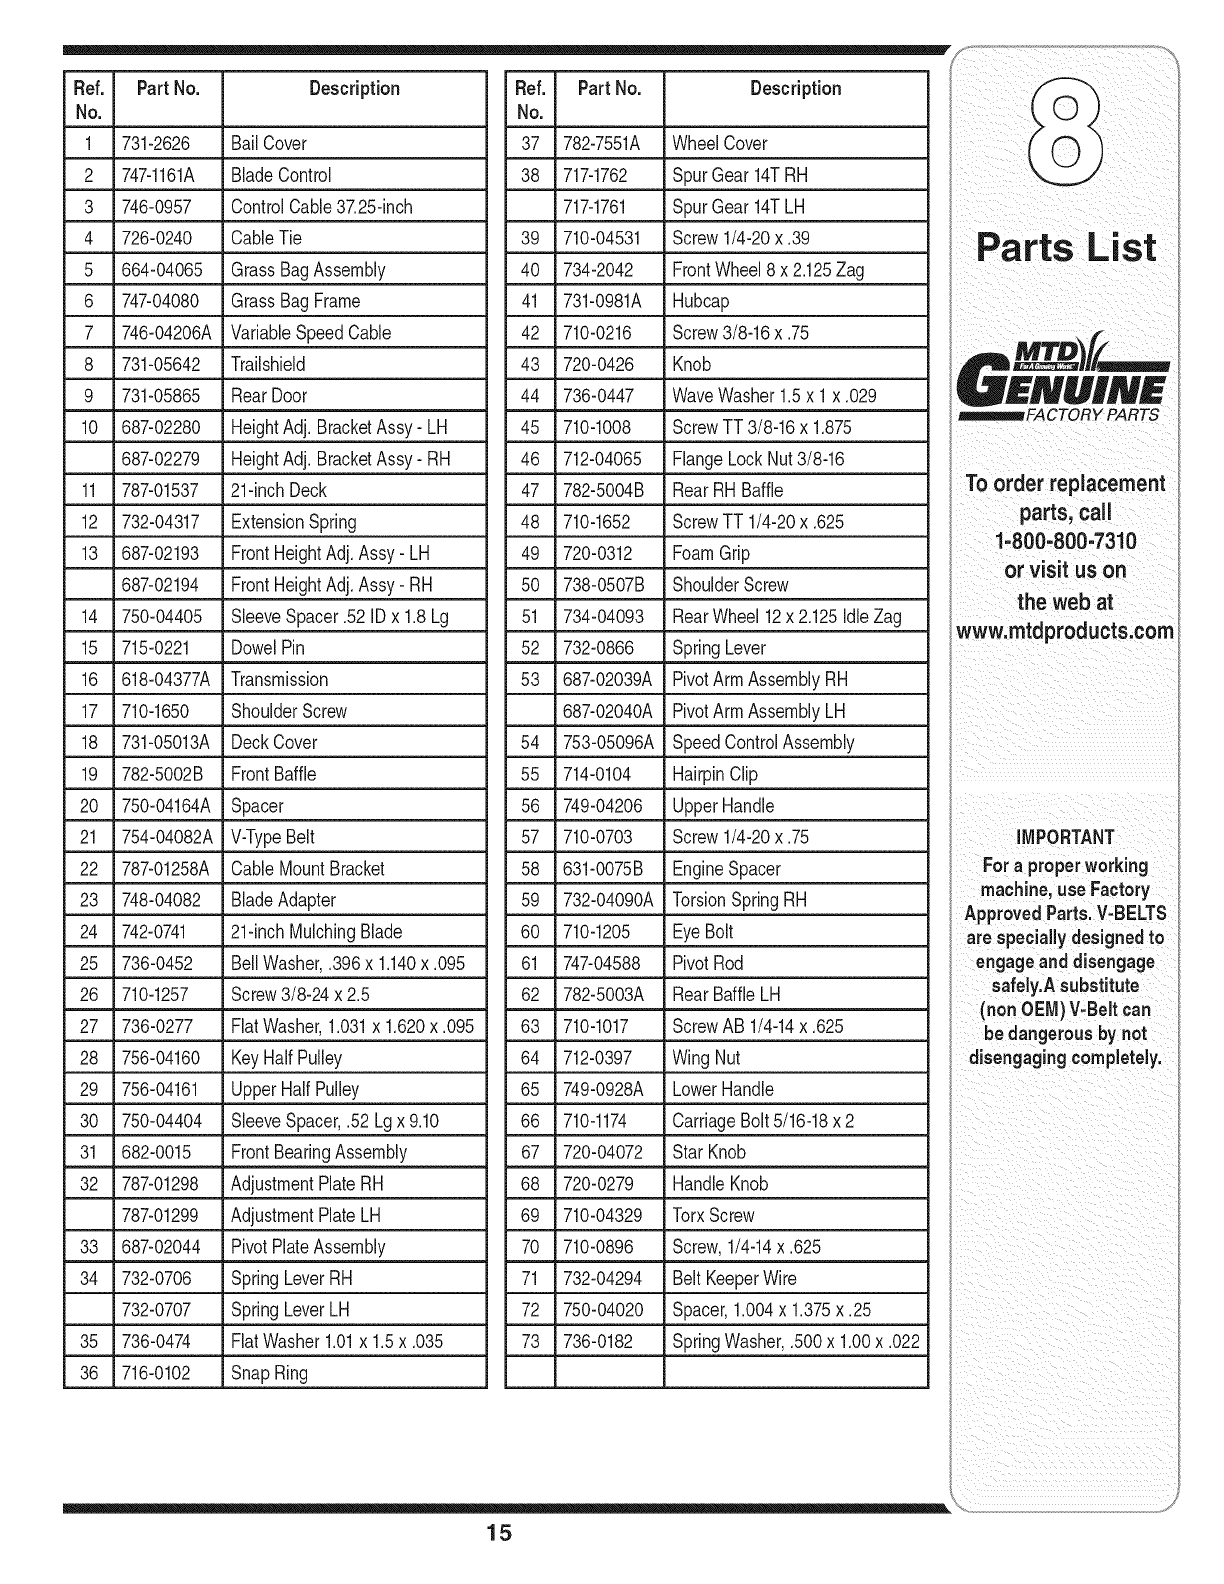
Fief. Part No. Description
No.
1 731-2626 BailCover
2 747-1161A BladeControl
3 746-0957 ControlCable37.25-inch
4 726-0240 CableTie
5 664-04065 GrassBagAssembly
6 747-04080 GrassBagFrame
7 746-04206A VariableSpeedCable
8 731-05642 Trailshield
9 731-05865 Rear Door
Fief. PartNo. Description
No.
37 782-7551A WheelCover
38 717-1762 SpurGear14T RH
717-1761 SpurGear 14TLH
39 710-04531 Screw1/4-20x.39
40 734-2042 FrontWheel8x 2.125Zag
41 731-0981A Hubcap
42 710-0216 Screw3/8-16x .75
43 720-0426 Knob
44 736-0447 WaveWasher1.5x 1x .029
10 687-02280
687-02279
11 787-01537
12 732-04317
13 687-02193
687-02194
14 750-04405
15 715-0221
16 618-04377A
17 710-1650
18 731o05013A
19 782-5002B
20 750-04164A
21 754-04082A
22 787o01258A
23 748-04082
HeightAdj. BracketAssy- LH
HeightAdj. BracketAssy- RH
21-inchDeck
ExtensionSpring
FrontHeightAdj. Assy- LH
FrontHeightAdj. Assy- RH
SleeveSpacer.52 IDx 1.8Lg
DowelPin
SNUIN£
45 710-1008 ScrewTT3/8-16x 1.875 _FACTORYPARTS
Transmission
ShoulderScrew
DeckCover
FrontBaffle
Spacer
V-TypeBelt
CableMountBracket
BladeAdapter
46 712-04065
47 782-5004B
48 710-1652
49 720-0312
50 738o0507B
51 734-04093
52 732-0866
FlangeLockNut3/8-16
RearRHBaffle
ScrewTT 1/4-20x .625
FoamGrip
ShoulderScrew
RearWheel12x 2.125IdleZag
SpringLever
24 742-0741 21-inchMulchingBlade
25 736-0452 BellWasher,.396x 1.140x .095
26 710-1257 Sc_w3/8-24 x2.5
27 736-0277
28 756-04160
29 756-04161
30 750-04404
31 682-0015
FiatWasher,1.031x 1.620x .095
Key HalfPulley
UpperHalfPulley
SleeveSpacer,.52 Lgx 9.10
FrontBearingAssembly
53 687o02039A
687o02040A
54 753-05096A
55 714-0104
56 749-04206
57 710-0703
58 631-0075B
59 732-04090A
PivotArmAssemblyRH
PivotArmAssemblyLH
SpeedControlAssembly
HairpinClip
UpperHandle
Screw1/4-20x .75
EngineSpacer
TorsionSpringRH
60 710-1205 EyeBolt
61 747°04588 PivotRod
62 782-5003A RearBaffle LH
32 787-01298 AdjustmentPlateRH
787-01299 AdjustmentPlateLH
33 687-02044 PivotPlateAssembly
34 732-0706 SpringLeverRH
732-0707 SpringLeverLH
35 736-0474 FlatWasher1.01x 1.5x .035
36 716-0102 SnapRing
63 710-1017
64 712-0397
65 749-0928A
66 710-1174
67 720-04072
ScrewAB 1/4-14x .625
WingNut
LowerHandle
CarriageBolt5/16-18x 2
Star Knob
68 720-0279
69 710-04329
70 710-0896
71 732-04294
72 750-04020
73 736-0182
parts, Call
1'800,800.7310
or visit uson
the web
,ww:mtdp,od,,ots:oo,,,
ii i _iI_ ii
IMPORTANT
For a properworking
machine, use Factory
Approved Parts. V-BELTS
are specially designed to
engageanddisengage
safely.Asubstitute
(non OEM) V-Belt can
be dangerous by not
disengaging completely.
HandleKnob
TorxScrew
Screw,1/4-14x .625
Belt KeeperWire
Spacer,1.004x 1.375x .25
SpringWasher,.500x 1.00x .022
15

MANUFACTURER'S LiMiTED WARRANTY FOR
The limitedwarrantysetforthbelowisgivenby MTDLLCwithrespect
to newmerchandisepurchasedandusedin the UnitedStates,its
possessionsandterritories.
"MTD"warrantsthisproductagainstdefectsinmaterialandworkman-
shipfor a periodof two (2)yearscommencingonthe date of original
purchaseandwill,at itsoption,repairor replace,freeof charge,any
part foundto bedefectiveinmaterialsorworkmanship.Thislimitedwar-
rantyshallonlyapply if thisproducthasbeenoperatedand maintained
inaccordancewiththe Operator'sManualfurnishedwiththe product,
andhas notbeensubjectto misuse,abuse,commercialuse,neglect,
accident,impropermaintenance,alteration,vandalism,theft,fire,water,
ordamagebecauseof otherperilor naturaldisaster.Damageresulting
fromthe installationor useof any part,accessoryor attachmentnot
approvedby MTDfor use withthe product(s)coveredbythis manual
willvoid yourwarrantyas to any resultingdamage.
Normalwearpartsarewarrantedto befree fromdefectsinmaterialand
workmanshipfor a periodof thirty (30)daysfromthe dateof purchase.
Normalwearpartsinclude,butare notlimitedto itemssuchas: batter-
ies,belts,blades,bladeadapters,grassbags,riderdeckwheels,seats,
snowthrowerskidshoes,shaveplates,augerspiralrubberandtires.
HOW TO OBTAIN SERVICE: Warranty service is available,WITH
PROOFOF PURCHASE, through your local authorized service
dealer. To locate the dealer in your area, check your Yellow Pages,
or contact MTD LLC at RO. Box 361131,Cleveland, Ohio 44136-
0019, or call 1-800-800-7310or 1-330-220-4683 or log on to our
Web site at www.mtdproducts.com.
Thislimitedwarrantydoesnot providecoverageinthe followingcases:
a. Theengineor componentpartsthereof.Theseitemsmaycarrya
separatemanufacturer'swarranty.Referto applicablemanufacturer's
warrantyfor termsandconditions.
b. Logsplitterpumps,valves,andcylindershavea separateoneyear
warranty.
c. Routinemaintenanceitemssuchas lubricants,filters,blade
sharpening,tune-ups,brakeadjustments,clutchadjustments,deck
adjustments,andnormaldeteriorationof the exteriorfinishdueto
useor exposure.
d. Servicecompletedby someoneotherthananauthorizedservice
dealer.
e. MTDdoesnot extendanywarrantyfor productssoldor exported
outsideof the UnitedStates,its possessionsandterritories,except
thosesoldthroughMTD'sauthorizedchannelsof exportdistribution.
f. ReplacementpartsthatarenotgenuineMTDparts.
g. Transportationchargesandservicecalls.
No impliedwarranty,includingany impliedwarranty of mer-
chantabilityof fitness for a particular purpose,applies after the
applicable periodof express written warranty aboveas to the
partsas identified.No otherexpresswarranty, whetherwrittenor
oral, except as mentioned above,givenby any personor entity,
includingadealeror retailer, withrespect to any product,shall
bindMTD.Duringthe periodof the warranty,the exclusiveremedy
is repairor replacementof the productas setforth above.
Theprovisionsas set forth inthis warrantyprovidethe soleand
exclusiveremedy arising from the sale.MTDshallnot be liable
for incidentalor consequentiallossor damage including,without
limitation, expensesincurredfor substituteor replacementlawn
careservicesor for rentalexpensesto temporarily replacea
warranted product.
Somestatesdo notallowthe exclusionor limitationof incidentalor
consequentialdamages,or limitationsonhowlongan impliedwarranty
lasts,sothe aboveexclusionsor limitationsmaynot applyto you.
In noeventshallrecoveryof any kindbegreaterthanthe amountof the
purchasepriceof the productsold.Alterationof safetyfeatures of
the productshallvoid this warranty. Youassumethe riskandliability
for loss,damage,or injuryto you andyourpropertyand/orto othersand
theirpropertyarisingout of the misuseor inabilityto usethe product.
Thislimitedwarrantyshallnot extendto anyoneotherthan theoriginal
purchaserorto the personfor whomitwas purchasedas a gift.
HOWSTATELAWRELATESTOTHIS WARRANTY:This limited
warrantygivesyou specificlegalrights,and youmayalsohaveother
rightswhichvaryfromstateto state.
IMPORTANT:OwnermustpresentOriginalProofof Purchaseto obtain
warrantycoverage.
IViTD LLC, P.O. BOX 361131 CLEVELAND, OHiO 44136-0019; Phone: 1=800=800-7310, 1-330=220-4683
