Machine Technology RAPNASMF Network audio system (built-in amplifier) User Manual RAPNAS MF 1
Machine Technology (SZ) Co., Ltd. Network audio system (built-in amplifier) RAPNAS MF 1
User manual
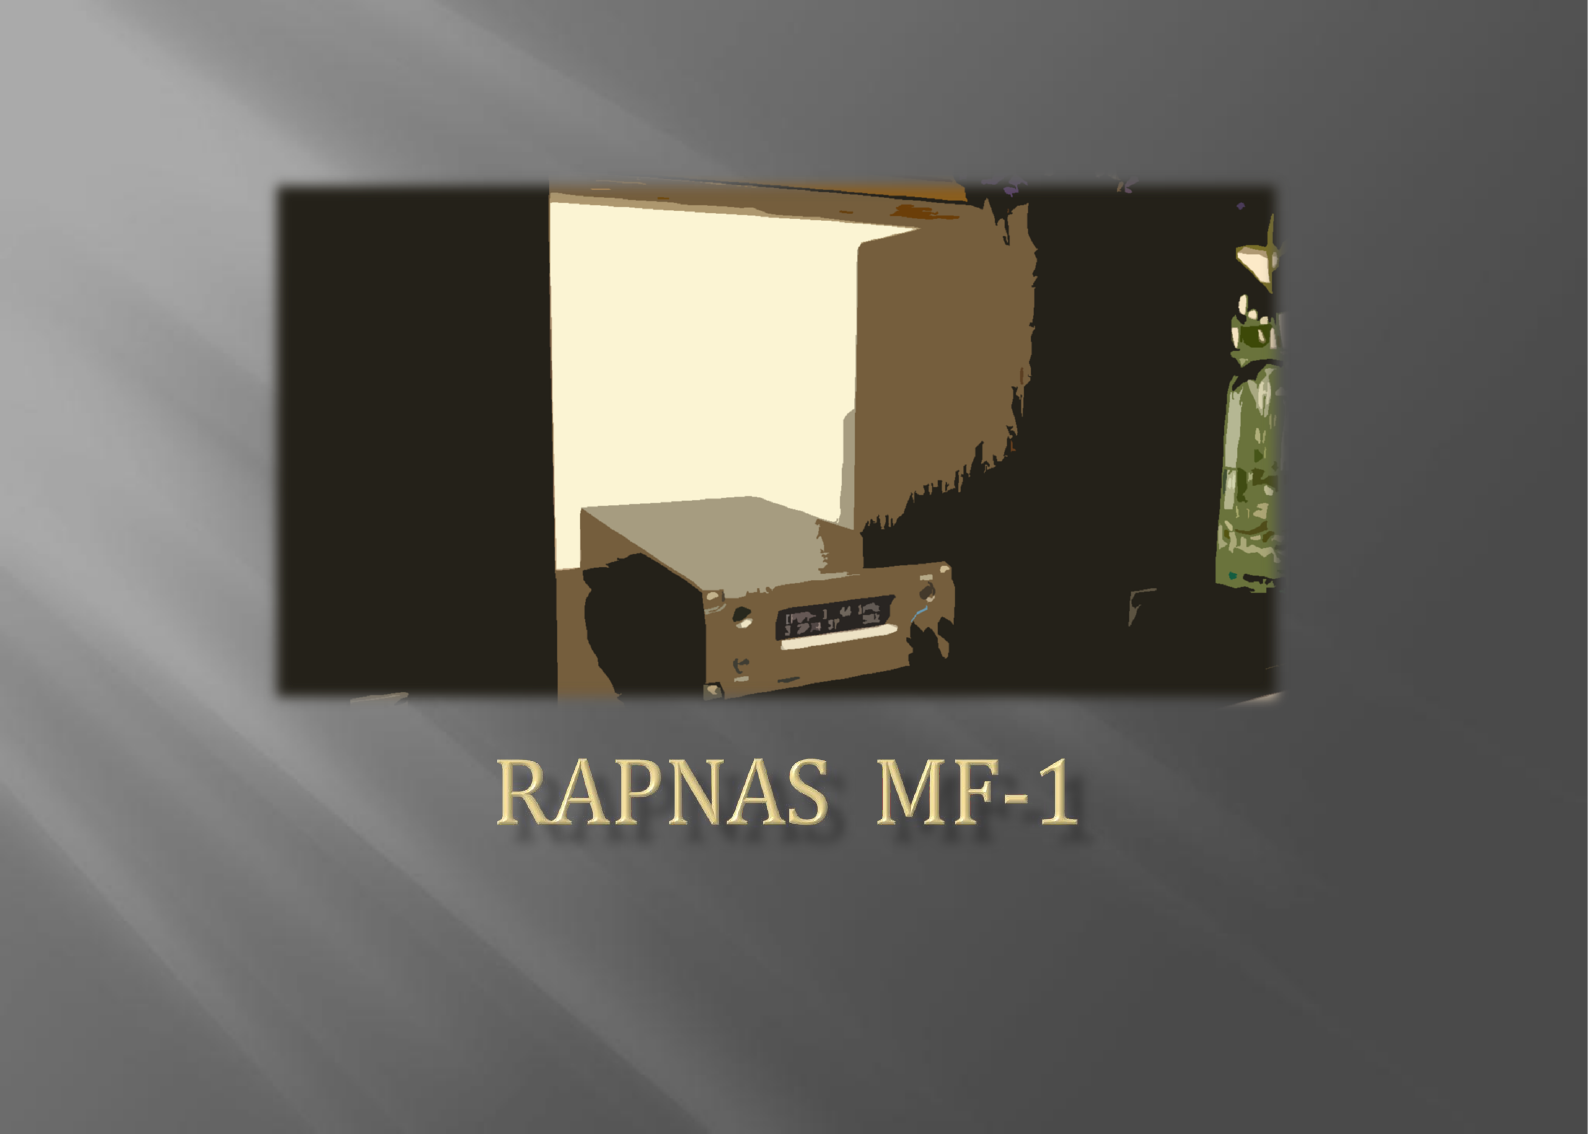
Network audio system(built-in amplifier)
OWNER’S MANUAL
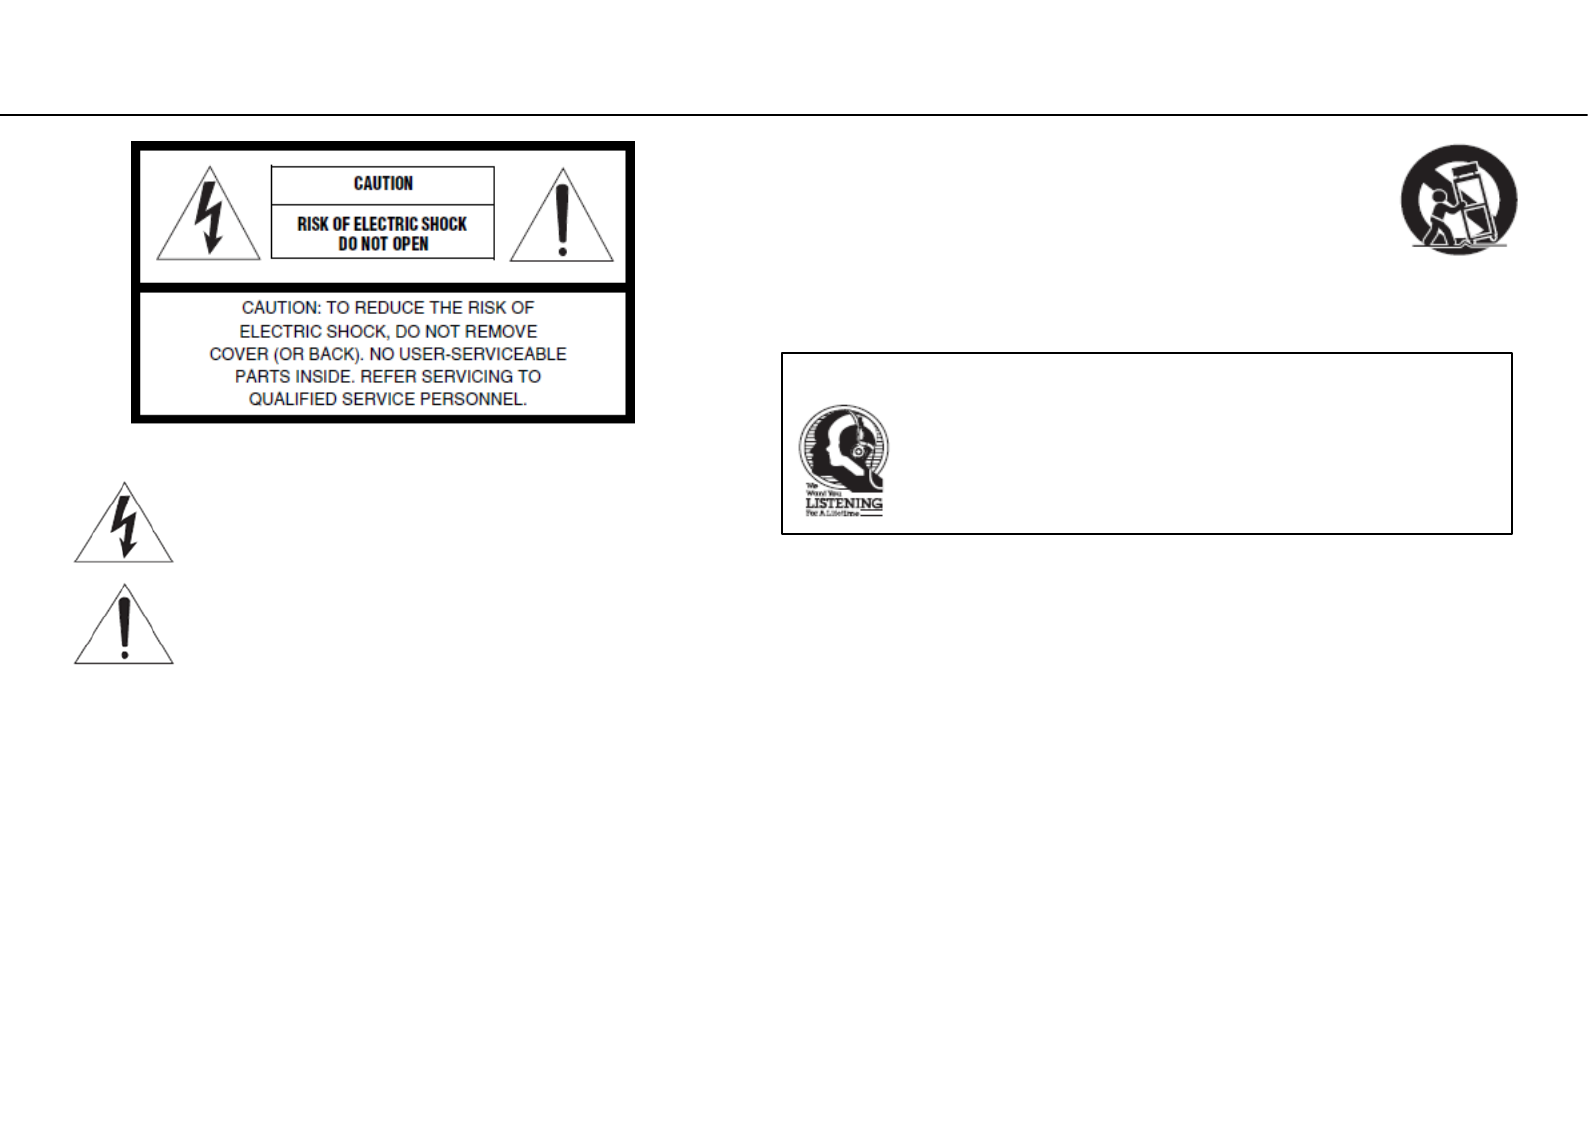
IMPORTANT SAFETY INSTRUCTIONS
• Explanation of Graphical Symbols
12 Use only with the cart, stand, tripod, bracket, or table specified by the
manufacturer, or sold with the apparatus. When a cart is used, use caution when
moving the cart/apparatus combination to avoid injury from tip-over.
13 Unplug this apparatus during lightning storms or when unused for long periods of
time.
14 Refer all servicing to qualified service personnel. Servicing is required when the
apparatus has been damaged in any way, such as power-supply cord or plug is damaged, liquid has
been spilled or objects have fallen into the apparatus, the apparatus has been exposed to rain or
moisture, does not operate normally, or has been dropped.
We Want You Listening For A Lifetime
We group want you to get the most out of your equipment by playing it at a safe
level. One that lets the sound come through loud and clear without annoying
blaring or distortion – and, most importantly, without affecting your sensitive
hearing.
Since hearing damage from loud sounds is often undetectable until it is too late,
We recommend you to avoid prolonged exposure from excessive volume levels.
The lightning flash with arrowhead symbol, within an equilateral triangle, is
intended to alert you to the presence of uninsulated “dangerous voltage” within
the product’s enclosure that may be of sufficient magnitude to constitute a risk
of electric shock to persons.
The exclamation point within an equilateral triangle is intended to alert you to
the presence of important operating and maintenance (servicing) instructions in
the literature accompanying the appliance.
1 Read these instructions.
2 Keep these instructions.
3 Heed all warnings.
4 Follow all instructions.
5 Do not use this apparatus near water.
6 Clean only with dry cloth.
7 Do not block any ventilation openings. Install in accordance with the manufacturer’s instructions.
8 Do not install near any heat sources such as radiators, heat registers, stoves, or other apparatus
(including amplifiers) that produce heat.
9 Do not defeat the safety purpose of the polarized or grounding-type plug. A polarized plug has
two blades with one wider than the other. A grounding type plug has two blades and a third
grounding prong. The wide blade or the third prong are provided for your safety. If the provided
plug does not fit into your outlet, consult an electrician for replacement of the obsolete outlet.
10 Protect the power cord from being walked on or pinched particularly at plugs, convenience
Receptacles, and the point where they exit from the apparatus.
11 Only use attachments/accessories specified by the manufacturer.

FCC, IC and CE Statement
FCC requirements
This equipment has been tested and found to comply with the limits for a
Class B digital device, pursuant to part 15 of the FCC Rules. These limits are
designed to provide reasonable protection against harmful interference in a
residential installation. This equipment generates, uses and can radiate radio
frequency energy and, if not installed and used in accordance with the
instructions, may cause harmful interference to radio communications.
However, there is no guarantee that interference will not occur in a
particular installation. If this equipment does cause harmful interference to
radio or television reception, which can be determined by turning the
equipment off and on, the user is encouraged to try to correct the
interference by one or more of the following measures:
•Reorient or relocate the receiving antenna.
• Increase the separation between the equipment and receiver.
• Connect the equipment into an outlet on a circuit different from that to
which the receiver is connected.
• Consult the dealer or an experienced radio/TV technician for help.
Caution: Any changes or modifications to this device not explicitly approved
by manufacturer could void your authority to operate this equipment.
This device complies with part 15 of the FCC Rules. Operation is subject to
the following two conditions: (1) This device may not cause harmful
interference, and (2) this device must accept any interference received,
including interference that may cause undesired operation.
This equipment complies with FCC radiation exposure limits set forth for an
uncontrolled environment. This equipment should be installed and operated
with minimum distance 20cm between the radiator and your body.
Declaration Of Conformity Hereby, Machine Technology (SZ)
Co. , Ltd. Declares that this RAPNAS MF-1 is in compliance
with the essential requirements and other relevant provisions
of Directive 2014/53/EU.
IC warning statements
This device complies with Industry Canada’s license-exempt RSSs.
Operation is subject to the following two conditions:
(1) This device may not cause interference; and
(2) This device must accept any interference, including interference that
may cause undesired operation of the device.
Le présent appareil est conforme aux CNR d’Industrie Canada applicables
aux appareils radio exempts de licence. L’exploitation est autorisée aux
deux conditions suivantes:
(1) l’appareil ne doit pas produire de brouillage;
(2) l’utilisateur de l’appareil doit accepter tout brouillage radioélectrique
subi, même si le brouillage est susceptible d’en compromettre le
fonctionnement.
The device for operation in the band 5150–5250 MHz is only for indoor
use to reduce the potential for harmful interference to co-channel mobile
satellite systems;
les dispositifs fonctionnant dans la bande de 5150 à 5250MHz sont
réservés uniquement pour une utilisation à l'intérieur afin de réduire les
risques de brouillage préjudiciable aux systèmes de satellites mobiles
utilisant les mêmes canaux;
This equipment complies with Canada radiation exposure limits set forth
for an uncontrolled environment. This equipment should be installed and
operated with minimum distance 20cm between the radiator & your
body.
Cet équipement est conforme Canada limites d'exposition aux radiations
dans un environnement non contrôlé. Cet équipement doit être installé et
utilisé à distance minimum de 20cm entre le radiateur et votre corps.
The digital apparatus complies with Canadian CAN ICES-3 (B)/NMB-3(B).
Cet conforme à la norme NMB-003 du Canada.
CAUTION: READ THIS BEFORE OPERATING YOUR UNIT.
1. To assure the finest performance, please read this manual carefully. Keep it in a safe place for future
reference.
2. Install this sound system in a well ventilated, cool, dry, clean place - away from direct sunlight,
heat sources, vibration, dust, moisture, and/or cold. For proper ventilation, allow the following
minimum clearances.
Top: 10 cm (4 in.), Rear: 10 cm (4 in.), Sides: 6 cm (2.5 in.)
3. Locate this unit away from other electrical appliances, motors, or transformers to avoid humming
sounds.
4. Do not expose this unit to sudden temperature changes from cold to hot, and do not locate this unit
in an environment with high humidity (i.e. a room with a humidifier) to prevent condensation inside
this unit, which may cause an electrical shock, fire, damage to this unit, and/or personal injury.
5. Avoid installing this unit where foreign object may fall onto this unit and/or this unit may be exposed
to liquid dripping or splashing. On the top of this unit, do not place:
– Other components, as they may cause damage and/or discoloration on the surface of this unit.
– Burning objects (i.e. candles), as they may cause fire, damage to this unit, and/or personal injury.
– Containers with liquid in them, as they may fall and liquid may cause electrical shock to the user
and/or damage to this unit.
6. Do not cover this unit with a newspaper, tablecloth, curtain, etc. in order not to obstruct heat radiation.
If the temperature inside this unit rises, it may cause fire, damage to this unit, and/or personal injury.
7. Do not plug in this unit to a wall outlet until all connections are complete.
8. Do not operate this unit upside-down. It may overheat, possibly causing damage.
9. Do not use force on switches, knobs and/or cords.
10. When disconnecting the power cable from the wall outlet, grasp the plug; do not pull the cable.
11. Do not clean this unit with chemical solvents; this might damage the finish. Use a clean, dry cloth.
12. Only voltage specified on this unit must be used. Using this unit with a higher voltage than specified is
dangerous and may cause fire, damage to this unit, and/or personal injury. We will not be held
responsible for any damage resulting from use of this unit with a voltage other than specified.
13. To prevent damage by lightning, keep the power cable and outdoor antennas disconnected from a wall
outlet or this unit during a lightning storm.
14. Do not attempt to modify or fix this unit. Contact qualified service personnel when any service is
needed. The cabinet should never be opened for any reasons.
15. When not planning to use this unit for long periods of time (i.e. vacation), disconnect the AC power
plug from the wall outlet.
16. Be sure to refer to the “Troubleshooting” section for common operating errors before concluding that
this unit is faulty.
17. Before moving this unit, press A to set it to standby mode and disconnect the AC power plug from the
wall outlet.
18. Condensation will form when the surrounding temperature changes suddenly. Disconnect the power
cable from the outlet, then leave this unit alone.
19. When using this unit for a long time, this unit may become warm. Turn the power off, then leave this
unit alone for cooling.
20. Install this unit near the AC outlet and where the AC power plug can be reached easily.
21. The batteries shall not be exposed to excessive heat such as sunshine, fire or the like. When you
dispose of batteries, follow your regional regulations.
WARNING
TO REDUCE THE RISK OF FIRE OR ELECTRIC SHOCK, DO NOT EXPOSE THIS
UNIT TO RAIN OR MOISTURE.
This unit is not disconnected from the AC power source as long as it is connected to the wall
outlet, even if this unit itself is turned off by A. This state is called the standby mode. In this
state, this unit is designed to consume a very small quantity of power.
Radio waves may affect electro-medical devices. Do not use this unit near medical devices or
inside medical facilities.
Do not use this unit within 20 cm (8.5 inches) of persons with a heart pacemaker implant
or defibrillator implant.
•Do not spill water or other liquids on the remote control.
•Do not drop the remote control.
•Do not leave or store the remote control in the following conditions:
– places of high humidity, such as near a bath
– places of high temperatures, such as near a heater or stove
– places of extremely low temperatures
– dusty places
•Insert the battery according to the polarity markings (+ and -).
•Change all batteries if you notice the following conditions:
– the operation range of the remote control narrows
– the transmit indicator does not flash or is dim
•If the batteries run out, immediately remove them from the remote control to prevent an explosion or
acid leak.
•If you find leaking batteries, discard the batteries immediately, taking care not to touch the leaked
material. If the leaked material comes into contact with your skin or gets into your eyes or mouth, rinse
it away immediately and consult a doctor. Clean the battery compartment thoroughly before installing
new batteries.
•Do not use old batteries together with new ones. This may shorten the life of the new batteries or cause
old batteries to leak.
•Do not use different types of batteries (such as alkaline and manganese batteries) together.
Specification of batteries may be different even though they look the same. Danger of explosion may
happen if batteries are incorrectly replaced.
•Before inserting new batteries, wipe the compartment clean.
•Dispose of batteries according to your regional regulations.
•Keep batteries away from children. If a battery is accidentally swallowed, contact your doctor
immediately.
•When not planning to use the remote control for long periods of time, remove the batteries from the
remote control.
•Do not charge or disassemble the supplied batteries.
Notes on remote controls and batteries
Table of Contents
Important safety instructions 2
Caution: Read this before operating your unit 3
FCC, IC and CE Statement 4
Table of Contents 5
What you can do with this unit (Network Audio) 6
What you can do with this unit (Wire connection input) 7
What you can do with this unit (USB-DAC) 8
Accessories 9
Remote control preparation 10
Names and functions of parts (remote control) 11
Part name (Front) 12
Part name (Rear) 13
Part name (Side) 14
Connecting speakers 15
Connecting headphone 16
Connecting to a network (PC/NAS/Internet connection) 17
Basic connection of this unit 18
Stand by before use 19
Power ON 20
Mode and initial display of DAC 21
Front panel OLED display (page1) 22
Front panel OLED display (page2) 23
Front panel OLED display (page3) 24
Front panel OLED display (exception) 25
Launch Web UI 26
Volumio Web UI 27
Queue screen function 28
Select storage 29
Playback LR Stereo Test 30
Playback from USB storage 31
DSD Native Playback 32
Change DAC mode 33
Playback from AUX-IN 34
DAC output 35
AirPlay Receive Playback 36
Playback from SPDIF 37
Used as external player's USB-DAC 38
Additional Information 39
System Reboot 40
Normal Power Off 41
Forced Power Off 42
Appearance dimension 43
Specification sheet1 44
Specification sheet2 45
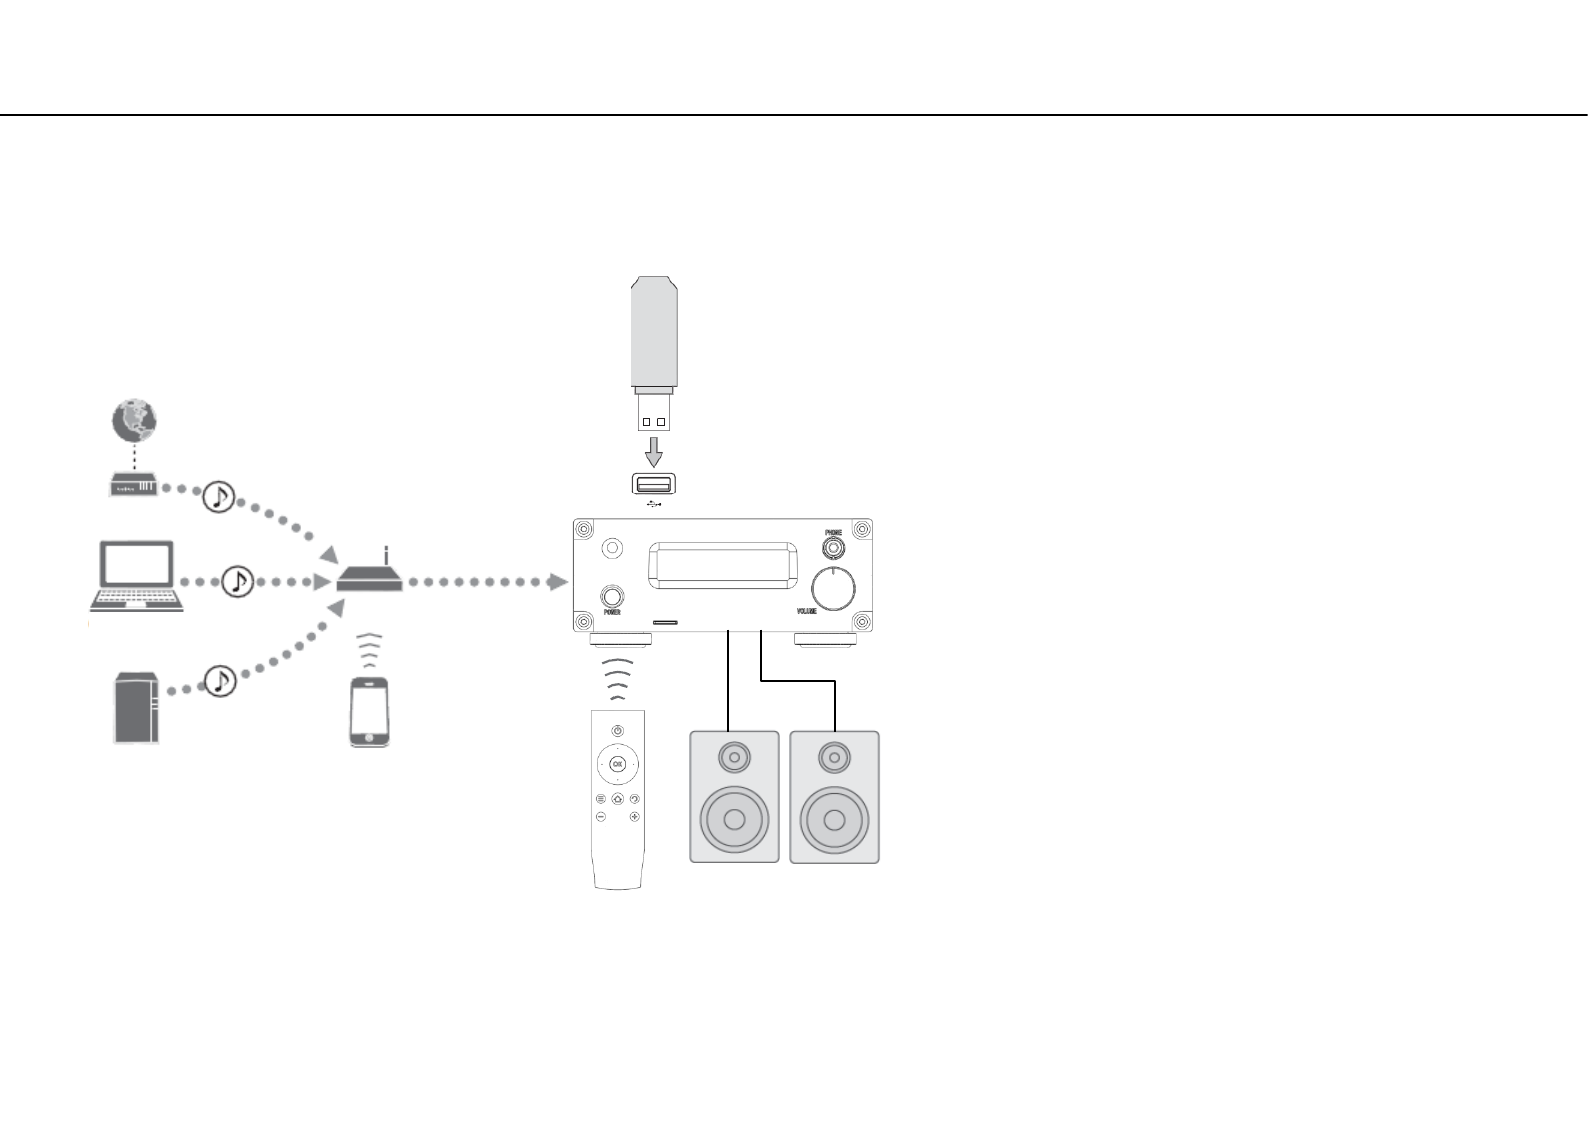
What you can do with this unit (Network Audio)
• This unit as a player with built-in amplifier, can be used not only for USB storage playback but also as a network player.
You can play from a media server (PC,NAS,etc.) on the same network or connect to an AirPlay / DLNA device.
In addition, Internet radio and streaming service can be received in an environment connected to the Internet.
①Playback the Internet radio and Spotify etc. streaming
②Play back music files stored on your PC (support Roon bridge)
③Play back music files stored on your NAS
④Play back your mobile with AirPlay or dlna connect
⑤Play back music in an USB device
⑥You can operate this unit on the PC
⑦You can operate this unit on the Mobile phone
⑧If it is easy operation you can do it from the remote control
①Internet
②⑥PC
③NAS
Broadband router
④⑦Mobile phone
(AirPlay or DLNA)
Modem
⑧Remote control
⑤
USB flash drive
USB hard disk drive
Speakers
Note
If you use streaming services such as Spotify, you will need to subscribe to the service (charged) by yourself.
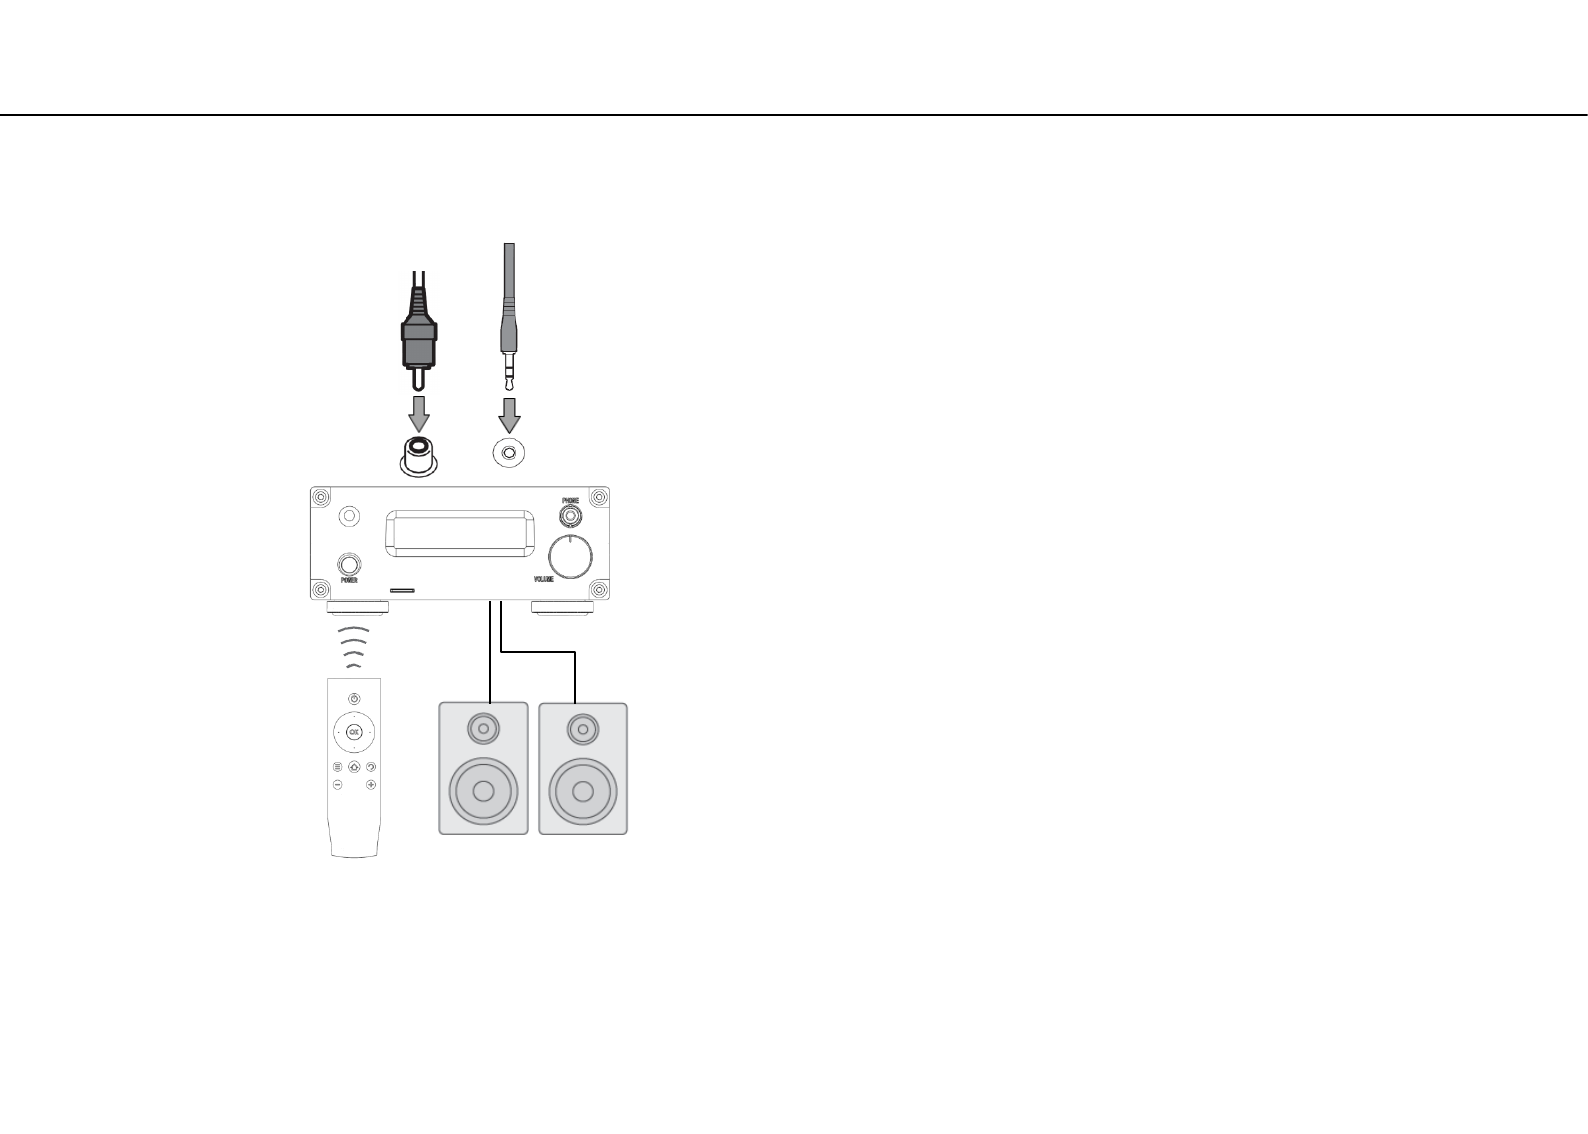
What you can do with this unit (Wire connection input)
• By wired connection to an external playback device, this unit can be used as a Integrated amplifier.
① Playback music in an external digital(SPDIF) device
② Playback music in an external analog device
③ With this use method, only the reboot of this unit and the
power off and digital volume up / down can be operated with
the remote control.
③Remote control
②
AUX-IN
Speakers
①
SPDIF-IN
Note
In case of digital (SPDIF) input, you can use digital volume of DAC, digital volume can not be used with analog input.
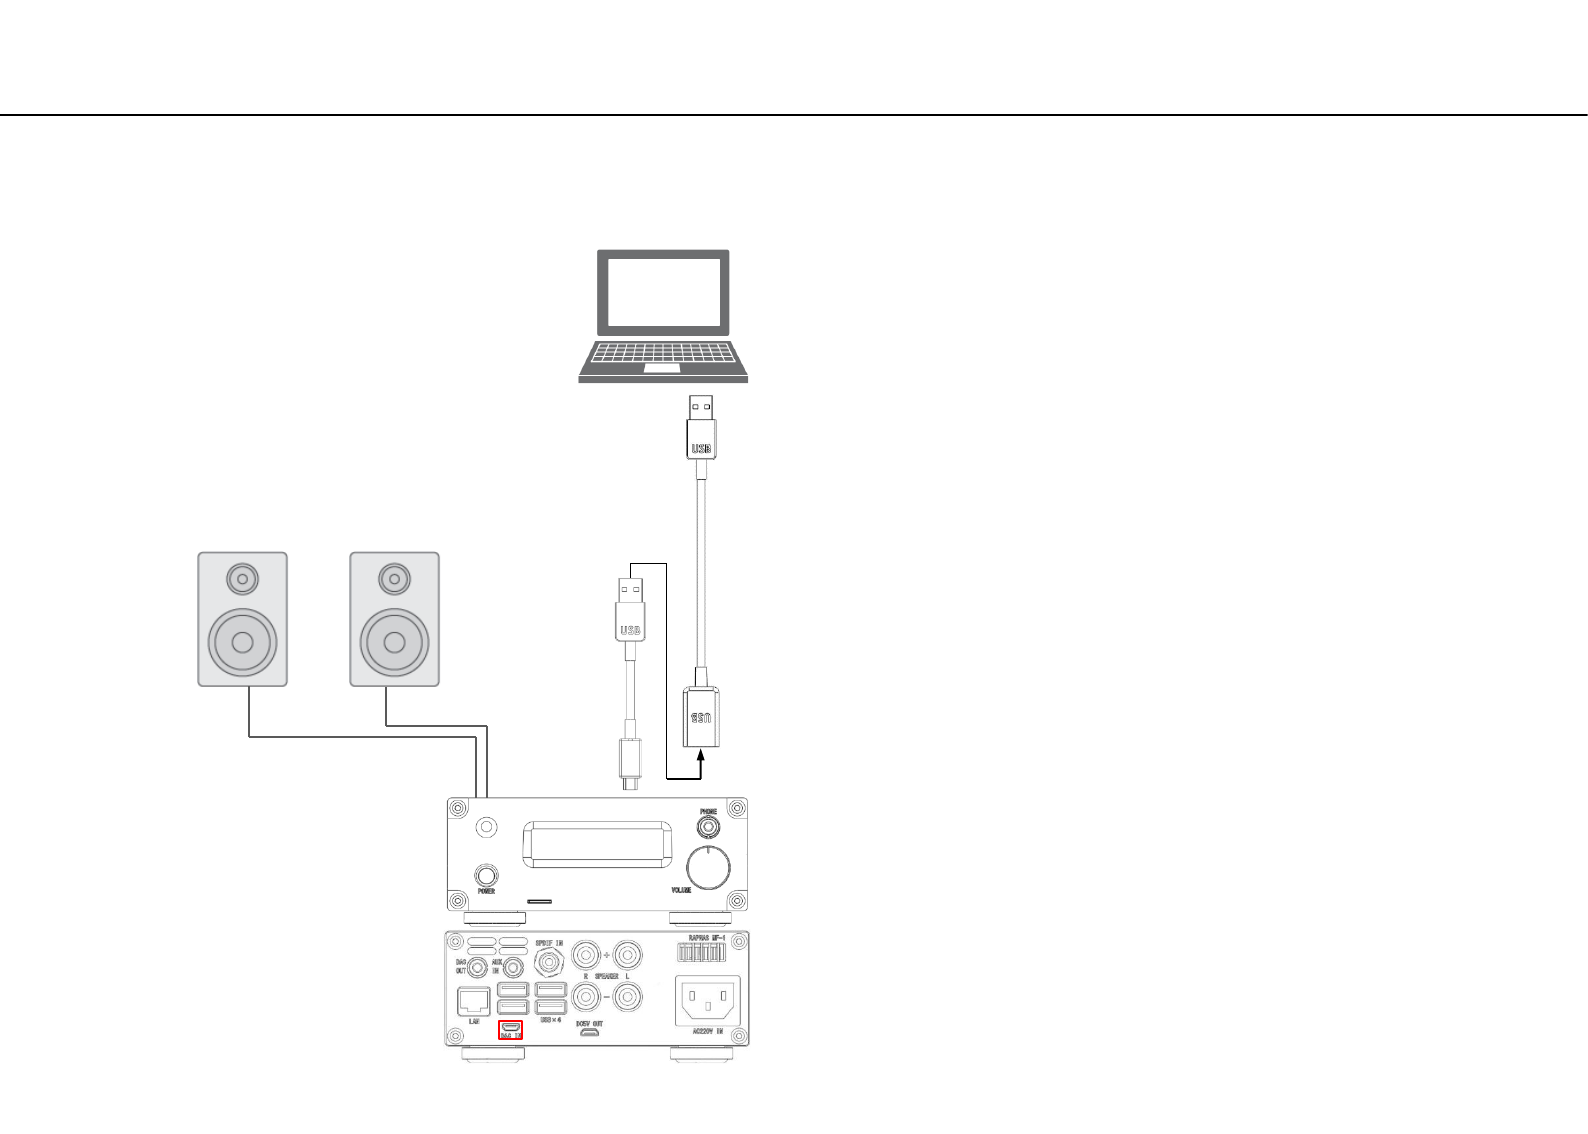
What you can do with this unit (USB-DAC)
• This unit can be used as a USB-DAC by connecting PC with a USB conversion cable B and C.
①Support foobar2000
②Support JRiver Media Center
③Support Audirvana Plus
USB conversion
cable B
Speaker
①②
USB conversion
cable C
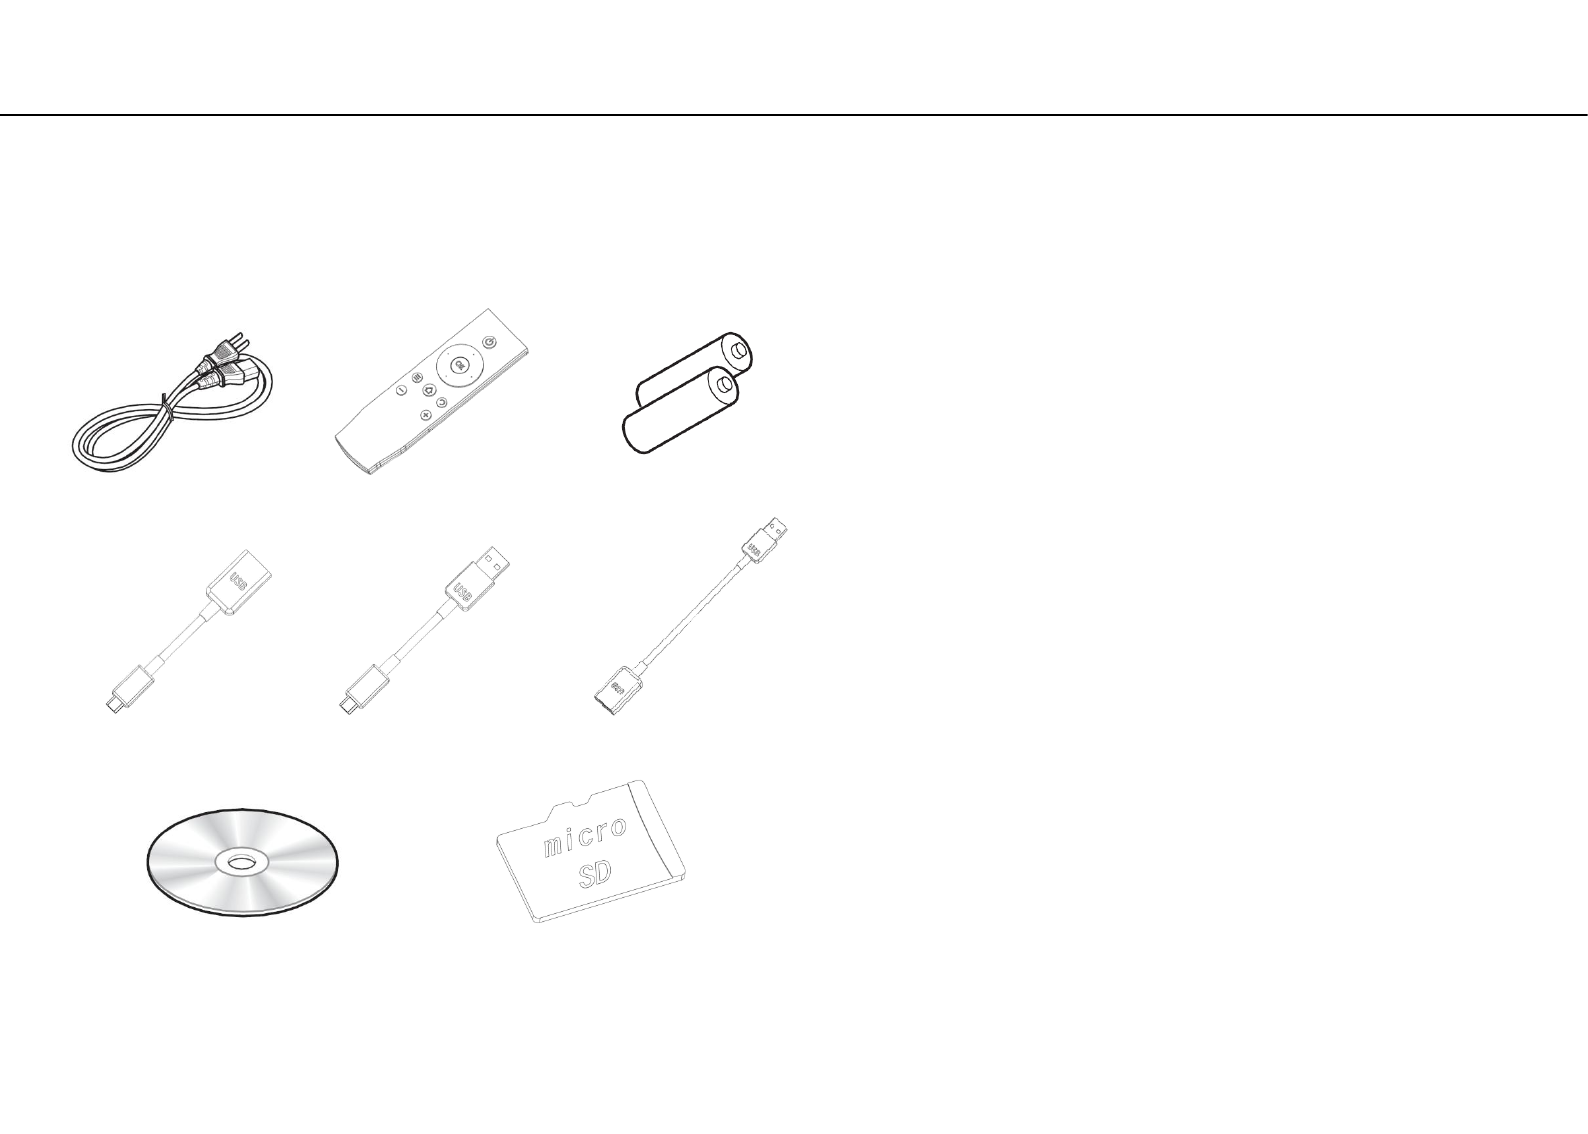
Accessories
• Confirm the package contents and useful points of this manual.
• Instructions and illustrations used in this manual refer to the
RAPNAS MF-1, unless otherwise specified.
• How to operate this unit is described mainly using the WindowsPC
and remote control.
• iOS and Android mobile devices are collectively referred to as
“mobile devices.”
Supplied accessories About this manual
CD-ROM
•MicroSD card Backup (image file)
•Owner’s manual (PDF file)
Micro SD card
(volumio2 based rapnas distribution)
USB conversion cable A USB conversion cable B
Power cable Remote control
USB conversion cable C
AAA battery
Remote control preparation
Installing batteries
R03/AAA batteries
Remove the cover from the back of the remote control and insert
two AAA batteries with their (+) (-) ends oriented in the case as
shown. Replace the cover.
If the distance required between the remote and the main unit
decreases or if the unit stops responding to the remote buttons,
replace both batteries with new ones.
Dispose of the used batteries according to the instructions on them
or requirements set by your local municipality.
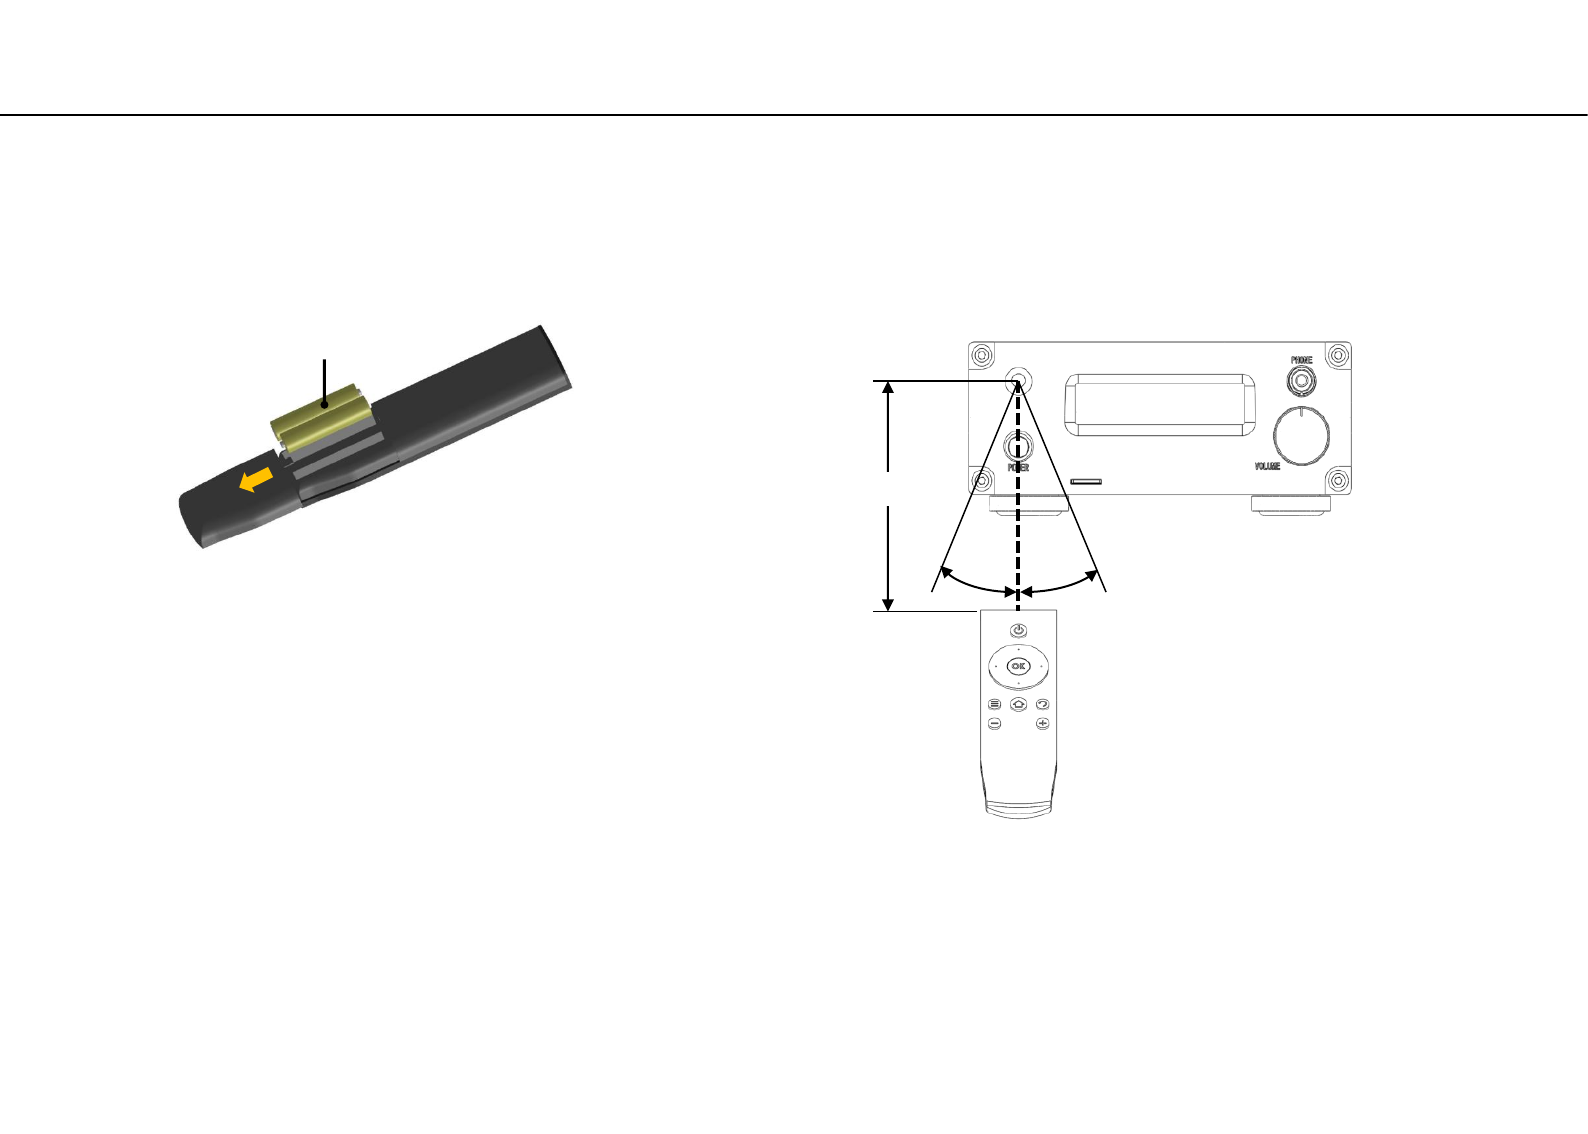
30° 30°
About 6 meters
Operation range
Aim the remote control directly at the remote control
sensor on the main unit during operation.
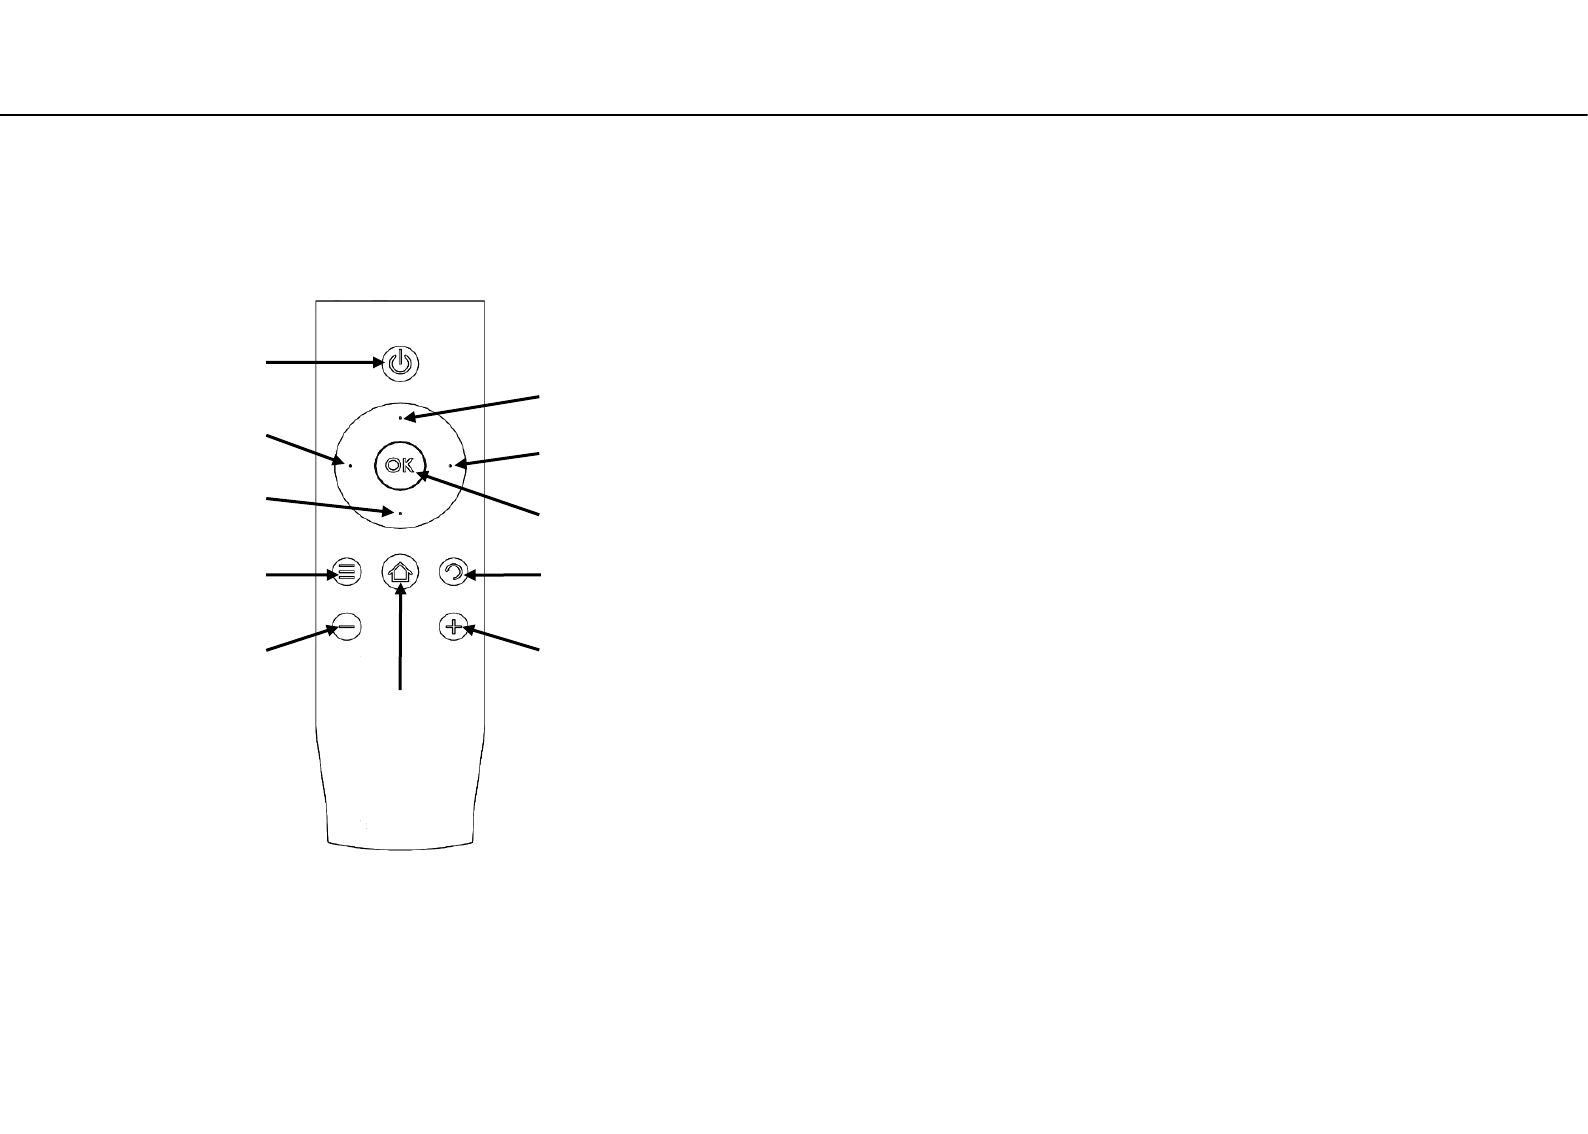
Names and functions of parts (remote control)
A) Power off or Reboot Decision button *1
B) Skip backward button
C) Fast-reverse button
D) Fast-forward button
E) Skip forward button
F) Play/Pause button
G) Change display button
H) Stop or Power off selection button
I) Reboot selection button
J) Volume down button *2
K) Volume up button *2
*1: Pressing the (I) button first, pressing this button shifts the
system to power off.
Pressing the (J) button first, pressing this button shifts the
system to reboot.
*2: With these buttons you can raise or lower the DAC's digital
volume (display volume value).It has nothing to do with amp
volume at the latter stage.
A
F
C D
B
G
H
E
I
K
J
• Familiarize yourself with all parts and these functions.
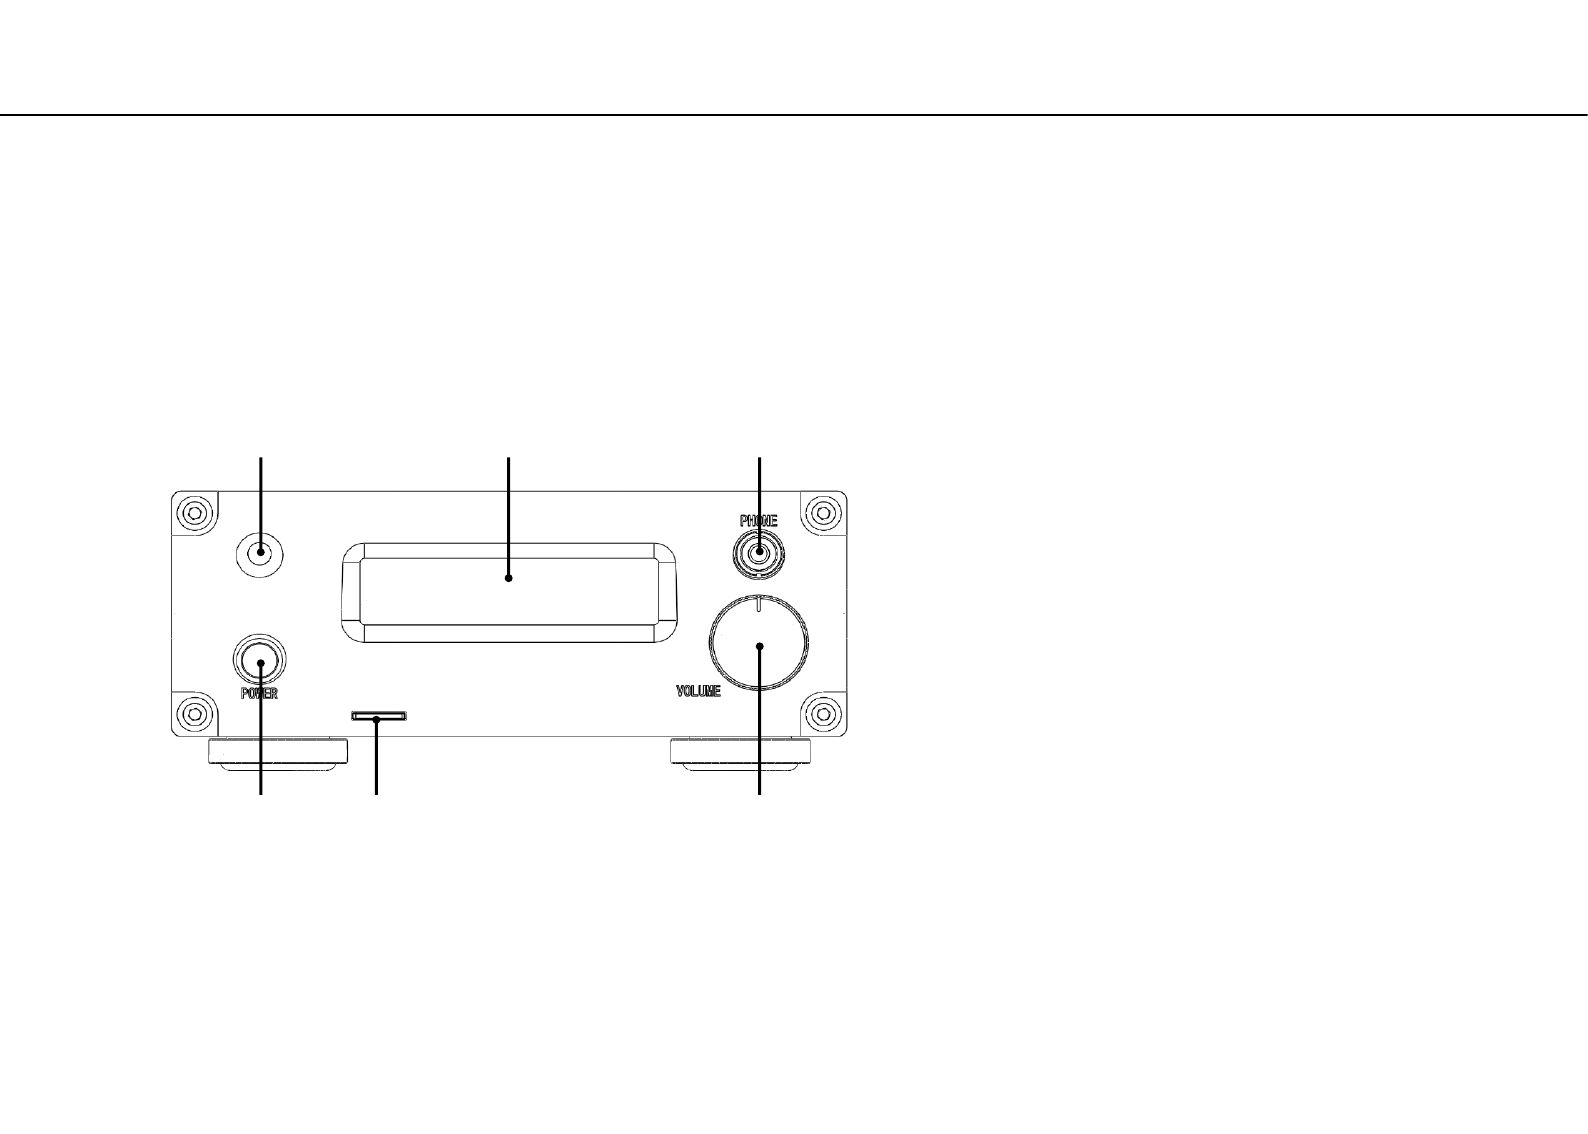
Part name (Front)
①Power Switch
②microSD card slot
③Pre-Amplifier Volume knob
④Headphones jack (3.5mm stereo) mini plug
⑤Front panel OLED display
⑥Remote control sensor
• Familiarize yourself with all parts and these functions.
Front panel
① ②
⑥
③
⑤ ④
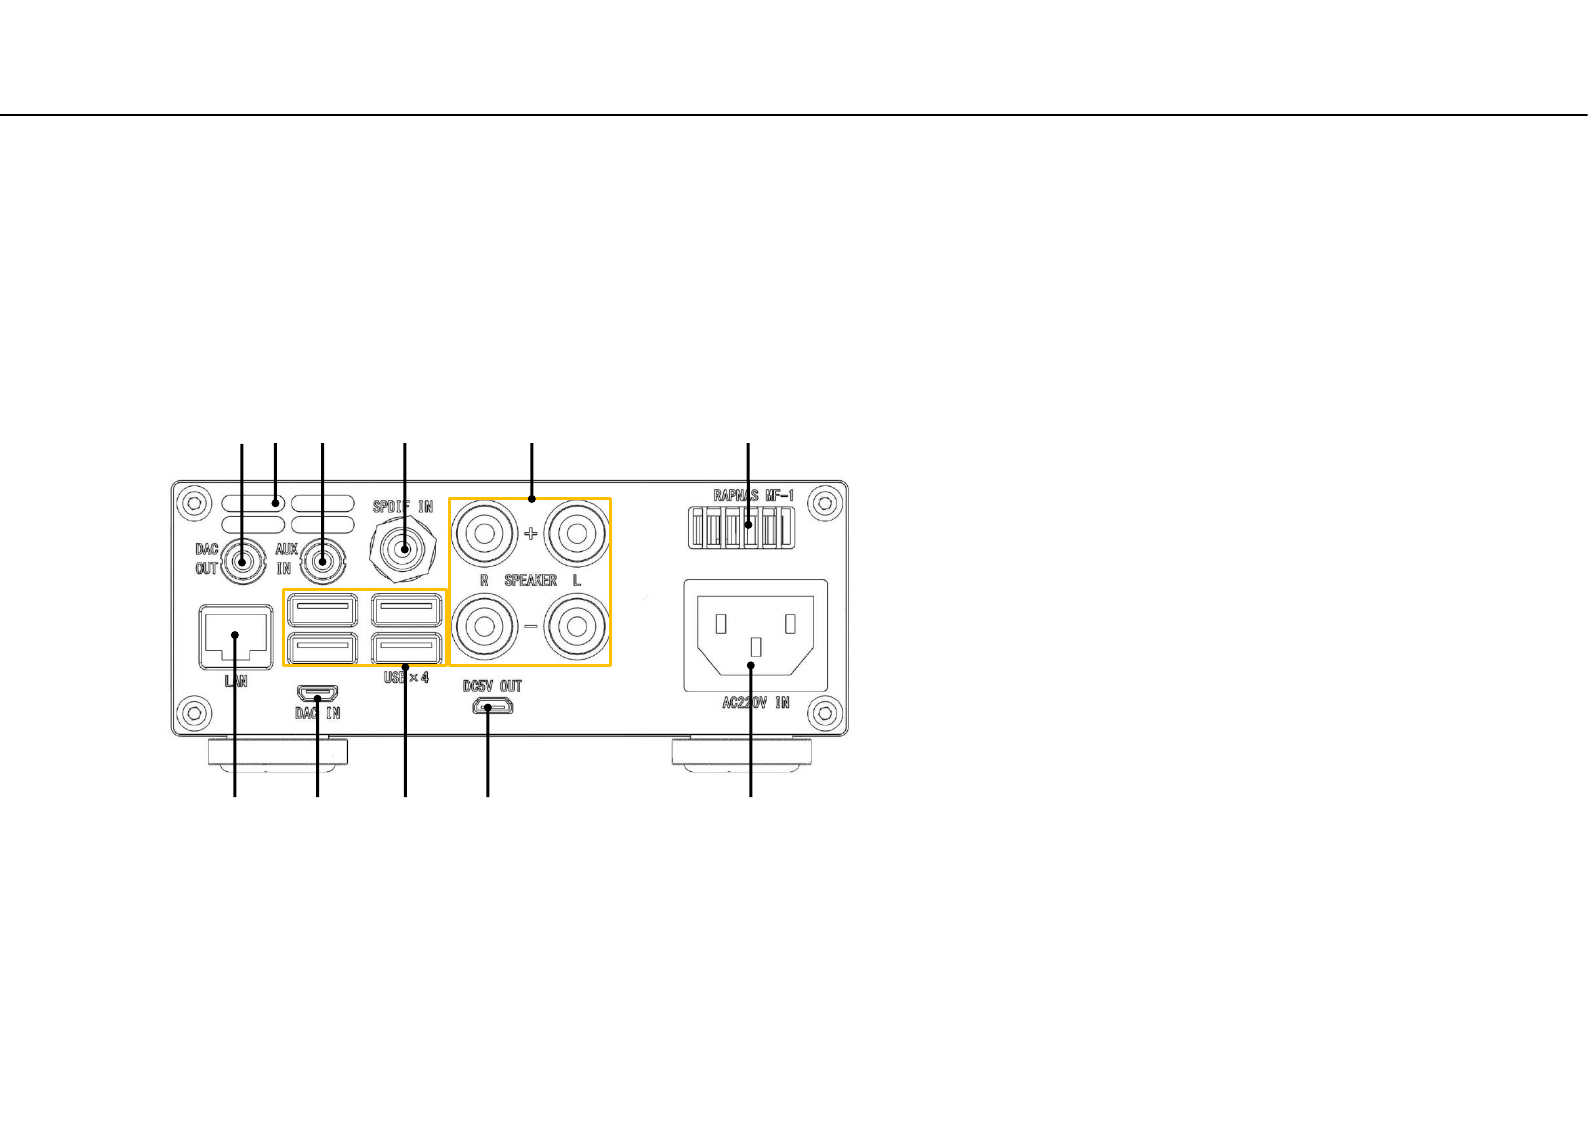
Part name (Rear )
①Wired LAN (RJ-45x1)
②USB-DAC IN (micro USB B)
③USB expansion port (USB type A ×4)
④DC5V OUT (micro USB B)
⑤Power supply (AC 100-120V or AC200-240V)
⑥Exhaust port 1
⑦Speaker terminal
⑧SPDIF-Digital IN (RCA coaxial plug)
⑨AUX-Analog IN (3.5mm stereo mini plug)
⑩Exhaust port 2
⑪ DAC-Analog OUT (3.5mm stereo mini plug)
Rear panel
② ④
⑪
①
⑧ ⑥
③
⑨
⑤
⑦ ⑩
• Familiarize yourself with all parts and these functions.
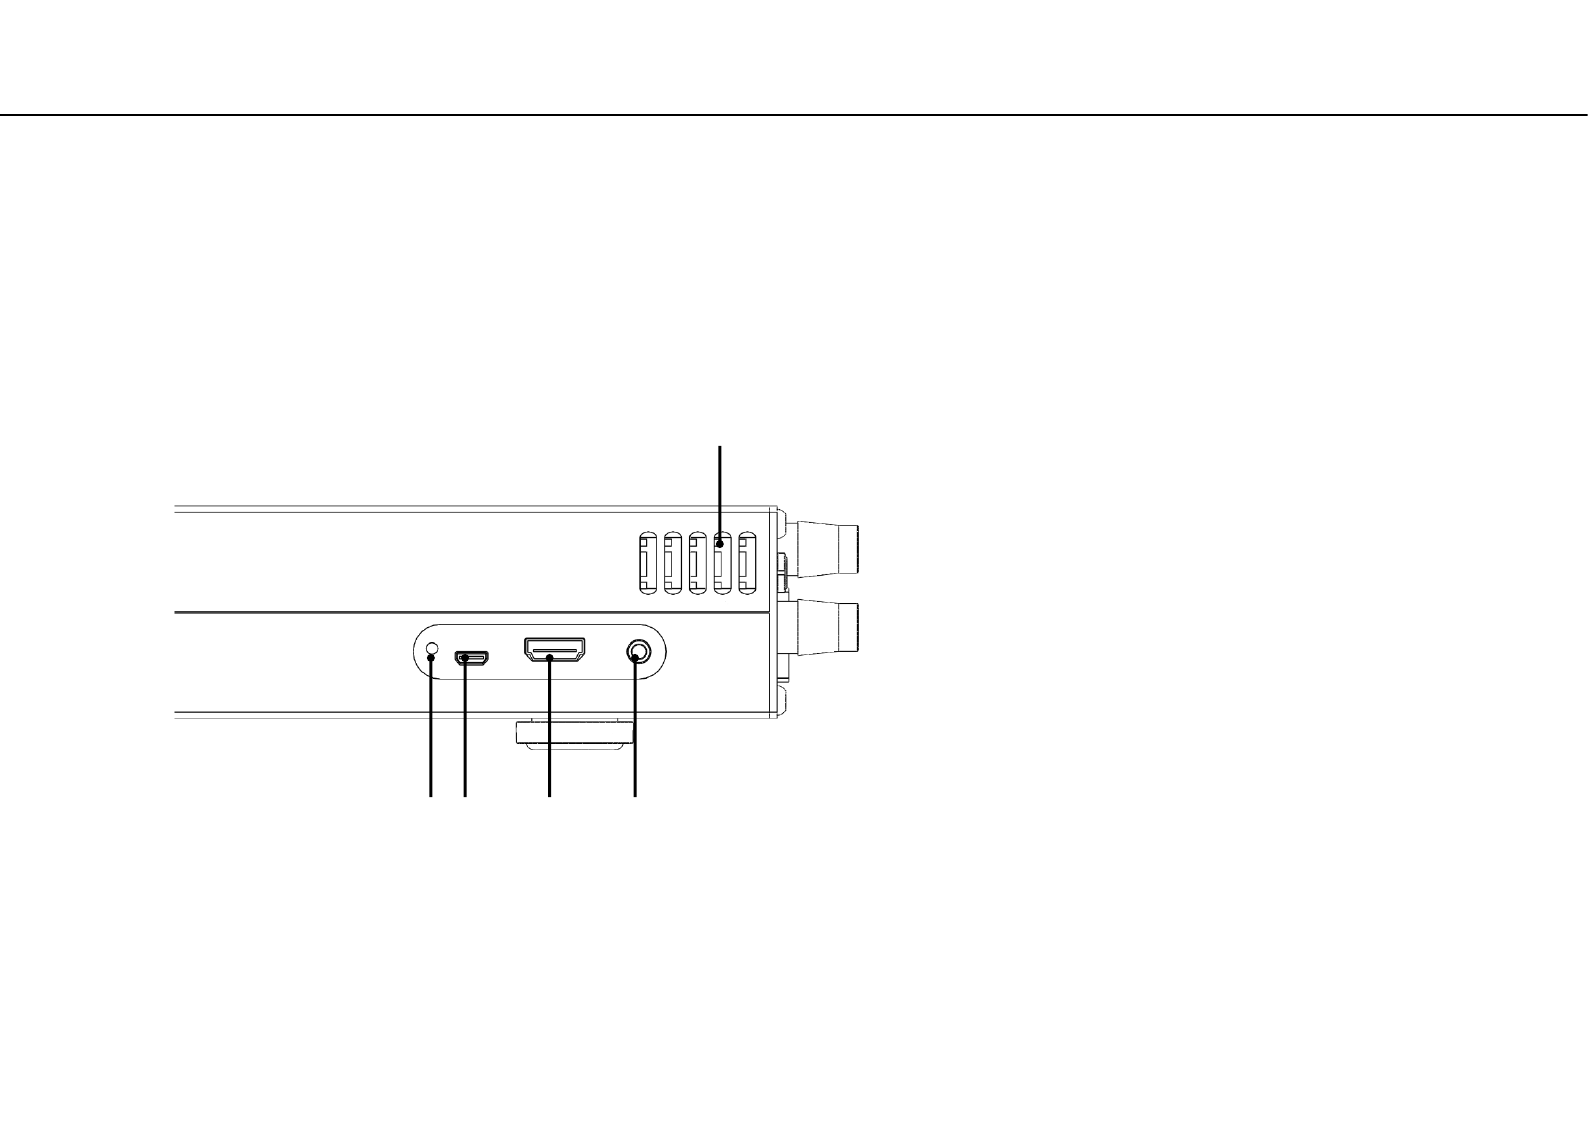
Part name (Side)
①ACTION-LED (MicroSD card read or write indicator)
②DC5V IN (For special use : microUSB B)
③HDMI TYPE A (Video and audio output)
④3.5mm 4section mini plug (Video and audio output)
⑤Exhaust port 3
Side panel
② ④ ①
⑤
③
• Familiarize yourself with all parts and these functions.
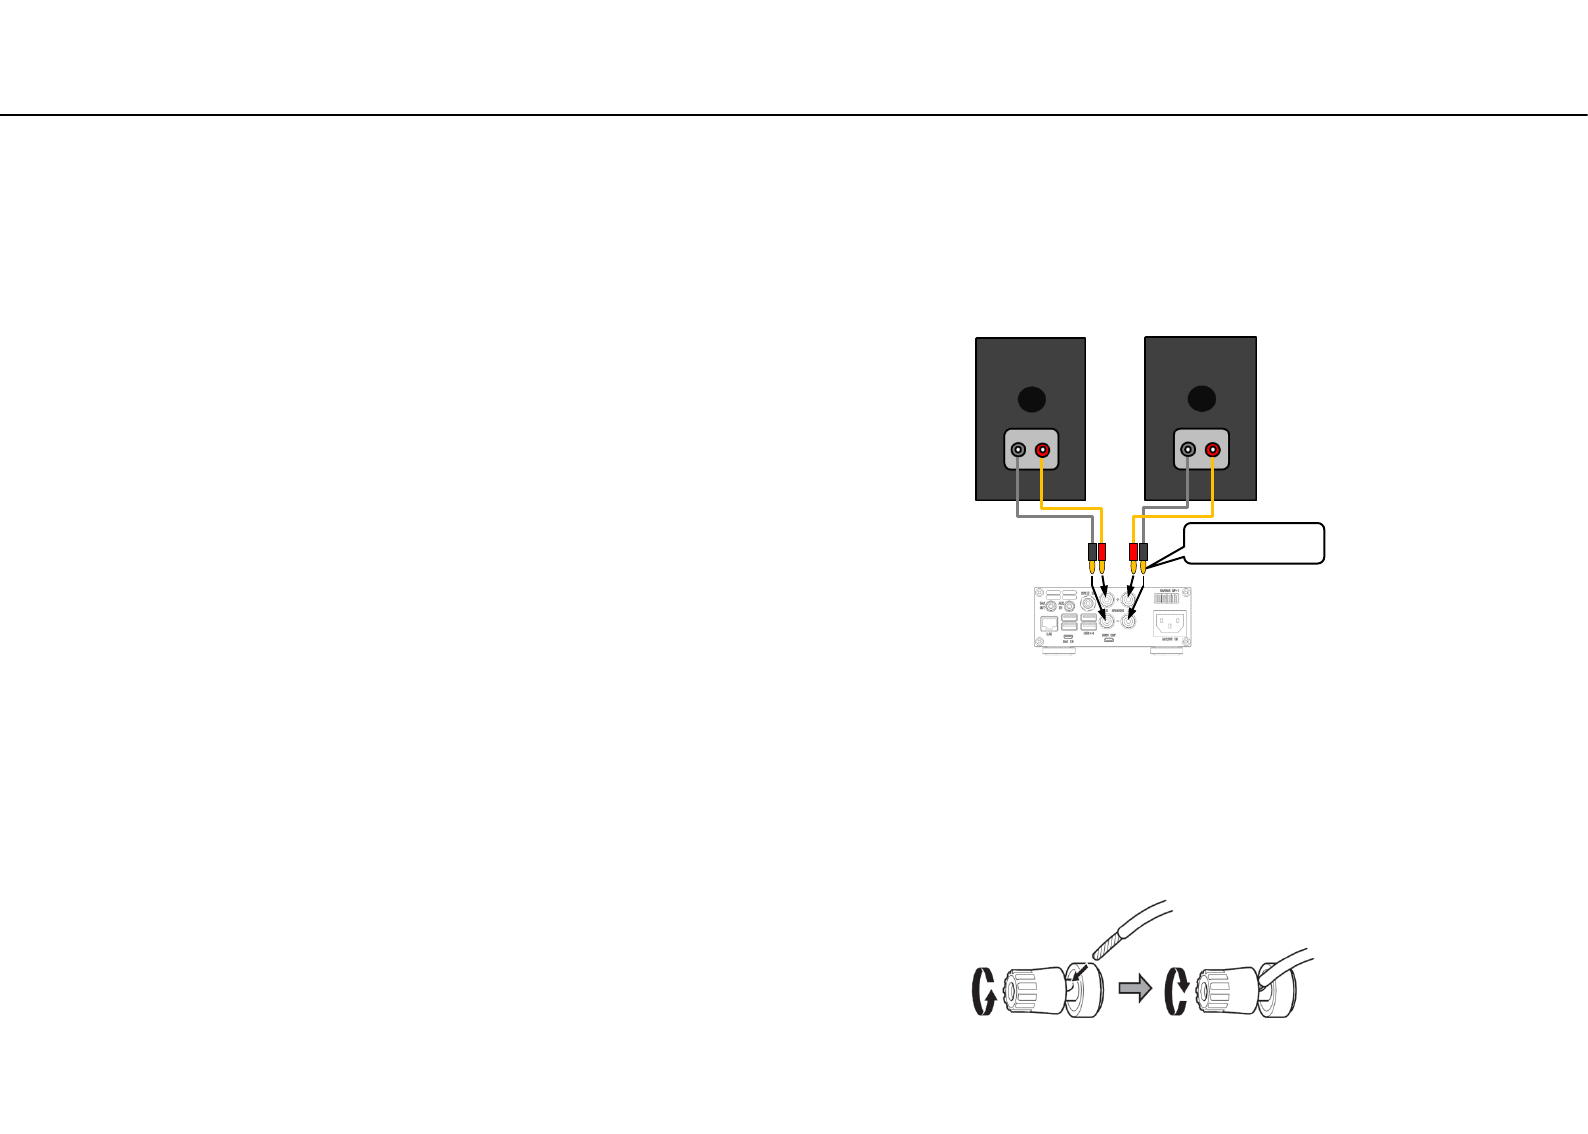
Connecting speakers
・Connection method A (Recommendation)
Insert a 4 mm banana clip (not included) to the end of the cable
and insert it into the speaker terminal hole of this instrument.
Attention How to connect speakers
・This unit is compatible with speakers that have 4–8Ω nominal
impedance. If speakers with impedance of less than 4 Ω are used,
the protection circuit could operate, causing sound output to
stop. In some cases, this unit or the speakers could be damaged.
・The red speaker terminals are positive (+) and the black speaker
terminals are negative (-). Generally, the (+) wire of the speaker
cable is marked to distinguish it from the (-) wire of the cable.
Connect the marked wire to the red (+) terminal and the
unmarked wire to the black (-) terminal.
・If the exposed core wires at the tips of the speaker cables
should touch other cables or terminals, an electrical short might
occur.
・ Never allow speaker cables to cause a short.
・ To prevent hum and noise, avoid bundling the cables together
with the AC power cord or other cables.
・Connection method B
Remove about one centimeter of insulation from the end of the
speaker cable and twist the core wires well.
Turn the terminal cap counterclockwise to loosen it.
Insert the wire into the hole in the terminal post and turn the
terminal cap clockwise to securely connect it.
Banana Plug
Diameter 4mm
Left Speaker Right Speaker
Connecting headphone
◆ CAUTION
While wearing headphones, do not connect or disconnect them,
turn the unit on or off, or switch the headphone amp gain.
Doing so could result in a sudden loud noise that could harm your
hearing.
Always set the amplifier volume to minimum before connecting
and unconnecting headphones on. (Left rotating end is minimum
volume)
To prevent hearing loss, do not raise the volume level excessively
when using headphones.
PHONES jack
This headphone amp circuit uses a three-pole connector with
Common left and right for grounding. Ordinary 3.5mm stereo
mini plugs with 3 poles can be used.
Left rotating end is minimum volume
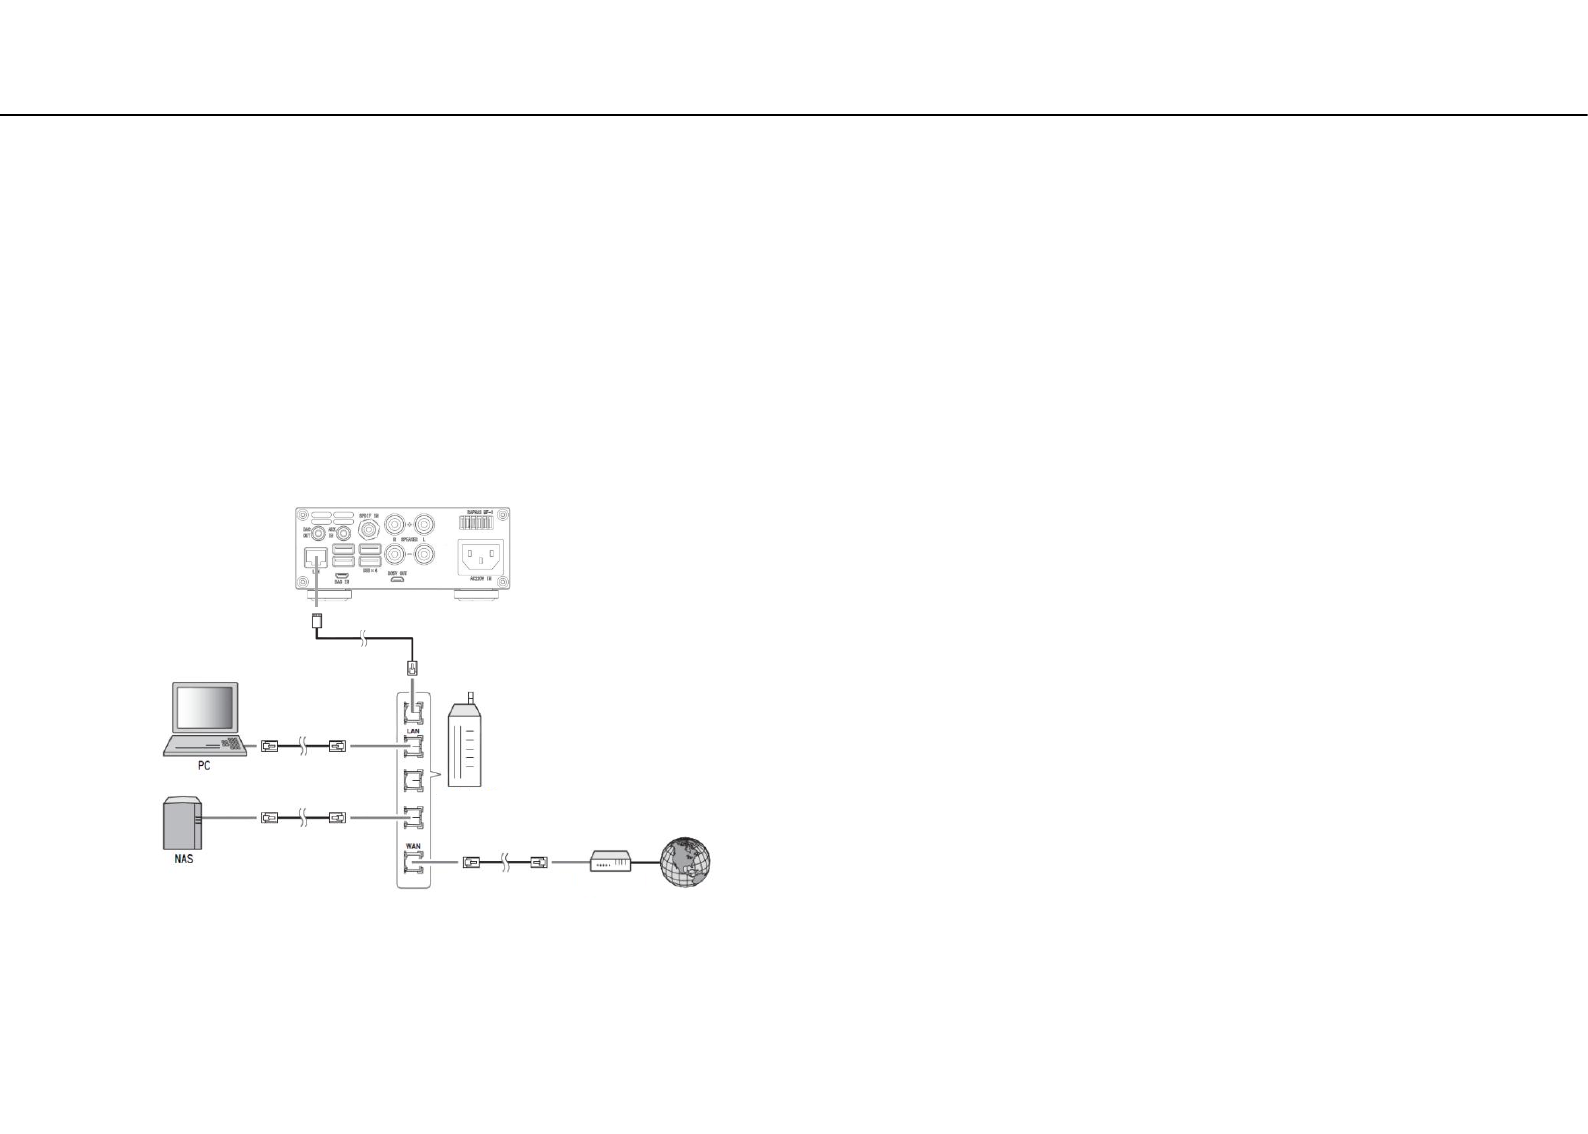
Connecting to a network (PC/NAS/Internet connection)
CAUTION
•For details on Internet connection, refer to the owner’s manuals
of your network devices.
•If you are using a router that supports DHCP, you do not need to
configure any network settings for the unit.
• Wired connections are recommended for devices other than the
mobile to ensure high sound quality.
• Some security software installed on your PC or the firewall
settings of network devices (such as a router) may block the
access of the unit to the network devices or the Internet. In this
case, change the setting of the security software or network
devices.
•When setting the subnet manually, each server must be
connected to the same subnet as the unit .wearing headphones,
do not connect or disconnect them, turn the unit on or off, or
switch the headphone amp gain. Doing so could result in a
sudden loud noise that could harm your hearing. Always set the
amplifier volume to minimum before connecting and un
connecting headphones on. (Left rotating end is minimum
volume) To prevent hearing loss, do not raise the volume level
excessively when using headphones.
Connecting to a network
(PC/NAS/Internet connection)
You can play back music files stored on your PC or NAS, audio
contents on the Internet radio, by connecting this unit to
a network.
Connect with a commercially available STP (shielded twisted pair)
network cable (CAT-5 or higher, straight-through)
Network cable
Broadband router
Modem Internet
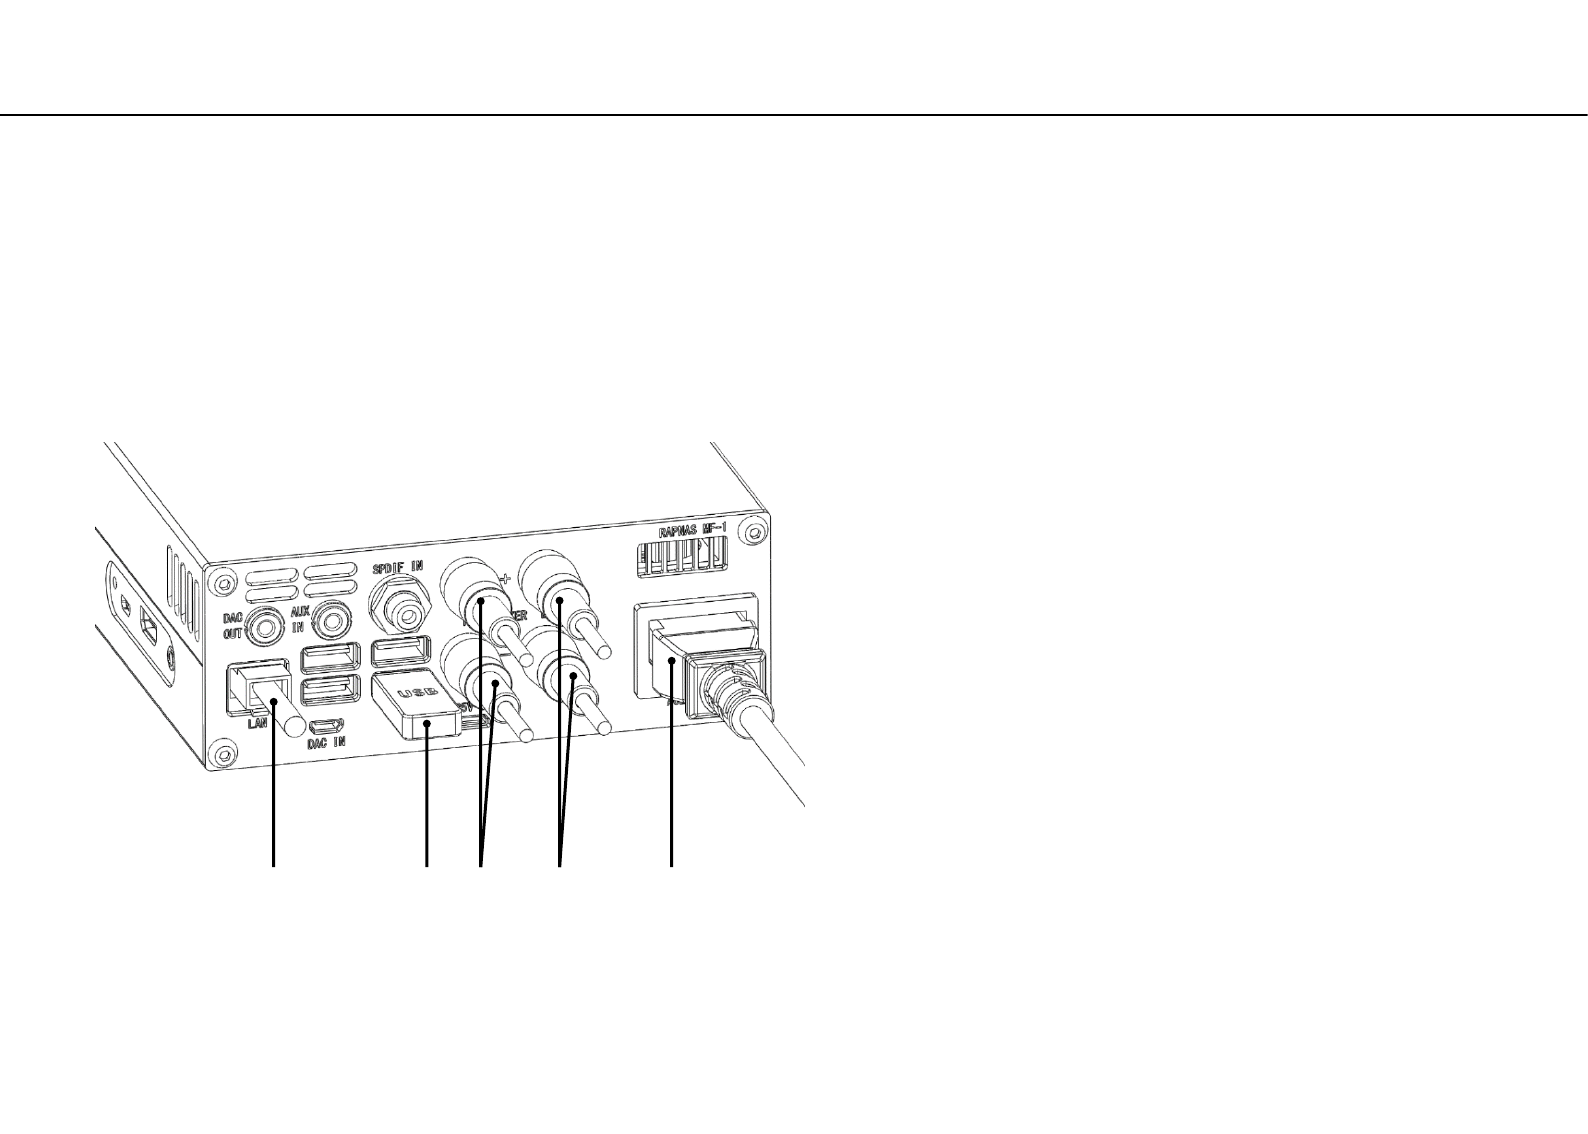
Basic connection of this unit
①Connect with your home router and LAN cable.
②Connect USB storage that saved the music source. (USB flash
memory, USB external hard disk etc.)
③Connect the right speaker cable.
④Connect the left speaker cable.
⑤Connect the Included power cord. (Do not connect to
household outlet yet.)
• Below is a description of the basic connection state that should be done before turning on the power supply.
Rear panel
③ ① ⑤ ② ④
Stand by before use
② Finally connect the power plug to the household outlet.
• Familiarize yourself with all parts and these functions.
Front panel
①
②
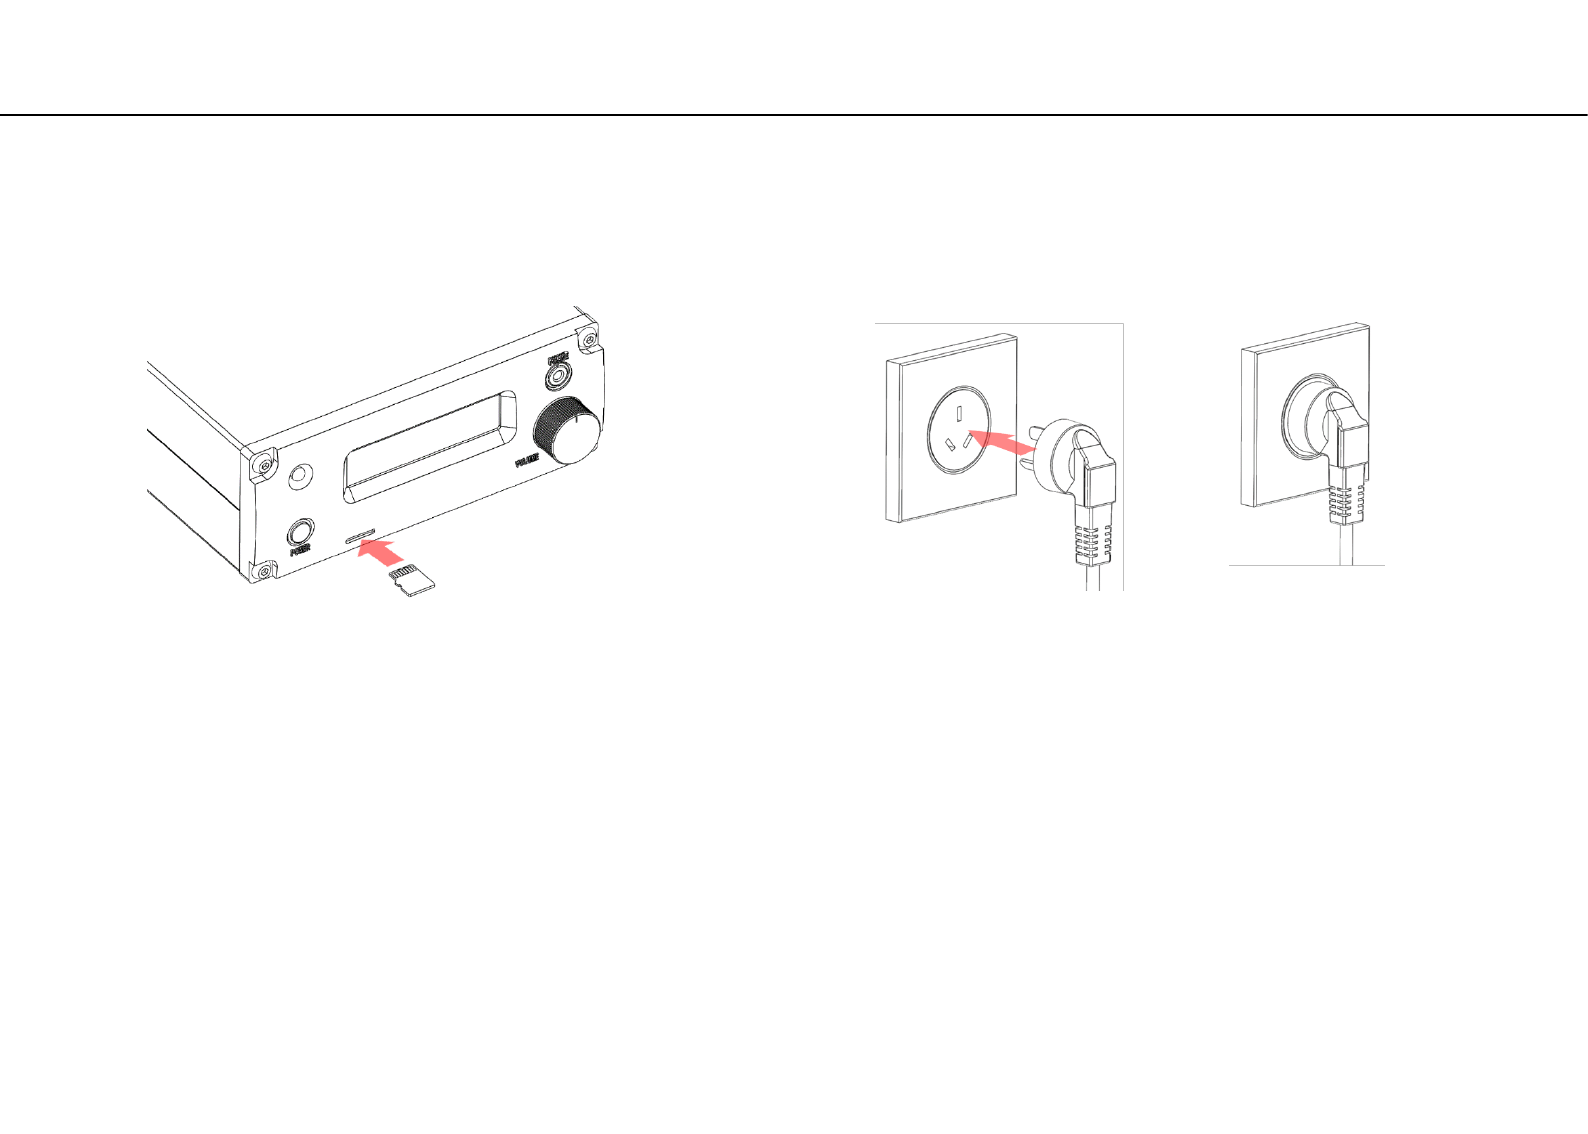
①Insert the supplied micro SD card into the card slot. Be sure to
insert with electrode slit face up. (To remove the card, push it
again and it will be discharged in front.)
Connect the power plug
Caution
Before connecting the plug, check that the
power supply voltage of the home matches
the voltage specification of this unit. It can
be confirmed at the end A or B of the serial
number.
A corresponds to AC 100 - 120V
B corresponds to AC 200 - 240V
If it is different, you should never connect.
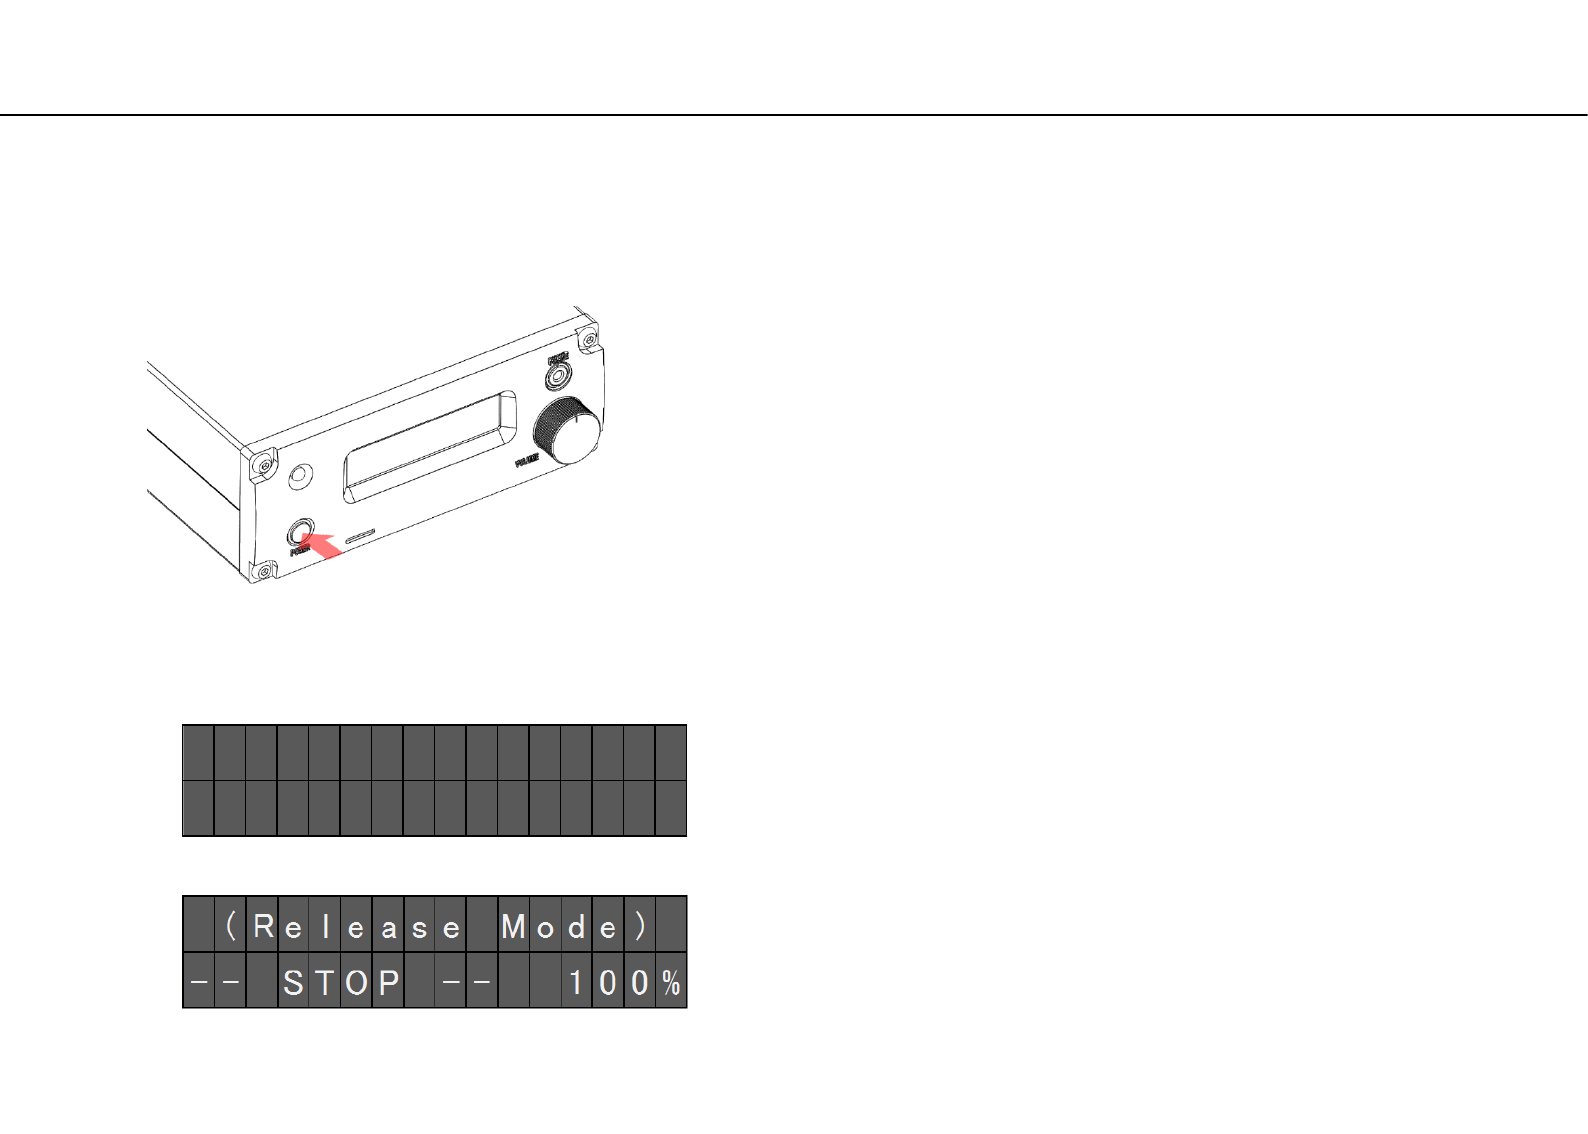
Power ON
①Press and release the POWER button on the panel for about
0.5 seconds. When the power turns on, the back of the
amplifier volume knob glows blue. Wait approximately
40 seconds from the power ON until the startup is completed.
②The letter of Figure 1 is displayed on the front panel OLED,
After a few seconds the start up completed when Figure 2 is
displayed.
• Familiarize yourself with all parts and these functions.
◆ Front panel
②
R A P N A S
M
F - 1
b y V o l u
m
i o 2
①
Figure 1
Figure 2
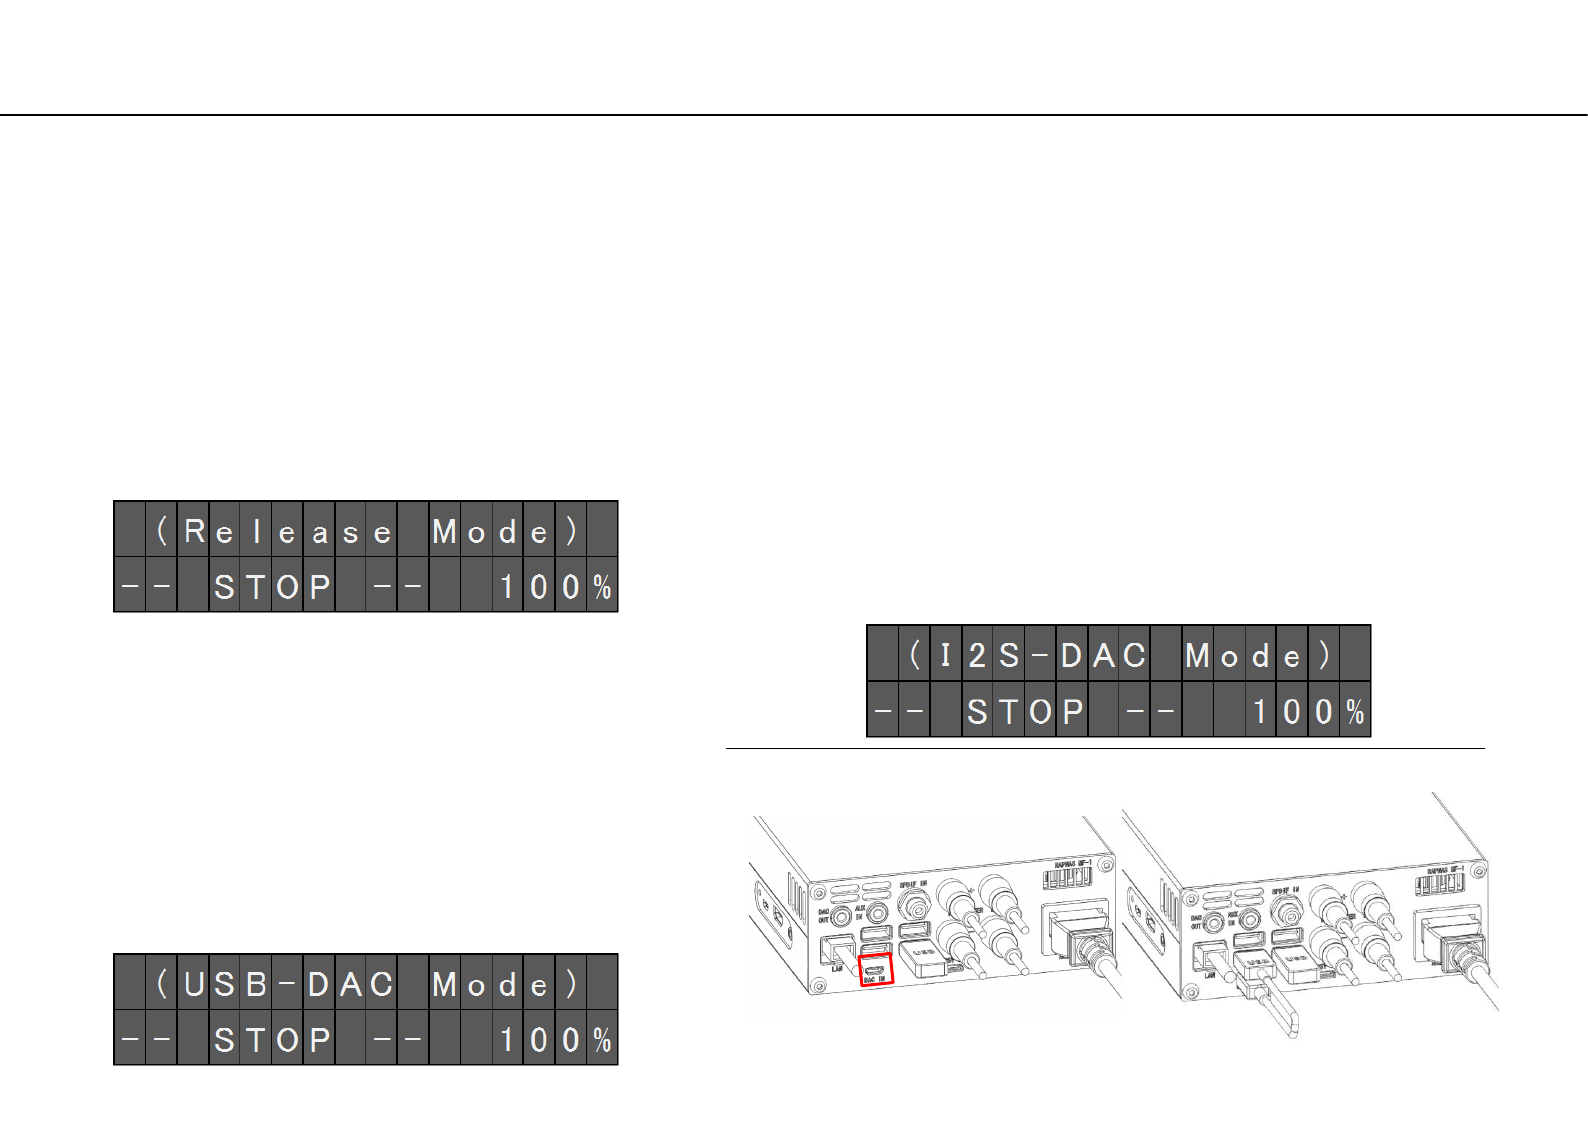
Mode and initial display of DAC
• There are three modes depending on the usage conditions of the DAC, and this mode is displayed on the OLED at the
beginning of system startup.
◆ Release Mode
Condition under which the built-in USB-DAC is released to
the outside. (OLED display status is Figure1)
As shown in Figure4, nothing is connected to the DAC-IN.
Or when it is connected to an external personal computer
via a conversion cable. It is a mode to connect with
foobar2000 etc.
◆ USB-DAC Mode
Figure 4 Figure 5
As shown in Figure5, DAC-IN and USB port are connected
by conversion cable B. And the output device setting of the
volumio playback option described later is "RAPNAS USB
audio 2.0". (OLED display status is Figure2)
It is a mode that USB-DAC is preferentially used in volumio.
Playback of PCM and DSD (Native) sound source Is possible.
◆ I2S-DAC Mode
As shown in Figure5, DAC-IN and USB port are connected
by conversion cable B. And the output device setting of the
volumio playback option described later is “RAPNAS I2S-
DAC". (OLED display status is Figure3)
Bypass USB conversion and send I2S signal directly to DAC,
so pure playback is possible.
Although the playable format is limited to PCM, If DSD is
256 or less, it will automatically convert to PCM 384 KHz
and play it.
Figure 1
Figure 2
Figure 3
Front panel OLED display (page1)
• The display content of the front panel is the structure of 3 pages, the first page is displayed at the beginning.
The page switches from 1 → 2 → 3 → 1 each time "Change display button" on the attached remote control is pressed.
Page1 Stopped
④
[ P C
M
- 1 ] 4 4 . 1 K H z
0 : 1 2 > 4 : 0 8 1 0 0 %
② ③
⑤
①DAC mode
(Release Mode): When USB-DAC is released
(USB-DAC Mode): Set RAPNAS USB-DAC in volumio
(I2S-DAC Mode): Set RAPNAS I2S-DAC in volumio
③ Sampling rate
PCM-1: Support 44.1KHz-384KHz
PCM-2: Support 44.1KHz-768KHz
PCM-3: Support 44.1KHz-768KHz
DSD-2: Support DSD64-DSD512
DoP-2: Support DSD64-DSD256
DSD-3: Support DSD64-DSD256
SPDIF: Support 44.1KHz-192KHz
X:XX>X:XX or X:XX!X:XX : When volumio playing
music from the queue, that time is displayed.
・When the middle mark is > : During playback
・When the middle mark is ! : Paused
・Left term is playing time, right term is ending time
-- LINK --: When playing from other than the queue,
will be displayed.
⑤ Current value of DAC digital volume
0 to 100% (-127 to 0dB)
( R e l e a s e
M
o d e )
- - S T O P - - 1 0 0 %
①
④ ⑤
④ Playback status
-- STOP --: Stopped
Page1 During playback
② Format and DAC input stream
PCM-1: I2S direct input of PCM
PCM-2: Input via USB-DAC of PCM
PCM-3: External PCM input to USB-DAC
DSD-2: Input via USB-DAC of DSD
DoP-2: Input via USB-DAC of DoP
DSD-3: External DSD input to USB-DAC
SPDIF: Direct input of SPDIF

Front panel OLED display (page2)
Page2 Stopped
④ Current value of DAC digital volume
Same as page1
Page2 During playback
2018/07/25 21 : 30
- - S T O P - - 1 0 0 %
①
③ ④
M
u s i c i s V F R - O
0 : 0 1 > 4 : 5 7 1 0 0 %
③
②
④
①Current date and time
If the time zone is not set, world
standard time will be displayed.
Since the date and time information is
acquired from the Internet, correct
date and time will not be displayed if
you are not connected to the Internet.
② While playing from volumio's queue, artist and title
information will be displayed.(If there is more than 16
letters of information, it will be scrolled)
When playing from other than the queue, the date and
time will be displayed.
③ Playback status
Same as page1
E : 1 9 2 . 1 6 8 . 1 . 1 0 1
W
: 1 9 2 . 1 6 8 . 2 1 1 . 1
Front panel OLED display (page3)
Page3 Page3 option1
①
②
①Wired LAN connection IP address
If there is no connection, "no connection" is displayed
Option1
If you continue to display page 3 for more than 5 seconds
with the DAC volume set to 100%, the display changes to
option 1, and after 3 seconds, the display turns off.
This is aimed at reducing the CPU load and increasing the
sound quality by stopping the display program.
② Wireless LAN connection IP address
However, if the IP address is 192.168.211.1, it means
that it is functioning as an access point.
If there is no connection, "no connection" is displayed
T u r n o f f d i s p l a y
a f t e r 3 s e c o n d s .
- - N o w R e b o o t - -
S e t e t h 0 t o D H C P
Page3 option2
Option2
When rebooting from the remote control or volumio Web
UI while displaying Page 3, option 2 is displayed and
rebooting is performed.
After rebooting, volumio sets the wired LAN connection
to DHCP (automatic acquisition), and it becomes invalid if
previously static IP address was set.
Front panel OLED display (exception)
Exception 1
Exception 1
It is displayed when communication for
display could not be performed normally
due to some cause.
The system automatically attempts to
resume communication, but if it does not
return to normal display even after 1
minute or more, you need to restart or
turn off the power once.
C o n n e c t i o n f a i l s
w a i t i n g r e t r y . . .
S h u t d o w n d u e t o
h i g h t e
m
p e r a t u r e
Exception 2
Exception 2
When the CPU temperature reaches 75°
it is a display that the system automatically
shifts to shut down.
When turning on the power supply again
must be wait until the case becomes room
temperature.
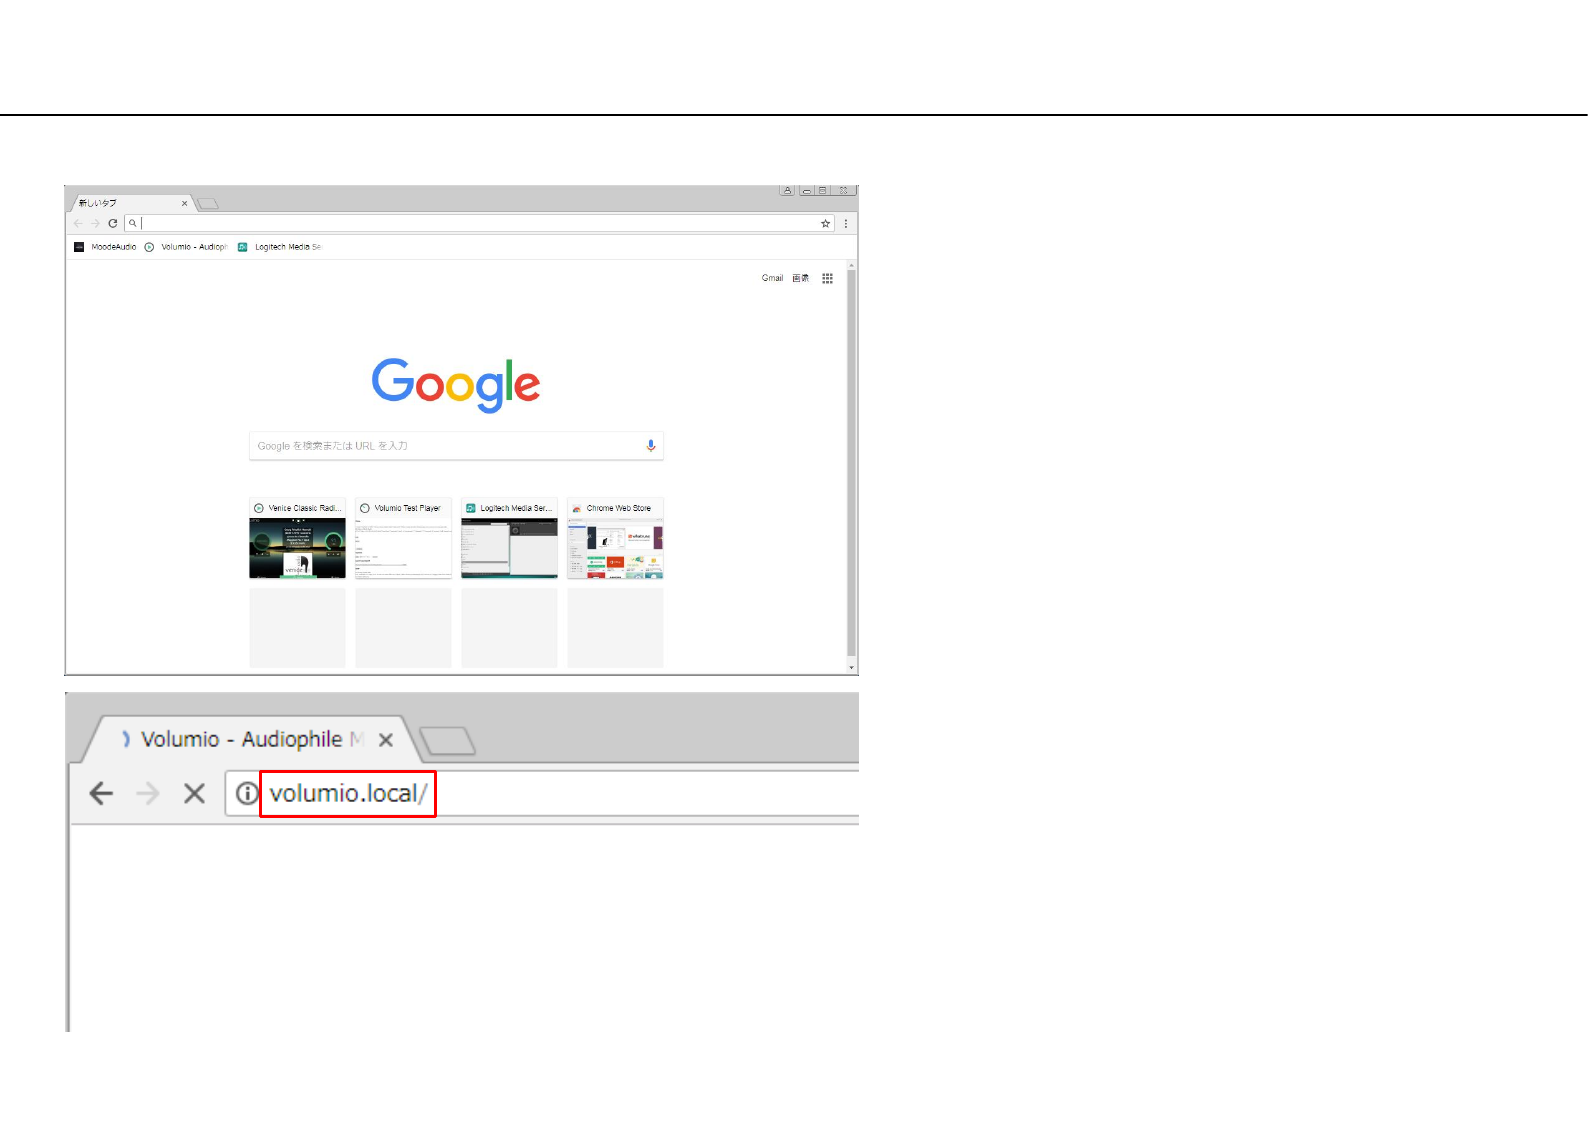
Launch Web UI
①Launch a PC on the same network and launch Web (google
chrome).
②Enter volumio.local/ in the URL field and press the enter key.
Description uses windows 7 google chrome.
What is volumio?
Volumio is a free and Open Source Linux Distribution, designed
and fine-tuned exclusively for music playback. It runs on a variety
of devices, typically small and cheap computers like the Raspberry
PI, but also on low power PCs, notebooks or thin clients.
By flashing (installing) Volumio on any of this platforms, it will
then become an headless Audiophile Music Player. Headless
means that the only way to control it will be with another Mobile
phone, computer or tablet.
This is made possible by Volumio’s UI: a web applications that
runs on any device with a browser, and that allows an easy and
intuitive control of your playback sessions. All communications
between the webapp and Volumio will happen through your
home network.
We added a program to this volumio, and it will function
exclusively for RAPNAS.
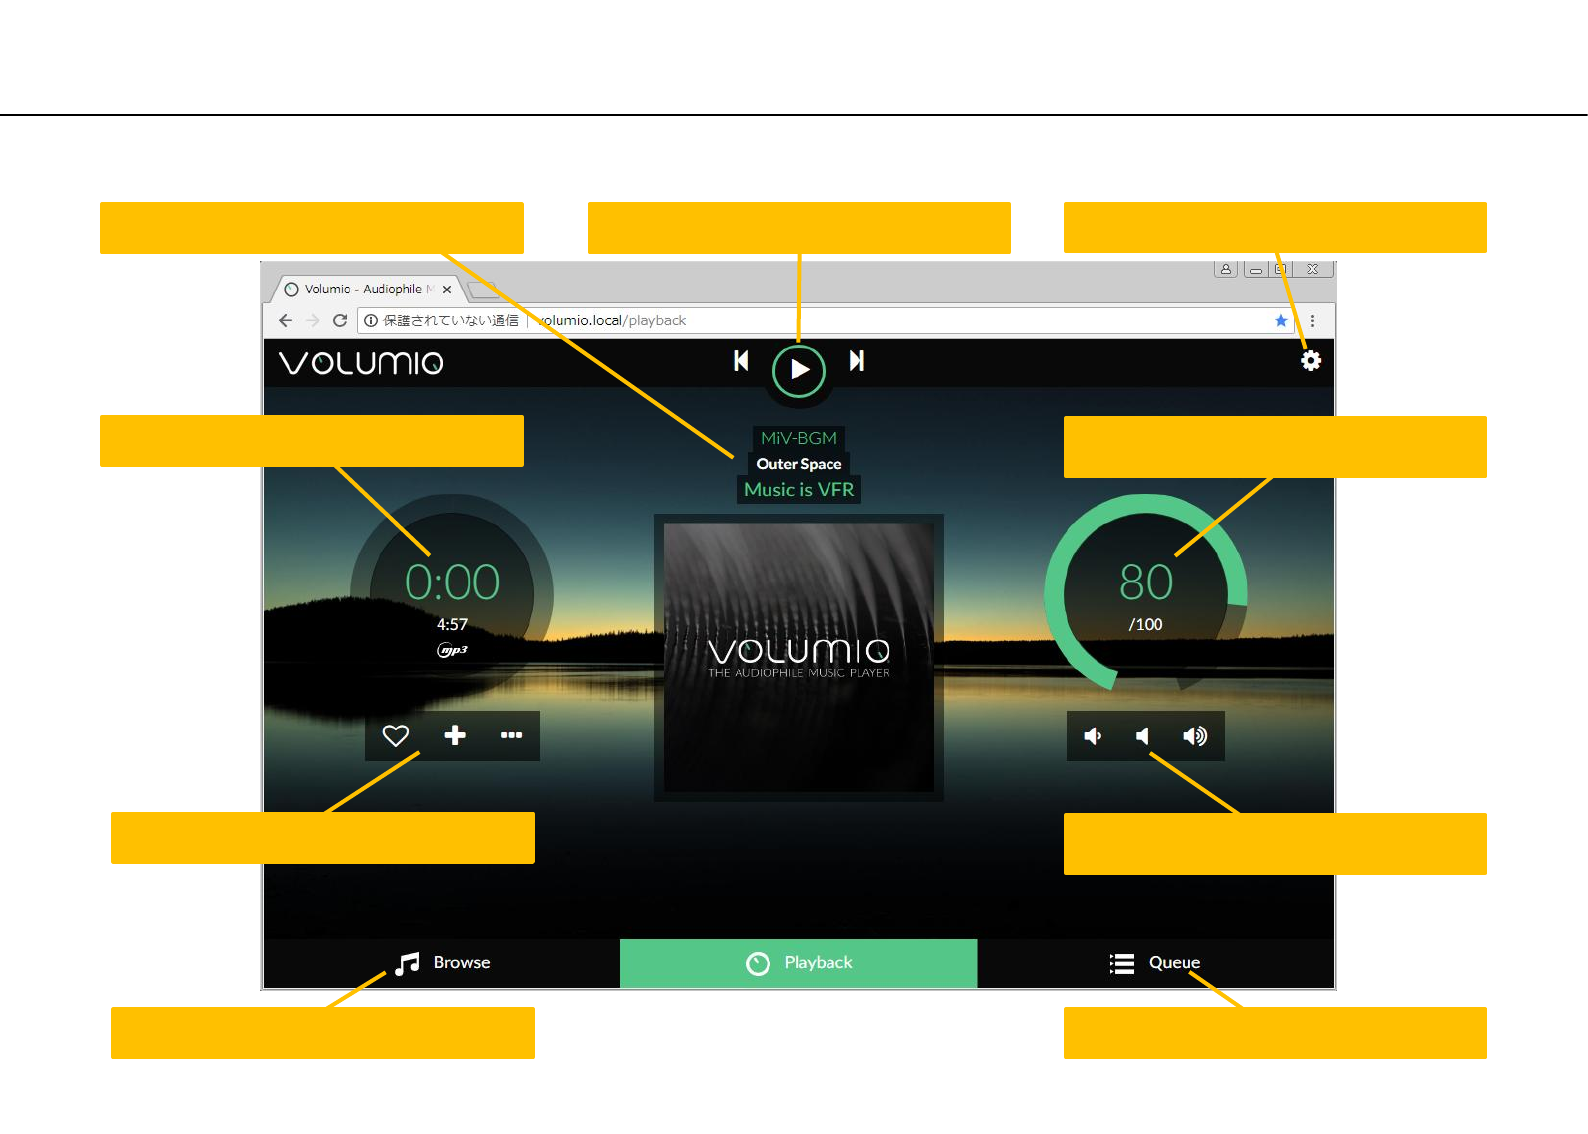
Volumio Web UI
• The playback screen is displayed as the initial screen.
Click to display You can browse where music
sources are located. Click to display music waiting for playback.
Click to From left to right
Decrease the volume, Mute, Increase volume.
Click to display setting menu.
Click to display Add conditions to the source
being played.
Displays source information during playback (or
standby). Click to play start/stop previous and next.
Displays source output type and playback time. Display DAC digital volume rate.
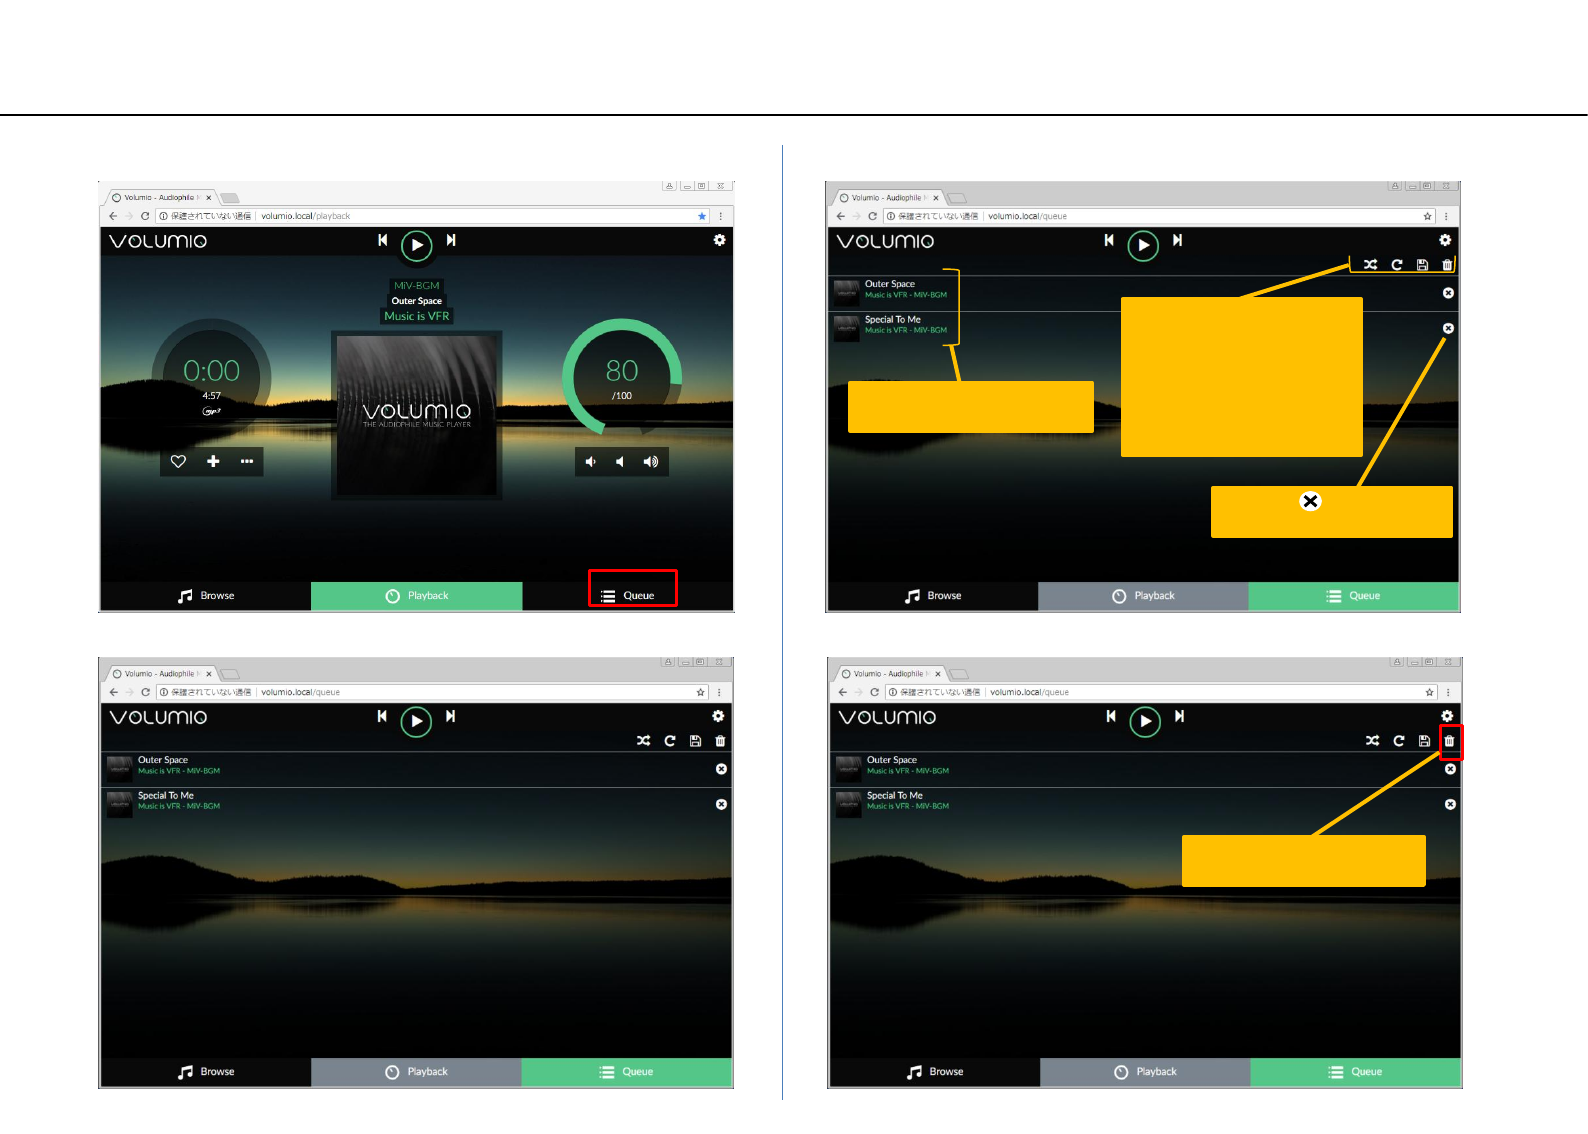
Queue screen function
② The songs currently in the queue are displayed.
① Click queue at the bottom right of the screen. ③ Feature Description.
④ Empty the queue here before the next section.
Note
Emptying the queue makes it impossible to
demonstrate playback by the method in the
"Quick Guide" in another booklet.
Click on × to delete the
song from the queue.
Click the icon to function.
From left icon to
· Random play
· Repeat playback
· Save to Playlist
· Empty the queue
It plays downward from
the clicked song.
Click the trash can icon.
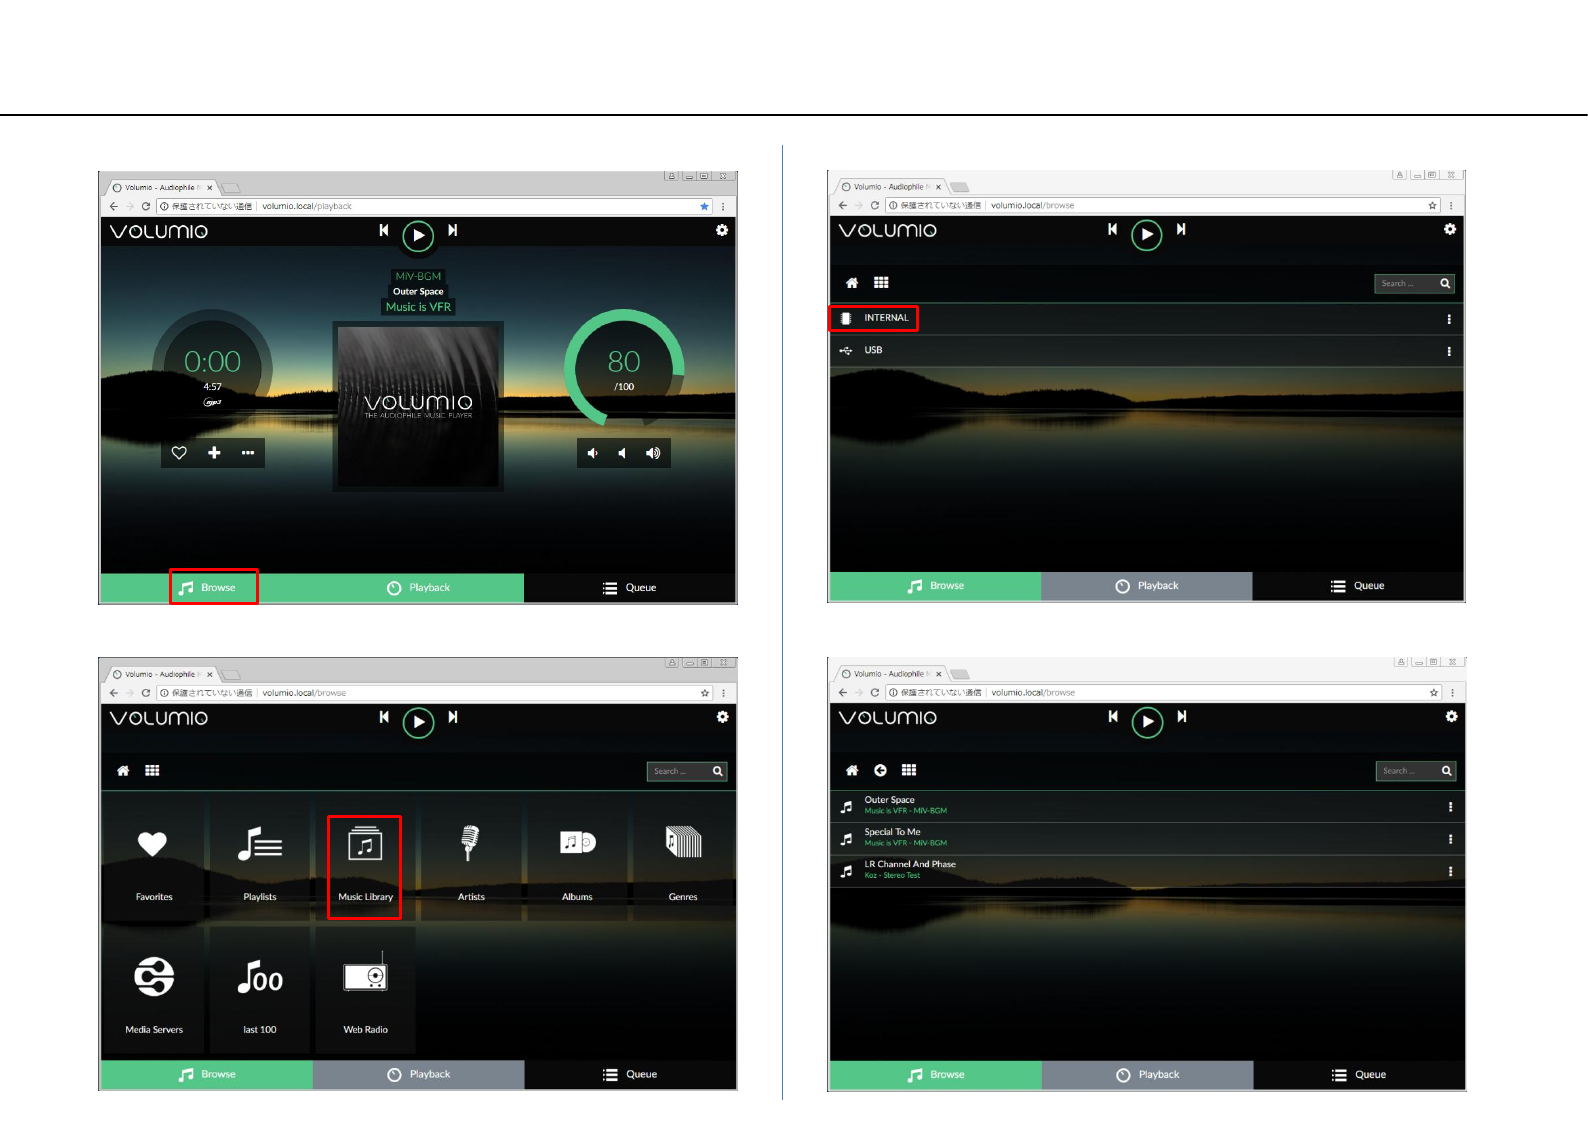
Select storage
② Click Music Library.
① Click browse at the bottom left of the screen. ③ Click INTERNAL. (INTERNAL is a storage location in micro SD card)
④ Two demo songs will be displayed.
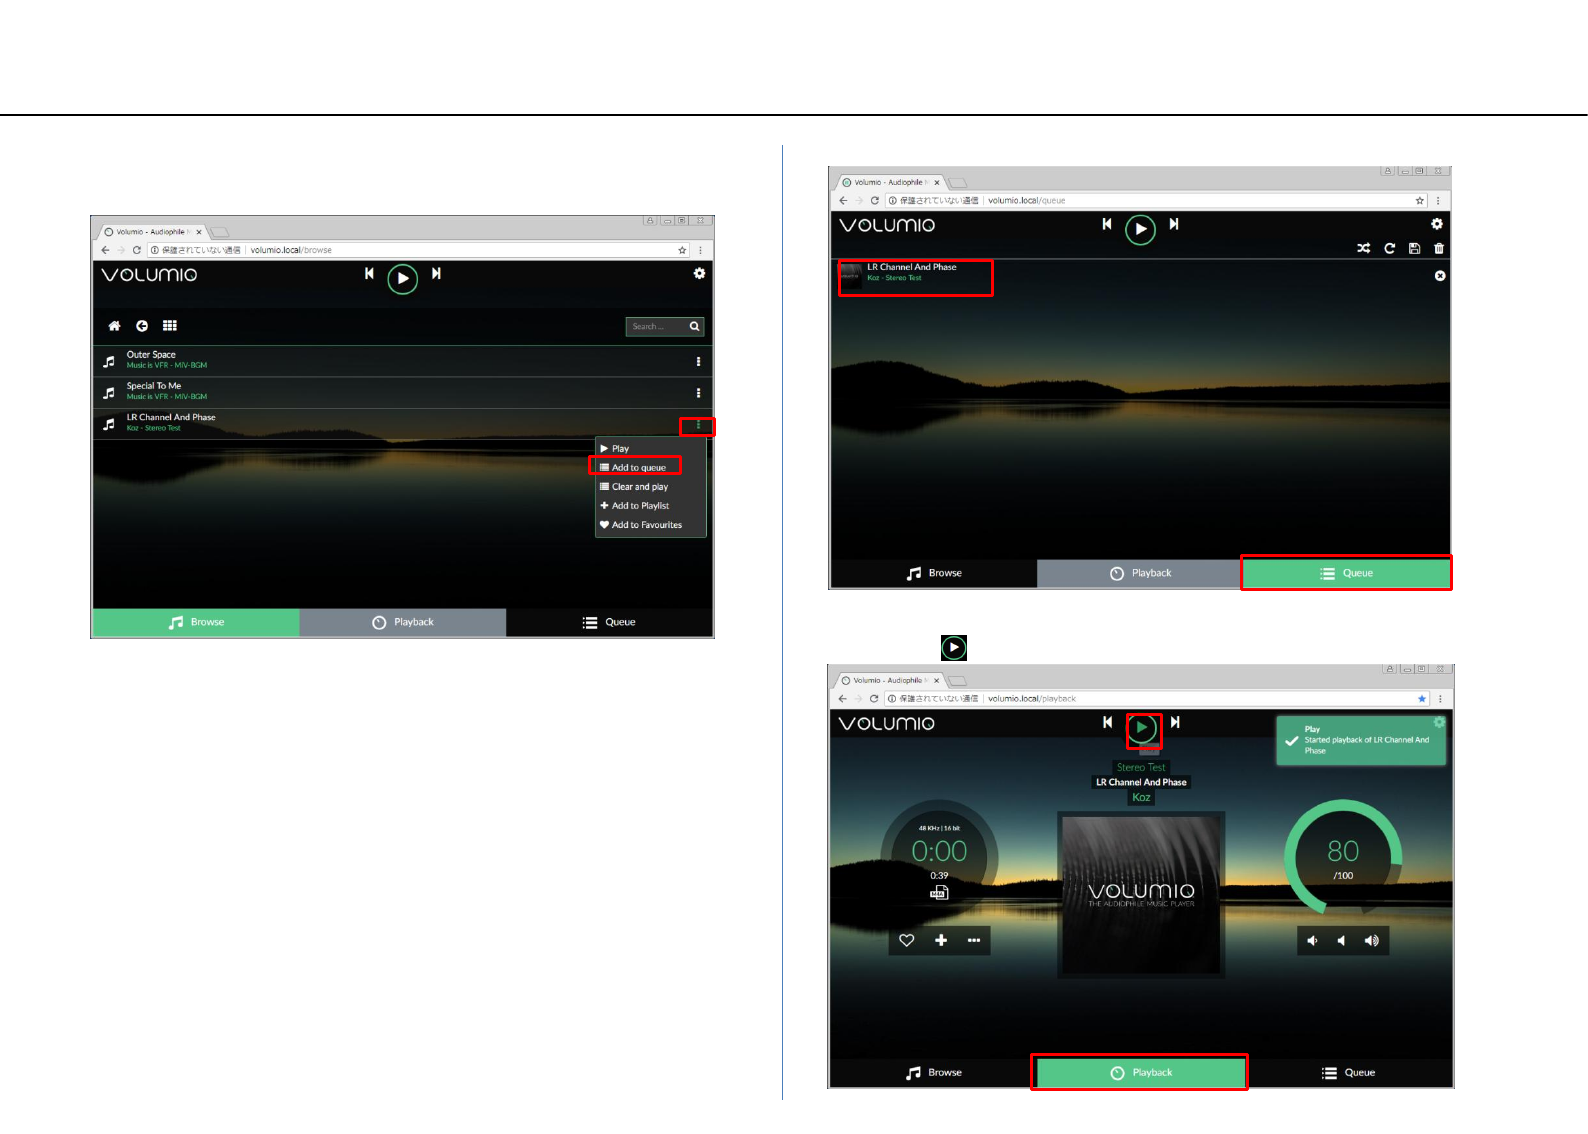
Playback LR Stereo Test
Item Function
[Play]: When clicked, the title is added to the queue and playback
starts.(You can do the same thing by directly clicking the title
name)
[Add to queue]: Add title to queue.
[Clear and play]: The queue is first emptied, the title is added to
the queue, and playback is started.
[Add to Playlist]: Save the title to an arbitrary Playlist name. *1
[Add to Favorite]: Save the title to an favorites. *1
*1: The saved title can be selected from the Browse screen on the
previous page.
① When you click the at the right end of the title "LR Channel
And Phase" , the menu is displayed. Here we select ”Add to
queue”
② When you return to the queue screen, a title has been added.
③ Click the title on the queue screen or move to the playback screen
and click the to start playback.
...
Playback from USB storage
①First of all, plug in the USB storage that recorded the sound
source that can be played on this instrument in any position
on the rear panel USB expansion port x 4.
② Perform the same operation as page20(Select storage) ①②.
③ Click USB.
④ The distinguished name of the connected USB storage is displayed.
Click the USB name you want to play.
④ The folder name or file name are displayed according to the
directory structure in the USB storage. You can directly click on the
desired folder or file, or add it to the queue and play it.
File name (song title)
Folder name (or Album name)
DSD Native Playback
② Follow "Change DAC mode" on page 23 to switch the output
device for the volumio playback option to RAPNAS USB-DAC.
Preparation is completed when the following figure is
displayed in the OLED.
• In the case of performing native playback of DSD in Volumio, two preparations are required beforehand. Work should be
done with playback stopped.
USB conversion
cable B
①Connect the rear panel DAC - IN and USB expansion port with
the included USB conversion cable B.
( U S B - D A C
M
o d e )
- - S T O P - - 1 0 0 %
Afterwards, it is only selecting and playing the sound source of
DSD format with volumio.
During DSD playback, the OLDE will display as shown below.
[ D S D - 2 ] 1 1 . 2 8
M
H z
0 : 3 2 > 5 : 0 8 1 0 0 %
Change DAC mode
② Click the “PLAYBACK OPTIONS” on the side menu.
① Click the gear icon in the upper right corner of the UI screen. ③ By default, Output Device is “RAPNAS I 2 S – DAC”
⑤ Click “USB: RAPNAS USB-DAC” and select it.
④ Click ▼ to open the menu for the device.
⑥ Click “Save” to save your settings.
When the “Configuration update” message is displayed at the
upper right of the screen, saving is completed.
Playback from AUX-IN
By connecting RCA-stereo mini plug cable (Sold separately) to the
instrument with RAC analog output terminal, this unit can be used as an
Integrated Amplifier.
Or you can connect with stereo mini plug cable (Sold separately) with
headphone jack of mobile phone or portable player
When the stereo mini plug is inserted in the AUX - IN of this unit, the
internal DAC and the amplifier are disconnected, in this case it becomes
independent of the operation of volumio.
CD player etc mobile phone,
portable player etc
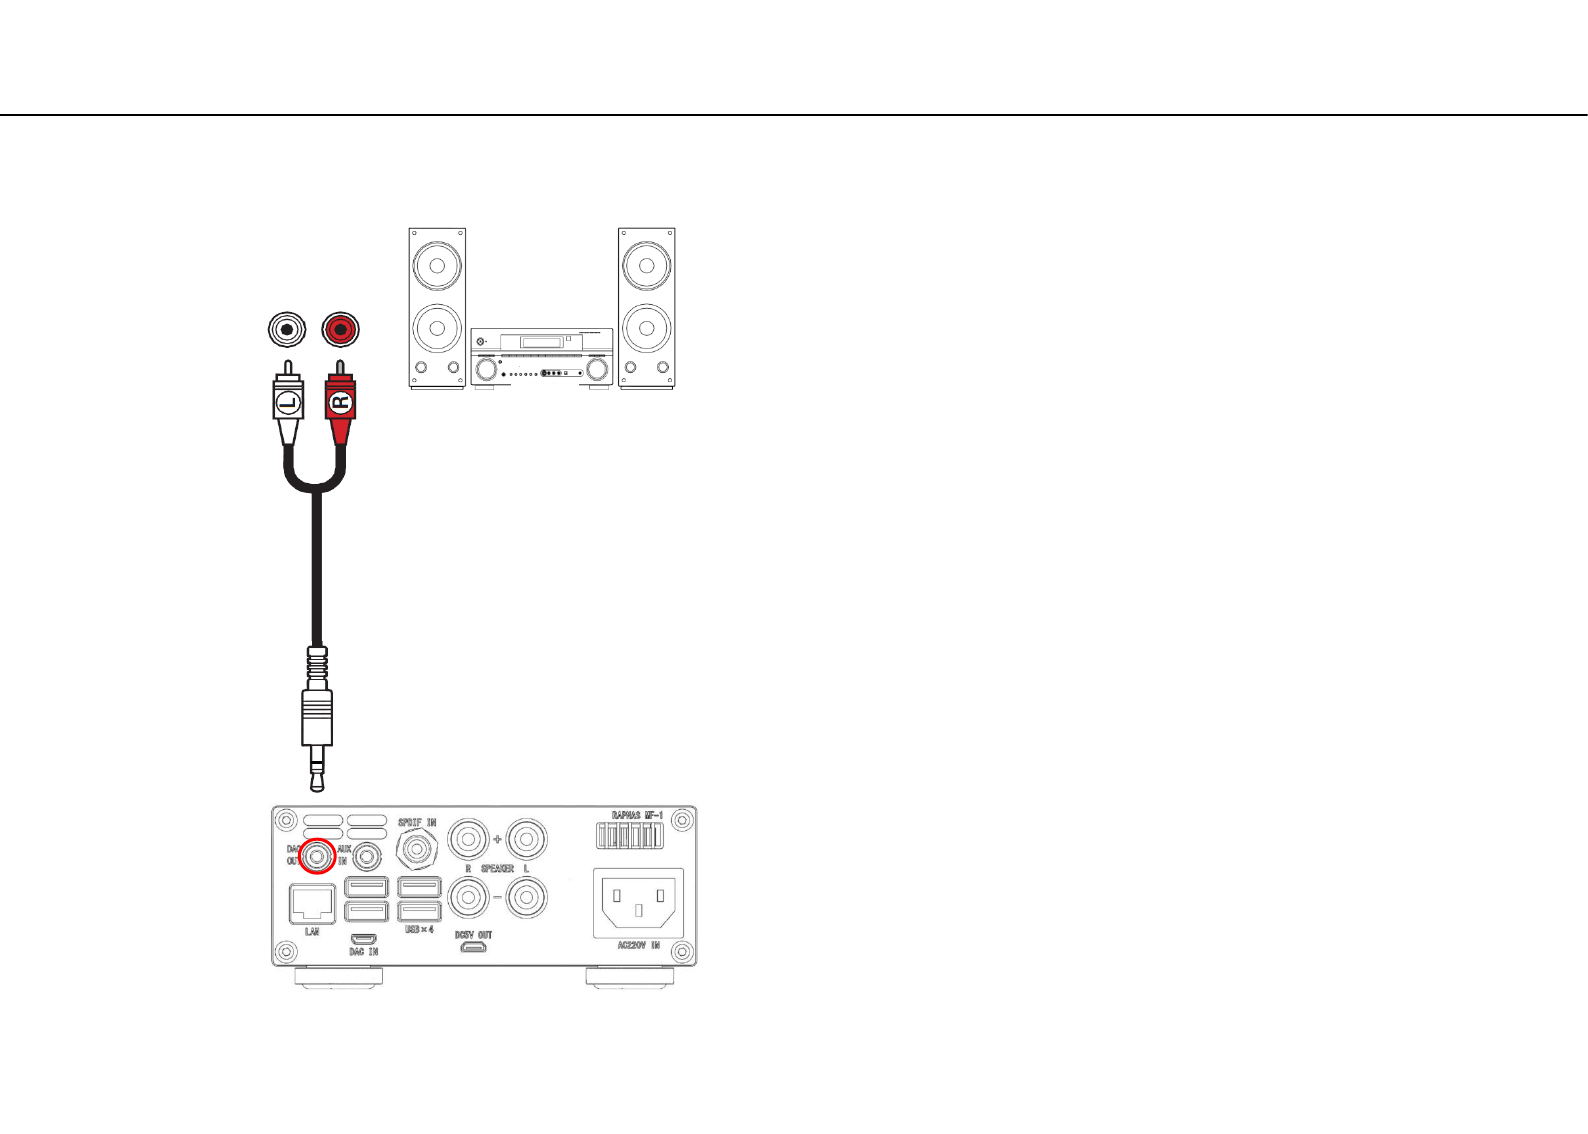
DAC output
With the RCA-stereo mini plug cable (Sold separately) you can connect
the DAC analog output of this unit with an external amplifier or active
speaker.
When the stereo mini plug is inserted in the DAC - OUT of this unit, the
DAC and the internal amplifier are disconnected.
Amplifier and speaker
Active speaker

AirPlay Receive Playback
① Connect your iPhone, iPod touch or iPad Wi-Fi to the same
network as this unit.(For details, see your device’s manual.)
② Play the song on your iPhone, iPod touch or iPad.
③ Tap the AirPlay icon.
• Music files stored on your iPhone, iPod touch, iPad
or iTunes can be played on this unit via the network.
Playing songs from iPhone, iPod touch or iPad
④ Select "volumio" for the speaker (device) to use.
① Install iTunes 10, or later, on a Mac or Windows PC that is
connected to the same network as this unit.
② Start iTunes and click the AirPlay icon to select the "volumio".
Playing iTunes music with this unit
③ Choose a song and click play in iTunes. The music will stream to
this unit.
This Unit
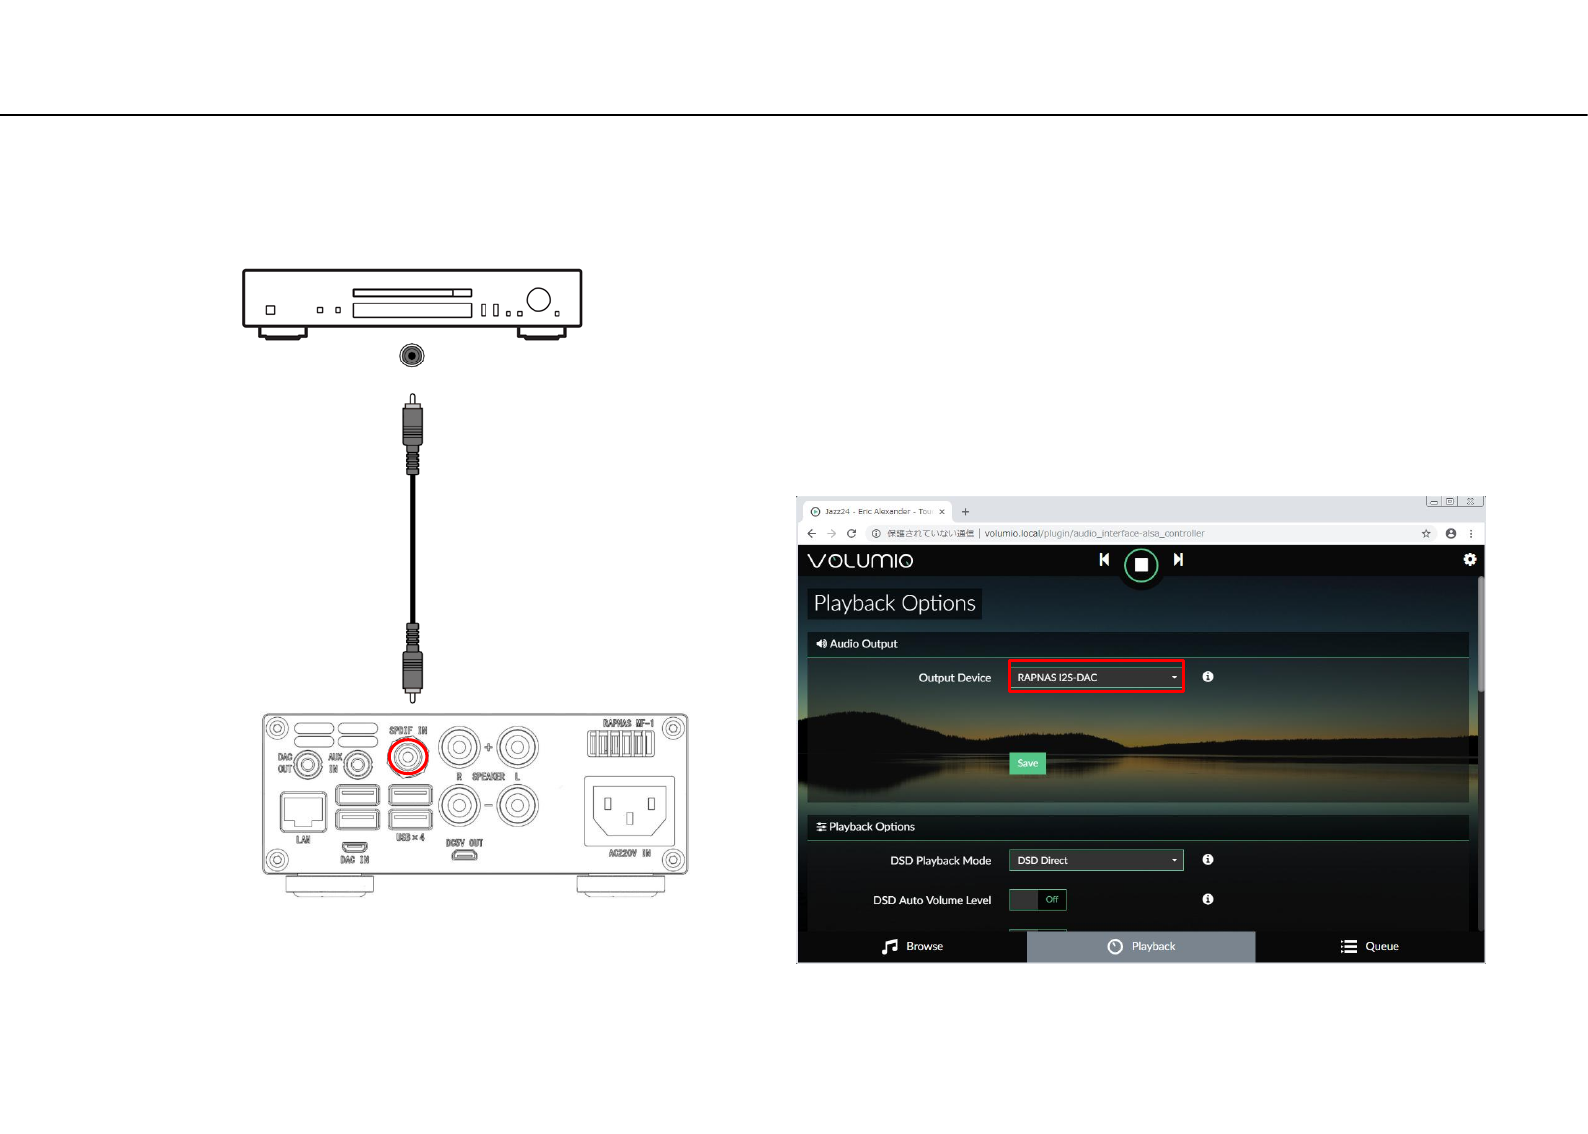
Playback from SPDIF
It can be connected to a device such as a CD player with a coaxial
digital output terminal by coaxial cable(Sold separately), and this unit
can be used as an Integrated Amplifier.
In this case, you need to select RAPNAS I2S-DAC in advance as the
Output Device of the volumio playback option setting.
CD player etc
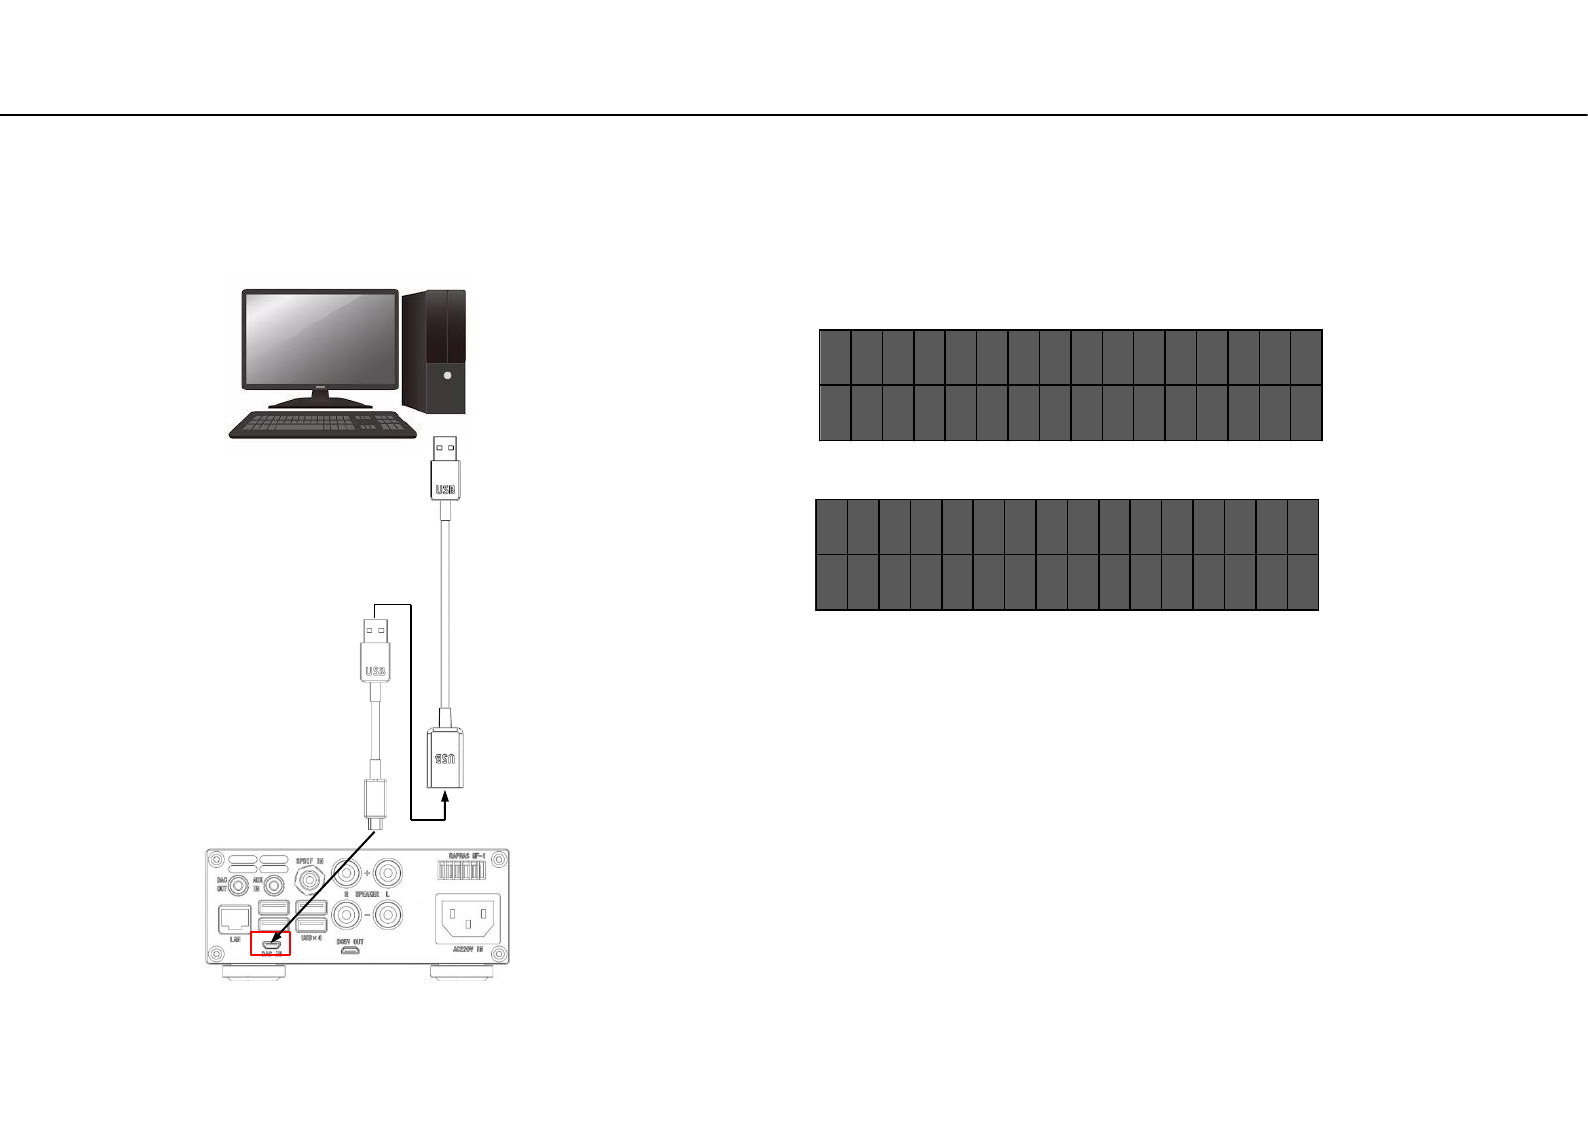
Used as external player's USB-DAC
• This unit can be used as a USB-DAC by connecting
PC with a USB conversion cable B and C.
About the USB driver
You can use foobar2000 etc as playback software on the PC side,
USB audio 2.0 driver is not installed on Windows 10 version 1703
or earlier OS. You will need to install the driver yourself as needed.
For Mac OS, the driver is installed by default.
・As shown in the figure on the left, when connected to a personal
computer and this unit is used as an external USB-DAC, the OLED
being played back will be displayed as shown below.
[ D S D - 3 ] 5 . 6 4
M
H z
- - L I N K - - 1 0 0 %
[ P C
M
- 3 ] 9 6 . 0 K H z
- - L I N K - - 1 0 0 %
During PCM playback
During DSD playback
・In reproduction of the DSD of this connection, the output from the
personal computer is the DoP format due to the nature of the driver,
but the OLED display becomes DSD instead of DoP.
The DSD rate that can be supported as DoP input in this unit is
maximum, and it is up to DSD 256.

Additional Information
• This section describes about general ideas of DLNA (Digital
Living Network Alliance) and NAS (Network Attached Storage).
This Unit
DLNA
“DLNA” stands for Digital Living Network Alliance, and is a
guideline to promote standardization of interconnection of
home network devices such as digital consumer electronics.
DLNA components are separated into four device classes:
Digital Media Server (DMS), Digital Media Renderer (DMR),
Digital Media Player (DMP) and Digital Media Controller (DMC).
“Digital Media Server (DMS)” is a device that is used to store or
distribute digital contents such as music files. For the system
using this unit, PCs and NAS are regarded as “Digital Media
Server (DMS)”.
“Digital Media Controller (DMC)” is a device to control digital
contents. The dedicated mobile device application corresponds
to “Digital Media Controller (DMC)” for the system using this
unit.
“Digital Media Renderer (DMR)” is a device to receive
instructions from “Digital Media Controller (DMC)” and play
back digital contents such as this unit.
Similarly, “Digital Media Player (DMP)” is a device that can play
back digital contents stored on “Digital Media Server (DMS)”.
NAS
“NAS” stands for Network Attached Storage. By connecting
your NAS and home network with a network cable directly,
NAS can be a storage device, such as a hard disc drive. If your
NAS is compatible with DLNA, you can share your music,
pictures, or movies on the same home network as a digital
media server.
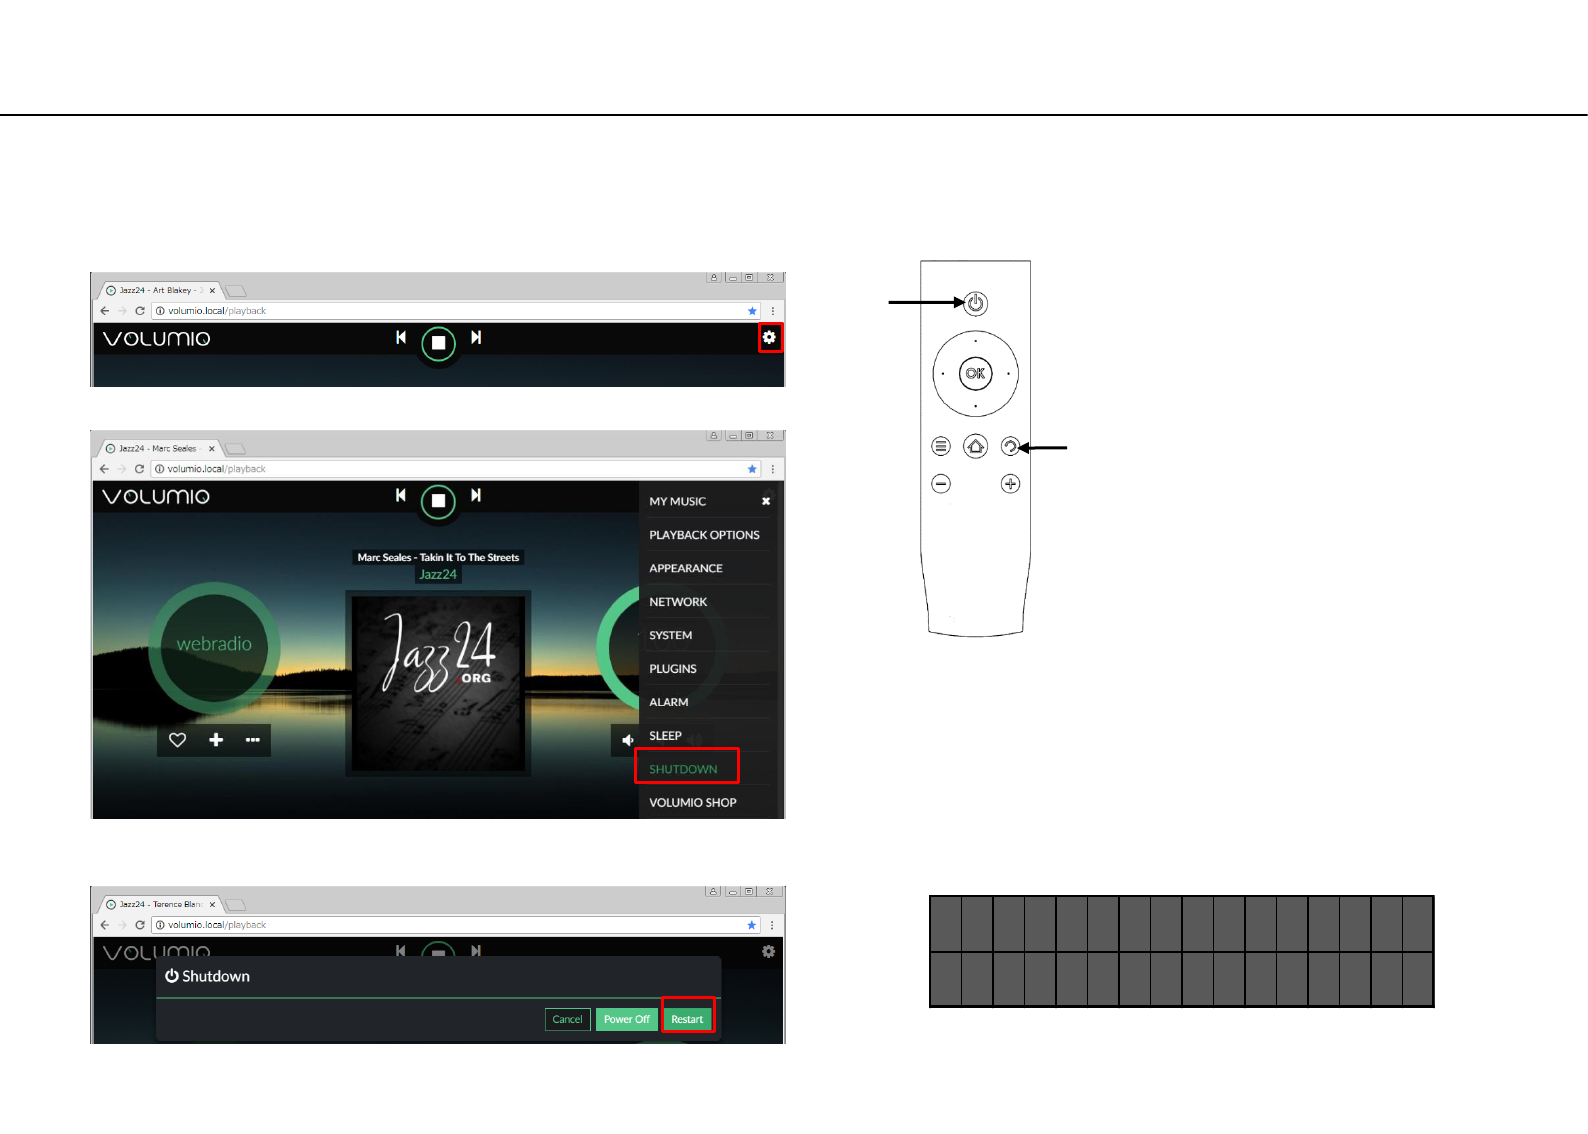
System Reboot
• Rebooting may be necessary for this unit as with a personal computer. There are two ways to reboot.
Method 2 (Use remote control)
②
Figure 1
Method 1 (Use Volumio Web UI)
① Click the gear icon at the top right of the screen
② Click Shutdown from the side menu
③ Click Restart to system reboot.
A
I
Press the button (I) on the remote control,
then press (A) to reboot the system.
Reboot display
- - N o w R e b o o t - -
p l e a s e w a i t !
When rebooting is started, Figure1 is displayed on the
display It disappears. After about 1 minute the restartup
is completed.
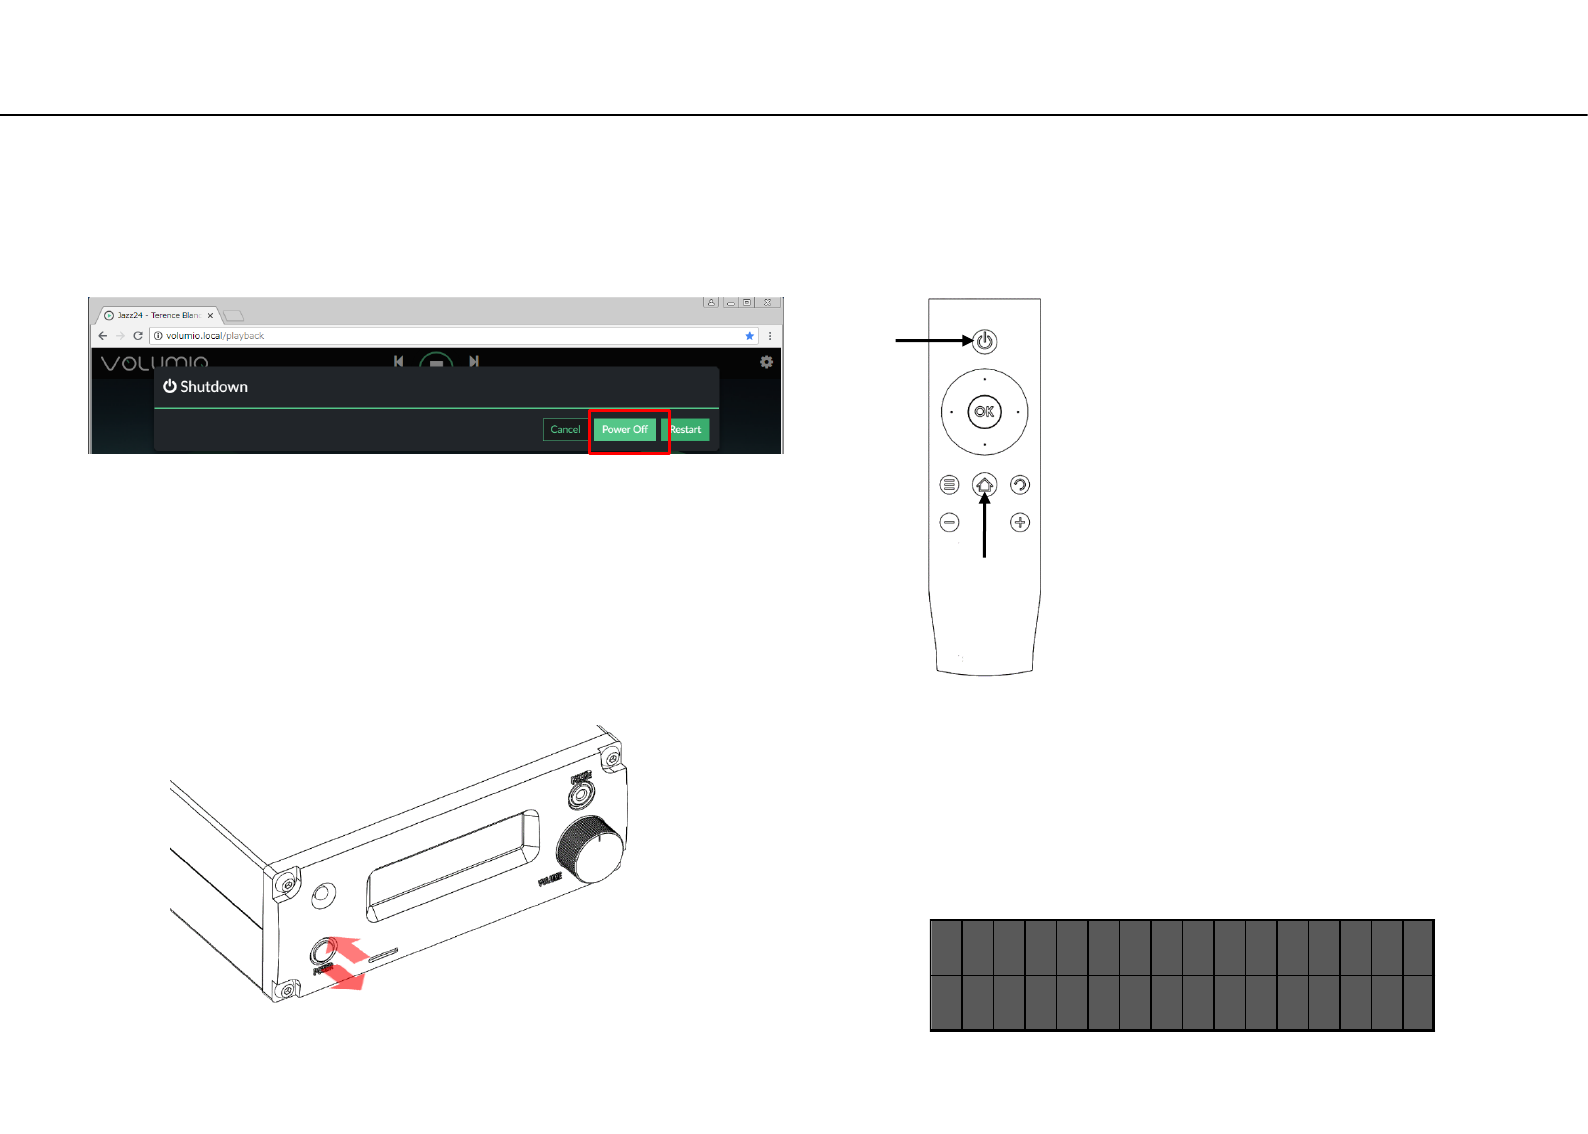
Normal Power Off
• As with the personal computer, power shutdown requires software shutdown. There are three ways to normal power off.
Method 3 (Use remote control)
Figure 1
Method 1 (Use Volumio Web UI)
Do the same work as system reboot, and finally click Power off.
Press the button (H) on the remote control,
then press (A) to power off.
Power off display
When rebooting is started, Figure1 is displayed on the display
It disappears. After about 10 seconds the backlight of the
volume knob goes off and the power off is completed.
A
H
- N o w S h u t d o w n -
s e e y o u n e x t ! !
Method 2 (power button)
Press and hold the power button for about 3 seconds, and release
the button immediately when figure figure1 is displayed on the
display. If you hold down the button for more than 5 seconds, the
forced power off described later will work, so be careful.

Forced Power Off
①Press and hold the power button for at least 5 seconds.
②Release the buttons at the timing when the action LED is off.
As soon as the button is released, the backlight of the volume
knob goes out and the power turns off.
• When normal power off can not be done for some reason, forcibly Means for shutting down the system.
Caution
The forced power-off function has the risk of damaging the system file depending on its execution timing.
②
①
ACTION-LED
(MicroSD card read or write indicator)
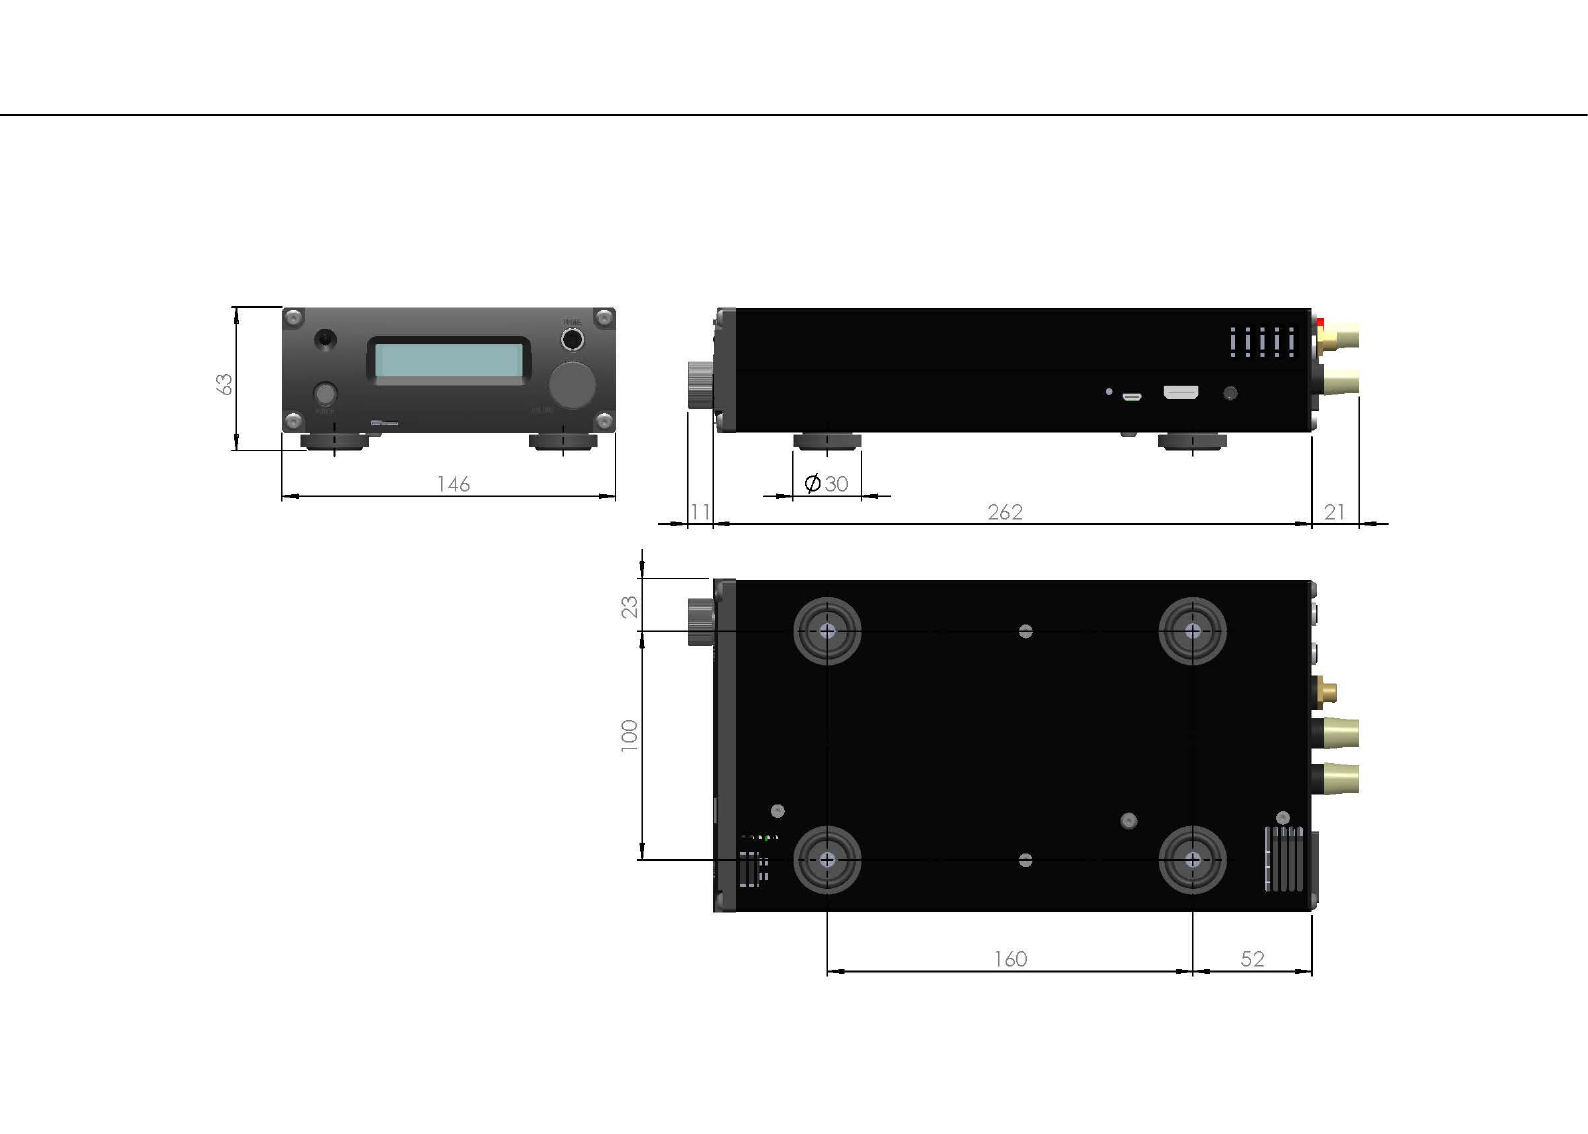
Appearance dimension
Unit (mm)

Specification sheet1
Classification
Object
specification
Single Board
Computer
(Raspberry Pi 3
Model B+)
CPU
Broadcom BCM2837B0
1.4GHz 64-bit quad-core ARMv8 Cortex-A53
memory
1GB LPDDR2 SDRAM
USB
USB2.0 Standard A x4
storage
microSDcard
Video output
Composite RCA (PAL/NTSC) ,HDMI1.3/1.4
Wired network
RJ-45 x1: Gigabit Ethernet over USB 2.0 (maximum throughput 300Mbps)
Wireless network
2.4GHz and 5GHz IEEE 802.11.b/g/n/ac wireless LAN
Bluetooth
Bluetooth 4.2, BLE
Main-Amplifier
Maximum output
47W+47W (1%THD+N 4Ω)
23W+23W (1%THD+N 8Ω)
Allowable speaker impedance
4Ω-8Ω
Frequency response
20Hz - 20kHz (–0.5dB)
10Hz - 80kHz (–3dB)
Dynamic range
>110dB
S/N ratio
>115dB
THD+N
0.003% (1kHz, 8Ω,1W)
Pre(Headphone)
-Amplifier
AUX-IN Input level
2.1Vrms (3.5mm 3-pole stereo mini jack)
OPAMP
MUSES8920
Output
3.5mm 3-pole stereo mini jack
Compatible impedance range
16Ω-300Ω
Practical maximum output
125mW+125mW (1KHz,32Ω)

Specification sheet2
Classification
Object
specification
converter
DDC Processor
XMOS(XU208-128-QF48)
DAC Processor
ES9038Q2M
Maximum output level
2.1Vrms (3.5mm 3-pole stereo mini jack)
Bit depth
16-32bit
Sampling rate
I2S-DAC mode
PCM: 44.1KHz - 384KHz
DSD: DSD convert to PCM (up to DSD128)
USB-DAC mode
PCM: 44.1KHz - 768KHz
DSD: DoP is up to DSD256, Native is up to DSD512
SPDIF
PCM: 44.1KHz - 192KHz
volumio2
Distribution
Supported audio format
WMA, MP3, MP2, WAV, AAC, FLAC, ALAC, AIFF, DFF, DSF
Media service
Support Airplay
Support DLNA Ver.1.5
Power supply
Input power supply
Serial partition A : AC100-120V,50/60Hz
Serial partition B : AC220-240V,50/60Hz
Power consumption
130W
DC output
USB Micro B 5V±5% Maximum allowable load 500mA
Other
External dimensions W×H×D
W146mm×H63mm×D262mm(Excluding protrusions)
Weight
2.5kg
Machine Technology (SZ ) Co.,Ltd.
Post code: 518101
Address: West-side,2F, Block-1,Yin jin-industry building,Liu xian 3rdroad,
Bao an xin an 71-district, Shen zhen-city, Guang dong-province, China
Phone: +86-755-2784-7182
Model name: RAPNAS MF-1
Printed in China