Macro Image Technology MDP-110L HD-TV Reception PCI Card User Manual MyHD 20020529
Macro Image Technology, Inc HD-TV Reception PCI Card MyHD 20020529
User Manual
Macro Image Technology
MyHD
Macro Image Technology
MyHD
MyHD
Macro Image Technology, Inc.
HDTV PC Card UserHDTV PC Card User’’s Manuals Manual
Macro Image Technology
Produced by :
6th Floor, East Bldg., IT Venture Tower, 78 Garakbon-Dong, Songpa-Gu, Seoul, Korea, 138-803
TEL : 822-2142-4000 FAX : 822-2142-4099
Website : www.DTVsolution.com E-mail : sales@mitinc.co.kr

Macro Image Technology
MyHD
Macro Image Technology
MyHD
Copyright 2002 Macro Image Technology, Inc. All rights reserved
License Notice and Trademark:
•
Manufactured under license from Dolby Laboratories. “Dolby”and
the double-D symbol are trademarks of Dolby Laboratories.
•
Windows 98 SE, Windows ME, Windows 2000 and Windows XP are
trademarks of Microsoft Corporation.
•
Intel and Pentium are trademarks of Intel Corporation.
FCC RF
INTERFERENCE STATEMENT
NOTE:
This equipment has been tested and found to comply with the limits for a Class B digital
device, pursuant to Part 15 of the FCC Rules. These limits are designed to provide
reasonable protection against harmful interference in a residential installation.
This equipment generates, uses and can radiate radio frequency energy and, if not
installed and used in accordance with the instructions, may cause harmful interference to
radio communications. However, there is no guarantee that interference will not occur in
a particular installation.
If this equipment does cause harmful interference to radio or television reception which
can be determined by turning the equipment off and on, the user is encouraged to try to
correct the interference by one or more of the following measures.
-Reorient or relocate the receiving antenna.
-Increase the separation between the equipment and receiver.
-Connect the equipment into an outlet on a circuit different from that to which the
receiver is connected.
-Consult the dealer or an experienced radio, TV technical for help.
-Only shielded interface cable should be used.
Finally, any changes or modifications to the equipment by the user not expressly approved
by the grantee or manufacturer could void the users authority to operate such equipment,

Macro Image Technology
MyHD
Macro Image Technology
MyHD
MyHD Hardware Installation
PC Platform Requirements --------------------------------------------------------------------
MyHD Package List ---------------------------------------------------------------------------
Hardware Installation Overview -------------------------------------------------------------
MyHD Board Diagram -------------------------------------------------------------------------
Installation of MyHD board in a PC ---------------------------------------------------------
Dual Monitor Configuration ------------------------------------------------------------------
Single Monitor Configuration ----------------------------------------------------------------
Optional external hardware connections ---------------------------------------------------
Connection of Digital Audio Amp -----------------------------------------------------------
MyHD Program Installation
Installing the MyHD device driver for Windows 98 SE/ME -------------------------------
Confirming the installing MyHD device driver -------------------------------------------
Setting DMA ------------------------------------------------------------------------------------
Setting windows environment ---------------------------------------------------------------
Installing the MyHD device driver for Windows XP ------------------------------------
Confirming DMA Settings ---------------------------------------------------------------------
Installing the MyHD Application Software ------------------------------------------------
MyHD Program
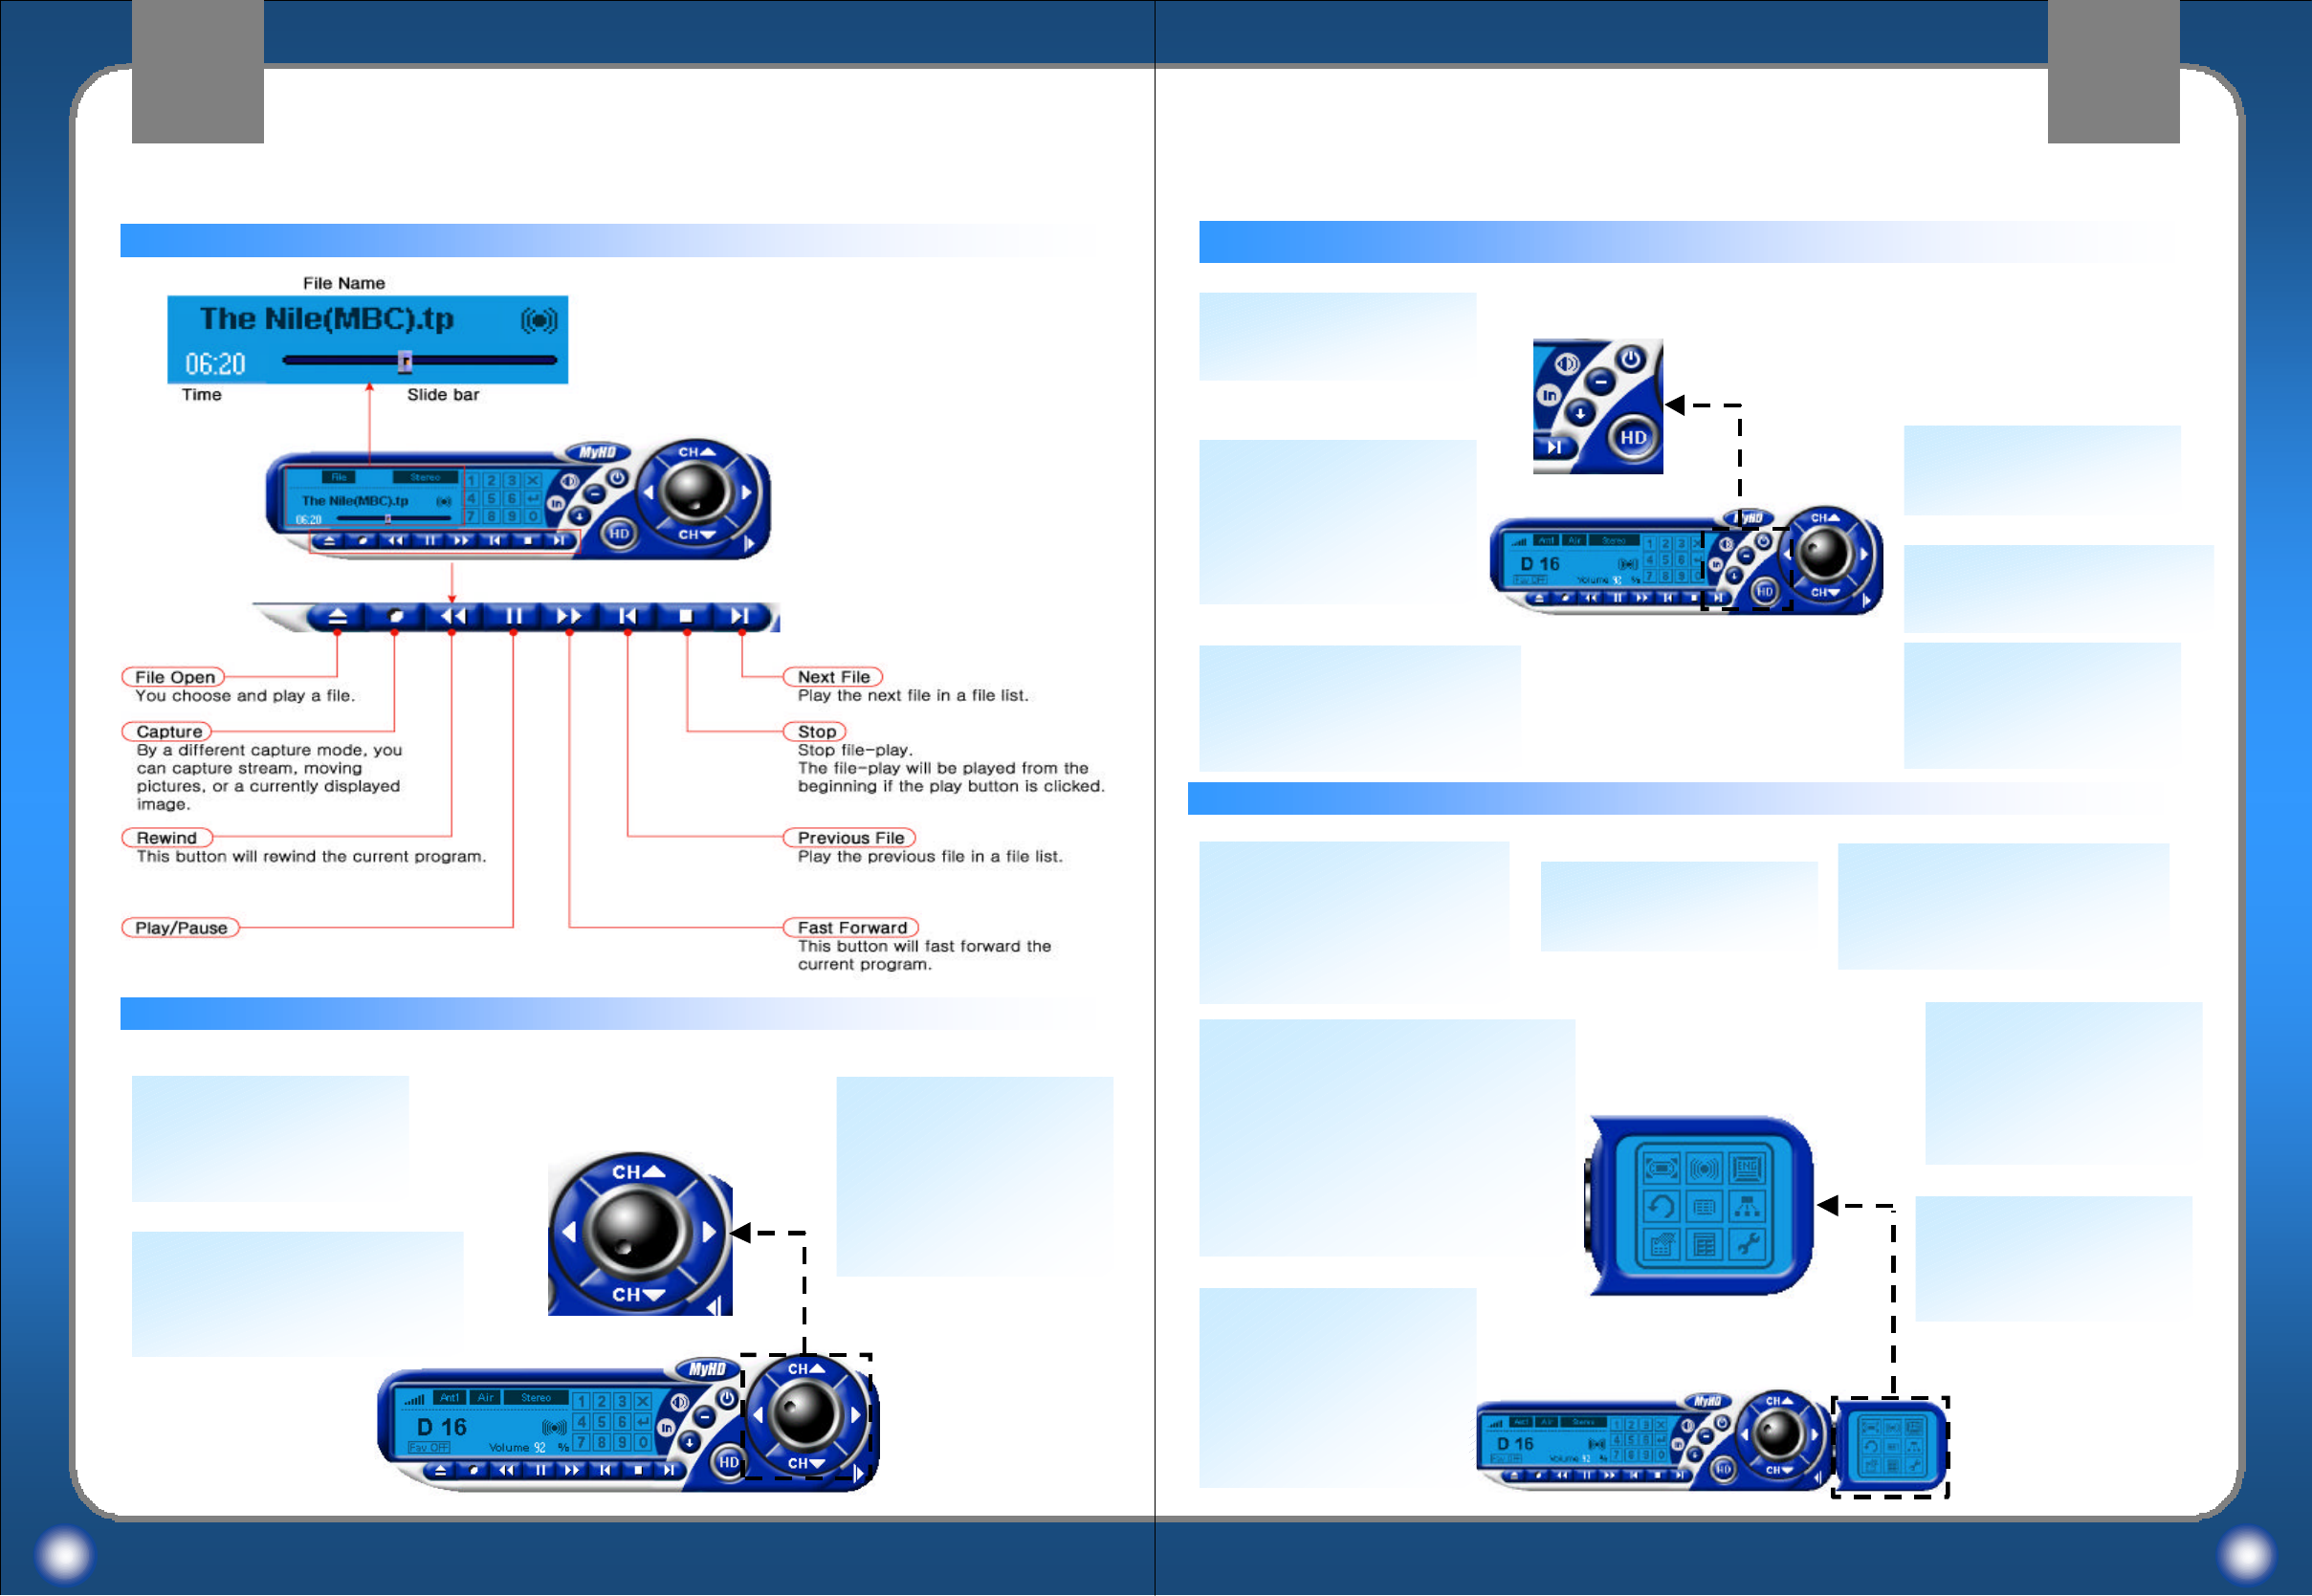
Operating MyHD -------------------------------------------------------------------------------
Current Display Status --------------------------------------------------------------------------
Channel Number Key Pad ---------------------------------------------------------------------
File Control --------------------------------------------------------------------------------------
Channel and Volume Control -----------------------------------------------------------------
Mode Setting -------------------------------------------------------------------------------------
Configuration -------------------------------------------------------------------------------------
Pop-up Menu -------------------------------------------------------------------------------------
Remote Controller
Remote Controller -------------------------------------------------------------------------------
1
2
3
4
5
8
9
10
10
11
13
14
15
16
19
20
22
23
24
25
25
26
26
27
31
Channel Settings
To Scan Auto-Channels -------------------------------------------------------------------------
Add/Delete Channels ----------------------------------------------------------------------------
Selecting Favorite Channels -----------------------------------------------------------------
A/V Settings
Setting Video Configuration -------------------------------------------------------------------
Setting Audio Configuration -------------------------------------------------------------------
VGA Settings
Fixed Aspect Ratio ----------------------------------------------------------------------------
Overlay Mode ----------------------------------------------------------------------------------
Capture Settings
Setting a capture mode -----------------------------------------------------------------------
AVI Capture Option ---------------------------------------------------------------------------
Reservation Capture Option for Timer Recording ----------------------------------------
File Play -----------------------------------------------------------------------------------------
Running MyHD
Setting Channels -------------------------------------------------------------------------------
Controlling Volume ---------------------------------------------------------------------------
Changing Input Type --------------------------------------------------------------------------
Storing Transport Stream into a HDD ------------------------------------------------------
Replay the captured Transport Stream Files -----------------------------------------------
AVI Capture ------------------------------------------------------------------------------------
Still Image Capture ----------------------------------------------------------------------------
Tape Record ------------------------------------------------------------------------------------
HD Mode & Overlay Window Mode -------------------------------------------------------
Tape(D-VHS) record and playback Settings ------------------------------------------------
33
34
34
35
37
38
38
39
40
41
42
45
45
45
46
46
48
59
50
50
51
Macro Image Technology
MyHD
Macro Image Technology
MyHD
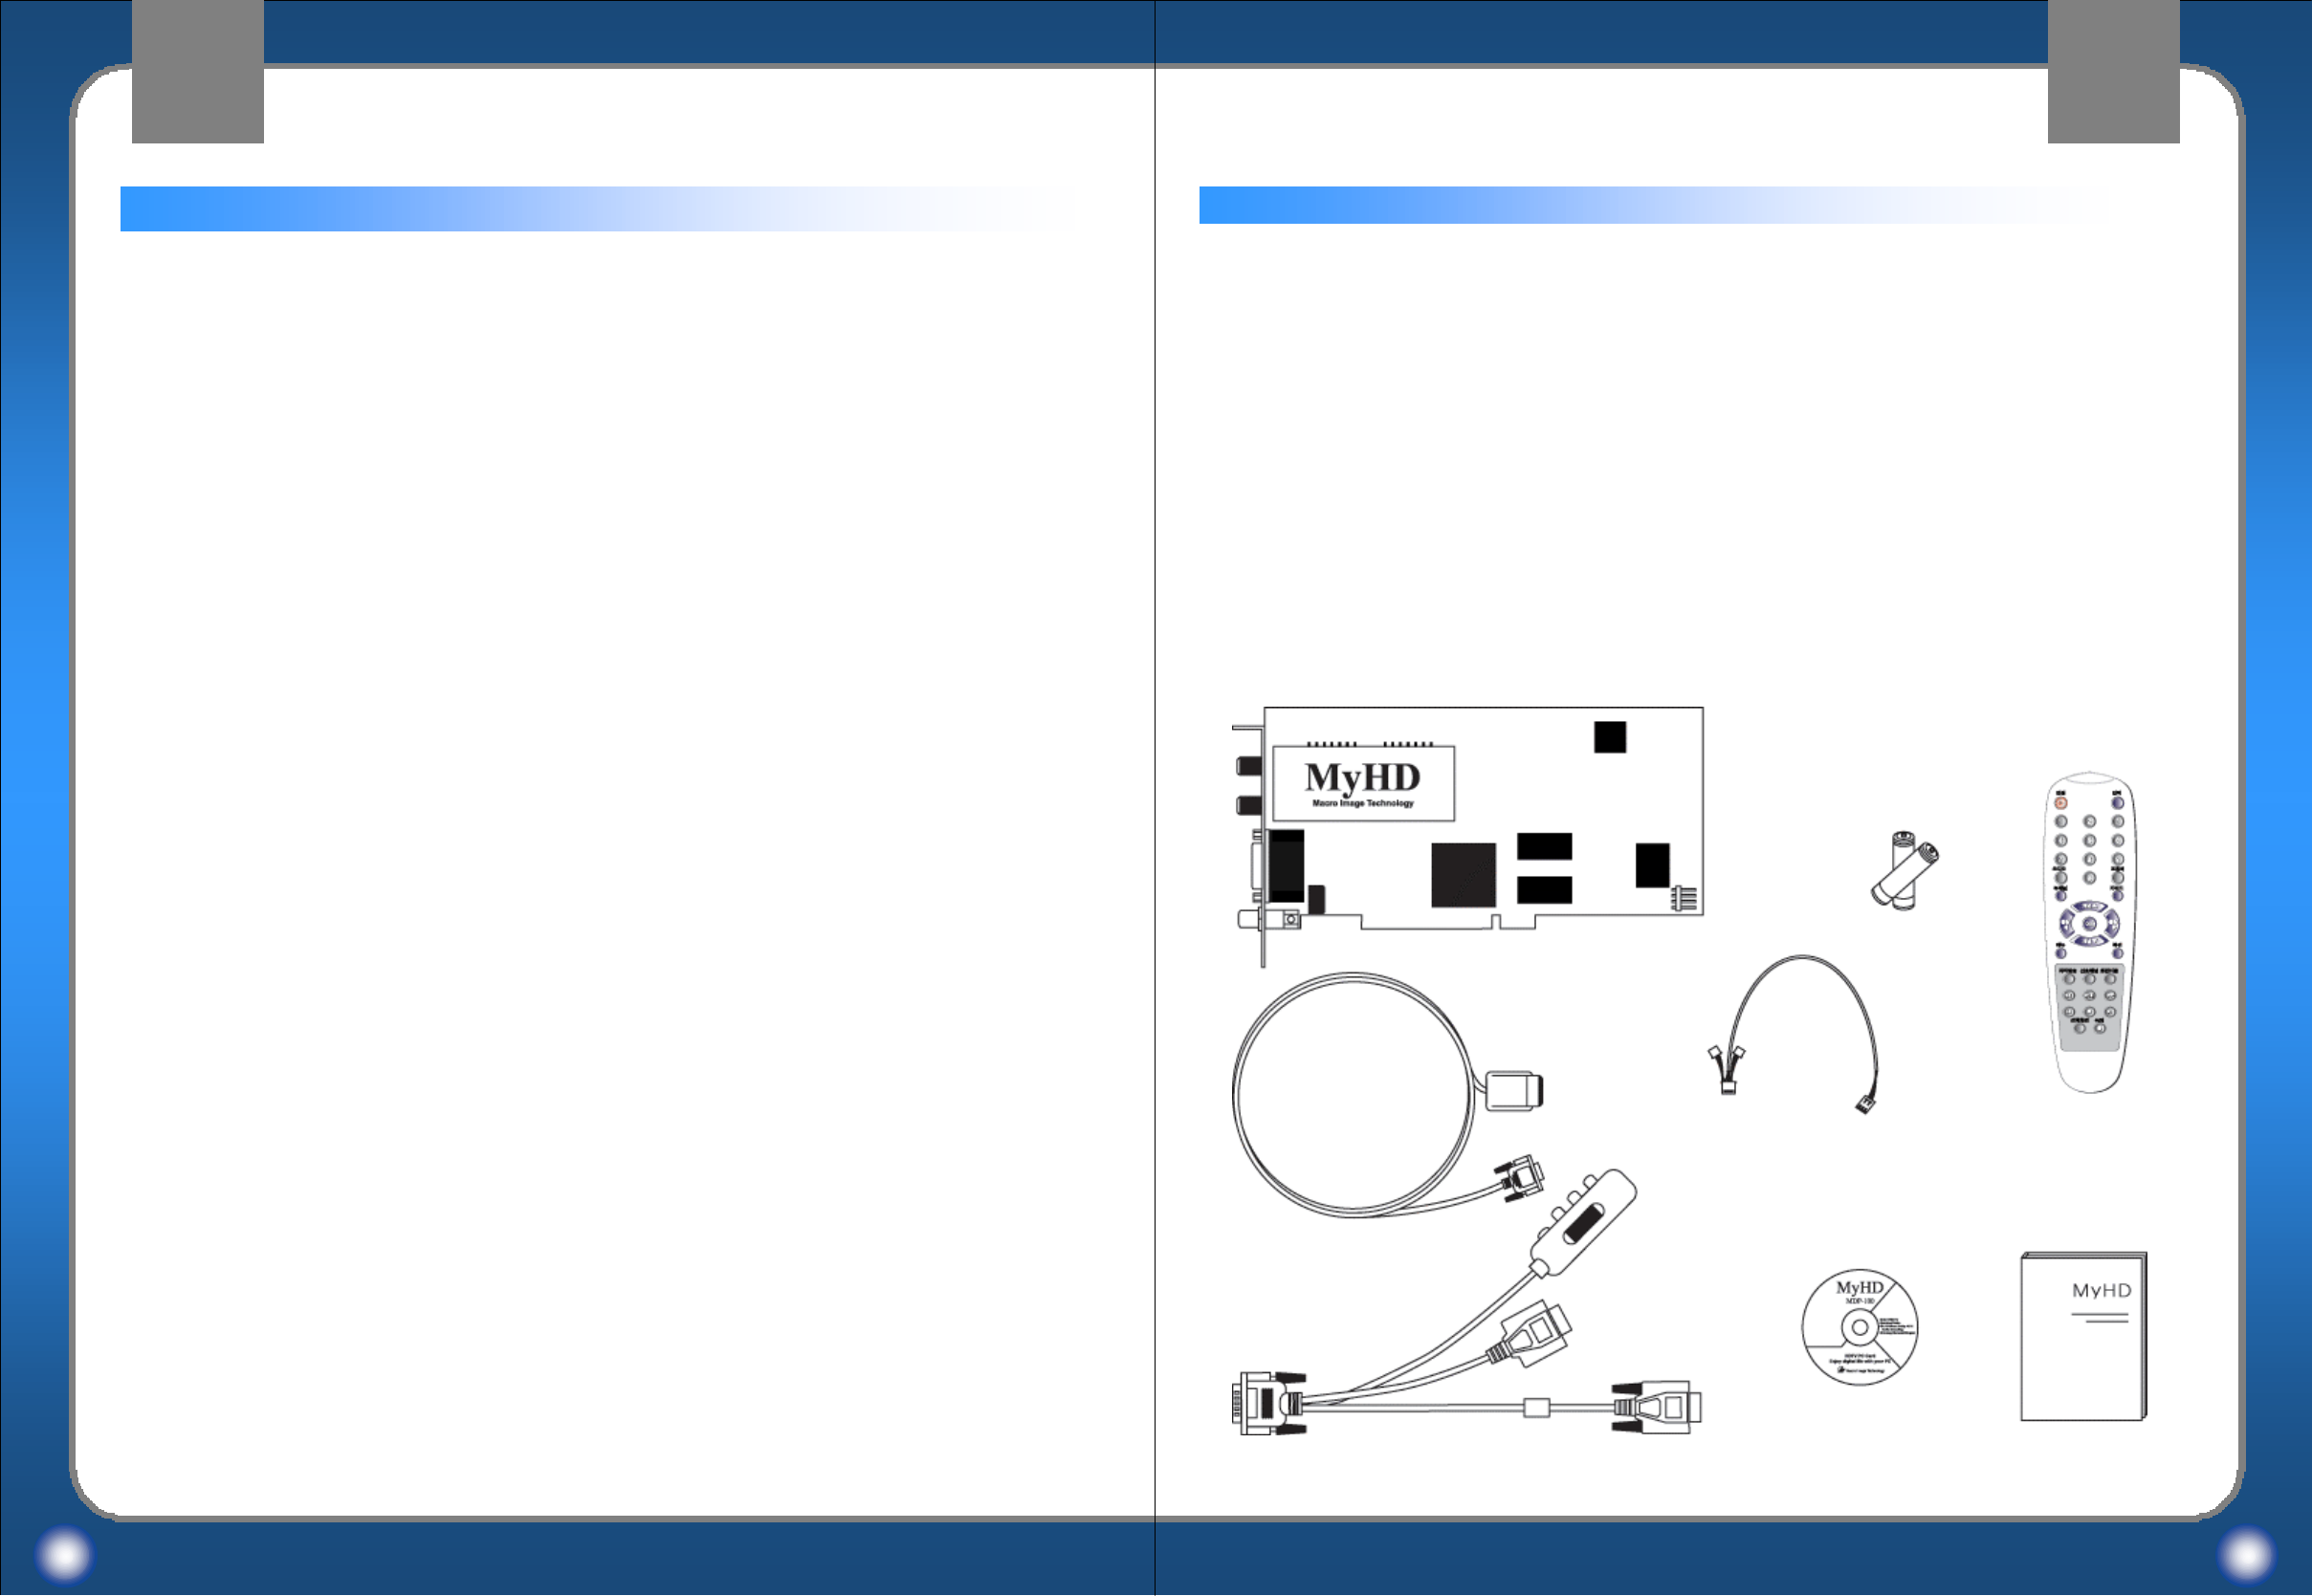
MyHD Package List
CPU : Pentium-III 800MHz or faster
All other requirements are the same with the above configuration.
1 2
MyHD Hardware InstallationMyHD Hardware Installation MyHD Hardware InstallationMyHD Hardware Installation
This package is including :
-MyHD PCI Card
-Quick Installation Guide
-VGA Loop through Cable with External A/V Connector
-Remote Control Handset
-Remote Control Receiver
-Installation CD
-Audio Card Jumper Cable
-Two 1.5V AAA Batteries
To achieve optimum performance of the MyHD Board, your PC requires a following
minimum configuration.
CPU : Pentium-II 333MHz or faster
DRAM : 64 Megabytes or more
System Bus : PCI
OS : Windows 98SE, Windows ME , Windows 2000, Windows XP
Other Software : DirectX Media 7.0 or Higher
Graphics Card : DirectX compatible VGA card
(8 MB memory or more recommended)
One Available PCI Slot
One 9-pin serial port
*For digital transport stream(ATSC) recording and playback, minimum system
requirements are as follows: MyHD PCI Card
Remote Control
Handset
VGA Loop through Cable with External A/V Connector
Two 1.5V
AAA Batteries
Audio Card Jumper Cable
Remote
Control
Receiver
Quick Installation Guide
Installation CD
PC Platform Requirements
Macro Image Technology
MyHD
Macro Image Technology
MyHD
Hardware installation Overview
Turn off your PC, install the MyHD PCI card, connect the audio jumper cable as needed, and
connect the Remote Control Receiver to a serial port on your PC.
Connect the MyHD PCI card to an external video source and display devices as desired.
Turn on your PC and install the MyHD Windows device driver from the installation CD, then
install the MyHD application software.
If DirectX 7.0 or higher version is not installed on your PC, install the latest version of DirectX
before the installation of the MyHD device driver.
To install MyHD on your Windows 98SE, Windows ME, Windows 2000, or Windows
XP system:
3 4
MyHD Hardware InstallationMyHD Hardware Installation
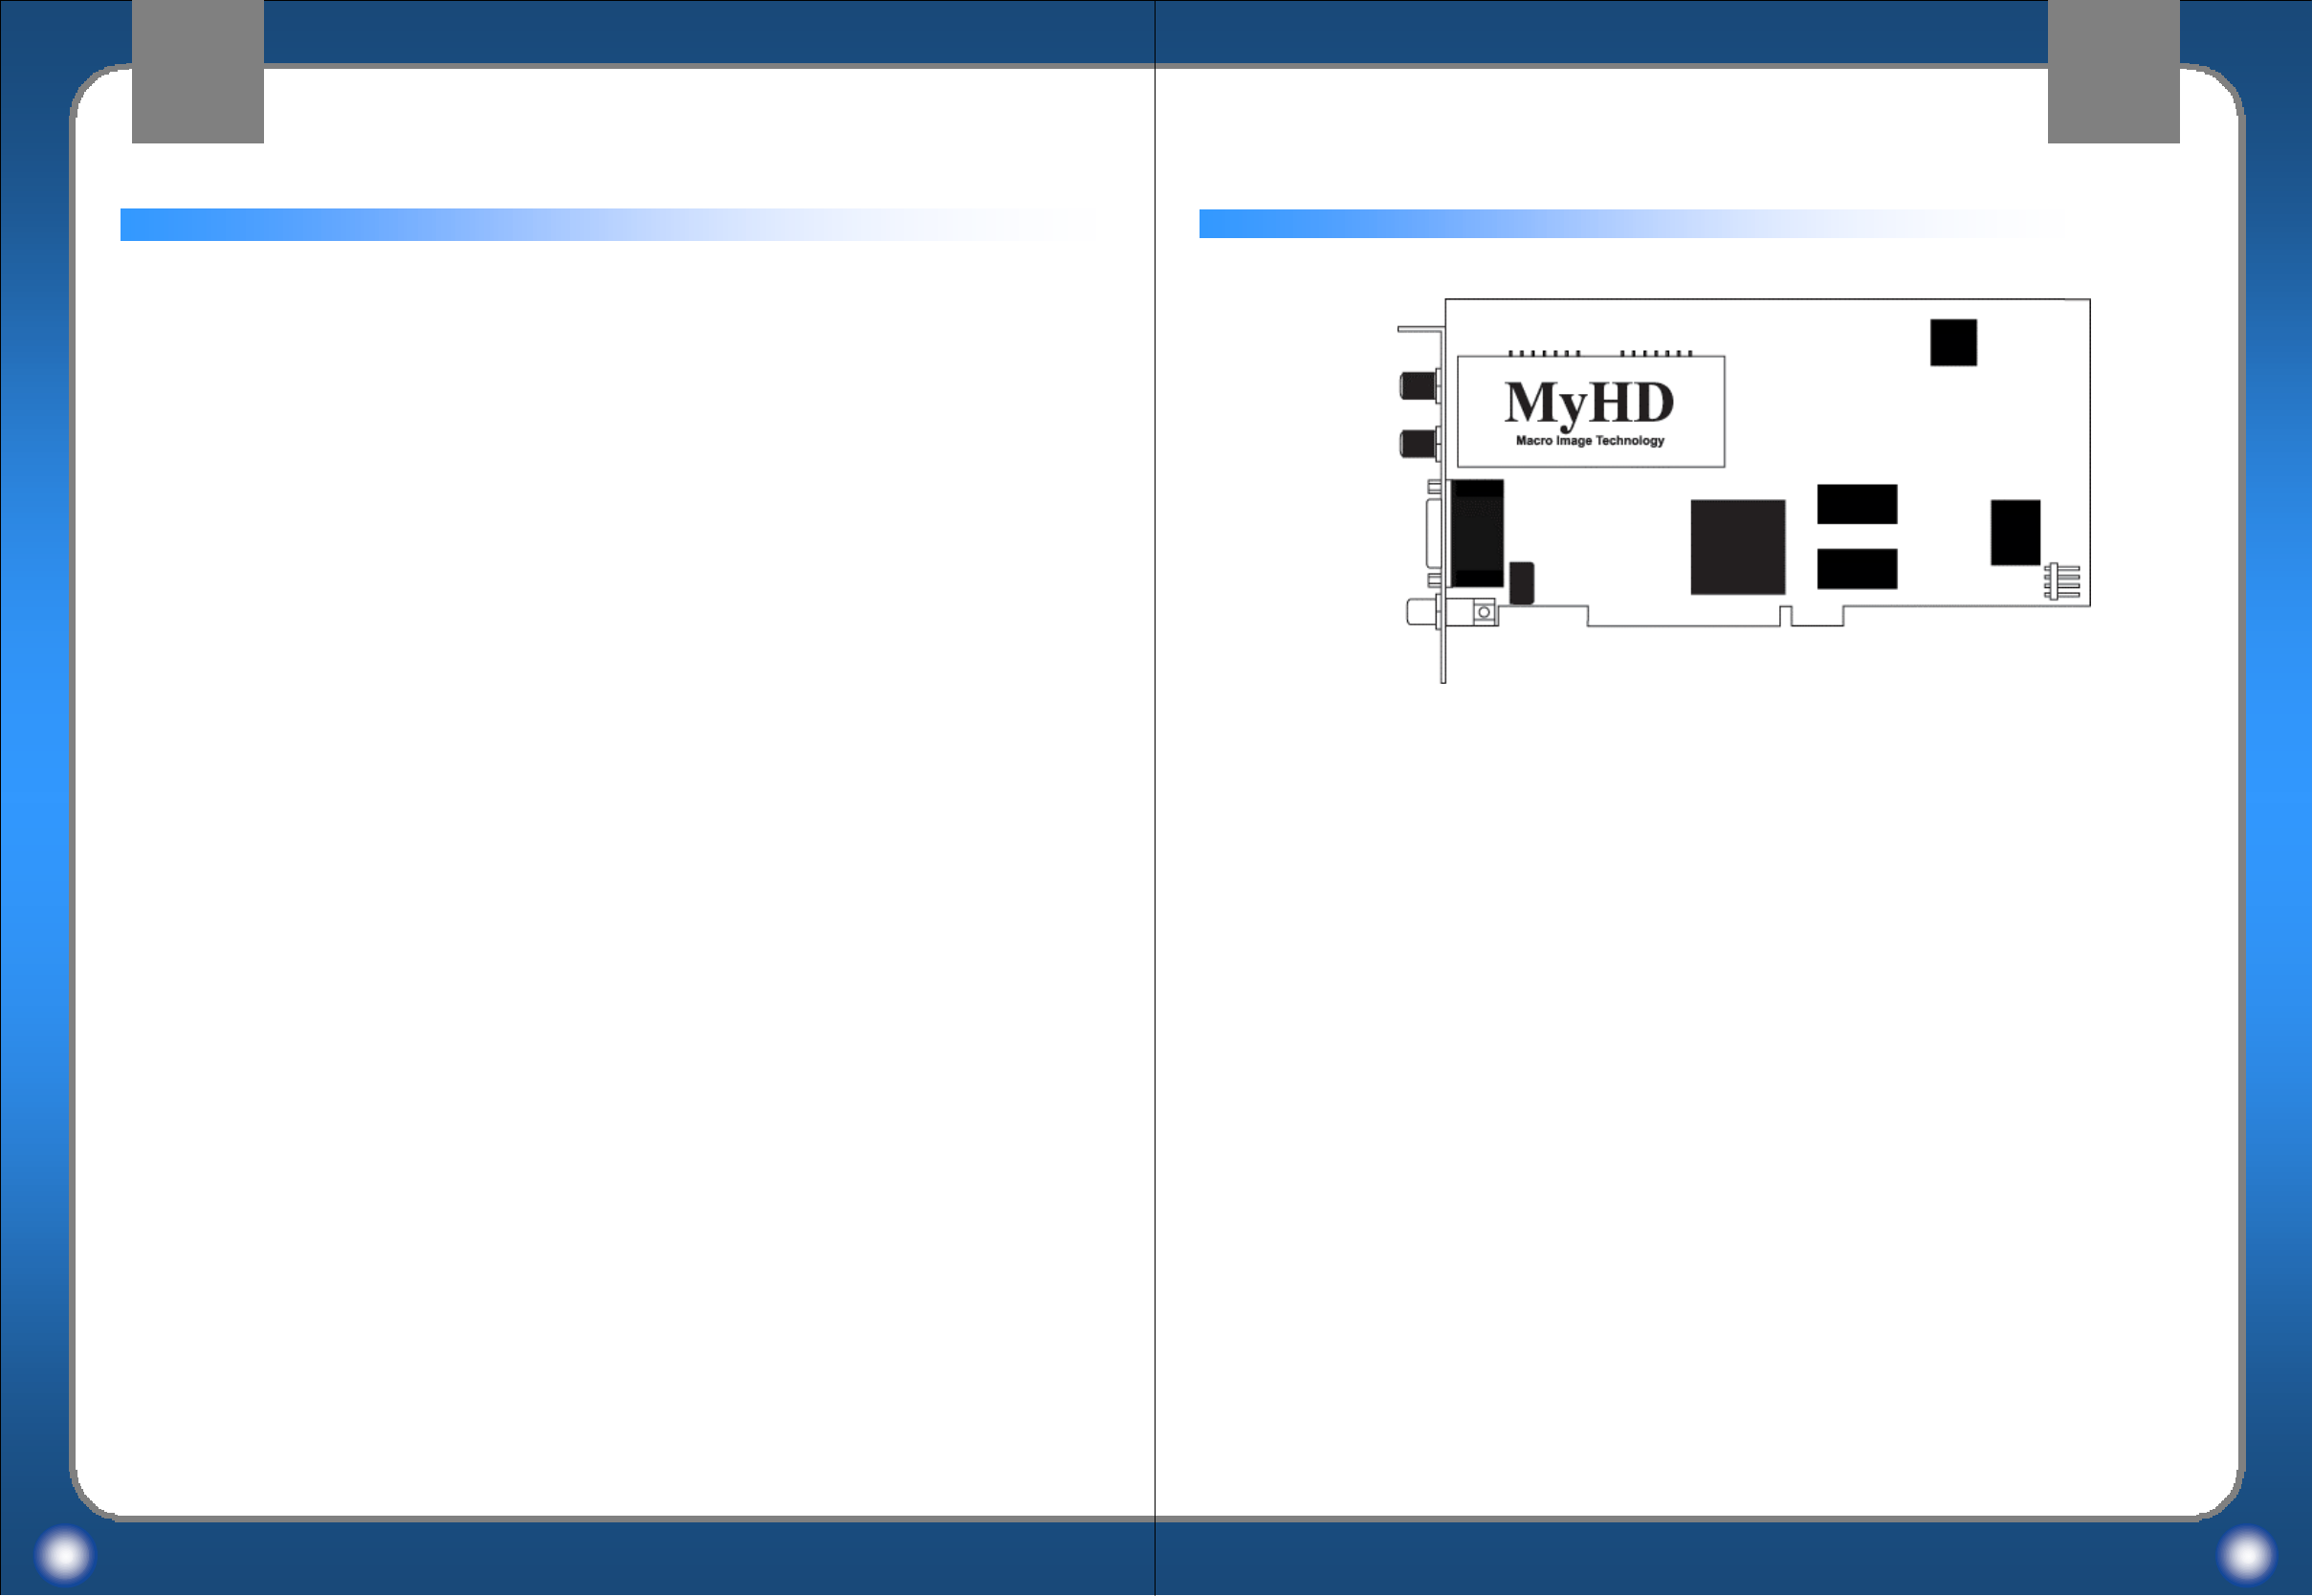
MyHD board diagram
Antenna 1
Antenna 2
A/V Connector
SPDIF Output
Audio Output
Antenna 1
Recommended to connect the antenna lead from your rooftop antenna
Antenna 2
Recommended to connect the antenna lead from your cable antenna
A/V Connector
Connector to connect A/V cable
SPDIF Output
Allows the digital audio output of the MyHD card to be connected to an external audio
amplifier.
Audio Output
Allows the analog audio output of the MyHD card to be connected to the LINE IN, AUX or
CD input of your PC sound card or motherboard(using the enclosed jumper cable).
MyHD Hardware InstallationMyHD Hardware Installation
VIP 1.1 Connector
This connector is not currently working.
VIP 1.1 Connector
Macro Image Technology
MyHD
Macro Image Technology
MyHD
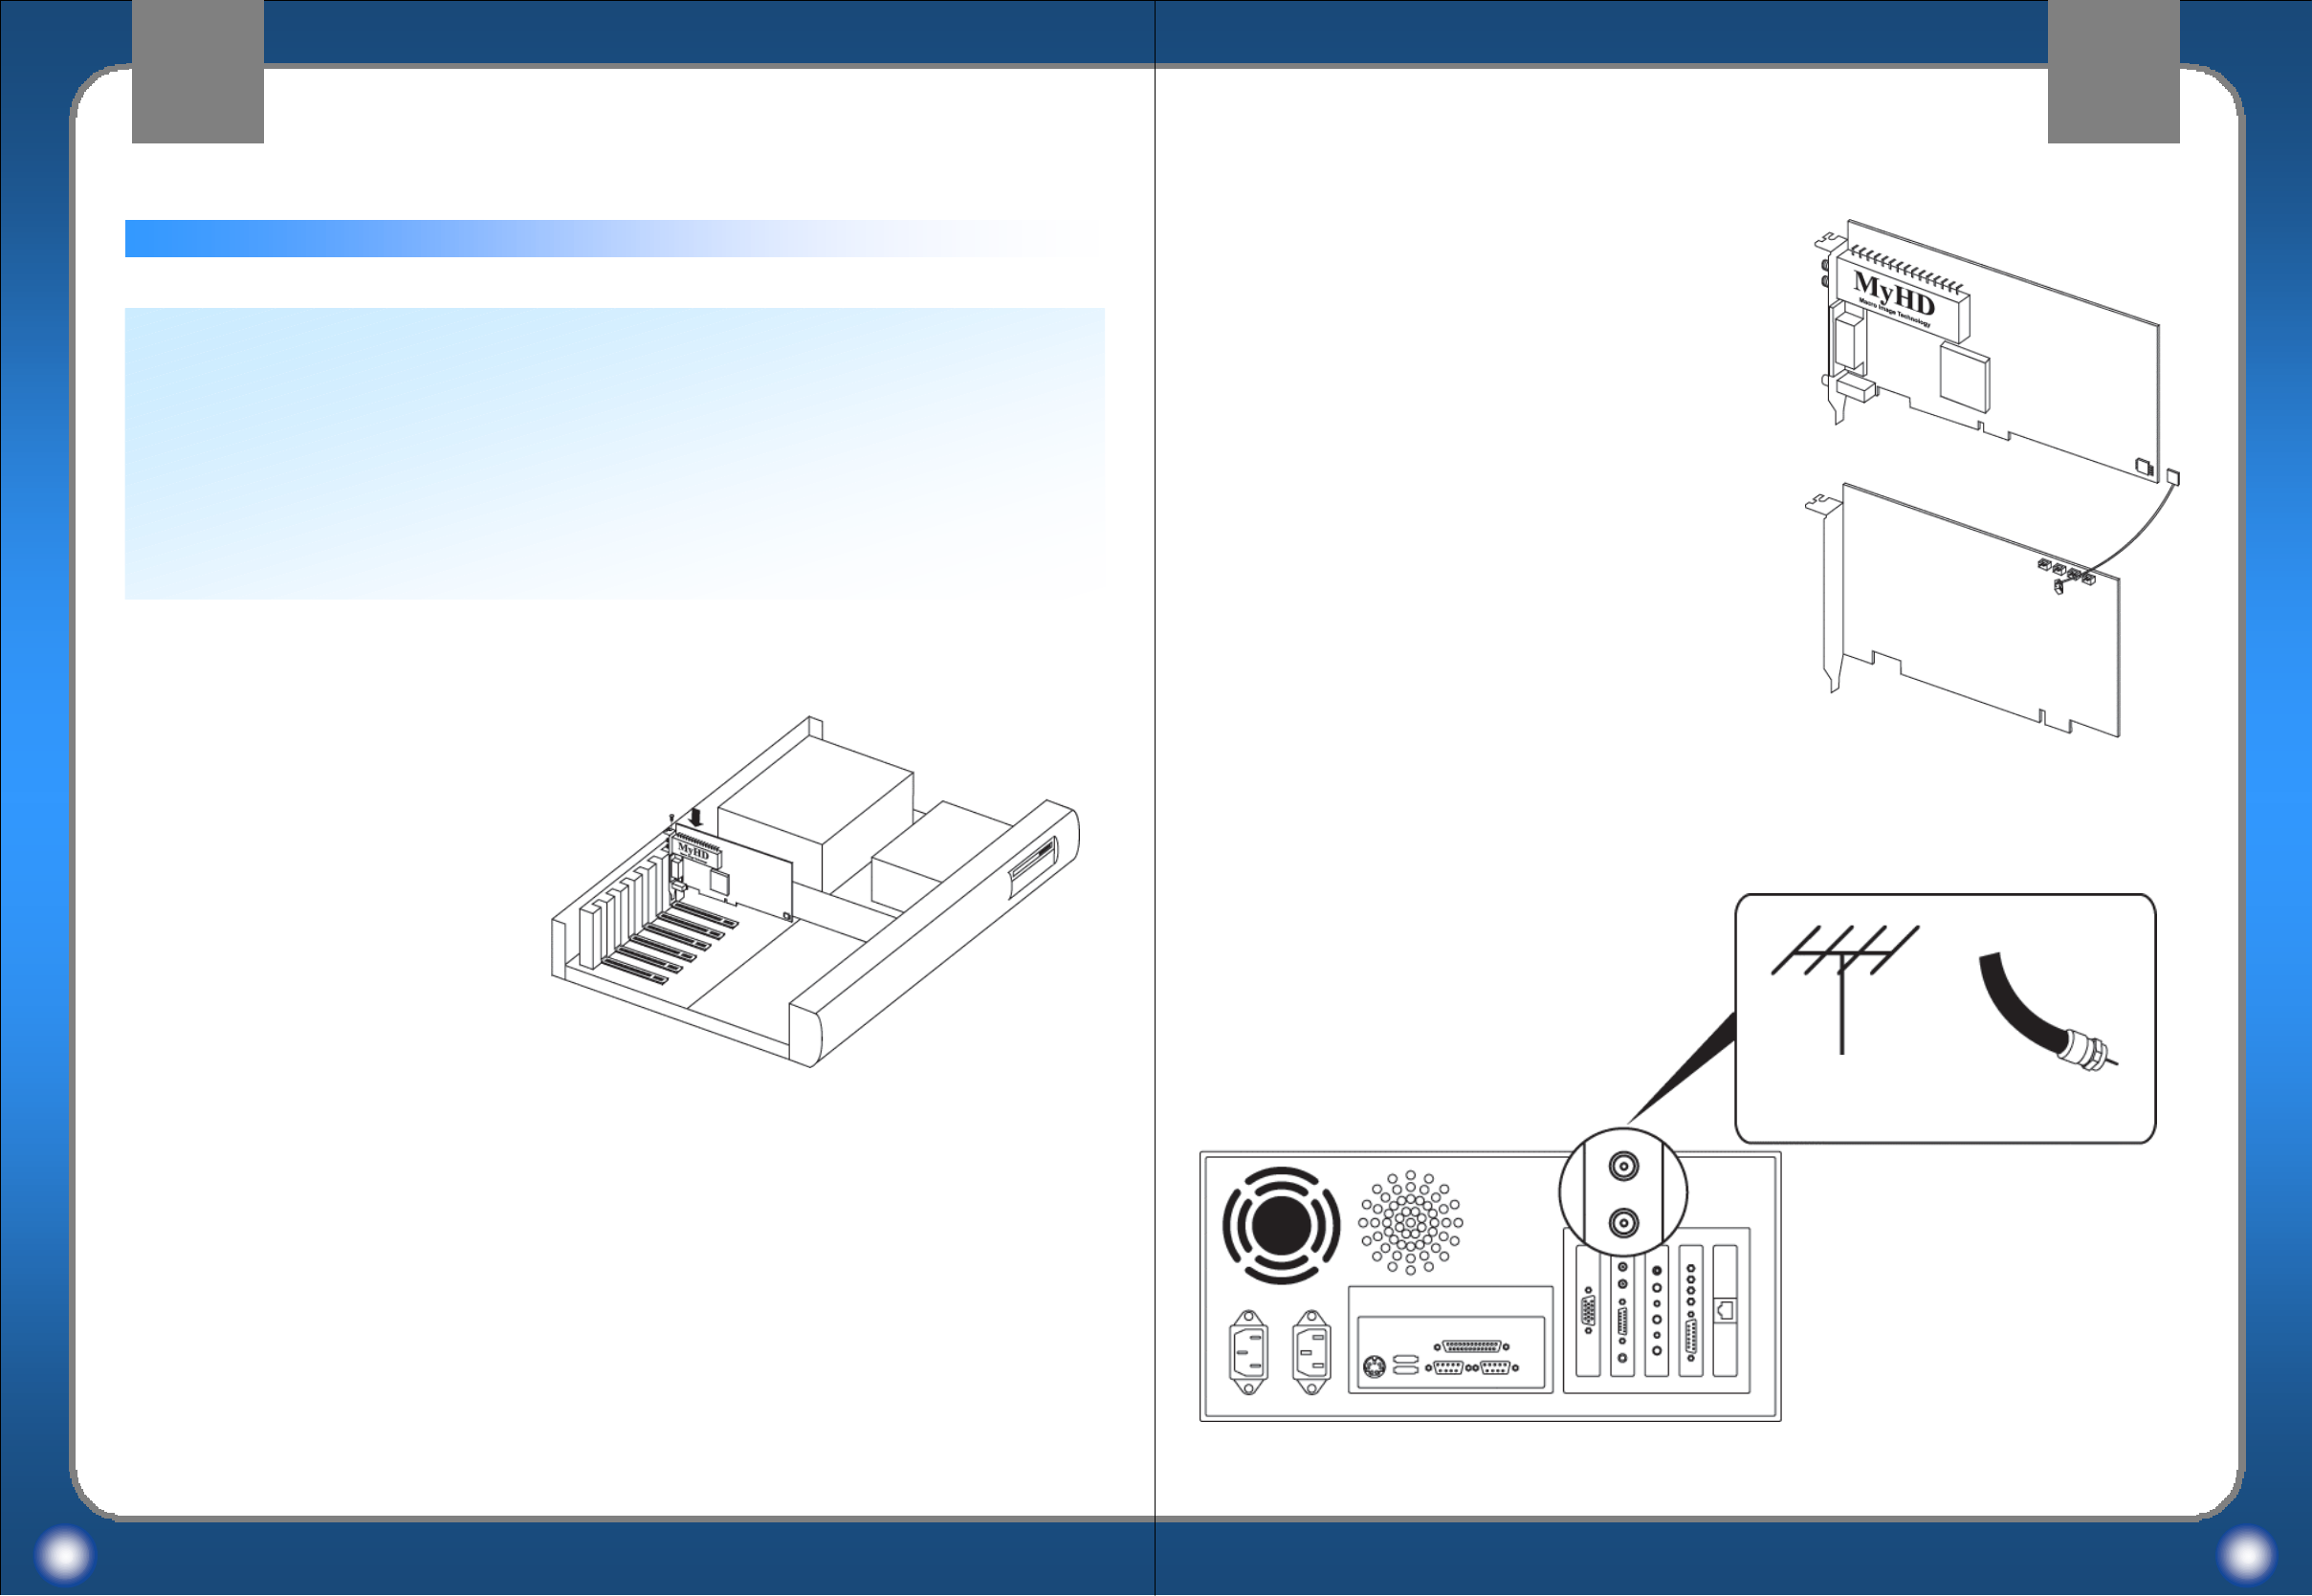
Installation of MyHD board in a PC
5 6
MyHD Hardware InstallationMyHD Hardware Installation MyHD Hardware InstallationMyHD Hardware Installation
1. With the power off, remove your computer
cover and locate an available PCI slot.
2. Remove the screw attached to the slot cover and remove the slot cover plate.
3. Before handling the MyHD card, ground yourself by touching the power supply box
inside your computer
4. Position your card directly above the PCI slot and insert the card firmly into the slot. Care
should be taken to press it evenly and snugly into its slot.
To install the MyHD board, follow the steps listed below:
Warning -Static Sensitive Components
To avoid possible damage to MyHD Board and/or other system components from static
discharge, always discharge your body’s static electricity prior to handling MyHD Board
or other system components.
Discharging can be done either by using a properly grounded anti-static wrist strap or by
simply touching the chassis of a grounded (plugged-in) computer. In addition, always
handle the card by its edges whenever possible, to avoid mechanical damage to delicate
components on the board.
5. Use the enclosed audio jumper cable to connect
the audio output of the MyHD card to the LINE IN,
AUX or CD input of your PC sound card or
motherboard.
**If the audio output is set by the jumper cable in the
MyHD application program, you have to connect the
jumper cable between the MyHD card and a sound
card. However, you do not need to do it when the
audio output is set by wave in the MyHD application
program.(Refer to “Audio Configuration on page 37 ).
6. Replace the cover on the computer.
7. Attach the antenna lead from your rooftop antenna or cable system to the antenna input
of the MyHD card.
Rooftop
Antenna Cable
Macro Image Technology
MyHD
Macro Image Technology
MyHD
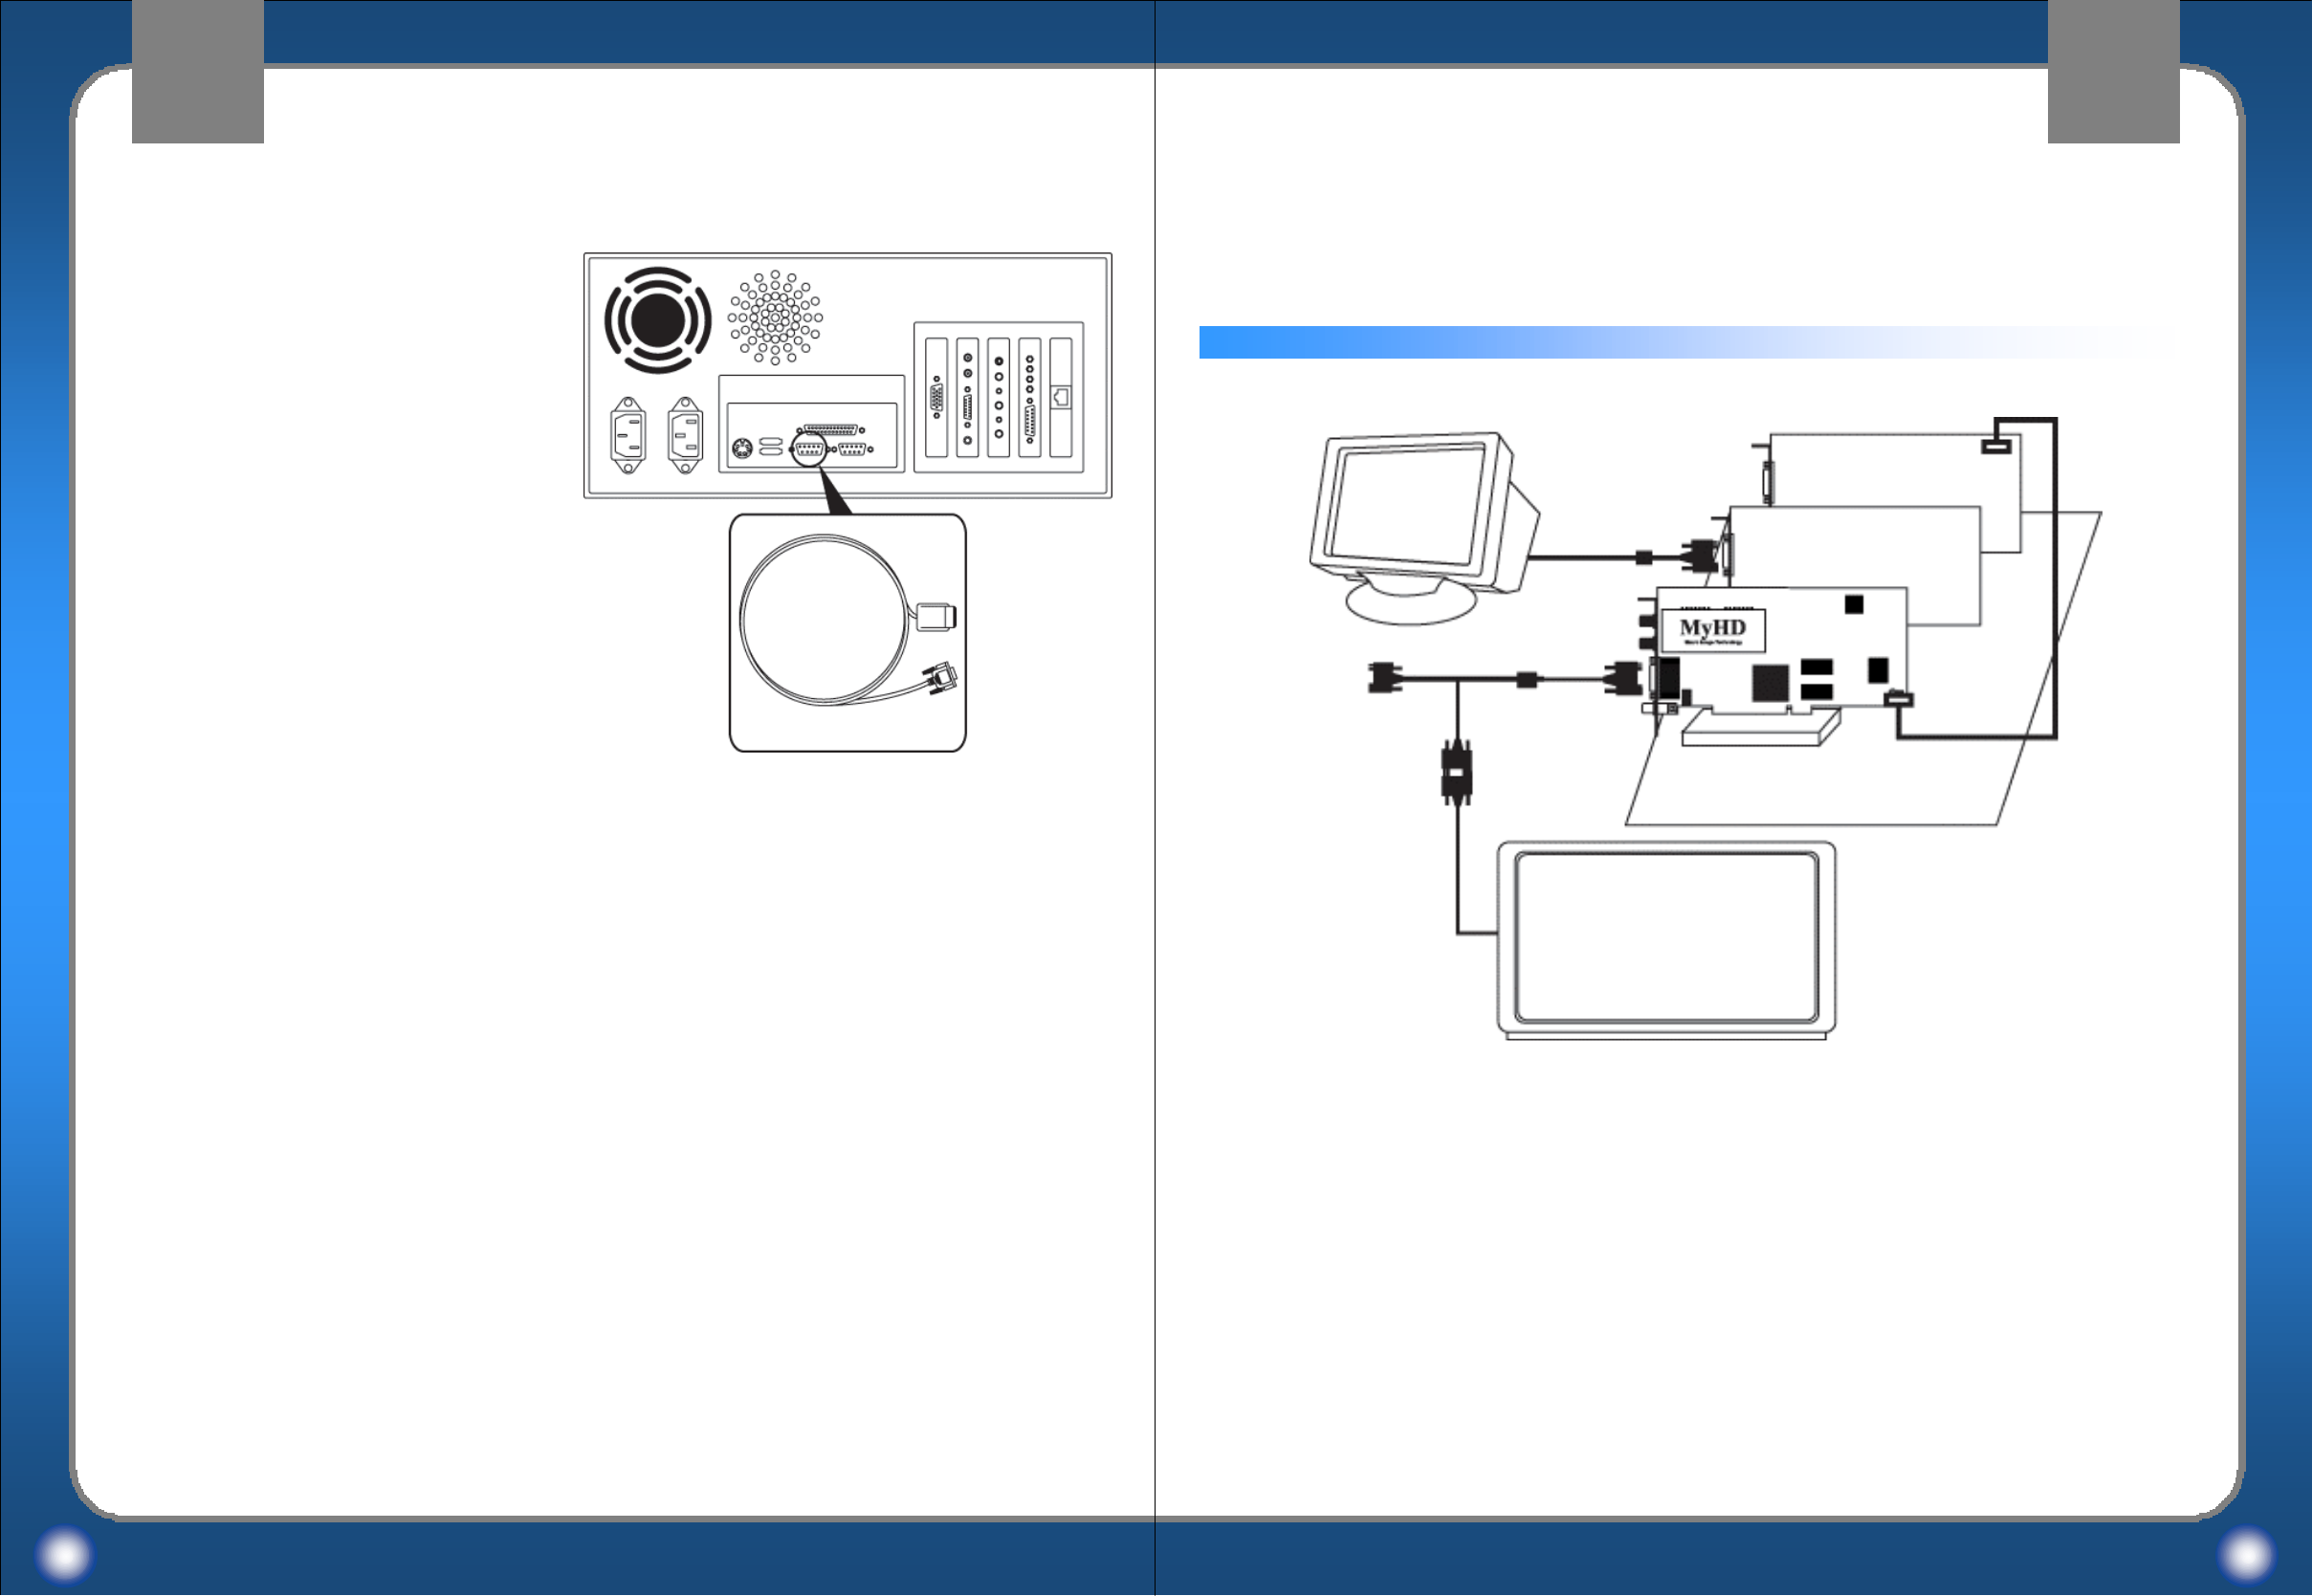
A dual monitor configuration displays the standard Windows desktop on your PC monitor
along with full-screen output from your MyHD card on a separate HDTV or VGA monitor.
MyHD supports the following resolutions and horizontal frequencies on any monitor
equipped with standard RGBHV or YPbPr inputs:
q1080i (1920x1080 interlaced, 33.7kHz)
q1024p (1024x768 progressive, 48.3kHz)
q720p (1280x720 progressive, 44.9kHz)
q480p (720x480 progressive, 31.5kHz)
q480i (720x480 interlaced, 15.75kHz)
7 8
MyHD Hardware InstallationMyHD Hardware Installation MyHD Hardware InstallationMyHD Hardware Installation
8. Connect the remote control receiver to
9-pin serial port.
Monito
r
Main Board
Graphic Card
Sound Card
HDTV
Remote Control Receiver
Dual monitor configuration
Choose your display configuration (for single-monitor displays, please go to page 9)
Macro Image Technology
MyHD
Macro Image Technology
MyHD
Monitor
Main Board
Graphic Card
Sound Card
Single Monitor Configuration
A single monitor configuration displays the output of your MyHD card in either a
resizable window or full-screen (giving you the ability to switch between the regular
Windows desktop and MyHD’s full-screen display), by using the enclosed VGA loop
through cable with external A/V connector as shown (connecting the VGA output of your
PC to the MyHD card, which then passes the combined video signals to your PC monitor).
Optional external hardware connections
Connection of Digital Audio Amp
MyHD also supports SPDIF for digital audio
output. Simply connect a digital audio cable
from the RCA output jack on the MyHD card to
the SPDIF input of any Dolby AC-3 5.1 channel
audio amplifier.
9 10
MyHD Hardware InstallationMyHD Hardware Installation MyHD Hardware InstallationMyHD Hardware Installation
You can watch and capture video from any
external source (including VCR, DVD, laserdisc,
etc.) by connecting them to the VGA loop
through cable with external A/V connector.
Simply connect the video and audio outputs
from your external source to the S-Video and/or
RCA input jacks.
A/V Cable
Camcorder VCR
Digital Audio Amp
Macro Image Technology
MyHD
Macro Image Technology
MyHD
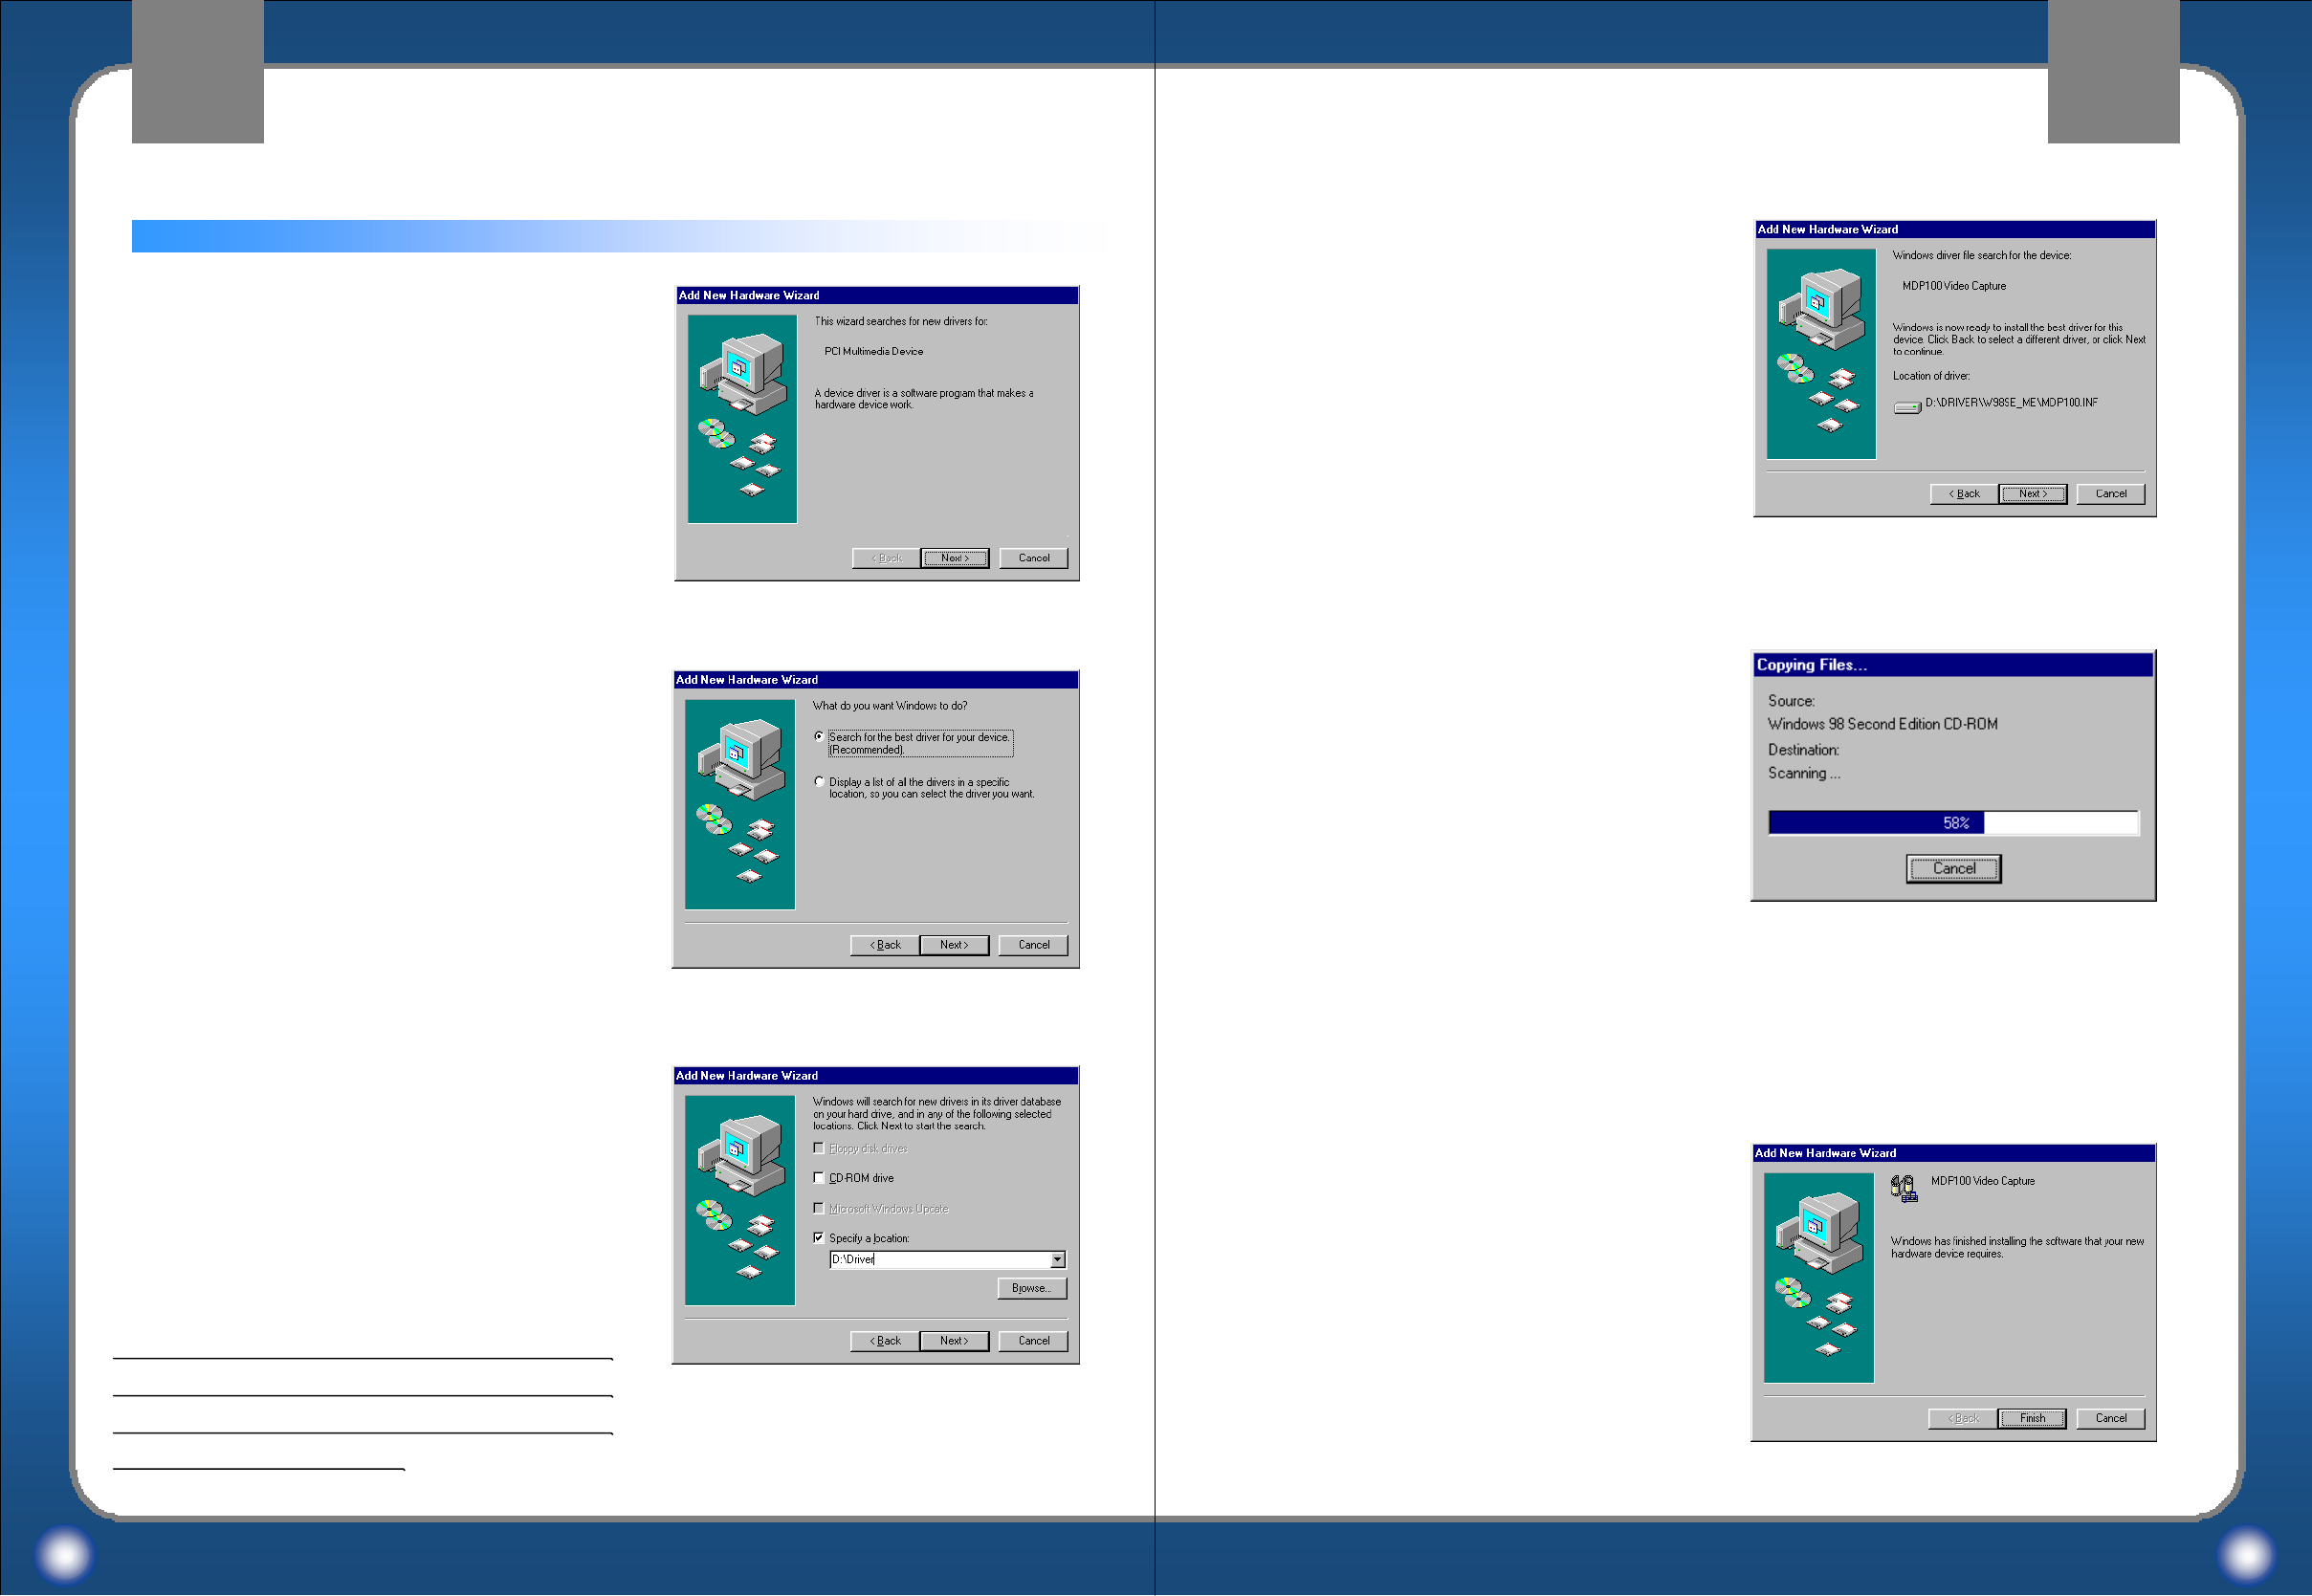
Installing the MyHD device driver for Windows 98/Me
11 12
Choose “Search for the best driver for your
device.(Recommended)”and click on “Next >”.
After your hardware installation has completed,
turn on your PC and insert the installation CD. As
Windows begins to boot, it will automatically
open the “Add New Hardware Wizard”once it
detects your addition of the MyHD card:
Click on “Next >”.
Choose “Specify a location”and then click on
Browse to open the contents of the installation
CD, navigate to the DRIVERS folder, and
choose the subdirectory for the version of
Windows currently installed on your computer
and click on “Next >”
Note: you must choose the driver which
matches your operating system as software
designed for one version of Windows may not
operate properly on another.
Click on “Next >”if MyHD driver is searched.
Copying Files…
After the installation has completed, click on
“Finish”.
MyHD Program InstallationMyHD Program Installation MyHD Program InstallationMyHD Program Installation
Macro Image Technology
MyHD
Macro Image Technology
MyHD
13 14
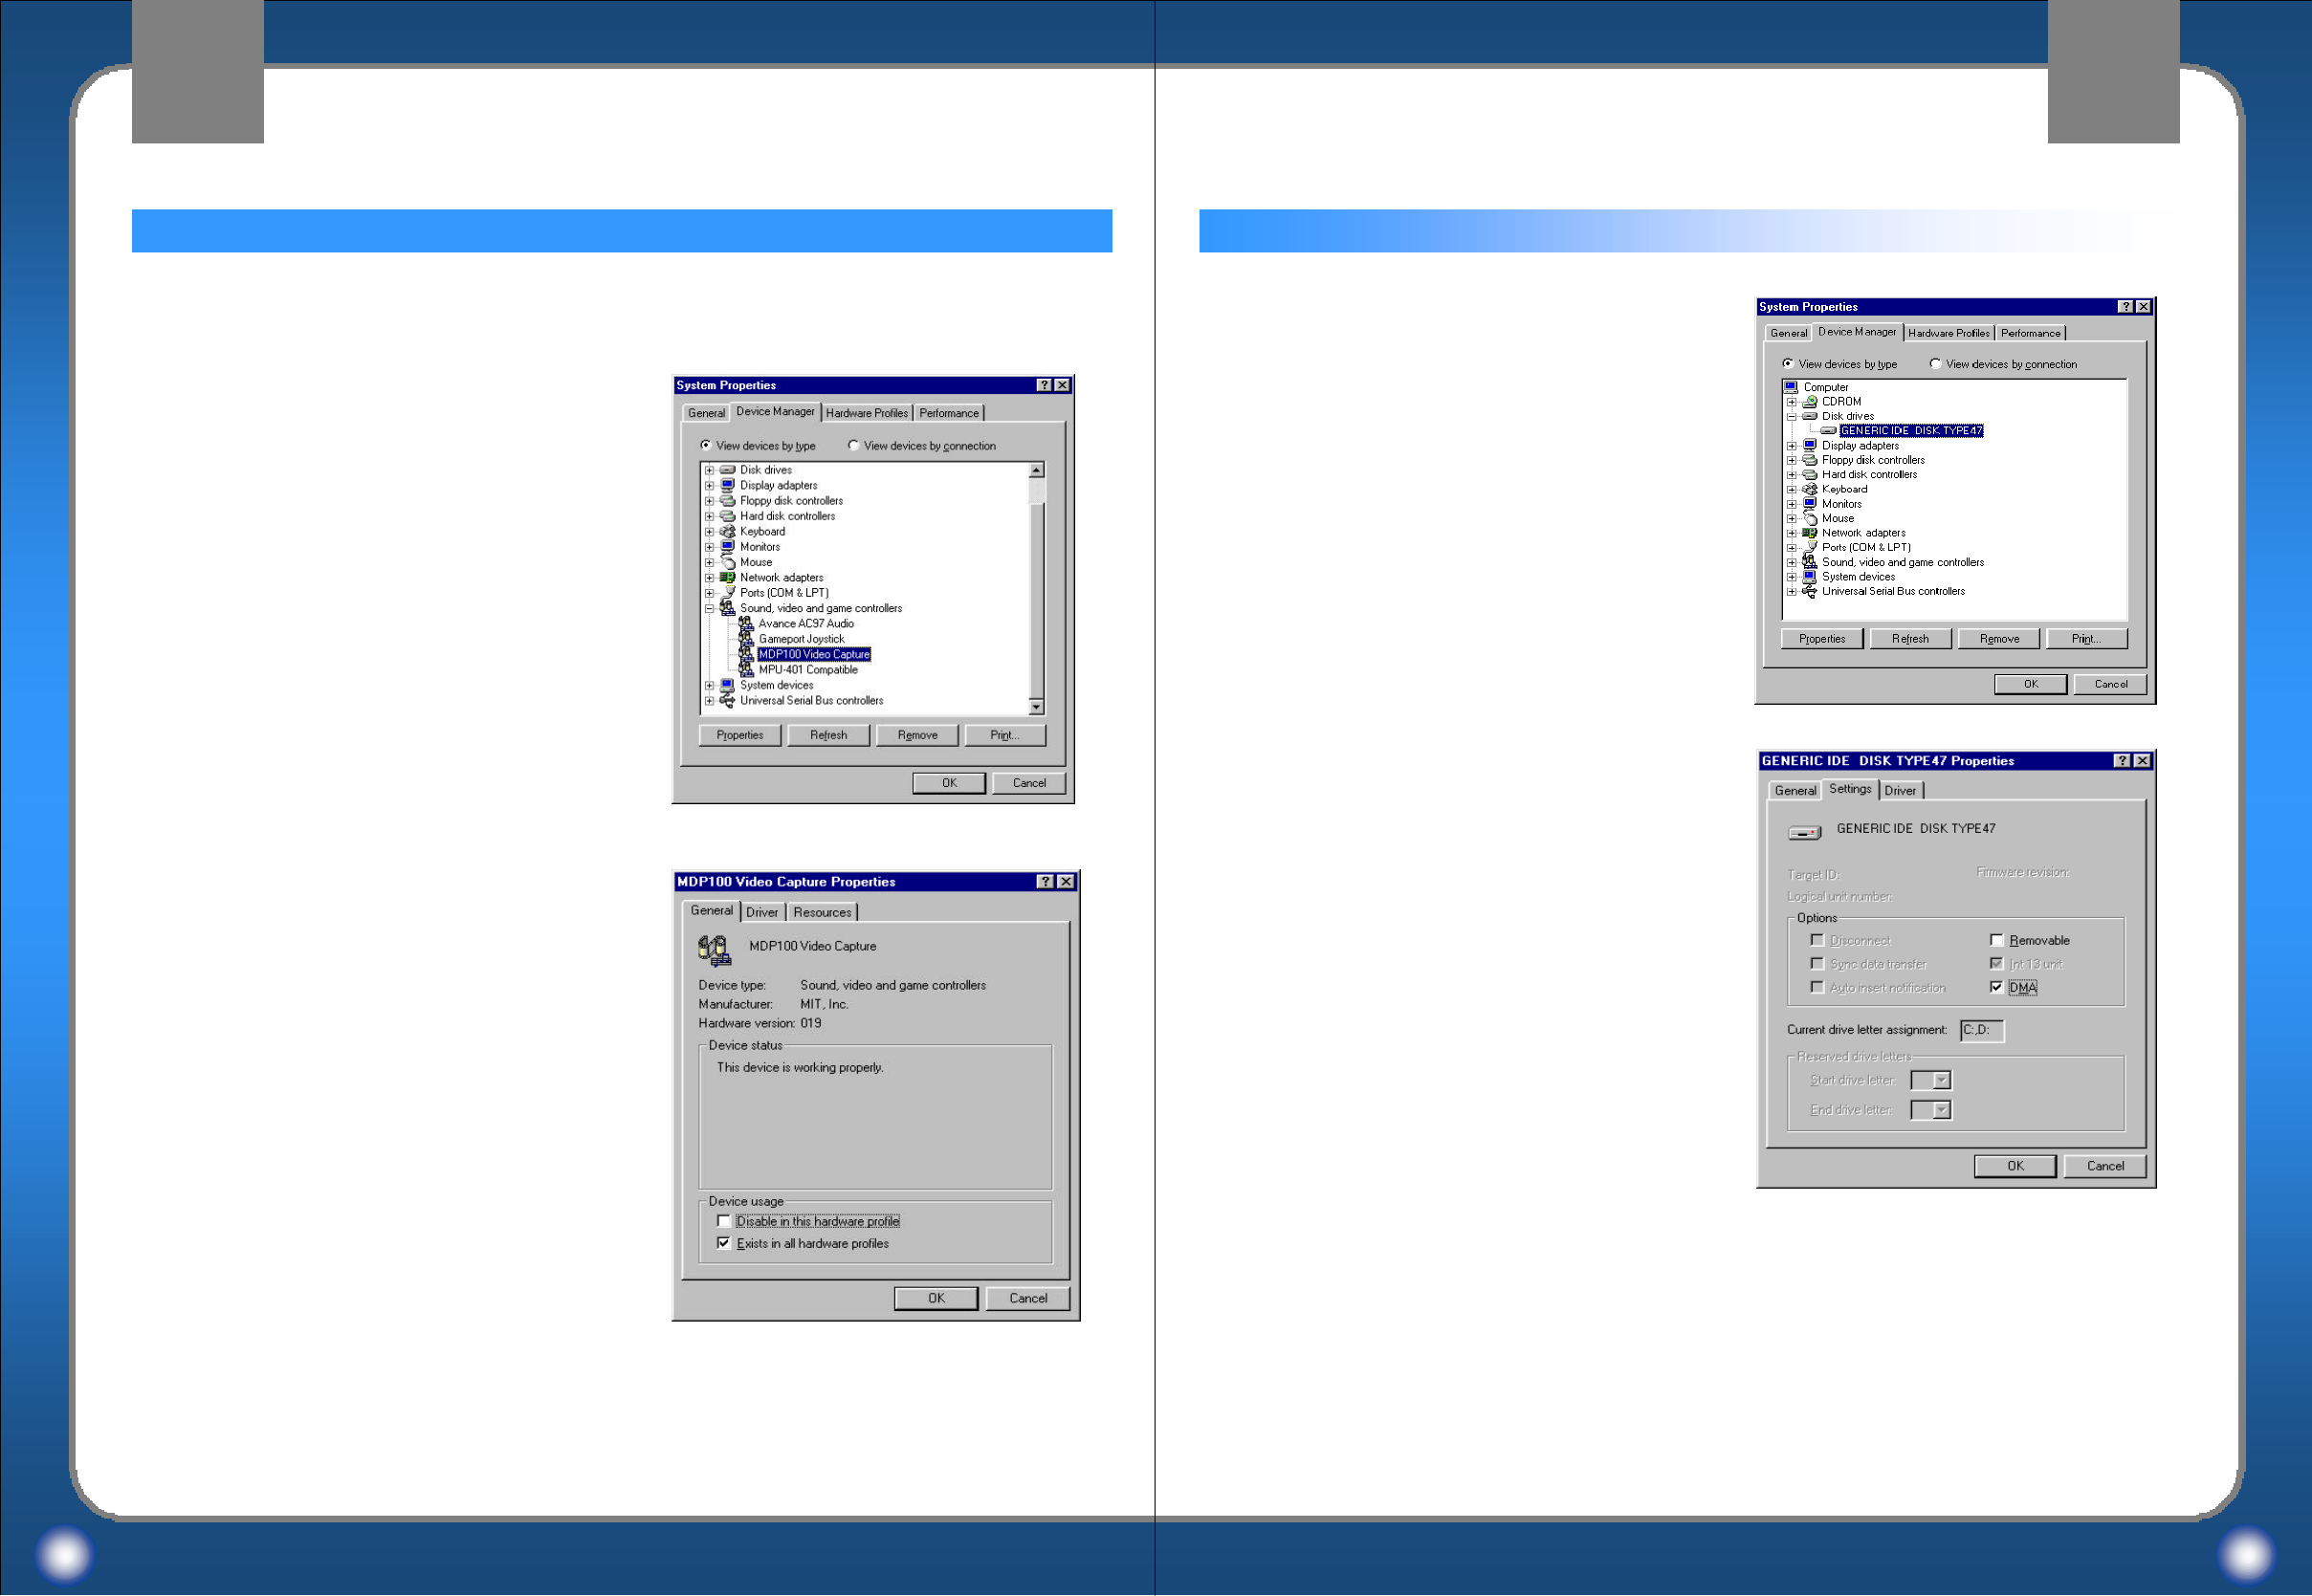
1. Choose “Control Panel”/“System”
/“Device Manager”.
2. Click “Sound, video and game controllers”
and then confirm the category of
“MDP100 Video Capture”.
Choose;
1. “MDP100 Video Capture Properties”
2. “General”
Confirm the phrase of “This device is working
properly”in Device status.
If the phrase is not shown, please install the
device driver of MyHD again.
Confirming the installation of the MyHD device driver Setting DMA
1. Choose “Control Panel”/“System”
/“Disk drives”.
2. Click “GENERIC IDE DISK …”.
Choose;
1. “GENERIC IDE DISK … Properties”
2. “Settings”
Confirm the “DMA”in Options.
If the “DMA”is not checked, please check the
“DMA”.
MyHD Program InstallationMyHD Program Installation MyHD Program InstallationMyHD Program Installation
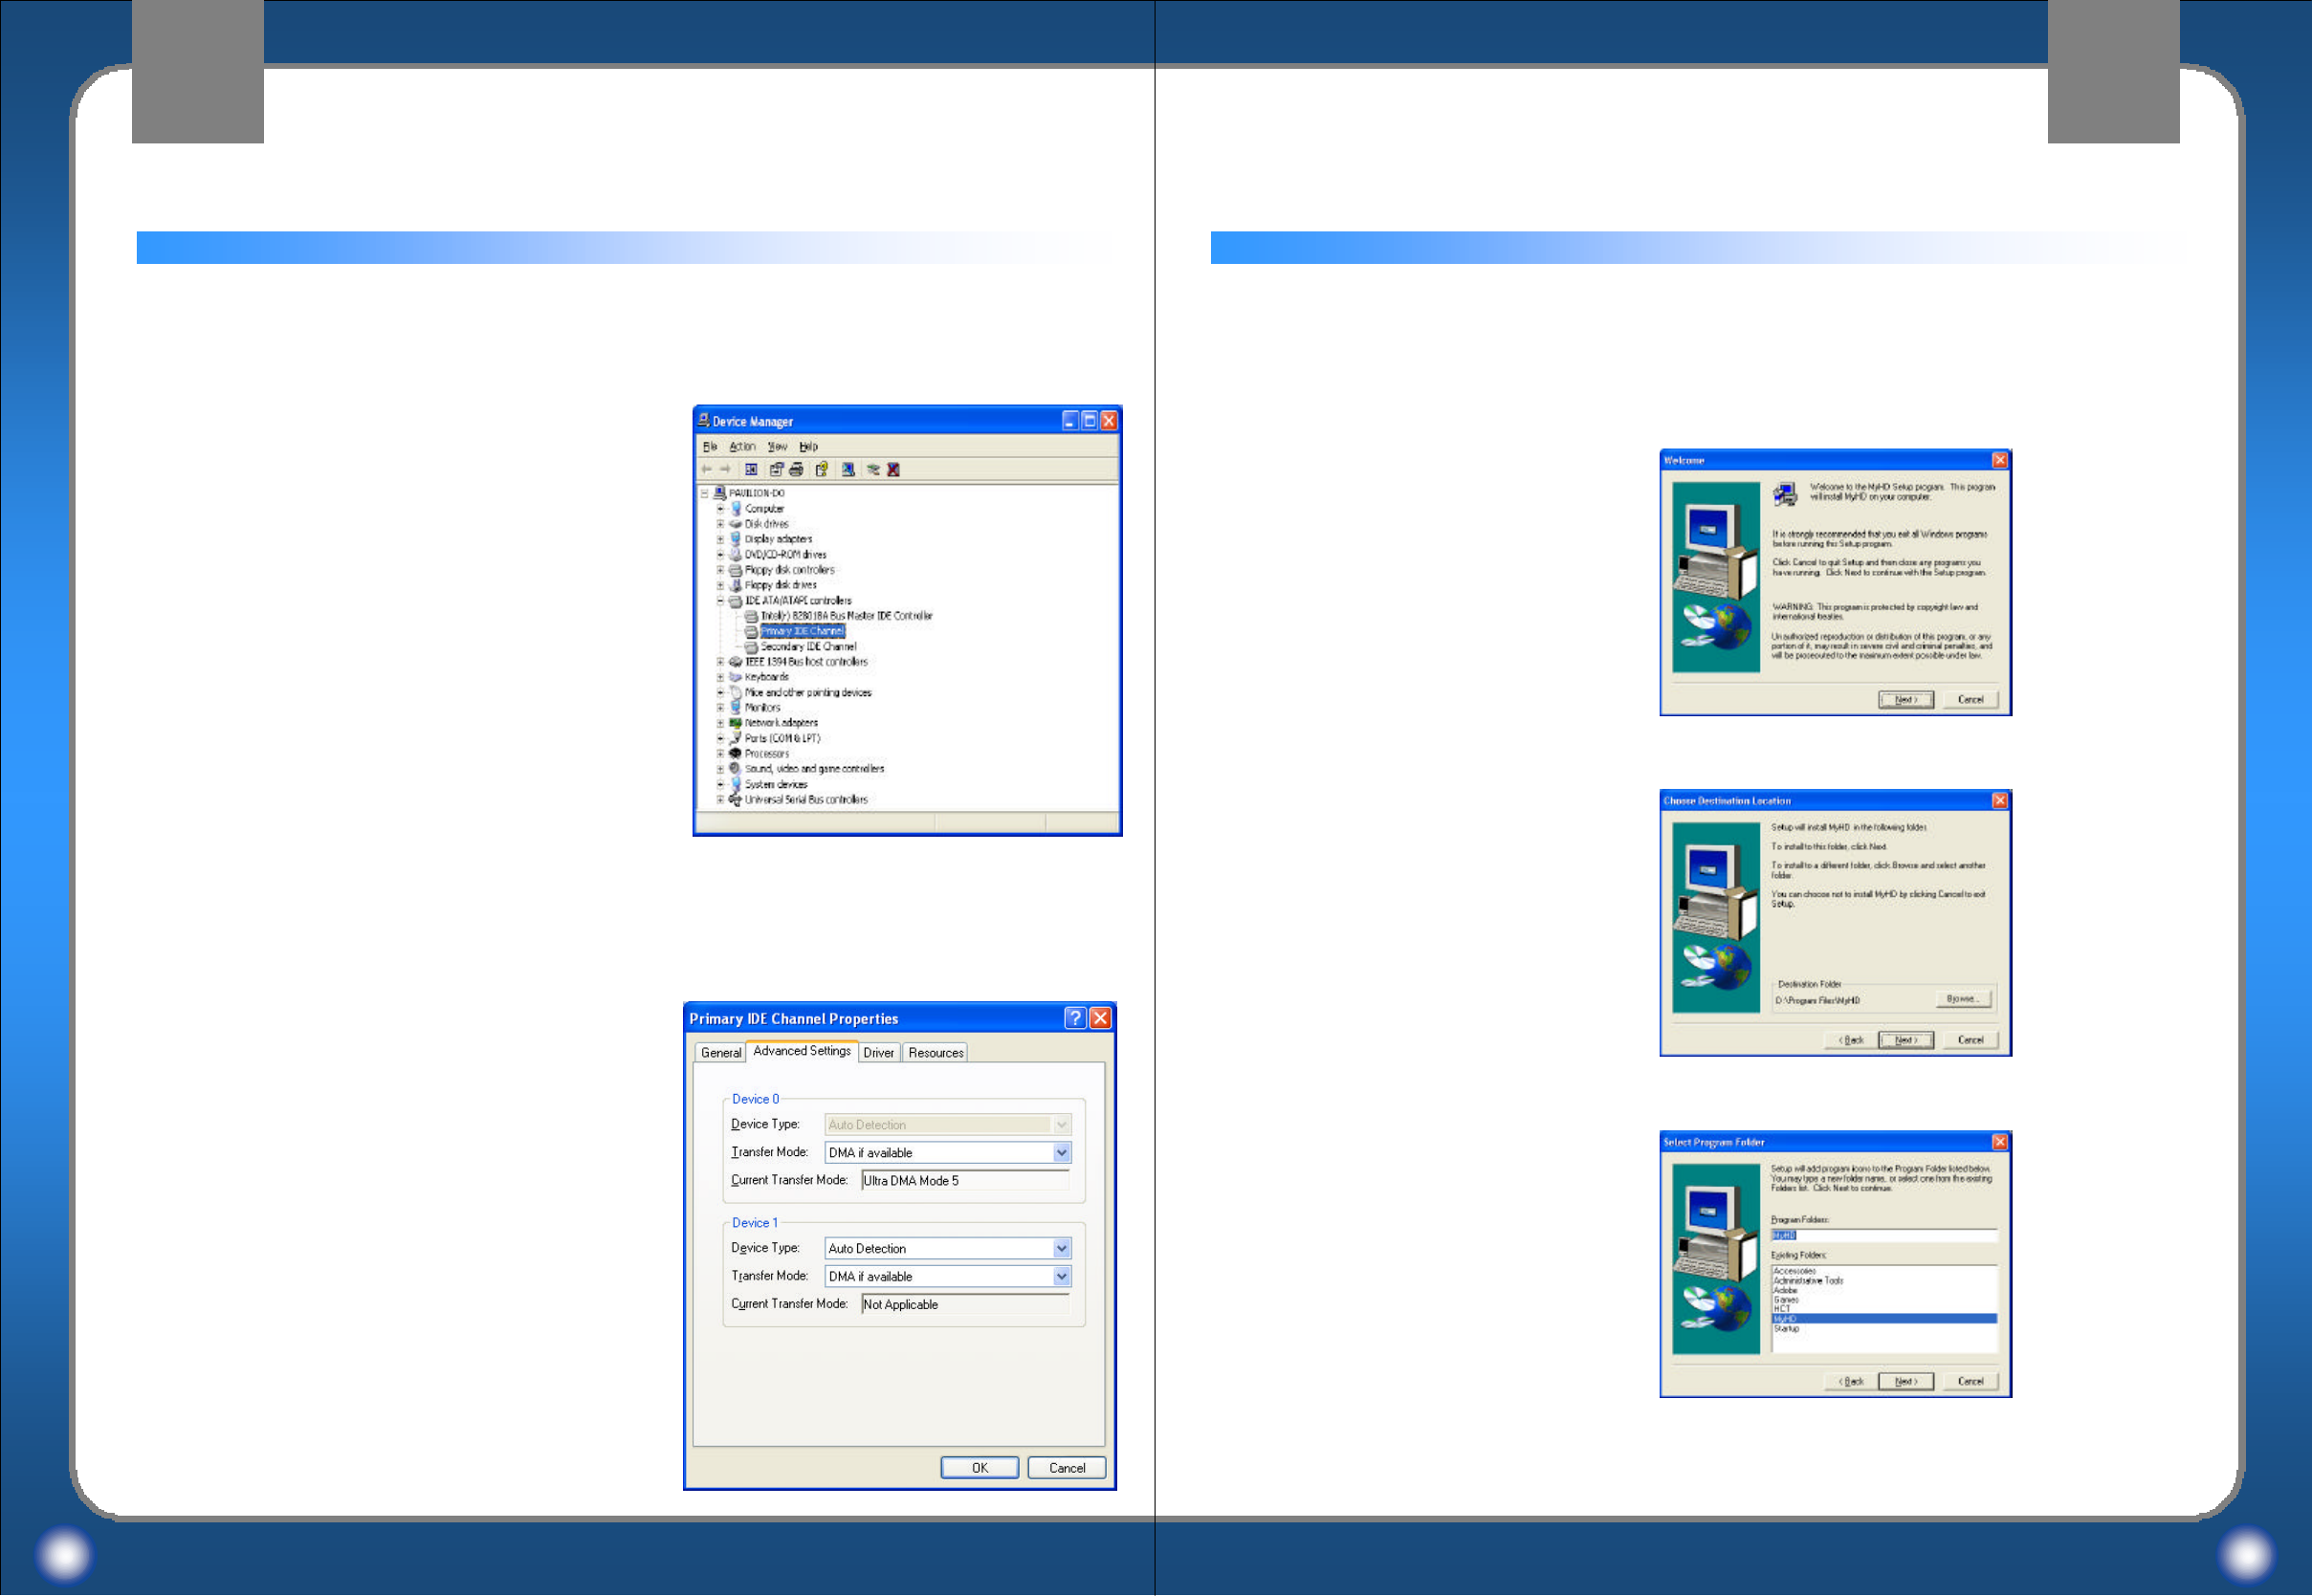
To confirm the installing MyHD in Device Manager,
Macro Image Technology
MyHD
Macro Image Technology
MyHD
MyHD Program InstallationMyHD Program InstallationMyHD Program InstallationMyHD Program Installation
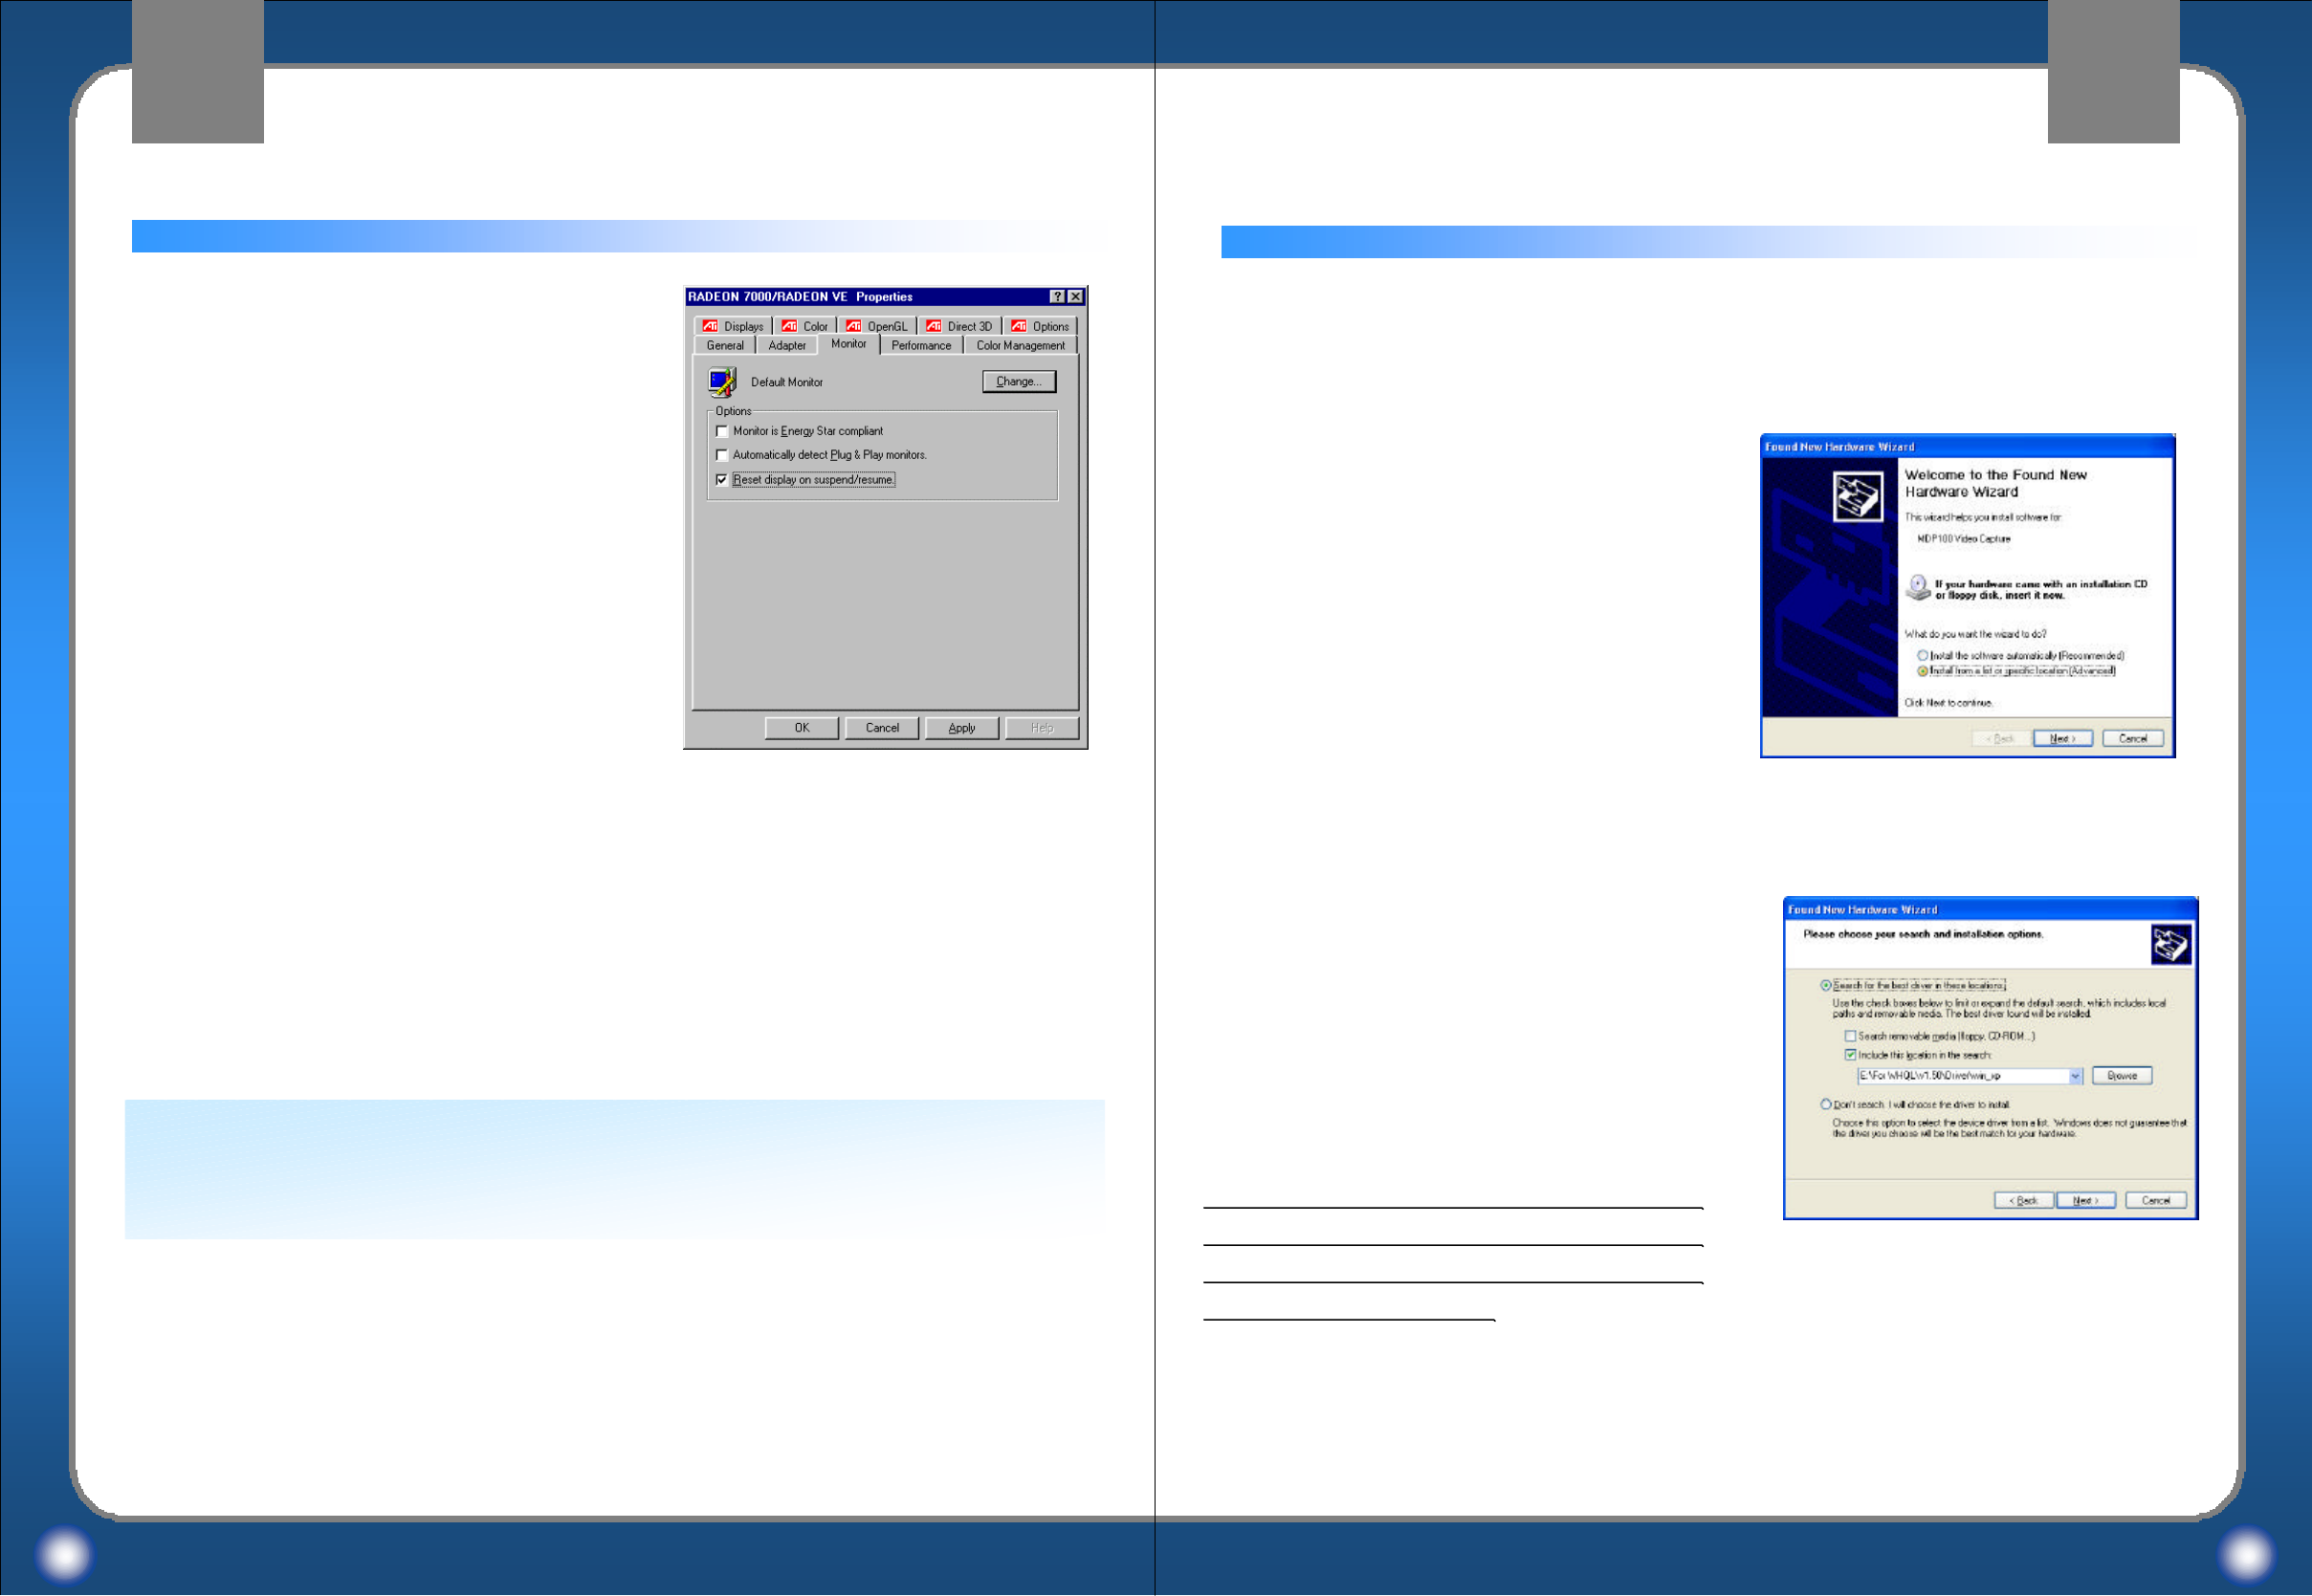
Setting windows environment
Warning
Don’t change resolution of screen area in “display properties”/”settings”while the MyHD
program is executing.
If the monitor is connected to VGA card
through VGA loop through cable with
external A/V connector, confirm display
properties.
1. Choose “Control Panel”/“Display”.
2. Choose “Settings”/“Advanced”in display
Properties.
3. Choose “Monitor”and then uncheck
“Automatically detect Plug & Play monitors.”
15 16
Installing the MyHD device driver for Windows XP
After your hardware installation has completed, turn on your PC and insert the installation
CD. As Windows begins to boot, it will automatically open the “Found New Hardware
Wizard”once it detects your addition of the MyHD card:
Choose “Install from a list or specific location
(Advanced)”and click on “Next >”.
Choose “Search for the best driver in these
locations”and “Include this location in the
search,”then click on Browse to open the
contents of the installation CD, navigate to the
DRIVERS folder, and choose the subdirectory
for the version of Windows currently installed
on your computer and click on “Next >”.
Note: you must choose the driver which
matches your operating system as software
designed for one version of Windows may not
operate properly on another.

Macro Image Technology
MyHD
Macro Image Technology
MyHD
17 18
MyHD Program InstallationMyHD Program Installation MyHD Program InstallationMyHD Program Installation
Click on “Next >”to install the driver.
After the installation has completed, click on
“Finish”.
1. Choose “Control Panel”/“System”
/“Device Manager”
2. Click “Sound, video and game controllers”
then confirm the category of
“MDP100 Video Capture”.
Choose;
1. “MDP100 Video Capture Properties”
2. “General”
Confirm the phrase of “This device is working
properly”in Device status.
If the phrase is not shown, please install the
device driver of MyHD again.
Confirming the installation of MyHD device driver
To confirm the installation of MyHD device driver in Device Manager,
Macro Image Technology
MyHD
Macro Image Technology
MyHD
19 20
MyHD Program InstallationMyHD Program Installation MyHD Program InstallationMyHD Program Installation
Confirming DMA Settings
To confirm the installing MyHD in Device
Manager(DMA is default “Transfer Mode”in
Windows XP),
1. Choose “Control Panel”/“System”
/“Device Manager”
2. Select “IDE ATA/ATAPI Controllers”
/”Primary IDE Channel”
3. Click “Advanced Setting”then, confirm DMA
is selected in “Transfer Mode”
With the installation CD still loaded in your PC, open the Windows Explorer, navigate to the
APP folder on the CD, and double-click on SETUP.EXE to launch the installation, following
the on-screen prompts until installation is complete.
Click Next >
Choose Destination Folder,
Click Next >
Choose a program folder,
Click Next >
Installing the MyHD Application Software
To confirm the installing MyHD in Device Manager,
Macro Image Technology
MyHD
Macro Image Technology
MyHD
21 22
MyHD Program InstallationMyHD Program Installation
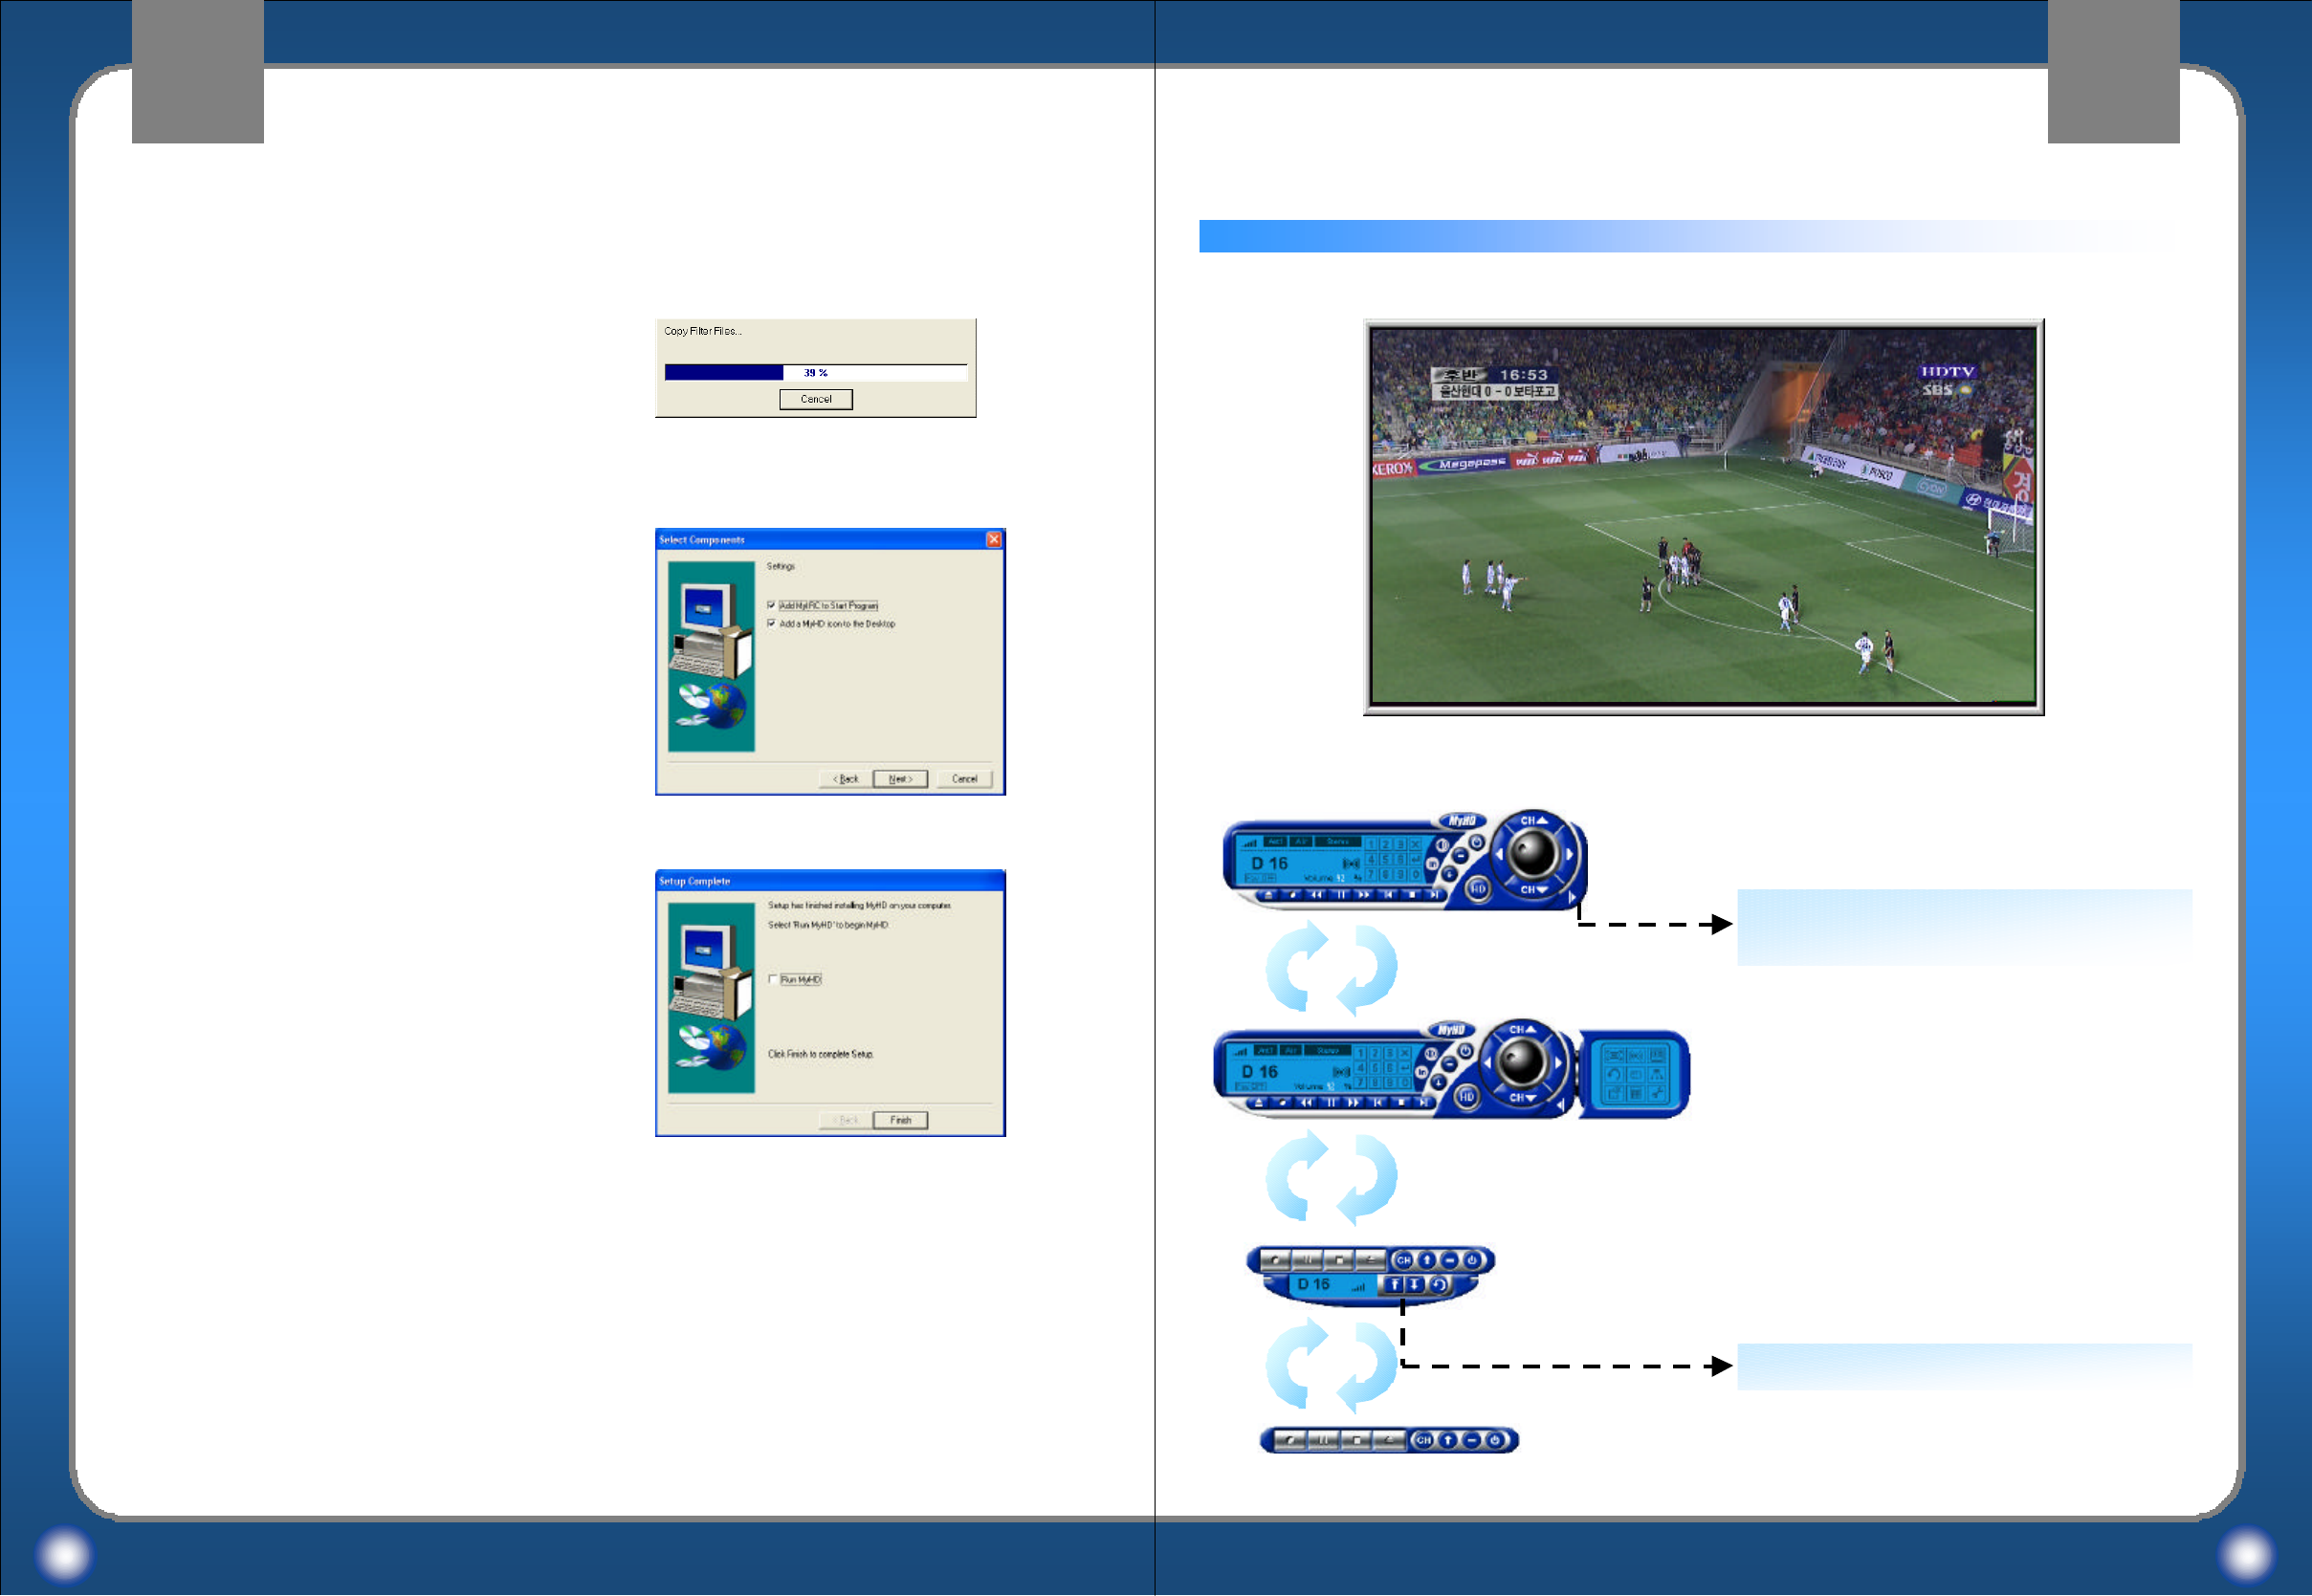
Installing is started.
The right window is appeared after
completing installing.
Desired Settings are set, then
click Next >
Installing of MyHD is completed.
To run the MyHD program immediately,
Check the check box and click Finish.
Mini control panel
for simple operation such as channel
up/down and volume up/down.
Overlay window for watching TV
The below window will be appeared when you execute the MyHD program.
Expanded Main control panel for
configuring MyHD
Goes to main control panel
Main control panel
for the MyHD
Operating MyHD
MyHD ProgramMyHD Program
Macro Image Technology
MyHD
Macro Image Technology
MyHD
23 24
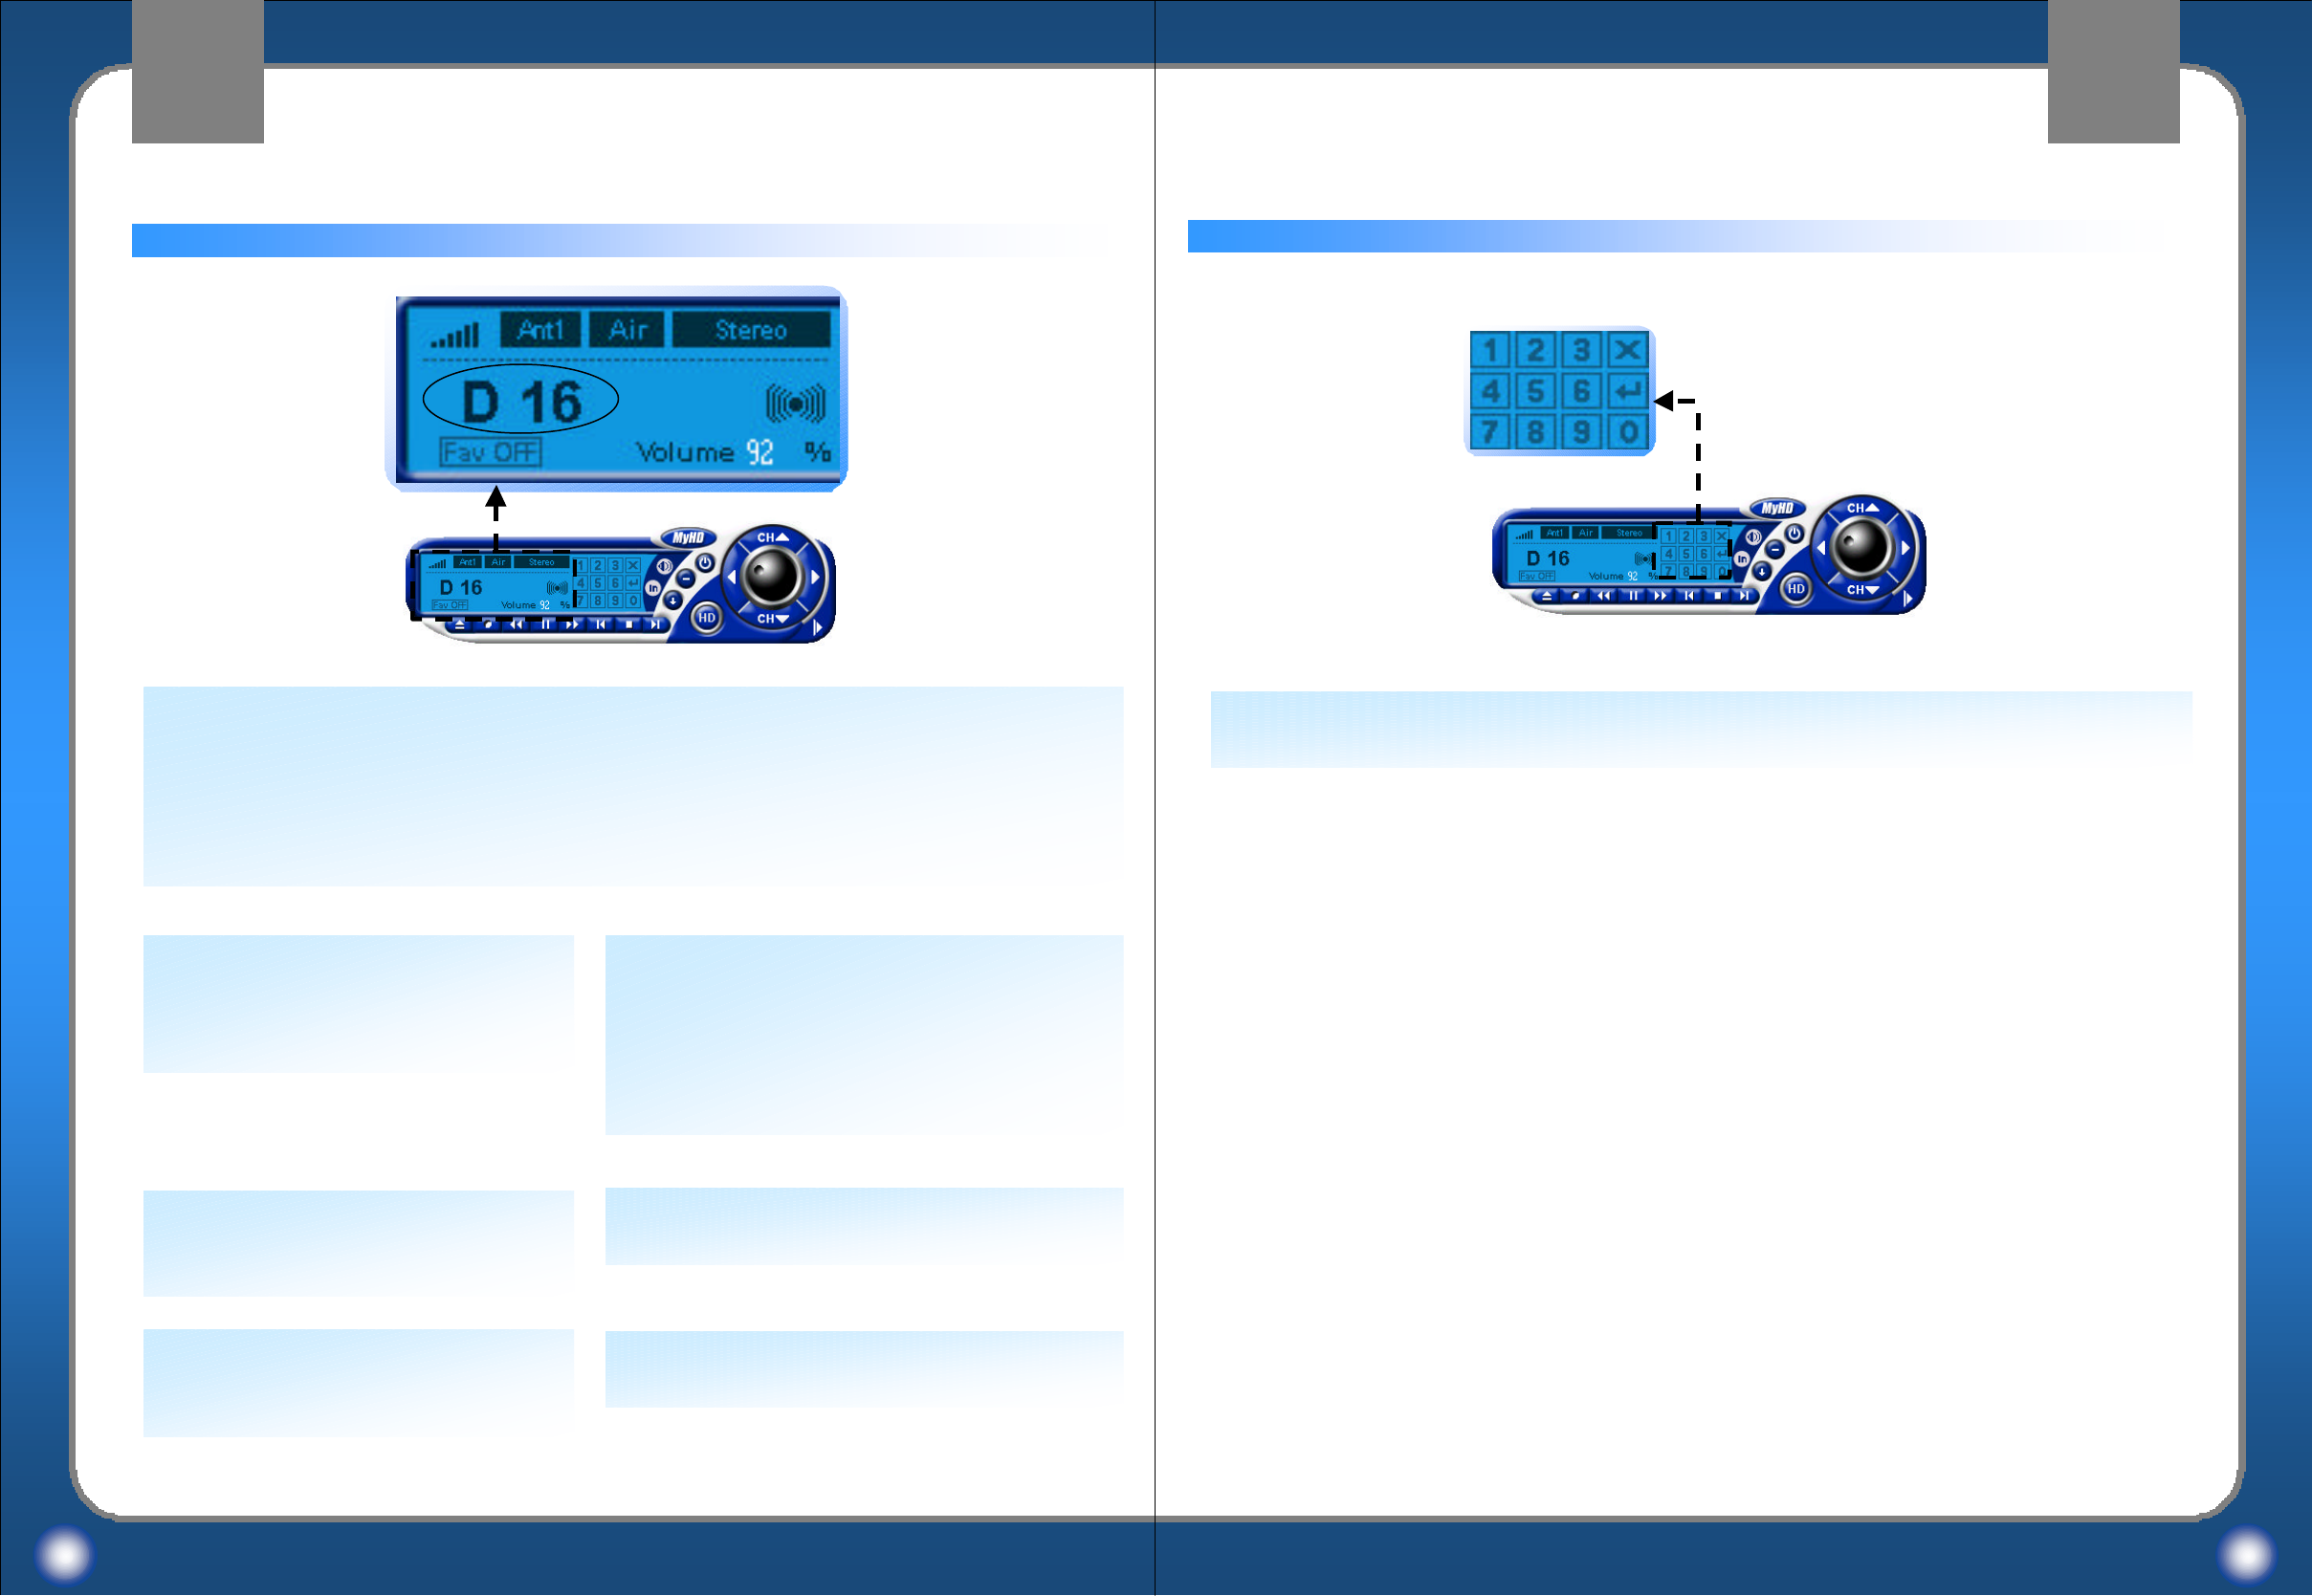
MyHD ProgramMyHD Program MyHD ProgramMyHD Program
Channel number key pad
Select a channel number by a mouse.
You can also select a channel by a keyboard.
Current Channel
Indicate a current channel.
The D notes a digital broadcasting and the A
notes an analog broadcasting channel.
Following the channel number, -1 or -2 notes a
sub-channel if the sub-channel is existed.
Current Display Status
Audio Status
Indicate the current audio configuration.
1. On digital broadcasting: Dual Mono, Center, Stereo, LCR, LRS, LCRS, LRLsRs or
LCRsLs (L:left, R:right, C:center, Ls:left surround, Rs:right surround) will be
displayed.
2. On analog broadcasting: Stereo, Mono, SAP will be displayed.
Receiving Sensitivity
Indicate the sensitivity of Antenna
Receiving on a current digital
broadcasting channel.
Current Volume
Display current volume.
Favorite Channel Mode
Display the favorite channel mode is on/off.
Air/Cable
Display a current channel, either
terrestrial or cable.
Current Input
Display a current input antenna, either
Ant1 or Ant2.
Macro Image Technology
MyHD
Macro Image Technology
MyHD
25 26
Channel and volume control
Configuration
Mode setting
File control
Channel Up/Down
Change next channel in
a channel list.
Sub-channel Up/Down
Change the sub-channel if a
sub-channel exists.
Volume
Control volume.
Press mouse in knob
and spin clockwise,
volume will be risen.
Exit Program
Exit the MyHD program.
Hide Control Panel
Hide control panel.
Change Control Panel
Change to mini control
panel.
Input Select
Select input mode:
antenna 1, antenna 2,
external A/V in or file.
Mute Volume
Mute audio volume.
Full Screen
Change to full screen
mode.
Change Sub-channel
Change a sub-channel if it
exists.
Closed Caption
Configure closed
caption.
(It will be served the
next version.)
Change Audio
Switch audio mode to stereo,
mono or SAP in analog TV,
switch audio channel in digital
TV or DVD file play if multiple
audio channels are available.
Program Guide
Display program guide.
(This will serve next
version)
Channel List
Change a channel list
Change Aspect Ratio
Change an aspect ratio in
overlay window:
2:1, 16:9 or 4:3.
Configuration
Configuration MyHD
Environment.
MyHD ProgramMyHD Program MyHD ProgramMyHD Program
Macro Image Technology
MyHD
Macro Image Technology
MyHD
27 28
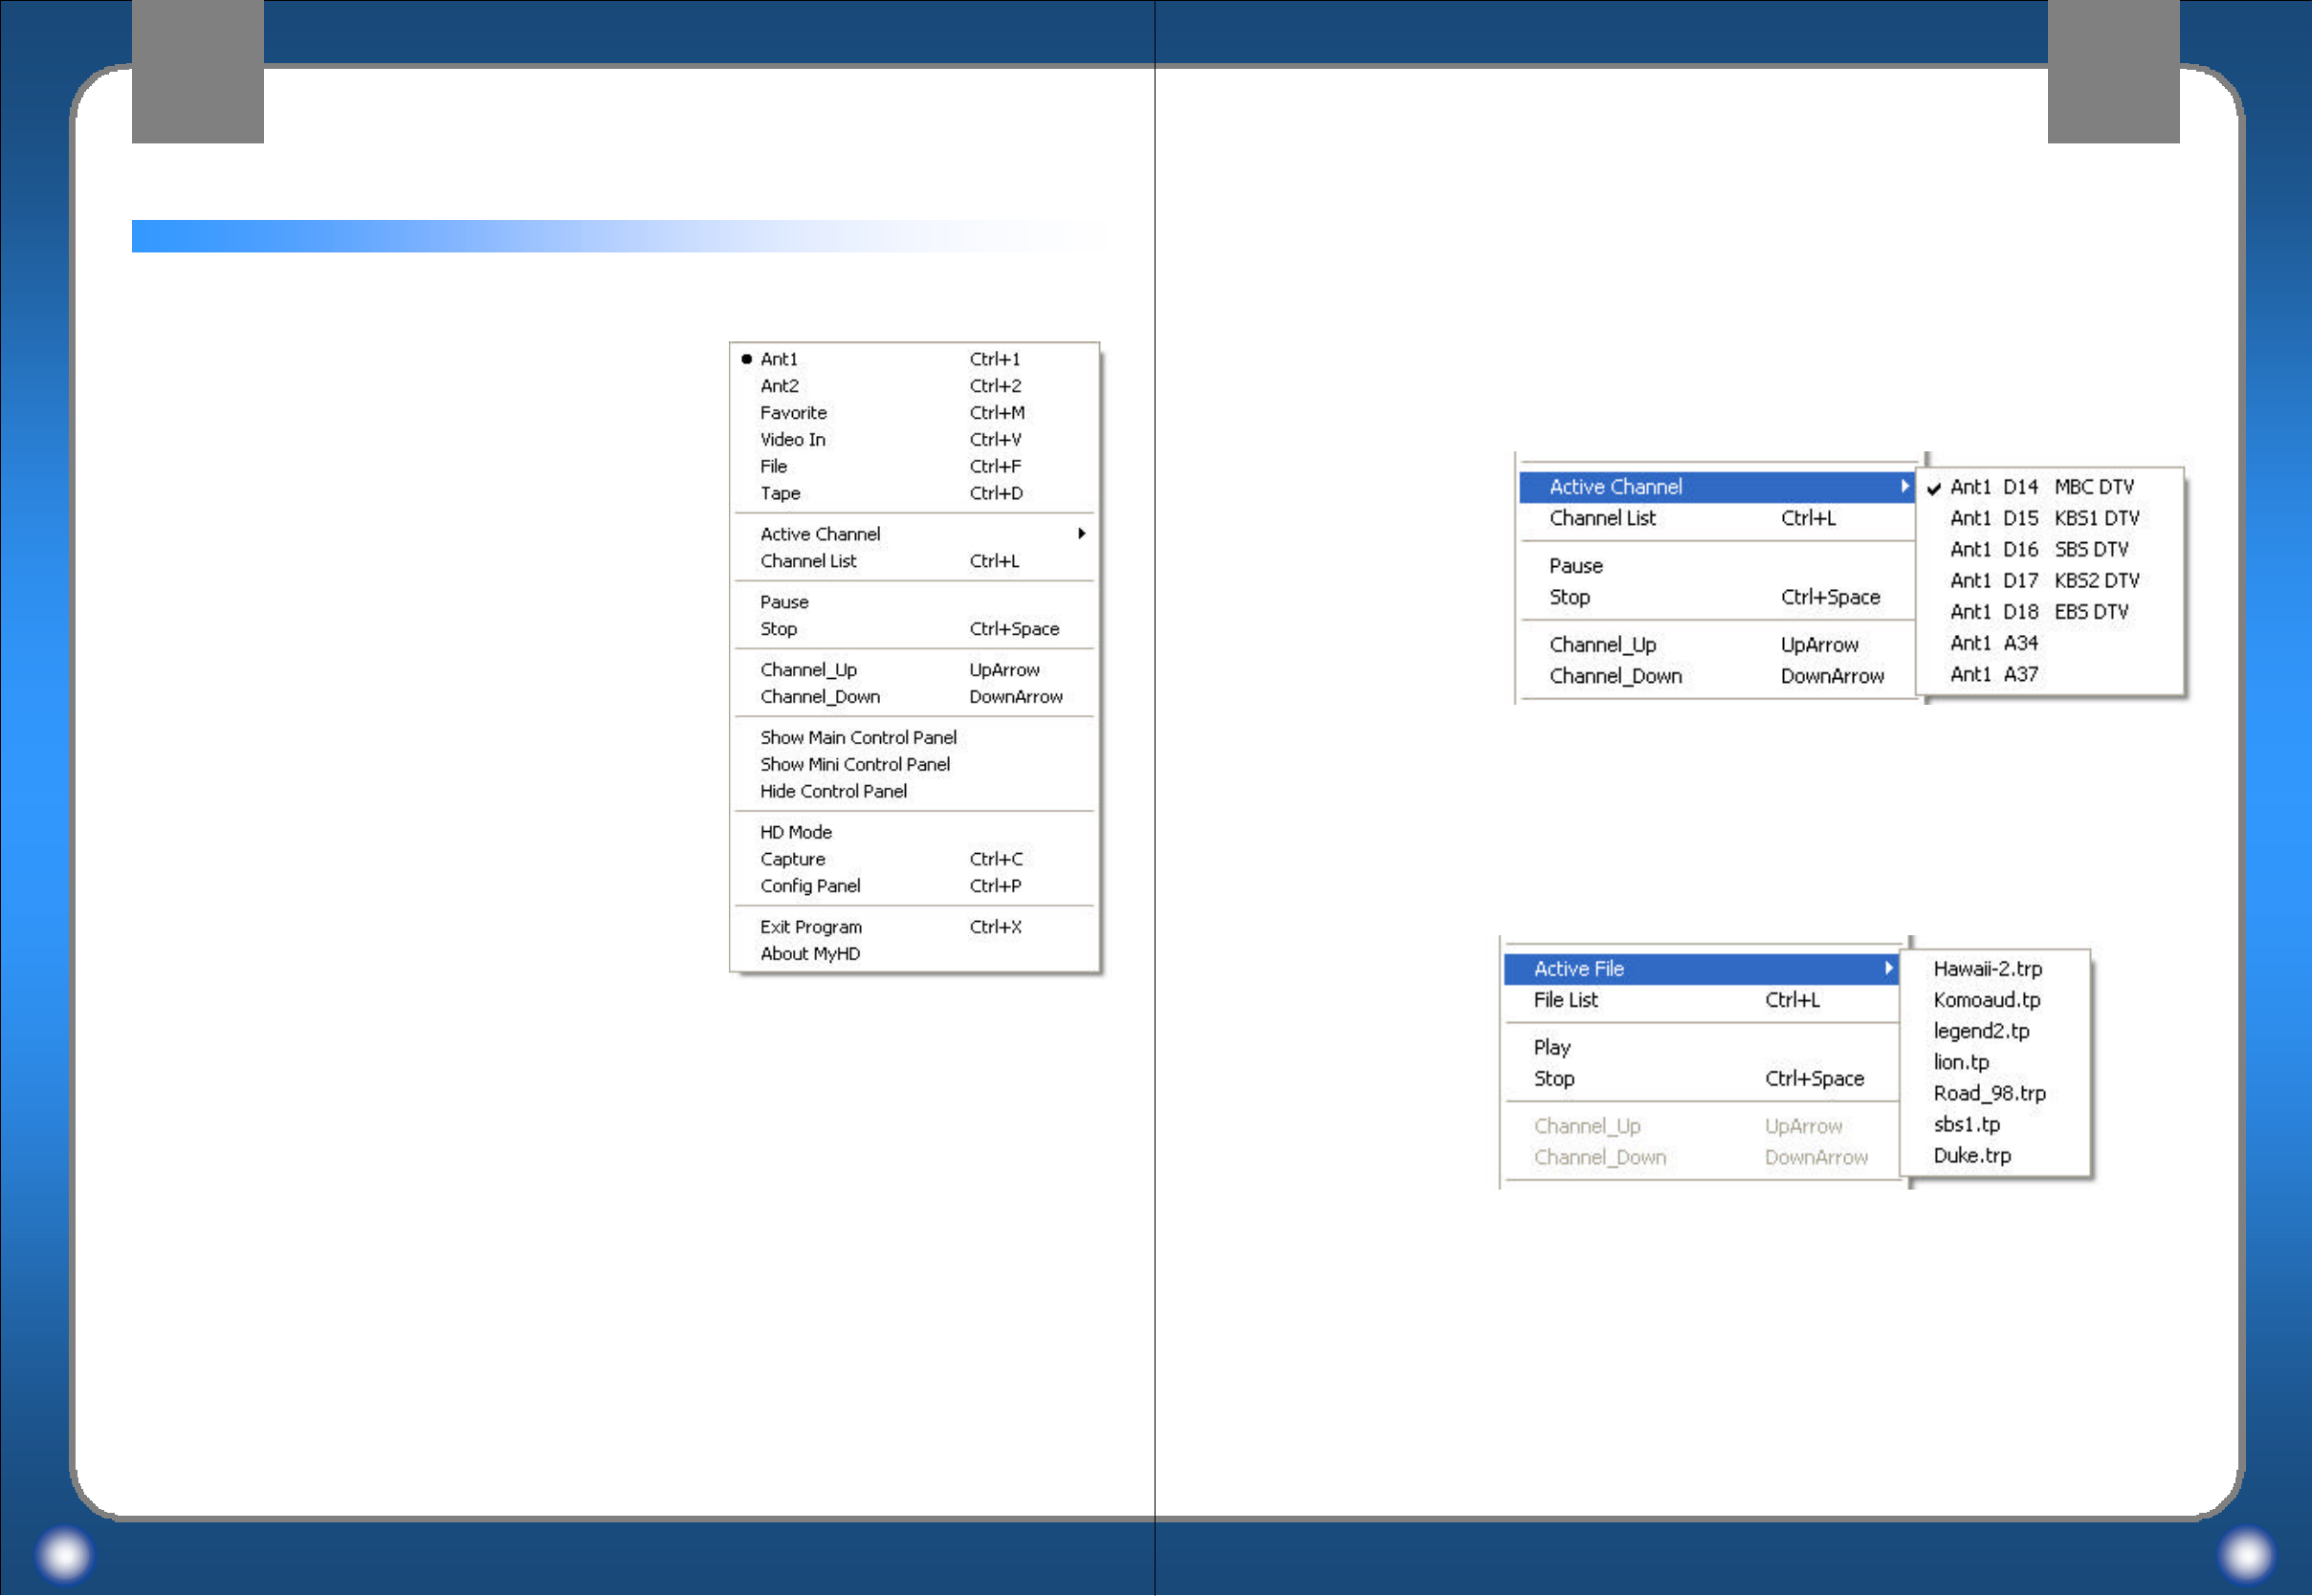
Pop-up menu
MyHD ProgramMyHD Program MyHD ProgramMyHD Program
Press mouse right button on MyHD application program. Pop-up menu will appear like this.
antenna1 (Ctrl+1)
Change input to antenna 1.
antenna2 (Ctrl+2)
Change input to antenna2
Favorite (Ctrl+M)
Favorite channel mode on
Video In (Ctrl+V)
Change current input to external video in.
File (Ctrl+F)
Choose transport stream file to play. and, File play mode on. When this menu is selected,
Active Channel change to Active File and Channel List changed to File List in the menu.
Channel list (Ctrl+L)
Execute Channel list configure window. ( refer to page 33 for setting channels)
Active File
As shown above, files that are in the file list is shown. Select one of them, you will play the
file you selected.
File List (Ctrl+L)
Execute File list dialog box. (refer page 42 for file play setup)
Tape (Ctrl+D)
Record and playback with AV/C Tape Recorder through IEEE 1394 interface.
As shown below, current active channel is
shown. Select one of them, the channel will be
changed you selected.
Active channel

Macro Image Technology
MyHD
Macro Image Technology
MyHD
Exit Program (Ctrl+X) : Exit MyHD
Pause/Play
Pause display. and, Toggled to Play. and, Select again, menu is toggled to Pause and,
display play again.
Stop : Stop display
Channel_Up (UpArrow) : Change channel up
Channel_Down (DownArrow) : Change channel down
Show Main Control Panel : Shows main control panel
Show Mini Control Panel : Shows mini control panel
Hide Control Panel : Hide control panel.
HD mode : Change to Full screen mode.
Capture (Ctrl+C)
Start Capturing stream, moving picture or image as referred to configure
Config panel (Ctrl+P)
Execute environment configure window. (refer page 29 for setting A/V)
29 30
Macro Image Technology
MyHD
Macro Image Technology
MyHD
31 32
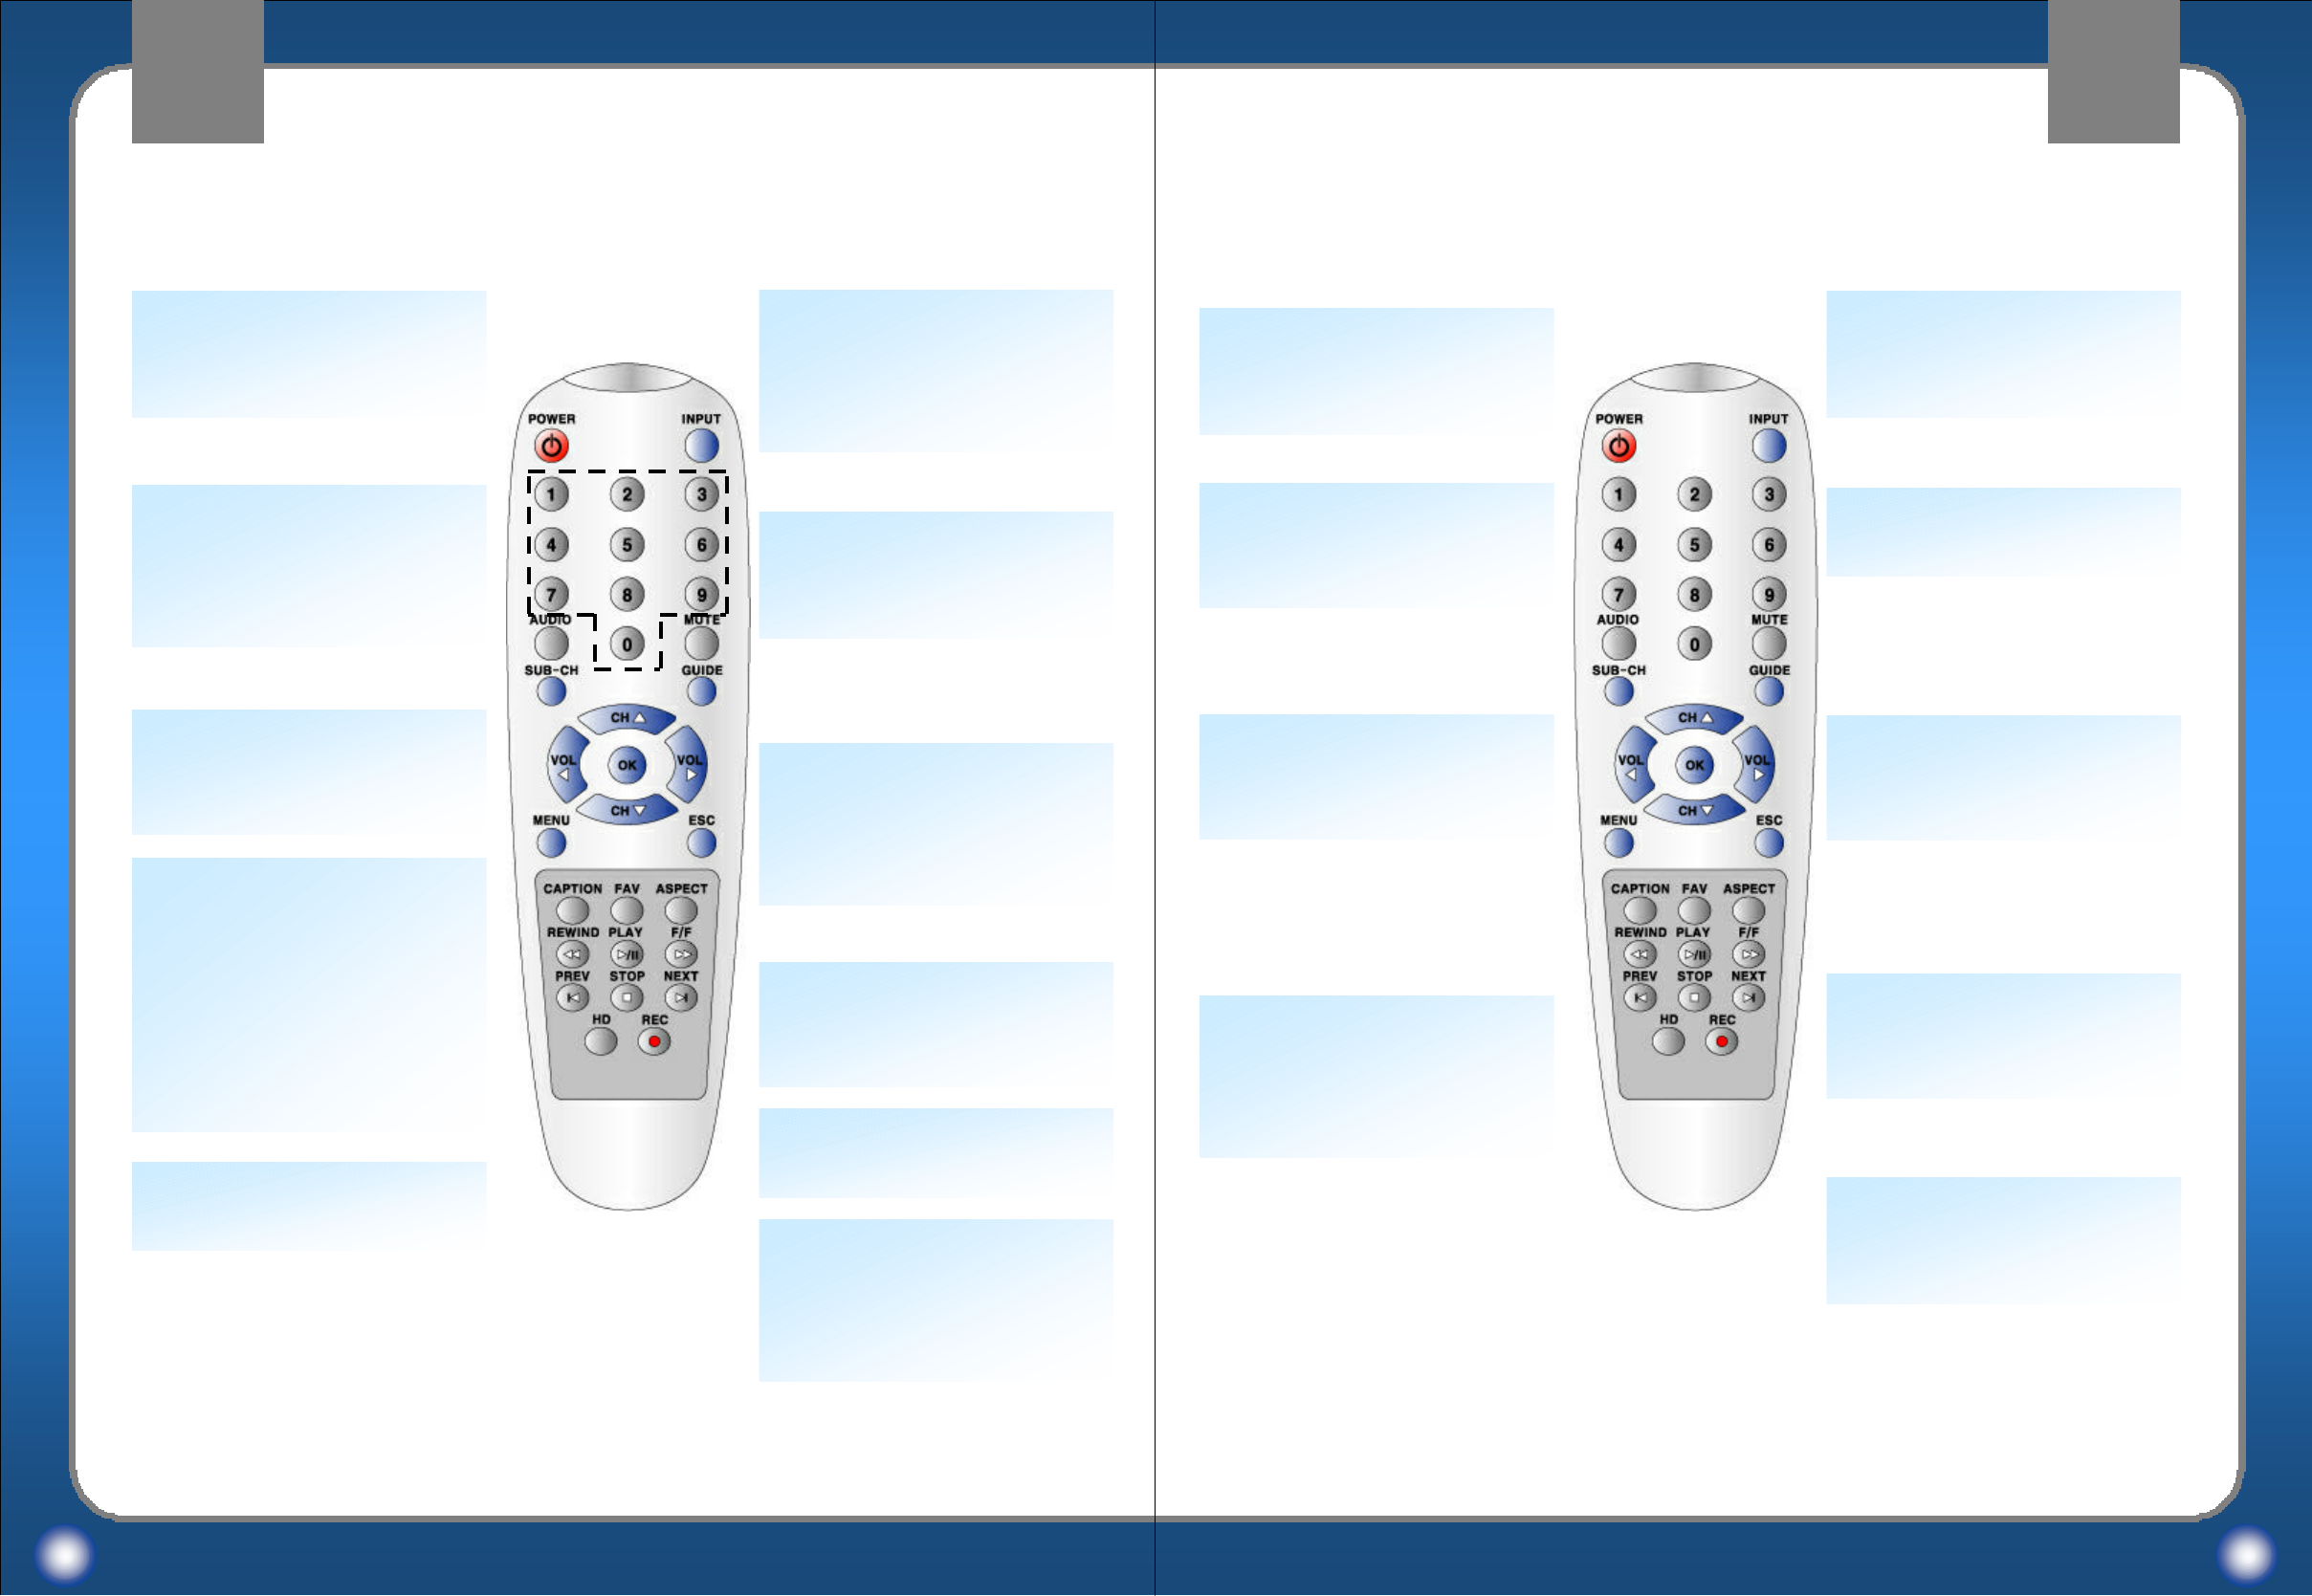
ESC
Remove file list window.
OK
Display current channel and,
volume Information.
Channel Up/Down
Change memorized next
channel. If FAV is on, changed
to next favorite channel.
SUB-CH
In Digital broadcasting. If there
is sub-channel, sub-channel
will change.
AUDIO
Switch audio mode to stereo,
mono or SAP in analog TV,
switch audio channel in digital
TV or DVD file play if
multiple audio channels are
available.
POWER
Start or Exit MyHD application
program.
GUIDE
Display Channel Guide.
(Will serve next version)
MUTE
Mute volume.
Numeric Key (0 ~ 9)
Change channel number
directly.
INPUT
Change MyHD’s input to
antenna 1, antenna 2, Video In,
file, or tape(if available).
HD
Toggle full screen mode or
windows mode.
Previous File
In full screen mode, open file
list and navigate.
PLAY/PAUSE
Play or pause display.
In full screen mode and file list
is on, play selected file.
CAPTION
Change closed caption mode.
(Will serve next version)
FAV
Set or release favorite channel
mode.
ASPECT
Change overlay window’s
aspect ratio to 16:9, 4:3 or 2:1.
STOP
Stop display.
RECORD
Start Capturing stream, moving
picture or image.
Next File
In full screen mode, open file
list and navigate.
Remote Control HandsetRemote Control Handset Remote Control HandsetRemote Control Handset
MENU
Show EPG or function
settings(Will serve next
version)
Macro Image Technology
MyHD
Macro Image Technology
MyHD
33 34
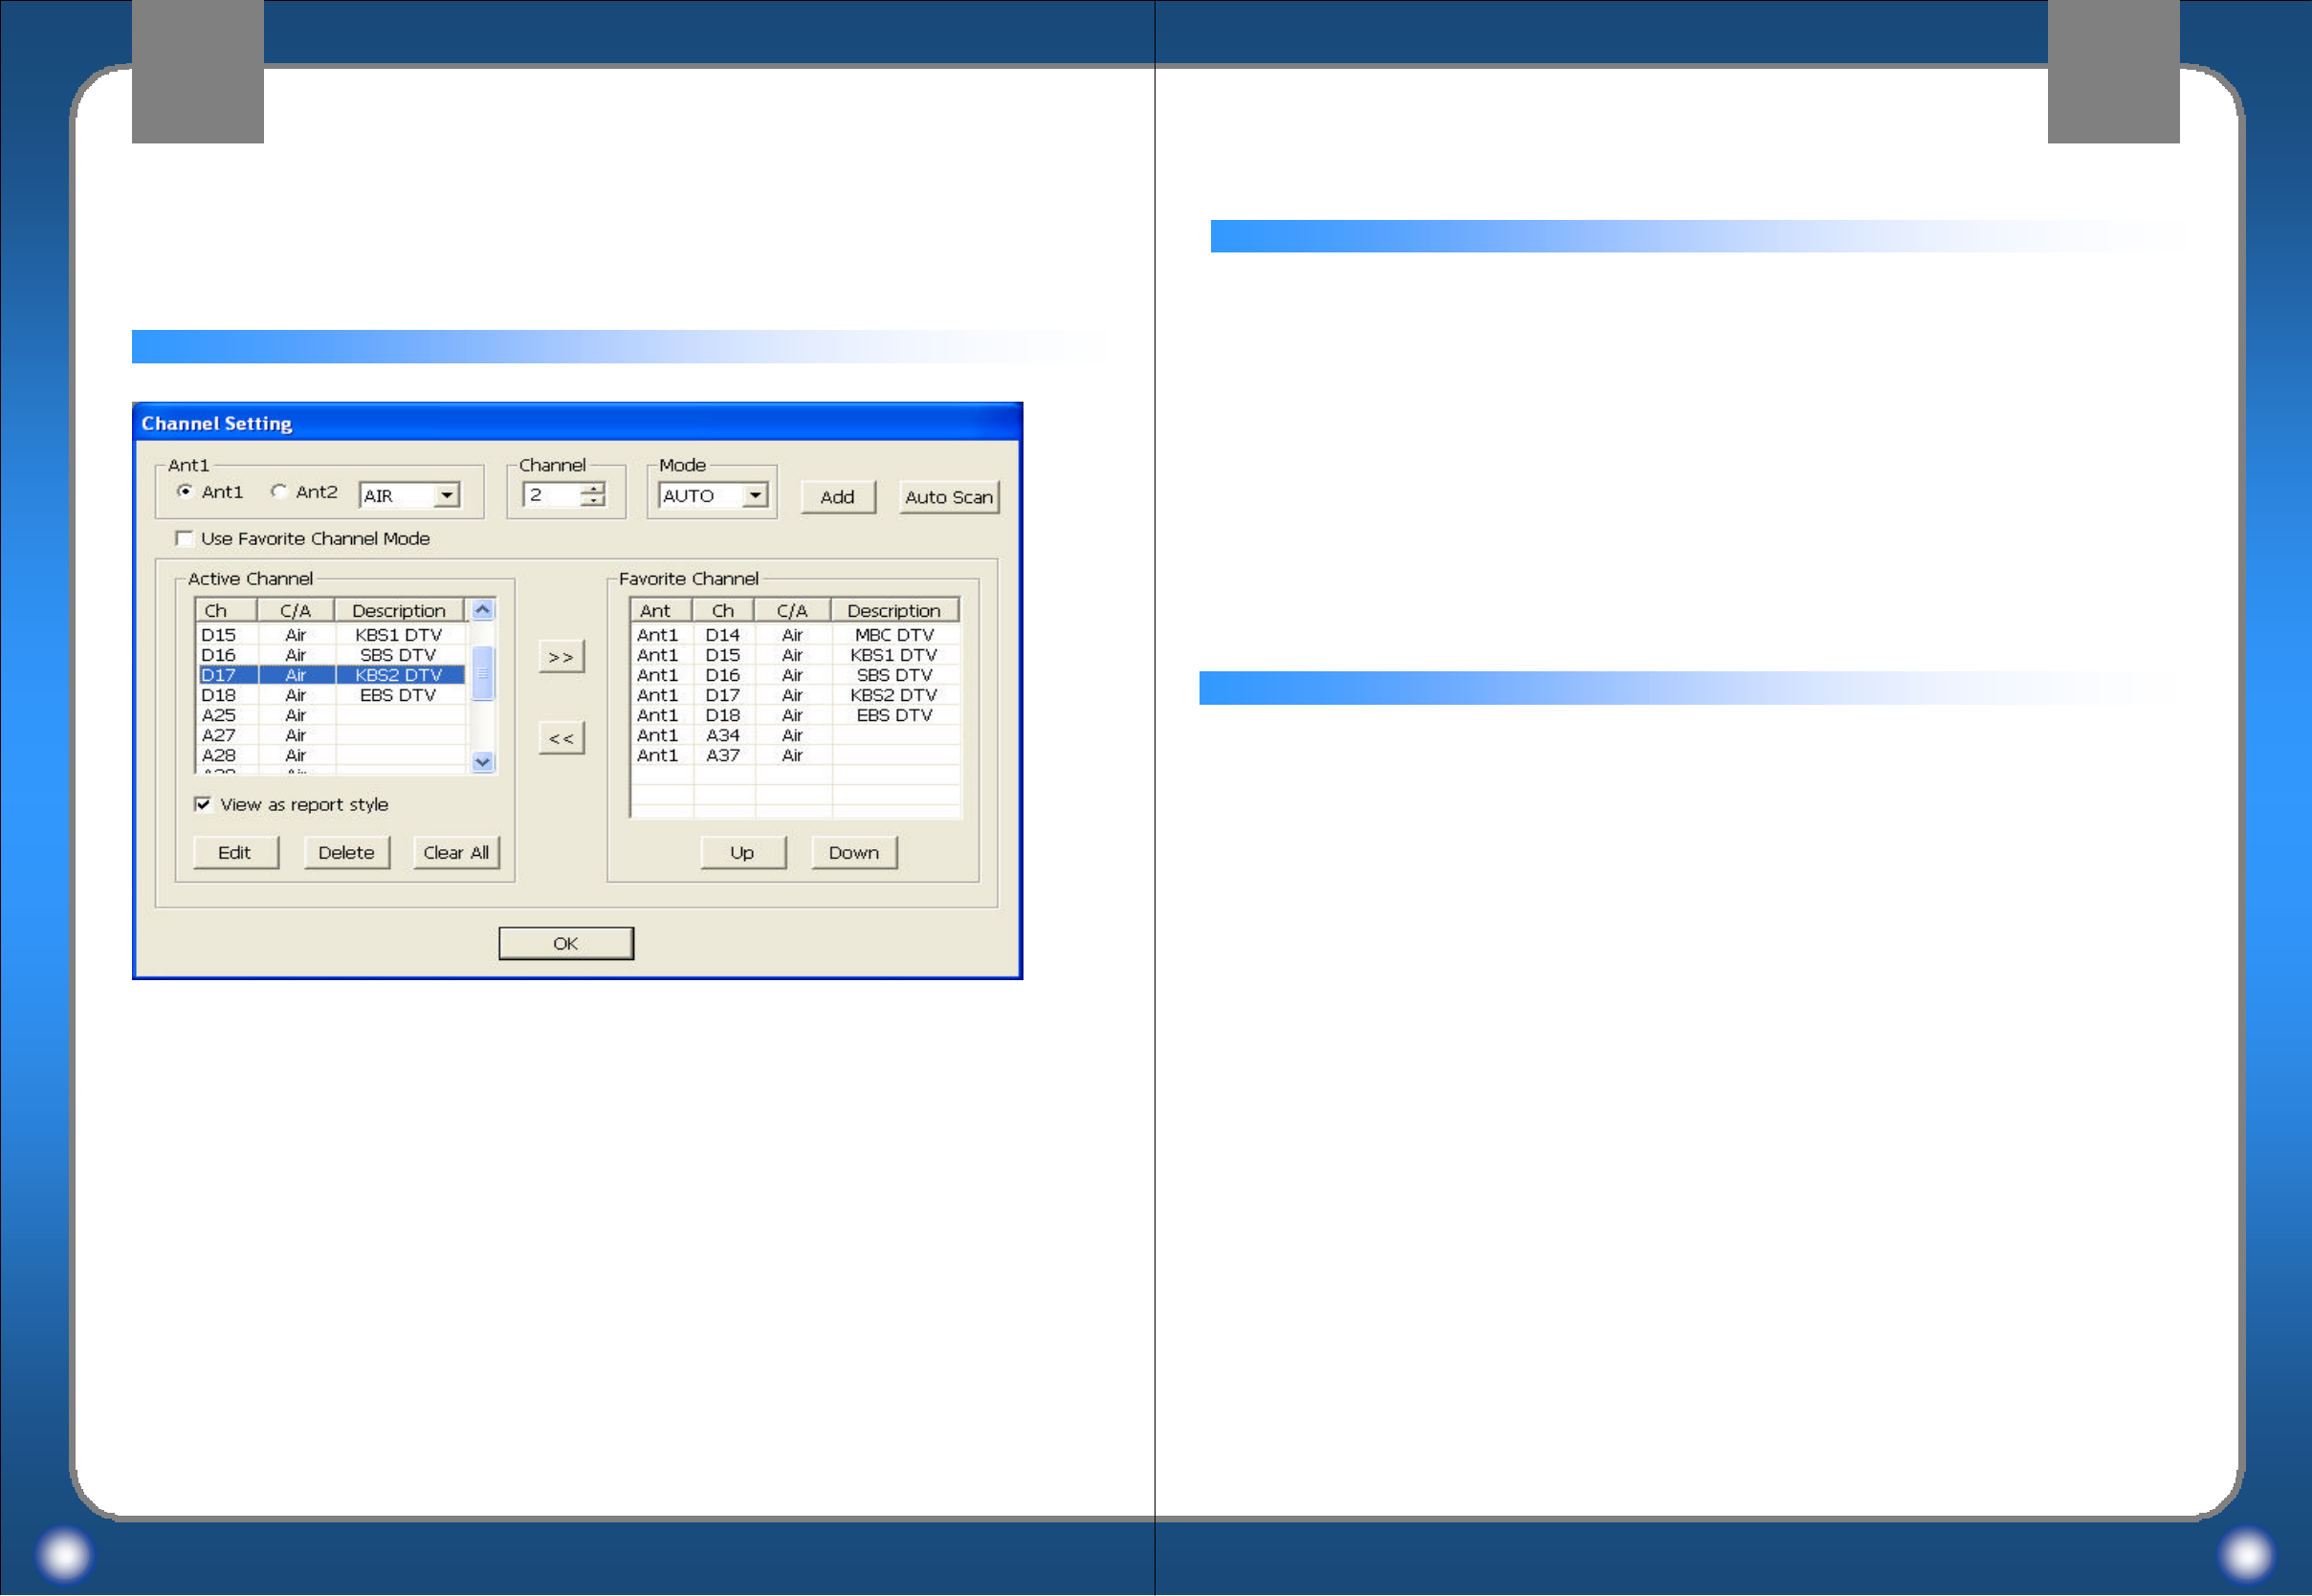
Add/Delete Channels
To Scan Auto-Channels
Selecting favorite channels
To select favorite channels:
1. Choose a channel number in the “Scanned Channel”box
2. Click >> button
The channel is added in the favorite channel box.
To delete a channel from the favorite channels:
1. Choose a channel number in the “favorite channel box”
2. Click << button
The channel will be delete from the “favorite channel”box.
To change the sequence of favorite channel list, click up/down in the “favorite
channel”box.
To set the configure of MyHD program:
1. Click Config in the expanded main control or
2. Click right mouse button/pop-up menu/Config Panel
then, Config Panel window will be displayed.
Channel SettingsChannel Settings Channel SettingsChannel Settings
To set up the TV channels and display the window of “Channel Setting”
1. Select Expanded main control panel/Channel List
2. Click right mouse button/pop up menu/channel list
1. Select Antenna 1 or Antenna 2
2. Choose Air(terrestrial broadcast) or Cable
* If you are not sure, please select Auto.
If Auto is selected, the program will detect either Air or Cable automatically.
3. Click Auto Scan
Scanned channels will be appeared in the window of scanned channel after searching
analog and digital broadcasting channels.
A channel is selected from the scanned channels when the channels are up and down.
To add channels by manual mode:
1. Input a channel number in the channel box
2. Choose either analog or digital in the mode box
3. Automatically Adding the channel in the “Scanned Channel”box
If Auto is selected, the program will detect a channel either Air or Cable
automatically, and the channel is added in the “Scanned Channel”box.
To delete channels:
1. Choose a channel that you want to delete in the “Scanned Channel”box
2. Click delete
Macro Image Technology
MyHD
Macro Image Technology
MyHD
35 36
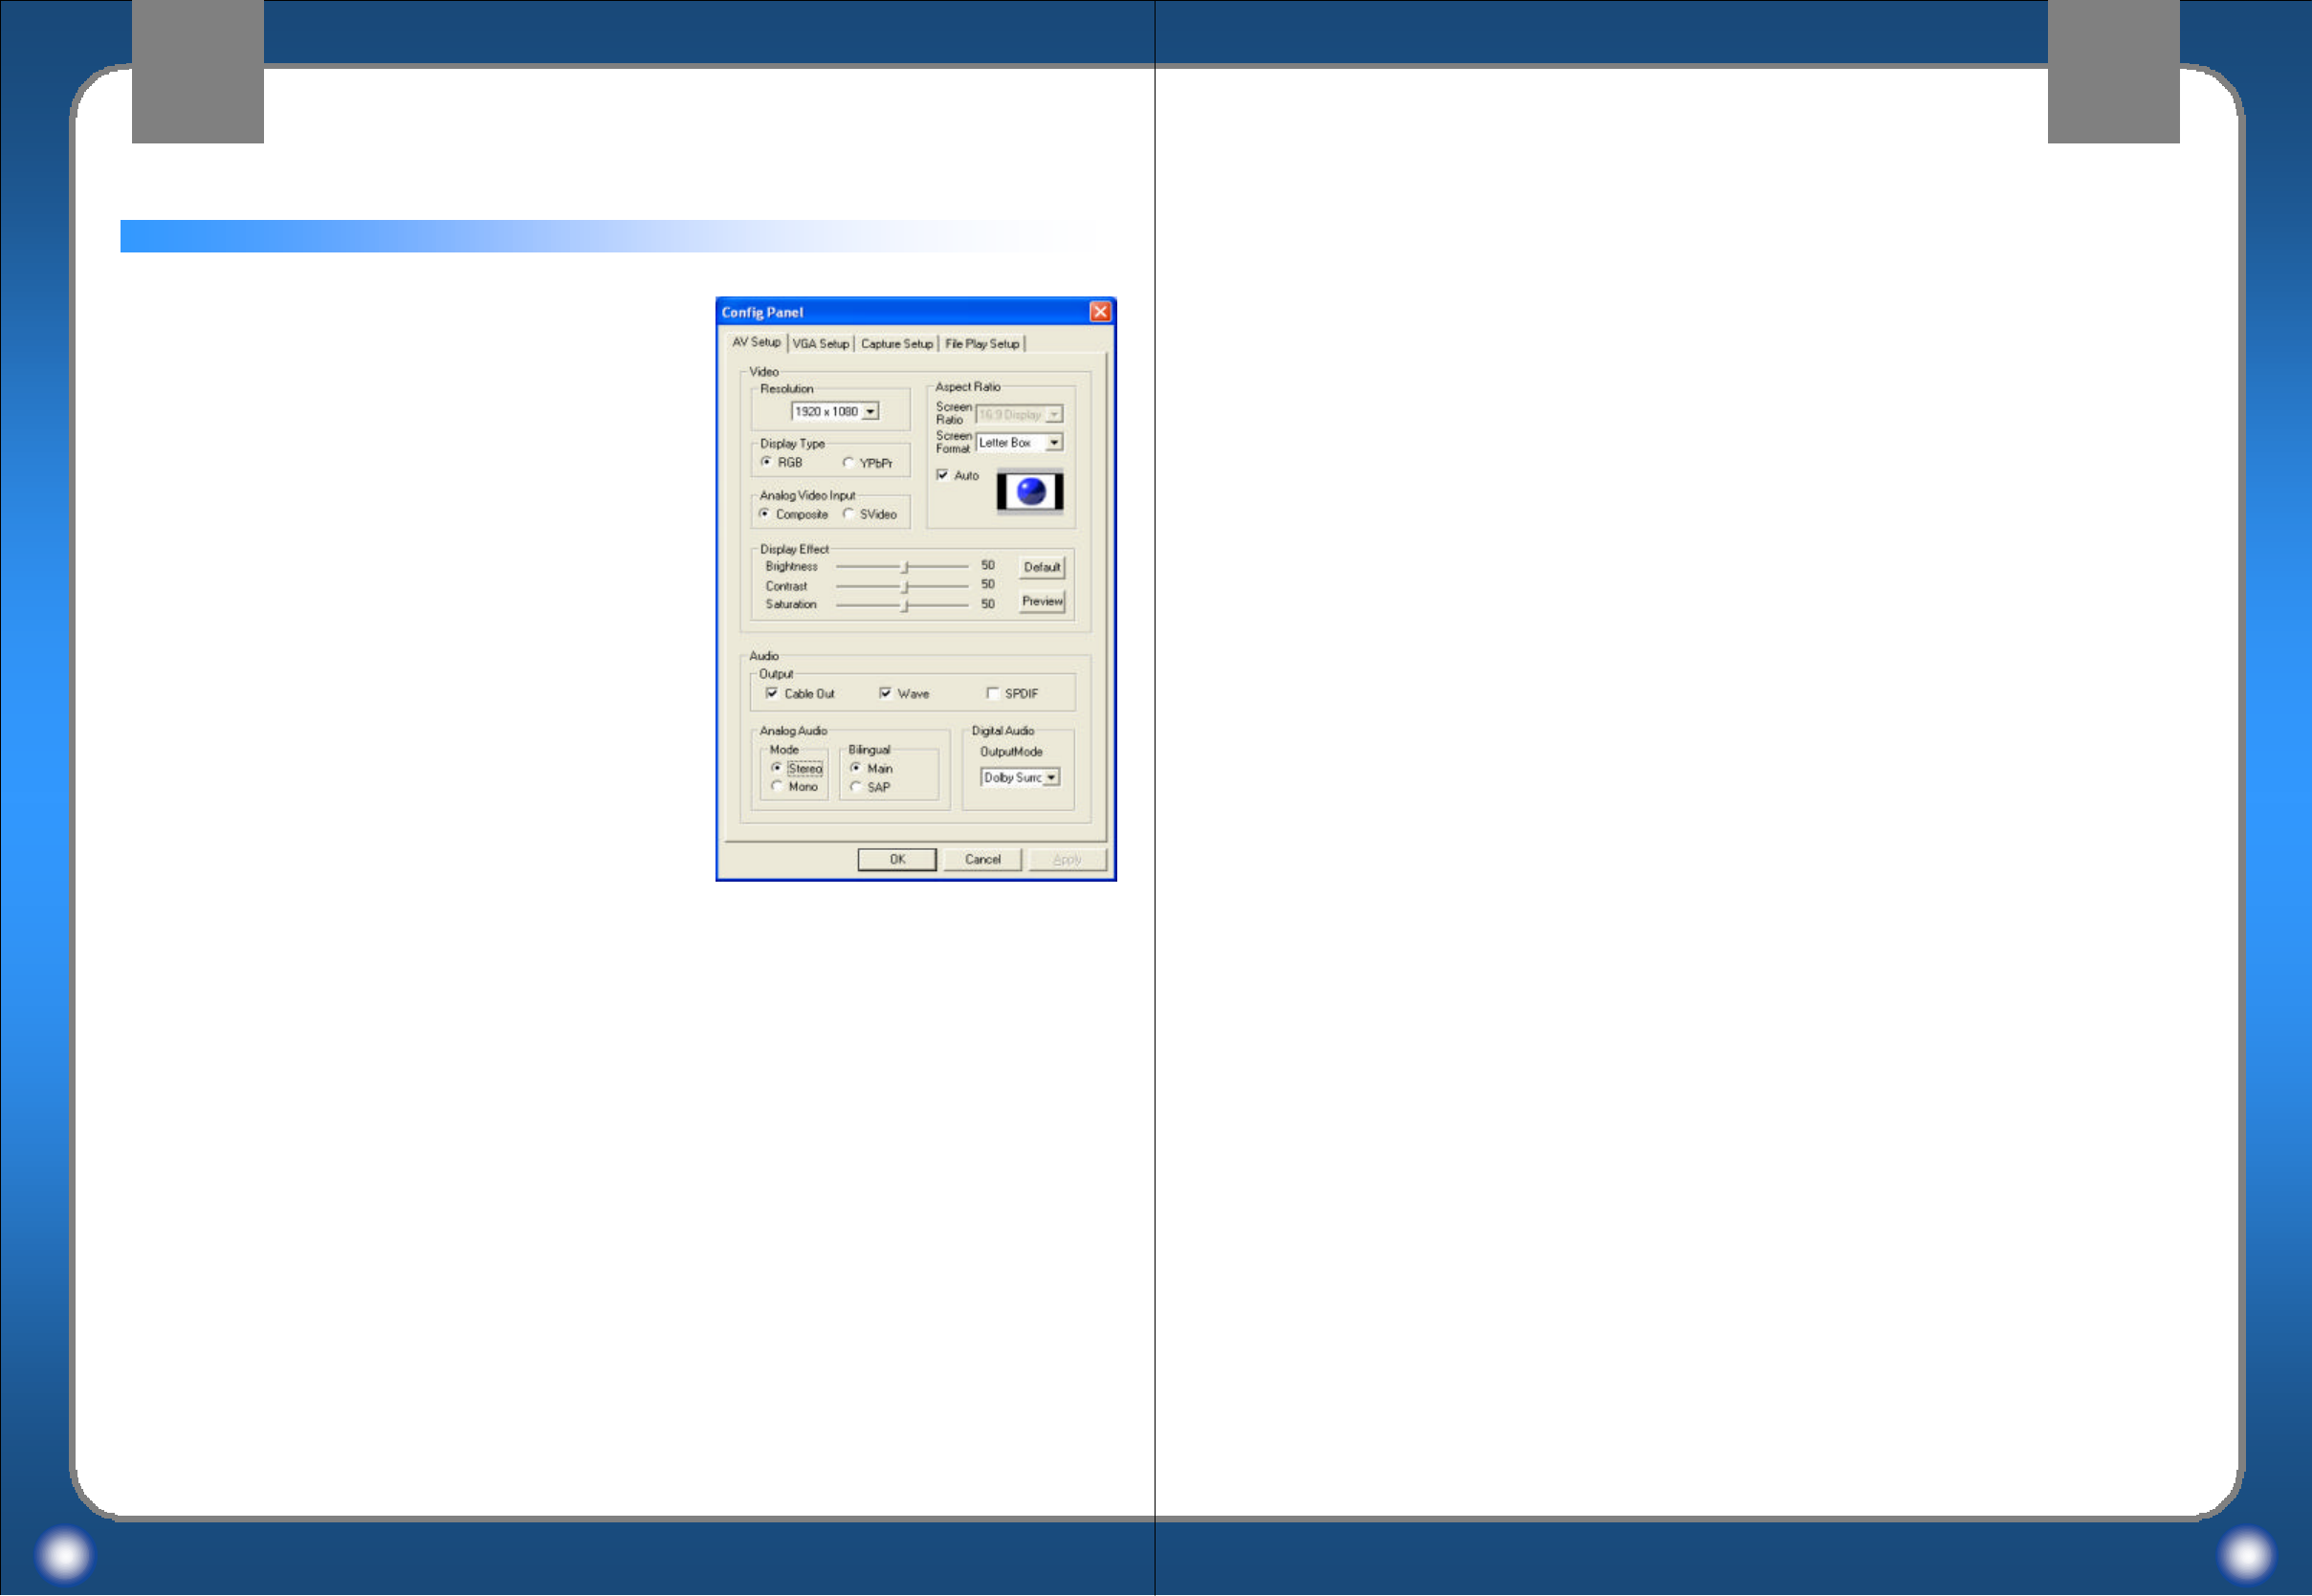
Setting Video Configuration
To select a screen format of HDTV(full screen) mode, click one of following format:
1. Letter Box:
-Display a HDTV mode to add letter box. by 16:9(or 4:3) in a monitor 4:3(or 16:9)
2. Zoom:
-A screen is filled by a HDTV mode which does not regard screen ratio.
3. Full:
-A screen is filled by a HDTV mode which does regard the vertical and horizontal
ratio of a monitor.
* If Auto is selected, only Letter Box and Zoom can be chosen.
Resolution
Select full screen(HDTV) mode of MyHD video
output.
•1920 x 1080i is recommended if you are using a
HDTV or a PC monitor because most of digital
broadcast programs are sent on the air by 1920 x 1080i
format.
If you are watching an analog TV, please choose 720 x
480i format which is the current format of analog
broadcasting programs.
Aspect Ratio
If you choose Auto, screen ratio will be selected
automatically. When Auto is selected, you can choose
screen format ,zoom or letter box. If screen ratio is
different between monitor and stream, Screen ratio is
changed as screen format selected.
Screen format
A/V SettingsA/V Settings
Display Type
Choose a video output signal of MyHD either RGB or YPbPr;
RGB for a PC monitor and YPbPr for component output to an HDTV(need a cable for
connecting DSUB-15 to RCA).
Analog Video Input
Select either S-Video or composite for the external input connector.
Display Effect
Setting Brightness, Contrast and Saturation of MyHD video output.
To display HD mode, click the Preview button and to exit from the HD mode, hit the “Esc”on
the keyboard.
A/V SettingsA/V Settings
Screen ratio
If Auto is not selected, you can select screen ratio
manually. If video resolution and screen ratio is
different, you can change screen ratio fit for monitor.
Macro Image Technology
MyHD
Macro Image Technology
MyHD
37 38
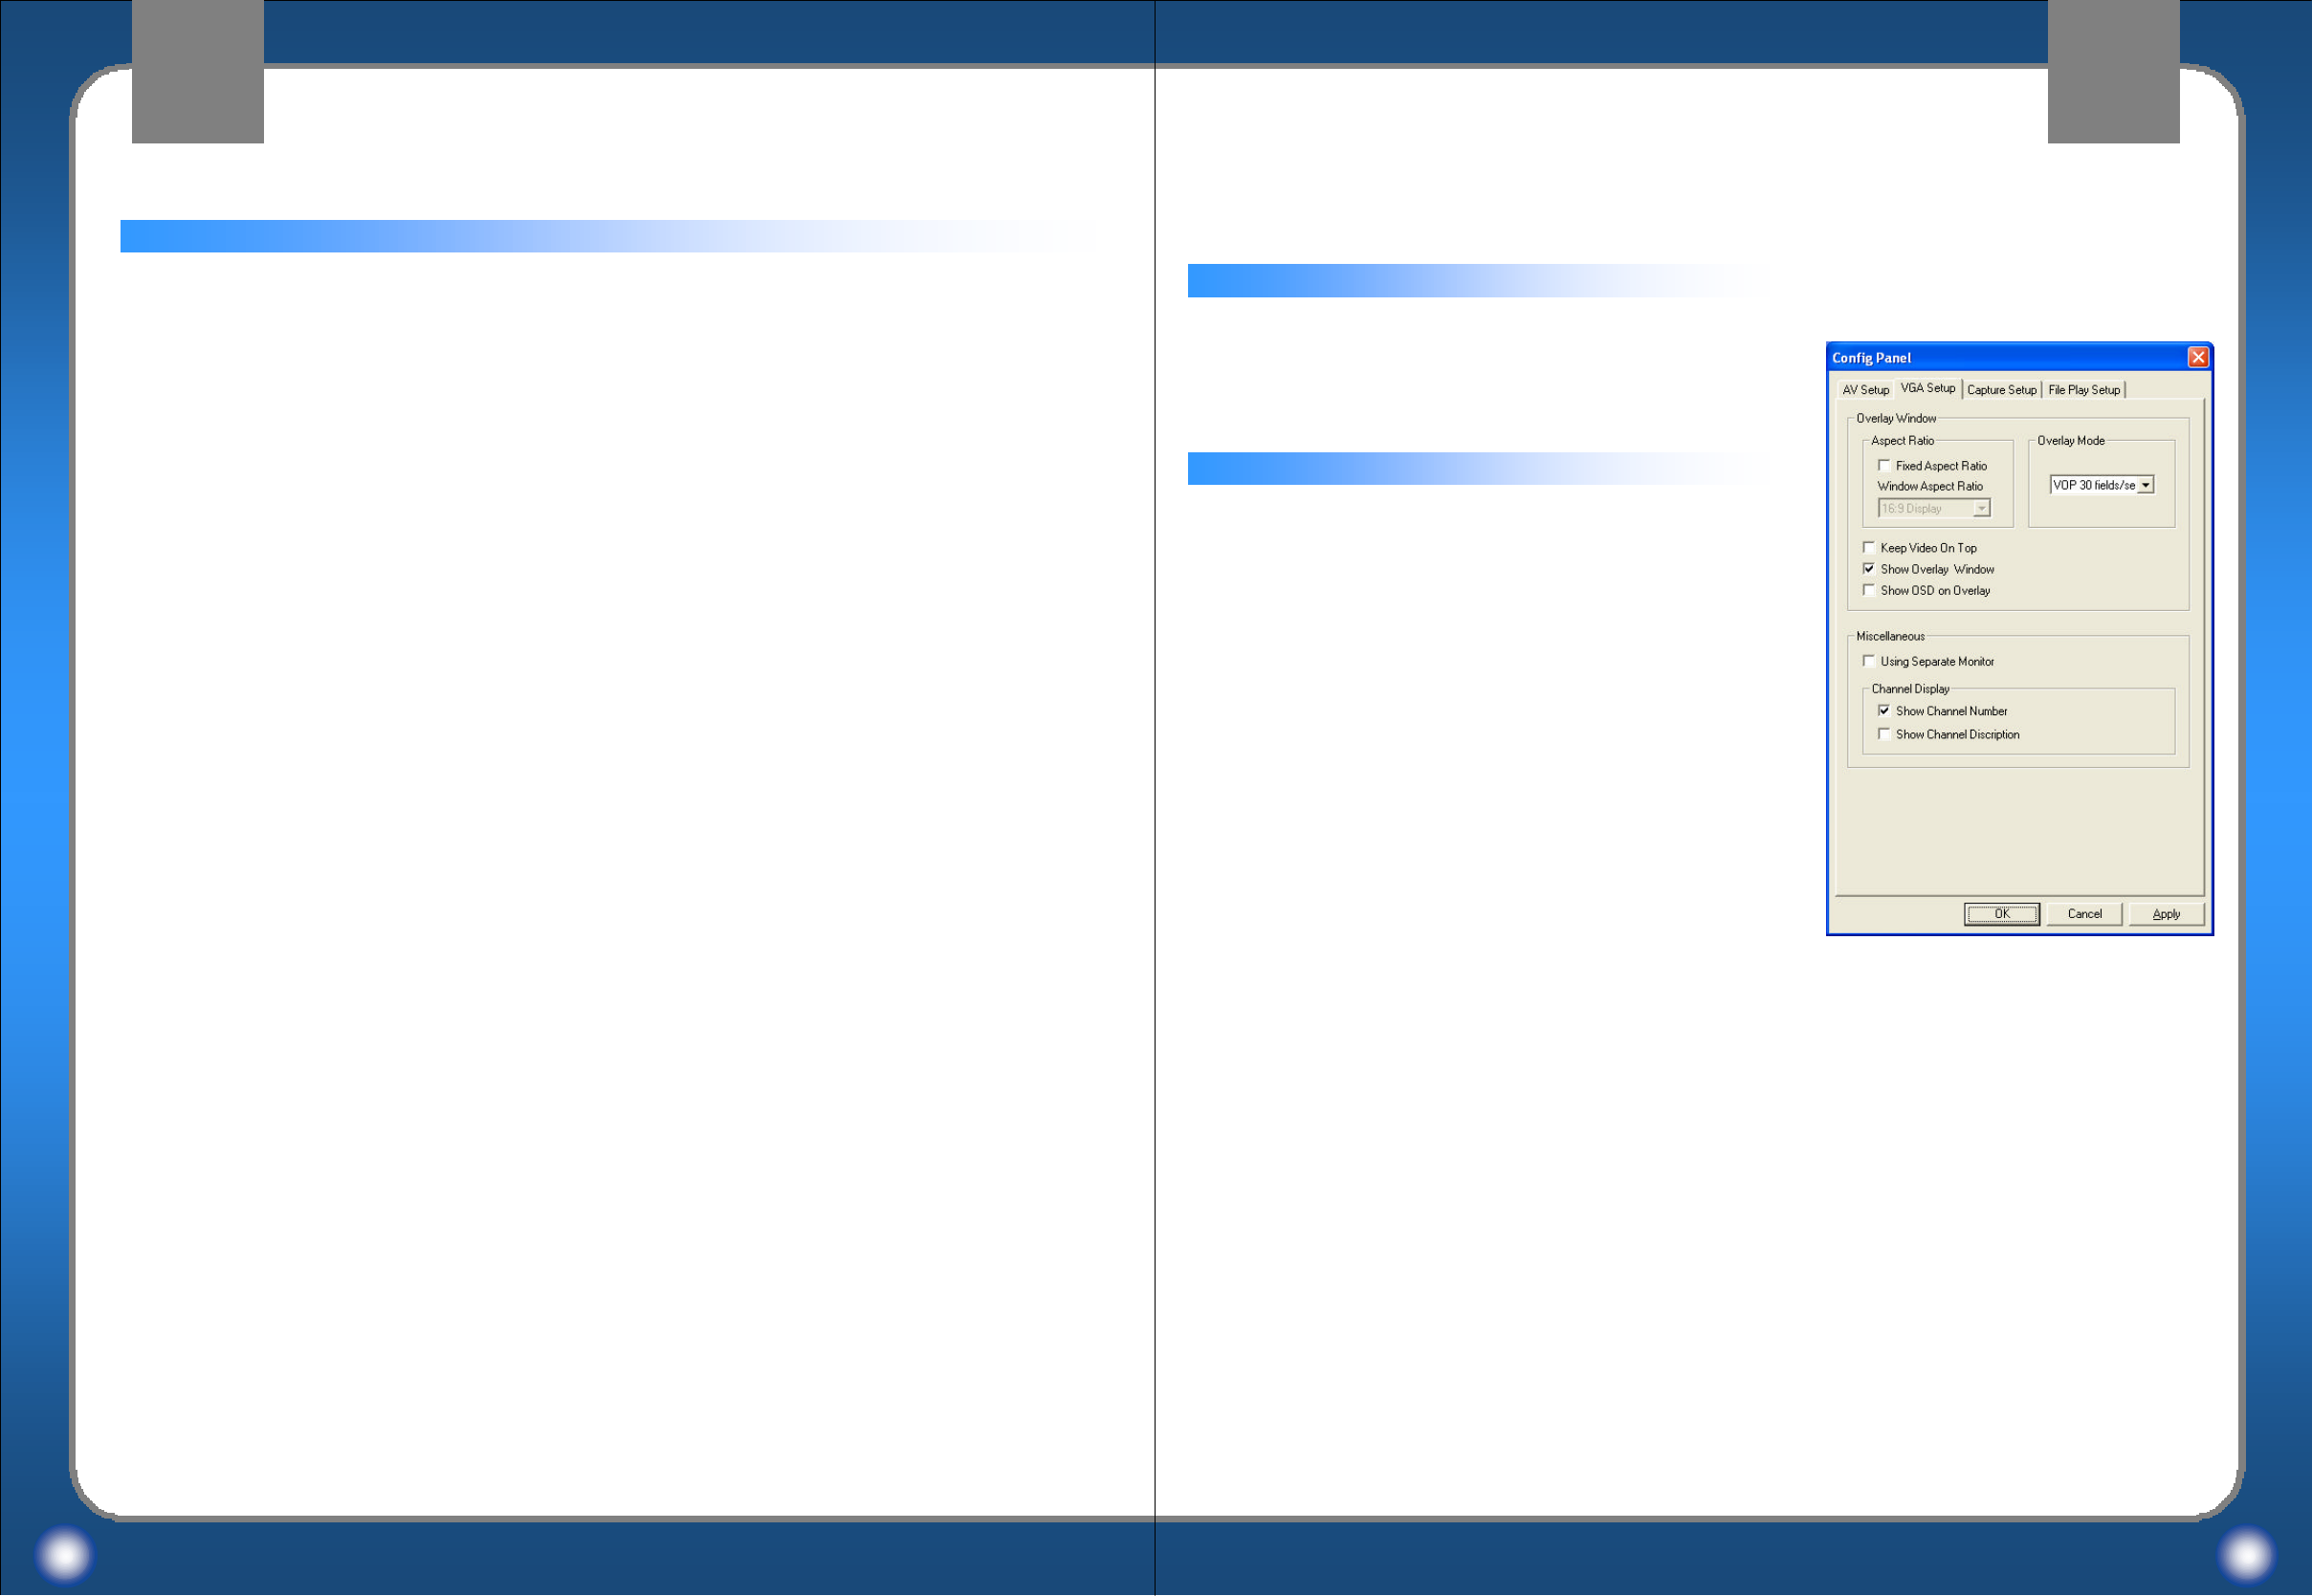
Setting the display options of an overlay window in VGA Setup.
Fixed Aspect Ratio
If “Fixed Aspect Ratio”is selected, the ratio of an overlay window is fixed even size of the
window is changed.
Overlay Mode
Setting a mode of an overlay window in Windows.
VOP 30 fields/sec
30 fields of images in a second.
Basic mode of an overlay window
VOP 60 fields/sec
60 fields of images in a second.
This mode will display more smooth motions than
30 fields/sec and it requires higher specification of PC.
(It might not be supported by performances and specifications of graphic card.)
VOP 30 frames/sec
30 frames of images in a second.
Vertical resolution is twice higher than 30 fields/sec.
It requires higher specification of PC.
(It might not be supported by performances and specifications of graphic card.)
VOP 60 frames/sec
60 frames of images in a second.
The best quality of video will be displayed by this mode and higher specification of PC is
required. (It might not be supported by performances and specifications of graphic card.)
To set Audio configuration
Audio Output
1. Cable Out (only for analog broadcasting) :
To use the cable output, audio output of MyHD and a sound card must be
connected(refer to Hardware Settings on the page6). If Cable Out is selected,
audio output of analog broadcasting is worked by a cable even though Wave is
checked.
2. Wave : Audio output of digital broadcasting through a sound card without a cable.
Wave must be selected for Audio output of digital broadcasting.
3. SPDIF: SPDIF is used for an Audio Amp(refer to Hardware Settings on page 10).
Analog Audio
Choose either Stereo or Mono mode.
Bilingual
You can choose Main or SAP only if Mono mode is selected.
A/V SettingsA/V Settings VGA SettingsVGA Settings
Setting Audio Configuration
Macro Image Technology
MyHD
Macro Image Technology
MyHD
39 40
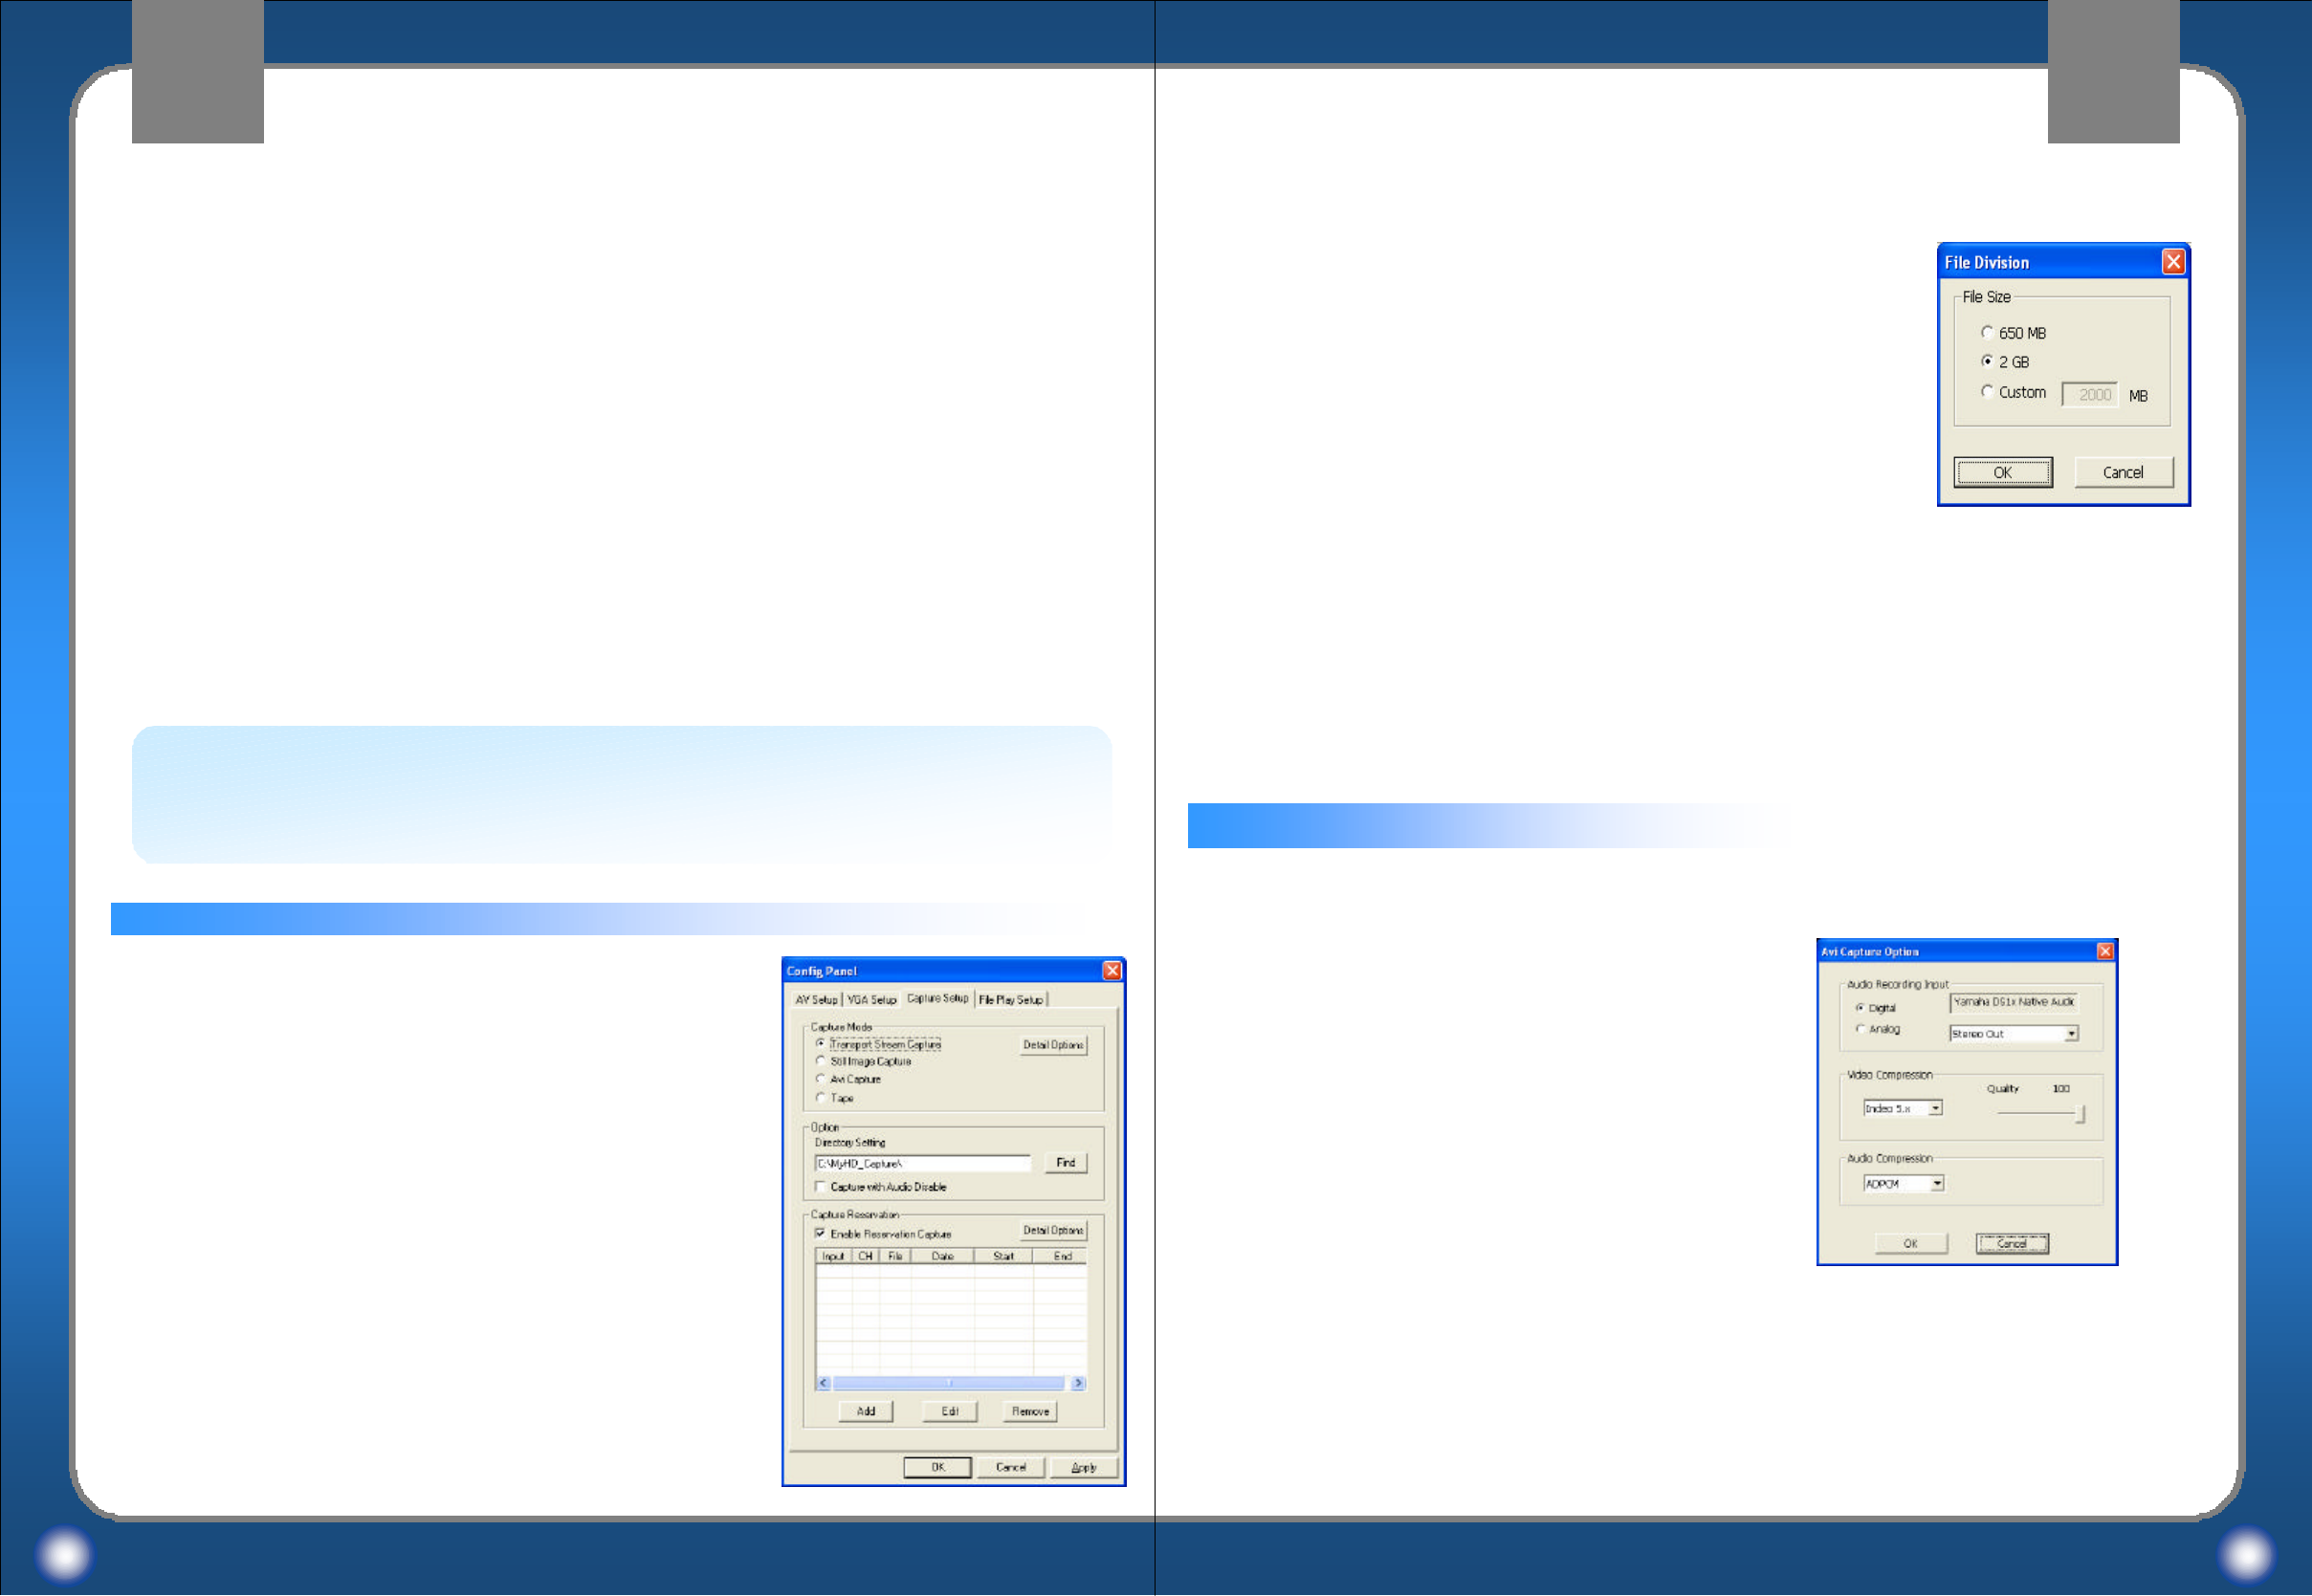
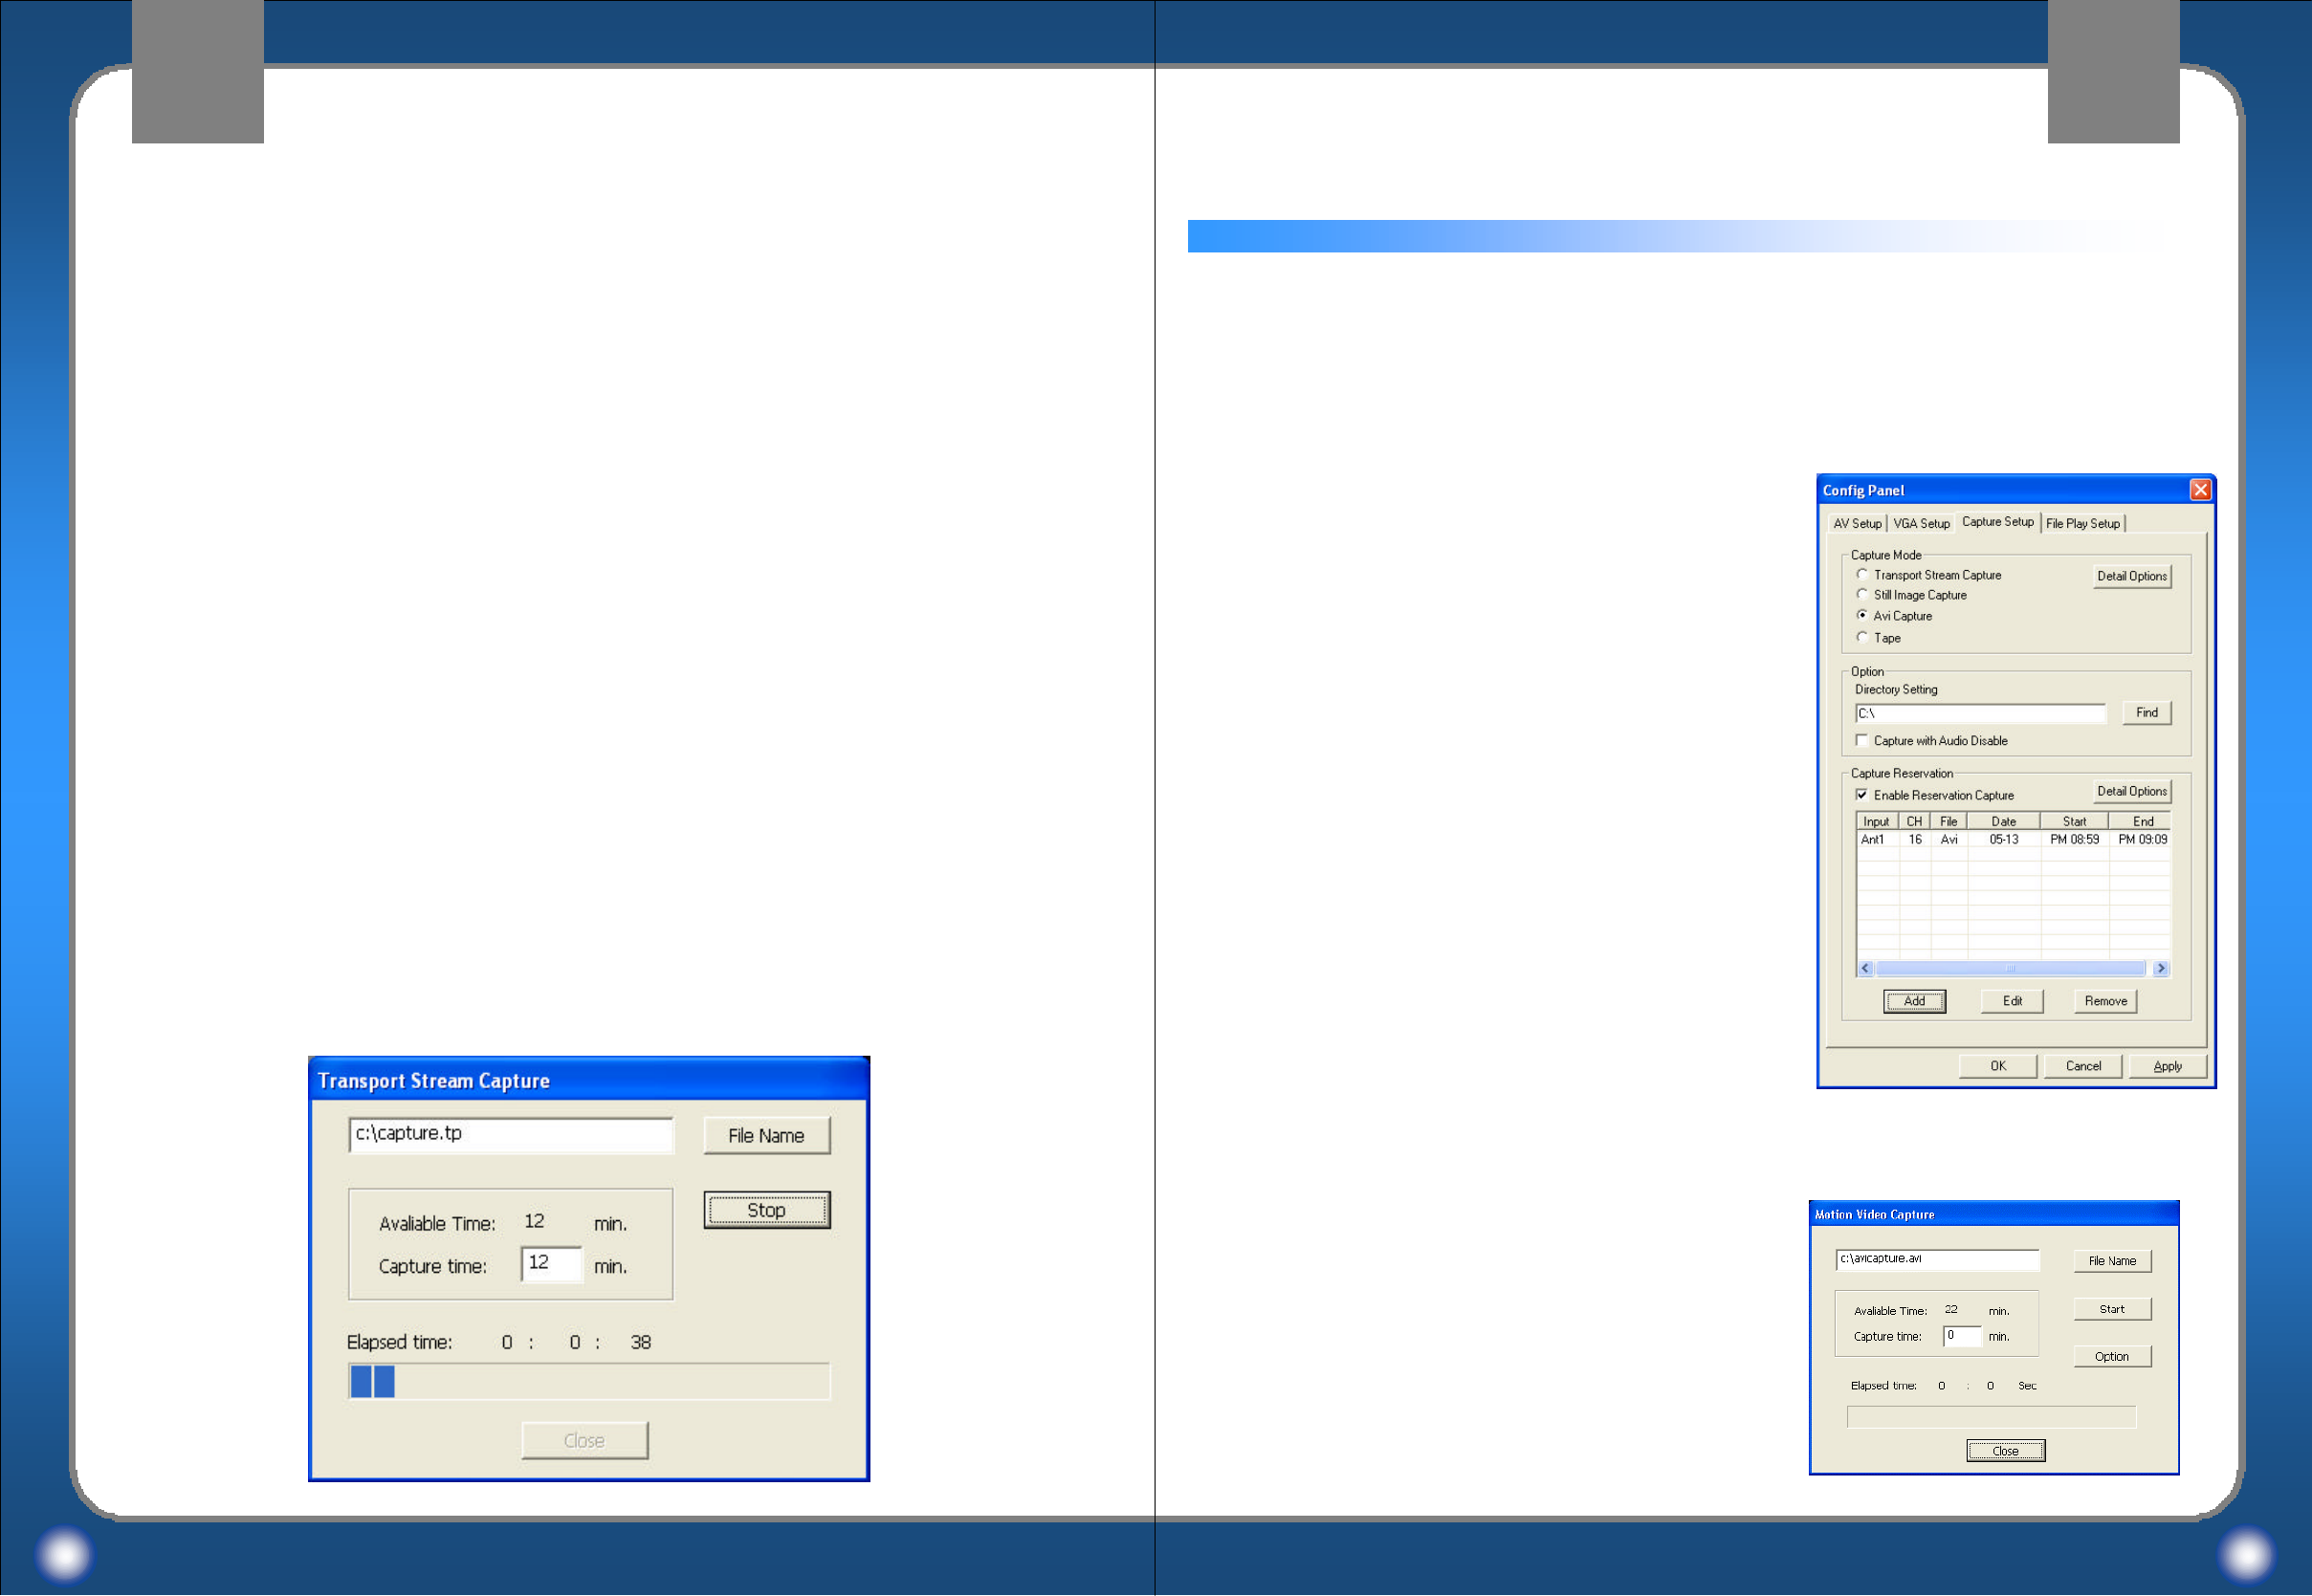
Avi Capture
Capturing a real time digital broadcasting program
as an AVI file format
Tape
Recording and replaying digital broadcasting program through
AV/C Tape Recorder
(Refer to page 51 for D-VHS record and playback settings)
((Refer
Avi Capture Option
Audio Recording Input
Selecting an audio recording input of Avi Capture.
Video Compression
Selecting a compressor of video.
Supported compressor: Indeo 5.x
Supported uncompressed mode:
RGB24bpp (RGB 8 bit/pixel)
and RGB16bpp (RGB 5 bit/pixel)
Audio Compression
Selecting a compressor of audio.
Supported compressor: ADPCM
Supported uncompressed mode: PCM
Keep Video On Top
The overlay window is always displayed over other windows.
Show Overlay Window
Show images in an overlay window.
Using Separate Monitor
To display HD mode in a HDTV and an overlay window in a PC Monitor simultaneously,
select this function.
Channel Display
A Channel display mode in main control panel or OSD can be selected among three modes,
channel number only, channel description only, both.
Caution –VGA screen is not displayed when “Using Separate Monitor”is selected with
connecting the MyHD’sA/V cable. In this case, a monitor cable should be directly
connected to VGA Card. Then VGA screen is displayed.
Capture SettingsCapture Settings Capture SettingsCapture Settings
Setting a capture mode.
Transport Stream Capture
Capturing a real time digital broadcasting program into HDD
as Transport Stream.
In Detail Setting, a capturing file size
can be selected 650MB, 2 GB or Custom.
Still Image Capture
Capturing a still image as format of bitmap(.bmp).
Resolution depends on video resolution in A/V settings.
Enable Reservation Capture :
Indicate the execution of reservation capturing.
Macro Image Technology
MyHD
Macro Image Technology
MyHD
41 42
Options
Directory Setting
Setting a directory for capturing transport Stream and AVI file.
Capture with Audio Disable
Using this function when broadcasting program is capturing with low specifications of PC.
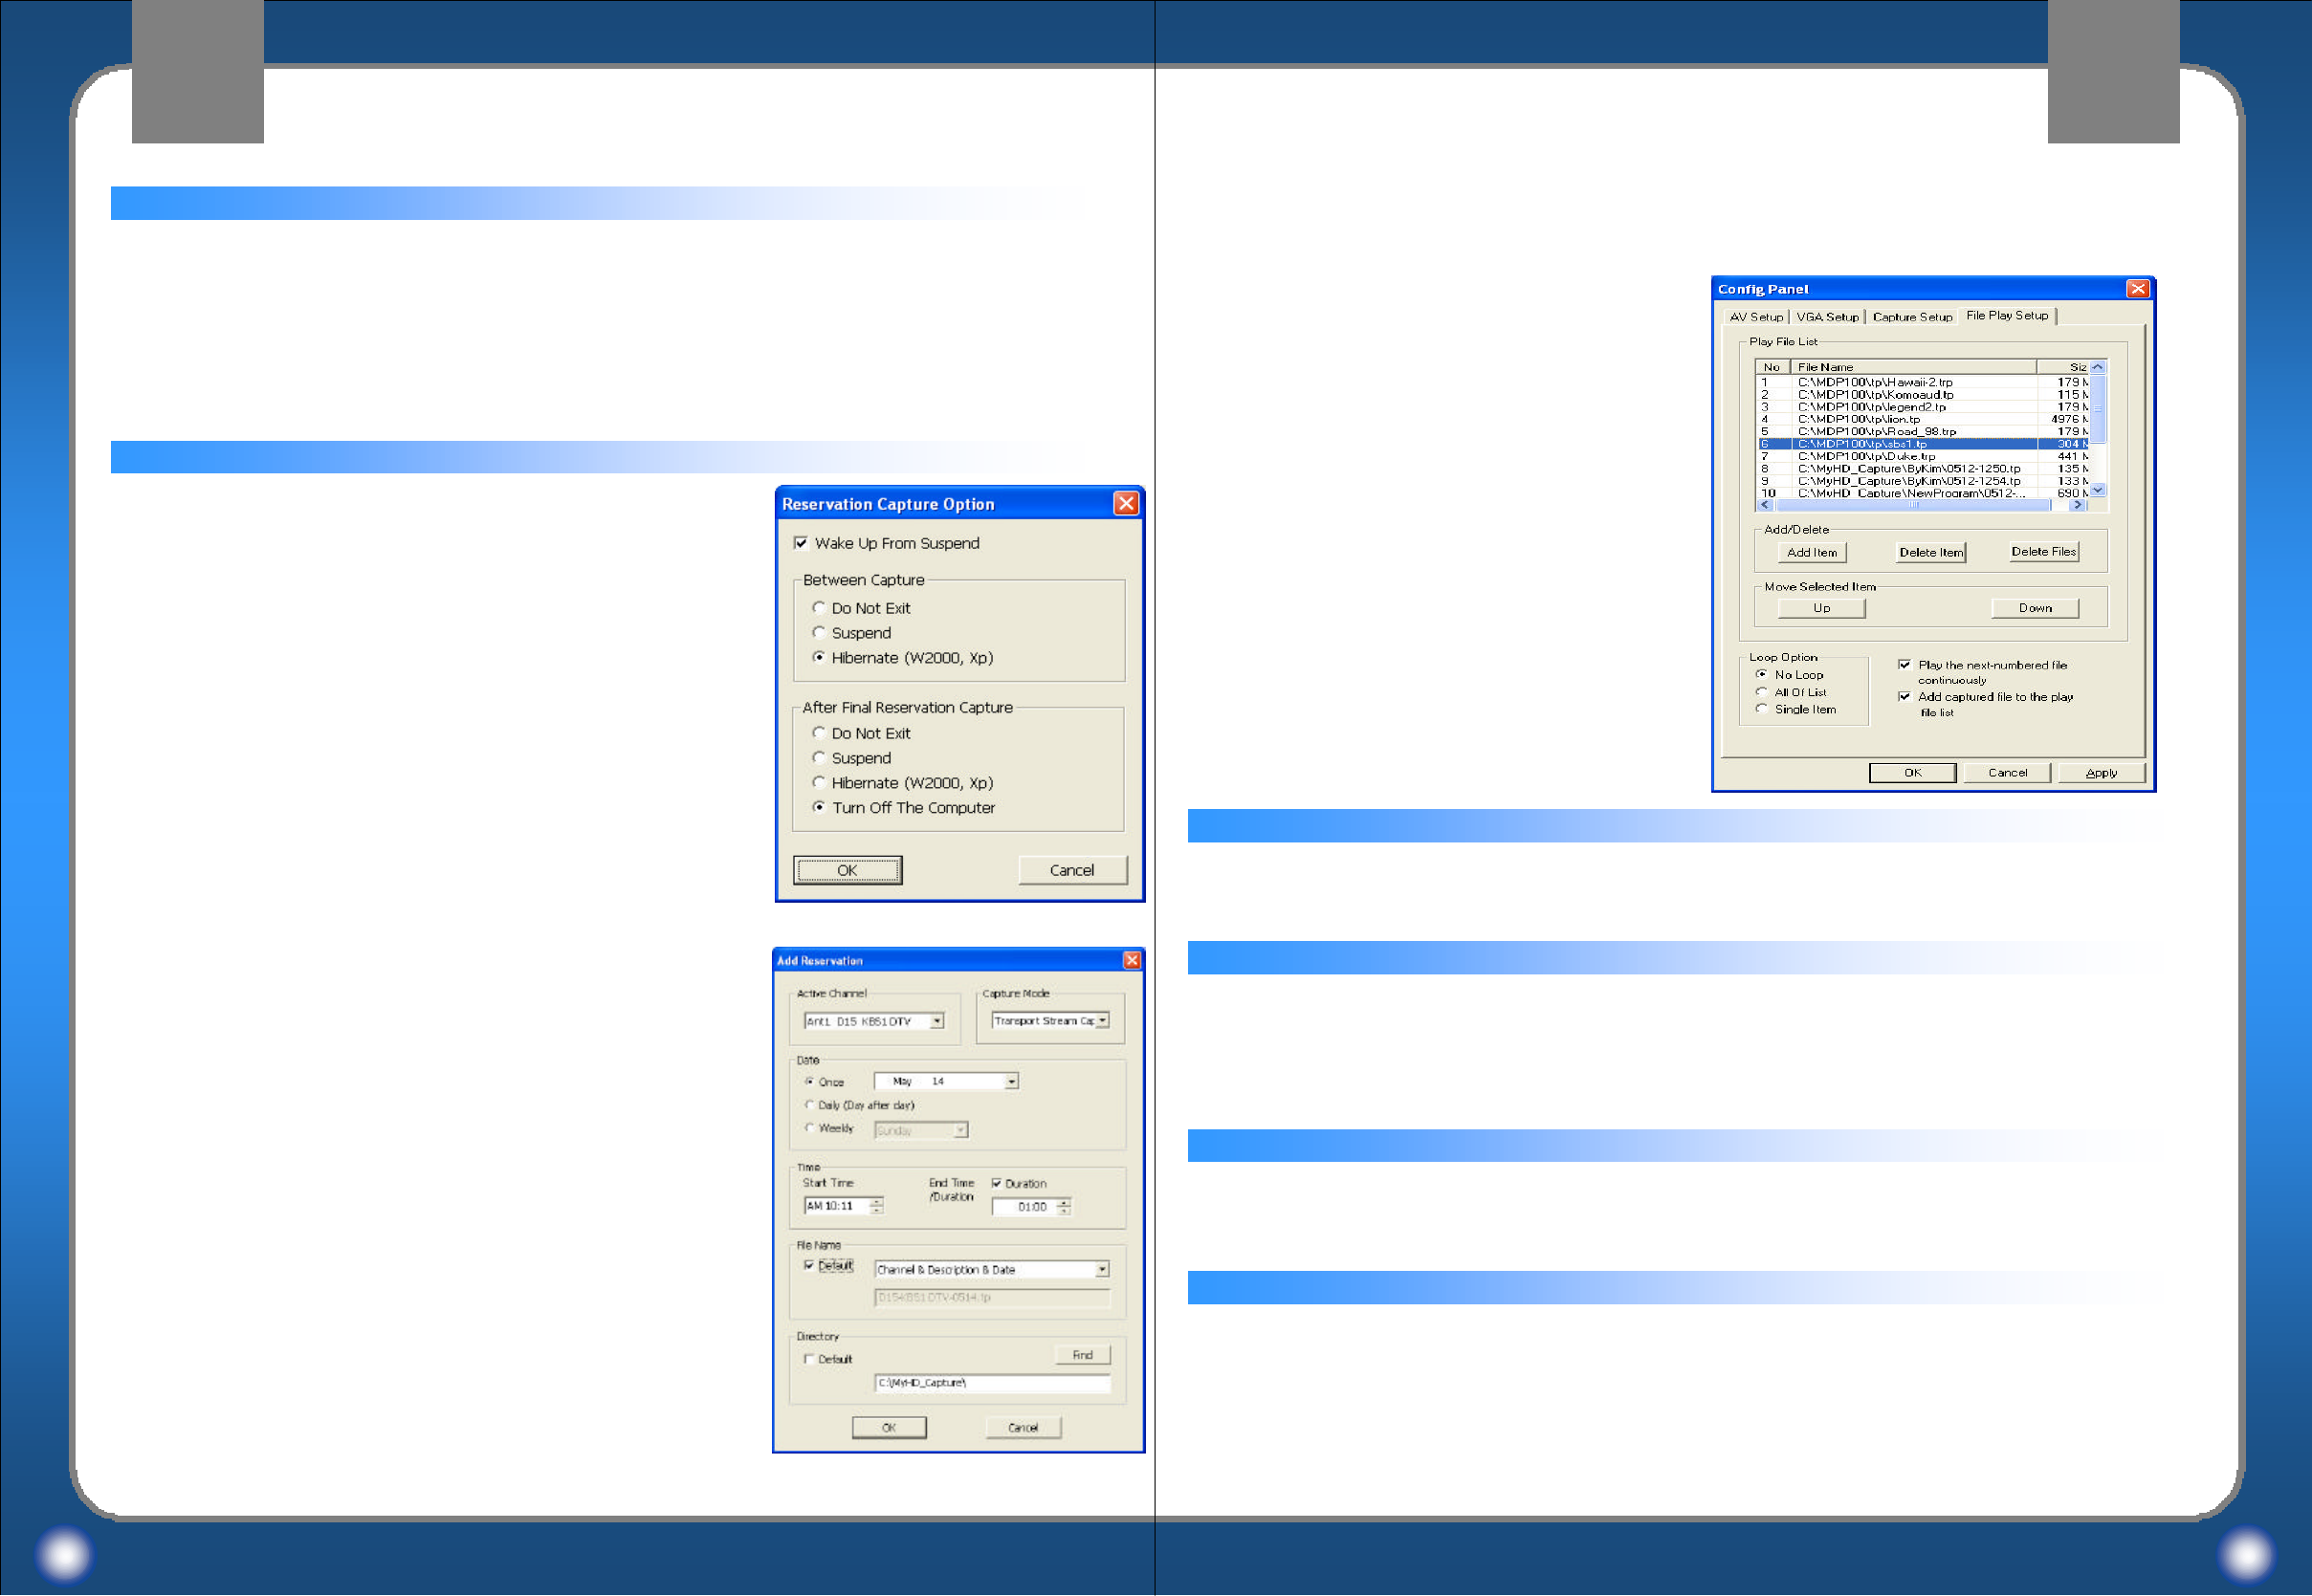
Reservation Capture Option for Timer Recording
Wake Up From Suspend
Wake up the MyHD program from suspend mode one minute
before recording.
Do not exit
MyHD program is still on after recording.
Suspend
MyHD program will be off after recording and then your PC
will be in suspend mode.
Hibernate
MyHD program will be off after recording and then
your PC will be in hibernate mode.
Turn off the computer
MyHD program will be off after recording and then
your PC will be turned off.
* For adding Reservation, refer to the right window.
Capture SettingsCapture Settings File Play SetupFile Play Setup
Play File List
The Play File List shows the list of files to be played.
Add/Delete
Move Selected Item
You can change the order of the Play File List clicking the Up button and Move button.
The Add/Delete allows you to add or delete files in the Play File List clicking the Add Item
button or Delete Item button. Click the Delete Files button If you want to delete files from
your hard disk as well as the Play File List.
Loop Option
Select all of list in Loop Option to play repeatedly all files in the Play File List or select
single Item in Loop Option to play repeatedly a specific selected file.
To choose a file for replaying by a remote control Handset in a HD mode, go to
“Config Panel”/”Capture File List.”
Then the right window will be Displayed.

Macro Image Technology
MyHD
Macro Image Technology
MyHD
43 44
Play the next-numbered file
File Play SetupFile Play SetupFile Play SetupFile Play Setup
Select this option to play automatically the divided files in the sequence according to the
number of their file names. If a current file have a properly numbered file name, the next-
numbered file in the same directory will be played automatically and sequentially. If a
current file have no properly numbered file name, a file with a properly numbered name
like "filename_01.tp"will be searched in the same directory. if such a file does exist the file
will be played automatically and sequentially. Otherwise the next item in the Play File List
will be played. this rule is identically applied to VOB Files.
Add captured file to the play file
You can select it to add the captured file to the Play File List.
The files are played in order of the Play File List. To play a specific file, Select and Double
Click the file. If a file is divided and captured (example : a.tp, a_01.tp, ...), it is only
necessary to add the first divided and captured file to the Play File List.
If you push the Previous/Next button of the remote control in the Full Screen Mode, the Play
File List is displayed on the screen. And you can play the file you select using the Channel
button in the Play File List on the screen.
You can watch the DVD files(*.vob) in the HD Resolution Mode of the MyHD Card. To
play sequentially several VOB files in the DVD, select the "Play the next-numbered files"
option, add VTS_01_1.VOD file to Play File List and play it. Then, the next-numberd files
will be played automatically and sequentially. (At present, the limited function is provided
only to play the VOD files not copy protected because of the license of DVD with copy
protection.)

Macro Image Technology
MyHD
Macro Image Technology
MyHD
45 46
Setting Channels
Select channels
Entering numbers by keyboard or push numbers on the MyHD’s remote control Handset.
Changing channels
To change channels :
1. Using channel buttons in the main control panel
2. Using arrow keys in a keyboard
3. Using channel buttons of the remote controller
Changing Sub-channels
If there are sub-channels in digital broadcasting, sub-channel can be selected by
using sub-channel button in the main control panel or the remote controller.
Favorite channel mode
To select favorite channels, using channel settings or a favorite channel button in the
remote controller.
Controlling Volume
To control volume:
1. dragging the knob in the main control panel
2. using left/right arrow keys in a keyboard
3. handling volume button in the remote controller
Changing Input Type
To change the input Type;
1. Using input button in the remote controller
2. Click “In”key in the main control panel
3. Click right side button of a mouse
Storing Transport Stream into a HDD
MyHD supports capturing Transport Stream and stores the stream into a HDD to
display images any time.
If audio is not working properly during capturing, DMA mode should be selected in a
HDD.
For the perfect capture, we recommend the PC system that is Pentium III 800MHz or
higher specifications.
During capturing, the size of file is automatically divided into 650MB or 2GB, and files
are created continuously. For example, Capture.tp, Capture_01.tp, Capture_02.tp,
and so on.
The captured files will be played continuously by numbers when they are replayed.
Replay the Captured Transport Stream files
From VGA mode
1. Using file open in the main control panel
2. Clicking the right side button of a mouse, and selecting “File”in the pop up menu
3. Using Drag & Drop method
From HD mode
Using the remote controller to replay the files when HD mode is played.
1. Add files in “Play File List”from “Config Panel”/”Capture File List”
2. Push the next file button or the previous file button in the remote controller
3. Use the play button to replay.
Using Esc button in the remote controller to exit or cancel.
Running MyHDRunning MyHD Running MyHDRunning MyHD
Macro Image Technology
MyHD
Macro Image Technology
MyHD
47 48
Avi Capture
To execute Avi capture, select “Config Panel”/”Capture Setup”/“AviCapture.”
Capturing
Use the capture button in the main control panel
or the record button on the remote control Hanset
To record broadcasting program as an avi format.
File names are automatically selected by the
following format ( “MMDD-HHmmss.avi”,
MM:month, DD:date, HH:hour, mm:minute,
ss:second).
To stop the capturing, use the same method with
capturing transport Stream.
Avi Capture after Capture time is selected
Execute same method with Transport Stream Capture after Capture time is selected .
During Avi capture, the size of file
cannot be limited.
The captured avi files can be replayed
through Windows Media Player.
To storing Transport Stream, Transport Stream Capture must be selected from
“Config Panel”/”Capture Setup”/”Capture Mode.”
Capturing
Use the record button on the remote controller or the capture button in the main
control panel for storing the stream into a destined file.
To stop the capturing, use the record button on the remote controller or the
capture button in the main control panel again.
The record button on the remote controller can be used for capturing in HD mode.
Transport Stream Capture after Capture time is selected
To decide a capturing time, select Capture from the below pop-up menu.
1. Type a desired capturing time in the Capture time box.
2. If you type “0,”the capturing will be executed as long as possible.
3. To stop the capture, use stop button on the remote controller.
Running MyHDRunning MyHD Running MyHDRunning MyHD
Macro Image Technology
MyHD
Macro Image Technology
MyHD
49
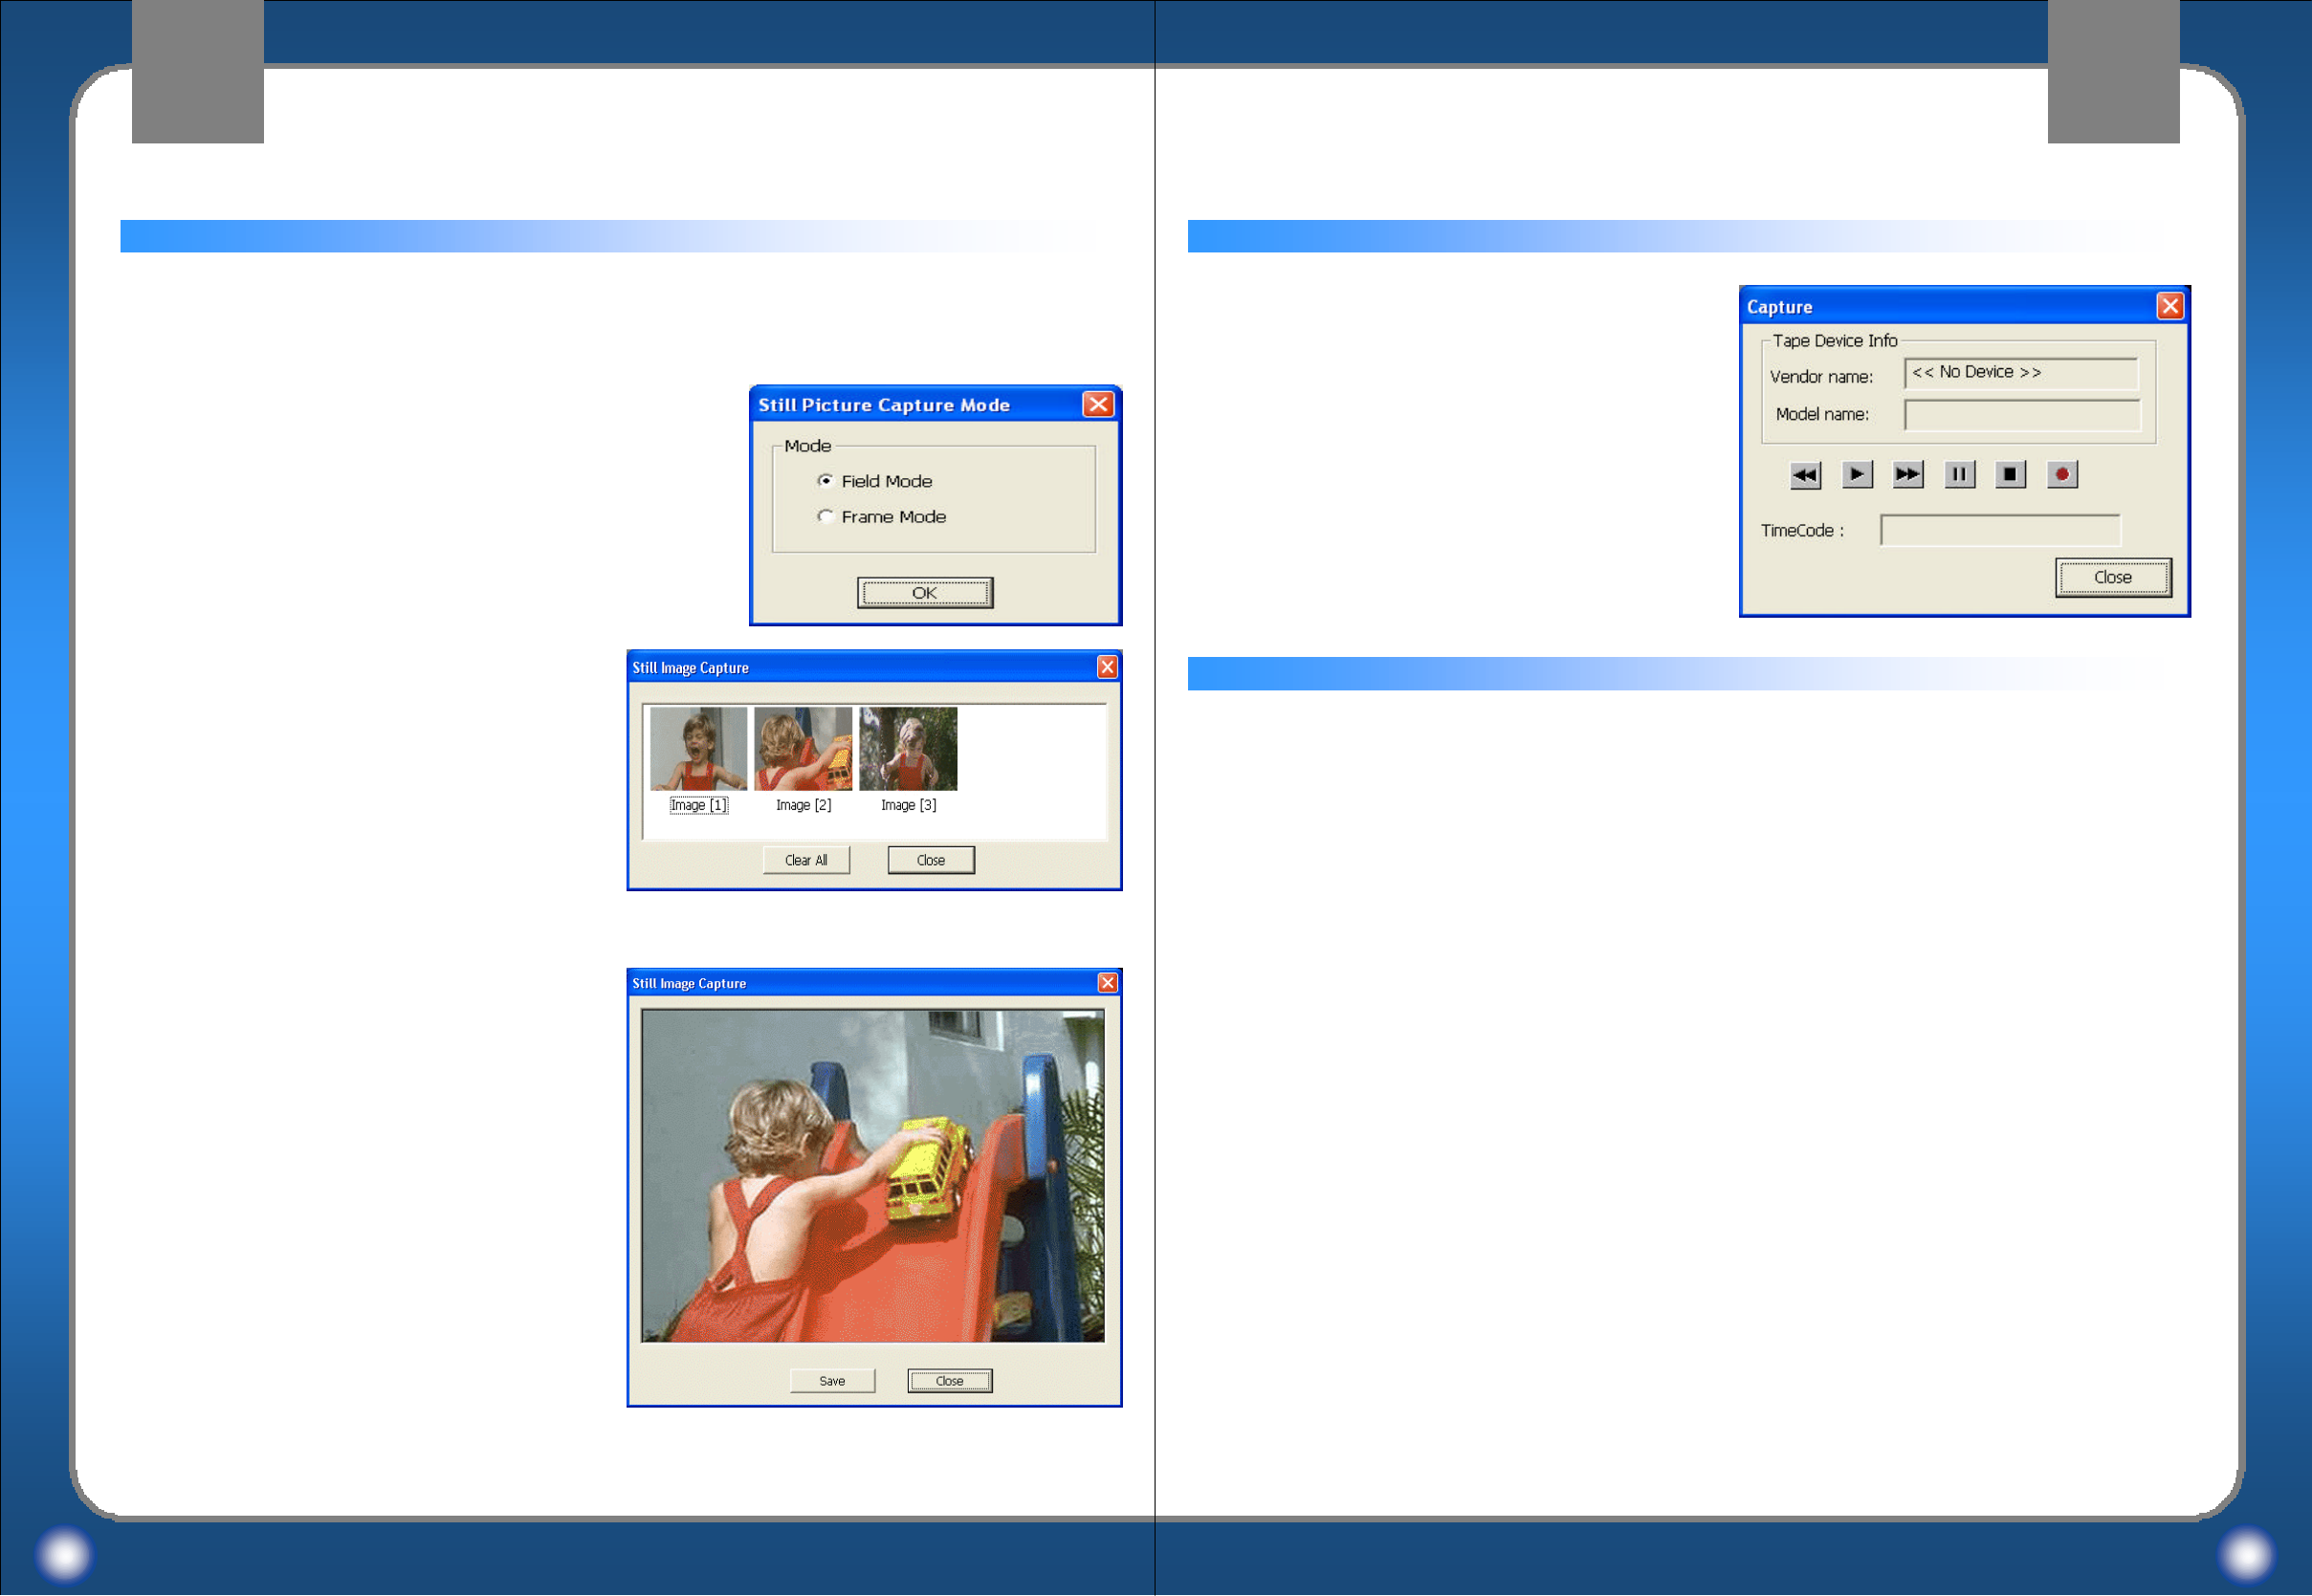
Still Image Capture is capturing a still image as a file of bitmap.
To execute Still Image Capture, select “Config Panel”/”Capture Setup”then check the box of
“Still Image Capture.”
In Detailed Options, either Field or Frame Mode can be
selected.
When the capture button, capture menu, or
record button is used, following images are displayed
in a window as small images(example).
To view a large image, double click
the small image.
Click Save to store the image as a bitmap file.
HD Mode & Overlay window Mode
MyHD supports output of graphic card and HD output in a monitor
(refer to page 8 for Hardware Settings)
To view the HD mode;
1. Select HD mode from the pop-up menu, or
2. Click HD button in the main control panel, or
3. Double click the left side button of a mouse on the overlay window
To exit the HD mode;
1. Double click the left side button of a mouse, or
2. Hit Esc key in a keyboard
To use the remote controller;
HD mode and an overlay window mode is worked by HD button on the remote
controller.
Running MyHDRunning MyHD Running MyHDRunning MyHD
50
Still Image Capture Tape Record
For Tape recording;
1. Select ”Config Panel”/”Capture Setup”/”Tape”
2. Click “Capture”from pop-up menu, or
3. Use the main control panel

Macro Image Technology
MyHD
Macro Image Technology
MyHD
51
Tape(D-VHS) record and playback Settings
* It is working on Windows XP only.
For settings of VCR driver
1. Two new hardware found boxes will be displayed when a D-VHS is connected to your
XP machine via firewire.
2. Install software for "AV/C Tape Recorder>>Player." Do not install software for
"AV/C Tuners."
3. Choose "Install from a list or specific location(Advaced)."
4. Click "Next>"
5. Choose "Don't search, I will choose the driver to install."
6. Click "Next>"
7. Select "Sound, video and game controllers" option and click "Next."
8. If you have a JVC Victor HM-DH30000, select "JVC" as the manufacturer and
"JVC Tape Device" as the model and click "Next>."
9. Click "Finish."
10. JVC D-VHS tape deck is ready to use by DirectShow applications.
For recording
1. Excute MyHD program,then click right mouse button.
2. Select "Config Panel>>Capture Setup>>Tape"
3. Click "apply>>OK"
Then choose either a or b method during broadcasting.
a. Click "recording button" on the remote controller or main panel.
b. Click right mouse button, then select "menu>>Capture(Ctrl+C)."
Popup window will be appeared, then click "Recording" after searching a right position
of recording tape by the button of "Rew/FF."
For replaying
1. Select "menu>>Tape(Ctrl+D)," then "Tape" will be displayed in the main control panel.
2. Use Play/FF/REW buttons for playback.
-When video output does not work because programs or settings are changed during playing,
Click "stop" then "play" button.
-If record/playback excutes on MyHD program, the power of VCR will be "ON" even though
it is "OFF."
-"Time Record" is available even though the power of VCR is "OFF."
52
Tape record and playback SettingsTape record and playback Settings Tape record and playback SettingsTape record and playback Settings