Mad Catz 47674S4711R Warhead Dolby Virtual 7.1 Wireless Stereo Headset User Manual TRI 476740M02 HD3 UG 16Jan12 2
Mad Catz, Inc. Warhead Dolby Virtual 7.1 Wireless Stereo Headset TRI 476740M02 HD3 UG 16Jan12 2
Mad Catz >
Contents
- 1. 47674R_User Manual_Part 1
- 2. 47674R_User Manual_Part 2
47674R_User Manual_Part 1

WARHEAD™ 7.1
WIRELESS SURROUND HEADSET
PRODUCT MANUAL
®
TRI_476740M02_HD3_UG_16Jan12.indd 1 16/01/2012 11:28 AM
[3]
®
[2]
®
[
[
[
[
EN
FR
DE
IT
]
]
]
]
[
[
[
[
EN
FR
DE
IT
]
]
]
]
[
[
[
[
EN
FR
DE
IT
]
]
]
]
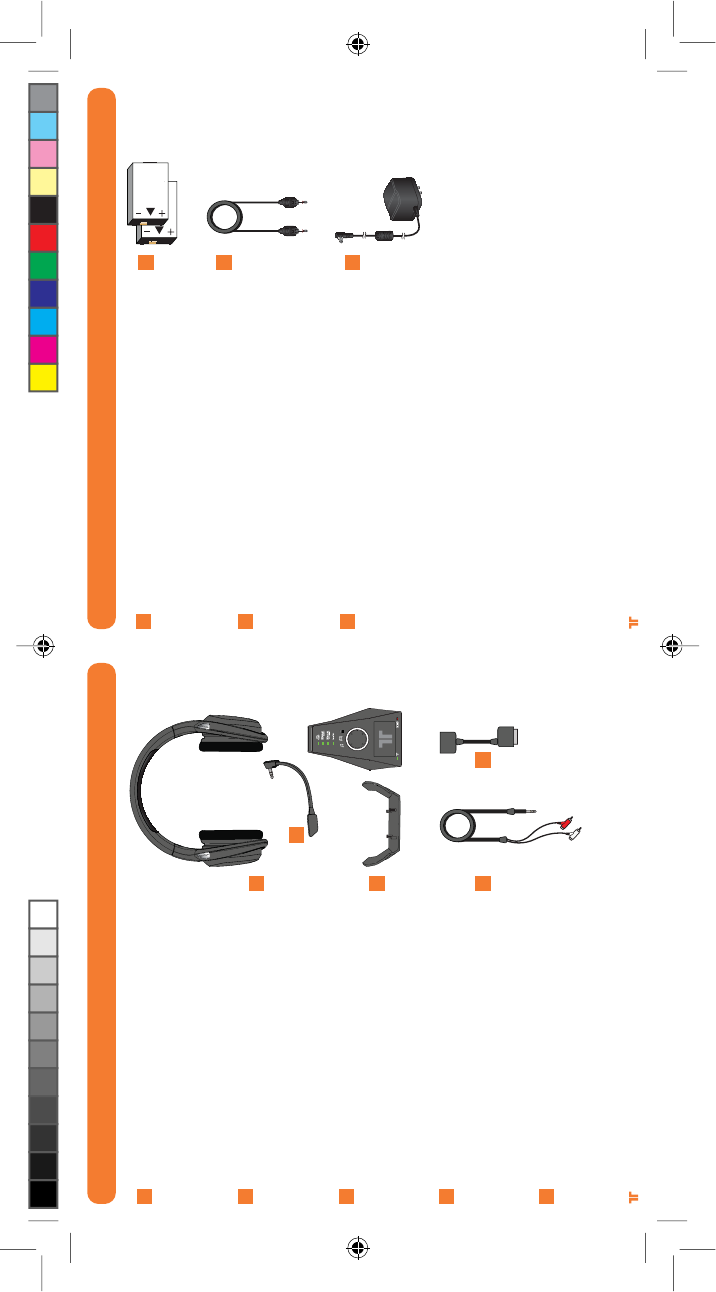
Optical Cable
Câble optique
Optisches Kabel
Cavo ottico
2x Rechargeable Battery Packs
2 batteries rechargeables
2 Akkus
2 gruppi batterie ricaricabili
PACKAGE CONTENTS
[
[
[
[
EN
FR
DE
IT
]
]
]
]
Auriculares Warhead 7.1
Casque Warhead 7.1Warhead
Warhead 7.1-Headset
Cuffia Warhead 7.1
[
[
[
[
EN
FR
DE
IT
]
]
]
]
[
[
[
[
EN
FR
DE
IT
]
]
]
]
[
[
[
[
EN
FR
DE
IT
]
]
]
]
Microphone
Microphone
Mikrofon
Microfono
[
[
[
[
EN
FR
DE
IT
]
]
]
]
RCA Adapter Cable
Câble adaptateur RCA
RCA-Adapterkabel
Cavo adattatore RCA
Digital Audio Adapter
Adaptateur audio numériqu
Digitaler Audioadapter
Adattatore audio digitale
PACKAGE CONTENTS
Base Station with Charger and Headset Stand
Socle avec chargeur et support de casque
Basisstation mit Ladegerät und Headset-Ständer
Stazione base con caricatore e supporto per cuffie
A
B
C
D
E
A
B
C
D E
F
G
HPower Adapter
Adaptateur d’alimentation
Netzadapter
Adattatore di alimentazione
F
G
H
TRI_476740M02_HD3_UG_16Jan12.indd 2-3 16/01/2012 11:28 AM
[5]
®
[4]
®
CONTENTS CONTENTS
ENGLISH
Microphone Insertion Directions
Headset Stand Insertion Directions
Batteries
Headset Controls
Base Station
Digital Audio Setup
Analog Audio Setup
Power Save Mode
Wireless Range
Syncing Headset to Base Station
Stereo Input Modes
Dolby Digital/EX Input Modes
Matching with Controllers
Troubleshooting
Warranty
Technical Support
FRANÇAIS
Installation du microphone
Installation du support de casque
Batteries
Commandes du casque
Socle
Installation audio numérique
Installation audio analogique
Mode Économie d’énergie
Portée sans fil
Synchronisation du casque avec le socle
Modes d’entrée stéréo
Modes d’entrée Dolby Digital/EX
Association à des manettes
Résolution des problèmes
Garantie
Assistance technique
6
6
7
8
10
12
14
15
15
15
16
17
18
18
19
19
22
22
23
24
26
28
30
31
31
31
32
33
34
34
35
35
DEUTSCH
Anweisungen zum Anschließen des Mikrofons
Anweisungen zum Anschließen des Headset-Ständers
Akkus
Headset-Steuerelemente
Basisstation
Digitale Audioeinrichtung
Analoge Audioeinrichtung
Energiesparmodus
Wireless-Bereich
Headset mit Basisstation synchronisieren
Stereo-Eingangsmodi
Dolby Digital-/EX-Eingangsmodi
Controllern zuordnen
Problembehandlung
Garantie
Technischer Support
ITALIANO
Indicazioni per l’inserimento del microfono
Indicazioni per l’inserimento del supporto per cuffie
Batterie
Comandi cuffie
Stazione base
Impostazione audio digitale
Impostazione audio analogico
Modalità risparmio energetico
Raggio di copertura del segnale wireless
Sincronizzazione delle cuffie con la stazione base
Modalità di ingresso stereo
Modalità di ingresso Dolby Digital/EX
Abbinamento ai controller
Risoluzione problemi
Garanzia
38
38
39
40
42
44
46
47
47
47
48
49
50
50
51
51
54
54
55
56
58
60
62
63
63
63
64
65
66
66
67
CONTENTS
TRI_476740M02_HD3_UG_16Jan12.indd 4-5 16/01/2012 11:28 AM
[7]
ENGLISH
®
[6]
®
WARNING
Before using this product, read the manuals for this accessory and the Xbox 360 console (and any other applicable manuals) for
important safety and health information. Keep all manuals for future reference.
For replacement Xbox manuals, see www.xbox.com/support or call Xbox Customer Service.
PREVENTION OF HEARING LOSS
CAUTION – Permanent hearing loss may occur if earphones or headphones are used at high volume for prolonged periods of time.
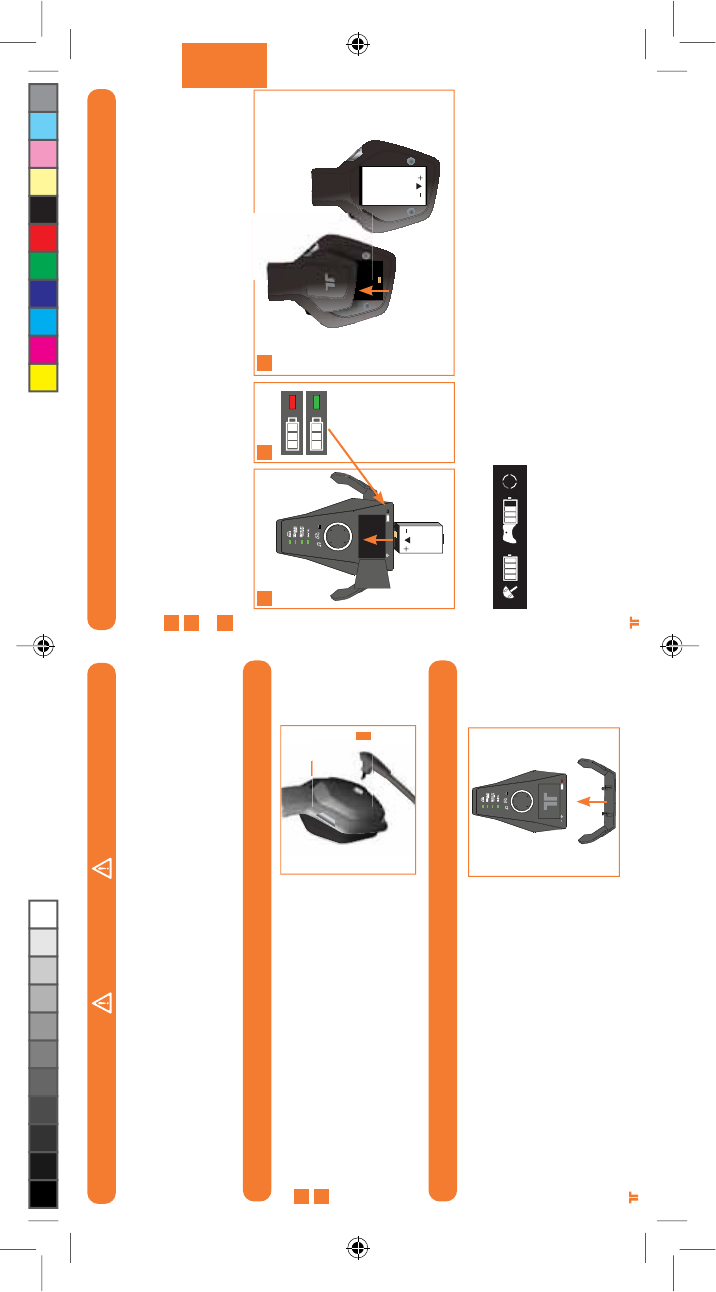
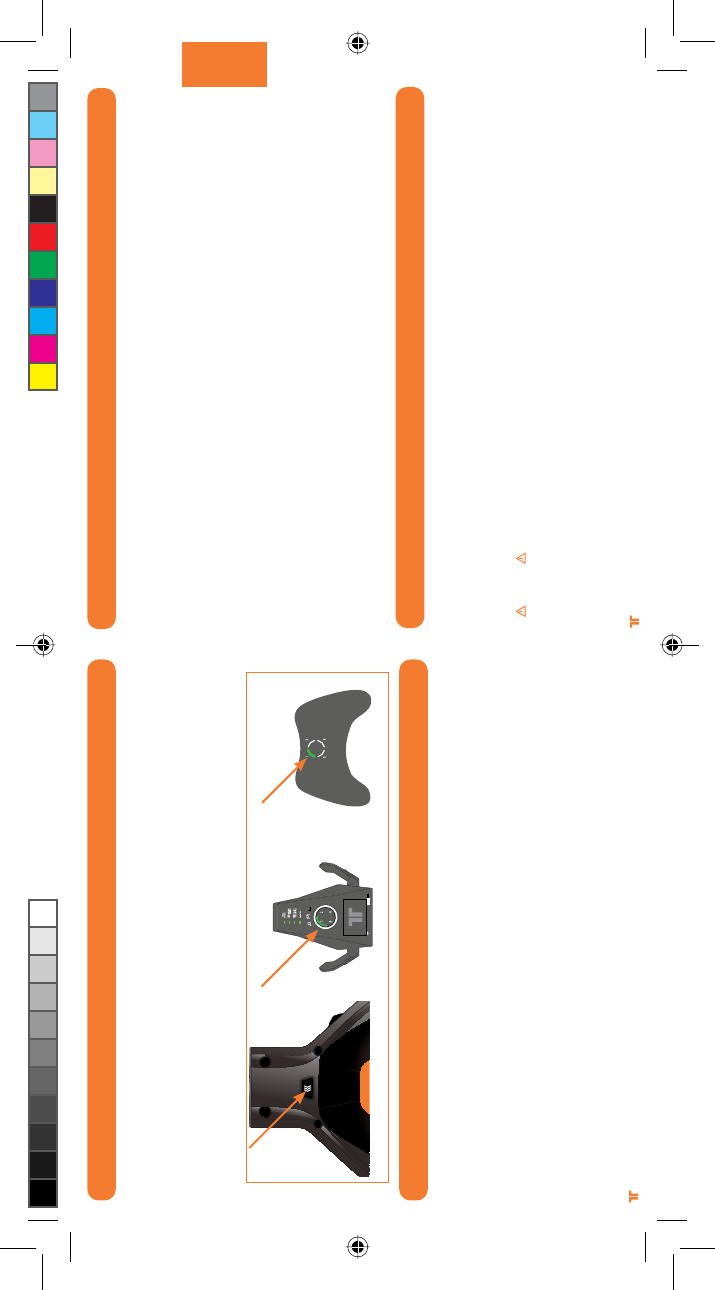
MICROPHONE INSERTION
HEADSET STAND INSERTION
1
2
Locate jack port.
Insert microphone.
Adjust microphone into desired position.
1
2
Snap Headset Stand onto bottom of Base Station.
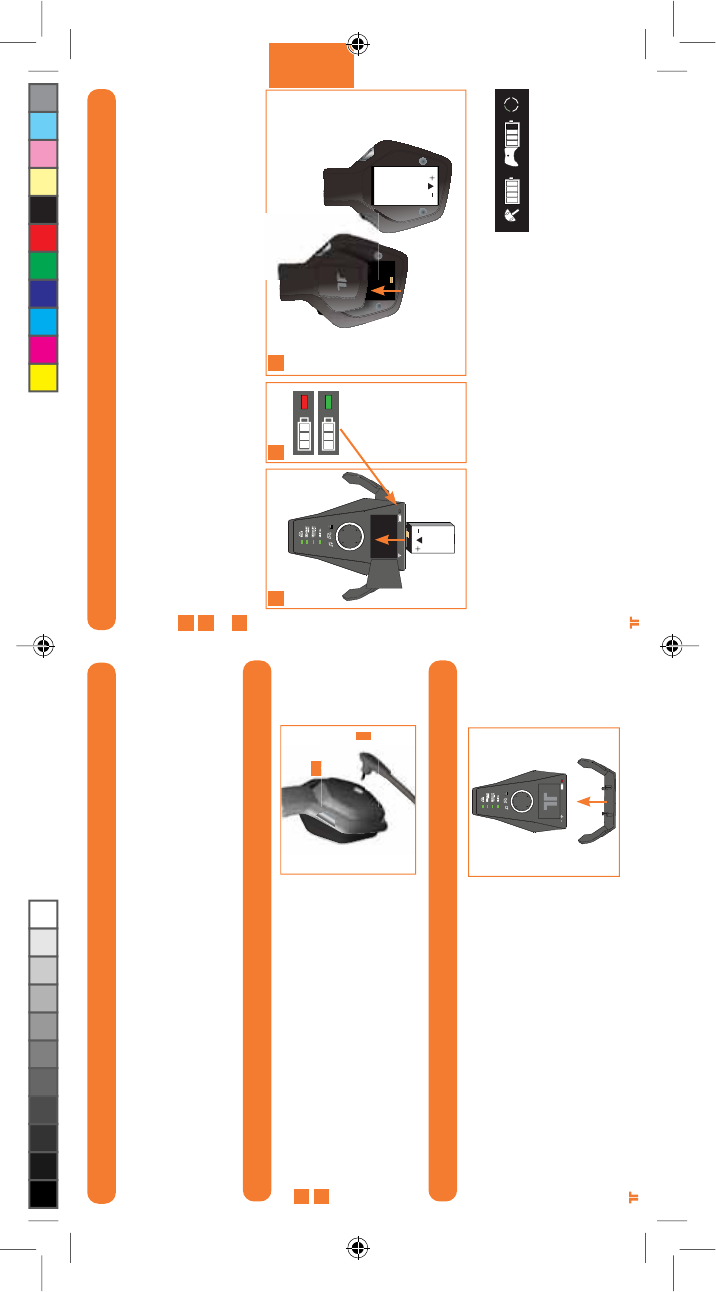
BATTERIES
Charge your Warhead 7.1 Wireless Surround Headset batteries before first-time use, and
whenever either battery is depleted. To charge or recharge the battery:
Place the battery in the charging slot on the Base Station.
While the battery is charging, the Battery Charge Indicator will illuminate Red. Once
charging is complete, the Battery Charge Indicator will illuminate Green.
Once the battery is charged, insert it into the Headset by removing the battery cover from the
right earcup and placing the battery into the compartment.
To check the current charge level of the battery in the Headset, press and release the Xbox
Guide Button. The charging status will be displayed on screen.
Notes:
UÊ ÕÞÊV>À}}Ê>ÊL>ÌÌiÀÞÊV>ÊÌ>iÊÕ«ÊÌÊnÊÕÀð
UÊ vÊÌiÊL>ÌÌiÀÞÊÃÊÕÕÃi`ÊvÀÊ>Ê}ÊÌi]ÊÌiÊL>ÌÌiÀÞÊ>ÞÊÃiÊÌÃÊV>À}i°ÊÊ
If this occurs, simply recharge the battery normally.
UÊ /iÊL>ÌÌiÀÞÊ>`Ê>ÃiÊ-Ì>ÌÊ>ÞÊLiViÊÜ>ÀÊÜiÊV>À}}°
1
2
3
1 2 3
TRI_476740M02_HD3_UG_16Jan12.indd 6-7 16/01/2012 11:28 AM
[9]
ENGLISH
®
[8]
®
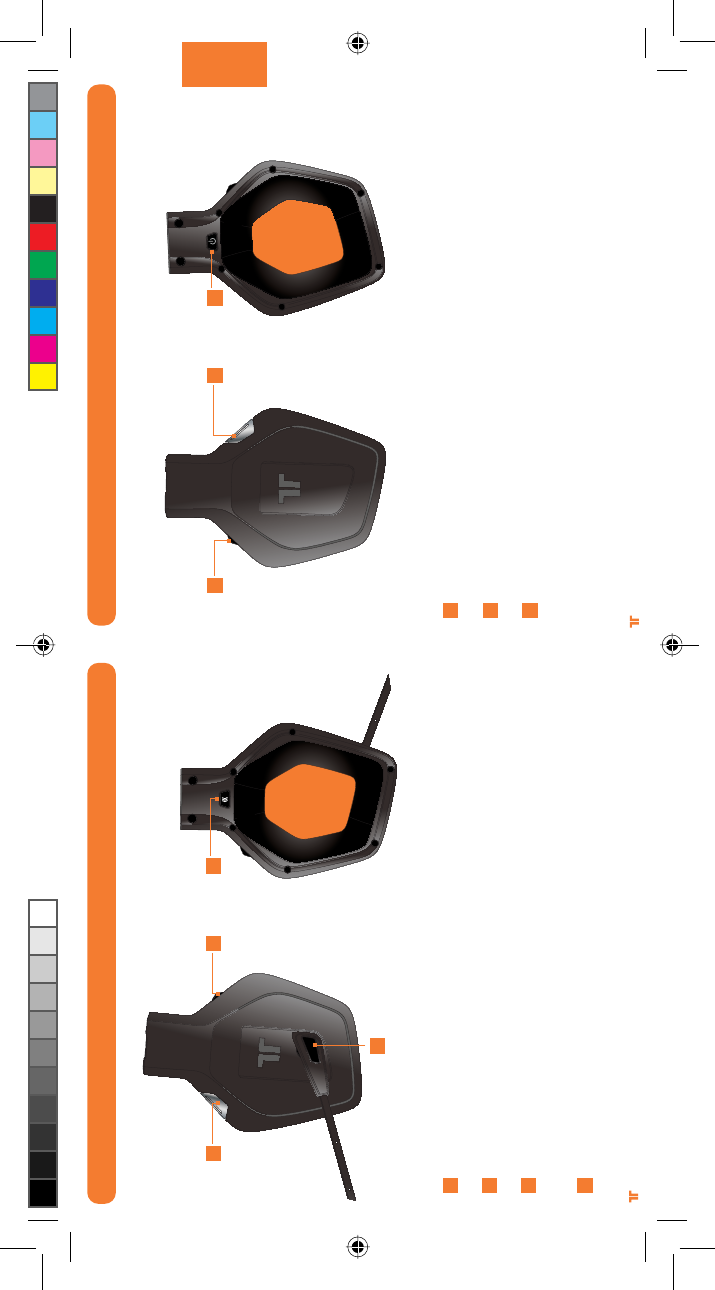
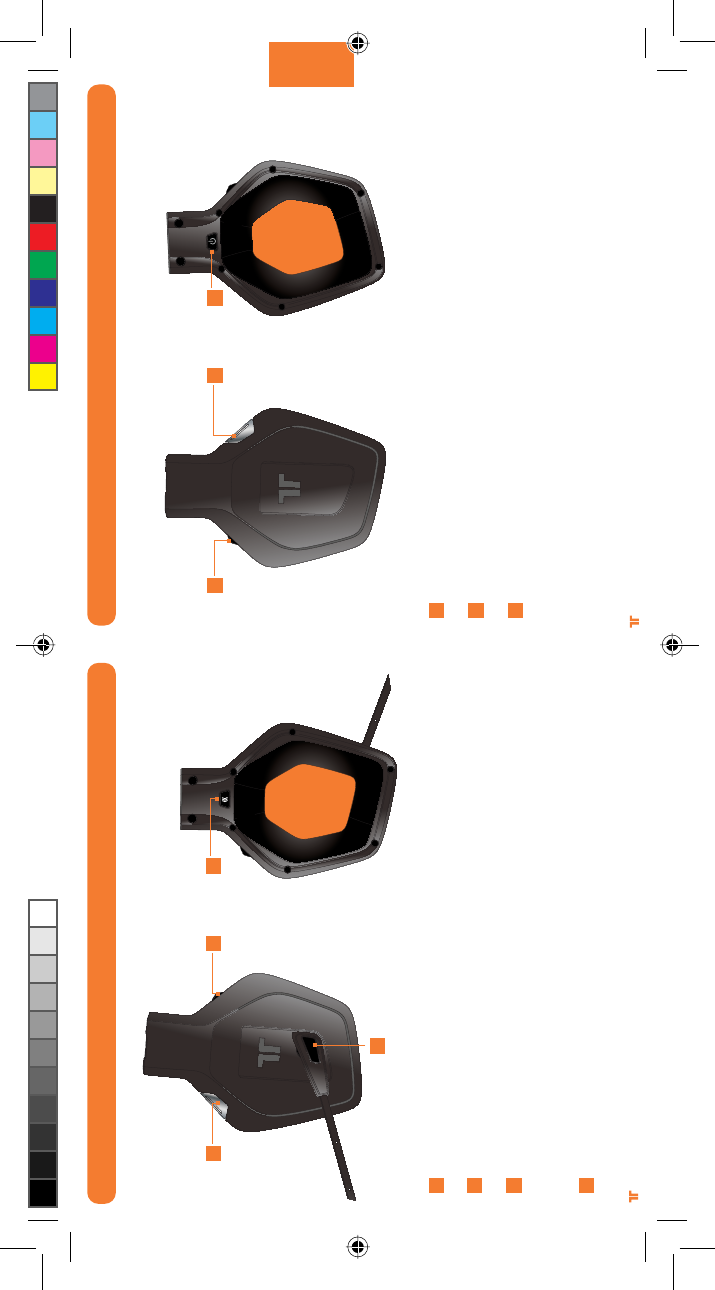
Game Audio Volume and Mute: Use to adjust the volume of the game audio.
Push in to mute/unmute game audio.
Dolby Mode: Push to select between the various Dolby modes. Press and hold this button
for 0.5 seconds. See pages 16-17 for more information.
Power/Sync: Push and release to turn Headset ON/OFF. Hold for 5 seconds to put
Headset in Sync mode. See page 15 for more information on Syncing the Headset
to the Base Station.
HEADSET CONTROLS - RIGHT SIDE
E
F
G
E F G
HEADSET CONTROLS - LEFT SIDE
Input: Push this button to toggle between the Analog and Digital (optical) inputs. Press
and hold this button for 0.5 seconds.
Mic Mute: Press the mic mute button so that others cannot hear you. The LED at the
end of the microphone will illuminate when the mic is muted.
Voice Communication Volume and SVM Control: Use to adjust the volume of the voices
of other players. SVM = Selectable Voice Monitoring. SVM allows the user to hear his or
her own voice through the Headset. Push in to turn SVM ON/OFF.
Connect Button: Push and release this button to match the Headset to the controller.
Press and hold this button for 3 seconds to connect Headset to the console.
A
B
C
D
A
B
C D
TRI_476740M02_HD3_UG_16Jan12.indd 8-9 16/01/2012 11:28 AM
[11]
ENGLISH
®
[10]
®
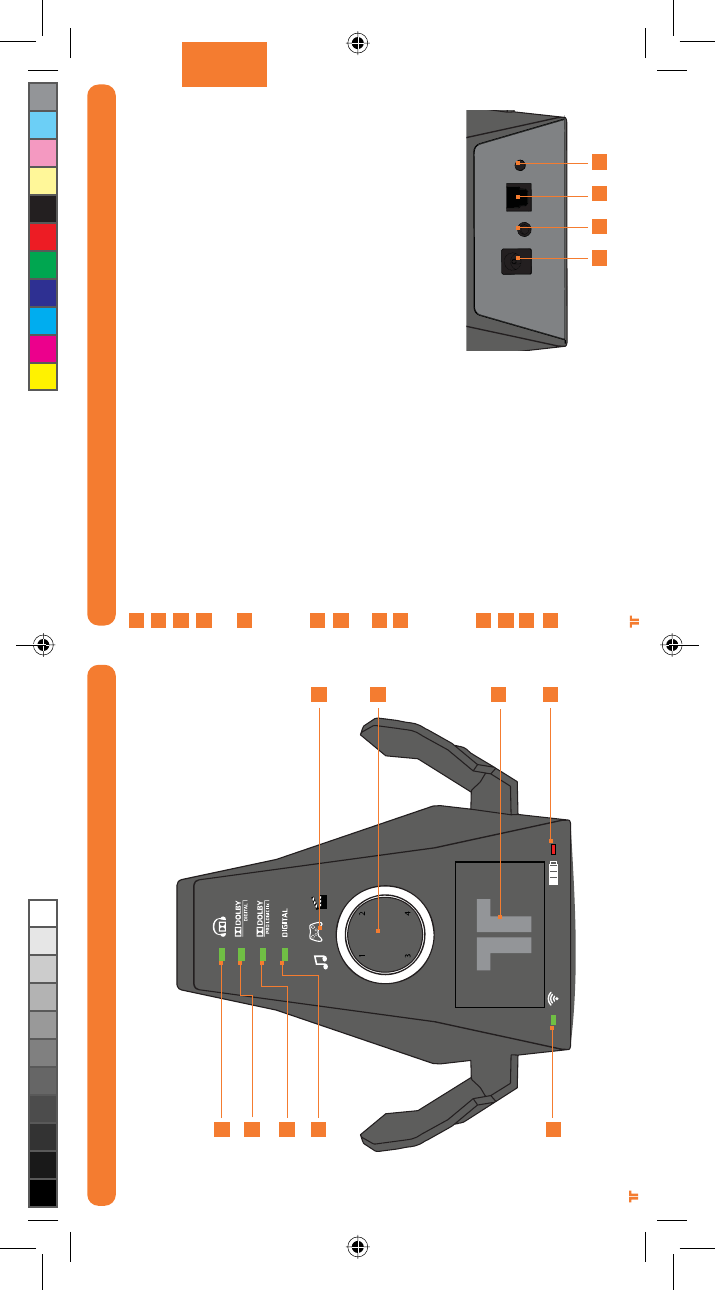
BASE STATION
Dolby Headphone Indicator: Illuminates when Dolby Headphone mode is enabled.
Dolby Digital Indicator: Illuminates when a Dolby Digital signal is received.
Dolby Pro Logic IIx Indicator: Illuminates when Dolby Pro Logic IIx is enabled.
Digital Indicator: Illuminates when the Digital (optical) input is selected. The LED will turn
OFF when the analog input is selected.
Power/Sync Status Indicator:
a. Flashing: Syncing or searching for Headset.
b. Solid: Connected to a Headset while Base Station is powered ON.
c. OFF: Base Station is powered OFF.
EQ Mode Indicator: Indicates if Music, Movie or Game mode is selected.
Ring of Light: Indicates the quadrant to which the Headset is associated. See page 18 for
more information.
Battery Charging Slot: Insert battery here for charging.
Battery Charge Indicator: Red when charging, Green when fully charged.
AC Power Input
Line In
Digital Optical input
Sync Button: Press and hold for
2 seconds to put Base Station
in Sync mode. See page 15 for
more information.
A
B
C
D
E
F
G
H
i
j
k
l
m
j k l m
Rear of Base Station
BASE STATION
A
B
C
D
E
F
G
H
i
TRI_476740M02_HD3_UG_16Jan12.indd 10-11 16/01/2012 11:28 AM
[13]
ENGLISH
®
[12]
®
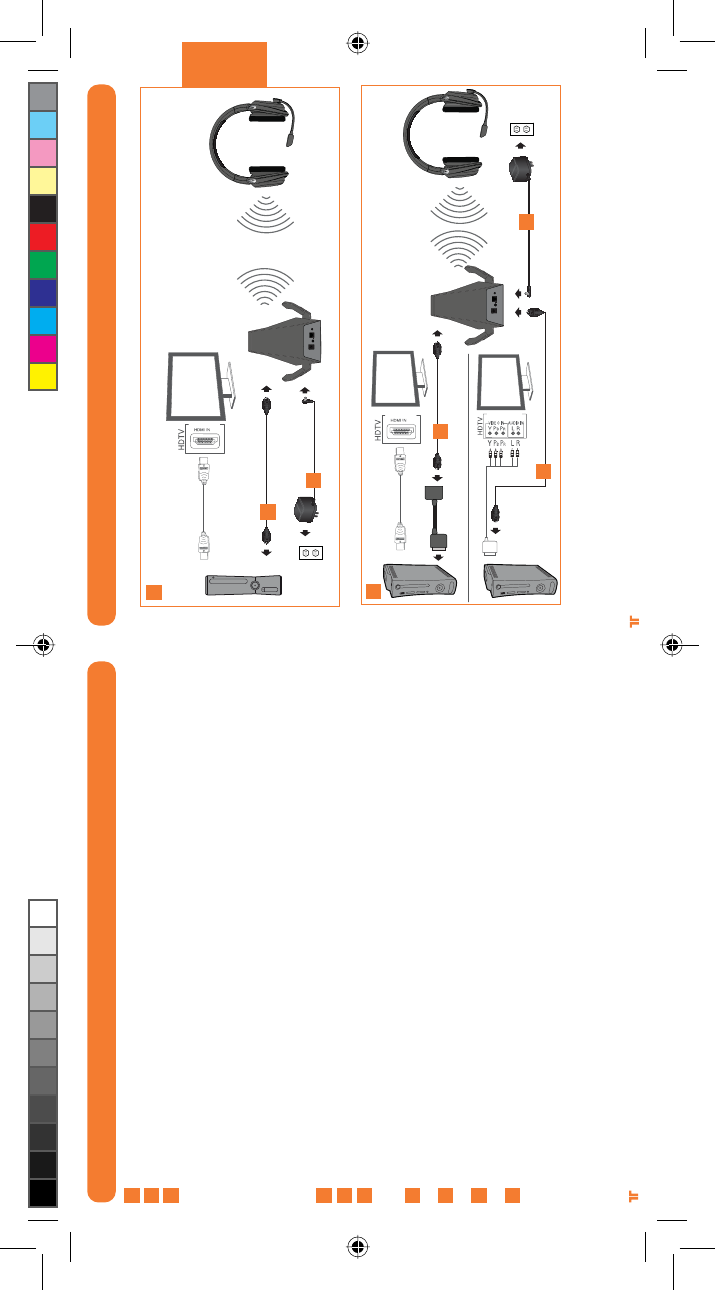
DIGITAL AUDIO SETUP
A
B
3
4
3
3
4
*HDMI cable and Component/VGA/Composite AV cable not included
DIGITAL AUDIO SETUP
Charge the battery and insert it into the Headset. See page 7 for more information.
Remove protective caps from the Optical Cable.
A- Plug one end of the Optical Cable into the optical port on the rear of the Xbox 360® S
Console. Plug the other end of the Optical Cable into the wireless Base Station.
OR
B- If using the Xbox 360 Console (Original) with HDMI, connect the Optical Cable to the
Digital Audio Adapter, and then connect the Digital Audio Adapter to the AV port on the
rear of the Xbox 360.
If using the Xbox 360 Console (Original) with Component/VGA/Composite AV cable,
connect the Optical Cable to the optical port on the Component/VGA/Composite AV cable.
Connect Power Adapter to Base Station. Plug Power Adapter into wall outlet.
Power ON the Xbox 360 Console and Headset.
In the Xbox dashboard, select System Settings > Console Settings > Audio > Digital Output
and select “Dolby Digital 5.1.” Watch to ensure that the “Dolby Digital” light on the Base
Station illuminates as a game or movie starts.
To confirm Xbox LIVE settings, press the “Xbox Guide Button” when a game is loaded, and go
to Personal Settings > Voice. Ensure that “Headset Only” is selected.
Press the connect button on the Xbox 360. Press and hold the connect button on the headset
for 3 seconds.
Match the Base Station quadrant to the controller by pressing the Connect Button. See page
18 for more information.
Press the Input button on the Headset to select the digital input. The “Digital” LED on the
Base Station will illuminate when the digital input is selected.
1
2
3
4
5
6
7
8
9
10
TRI_476740M02_HD3_UG_16Jan12.indd 12-13 16/01/2012 11:28 AM
[15]
ENGLISH
®
[14]
® ®
POWER SAVE MODE
If the Headset receives no audio for 15 minutes, the Headset will power down to save
battery power. Press the Power/Sync button to turn the Headset back ON.
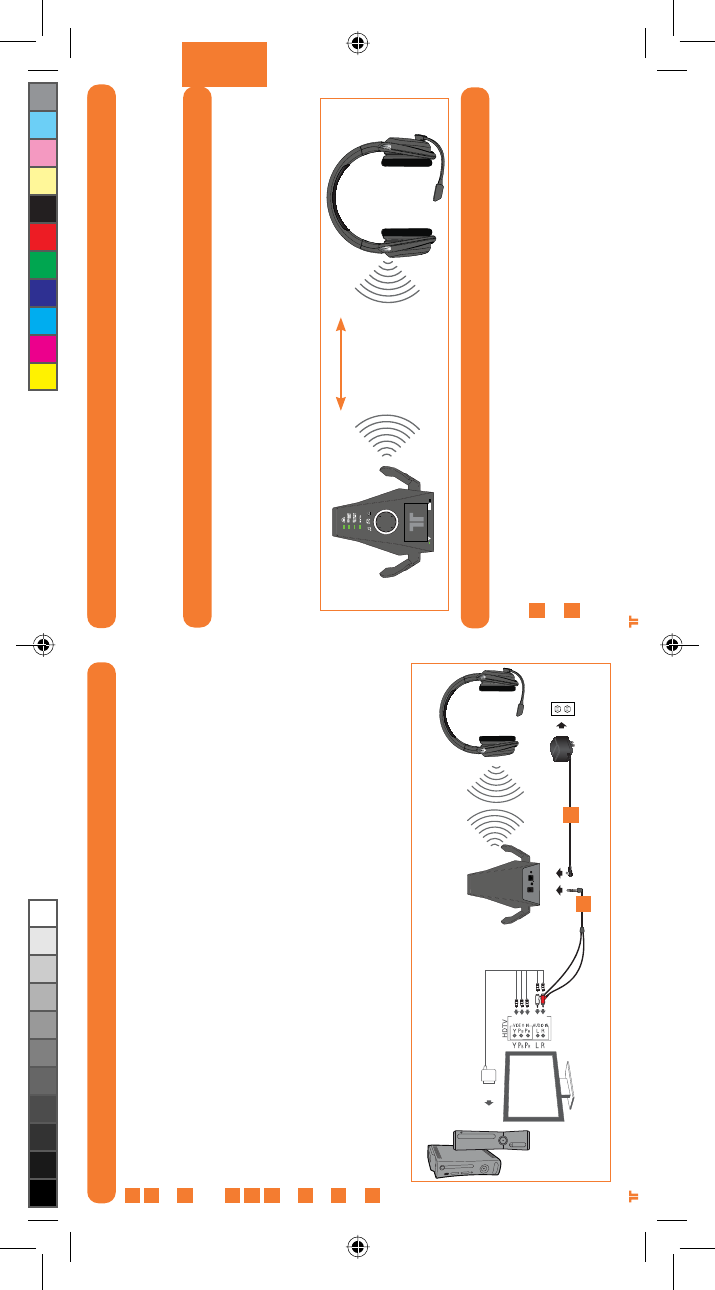
WIRELESS RANGE
The Warhead 7.1 Headset transmits audio via digital radio frequency (RF) and has an
operating range of 33 feet/10 meters in any direction. Please remain within this range for
optimal performance. Avoid placing the Base Station on top of a metal surface or behind
other devices that use RF. If the Headset is not operating properly within the 33-foot/10-
meter range, try moving the Base Station to a different location for improved performance.
SYNCING HEADSETS TO BASE STATION
Note: Headsets are paired to the Base Station at the factory. This step is only
necessary when Syncing a new Headset.
With the Base Station powered ON, press and hold the Power/Sync button on the Base
Station for 2 seconds. The Power/Sync LED on the Base Station will flash slowly.
On the Headset, quickly press and hold the Power/Sync button for 5 seconds. The
Headset and Base Station will Sync, and the LED on the Base Station will illuminate solid
when the Syncing is successful.
1
2
33ft/10m
ANALOG AUDIO SETUP
Charge the battery and insert it into the Headset. See page 7 for more information.
Plug the 3.5mm stereo audio connector of the RCA Adapter Cable into the Line In input of
the Base Station.
Connect the Red/White RCA cables from the RCA Adapter Cable to the Red/White RCA
cables on the Component/VGA/Composite AV cable. Optional: Connect the male ends of
these cables to the RCA audio inputs on the display.
Connect Power Adapter to Base Station. Plug Power Adapter into wall outlet.
Power ON the Xbox 360 Console and Headset.
To confirm Xbox LIVE settings, press the “Xbox Guide Button” when a game is loaded, and
go to Personal Settings > Voice. Ensure that “Headset Only” is selected.
Press the connect button on the Xbox 360. Press and hold the connect button on the
headset for 3 seconds.
Match the Base Station quadrant to the controller by pressing the Connect button.
See page 18 for more information.
Press the Input button on the Headset to select the analog input. The “Digital” LED on the
Base Station will turn OFF when the analog input is selected.
1
2
3
4
5
6
7
8
34
9
TRI_476740M02_HD3_UG_16Jan12.indd 14-15 16/01/2012 11:28 AM
[17]
ENGLISH
®
[16]
®
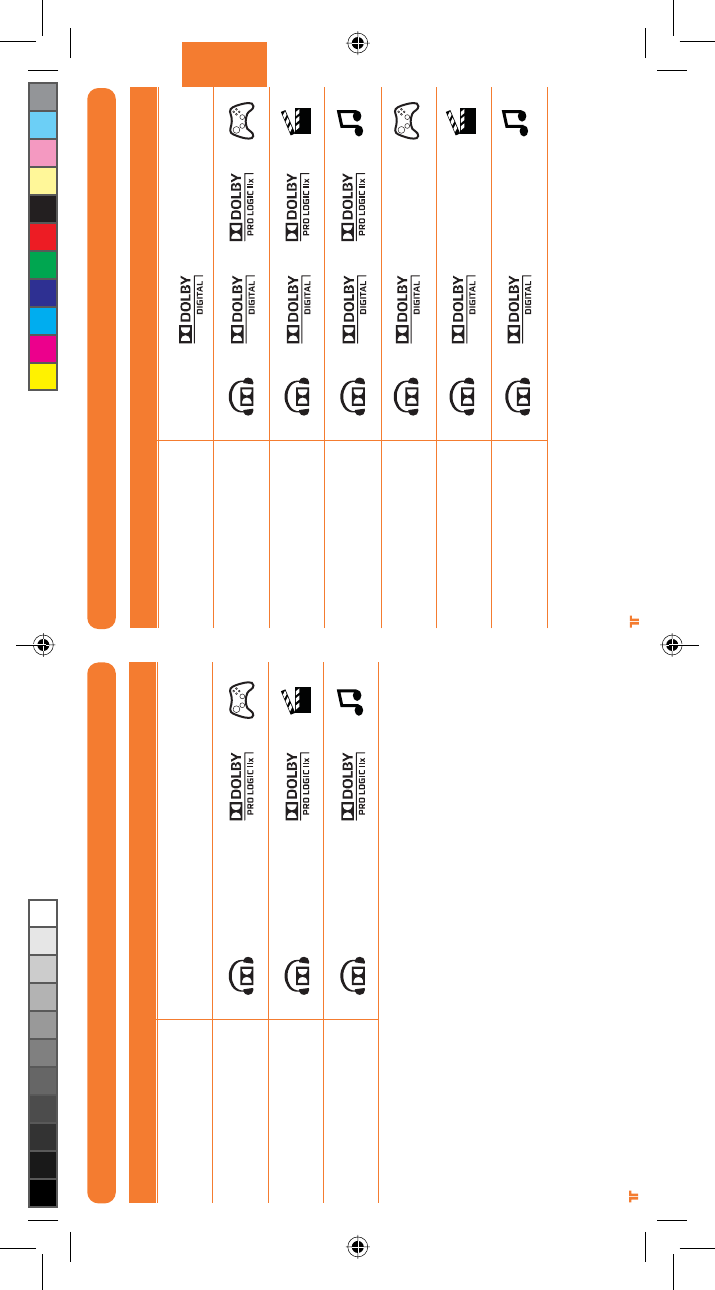
DOLBY DIGITAL/EX INPUT MODES
Pro Logic IIx Game 7.1 audio
Pro Logic IIx Movie 7.1 audio
Pro Logic IIx Music 7.1 audio
Dolby Digital Game 5.1 audio
Dolby Digital Movie 5.1 audio
Dolby Digital Music 5.1 audio
LED lights ONMode
Stereo
Pro Logic IIx Game 7.1 audio
Pro Logic IIx Movie 7.1 audio
Pro Logic IIx Music 7.1 audio
STEREO INPUT MODES
No LEDs
LED lights ONMode
Stereo
TRI_476740M02_HD3_UG_16Jan12.indd 16-17 16/01/2012 11:28 AM
[19]
ENGLISH
®
[18]
®
WARRANTY
Register your product at TRITTONUSA.COM to receive warranty coverage, news, events and updates.
If you have any issues using this product, please try the following before returning this product to the store:
If people cannot hear you talk, make sure that the mute switch is not enabled.
UÊ To confirm Xbox LIVE settings, press the Xbox Guide Button when a game is loaded, and go to Personal Settings > Voice. Ensure that
“Headset only” is selected.
UÊ For immediate support, visit http://www.trittonusa.com to find the latest documentation, Knowledge Base articles, and software for
your device. You can also chat live with a support technician or submit a trouble ticket.
2-year limited warranty
Mad Catz warrants this product to be free from defects in materials and workmanship for the warranty period. This non-transferable, two- (2) year limited
warranty is only to you, the first end-user purchaser. If a defect covered by this warranty occurs AND you have registered your product with Mad Catz
AND you provide proof of purchase, Mad Catz, at its option, will repair or replace the product at no charge.
The Mad Catz two- (2) year limited warranty is available to North American and European customers. Your sole and exclusive remedy is repair or
replacement of your Mad Catz product. In no event shall Mad Catz liability exceed the original purchase price of the product. This warranty does not
apply to: (a) normal wear and tear or abusive use; (b) industrial, professional or commercial use; (c) if the product has been tampered with or modified.
To receive warranty service you must:
- North America: call Mad Catz Technical Support at 1.800.659.2287 or 1.619.683.2815
- Europe: call Mad Catz Technical Support at +44 (0) 8450-508418
- Obtain a Return Authorization Number from Mad Catz Technical Support
- Ship the product to Mad Catz at your expense for service
- Enclose a copy of the original sales receipt showing a purchase date
- Enclose a full return address with daytime and evening phone numbers
Online Support and User Guides: www.trittonusa.com
North American E-mail: techsupport@madcatz.com
North American telephone: Available 8am - 12pm, 1 - 4pm Pacific Standard Time, Monday
through Friday (excluding holidays) at 1.800.659.2287 (US only) or 1.619.683.2815 (outside US).
European E-mail: techsupporteurope@madcatz.com
European telephone: Available 9 A.M. to 5 P.M. Greenwich Mean Time, Monday through Friday (excluding bank holidays) at +44 (0) 8450-508418
CAUTIONS
UÊ }ÌiÀÊiÝ«ÃÕÀiÊÌÊÕ`ÊÕÃVÊÀÊÌiÀÊÃÕ`ÃÊÊi>`«iÃÊ>ÞÊV>ÕÃiÊi>À}Ê`>>}i°ÊÌÊÃÊLiÃÌÊÌÊ>Û`ÊiÝÌÀiiÊÛÕiÊiÛiÃÊÜiÊÊ Ê
using headphones, especially for extended periods.
UÊ 1ÃiÊÌÃÊÕÌÊÞÊ>ÃÊÌi`i`°
UÊ /Ê«ÀiÛiÌÊwÀiÊÀÊÃVÊ>â>À`]Ê`ÊÌÊiÝ«ÃiÊÌÃÊÕÌÊÌÊÀ>ÊÀÊÃÌÕÀi°ÊÊÌÊÕÃiÊÜÌÊÎä½ÊvÊ>ÞÊÜ>ÌiÀÊÃÕVÊ>ÃÊÃÜ}Ê«Ã]ÊL>ÌÌÕLÃ]ÊÊ
or sinks.
UÊ /Ê>Û`ÊiiVÌÀV>ÊÃV]Ê`ÊÌÊ`Ã>ÃÃiLi°Ê,iviÀÊÃiÀÛV}ÊÌʵÕ>wi`Ê«iÀÃiÊÞ°
UÊ iÛiÀÊÃiÀÌÊLiVÌÃÊvÊ>ÞÊ`]ÊÌiÀÊÌ>Ê>ÕÌÀâi`ÊÌiÃ]ÊÌÊÌiÊ«À`ÕVÌÊ>ÃÊÌiÞÊ>ÞÊÌÕVÊ`>}iÀÕÃÊÛÌ>}iÊ«ÌÃÊÀÊÃÀÌÊÕÌÊ«>ÀÌÃÊÌ>ÌÊÊ
could result in fire or electrical shock.
TECHNICAL SUPPORT
MATCHING WITH CONTROLLERS
If a controller is connected to quadrant 1, the Xbox 360 will associate the Headset with
quadrant 1 on the Ring of Light. If another wireless Headset is already associated with
quadrant 1, the Headset will be associated with quadrant 2.
Press the Connect button on the Headset repeatedly to match the quadrant of the Headset
to the quadrant of the controller in use. For example, if the controller on the Xbox 360 is
assigned to quadrant 3, press the Connect button on the Headset until quadrant 3 lights up
on the Base Station.
TROUBLESHOOTING
Chat isn’t working:
UÊ >iÊÃÕÀiÊÞÕÀÊVÃiÊÃÊViVÌi`ÊÌÊ8LÝÊ6°ÊÊÀÊvÀ>ÌÊ>LÕÌÊ8LÝÊ6]ÊÛÃÌÊÜÜÜ°ÝLÝ°VÉÛi°
UÊ >iÊÃÕÀiÊÌiÊL>ÌÌiÀÞÊÃÊvÀiÃÞÊV>À}i`°
UÊ vÊÞÕÊ>ÛiÊ{ÊÜÀiiÃÃÊVÌÀiÀÃÊViVÌi`ÊÌÊÞÕÀÊVÃi]ÊÞÕÊÜÊii`ÊÌÊ`ÃViVÌÊiÊvÊÌiÊÊÀ`iÀÊÌÊViVÌÊÊ
a wireless Headset. To disconnect a wireless controller, press and hold the Xbox Guide Button for 3 seconds, and then
turn the controller OFF.
No Sound:
UÊ iVÊÌ>ÌÊÌiÊ}>iÊ>Õ`ÊÕÌiÊÃÜÌVÊÃÊÌÊi>Li`°
UÊ iVÊÌ>ÌÊÌiÊ>ÃiÊ-Ì>ÌÊÃÊ«Õ}}i`Ê]Ê«ÜiÀi`Ê" ]Ê>`Ê«>Ài`ÊÌÊÌiÊi>`ÃiÌ°
UÊ iVÊÌ>ÌÊÌiÊ"«ÌV>ÊÀÊ>}ÊÕ`ÊiVÌÊ>LiÊÃÊViVÌi`ÊLiÌÜiiÊÌiÊ>ÃiÊ-Ì>ÌÊ>`ÊÌiÊ8LÝÊÎÈä]Ê
and that the correct input is selected on the Base Station. Check to ensure that the plastic protective caps on the
Optical Cable have been removed.
UÊ ÛiÊÌiÊi>`ÃiÌÊVÃiÀÊÌÊÌiÊVÃi°
UÊ >iÊÃÕÀiÊÌiÊL>ÌÌiÀÞÊÃÊvÀiÃÞÊV>À}i`°
TRI_476740M02_HD3_UG_16Jan12.indd 18-19 16/01/2012 11:28 AM
[20] [21]
® ®
UÊ -Ì«ÊÕÃ}ÊÌÃÊÕÌÊi`>ÌiÞÊvÊÞÕÊLi}ÊÌÊviiÊÌÀi`ÊÀÊvÊÞÕÊiÝ«iÀiViÊ`ÃVvÀÌÊÀÊ«>ÊÊÞÕÀÊ>`ÃÊ>`ÉÀÊ>ÀÃÊÜiÊ«iÀ>Ì}ÊÌiÊÊ Ê
unit. If the condition persists, consult a doctor.
UÊ Û`Ê«À}i`ÊÕÃiÊvÊÌÃÊÕÌ°Ê/>iÊLÀi>ÃÊiÛiÀÞÊÎäÊÕÌið
UÊ ,ÕÌiÊ>ÊVÀ`ÃÊÃÊÌ>ÌÊÌiÞÊ>ÀiÊÌÊiÞÊÌÊLiÊÜ>i`ÊÊÀÊÌÀ««i`ÊÛiÀ°Ê>iÊÃÕÀiÊÌ>ÌÊVÀ`ÃÊ>ÀiÊÌÊ«>Vi`ÊÊ>Ê«ÃÌÊÀÊ>Ài>ÃÊÜiÀiÊÌiÞÊÊÊ
may become pinched or damaged.
UÊ ÊÌÊÜÀ>«ÊVÀ`ÃÊ>ÀÕ`Ê>ÞÊ«>ÀÌÊvÊ>Þi½ÃÊL`Þ°
UÊ ÊÌÊ>ÜÊV`ÀiÊÌÊ«>ÞÊÜÌÊVÀ`ð
UÊ /ÃÊÕÌÊÃÕ`ÊLiÊ«iÀ>Ìi`ÊÞÊvÀÊÌiÊ«ÜiÀÊÃÕÀViÊ`V>Ìi`ÊÊÌiÊÕÌ°ÊvÊÞÕÊ>ÀiÊÌÊÃÕÀiÊvÊÌiÊÌÞ«iÊvÊiiVÌÀV>Ê«ÜiÀÊÃÕ««i`ÊÌÊÞÕÀÊi]ÊÊ
contact your local power company.
UÊ ÊÌÊÛiÀ>`ÊÜ>ÊÕÌiÌÃÊÀÊiÝÌiÃÊVÀ`ÃÊLiÞ`ÊÌiÀÊV>«>VÌÞ]ÊÃViÊ`}ÊÃÊV>ÊV>ÕÃiÊwÀiÊÀÊiiVÌÀVÊÃV°
UÊ ÊMisuse of batteries within this unit may cause batteries to leak and/or explode and lead to personal injury.
UÊ ÊThis product contains small parts that may cause choking if swallowed. Not intended for use by children under 3 years of age.
WARNINGS
- Non-rechargeable batteries are not to be recharged.
- Do not mix old and new or different types of batteries.
- Batteries are to be inserted with the correct polarity.
- Remove exhausted batteries from the product.
- Supply terminals are not to be short-circuited.
- Rechargeable batteries are to be removed from the product before being charged.
- Rechargeable batteries are only to be charged under adult supervision.
- The packaging must be retained since it contains important information.
United States and Canada:
As required, certain of these class B digital devices (the headsets) have been tested by Mad Catz, Inc., 7480 Mission Valley Road, Suite 101, San Diego, CA
92108, and found to comply with part 15 of the FCC rules and the Canadian RSS-210 which sets forth limits designed to provide reasonable protection against
harmful interference in a residential installation. These device(s) use, generate and can radiate radio frequency energy and, if not assembled, installed and
used in accordance with the instructions, may cause harmful interference to radio communications. There is no guarantee that interference will not occur in
any particular location or use. Operation is subject to the following two conditions: (1) this device may not cause harmful interference and (2) this device must
accept any interference received, including interference that may cause undesired operation.
FCC Part 15 section 15.105
Warning: Any changes or modifications made on the system not expressly approved by the manufacturer could void the user’s authority to operate
the equipment.
Exposure to Radio Frequency Radiation:
The radiated output power of the headset is well within FCC radio frequency exposure limits for this type of device when unaltered and used as described in our
instructions and the controller operates within guidelines found in radio frequency safety standards, which reflect the consensus of the scientific community
and therefore, the manufacturer believes the device’s internal wireless radio is safe for use by consumers. The level of energy emitted is far less than the
electromagnetic energy emitted by wireless devices such as mobile phones. However, the use of wireless radios may be restricted in some situations (e.g., on
airplanes). If you are unsure of restrictions that may apply in any situation, you must ask for authorization before turning on, connecting or using the controller.
EU DECLARATION OF CONFORMITY:
As required, certain of these products have been tested and conform to the requirements of the European Union Directives 1999/5/EC, 2002/95/EC,
2002/96/EC, and 2004/108/EC. Authorized signatory of the manufacturer is Mad Catz, Inc., 7480 Mission Valley Road, Suite 101, San Diego, CA 92108.
CAUTION
RISK OF EXPLOSION IF BATTERY IS REPLACED BY AN INCORRECT TYPE.
DISPOSE OF USED BATTERIES ACCORDING TO THE INSTRUCTIONS.
12/11
NOTES
TRI_476740M02_HD3_UG_16Jan12.indd 20-21 16/01/2012 11:28 AM
[23]
®
FRANÇAIS
[22]
®
INSTALLATION DU MICROPHONE
BATTERIES
Chargez les batteries de votre casque sans fil à son surround Warhead 7.1 avant de l’utiliser
pour la première fois et chaque fois que l’une d’entre elles est déchargée. Pour charger ou
recharger la batterie :
Placez la batterie dans le compartiment du socle.
Lorsque la batterie est en charge, le témoin de charge est allumé et de couleur rouge. Une
fois la batterie chargée, le témoin devient vert.
Vous pouvez alors retirer la batterie du socle, ouvrir le compartiment de l’écouteur droit du
casque et placer la batterie à l’intérieur.
Pour vérifier le niveau de charge de la batterie dans le casque, appuyez sur le bouton Xbox
Guide, puis relâchez-le. Le niveau de charge s’affiche à l’écran.
Remarques :
UÊ >ÊV>À}iÊV«mÌiÊ`½ÕiÊL>ÌÌiÀiÊ«iÕÌÊ«Ài`ÀiÊÕõսDÊnÊiÕÀið
UÊ 1iÊL>ÌÌiÀiÊÕÌÃjiÊÃiÊ`jV>À}iÊ>ÛiVÊiÊÌi«Ã°ÊiÊV>ÃÊjVj>Ì]ÊÊÃÕvwÌÊ`iÊ>ÊÀiV>À}iÀÊÀ>iiÌ°
UÊ >ÊL>ÌÌiÀiÊiÌÊiÊÃViÊ«iÕÛiÌÊ`iÛiÀÊV>Õ`ÃÊ«i`>ÌÊiÊV>À}iiÌ°
1
2
3
1 2 3
INSTALLATION DU SUPPORT DE CASQUE
1
2
Repérez le port jack.
Branchez le microphone.
Mettez le microphone dans la position souhaitée.
1
2
Installez le support de casque sur le socle.
AVERTISSEMENT
Avant d’utiliser ce produit, lisez les manuels de cet accessoire et de la console Xbox 360 (et tout autre manuel pertinent) pour les
consignes de sécurité et les informations importantes concernant la santé. Conservez tous les manuels pour référence future. Pour
obtenir des manuels Xbox de remplacement, allez sur www.xbox.com/support ou appelez le Service client Xbox.
PRÉVENTION CONTRE UNE PERTE DE L’AUDITION
Attention – une perte d’audition permanente risque de se produire si les écouteurs
Ou le casque sont utilisés à un volume élevé pendant des périodes prolongées.
TRI_476740M02_HD3_UG_16Jan12.indd 22-23 16/01/2012 11:28 AM
[25]
®
FRANÇAIS
[24]
®
COMMANDES DU CASQUE – CÔTÉ GAUCHE
Entrée : appuyez sur ce bouton pour basculer entre l’entrée numérique (optique) et
l’entrée analogique. Appuyez sur ce bouton pendant 0.5 secondes.
Désactivation du micro : appuyez sur ce bouton pour ne pas être entendu. Quand votre
microphone est désactivé, le témoin placé à son extrémité est allumé.
SVM et réglage du volume des voix : utilisez ce bouton pour régler le volume des voix
des autres joueurs. SVM = Selectable Voice Monitoring ou contrôle sélectif de la voix.
La fonction SVM permet d’entendre votre propre voix dans le casque. Appuyez sur le
bouton pour activer/désactiver cette fonction.
Connexion : appuyez sur ce bouton, puis relâchez-le pour associer le casque à la
manette. Appuyez sur ce bouton pendant 3 secondes pour connecter le casque à la
console.
Volume sonore du jeu et désactivation du son : utilisez ce bouton pour régler le volume
sonore du jeu. Appuyez dessus pour désactiver/rétablir le son du jeu.
Mode Dolby : appuyez sur ce bouton pour choisir l’un des modes Dolby. Appuyez sur ce
bouton pendant 0.5 secondes. Consultez la page 32-33 pour plus d’informations.
Marche/arrêt et synchronisation : appuyez sur ce bouton, puis relâchez-le pour allumer/
éteindre le casque. Appuyez sur le bouton pendant 5 secondes pour mettre le casque en
mode de synchronisation. Consultez la page 31 pour plus d’informations sur la synchroni-
sation du casque avec le socle.
COMMANDES DU CASQUE – CÔTÉ DROIT
A
B
C
D
E
F
G
A
B
C D E F G
TRI_476740M02_HD3_UG_16Jan12.indd 24-25 16/01/2012 11:28 AM
[27]
®
FRANÇAIS
[26]
®
SOCLESOCLE
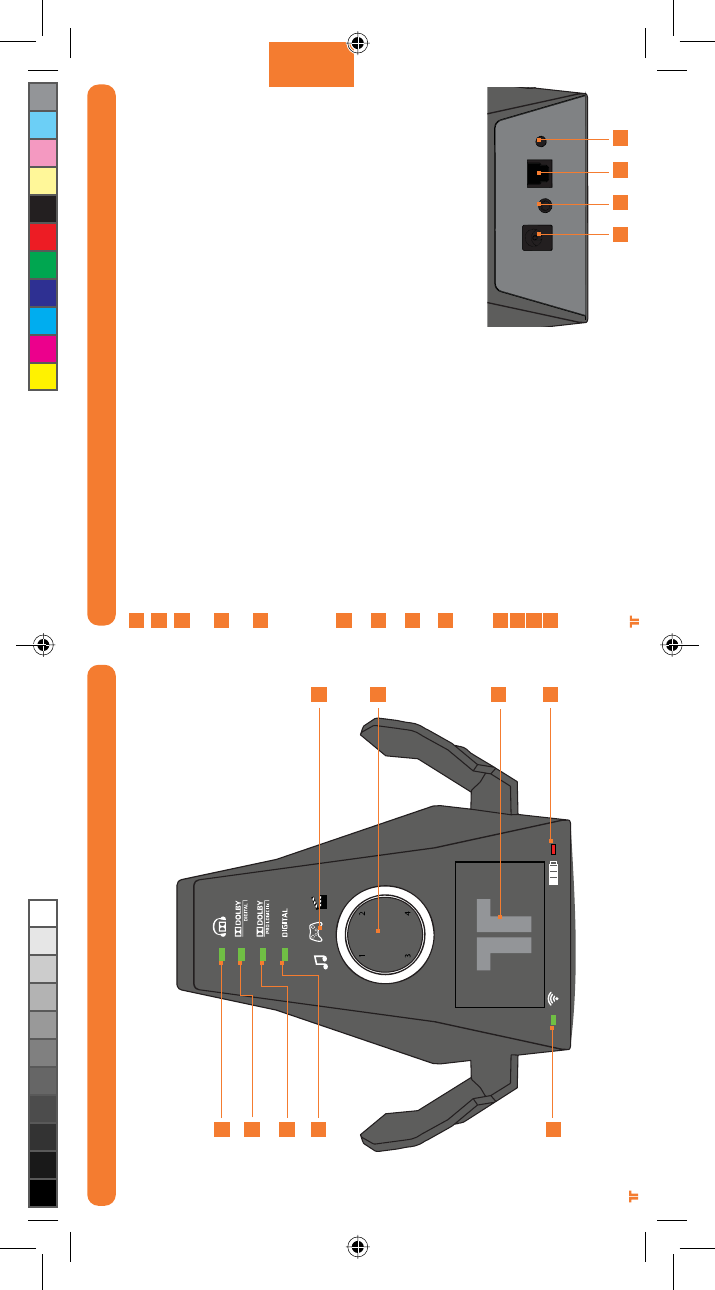
Témoin Dolby : ce témoin est allumé quand le casque est en mode Dolby.
Témoin Dolby Digital : ce témoin est allumé quand un signal Dolby Digital est reçu.
Témoin Dolby Pro Logic IIx : ce témoin est allumé quand le mode Dolby Pro Logic IIx est
activé.
Témoin numérique : ce témoin est allumé quand l’entrée numérique (optique) est
sélectionnée. Il est éteint avec l’entrée analogique.
Témoin de marche/arrêt et de synchronisation :
a. Clignotant : synchronisation ou recherche du casque
b. Fixe : socle allumé et connecté à un casque
c. Éteint : socle éteint
Témoins du mode d’égalisation : ces témoins indiquent si le mode Musique, Film ou Jeu est
sélectionné.
Anneau lumineux : cet anneau indique le quadrant auquel le casque est associé. Consultez
la page 34 pour plus d’informations.
Compartiment de chargement de la batterie : installez la batterie dans ce compartiment
pour la recharger.
Témoin de charge de la batterie : ce témoin est rouge quand la batterie est en cours de
charge et vert lorsqu’elle est rechargée.
Entrée d’alimentation CA
Entrée de ligne
Entrée numérique (optique)
Bouton de synchronisation : appuyez sur ce
bouton pendant 2 secondes pour mettre le
socle en mode de synchronisation. Consultez
la page 31 pour plus d’informations.
A
B
C
D
E
F
G
H
i
j
k
l
m
A
B
C
D
E
F
G
H
i
j k l m
ARRIÈRE DU SOCLE
TRI_476740M02_HD3_UG_16Jan12.indd 26-27 16/01/2012 11:28 AM
[29]
®
FRANÇAIS
[28]
®
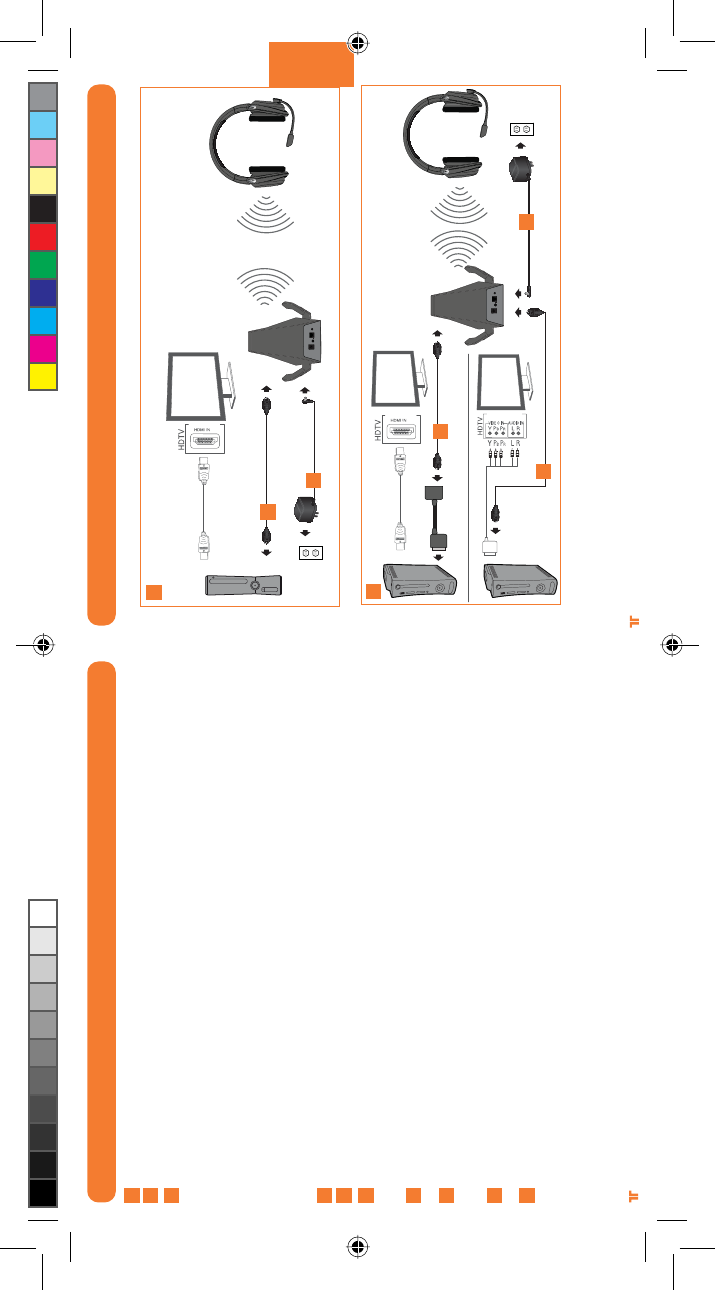
INSTALLATION AUDIO NUMÉRIQUE
Chargez la batterie et insérez-la dans le casque. Consultez la page 23 pour plus d’informations.
Ôtez les caches de protection du câble optique.
A- Branchez une extrémité du câble optique sur le port optique qui se trouve à l’arrière de la
console Xbox 360® S. Branchez l’autre extrémité du câble sur le socle sans fil.
OU
B- Si vous utilisez la console Xbox 360 (d’origine) avec HDMI, connectez le câble optique à
l’adaptateur audio numérique, puis branchez ce dernier sur le port AV situé à l’arrière de la
Xbox 360.
Si vous utilisez la console Xbox 360 (d’origine) avec un câble composante/VGA/composite AV,
connectez le câble optique au port optique du câble composante/VGA/composite AV.
Connectez l’adaptateur d’alimentation au socle, puis branchez-le sur une prise murale.
Mettez en marche la console Xbox 360 et le casque.
Dans le menu de la Xbox, sélectionnez Paramètres système > Paramètres de la console >
Audio > Sortie numérique, puis « Dolby Digital 5.1 ». Surveillez que le témoin Dolby Digital
s’allume bien sur le socle lorsqu’un jeu ou un film commence.
Appuyer sur le bouton de connexion de la Xbox 360. Appuyer sur le bouton de connexion du
casque et le maintenir enfonce pendant 3 secondes.
Pour vérifier les paramètres Xbox LIVE, appuyez sur le bouton Xbox Guide au chargement
d’un jeu, puis sélectionnez Paramètres personnels > Voix. Assurez-vous que l’option «
Casque seulement » est sélectionnée.
Associez le quadrant du socle à la manette en appuyant sur le bouton Connexion. Consultez
la page 34 pour plus d’informations.
Appuyez sur le bouton Entrée du casque pour sélectionner l’entrée numérique. Le témoin
numérique du socle s’allume dès que vous sélectionnez l’entrée numérique.
1
2
3
4
5
6
7
8
9
INSTALLATION AUDIO NUMÉRIQUE
A
B
3
4
3
3
4
**Câble HDMI et câble composante/VGA/composite non inclus
10
TRI_476740M02_HD3_UG_16Jan12.indd 28-29 16/01/2012 11:28 AM
[31]
®
FRANÇAIS
[30]
®
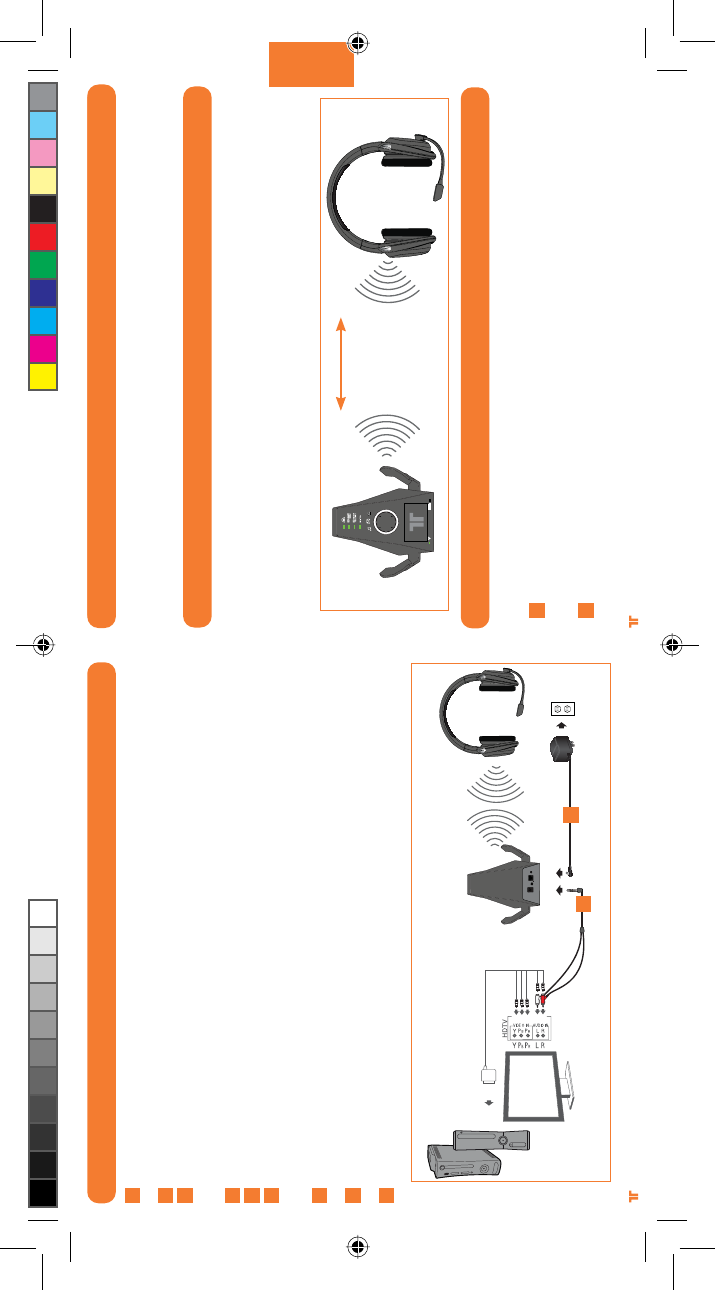
INSTALLATION AUDIO ANALOGIQUE
Chargez la batterie et insérez-la dans le casque. Consultez la page 23 pour plus
d’informations.
Branchez la fiche jack de 3,5 mm du câble adaptateur RCA sur l’entrée de ligne du socle.
Connectez les fiches rouge et blanche du câble adaptateur RCA aux fiches rouge et
blanches du câble composante/VGA/composite. Facultatif : branchez l’extrémité mâle de
ces câbles aux entrées audio RCA de l’affichage.
Connectez l’adaptateur d’alimentation au socle, puis branchez-le sur une prise murale.
Mettez en marche la console Xbox 360 et le casque.
Pour vérifier les paramètres Xbox LIVE, appuyez sur le bouton Xbox Guide au chargement
d’un jeu, puis sélectionnez Paramètres personnels > Voix. Assurez-vous que l’option «
Casque seulement » est sélectionnée.
Appuyer sur le bouton de connexion de la Xbox 360. Appuyer sur le bouton de connexion du
casque et le maintenir enfonce pendant 3 secondes.
Associez le quadrant du socle à la manette en appuyant sur le bouton Connexion.
Consultez la page 34 pour plus d’informations.
Appuyez sur le bouton Entrée du casque pour sélectionner l’entrée analogique. Le témoin
numérique du socle s’éteint dès que vous sélectionnez l’entrée analogique.
1
2
3
4
5
6
7
8
®
MODE ÉCONOMIE D’ÉNERGIE
Si le casque ne reçoit aucun signal audio pendant 15 minutes, il s’éteint afin
d’économiser la batterie. Appuyez sur le bouton de marche/arrêt pour remettre le casque
en fonctionnement.
PORTÉE SANS FIL
Le casque Warhead 7.1 transmet les signaux audio par radiofréquences numériques (RF)
et offre une portée d’un rayon de 10 mètres. Respectez cette distance pour profiter de
performances optimales. Évitez de placer le socle sur une surface métallique ou derrière
d’autres appareils qui utilisent des radiofréquences. Si le casque ne fonctionne pas
correctement dans un rayon de 10 mètres, changez le socle d’emplacement afin de voir si
le casque fonctionne mieux.
SYNCHRONISATION DU CASQUE AVEC LE SOCLE
Remarque : le casque est associé au socle en usine. Cette étape n’est nécessaire que si
vous installez un nouveau casque.
Appuyez pendant 2 secondes sur le bouton de marche/arrêt-synchronisation du socle
tandis que celui-ci est allumé. Le témoin de marche/arrêt-synchronisation du socle se
met à clignoter lentement.
Sur le casque, appuyez rapidement sur le bouton de marche/arrêt-synchronisation et
maintenez-le enfoncé pendant 5 secondes. Le casque et le socle se synchronisent. Une
fois la synchronisation effectuée, le témoin du socle cesse de clignoter.
1
2
33ft/10m
34
9
TRI_476740M02_HD3_UG_16Jan12.indd 30-31 16/01/2012 11:28 AM
[33]
®
FRANÇAIS
[32]
®
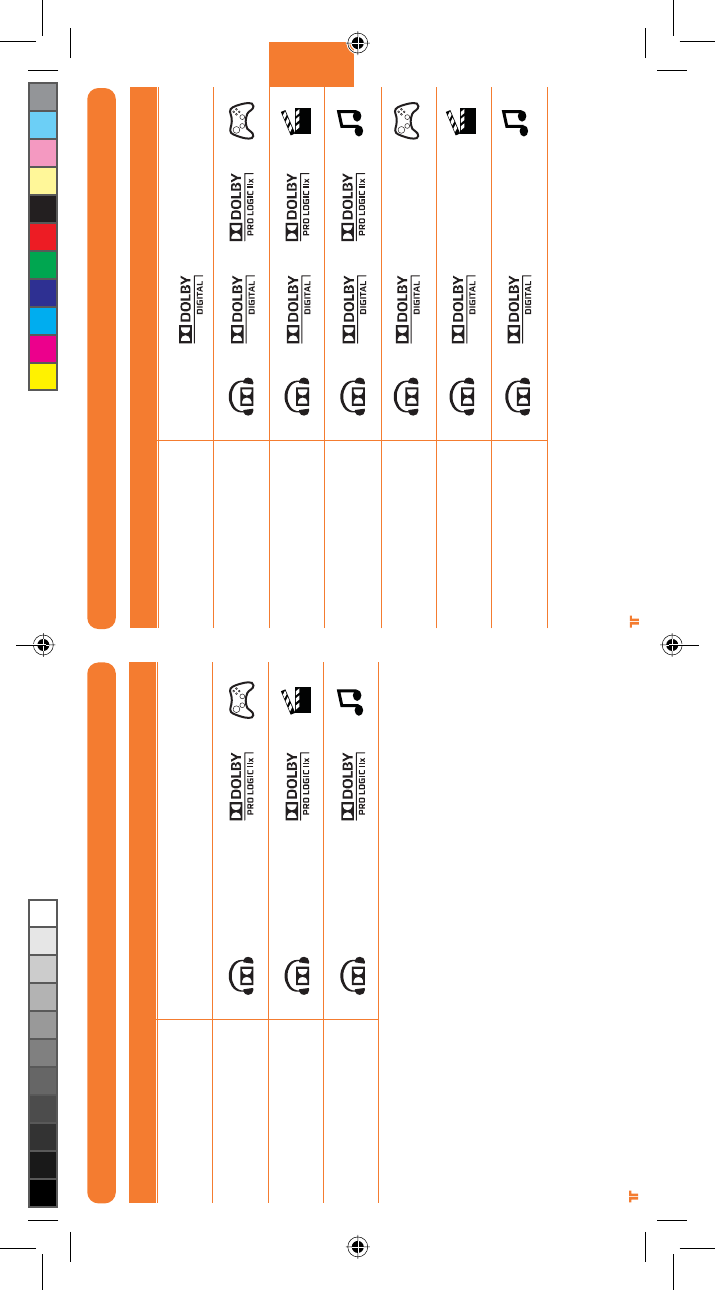
MODES D’ENTRÉE DOLBY DIGITAL/EX
Jeu en audio Pro Logic IIx 7.1
Film en audio Pro Logic IIx 7.1
Musique en audio
Pro Logic IIx 7.1
Jeu en audio Dolby Digital 5.1
Film en audio Dolby Digital 5.1
Musique en audio
Dolby Digital 5.1
Témoins allumésMode
Stéréo
Jeu en audio Pro Logic IIx 7.1
Film en audio Pro Logic IIx 7.1
Musique en audio
Pro Logic IIx 7.1
MODES D’ENTRÉE STÉRÉO
Aucun témoin
Témoins allumésMode
Stéréo
TRI_476740M02_HD3_UG_16Jan12.indd 32-33 16/01/2012 11:28 AM
[35]
®
FRANÇAIS
[34]
®
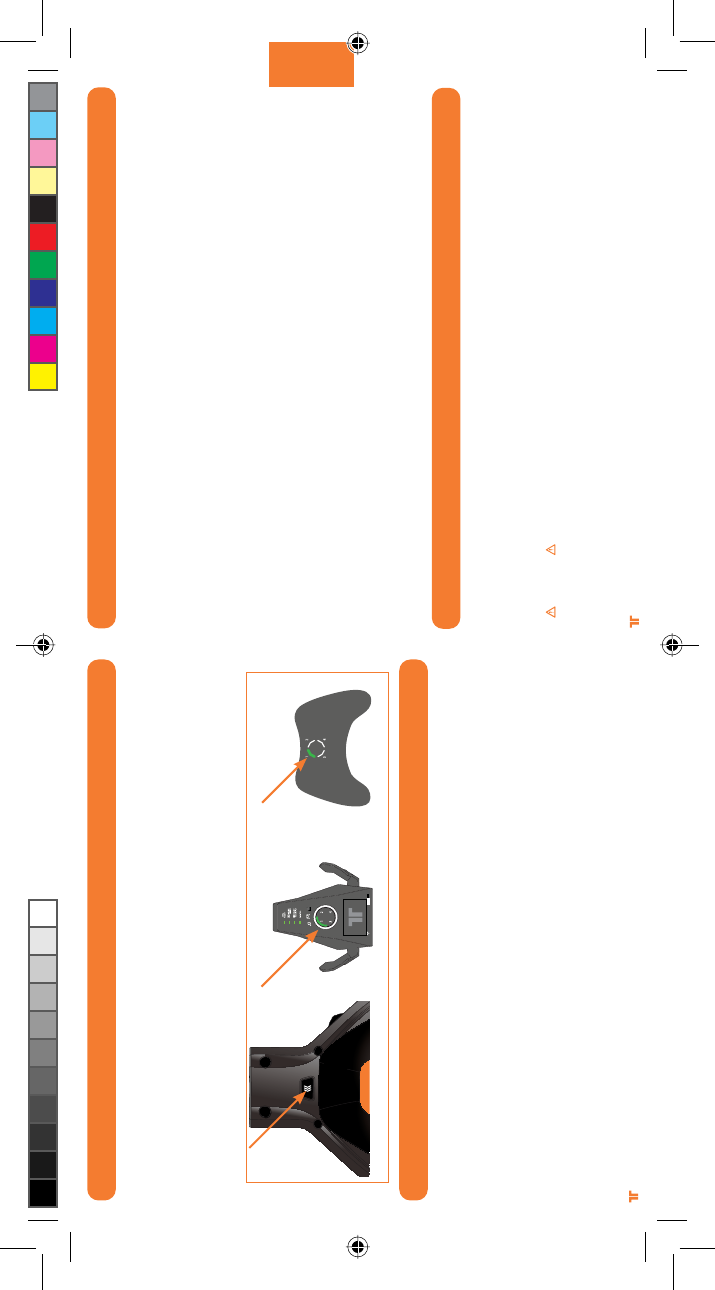
ASSOCIATION À DES MANETTES
Si une manette est reliée au quadrant 1, la Xbox 360 associe le casque au quadrant 1 de
l’anneau lumineux. Si un autre casque sans fil est déjà associé au quadrant 1, le casque
sera associé au quadrant 2.
Appuyez sur le bouton Connexion du casque à plusieurs reprises pour associer le quadrant
du casque au quadrant de la manette utilisée. Par exemple, si la manette de la Xbox 360
est affectée au quadrant 3, appuyez sur le bouton Connexion du casque jusqu’à ce que le
quadrant 3 s’allume sur le socle.
RÉSOLUTION DES PROBLÈMES
Impossibilité de discuter avec d’autres personnes :
UÊ ÃÃÕÀiâÛÕÃʵÕiÊÛÌÀiÊVÃiÊiÃÌÊLiÊViVÌjiÊ>ÕÊÃiÀÛViÊ8LÝÊ6°Ê*ÕÀÊ«ÕÃÊ`½vÀ>ÌÃÊÃÕÀÊiÊÃiÀÛViÊ8LÝÊ6]Ê
rendez-vous sur le site www.xbox.com/live.
UÊ ÃÃÕÀiâÛÕÃʵÕiÊ>ÊL>ÌÌiÀiÊiÃÌÊLiÊV>À}ji°
UÊ -ʵÕ>ÌÀiÊ>iÌÌiÃÊÃ>ÃÊwÊÃÌÊViVÌjiÃÊDÊÛÌÀiÊVÃi]Ê>««ÕÞiâÊÃÕÀÊiÊLÕÌÊ8LÝÊÕ`iÊ«i`>ÌÊÎÊÃiV`iÃ]Ê«ÕÃÊ
éteignez la manette.
Absence de son :
UÊ 6jÀwiâʵÕiÊÛÕÃʽ>ÛiâÊ«>ÃÊ`jÃ>VÌÛjÊiÊÃÊ`ÕÊiÕ°
UÊ ÃÃÕÀiâÛÕÃʵÕiÊiÊÃViÊiÃÌÊLÀ>Vj]Ê>ÕjÊiÌÊ>ÃÃVjÊ>ÕÊV>õÕi°
UÊ ÃÃÕÀiâÛÕÃʵÕiÊiÊV@LiÊ>Õ`Ê>>}µÕiÊÕÊÕjÀµÕiÊiÃÌÊLiÊViVÌjÊiÌÀiÊiÊÃViÊiÌÊ>Ê8LÝÊÎÈä]ÊiÌʵÕiÊÛÕÃÊ>ÛiâÊ
sélectionné l’entrée correspondante sur le socle. Vérifiez que vous avez bien ôté les caches de protection sur le câble optique.
UÊ ,>««ÀViâÊiÊV>õÕiÊ`iÊ>ÊVÃi°
UÊ ÃÃÕÀiâÛÕÃʵÕiÊ>ÊL>ÌÌiÀiÊiÃÌÊLiÊV>À}ji°
GARANTIE
Enregistrez votre produit sur TRITTONUSA.COM pour bénéficier de la couverture de la garantie, de nouveautés, d’évènements et
de mises à jour.
Si vous rencontrez des problèmes lorsque vous utilisez ce produit, veuillez essayer d’appliquer les méthodes suivantes avant de renvoyer ce
produit au magasin:
Si des personnes ne vous entendent pas parler, assurez-vous que l’interrupteur de sourdine n’est pas activé et que le micro est complètement
inséré dans le casque.
UÊ Pour confirmer des paramètres Xbox LIVE, appuyez sur le bouton Xbox Guide lorsqu’un jeu est chargé et rendez-vous dans paramètres
personnels > Voix. Assurez-vous que « Casque seulement » est sélectionné.
UÊ Pour une assistance immédiate, veuillez consulter www.trittonusa.com pour trouver la documentation la plus récente, des
articles de la Base de connaissances et des logiciels pour votre périphérique. Vous pouvez également discuter en direct avec un technicien
du service d’assistance ou soumettre une fiche d’incidence.
Garantie limitée à 2 ans (clients européens seulement)
Mad Catz garantit ce produit contre tout vice de matériau ou de fabrication pendant la période de garantie. Cette garantie est limitée à deux
(2) ans non transférable s’applique à vous uniquement en tant qu’acheteur et premier utilisateur fi nal. Si un vice couvert par cette garantie est
décelé ET que vous avez enregistré votre produit auprès de Mad Catz ET que vous fournissez une preuve d’achat, Mad Catz, à sa seule discré-
tion, réparera ou remplacera le produit gratuitement. La garantie limitée par Mad Catz à deux (2) ans est à la disposition des clients Européens
uniquement. Votre recours exclusif est la réparation ou le remplacement de votre produit Mad Catz. En aucun cas la responsabilité de Mad Catz
ne pourra dépasser le prix d’achat d’origine du produit. Cette garantie ne s’applique pas à : (a) une usure normale ou un mauvais usage ; (b) une
utilisation industrielle, professionnelle ou commerciale ; (c) un produit ayant fait l’objet de modifications.
Pour bénéficier de la garantie, vous devez :
- Pour l’Amérique du Nord : Appeler le service d’assistance technique de Mad Catz au +1.800.659.2287 ou au +1.619.683.2815
- Pour l’Europe : Appeler le service d’assistance technique de Mad Catz au +44 (0) 8450 508418
- Obtenir un numéro d’autorisation de retour auprès du service d’assistance technique de Mad Catz
- Expédier le produit à Mad Catz à vos frais
- Joindre une copie du ticket de caisse original montrant la date d’achat
- Indiquer une adresse complète de retour avec numéros de téléphone où vous joindre dans la journée et en soirée
Aide et Guides de l’utilisateur en ligne : www.madcatz.com
Courrier électronique pour l’Amérique du Nord : techsupport@madcatz.com
Téléphone pour l’Amérique du Nord : disponible de 8 h à 16 h, heure normale du Pacifique, du lundi au vendredi (sauf jours fériés) au +1.800.659.2287 (États-
Unis uniquement) ou au +1.619.683.2815 (depuis l’étranger).
Courrier électronique pour l’Europe : techsupporteurope@madcatz.com
Téléphone pour l’Europe : disponible de 9 h à 17 h, GMT, du lundi au vendredi (sauf jours fériés) au +44 (0) 8450-508418
ATTENTION
UÊ 1iÊiÝ«ÃÌÊDÊ}ÊÌiÀiÊDÊ`iÊ>ÊÕõÕiÊÕÊDÊ`½>ÕÌÀiÃÊÃÃÊvÀÌÃÊ`>ÃÊÕÊV>õÕiÊ«ÕÀÀ>ÌÊiÌÀ>iÀÊÕiÊ«iÀÌiÊ>Õ`ÌÛi°ÊÊV>ÃÊ`½ÕÌÃ>ÌÊ`½ÕÊ
casque, il est conseillé de régler le volume de façon à éviter des sons trop forts.
UÊ ½ÕÌÃiâÊViÌÌiÊÕÌjʵÕiÊ`>ÃÊiÊLÕÌÊ«ÕÀÊiµÕiÊiiÊ>ÊjÌjÊVXÕi°
UÊ *ÕÀÊ«ÀjÛiÀÊÌÕÌÊÀõÕiÊ`½Vi`iÊÕÊ`iÊVVÊjiVÌÀµÕi]ʽiÝ«ÃiâÊ«>ÃÊViÌÌiÊÕÌjÊDÊ>Ê«ÕiÊÕÊDʽÕ`Ìj°Ê iʽÕÌÃiâÊ«>ÃÊDÊÃÊ`iÊÊmÌÀiÃÊ`iÊ
l’eau (par exemple une piscine, une baignoire ou un évier).
UÊ *ÕÀÊjÛÌiÀÊÌÕÌÊÀõÕiÊ`iÊVVÊjiVÌÀµÕi]ÊiÊ`jÌiâÊ«>ÃÊViÌÌiÊÕÌj°Ê/ÕÌiÊÀj«>À>ÌÊ`ÌÊkÌÀiÊivviVÌÕjiÊÕµÕiiÌÊ«>ÀÊÕÊ«iÀÃiʵÕ>wj°
ASSISTANCE TECHNIQUE
TRI_476740M02_HD3_UG_16Jan12.indd 34-35 16/01/2012 11:28 AM
[36] [37]
® ®
UÊ ½ÃjÀiâÊ>ÕVÕÊLiÌÊ>ÕÌÀiʵÕiÊViÕÝÊ>ÕÌÀÃjÃÊ`>ÃʽÕÌjÊV>ÀÊÃÊ«ÕÀÀ>iÌÊÌÕViÀÊ`iÃÊ«ÌÃÊ`iÊÌiÃÊ`>}iÀiÕÃiÊÕÊ«ÀÛµÕiÀÊÕÊVÕÀÌVÀVÕÌÊ
résultant en un incendie ou un choc électrique.
UÊ ÀÀkÌiâÊj`>ÌiiÌÊ`½ÕÌÃiÀÊViÌÌiÊÕÌjÊÃÊÛÕÃÊÛÕÃÊÃiÌiâÊv>Ì}ÕjÊÕÊ>ÊDʽ>Ãi]ÊÕÊÃÊÛÕÃÊÀiÃÃiÌiâÊ`iÃÊ`ÕiÕÀÃÊ`>ÃÊiÃÊ>ÃÊiÌÉÕÊiÃÊLÀ>ÃÊÀÃÊ
de son emploi. Si les symptômes persistent, consultez un médecin.
UÊ ÛÌiâʽi«Ê«À}jÊ`iÊViÌÌiÊÕÌj°Ê*ÀiiâÊÕÊ«iÕÊ`iÊÀi«ÃÊÌÕÌiÃÊiÃÊÎäÊÕÌið
UÊ *>ViâÊiÃÊV@LiÃÊ`iÊv>XÊDÊjÛÌiÀʵսÊiÊ>ÀViÊÕÊiÊÌÀjLÕViÊ`iÃÃÕðÊÃÃÕÀiâÛÕÃʵÕiÊiÃÊV@LiÃÊÃÌÊ«>VjÃÊ`>ÃÊ`iÃÊ«ÃÌÃÊÕÊ`iÃÊi`ÀÌÃÊÙÊ
ils ne seront ni pincés ni endommagés.
UÊ ½iÀÕiâÊ«>ÃÊ`iÊV@LiÊ>ÕÌÕÀÊ`½ÕiÊ«>ÀÌiÊ`ÕÊVÀ«ÃÊ`iʵÕVµÕi°
UÊ iÊ>ÃÃiâÊ«>ÃÊiÃÊiv>ÌÃÊÕiÀÊ>ÛiVÊiÃÊV@Lið
UÊ iÊ>ÕÛ>ÃÊÕÃ>}iÊ`iÃÊL>ÌÌiÀiÃÊ`iÊViÌÌiÊÕÌjÊ«iÕÌÊ«ÀÛµÕiÀÊ`iÃÊvÕÌiÃÊiÌÉÕÊÕiÊiÝ«Ã]ÊViʵÕÊ«ÕÀÀ>ÌÊiÌÀ>iÀÊ`iÃÊLiÃÃÕÀið
UÊ iÊ«À`ÕÌÊVÌiÌÊ`iÃÊ«iÌÌiÃÊ«mViÃʵÕÊ«ÀjÃiÌiÌÊÕÊÀõÕiÊ`½jÌÕvviiÌÊÃÊiiÃÊÃÌÊ>Û>jiðÊiÊ«À`ÕÌÊiÃÌÊ`jVÃijÊ>ÕÝÊiv>ÌÃ
de moins de trois ans.
AVERTISSEMENT
- Les piles non rechargeables ne doivent pas être rechargées
- Ne mélangez pas les piles usagées avec les piles neuves ou avec d’autres types depiles.
- Les piles doivent être insérées en respectant la polarité appropriée.
- Retirez les piles épuisées du produit.
- Ne court-circuitez pas les bornes d’alimentation
- Les piles rechargeables doivent être retirées du produit avant d’être rechargées.
- Les piles rechargeables doivent uniquement être rechargées sous la surveillance d’un adulte.
- L’emballage doit être conservé car il comporte des informations importantes.
États-Unis et Canada :
Comme requis, certains de ces périphériques numériques de classe B ont été testés par Mad Catz, Inc., 7480 Mission Valley Road, Suite 101, San Diego, CA
92108, et ont été trouvés conformes à la partie 15 des règles FCC et à la directive canadienne RSS-210 qui définisssent les limites de conception pour fournir une
protection raisonnable contre les interférences nuisibles dans une installation résidentielle. Ces périphériques utilisent, génère et peuvent émettre de l’énergie
sous forme de radiofréquences et s’ils ne sont pas montés, installés et utilisés conformément aux instructions, il peut produire des interférences nuisibles aux
communications radio. Il n’y a aucune garantie que des interférences ne se produiront pas dans un emplacement donné ou pour une utilisation particulière.
L’utilisation de l’unité est soumise aux deux conditions suivantes : 1) cet appareil ne doit pas produire d’interférences nuisibles, et (2) cet appareil doit accepter
ÌÕÌiÃÊiÃÊÌiÀvjÀiViÃÊÀiXÕiÃ]ÊÞÊV«ÀÃÊViiÃÊ«ÕÛ>ÌÊiÌÀ>iÀÊÕÊvVÌiiÌÊ`jÃÀ>Li°
Exposition aux émissions de fréquences radio :
La puissance des radiations émises par la manette se trouve dans les limites d’expositions aux fréquences radio imposées par la FCC, lorsque l’appareil n’est pas
altéré et qu’il est utilisé conformément aux instructions. De plus, la manette fonctionne selon les directives concernant les normes de sécurité sur les fréquences
radio selon la communauté scientifi que. Le fabricant pense donc raisonnablement que les ondes sans fi l de l’appareil sont sans danger pour les consom-
mateurs. Le niveau d’énergie émis est bien moins important que l’énergie électromagnétique émise par des appareils sans fi l comme les téléphones portables.
Cependant, l’utilisation d’ondes sans fi l peut être restreinte dans certaines situations (dans les avions, par exemple). Si vous ne connaissez pas
les restrictions qui peuvent s’appliquer dans certaines situations, demandez l’autorisation avant d’allumer, connecter ou utiliser la manette.
DÉCLARATION DE CONFORMITÉ DE L’UE
Comme exigé, certains de ces produits ont été testés et sont conformes aux exigences aux directives de l’Union Européenne 1999/5/EC, 2002/95/EC, 2002/96/EC,
et 2004/108/EC. Le signataire autorisé du constructeur est Mad Catz, Inc., 7480 Mission Valley Road, Suite 101, San Diego, CA 92108.
ATTENTION
RISQUE D’EXPLOSION SI LES PILES SONT REMPLACÉES PAR UN TYPE INCORRECT.
JETEZ LES PILES USÉES CONFORMÉMENT AUX INSTRUCTIONS.
12/11
NOTES
TRI_476740M02_HD3_UG_16Jan12.indd 36-37 16/01/2012 11:28 AM
[38] [39]
® ®
DEUTSCH
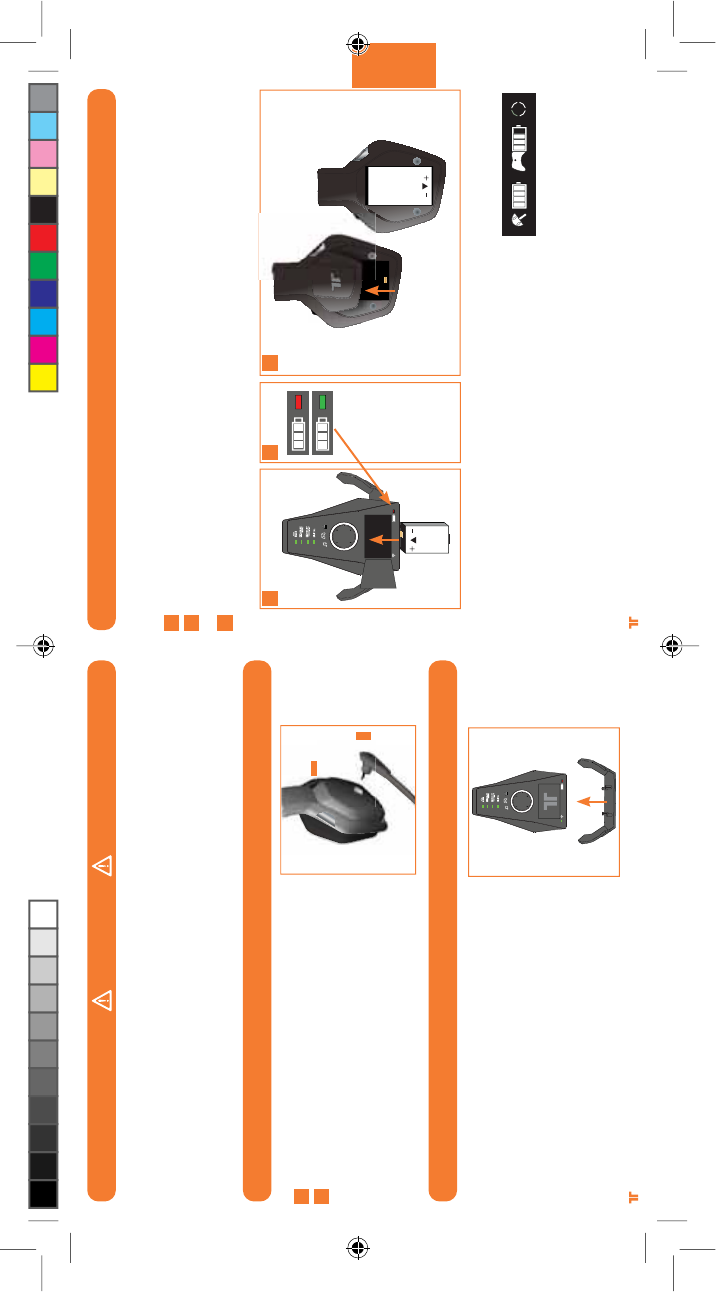
ANSCHLUSS DES MIKROFONS
ANSCHLUSS DES HEADSET-STÄNDERS
1
2
Suchen Sie den Buchsenanschluss.
Schließen Sie das Mikrofon an.
Bringen Sie das Mikrofon in die
gewünschte Position.
1
2
Docken Sie den Headset-Ständer
auf der Basisstation an.
WARNUNG
Lesen Sie vor Verwendung dieses Produkts die wichtigen Hinweise zu Sicherheit und Gesundheitsschutz in der Dokumentation für die-
ses Zubehör und die Xbox 360-Konsole (sowie auch in anderen relevanten Dokumenten). Bewahren Sie alle Dokumente für zukünftige
Referenzzwecke auf. Wenn Sie Ersatz für Ihre Xbox-Handbücher benötigen, können Sie diesen unter www.xbox.com/support oder
telefonisch vom Xbox-Kundendienst anfordern.
VERMEIDUNG VON HÖRSCHÄDEN
Warnung – werden kopfhörer oder headsets über längere zeiträume bei hoher lautstärke Benutzt, können bleibende
hörschäden auftreten.
AKKUS
Laden Sie Akkus Ihres kabellosen Warhead 7.1-Surround-Headsets, bevor Sie sie das erste
Mal verwenden oder immer wenn sie leer sind. So laden Sie die Akkus auf:
Setzen Sie den Akku in den Ladeschacht an der Basisstation ein.
Während der Akku geladen wird, leuchtet die Akkuladeanzeige rot. Sobald der Ladevorgang
abgeschlossen ist, leuchtet die Akkuladeanzeige grün.
Sobald der Akku aufgeladen ist, setzen Sie ihn in das Headset ein, indem Sie die
Akkufachabdeckung an der rechten Hörmuschel entfernen und den Akku in das Fach
einsetzen.
Wenn Sie den derzeitigen Ladezustand des Akkus im Headset überprüfen möchten, drücken
Sie die Xbox Guide-Taste und lassen Sie sie los. Der Ladezustand wird auf dem Bildschirm
angezeigt.
Hinweise:
UÊ >ÃÊÛÃÌB`}iÊÕy>`iÊiiÃÊÕÃÊ>ÊLÃÊâÕÊnÊ-ÌÕ`iÊ`>ÕiÀ°
UÊ 7iÊ`iÀÊÕÊØLiÀÊiiÊB}iÀiÊ<iÌÀ>ÕÊVÌÊÛiÀÜi`iÌÊÜÕÀ`i]ÊiÌB`ÌÊiÀÊÃVÊ}ViÀÜiÃi°ÊÃÌÊ`iÃÊ`iÀÊ>]Ê
laden Sie den Akku normal auf.
UÊ iÀÊÕÊÕ`Ê`iÊ>ÃÃÃÌ>ÌÊiÊÃVÊLiÊÕy>`iÊiÀÜBÀi°
1
2
3
1 2 3
TRI_476740M02_HD3_UG_16Jan12.indd 38-39 16/01/2012 11:28 AM
[40] [41]
® ®
DEUTSCH
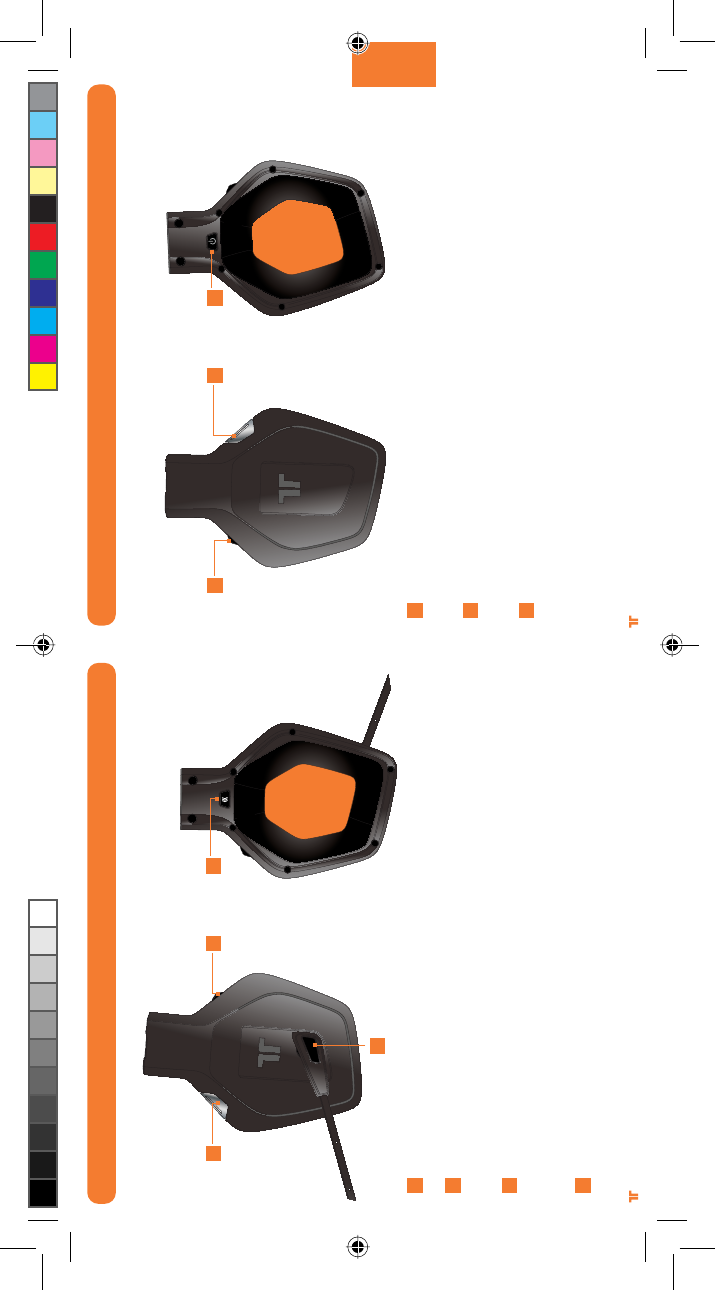
HEADSET-STEUERELEMENTE – LINKE SEITE
Eingang: Drücken Sie diese Taste, um zwischen den analogen und digitalen (optischen)
Eingängen zu wechseln. Drücken Sie diese Taste 0.5 Sekunden lang.
Mikrofonstummschaltung: Drücken Sie die Taste zum Stummschalten des Mikrofons,
damit andere Sie nicht hören können. Die LED am Ende des Mikrofons leuchtet, wenn
das Mikrofon stummgeschaltet ist.
Lautstärke für Sprachkommunikation und SVM-Regulierung: Passen Sie hiermit die
Lautstärke der Stimmen anderer Spieler an. SVM = Selectable Voice Monitoring. Mit
SVM kann der Benutzer seine eigene Stimme über das Headset hören. Schalten Sie SVM
hiermit EIN/AUS.
Taste zum Verbinden: Drücken Sie diese Taste und lassen Sie sie los, um das Headset
dem Controller zuzuordnen. Drücken Sie diese Taste 3 Sekunden lang, um das Headset
mit der Konsole zu verbinden.
A
B
C
D
A
B
C D
Lautstärke und Stummschaltung des Spielsounds: Passen Sie hiermit die Lautstärke
des Spielsounds an. Drücken Sie die Taste, um den Spielsound stummzuschalten/die
Stummschaltung aufzuheben.
Dolby-Modus: Drücken Sie die Taste, um zwischen verschiedenen Dolby-Modi auszu-
wählen. Drücken Sie diese Taste 0.5 Sekunden lang. Auf Seite 48-49 finden Sie weitere
Informationen.
Einschalten/Synchronisieren: Drücken Sie die Taste und lassen Sie sie los, um das Head-
set ein-/auszuschalten. Drücken Sie die Taste 5 Sekunden lang, um das Headset in den
Synchronisierungsmodus zu versetzen. Auf Seite 47 erhalten Sie weitere Informationen
zum Synchronisieren des Headsets mit der Basisstation.
HEADSET-STEUERELEMENTE – RECHTE SEITE
E
F
G
E F G
TRI_476740M02_HD3_UG_16Jan12.indd 40-41 16/01/2012 11:28 AM
[42] [43]
® ®
DEUTSCH
BASISSTATION
A
B
C
D
E
F
G
H
i
BASISSTATION
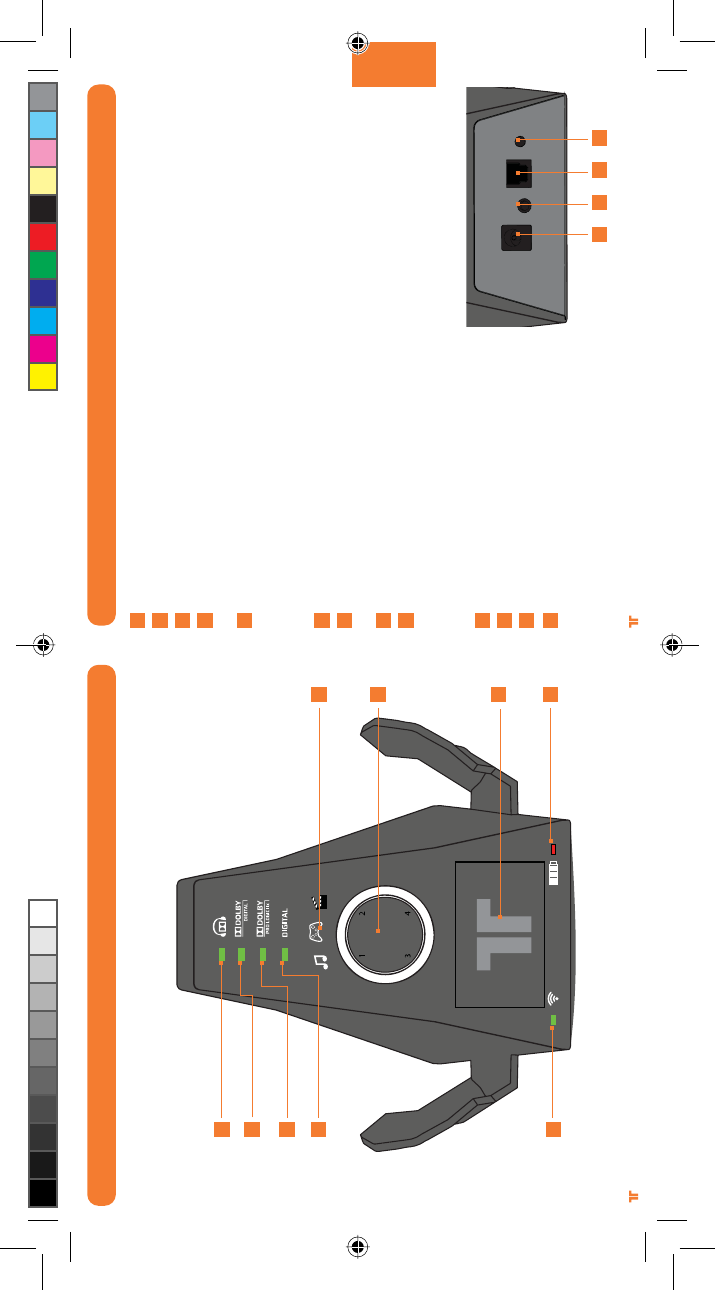
Dolby Headphone-Anzeige: Leuchtet, wenn der Dolby Headphone-Modus aktiviert ist.
Dolby Digital-Anzeige: Leuchtet, wenn ein Dolby Digital-Signal empfangen wird.
Dolby Pro Logic IIx-Anzeige: Leuchtet, wenn Dolby Pro Logic IIx aktiviert ist.
Digital-Anzeige: Leuchtet, wenn der digitale (optische) Eingang ausgewählt ist. Die LED
wird ausgeschaltet, wenn der analoge Eingang ausgewählt ist.
Statusanzeige für „Einschalten/Synchronisieren”
a. Blinkend: Synchronisierung oder Suche nach Headset
b. Konstant: Bei eingeschalteter Basisstation an Headset angeschlossen.
c. AUS: Basisstation ist ausgeschaltet.
EQ-Modus-Anzeige: Gibt an, ob der Musik-, Film- oder Spielemodus ausgewählt ist.
Ring of Light: Gibt den Quadranten an, dem das Headset zugeordnet ist. Auf Seite 50 finden
Sie weitere Informationen.
Akkuladeschacht: Setzen Sie den Akku hier zum Laden ein.
Akkuladeanzeige: Rot beim Laden, grün wenn der Ladevorgang abgeschlossen ist.
Netzeingang
Leitungseingang
Digitaler (optischer) Eingang
Taste zum Synchronisieren: Drücken Sie die
Taste 2 Sekunden lang, um die Basisstation in
den Synchronisierungsmodus zu versetzen.
Auf Seite 47 finden Sie weitere Informationen.
A
B
C
D
E
F
G
H
i
j
k
l
m
j k l m
RÜCKSEITE DER BASISSTATION
TRI_476740M02_HD3_UG_16Jan12.indd 42-43 16/01/2012 11:28 AM
[44] [45]
® ®
DEUTSCH
DIGITALE AUDIOEINRICHTUNG
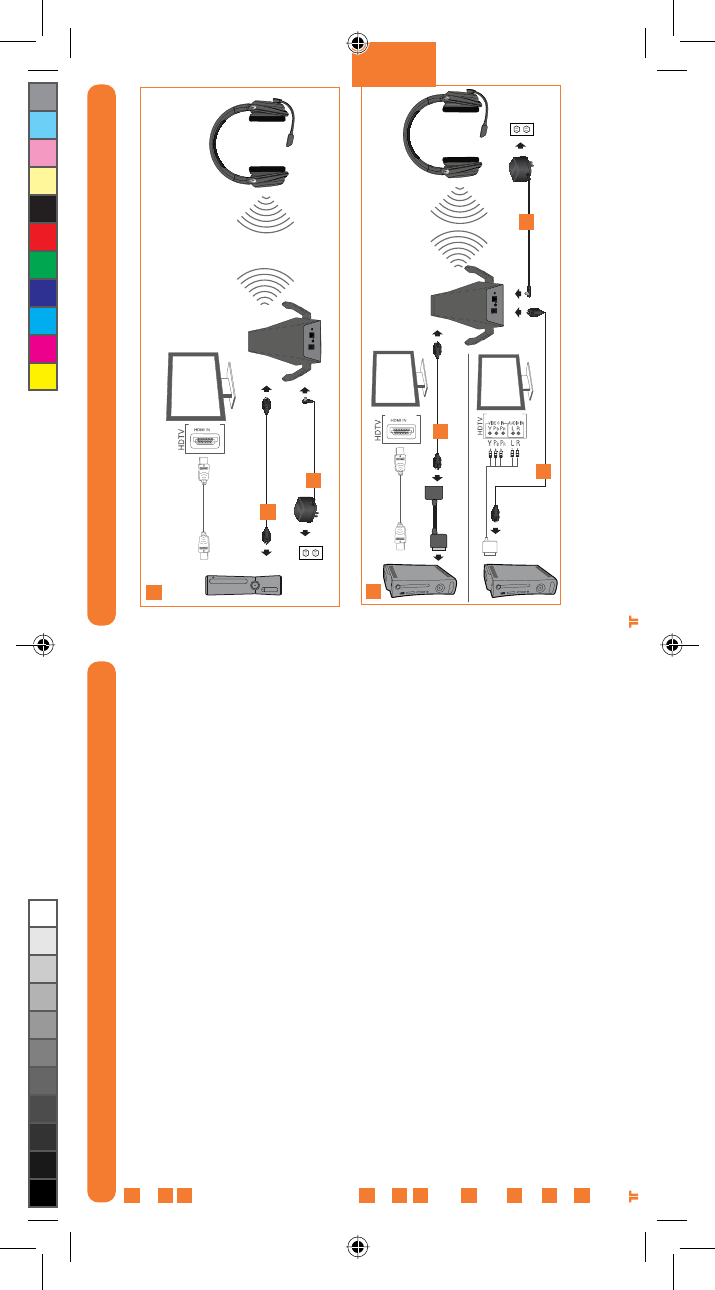
Laden Sie den Akku und setzen Sie ihn in das Headset ein. Auf Seite 39 finden Sie weitere
Informationen.
Entfernen Sie die Schutzkappen vom optischen Kabel.
A- Stecken Sie ein Ende des optischen Kabels in den optischen Anschluss an der Rückseite
der Xbox 360 S-Konsole. Stecken Sie das andere Ende des optischen Kabels in die kabellose
Basisstation.
ODER
B- Wenn Sie die Xbox 360-Konsole (Original) mit HDMI verwenden, schließen Sie
das optische Kabel an den digitalen Audioadapter an und schließen Sie den digitalen
Audioadapter an den AV-Anschluss an der Rückseite der Xbox 360 an.
Wenn Sie die Xbox 360-Konsole (Original) mit Komponenten-/VGA-/Composite-AV-
Kabel verwenden, schließen Sie das optische Kabel in den optischen Anschluss des
Komponenten-/VGA-/Composite-AV-Kabels an.
Schließen Sie den Netzadapter an die Basisstation an. Stecken Sie den Netzadapter in eine
Steckdose.
Schalten Sie die Xbox 360-Konsole und das Headset EIN.
Wählen Sie in der Xbox-Steuerung „Systemeinstellungen“ > „Konsoleneinstellungen“ >
„Audio“ > „Digitaler Ausgang“ und dann „Dolby Digital 5.1.“ aus. Stellen Sie sicher, dass die
„Dolby Digital“-Leuchte an der Basisstation leuchtet, wenn ein Spiel oder Film gestartet wird.
Um die Xbox LIVE-Einstellungen zu bestätigen, drücken Sie die Xbox Guide-Taste, wenn ein
Spiel geladen wird, und öffnen Sie „Voreinstellungen“ > „Sprache“. Stellen Sie sicher, dass
„Nur Headset“ ausgewählt ist.
Drücken sie auf der Xbox 360 die taste zum verbinden. Halten sie kie taste zum verbinden am
headset für 3 sekunden gedrückt.
Ordnen Sie den Quadranten der Basisstation dem Controller zu, indem Sie die Taste zum
Verbinden drücken. Auf Seite 50 finden Sie weitere Informationen.
Drücken Sie die Eingangstaste am Headset, um den digitalen Eingang auszuwählen. Die
„Digital“-LED an der Basisstation leuchtet, wenn der digitale Eingang ausgewählt ist.
1
2
3
4
5
6
7
8
9
DIGITALE AUDIOEINRICHTUNG
A
B
3
4
3
3
4
**HDMI-Kabel und Komponenten-/VGA-/Composite-AV-Kabel nicht im Lieferumfang enthalten
10
TRI_476740M02_HD3_UG_16Jan12.indd 44-45 16/01/2012 11:28 AM
[46] [47]
® ®
DEUTSCH
ANALOGE AUDIOEINRICHTUNG
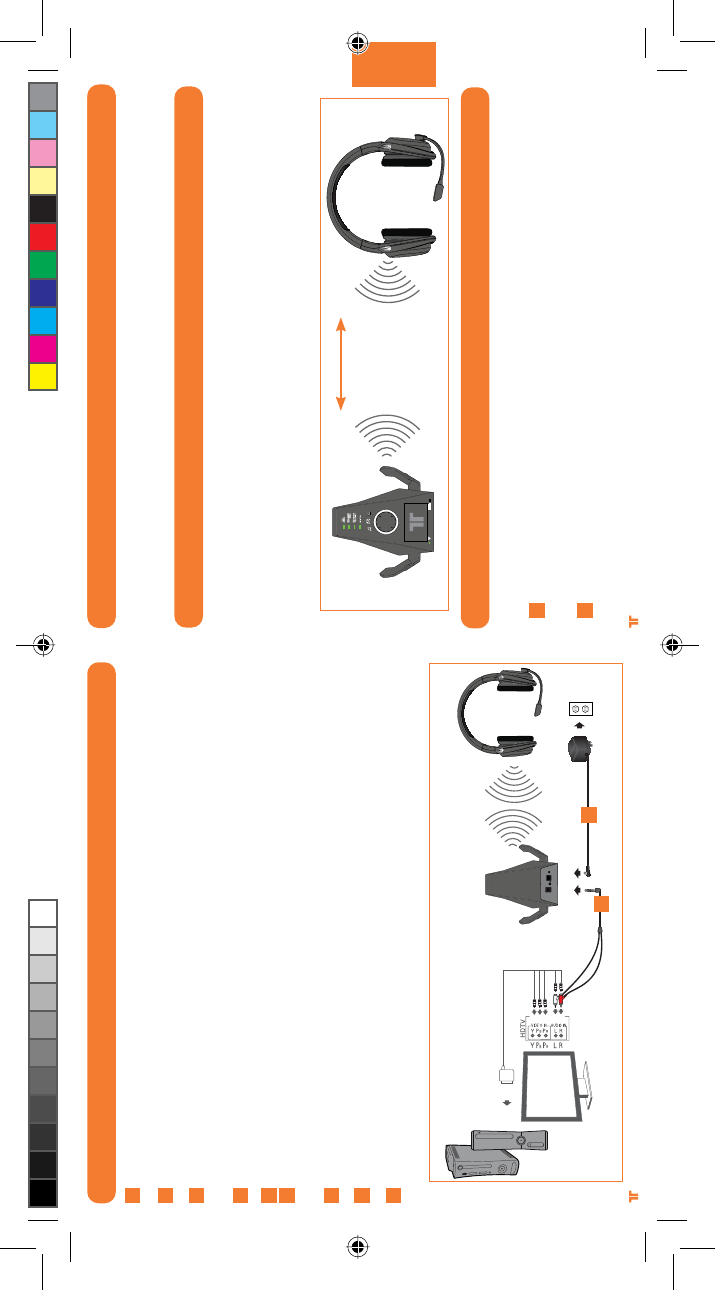
Laden Sie den Akku und setzen Sie ihn in das Headset ein. Auf Seite 39 finden Sie weitere
Informationen.
Schließen Sie den 3,5-mm-Stereo-Audio-Stecker des RCA-Adapterkabels an den
Leitungseingang der Basisstation an.
Schließen Sie die roten/weißen RCA-Kabel des RCA-Adapterkabels an die roten/weißen
RCA-Kabel des Komponenten-/VGA-/Composite-AV-Kabels an. Optional: Schließen Sie die
Stecker dieser Kabel an die RCA-Audioausgänge am Bildschirm an.
Schließen Sie den Netzadapter an die Basisstation an. Stecken Sie den Netzadapter in
eine Steckdose.
Schalten Sie die Xbox 360-Konsole und das Headset EIN.
Um die Xbox LIVE-Einstellungen zu bestätigen, drücken Sie die Xbox Guide-Taste, wenn ein
Spiel geladen wird, und öffnen Sie „Voreinstellungen“ > „Sprache“. Stellen Sie sicher, dass
„Nur Headset“ ausgewählt ist.
Drücken sie auf der Xbox 360 die taste zum verbinden. Halten sie kie taste zum verbinden
am headset für 3 sekunden gedrückt.
Ordnen Sie den Quadranten der Basisstation dem Controller zu, indem Sie die Taste zum
Verbinden drücken. Auf Seite 50 finden Sie weitere Informationen.
Drücken Sie die Eingangstaste am Headset, um den digitalen Eingang auszuwählen.
Die „Digital“-LED an der Basisstation wird ausgeschaltet, wenn der analoge Eingang
ausgewählt ist.
1
2
3
4
5
6
7
8
34
ENERGIESPARMODUS
Wenn das Headset 15 Minuten lang keine Audiosignale empfängt, wird es in den
Energiesparmodus versetzt, um Akkustrom zu sparen. Drücken Sie die Taste zum
Einschalten/Synchronisieren, um das Headset wieder einzuschalten.
WIRELESS-BEREICH
Das Warhead 7.1-Headset überträgt Audiosignale per digitaler Funkfrequenz (RF) und
hat eine Reichweite von 10 Metern in jede Richtung. Halten Sie sich innerhalb dieser
Reichweite auf, um die optimale Leistung des Headsets zu gewährleisten. Stellen Sie
die Basisstation niemals auf einen Untergrund aus Metall oder hinter andere Geräte, die
RF-Frequenz nutzen. Falls das Headset innerhalb der Reichweite von 10 Metern nicht
ordnungsgemäß funktioniert, stellen Sie die Basisstation an einem anderen Ort auf, um die
Leistung zu verbessern.
HEADSETS MIT BASISSTATION SYNCHRONISIEREN
Hinweis: Headsets werden werkseitig mit der Basisstation gekoppelt. Dieser Schritt ist
nur beim Synchronisieren eines neuen Headsets erforderlich.
Halten Sie die Taste zum Einschalten/Synchronisieren an der Basisstation bei
eingeschalteter Basisstation 2 Sekunden lang gedrückt. Daraufhin blinkt die
entsprechende LED an der Basisstation langsam.
Halten Sie die Taste zum Einschalten/Synchronisieren am Headset schnell 5 Sekunden
lang gedrückt. Headset und Basisstation werden synchronisiert und die LED an der
Basisstation leuchtet konstant, wenn die Synchronisierung erfolgreich war.
1
2
33ft/10m
9
TRI_476740M02_HD3_UG_16Jan12.indd 46-47 16/01/2012 11:28 AM
[48] [49]
® ®
DEUTSCH
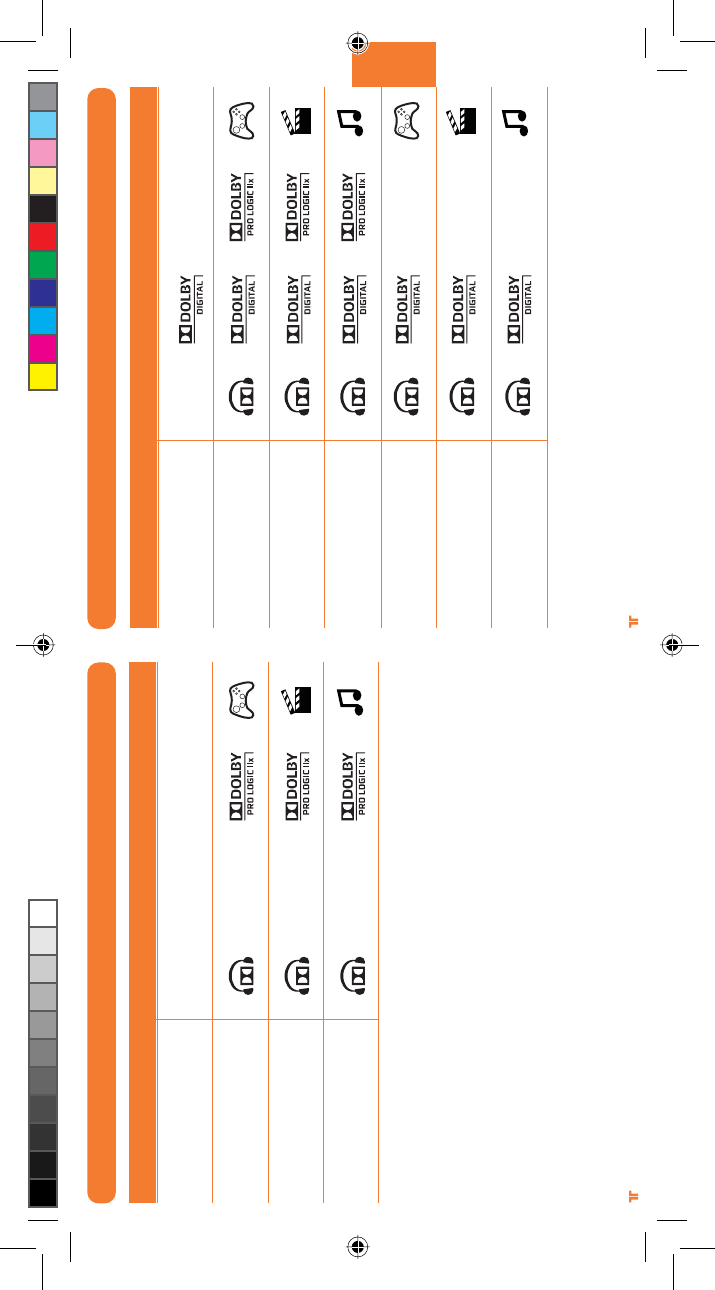
Pro Logic IIx Game
7.1-Audiosignal
Pro Logic IIx Movie
7.1-Audiosignal
Pro Logic IIx Music
7.1-Audiosignal
STEREO-EINGANGSMODI
Keine LEDs
LED-Leuchten EINModus
Stereo
DOLBY DIGITAL-/EX-EINGANGSMODI
Pro Logic IIx Game
7.1-Audiosignal
Pro Logic IIx Movie
7.1-Audiosignal
Pro Logic IIx Music
7.1-Audiosignal
Dolby Digital Game
5.1-Audiosignal
Dolby Digital Movie
5.1-Audiosignal
Dolby Digital Music
5.1-Audiosignal
LED-Leuchten EINModus
Stereo
TRI_476740M02_HD3_UG_16Jan12.indd 48-49 16/01/2012 11:28 AM
[50] [51]
® ®
DEUTSCH
CONTROLLERN ZUORDNEN
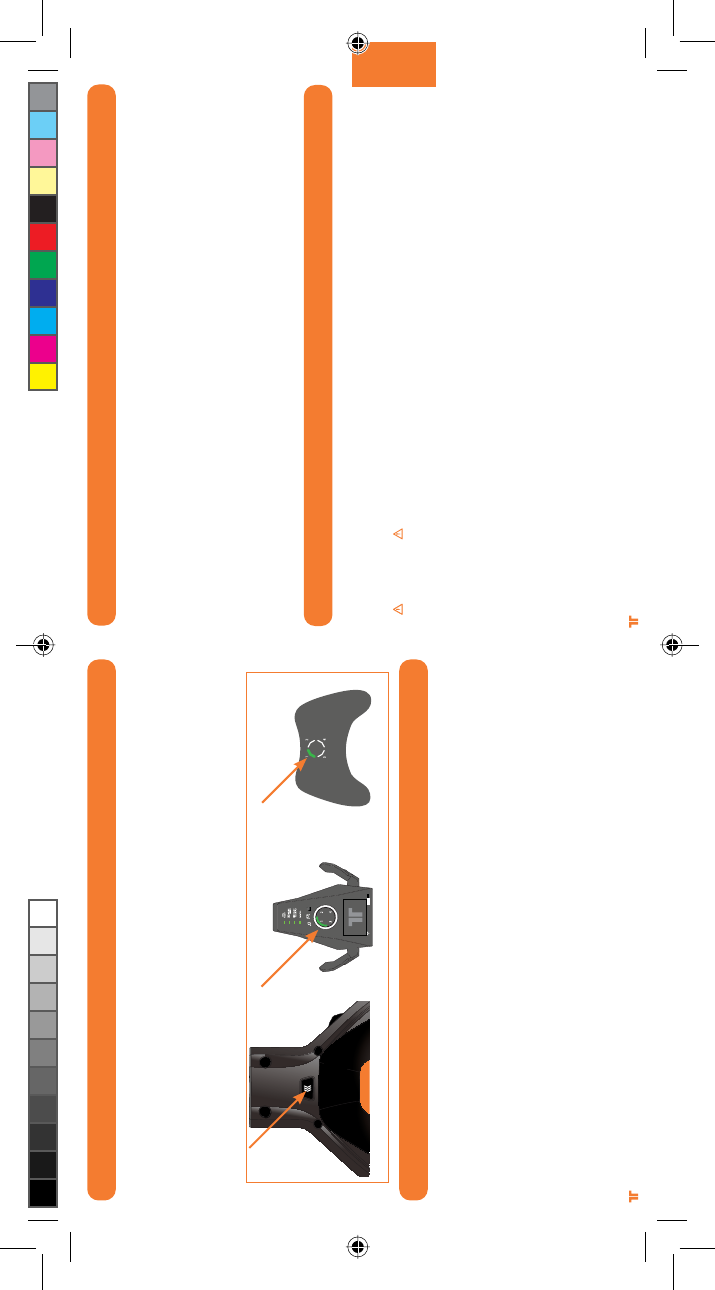
Wenn ein Controller mit Quadrant 1 verbunden ist, wird das Headset von der Xbox 360
dem Quadranten 1 auf dem Ring of Light zugeordnet. Wenn Quadrant 1 bereits ein anderes
kabelloses Headset zugeordnet ist, wird das Headset Quadrant 2 zugeordnet.
Drücken Sie die Taste zum Verbinden am Headset mehrfach, um den Quadranten des
Headsets dem Quadranten auf dem verwendeten Controller zuzuordnen. Wenn der
Controller auf der Xbox 360 beispielsweise Quadrant 3 zugewiesen ist, drücken Sie die
Taste zum Verbinden am Headset so lange, bis Quadrant 3 an der Basisstation aufleuchtet.
PROBLEMBEHANDLUNG
Die Chat-Funktion funktioniert nicht:
UÊ -ÌiiÊ-iÊÃViÀ]Ê`>ÃÃÊ`iÊÃiÊÌÊ8LÝÊ6ÊÛiÀLÕ`iÊÃÌ°Ê7iÌiÀiÊvÀ>ÌiÊâÕÊ8LÝÊ6Êw`iÊ
Sie unter www.xbox.com/live.
UÊ -ÌiiÊ-iÊÃViÀ]Ê`>ÃÃÊ`iÀÊÕÊvÀÃVÊ}i>`iÊÃÌ°
UÊ 7iÊ{Ê>LiÃiÊÌÀiÀÊÌÊ`iÀÊÃiÊÛiÀLÕ`iÊÃ`]Ê`ÀØViÊ-iÊ`iÊ8LÝÊÕ`i/>ÃÌiÊÎÊ-iÕ`iÊ>}ÊÕ`ÊÃV>ÌiÊÊ
Sie den Controller dann aus.
Kein Ton:
UÊ -ÌiiÊ-iÊÃViÀ]Ê`>ÃÃÊ`iÀÊ-V>ÌiÀÊvØÀÊ`iÊ-ÌÕÃV>ÌÕ}Ê`iÃÊ-«iÃÕ`ÃÊVÌÊ>ÌÛiÀÌÊÃÌ°
UÊ 4LiÀ«ÀØviÊ-i]ÊLÊ`iÊ>ÃÃÃÌ>ÌÊ>}iÃVÃÃi]Êi}iÃV>ÌiÌÊÕ`ÊÌÊ`iÊi>`ÃiÌÊ}i««iÌÊÃÌ°
UÊ 4LiÀ«ÀØviÊ-i]ÊLÊ`>ÃÊ«ÌÃViÊ`iÀÊ>>}iÊÕ`ÛiÀL`Õ}Ã>LiÊ>Ê`iÊ>ÃÃÃÌ>ÌÊÕ`Ê`iÊ8LÝÊÎÈäÊ>}iÃVÃÃi
und an der Basisstation der richtige Eingang ausgewählt ist. Stellen Sie sicher, dass die Schutzkappen vom optischen
Kabel entfernt wurden.
UÊ 6iÀÀ}iÀÊ-iÊ`iÊLÃÌ>`ÊâÜÃViÊi>`ÃiÌÊÕ`ÊÃi°
UÊ -ÌiiÊ-iÊÃViÀ]Ê`>ÃÃÊ`iÀÊÕÊvÀÃVÊ}i>`iÊÃÌ°
GARANTIE
Registrieren Sie Ihr Produkt unter TRITTONUSA.COM, um Garantieleistungen, Neuigkeiten, Veranstaltungen und Aktualisierungen zu erhalten.
Wenn Probleme mit dem Produkt auftreten, führen Sie zuerst die folgenden Maßnahmen durch, bevor Sie das Produkt zum Händler
zurückbringen:
UÊ Wenn Ihre Gesprächspartner Ihre Stimme nicht hören können, vergewissern Sie sich, dass der Stummschalter nicht aktiviert ist
und dass das Mikrofon vollständig an das Headset angeschlossen ist.
UÊ Um die Xbox LIVE-Einstellungen zu bestätigen, drücken Sie die Xbox Guide-Taste, wenn ein Spiel geladen wird, und gehen Sie zu
„Persönliche Einstellungen“ > „Sprache“. Stellen Sie sicher, dass „Nur Headset“ ausgewählt ist.
Gehen Sie zu www.trittonusa.com, um aktuelle Dokumentationen, Artikel der Wissensdatenbank und Software für
Ihr Gerät zu erhalten. Sie können außerdem live mit einem Support-Mitarbeiter chatten oder eine Anfrage zur Fehlerbehebung
senden.
Per E-mail: dehotline@madcatz.com
Telefonisch: 089-54612710
Mo - Fr von 16:00 - 19:00 Uhr
WARNHINWEISE
UÊ -ÌB`}iÃÊÀiÊÛÊâÕÊ>ÕÌiÀÊÕÃÊ`iÀÊ>`iÀiÊiÀBÕÃViÊÌÊ`iÊ«vÀiÀÊ>ÊâÕÊÃVÜiÀiÊÀÃVB`iÊvØÀi°ÊÃÊÜÀ`Ê
empfohlen, zu hohe Lautstärken zu vermeiden, insbesondere wenn Sie den Kopfhörer längere Zeit verwenden.
UÊ iÕÌâiÊ-iÊ`iÊiÌÊÕÀÊvØÀÊ`iÊÛÀ}iÃiiiÊ<ÜiV°
UÊ 1Ê`iÊÕÃLÀÕVÊiiÃÊiÕiÀÃÊ`iÀÊiiÊ>`iÀiÊiv>ÀiÃÌÕ>ÌÊâÕÊÛiÀ`iÀ]ÊÃiÌâiÊ-iÊ`iÊiÌÊÜi`iÀÊ,i}iÊVÊiÕVÌ}iÌÊ
aus. Halten Sie einen ausreichend großen Abstand zu Wasser (ca. 80 cm), z. B. in Schwimmbecken, in Badewannen oder Waschbecken.
UÊ 1ÊiiÌÀÃViÊ-VVÊâÕÊÛiÀi`i]ÊiiÊ-iÊ`>ÃÊiÀBÌÊVÌÊ>ÕÃi>`iÀ°Ê>ÃÊiÀBÌÊ`>ÀvÊÕÀÊÛʵÕ>wâiÀÌiÊ*iÀÃ>Ê}iÜ>ÀÌiÌÊ
werden.
UÊ ØÀiÊ-i]ÊÌÊÕÃ>iÊ`iÀÊâÕBÃÃ}iÊiiÌi]ÊiiÊi}iÃÌB`iÊi}ViÀÊÀÌÊÊ`>ÃÊiÀBÌÊi]Ê`>ÊÃiÊ}ivBÀViÊ-«>Õ}ëÕÌiÊ
berühren oder einen Kurzschluss auslösen können, was zum Ausbruch von Feuer oder elektrischem Schock führen kann.
UÊ 7iÊ-iÊÃVÊØ`iÊ`iÀÊÕÜÊvØiÊ`iÀÊ-ViÀâiÊÊÀiÀÊ>`Ê`iÀÊÀiÊÀÊ>Li]ÊLii`iÊ-iÊÕÛiÀâØ}VÊ`iÊ6iÀÜi`Õ}Ê
der Einheit. Suchen Sie einen Arzt auf, wenn sich Ihr Zustand nicht bessert.
UÊ 6iÀi`iÊ-iÊiiÊâÕÊ>}iÊ6iÀÜi`Õ}Ê`iÀÊiÌ°Êi}iÊ-iÊ>iÊÎäÊÕÌiÊiiÊ*>ÕÃiÊi°
UÊ -ViÀÊ-iÊ>iÊ>Li]Ê`>ÌÊ*iÀÃiÊVÌÊ>ÕvÊÃiÊÌÀiÌiÊ`iÀÊØLiÀÊÃiÊÃÌ«iÀÊi°Ê6iÀ}iÜÃÃiÀÊ-iÊÃV]Ê`>ÃÃÊ`iÊ>LiÊVÌÊ
eingeklemmt oder beschädigt werden.
UÊ iiÊ7ViÊ`iÊ>LiÊVÌÊÕÊÀ«iÀÌiiÊÛÊ*iÀÃi°
UÊ >ÌiÊ-iÊ`iÀÊÛÊ`iÊ>LiÊviÀ°
UÊ iÊv>ÃViÊ6iÀÜi`Õ}ÊÛÊ>ÌÌiÀiÊÊ`iÃiÀÊiÌÊ>ÊâÕÊÕÃ>ÕviÊ`iÀÊ>ÌÌiÀiÊ`iÀÊâÕÊÀiÀÊÝ«ÃÊvØÀiÊÕ`ÊÀ«iÀViÊ
Verletzungen zur Folge haben.
UÊ iÃiÃÊ*À`ÕÌÊiÌBÌÊiÌii]Ê`iÊLiÊ6iÀÃVÕViÊÀÃÌVÕ}Ã}iv>ÀÊ`>ÀÃÌii°ÊØÀÊ`iÀÊÕÌiÀÊÎÊ>ÀiÊVÌÊ}ii}iÌ°Ê
TECHNISCHER SUPPORT
TRI_476740M02_HD3_UG_16Jan12.indd 50-51 16/01/2012 11:28 AM
[52] [53]
® ®
WARNING
- Nicht aufladbare Batterien können nicht wieder aufgeladen werden.
- Alte und neue Batterien sowie Batterien unterschiedlichen Typs sollten nie zusammen verwendet werden.
- Die Batterien sind mit der korrekten Polung einzulegen.
- Entfernen Sie leere Batterien aus dem Produkt.
- Anschlüsse dürfen nicht kurzgeschlossen werden.
- Wiederaufladbare Batterien (Akkus) sind zum Aufladen aus dem Produkt zu nehmen.
- Wiederaufladbare Batterien (Akkus) dürfen nur unter Aufsicht Erwachsener aufgeladen werden.
- Die Verpackung muss aufbewahrt werden, da sie wichtige Informationen enthält.
Vereinigte Staaten und Kanada:
Bestimmte der digitalen Geräte (Controller) wurden von Mad Catz, Inc., 7480 Mission Valley Road, Suite 101, San Diego, CA 92108, getestet und erfüllen die
Anforderungen für digitale Geräte der Klasse B gemäß Teil 15 der FCC-Vorschriften und der kanadischen Norm RSS-210, welche Grenzwerte vorgeben, die
angemessenen Schutz vor schädlichen Störungen gewährleisten sollen. Diese Geräte verwenden, erzeugen und strahlen eventuell Hochfrequenzenergie aus.
Wenn sie nicht gemäß der Anweisungen montiert, installiert und betrieben werden, können sie Störungen der Funkkommunikation verursachen. Störungen
können generell nicht gänzlich ausgeschlossen werden. Der Betrieb dieser Geräte unterliegt den beiden folgenden Bedingungen: (1) Die Geräte dürfen keine
schädlichen Störungen verursachen und (2) die Geräte müssen alle empfangenen Störungen akzeptieren, auch wenn diese eine unerwünschte Beeinflussung
des Betriebs verursachen.
EU-KONFORMITÄTSERKLÄRUNG:
Wie vorgeschrieben wurden bestimmte dieser Produkt getestet und sie erfüllen die Anforderungen der EG-Richtlinien 1999/5/EG, 2002/95/EG,
2002/96/EG, und 2004/108/EG. Der vom Hersteller autorisierte Unterzeichner ist Mad Catz, Inc., 7480 Mission Valley Road, Suite 101, San Diego, CA
92108.
ACHTUNG
EXPLOSIONSGEFAHR BEI VERWENDUNG VON FALSCHEN ERSATZBATTERIEN.
BATTERIEN GEMÄSS DER ANLEITUNG ENTSORGEN.
12/11
NOTES
TRI_476740M02_HD3_UG_16Jan12.indd 52-53 16/01/2012 11:28 AM
[54] [55]
® ®
ITALIANO
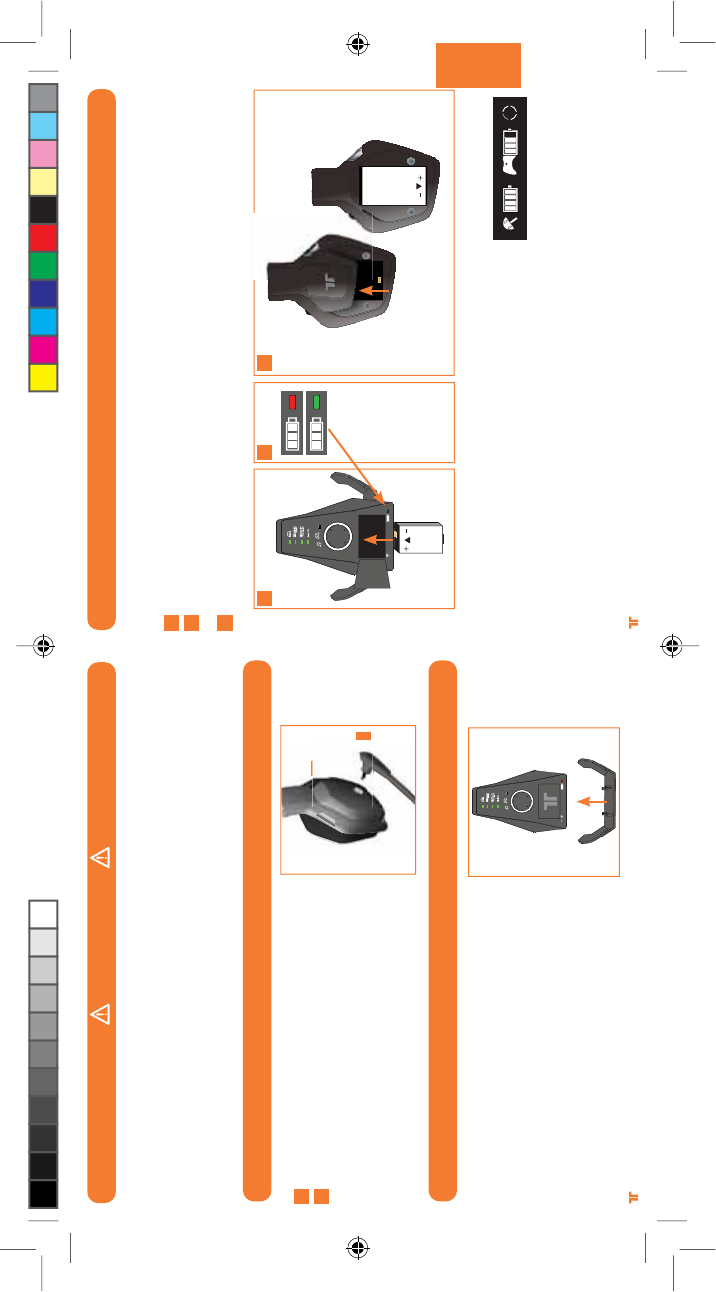
INSERIMENTO DEL MICROFONO
INSERIMENTO DEL SUPPORTO PER CUFFIE
1
2
Individuare la porta del jack.
Inserire il microfono.
Sistemare il microfono nella posizione
desiderata.
1
2
Inserire il supporto per cuffie nella parte inferiore
della stazione base.
BATTERIE
Caricare le batterie delle cuffie wireless surround Warhead 7.1 prima di usarle per la prima
volta e ogni volta che una delle batterie è scarica. Per caricare o ricaricare la batteria.
Posizionare la batteria nell’alloggiamento per la ricarica della stazione base.
Mentre la batteria è in carica, l’indicatore di carica della batteria diventa rosso. Una volta
completata la carica, l’indicatore di carica della batteria diventa verde.
Una volta caricata la batteria, inserirla nella cuffia rimuovendo il coperchio della batteria
dalla coppa auricolare sinistra e collocando la batteria all’interno del vano.
Per controllare l’attuale livello di carica della batteria nella cuffia, premere e rilasciare il
pulsante Xbox Guide. Lo stato di carica compare sullo schermo.
Note:
UÊ *iÀÊÀV>ÀV>ÀiÊV«iÌ>iÌiÊÕ>ÊL>ÌÌiÀ>Ê«Õ¢ÊiÃÃiÀiÊiViÃÃ>ÀÊwÊ>ÊÕÊ>ÃÃÊ`ÊnÊÀi°
UÊ -iÊÊÛiiÊÕÌââ>Ì>Ê«iÀÊÌÊÌi«]Ê>ÊL>ÌÌiÀ>Ê«Õ¢ÊÃV>ÀV>ÀðÊÊÌ>ÊV>Ã]ÊÀV>ÀV>ÀiÊÀ>iÌiÊ>ÊL>ÌÌiÀ>°
UÊ >ÊL>ÌÌiÀ>ÊiÊ>ÊÃÌ>âiÊL>ÃiÊ«ÃÃÊÀÃV>`>ÀÃÊ`ÕÀ>ÌiÊ>ÊV>ÀV>°
1
2
3
1 2 3
AVVERTENZA
Prima di utilizzare il prodotto consultare i manuali di questo accessorio e della console Xbox 360, nonché i manuali di altri accessori o
giochi per informazioni importanti sulla sicurezza e sulla tutela della salute. Conservare tutti i manuali per consultazioni successive. Per
i manuali di sostituzione Xbox, visitare il sito
www.xbox.com/support oppure contattare il servizio di Assistenza clienti di Xbox.
PREVENZIONE DELLA PERDITA DELL’UDITO
Attenzione – è possibile incorrere nella perdita permanente dell’udito se le cuffie o Gli auricolari vengono usati a volume elevato per
periodi di tempo prolungati.
TRI_476740M02_HD3_UG_16Jan12.indd 54-55 16/01/2012 11:28 AM
[56] [57]
® ®
ITALIANO
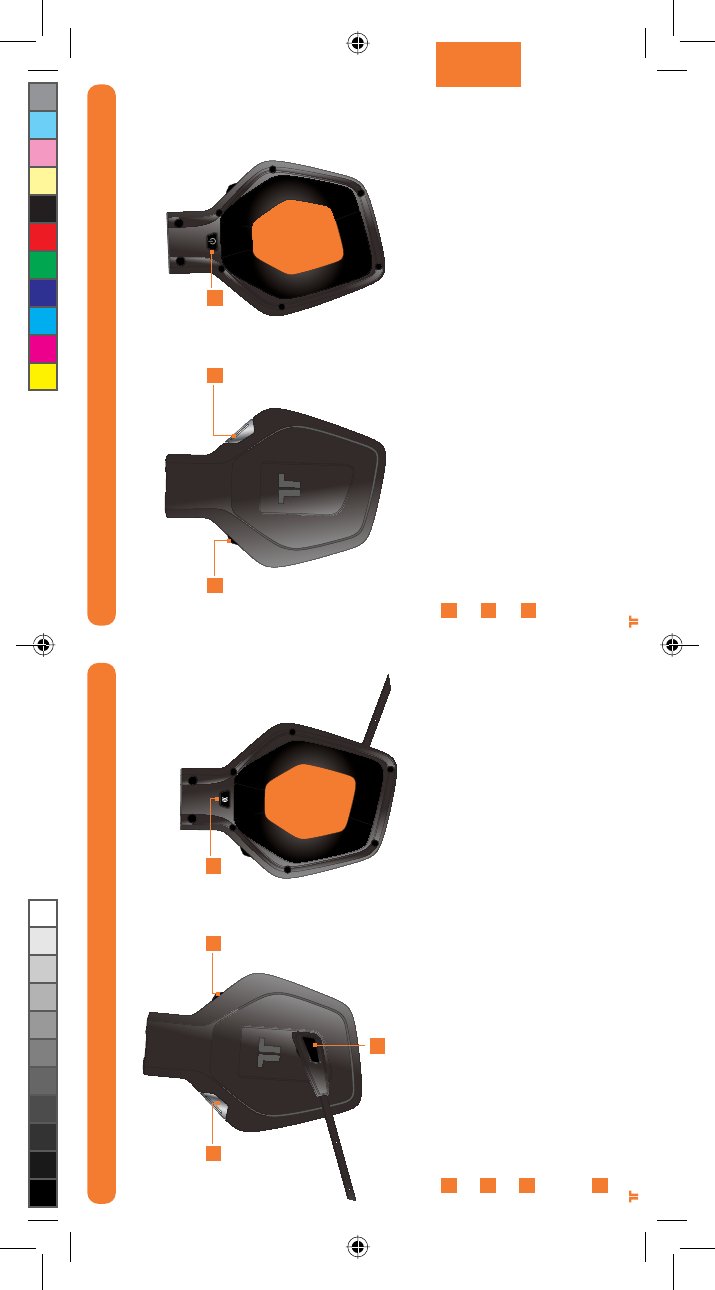
Game Audio Volume e Mute: Da usare per regolare il volume dell’audio del gioco.
Premere verso l’interno per attivare/disattivare l’audio del gioco.
Modalità Dolby: Premere per selezionare tra le varie modalità Dolby. Tenere premuto
questo pulsante per 0.5 secondi. Vedere pagina 64-65 per maggiori informazioni.
Power/Sync: Premere e rilasciare per spegnere e accendere le cuffie. Tenere premuto
per 5 secondi per far entrare le cuffie nella modalità di sincronizzazione. Vedere pagina
63 per maggiori informazioni sulla sincronizzazione delle cuffie con la stazione base.
COMANDI CUFFIE – LATO DESTRO
E
F
G
E F G
COMANDI CUFFIE – LATO SINISTRO
Input: Premere questo pulsante per passare da ingresso Analogico a Digitale (ottico).
Tenere premuto questo pulsante per 0.5 secondi.
Mic. Mute: Premere il pulsante Mic. Mute in modo tale che gli altri non possano sentire.
Il LED all’estremità del microfono si accende quando il microfono è spento.
Voice Communication Volume e comando SVM: Usarli per regolare il volume delle voci
degli altri giocatori. SVM = Monitoraggio selezionabile della voce. SVM consente all’utente
di sentire la propria voce attraverso le cuffie. Premere verso l’interno per accendere o
spegnere SVM.
Pulsante Connect: Premere e rilasciare questo pulsante per abbinare le cuffie al controller.
Tenere premuto questo pulsante per 3 secondi per collegare le cuffie alla console.
A
B
C
D
A
B
C D
TRI_476740M02_HD3_UG_16Jan12.indd 56-57 16/01/2012 11:28 AM
[58] [59]
® ®
ITALIANO
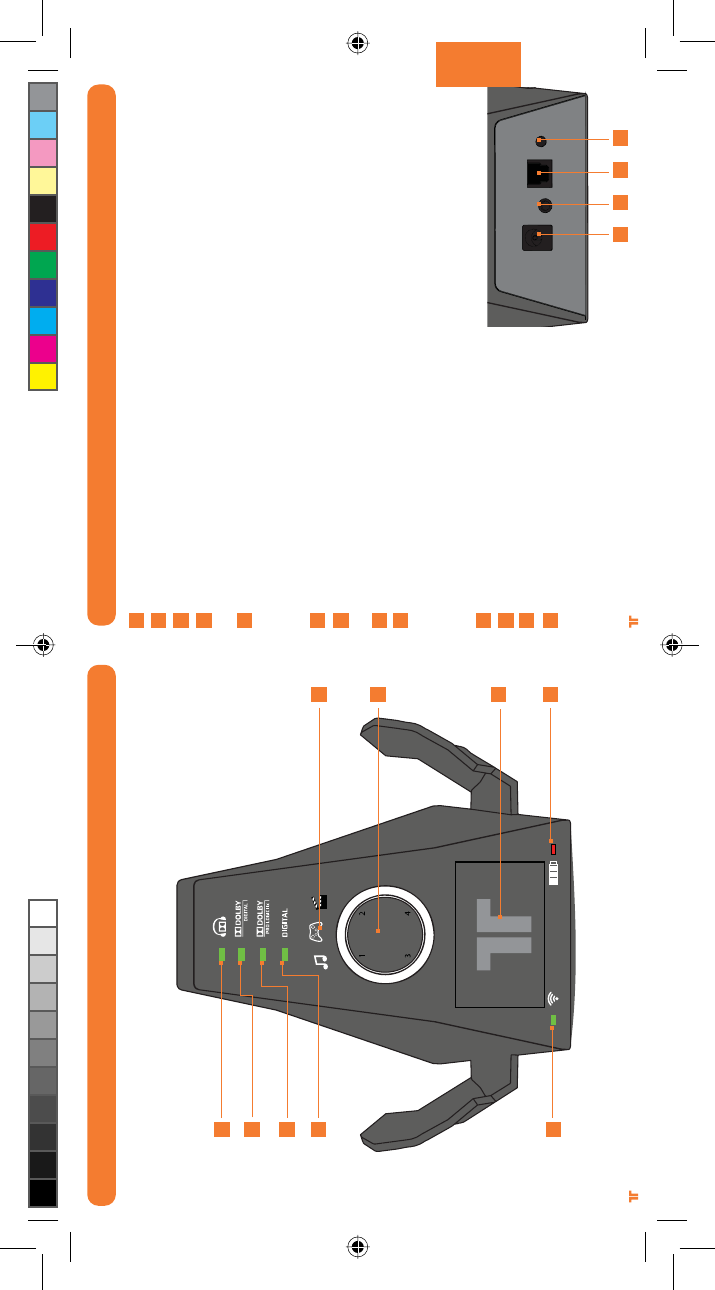
STAZIONE BASE
Indicatore Dolby Headphone:
Si illumina quando viene abilitata la modalità Dolby Headphone.
Indicatore Dolby Digital: Si illumina quando viene ricevuto un segnale Dolby Digital.
Indicatore Dolby Pro Logic IIx: Si illumina quando si abilita Dolby Pro Logic IIx.
Indicatore Digital: Si illumina quando si seleziona l’ingresso digitale (ottico). Il LED si
spegne quando si seleziona l’ingresso analogico.
Indicatore di stato Power/Sync:
a. Lampeggiante: Sincronizzazione o ricerca delle cuffie
b. Fisso: Collegato alle cuffie mentre la stazione base è accesa.
c. Spento: La stazione base è spenta.
Indicatore EQ Mode: Indica se si è selezionata la modalità musica, film o gioco.
Ring of Light: Indica il quadrante al quale le cuffie sono associate. Vedere pagina 66 per
maggiori informazioni.
Alloggiamento per la ricarica della batteria: Inserire qui la batteria per ricaricarla.
Indicatore di carica della batteria: Rosso quando è in carica, verde quando è carica.
Ingresso alimentazione CA
Linea in ingresso
Ingresso digitale ottico
Pulsante M. Sync: Tenendolo premuto per 2
secondi si fa entrare la stazione base nella
modalità di sincronizzazione. Vedere pagina
63 per maggiori informazioni.
A
B
C
D
E
F
G
H
i
j
k
l
m
j k l m
RETRO DELLA STAZIONE BASE
STAZIONE BASE
A
B
C
D
E
F
G
H
i
TRI_476740M02_HD3_UG_16Jan12.indd 58-59 16/01/2012 11:28 AM