Mad Catz HTMC8246A2602R LYNX Wireless Base User Manual 8246 English UG layout
Mad Catz, Inc. LYNX Wireless Base 8246 English UG layout
UserManual.wiki
>
Mad Catz
>
HTMC8246A2602R User Manual
Manual
Navigation menu
Upload a User Manual
Namespaces
Wiki Guide
HTML
PDF
Info
Views
User Manual
Discussion / Help
Navigation
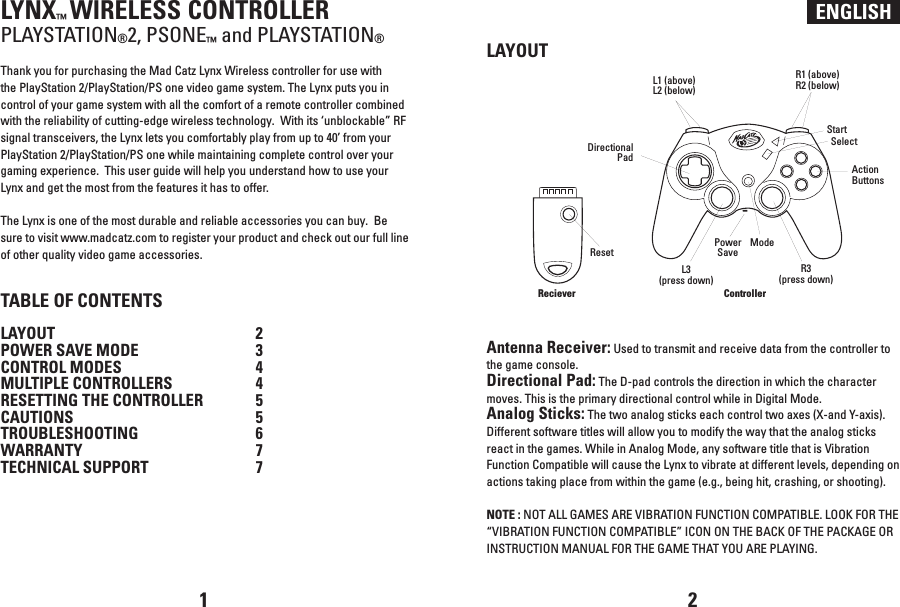
![Shoulder Buttons (L1, L2, R1, and R2): These are action buttons and their specific functions depend on the software being used.Action Buttons ( ) : These buttons are used to perform various actions, depending on the software. For more details, see the software instruction manual.Start Button: This button is generally used to make selections in the menus and for pausing the game. For more details, see the software instruction manual.Select Button: This is a standard button that allows you to do various things, depending on the software. For more details, see the software instruction manual.Mode Button: The Lynx has two different modes; Analog Controller Mode, Steering Wheel Mode and Digital Mode. The current mode is indicated by the color of the [MODE] Button on the faceplate of the controller: Red Light - ANALOG MODE Light Off - DIGITAL MODE(Refer to “CONTROL MODES” for instructions on this feature.)Reset Button: The Antenna Receiver unit features a [RESET] button. The [RESET] button will tell the Antenna Receiver to find a new clear transmission channel if interference is experienced. Refer to “RESETTING THE CONTROLLER” for instructions on this feature.POWER SAVE MODEThe Lynx comes with a switch that will turn off the controller to save batteries when not in use. This switch is located between the two controller handles. It is advised that when you are not using the controller for prolonged periods of time, that you turn the controller off. Additionally, the controller has an automatic “Sleep” mode -- when the controller is not in use for more than a few minutes, the controller will partially turn itself off in order to conserve batteries. To wake the controller from sleep mode, simply twirl the analog sticks or press any of the buttons of the controller.ENGLISH ENGLISHCONTROL MODESThere are two different control modes from which you can choose, depending on your style of play. Change control modes by pressing the Mode button. The color of the lighted Mode button tells you which mode you are in: Analog Controller Mode - RED light This is the standard “Dual Shock™” mode. Some games will only vibrate if the controller is in Analog Controller mode. Digital Mode - Light OFF This is the original PlayStation controller mode. This is the default control mode.MULTIPLE CONTROLLERSIf you want to use two or more Lynx controllers at the same time (as in multi-player games or with the Mad Catz PS2 Multi-Port™), simply plug the controllers into the game system as you normally would and begin play. You don’t need to set any buttons or switches. The Lynx uses AUTOMATIC CHANNEL RECOGNITION and AUTOMATIC ID RECOGNITION to automatically avoid most controller interference conflicts.When you play in the multi-player mode WITHOUT a Multi-Port:1. Insert the game disk and turn on your console.2. Insert the Antenna Receiver for the first controller into the Player-1 Controller port on the game console.3. Confirm the link between first Antenna Receiver and first Lynx by using the controller to see if it works in the game or game menu. (If the controller will not respond, refer to “RESETTING THE CONTROLLER”.)4. Insert the Antenna Receiver for the second Lynx into the Player-2 Controller port on the game console.5. Confirm the link between second Antenna Receiver and second Lynx controller by using the controller to see if it works in the game or game menu. (If the controller will not respond, refer to “RESETTING THE CONTROLLER”.)3 4](https://usermanual.wiki/Mad-Catz/HTMC8246A2602R/User-Guide-267021-Page-2.png)
![ENGLISH ENGLISHWhen you play in the multi-player mode WITH a Multi-Port:If you want to play with the Multi-Port, you should set each controller in the same way as listed above – Plug in and confirm each controller one by one.RESETTING THE CONTROLLEROn a rare occasion, two or more controllers may be set to the same ID and may interfere with each other, preventing each controller from working properly. Additionally, another RF source (such as a 900 MHz wireless phone) may cause interference. If this should happen, reset the controller as follows:1. Disconnect the Antenna Receiver from the game console.2. Press [START] and [SELECT] and [MODE] buttons on the Lynx at the same time and hold for two seconds – then release the buttons – the [MODE] button should begin to flash.3. Press and hold the [RESET] button on the Antenna Receiver – While holding the [RESET] button, insert Antenna Receiver into the game console – Release the [RESET] button on the Antenna Receiver when the [MODE] button stops flashing on the Lynx controller (allow several seconds for the Lynx and Antenna Receiver to establish a link.)CAUTIONS- IMPORTANT! Before using this product read all accompanying information and your game system’s instruction manual for safety, health and other information.- To prevent fire or shock hazard, do not expose this unit to rain or moisture. Do not use within 30’ of any water such as swimming pools, bathtubs, or sinks.- To avoid electrical shock, do not disassemble. Refer servicing to qualified personnel only.- This unit should be operated only from the power source indicated on the unit. If you are not sure of the type of electrical power supplied to your home, contact your local power company.- Never push objects of any kind, other than authorized items, into the product as they may touch dangerous voltage points or short out parts that could result in fire or electrical shock.- Stop using this unit immediately if you begin to feel tired or if you experience discomfort or pain in your hands and/or arms while operating the unit. If the condition persists, consult a doctor.- Do not attempt to operate the unit in any way except with your hands. Do not bring the unit in contact with your head, face, or near the bones of any other part of your body- The vibration function of this unit can aggravate injuries. Switch off or do not use the vibration function of the unit if you have any ailment of the bones or joints of your hands or arms.- Avoid prolonged use of this unit. Take breaks every 30 minutes.- Use this unit only as intended.- Do not dispose of batteries in fire. Refer to local country, state and city guidelines for appropriate methods of battery disposal.- Do not put batteries into unit backwards.- Misuse of batteries within this unit may cause batteries to leak and/or explode and lead to personal injury.- This product contains small parts that may cause choking if swallowed. Not intended for children under 3 years of age.TROUBLESHOOTINGProblem: The Lynx controller does not respond.Solution: Make sure the batteries are fully charged. Solution: Reset the controller – Refer to “RESETTING THE CONTROLLER”Solution: Make sure the receiver is fully plugged in to the PlayStation game console.Problem: The Lynx controller does not vibrate.Solution: Check the game to make sure that the game is “Vibration Function Compatible”.Solution: Change the control mode to Analog. Not all games will instruct the controller to vibrate unless it is in Analog Mode.Solution: Check the options menu in the game. Some games require the vibration function to be turned on. 5 6](https://usermanual.wiki/Mad-Catz/HTMC8246A2602R/User-Guide-267021-Page-3.png)