Mad Catz HTMC8246A2602R LYNX Wireless Base User Manual 8246 English UG layout
Mad Catz, Inc. LYNX Wireless Base 8246 English UG layout
Mad Catz >
Manual
ENGLISH
LYNX™ WIRELESS CONTROLLER
PLAYSTATION®2, PSONE™ and PLAYSTATION®
Thank you for purchasing the Mad Catz Lynx Wireless controller for use with
the PlayStation 2/PlayStation/PS one video game system. The Lynx puts you in
control of your game system with all the comfort of a remote controller combined
with the reliability of cutting-edge wireless technology. With its ‘unblockable” RF
signal transceivers, the Lynx lets you comfortably play from up to 40’ from your
PlayStation 2/PlayStation/PS one while maintaining complete control over your
gaming experience. This user guide will help you understand how to use your
Lynx and get the most from the features it has to offer.
The Lynx is one of the most durable and reliable accessories you can buy. Be
sure to visit www.madcatz.com to register your product and check out our full line
of other quality video game accessories.
TABLE OF CONTENTS
LAYOUT 2
POWER SAVE MODE 3
CONTROL MODES 4
MULTIPLE CONTROLLERS 4
RESETTING THE CONTROLLER 5
CAUTIONS 5
TROUBLESHOOTING 6
WARRANTY 7
TECHNICAL SUPPORT 7
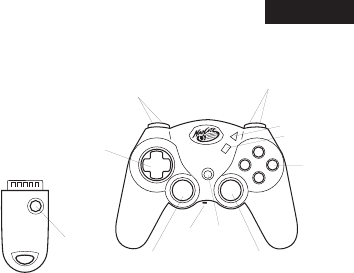
LAYOUT
Antenna Receiver: Used to transmit and receive data from the controller to
the game console.
Directional Pad: The D-pad controls the direction in which the character
moves. This is the primary directional control while in Digital Mode.
Analog Sticks: The two analog sticks each control two axes (X-and Y-axis).
Different software titles will allow you to modify the way that the analog sticks
react in the games. While in Analog Mode, any software title that is Vibration
Function Compatible will cause the Lynx to vibrate at different levels, depending on
actions taking place from within the game (e.g., being hit, crashing, or shooting).
NOTE : NOT ALL GAMES ARE VIBRATION FUNCTION COMPATIBLE. LOOK FOR THE
“VIBRATION FUNCTION COMPATIBLE” ICON ON THE BACK OF THE PACKAGE OR
INSTRUCTION MANUAL FOR THE GAME THAT YOU ARE PLAYING.
1 2
Reciever
L1 (above)
L2 (below)
R1 (above)
R2 (below)
Directional
Pad
Controller
L3
(press down)
Start
Action
Buttons
Select
R3
(press down)
Reset
Power
Save
Mode

Shoulder Buttons (L1, L2, R1, and R2): These are action buttons and
their specific functions depend on the software being used.
Action Buttons ( ) : These buttons are used to perform
various actions, depending on the software. For more details, see the software
instruction manual.
Start Button: This button is generally used to make selections in the menus
and for pausing the game. For more details, see the software instruction manual.
Select Button: This is a standard button that allows you to do various things,
depending on the software. For more details, see the software instruction manual.
Mode Button: The Lynx has two different modes; Analog Controller Mode,
Steering Wheel Mode and Digital Mode. The current mode is indicated by the
color of the [MODE] Button on the faceplate of the controller:
Red Light - ANALOG MODE
Light Off - DIGITAL MODE
(Refer to “CONTROL MODES” for instructions on this feature.)
Reset Button: The Antenna Receiver unit features a [RESET] button. The
[RESET] button will tell the Antenna Receiver to find a new clear transmission
channel if interference is experienced. Refer to “RESETTING THE CONTROLLER”
for instructions on this feature.
POWER SAVE MODE
The Lynx comes with a switch that will turn off the controller to save batteries
when not in use. This switch is located between the two controller handles. It
is advised that when you are not using the controller for prolonged periods of
time, that you turn the controller off. Additionally, the controller has an automatic
“Sleep” mode -- when the controller is not in use for more than a few minutes,
the controller will partially turn itself off in order to conserve batteries. To wake
the controller from sleep mode, simply twirl the analog sticks or press any of the
buttons of the controller.
ENGLISH ENGLISH
CONTROL MODES
There are two different control modes from which you can choose, depending on
your style of play. Change control modes by pressing the Mode button. The color of
the lighted Mode button tells you which mode you are in:
Analog Controller Mode - RED light
This is the standard “Dual Shock™” mode. Some games will only vibrate if the
controller is in Analog Controller mode.
Digital Mode - Light OFF
This is the original PlayStation controller mode. This is the default control mode.
MULTIPLE CONTROLLERS
If you want to use two or more Lynx controllers at the same time (as in multi-player
games or with the Mad Catz PS2 Multi-Port™), simply plug the controllers into the
game system as you normally would and begin play. You don’t need to set any
buttons or switches. The Lynx uses AUTOMATIC CHANNEL RECOGNITION and
AUTOMATIC ID RECOGNITION to automatically avoid most controller interference
conflicts.
When you play in the multi-player mode
WITHOUT a Multi-Port:
1. Insert the game disk and turn on your console.
2. Insert the Antenna Receiver for the first controller into the Player-1 Controller
port on the game console.
3. Confirm the link between first Antenna Receiver and first Lynx by using the
controller to see if it works in the game or game menu. (If the controller will not
respond, refer to “RESETTING THE CONTROLLER”.)
4. Insert the Antenna Receiver for the second Lynx into the Player-2 Controller port
on the game console.
5. Confirm the link between second Antenna Receiver and second Lynx controller
by using the controller to see if it works in the game or game menu. (If the
controller will not respond, refer to “RESETTING
THE CONTROLLER”.)
3 4

ENGLISH ENGLISH
When you play in the multi-player mode WITH a Multi-Port:
If you want to play with the Multi-Port, you should set each controller in the same
way as listed above – Plug in and confirm each controller one by one.
RESETTING THE CONTROLLER
On a rare occasion, two or more controllers may be set to the same ID and
may interfere with each other, preventing each controller from working properly.
Additionally, another RF source (such as a 900 MHz wireless phone) may cause
interference. If this should happen, reset the controller as follows:
1. Disconnect the Antenna Receiver from the game console.
2. Press [START] and [SELECT] and [MODE] buttons on the Lynx at the same time
and hold for two seconds – then release the buttons – the [MODE] button should
begin to flash.
3. Press and hold the [RESET] button on the Antenna Receiver – While holding
the [RESET] button, insert Antenna Receiver into the game console – Release the
[RESET] button on the Antenna Receiver when the [MODE] button stops flashing
on the Lynx controller (allow several seconds for the Lynx and Antenna Receiver
to establish a link.)
CAUTIONS
- IMPORTANT! Before using this product read all accompanying information and
your game system’s instruction manual for safety, health and other information.
- To prevent fire or shock hazard, do not expose this unit to rain or moisture. Do
not use within 30’ of any water such as swimming pools, bathtubs, or sinks.
- To avoid electrical shock, do not disassemble. Refer servicing to qualified
personnel only.
- This unit should be operated only from the power source indicated on the unit. If
you are not sure of the type of electrical power supplied to your home, contact
your local power company.
- Never push objects of any kind, other than authorized items, into the product
as they may touch dangerous voltage points or short out parts that could result
in fire or electrical shock.
- Stop using this unit immediately if you begin to feel tired or if you experience
discomfort or pain in your hands and/or arms while operating the unit. If the
condition persists, consult a doctor.
- Do not attempt to operate the unit in any way except with your hands. Do not
bring the unit in contact with your head, face, or near the bones of any other
part of your body
- The vibration function of this unit can aggravate injuries. Switch off or do not use
the vibration function of the unit if you have any ailment of the bones or joints
of your hands or arms.
- Avoid prolonged use of this unit. Take breaks every 30 minutes.
- Use this unit only as intended.
- Do not dispose of batteries in fire. Refer to local country, state and city guidelines
for appropriate methods of battery disposal.
- Do not put batteries into unit backwards.
- Misuse of batteries within this unit may cause batteries to leak and/or explode
and lead to personal injury.
- This product contains small parts that may cause choking if swallowed. Not
intended for children under 3 years of age.
TROUBLESHOOTING
Problem: The Lynx controller does not respond.
Solution: Make sure the batteries are fully charged.
Solution: Reset the controller – Refer to “RESETTING THE CONTROLLER”
Solution: Make sure the receiver is fully plugged in to the PlayStation
game console.
Problem: The Lynx controller does not vibrate.
Solution: Check the game to make sure that the game is “Vibration Function
Compatible”.
Solution: Change the control mode to Analog. Not all games will instruct the
controller to vibrate unless it is in Analog Mode.
Solution: Check the options menu in the game. Some games require the
vibration function to be turned on.
5 6

NOTE: This equipment has been tested and found to comply with the limits
for a Class B digital device, pursuant to Part 15 of the FCC Rules. These
limits are designed to provide reasonable protection against harmful interference
in a residential installation. This equipment generates, uses, and can radiate
radio frequency energy and, if not installed and used in accordance with the
instructions, may cause harmful interference to radio communications. However,
there is no guarantee that interference will not occur in a particular installation.
If this equipment does cause harmful interference to radio or television reception,
which can be determined by turning the equipment off and on, the user is
encouraged to try to correct the interference by one or more of the following
measures:
• Reorient or relocate the receiving antenna.
• Increase the separation between the equipment and receiver.
• Connect the equipment into an outlet on a circuit different from that to which
the receiver is needed.
• Consult the dealer or an experienced radio TV technician for help.
Any changes or modification to the Lynx Controller or Base Unit not expressly
approved by Mad Catz, Inc. could void your authority to operate the equipment.
This Class B digital apparatus complies with Canadian ICES-003.
Cet appareil numérique de la classe B est conforme à la norme NMB-003 du
Canada.
Thank you for purchasing the Mad Catz Lynx Wireless Controller for the
PlayStation, PS one and PlayStation 2 video game systems. Be sure to register
your product at www.madcatz.com and check out our full line of quality video game
accessories.
© 2002 Mad Catz, Inc. 7480 Mission Valley Road, Suite 101, San Diego, CA 92108 USA. Mad Catz, Lynx, and the Mad Catz
logo are trademarks or registered trademarks of Mad Catz, Inc., its subsidiaries and affiliates. PlayStation and PS one
are registered trademarks or trademarks of Sony Computer Entertainment, Inc. (“SCEI”). This product is not sponsored,
endorsed or approved by SCEI. International and domestic patents pending. Made in China. Printed in Honk Kong. All rights
reserved. Features, appearance and specifications may be subject to change without notice. Please retain this information
for future reference. Mad Catz stands behind its products 100%.
Questions? Visit our web site at www.madcatz.com or call 1.800.659.2287 (USA only) or 1.619.683.9830.
Product No. 8246 07/02
ENGLISH ENGLISH
5-YEAR LIMITED WARRANTY
Mad Catz warrants this product to be free from defects in materials and
workmanship for the warranty period. This non-transferable, five (5) year limited
warranty is only to you, the first end-user purchaser. If a defect covered by this
warranty occurs AND you have registered your product with Mad Catz AND you
provide proof of purchase, Mad Catz, at its option, will repair or replace the product
at no charge.
The Mad Catz five (5) year limited warranty is available to North American
customers only, including Canada, Mexico and the United States. Your sole and
exclusive remedy is repair or replacement of your Mad Catz product. In no event
shall Mad Catz liability exceed the original purchase price of the product. This
warranty does not apply to:
(a) normal wear and tear or abusive use; (b) industrial, professional or commercial
use; (c) if the product has been tampered with or modified.
To receive warranty service you must:
- Call Mad Catz Technical Support at 1.800.659.2287 or 1.619.683.9830
- Obtain a Return Authorization Number from Mad Catz Technical Support
- Ship the product to Mad Catz at your expense for service
- Enclose a copy of the original sales receipt showing a purchase date
- Enclose a full return address with daytime and evening phone numbers
TECHNICAL SUPPORT
Online Support and User Guides: www.madcatz.com
E-mail: techsupport@madcatz.com
Telephone: Available 8 A.M. to 4 P.M. Pacific Standard Time, Monday through Friday
(excluding holidays) at 1.800.659.2287 (US only) or 1.619.683.9830 (outside US).
7 8