Magnadyne M6-LCD Car DVD Player User Manual
Magnadyne Corporation Car DVD Player
UserManual.wiki
>
Magnadyne
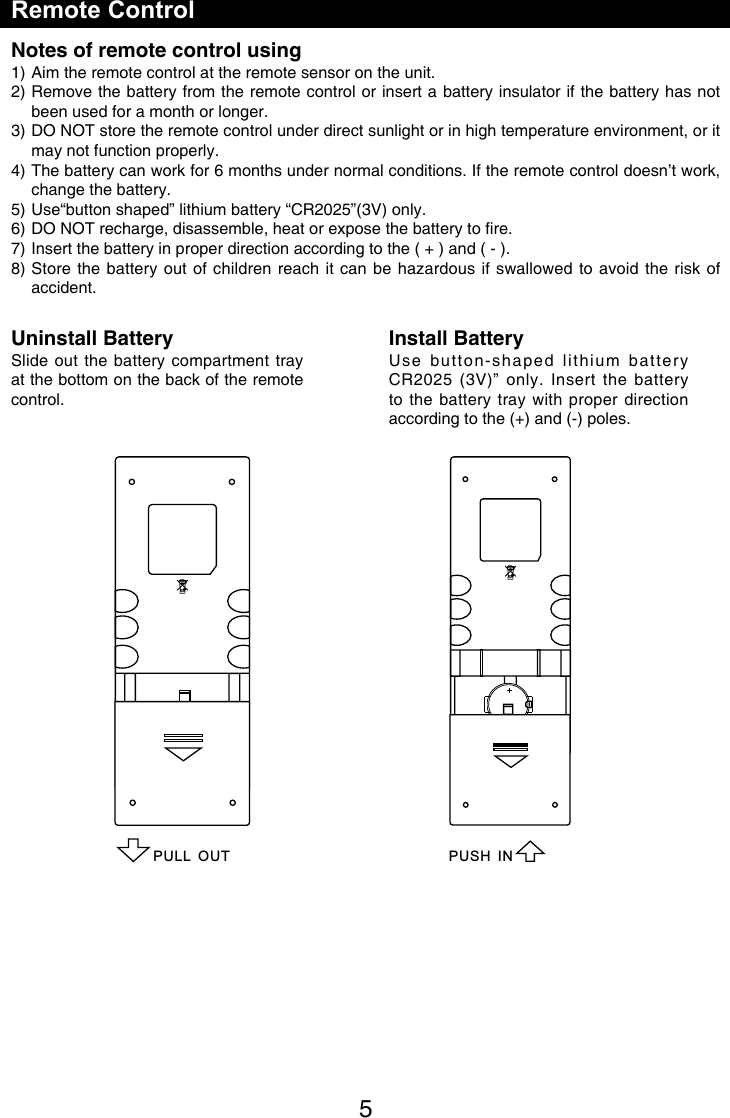
>
M6 LCD User Manual
User Manual
Navigation menu
Upload a User Manual
Namespaces
Wiki Guide
HTML
PDF
Info
Views
User Manual
Discussion / Help
Navigation
![23Control Panel Press [ VOL/MUTE SELECT ] button to turn on the unit.1. [ HOME ] ButtonShow main menu (press)Show main options(long press)2. [ BACK ] ButtonPress to go back one step on anyscreen3. Volume Ring /Mute Button> When radio is off, press and releaseto turn radio on> When radio is on, press and holdto turn radio off> When sound is playing, press andrelease to mute the sound> When sound is muted, press andrelease to un-mute soundIncrease or decrease the audio volume by rotating the ringNote: Rotating the volume ring while in mute will un-mute the audio. 4. USB Socket5. AUX IN SocketWarningOperate the unit correctly according to theinstruction manual to prevent unnecessaryproblems.CAUTIONS ON HANDLINGThis product is a CLASS 1 LASER PRODUCT. Use of controls or adjustments or performance of procedures other than those specified herein may result in hazardous radiation exposure. Do not open covers and do not repair yourself. Refer servicing to qualified personnel.Two laser productsWave length: CD: 780mm DVD: 650mmLaser power: No hazardous radiation is emitted with safety protection.To reduce the risk of fire electric shock, and annoying interference, use only the included components.Caution of disc using1. DO NOT use irregular shaped disc.2. Disc Cleaning. Use a dry, soft cloth towipe the disc from center to edge, only neutral detergent can be used.3. When playing a new disc. New disc may have some rough spots around the inner and outer edges. If such a disc is used, remove these rough spots with a pencil or ball-point pen, etc. Precautions ContentsPrecautions ...............................................1Control Panel ...........................................3Remote Control .........................................4Basic Operations ......................................6Main menu .................................................7Disc Operation ..........................................7Radio Operations ....................................10USB Operations ......................................12Bluetooth Operations .............................15iPod/iPhone Operations .........................17DVR-RECORDER (optional) ...................18SiriusXM Satellite Radio ........................19Internet ....................................................22Other Mode ..............................................23Sound setting ..........................................23System settings ......................................24Device Connections ...............................26Troubleshooting .....................................30 ......................................... 311234578 9116106. ResetLoad factory settings7. Bluetooth MIC8. Eject Disc (when disc inserted)9. Disc Slot10. SD Card Reader for Media. (Top)11. Map Card Slot (Bottom)2 3Control Panel Press [ ] button to turn on the unit.1. [ ] ButtonBack to previous MENU.2. Eject disc (when disc inserted)3. [ ] Button> Power “ON” (press)> Power “OFF” (long press)> Mute the Volume (press)4. [ ] ButtonShow main menu (press)Show main options(long press)5. Volume /Increase / Decrease the volumeWarningOperate the unit correctly according to theinstruction manual to prevent unnecessaryproblems.CAUTIONS ON HANDLINGThis product is a CLASS 1 LASER PRODUCT. Use of controls or adjustments or performance of procedures other than those specified herein may result in hazardous radiation exposure. Do not open covers and do not repair yourself. Refer servicing to qualified personnel.Two laser productsWave length: CD: 780mm DVD: 650mmLaser power: No hazardous radiation is emitted with safety protection.To reduce the risk of fire electric shock, and annoying interference, use only the included components.Caution of disc using1. DO NOT use irregular shaped disc.2. Disc Cleaning. Use a dry, soft cloth towipe the disc from center to edge, only neutral detergent can be used.3. When playing a new disc. New disc may have some rough spots around the inner and outer edges. If such a disc is used, remove these rough spots with a pencil or ball-point pen, etc. Precautions ContentsPrecautions ...............................................1Control Panel ...........................................3Remote Control .........................................4Basic Operations ......................................6Main menu .................................................7Disc Operation ..........................................7Radio Operations ....................................10USB Operations ......................................12Bluetooth Operations .............................15iPod/iPhone Operations .........................17DVR-RECORDER (optional) ...................18SiriusXM Satellite Radio ........................19EasyConnect ...........................................22Internet ....................................................24Other Mode ..............................................25Sound setting ..........................................25System settings ......................................26Device Connections ...............................28Troubleshooting .....................................31Specications .........................................32324581671096. AUX IN Socket7. ResetLoad factory settings8. USB Socket9. SD card reader for media.10. Map Card Slot](https://usermanual.wiki/Magnadyne/M6-LCD/User-Guide-3118720-Page-3.png)
![23Control Panel Press [ ] button to turn on the unit.1. [ ] ButtonBack to previous MENU.2. Eject disc (when disc inserted)3. [ ] Button> Power “ON” (press)> Power “OFF” (long press)> Mute the Volume (press)4. [ ] ButtonShow main menu (press)Show main options(long press)5. Volume /Increase / Decrease the volumeWarningOperate the unit correctly according to theinstruction manual to prevent unnecessaryproblems.CAUTIONS ON HANDLINGThis product is a CLASS 1 LASER PRODUCT. Use of controls or adjustments or performance of procedures other than those specified herein may result in hazardous radiation exposure. Do not open covers and do not repair yourself. Refer servicing to qualified personnel.Two laser productsWave length: CD: 780mm DVD: 650mmLaser power: No hazardous radiation is emitted with safety protection.To reduce the risk of fire electric shock, and annoying interference, use only the included components.Caution of disc using1. DO NOT use irregular shaped disc.2. Disc Cleaning. Use a dry, soft cloth towipe the disc from center to edge, only neutral detergent can be used.3. When playing a new disc. New disc may have some rough spots around the inner and outer edges. If such a disc is used, remove these rough spots with a pencil or ball-point pen, etc. Precautions ContentsPrecautions ...............................................1Control Panel ...........................................3Remote Control .........................................4Basic Operations ......................................6Main menu .................................................7Disc Operation ..........................................7Radio Operations ....................................10USB Operations ......................................12Bluetooth Operations .............................15iPod/iPhone Operations .........................17DVR-RECORDER (optional) ...................18SiriusXM Satellite Radio ........................19EasyConnect ...........................................22Internet ....................................................24Other Mode ..............................................25Sound setting ..........................................25System settings ......................................26Device Connections ...............................28Troubleshooting .....................................31Specications .........................................32324581671096. AUX IN Socket7. ResetLoad factory settings8. USB Socket9. SD card reader for media.10. Map Card Slot](https://usermanual.wiki/Magnadyne/M6-LCD/User-Guide-3118720-Page-4.png)

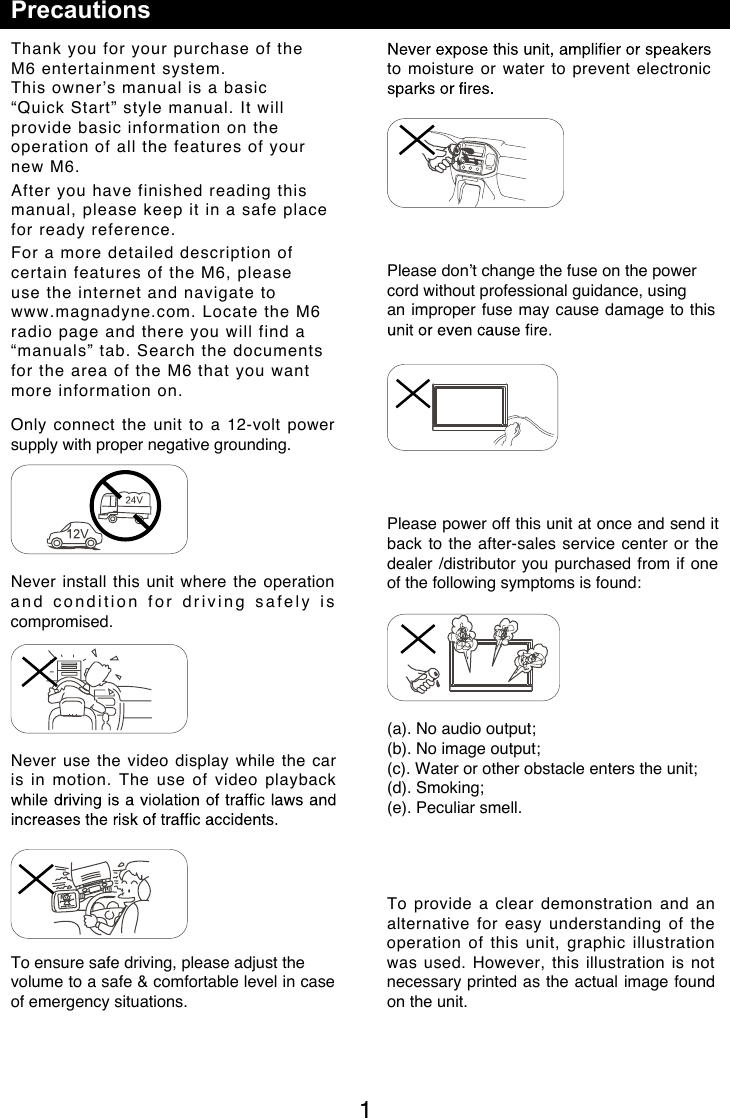
![6 7Basic Operations1. If 'PRK SW' cable is connected to handbrake switch, the video display of the TFTmonitor will be controlled by driving status,system setup and input video sources.2. When the car is moving forward, and avideo source is being played, the screen willdisplay a warning disclaimer. The warning screen will prevent the driver from watchingimages.Customized To change the icon theme and the wallpaper of the home screens, press the [ ] button. Swipe through the icons to the “settings” icon. Once in the setting screen, touch “General” then touch “Customized”. 1. Choose theme: [Theme 1], [Theme 2]. (Theme 2 is the default theme)2. Choose wallpaper from: [Live wallpapers]: to show the wallpaperswith animation stored in the unit. Drag up/down to scroll. [Photo]: to visit the photo of mobile storage. [Wallpapers]: to show the wallpapers storedin the unit. Drag left/right to scroll. Select desired picture to view, touch [Set Main menuMain MenuTouch the [ ] button to enter main source menu.196 8725431. Show current player source.2. Hold and drag down to show the3. Car AV system source bar: Touch and hold the center of the bar anddrag left/right to show more icons. Touch desired icon to enter correspondingmode.4. Clock.5. Enter music menu. (USB or SD card)6. Enter radio mode.7. Show applications list.8. Enter bluetooth phone mode.9. Enter NAVI mode.Applications MenuTouch [ ] to enter applications menu.1. IN-CARCar AV applications.2. APPSShow the Android applications installed.In the list menu, drag left/right to scroll. Touch and hold an icon for more than 2seconds to add shortcut to the desktop. Todelete the shortcut, hold it and drag to the[ ] on the top, and release after it turnsred. Touch the [ BACK ] button on the panel toexit.Disc OperationInsert a DiscInsert a disc into the slot, and the unit will change to disc mode automatically.Notes:• Please confirm whether there is a disc inthe unit before you insert another one.• The unit will exit current playing source andenter DVD mode when one disc is inserted.• The following disc formats are supported:CD-R, CD-RW, DVD-R, DVD+R, DVD-RW,DVD + RW .Eject the DiscPress [ ] on the panel to eject the disc. Notes:• After ejecting the disc, the unit reverts toanother source automatically.• If the disc is not removed from the unitwithin 10 seconds, the disc will be reloadedto prevent accidental damage.Disc PlaybackWhen a disc is inserted, the display will show “Loading...”. For MP3/WMA or a disc with mixed files, reading time may exceed 1 minute.DVD Playback MenuDuring playback, touch the screen (except top left corner) to show control buttons.17 8654321. Return to home menu2. Show DVD menu3. Progress bar4. Previous chapter5. Play/Pause6. Next chapter7. Enter preset EQ menu8. Show more control buttonsWhen video is playing and the parking brake is Off, the unit’s display will show the safety warning disclaimer screen. Turn on/off the power1. Press and release [ VOL/MUTE SELECT] to turn the unit on. 2. Press and hold the [ VOL/MUTE SELECT] to turn the unit off. The unit will power on in the same state it was in when powered off. MutePress the [ VOL/MUTE SELECT] button to mute the sound. Note: • Pressing the [VOL/MUTE SELECT] button again or adjusting volume willunmute.Adjust the VolumeRotate the [ VOL/MUTE SELECT] button to increase or decrease the volume The adjustable range of volume is 0 to 40.Playing Source Selection1. Press the [ ] button on the panel toshow main source menu.2. Touch the desired icon on the the screen to enter corresponding mode, such asDisc, Navi, Radio, etc.Drag left/right to scroll.Note:When some devices are not ready, theycannot be selected.You should stop switching when the playingsource you desired has been selected andwait for some seconds, the unit will auto enterthe playing source mode you have selected.Video Safety SystemThe parking brake must be set ON before any video playback can be displayed on the radio’s display. If the vehicle is in motion and the parking brake is Off, the unit will play the video from a DVD, USB or SD card to an external monitor. The sound will still be provided by the unit and speakers connected to it. Note: [ ] to turn the unit [ ] to turn the unit [ ] button to mute the sound.[ ] button again or Press the [ ] or [ ] button to increase or decrease the volume level.on.off.adjusting volume will unmute.](https://usermanual.wiki/Magnadyne/M6-LCD/User-Guide-3118720-Page-7.png)
![6 7Basic OperationsTurn on/off the power1. Press and release [ VOL/MUTE SELECT] to turn the unit on. 2. Press and hold the [ VOL/MUTE SELECT] to turn the unit off. The unit will power on in the same state it was in when powered off. MutePress the [ VOL/MUTE SELECT] button to mute the sound. Note: • Pressing the [VOL/MUTE SELECT] button again or adjusting volume willunmute.Adjust the VolumeRotate the [ VOL/MUTE SELECT] button to increase or decrease the volume level.The adjustable range of volume is 0 to 40.Playing Source Selection1. Press the [ HOME ] button on the panel toshow main source menu.2. Touch the desired icon on the the screen to enter corresponding mode, such asDisc, Navi, Radio, etc.Drag left/right to scroll.Note:•When some devices are not ready, theycannot be selected.•You should stop switching when the playingsource you desired has been selected andwait for some seconds, the unit will auto enterthe playing source mode you have selected.Video Safety System1. If 'PRK SW' cable is connected to handThe parking brake must be set ON before any video playback can be displayed on the radio’s display. If the vehicle is in motion and the parking brake is Off, the unit will play the video from a DVD, USB or SD card to an external monitor. The sound will still be provided by the unit and speakers connected to it. brake switch, the video display of the TFTmonitor will be controlled by driving status,system setup and input video sources.2. When the car is moving forward, and avideo source is being played, the screen willdisplay a warning disclaimer and a blankscreen. The warning screen will prevent thedriver from watching images.Customized To change the icon theme and the wallpaper of the home screens, press the [ HOME] button. Swipe through the icons to the “settings” icon. Once in the setting screen, touch “General” then touch “Customized”. 1. Choose theme: [Theme 1], [Theme 2]. (Theme 2 is the default theme)2. Choose wallpaper from: [Live wallpapers]: to show the wallpaperswith animation stored in the unit. Drag up/down to scroll. [Photo]: to visit the photo of mobile storage. [Wallpapers]: to show the wallpapers storedin the unit. Drag left/right to scroll. Select desired picture to view, touch [Set Main menuMain MenuTouch the [ HOME ] button to enter main source menu.196 8725431. Show current player source.2. Hold and drag down to show the3. Car AV system source bar: Touch and hold the center of the bar anddrag left/right to show more icons. Touch desired icon to enter correspondingmode.4. Clock.5. Enter music menu. (USB or SD card)6. Enter radio mode.7. Show applications list.8. Enter bluetooth phone mode.9. Enter NAVI mode.Applications MenuTouch [ ] to enter applications menu.1. IN-CARCar AV applications.2. APPSShow the Android applications installed.In the list menu, drag left/right to scroll. Touch and hold an icon for more than 2seconds to add shortcut to the desktop. Todelete the shortcut, hold it and drag to the[ ] on the top, and release after it turnsred. Touch the [ BACK ] button on the panel toexit.Disc OperationInsert a DiscInsert a disc into the slot, and the unit will change to disc mode automatically.Notes:• Please confirm whether there is a disc inthe unit before you insert another one.• The unit will exit current playing source andenter DVD mode when one disc is inserted.• The following disc formats are supported:CD-R, CD-RW, DVD-R, DVD+R, DVD-RW,DVD + RW .Eject the DiscPress [ ] on the panel to eject the disc. Notes:• After ejecting the disc, the unit reverts toanother source automatically.• If the disc is not removed from the unitwithin 10 seconds, the disc will be reloadedto prevent accidental damage.Disc PlaybackWhen a disc is inserted, the display will show “Loading...”. For MP3/WMA or a disc with mixed files, reading time may exceed 1 minute.DVD Playback MenuDuring playback, touch the screen (except top left corner) to show control buttons.17 8654321. Return to home menu2. Show DVD menu3. Progress bar4. Previous chapter5. Play/Pause6. Next chapter7. Enter preset EQ menu8. Show more control buttons Note: When video is playing and the parking brake is Off, the unit’s display will show the safety warning disclaimer screen. 12 3 4 5 6 87198762543](https://usermanual.wiki/Magnadyne/M6-LCD/User-Guide-3118720-Page-8.png)
![8 9Disc Operation9 10 11 12 13 149. Repeat play10. To enter search menu11. Select audio channel12. Select subtitle language13. Select viewing angle14. Hide the second line of control buttonsCD PlaybackInsert a CD in the disc slot, and the unit will read the disc. For some discs, you will need to choose Music/Video/Photo for playback.12 3 4 5 61. Return to home menu2.3. Previous track4. Play/Pause5. Next track6. Show more control buttons7 8 9 107. Sequential play8. Repeat play9. To enter search menu10. Hide the second line of control buttonsMixed Disc PlaybackWhen inserting a mixed disc, the unit will read the disc and show the files list. For some discs, you need to choose Music/Video/Photo to play back.1523461. Return to home menu2. Show music list3. Show video list4. Show photo list5. Show the folders6. File/Folder listDrag the list up/down to scroll.When viewing a picture, touch the screen (except top left corner) to show control buttons.12 3 4 5 6 71. Return to home menu2.3. Previous picture4. Play/Pause5. Next picture6. Zoom out/in7. Rotate clockwise* Video/Audio playback reference DVD/CDplayback.Stop Playback Temporarily1. During playback, press [ ] to pauseplayback. The sound will be muted.2. Press [ ] to continue playback.Select Desired Track/ChapterPress [ ] or [ ] to skip to the previous or next track/chapter.RepeatDuring playback, press [ ] button on screen to select repeat playback.• Default setting is off.Note:If you do not select Repeat on, when the entire disc or TITLE playback has finished, the system will stop. If no other control, after 5 minutes the unit will turn into standby mode.Sequential Track Playback (for CD/VCD/MP3/WMA Only)You can play all the tracks in random order.1. During playback, press [ ] button on the screen to select random playback. 2. Press [ ] to select sequential playback.Disc OperationSearch1. Touch [Goto] on the control bar.2. Input the chapter number.3. Touch [OK] to cDVD Audio SelectPress [ ] button to select audio language to listen if the DVD has multiple audio languages.VCD Audio SelectPress [ ] button to select audio channel to listen (LEFT, RIGHT, MIXED, STEREO).DVD Subtitle SelectPress [ Subtitle ] button to select the subtitle language to show if the DVD has multiple language subtitles.9 10 11 12 13 1412 3 4 5 67 8 9 1012 3 4 5 6 7152346](https://usermanual.wiki/Magnadyne/M6-LCD/User-Guide-3118720-Page-9.png)
![8 9Disc Operation9 10 11 12 13 149. Repeat play10. To enter search menu11. Select audio channel12. Select subtitle language13. Select viewing angle14. Hide the second line of control buttonsCD PlaybackInsert a CD in the disc slot, and the unit will read the disc. For some discs, you will need to choose Music/Video/Photo for playback.12 3 4 5 61. Return to home menu2.3. Previous track4. Play/Pause5. Next track6. Show more control buttons7 8 9 107. Sequential play8. Repeat play9. To enter search menu10. Hide the second line of control buttonsMixed Disc PlaybackWhen inserting a mixed disc, the unit will read the disc and show the files list. For some discs, you need to choose Music/Video/Photo to play back.1523461. Return to home menu2. Show music list3. Show video list4. Show photo list5. Show the folders6. File/Folder listDrag the list up/down to scroll.When viewing a picture, touch the screen (except top left corner) to show control buttons.12 3 4 5 6 71. Return to home menu2.3. Previous picture4. Play/Pause5. Next picture6. Zoom out/in7. Rotate clockwise* Video/Audio playback reference DVD/CDplayback.Stop Playback Temporarily1. During playback, press [ ] to pauseplayback. The sound will be muted.2. Press [ ] to continue playback.Select Desired Track/ChapterPress [ ] or [ ] to skip to the previous or next track/chapter.RepeatDuring playback, press [ ] button on screen to select repeat playback.• Default setting is off.Note:If you do not select Repeat on, when the entire disc or TITLE playback has finished, the system will stop. If no other control, after 5 minutes the unit will turn into standby mode.Sequential Track Playback (for CD/VCD/MP3/WMA Only)You can play all the tracks in random order.1. During playback, press [ ] button on the screen to select random playback. 2. Press [ ] to select sequential playback.Disc OperationSearch1. Touch [Goto] on the control bar.2. Input the chapter number.3. Touch [OK] to cDVD Audio SelectPress [ ] button to select audio language to listen if the DVD has multiple audio languages.VCD Audio SelectPress [ ] button to select audio channel to listen (LEFT, RIGHT, MIXED, STEREO).DVD Subtitle SelectPress [ Subtitle ] button to select the subtitle language to show if the DVD has multiple language subtitles.](https://usermanual.wiki/Magnadyne/M6-LCD/User-Guide-3118720-Page-10.png)
![1011Radio OperationsSelect [Radio] on the main menu to enter radio mode.12 45376 8 9 10 12111. Return to home menu2. Tune backwardAuto tune backward. (long press)3. Current frequency4. Tune forwardAuto tune forward. (long press)5. Enter EQ menu6. Enter favorite list7. Search and store preset stationsautomatically8. To receive local / distant radio stations9. Goto station by inputting frequency10. Band switch11. Stations list12. Show more control buttons13 14 15 16 1713. Enter customized list14. Show discovery stations15. Show favorite stations16. Mute radio17. Hide the second line of control buttons18. Show RDS optionsSelect One Radio BandTouch the [ Band ] button to select one radio band among FM and AM.Manual TuningDuring manual tuning, the frequency will be changed in steps.Touch the [ ] or [ ] button on the operation bar to tune in a lower/higher station.Auto TuningHold the [ ] or [ ] button on the operation bar for more than 2 seconds to seek a lower/higher station.To stop searching, repeat the operation above or press other buttons having radio functions.Note:Whenastationisreceived,searchingstopsandthestationisplayed.Auto StoreOnly stations with sufcient signal strength will be detected and stored in the memory.To start automatic station search, touch the [ ] button on the operation bar.To stop auto store, repeat the operation above or press other buttons having radio functions.Note:Afterautostore,thepreviousstoredstationswillbeoverwritten.Manual store 1. When one expected radio station has beendetected, touch [ ] to show customizedstation store list.2. Touch to select an item on the list to storethe current station in the memory.3. Touch top left of the screen to exit.Radio OperationsRecall the Stored StationsMethod 1:1. Touch [ ] button on the screen to show the preset stations.2. Select a band3. On the middle of the screen, drag the listleft/right to scroll, touch a station on the listto listen to.Method 2:1. Touch [ ] button on the screen to show the favorite stations.2. Select a band3. On the middle of the screen, drag the listleft/right to scroll, touch a station on the listto listen to.4. Touch top left of the screen to exit.Local SeekingWhen LOCAL seeking is on, only radio stations with strong radio signal will be be received.To open LOCAL function, touch [ ] button on the operation bar, then touch the [ ] button to select “Loc” or “DX”. NoteThe numberof radiostationsthatcanbereceivedwilldecreaseaftertheLocseekingmodeison.Key SearchTouch [ ] button on the operation bar to show key search menu.Touch the keypad to input the frequency, touch [ OK ] to goto the station directly.To cancel an input number, touch [ ].RDS BasicsRadio Data System (RDS) enables traffic reports to be received and provides many facilities, including enabling the radio station name to be displayed on the radio display.Adjust RDS Settings1. In Radio menu, touch [ ].The option menu is displayed.2. Touch on the selected option to change thesetting.∙ [TA]: To turn on or off “TA” function.∙ [AF]: To turn on or off “AF” function.∙ [REG]: To turn on or off “REG” function.∙ [CT]: To turn on or off “Clock Time”synchronization function.∙ [PTY]: To show PTY list.TAPress the TA ON/OFF button to switch the priority for trafc announcements on or off.AFThe receiver can automatically switche to an alternative frequency (AF) of the same station if the reception becomes poor. Press the OFF/ON touch-point to turn the automatic scanning for alternative frequencies of an RDS broad-cast station off and on.CT (Clock Time)Some stations broadcast the time and date within the encoded RDS signal. The clock time is automatically adjusted when ‘CT’ is set to ‘ON’.181 2 4 5376 8 9 10 121113 14 15 16 1718](https://usermanual.wiki/Magnadyne/M6-LCD/User-Guide-3118720-Page-11.png)
![1011Radio OperationsSelect [Radio] on the main menu to enter radio mode.12 45376 8 9 10 12111. Return to home menu2. Tune backwardAuto tune backward. (long press)3. Current frequency4. Tune forwardAuto tune forward. (long press)5. Enter EQ menu6. Enter favorite list7. Search and store preset stationsautomatically8. To receive local / distant radio stations9. Goto station by inputting frequency10. Band switch11. Stations list12. Show more control buttons13 14 15 16 1713. Enter customized list14. Show discovery stations15. Show favorite stations16. Mute radio17. Hide the second line of control buttons18. Show RDS optionsSelect One Radio BandTouch the [ Band ] button to select one radio band among FM and AM.Manual TuningDuring manual tuning, the frequency will be changed in steps.Touch the [ ] or [ ] button on the operation bar to tune in a lower/higher station.Auto TuningHold the [ ] or [ ] button on the operation bar for more than 2 seconds to seek a lower/higher station.To stop searching, repeat the operation above or press other buttons having radio functions.Note:Whenastationisreceived,searchingstopsandthestationisplayed.Auto StoreOnly stations with sufcient signal strength will be detected and stored in the memory.To start automatic station search, touch the [ ] button on the operation bar.To stop auto store, repeat the operation above or press other buttons having radio functions.Note:Afterautostore,thepreviousstoredstationswillbeoverwritten.Manual store 1. When one expected radio station has beendetected, touch [ ] to show customizedstation store list.2. Touch to select an item on the list to storethe current station in the memory.3. Touch top left of the screen to exit.Radio OperationsRecall the Stored StationsMethod 1:1. Touch [ ] button on the screen to show the preset stations.2. Select a band3. On the middle of the screen, drag the listleft/right to scroll, touch a station on the listto listen to.Method 2:1. Touch [ ] button on the screen to show the favorite stations.2. Select a band3. On the middle of the screen, drag the listleft/right to scroll, touch a station on the listto listen to.4. Touch top left of the screen to exit.Local SeekingWhen LOCAL seeking is on, only radio stations with strong radio signal will be be received.To open LOCAL function, touch [ ] button on the operation bar, then touch the [ ] button to select “Loc” or “DX”. NoteThe numberof radiostationsthatcanbereceivedwilldecreaseaftertheLocseekingmodeison.Key SearchTouch [ ] button on the operation bar to show key search menu.Touch the keypad to input the frequency, touch [ OK ] to goto the station directly.To cancel an input number, touch [ ].RDS BasicsRadio Data System (RDS) enables traffic reports to be received and provides many facilities, including enabling the radio station name to be displayed on the radio display.Adjust RDS Settings1. In Radio menu, touch [ ].The option menu is displayed.2. Touch on the selected option to change thesetting.∙ [TA]: To turn on or off “TA” function.∙ [AF]: To turn on or off “AF” function.∙ [REG]: To turn on or off “REG” function.∙ [CT]: To turn on or off “Clock Time”synchronization function.∙ [PTY]: To show PTY list.TAPress the TA ON/OFF button to switch the priority for trafc announcements on or off.AFThe receiver can automatically switche to an alternative frequency (AF) of the same station if the reception becomes poor. Press the OFF/ON touch-point to turn the automatic scanning for alternative frequencies of an RDS broad-cast station off and on.CT (Clock Time)Some stations broadcast the time and date within the encoded RDS signal. The clock time is automatically adjusted when ‘CT’ is set to ‘ON’.18](https://usermanual.wiki/Magnadyne/M6-LCD/User-Guide-3118720-Page-12.png)
![1213SD/USB Operations9. List windowDrag up/down to scroll.Touch an item to select.10. Enter search menu.11112 13 14 15 1611. Favorite12. Show list menu13. Previous track14. Play/Pause15. Next track15. Show more control buttons17 18 19 2017. Sequential play18. Repeat play19. Follow your heart20. Hide the second line of control buttons.Play/PauseWhen playing, press [ ] button to pause, and the sound will be mute.Press [ ] button to play.Previous/Next Track Press [ ] or [ ] button to go to previous or next track.Select Music by Artist1. Touch [Artists] on the left of the screen.2. Touch an artist shown on the list.3. Select a song to play.Select Music by Album1. Touch [Albums] on the left of the screen.2. Touch an album shown on the list.3. Select a song to play.Select Music by Song Name1. Touch [Songs] on the left of the screen.2. Select a song to play.PlaylistsAdd a song to favorite playlist1. Press a song and select [ ].2. Add it to an favorite playlist. If choose [Favorite], you need input a nameof the playlist.Delete a song from favorite playlist1. Touch [favorite], and select a playlist nameon the screen.2. Press [ ] on the favorite playlist, then remove it from playlist.Video PlaybackSelect [Video] on the applications menu, the unit will display all the video files on the storages.During playback, touch the screen(except top left corner) to show control buttons.1 23 41. Return to home menu2. Select le source3. Folder/File listDrag up/down to scroll, touch to access.4. ThumbnailPTY Function PTY is the abbreviation for Program Type which is a code dening the type of program being broadcast (e.g. News or Rock).PTY options will display on the screen. To view more PTY options, touch the scroll bar and arrows on the screen. W hen one PTY option is touched (e.g. News), auto search for next available PTY by increasing tuning frequency until the PTY of the next station matches the current. If no matched PTY has been found, the unit will return to the original radio frequency. SD/USB OperationsUsing a SD Card 1. Open the card slot cap, insert a SD cardinto the corresponding slot, the unit will loadthe les automatically.2. To remove the card, you should rst selectanother source, in order to avoid damagingthe card, press the card slightly, and takeoff the card after it pops out.Using USB device1. Connect your USB device to the USBcable. When connecting a USB device, the unitwill read the les automatically.2. T o remove the USB device, you shouldrst select another source, in order to avoiddamaging the USB device.Music PlaybackSelect [Music] on the applications menu, the unit will display all the music on the mobile storages. 1 23456789 101. Return to home menu2. Select le source3. List the les by favorite4. List the new les5. List the les by song nameTouch a song to start play.6. List the les by artistDrag up/down to scroll.7. List the les by album8. Show the leRadio Operations1 23456789 10](https://usermanual.wiki/Magnadyne/M6-LCD/User-Guide-3118720-Page-13.png)
![1213SD/USB Operations9. List windowDrag up/down to scroll.Touch an item to select.10. Enter search menu.11112 13 14 15 1611. Favorite12. Show list menu13. Previous track14. Play/Pause15. Next track15. Show more control buttons17 18 19 2017. Sequential play18. Repeat play19. Follow your heart20. Hide the second line of control buttons.Play/PauseWhen playing, press [ ] button to pause, and the sound will be mute.Press [ ] button to play.Previous/Next Track Press [ ] or [ ] button to go to previous or next track.Select Music by Artist1. Touch [Artists] on the left of the screen.2. Touch an artist shown on the list.3. Select a song to play.Select Music by Album1. Touch [Albums] on the left of the screen.2. Touch an album shown on the list.3. Select a song to play.Select Music by Song Name1. Touch [Songs] on the left of the screen.2. Select a song to play.PlaylistsAdd a song to favorite playlist1. Press a song and select [ ].2. Add it to an favorite playlist. If choose [Favorite], you need input a nameof the playlist.Delete a song from favorite playlist1. Touch [favorite], and select a playlist nameon the screen.2. Press [ ] on the favorite playlist, then remove it from playlist.Video PlaybackSelect [Video] on the applications menu, the unit will display all the video files on the storages.During playback, touch the screen(except top left corner) to show control buttons.1 23 41. Return to home menu2. Select le source3. Folder/File listDrag up/down to scroll, touch to access.4. ThumbnailPTY Function PTY is the abbreviation for Program Type which is a code dening the type of program being broadcast (e.g. News or Rock).PTY options will display on the screen. To view more PTY options, touch the scroll bar and arrows on the screen. W hen one PTY option is touched (e.g. News), auto search for next available PTY by increasing tuning frequency until the PTY of the next station matches the current. If no matched PTY has been found, the unit will return to the original radio frequency. SD/USB OperationsUsing a SD Card 1. Open the card slot cap, insert a SD cardinto the corresponding slot, the unit will loadthe les automatically.2. To remove the card, you should rst selectanother source, in order to avoid damagingthe card, press the card slightly, and takeoff the card after it pops out.Using USB device1. Connect your USB device to the USBcable. When connecting a USB device, the unitwill read the les automatically.2. T o remove the USB device, you shouldrst select another source, in order to avoiddamaging the USB device.Music PlaybackSelect [Music] on the applications menu, the unit will display all the music on the mobile storages. 1 23456789 101. Return to home menu2. Select le source3. List the les by favorite4. List the new les5. List the les by song nameTouch a song to start play.6. List the les by artistDrag up/down to scroll.7. List the les by album8. Show the leRadio Operations11112 13 14 15 1617 18 19 201 23 416](https://usermanual.wiki/Magnadyne/M6-LCD/User-Guide-3118720-Page-14.png)
![14 15SD/USB Operations9 0187655. Show list menu6. Previous chapter7. Play/Pause8. Next chapter9. Enter preset EQ menu10. Show more control buttons11 12 1311. Sequential play12. Repeat play13. Show previous page of control buttonsNotes• Disconnect USB storage devices from theunit when not in use.• Use an optional cable to connect the USBaudio player/USB memory as any deviceconnected directly to the unit will protrudeout from the unit and may be dangerous.• Do not use unauthorized products.Gallery Operations1. Select [Photo] on the APPS menu.2. Select one gallery to show the picture list.3. Touch to view it.Drag left/right to scroll.Touch top left corner to back.The Bluetooth allows you to utilize your car’s built-in audio system for handsfree wireless mobile phone or music communication. Some Bluetooth mobile phones have the audio features, and some portable audio players support Bluetooth feature. This system can play audio data stored in a Bluetooth audio device. The car stereo with Bluetooth will be able to retrieve phonebook contacts, received calls, dialed calls, missed calls, incoming calls, outgoing call and listen to music. Notes:• This system will not operate or may operateimproperly with some Bluetooth audioplayers.• The unit cannot guarantee the compatibilityof all mobile phones together with the unit.• Audio playback will be set to the samevolume level as set during telephone call. This can cause problems, if extreme volumelevel is set during the telephone call.Touch [ ] on t he main menu to enter Bluetooth Phone mode.1. If the Bluetooth function of the unit is off,the unit will ask you to turn it on.(Default setting is on)2. Turn on Bluetooth function of your mobilephone.3. Search for new Bluetooth devices onyour phone. Select “MAG-M6” from thepairing list on the mobile phone, and enterpassword Or touch [ Scan ] button on the screen tosearch mobile Bluetooth devices. After connect successfully, the unit showfollowing menu.Bluetooth OperationsMaking a Call •Dial Number1. Input numbers by digit-keys on the screen.Touch [ ] to clear the digits.2. Touch [ ] button to dial out.3. Touch [ ] button to terminate call.•Answering a callYou can answer an incoming call by pressingthe [ ] button.Touch [ ] button to reject an incoming call.•DisconnectTo disconnect a paired device, touc h[Disconnect] button.Call from Phonebook1. Touch [ Contacts ] button to show yourphone book.2. Select a number to select and touch [ ]button to dial out.3. Touch [ ] to search a contact name.5 6 7 8 10911 12 13](https://usermanual.wiki/Magnadyne/M6-LCD/User-Guide-3118720-Page-15.png)
![1415SD/USB Operations9 0187655. Show list menu6. Previous chapter7. Play/Pause8. Next chapter9. Enter preset EQ menu10. Show more control buttons11 12 1311. Sequential play12. Repeat play13. Show previous page of control buttonsNotes• Disconnect USB storage devices from theunit when not in use.• Use an optional cable to connect the USBaudio player/USB memory as any deviceconnected directly to the unit will protrudeout from the unit and may be dangerous.• Do not use unauthorized products.Gallery Operations1. Select [Photo] on the APPS menu.2. Select one gallery to show the picture list.3. Touch to view it.Drag left/right to scroll.Touch top left corner to back.The Bluetooth allows you to utilize your car’s built-in audio system for handsfree wireless mobile phone or music communication. Some Bluetooth mobile phones have the audio features, and some portable audio players support Bluetooth feature. This system can play audio data stored in a Bluetooth audio device. The car stereo with Bluetooth will be able to retrieve phonebook contacts, received calls, dialed calls, missed calls, incoming calls, outgoing call and listen to music. Notes:• This system will not operate or may operateimproperly with some Bluetooth audioplayers.• The unit cannot guarantee the compatibilityof all mobile phones together with the unit.• Audio playback will be set to the samevolume level as set during telephone call. This can cause problems, if extreme volumelevel is set during the telephone call.Touch [ ] on t he main menu to enter Bluetooth Phone mode.1. If the Bluetooth function of the unit is off,the unit will ask you to turn it on.(Default setting is on)2. Turn on Bluetooth function of your mobilephone.3. Search for new Bluetooth devices onyour phone. Select “MAG-M10” from thepairing list on the mobile phone, and enterpassword Or touch [ Scan ] button on the screen tosearch mobile Bluetooth devices. After connect successfully, the unit showfollowing menu.Bluetooth OperationsMaking a Call •Dial Number1. Input numbers by digit-keys on the screen.Touch [ ] to clear the digits.2. Touch [ ] button to dial out.3. Touch [ ] button to terminate call.•Answering a callYou can answer an incoming call by pressingthe [ ] button.Touch [ ] button to reject an incoming call.•DisconnectTo disconnect a paired device, touc h[Disconnect] button.Call from Phonebook1. Touch [ Contacts ] button to show yourphone book.2. Select a number to select and touch [ ]button to dial out.3. Touch [ ] to search a contact name.M6](https://usermanual.wiki/Magnadyne/M6-LCD/User-Guide-3118720-Page-16.png)
![1617Bluetooth OperationsCall HistoryAccess Call History by touching [ Call log ] button.Then select a number from Dialled/Missed/Received calls.Bluetooth Audio StreamingWhat is audio streaming?Audio streaming is a technique for transferring audio data such that it can be processed as a steady and continuous stream. Users can stream music from their external audio player to their car stereo wirelessly and listen to the tracks through the car’s speakers. Please consult your nearest dealer for more information on the product of wireless audio streaming transmitter offered.CAUTIONPlease avoid operating your connected mobile phone while audio streaming as this may cause noise or the sound to cut in and out on playback.Audio streaming may or may not resume after telephone interrupt as this is dependent on your mobile phone.Touch [Streaming] button to play music on your mobile phone.: Previous track: Play/Pause: Next track: Enter Bluetooth PhoneBluetooth SettingsTouch [ Settings ] button to show Bluetooth setting menu.iPod/iPhone OperationsThis unit supports only the following iPod/iPhone models:· iPhone 5· iPhone 4S· iPhone 4· iPod touch (5th generation)· iPod touch (4th generation)· iPod classic· iPod nano (7th generation)· iPod nano (6th generation)· iPod nano (5th generation)“Made for iPod,” and “Made for iPhone” mean that an electronic accessory has been designed to connect specically to iPod, or iPhone, respectively, and has been certied by the developer to meet Apple performance standards.Apple is not responsible for the operation of this device or its compliance with safety and regulatory standards. Please note that the use of this accessory with iPod or iPhone may affect wireless performance. iPhone and iPod are trademarks of Apple Inc., registered in the U.S. and other countries.Accessing iPod modeConnect an iPod or iPhone to the USB connector via an iPod cable.REDWHITEAUX INLIGHTINGTouch [iPod] on the main menu to enter iPod menu.If [iPod] isn’t on the current menu, slide the bottom bar left or right to nd it.Pausing play1. Touch the [ ] button on the bottom of thescreen to pause play. “PAUSE” appears in the display, and [ ]button becomes [ ] .2. Touch [ ] button to resume play.Selecting a trackTrack-up Touch the [ ] button to move to the beginning of the next track.Track-down1. Touch the [ ] button to move back to the beginning of the current track.2. Touch the [ ] button twice to move back to the beginning of the previous track.Fast forward/Fast reverseFast forwardTouch and hold the [ ] button .Fast reverse Touch and hold the [ ] button .Repeat playThis function allows you to play the track repeatedly.Touch the [ ] button to select Repeat one or Repeat all.Random playThis function allows you to play all tracks recorded in a random order.Touch the [ ] button to perform random play.Search function1. Touch the [ ] button to enter search menu. 2 Input number by touching buttons on the screen, then touch [ ] to begin searching. Touch [ ] button to delete inputted number.](https://usermanual.wiki/Magnadyne/M6-LCD/User-Guide-3118720-Page-17.png)
![1617Bluetooth OperationsCall HistoryAccess Call History by touching [ Call log ] button.Then select a number from Dialled/Missed/Received calls.Bluetooth Audio StreamingWhat is audio streaming?Audio streaming is a technique for transferring audio data such that it can be processed as a steady and continuous stream. Users can stream music from their external audio player to their car stereo wirelessly and listen to the tracks through the car’s speakers. Please consult your nearest dealer for more information on the product of wireless audio streaming transmitter offered.CAUTIONPlease avoid operating your connected mobile phone while audio streaming as this may cause noise or the sound to cut in and out on playback.Audio streaming may or may not resume after telephone interrupt as this is dependent on your mobile phone.Touch [Streaming] button to play music on your mobile phone.: Previous track: Play/Pause: Next track: Enter Bluetooth PhoneBluetooth SettingsTouch [ Settings ] button to show Bluetooth setting menu.iPod/iPhone OperationsThis unit supports only the following iPod/iPhone models:· iPhone 5· iPhone 4S· iPhone 4· iPod touch (5th generation)· iPod touch (4th generation)· iPod classic· iPod nano (7th generation)· iPod nano (6th generation)· iPod nano (5th generation)“Made for iPod,” and “Made for iPhone” mean that an electronic accessory has been designed to meet Apple performance standards.Apple is not responsible for the operation of this device or its compliance with safety and regulatory standards. Please note that the use of this accessory with iPod or iPhone may affect wireless performance. iPhone and iPod are trademarks of Apple Inc., registered in the U.S. and other countries.Accessing iPod modeConnect an iPod or iPhone to the USB connector via an iPod cable.LIGHTNINGTouch [iPod] on the main menu to enter iPod menu.If [iPod] isn’t on the current menu, slide the Pausing play1. Touch the [ ] button on the bottom of thescreen to pause play. “PAUSE” appears in the display, and [ ]button becomes [ ] .2. Touch [ ] button to resume play.Selecting a trackTrack-up Touch the [ ] button to move to the beginning of the next track.Track-down1. Touch the [ ] button to move back to the beginning of the current track.2. Touch the [ ] button twice to move back to the beginning of the previous track.Fast forward/Fast reverseFast forwardTouch and hold the [ ] button .Fast reverse Touch and hold the [ ] button .Repeat playThis function allows you to play the track repeatedly.Touch the [ ] button to select Repeat one or Repeat all.Random playThis function allows you to play all tracks recorded in a random order.Touch the [ ] button to perform random play.Search function1. Touch the [ ] button to enter search menu. 2 Input number by touching buttons on the screen, then touch [ ] to begin searching. Touch [ ] button to delete inputted number.· iPhone SE· iPhone 6s Plus· iPhone 6s · iPhone 6 Plus· iPhone 6 · iPhone 5s· iPhone 5c· iPhone 5· iPod touch (6th generation)· iPod touch (5th generation)](https://usermanual.wiki/Magnadyne/M6-LCD/User-Guide-3118720-Page-18.png)
![2021SiriusXM main displayThe SiriusXM main display features the following functions and displays:1. Changing to the main menu2. Channel info area:• Current channel number and presetnumber (if applicable)• Current channel name• Current channel category• Current title information3. SiriusXM eld strengh4. Time 5. Changing to the replay display6. Display the Direct Entry Menu.7. Tune to the previous channel8. Toggling between seek tuning through allcategories and seek tuning in the currentcategory only9. Tune to the next channel.10. Go to SiriusXM® Menu Page 2.11 13 15 17 191811. Go to the change password screen.12. Opens the preset list13. Display the SXM Lock Screen.14. Opens the channel list15. Touch to access the Equalizer levelsettings menu16. Opens the category list17. Tune on/off18. Touch to scan all channels starting at5 678 1 09123412 14 16channel 119. Go to SiriusXM® Menu Page 1Seek Tuning• To tune to the next higher channel, touchthe [ ] icon and to scroll through thehigher channels touch and hold the [ ]icon.• T o tune to the next lower channel, touchthe [ ] icon and to scroll through thelower channels touch and hold the [ ]icon.Direct TuningTo enter a SiriusXM® radio channel directly:1. On the SiriusXM® menu, touch [ ] icon to display the Direct Entry Menu.2. Enter the desired SiriusXM® radio channelusing the on-screen number pad then touchthe [Ok] icon. If you wish to delete an entrynumber touch the [ X ] icon.3. To exit the screen without changing thechannel, touch [ < ] icon.Using Preset ChannelsA preset is a channel name that is stored for instant access to that channel. Ten numbered preset buttons store and recall channels for each band.Storing a Channel1. On the SiriusXM® menu page 2, touch[ ] icon to access the Preset ChannelScreen.2. Touch the preset number (P1 through P18)in which you would like to store the currentchannel (or touch the [ < ] icon to canceland close the menu). The channel will be stored and displayed inthat preset. Drag up/down to scroll.3. Touch the [ < ] icon to return to the SXMMenu screen.Recalling a Channel1. Touch the Preset icon to access the RecallPreset Channel Screen.2. Touch a channel on the preset channel listto select the corresponding stored channel.Drag up/down to scroll.Searching for a ChannelSearch by Channel1. On the SirusXM® menu, touch the [ ]icon (if needed) to select Channel.2. Touch List to display the Channel SearchScreen.3. Touch a channel to tune to that channel.Drag up/down to scroll.Search by CategoryCategories group music by type such as jazz, rock, classical, etc. To search by category:1. On the SirusXM® menu, touch the [ ]icon (if needed) to select Category.2. Touch List to display the Category SearchScreen.3. Touch a category item. A channel listscreen appears.4. Touch a channel to tune to that channel.Scroll up or down the list.Locking Individual SXM ChannelsA user can lock individual channels. When locked, a channel has the lock icon next to it on the channel list.Locking a ChannelTo lock an individual channel:1. On the SirusXM® menu page 2, touch [ ] icon. The following screen appears:2. Enter your 4-digit password and then pressthe OK icon.Unlocking a ChannelTo unlock an individual channel:1. On the SirusXM® menu page 2, touch [ ] icon. The Enter Password Screenappears appears.2. Enter your 4-digit password.3. Touch a lock icon to unlock a channel. Theicon is replaced by an unlocked icon. Thechannel is now unlocked.Change Lock PasswordThe Change Lock Password option allows you to change the password from current custom password to another password.To change a password:1. Touch the [ ] icon.2. Enter your 4-digit password and press theOK icon.3. Enter the new 4-digit password and pressthe OK icon. The new password is set.SiriusXM Satellite RadioSiriusXM Satellite Radio5 6 7 8 109123411 13 15 17 191812 14 16](https://usermanual.wiki/Magnadyne/M6-LCD/User-Guide-3118720-Page-21.png)
![2021SiriusXM main displayThe SiriusXM main display features the following functions and displays:1. Changing to the main menu2. Channel info area:• Current channel number and presetnumber (if applicable)• Current channel name• Current channel category• Current title information3. SiriusXM eld strengh4. Time 5. Changing to the replay display6. Display the Direct Entry Menu.7. Tune to the previous channel8. Toggling between seek tuning through allcategories and seek tuning in the currentcategory only9. Tune to the next channel.10. Go to SiriusXM® Menu Page 2.11 13 15 17 191811. Go to the change password screen.12. Opens the preset list13. Display the SXM Lock Screen.14. Opens the channel list15. Touch to access the Equalizer levelsettings menu16. Opens the category list17. Tune on/off18. Touch to scan all channels starting at5 678 1 09123412 14 16channel 119. Go to SiriusXM® Menu Page 1Seek Tuning• To tune to the next higher channel, touchthe [ ] icon and to scroll through thehigher channels touch and hold the [ ]icon.• T o tune to the next lower channel, touchthe [ ] icon and to scroll through thelower channels touch and hold the [ ]icon.Direct TuningTo enter a SiriusXM® radio channel directly:1. On the SiriusXM® menu, touch [ ] icon to display the Direct Entry Menu.2. Enter the desired SiriusXM® radio channelusing the on-screen number pad then touchthe [Ok] icon. If you wish to delete an entrynumber touch the [ X ] icon.3. To exit the screen without changing thechannel, touch [ < ] icon.Using Preset ChannelsA preset is a channel name that is stored for instant access to that channel. Ten numbered preset buttons store and recall channels for each band.Storing a Channel1. On the SiriusXM® menu page 2, touch[ ] icon to access the Preset ChannelScreen.2. Touch the preset number (P1 through P18)in which you would like to store the currentchannel (or touch the [ < ] icon to canceland close the menu). The channel will be stored and displayed inthat preset. Drag up/down to scroll.3. Touch the [ < ] icon to return to the SXMMenu screen.Recalling a Channel1. Touch the Preset icon to access the RecallPreset Channel Screen.2. Touch a channel on the preset channel listto select the corresponding stored channel.Drag up/down to scroll.Searching for a ChannelSearch by Channel1. On the SirusXM® menu, touch the [ ]icon (if needed) to select Channel.2. Touch List to display the Channel SearchScreen.3. Touch a channel to tune to that channel.Drag up/down to scroll.Search by CategoryCategories group music by type such as jazz, rock, classical, etc. To search by category:1. On the SirusXM® menu, touch the [ ]icon (if needed) to select Category.2. Touch List to display the Category SearchScreen.3. Touch a category item. A channel listscreen appears.4. Touch a channel to tune to that channel.Scroll up or down the list.Locking Individual SXM ChannelsA user can lock individual channels. When locked, a channel has the lock icon next to it on the channel list.Locking a ChannelTo lock an individual channel:1. On the SirusXM® menu page 2, touch [ ] icon. The following screen appears:2. Enter your 4-digit password and then pressthe OK icon.Unlocking a ChannelTo unlock an individual channel:1. On the SirusXM® menu page 2, touch [ ] icon. The Enter Password Screenappears appears.2. Enter your 4-digit password.3. Touch a lock icon to unlock a channel. Theicon is replaced by an unlocked icon. Thechannel is now unlocked.Change Lock PasswordThe Change Lock Password option allows you to change the password from current custom password to another password.To change a password:1. Touch the [ ] icon.2. Enter your 4-digit password and press theOK icon.3. Enter the new 4-digit password and pressthe OK icon. The new password is set.SiriusXM Satellite RadioSiriusXM Satellite Radio](https://usermanual.wiki/Magnadyne/M6-LCD/User-Guide-3118720-Page-22.png)
![22 23InternetWi-Fi Settings1. Connect the WiFi dongle to the unit. Touchthe [ Settings ] icon on the main menu toenter setting menu, and turn on Wi-Fi(if necessary).2. Touch [ ] to enter WiFi setting menu.3. Touch an available WiFi hotspot.4. Touch [ Password ] and input the password,Visit WebsiteTo access the internet, you must setup “wireless & network” in system settings menu.Select [ ] on the main menu to view a website.Touch the dialog box on the upper side of the screen to show keypad. Input the website address, and touch [Go] to visit it. Drag the web page to scroll.E-mailSelect [Email] or other mail software on the applications menu.First you must setup an account, or sign into an existing account. Enter your Email address and password. Then you can send/receive E-mails through the unit.5. After successfully connected, the [ ]icon appears on the top right corner of themain menu . Now you can access internet.Other ModeNavigation OperationsTo navigate by the unit, simply select the desired navigation application on the main menu. Then navigate by the touch screen. AUX OperationsSelect [A/V In 1]/[A/V In 2] on the main menu to visit auxiliary device. File ExplorerSelect [File Explorer] on the applications menu The USB files and folders are in the folder named "external_usb".You can install applications and edit files/ folders.Select [EQ] on the menu to enter sound setting mode.Touch to select a preset EQ on upper side of , onhceT , k coR , r esU , poP , t a l F m o r f nee r c s eh tClassic, Jazz and Optimal.[ ]: When listening to music at low volumes, this featurewill selectively boost certain bass and treble frequencies.Touch [ ] to enter Fader/Balance/Subwoofer setting menu.Touch [ ] or [ ] to setup Balance, touch [ ] or [ ] to setup Fader. Sub woofer Level: Touch [ ] or [ ] to adjust subwoofer Level.Touch [“Speakers”] to enter the speaker setting menu (A): Touch to set A speakers On or Off(B): Touch to set B speakers On or Off(C): Touch to set C speakers On or OffNote: All three speakers sets can be On at the same time.Sound settingWi-Fi Settings1. Connect the WiFi dongle to the unit. Touch the [ Settings ] icon on the main menu to enter setting menu, and turn on Wi-Fi (if necessary). 2. Touch [ ] to enter WiFi setting menu. 3. Touch an available WiFi hotspot. 4. Touch [ Password ] and input the password, touch [Connect] to conrm. Visit WebsiteTo access the internet, you must setup “wireless & network” in system settings menu.Select [ ] on the main menu to view a website.Touch the dialog box on the upper side of the screen to show keypad. Input the website address, and touch [Go] to visit it. Drag the web page to scroll.E-mailSelect [Email] or other mail software on the applications menu.First you must setup an account, or sign into an existing account. Enter your Email address and password. Then you can send/receive E-mails through the unit.5. After successfully connected, the [ ] icon appears on the top right corner of the main menu . Now you can access internet.](https://usermanual.wiki/Magnadyne/M6-LCD/User-Guide-3118720-Page-23.png)
![2223InternetWi-Fi Settings1. Connect the WiFi dongle to the unit. Touchthe [ Settings ] icon on the main menu toenter setting menu, and turn on Wi-Fi(if necessary).2. Touch [ ] to enter WiFi setting menu.3. Touch an available WiFi hotspot.4. Touch [ Password ] and input the password,Visit WebsiteTo access the internet, you must setup “wireless & network” in system settings menu.Select [ ] on the main menu to view a website.Touch the dialog box on the upper side of the screen to show keypad. Input the website address, and touch [Go] to visit it. Drag the web page to scroll.E-mailSelect [Email] or other mail software on the applications menu.First you must setup an account, or sign into an existing account. Enter your Email address and password. Then you can send/receive E-mails through the unit.5. After successfully connected, the [ ]icon appears on the top right corner of themain menu . Now you can access internet.Other ModeNavigation OperationsTo navigate by the unit, simply select the desired navigation application on the main menu. Then navigate by the touch screen. AUX OperationsSelect [A/V In 1]/[A/V In 2] on the main menu to visit auxiliary device. File ExplorerSelect [File Explorer] on the applications menu The USB files and folders are in the folder named "external_usb".You can install applications and edit files/ folders.Select [EQ] on the menu to enter sound setting mode.Touch to select a preset EQ on upper side of , onhceT , k coR , r esU , poP , t a l F m o r f nee r c s eh tClassic, Jazz and Optimal.[ ]: When listening to music at low volumes, this featurewill selectively boost certain bass and treble frequencies.Touch [ ] to enter Fader/Balance/Subwoofer setting menu.Touch [ ] or [ ] to setup Balance, touch [ ] or [ ] to setup Fader. Sub woofer Level: Touch [ ] or [ ] to adjust subwoofer Level.Touch [“Speakers”] to enter the speaker setting menu (A): Touch to set A speakers On or Off(B): Touch to set B speakers On or Off(C): Touch to set C speakers On or OffNote: All three speakers sets can be On at the same time.Sound setting](https://usermanual.wiki/Magnadyne/M6-LCD/User-Guide-3118720-Page-24.png)
![2425System settingsDisplay System1. Touch the upper left corner to display main menu.2. Touch [ Settings ].The settings menu is displayed.3. Touch the upper left corner of the screen to exit.Adjust General Settings1. Touch [ General ].2. Touch to select a setting.3. Touch on the option to display/select an option.General settings Options DescriptionLighting You can select the key color.Customized See page 6 for reference.Radio region Select one that matches your location.Microphone Internal Internal microphone for Bluetooth calls.External External microphone for Bluetooth calls.Blackout Choose screen blackout off, 15s or 30s.Fast boot Choose fast boot off, 1 day , 3 days or 5 days.Beep On Turn on the beep sound. Each time you press a button, the unit beeps.Off Turn off the beep sound.Adjust Video Settings1. Touch [Video].2. Touch an option repeatedly to select.Video settings Opciones DescripciónVideo output NTSC/PAL Choose video output mode.Camera Settings Choose rear/left/right camera display mode.Adjust Time Settings1. Touch [ Time ].2. To setup Date & time.Adjust Volumes SettingsChoose input volume gain of each source. 1. Touch [Volumes].The volume setting sub-menu is displayed.2. Touch on a source, to assign value: 0 to 40.When switching to the source, the volume increases automatically.System settingsAdjust Disc Rating1. Touch [Disc].2. Touch an option repeatedly to select.DVD rating Options DescriptionAudio Select DVD audio language. Options available depending on DVD disc.Subtitle Select DVD subtitle language. Options available depending on DVD disc.Disk Menu Select DVD menu language. Options available depending on DVD disc.AgeControlKID SAF Acceptable for children.G Acceptable for general viewers.PG Parental guidance suggested.PG 13 Unsuitable for children under age 13.PGR Recommend parents to restrict viewing for children under 17 .RRestricted re parental guidance is advised for children under the age of 17 .NC17 Unsuitable for children under age 17.ADULT Acceptable for adults only.Parental Set password to restrict the play of discs. The default password is 000000.Network* For Wi-Fi settings, refer to “Internet”.PersonalTo setup Location access, Security, Language & input, Factory data reset, All data erase, Accounts, etc.DeviceTo setup Brightness, Storage, Apps.System settingsAccessibilityTo setup accessibility related applications.You need download a screen reader and establish an account.Software versionTo view software version information.UUID QR codeTo view UUID QR code information.](https://usermanual.wiki/Magnadyne/M6-LCD/User-Guide-3118720-Page-25.png)
![2425System settingsDisplay System1. Touch the upper left corner to display main menu.2. Touch [ Settings ].The settings menu is displayed.3. Touch the upper left corner of the screen to exit.Adjust General Settings1. Touch [ General ].2. Touch to select a setting.3. Touch on the option to display/select an option.General settings Options DescriptionLighting You can select the key color.Customized See page 6 for reference.Radio region Select one that matches your location.Microphone Internal Internal microphone for Bluetooth calls.External External microphone for Bluetooth calls.Blackout Choose screen blackout off, 15s or 30s.Fast boot Choose fast boot off, 1 day , 3 days or 5 days.Beep On Turn on the beep sound. Each time you press a button, the unit beeps.Off Turn off the beep sound.Adjust Video Settings1. Touch [Video].2. Touch an option repeatedly to select.Video settings Opciones DescripciónVideo output NTSC/PAL Choose video output mode.Camera Settings Choose rear/left/right camera display mode.Adjust Time Settings1. Touch [ Time ].2. To setup Date & time.Adjust Volumes SettingsChoose input volume gain of each source. 1. Touch [Volumes].The volume setting sub-menu is displayed.2. Touch on a source, to assign value: 0 to 40.When switching to the source, the volume increases automatically.System settingsAdjust Disc Rating1. Touch [Disc].2. Touch an option repeatedly to select.DVD rating Options DescriptionAudio Select DVD audio language. Options available depending on DVD disc.Subtitle Select DVD subtitle language. Options available depending on DVD disc.Disk Menu Select DVD menu language. Options available depending on DVD disc.AgeControlKID SAF Acceptable for children.G Acceptable for general viewers.PG Parental guidance suggested.PG 13 Unsuitable for children under age 13.PGR Recommend parents to restrict viewing for children under 17 .RRestricted re parental guidance is advised for children under the age of 17 .NC17 Unsuitable for children under age 17.ADULT Acceptable for adults only.Parental Set password to restrict the play of discs. The default password is 000000.Network* For Wi-Fi settings, refer to “Internet”.PersonalTo setup Location access, Security, Language & input, Factory data reset, All data erase, Accounts, etc.DeviceTo setup Brightness, Storage, Apps.System settingsAccessibilityTo setup accessibility related applications.You need download a screen reader and establish an account.Software versionTo view software version information.UUID QR codeTo view UUID QR code information.](https://usermanual.wiki/Magnadyne/M6-LCD/User-Guide-3118720-Page-26.png)