Maono Technology 21001 Mouse User Manual 2
Shenzhen Maono Technology Co., Ltd. Mouse 2
User Manual
Windows 2000/XP
Windows Vista
Windows 7/8/10
Mac OS X
Main Features:
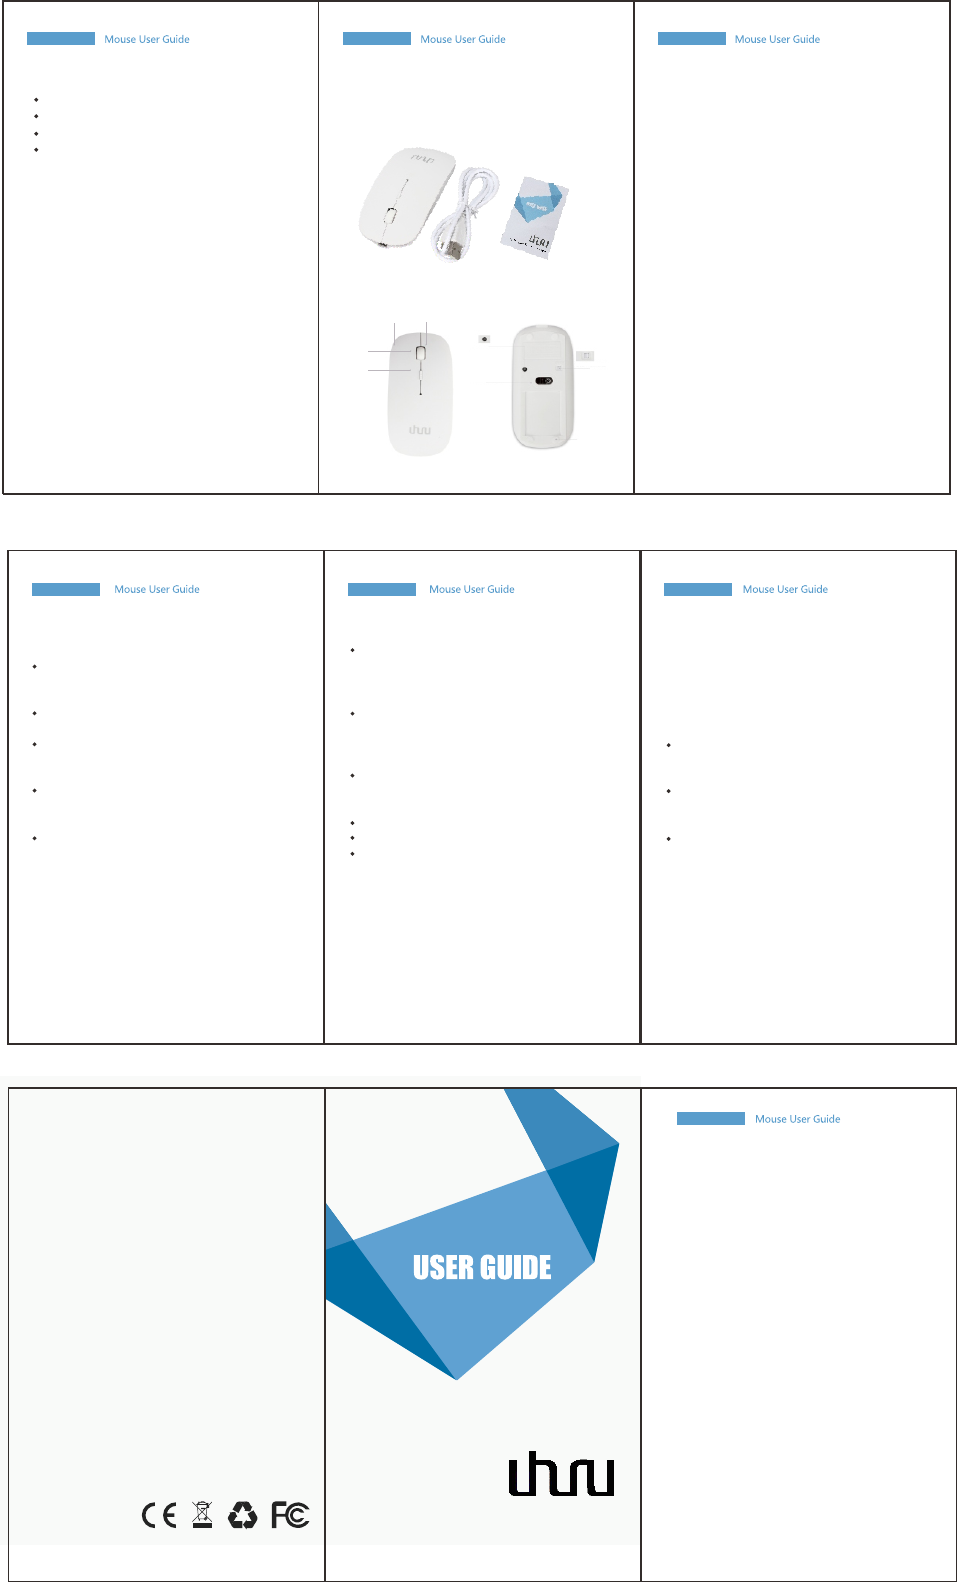
Package includes:
1 x Optical Bluetooth mouse
1 x Charge cable
1 x User manual
Instruction:
6.ID Button
7.LED Optical
Engine
5.ON/OFF
1.Left 2.Righ t
3.Wheel Click
4.DPI Button
2. The mouse cannot pair with computer?
Verify that your computer is Bluetooth
enabled. (has Bluetooth Function)
Verify that the pairing device is within range
(10 meter), and powered up , and then
attempt the connection again.
Delete all other Bluetooth devices
connection in My Bluetooth Places and pair
the mouse again.
Troubleshooting: 3. Bluetooth device doesn't work after computer
In the Device Manager, change the Bluetooth
wakes from sleep mode?
wireless adapter power settings:
1. Go to Control Panel > System and Security
> System > Device Manager
In Device Manager, expand Bluetooth
Radios, right-click on the Bluetooth wireless
adapter (ex. Dell Wireless 370 adapter), and
then click Properties.
In the Properties window, click the Power
Management tab and uncheck Allow the
computer to turn off this device to save power.
Click OK.
Restart your computer to apply the change.
The connection between the mouse and the
computer can be lost also for several reasons,
such as:
(1)Low battery power
(2)Using your mouse on metal surfaces
(3)Radio frequency (RF) interference from
other wireless devices, such as:
(1)Wireless speakers
(2)Computer power supplies
(3)Monitors
(4)Cell phones
(5)Garage door openers.
Try to rule out these and other possible
problem sources that might be affecting
your mouse.
Please move the mouse only on a dark,
smooth surface (e.g. A customary mouse
-pad), not on transparent materials like glass.
Please shut down the Bluetooth mouse if
the mouse will not be used for an extended
period of time.
The mouse buttons may be misaligned
during shipping, if you have trouble clicking,
try to adjust the mouse buttons by slightly
polling them upward and press them
backward.
Warnings:
Make sure you follow this instruction correctly.
Turn on the mouse again, and press the black
small match button (Button 6) before you try to
scan for the mouse on your computer.
1. The mouse cannot power on?
Make sure the batteries are charged.
1. Full charge is recommended before first use.
2. Charge with USB cable plugging to power
source or computer. Blue light means charging.
3. After full charge, unplug USB cable and turn
on Bluetooth of your PC.
4. Turn on the mouse (Button 5) and press the
black small connection ID button (Button 6) at
the bottom of the mouse until blue light blinks
which shows that the PC is ready to connect.
5. Click “Bluetooth Mouse” on your laptop/
desktop to connect to PC after the computer
finishes detecting the Bluetooth device, then
the setup is completed.
6. With Auto Stand-by and Sleep Mode, press
both mouse buttons (Button 1&2) and scroll
wheel (Button 3) simultaneously to set up when
it happens.
7. By activating DPI button, the mouse will
change tracking sensitivity from 1600 DPI to
800 DPI. (the default DPI is 1200)
Operating System:
- 3 levels of DPI 800/1200/1600
- Built-in software with interface that is
compatible with Bluetooth 2.0/3.0
- Frequency band: 2.4-2.4835GHz unlicensed
ISM band
- Receiving sensitivity: -75bm (Standard)
- RF output power: < 4bm (minimum radiates)
- Operation distance: 10 meter without
obstacle, or 8 meter
- Operating temperature: -10-55℃
- Humidity: 20%-50%
- Power Save Mode: The mouse will cut power
save mode if not used for about 8 minutes.
Wake it by pressing both mouse buttons
(Button 1&2) and scroll wheel (Button 3)
simultaneously. 8.Non Slip Mat
7
Uhuru Uhuru UhuruUhuruUhuru
Uhuru
UhuruUhuru
Mouse
1 2 3
654
7
Warning StatementWarning StatementWarning Statement
This equipment has been tested and found to comply with the
limits for a Class B digital device, pursuant to part 15 of
the FCC Rules. These limits are designed to provide reasonable
protection against harmful interference in a residential
installation. This equipment generates, uses and can radiate
radio frequency energy and, if not installed and used in
accordance with the instructions, may cause harmful interference
to radio communications. However, there is no guarantee that
interference will not occur in a particular installation.
If this equipment does cause harmful interference to radio or
television reception, which can be determined by turning the
equipment off and on, the user is encouraged to try to
correct the interference by one or more of the following measures:
Reorient or relocate the receiving antenna.
Increase the separation between the equipment and receiver.
Connect the equipment into an outlet on a circuit different
from that to which the receiver is connected.
Consult the dealer or an experienced radio/TV technician for help.
Caution: Any changes or modi?cations to this device not explicitly
approved by manufacturer could void your authority to operate
this equipment.
This device complies with part 15 of the FCC Rules. Operation
is subject to the following two conditions: (1) This device may
not cause harmful interference, and (2) this device must accept
any interference received, including interference that may cause
undesired operation.
The device has been evaluated to meet general RF exposure
requirement. The device can be used in portable exposure
condition without restriction.