Marelli Europe S p A GRG2501 GRG2501 User Manual Infotainment Marelli 952
Magneti Marelli S.p.A. GRG2501 Infotainment Marelli 952
Contents
- 1. User Manual
- 2. Warning Statements letter
User Manual

CONTENTS
INTRODUCTION . . . . . . . . . . . . . . . 3
TIPS, CONTROLS AND GENERAL
INFORMATION . . . . . . . . . . . . . . . . 4
TIPS . . . . . . . . . . . . . . . . . . . . . . . 4
MULTIMEDIA DEVICES: SUPPORTED
AUDIO FILES AND FORMATS . . . . . 4
NOTES ON TRADEMARKS . . . . . . . 5
EXTERNAL AUDIO SOURCES . . . . . 5
ANTITHEFT PROTECTION . . . . . . . 5
SOFTWARE UPDATES . . . . . . . . . . 5
MAP UPDATE . . . . . . . . . . . . . . . . 5
ASSISTANCE FOR USING THE
NAVIGATION SYSTEM . . . . . . . . . . 5
AUDIO SYSTEM . . . . . . . . . . . . . . 5
DISPLAY . . . . . . . . . . . . . . . . . . . . 6
GPS RECEPTION (Global Positioning
System) . . . . . . . . . . . . . . . . . . . . 6
IMPORTANT INFORMATION ON
COPYRIGHTS . . . . . . . . . . . . . . . . 7
CONTROLS . . . . . . . . . . . . . . . . . . . 8
CONTROLS ON TUNNEL . . . . . . . . 8
Tunnel control summary table . . . . . 8
CONTROLS ON STEERING
WHEEL . . . . . . . . . . . . . . . . . . . . . 11
DESCRIPTION . . . . . . . . . . . . . . . 11
CONTROLS ON STEERING WHEEL
SUMMARYTABLE . . . . . . . . . . . . 11
SWITCHING THE SYSTEM ON AND
OFF . . . . . . . . . . . . . . . . . . . . . . . . 13
RADIO (TUNER) MODE . . . . . . . . 13
RADIO MODE SELECTION . . . . . . 13
SELECTING A FREQUENCY
BAND . . . . . . . . . . . . . . . . . . . . . 14
DISPLAYED INFORMATION . . . . . 14
RADIO STATION SELECTION . . . . 14
PREVIOUS/NEXT RADIO STATION
FAST SEARCH . . . . . . . . . . . . . . 15
PREVIOUS/NEXT RADIO STATION
SEARCH . . . . . . . . . . . . . . . . . . 15
AM/FM RADIO STATION TUNING
. . . . . . . . . . . . . . . . . . . . . . . . . . 15
DAB RADIO . . . . . . . . . . . . . . . . . 15
SiriusXM™ RADIO . . . . . . . . . . . . 17
HD Radio™ TECHNOLOGY . . . . . . 17
SETTING THE PRESELECTIONS . . 17
AUDIO . . . . . . . . . . . . . . . . . . . . 17
MEDIA MODE . . . . . . . . . . . . . . . . 20
AUDIO SOURCE SELECTION . . . . 20
RESTARTOR PAUSE A TRACK (Play /
Pause) . . . . . . . . . . . . . . . . . . . . 20
TRACK CHANGE (previous/next) . 20
TRACK FAST FORWARD/REWIND
. . . . . . . . . . . . . . . . . . . . . . . . . . 21
TRACK SELECTION (Library) . . . . 21
TRACK INFORMATION DISPLAY . 21
RANDOM TRACK
REPRODUCTION . . . . . . . . . . . . . 21
Bluetooth
®
SOURCE . . . . . . . . . . . 21
PAIRING A Bluetooth
®
AUDIO
DEVICE . . . . . . . . . . . . . . . . . . . . 22
USB/iPod SUPPORT . . . . . . . . . . 22
USB/iPod MODE . . . . . . . . . . . . . 22
AUX SOURCE . . . . . . . . . . . . . . . . 23
PHONE MODE . . . . . . . . . . . . . . . . 24
PHONE MODE ACTIVATION . . . . . 24
MAIN FUNCTIONS . . . . . . . . . . . . 24
DISPLAYED INFORMATION . . . . . 25
PAIRING A MOBILE PHONE . . . . . 26
TRANSMISSION OF PHONE DATA
(PHONEBOOK AND RECENT
CALLS) .................... 26
CONNECTION/DISCONNECTION OF A
MOBILE PHONE OR A Bluetooth
®
AUDIO DEVICE . . . . . . . . . . . . . . 27
DELETION OF A MOBILE PHONE OR A
Bluetooth
®
AUDIO DEVICE . . . . . . 27
SETTING A MOBILE PHONE OR A
Bluetooth
®
AUDIO DEVICE AS
FAVOURITE . . . . . . . . . . . . . . . . . 28
DELETION OF PHONE DATA
(PHONEBOOK AND RECENT
CALLS) . . . . . . . . . . . . . . . . . . . . 28
MAKING A PHONE CALL . . . . . . . 28
MANAGING AN INCOMING CALL . 29
MAKING A SECOND PHONE
CALL ...................... 29
MANAGING TWO PHONE CALLS . 29
ENDING A CALL . . . . . . . . . . . . . . 29
CONTINUING A PHONE CALL . . . . 29
ACTIVATION/DEACTIVATION OF THE
MICROPHONE . . . . . . . . . . . . . . 30
NAVIGATION MODE . . . . . . . . . . . 30
SAFETY/LEGAL NOTICE . . . . . . . 30
ACTIVATE NAVIGATION . . . . . . . . 30
SET DESTINATION . . . . . . . . . . . . 31
RECENT DESTINATIONS . . . . . . . 32
FAVOURITE DESTINATIONS . . . . 32
POI DESTINATIONS . . . . . . . . . . . 32
ZOOM MAP . . . . . . . . . . . . . . . . . 32
1
Connect

EXPLORE MAP . . . . . . . . . . . . . . 32
LAUNCH NAVIGATION . . . . . . . . . 32
INTERRUPT NAVIGATION . . . . . . 33
VOLUME . . . . . . . . . . . . . . . . . . . 33
ROUTE MANAGEMENT . . . . . . . . 33
ROUTE PREVIEW . . . . . . . . . . . . 33
DRIVING VIEW . . . . . . . . . . . . . . . 34
ABOUT DRIVING VIEW . . . . . . . . 34
DRIVING VIEW . . . . . . . . . . . . . . 34
2D / 3D / AERIAL VIEWMAP DISPLAY
. . . . . . . . . . . . . . . . . . . . . . . . . . 34
LANE GUIDANCE . . . . . . . . . . . . . 35
DISPLAYED SYMBOLS . . . . . . . . 35
SETTINGS . . . . . . . . . . . . . . . . . . . 37
VOICE COMMANDS . . . . . . . . . . . 49
INTRODUCTION . . . . . . . . . . . . . 49
OPENING AND CLOSING VOICE
SESSIONS . . . . . . . . . . . . . . . . . 49
VOICE SESSION STATUS . . . . . . . 50
MULTIPLE CHOICE LIST . . . . . . . 50
VOICE COMMANDS - PRACTICAL
USE . . . . . . . . . . . . . . . . . . . . . . 51
RADIO AM/FM/DAB VOICE
COMMANDS . . . . . . . . . . . . . . . 52
MEDIA VOICE COMMANDS . . . . . 53
NAVIGATION VOICE
COMMANDS . . . . . . . . . . . . . . . . 54
PHONE VOICE COMMANDS . . . . . 55
CUSTOMER SERVICE NUMBER
LIST . . . . . . . . . . . . . . . . . . . . . . . 56
2
Connect

INTRODUCTION
The vehicle is equipped with a Connect system designed according to the specific features of the passenger compartment with a
customised design which matches the style of the dashboard and the central tunnel.
The system is installed in an ergonomic position for the driver and passenger, and controls can be quickly located from the graphical
display on the front, making the device easy to use.
To increase protection against theft, the system has a protection system which only allows it to be used on the vehicle in which it was
originally fitted.
The instructions for use are given below and we recommend you read them carefully and always keep them to hand (for example, in
the glove compartment).
Enjoy reading. Happy motoring!
3
Connect
TIPS, CONTROLS AND GENERAL
INFORMATION
TIPS
Road safety
Learn how to use the various system
functions before setting off.
Read the instructions for the system
carefully before setting off.
1) 2)
Reception conditions
Reception conditions change constantly
while driving. Reception may be
interfered with by the presence of
mountains, buildings or bridges,
especially when you are far away from
the broadcaster.
IMPORTANT The volume may be
adjusted when receiving traffic
information and news.
Care and maintenance
Observe the following precautions to
ensure the system is fully operational:
1) 2)
avoid hitting the display lens with
pointed or hard objects that could
damage its surface.
clean with a damp cloth (microfibre if
possible). If necessary, you can use a
delicate mild soap and water solution,
then dry with a soft, dry cloth. Do not
apply pressure to the display lens while
cleaning;
do not use alcohol, benzines and their
derivatives, ammonia, solvents or other
surfactants to clean the display lens;
prevent any liquid from entering the
system: this could damage it beyond
repair.
Important notes
In the event of an anomaly, the system
must only be checked and repaired by an
Alfa Romeo Dealership.
If the temperature is particularly low, the
display may take a while to reach
optimum brightness.
In case of overheating (e.g. excessive
outside temperature, prolonged
exposure to sunlight, etc.), the system
may switch to "protection mode" by
limiting amplification (maximum volume)
and even stopping operation until the
temperature of the radio drops to
acceptable levels.
MULTIMEDIA DEVICES: SUPPORTED
AUDIO FILES AND FORMATS
For USB sources the system can play
files with the following extensions and
formats:
.MP3 (Bitrate 32 – 320 kbps,
Frequency 8 – 48 kHz);
.WAV;
.AAC (Frequency 8 – 96 kHz);
Supported extensions: .ACC; .M4A;
.M4B; .MP4;
.WMA (Bitrate 8 – 320 kbps; 8 –
48 kHz);
.FLAC (8 – 44.1 kHz);
For all USB sources, the system can also
play the following Playlist formats:
.PLS;
.WPL;
.M3U.
For Apple devices and those that support
the MTP (Media Transfer Protocol), the
system can play back all file and playlist
extensions and formats supported by the
device itself and presented by the
device to the system.
NOTE It makes no difference whether the
suffixes are written in capital or small
letters.
4
Connect
NOTE It is recommended to load only
unprotected music files, with supported
extensions.
NOTES ON TRADEMARKS
iPod, iTunes and iPhone are registered
trademarks of Apple Inc.
All other trademarks are the property of
their respective owners.
Apple is not responsible for the operation
of this device and of its conformity with
the safety rules and standards.
EXTERNAL AUDIO SOURCES
Other electronic devices (e.g. iPod, PDA,
etc.) can be used on the vehicle.
Some of them may cause
electromagnetic interference however.
Disconnect these devices if the system
performance worsens.
IMPORTANT The system supports USB
formatted as FAT32, FAT16, ExFat,
NTFS, HFS+, UDF, ISO9660. The system
does not support devices with capacity
greater than 64 GB. The maximum
number of tracks which can be indexed
for each single MSD/MTP device is
16,000.
IMPORTANT The system does not
support USB hubs connected to the USB
port of the vehicle. Connect your
multimedia device directly to the USB
port, using the specific connection cable
for the device if necessary.
IMPORTANT It is recommended to load
only unprotected music files, with
supported extensions.
ANTITHEFT PROTECTION
The system is equipped with an anti-theft
protection system based on the
exchange of information with the
electronic control unit (Body Computer)
on the vehicle.
This guarantees maximum security and
prevents the system from being used
on other cars in the event of theft. If
necessary contact an Alfa Romeo
Dealership.
SOFTWARE UPDATES
As soon as update software for the
Connect system is available, you can
contact an Alfa Romeo Dealership to
perform the update.
MAP UPDATE
To update the maps, contact an Alfa
Romeo Dealership.
ASSISTANCE FOR USING THE
NAVIGATION SYSTEM
To display further information, go to the
www.tomtom.com/support website.
AUDIO SYSTEM
Basic level audio system
The "basic" audio system is equipped
with 8 speakers and it is able to develop a
sound power level of 100 Wfig. 1.
The basic system consists of:
4 Tweeters (2 on the front doors and
2 on the rear doors), 1.57 in (40 mm)
in diameter;
4 Woofers (2 on the front doors and
2 on the rear doors), 6.3 in (160 mm)
in diameter.
5
Connect
Sound Theatre system
(where provided)
The “average” audio system equipped
with 10 speakers with a 400 Wamplifier
fig. 2.
The system consists of:
4 Tweeters (2 on the front doors and
2 on the rear doors), 1.57 in (40 mm)
in diameter;
1 Midrange speaker (on dashboard) of
3.54 in (90 mm) in diameter;
4 Woofers (2 on front doors and 2 on
rear doors) of 6.3 in (160 mm) in
diameter;
1 Subwoofer, 7.1x10.6 in
(180x270 mm), on the parcel shelf;
1 8-channel Amplifier in the luggage
compartment.
Harman / Kardon Sound Theatre
system
(where provided)
The “high” audio system equipped with
14 speakers and a 900 Wamplifier fig. 3.
The system consists of:
4 Tweeters (2 on the front doors and
2 on the rear doors), 1.57 in (40 mm)
in diameter;
5 Midrange speakers (1 on the
dashboard, 2 on the front doors and 2 on
the parcel shelf), 3.15 in (80 mm) in
diameter;
4 Woofers (2 on front doors and 2 on
rear doors) 6.3 in (160 mm) in diameter;
1 Subwoofer, 7.1x10.6 in
(180x270 mm), on the parcel shelf;
1 12-channel Amplifier in the luggage
compartment.
DISPLAY
The system can be equipped with a 6.5"
or a 8.8" display.
GPS RECEPTION (Global Positioning
System)
The GPS is a satellite system which
provides worldwide information about
time and position. The GPS is exclusively
controlled by the government of the
United States of America, the only body
responsible for the availability and
accuracy of this system.
The operation of this navigation system
can be influenced by any change made
to the availability and precision of the
GPS or by specific environmental
conditions.
111026S0001EM 211026S0002EM 311026S0003EM
6
Connect
When navigation is started for the first
time, the system may require several
minutes to determine the GPS position
and display the current position on
the map. Afterwards the position will be
found much more quickly (usually a
few seconds are needed).
The presence of big buildings (or similar
obstacles) may sometimes interfere with
the GPS signal reception.
IMPORTANT INFORMATION ON
COPYRIGHTS
© 2006-2015 TomTom. All rights
reserved. This material is proprietary and
protected by copyright and/or by
database rights and/or other rights on
intellectual property of TomTom or of its
suppliers. The use of this material is
subject to the terms of a license contract.
Any unauthorised copy or disclosure of
this material constitutes a legally
prosecutable violation.
The software included in this product is
protected by copyright and its use is
authorised according to a LPG. A copy of
the license is available in the License
section. After the product has been sent,
the relevant source code can be
requested within three years. For further
information go to the tomtom.com/gpl
website or contact the nearest TomTom
customer service from the
tomtom.com/support website. A CD with
the corresponding source code will be
sent upon request.
Linotype, Frutiger and Univers are
trademarks of Linotype GmbH registered
in the US Patent and Trademark Office
and may be registered in certain
jurisdictions. MHei is a trademark of The
Monotype Corporation and may be
registered in certain jurisdictions.
Copyright ©2015. Magneti Marelli. All
rights reserved
Magneti Marelli is a registered
trademark of Magneti Marelli S.p.A..
The Alfa Romeo Giulia Infotainment
system is protected by copyright and/or
other intellectual property rights of
Magneti Marelli S.p.A. and/or its
suppliers and/or third parties.
Unauthorised use will be prosecuted.
Open source or proprietary modules,
components and/or libraries of suppliers
and/or third parties used by Magneti
Marelli are subject to the terms and
conditions of the respective licences.
WARNING
1) Follow the safety rules here below:
otherwise serious injuries may occur to the
occupants or the system may be damaged.
2) If the volume is too loud this can be
dangerous. Adjust the volume so that you
can still hear background noises (e.g. horns,
ambulances, police vehicles, etc.).
IMPORTANT
1) Only clean the front panel and the display
with a soft, clean, dry, anti-static cloth.
Cleaning and polishing products may
damage the surface. Do not use alcohol or
similar products to clean the panel or the
display.
2) Do not use the display as a base for
supports with suction pads or adhesives for
external navigators or smartphones or
similar devices.
7
Connect
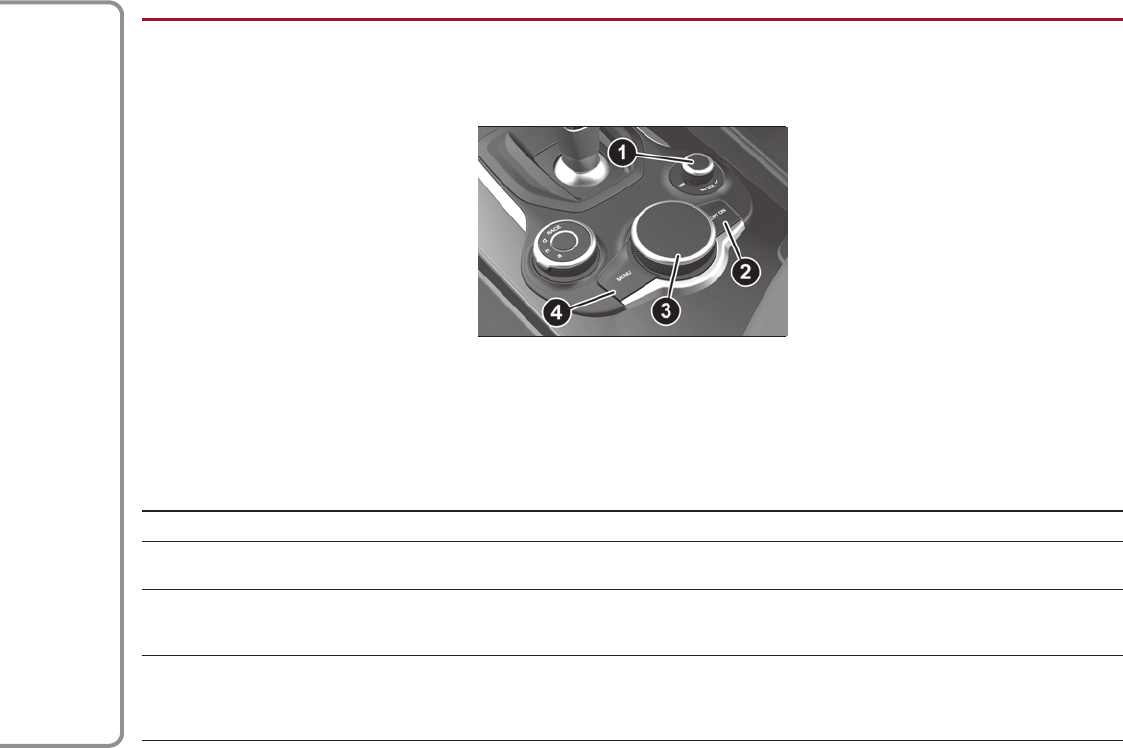
CONTROLS
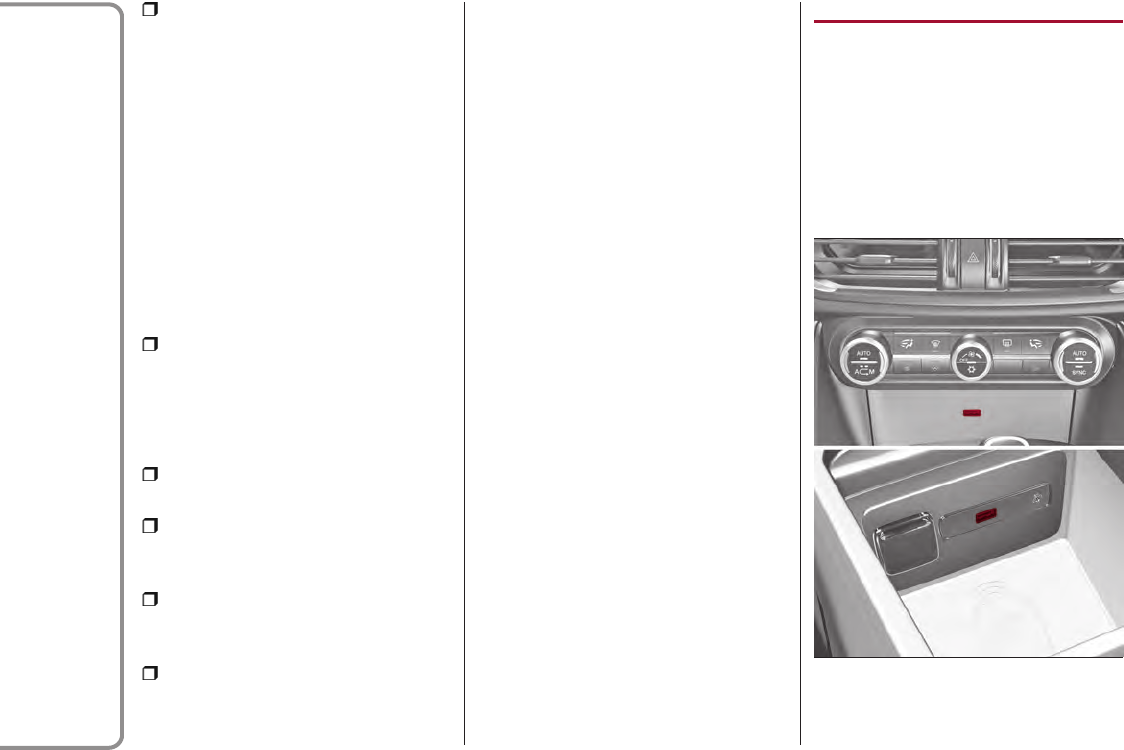
CONTROLS ON TUNNEL
Tunnel control summary table
ON/OFF control and Volume (1)
Action Function
LONG PRESS switches the Connect system on and off.
ROTATION clockwise to increase the volume, counter-clockwise to decrease the
volume.
SHORT PRESS
Switches the system on if it is off.
In Radio mode: activates/deactivates the Mute function.
In Media mode: activates play/pause.
MOVE TO THE SIDE
In Radio mode: to the right, selects the next radio station, to the left,
selects the previous radio station.
In Media mode: to the right, selects the next track, to the left, selects
the previous track.
411036S0015EM
8
Connect

OPTION button (2)
Pressing the "Option" button while within the modes (”RADIO”, “MEDIA”, “PHONE”, “NAVIGATION”) will open the "Settings" screen of
the concerned mode. Press it again to go back to the previously selected mode.
Rotary Pad (3)
Action Function
ROTATION Within the Menus: scrolls the menu items.
In Navigation mode (where provided): zoom function on the maps.
PUMP Within the Menus: confirms the selection.
BRIEF MOVEMENTTOTHE RIGHT
Within the Menus: accesses to the sub-menu of the selected function.
In Navigation mode (where provided), in the Explore map: to move to the
right on the map.
BRIEF MOVEMENTTOTHE LEFT
Within the Menus: returns to the previous menu; Esc function.
In Navigation mode (where provided), in the Explore map: to move to the
left on the map.
BRIEF UPWARD MOVEMENT
Within the Menus: enter the Multitasking menu and closes the
preselection bar.
In Navigation mode (where provided), in the Explore map: to move
upwards on the map.
BRIEF DOWNWARD MOVEMENT
Activates the radio preselection.
Within the Menus: enter the preselection bar and closes the
Multitasking menu.
In Navigation mode (where provided), in the Explore map: to move
downwards on the map.
9
Connect
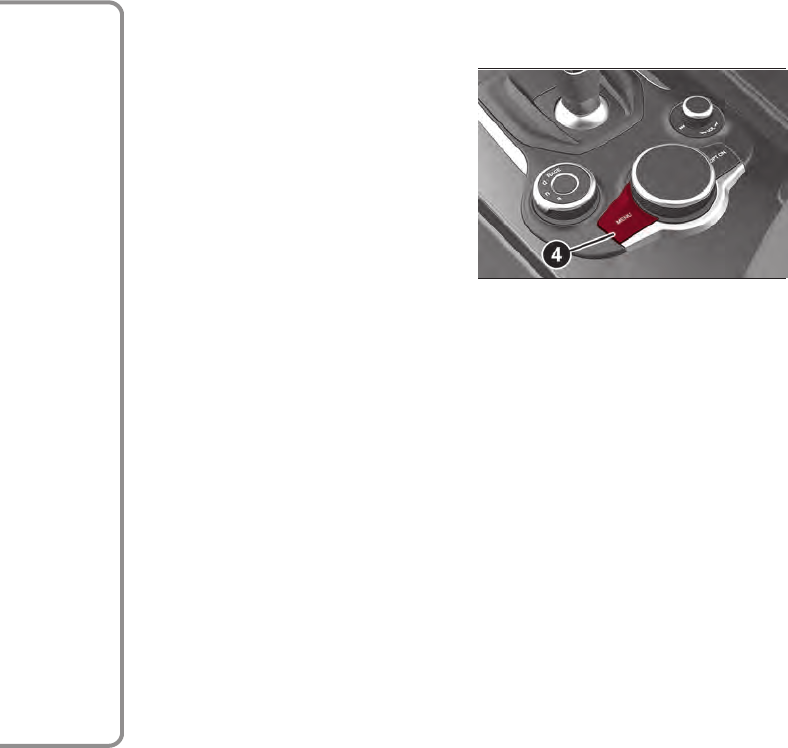
MENU button (4)
Opens the main menu.
511036S0060EM
10
Connect
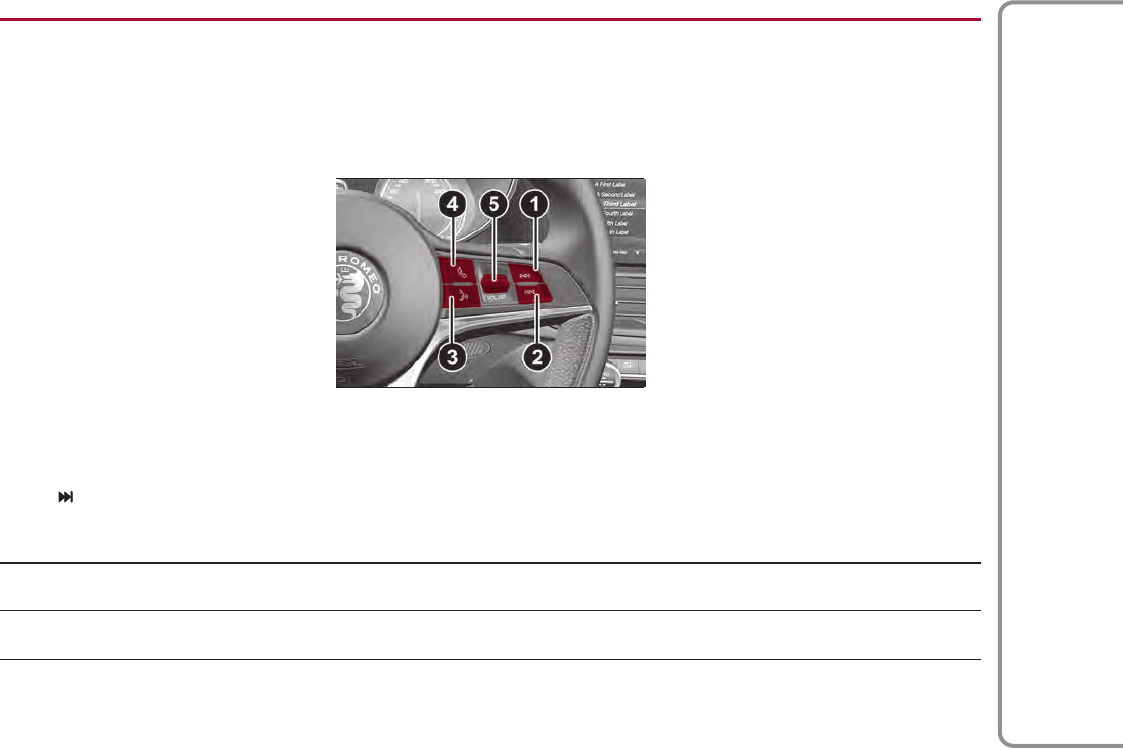
CONTROLS ON STEERING WHEEL
DESCRIPTION
The controls for the main system functions are present on the steering wheel to make control easier.
The activation of the function selected is controlled, in some cases, by how long the button is pressed (short or long press) as
described in the table below.
CONTROLS ON STEERING WHEEL SUMMARYTABLE
Button (1)
Action Function
SHORT PRESS In Radio mode: selects the next radio station.
In Media mode: selects the next track.
LONG PRESS In Radio mode: scan higher frequencies until released.
In Media mode: fast forward track.
611046S0001EM
11
Connect
Button (2)
Action Function
SHORT PRESS In Radio mode: selects the previous radio station.
In Media mode: selects the previous track.
LONG PRESS In Radio mode: scan lower frequencies until released.
In Media mode: fast rewind track.
Voice command button (3)
Action Function
SHORT PRESS Activate voice commands
LONG PRESS Close the voice session immediately.
Phone button (4)
Answers / closes call or shows the recent calls list.
Volume Control (5)
Action Function
ROTATION Upwards: increases the volume.
Downwards: decreases the volume.
SHORT PRESS
In Radio mode: activates/deactivates the Mute function.
In Media mode: activates play/pause.
In Phone mode: activates/deactivates the microphone Mute function.
12
Connect
SWITCHING THE SYSTEM ON
AND OFF
RADIO (TUNER) MODE
The system is switched on/off by
pressing the ON/OFF and Volume button
fig. 7.
The Connect system stores the last state
(on or off) in memory when the engine is
turned off. So the next time the engine
is started, the system will turn back
on automatically or will remain off
depending on its state the last time the
engine was turned off.
This setting can be changed by enabling
the "Automatic activation" function in the
"SETTINGS” menu.
The electronic volume adjustment
control turns continuously (360°) in both
directions, without stop positions.
Turn the control clockwise to increase the
radio volume or counter-clockwise to
decrease it.
The system is equipped with the
following tuners: AM, FM, DAB and
SiriusXM™ Satellite Radio (where
available).
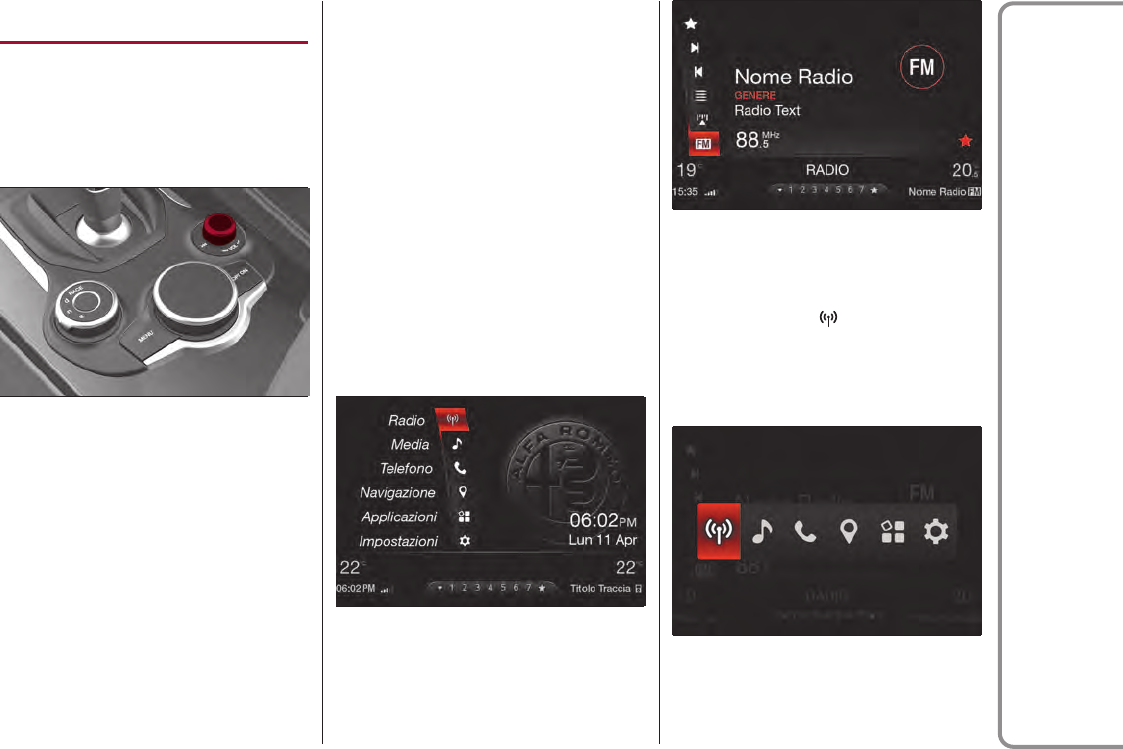
RADIO MODE SELECTION
To activate the "RADIO" mode, proceed
as described below; press the MENU
4 fig. 4 button to activate the main menu
fig. 8.
By turning and pressing the Rotary Pad 3
fig. 4, select and activate RADIO mode
fig. 9.
Or, in a menu, open the Multitasking menu
by moving the Rotary Pad upward, turn
it to select the logo fig. 10 and press
it to activate the function.
This procedure accesses the last screen
active on the previous access.
711056S0016EM
811056S0001EM
911056S0002EM
10 11056S0003EM
13
Connect
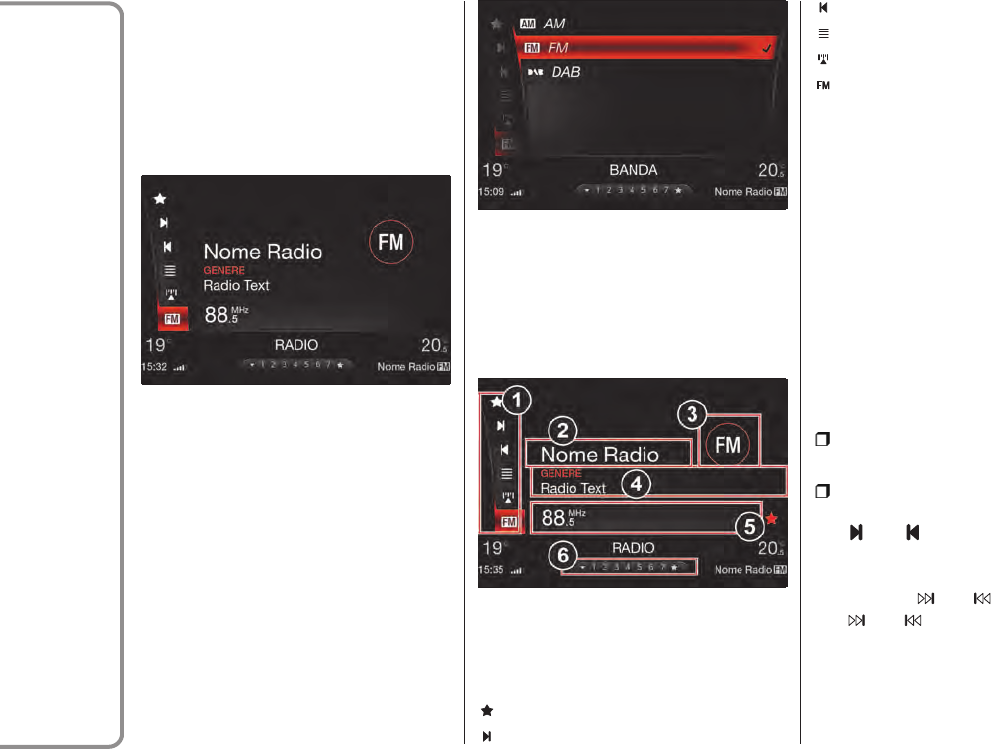
SELECTING A FREQUENCY BAND
Within the "RADIO" menu, select the
"Frequency Band" fig. 11 function by
rotating and pressing the Rotary Pad. The
available frequency bands can be
selected cyclically by pressing the Rotary
Pad.
The possible options are: AM, FM or DAB
or SiriusXM™ Satellite Radio (where
available). fig. 12.
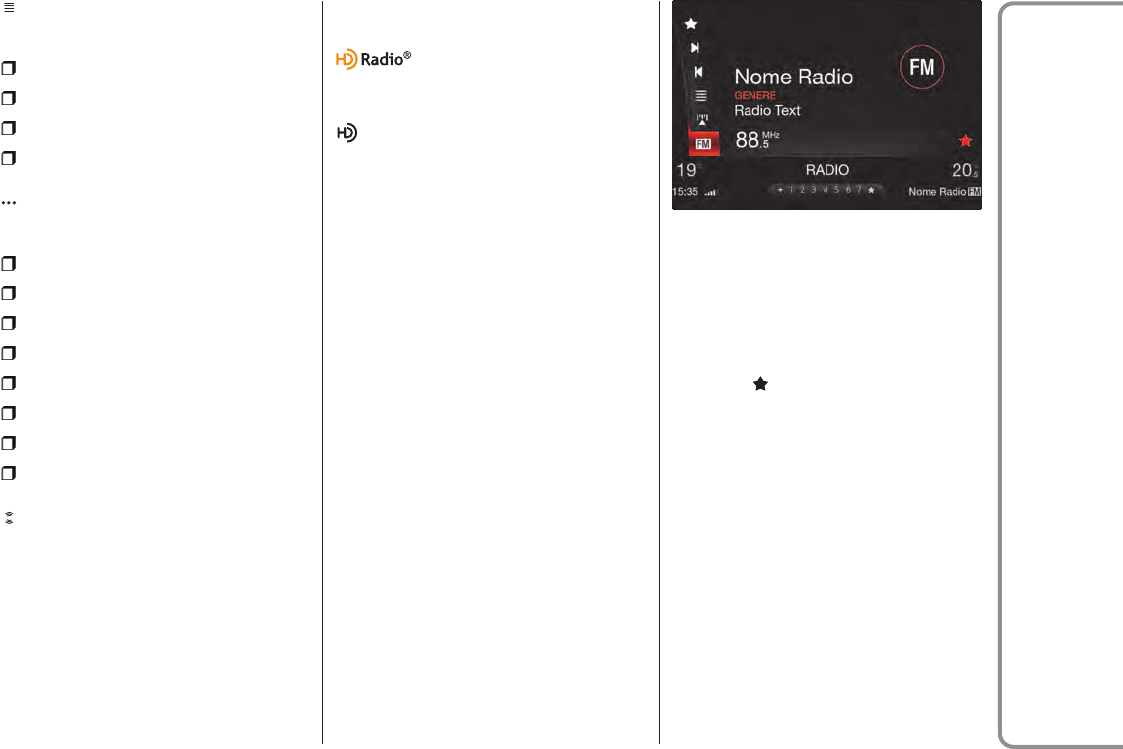
DISPLAYED INFORMATION
After the desired radio station is
selected, the following information is
shown on the display fig. 13:
In the central part:
1 - control bar:
FAVOURITES LIST
NEXT
PREVIOUS
STATIONS LIST
TUNER SEEK
FREQUENCY BAND
2 - name of the radio being played and the
favourite symbol if the station is store
in the list;
3 - logo of the active frequency band;
4 - transmitted programme type;
5 - current station frequency.
In the lower part:
6 - if the station has been stored, the
number of the preselection.
RADIO STATION SELECTION
You can search in the following ways:
Manually, using the control bar on the
Display;
Automatically, using the following
controls:
– and buttons on the control bar
on the display;
–by moving the volume control to the
positions and ;
– and buttons on the steering
wheel;
–by activating the favourite stations
list;
–by activating the stations list.
11 11056S0004EM
12 11056S0005EM
13 11056S0006EM
14
Connect
PREVIOUS/NEXT RADIO STATION FAST
SEARCH
To move within a frequency band, long
press the following controls:
Search next, push the ON/OFF and
Volume control to the right to or press
on the steering wheel, or use the
button on the display, which can be
selected and activated by turning and
pressing the Rotary Pad.
Search back, push the ON/OFF and
Volume control to the left to or press
on the steering wheel, or use the
button on the display, which can be
selected and activated by turning and
pressing the Rotary Pad.
PREVIOUS/NEXT RADIO STATION
SEARCH
Search next, briefly push the ON/OFF
and Volume control to the right to or
briefly press on the steering wheel, or
use the button on the display, which
can be selected and activated by turning
and pressing the Rotary Pad.
Search back, briefly push the ON/OFF
and Volume control to the left to or
briefly press on the steering wheel, or
use the button on the display, which
can be selected and activated by turning
and pressing the Rotary Pad.
When searching forwards, if the system
reaches the end of the band, it will
automatically stop on the station where
the search has started from.
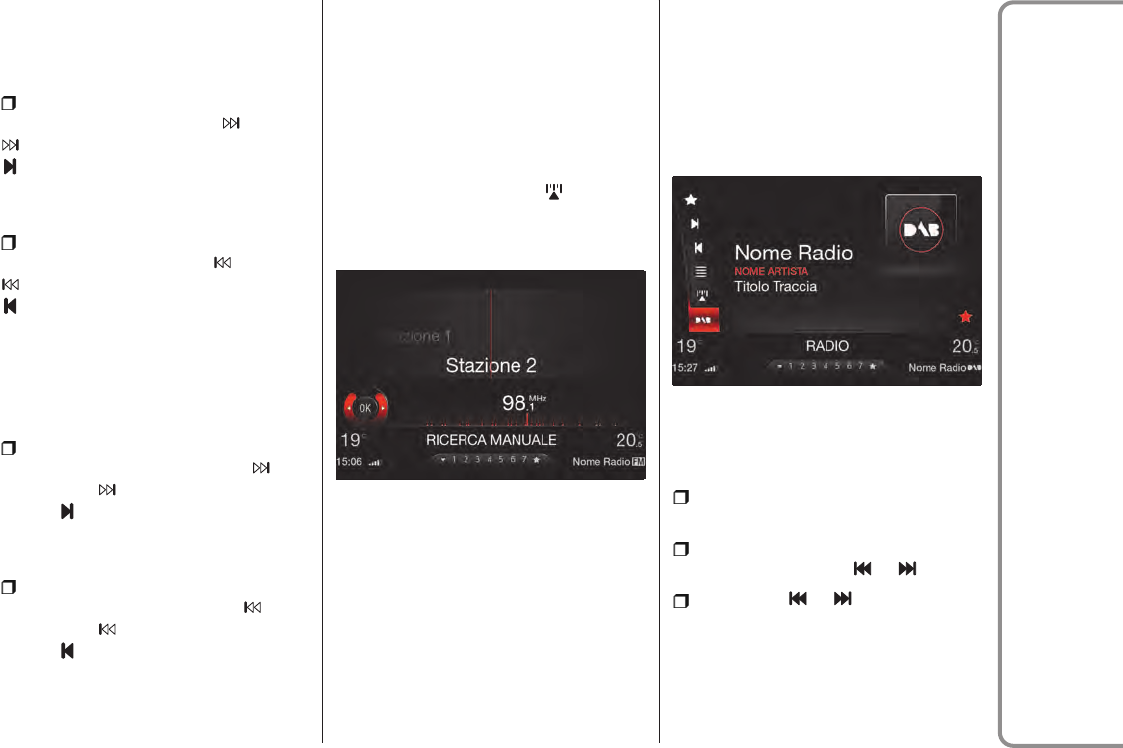
AM/FM RADIO STATION TUNING
Use the "Manual Search" function to
directly select a radio station. To activate
the function, select the icon on the
control bar of the display fig. 14, by
rotating and pressing the Rotary Pad.
Then turn the control to move on the
frequency bar.
DAB RADIO
(where provided)
Once the "DAB RADIO" mode on the
display is selected, the information on
the current services is displayed (see
fig. 15 ) and the following functions will
be available:
Selection of the previous/next radio
services by:
turning the Rotary Pad, with the
"search channels" function active;
Movement of the ON/OFF and Volume
control to the positions: or ;
pressing the or controls on the
steering wheel.
Holding down the buttons activates rapid
scrolling through the list of Services.
14 11056S0007EM
15 11056S0008EM
15
Connect
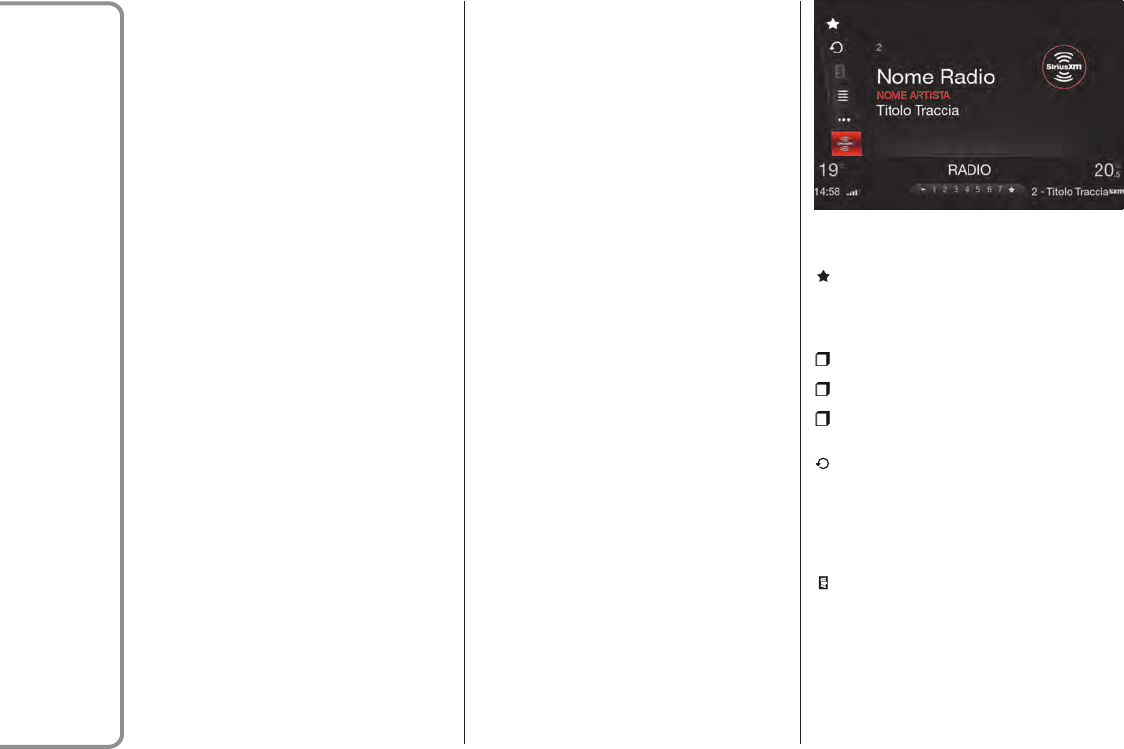
SiriusXM™ RADIO
(where provided)
The SiriusXM™ Satellite Radio uses a
direct satellite-receiver broadcast
technology to deliver clear digital sound
anywhere in the country.
Service subscription is provided by
SiriusXM™ Satellite Radio.
The service offers over 130 channels for
music, sports, news, entertainment and
children's programs directly from the
broadcast studios via satellite.
SiriusXM™ and all related trademarks
and symbols are the property of
SiriusXM™ Radio Inc. and its subsidiaries.
SiriusXM™ Radio requires a subscription,
sold separately after subscribing for
the trial period included in the purchase
of the vehicle (where available). Prices
and programs are provided by SiriusXM™
and are subject to changes. Subscriptions
are governed by the Terms and
Conditions available on the website
sirius.com/serviceterms. The SiriusXM™
Radio U.S. service is available only for
adults in the 48 contiguous United
States, DC and PR. Service available in
Canada. Go to www.siriuscanada.ca.
This functionality is only available for
radios with satellite receiver. To receive
the satellite radio signal, the vehicle must
be in an open space.
If the display shows Acquiring signal, it
could be necessary to change the vehicle
position to receive a signal. In most
cases, the satellite radio does not receive
a signal in underground parking lots or
tunnels.
No subscription
Radios with satellite receivers must be
subscribed to the SiriusXM™ Service.
Without the necessary subscription, the
only receivable channel is Traffic/
Weather.
SiriusXM™ Subscription
To activate the SiriusXM™ subscription
call the toll-free number of the Weather
channel. Then you will have to provide the
SiriusXM™ identification number (SID),
which can be found at the bottom of
the Channel 0 page.
After the "SiriusXM™ Satellite Radio"
mode has been selected, the following
functions will become available on the
display fig. 16:
Favourites
Allows you to access the following
options:
Manage favourites;
Favourite station 01;
Favourite station 0... .
Instant replay
allows you to store and play up to
22 minutes of music and up to
48 minutes of radio speech.
Go live
plays Live content.
16 11056S0017EM
16
Connect
Browse
you can access the following options:
Direct tuning;
Genre;
Channel 01;
Channel 0... .
More
you can access the following options:
"Main Favourites";
"Favourite Artists";
"Favourite Tracks";
"Games";
"Traffic and weather";
"Delete favourites";
"Subscription status";
"Excluded channels";
Siriusxm
Frequency band
allows you to access the various radio
frequency bands.
HD Radio™ TECHNOLOGY
(where provided)
The radio stations broadcast with the HD
Radio™ system are indicated by the
icon and operate on the AM and FM
bands.
This new transmission system offers
better sound quality than the traditional
one as well as the ability to convey
additional information such as the artist’s
name and the title of the track being
played.
SETTING THE PRESELECTIONS
The preselections are available in all
system modes, listed and accessible by
briefly touching the Rotary Pad
downwards.
If you are tuned to a radio station you
want to store, by turning the Rotary Pad,
select the desired preselection position
and holding the knob pressed.
Up to 5 preset stations can be viewed on
the system with 6.5” display and up to
7 can be viewed on the system with 8.8”
display fig. 0. To access the list of preset
stations directly from the preset bar,
select the icon and confirm with the
Rotary Pad.
The preset stored stations will be the
first ones displayed in the favourite
stations list.
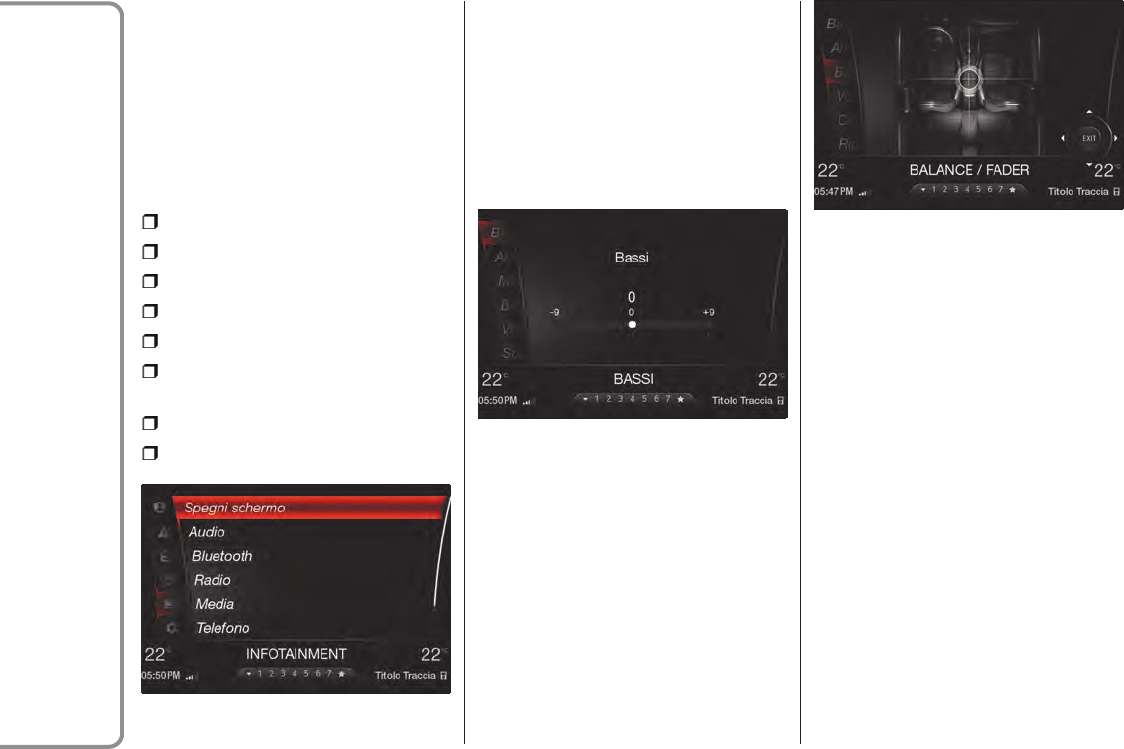
AUDIO
(where provided)
The "Audio" function can be found in the
Options menu, which is selected by
pressing the Option 2 button fig. 4.
To activate the function, select
and confirm it by turning and pressing the
Rotary Pad.
17 11056S0009EM
17
Connect
You can also access the
"Audio"fig. 18 function from the main
menu (MENU button) by selecting and
activating in sequence the functions
"SETTINGS", "Infotainment" and "Audio",
by rotating and pressing the Rotary
Pad.
When the function is activated, the
following parameters can be set:
"Bass" (-9; 0; +9);
"Treble" (-9; 0; +9);
"Mid" (-9; 0; +9);
“Balance/Fade”;
"Volume Speed" (OFF; +5);
“Surround Sound” (OFF/ON) (where
provided);
"AUXVolume Comp." (OFF; +20);
"Restore settings".
Bass/Treble/Medium
By turning and pressing the Rotary Pad,
select the function you wish to change
and set the parameter as desired using
the Rotary Padfig. 19.
The adjustment can be set to
19 positions: from -9 to +9, "0" is the
balanced position.
Balance/Fader
The adjustment can be set to
19 positions: from -9 to +9, "0" is the
balanced position.
By turning and pressing the Rotary Pad,
select the Balance/Fader function fig. 20.
This function allows you to adjust the
balance and fading of the sound coming
from the front and rear speakers. Adjust
the balance by turning the Rotary Pad,
when the desired position is reached,
store it by pressing the pad.
Volume/Speed
By turning and pressing the Rotary Pad,
select the Volume/Speed function fig. 21.
18 11056S0010EM
19 11056S0011EM
20 11056S0012EM
18
Connect
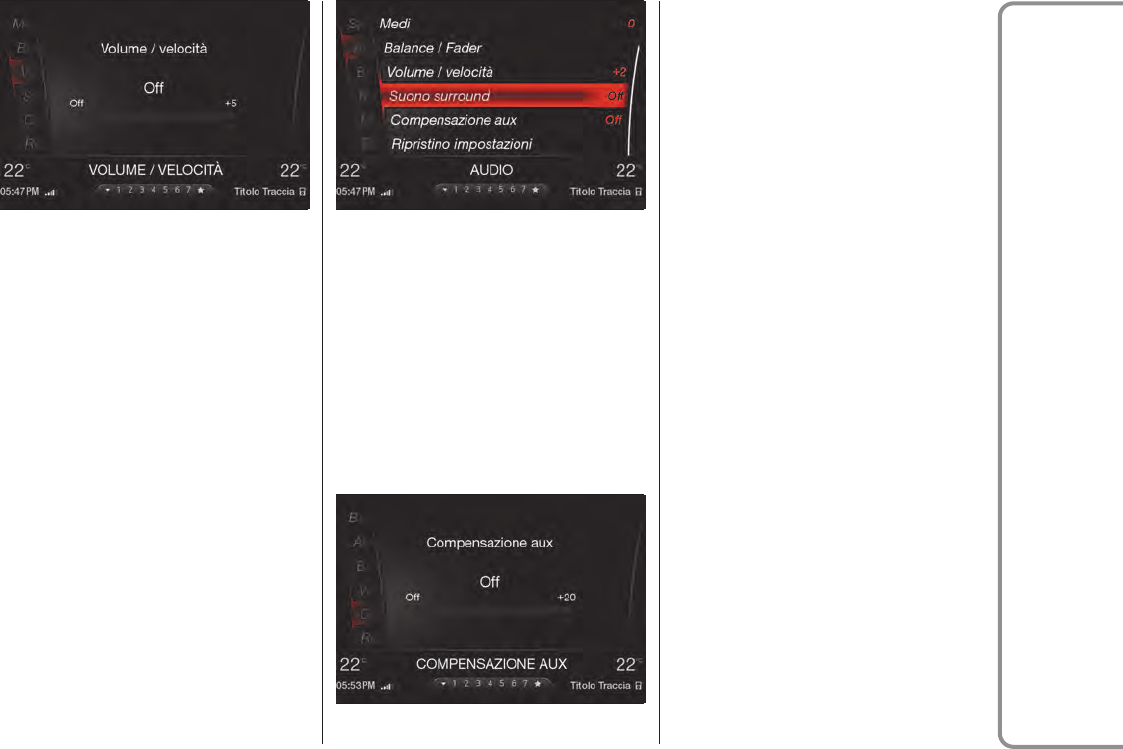
The adjustment can be set to 6 positions:
"off", system is turned off, and
5 sensitivity levels. The levels can be
selected by turning and pressing the
Rotary Pad.
Surround sound
(where provided)
By turning and pressing the Rotary Pad,
select the Sound Surround function
fig. 22.
This function provides the simulated
surround sound mode. To activate it, turn
the Rotary Pad to ON, then confirm by
pressing it.
AUX compensation
By turning and pressing the Rotary Pad,
select the AUX Compensation function
fig. 23.
This function allows the output volume
level of the connected device to be
compensated.
Restore Settings
By turning and pressing the Rotary Pad,
select the Restore Settings function.
This function deletes the current settings
and restores the factory settings.
21 11056S0013EM 22 11056S0014EM
23 11056S0015EM
19
Connect

MEDIA MODE
AUDIO SOURCE SELECTION
This chapter describes the interaction
modes concerning the operation of
Bluetooth®, AUX and USB/iPod.
Proceed as follows to activate the
"Media function":
press the MENU button fig. 4;
select "MEDIA" mode fig. 24 by turning
the Rotary Pad.
Press the Rotary Pad to activate the
mode fig. 25.
Or, in a menu, open the Multitasking menu
by moving the Rotary Pad upward, turn
it to select the logo fig. 26 and press
it to activate the function.
Within the "MEDIA" mode, rotate the
Rotary Pad until you select the desired
audio source among those available
(up to 2 USB devices, AUX and
Bluetooth® when a device is connected).
With the source activated, the display
shows the following control bar:
PLAY/PAUSE
NEXTTRACK
PREVIOUS TRACK
SHUFFLE MODE / PLAY MODE
TRACK LIBRARY
SOURCE
Going to the or control and moving
the Rotary Pad to the right, accesses
the currently playing Playlist.
RESTART OR PAUSE A TRACK (Play /
Pause)
To restart a track, when the external
device is connected, press the button.
To pause the track currently being
played, press the button.
TRACK CHANGE (previous/next)
To pass to the next track, push the
ON/OFF and Volume control to the right
or press the button on the steering
wheel, or use the control on the
display, which can be selected and
activated by rotating and pressing the
Rotary Pad.
24 11066S0001EM
25 11066S0002EM
26 11066S0003EM
20
Connect
To pass to the previous track, push the
ON/OFF and Volume control to the left or
press the button on the steering
wheel, or use the control on the
display, which can be selected and
activated by rotating and pressing the
Rotary Pad.
TRACK FAST FORWARD/REWIND
To move within a track, long press the
following controls:
To fast forward the track, push and
keep pushing the volume control to the
right or press the button on the
steering wheel, or use the control in
the control bar on the display, which
can be selected and activated by rotating
and pressing the Rotary Pad.
To rewind the track, push and keep
pushing the volume control to the left or
press the button on the steering
wheel, or use the control in the control
bar on the display, which can be selected
and activated by rotating and pressing
the Rotary Pad.
TRACK SELECTION (Library)
Use this function to scroll through
and select the tracks on the active
device.
On a USB/iPod device you can also scroll
through the list of artists, albums, tracks,
genres, composers, podcasts and audio
books stored on the device, depending on
the information present on the tracks.
NOTE The "Browse" button does not
allow any operation on the device
connected through the AUX jack.
Press the "Browse" button to activate
this function on the source being played.
Turn the Rotary Pad to select the desired
category and then press the Rotary Pad
to confirm the selection.
TRACK INFORMATION DISPLAY
If a USB/iPod or Bluetooth® device is
connected, it is possible to view
information about the current track,
depending on the information stored in
the tracks themselves.
If a device is connected to the AUX
socket, it is not possible to view any
information about the track.
RANDOM TRACK REPRODUCTION
Within the Media mode, activate the /
button, by rotating and pressing the
Rotary Pad, to play the tracks on the
USB/iPod or Bluetooth® (where
supported by the device) device in a
“random”/”defined” order.
Bluetooth
®
SOURCE
This mode is activated by pairing a
Bluetooth® device containing music
tracks with the system.
PAIRING A Bluetooth
®
AUDIO DEVICE
To pair a Bluetooth® audio device,
proceed as follows:
activate the Bluetooth® function on
the device;
from the main menu, activated by
pressing the MENU button, select the
"SETTINGS" function by rotating and
pressing the Rotary Pad;
select “Infotainment”;
select the Bluetooth® device;
select "Add device";
search for the Connect system on the
Bluetooth® audio device (during the
pairing stage a screen is displayed
showing the progress of the operation);
select the device to be paired;
when requested by the audio device,
enter the PIN code shown on the system
display or confirm on the device the
PIN displayed;
when the pairing procedure is
completed successfully, a dedicated
screen is displayed;
21
Connect
the Bluetooth® function can also be
found by pressing the OPTION button
within the "PHONE" or "MEDIA
functions", which can be selected from
the main menu, activated by pressing the
MENU button.
IMPORTANT If the Bluetooth®
connection between mobile phone and
system is lost, consult the mobile
phone handbook.
The following menu will appear on the
video once the telephone or device
is connected to the system via
Bluetooth®:
“priority device”: allows connection to
the selected device to be given priority
relative to other registered users.
The priority can be assigned on both the
"Audio" and "Phone” profiles.
“phone profile”: allows you manually
connect/disconnect the selected device;
"audio profile": allows you to
select/deselect the device connected as
the main device;
"personal data": allows you to
save/delete the personal data on the
device;
"delete device": allows you to delete a
device from the list of paired devices.
The configuration suggested by the
system can be changed in this menu. USB/iPod SUPPORT
USB/iPod MODE
To activate the USB/iPod mode insert the
corresponding device (USB or iPod) in
the USB ports located on the central
tunnel inside the storage compartment
below the front armrest and under the
climate control panel fig. 27.
27 11086S0001EM
22
Connect
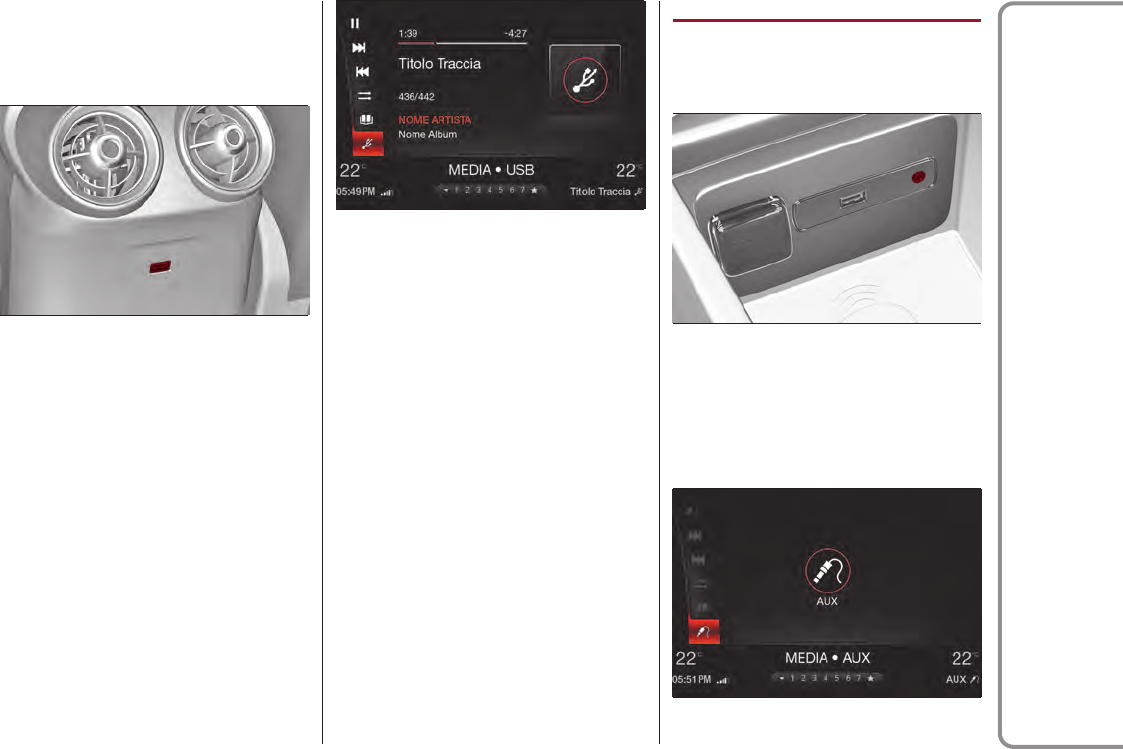
The car may be equipped with a third USB
port, located in the rear part of the
central tunnel. This port can only be used
for "battery charging"fig. 28.
After having inserted a USB/iPod device
while the system is on, activate “Media”
mode and press Play to start playback. To
play the tracks stored on the device
automatically, go to “SETTINGS”,
“Infotainment”, “Media” and “Autoplay”
fig. 29.
IMPORTANT After using a USB
recharging socket, we recommend
disconnecting the device (smartphone),
always removing the cable from the
vehicle socket first, never from the
device. Cables left flying or connected
incorrectly could compromise correct
recharging and/or the USB socket
condition.
AUX SOURCE
To activate AUX mode, insert an
appropriate device in the AUX socket on
the vehicle fig. 30.
When a device is connected that socket,
the system starts reproducing the AUX
source connected, if it is already being
played fig. 31.
28 11086S0002EM
29 11086S0003EM
30 11096S0001EM
31 11096S0002EM
23
Connect
Adjust the volume using the ON/OFF and
Volume control or using the volume
adjustment control on the connected
device.
If multiple external devices are
connected, to choose the device you wish
to activate, select the function "Audio
source selection"; for further information
see section "Media Mode".
IMPORTANT NOTES
The functions of the device connected
with the AUX socket are directly
managed by the device itself: it is not
possible to change track/folder/playlist
or control playing start/end/pause
with the controls on the steering wheel.
Do not leave the cable of your portable
player connected to the AUX socket after
disconnection, to avoid possible hiss
from the speakers.
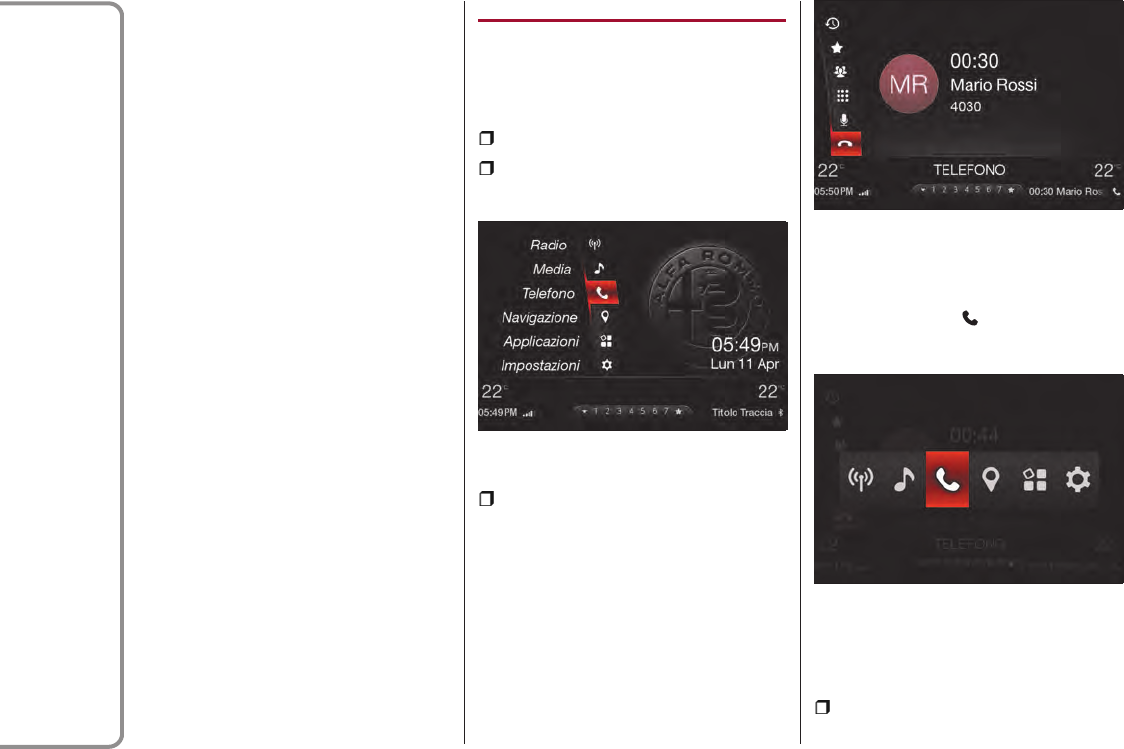
PHONE MODE
PHONE MODE ACTIVATION
Proceed as follows to activate "PHONE"
mode:
press the MENU 4 button fig. 4;
select "PHONE" mode by turning the
Rotary Pad fig. 32.
Activate "PHONE" mode by pressing
the Rotary Pad fig. 33.
Or, in a menu, open the Multitasking menu
by pushing the Rotary Pad upward, turn
it to select the logo fig. 34 and press
it to activate the function.
MAIN FUNCTIONS
When this mode is active, you can:
compose the phone number (using the
graphic keypad on the display);
32 11106S0001EM
33 11106S0002EM
34 11106S0003EM
24
Connect
display and call the contacts in the
mobile phone phonebook;
display and call contacts from the
registers of previous calls;
pair up to 10 phones/audio devices to
make access and connection easier and
quicker;
The mobile phone audio is transmitted
through the vehicle’s audio system;
the system automatically mutes the radio
when the PHONE function is used; the
microphones (voice commands) are
located near the sun visors fig. 35.
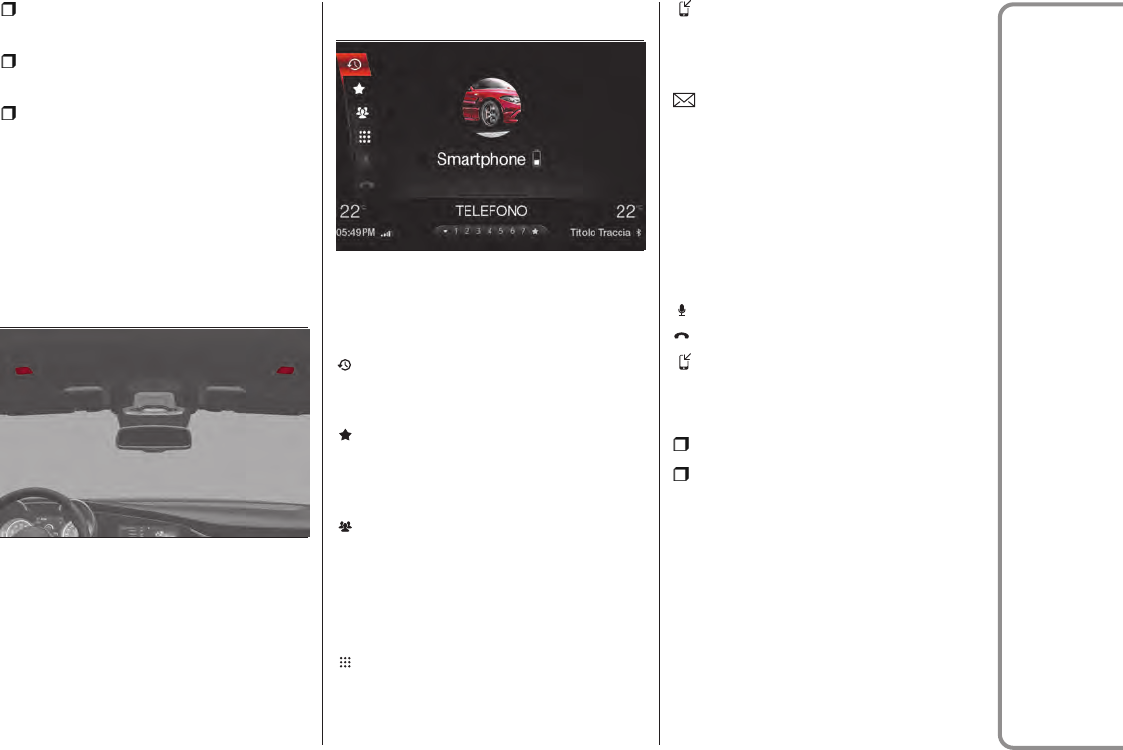
DISPLAYED INFORMATION
When a phone is connected to the
system, the display shows various
information (if available) fig. 36:
1 - network signal intensity;
2 - mobile phone battery charge;
3 - mobile phone name.
When the "PHONE" mode is active, the
display shows the following control bar:
Recent calls: by selecting this option,
you can choose between "all calls"
and "missed calls"
Favourites: by selecting this option,
you can choose between "manage
favourites", "add favourites", "sort
favourites" and "delete favourites"
Contacts: shows the list of all
contacts stored on the phone. When
you select a contact with the Rotary
Pad, the phone number and the photo
(if any) linked to the contact appear
on the right of the display.
Dial: selecting this option opens the
"Dial number" screen where you
can dial the number directly by
rotating and pressing the Rotary Pad.
Transfer to device: by selecting this
option during an active call, the call is
switched to the portable device
and vice versa.
Text: this is used to receive and send
text messages (if supported by the
device). The car must be stationary
to read the messages. The listening
function and the sending of default
messages which can be customised
by the user is always possible.
During a call, the following options are
enabled:
Disable microphone;
End call;
Transfer to device.
If you receive or make another call during
a call, the following options are enabled:
"Transfer Call";
"Join Calls".
To consult the list of mobile phones and
supported functions, call Customer
Service on 00 800 2532 0000
(Quadrifoglio 00 800 253 242 00) (the
number may vary depending on the
country: please refer to the reference
table in the "Customer Service number
list" section herein).
35 11106S0004EM
36 11106S0005EM
25
Connect

PAIRING A MOBILE PHONE
IMPORTANT Only do this with the vehicle
stationary and in safe conditions. The
feature is disabled when the car is
moving faster than 5 km/h (3 mph).
The pairing procedure for a mobile phone
is described below: always consult the
handbook for the mobile phone in any
case.
To pair the mobile phone, proceed as
follows:
activate the Bluetooth® function on
the device;
from the main menu, activated by
pressing the MENU button, select the
"SETTINGS" function by turning and
pressing the Rotary Pad;
select “Infotainment”;
select the Bluetooth® device;
select "Add device";
search for the Connect system on the
Bluetooth® audio device (during the
pairing stage a screen is displayed
showing the progress of the operation);
select the device to be paired;
when requested by the audio device,
enter the PIN code shown on the system
display or confirm on the device the
PIN displayed;
when the pairing procedure is
completed successfully, a dedicated
screen is displayed;
the Bluetooth® function can also be
found by pressing the OPTION button
within the "PHONE" or "MEDIA
functions", which can be selected from
the main menu, activated by pressing the
MENU button.
IMPORTANT If the Bluetooth®
connection between mobile phone and
system is lost, consult the mobile
phone handbook.
The following menu will appear on the
video once the telephone or device
is connected to the system via
Bluetooth®:
“priority device”: allows connection to
the selected device to be given priority
relative to other registered users.
The priority can be assigned on both the
"Audio" and "Phone” profiles.
“phone profile”: allows you manually
connect/disconnect the selected device;
"audio profile": allows you to
select/deselect the device connected as
the main device;
"personal data": allows you to
save/delete the personal data on the
device;
"delete device": allows you to delete a
device from the list of paired devices.
NOTE After updating the phone software,
for proper operation, it is recommended
to remove the phone from the list of
devices linked to the radio, delete the
previous system pairing also from the list
of Bluetooth® devices on the phone and
make a new pairing.
TRANSMISSION OF PHONE DATA
(PHONEBOOK AND RECENT CALLS)
The system can transmit phone data
(phonebook and recent calls) from the
phonebook via Bluetooth® automatically
when the device is connected.
This setting can be modified at any time
in the Bluetooth® menu.
After the first phone data transfer, the
procedure for transmitting and updating
the phonebook (if supported) starts
whenever the phone is reconnected to
the system.
Whenever a mobile phone is connected to
the system, a maximum of
2000 numbers can be downloaded and
updated for each phone.
26
Connect
Depending on the amount of items
downloaded from the phonebook, a slight
delay can occur before the last names
downloaded can be used. Up to then the
phonebook downloaded previously (if
present) will be available.
Only the phonebook of the mobile phone
currently connected to the system can
be accessed.
The phonebook downloaded from the
mobile phone can neither be modified nor
be deleted through the Connect system:
changes will be transmitted and updated
in the system when the mobile phone is
connected again.
CONNECTION/DISCONNECTION OF A
MOBILE PHONE OR A Bluetooth
®
AUDIO DEVICE
Connection
The system connects automatically to
the paired mobile phone with the highest
priority.
To select a mobile phone or a specific
Bluetooth® audio device, proceed as
follows:
activate the Bluetooth® function on
the device;
from the main menu, activated by
pressing the MENU button, select the
"SETTINGS" function by turning and
pressing the Rotary Pad;
select “Infotainment”;
select the Bluetooth® device;
select "Add device";
select the "Paired Phones" or "Paired
Audio" list using the corresponding
button on the display;
select the specific device (mobile
phone or Bluetooth® device);
select "Connect";
during the connection stage a screen is
displayed showing the progress of the
operation;
the device connected is highlighted in
the list with priority order.
NOTE The priority is determined
according to the order of connection for
mobile phones which are not set as
favourites. The last phone connected will
have the highest priority.
Disconnection
To disconnect a specific mobile phone or
Bluetooth® audio device, proceed as
follows:
from the main menu, activated by
pressing the MENU button, select the
"SETTINGS" function by turning and
pressing the Rotary Pad;
select “Infotainment”;
select the Bluetooth® device;
select the specific device (mobile
phone or Bluetooth® device);
select “Delete Device”.
DELETION OF A MOBILE PHONE OR A
Bluetooth
®
AUDIO DEVICE
To delete a mobile phone or a Bluetooth®
audio device from a list, proceed as
follows:
from the main menu, activated by
pressing the MENU button, select the
"SETTINGS" function by turning and
pressing the Rotary Pad;
select “Infotainment”;
select the Bluetooth® device;
select the specific device (mobile
phone or Bluetooth® device);
select “Remove device”;
a confirmation screen will appear on
the display: press "Yes" to delete the
device or "No" to cancel the operation.
27
Connect
SETTING A MOBILE PHONE OR A
Bluetooth
®
AUDIO DEVICE AS
FAVOURITE
To set a mobile phone or Bluetooth®
audio device as main device, proceed as
follows:
from the main menu, activated by
pressing the MENU button, select the
"SETTINGS" function by turning and
pressing the Rotary Pad;
select “Infotainment”;
select the Bluetooth® device;
select the device in the paired device
list;
Select “phone profile” or “audio
profile”;
set as “Main”.
DELETION OF PHONE DATA
(PHONEBOOK AND RECENT CALLS)
Proceed as follows to delete the phone
data (phonebook and recent calls):
First procedure
Press the MENU button, turn and
press the Rotary Pad and select
the "SETTINGS" function;
select “Infotainment”;
select the Bluetooth® device;
select the device in the paired device
list;
select “Personal data”;
select “Not stored”.
Second procedure
Press the MENU button, turn and
press the Rotary Pad and select
the "SETTINGS" function;
select “Infotainment”;
select “System”;
select “Clear personal data”.
NOTE This procedure deletes all the data
downloaded from the connected device.
MAKING A PHONE CALL
The operations described below can only
be accessed if supported by the mobile
phone in use.
For all functions available, refer to the
mobile phone owner's handbook.
With the PHONE function on, you can
make a call in the following ways:
selecting “Phonebook” or “Recent
Calls” on the display command bar;
then selecting a contact from the list;
or
selecting “Dial” on the display
command bar
Dialling the phone number using the
"keyboard" icon on the display
Enter the phone number using the graphic
keypad displayed.
Proceed as follows:
Press the MENU button, turn and
press the Rotary Pad and select
the "PHONE" function;
On the round keyboard, compose the
number by rotating and pressing the
Rotary Pad;
Select "Compose";
When you have composed the number,
select "confirm".
Dialling the phone number using the
mobile phone
It is possible to dial a phone number with
the mobile phone and continue using
the system (never allow yourself to be
distracted while driving).
When a phone number is dialled with the
keypad of the mobile phone, the audio
of the call is played over your vehicle's
sound system.
28
Connect

Recent calls
The list of the last calls made for each of
the following call types can be displayed:
"Missed calls";
"ALL CALLS";
To access these lists, select "Recent
Calls" on the Phone menu main screen.
MANAGING AN INCOMING CALL
Call controls
The buttons on the display allow the
following phone call functions to be
managed:
"Answer";
"Ignore";
"Reject";
Answer a call
When a phone call is received on the
mobile phone, the system deactivates
the audio system (if active) and displays a
screen.
Press the "Answer" button or the button
on the steering wheel controls to
answer
Rejecting a call
To reject a call, press the "Ignore" or
“Reject” graphic button on the display.
Answering an incoming call during
a conversation
To answer an incoming call whilst another
phone conversation is in progress, select
"Answer" to put the ongoing call on
hold and answer the new incoming call.
IMPORTANT Not all mobile phones may
support the management of an incoming
call when another phone conversation
is active.
MAKING A SECOND PHONE CALL
When a phone conversation is active, a
second phone call can be made as
follows:
from the main menu, activated by
pressing the MENU button, select the
"PHONE" function by rotating and
pressing the Rotary Pad;
select “Phone Book” or “Recent Calls”;
select a contact from the list.
The first call is automatically put on hold
and the second call is activated.
MANAGING TWO PHONE CALLS
If two calls are in progress (one active
and one on hold), it is possible to switch
between them by selecting "switch calls"
or merge the two calls in a conference
by selecting "merge calls".
Check whether the telephone in use
supports the management of a second
call and the "Merge calls" mode.
ENDING A CALL
Press the "End" button or the button
on the steering wheel controls to end
a call in progress.
Only the ongoing call is ended and any call
on hold becomes the new active call.
Depending on the type of mobile phone, if
the ongoing call is ended by the caller,
the call on hold may not be activated
automatically.
CONTINUING A PHONE CALL
After the engine is switched off, it is still
possible to continue a phone call.
The call can be closed manually, or
continue up to a maximum time
of 20 minutes, after which the system
turns off and the call is transferred to the
phone.
29
Connect
ACTIVATION/DEACTIVATION OF THE
MICROPHONE
During a call the microphone can be
deactivated by selecting "deactivate
microphone" or by pressing the "Mute"
button on the display.
When the microphone is deactivated it is
still possible to listen to the call in
progress.
To reactivate the microphone, choose the
corresponding control.
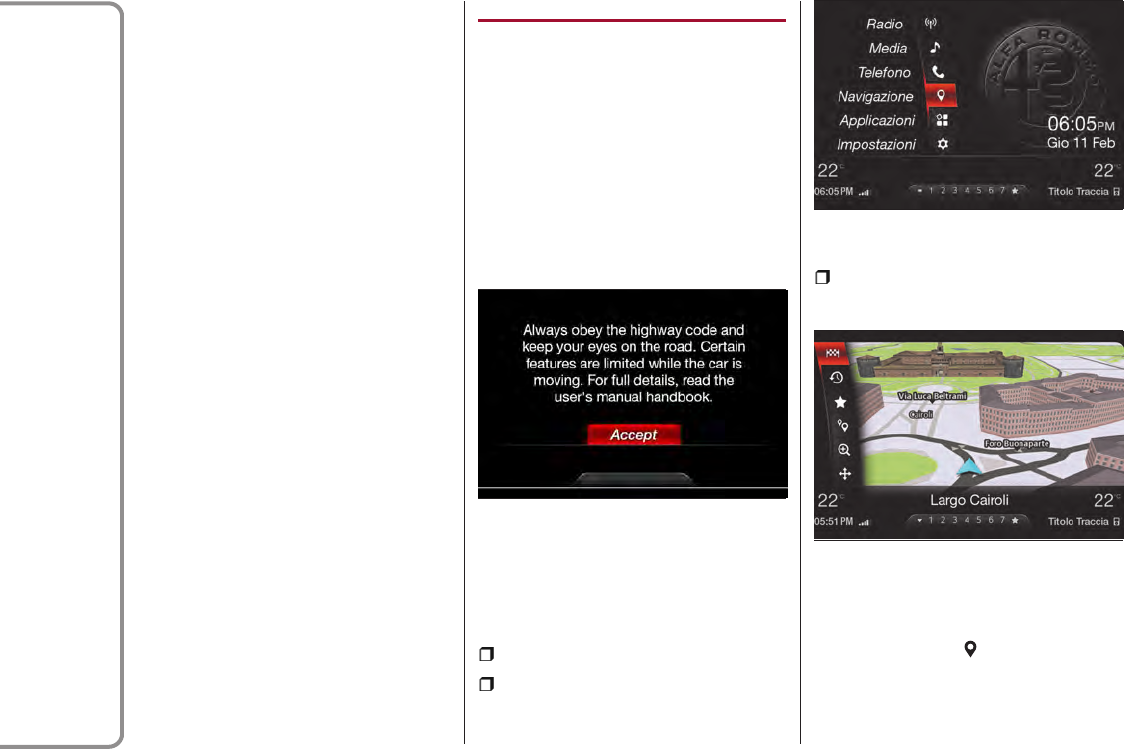
NAVIGATION MODE
(where provided)
SAFETY/LEGAL NOTICE
When the system is used for the first
time, after resetting the default settings
and having changed the language, the
system will ask you to accept a
safety/legal notice, fig. 37, warning you
about the responsibilities involved in
the product use while navigating.
ACTIVATE NAVIGATION
Proceed as follows to activate
"NAVIGATION" mode:
press the MENU 4 button fig. 4;
select "NAVIGATION" mode fig. 38 by
turning the Rotary Pad.
Press the Rotary Pad to activate the
mode fig. 39.
Or, in a menu, open the Multitasking menu
by pushing the Rotary Pad upward, turn
it to select the logo fig. 40 and press
it to activate the function.
37 11186S0001EM
38 11186S0002EM
39 11186S0003EM
30
Connect
The following controls are available
within the navigation mode:
When a destination is NOT set
"Set destination";
"Recent destinations";
"Favourite destinations";
“Points of interest”;
"Zoom";
"Explore map".
The controls can be selected by turning
and pressing the Rotary Pad.
SET DESTINATION
To set a new destination, select and
activate the "Set Destination" control
by turning and pressing the Rotary
Pad.
The following menu items can be found
here:
"Country": enter the name of the
country where the arrival point of the
new destination is;
"State" (where available): enter the
name of the state where the arrival point
of the new destination is;
"City/ZIP code": enter the name or ZIP
code of the city where the arrival point
of the new destination is;
"Street": enter the street name of the
new destination;
"Street number": enter the street
number of the new destination;
"Start navigation": once the desired
destination has been set, select "Start
navigation" by pressing the Rotary Pad.
To enter the address, rotate and press
the Rotary Pad to select the item you
wish to add (Country, City, etc.) on the
round keyboard fig. 41, by rotating and
pressing the Rotary knob, select the
characters to compile the desired name;
as you enter the letters, the system
will automatically complete the word and
suggest, on the right of the display, a
list of options consistent with the
characters you have entered. You will
now be able to complete the word or
move to the list of suggestions offered
by moving the Rotary Pad to the right, or
go to "OK" and press the Rotary Pad.
When you have set the desired
destination, select "Start navigation"
40 11186S0004EM
41 11186S0005EM
31
Connect
RECENT DESTINATIONS
To set a destination from Recent
Destinations, select and activate the
"Recent Destinations" control by
turning and pressing the Rotary Pad.
The following menu items can be found
here:
"Recent destinations management":
within this option, you can add to
favourites, remove a destination and
delete recent destinations;
"Recent destination 01";
"Recent destination 02";
"Recent destination ......";
After selecting the recent destination, to
start the navigation, select and activate
the "Start navigation" function by turning
and pressing the Rotary Pad.
FAVOURITE DESTINATIONS
This function, which can be activated by
rotating and pressing the Rotary Pad,
allows you to choose an address from the
list of "Favourite Destinations" .
The following menu items can be found
here:
"Favourite destinations management":
within this option, you can add
favourites, change the home address and
delete favourite destinations;
"Home": choosing this option will set
the navigation to the "home address" set
in "Favourite destinations management";
"Favourite destination 01";
"Favourite destination 02";
"Favourite destination ......";
After selecting the recent destination, to
start the navigation, select and activate
the "Start navigation" function by turning
and pressing the Rotary Pad.
POI DESTINATIONS
This function allows you to reach points
of interest or add them to the set route.
You can select them from a list.
Within each POI list there is an option to
select all POIs related to that group.
For each single POI, you can also search
by address.
ZOOM MAP
To access the “Zoom” function, select
it by turning the Rotary Pad and press
the Rotary Pad to activate. Rotate the
Rotary Pad clockwise to zoom in or
anticlockwise to zoom out.
EXPLORE MAP
To access the “Explore map” function,
select it by turning the Rotary Pad and
press the Rotary Pad to activate. Push
the Rotary Pad towards the four
directions to move within the map.
Rotate the Rotary Pad clockwise to zoom
in or anticlockwise to zoom out.
To access the commands that appear on
the screen (e.g. "Exit Points On Map
View"; "Continue Viewing Points On Map";
"Navigate to This Point") press the
Rotary Pad.
LAUNCH NAVIGATION
After setting the destination by using one
of the three available options ("Set
destination"; "Recent destinations" or
"Favourite destinations"), start the
navigation by selecting "Launch
navigation".
Display commands with navigation on
X
"Interrupt navigation";
32
Connect

“Navigation volume”;
"Route management";
"Route preview";
"Zoom";
"Explore map".
INTERRUPT NAVIGATION
After starting the navigation, you can
interrupt it. To access the “Stop
Navigation” X, function, select it by
turning the Rotary Pad and pressing it to
activate. Confirm again to interrupt
the navigation.
VOLUME
To access the “Volume” function,
select it by turning the Rotary Pad and
press the Rotary Pad to activate. You can
set the volume of the navigation
messages using the Rotary Pad.
ROUTE MANAGEMENT
To access the “Edit Route” function,
select it by turning the Rotary Pad and
press the Rotary Pad to activate.
With this function, you can add
specifications and improve the route
choice. The possible options are:
Add new destination
This allows you to add a new destination;
the entry method is the same as that
described in the "Set destination"
paragraph. After having completed the
entry, confirm the action by selecting the
“Add to current trip” option;
Add Recent Destination
This allows you to choose a destination
from the list of last set destinations,
select your choice by turning and
pressing the Rotary Pad.
Add Favourite Destination
This allows you to choose a destination
from the list of preferred destinations,
select your choice by turning and
pressing the Rotary Pad.
Add POI
This allows you to add points of interest
to the set route.
Reorder Trip
This allows you to move or delete
intermediate points on the route.
Remove stopover
This allows you to delete a secondary
destination after having added it.
ROUTE PREVIEW
To access the "Route preview" function
(with active navigation), select it
by rotating the Rotary Pad and activate it
by pressing the control.
The route preview shows an overview of
your route, the remaining distance to
your destination and the remaining
estimated journey time.
33
Connect
DRIVING VIEW
ABOUT DRIVING VIEW
When your navigation system is started
for the first time, you are shown the
"Driving View" along with detailed
information about your current position.
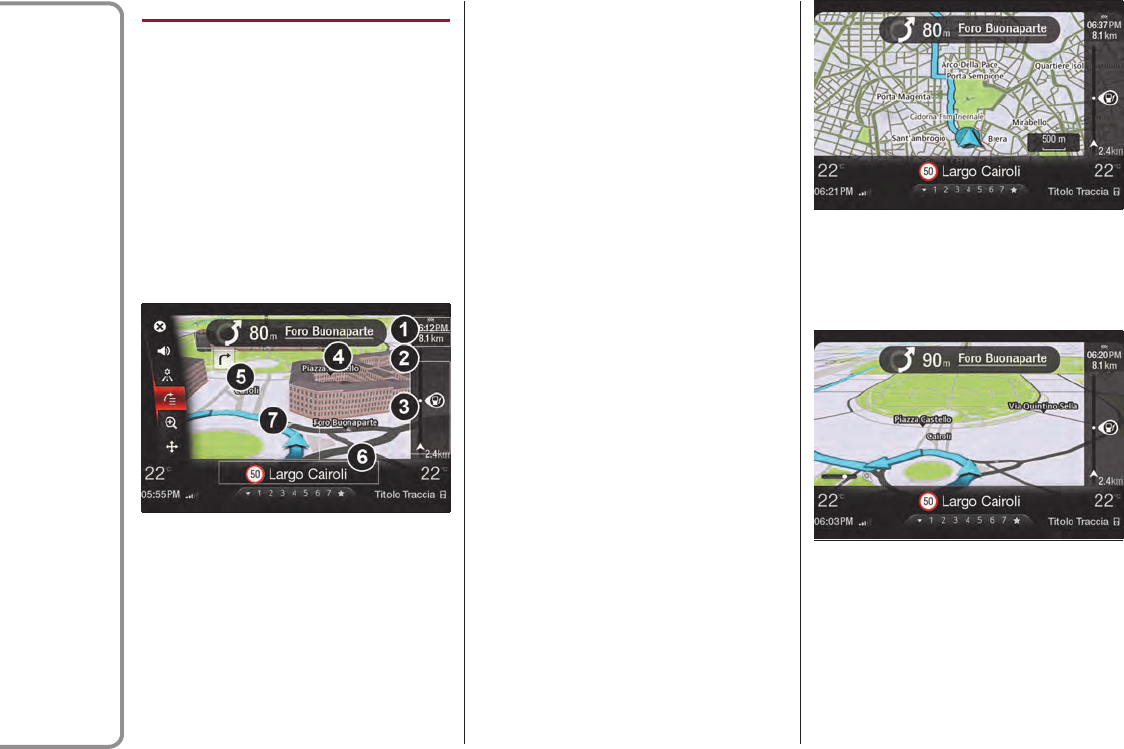
DRIVING VIEW
When navigation is started, the screen
fig. 42 that appears is:
The information shown on the display is
as follows:
1 - Expected arrival time: indicates the
time of arrival at the destination;
2 - Remaining distance: indicates the
distance remaining until arrival at the
destination;
3 - Route status bar: displays information
along the route (e.g. parking lots, traffic,
accidents, speed cameras, etc.);
4 - Navigation instructions for the way
forward and distance until next
instruction;
5 - Next navigation instruction;
6 - Name of the street you are currently
travelling on;
7 - Current position.
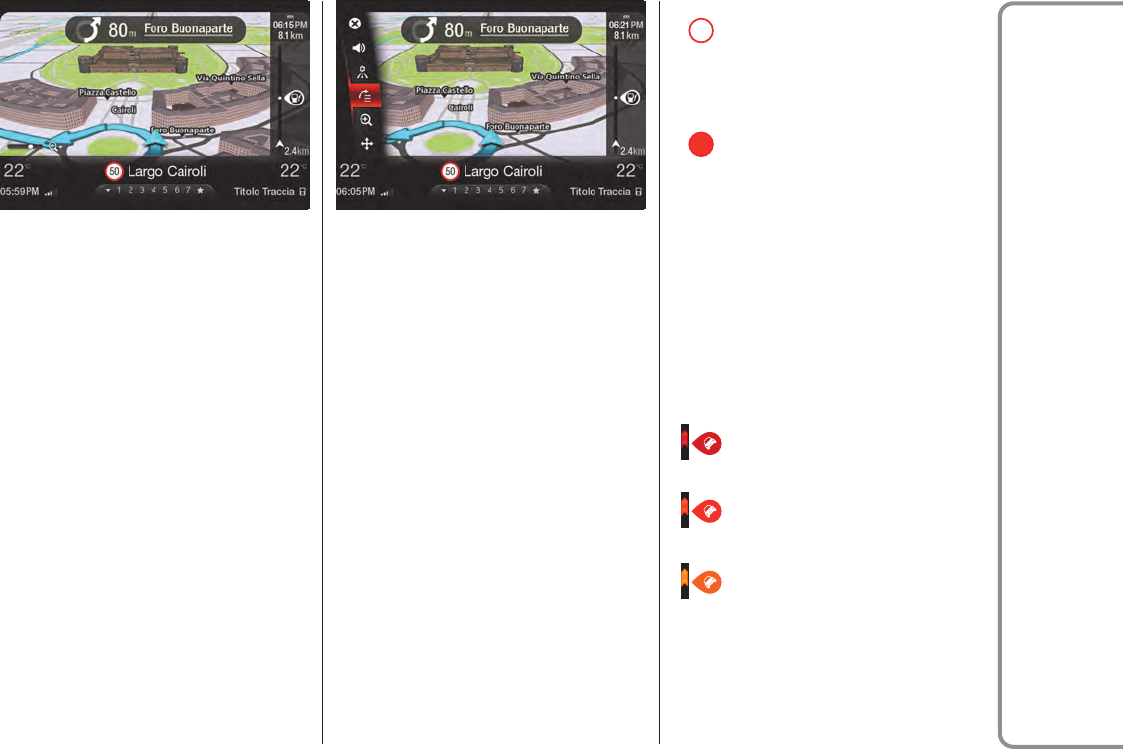
2D / 3D / AERIAL VIEWMAP DISPLAY
(where provided)
There are three map display options: 2D,
3D or Aerial view.
It is sometimes easier to view the map
from above, such as when navigating
a complex road network.
The 2D view shows a two-dimensional
view of the map as though viewed from
above fig. 43.
Aerial view shows the map viewed from
abovefig. 44.
The 3D view (where provided) shows a
three-dimensional view of the map
as though you are driving through the
landscape fig. 45.
42 11206S0001EM
43 11206S0002EM
44 11206S0004EM
34
Connect
LANE GUIDANCE
IMPORTANT lane guidance is not
available for all road junctions or in all
countries.
The navigator shows the exits and
crossroads indicating the most suitable
lane to use.
As you approach an exit or junction, the
lane you need is displayed on the screen
fig. 46.
IMPORTANT If no lane guidance is shown
in the navigation bar and all lanes are
highlighted, you can use any lane.
DISPLAYED SYMBOLS
(where provided)
If they have been activated on the
system, some symbols, which are meant
to help the user while driving, will appear
on the display.
To activate/deactivate the display of
warning symbols, select the following
functions from the main menu in
sequence: "SETTINGS", "Infotainment",
"Nav", "Warnings" and "Speed Limit
Warning". The symbols which can be
activated/deactivated within this
function are:
50
displayed on the status bar near
the name of the street you are
currently travelling on,
indicating the speed limit of
that street;
50
displayed on the status bar near
the name of the street you are
currently travelling on,
indicating that the user has
exceeded the speed limit by at
least 5 km/h (3 mph);
To activate/deactivate the display of
warning symbols, select the following
functions from the main menu in
sequence: "Settings", "Infotainment",
"Nav", "Warnings" and "Traffic Warning".
The symbols which can be activated/
deactivated within this function are:
"stationary traffic": indicates
the traffic situation; it is
displayed on the route bar;
"queue traffic": indicates the
traffic situation; it is displayed
on the route bar;
"slow traffic": indicates the
traffic situation; it is displayed
on the route bar;
45 11206S0003EM 46 11206S0005EM
35
Connect
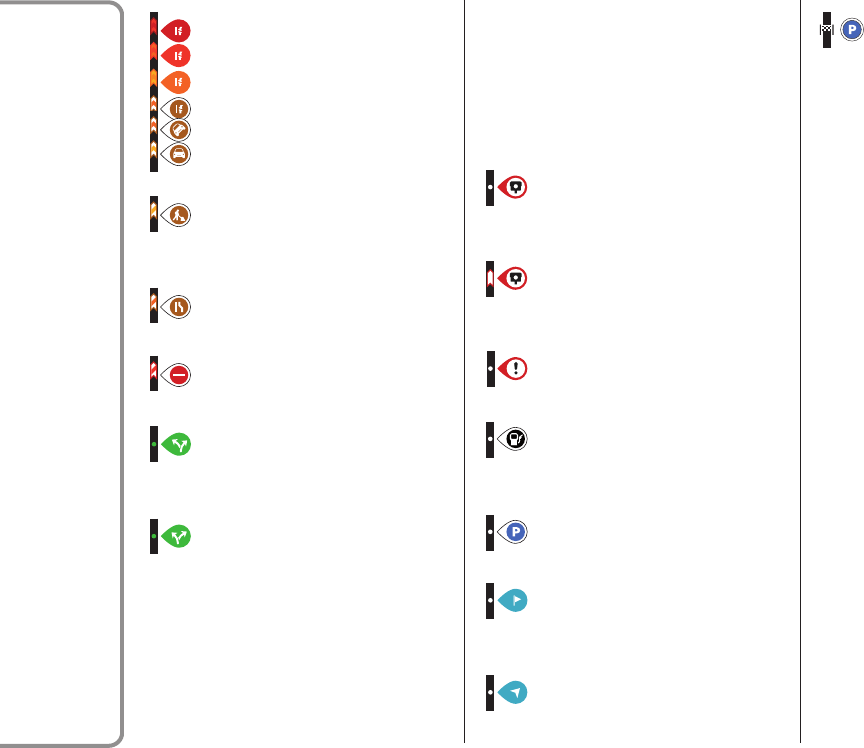
"junction": indicates the traffic
situation in a junction; it is
displayed on the route bar;
"unknown accident": indicates
an accident on the road; it is
displayed on the route bar;
"work in progress": indicates
the presence of work in
progress; it is displayed on the
route bar;
"lane closed": indicates that a
lane is closed; it is displayed on
the route bar;
"street closed": indicates that a
street is closed; it is displayed
on the route bar;
"alternative route (left)":
indicates the availability of an
alternative route to the left; it is
displayed on the route bar;
"alternative route (right)":
indicates the availability of an
alternative route to the right;
it is displayed on the route bar;
To activate/deactivate the display of
information symbols, select the following
functions from the main menu in
sequence: "Settings", "Infotainment",
"Nav", "Appearance" and "Route Bar". The
symbols which can be activated/
deactivated within this function are:
"speed camera warning":
indicates the presence of a
speed camera; it is displayed on
the route bar;
"speed camera area": indicates
the presence of a speed camera
area; it is displayed on the
route bar;
"dangerous area": indicates the
presence of a dangerous area;
it is displayed on the route bar;
"POI filling station": indicates
the presence of a fuel filling
station; it is displayed on the
route bar;
"Parking": indicates the
presence of a parking lot; it is
displayed on the route bar;
"Half-way crossing point":
indicates the presence of a
crossing point; it is displayed on
the route bar;
"Start point": indicates the start
point; it is displayed on the
route bar;
"Parking lot near arrival point":
indicates a parking lot close
to the arrival point; it is
displayed on the route bar.
36
Connect
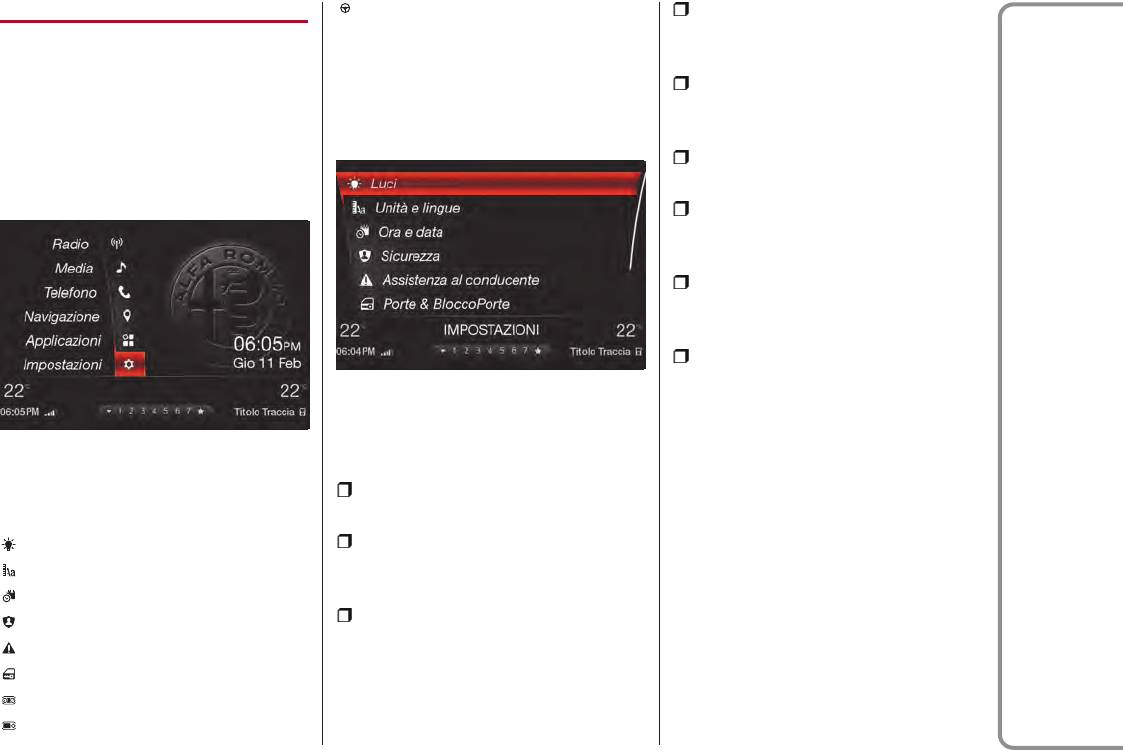
SETTINGS
A series of user-programmable functions
can be set using the Connect system.
To access the user-programmable
functions, open the main menu by
pressing the MENU 4 button fig. 4, then
select SETTINGS by turning and pressing
the Rotary Pad fig. 47.
The following menu items can be found
here:
"Lights";
"Units and Language";
"Clock and Date";
"Safety";
"Driver assistance";
“Doors & Locks”;
"Cluster";
"Infotainment";
"System".
Lights
To access the Lights function, select it by
turning the Rotary Pad and press the
Rotary Pad to activate fig. 48.
The following settings can be modified
when this mode is selected:
"Twilight Sensor": for adjusting the
headlight activation sensitivity;
"Follow me": for setting the headlight
deactivation delay after switching off the
engine;
"Cornering lights": activates/
deactivates the automation that links the
light beam of the headlight to the
steering angle.
"Flash Lights with Lock": activates
flashing when the vehicle doors are
locked.
"Daytime Running Lights": activates/
deactivates the daytime running lights
(DRLs);
"Courtesy lights": activates/
deactivates the courtesy lights;
"Interior Ambient Lighting": for
selecting the brightness of the interior
lights;
"Automatic High Beam": activates/
deactivates the automatic main beam
headlights.
“Restore Settings” : allows you to
delete the settings from this menu and
restore the default settings.
Enter the single functions and adjust
them by rotating and pressing the Rotary
Pad.
Units & Language
To access the "Units and Language"
function and the respective submenus,
select the option by turning the Rotary
Pad and activate it by pressing the
control itselffig. 49.
47 11126S0001EM
48 11126S0009EM
37
Connect
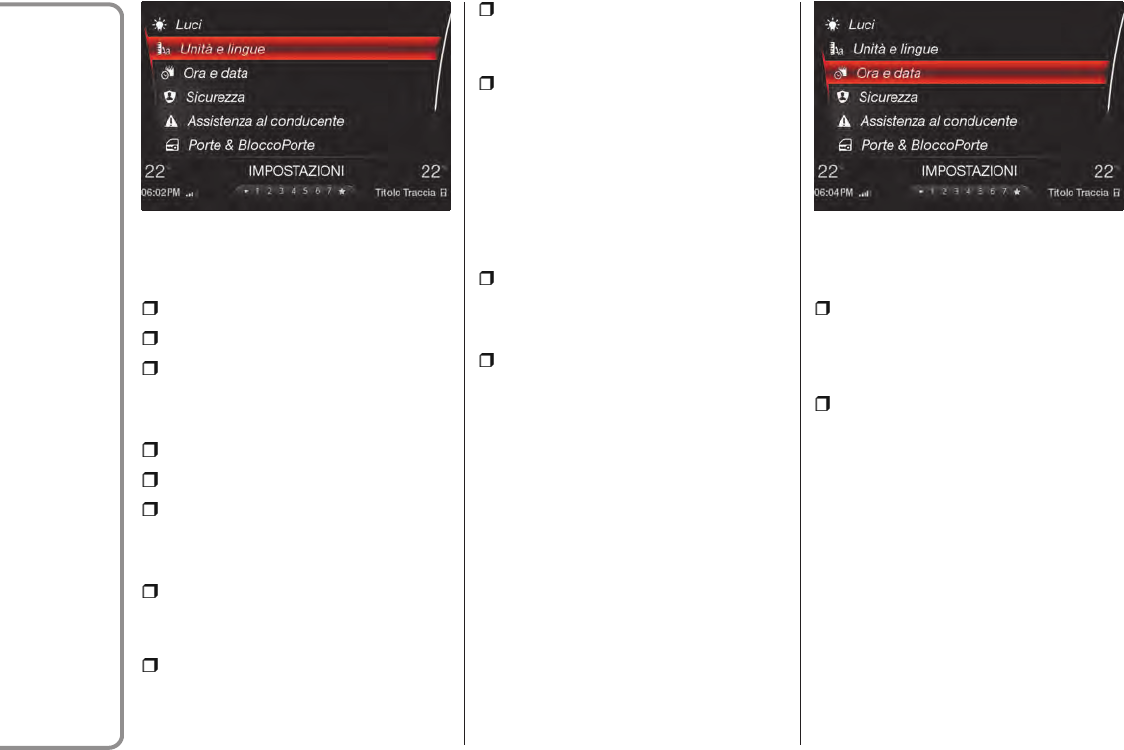
The options available are:
"Units";
"Language";
"Restore settings".
Selecting the "Units" option activates the
following submenus:
"US" (For North American market only)
"Metric"
"Custom"
Selecting the "Custom" activates the
following submenus:
"Distance": allows you to select the
units of measurement for distance ("km"
or "mi");
"Temperature": allows you to select
the units of measurement for
temperature ("°C" or "°F").
"Pressure": allows you to select the
unit of measurement for pressure
(options available: "psi", "kPa", "bar");
"Fuel Consumption": allows you to
select the units of measurement for fuel
consumption. If the unit of measurement
for distance is "km", "km/l" or "l/100 km"
can be selected, while if the unit of
measurement for distance is "mi" (miles),
"mpg" is set automatically.
Selecting the "Language" option:
Allows the system language setting to
be selected.
Selecting the "Restore Settings" option:
Allows you to delete the settings
from this menu and restore the default
settings.
Enter the single functions and adjust
them by rotating and pressing the Rotary
Pad.
Clock and Date
To access the “Time & date” function,
select it by turning the Rotary Pad and
press the Rotary Pad to activate fig. 50.
The options available are:
"Sync with GPS time": activates/
deactivates the clock synchronization
through the GPS; if it's off, the options
"Set Time" and "Set Date" are enabled;
"Set time": allows to manually set the
time, turn the Rotary Pad to adjust the
hours value, press the control to confirm
it, proceed similarly to set the minutes
fig. 51;
49 11126S0019EM 50 11126S0011EM
38
Connect
“Time format": you can choose
between a 24h clock and a 12h clock;
"Set date": to set the date manually.
Turn the Rotary Pad to adjust the day,
press the control to confirm it, proceed
similarly to set month and year fig. 52;
“Restore Settings” : allows you to
delete the settings from this menu and
restore the default settings.
Enter the single functions and adjust
them by rotating and pressing the Rotary
Pad.
Safety
To access the “Safety” function, select it
by turning the Rotary Pad and press
the Rotary Pad to activate fig. 53.
The following settings can be modified
when this mode is selected:
Speed Limiter
This lets you activate/deactivate the
function warning that you have exceeded
the set speed.
Speed Limiter - Set Speed
Lets you set the speed limit value. If you
continue to turn the Rotary Pad, the
speed increases by 5 km/h (5 mph) per
rotation, from a minimum of 30 km/h
(20 mph) to a maximum of 180 km/h
(110 mph).
Forward Collision Warning
Allows you to select the intervention
readiness for the anti-collision system.
The options available are:
"Status": lets you activate/deactivate
the system (where provided);
"Mode": used to set the following
operating modes: Warning-brake,
Warning, Off (where provided);
"Sensitivity": allows you to select the
intervention readiness for the system
according to the distance of the obstacle
(near, average, far).
Lane Departure Warning
This function can be used to select the
"readiness" of the Lane Departure
Warning system to intervene. The options
available are:
“Sensitivity": allows you to select the
intervention readiness for the system
(high, low).
51 11126S0002EM
52 11126S0003EM
53 11126S0012EM
39
Connect
Blind Spot Monitoring
This function can be used to activate/
deactivate the acoustic warning linked to
the presence of objects in the blind
spot of the door mirror.
Passenger's airbag
(where provided)
Lets you activate/deactivate the front
passenger airbag function. When the
function is accessed, the system will
detect the activation/deactivation status
of the airbags and confirm change of
status. Press the Rotary Pad to continue.
The air bag status is visible through the
LED next to the status icon on the
dashboard.
Passenger protection activated: the ON
LED switches on with a steady light.
Passenger protection deactivated: the
OFF LED switches on with a steady light.
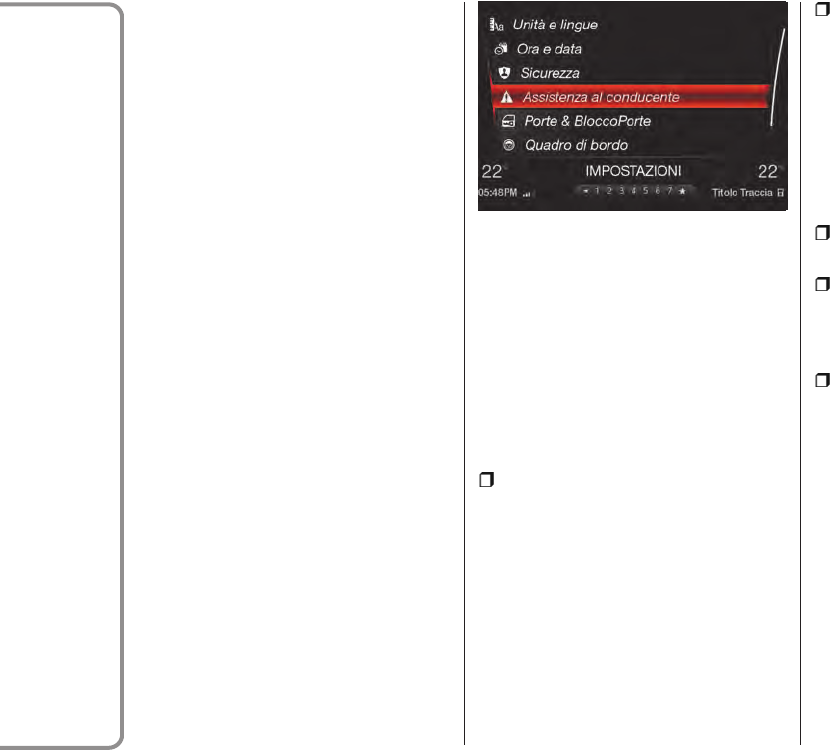
Driver assistance
To access the “Driver assistance”
function, select it by turning the Rotary
Pad and press the Pad to activate fig. 54.
This function can be used to carry out the
following adjustments:
Parking sensors
This function can be used to select the
type of warning provided by the
ParkSense system.
The options available are:
“Mode”: the possible options are:
“Sound”, the system notifies the driver of
the presence of an obstacle by means
of auditory signals only, by means of the
speakers in the car or “Sound and
Display”, the system notifies the driver of
the presence of an obstacle by means
of auditory signals (by means of the
speakers in the vehicle) and visual
signals, on the instrument panel display.
"Audio": allows to select the volume of
the acoustic warnings provided by the
ParkSense system, the available options
are: "High", "Medium" or "Low".
Reversing Camera
(where provided)
This function can be used to carry out the
following adjustments:
"View": lets you activate viewing the
video camera on the display;
"Cam Delay": allows you to delay
switching off the camera by a few
seconds when reverse gear is
disengaged.
"Camera Guidelines": Allows you to
activate the display of the dynamic
guidelines that indicate the route of the
vehicle.
Auto Park Brake
This function allows you to activate/
deactivate the automatic parking brake
engagement upon switching off the
engine.
Brake service
(where provided)
This function permits the activation of
the procedure to carry out braking
system maintenance.
54 11126S0013EM
40
Connect
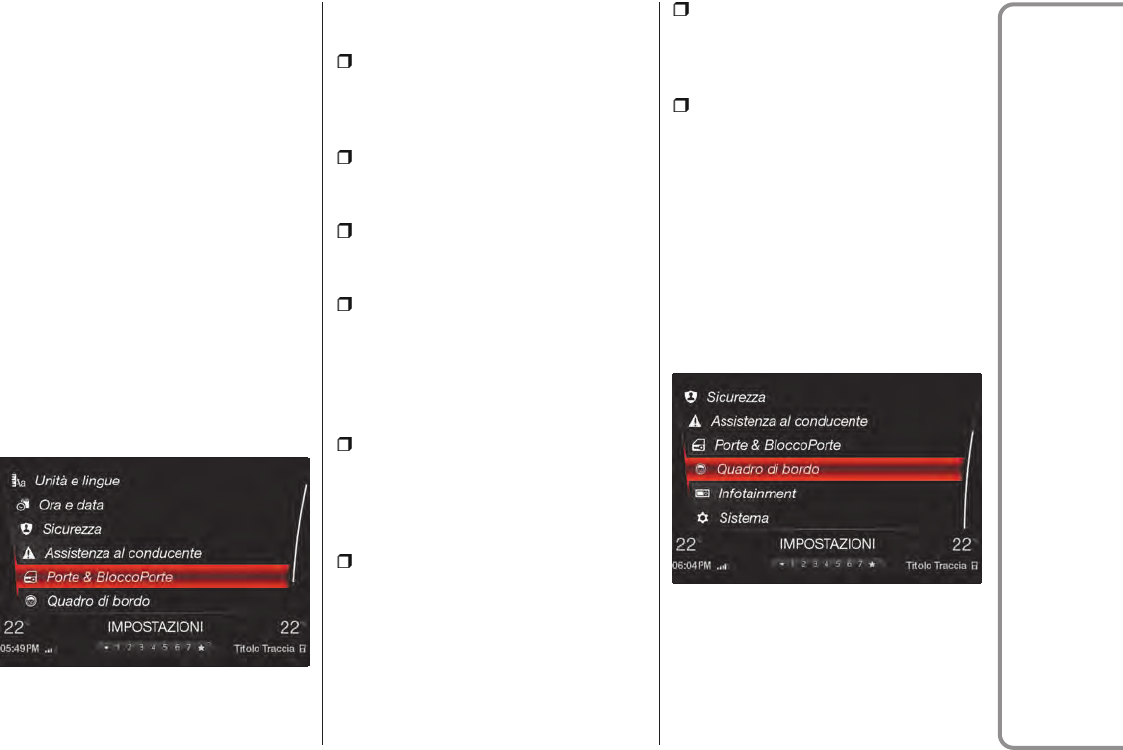
Automatic mirror closing
(where provided)
This function activates/deactivates
automatic folding of the mirrors when the
doors are locked/unlocked.
Restore settings
This function allows you to delete the
settings from this menu and restore the
default settings.
Access the functions and select the
setting by turning and pressing the
Rotary Pad.
Doors & Locks
To access the “Doors & Locks” function,
select it by turning the Rotary Pad and
press the control fig. 55 to activate it.
The following settings can be modified
when this mode is selected:
"Door lock in motion": this function can
be used to activate/deactivate
automatic door locking when the car is
moving;
"Unlock All Doors On Exit": permits the
automatic unlocking of the doors when
exiting the car;
“Passive Entry" (where provided):
allows you to activate the automatic door
closing strategy.
"Door Unlock On Entry" (where
provided): allows you to choose whether
to open all the doors or only the driver
side door when the corresponding button
on the key with remote control is first
pressed;
"Sound Horn with Remote Start" (for
versions/markets, where provided):
permits the activation/deactivation of
the horn when the engine is started with
the electronic key.
“Sound Horn with Lock” (where
provided): allows you to sound the horn
when the door lock button on the key with
remote control is pressed. The options
available are "Off", "1st Touch", "2nd
Touch";
“Auto Relock” (where provided): allows
you to activate/deactivate automatic
door locking after the engine is switched
off;
“Restore Settings” : allows you to
delete the settings from this menu and
restore the default settings.
Enter the single functions and adjust
them by rotating and pressing the Rotary
Pad.
Control panel
To access the “Control panel” function,
select it by turning the Rotary Pad and
press the Rotary Pad to activate fig. 56.
The following settings can be modified
when this mode is selected:
55 11126S0014EM
56 11126S0015EM
41
Connect
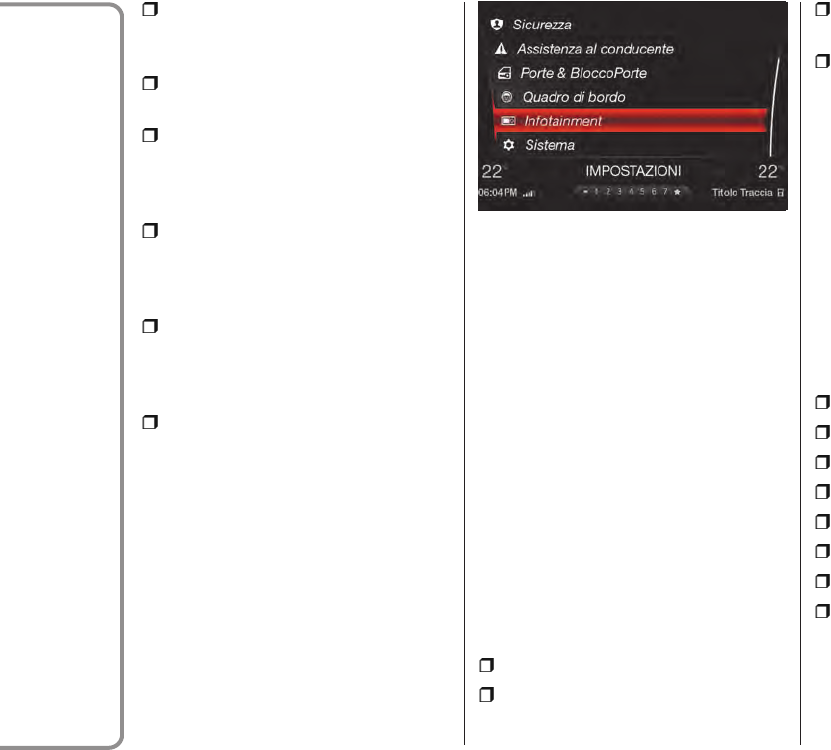
"Warning buzzer volume" (allows you
to set the volume of the warning buzzer
on seven levels).
"Trip B" (to activate/deactivate the
function).
"Show Phone Info” (allows you to
activate/deactivate repetition of the
phone function screens also on the
instrument panel display).
"Show Audio Info” (allows you to
activate/deactivate repetition of the
audio function screens (Radio and Media)
also on the instrument panel display).
"Show Nav Info” (allows you to
activate/deactivate repetition of the
navigation function screens also on the
instrument panel display).
“Restore Settings” (allows you to
delete the settings from this menu and
restore the default settings).
To access and adjust the various settings,
turn and press the Rotary Pad to select
and confirm the selection.
Infotainment
To access the “Infotainment” function,
select it by turning the Rotary Pad and
press the Rotary Pad to activate fig. 57.
The following settings can be modified
when this mode is selected:
Screen Off
Allows the screen to be turned off
automatically, all functions remain
available. Interaction with Rotary Pad
turns the screen back on.
Access the function and select the
setting by turning and pressing
the Rotary Pad.
Split Screen
Allows for multiple functioning modes to
be displayed on the same screen (where
provided). The possible options are:
"Off": system disengaged;
"Audio": displays the audio function
parameters;
“Nav": displays the navigator function
parameters;
“Efficient Drive”: displays the driving
style efficiency parameters (function
linked to the Alfa DNA™ selector);
Enter the single functions and adjust
them by rotating and pressing the Rotary
Pad.
NOTE: On systems with 8.8" display,
activating this function will reduce the
number of stations shown on the preset
bar from 7 to 5.
Audio
This allows you to set the following audio
parameters:
“Bass”;
“Treble”;
“Mid”;
“Balance/Fade”;
"Volume/Speed";
"Surround sound";
"Aux Volume Comp.";
"Restore settings".
For setting the parameters, see
paragraph "Audio" in section "Switching
the system on/off".
57 11126S0016EM
42
Connect

Bluetooth®
Allows for devices that have the
Bluetooth function to connect to the
system. The possible options are:
"Add device": allows you to add a
device;
“Device 01” allows you to select the
following functions: “Priority Device";
"Phone Profile"; "Audio Profile"; "Personal
Data"; "Delete Device".
Enter the single functions and adjust
them by rotating and pressing the Rotary
Pad.
Radio
This allows you to set the following
parameters:
“Screen off”: allows the screen to be
turned off automatically, all functions
remain available. Interaction with Rotary
Pad turns the screen back on;
"Split Screen": allows for a second
mode to be displayed within the Radio
screen. The parameters that can be
set are: “On” (system on); “Audio” (to view
audio function parameters); “Nav” (to
view navigator function parameters);
“Efficient Drive” (to view fuel
consumption reduction parameters,
function linked to the Alfa DNA™
selector);
"Seek Mode": the available options are:
“by frequency”; “in Stations List”; “by
favourites”.
"Traffic Announcements" (where
provided): allows you to display
the traffic news. The possible options
are: “On”; “Off”.
"RDS": allows for the messages
transmitted by the radio broadcasters to
be displayed. The possible options are:
“On”; “Off”.
“HD Radio”: The possible options are:
“On”; “Off”.
"DAB": displays information related to
this function.
"Audio settings": allows you to enter
the audio menu and set all related
parameters. For setting the parameters,
see paragraph "Audio" in section
"Switching the system on/off".
“Restore Settings” : allows you to
delete the settings from this menu and
restore the default settings.
Enter the single functions and adjust
them by rotating and pressing the Rotary
Pad.
Media
This allows you to set the following
parameters:
“Screen off”: allows the screen to be
turned off automatically, all functions
remain available. Interaction with Rotary
Pad turns the screen back on;
"Split Screen": allows for a second
mode to be displayed within the Media
screen: “On” (system on); “Audio” (to view
audio function parameters); “Nav” (to
view navigator function parameters);
“Efficient Drive” (to view fuel
consumption reduction parameters,
function linked to the Alfa DNA™
selector);
“Autoplay”: this can be used to play
audio tracks stored on USB flash drives
automatically. The setting does not apply
to devices connected via Bluetooth®;
"Audio settings": allows you to enter
the audio menu and set all related
parameters. For setting the parameters,
see paragraph "Audio" in section
"Switching the system on/off";
“Bluetooth® settings": allows you to
enter the Bluetooth® menu and set the
related parameters. See Bluetooth®
functions in this paragraph.
Phone
This allows you to set the following
parameters:
43
Connect
“Screen off”: allows the screen to be
turned off automatically, all functions
remain available. Interaction with Rotary
Pad turns the screen back on;
"Split Screen": allows for a second
mode to be displayed within the Phone
screen: “On” (system on); “Audio” (to view
audio function parameters); “Nav” (to
view navigator function parameters);
“Efficient Drive” (to view fuel
consumption reduction parameters,
function linked to the Alfa DNA™
selector);
"Phone Book": allows you to set the
contacts list order mode;
"Profile Picture": allows you to link an
image to the connected phone;
“Bluetooth® settings": allows you to
enter the Bluetooth® menu and set the
related parameters. See Bluetooth®
functions in this paragraph.
Navigation
This allows you to set the following
parameters:
“Screen off”: allows the screen to be
turned off automatically, all functions
remain available. Interaction with Rotary
Pad turns the screen back on;
"Split Screen": allows for a second
mode to be displayed on the Navigation
screen: “On” (system on); “Audio” (to
view audio function parameters); “Nav”
(to view navigator function parameters);
“Efficient Drive” (to view fuel
consumption reduction parameters,
function linked to the Alfa DNA™
selector);
"Appearance": allows you to set the
map display mode. The possible options
are: "Display options": the display modes
are: “2D”, “Aerial view” or “3D with details;
“Map POI” (the available options are:
“Select all” or “Select none”); “Route Bar”
(the available options are: "Fuel Stations",
"Parking", "Stops", "Route Alternatives",
"Exits and junctions", "Rest areas",
"Ferry-boats" or "Tolls"; "Colour schemes"
(the available options are: “Day”; “Night”
or “Auto”); “Expressway exit preview” (the
available options are: “on” or “off”);
"Automatic zoom on turn" (the available
options are: “Off”, “Speed dependant”
or “Next command”).
"Warnings": allows you to set the types
of warnings to display. The possible
options are: "Speed Limit Warning" (the
available options are: “On” or “Off”);
"Speed camera warning" (the available
options are: “Map”, “Map and acoustic
signal” or “Off”).
"Route Planning": allows you to set a
route. The possible options are: "Route
Alternatives": the available options
are: “Fastest Route”, “Shortest Route”, o
“Eco-Route”); “Diversions” (the available
options are: “Avoid Motorways”, “Avoid
Toll Routes”, “Avoid Ferries / Trains”,
“Avoid Reserved Lanes” or “Avoid
Unpaved Roads”); “Faster Route
Available” (the available options are:
“Automatic”, “Ask Me” or “Off”);
“Destination input mode” (the available
options are: “Address” or “GPS”).
"System information": the available
options are: "About"; "Software Update".
“Restore Settings” : allows you to
delete the settings from this menu and
restore the default settings.
System
To access the “System” function, select it
by turning the Rotary Pad and press the
Rotary Pad to activate fig. 58.
44
Connect
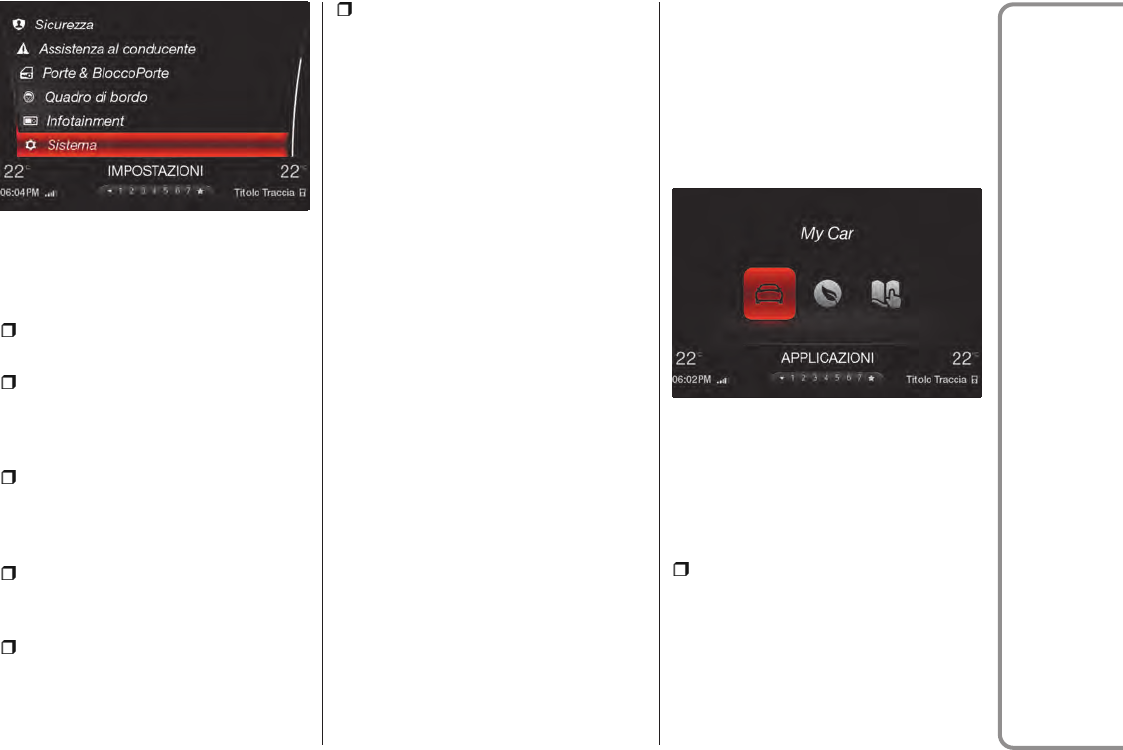
The following settings can be modified
when this mode is selected:
"Automatic activation": allows you to
activate the system upon starting the car;
“Switch-off delay": enables the
system to continue functioning for a
certain period after the car has been
turned off;
"Software Update": allows you to
choose between the following options:
“Current version”; “Update software”;
“Restore software”.
"Maps Update": allows you to choose
between the following options: “Current
version”; “Update map”.
“Clear Personal Data": allows you to
delete all the data that the system stores
after connecting a device (e.g. phone,
MP3 player, etc.)
“Restore Settings” : allows you to
delete the settings from this menu and
restore the default settings.
Enter the single functions and adjust
them by rotating and pressing the Rotary
Pad.
“Map Update” - Procedure
To update the navigation maps, proceed
as described below:
1 - start the engine;
2 - with the vehicle stationary, insert the
USB flash drive that contains the
updated maps into one of the two front
ports fig. 27;
3 - select the “Update Map” option from
within the “Map Update” function. The
display will show a screen with the
version and the duration of the whole
procedure in minutes;
4 - select the “Update” function. The
display will show a screen with the
instructions to be followed and a request
for confirmation;
5 - confirm to start the process.
During the update, the instructions to be
followed will continue to be displayed
together with the process progress. You
can move the car during this phase.
NOTE The map updates are available on
the www.tomtom.com/support website.
APPLICATIONS
To access the "APPLICATIONS" functions
open the main menu by pressing the
MENU 4 button fig. 4, then select by
turning and pressing the Rotary Pad.
The following settings can be modified
when this mode is selected fig. 59:
My Car
Allows to display information regarding
the state of the car. The possible options
are:
“Tyre pressure/Carbon ceramic brakes
status (where provided)": repeats the
“Tyre pressure” function screens on the
Connect system display, usually
displayed on the instrument panel in case
of failures fig. 60;
58 11126S0017EM
59 11126S0004EM
45
Connect
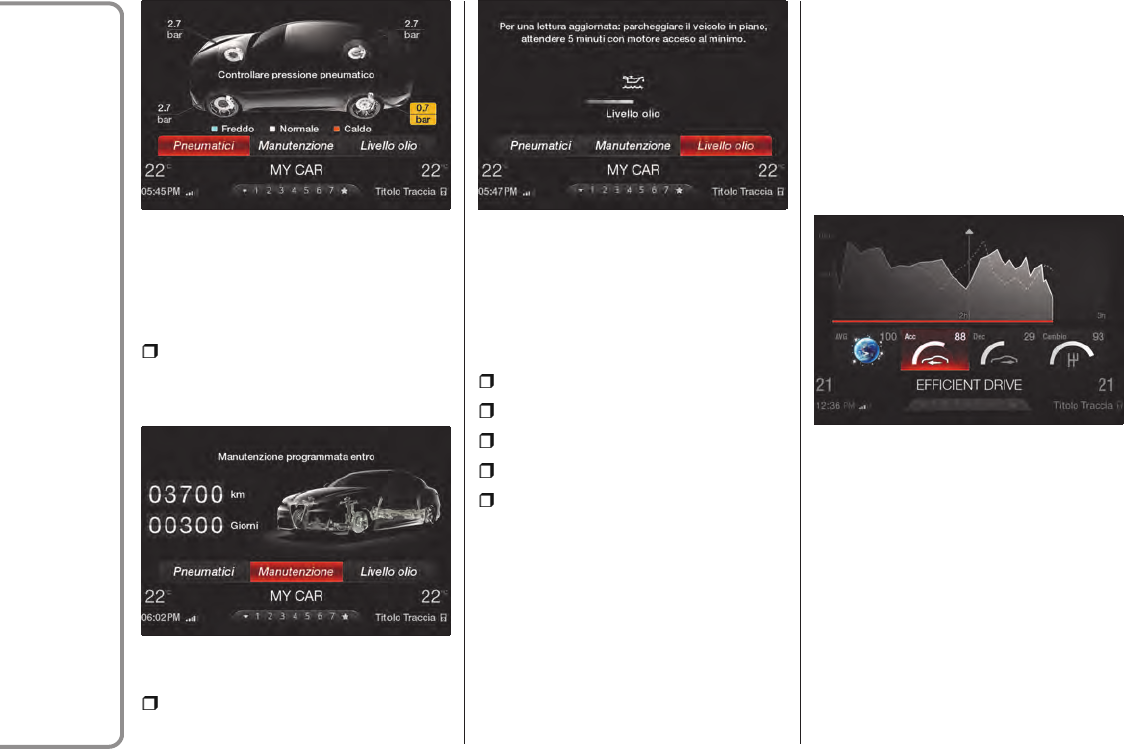
Enter the single functions and adjust
them by rotating and pressing the Rotary
Pad.
"Service": displays the kilometres and
the days left until the next service
fig. 61;
"Oil level": displays the engine oil level
fig. 62.
Efficient Drive
Displays some functional parameters
related to the driving style fig. 63. The
parameters displayed are:
"Live Index";
"Acceleration";
"Deceleration";
"Gear".
“Compass” (where provided): shows
heading, positioning coordinates,
location and altitude.
Turning the Rotary Pad scrolls through
the items and the screen displays the
relative plot. The average value plot
remains dashed also on the other plots.
The coloured line at the bottom of the
plot indicates the driving mode selected
at the corresponding time (e.g. red for
Dynamic mode, green for Advanced
Efficiency mode).
User's Manual
This allows to browse the Owner
Handbook of the car.
60 11126S0005EM
61 11126S0006EM
62 11126S0007EM
63 11126S0008EM
46
Connect
Apple CarPlay and Android Auto
(where provided)
The Apple CarPlay and Android Auto
applications allow you to use your
smartphone in the car safely and
intuitively.
To enable them, just connect a
compatible smartphone via the USB port
and the contents of the phone will be
automatically shown on the Connect
system display.
To check the compatibility of your
smartphone, refer to the indications on
the websites:
https://www.android.com/intl/it_it/auto/
e http://www.apple.com/it/ios/carplay/.
If the smartphone is connected correctly
to the car via the USB port, the Apple
CarPlay or Android Auto icon will be
displayed in the main menu.
For correct use, it is advisable to use
original or certified USB cables.
NOTE Interaction with the smartphone
may be needed to enable Apple
Carplay/Android Auto and some other
functions. Complete the action on your
device (smartphone) as needed.
Apple CarPlay – app configuration
Apple CarPlay is compatible with the
iPhone 5 or more recent models, with the
iOS 7.1 operating system or later
versions.
Before using Apple CarPlay, enable Siri
from the settings on your smartphone.
To use Apple CarPlay, the smartphone
must be connected to the car with a USB
cable.
Before the first connection, a pop-up
window will appear on the smartphone
for performing the necessary
configuration procedure. You can only
perform this procedure with the vehicle
stationary.
Android Auto – app configuration
Before use, download the Android Auto
application to your smartphone from
Google Play Store.
The application is compatible with
Android 5.0 (Lollipop) and later versions.
To use Android Auto, the smartphone
must be connected to the car with a USB
cable.
Before the first connection, a pop-up
window will appear on the smartphone
for performing the necessary
configuration procedure. You can only
perform this procedure with the vehicle
stationary.
Interaction
After the setup procedure, on connecting
your smartphone to the car's USB port,
the application will automatically run
on the Connect system.
The Rotary Pad can be used to select and
confirm the available smartphone
functions.
You can interact with the Apple CarPlay
and Android Auto voice assistants using
the control on the steering wheel (long
press of the button to start the
interaction and short press to close the
voice assistant).
64 11126S0020EM
47
Connect
The Telephone application of the
smartphone can be accessed directly
using the control on the steering wheel
.
Multimedia contents on the smartphone
can be accessed directly via “MEDIA”
mode of Connect.
Navigation
With the Apple CarPlay and Android Auto
applications, the user can choose to use
the navigation system on their
smartphone.
The user can choose to change their
selection at any time by accessing the
navigation system that they want to use
and setting a new destination.
Exiting from the Apple CarPlay and
Android Auto apps
With the CarPlay app active, you can
always access the contents of the
Connect system by pressing the MENU
button.
With the Android Auto app you can
always access the contents of the
Connect system by pressing the MENU
button, or select the last item present on
the Android Auto system and then
conform the “Back to Alfa Romeo” item.
To end the Apple CarPlay or Android Auto
session, physically disconnect the
smartphone from the USB port.
NOTES
Bluetooth® is disabled while Apple
CarPlay or Android Auto is being used.
The data connection will depend on the
smartphone's tariff plan.
This information may be subject to
changes that depend on the smartphone
operating system or the version of the
Android Auto application.
"OPTION" button
If you press the "OPTION" button while in
one of the modes ("RADIO", "MEDIA",
"PHONE" and "NAVIGATION"), you can
access directly the settings menu of that
mode fig. 65.
The following menu items can be found
here:
“Radio”;
“Media”;
"Phone";
“Nav";
"Apps".
Pressing the “OPTION" button again, you
will return to the previously active menu
screen.
If, after having set the data on the page,
the user pushes the Rotary Pad to the left
to go back, all of the passages of the
settings menu will be displayed again, as
it does not return directly to the home
screen of the previously selected mode.
65 11126S0018EM
48
Connect
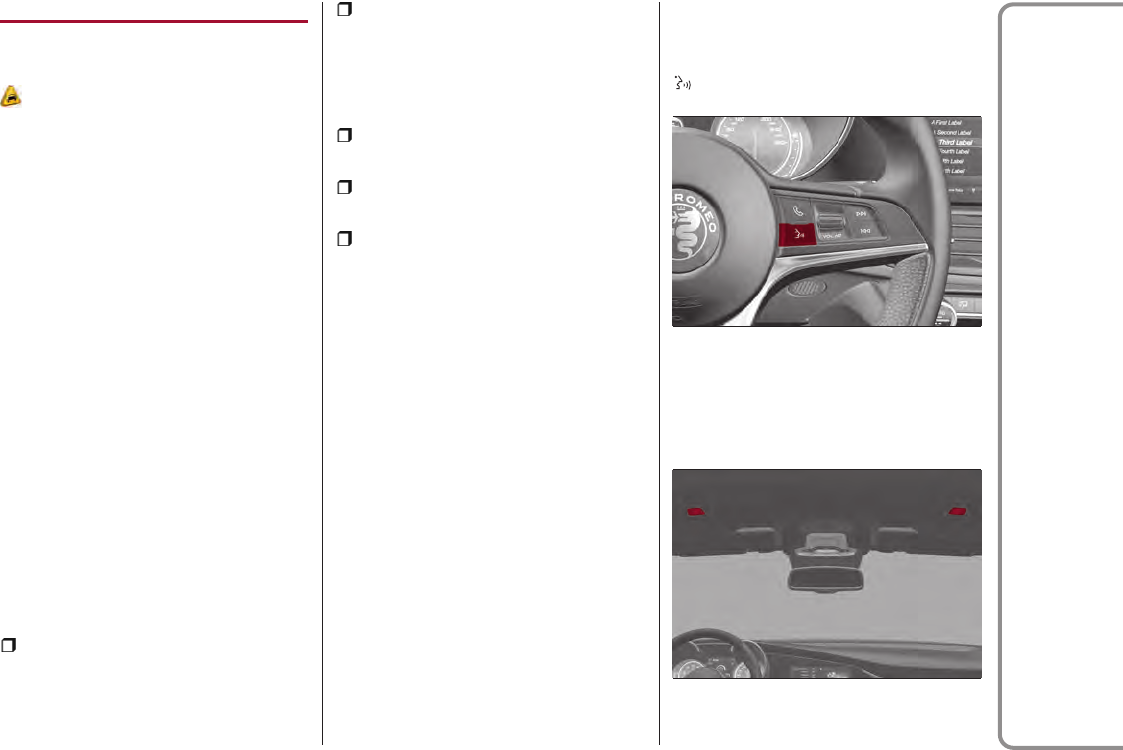
VOICE COMMANDS
INTRODUCTION
3)
Most of the navigator, radio, multimedia
and phone actions can be imparted
using the voice system instead of the
Rotary Pad.
For example, to make a phone call, you
can say “dial number” followed by the
number: “dial number 8 0 0 0 4 2 6 5 3”
In addition to being practical and fast,
this method increases safety because it
allows to keep both hands on the wheel
during the interaction and to reduce
distractions while driving; the voice
system will perform the required
operations and, if required, will answers
or confirm using a synthesised voice.
The system can recognise the voice
commands given, irrespective of gender,
tone of voice and intonation of the
person uttering them.
Please follow the suggestions below to
be sure that the voice commands are
always recognised by the system:
speak with normal volume and speed;
for optimum operation, it is advisable
to close the windows to reduce noise
and avoid sources of external
interference.
Before speaking:
always wait for the sound which
indicates beginning of the voice session;
reduce noise inside the passenger
compartment as much as possible;
ask passengers not to talk. The system
can recognise commands irrespective
of the person uttering them; if several
people talk at the same time the
superimposition can create confusion
and cause different or additional
commands to be recognised.
It is important to remember that some
functions which can be executed by
means of voice control may not be
available until synchronisation between
the system and external devices is
completed (e.g. phonebook of phones
paired via Bluetooth®, archive of
MP3 tracks on USB devices).
Synchronisation may take from a few
seconds to a few minutes according
to the amount of data.
OPENING AND CLOSING VOICE
SESSIONS
To activate the voice system, press the
button on the steering wheel fig. 66.
To ensure better control reception by the
system, it is recommended to talk
towards one of two microphones fig. 67.
66 11256S0001EM
67 11256S0004EM
49
Connect
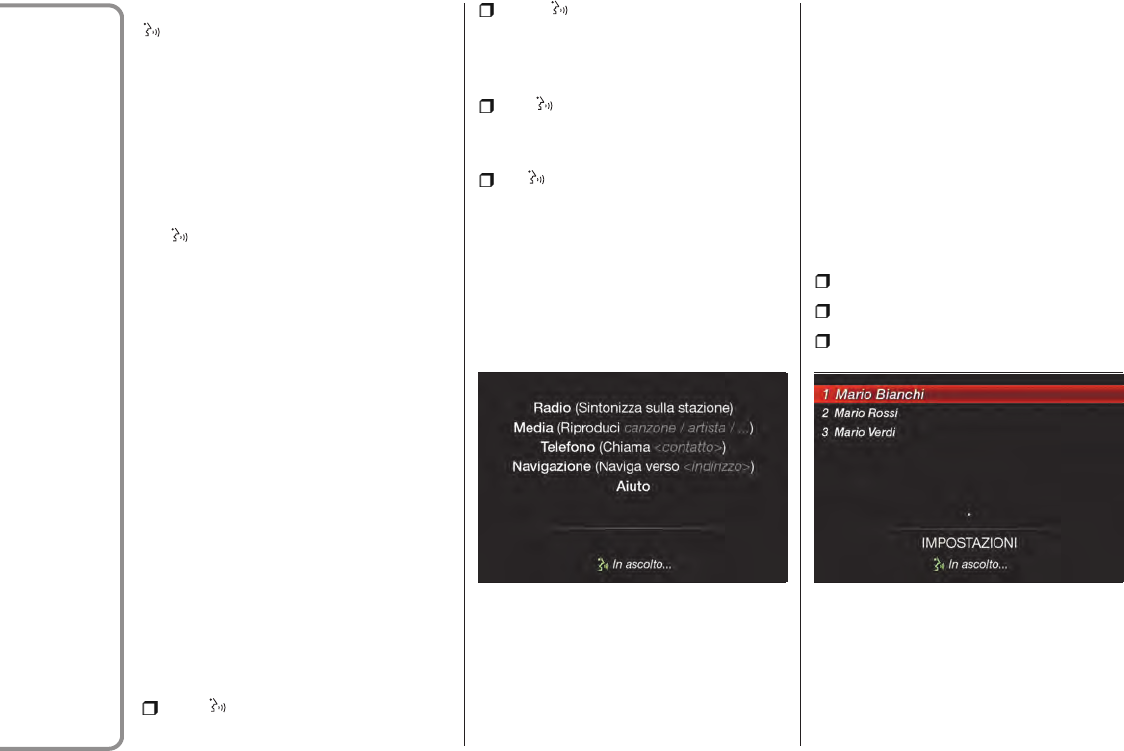
To start a voice session, press the
button once. At any time during the
voice session (dialogue), you may press
the button again to restart the session
and give a new command regardless
of the previous dialogue.
For example, if the system is giving a help
voice message and you recognize the
desired command, it may be useful
to interrupt the help message by pressing
the button and giving the command,
so that you don't have to wait until the
end of the help message.
If you long-press the button (for a few
seconds), the current voice session
is immediately closed.
The voice session will automatically close
when a command has been recognized
and no further actions are required by the
user. A phone call will also interrupt the
voice session, in order to allow you to
answer and speak normally using the
speakerphone.
VOICE SESSION STATUS
After a voice session has been opened,
the system shows its status through
an icon on the display fig. 68.
There are 4 possible statuses:
green icon: the system is listening -
you can say a command;
yellow icon: the system is
processing the command - wait for the
voice response or for the execution
of the command;
grey icon: the system has
processed the command and is giving the
voice response or other response;
red icon: a problem has occurred
with understanding the command. In
a few seconds, the icon will turn back to
green and you will be able to repeat
the command or give a new command.
A short text next to the icon provides
information on the processing status or
on the system response to the command.
MULTIPLE CHOICE LIST
In some cases, the system may find
multiple responses to the requested
action. When that happens, the display
shows a list of the possible alternatives.
Just say the number of the desired item
or, if the command did not provide the
desired response, say "edit" to go back.
For example, the command "Call John"
could receive as a response a multiple
choice list containing fig. 69:
John Doe;
John Smith;
John Roe;
When these lists are open, you can make
your choice also by using the Rotary Pad.
68 11256S0002EM 69 11256S0003EM
50
Connect

VOICE COMMANDS - PRACTICAL USE
Voice commands can be used for most functions of the main applications of the Connect system ("RADIO", "MEDIA", "NAVIGATION",
"TELEPHONE").
Voice commands may be simple instructions, such as “Help”, “Show contacts”, or instructions with a variable part according to the
phonebook, connected peripheral devices, available radio stations or navigation addresses. For example, the commands with
variables are: “tune to 95.6”, “Navigate to 221B, Baker Street, London”.
The “complex” instructions can also be performed using a simple command that starts the two-step dialogue in which the system
asks to specify the variable. (“step by step” method).
For example, using the "call number" command, the system asks to specify the number to call; using the “play album" command (or
“genre” / “author” / “artist” / “playlist” / “song”), the system asks to pronounce the desired title of the album (or the genre/author etc.).
A help will appear on the screen suggesting the most common commands for the current application and the main command for the
other applications if a voice session is opened and either no command is uttered or the command is not understood.
To access detailed help, say “Help” and follow the instructions.
The system can understand a number of synonyms for each command. For instance, you can say “play track” or “play song”; or you can
say “show contacts” or “view contacts” or “contact list”.
The following charts show the main word for each command.
51
Connect
RADIO AM/FM/DAB VOICE COMMANDS
Control Parameter Example/variable
TUNE TO STATION Radio 24
TO FREQUENCY 97.6 FM
ADD TO FAVOURITES
SHOW FAVOURITE STATIONS
AVAILABLE STATIONS
FM
AM
DAB/SiriusXM™***
*** According to the country and the versions.
52
Connect
MEDIA VOICE COMMANDS
Control Parameter
SHOW/PLAY
ALBUMS
ARTIST
COMPOSER
GENRE
PLAYLIST
PLAY SONG
PLAY ALL
VIEW ALL
ALBUMS
ARTISTS
COMPOSERS
GENRES
PLAYLISTS
SONGS
ENABLE/DISABLE SHUFFLE
GO TO...
AUX
USB 1
USB 2
Bluetooth
NOTE These controls are valid on devices connected to the system via USB ports and not through the Bluetooth® system.
53
Connect

NAVIGATION VOICE COMMANDS
Control Parameter Example/variable
NAVIGATION -
NAVIGATION CONTROLS -
PREFERRED MOTHER (previously set address)
NAVIGATE HOME (previously set address)
SET
2D MAP
DETAILED 3D MAP
TOP VIEW
START / STOP NAVIGATION
REPEAT INSTRUCTIONS
SHOW MAP
FIND NEAREST... Hospital
The command "Enter country" is also available and it starts a step-by-step interaction to add the navigation address by specifying
city, street, street number. If the country has already been entered, you can use "enter city" and if this has already been entered, use
directly the command "Enter street".
The “Enter country” command depends on the voice system language. Using Italian, it is possible to enter only (Italy), Switzerland,
San Marino and Vatican City.
54
Connect
PHONE VOICE COMMANDS
Control Parameter Example/variable
TELEPHONE -
PHONE COMMANDS -
DIAL - 8 0 0 0 4 2 6 5 3***
CALL - John Smith
SHOW CONTACTS
REDIAL
SHOW MISSED CALLS
ALL CALLS
SEARCH - John Smith
*** Phone numbers must be pronounced one digit at a time: for example 02 444 12 045 will be pronounced as: "zero two four four
four one two zero four five".
IMPORTANT
3) Voice commands must always be given in safe driving conditions, in compliance with the laws in force in the country where you are driving.
55
Connect

CUSTOMER SERVICE NUMBER LIST
The following table shows the specific Customer Service numbers for each country.
Country Universal Freephone Number National Freephone Number Toll number
Austria
00 800 2532 0000
(Quadrifoglio
00 800 253 242 00)
This number is not available for
some mobile system operators.
0800 20 1741 +39 02 444 12 045
Belgium
00 800 2532 0000
(Quadrifoglio
00 800 253 242 00)
This number is not available for
some mobile system operators.
0800 55 888 +39 02 444 12 045
Denmark
00 800 2532 0000
(Quadrifoglio
00 800 253 242 00)
This number is not available for
some mobile system operators.
80 20 5337 +39 02 444 12 045
France
00 800 2532 0000
(Quadrifoglio
00 800 253 242 00)
0800 042653 +39 02 444 12 045
Germany
00 800 2532 0000
(Quadrifoglio
00 800 253 242 00)
This number is not available for
some mobile system operators.
0800 0426533 +39 02 444 12 045
Ireland
00 800 2532 0000
(Quadrifoglio
00 800 253 242 00)
This number is not available for
some mobile system operators.
1800 505337 +39 02 444 12 045
56
Connect

Country Universal Freephone Number National Freephone Number Toll number
Italy
00 800 2532 0000
(Quadrifoglio
00 800 253 242 00)
This number is not available for
some mobile system operators.
800 042653 +39 02 444 12 045
Luxembourg
00 800 2532 0000
(Quadrifoglio
00 800 253 242 00)
This number is not available for
some mobile system operators.
8002 5888 +39 02 444 12 045
Morocco 0801000201
Netherlands
00 800 2532 0000
(Quadrifoglio
00 800 253 242 00)
This number is not available for
some mobile system operators.
+39 02 444 12 045
Poland
00 800 2532 0000
(Quadrifoglio
00 800 253 242 00)
800 533700 +39 02 444 12 045
United Kingdom
00 800 2532 0000
(Quadrifoglio
00 800 253 242 00)
0800 1692966 +39 02 444 12 045
Spain
00 800 2532 0000
(Quadrifoglio
00 800 253 242 00)
This number is not available for
some mobile system operators.
900 10 5337 +39 02 444 12 045
Sweden
00 800 2532 0000
(Quadrifoglio
00 800 253 242 00)
This number is not available for
some mobile system operators.
020 5337 00 +39 02 444 12 045
57
Connect
Country Universal Freephone Number National Freephone Number Toll number
Switzerland
00 800 2532 0000
(Quadrifoglio
00 800 253 242 00)
This number is not available for
some mobile system operators.
0800 0426 53 +39 02 444 12 045
Australia 1300 133 079
58
Connect