Marson Technology Co MT100A Mini Wireless Barcode Reader User Manual MT100A QG revFCC
Marson Technology Co Ltd Mini Wireless Barcode Reader MT100A QG revFCC
UserManual.wiki
>
Marson Technology Co
>
MT100A User Manual
Users Manual
Navigation menu
Upload a User Manual
Namespaces
Wiki Guide
HTML
PDF
Info
Views
User Manual
Discussion / Help
Navigation
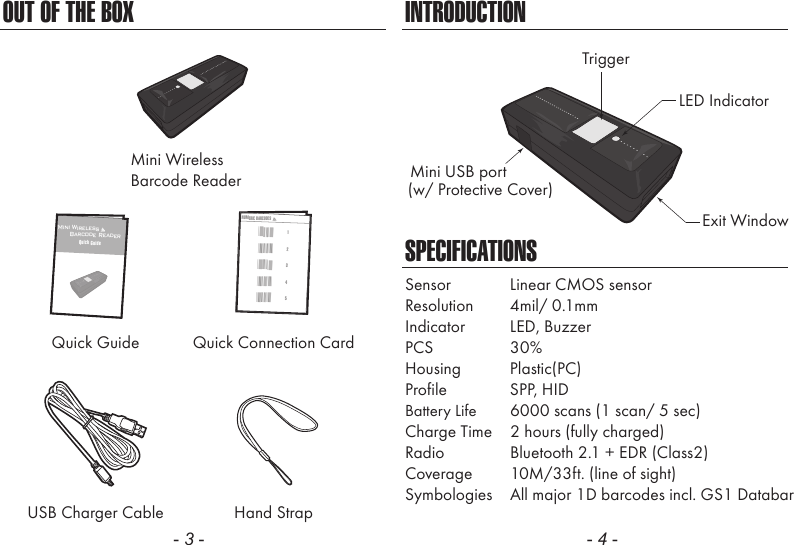
![GETTING STARTEDCHARGING THE BATTERYTo scan a barcode, make sure the aiming beam crossesevery bar and space of the barcode.1. Flip open the mini USB port on the scanner.2. Insert the mini USB connector into the port on the scanner and USB A connector into a USB port on the host PC.- 5 - - 6 -ScannerMini USBUSB AHostBEEPER INDICATIONLED INDICATIONOffFlashing GreenGreen for 2 secFlashing RedSolid RedStandby or Power offDisconnected or DiscoverableGood ReadLow powerChargingSingle long beep Power upSingle beep Good readSingle short beep The scanner reads a Code39 of ASCII in configuration procedureTwo beeps i. Wireless connection ii. The scanner successfully reads a configuration barcodeTwo short beeps Good read (Batch mode/Memory mode)Four beeps (Hi-Lo-Hi-Lo) Out of range/Poor connectionFive beeps Low powerThree beeps Wireless disconnectionThree short beeps i. The scanner reads a barcodes while disconnected. ii. The scanner reads an unexpected barcode during configuration procedure. (scan [ABORT] to abort and start over)Several short beeps The scanner switches from one communication mode to another](https://usermanual.wiki/Marson-Technology-Co/MT100A/User-Guide-3112008-Page-4.png)
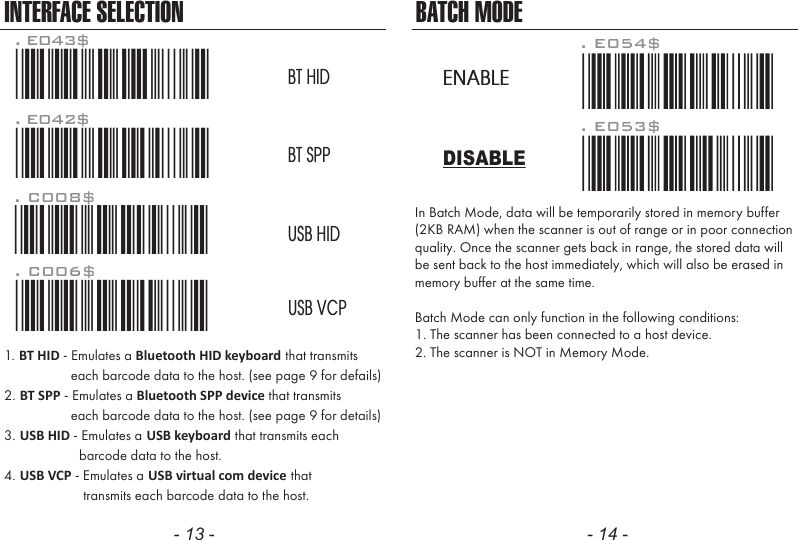
![GETTING CONNECTED PINCODE SETUP1. Press the trigger for 1 second to activate the scanner.2. Scan [DISCONNECT]3. Scan [BT mode - SPP]; the scanner will emit several beeps.4. Select “Wireless Scanner” from discovered device list. The default pincode is “1234”.5. Open serial communication software with com port (see Device Manager) properly set up.6. The scanner will beep twice to verify the connection.There are two modes of wireless communication:- 7 - - 8 -. E042$BT mode - SPPPincode Start*.E042$*. E032$*.E032$*. E033$*.E033$*. E043$BT mode - HID*.E043$*Disconnect. E031$*.E031$**$TX*$TX1. Press the trigger for 1 second to activate the scanner.2. Scan [DISCONNECT]3. Scan [BT mode - HID]; the scanner will emit several beeps.4. Select “Wireless Scanner” from discovered device list.5. The Bluetooth application may prompt you to scan a pincode(see PINCODE SETUP section) it generated.6. The scanner will beep twice to verify the connection.Scan numeric barcodes (see NUMERIC BARCODES sectionon the next pages) based on the pincode generatedby the Bluetooth application.STEP 1Pincode StopEnterSTEP 4STEP 3STEP 2[ Recommended ]](https://usermanual.wiki/Marson-Technology-Co/MT100A/User-Guide-3112008-Page-5.png)

![- 11 - - 12 -POWER OFF TIMEOUTTouch Keyboard - iOSTouch Keyboard - AndroidAfter enabling iOS Hotkey(disabled by default), you may simplydouble-click the trigger to toggle the iPhone/iPad Touch Keyboard.Please follow below steps to toggle Android virtual keybaord:1. Enter “Settings”2. Enter “Language & input”3. In Keyboard & input window, tap “Default” to continue.4. Turn off “Hardware - Physical keyboard”, and the Touch Keyboard will function properly again.. E047$ENABLE iOS HOTKEYSMARTPHONE/TABLET CONNECTIONGetting Connected - iOS & AndroidSimply follow instruction in 5 can be skipped since iOS & Android will not require pin-codefor connection.,in which step[BT mode - HID] (page 7)Variable TimeoutNo Timeout (Scanner Always On)*.B030$*. B030$SET MINUTE*.B029$*. B029$SET SECOND*.B021$*. B021$DISABLETIMEOUTThe default timeout is 3 minutes 0 second.For example, to set the timeout as 5 minutes 30 seconds:1. Scan [Set Minute]2. Scan [0] & [5] on page 9 & 10.(Range: 00 ~ 60)(Range: 00 ~ 60)3. Scan [Set Minute]4. Scan [Set Second]5. Scan [3] & [0] on page 9 & 10.6. Scan [Set Second]The period of inactivity before auto power-off.](https://usermanual.wiki/Marson-Technology-Co/MT100A/User-Guide-3112008-Page-7.png)

![- 25 - - 26 -MEMORY MODE For memory version only DATA FORMATExample: To change Data Format to <Barcode Data>, <Date>, <Time>1. Scan [Data Format]2. Scan [4], [2], [3] on page 9.3. Scan [Data Format]The default Data Format is <Barcode Data> onlybelow are all items available for display and their codes: For memory version onlyDefault is comma ( , ) . You may replace it with any alphanumericcharacters from the full ASCII table in Full User’s Manual.Example: To change Field Separator to Semicolon ( ; )1. Scan [Field Separator]2. Scan [ ; ] from the full ASCII table.3. Scan [Field Separator]. R010$*.R010$*FIELD SEPARATOR. R011$*.R011$*DATA FORMAT24DateBarcode DataCode Item Code Item3 TimeAfter scanning the above barcode, the scanner will be able to collect barcodedata off-line. The barcode data will be stored in the format of:< Date >, < Time >, < Barcode Data > < CR >To retrieve stored data, please connect the scanner to the host with cable, access removable storage device “MiniScan” from which you may openor copy the file “BARCODE.txt” to your computer.To delete ONE stored data, please scan below barcode :. R005$*.R005$*. C035$*.c035$*MEMORY MODEDELETE LAST DATATo delete ALL stored data, simply delete the file “BARCODE.txt” in theremovable storage device “MiniScan” until you hear two beeps.](https://usermanual.wiki/Marson-Technology-Co/MT100A/User-Guide-3112008-Page-14.png)
![- 27 - - 28 -The default Date Format is DD/MM/YYYY (Code = 09), belowis full list of available formats and their setup codes: Example: To set Date Format to MM/DD/YY (Code =12)1. Scan [Date Format]2. Scan [1], [2] on page 9.3. Scan [Date Format]. R008$*.R008$*DATE FORMATDATE FORMAT For memory version only0102030405060708DD-MM-YYYYMM-DD-YYYYDD-MM-YYMM-DD-YYYYYY-MM-DDYY-MM-DDDD-MMMM-DDCode Format Code Format0910111213141516DD/MM/YYYYMM/DD/YYYYDD/MM/YYMM/DD/YYYYYY/MM/DDYY/MM/DDDD/MMMM/DDThe default Time Format is HH:MM:SS (Code = 01), below are available formats and their setup codes:Example: To set Time Format to HH:MM (Code = 02)1. Scan [Time Format]2. Scan [0], [2] on page 9 & 103. Scan [TimeFormat]. R009$*.R009$*TIME FORMATTIME FORMAT For memory version only01 HH:MM:SSCode Format Code Format02 HH:MM](https://usermanual.wiki/Marson-Technology-Co/MT100A/User-Guide-3112008-Page-15.png)
![- 29 - - 30 -Example: To set Date to 2012-08-01 (Year-Month-Day):1. Scan [Set Date]2. Scan [1], [2], [0], [8], [0], [1] on page 9 & 10.3. Scan [Set Date]Example: To set Time to 08:10:30 am (Hr:Min:Sec)1. Scan [Set Time]2. Scan [0], [8], [1], [0], [3], [0] on page 9 & 10.3. Scan [Set Time]. R006$*.R006$*SET DATE. R007$*.R007$*SET TIMEDATE & TIME SETUP For memory version only* To avoid Time and Date being reset to factory default due to running low on battery, please fully charge the scanner for at least 2 hours before use.TEST BARCODESEANCode 12812345678Code 39CODE-39 TESTInterleaved 2 of 598765432107164154942052](https://usermanual.wiki/Marson-Technology-Co/MT100A/User-Guide-3112008-Page-16.png)