Maxtronic Co DESKFORCE Disk Array User Manual 8190 Ch3
Maxtronic International Co Ltd Disk Array 8190 Ch3
Contents
users manual 4

3-1
Chapter 3 : " Configuration "
After completing the hardware installation, the disk array must be
configured and the logical unit must be initialized before it is ready
to use. This can be accomplished through the following user
interfaces :
Front Panel function keys ( LCD Display )
or
VT100 terminal connected through the serial port ( Monitor Port )
The LCD display panel and a VT100 terminal can not be used at
the same time.
This chapter guides you through setting up your Disk Array for the first
time. This chapter contains information on setup. The setup program
is a menu-driven utility which enables you to make changes to the
configuration and tailor your Disk Array to your individual needs.
The setup program is a ROM-based configuration utility which
displays the Disk Array's status and allows you to set up the
parameters. The parameters are stored in a nonvolatile battery
backup CMOS RAM which saves the information even when the
power is off.
By using an easy-to-use user interface, you can configure such items
as :
RAID Level
Hot Spare Disk
SCSI ID
Termination
Password ( For protection from unauthorized use )
Firmware update (VT100 Terminal mode only) --- for update
procedures please refer to Chapter 4 : Advanced information.
The setup program has been designed to make it as easy to use as
possible. By using a menu-driven program, you can scroll through
the various sub-menus and make your selections among the various
predetermined choices.
Configuration from the front Panel
The LCD Display front panel function keys are the primary user
interface for the Disk Array. Except for the "Firmware update" ,all
configuration can be performed through this interface.
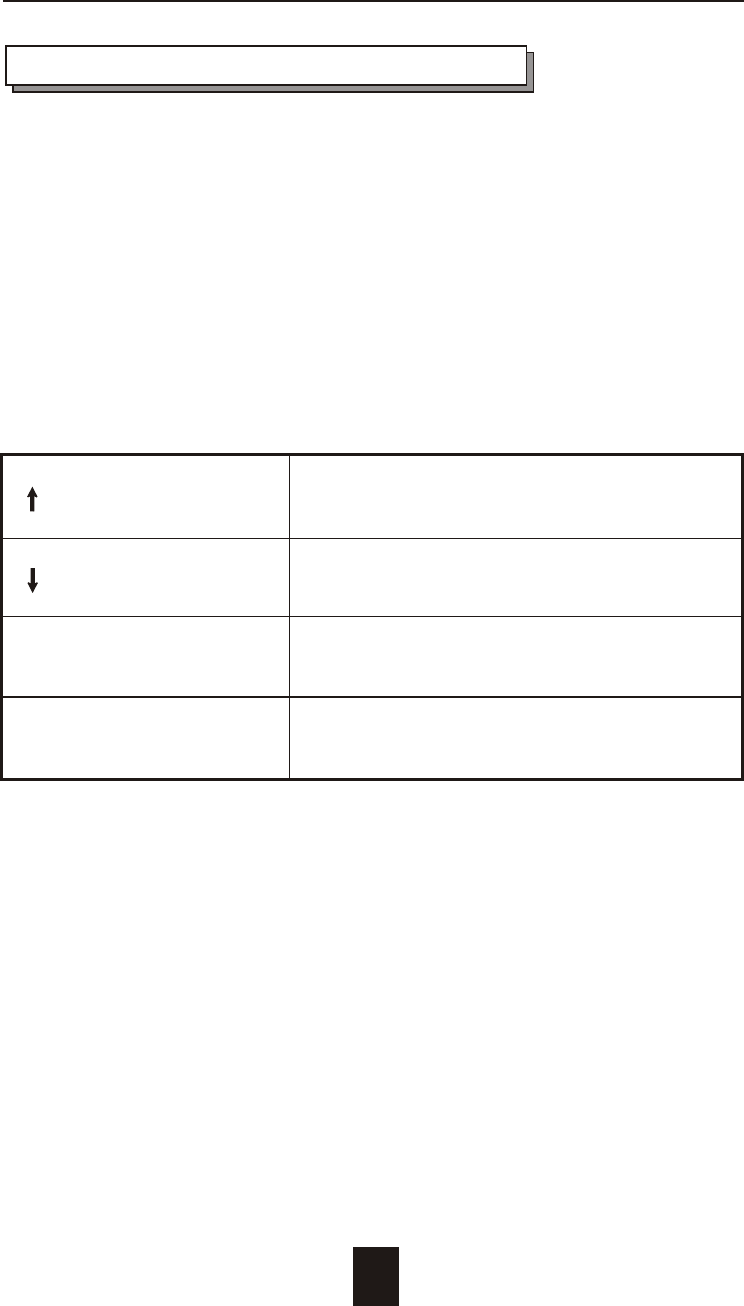
Function Key Definitions
The four function keys at the top of the front panel perform the
following functions :
( ) Up Arrow / Right Arrow Use to scroll the cursor Upward / Rightward
( ) Down Arrow / Left Arrow Use to scroll the cursor Downward / Leftward
( Enter ) Use to confirm a selected item
( ESC ) Use to exit a selection
Configuration
3-2
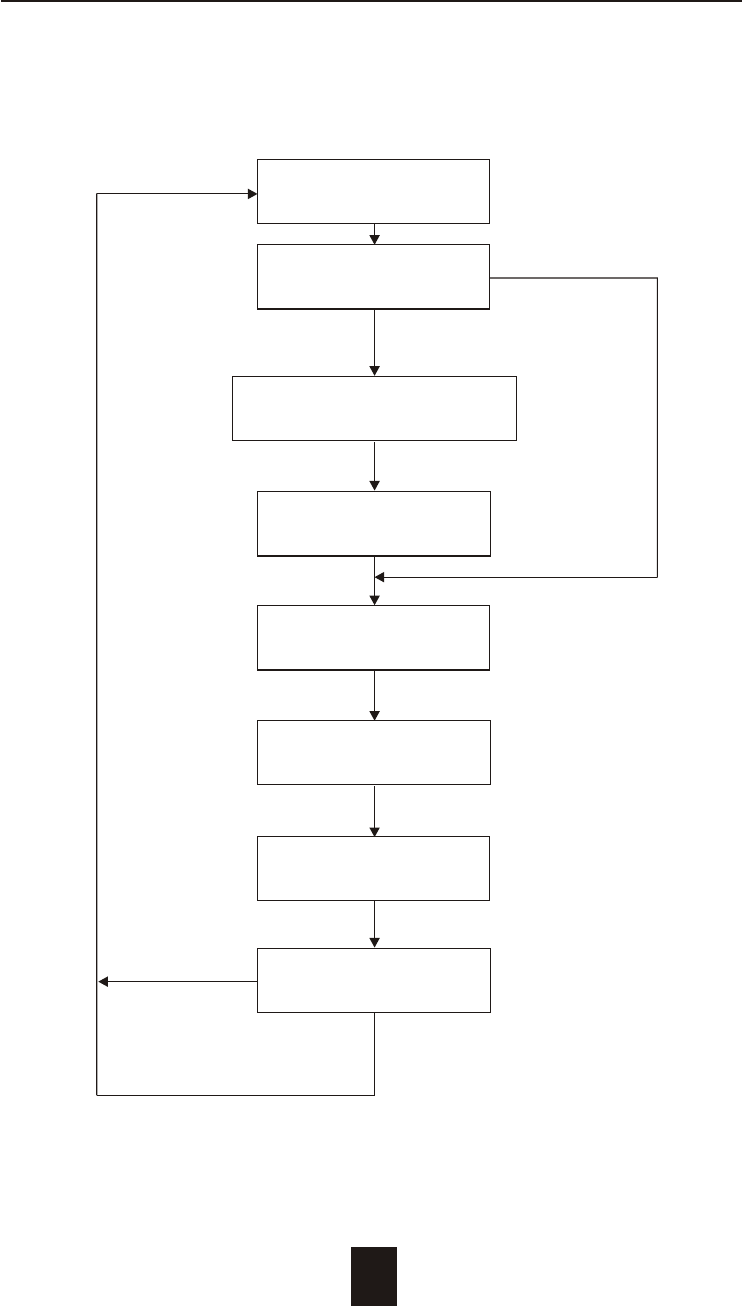
Configuration procedures (via Front Panel)
Main screen
Re-Config RAID
No
Yes
RAID Level
( 5, 3, 1, 0, 0+1, None )
Hot Spare Disk
( Yes / No )
Set SCSI ID
( 0 ~ 14 )
Termination
(Enable / Disable)
Set Password
( 4 Digital )
Save Configuration
No & Restart
Yes
3-3
Configuration

Starting the configuration
1. Power-on the Disk Array. At the end of the power-on self test
program, the LCD displays the current system status.
2. Press the front panel " Enter " key to access the built-in
configuration program.
3. When the screen displays the password prompt and asks you to
" Enter Password "
Enter Password
0
press " Enter " 4 times to input the default password
( default password is " 0000 " )
4. Re-Configuration RAID
Select " No " to just set up " SCSI ID# ", "Terminator", and
"Password"
Select " Yes " to set up " RAID Level " , " Hot spare disk " , " SCSI
ID# " , " Terminator " , and " Password "
3-4
Configuration

5. Set RAID Level
Move cursor ( ) to the desired RAID Level ( 5, 3, 1, 0, 0+1,
None ), press " Enter " to confirm.
All data on the disk drives will be lost by changing the RAID Level.
* RAID Level " None " = No Configuration
6. Set Hot Spare Disk
Select " Yes " to set one Disk Drive as a Hot-spare Disk.
(Valid for RAID Level 5 and 3 , the total number of Disk Drives
installed must be more than 3 Disk Drives )
7. Set SCSI ID
Each device on a specific SCSI bus must be configured with a
target address ( which is a "SCSI ID" ) which is different from any
other devices on the SCSI Bus.
The default SCSI ID for this system is ID 0.
If you need to assign a different ID # for your Disk Array. The
available SCSI ID# for this system is ID# 0 ~ 14 .
You must assign a different SCSI ID to each SCSI device on the
SCSI Bus. The SCSI ID# must be Unique for each device.
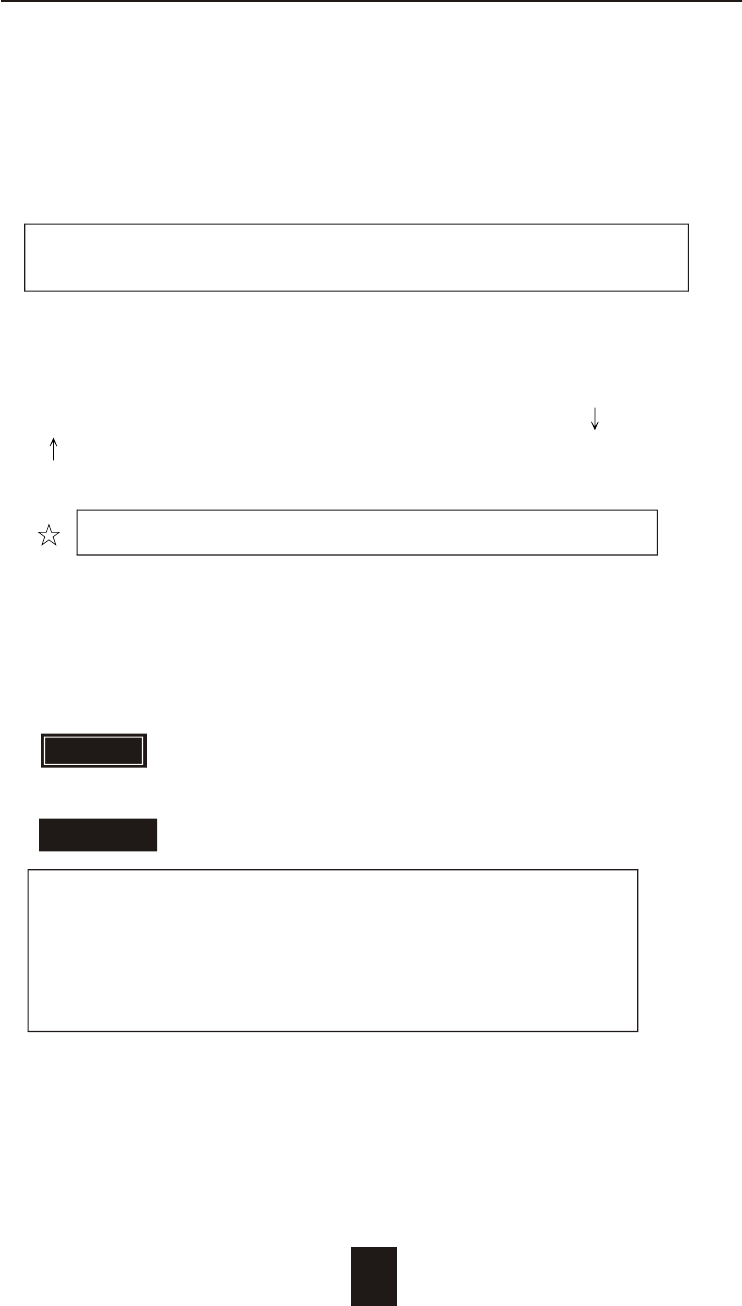
Warning
3-5
Configuration
3-6
Configuration
8. Termination
Terminating a SCSI chain is achieved by adding a terminator to
each end of the SCSI bus. The Disk Array supports active
termination at the controller's SCSI end.
Termination "enabled" must be set when the Disk Array is at
one end of the SCSI Bus.
9. Set Password
Press " Enter " to activate the Password setting. When the cursor
stop on the desired "number" or "character", Using " " and
" " function keys to choose the desired characters and then
press " Enter " to confirm it.
Press " ESC " function key for password "No Change"
10. Save Configuration & Restart
Select the Save Configuration function and Press the " Enter " key
to save and activate your selections.
Warning ! All data will be lost if you change RAID Levels .
Saving configuration changes causes the disk array
controller's working parameters to change. This can
produce unpredictable results if it occurs during Host
and Array activity. All activity to the controller should
be stopped before saving configuration changes.
WARNING
STOP
STOP

3-7
Configuration
Configuration from VT100 Terminal Mode
By connecting a VT100 compatible terminal or a PC operating in a
terminal emulation mode, a configuration can be performed
through this interface.
To ensure proper communications between the "Disk Array" and the
"Terminal", Please configure the VT100 terminal settings to the values
shown below :
VT100 Terminal ( or compatible ) Set up
Connection Serial Port ( COM 1 or COM 2 )
Protocol RS232 ( Asynchronous )
Cabling Null-Modem cable
Baud Rate 115,200
Data Bits 8
Stop Bit 1
Parity None
Keyboard Function Key Definitions
" Enter " key, Use to confirm a selected item
" ESC " key, Use to exit a selection
" A " key, Use to scroll the cursor Upward / Rightward
" Z " key, Use to scroll the cursor Downward / Leftward
" Tab " key, Use to switch mode ( Menu / Output Area )
3-8
Configuration
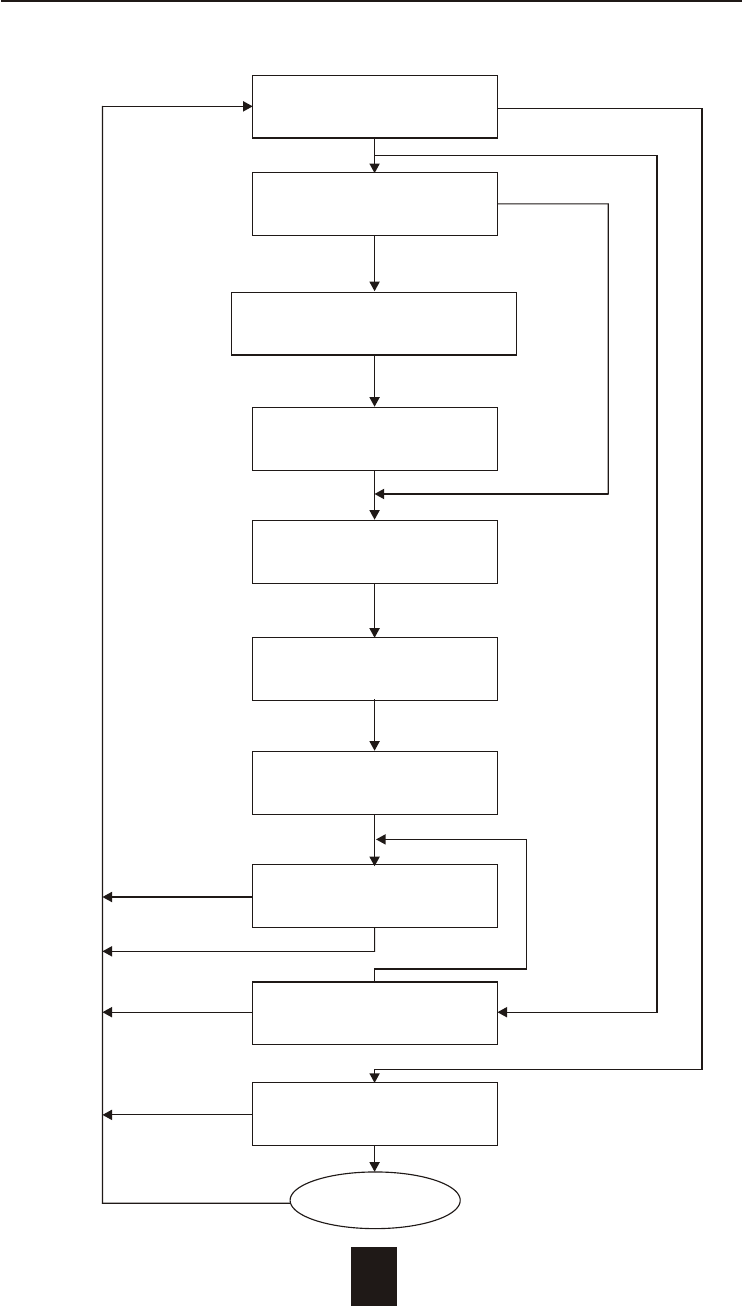
Configuration procedures ( VT100 Terminal )
Main screen
Re-Config RAID
No
Yes
RAID Level
( 5, 3, 1, 0, 0+1, None )
Hot Spare Disk
( Yes / No )
Set SCSI ID
( 0 ~ 14 )
Termination
(Enable / Disable)
Set Password
( 4 Digital )
Save Configuration
No & Restart
Yes
Yes
On-Line Expand
No (Enable)
Update Firmware
No
Yes
Update
3-9
Configuration
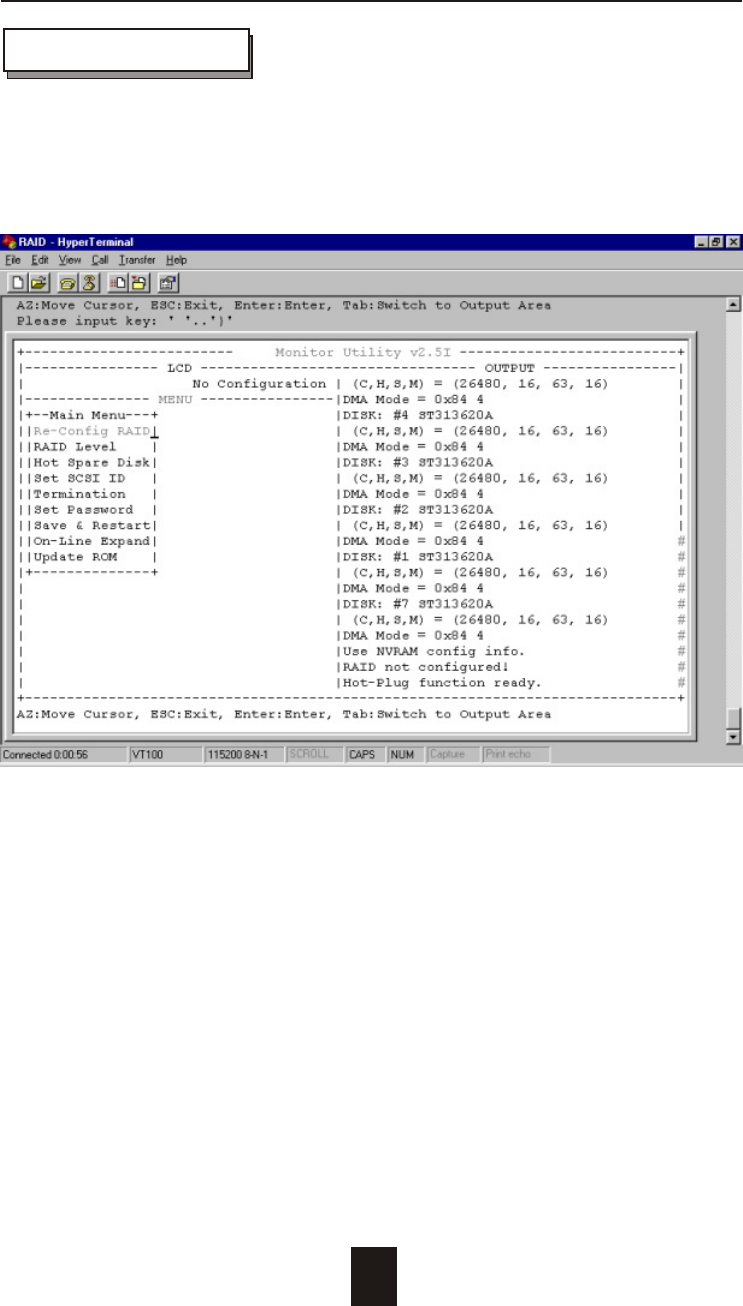
Main Screen
3-10
Configuration
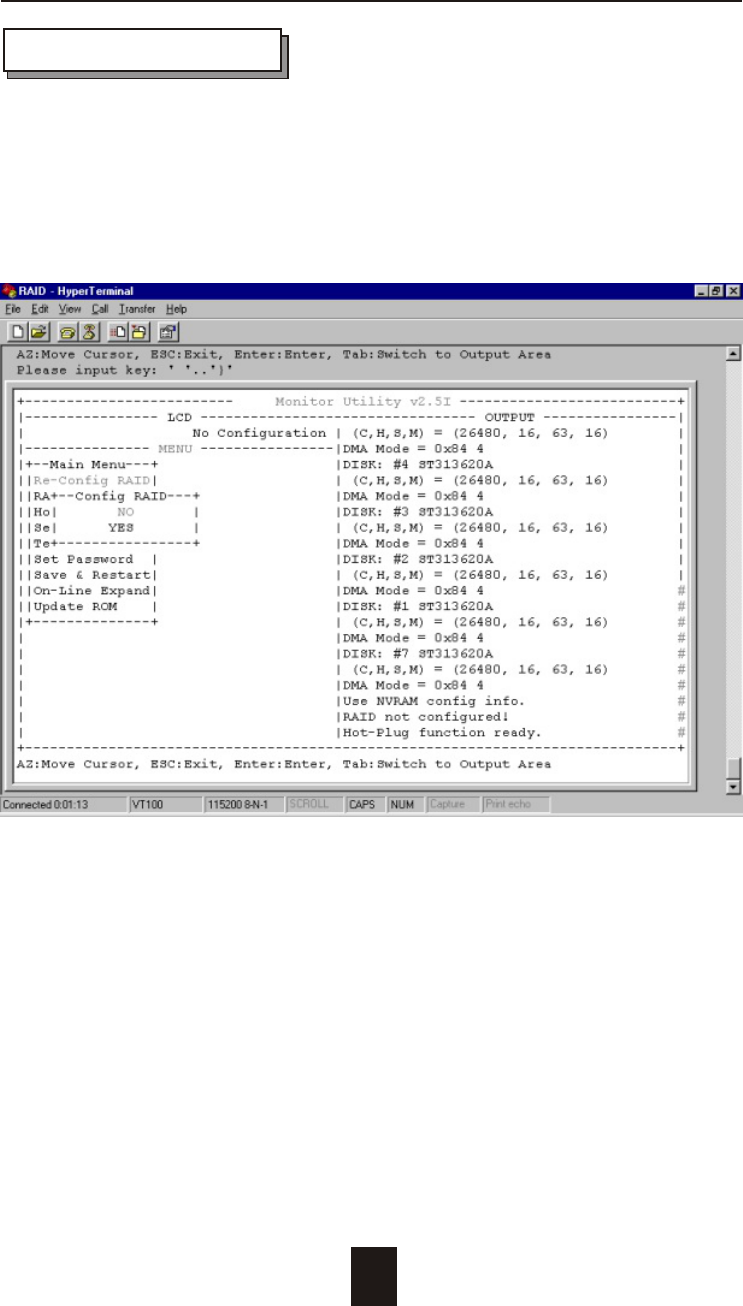
Re-Config RAID
Select " No" for setting : " SCSI ID ", " Terminator ", " Password "
Select " Yes " for setting all the configurations
3-11
Configuration
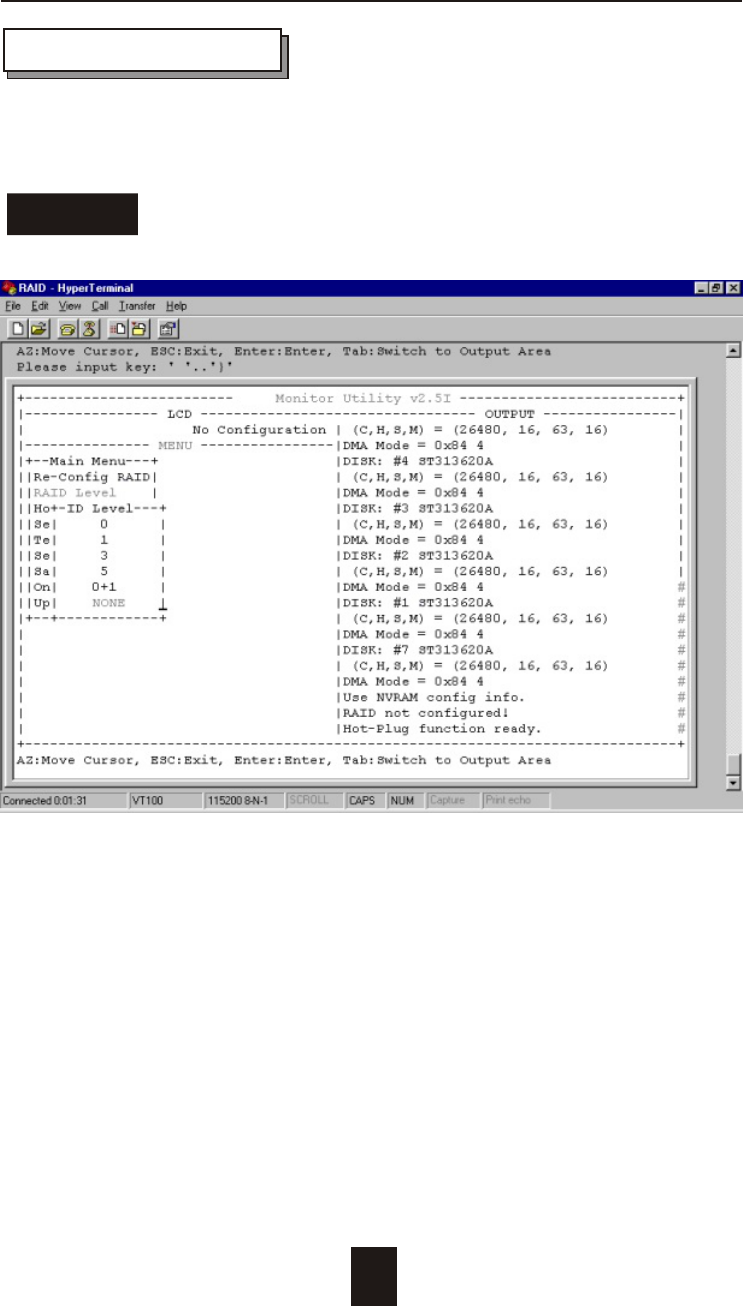
Set RAID Level
Move the cursor to the desired RAID Level ( 5, 3, 1, 0, 0+1, none ),
and Press " Enter " to confirm it.
All Data will be lost by changing the RAID level.Warning

3-12
Configuration
Hot Spare Disk
Select " Yes " to set One Disk Drive as a Hot Spare Disk.
This Function is valid in RAID level 5 and RAID level 3, the total Disk
Drives installed must be more than 3 Disk Drives.
( Disk Drives number > 3 )
3-13
Configuration
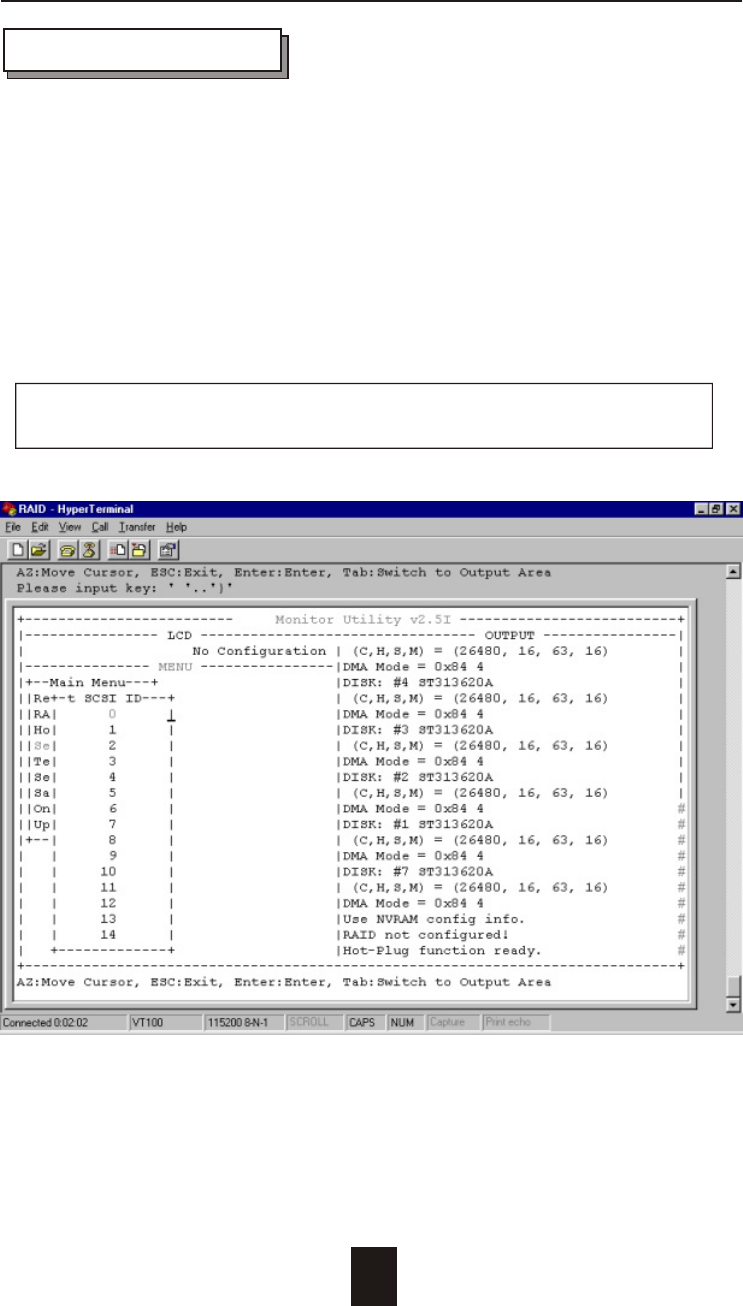
Set SCSI ID#
Each device on a SCSI bus must be configured for a Target
address (which is a "SCSI ID"), which is different from any other
device on the SCSI Bus.
The default ID for this Disk Array is ID#0
If you need assign a different ID# for your Disk Array,
The available SCSI ID# for this system is ID# 0 ~14
You must assign a different SCSI ID to each SCSI device on the
SCSI Bus. The SCSI ID# must be unique for each device.
3-14
Configuration
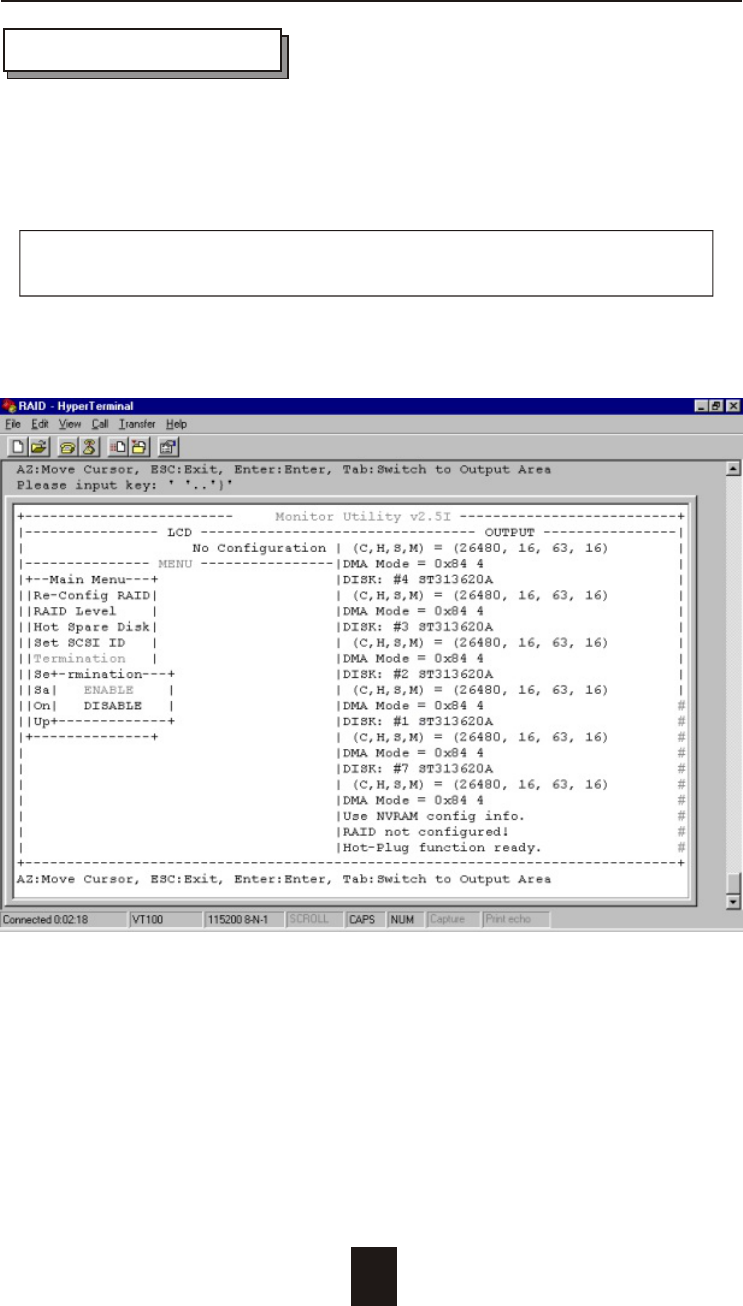
Termination
Terminating a SCSI chain is achieved by adding a terminator to
each end of the SCSI Bus. The Disk Array supports active
termination in the controller's SCSI end.
Termination "enabled" must be set when the Disk Array is at
one end of the SCSI Bus.
3-15
Configuration
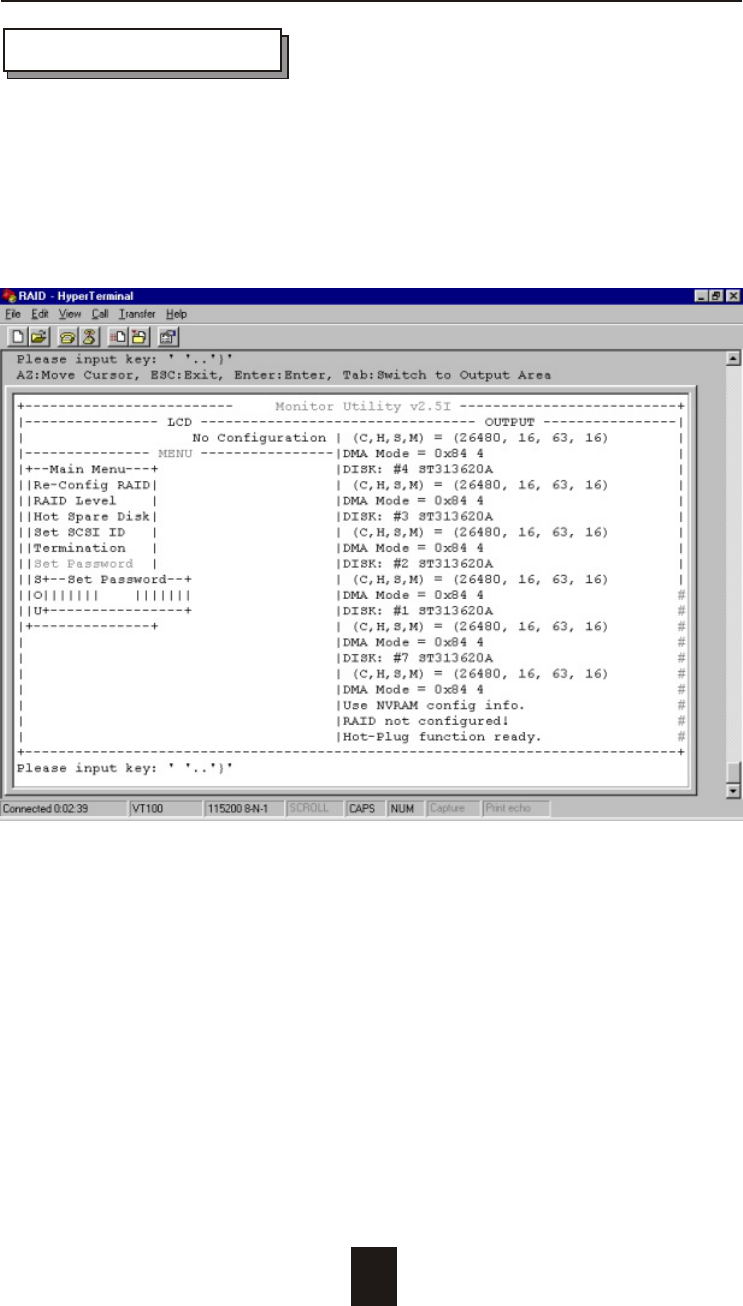
Set Password
Press " Enter " to activate the password setting when you
key-in the desired " Number " or " Character ".
Press " ESC " for no change to the password.
3-16
Configuration
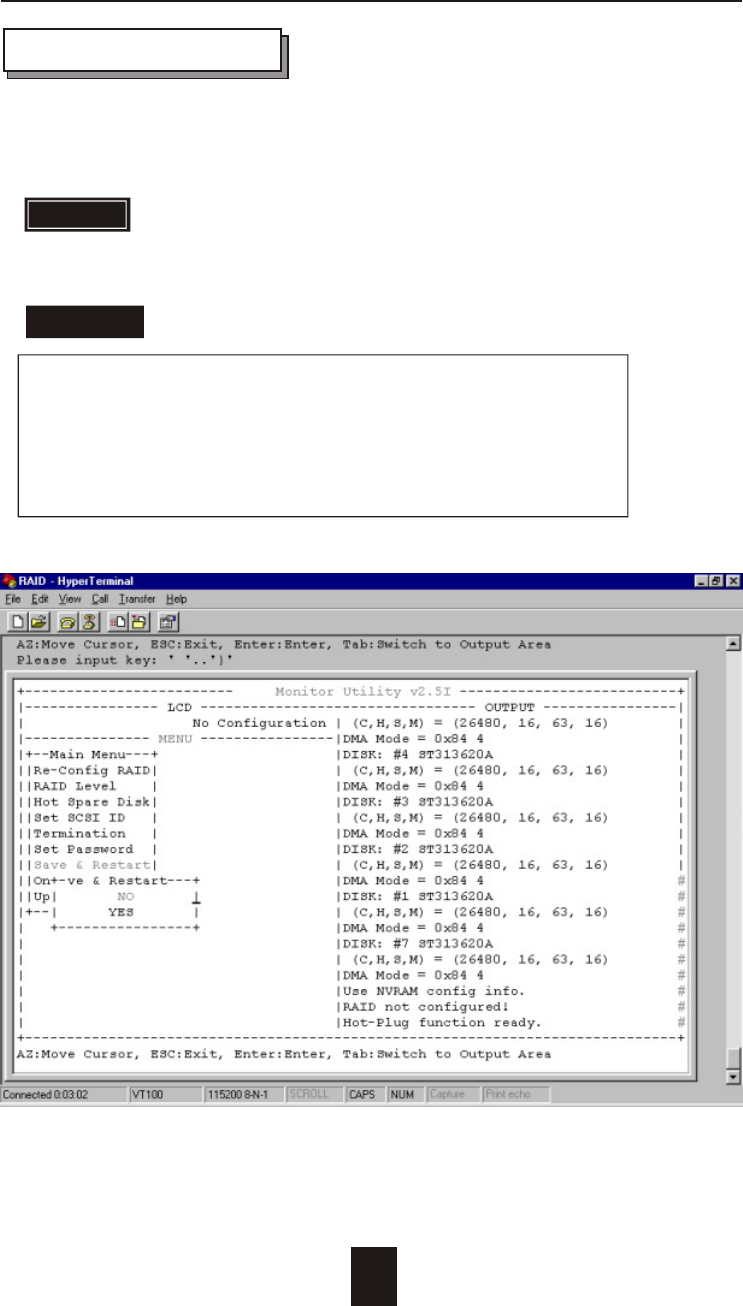
Save & Restart
Saving configuration changes causes the disk array
controller's working parameters to change. This can
produce unpredictable results if it occurs during Host
and Array activity. All activity to the controller should
be stopped before saving configuration changes.
WARNING
STOP
STOP
Select the Save & Restart function and press " Enter " to save and
activate your selections.
Warning! All data will be lost if you change the RAID level