Maycom Co MAYCOMVR-2000 Digital Voice Recorder User Manual N6MMAYCOMVR 2000 manual
Maycom Co Ltd Digital Voice Recorder N6MMAYCOMVR 2000 manual
User Manual

DIGITAL VOICE RECORDER
VOICE MAGIC
OPERATION MANUAL

2
Information to the user
This equipment has been tested and found to comply with the limits for a Class B digital device
pursuant to part 15 of the FCC Rules. These limits are designed to provide reasonable protection
against harmful interference in a residential installation. This equipment generates, uses and can
radiate radio frequency energy and, if not installed and used in accordance with the instructions,
may cause harmful interference to radio communications. However, there is no guarantee that
interference will not occur in a particular
installation. If this equipment does cause harmful interference to radio or television
reception, with can be determined by turning the equipment off and on, the user is
encouraged to try to correct the interference by one more of the following measures:
- Reorient or relocate the receiving antenna.
- Increase the separation between the equipment and receiver.
- Connect the equipment into an outlet on a circuit different from that to which the
receiver is connected.
-. Consult the dealer or an experienced radio/TV technician for help.
Warning
Changes or modifications not expressly approved by the party responsible
for compliance could void the user's authority to operate the equipment.

3
Contents
Voice Magic Overview 4
Features and Functions 6
Installing Batteries 7
Time Adjust 9
Selection of Mode 10
Recording 11
Playback 15
Erasing the Recorded Messages 18
Connecting to External Equipments 19
Connection to PC 21
Specification 29
Precautions 30
Troubleshooting 32
4
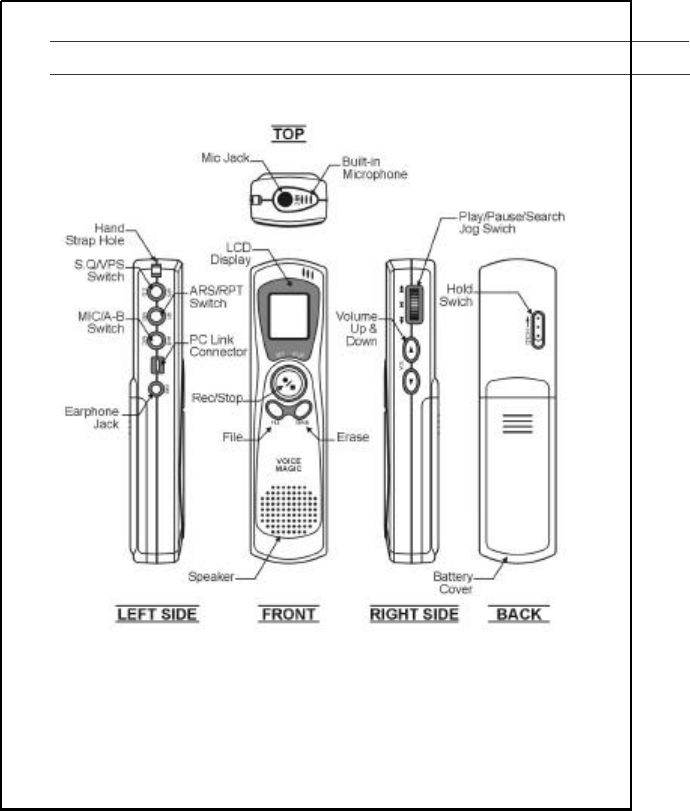
Voice Magic Overview
5
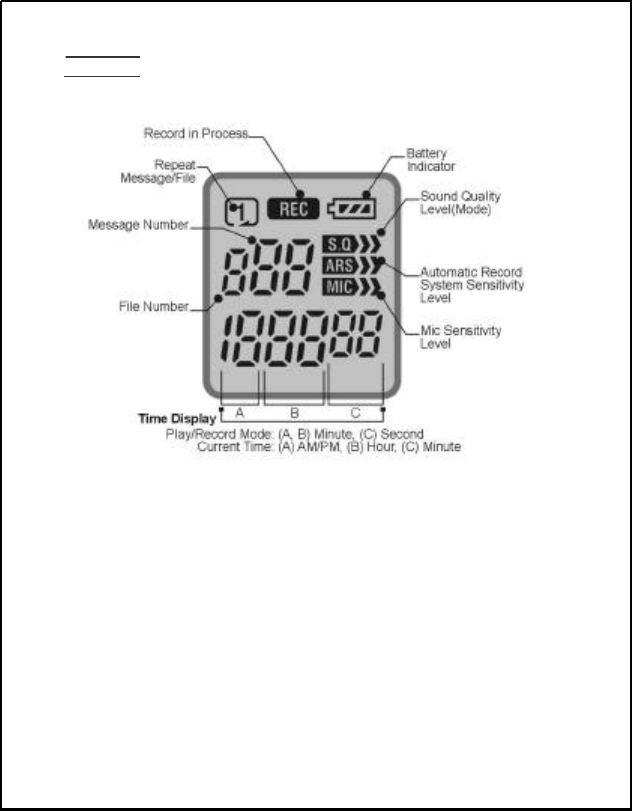
DISPLAY

6
Features and Functions
Fast Transfer Speed to PC approx 10:1 (VR-2000 series only)
Effective Variable Playback Speed (V.P.S)
as x0.5, x0.7, x1.0, x1.5, x2.0
1164-minute Recording Time in case of VR-x032 (LP Mode)
5 Files-Each File contains up to 99 individual messages
LCD Display shows message number, real-time counter, current
time and operating modes
Three (H/M/L) Steps for Sound Quality
and ARS (Automatic Recording System) Sensitivity.
Two (H/L) Steps for Microphone Sensitivity
Digital Volume & Jog Switch Control
Repeat Message or Repeat File Selection
Repeat specific section (A-B)
Message erase or file erase function
Battery Power Level & Low Voltage Indicator
Built-in microphone and speaker
Ultra palm Design
Hand strap for easy carrying
7
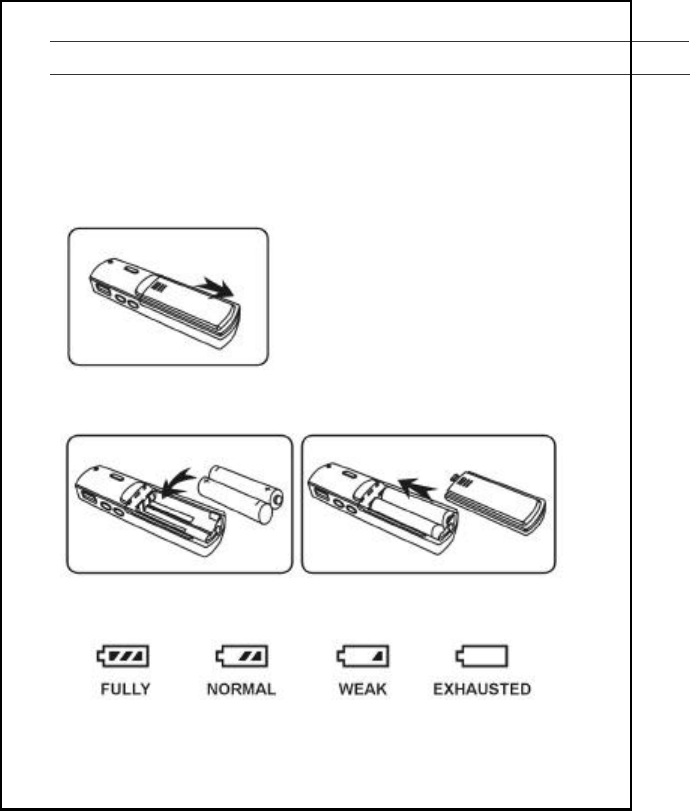
Installing Batteries
Loading/Replacing the Batteries
Caution : Be sure to replace batteries in Clock mode.
1. Open the battery cover, press and then slide it off.
2. Load two “AAA” batteries (LR-03) in the compartment, and then
slide the cover back into place
3. You can always check the battery condition as figures below.
8
Battery Life
Battery Type LR-03 Alkaline
Recording Mode Approx. 12 hours
Speaker Play (VOL.12) Approx. 7 hours
Earphone Play (VOL.12) Approx. 8 hours
Cautions :
1. Do not use different kind of batteries together.
2. Remove the batteries when voice recorder will not be used for
a long time.
9
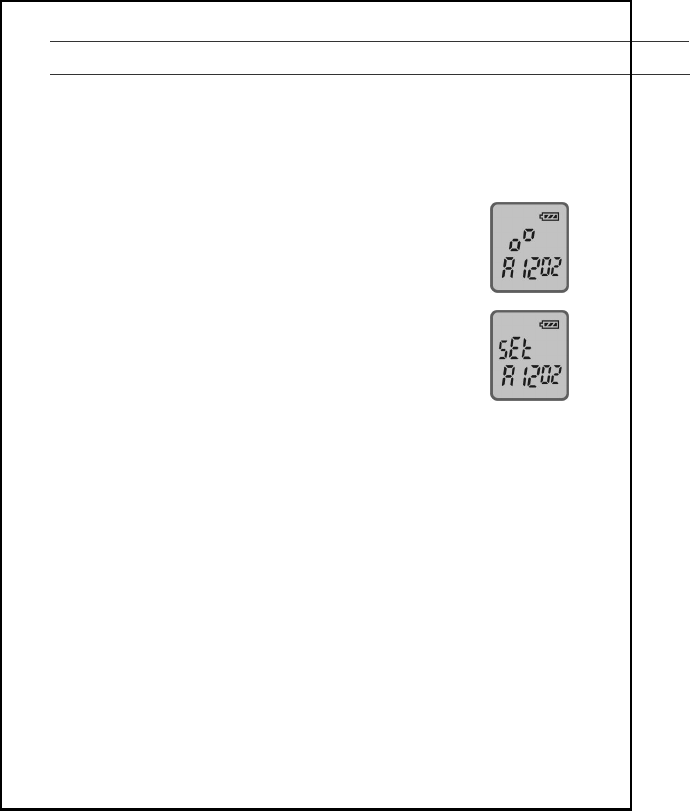
Time Adjust
Only available this function on Clock mode.
Time Adjustment
1. Press ERASE button for more than 2 seconds
during Clock mode.
2. When the digit blinks you can adjust time using
forward() or rewind() button,
Press PLAY/(PAUSE) button to adjust next digit.
3. After setting the time, press REC/STOP button
to store.
Note : - The stored time can be sustained about 90 seconds without
batteries. If you replace the batteries within 90 sec. you
don’t need to adjust the time again.
- When you replace the batteries, LCD display will be blurred
gradually.
10
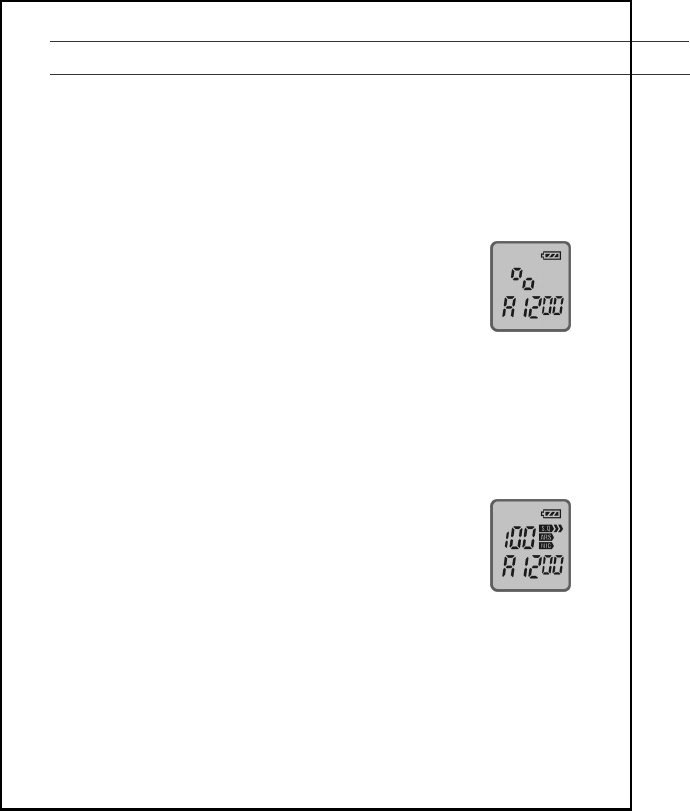
Selection of Mode
Power On/Off
In order to Power on/ off, you have to replace the battery.
Clock Mode
This mode display current time, and minimize battery
consumption.
If you press any button on clock mode, it will go to
stand-by mode.
If you no buttons are pressed for 30 seconds after stopping when
Recording or playback, the LCD will be changed to Clock mode
automatically.
Stand-By Mode
This mode is stand-by status of operation and displays
current file, message No, and Record Time.
If current file has no recorded Message, it displays
message No. as “00” also the current time.
This mode will keeps 30 sec. after changing from
clock to stand-By mode.
All functions are available in stand-by mode.
11
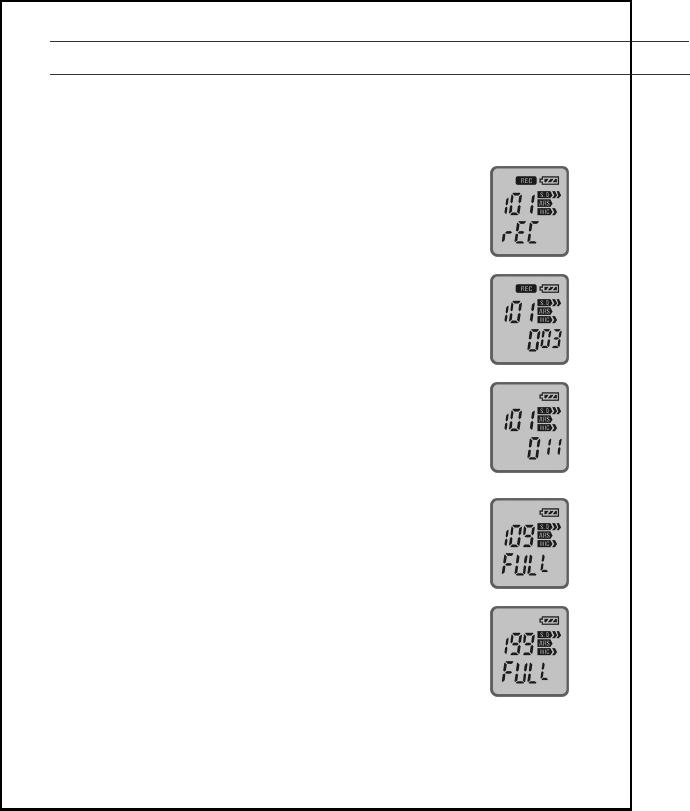
Recording
Following operations are available at the stand-by mode.
How to Record
1. Press the REC/(STOP) button after turning the
microphone toward the sound sources.
2. Now, the recording starts and “rEC” message,
file and message No. will be displayed on LCD
also, “REC” icon will be blinked.
* The recording number will be the next of the last one.
3. To stop recording, press the REC/(STOP) button
again.
Note :
- The message of below 2 sec. is not able to record.
- To avoid failure, perform a trial recording first.
- If the recording time exceeds the maximum,
a message “FULL” appears and the recording
no longer continues.
- You can record maximum 99 messages in each file.
If further messages are recorded, a message
“FULL” will appear.
At this time, record again after selecting a new file.
12
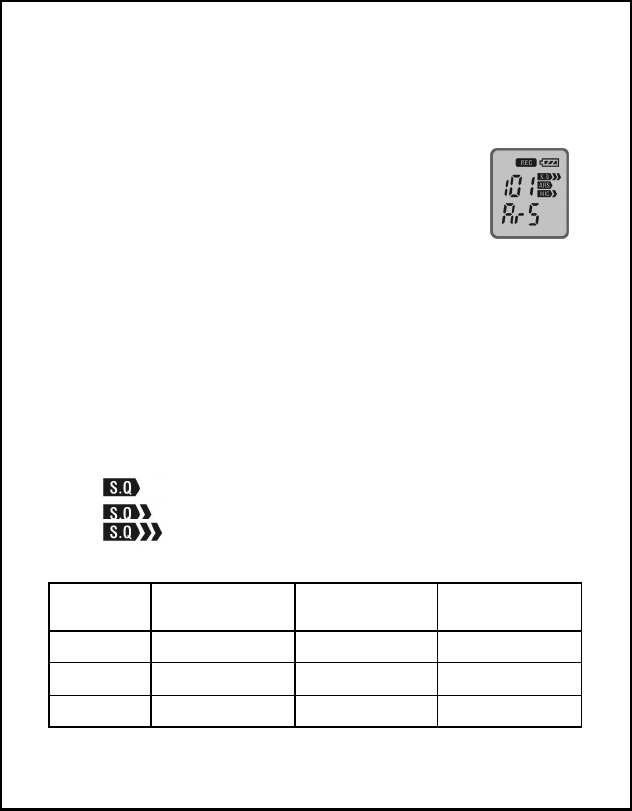
ARS(Automatic Record System) mode selection
Available only when any sound exists
1. Press REC/(STOP) button, for more than 2 sec.
in stand-by mode.
2. “ARS”, “REC” icon will be blinked and “ARS” will
be displayed on the LCD
3. Now, the recording starts with ARS mode.
Sound quality (S.Q) mode selection
Select recording mode with the S.Q/(VPS) button in stand-by mode.
You may select the recording time in 3 steps according to your desire.
You may have the standard record time (SP mode), more extended time
(MP mode) and most extended time (LP mode). Please refer to following
table for the each recording time mode.
- : Long play mode
- : Medium play mode
- : Standard play mode
Available Recording Time
Mode SP
(standard mode) MP
(medium mode) LP
(long mode)
VR-x008 133 min 174 min 290 min
VR-x016 266 min 355 min 581 min
VR-x032 533 min 711 min 1164 min
* Better-sound quality can be obtained in SP mode.

13
* The sound quality diminishes in LP mode.
ARS Sensitivity selection
Select recording mode with the ARS/(RPT) button in stand-by mode.
- : Hi sound input record
- : Medium sound input record
- : Low sound input record
Microphone Sensitivity (MIC) selection
Selecting the signal source’s distance or loudness.
Select recording mode using MIC/(A-B) button in stand-by mode.
- : Low Mic sense (Short distance source)
- : High Mic sense (Long distance source)
Remaining Record Time
You can check remaining record time by pressing
the FILE button long in clock mode or stand-by mode.
* Displays the amount of record time left, in the
present mode.
* You can check the memory capacity 8, 16 and 32.
14
Record Monitoring
You can monitor the records by an external earphone during record process.
It’s not possible to control recording level by the volume control.
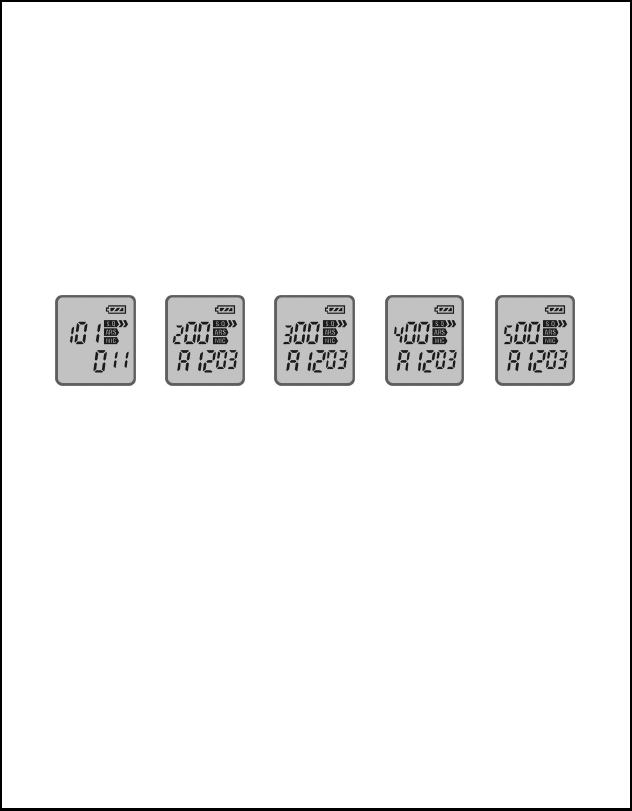
Selecting a File
Select a file among five files (1, 2, 3, 4 and 5) with the FILE button in
stand-by mode.
Each file can record maximum 99 messages.
* You can record similar messages in the same file.
* If it has no recorded message in a file, the current time will be
displayed on LCD.
15
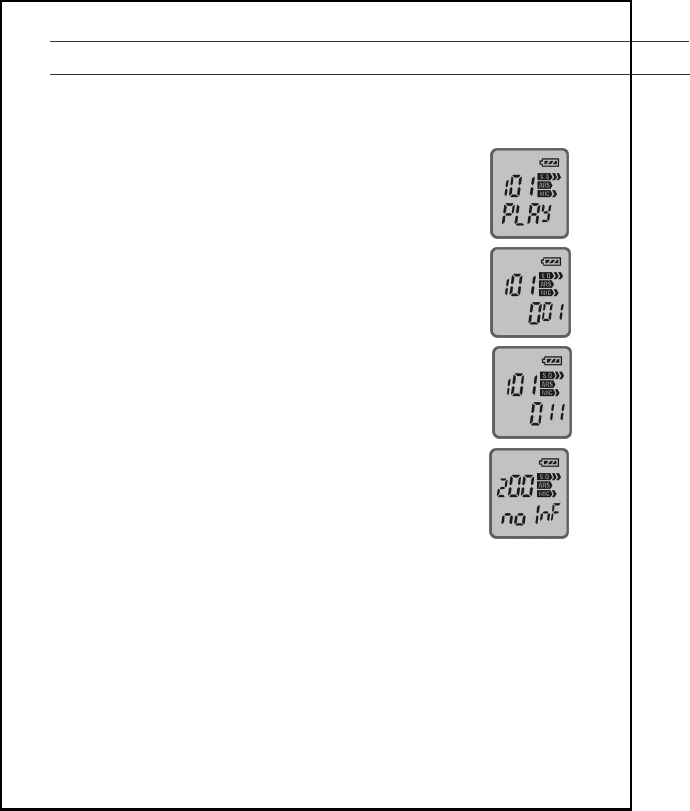
Playback
Following operations are available at the stand-by mode.
How to Playback
1. Select a message by sliding jog switch and
press PLAY/(PAUSE) jog switch, then playback
will start.
2. File No., Message No., playtime will be displayed
in sequence on LCD.
3. To stop the playback, press REC/(STOP) button.
The last played message will be displayed on
LCD.
4. When there is no recorded message, “no InF” will
be displayed, and playback will be cancelled.
After “no InF” display on LCD, the current time will
be displayed automatically.
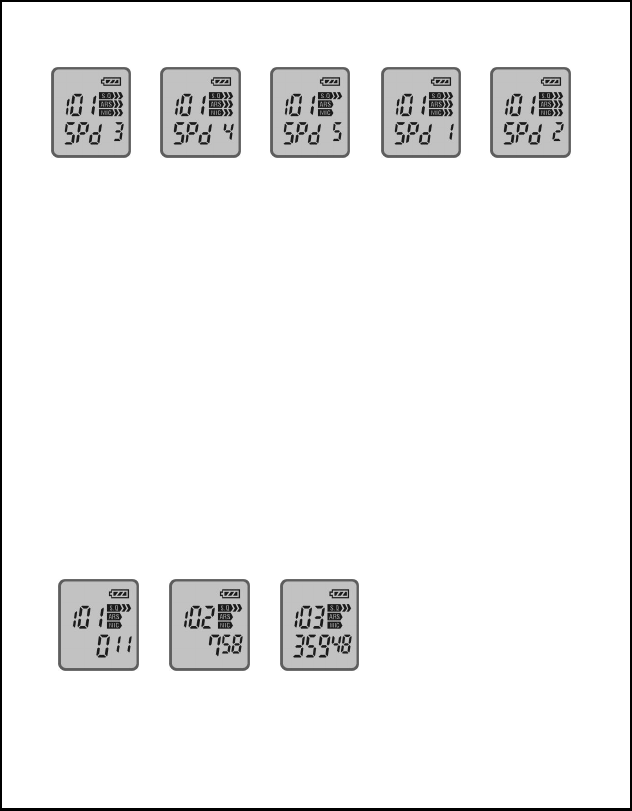
Variable Playback Speed (V.P.S)
This function controls the playback speed.
If you press VPS/(S.Q) button during playback mode, [SPd 3], [SPd 4],
[SPd 5], [SPd 1] and [SPd 2] sign will be displayed on LCD at each press
of the button.
Each sign indicates playback speed of x1.0, x1.5, x2.0, x0.5 and x0.7 in
order.
16
FF & RW search in playback
Use these functions to search fast and listen to what you want during
playback.
When you press Fast Forward() button or Rewind () button
shortly during playback, the message number will be increased or
decreased and will playback automatically.
FF & RW skip in playback
If you hold Fast Forward or Rewind button more than 2 seconds, playback
will stop and the playtime will be increased or decreased. If you release the
button, the playback will resume.
Selecting a Message
At stand-by mode, press fast forward() or rewind() button to
search next or prior message.
* The current file has no recorded message, the button will not
be operated and display the current time on LCD.
17
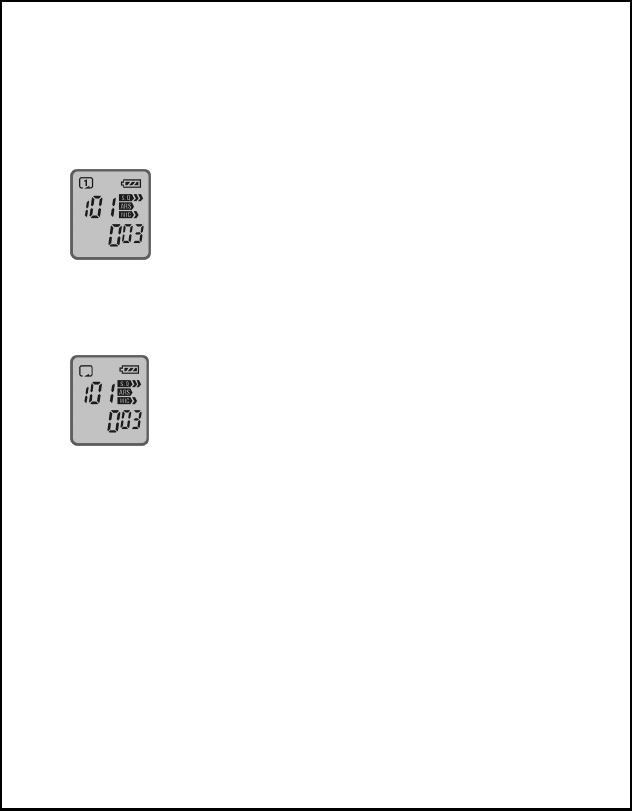
Repeat one message or All messages
If you press RPT/(ARS) button during playback, it will be displayed on
LCD as bellows.
Repeating one message.
If you press RPT/(ARS) button ones again, it will be displayed on LCD as
bellows
Repeating all messages in a file.
* If you want to cancel repeating message, press RPT/(ARS)
button once again.
Repeat A to B
In this function, playback repeats specific section of message continuously
in a message.
Press A-B/(MIC) button during playback to fix the point “A”. Then
playtime sign will blink on LCD. Playback or seek in a message what you
want, press A-B/(MIC) button again to fix the point “B”.
And then the section “A” to “B” will playback over and over again.
* If you want to cancel repeat A to B, press A-B/(MIC) button
once again.
18
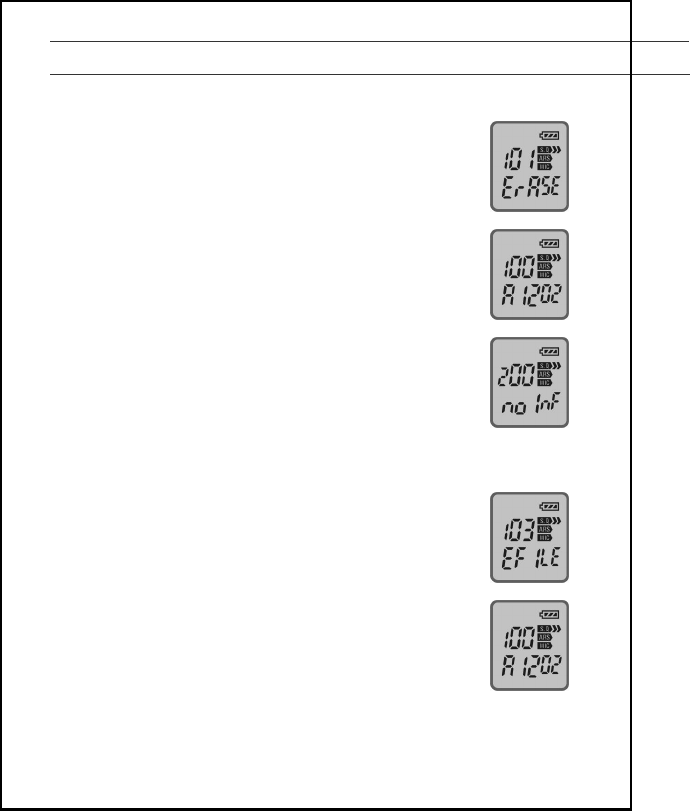
Erasing the Recorded Messages
Erasing one message
1. Select the message number you want to erase,
then press ERASE button at stand-by mode.
2. “ErASE” sign will appear and blink on LCD.
3. Press the ERASE button once more, then the
message will be erased.
If you do not press the ERASE button for more than
5 sec during “ErASE” sign blinks on LCD, Erase
function will be cancelled.
And then the LCD will be changed to stand-by mode
automatically.
* If there is no recorded message, “no InF” sign will be
displayed on LCD.
Erasing whole messages in a File
1. Select the file you want to erase, then press Erase
button for more than 2 sec at stand-by mode.
2. “EFILE” sign will appear and blink on LCD.
3. Press the ERASE button once more and then, all
messages in a file will be erased.
Caution : Please note the erased messages will not recover.
19
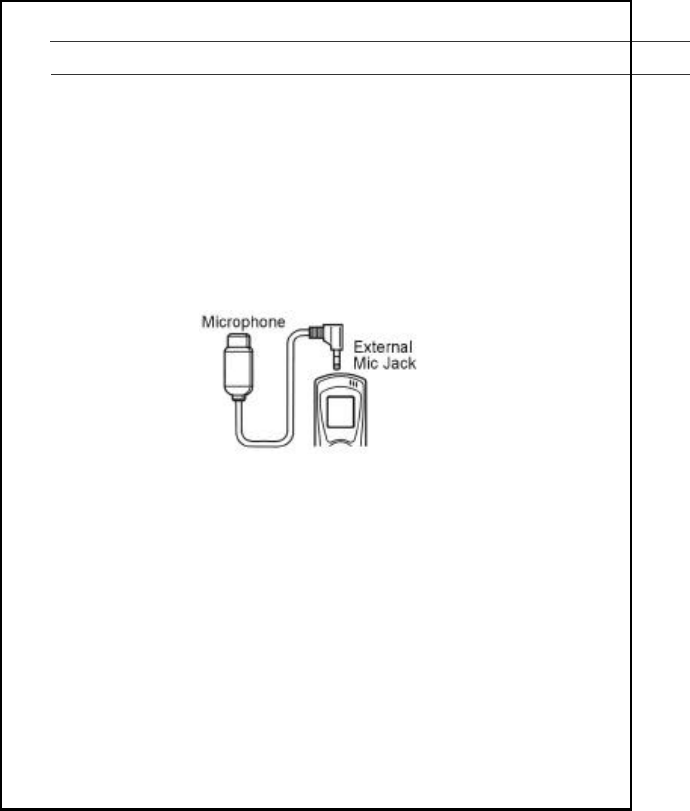
Connecting to External Equipments
Recording with External Microphone
Record after connecting an external microphone to the external
microphone jack, as shown in the figure below.
You can record your voice in action by mounting the external microphone
on your collar. And you can record with better sound quality when the
microphone is closer to the sound source.
* When External Microphone is connected to External Mic. jack,
built- in microphone does not operates.
20
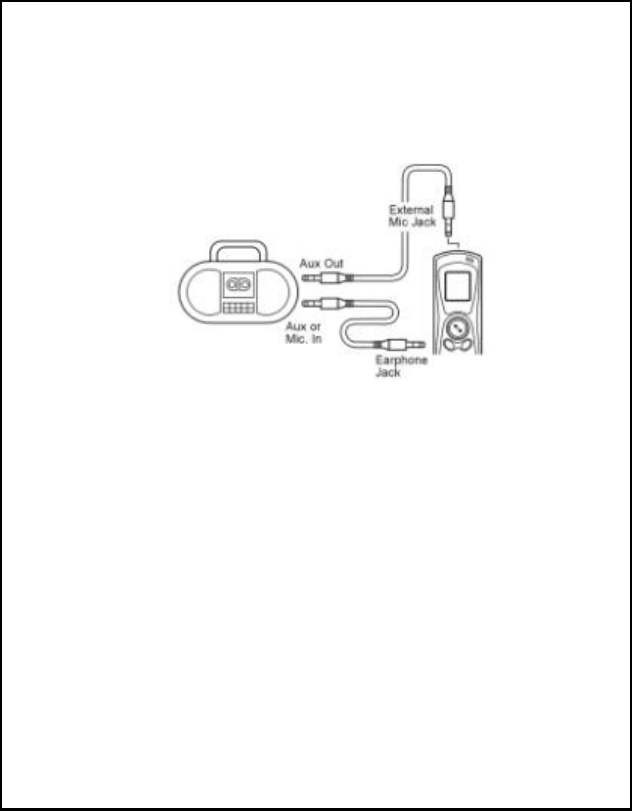
Connection to External Appliance
Following figure explains how to record from external appliance to the set,
and send recorded messages back to external appliance by connecting
audio cable.
Recording from External Appliance
Lower the sound volume of the external appliance, and connect the audio
cables between External Mic. jack of the set and audio output jack of the
external appliance. Then, start recording. (It is possible to monitor
recording sound through external earphone.
At this time the recording level is not changed by volume controller of set.
Recording into External Appliance
Connect the audio cables between earphone jack of set and External Mic.
jack of the external appliance. Then press, at the same time, PLAY button
of Voice Recorder and the RECORD button of external appliance together.
(Try test recording first in order to avoid recording failure. Adjust the
volume using the volume controller of the voice recorder.
21
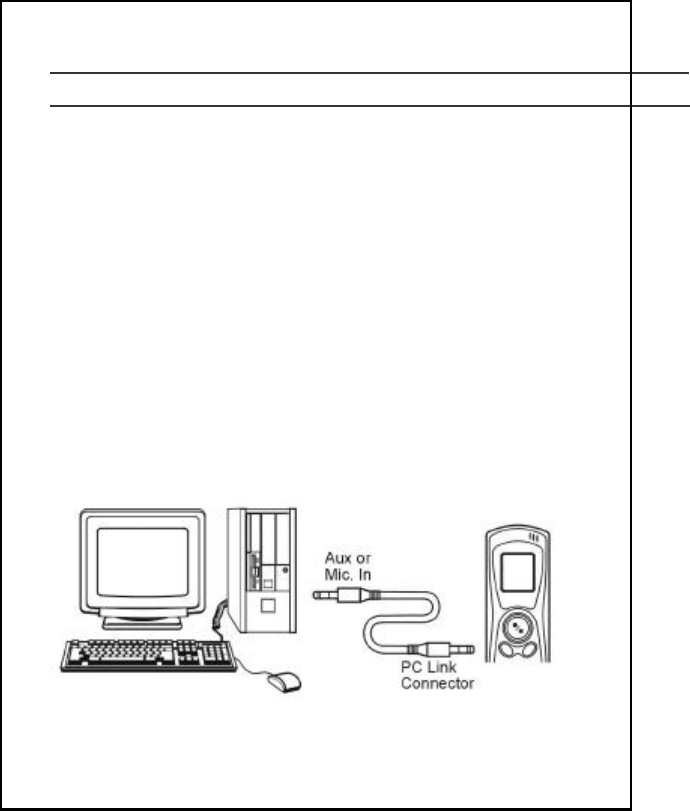
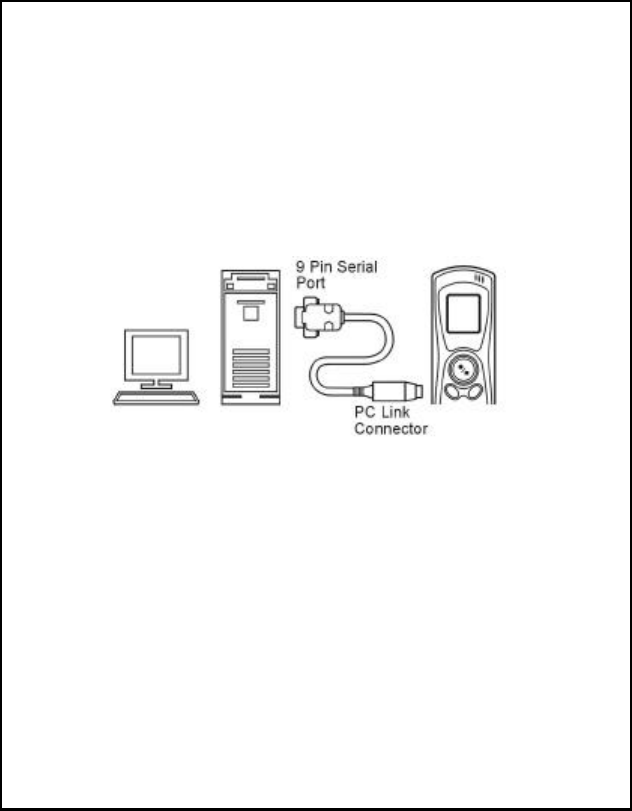
Connection to PC
Connection to PC
<Conditions>
- PC : IBM PC, Min. Pentium-150
- Memory : Min. 8MB(Above 32MB is recommended)
- Operation System : WIN 95/98/ME/2000
- Hard Disc : Min. 4MB - Sound Card
<How to Connect>
Jet Voice Mail is a program to save the recorded messages to PC by the
sound card in PC and send the voice mail and edit the saved messages.
Please check above PC conditions before using PC and connect
Line-in/out cable between PC and Voice Magic as the drawing right side.

22
<How to Install Program>
1. Turn on power and insert CD disc into CD-ROM drive.
2. The program will be set automatically.
3. Press NEXT to continue and press CLOSE to exit SETUP.
4. Jet-Voice Mail is automatically displayed on screen.
5. Double-click Jet-Voice Mail icon on screen. (Jet-Voice Mail
graphic will be displayed on screen.)
6. Click each icon you desire to use on the menu bar. (Record,
Playback, Voice Mail…etc.)
7. Please refer to the ReadMe for more detailed information
to operate.

23
<Trouble/Solution>
1. Question : During recording/playback is not activated after
installation.
Answer : Sound card is not inserted Check if sound card is
properly inserted in PC.
2. Question : No sound during playback after recording.
Answer : 1) Check if cord is properly connected into mic-in of
sound card.
2) Check if recording sound is too small.
3) Check if volume level of Mic-in set 0 on window
box.
3. Question : Too much noise during playback.
Answer : 1) Check if volume level of Mic-in on which box is too
big.
If so, set the volume level in appropriate position.
2) If there is still noise after volume control, it could be
problem with sound card.
4. Question : Poor sound quality or volume is too small.
Answer : 1) Click option menu on the upper side of graphic, then
sound quality control button will be displayed.
2) Set Mic-input level to appropriate position
throughout several tests.
24
Fast Transfer message to PC (Approx. 10:1)
* In order to operate this function it needs the PC serial port and
install S/W CD. (VR-2000 series : Basic, VR-1000 series : Option)
This is the program to save the recorded messages into PC by using a PC
serial port.
1. Installing The Voice Magic Manager
1) Operation Environment
- At least Pentium 150 PC, which has a sound card, serial port.
- Window 95/98/ME
- RAM 32MB, HDD 32MB
2) How to install program
- Insert the CD disc into CD-Rom drive.
- The program will be set automatically.
25
* Voice Magic Manager : To save the recorded messages into PC.
(Fast Transfer approx.10:1)
* Jet Voice Mail : To save the recorded messages to PC and send
the voice mail.
2. How to Operation
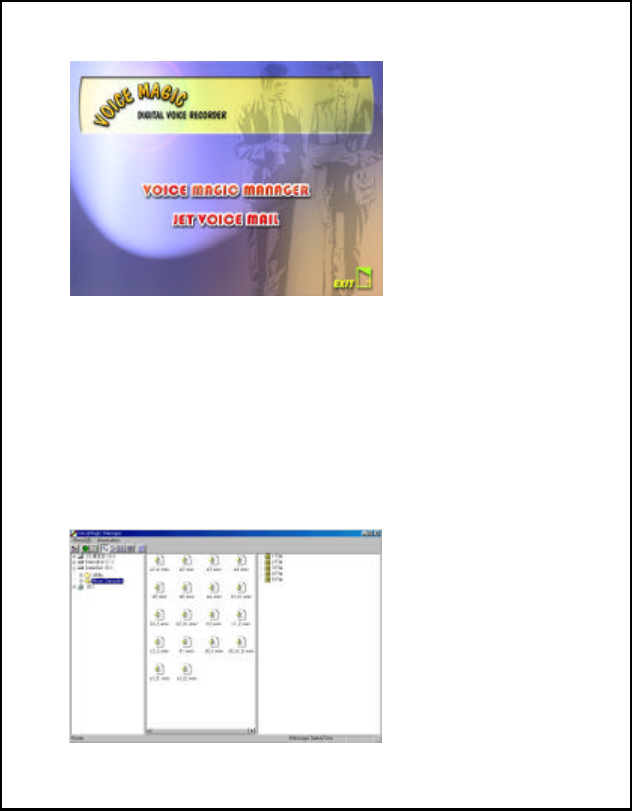
1) Execute the Voice Magic Manager.
Click start → program → Voice Magic Manager → Voice Magic
Manager. The picture will be displayed as belows.
26
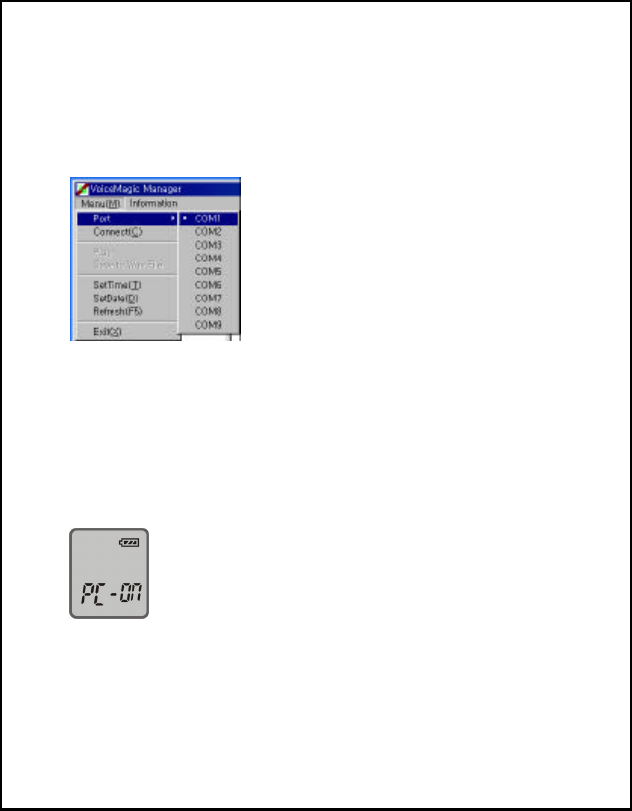
2) Selection of Com Port.
Please select the serial port in PC before operating and
connecting cable to serial port.
MENU(M) → PORT → COM1 or COM2
* Cautions : It causes electric shock when connect cable to
non-serial port.
3) Connection of Cable
If you connect cable to Voice Recorder, the Voice Recorder will
be able to correspond.
And, the LCD will be displayed as like belows.
27
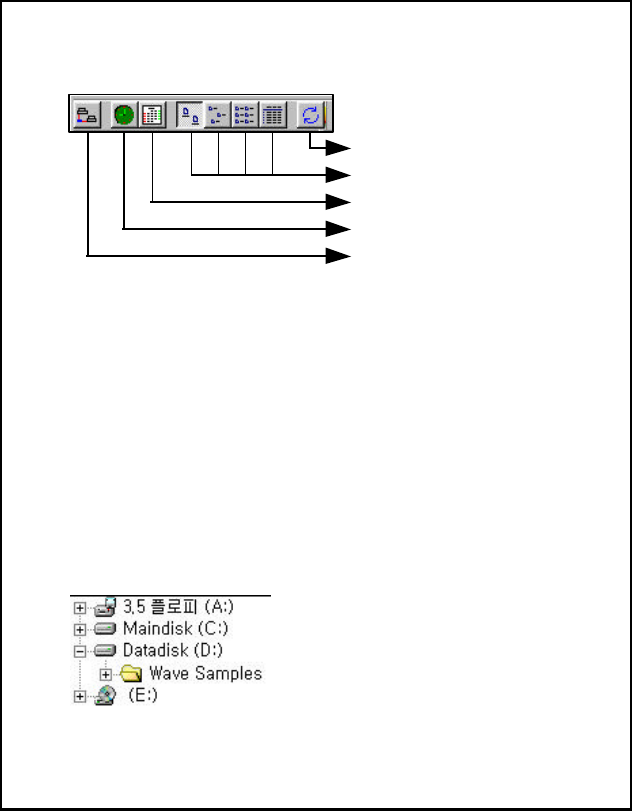
(a) Refresh
(b) List View
© Set Date
(d) Set Time
(e) Connect
4) Tool Bar.
<Description of Bar>
(a) Refresh : Refresh the contents in folder of PC
(b) List View : Choosing how to describe of contents in folder of
PC.
© Set Date : Setting the date in PC to Voice Recorder.
(d) Set Time : Setting the time in PC to Voice Recorder.
(e) Connect : Refresh the recorded messages in Voice Recorder.
Note : Even though the date will not be displayed in Voice Recorder,
the date of recorded will be displayed on Voice Magic
Manager.
5) Tree View
Display the Tree of folder in PC.
28
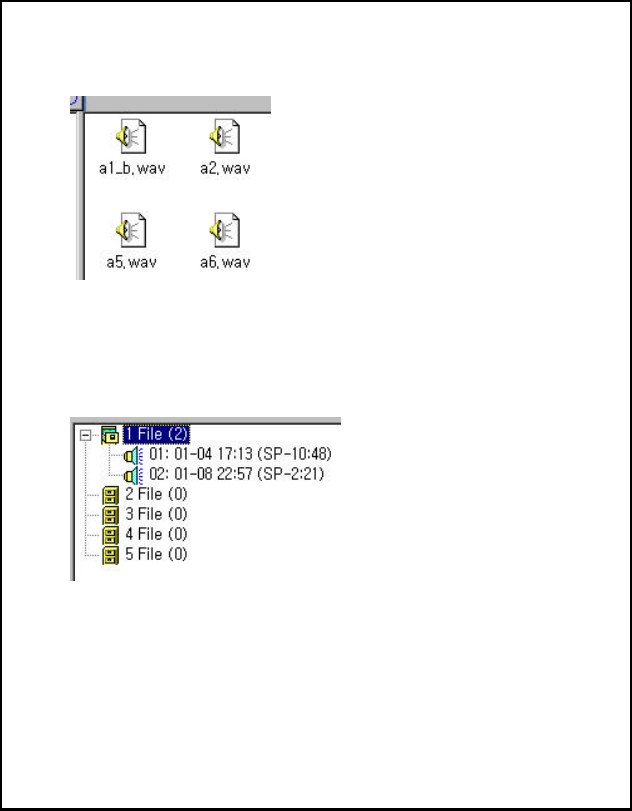
6) File List View
Display the recorded Wave file in PC.
7) Messages View
Display the recorded message in voice recorder.
Press right button on mouse and then, it can be changed to play
or upload the recorded messages.
Note : We would like to recommend choose the
“C:\WINDOWS\SNDREC32.EXE” to set the default
Wave file player.
29
Specification
Model Name VR-x008
(8MB) VR-x016
(16MB) VR-x032
(32MB)
Recording time(LP) 290 min 581 min 1164 min
Recording System Built-in Flash Memory
Dimension 104(L) x 26(W) x 18(H)mm
Weight Approx. 34g without Battery
Power Supply DC 3V, “AAA” Size Alkaline Batteries x 2
Battery Life About 12 hours in Recording mode
About 8 hours in Earphone Play at volume 12
About 7 hours in Speaker Play at volume 12
Maximum No. of
Recording Message 495 Messages, 5 Files x 99 Messages
Maximum Output Power 80mW, @8 ohm, 10% THD
Frequency Bandwidth 300Hz - 3300Hz
Input Plug-in Power Microphone (Mini Plug Mono)
Impedance is 2.2K ohm
Output Earphone (Mini Plug Mono)
Impedance is 32 ohm
Speaker Built-in 20mm Diameter
Microphone Built-in Omni-directional Elect Condenser
Microphone (Mono)
Condition for Use Temperature –0oC to +50 oC
Basic Accessories
Earphone (1), Alkaline batteries LR03 (2),
User’s Manual (1), External Microphone (1),
Telephone adaptor (1), Line-in/out cable (1),
Hand Strap (1), Audio Cable (1)
* Design and specifications are subject to change without any notice.

30
Precautions
Please read following precautions before using the voice recorder
1. Do not use or place the product at the following conditions:
- Hot places (above 60 oC)
- Cars whose windows are closed
- At a high humidity place (like bathroom)
- Under direct sunlight or near the heaters
- Dusty Areas
2. Avoid violent vibration or shock.
3. Do not drop the product. It could cause troubles.
4. Do not use it when driving a car or walking. It may cause accident.
5. Do not repair, disassemble, or alter your voice recorder yourself
6. Do not use in airplanes or areas restricting the use of electronic
devices.
7. Do not apply excessive force to the LCD window.
8. Do not heat, disassemble or place it into fire. A alkali solvent may
harm skin, eyes and cause a fever.
9. When above case, wash your skin or eyes with clean water and
see a doctor immediately.

31
10. If any malfunction (such as smoke or transformation due to
heat) happens, remove batteries immediately.
11. A magnetic card like a credit card or a subway communication
ticket may not work any longer once it is placed on or close to
the speaker.
12. The seller holds no liability for any damages caused by misuse
of the product, and claims from the third party.
13. The seller holds no liability for any lost messages that are
caused by repair or any other troubles.

32
Troubleshooting
SYMPTOM REASON REMEDY
No display on LCD Batteries are exhausted.
Batteries’ polarities are not
correctly placed.
Replace the batteries.
Place the batteries in the
right position.
Recording does not
operate
HOLD switch is ON.
All message number or spaces
are fully used.
Batteries are exhaused.
Set HOLD switch to OFF
position.
Erase unnecessary
messages.
Replace the batteries.
Playback does not
operate
HOLD switch is ON.
No recorded messages.
Batteries are exhausted.
Set HOLD switch to OFF
position.
Check the recording
message number.
Replace the batteries.
No speaker sound Volume level is set to 0.
Earphone is connected to
main unit.
Control the volume level.
Disconnect the earphone
from main unit.
No earphone sound Volume level is set 0.
Earphone plug is not
connected properly.
Control the volume level.
Insert the earphone plug
into main unit perfectly.
* When you find abnormal sign during operation or see abnormal
operation, unload batteries from main unit and reload batteries.
* Initialization Malfunction : In order to initialize this recorder, unload
batteries and then press File & Erase button together after
3 minutes “rESEt” message will be displayed on LCD.

33
Maycom B/D, 280-5, Seoksu 2-Dong, Manan-Gu, Anyang-City,
Kyoungki-Do, Korea
Office) Tel : 82 31 470-7700 Fax : 82 31 470-7799
Factory) Tel : 82 31 470-7740 Fax : 82 31 470-7798
http://www.emaycom.com
e-mail : maycom@emaycom.com
Printed in Korea