Mcube Technology BIOCON900S CUBEScan Charger User Manual
Mcube Technology Co.,Ltd CUBEScan Charger
User Manual
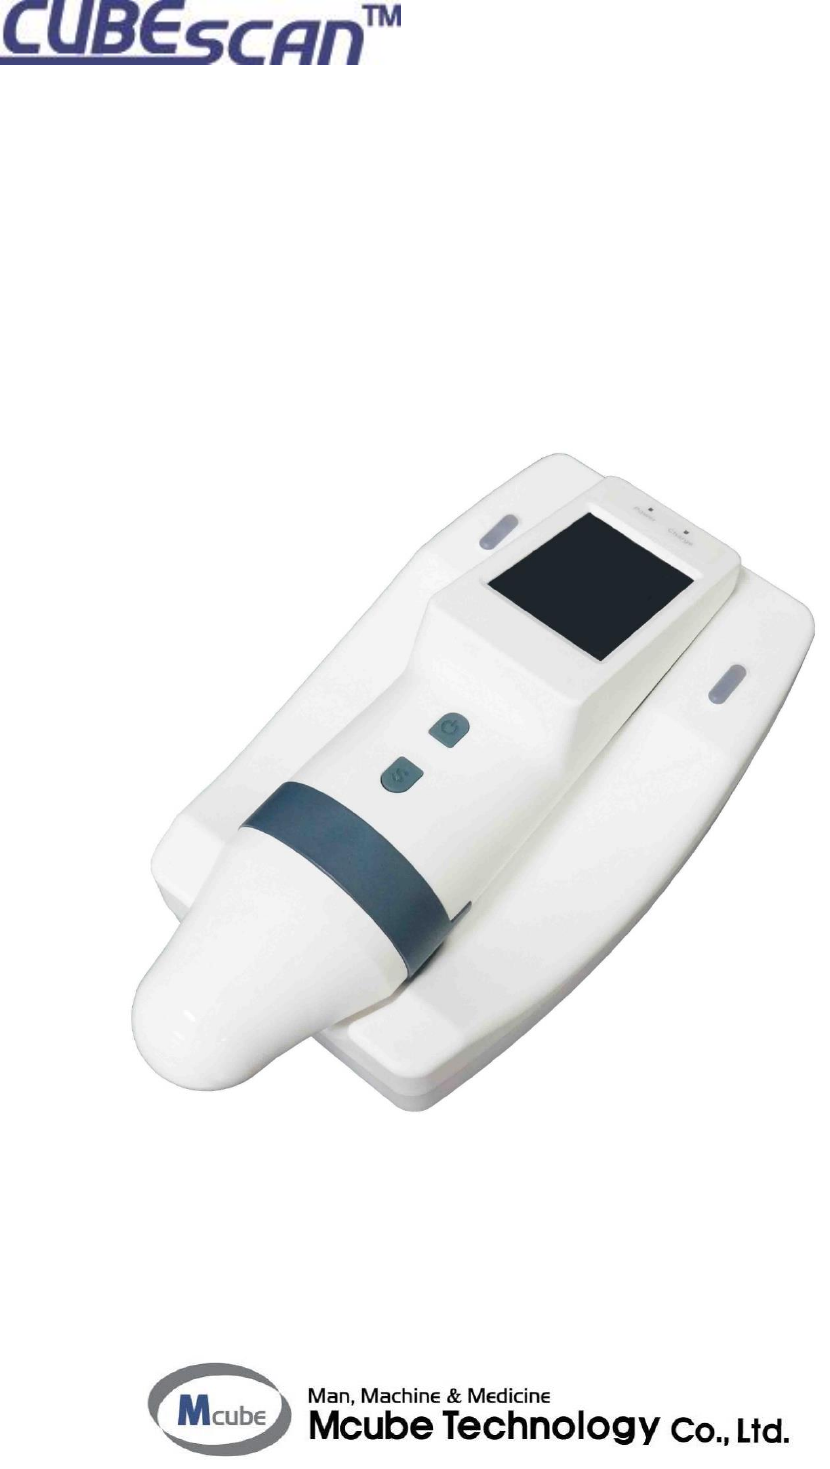
BioCon -900S
OPERATOR’S MANUAL

CUBEScanTM BioCon-900S Operator’s Manual
Page 2
This page left blank intentionally.

CUBEScanTM BioCon-900S Operator’s Manual
Page 3
BioCon-900S
Bladder Volume Measurement System
Operator’s Manual
CAUTION : In the United States, federal Law restricts
this device to sale by or on the order of a physician.
“This product is not made with natural rubber latex.”
The information in this document is subject to change at any time without notice. No part of
this document may be reproduced or transmitted in any form or by any means, electronic or
mechanical, for any purpose, without the express written permission of Mcube Technology.
Examples or images in this document are fictitious and do not in any way represent real
patient data. For up-to-date user information, contact your local distributor or
mcube@mcubetech.co.kr.
All other product or service names are the property of their respective owerner..
Mcube Technology Co., Ltd.
#803 123, Bonghwasan-ro,
Jungnang-gu, Seoul, Korea
Tel: +82-2-3421-7780
Fax: +82-2-3421-7076
E-mail: mcube@mcubetech.co.kr
Web site: www.mcubetech.co.kr
Copyright ⓒ 2018 by Mcube Technology Co.,Ltd. All rights reserved.

CUBEScanTM BioCon-900S Operator’s Manual
Page 4
TABLE OF CONTENTS
1 GENERAL INFORMATION ........................................................................................ 6
1.1 PRODUCT DESCRIPTION ............................................................................................................. 6
1.2 INTENDED USE / INDICATIONS FOR USE ................................................................................... 6
1.3 PATIENT/USER CHARACTERISTICS .......................................................................................... 6
1.4 PRESCRIPTION STATEMENT....................................................................................................... 6
1.5 SERVICE ........................................................................................................................................ 6
2 SAFETY INFORMATION ........................................................................................... 8
2.1 NOTICE TO ALL USERS................................................................................................................ 8
2.2 CONTRAINDICATIONS ................................................................................................................. 8
2.3 BIOLOGICAL SAFETY .................................................................................................................. 8
2.4 ELECTRICAL SAFETY .................................................................................................................. 8
2.5 DEVICE SAFETY............................................................................................................................ 9
2.6 SAFE HANDLING PROCEDURES FOR TRANSPORTER ......................................................... 11
3 INTRODUCTION ...................................................................................................... 12
3.1 PRODUCT FEATURES ................................................................................................................ 12
3.2 SYSTEM COMPONENTS ............................................................................................................ 12
3.3 OUTER APPEARANCE – PROBE ............................................................................................... 13
3.4 OUTER APPEARANCE - CHARGER .......................................................................................... 14
3.5 DISPLAY AND ICONS .................................................................................................................. 15
3.6 ICON DIRECTORY ....................................................................................................................... 15
4. SETUP ........................................................................................................................ 18
4.1 ACCURACY OF MEASUREMENT .............................................................................................. 18
4.2 CHARGE THE BATTERY ............................................................................................................. 18
4.3 SCAN TYPE .................................................................................................................................. 19
5 HOW TO USE .......................................................................................................... 20
5.1 CHECKUP BEFORE USE ............................................................................................................ 20
5.2 TURN SYSTEM ON/OFF .............................................................................................................. 20
5.3 SELECT PATIENT TYPE .............................................................................................................. 21
5.4 RECORD INFORMATION FOR A PATIENT ................................................................................. 22
5.5 MEASURE BLADDER VOLUME ................................................................................................. 24
5.6 DISPLAY A SCAN RESULTS ....................................................................................................... 26
5.7 RE-AIM BLADDER ....................................................................................................................... 28
5.8 SAVE A SCAN RESULT ............................................................................................................... 28
5.9 FETCH A MISSING DATA ............................................................................................................ 29
5.10 FINISH THE MEASUREMENT ..................................................................................................... 29
5.11 MANAGE SAVED SCAN RESULTS ............................................................................................ 29
6 SCREENS ................................................................................................................ 32
6.1 HOME SCREEN ........................................................................................................................... 32
6.2 INFORMATION SCREEN ............................................................................................................. 32
6.3 BARCODE SCREEN (OPTIONAL) .............................................................................................. 33
6.4 VIRTUAL KEYBOARD SCREEN ................................................................................................. 33
6.5 NORMAL SCAN SCREEN ........................................................................................................... 34
6.6 PRE-SCAN SCREEN ................................................................................................................... 34
6.7 SCAN RESULT SCREEN ............................................................................................................. 35
6.8 REVIEW SCREEN ........................................................................................................................ 35
6.9 SETUP SCREEN .......................................................................................................................... 36
6.10 BATTERY STATUS ....................................................................................................................... 37
6.11 DIALOG BOXES ........................................................................................................................... 38
7 SETTINGS ............................................................................................................... 39
7.1 DATE FORMAT SETTINGS .......................................................................................................... 39
7.2 DATE SETTINGS .......................................................................................................................... 39

CUBEScanTM BioCon-900S Operator’s Manual
Page 5
7.3 TIME SETTINGS ........................................................................................................................... 39
7.4 SLEEP MODE SETTINGS ............................................................................................................ 40
7.5 DISPLAY BRIGHTNESS SETTINGS ........................................................................................... 40
7.6 PRE-SCAN SETTINGS ................................................................................................................ 41
7.7 DELETE ALL MEASUREMENTS ................................................................................................ 41
8 MAINTENANCE ....................................................................................................... 43
8.1 TROUBLESHOOTING ................................................................................................................. 43
8.2 DIALOG BOXES FOR MAINTENANCE....................................................................................... 43
8.3 CLEANING & DISINFECTION ..................................................................................................... 44
8.4 BATTERY MAINTENANCE .......................................................................................................... 46
8.5 WEEKLY INSPECTION ................................................................................................................ 46
8.6 DISPOSAL .................................................................................................................................... 46
8.7 DEVICE REPAIR .......................................................................................................................... 46
8.8 SELF TEST ................................................................................................................................... 47
8.9 CALIBRATION ............................................................................................................................. 48
9 SPECIFICATIONS ................................................................................................... 51
9.1 ACOUSTIC OUTPUT TABLE ....................................................................................................... 51
9.2 ELECTROMAGNETIC COMPATIBILITY ..................................................................................... 51
9.3 EXCESSIVE TEMPERATURE TEST RESULT ............................................................................ 54
9.4 SPECIFICATIONS OF COMPONENTS ....................................................................................... 54
9.5 ENVIRONMENTAL CONDITIONS ............................................................................................... 56
10 GLOSSARY ............................................................................................................. 58
11 SYMBOL DIRECTORY ............................................................................................ 59
12 REFERENCES ......................................................................................................... 61

CUBEScanTM BioCon-900S Operator’s Manual
Page 6
1 GENERAL INFORMATION
1.1 PRODUCT DESCRIPTION
CUBEScanTM BioCon-900S is a safe and easy, non-invasive system to measure the bladder volume. The
device consists of a probe, CUBEScan Charger, and various components. The probe is a B-mode
instrument, hand-held, wireless and battery-operated. A 3D-mechanical sector transducer provides cross–
sectional images of the bladder from up to 12 scan planes and bladder volume is calculated based upon
those images and displays 12 scan planes on a screen. Furthermore, a live image of the bladder during
Pre-scan makes it easier to detect the bladder before scanning. The CUBEScan Charger is used for
recharge of the probe’s internal battery.
1.2 INTENDED USE / INDICATIONS FOR USE
CUBEScanTM BioCon-900S is a B-mode pulsed-echo ultrasound device. The BioCon-900S projects
ultrasonic energy through the lower abdomen of a patient to obtain images of the bladder to calculate the
urine volume non-invasively. BioCon-900S is intended to be used by a qualified medical professional to
non-invasively measure the urine volume in the bladder. Contraindications for the BioCon-900S are fetal
use and use on pregnant patients.
1.3 PATIENT/USER CHARACTERISTICS
1.3.1 PATIENT POPULATION
1) Male (All other patients)
2) Female patient
- A female who has not had a hysterectomy
- A female who has had a hysterectomy
3) Pediatric patient; A child with height less than 47 inches (120cm) and weight less than 55 lbs (25kg)
1.3.2 USERS
1) Physicians
2) Medical Professionals
1.3.3 MEDICAL CONDITIONS INCLUDING TARGET GROUP AND DISEAS
Bladder volume measurement system measures bladder volume, and it provides the accurate data to aid
in the diagnosis of common urological condition, to assess urinary retention, to help unnecessary
catheterization and to reduce rates of catheter-associated urinary tract infection.
The benefits are as below;
BioCon-900S assists to;
a. Assess urinary retention
b. Evaluate post-operative urinary retention (POUR)
c. Reduce unnecessary catheterization
d. Reduce catheter-associated urinary tract infections(CAUTIs)
e. Identify a blocked Foley catheter
f. Evaluate the need to catheterize after Foley catheter removal
g. Evaluate the need to catheterize during intermittent catheterization
h. Support to train urination and self-cathererization
i. Measure PVR (Post Void Residual)
1.4 PRESCRIPTION STATEMENT
Federal (United States) law restricts this system to sale by or on the order of a physician.
1.5 SERVICE
CUBEScanTM BioCon-900S Operator’s Manual
Page 8
2 SAFETY INFORMATION
2.1 NOTICE TO ALL USERS
This guide covers components, function, maintenance, storage, and precautions needed to use this
system. All users must read and thoroughly understand this entire guide prior to using the BioCon-900S.
This section has information on safe use of the BioCon-900S (Biological Safety, Electrical Safety, Device
Safety and Safe handling procedures for transporter).
Complies with FDA performance standards for laser products except for deviations pursuant to Laser
Notice No. 50, dated June 24, 2007.
2.2 CONTRAINDICATIONS
WARNING
Do not use the BioCon-900S on following cases:
1) Fetal use or pregnant patients.
2) Patients with ascites.
3) Patients with open or damaged skin.
Wounds in the suprapubic region.
2.3 BIOLOGICAL SAFETY
To date, exposure to pulsed diagnostic ultrasound has not been shown to produce adverse effects.
However, ultrasound should be used only by medical professionals when clinically indicated, using the
lowest possible exposure times possible commensurate with clinical utility. The ultrasonic output power of
BioCon-900S is limited to the minimum level necessary for performance effectively. Data on acoustic
output levels is listed in section “9. Specifications”.
2.4 ELECTRICAL SAFETY
This system meets IEC 60601-1, Class I, Type BF isolated patient-applied parts safety requirements. This
system complies with the applicable medical device requirements published in the Canadian Standards
Association (CSA), European Harmonized Standards, and Underwriters Laboratories (UL) safety
standards.
To avoid the risk of electrical shock or injury, observe the following warnings and cautions.
WARNING
To avoid the risk of electric shock, this device must only be connected to an adapter with the
protective earth. - Grounding reliability can only be achieved when device is connected to a
receptacle marked “Hospital Only” or “Hospital Grade” or the equivalent.
Do not operate the system in the presence of flammable gases or anesthetics.
Do not use the device with any defibrillator at the same time.
Do not use the device with any HF surgical equipment at the same time.
Before using the system, inspect the enclosures, power cord and adapter.Do not use the system if
these are damaged.
Do not use the probe if the entire probe is accidentally immersed in solution.
Connect only items that have been specified as part of the BioCon-900S or that have been specified
as being compatible with the BioCon-900S.
Charge the probe only with the provided Charger.
Connect the Charger only to the provided adapter.
CUBEScanTM BioCon-900S Operator’s Manual
Page 9
Do not attempt to open the system components. This may cause serious injury to the operator or
patients. All services must be made by a qualified technician only.
Use of components and cables other than those specified or provided by the manufacturer of this
device could result in increased electromagnetic emissions or decreased electromagnetic immunity
of this device and result in improper operation.
Portable RF communications equipment (including peripherals such as antenna cables and external
antennas) should be used no closer than 30 cm (12 inches) to any part of the BioCon-900S,
including cables specified by the manufacturer. Otherwise, degradation of the performance of this
device could result.
CAUTION
The BioCon-900S has been tested and found to comply with the electromagnetic compatibility (EMC)
limits for medical systems to IEC 60601-1-2. These limits are designed to provide reasonable protection
against harmful interference in a typical medical installation. Medical systems must be installed and
operated according to the instruction in this manual. For more information, see the section “9.2
ELECTROMAGNETIC COMPATIBILITY”.
This device is suitable for use in the professional health care environment
Medical electric devices can be affected by portable or mobile RF communication devices. Turn off any
portable or mobile RF device before operating your system.
Electrostatic discharge (ESD), or static shock, is a naturally occurring phenomenon. ESD is common in
conditions of low humidity, which can be caused by heating or air conditioning.
Static shock is a discharge of electrical energy from a charged body to a lesser or non-charged body.
The degree of discharge can be significant enough to cause damage to a transducer or an ultrasound
system. The following precautions can help reduce ESD: anti-static spray on carpet, anti-static spray on
linoleum, and anti-static mats.
The EMISSIONS characteristics of this device make it suitable for use in industrial areas and hospitals
(CISPR 11 class A). If it is used in a residential environment (for which CISPR 11 class B is normally
required) this device might not offer adequate protection to radio-frequency communication services.
The user might need to take mitigation measures, such as relocating or re-orienting the device.
Do not use the system if an error message appears on the display: note the error code; call Mcube
technology or your local distributor, shut down the system
2.5 DEVICE SAFETY
To protect your BioCon-900S, and components, follow these warnings and cautions.
WARNING
No modification of this device is allowed.
Do not use the system if the head of probe is damaged.
To avoid the risk of excessive heating or damage to the device, use the device in a well-ventilated
environment.
To avoid damage to cables, do not excessively twist or bend cables associated with the device.
Turn off the device and unplug the charger if it will not be used for a long period of time.
Do not use the system if there is evidence of leakage of internal liquids. Wash hands immediately in
warm, soapy water.
In the event that LCD is damaged, care should be taken to avoid contact with liquid crystal. Take the
urgent action indicated should any of the following situations arise:
- If liquid crystal comes in contact with your skin, clean the area with a cloth and then wash
thoroughly with soap and running water.
CUBEScanTM BioCon-900S Operator’s Manual
Page 10
- If liquid crystal enters your eyes, flush the affected eye with clean water for at least 15 minutes and
then seek medical assistance.
- If liquid crystal is swallowed, rinse your mouth thoroughly with water. Drink large quantities of water
and induce vomiting, then seek medical assistance.
CAUTION
Use the system indoors only.
Do not use the system if it exhibits erratic or inconsistent behavior. Shut down the system and contact
Mcube Technology or your local distributor.
Do not spill liquid on the system.
2.6 COMPLIANCE STATEMENTS
Federal Communication Commission Interference Statement
This equipment has been tested and found to comply with the limits for a Class A digital device, pursuant
to part 15 of the FCC Rules. These limits are designed to provide reasonable protection against harmful
interference when the equipment is operated in a commercial environment. This equipment generates,
uses, and can radiate radio frequency energy and, if not installed and used in accordance with the
instruction manual, may cause harmful interference to radio communications. Operation of this equipment
in a residential area is likely to cause harmful interference in which case the user will be required to correct
the interference at his own expense.”
This device complies with Part 15 of the FCC Rules. Operation is subject to the following two conditions:
(1) This device may not cause harmful interference, and
(2) this device must accept any interference received, including interference that may cause undesired
operation.
FCC Radiation Exposure Statement:
This equipment complied with FCC radiation exposure limits set forth for an uncontrolled environment. This
equipment should be installed and operated with minimum distance 20cm between the radiator & your
body.
CAUTION
Any changes or modifications not expressly approved by the party responsible for compliance could
void the user’s authority to operate this equipment.
IC Statement
This Class A digital apparatus complies with Canadian ICES-003.
This device complies with Industry Canada license-exempt RSS standard(s).
Operation is subject to the following two conditions:
(1) this device may not cause interference, and
(2) this device must accept any interference, including interference that may cause undesired operation of
the device.
Cet appareil numérique de la classe A est conforme á la norme NMB-003 du Canada.

CUBEScanTM BioCon-900S Operator’s Manual
Page 11
2.7 SAFE HANDLING PROCEDURES FOR TRANSPORTER
Quarantine: Packages that are crushed, punctured or torn open to reveal contents should not be placed
into deployment. Such packages should be isolated until the shipper has been contacted, provides
disposition instructions and, if appropriate, arranges to have the product inspected and repacked.
Spoiled Product: In the event that damage to packaging results in damage to the battery causing
released electrolyte, the spill should be contained and the shipper should be contacted for instructions.
CUBEScanTM BioCon-900S Operator’s Manual
Page 12
3 INTRODUCTION
3.1 PRODUCT FEATURES
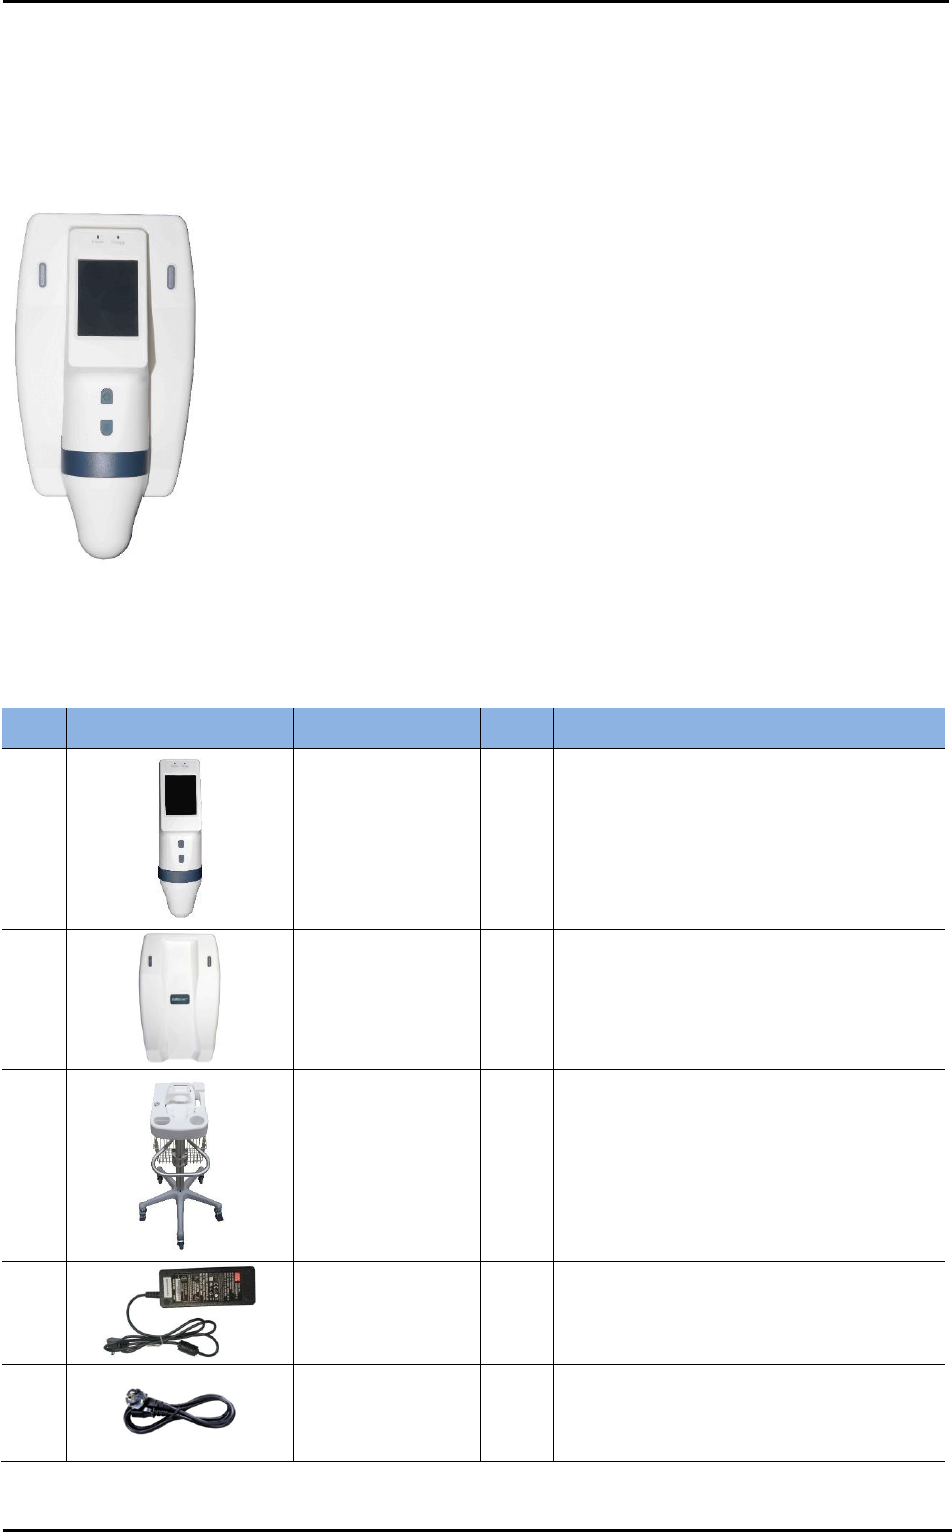
The main components of CUBEScanTM BioCon-900S are a Probe and the Charger.
BioCon-900S Probe & Charger
Hand-held, portable and lightweight
Touchscreen interface
Measures bladder volume with ultrasound
Provides a live image of bladder during Pre-scan
Takes scans and provides scan results in a short time
Easy to use: staff can easily learn how to scan patients in a
short time
Battery-operated, wireless charging
Figure 1 CUBEScanTM BioCon-900S
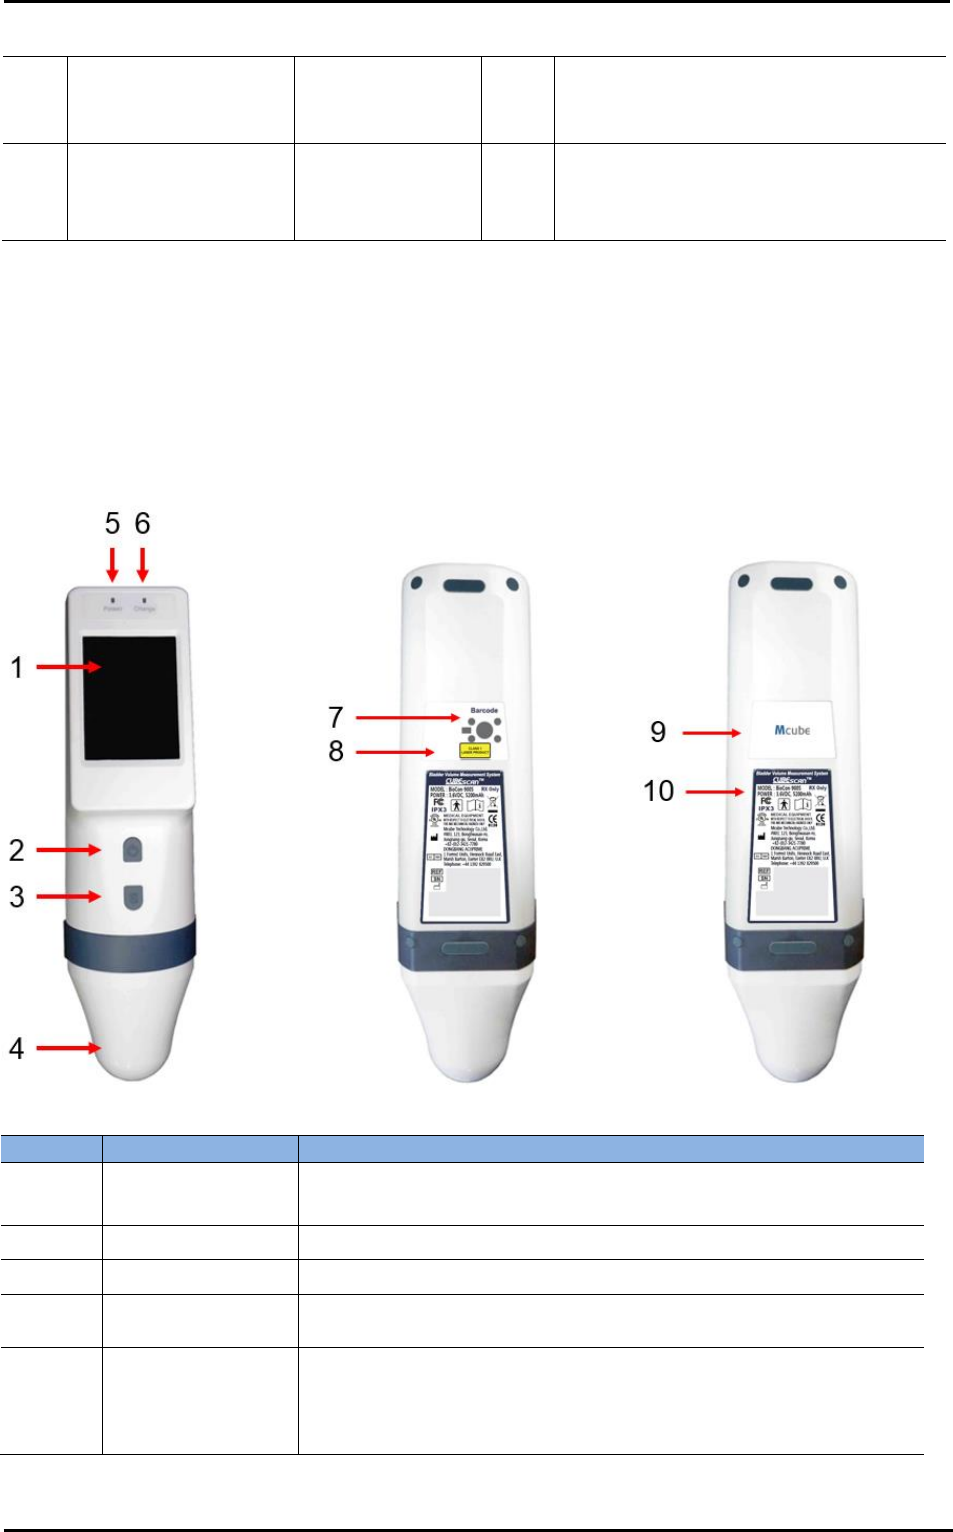
3.2 SYSTEM COMPONENTS
No.
Picture
Parts
Q’ty
Description
1
BioCon-900S
(Probe)
1
Hand-held, wireless, battery-operated,
touchscreen, ultrasound probe
2
Charger
1
Use the Charger to charge BioCon-
900S’s internal battery.
3
Mobile Cart
(MRC-900S)
1
Mobile cart
(Optional Component)
4
AC/DC Adapter
1
Use only with the Charger.
5
Power cord
1
The type of power cord depends on your
country.
CUBEScanTM BioCon-900S Operator’s Manual
Page 13
6
-
Barcode Module
1
Reading a barcode with information for a
patient. (Optional Component)
7
-
Operator’s manual
1
-
Users can replace only gel
The other parts are not allowed for the users to disassemble or replace except the gel. Please contact
your local distributor or Mcube Technology.
Only use the ultrasonic gel approved by FDA, CE.
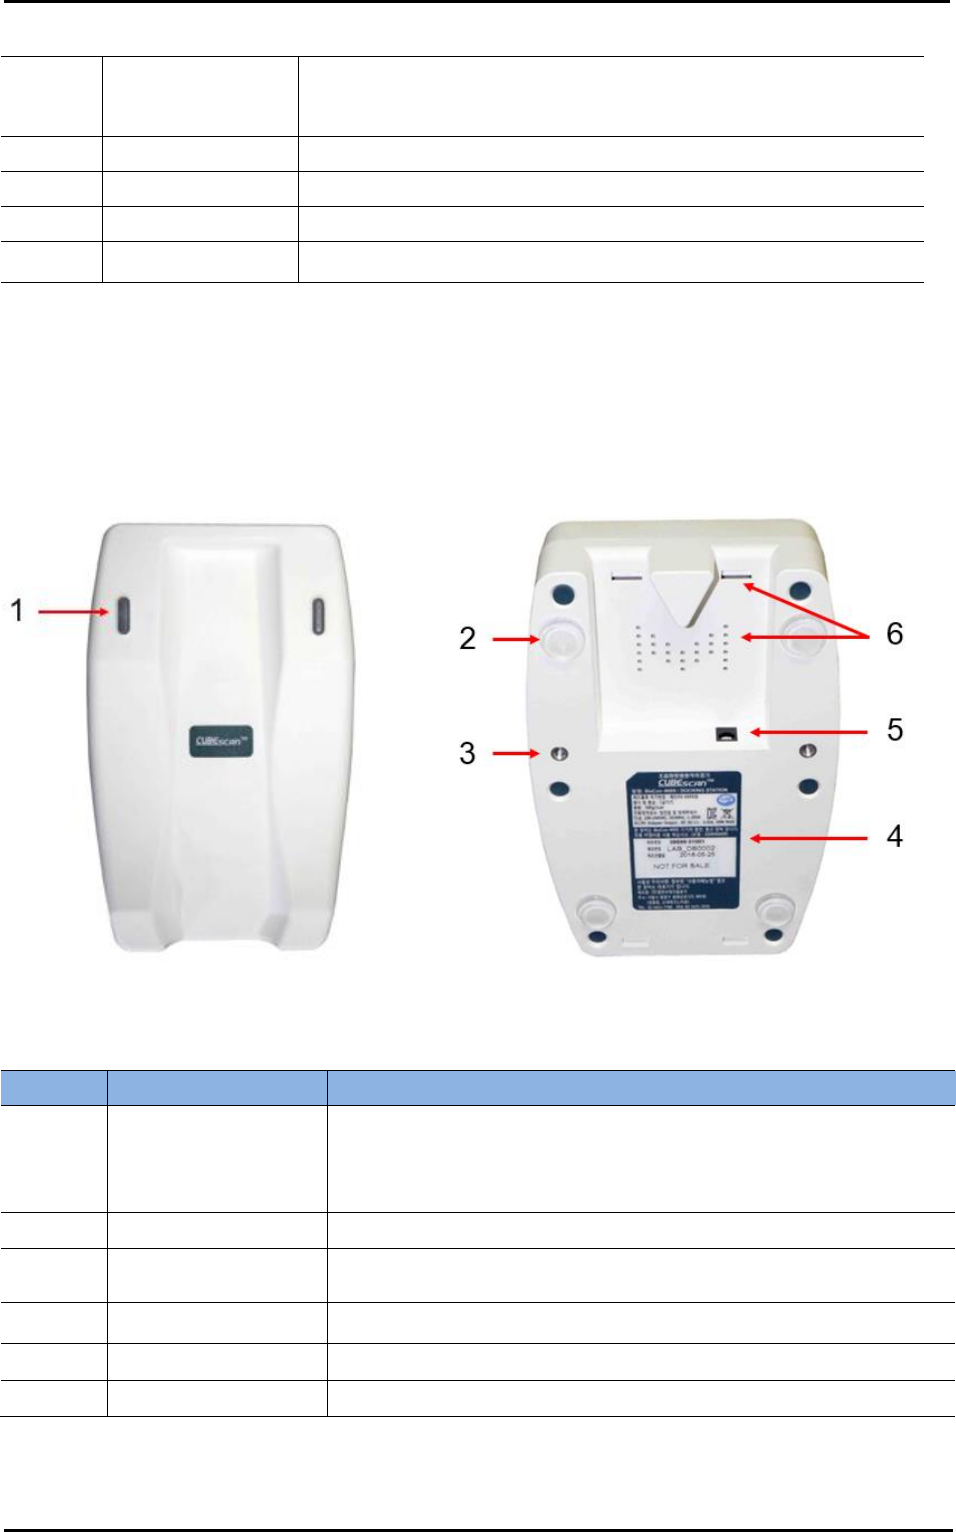
3.3 OUTER APPEARANCE – PROBE
Figure 2 Probe Appearance
No.
Part
Function
1
Touchscreen
Display
Displays bladder volume and other information.
2
Power Button
Press to turn the probe on or off and release
3
Scan Button
Press to take a scan
4
Probe Head
Generates, transmits and receives ultrasound waves, produces a 3D
image of bladder. Type BF applied part
5
Power Indicator
Indicates power status.
Orange solid – System is being booted
Yellow solid – Power on status
Off – Power off
CUBEScanTM BioCon-900S Operator’s Manual
Page 14
3.4 OUTER APPEARANCE - CHARGER
6
Battery indicator
Indicates charging status.
Orange solid - Battery is being charged.
Off – Battery is fully charged.
7
Barcode Module
Reads printed a barcode
8
Laser Safety Label
Explanatory label – Class 1 laser product
9
Label
Put on this label when there is no optional barcode module
10
Back Label
NOTE : Labels are subject to change without prior notice
NOTE: The appearance of these labels(No.8 - 9) depends on wheter the barcode option is selected or
not.
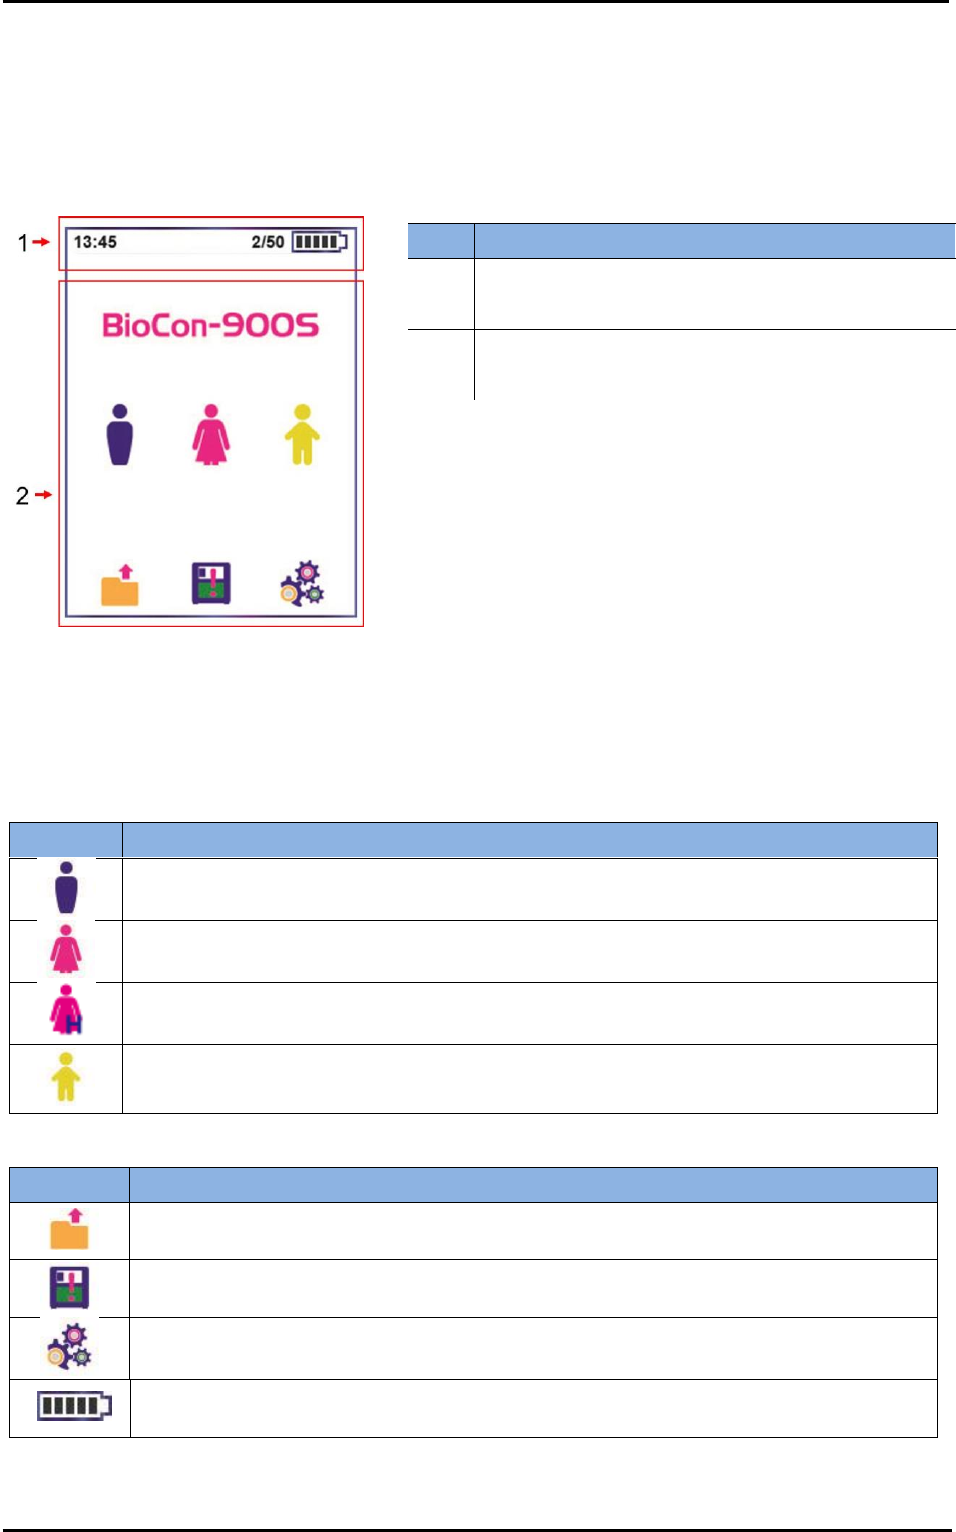
Figure 3 Charger Front-View
Figure 4 Charger Bottom-View
No.
Item
Function
1
Battery indicator
Indicates charging status.
Green (Solid) – Power cord is connected or Charging is completed.
Green (Blink) – Charging.in progress
Yellow (Solid) – Error Status
2
Silicone pad
Anti-skid pad
3
Insert Nut
Insert nut to secure the Charger to the mobile cart (MRC-900S). It
prevents movement or damage of Charger from shock.
4
Label
NOTE : Labels are subject to change without prior notice
5
AC/DC Adapter Inlet
AC/DC adapter inlet
6
Vents
Ventilate the Charger.
CUBEScanTM BioCon-900S Operator’s Manual
Page 15
3.5 DISPLAY AND ICONS
A touch-screen display allows you to perform scans, manage results and setup. The Home screen appears
when the probe is turned on. It services as a starting point for all the main functions of the device. You can
select the desired icons by tapping them directly on the touch-screen.
Figure 5 Home Screen
3.6 ICON DIRECTORY
Patient Type
Home screen
Information screen & Pre-scan screen
No.
Description
1
Status – Current time, the number of saved data
and battery status.
2
Main Display – controls the user interface
Icon
Description
Male (All other patients)
Female Patient – A female who has not had a hysterectomy
Female Patient – A female who has had a hysterectomy
Pediatric Patient – A child with height less than 47 inches (120cm) and weight less than
55 lbs(25kg).
Icon
Description
Review – Go to the Review screen.
Missing Data – Go to review the missing (unsaved) scan result.
Setup – Go to the Setup screen.
Battery status.
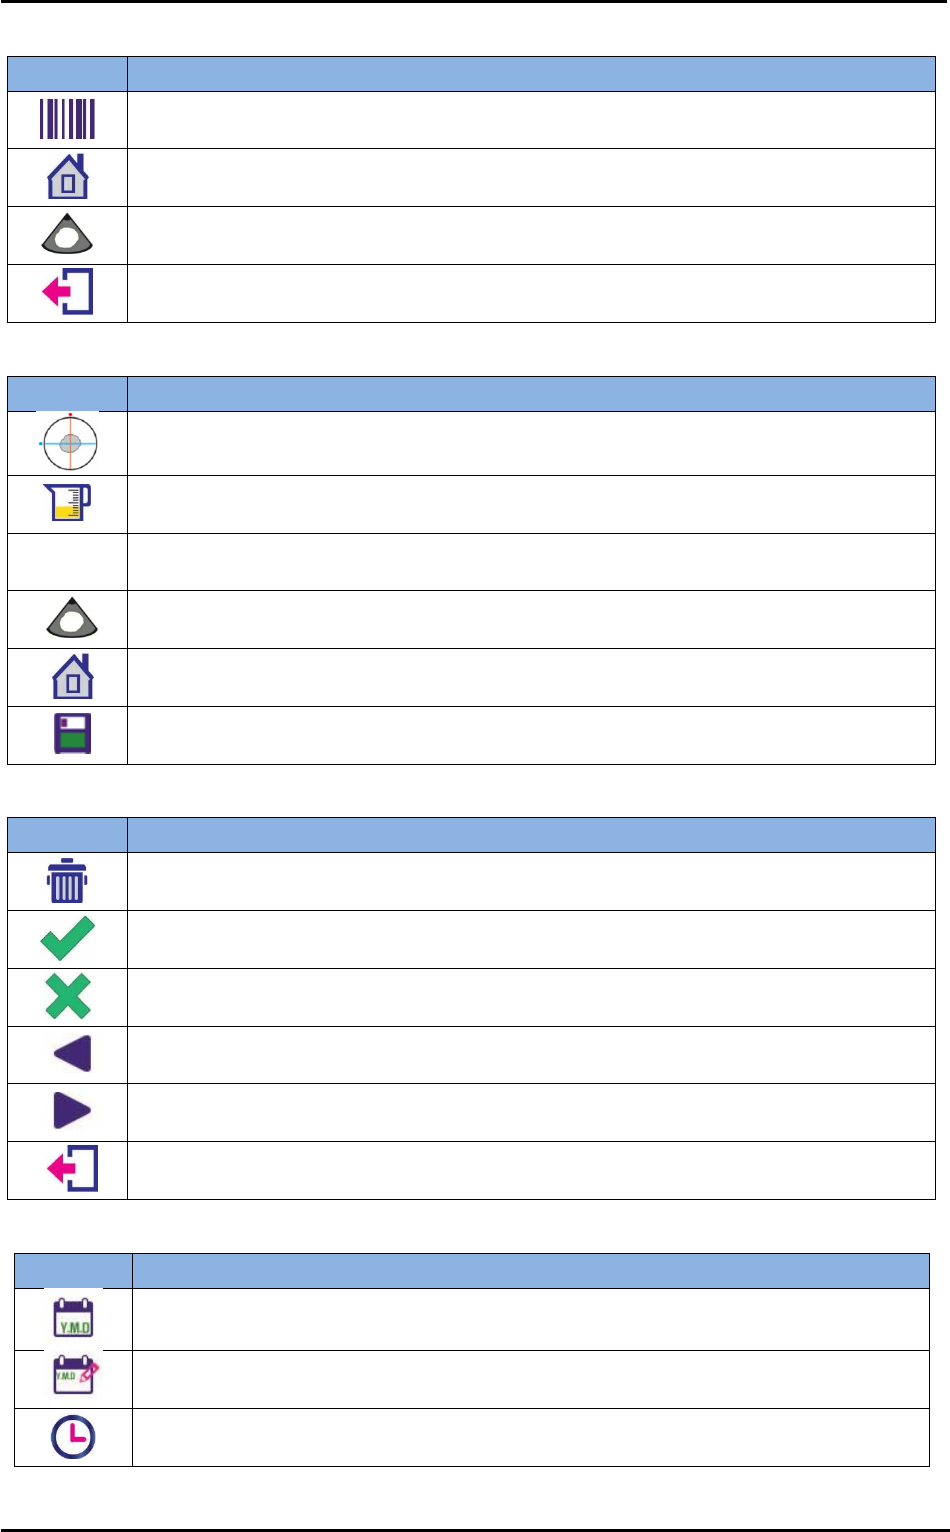
CUBEScanTM BioCon-900S Operator’s Manual
Page 16
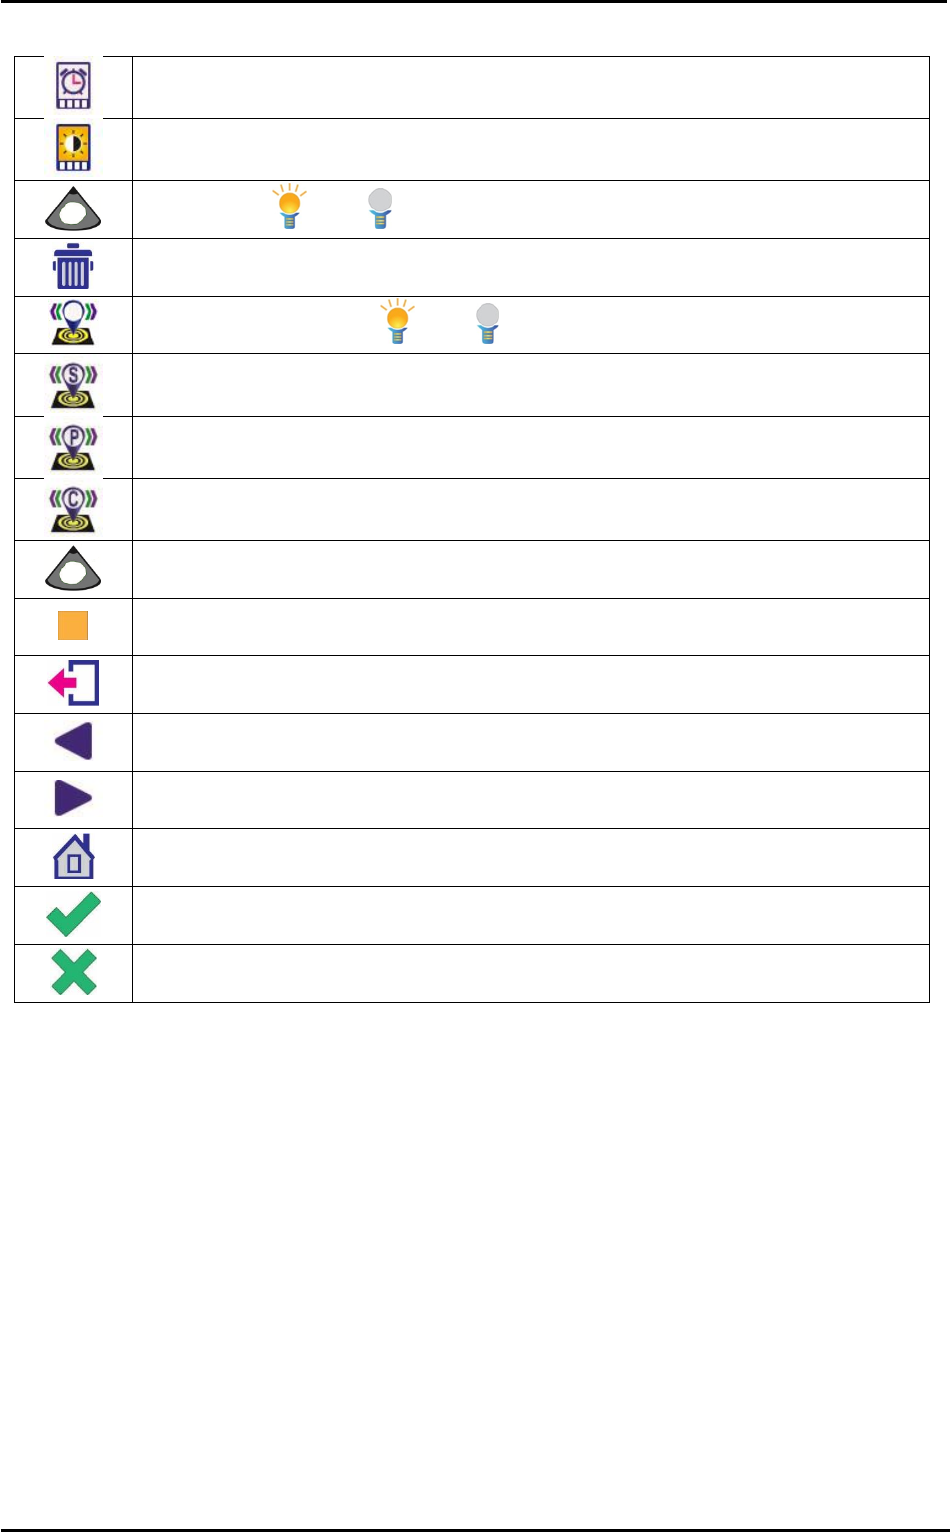
Scan Result screen
Review screen
Setup screen
Icon
Description
Barcode - Record a barcode (Optional)
Home – Return to the Home screen.
Scan – Perform the Normal scan or Pre-scan.
Exit –Return to the Information screen.
Icon
Description
Aiming Information – Rotate 15° clockwise, indicating the aiming point of the bladder.
Urine Volume – Measured urine volume.
P1
Plane No. – The 1st plane of 12 planes of the result (PX – The ordinal number of 12
planes)
Scan – Re-scan the bladder.
Home – Return to the Home screen.
Save – Save the scan result.
Icon
Description
Delete – On the Review screen, delete what is currently being displayed.
OK – Select the option or perform the action.
Cancel – Cancel the current function.
Previous – On the Review screen, move to the previous patient scan result.
Next – On the Review screen, move to the next patient scan result.
Exit –Return to the Home screen.
Icon
Description
Date format (YY-MM-DD, DD-MM-YY,MM-DD-YY)
Date
Time (format : 24-hour)
CUBEScanTM BioCon-900S Operator’s Manual
Page 17
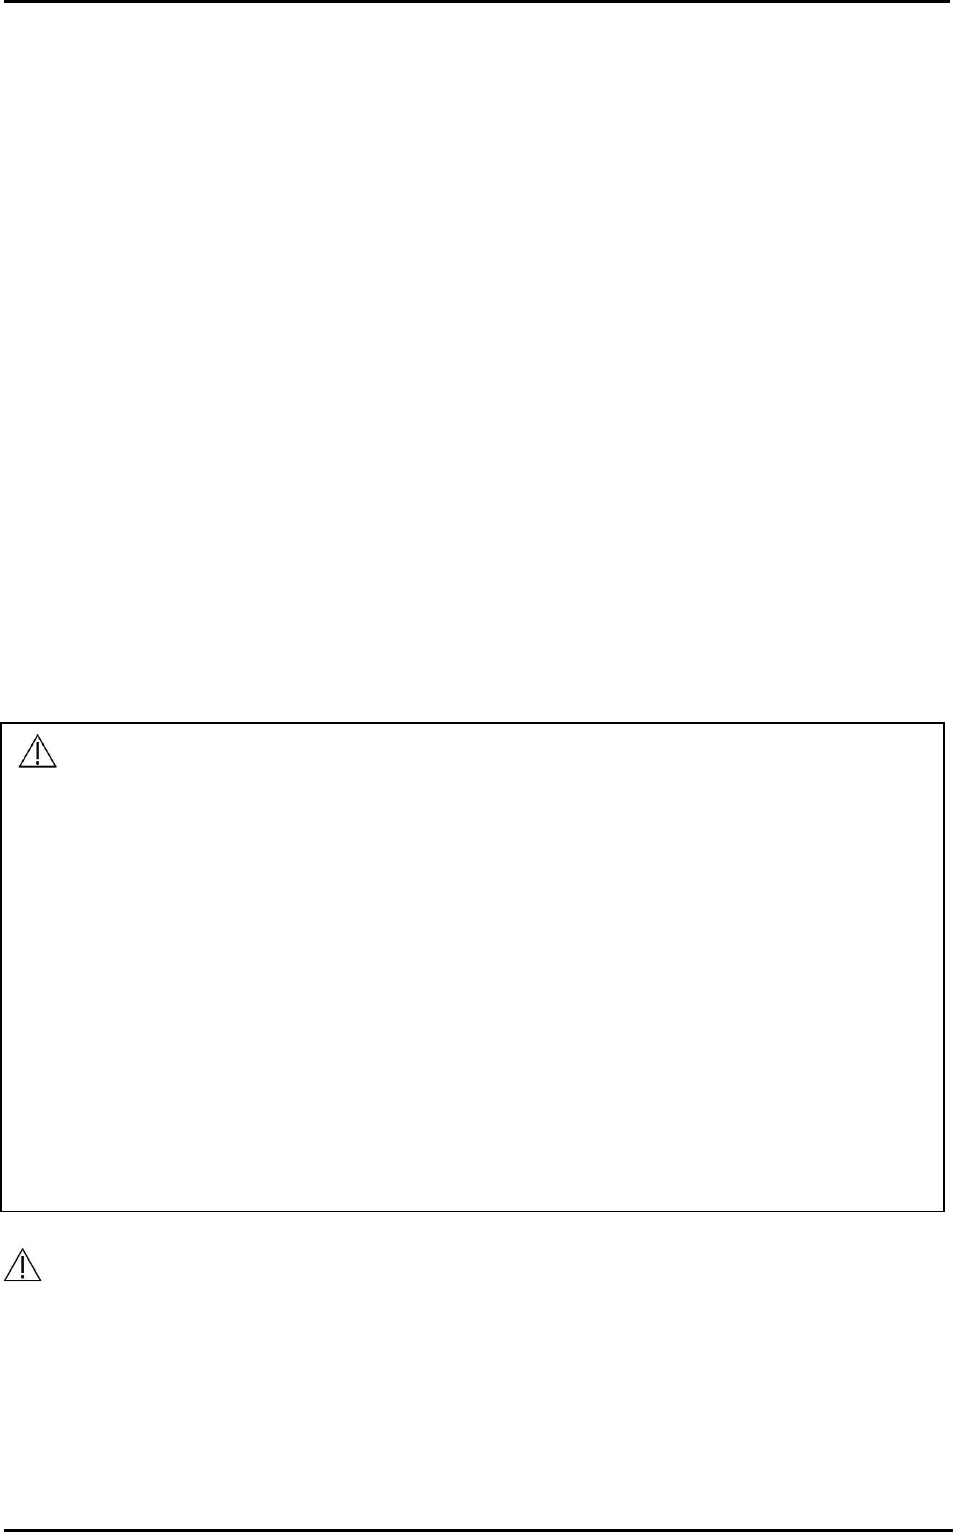
Sleep mode (2min, 3min, 5min)
Display brightness (0 to 100%, default= 50%))
Pre-scan On ( ) / Off ( )
Delete all saved results.
Calibration Reminder On ( ) / Off ( )
Self-test (YY/MM/DD)
Phantom Calibration (YY/MM/DD)
CalKit Calibration (YY/MM/DD)
On the self-test or calibration screen, perform self-test or calibration
Cease – On the self-test or calibration screen, cease self-test or calibration
Exit – Return from the self-test or calibration screen to the Setting screen.
Previous – Move to previous page.
Next – Move to next page.
Home – Return to Home screen.
OK – Select the option or perform the action.
Cancel – Cancel the current function.
CUBEScanTM BioCon-900S Operator’s Manual
Page 18
4. SETUP
See the section “4.1 ACCURACY OF MEASUREMENT” before use.
Check the probe’s battery has sufficient power through battery icon. If the battery has not been
sufficiently charged, recharge the battery before bladder measurement.
Wipe the probe head gently with a soft cloth dampened in cleaning and disinfection agents to clean and
disinfect the probe. See the section “8.3 CLEANING & DISINFECTION”.
4.1 ACCURACY OF MEASUREMENT
Following cases affect ultrasound transmission and accuracy of measurement.
When a patient has had supra-pubic or pelvic surgery.
A patient with catheter in his or her bladder.
A patient with scar, sutures, staples or incisions in his or her abdomen.
Use of unsuitable ultrasound gel .
Air bubbles between probe head and the skin of the patient.
An excessive obese patient.
Use of the probe with an unclean probe head.
Inappropriate patient position.
4.2 CHARGE THE BATTERY
CAUTION
The Charger, power cord, and adapter are not intended for patient contact. Ensure 6 ft (2 m) are
maintained between the patient and these components.
Immediately discontinue use of the battery, if the battery emits an unusual smell, feels hot, changes
color or shape, or appears abnormal in any other way. Contact Mcube Technology or your local
distributors.
The probe is powered by a internal lithium ion battery. The battery is charged by Charger and the Battery
WARNING
The battery must be replaced by the authorized service provider only.
Use only the provided Charger and power cord to charge the battery for electric safety.
Do not disassemble, heat or incinerate the battery.
Keep battery out of reach of children and in original sealed package.
Dispose of used batteries promptly according to local recycling or waste regulations.
To reduce the risk of leakage, explosion, fire, or serious injury, note the following when handling the
lithium-ion battery included in the system:
- Never short-circuit the battery by either accidentally or intentionally bringing the battery terminals
into contact with any other conductive objects. This could cause serious injury or fire and could also
damage the battery and BioCon-900S.
- Never expose the battery to abnormal shock, vibration or pressure. The battery’s internal
protective covering could fail, causing it to overheat or ignite, resulting in caustic liquid leakage,
explosion or fire.
Avoid charging near fire or in the sunlight.
Do not use the Charger for other equipment.
CUBEScanTM BioCon-900S Operator’s Manual
Page 19
Status icon ( ) is always displayed in the Status at the top of the screen, indicating the current
capacity. Before using the probe for the first time, you must fully charge the battery. When you don’t use
your probe, we recommend that you mount and store it on the Charger to ensure that the probe is
sufficiently charged. The battery is protected by protection circuit module and have the functions of
overcharge, overdischarge and overcurrent prevention to maintain safety and prevent significant
deterioration of cell performances.
To conserve battery life, the probe is configured to go into sleep mode. The probe goes into sleep mode
when you press the Power Button( ) twice or if the probe has not been touched in the designated time
with power on. You can adjust the time for sleep mode in the setup(2min/3min/5min), if necessary. See the
section“7.4 SLEEP MODE SETTING”. Shortly press the Power Button( ) to wake up the system.
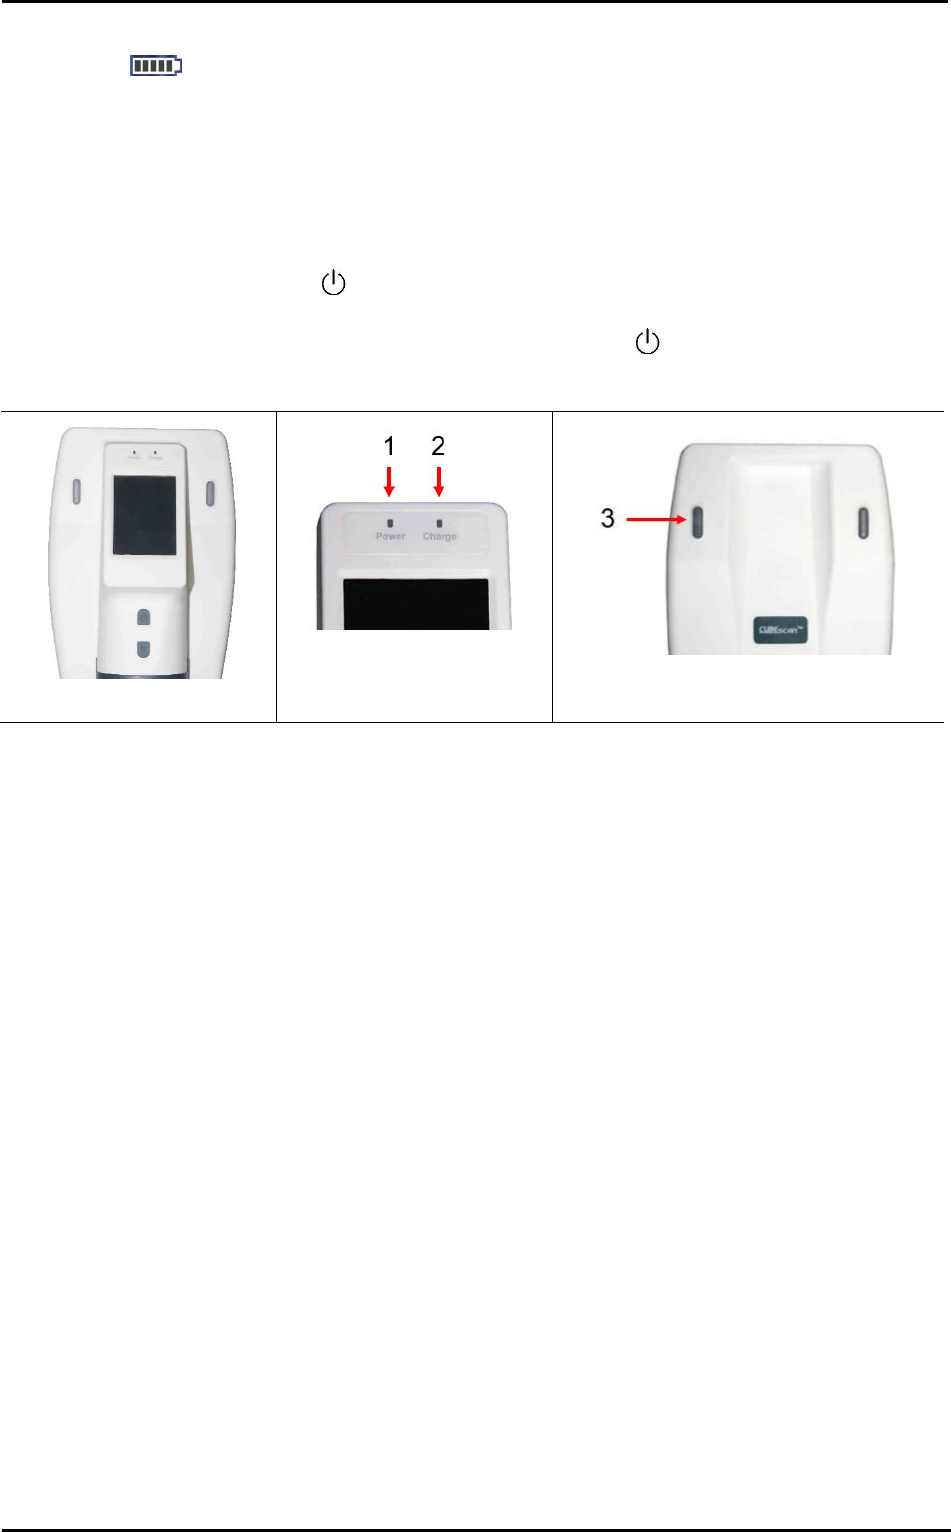
Figure 6 Probe-mounting
Figure 7 Probe Indicatior
Figure 8 Charger Indicator
1) Connect the AC/DC adapter to the power cord.
2) Connect the AC/DC adapter to the Charger
3) Plug the AC/DC adapter into an electric outlet
4) The battery indicator (3) on the Charger lights on in steady green (Power on).
5) Mount the probe on the Charger. Make sure that the upper part of probe reaches the wall of Charger.
See Figure 5.
6) As soon as the probe is mounted on the Charger, the beep and light indicators work as below;
a) A short beep: A connection for the probe’s battery charging is completed.
b) The battery indicator (3) on the Charger lights on in blinking green(Charging in progress).
c) The battery indicator (2) on the probe lights on in steady orange (Charging in progress).
7) The Power indicator (1) is turned on in steady yellow when the probe is ready to use.
8) It takes approximately 6 hours for the discharged battery to fully charge. When fully charged, the battery
indicator(2) on the probe turns off.
4.3 SCAN TYPE
You can adjust one of the following options to measure bladder volume:
Pre-scan: General 2D real-time ultrasound scanning. 2D ultrasound images are displayed continuously in
live image basis. This helps an operator locate bladder position and predicting the range of residual urine
to detect the bladder before normal scan.
Normal Scan: Get 12-plane ultrasound images and calculate the residual urine in the bladder (3D
scanning).
CUBEScanTM BioCon-900S Operator’s Manual
Page 20
5 HOW TO USE
5.1 CHECKUP BEFORE USE
Before using BioCon-900S, ensure you are familiar with the device and its parts. If you use it for the first
time, we strongly recommend you to try your first bladder volume measurement on a patient with
moderately full bladder using Pre-scan. Pre-scan helps you detect the bladder and moderately full bladder
can be located more easily.
CAUTION
If the oil leaks from housing and fluid gets in contact with your eyes, skin or clothing, flush the affected
area immediately with clean water and seek medical attention or see a doctor.
5.2 TURN SYSTEM ON/OFF
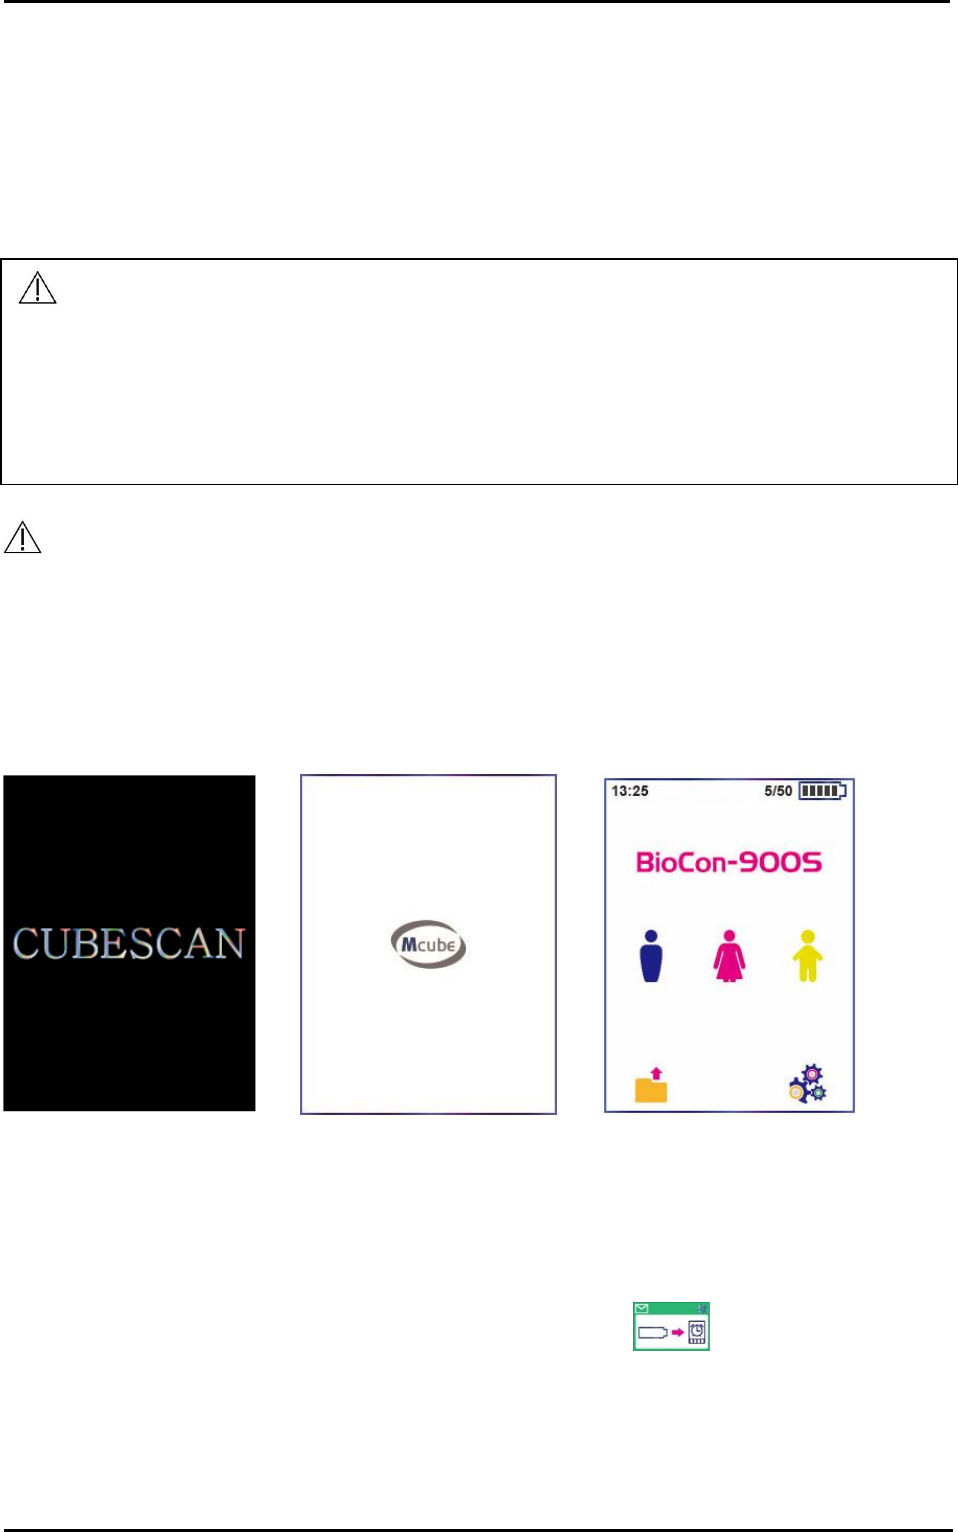
There are two power modes to system on/off the BioCon-900S. Loading screen depends on the power
mode and it shows during start-up.
Figure 9 Loading Screen (1)
Figure 10 Loading Screen (2)
Figure 11 Home Screen
5.2.1 SLEEP MODE
To preserve battery power, the probe goes into sleep mode by shutting itself down automatically when not
in use. You can set the time to go into sleep mode in the setup (2min/3min/5min). See the section “7.4
SLEEP MODE SETTING”.
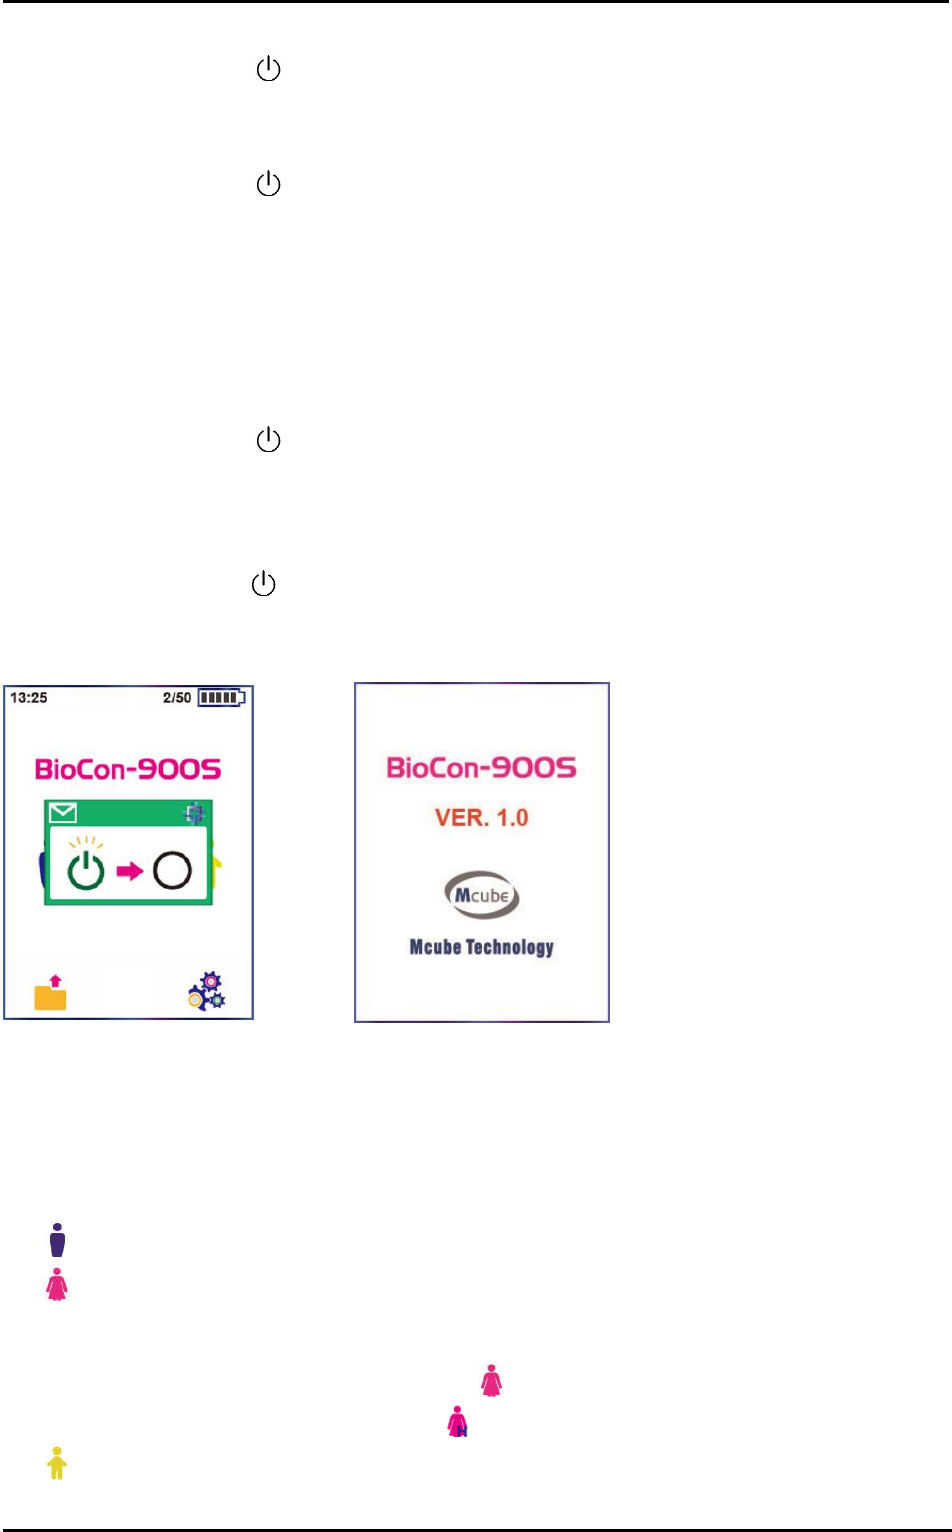
However, if a battery needs to be recharged immediately, Dialog box ( ) appears shortly and then
probe goes to sleep mode by shutting itself down. We strongly recommend that you should recharge the
battery immediately. See the section “4.2 CHARGE THE BATTERY”.
Turn System on
WARNING
If you use BioCon-900S in the presence of flammable anesthetics, explosion hazard exists.
Do not use the BioCon-900S on following cases:
1) Fetal use or pregnant patients.
2) Patients with ascites.
3) Patients with open or damaged skin.
4) Wounds in the suprapubic region.
CUBEScanTM BioCon-900S Operator’s Manual
Page 21
1) Press the Power Button ( ) shortly to wake the probe from sleep mode.
2) Only Loading screen (2) appears on the display.
3) Home screen appears when the system is fully loaded at start up.
Turn System off
1) Press the Power Button ( ) shortly twice to go into sleep mode.
5.2.2 SHUTDOWN MODE
The probe draws little power when it is gone into sleep mode. To preserve battery power, the probe shuts
down the system in approximately 24 hours after going into sleep mode, if there is no activity. However, if
you do not plan to use the probe for more than a week, you should shut the system down completely to
prevent it from discharging completely
Turn System on
1) Press the Power Button ( ) shortly to wake the probe from shutdown mode.
2) Loading screen (1) appears on the display and Loading screen (2) follows shortly.
3) Home screen appears when the system is fully loaded at start up
Turn System off
1) Press the Power Button( ) for 3~4 seconds.
2) A Shutdown dialog box appears on the Home screen.
3) Ths system shut down shortly after Shutdown screen appears.
Figure 12 Shutdown Dialog Box
Figure 13 Shutdown Screen
5.3 SELECT PATIENT TYPE
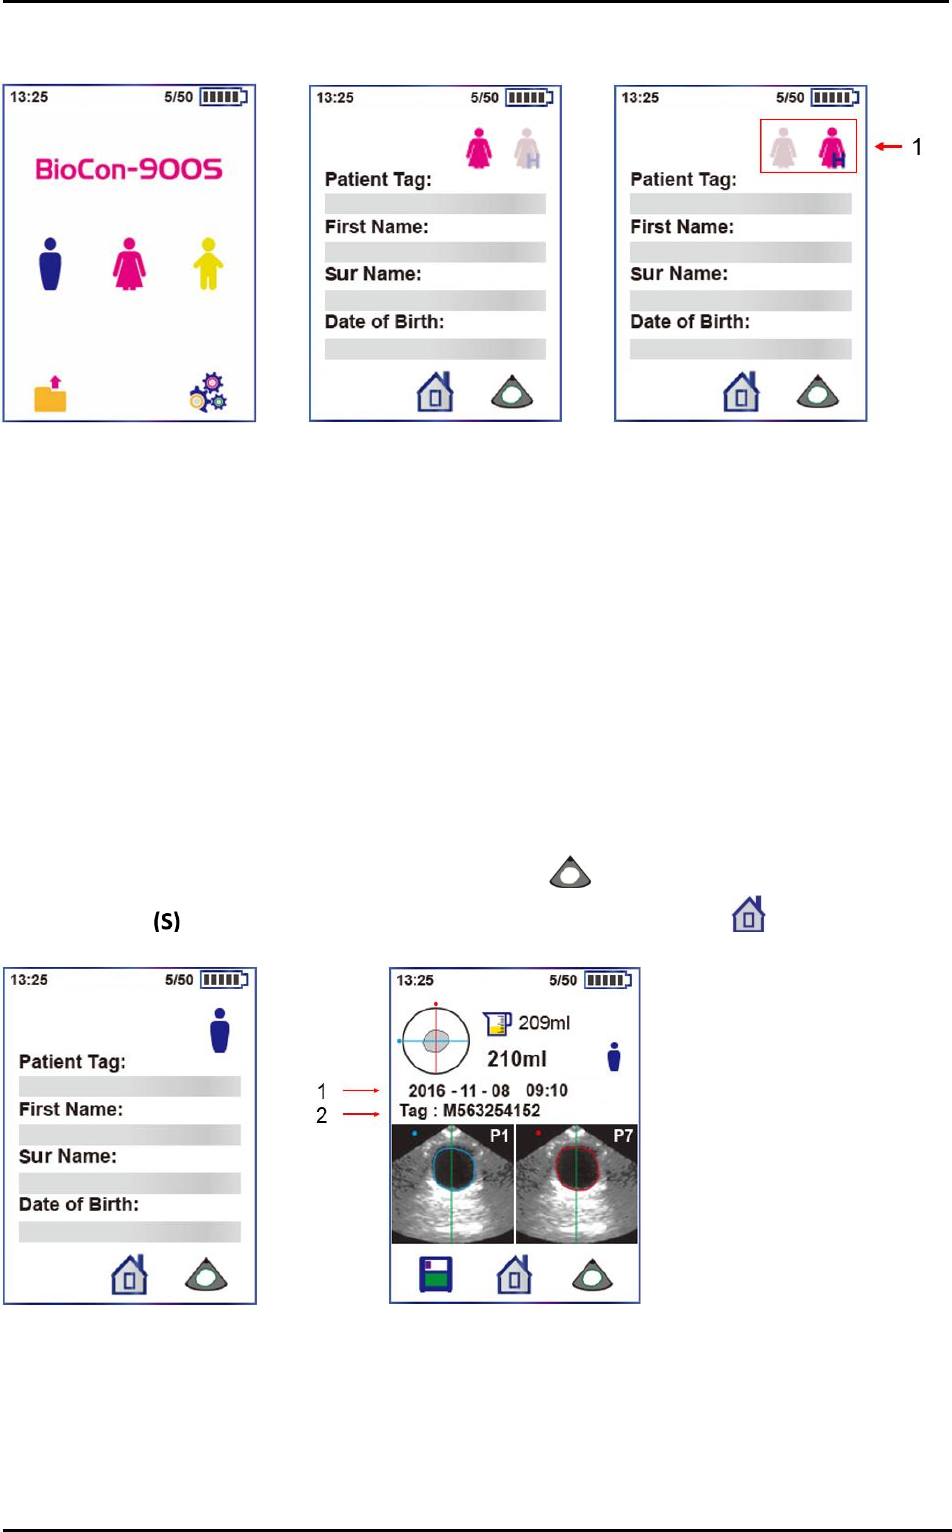
BioCon-900S has several patient types. Tap the Patient icon on the Home screen to select the patient type.
1) Male (All other patients)
2) Female patient – Select if you are scanning a female patient. If you select the female patient type
on the Home screen, the BioCon-900S allows you more granularity in chosing an female patient
type on the Information screen. Select female patient by tapping the (1) of Figure 23.
- A female who has not had a hysterectomy ( )
- A female who has had a hysterectomy ( )
3) Pediatric patient – Select if you are scanning a child with height less than 47 inches (120cm) and
weight less than 55 lbs. (25kg).
CUBEScanTM BioCon-900S Operator’s Manual
Page 22
Figure 14 Patient Type
Figure 15 Female Patient Type
5.4 RECORD INFORMATION FOR A PATIENT
5.4.1 INPUT INFORMATION – VIRTUAL KEYBOARD
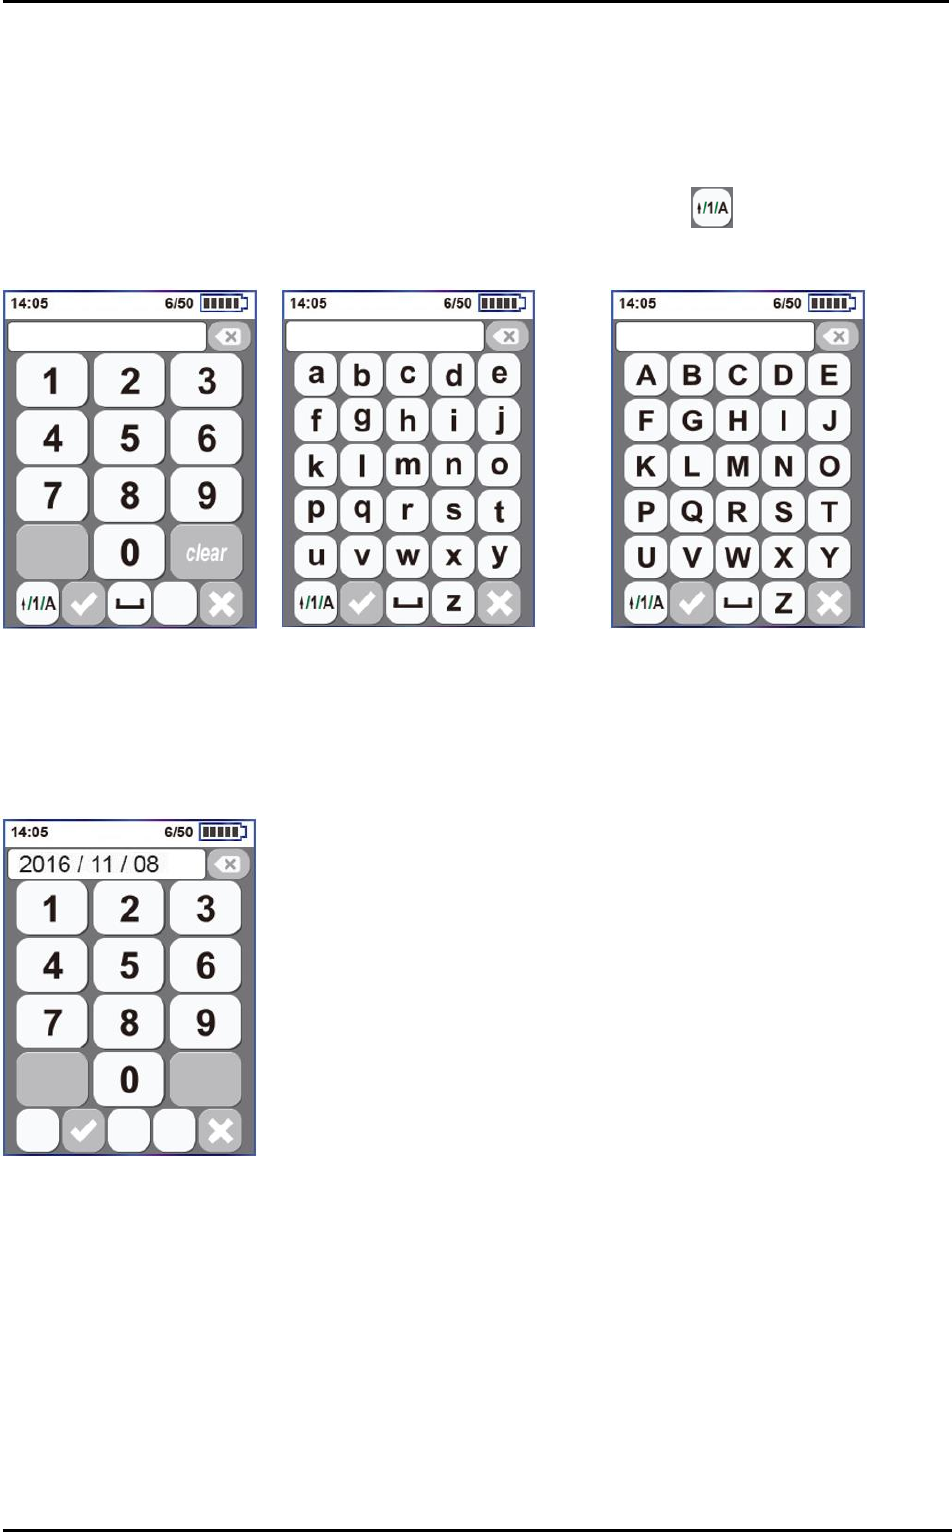
The Information screen appears when you tap one of the Patient icon on the Home screen. You can tap
the text box and update information for a patient by typping the virtual keyboard. The virtual keyboard
screen appears depend on the text box you select. See the section “6.4 VIRTUAL KEYBOARD
SCREEN”on for information about the function of the virtual keyboard.
You can scan a bladder volume without entering patient information. If you do not enter a patient
information, the patinet tag content(2) is empty on the Scan Result screen. Scanned date and time(1)
automatically display and it is based on your probe’s time settings. Once a scan result is saved, you cannot
add or modify patient information.
You can measure bladder volume by tapping the Scan icon( ) on the Information screen or pressing
the Scan Button . If you want to return to the Home screen, tap the Home icon( )
Figure 16 Information Screen
Figure 17 Scan Result Screen
Patient Tag
Tap Patient Tag text box, and then enter the patient’s tag by typping the virtual keyboard
CUBEScanTM BioCon-900S Operator’s Manual
Page 23
First Name
Tap First Name text box, and then enter the patient’s first name by typping the virtual keyboard
Sur Name
Tap Sur Name text box, and then enter the patient’s sur name by typping the virtual keyboard
If you would like to the change the virtual keyboard type, tap Keyboard icon ( ) in the left corner of the
virtual keyboard. The icon allows you to select an numeric, uppercase or lowercase virtual keyboard.
Figure 18 Numeric Key
Figure 19 Letter Key (Lowcase)
Figure 20 Letter Key (Uppercase)
Date of Birth
Tap Date of Birth text box, and then enter the patient’s birthday by typping the virtual keyboard
Figure 21 Date Key
5.4.2 INPUT INFORMATION – OPTIONAL BARCODE
The CUBEScanTM BioCon-900S can attach an optional barcode module. Installing the optional barcode
module on the device allows you to record a patient tag as necessary. Skip Skip this section if you do not
enter patient information through a barcode or if you do not have a barcode reader.
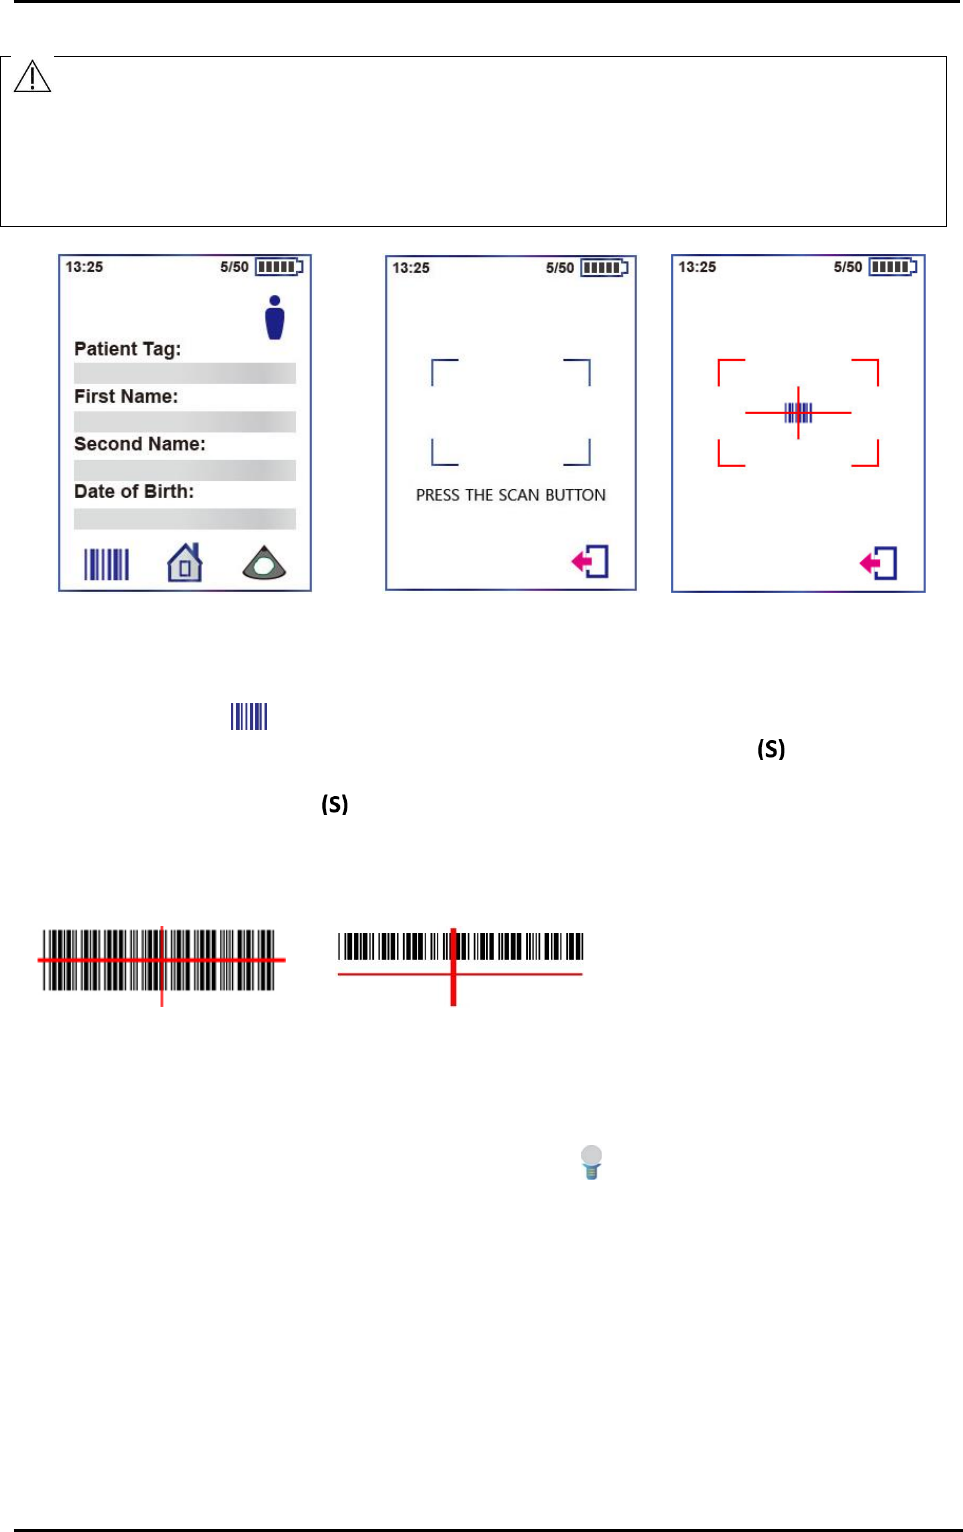
CUBEScanTM BioCon-900S Operator’s Manual
Page 24
WARNING
“LASER RADIATION – AVOID DIRECT EXPOSURE TO BEAM”
Do not capture human being with the barcode module.
Hold the probe with both hands tightly, when you read barcodes with patient information.
Recording barcodes is not available, after the scan result is saved.
Figure 22 Information Screen
Figure 23 Barcode Scan Screen
How to read a barcode
1) Tap the Barcode icon( ) on the Information screen.
2) Move the aiming position to the center of the barcode and press the Scan Button with thumb.
3) A red light guide is emitted.
4) Keep pressing the Scan Button and do not release until getting barcodes.
5) The barcode reader decodes continuously for a good barcode scan.
6) You have a good barcode with a short beep. The barcode numbers is displayed on Patient Tag of the
Information screen.
<good>
<bad>
5.5 MEASURE BLADDER VOLUME
5.5.1 NORMAL SCAN
The normal scan is executed only when Pre-scan setup is ‘Off( )’ on the Setup screen. See the section
“7.7 PRE-SCAN SETTING”
1) The patient should be lying in a supine position and lift up the patient garment exposing the abdominal
region from the pubis to the navel.
2) Place an ample amount of gel without air bubbles to the probe head. In order to assure optimal
transmission of energy between the patient and the probe, a conductive gel must be applied on the
probe head.
3) Place the probe head on the patient’s abdomen with the screen facing upwards and aim it to the location
where the bladder is expected to be above 3~4cm the pubic bone.
4) Ensure that the probe head is pointing toward the patient’s foot.
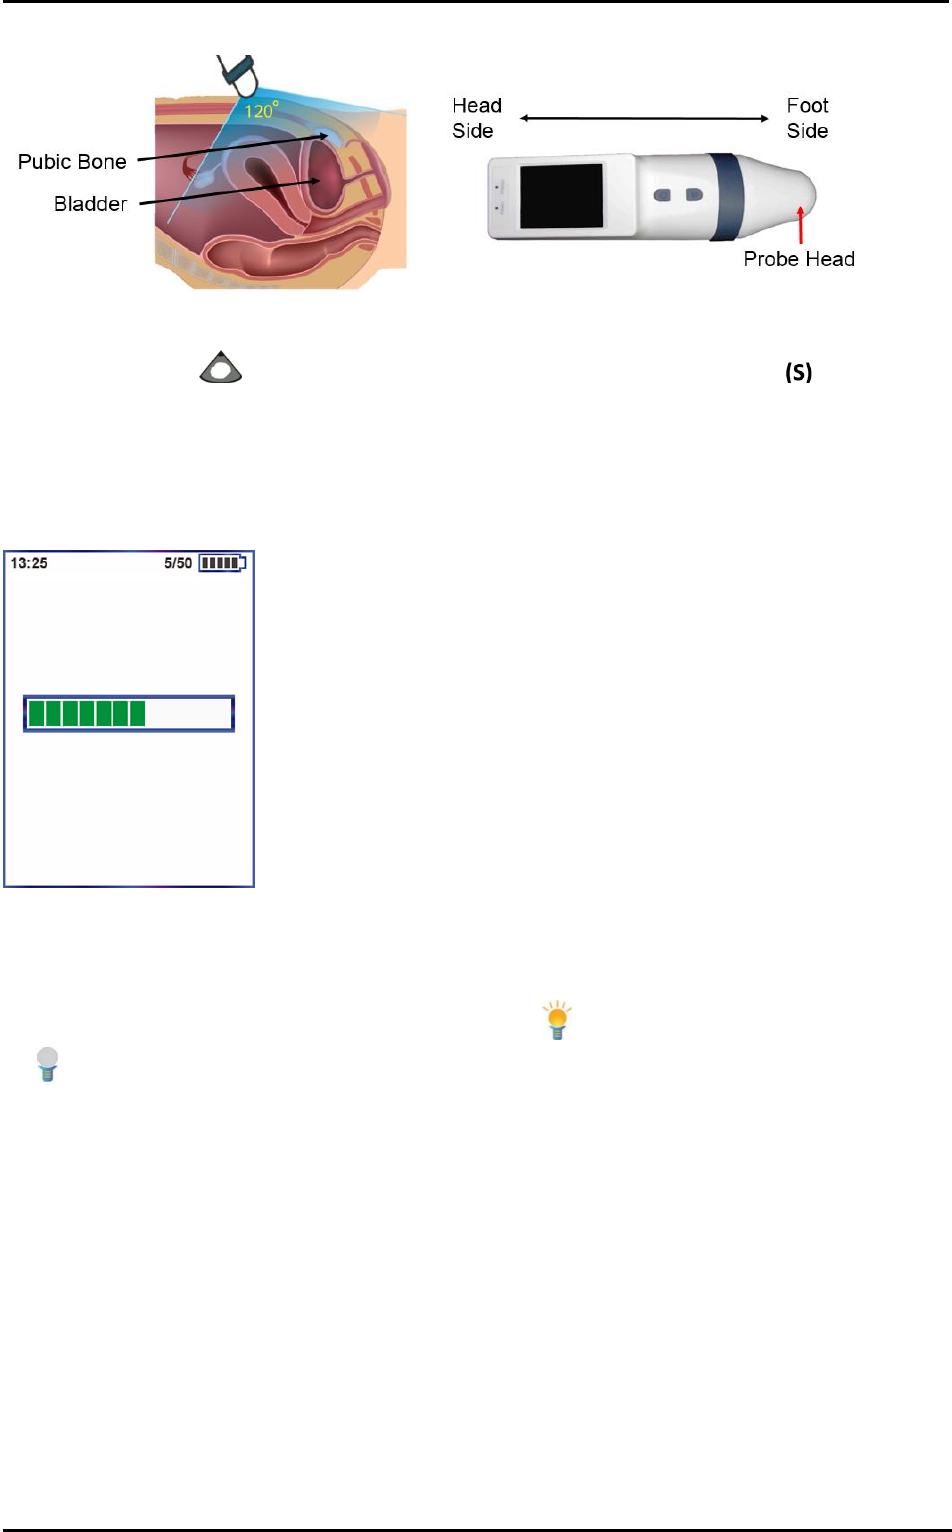
CUBEScanTM BioCon-900S Operator’s Manual
Page 25
Figure 24 Positioning Bladder
Figure 25 Probe Direction
1) Tap the Scan icon( ) on the Information screen or press the probe Scan Button . The scanning
process begins.
2) The progress bar on the screen appears. It takes 3 seconds to complete the normal scan. Hold the
probe steady while scanning. Movement of the probe during scanning reduces the accuracy of
measurement.
3) When you hear the beeps, the scan is complete.
Figure 26 Normal Scan Process
5.5.2 PRE-SCAN
The Pre-scan is executed only when Pre-scan setup is ‘ON( )’ on the Setup screen. When Pre-scan is
‘Off()’, a normal scan is executed. See the section “7.7 PRE-SCAN SETTING”
1) The patient should be lying in a supine position and lift up the patient garment exposing the abdominal
region from the pubis to the navel.
2) Place an ample amount of gel without air bubbles to the probe head. In order to assure optimal
transmission of energy between the patient and the probe, a conductive gel must be applied on the
probe head.
3) Place the probe head on the patient’s abdomen with the screen facing upwards and aim it to the location
where the bladder is expected to be above 3~4cm the pubic bone.
4) Ensure that the probe head is pointing toward the patient’s foot.
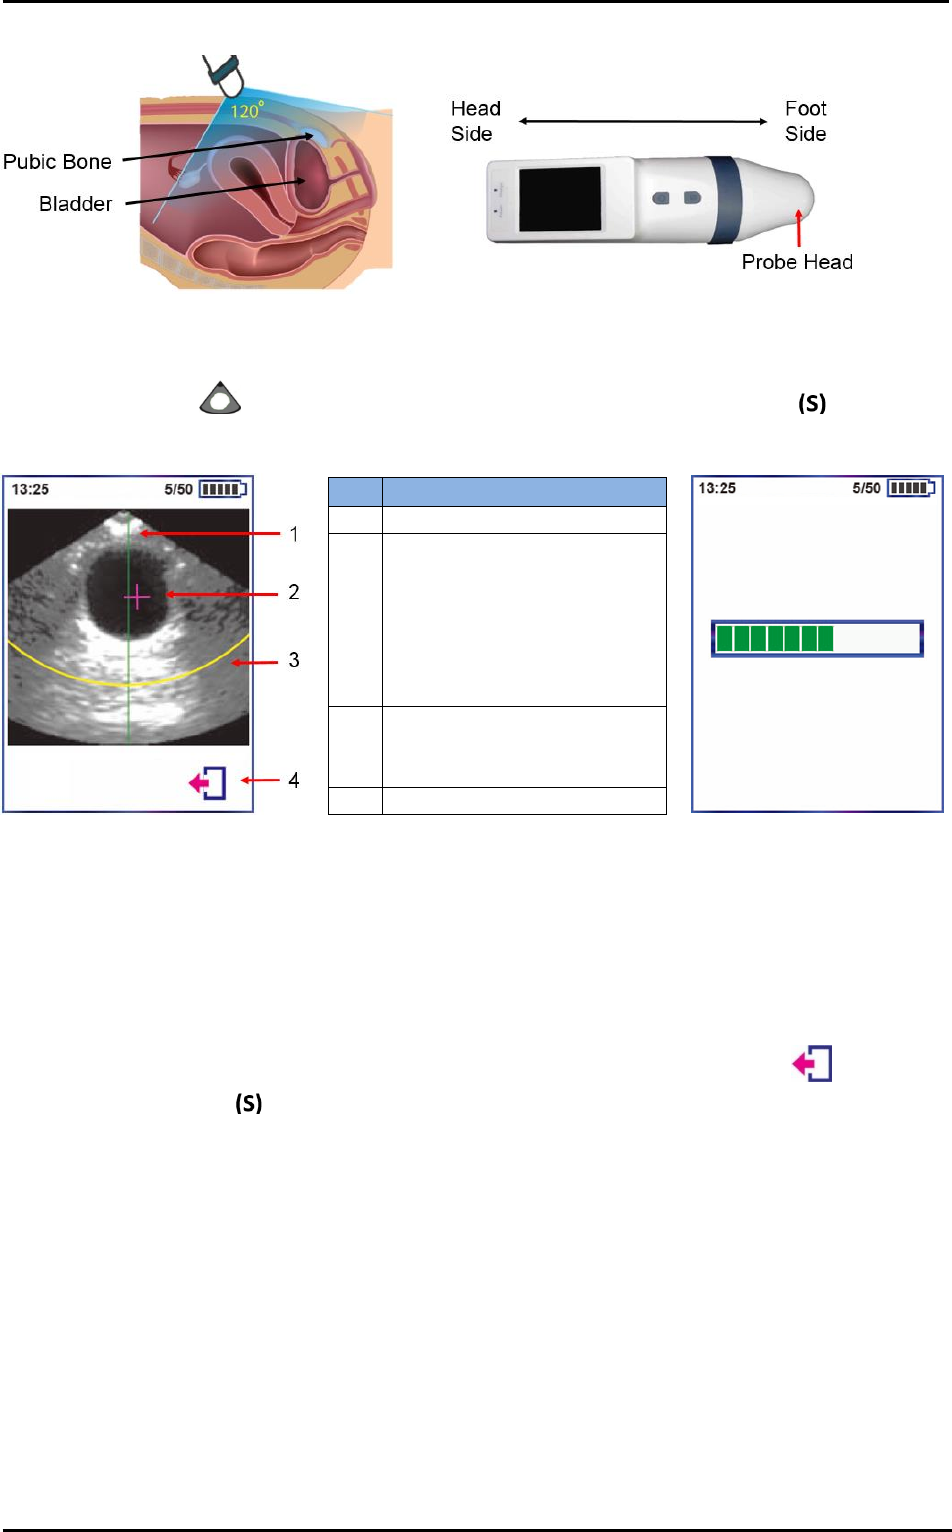
CUBEScanTM BioCon-900S Operator’s Manual
Page 26
Figure 27 Positioning Bladder
Figure 28 Probe Direction
5) Tap the Scan icon( ) on the Information screen or press the probe Scan Button to start Pre-
scan. A Pre-scan image such as 2D ultrasonic image appears on the probe screen.
No.
Description
1
Center Line
2
Bladder point: It helps to
easily recognize the bladder.
NOTE: It is not 100%
guaranteed that the pointer
shows the bladder in all
cases
3
Depth Line: Max detection
depth to measure a padiatric
patient’s bladder volume.
4
Exit Icon
Figure 29 Pre-scan Screen
Figure 30 Normal Screen
6) To locate the bladder, keep the probe contacted the abdomen. And tilt the probe slowly back and forth,
side to side. The position where the bladder image is the largest and most centered is the optimal place
to start the normal scan process. Locate the bladder along the centerline(1) on the Pre-scan screen. It
helps detect the optimal position during Pre-scan.
NOTE: Depth Line(3) is not displayed for male and female patient type.
7) If you want to stop the Pre-scan and return to the Information screen, tap the Exit icon( ).
8) Press the Scan Button again or tap the Pre-scan screen. The progress bar on the screen appears.
It takes 3 seconds to complete the normal scan Hold the probe steady while scanning. Movement of the
probe during scanning reduces the accuracy of measurement.
9) When you hear the beeps, the scan is complete.
5.6 DISPLAY A SCAN RESULTS
After a scan has been completed, the Scan Result screen appears. The Scan Result screen includes the
following information:
Current Urine Volume
Maximum Urine Volume
Patient Type & Tag
Scan Date & Time
Bladder Planes
Aiming Information
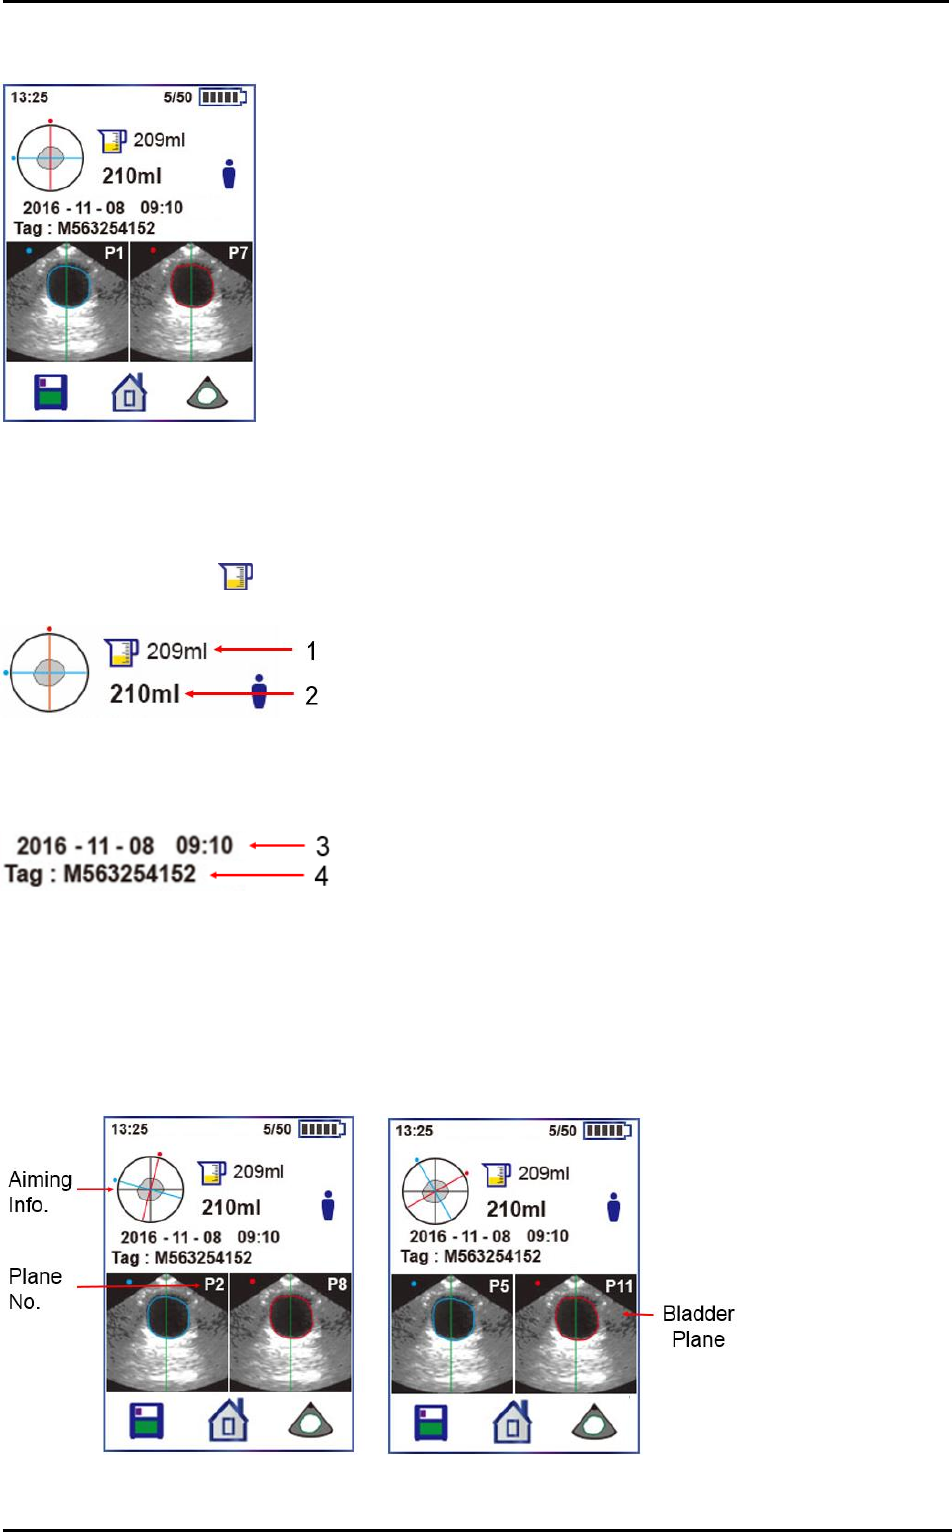
CUBEScanTM BioCon-900S Operator’s Manual
Page 27
Figure 31 Scan Result Screen
5.6.1 BLADDER VOLUME
View the bladder volume displayed in milliliters (ml).
The Urine Volume icon( ) shows the measured urine volume. (1) shows the most recent volume and (2)
shows the maximum volume from multiple results for one patient.
5.6.2 PATIENT INFORMATION AND SCAN DATE & TIME
(3) shows the date and time on the current scan.
(4) shows the patient tag entered on the Information screen.
5.6.3 BLADDER PLANES
Tap the bladder plane repeatedly with your finger to check other 12 planes of bladder on the Scan Result
screen, if necessary. At the same time, the Aiming information (crosshair) is rotated clockwise by 15° and
displayed the 2nd&8th planes, 3rd&9th, 4th&10th, 5th&11th, 6th&12th planes of bladder in order. If these plane’s
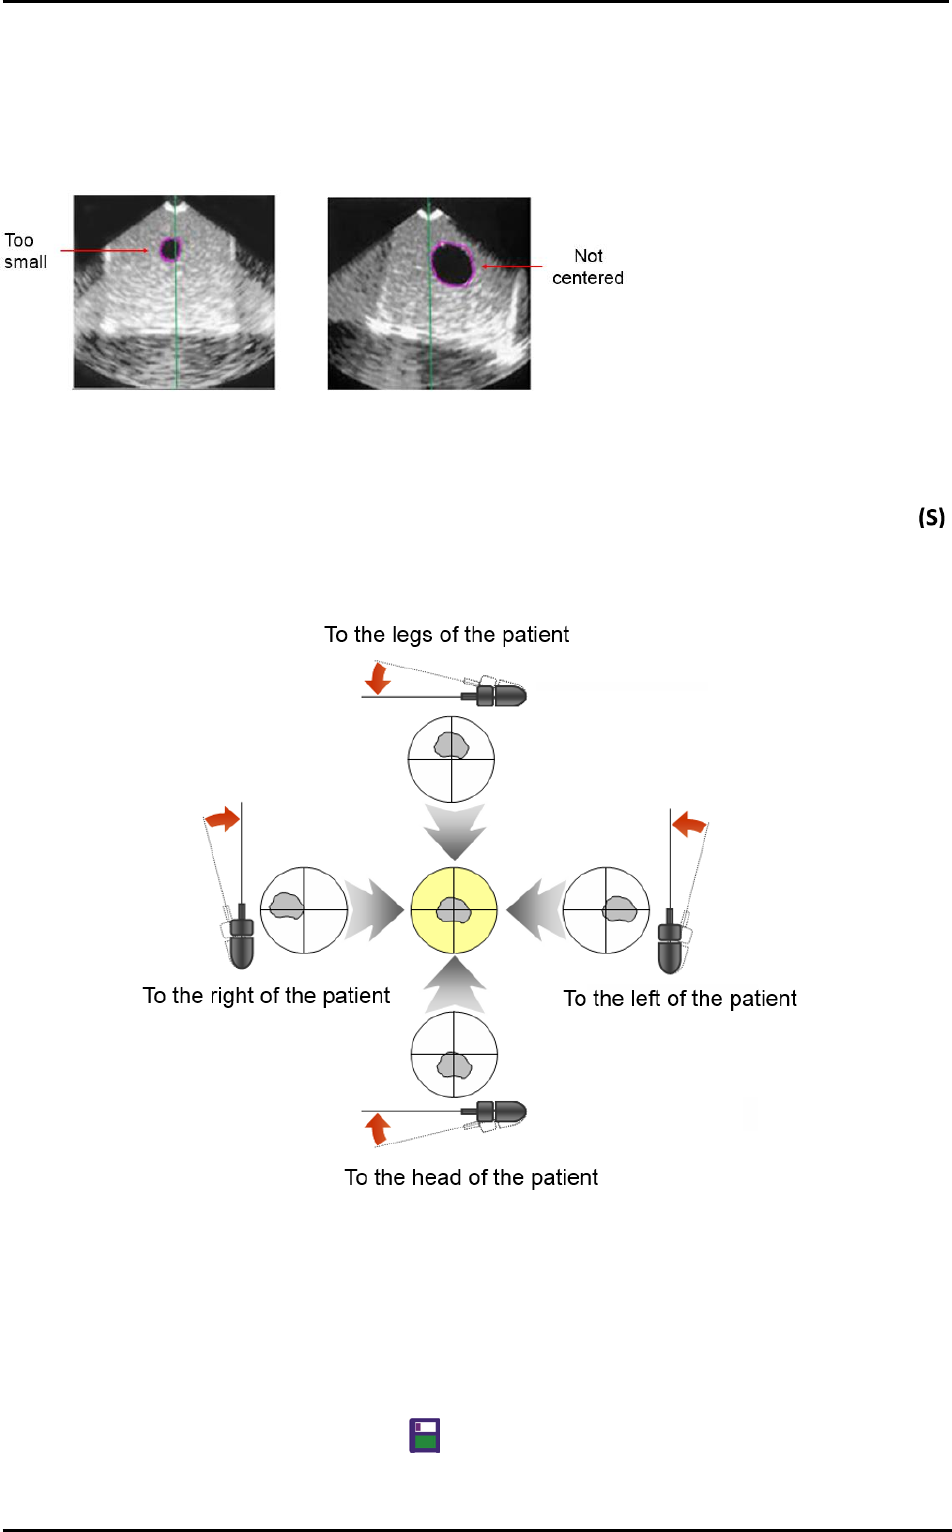
bladder is not centerd in the target or too small, we recommend that you scan the bladder again. See the
section “5.7 RE-AIM BLADDER”.
Figure 32 Planes & Aimming Information
CUBEScanTM BioCon-900S Operator’s Manual
Page 28
5.7 RE-AIM BLADDER
If the bladder is not centerd in the target or too small, you can re-aim and re-scan the bladder before
saving the scan result. We strongly recommend that you re-aim and re-scan more than one time for
accuracy.
Figure 33 Incorrectly Positioned
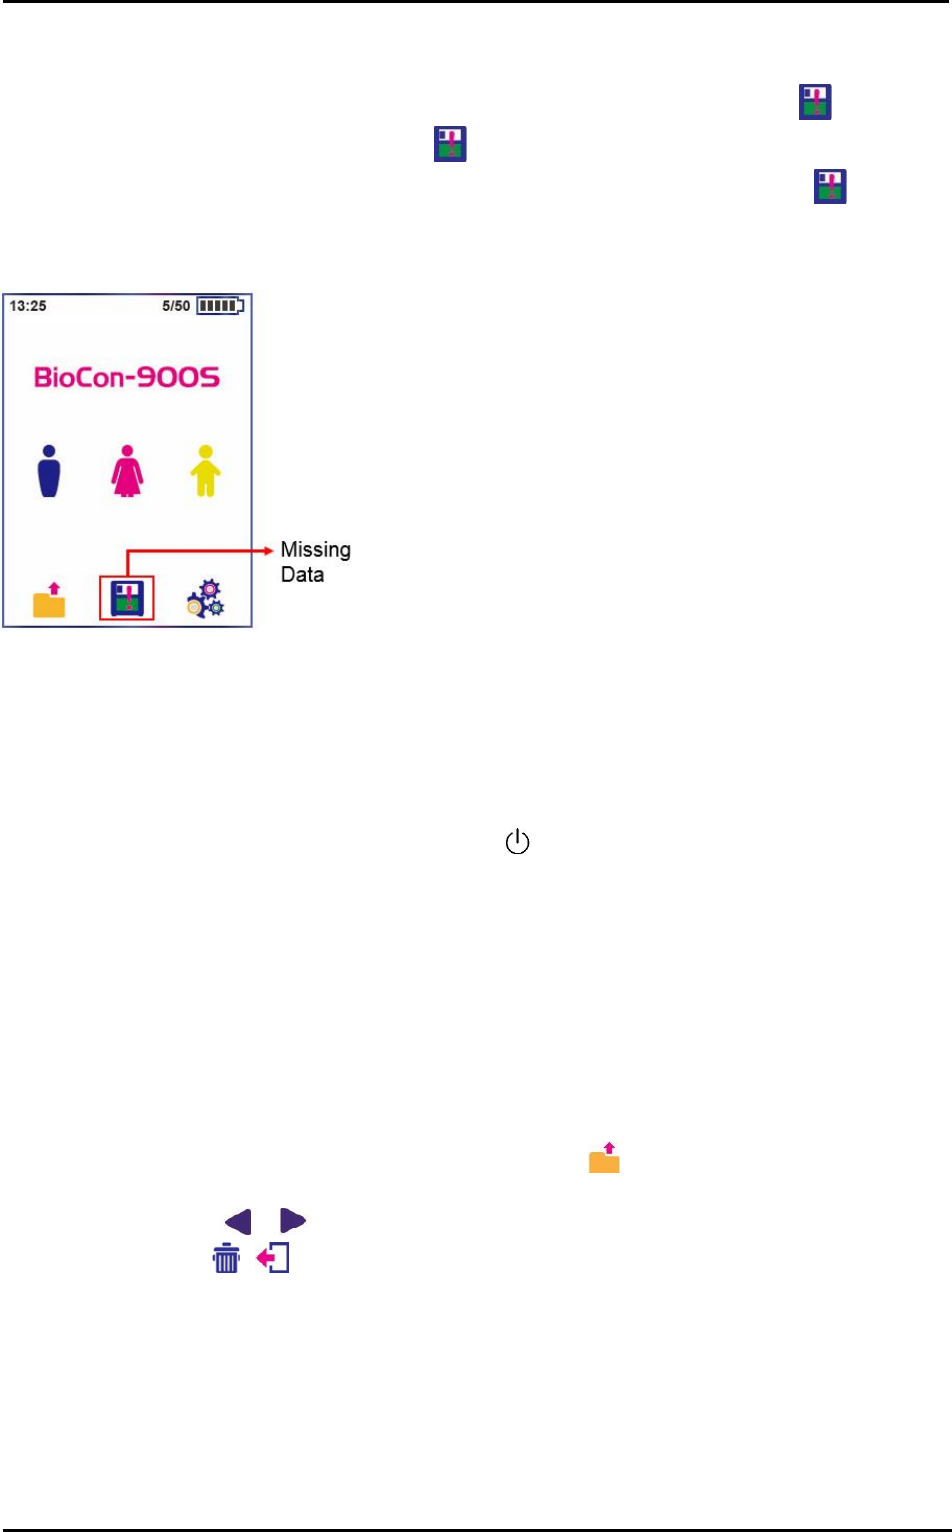
The crosshair helps how to re-aim and the guiding arrows show that the user has to move or tilt the probe
for a more accurate scan. If the bladder appears in the center of the crosshair, press the Scan Button
or tap the Pre-scan part of the screen.
Figure 34 How To Re-aim
5.8 SAVE A SCAN RESULT
When you do not need to scan again, you can save the currently displayed scan result. And also missing
scan result can be saved after fetching the missing scan result. See the section “5.9 FETCH A MISSING
DATA”.
To save the scan results, tap the Save icon ( ) below the display. The Home screen appears after the
scan result is saved successfully.
CUBEScanTM BioCon-900S Operator’s Manual
Page 29
5.9 FETCH A MISSING DATA
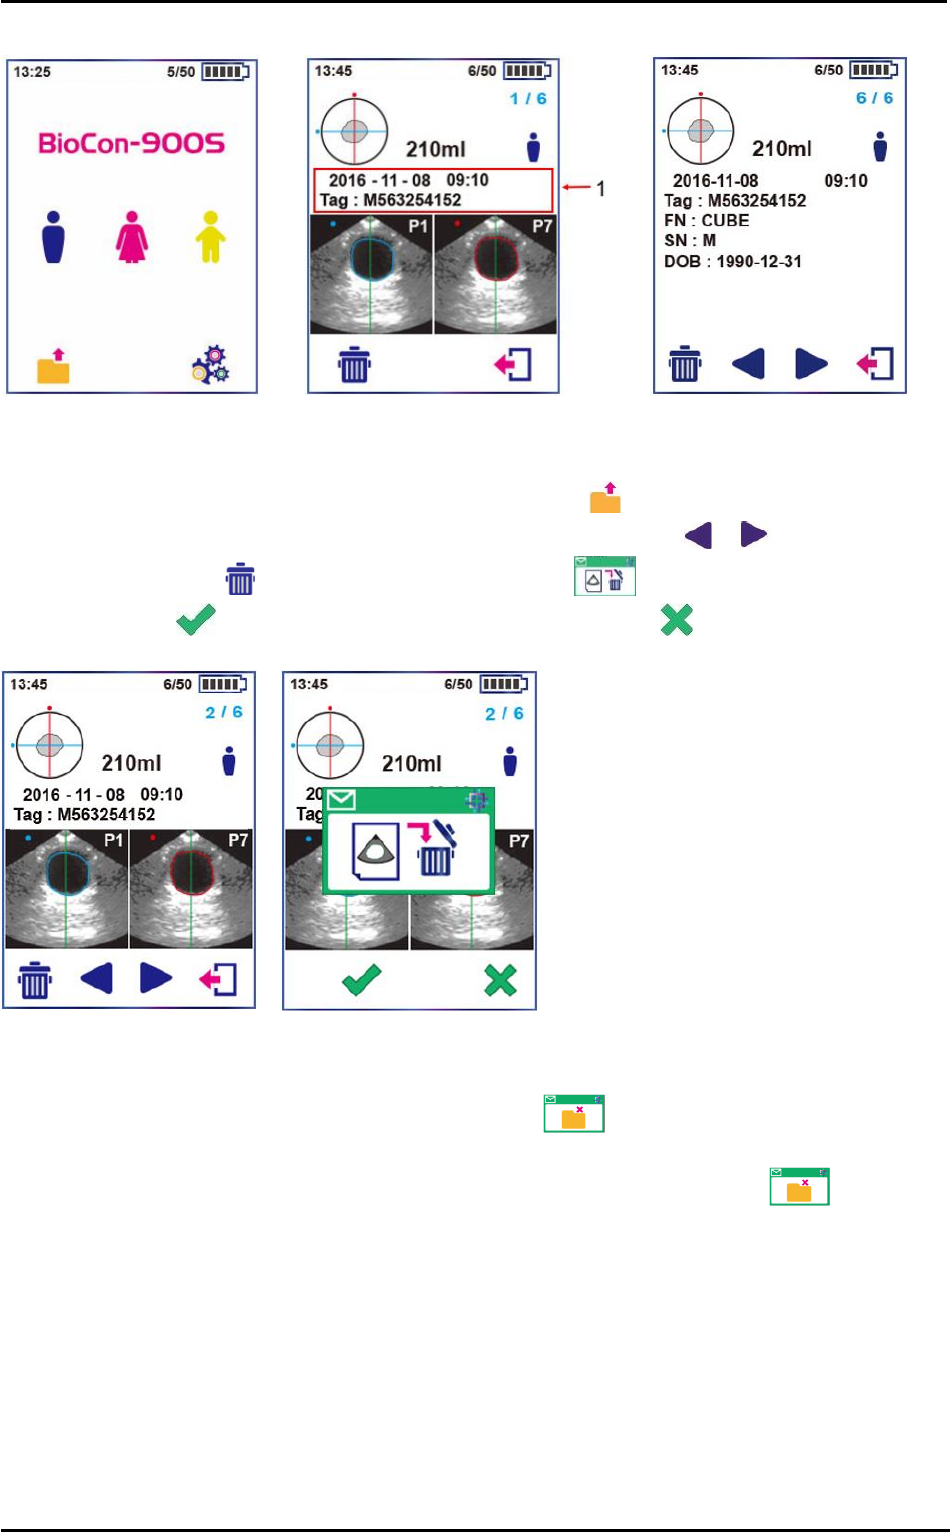
If you did not save a scan result and return to the Home screen, the Missing Data icon ( ) appears on
the Home screen. Tap the Missing Data icon ( ) to fetch the unsaved scan result. The Scan Result
screen on the missing data appears. The performances below make the Missing Data icon( ) disappear.
1) Fetch and save the missing scan result.
2) A new normal scan is performed.
Figure 35 Home Screen
5.10 FINISH THE MEASUREMENT
After finishing scanning, take the probe away from the patient and then wipe the ultrasound gel off the
probe. See the section “8.3 CLEANING & DISINFECTION”
When the probe is not in use, press the Power Button( ) twice to place the system in sleep mode and
then mount it for charging internal battery in the Charger.
5.11 MANAGE SAVED SCAN RESULTS
1) The scan results are saved to the internal memory of BioCon-900S Probe. If you scan the patient
several times using the probe, the lagest result is saved. Information can be entered and modified before
the scan result is saved, but once the scan result is saved, patient information can not be modified
2) If you want to delete the saved scan result, see the section “5.11.2 DELET A SAVED SCAN RESULT”
5.11.1 REVIEW A SCAN RESULT
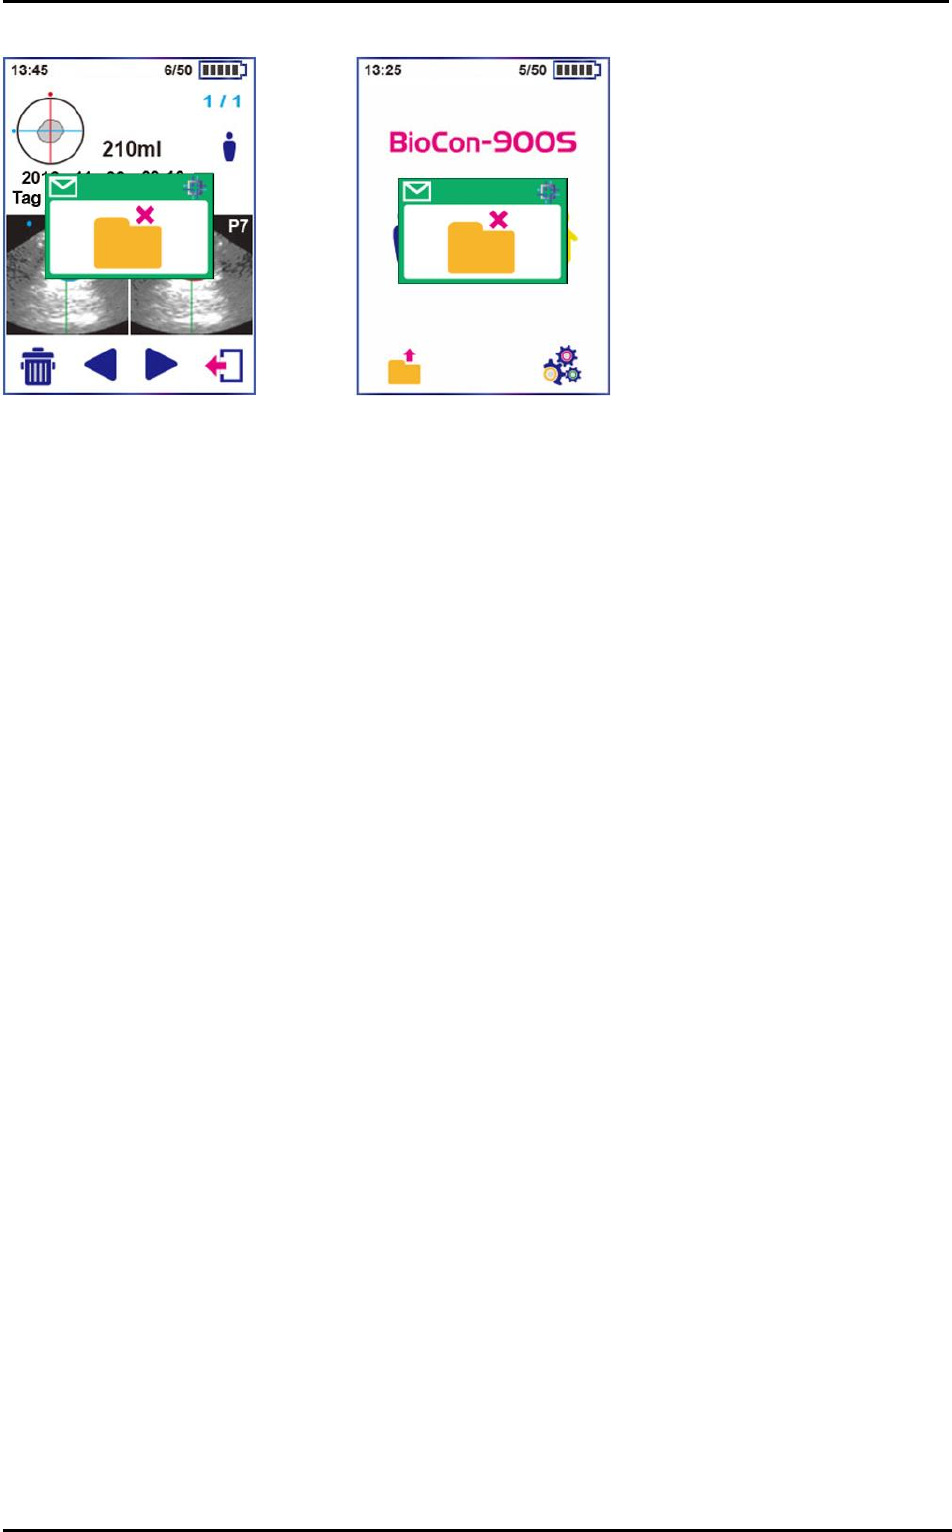
1) The Review screen is displayed when you tap the Review icon ( ) on the Home screen.
2) The Review screen opens, it shows the urine volume, ultrasound images and other saved information.
3) Previous & Next icon ( , ) allow you to review the scan results of the other patients.
4) Delete & Exit icons ( , ) allow you to delete the current reviewing results or return to the Home
screen.
5) Tap the (1) area to review the information you entered for the patient.
CUBEScanTM BioCon-900S Operator’s Manual
Page 30
Figure 36 Home Screen
Figure 37 Review Screen
5.11.2 DELETE A SAVED SCAN RESULT
1) The Review screen is displayed when you tap the Review icon ( ) on the Home screen.
2) Select the scan result you want to delete by tapping Previous & Next icon ( , ).
3) Tap the Deletion icon ( ) and a Delete Confirm dialog box ( ) appears.
4) Tap the OK icon ( ) to delete the scan result or Tap the Cancel icon ( ) to cancel.
Figure 38 Review Screen
Figure 39 Delete Scan Result
6) If you delete the last scan result, Empty Foder dialog box ( ) appears and BioCon-900S returns to
the Home screen.
7) If you tap the Review icon when there is no scan result, Empty Folder dialog box ( ) appears on
the Home screen.
8) You can delete all results in probe’s internal memory at one time, if you want. See the section “7.8
DELETE ALL MEASUREMENTS” for information on deleting all scan results
NOTE: The scan results are saved to the internal memory, which can store 50 data. If you exceed this limit,
the system deletes the oldest data to accommodate the new data.
CUBEScanTM BioCon-900S Operator’s Manual
Page 31
Figure 40 Delete Last Scan Result
Figure 41 Empty Folder Dialog Box
CUBEScanTM BioCon-900S Operator’s Manual
Page 32
6 SCREENS
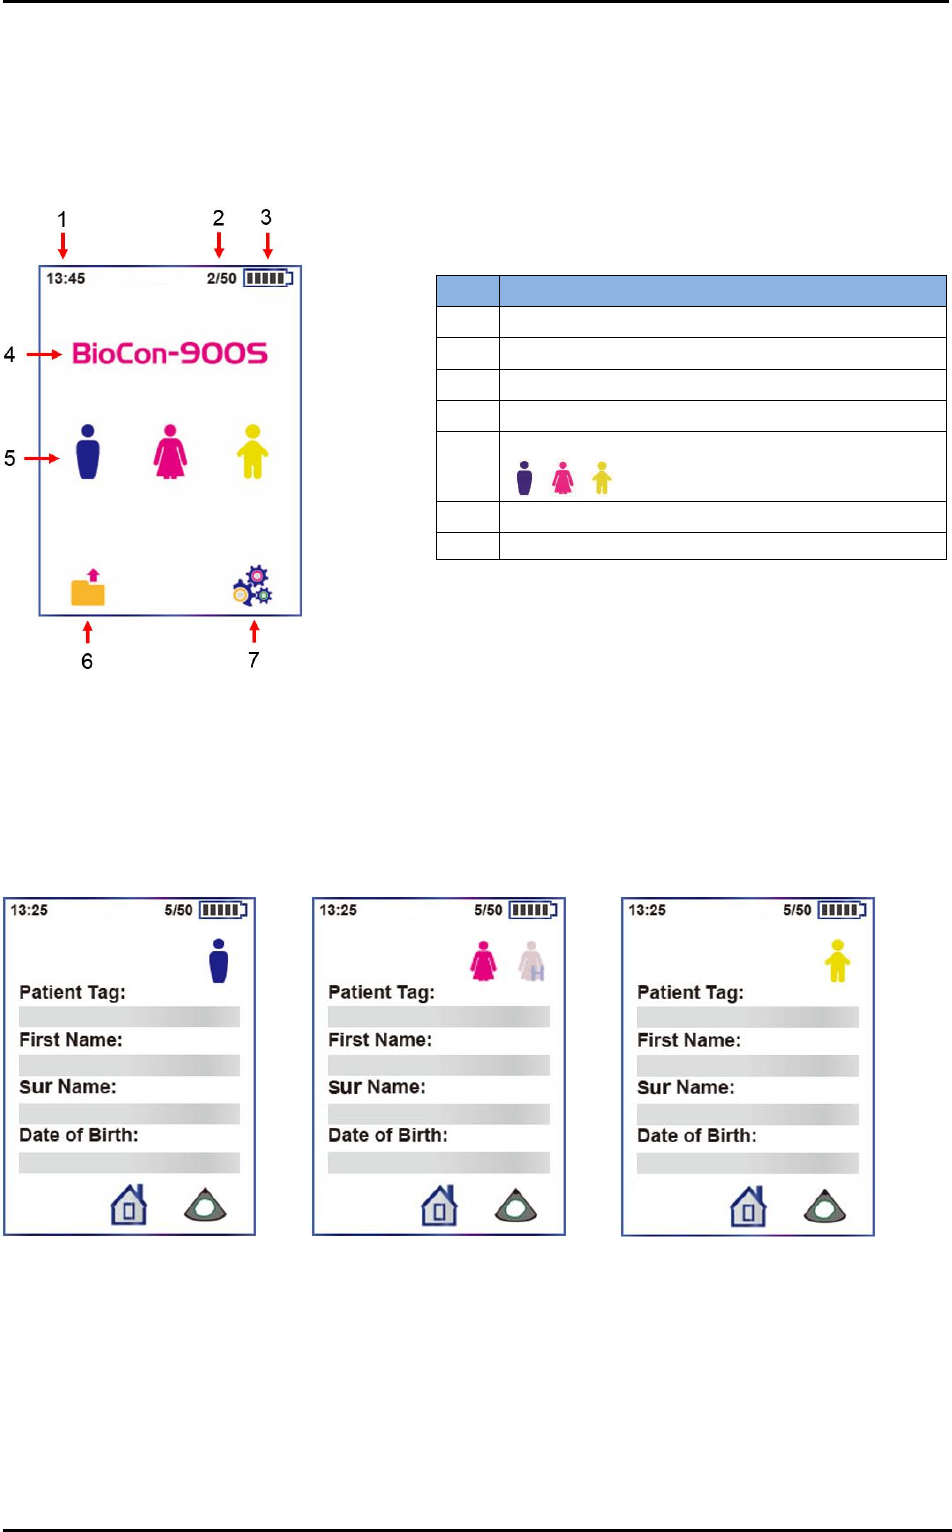
6.1 HOME SCREEN
Turn the probe on and the Home screen appears. It shows the main functions of the probe. The icons
below on the screen allow you to select patient type, go to the Review screen or go to the Setup screen.
No.
Description
1
Time
2
Number of Saved Data / Internal Storage (50)
3
Battery Status
4
Model Name
5
Patient Type Icons
6
Review Icon
7
Setup Icon
Figure 42 Home Screen
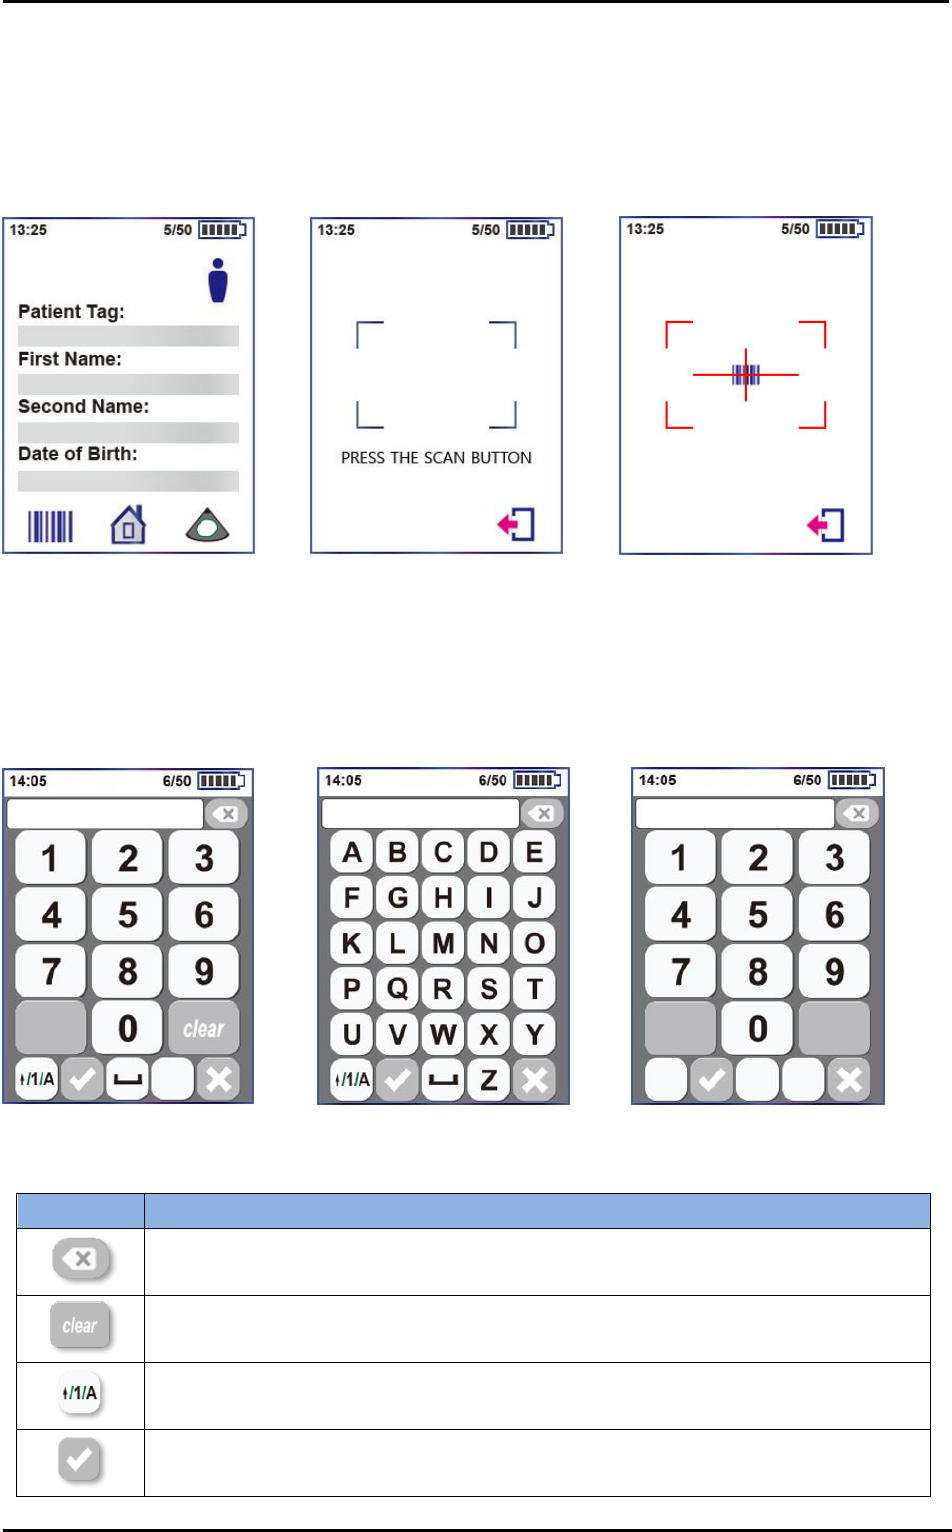
6.2 INFORMATION SCREEN
The Information screen is used to enter patient data. See the section “5.4.1 INPUT INFORMATION –
VIRTUAL KEYBOARD” for information on completing on the text box if you want.
Figure 43 Information Screen
(All)
Figure 44 Information Screen
(Female)
Figure 45 Information Screen
(Pediatric)
CUBEScanTM BioCon-900S Operator’s Manual
Page 33
6.3 BARCODE SCREEN (OPTIONAL)
The Barcode screen is used to record data by scanning barcode with patient information. See the section
“5.4.2 INPUT INFORMATION – OPTIONAL BARCODE” for more information if you want.
Figure 46 Information Screen
(Optional Barcode)
Figure 47 Barcode Screen
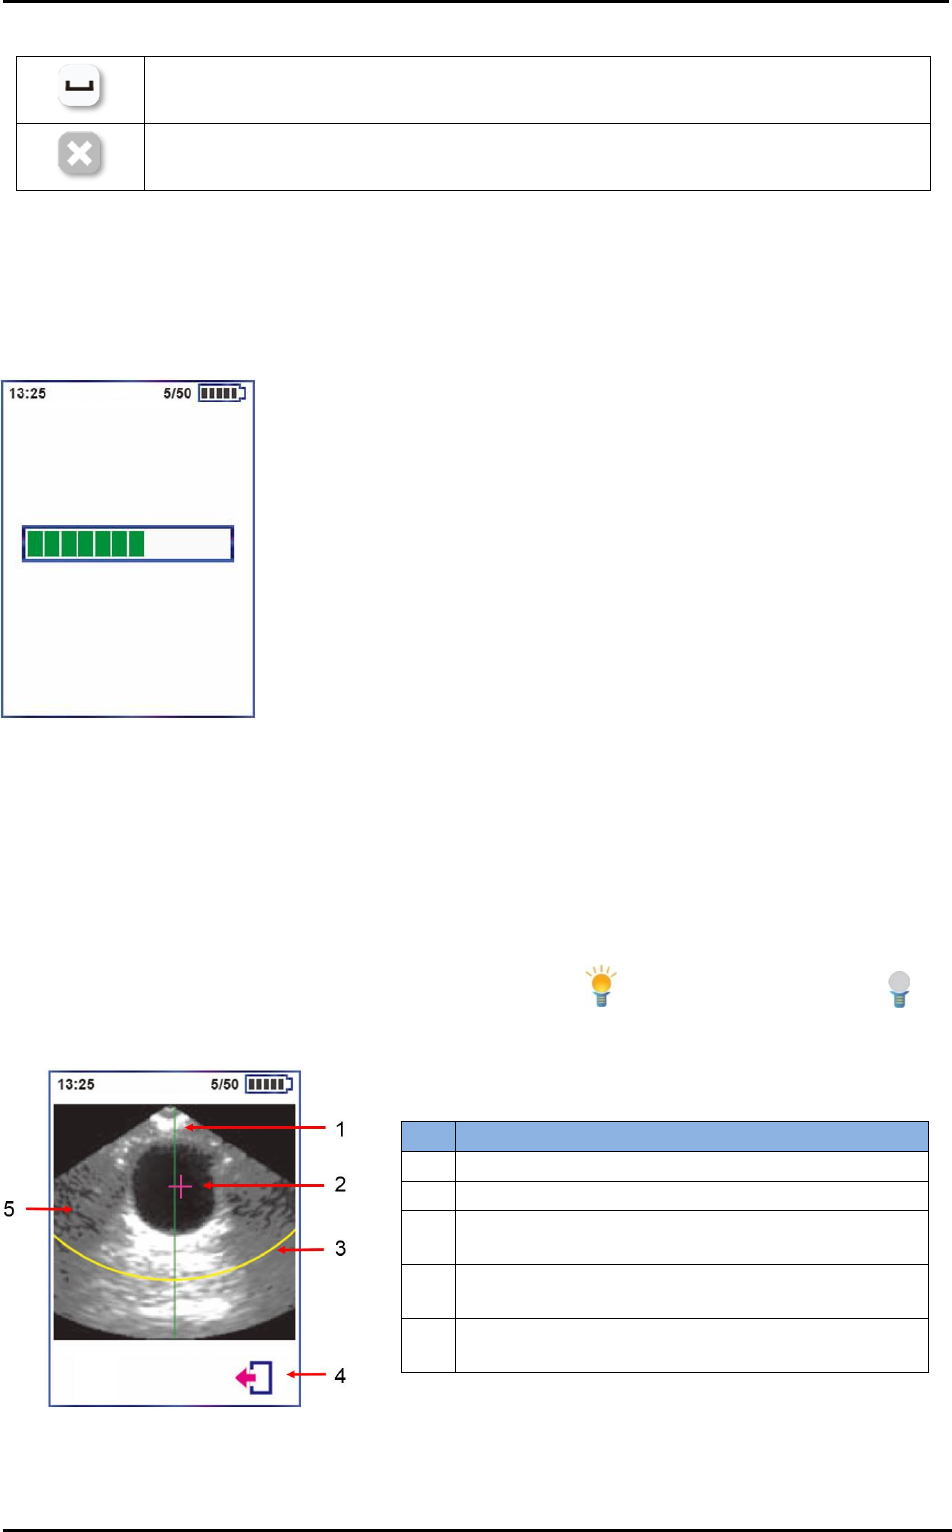
6.4 VIRTUAL KEYBOARD SCREEN
BioCon-900S has three different virtual keyboard types; Numeric, Letter(Uppercase, Lowcase), and Date.
Figure 48 Numeric Keyboard
Figure 49 Letter Keyboard
Figure 50 Date Keyboard
Icon
Description
Numeric and Letter Keyboard - Delete a character to the right of the cursor.
Date Keyboard – Move the cursor to the left
Delete all characters.
Convert a string on a virtual keyboard.
Exit the Virtual Keyboard screen after updating edited characters.
CUBEScanTM BioCon-900S Operator’s Manual
Page 34
6.5 NORMAL SCAN SCREEN
Normal scan - Get 12-plane ultrasound images and calculate the residual urine in the bladder (3D
scanning). It takes 3 sec to complete the Normal scan. As bladder volume is calculated, the progress bar
increases until the scan is completed.
Figure 51 Normal Scan Screen
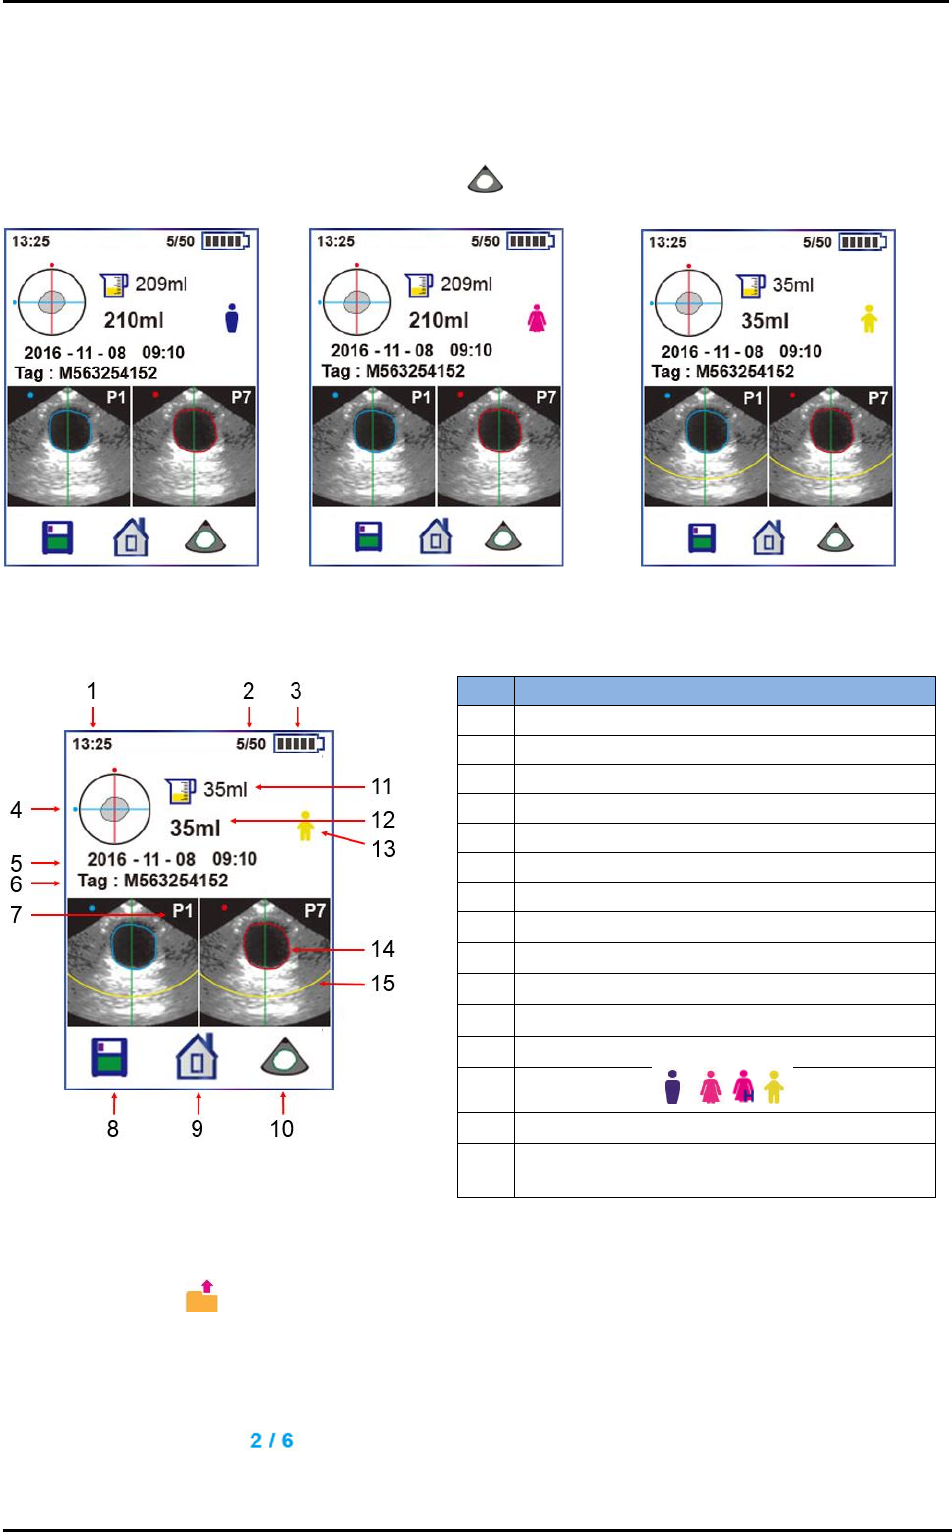
6.6 PRE-SCAN SCREEN
Pre-scan- 2D ultrasound images are displayed continuously in live image basis. This helps an operator
locate bladder position and predict the range of residual urine. And also the centerline is provided during
Pre-scan. Locate the bladder along the centerline on the screen. It helps detect the optimal position during
Pre-scan.
The Pre-scan is executed only when ‘Pre-scan’ setup is ‘ON ( )’. When ‘Pre-scan’ is ‘OFF ( )’, a
Normal scan is executed.
No.
Description
1
Centerline.
2
Bladder point
3
Max detection depth to measure a pediatric urine
volume.
4
Cease the Pre-scan and return to the Information
screen.
5
Tap the Pre-scan screen, the Pre-scan is
executed.
Figure 52 Pre-scan Screen (Default)
Add a space.
Exit the screen after recovering previous characters.
CUBEScanTM BioCon-900S Operator’s Manual
Page 35
6.7 SCAN RESULT SCREEN
The Scan Result screen appears automatically when a normal 3D measurement is complete. The aiming
information (crosshair) helps you verify the Scan result. The icons below on the display allow you to review
other planes of the same measurement, return to the Home screen, and save the measurement. Also if
you want to recan the bladder, tap the Re-Scan icon( ).
Figure 53 Scan Result (All)
Figure 54 Scan Result (Female)
Figure 55 Scan Result (Pediatric)
Figure 56 Scan Result Screen
No.
Description
1
Time
2
Number of Saved Data / Internal Storage (50)
3
Battery Status
4
Aiming Information(Crosshair)
5
Measured Date & Time
6
Patient Tag
7
The first plane of 12 planes
8
Save
9
Home
10
Re-Scan
11
Current Volume from Multiple Results
12
Maximum Volume from Multiple Results
13
Patient Types ( )
14
Bladder Outline
15
Max detection depth to measure a urine
volume (Only pediatric patient)
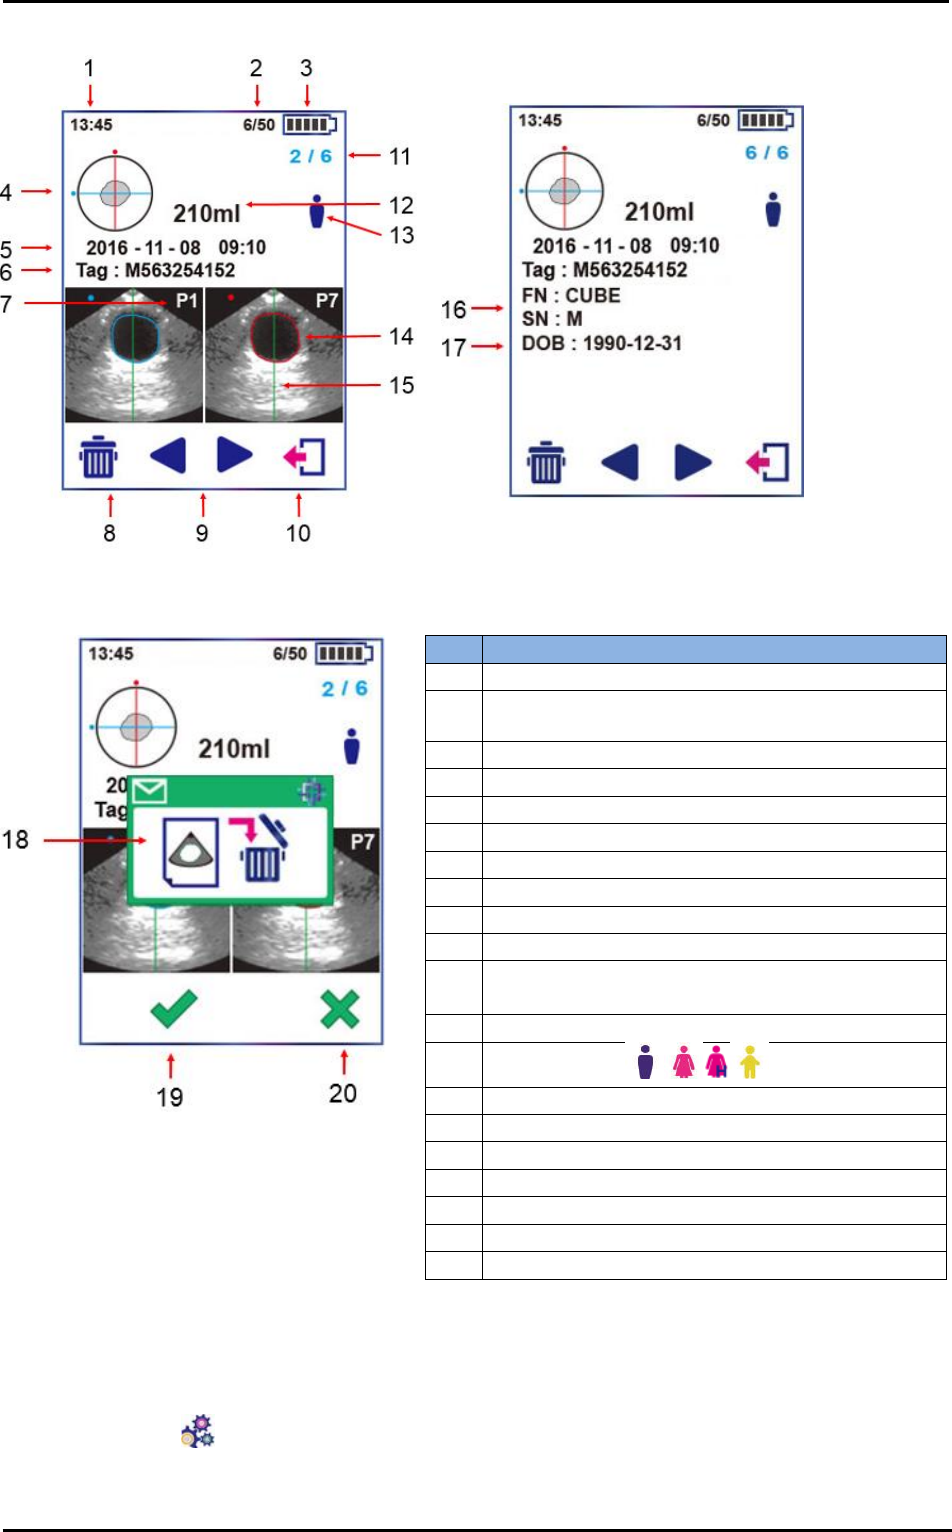
6.8 REVIEW SCREEN
Tap the Review icon( ) on the Home screen, Review screen appears
The Review screen shows the bladder volume, ultrasound images and other saved information with the
saved scan results. While reviewing the result, the menu icons below on the display allow you to delete the
current reviewing result or return to the Home screen. If you want to review the scan results of other
patients, tap the (9) icons. (11) shows the chronological order of saved results and the total number
of saved results. For example, 3/49 means the 3rd saved scan result of the 49 stored results.
CUBEScanTM BioCon-900S Operator’s Manual
Page 36
Figure 57 Review Screen
No.
Description
1
Time
2
Number of Saved Data / Internal Storage (50)
3
Battery Status
4
Aiming /information(Crosshair)
5
Measured Date & Time
6
Patient Tag
7
The first plane of 12 planes
8
Delete Icon
9
Previous & Next Patient Icon
10
Exit Icon
11
Chronological Order of Saved Results / Total
Order of Saved Results
12
Bladder volume
13
Patient Types ( )
14
Bladder Outline
15
Centerline (helps detect the optimal position)
16
First Name & Sur Name
17
Date of Birth
18
Delete Dialog Box
19
OK Icon
20
Cancel Icon
Figure 58 Review Screen - Delete
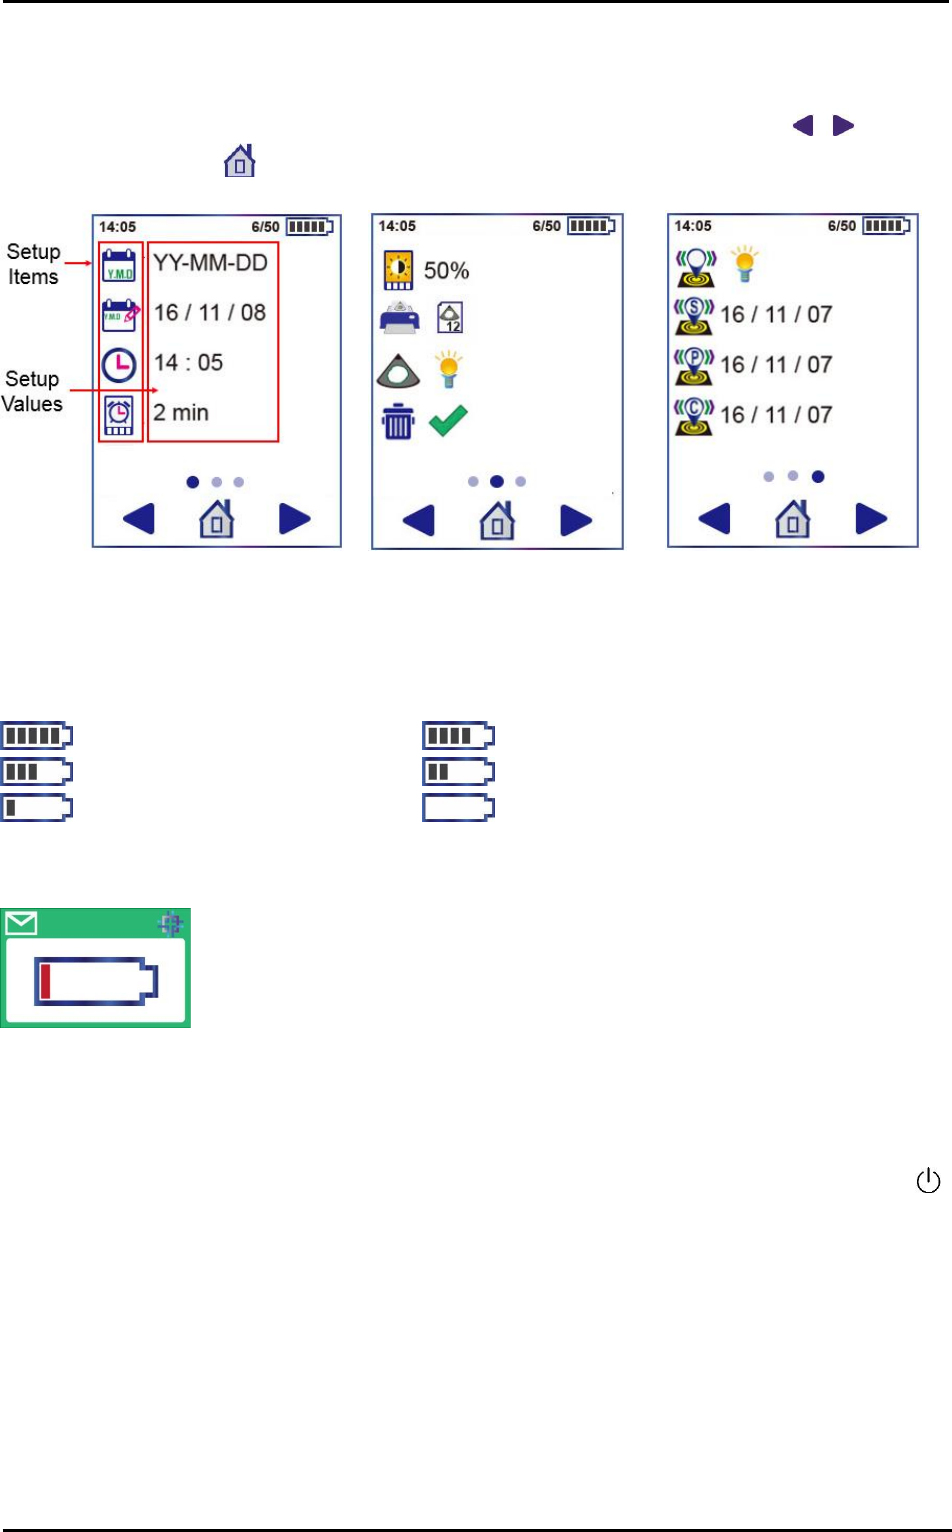
6.9 SETUP SCREEN
Tap the Setup icon ( ) on the Home screen.
In the Setup screen the left column shows the Setup Items and the right column shows the Setup Values.
For more information on the system setting, see the section “7. SETTINGS”
CUBEScanTM BioCon-900S Operator’s Manual
Page 37
1) Tap a Setup Value of the desired setup item.
2) Tap repeatedly a setup value untile desired setup value.
3) You can move to other Setup screen (1, 2, 3) by tapping the Previous or Next icon ( , )
4) Tap the Home icon ( ) to finish adjusting the setup.
Figure 59 Setup Screen (1)
Figure 60 Setup Screen (2)
Figure 61 Setup Screen (3)
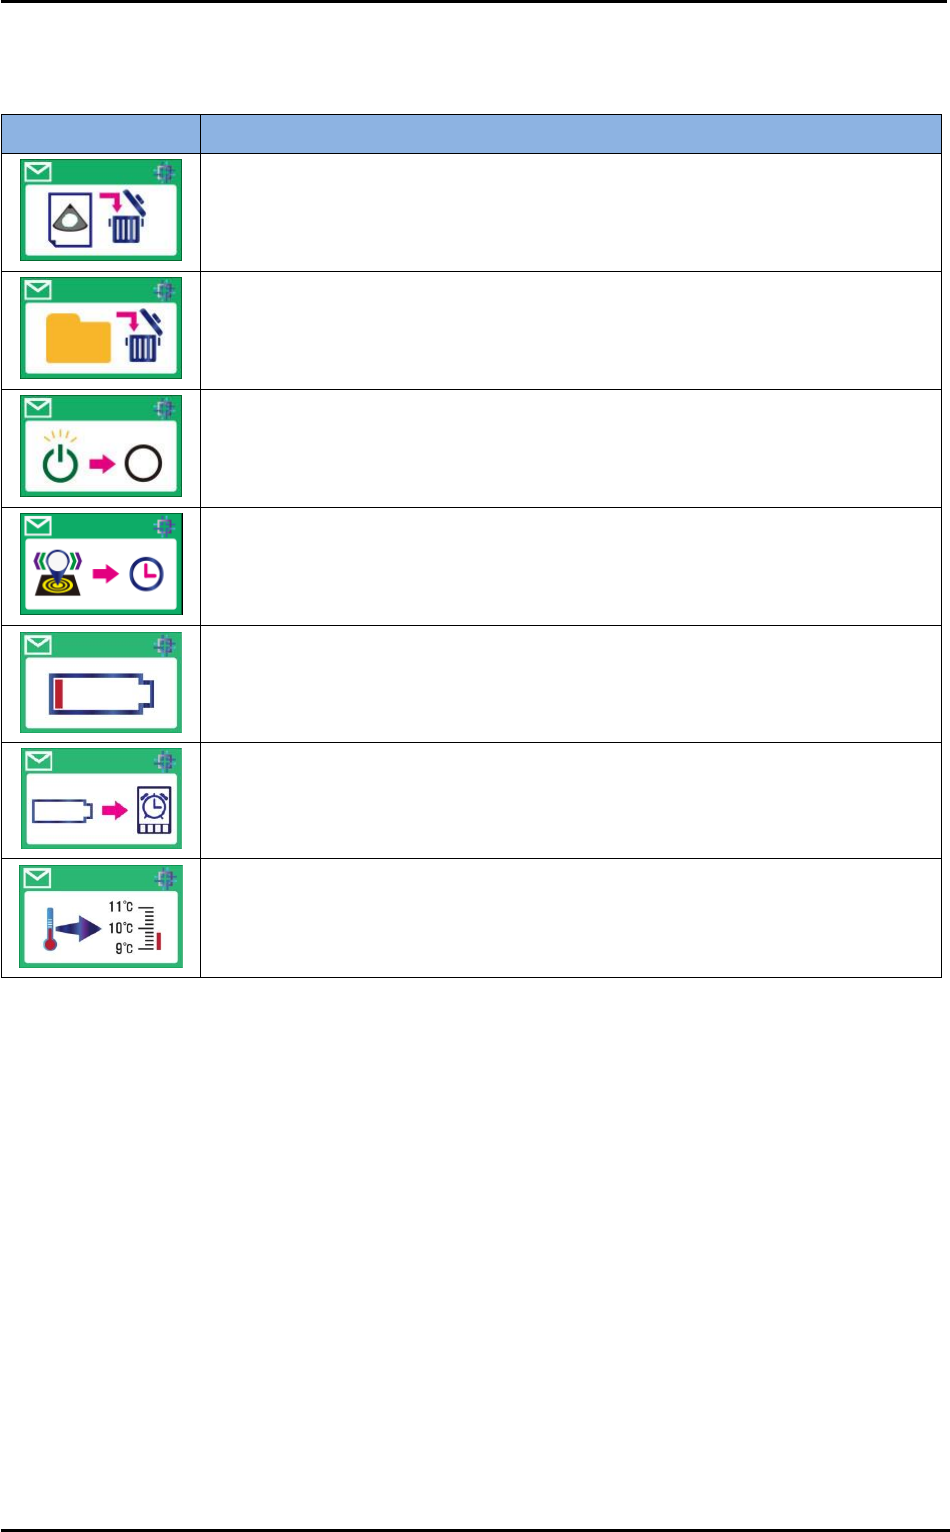
6.10 BATTERY STATUS
A fully charged battery
A battery about 80% charged.
A battery about 60% charged
A battery about 40% charged
A battery nearly depleted
Recharge the battery immediately
When the battery is nearly depleted, following dialog box appears asking you to charge the battery.
Figure 62 Dialog box - Needs to be recharged
To conserve battery power, the probe goes into sleep mode by turning off the screen when not in use
for a specified time. You can adjust the time to go into sleep mode in the setup. See the section “7.4
SLEEP MODE SETTINGS”. The probe also goes into sleep mode if you press the Power Button()
briefly with power on.
To preserve battery power, the probe goes into shut down mode in approximately 24 hours after going
into sleep mode, if there is no activity. However, if you do not plan to use the probe for more than a
week, you should shut the probe down completely to prevent it from discharging completely.
It takes approximately 6 hours for the discharged battery to fully charge.
Fully charged battery can provide approximately 1,000 normal scans.
Contact your local distributor when the fully charged battery does not allow normal scan for 10min.
CUBEScanTM BioCon-900S Operator’s Manual
Page 38
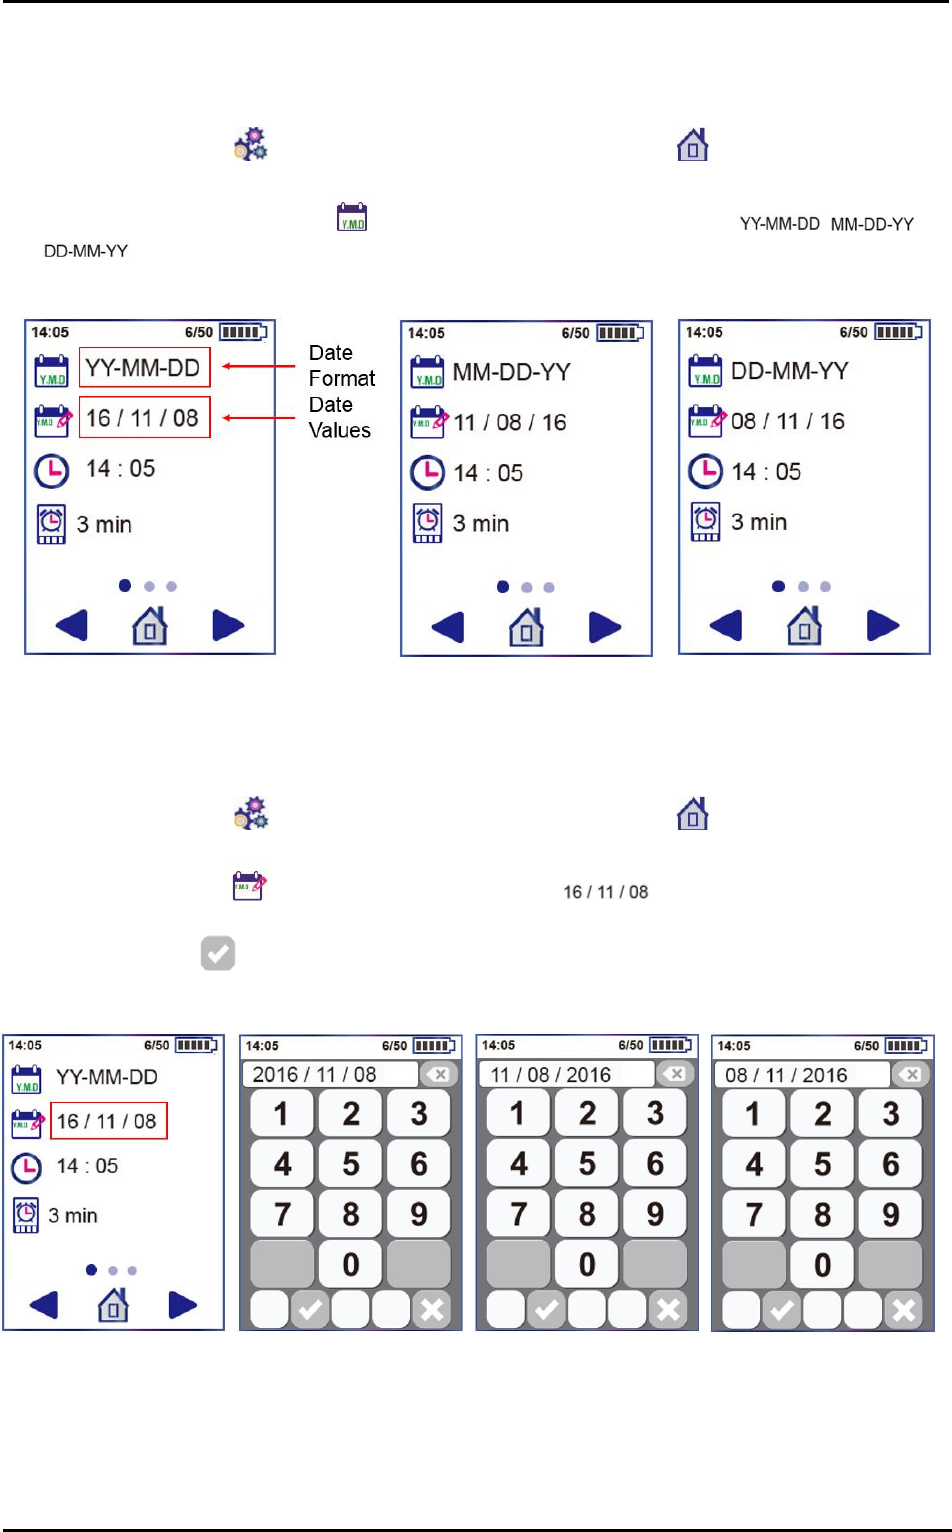
6.11 DIALOG BOXES
Windows
Description
Confirm Message: “Are you sure you want to delete this saved scan result?”
Confirm Message: “Are you sure you want to delete all saved measurements?”
Confirm Message: shutdown mode – To prevent the probe from discharging.
“Are you sure you want to go into shutdown mode?”
Alert Message: The message prompts you when calibration is needs.
Alert Message: The battery is nearly depleted and needs to be recharged.
Alert Message: The battery needs to be recharged immediately, so the probe
goes to sleep mode soon by shutting itself down
Alert Message: The temperature of oil inside the probe is below 10°C.
So the thermostat inside probe makes the oil warm and the temperature of oil
rises above 10°C. See the section “8.2 DIALOG BOXES FOR MAINTENANCE”
for more information
CUBEScanTM BioCon-900S Operator’s Manual
Page 39
7 SETTINGS
7.1 DATE FORMAT SETTINGS
1) Tap the Setup icon ( ) on the Home screen. Tap the Home icon ( ) to return to the Home
screen, if you want.
2) Locate the Date Format option( ), and then tap the Date Format Items ( / /
) repeatedly to adjust the desired date format.
3) A format of date values immediately updates depending on the date format.
Figure 63 Date Format (YY-MM-DD, MM-DD-YY, DD-MM-YY)
7.2 DATE SETTINGS
1) Tap the Setup icon ( ) on the Home screen. Tap the Home icon ( ) to return to the Home
screen, if you want.
2) Locate Date option( ) and tap Date Value Item (eg. ), use the virtual keyboard to
enter a date.
3) Tap the OK icon ( ) to finish adjusting the date after entering.
Figure 64 Date Setup
Figure 65 Enter Date Values (YY-MM-DD, MM-DD-YY, DD-MM-YY)
7.3 TIME SETTINGS
CUBEScanTM BioCon-900S Operator’s Manual
Page 40
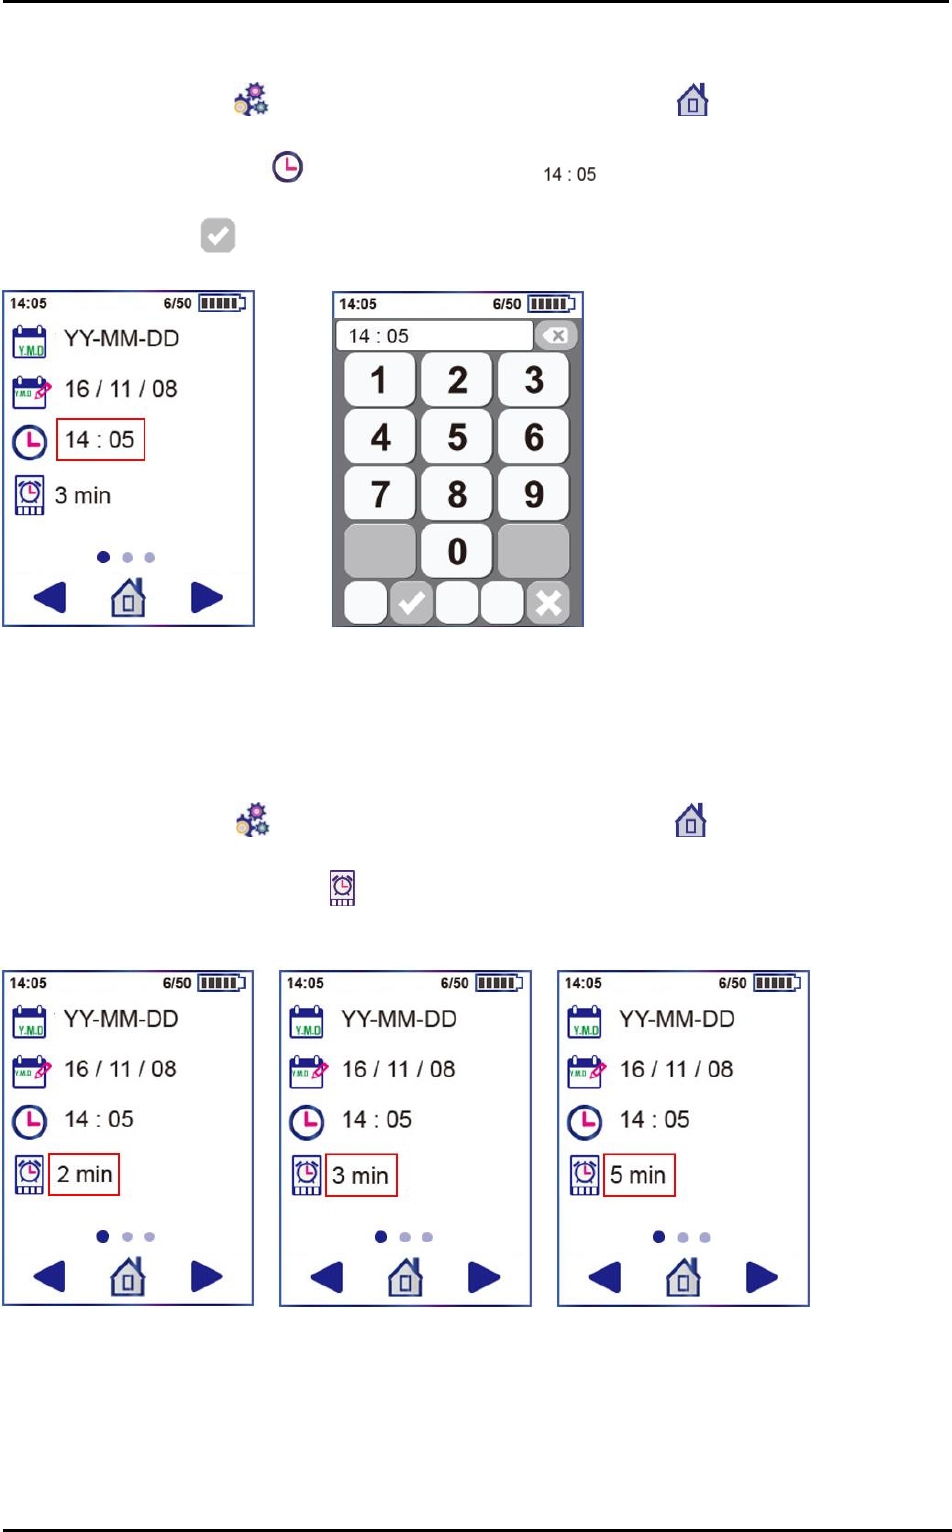
A 24-hour clock provided only.
1) Tap the Setup icon ( ) on the Home screen. Tap the Home icon ( ) to return to the Home
screen, if you want.
2) Locate the Time option( ) and tap Time Item (eg. ) to adjust the time, use the virtual
keyboard to enter a time.
3) Tap the OK icon ( ) to finish adjusting the time.
Figure 66 Time Setup
Figure 67 Enter Time Values (hour:minute)
7.4 SLEEP MODE SETTINGS
A time setting to go into sleep mode: 2min, 3min, 5min
1) Tap the Setup icon ( ) on the Home screen.Tap the Home icon ( ) to return to the Home
screen, if you want.
2) Locate the Sleep Mode option( ) and tap Sleep Mode Item ( 2min / 3min / 5min ) repeatedly to
adjust the time to go to sleep mode.
Figure 68 Time Setting of Sleep Mode (2min, 3min, 5min)
7.5 DISPLAY BRIGHTNESS SETTINGS
CUBEScanTM BioCon-900S Operator’s Manual
Page 41
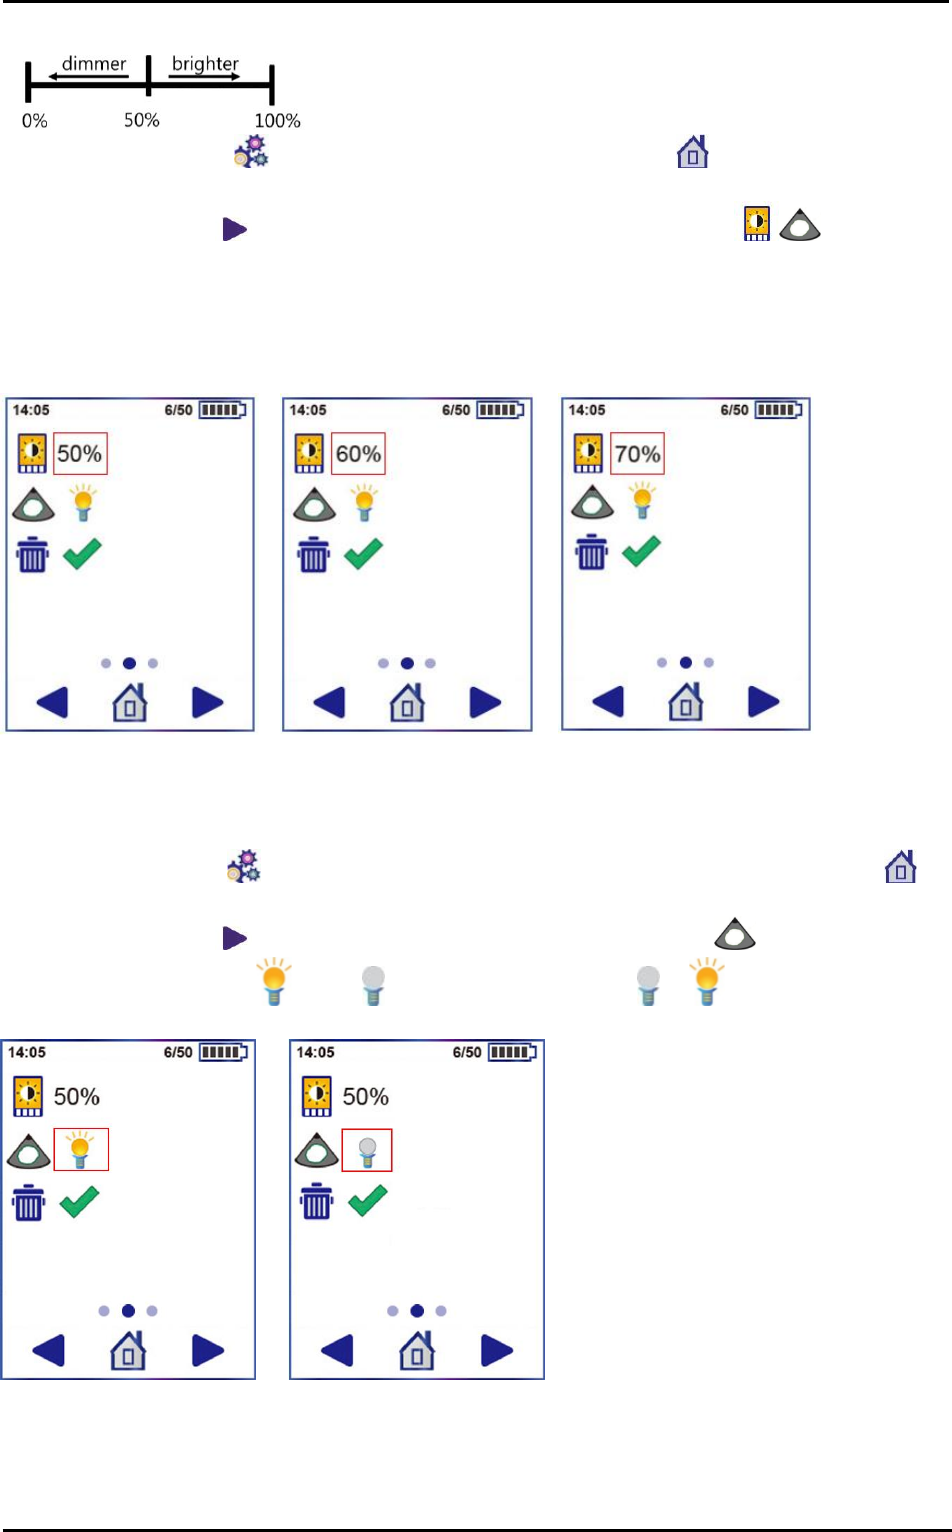
1) Tap the Setup icon ( ) on the Home screen. Tap the Home icon ( ) to return to the Home
screen, if you want.
2) Use the Next icon ( ) on the Setup screen, and look for Brightness option( ).
3) Tap the Brightness Item (eg.50%, 60%, 70%) repeatedly to adjust display brightness (0%-100%).
NOTE: The display brightness setting affects battery life. To conserve battery life, adjust brightness to a
lower setting
Figure 69 Brightness Setup
7.6 PRE-SCAN SETTINGS
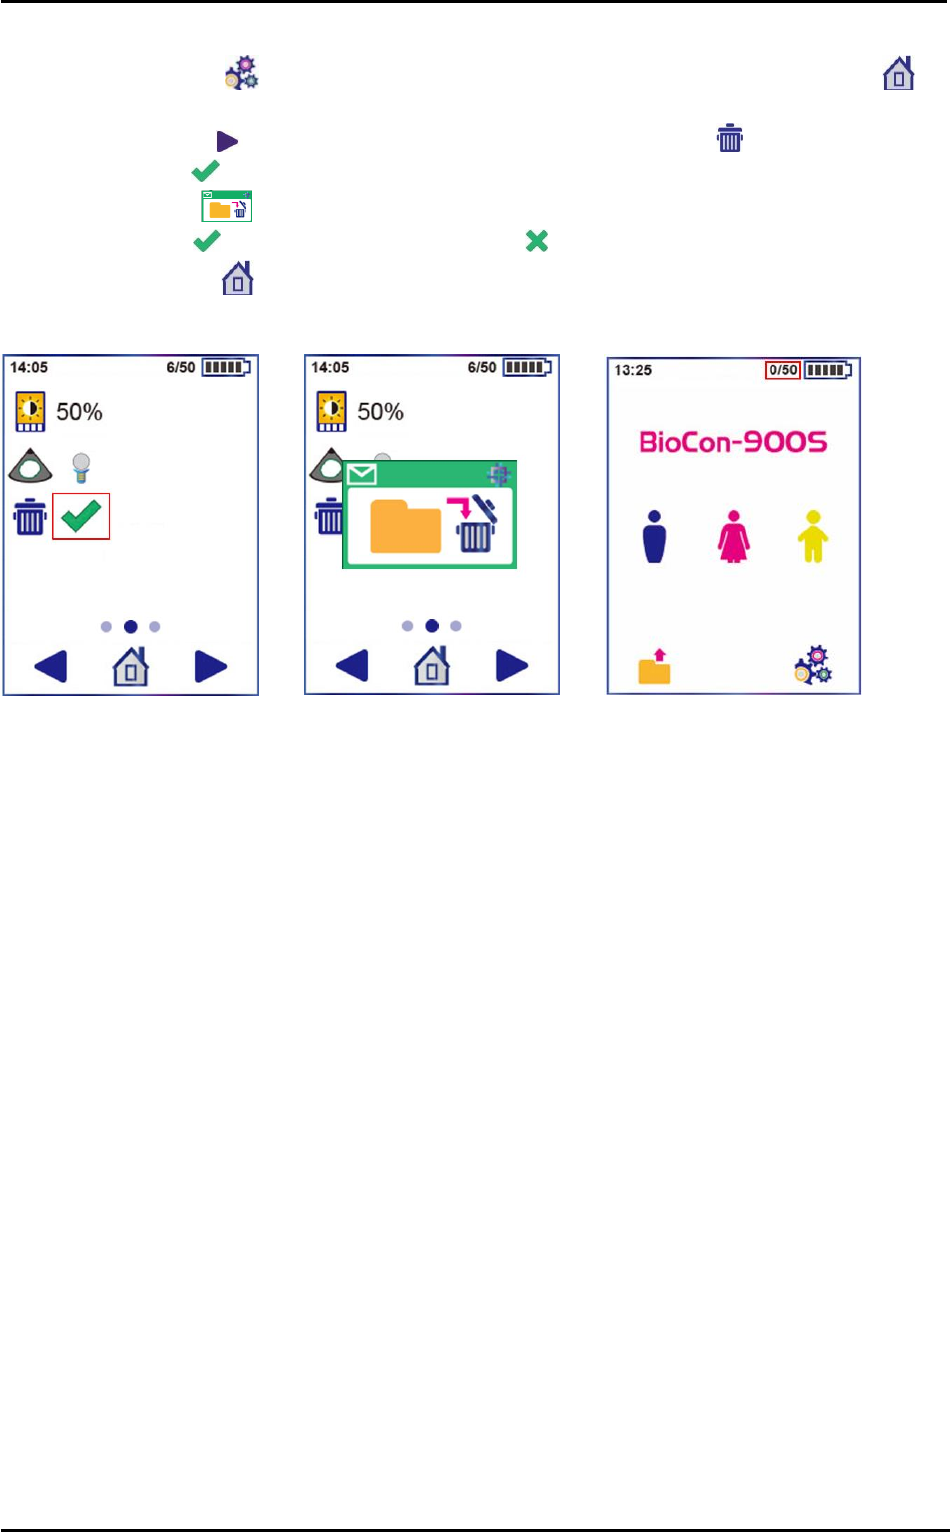
1) Tap the Setup icon ( ) on the Home screen to open the Setup screen. Tap the Home icon ( )
to return to the Home screen, if you want.
2) Use the Next icon ( ) on the Setup screen, and look for Pre-scan option( ).
3) Turn the Pre-scan on ( ) or off ( ) by tapping the Light Item ( or )
Figure 70 Pre-scan On/Off Setting
7.7 DELETE ALL MEASUREMENTS
CUBEScanTM BioCon-900S Operator’s Manual
Page 42
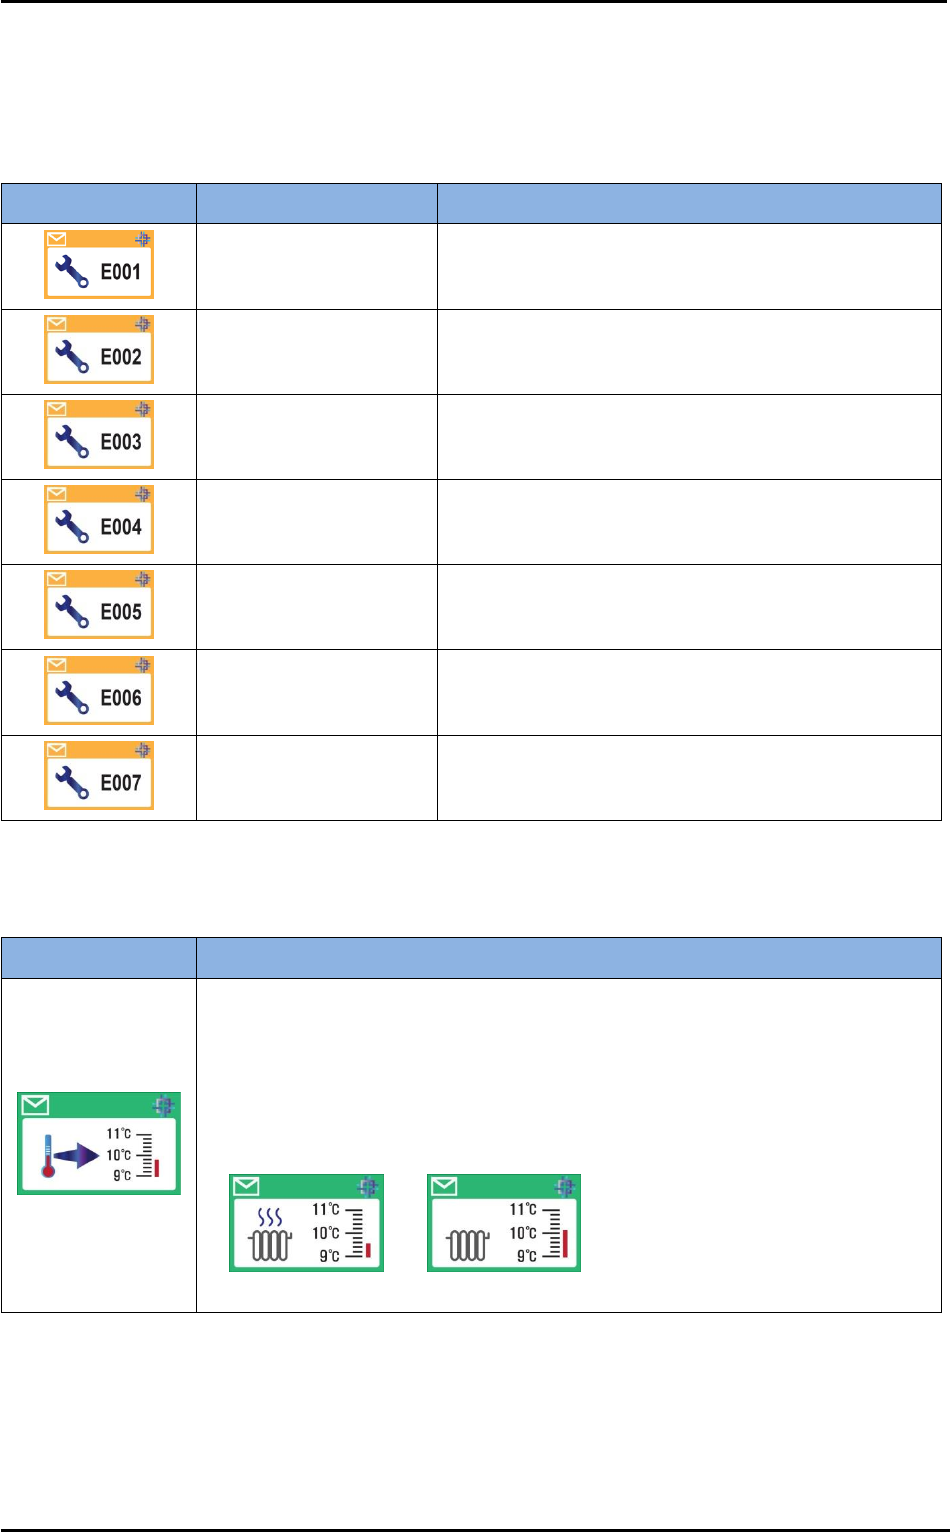
1) Tap the Setup icon ( ) on the Home screen to open the Setup screen. Tap the Home icon ( )
to return to the Home screen, if you want.
2) Use the Next icon ( ) on the Setup screen, and look for the Delete option( ).
3) Tap the Ok Item( ) to delete all saved results.
4) And a dialog box ( ) to confirm appears before deletion.
5) Tap the Ok icon ( ) to delete or tap the Cancel icon ( ) to cancel.
6) Tap the Home icon ( ) to returen to the Home screen.
7) See the Home screen whether all saved results were deleted.
Figure 71 Delete All Data
CUBEScanTM BioCon-900S Operator’s Manual
Page 43
8 MAINTENANCE
8.1 TROUBLESHOOTING
Error message
Description
Actions
FPGA Configuration
Error
Contact your local distributor or Mcube Technology.
System Information
Error
Contact your local distributor or Mcube Technology.
Angle Motor Error
Contact your local distributor or Mcube Technology.
Plane Motor Error
Contact your local distributor or Mcube Technology..
High Temperature Error
Contact your local distributor or Mcube Technology.
Low Temperature Error
Contact your local distributor or Mcube Technology.
Data Deletion Error
Contact your local distributor or Mcube Technology.
8.2 DIALOG BOXES FOR MAINTENANCE
popup
Description
Indicates that the temperature of oil inside the probe is below 10°C. So the
thermostat inside probe makes the oil warm and the temperature of oil rises
above 10°C.
The following dialog boxes appear during the progress of warming oil. Warming
oil lasts (about 3min or less) until the temperature of oil reaches 10°C. When
finished, it goes to the Home screen.
(During warming oil) (when finished)
CUBEScanTM BioCon-900S Operator’s Manual
Page 44
8.3 CLEANING & DISINFECTION
CAUTION
This product may only be cleaned and disinfected by using the approved processes provided in this
manual. Cleaning and disinfection methods listed are recommended by Mcube Technology based on
compatibility with component materials.
Ensure that you follow the manufacturer’s instructions for handling and disposing of the cleaning and
disinfection solutions provided in this manual.
BioCon-900S probe is intended to contact the abdominal skin to measure the bladder volume. For this
reason, cleaning and disinfecting the probe and Charger is an important procedure in using the system.
The following table shows the risk assessment for the probe including the Spauling’s/CDC classification for
the minimum required disinfection level.
Component
Packaged
Use
Spaulding’s/CDC
classification
Clean
Disinfection level
Low
High
Probe Head
Nonsterile
Reusable
Noncritical
√
√
Probe Except head
Nonsterile
Reusable
Noncritical
√
Charger
Nonsterile
Reusable
Noncritical
√
8.3.1 Compatibility
The following solutions have demonstrated cleaning or disinfection efficiency and material compatibility
with system components:
Metrex® CaviWipes™
Metrex® CaviCide™ Spray
8.3.2 Cleaning
Ensure the power cord is not plugged into wall outlet.
Using a dry paper towel or soft cloth, wipe any ultrasound gel, soils and dirt completely off the Charger or
WARNING
Cleaning is a necessary step to perform before disinfecting the device. If the device is not cleaned
properly, even after the disinfection procedure is completed, there may be contamination of the
device.
Incorrect cleaning or disinfecting of any part of the system can cause permanent damage.
Do not use solvents such as thinner or benzene, or abrasive cleaner on any part of the system.
Do not subject the system to any method of sterilization.
Do not immerse the probe except the probe head in cleaning or disinfectant solution.
Do not immerse the Charger in cleaning or disinfectant solution.
Do not use metal or abrasive brushes. These may scratch the instrument causing permanent device
damage.
Wear protective gloves when cleaning the device.
Availability of cleaning and disinfection products varies by country, and Mcube Technology is not
able to test the products in every market. Please contact your local service provider or Mcube
technology if you need more information.
Do not spray the disinfectant spray solution directly on the surface, recessed areas, crack, etc. of
the probe and the Charger.
CUBEScanTM BioCon-900S Operator’s Manual
Page 45
and probe.
1) Cleaning outer case (housing) of the Charger.
a) Put on new gloves.
b) Spray a soft-bristled brush(M16 recommended and validated) with Metrex CaviCide spray until
thoroughly wet. Using the brush, scrub mated surfaces, recessed areas, cracks, crevices and
other hard to reach areas until no visible contaminant is left on the Charger.
c) Use a CaviWipe towelette to completely clean the surface on the Charger.
d) Use a second CaviWipe towelette to thoroughly wet all surfaces of the Charger until all visible
contaminants are removed. Allow the Charger to remain wet for 2 minutes.
e) If using an additional Metrex CaviCide towelette, leave the solution on the wiped Charger surface
for about 2 minutes.
f) Visually inspect the Charger for visible contaminants.
g) Allow the Charger to air dry.
Figure 72 Charger
Please ensure that the electric inlet of Charger is not exposed to any solution during the cleaning
procedure. If the inlet is exposed to the solution (such as water, isopropyl alchol or ethyl), dry the Charger
completely before use.
2) Cleaning the probe
Since the surface of the probe affects the result of data, users should keep as follows:
a) Put on new gloves.
b) Spray a soft-bristled brush(M16 recommended and validated) with Metrex CaviCide spray until
thoroughly wet. Using the brush, scrub mated surfaces, recessed areas, cracks, crevices and
other hard to reach areas until no visible contaminant is left on the probe.
c) Use a CaviWipe towelette to completely clean the surface of the probe.
d) Use a second CaviWipe towelette to thoroughly wet all surfaces of the probe. Allow the probe to
remain wet for 2 minutes.
e) If using an additional Metrex CaviWipe towelette, leave the solution on the wiped probe surface for
about 2 minutes.
f) Visually inspect the probe for visible contaminants.
g) Allow the probe to air dry.
Figure 73 Probe Front-View
Figure 74 Probe Back-View

CUBEScanTM BioCon-900S Operator’s Manual
Page 46
8.3.3 Disinfection
Please note the that low-level disinfection of the probe head is required before a new measurement.
a) Put on new gloves
b) Spray the probe head until it is sufficiently wet with a Metrex CaviCide spray.
Figure 75 Probe Head
c) Leave the solution on the probe head surface for about 3 minutes.
d) If you spray the Metrex CaviCide spray additionally, leave the solution on the surface for at least 3
minutes.
e) Allow the probe head to air dry.
f) Wipe the probe head thoroughly using the fresh CaviWipes.
g) Keep the probe head wet for 3 minutes.
h) Additional wipes may be used to ensure the probe remaining wet for the 3 minutes, if necessary.
i) Allow the probe head to air dry.
j) Using sterile, lint-free cloths wetted with RO/DI water thoroughly wipe the probe for at least a minute
k) Allow the probe head to air dry.
8.4 BATTERY MAINTENANCE
BioCon-900S battery cannot be removed by the user. If you do not plan to use BioCon-900S for a long
period of time, you should switch the probe to shutdown mode to prevent its battery from fully discharging.
The BioCon-900S should be charged every 6 months at a minimum, store it in accordance with the
recommended conditions. See the section “9.5 ENVIRONMENTAL CONDITIONS”.
8.5 WEEKLY INSPECTION
a) Inspect the probe and Charger thoroughly for cracks or leakages.
b) Inspect the power cord for checking if there are any damaged parts.
c) When scanning, check out any abnormal noise emanating from the probe head.
8.6 DISPOSAL
The device and components may contain environmentally hazardous materials (mineral oil, lead, battery
pack, etc.). When they have reached the end of its useful service life, return them to the Mcube Technology,
or follow your local regulations for hazardous waste disposal.
8.7 DEVICE REPAIR
Faults not described in section “8.1 TROUBLESHOOTING” are intended to be serviced by a certified
technician. When any troubles unlisted in section “8.1 TROUBLESHOOTING” occur, contact an authorized
service provider or Mcube Technology.
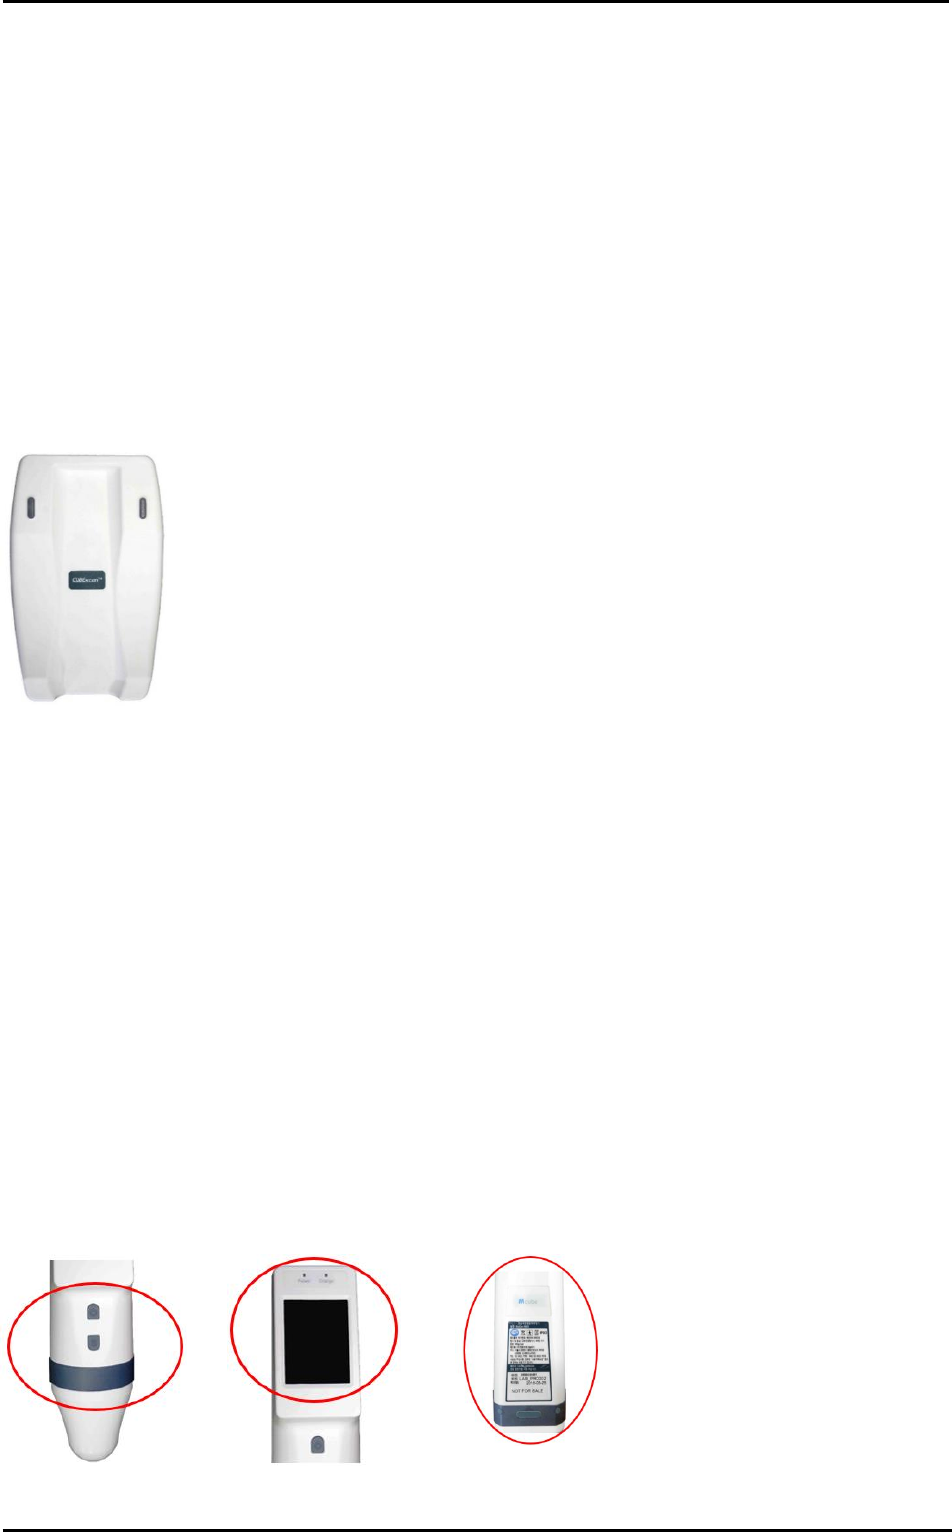
CUBEScanTM BioCon-900S Operator’s Manual
Page 47
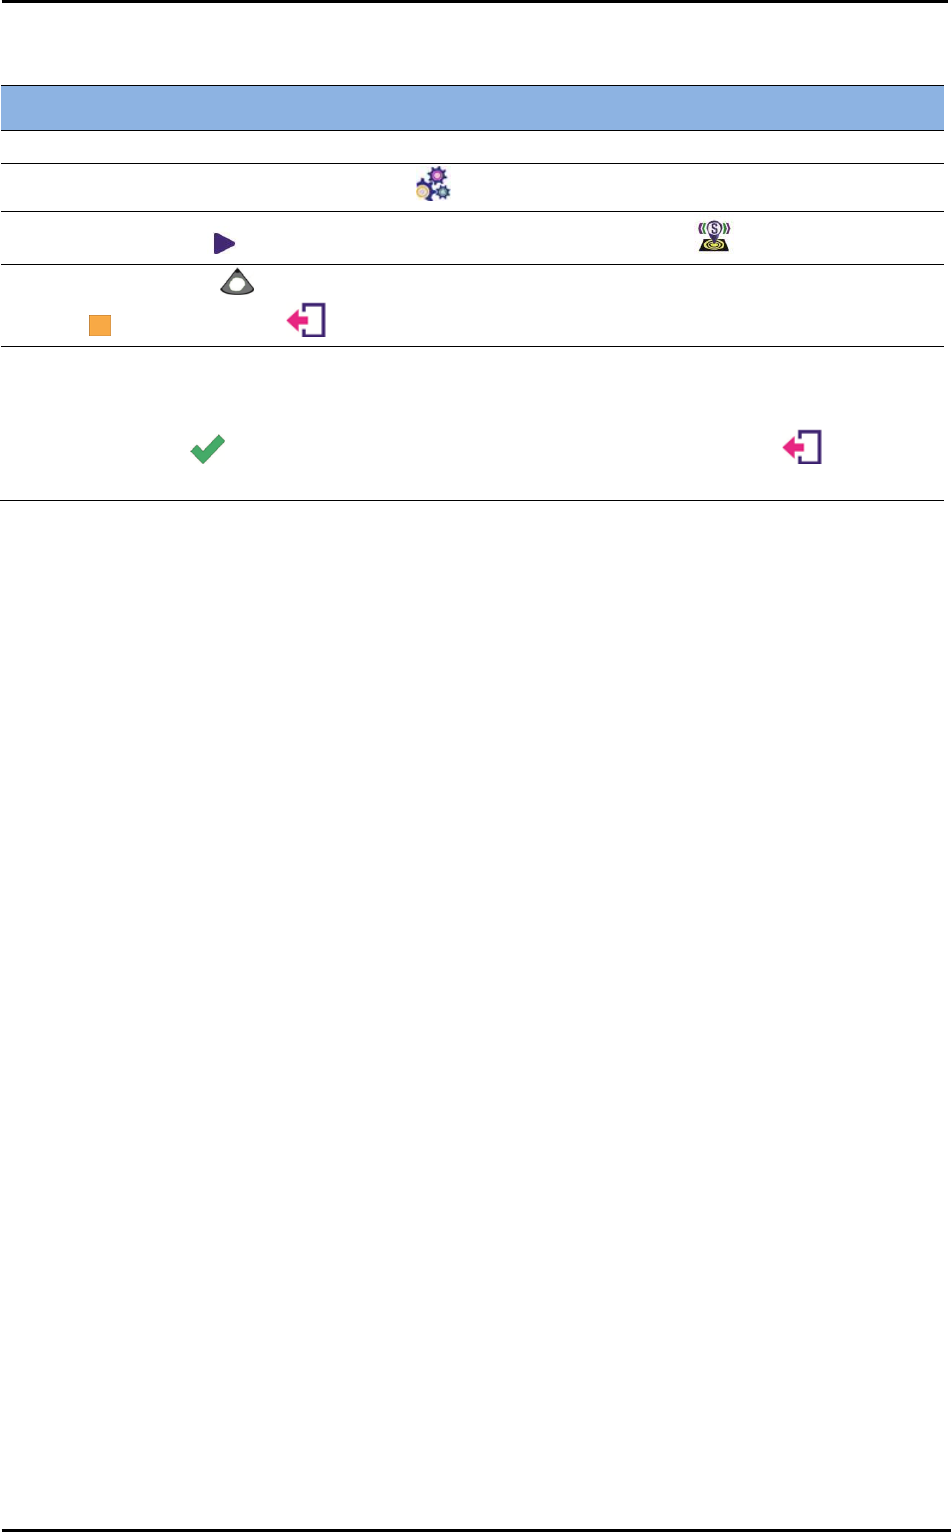
8.8 SELF TEST
Self-test
1) Put the probe on the Charger
2) Turn the probe on and tap the Setup icon ( ) on the bottom right side of the Home screen.
3) Tap the Next icon ( ) on the Setup screen and select the Self-test icon ( )
4) Tap the Scan icon ( ) to start the calibration. You can cease the Self-test by tapping the Cease
icon ( ). Tap the Exit icon ( ) to return to Setup screen, if you want.
5) Self-test progress bar appears, when the calibration is started. The progress bar indicates the
progress of calibration. It takes about 3minutes to complete the calibration. When the calibration is
completed, 100% sign is displayed.
Tap the Ok icon ( ) and the latest calibration date is updated. Tap the Exit icon ( ) to return to
the Setup screen.
CUBEScanTM BioCon-900S Operator’s Manual
Page 48
8.9 CALIBRATION
BioCon-900S must be calibrated every 12 months to ensure accurate results. Calibration ensures accurate
alignment of BioCon-900S’s internal system. You can take scan, even if calibration is not performed by the
designated date. But result can be compromised. There are following methods for the calibration.
CAUTION
Calibrate BioCon-900S when the battery is charged over 60%.
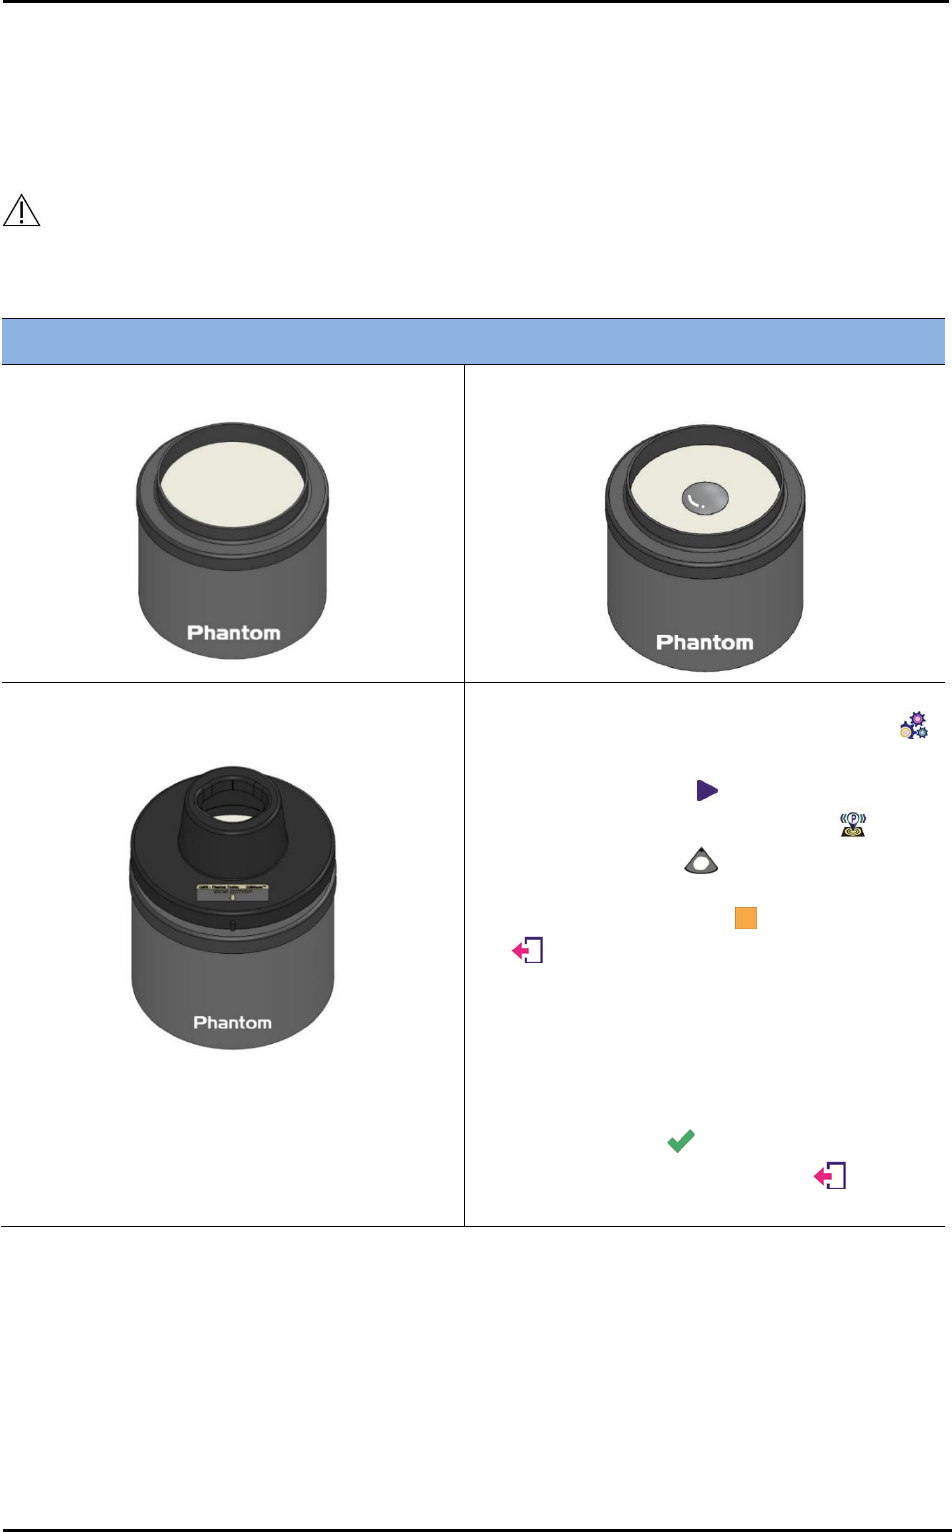
8.9.1 PHANTOM CALIBRATION
Phantom Calibration
1) Place the CubeScan phantom on a flat
surface and open the cover of the phantom.
2) Pour about 5ml of water or more on the center
surface of the phantom
3) Place the phantom cover on the top of the
CubeScan phantom. Check if the cover is in a
stable and flat position.
4) Put the probe head into the probe holder firmly.
5) Turn the probe on and Tap the Setup icon ( )
on the bottom right side of the Home screen.
6) Tap the Next icon ( ) on the Setup screen
and select Phantom Calibration icon ( )
7) Tap the Scan icon ( ) to start the calibration.
You can cease the phantom calibration by
tapping the Cease icon ( ). Tap the Exit icon
( ) to return to Setup screen, if you want.
8) The calibration progress bar appears, when the
calibration is started. The progress bar indicates
the progress of calibration. It takes about
3minutes to complete the calibration. When the
calibration is completed, 100% sign is displayed
on the screen.
9) Tap the Ok icon ( ) and the latest calibration
date is updated. Tap the Exit icon ( ) to return
to the Setup screen.
CUBEScanTM BioCon-900S Operator’s Manual
Page 49
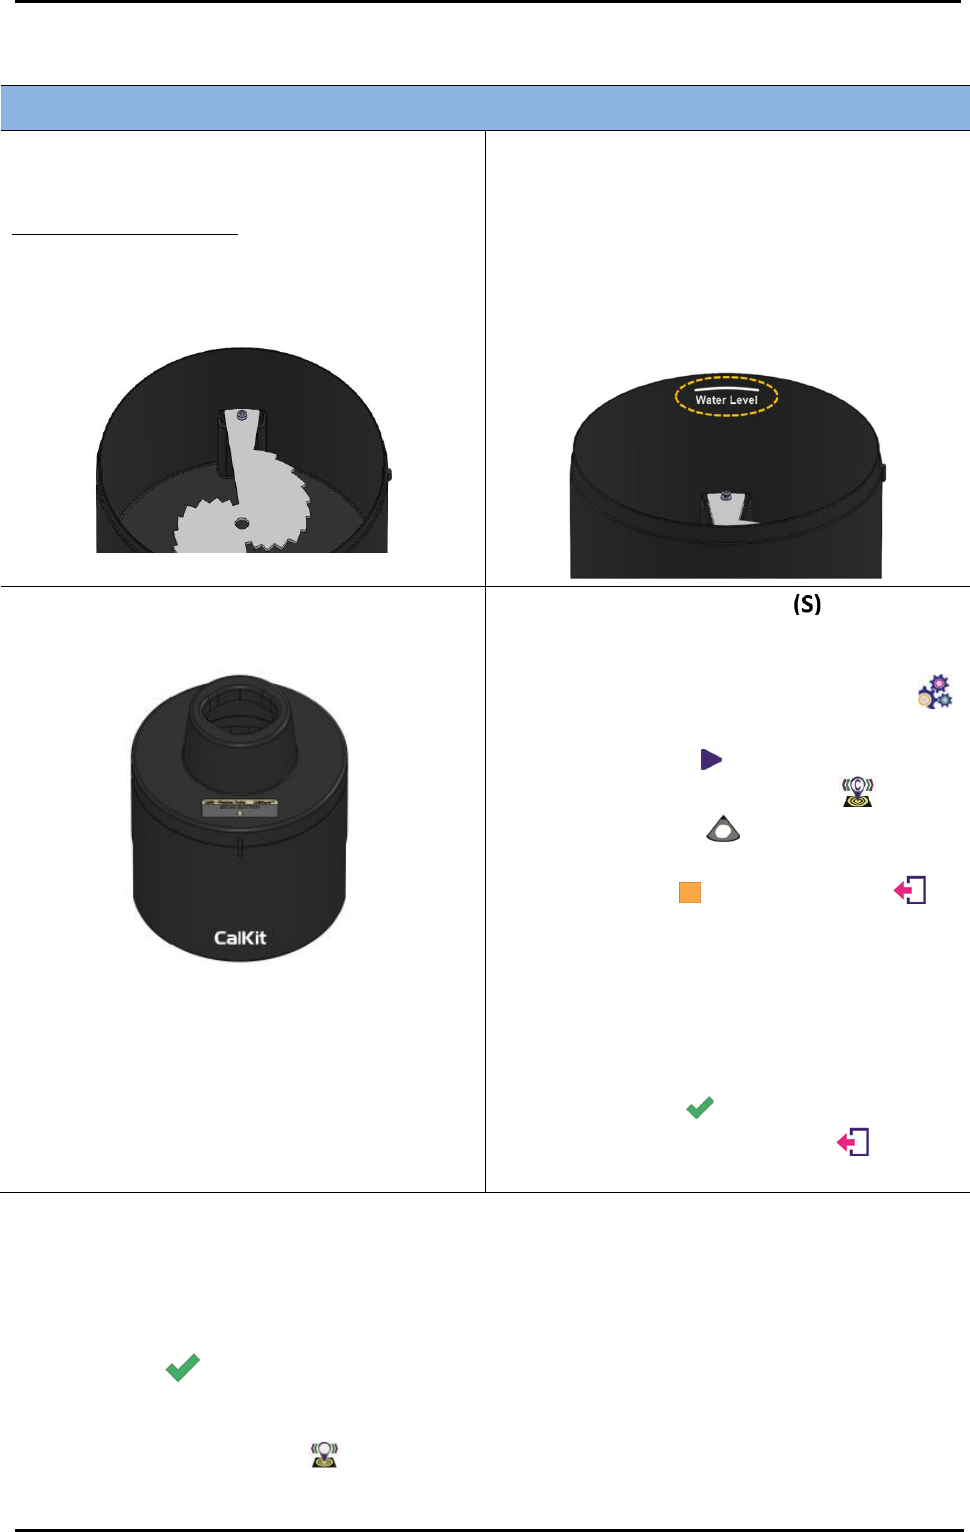
8.9.2 CALKIT CALIBRATION
Calkit Calibration
1) Open the cover of the calibration kit and pour the
saline solution.
Ideal calibration condition
You can pure water instead of the saline solution.
Ensure that water does not contain any air bubbles
before starting the calibration.
2) There is a mark on the inside of the Calkit
showing the Water Level. The Water Level is
about 1cm below the top edge. Pour water to the
Water Level.
3) Close the cover of the calibration Kit. Make sure
that the arrow of the Calkit cover is aligned with
the nipple of the Calkit body.
4) Align the probe’s Scan Button with the arrow
of the cover and put the probe head firmly into
the cover.
5) Turn the probe on and tap the Setup icon ( )
on the botton right side of the Home screen.
6) Tap the Next icon ( ) on the Setup screen and
select the CalKit Calibration icon ( )
7) Tap the Scan icon ( ) to start the calibration.
You can cease the calkit calibration by tapping
the Cease icon ( ). Tap the Exit icon ( ) to
return to the Setup screen, if you want.
8) The calibration progress bar appears, when the
calibration is started. The progress bar indicates
the progress of calibration. It takes about
3minutes to complete the calibration. When the
calibration is completed, 100% sign wil be
displayed on the screen.
Tap the Ok icon ( ) and the latest calibration
date is updated. Tap the Exit icon ( ) to return
to the Setup screen.
8.9.3 CALIBRATION REMINDER
1) Calibration Reminder Dialog box
Calibration Reminder Dialog box appears on the top screen under the conditions as follows:
- After 1 year since the last calibration
Tap the Ok icon ( ) to return to the Home screen. The Calibration Reminder Dialog box disappears.
2) Calibration Reminder icon
The Calibration Reminder icon ( ) is displayed on the Home screen after the Calibration Reminder
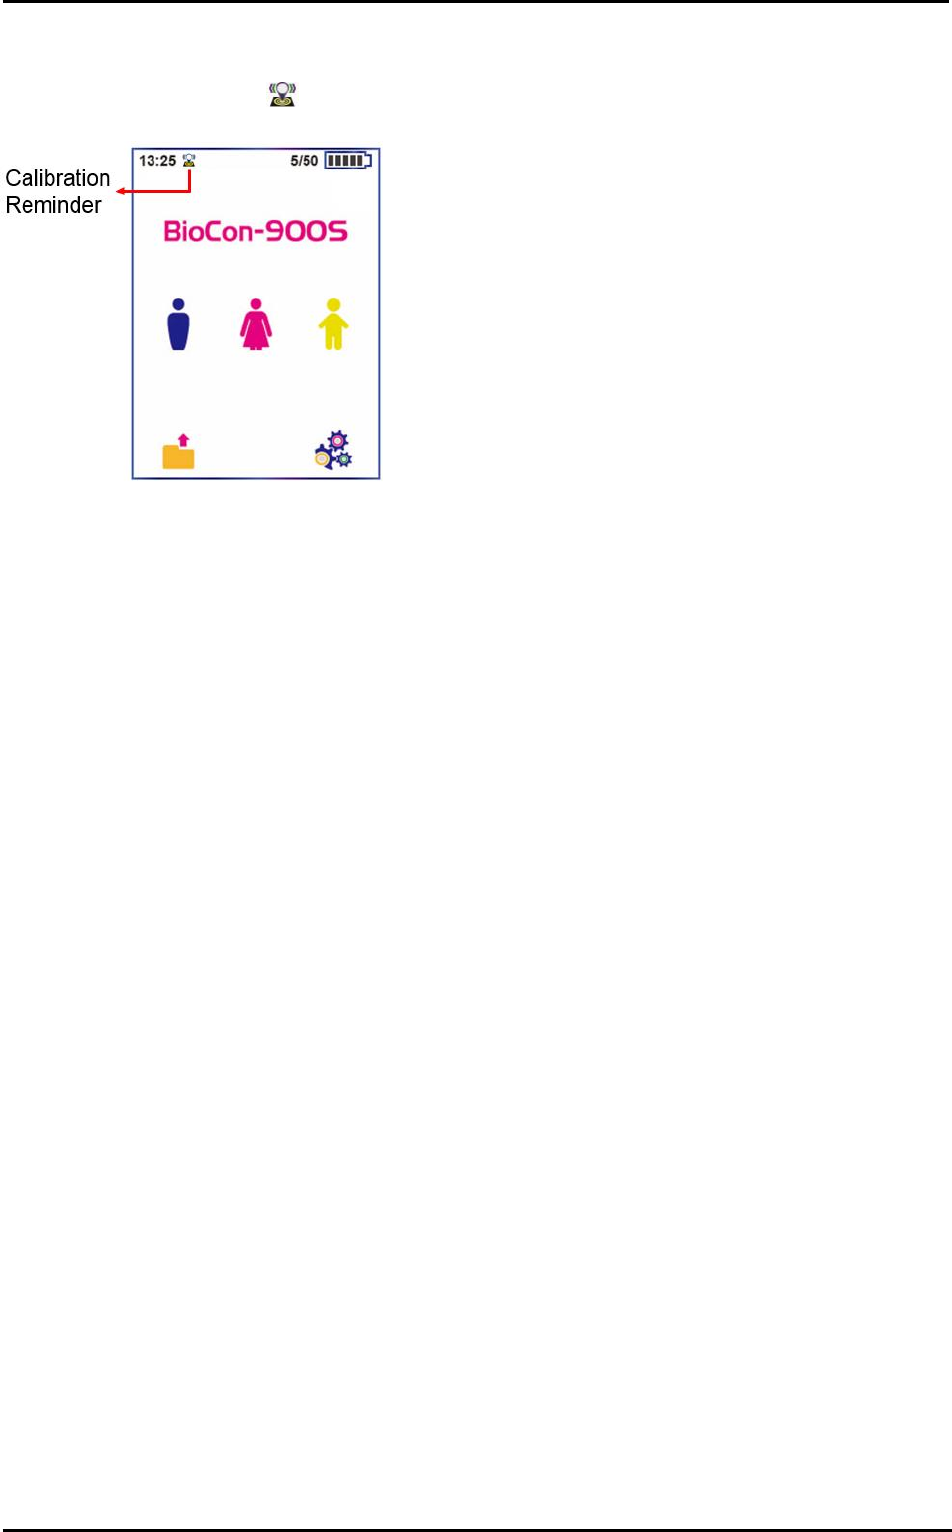
CUBEScanTM BioCon-900S Operator’s Manual
Page 50
Dialog box disappears. When you finish the calibration, the last calibration date is updated and the
Calibration Reminder icon ( ) disappears.
Figure 76 Calibration Reminder Icon on Home Screen
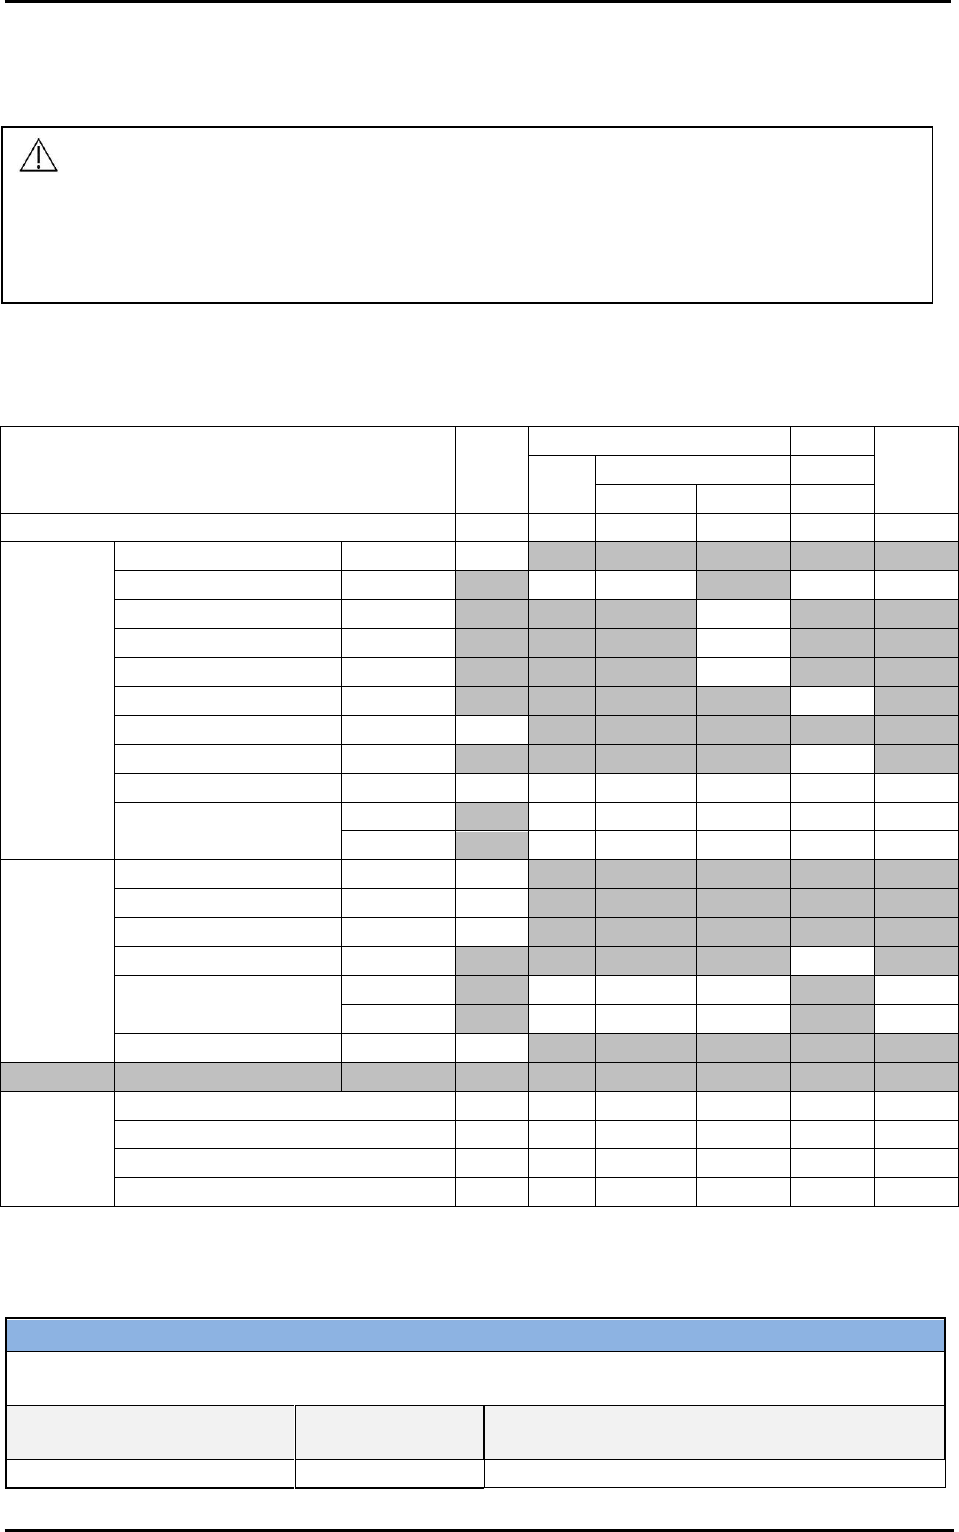
CUBEScanTM BioCon-900S Operator’s Manual
Page 51
9 SPECIFICATIONS
9.1 ACOUSTIC OUTPUT TABLE
Transducer Model: BioCon-900S Transducer Operating Mode: B-mode
The values in this table are the maximum readings obtained from each frequency.
TIS
TIB
TIC
Index Label
MI
scan
non-scan
non-
Aaprt<=1
Aaprt >1
scan
Global Maximum Index Value
0.34
0.62
Pr,a
(MPa)
0.48
P
(mW)
0.99
Min of [Pα(zs), Ita,α(zs)]]
(mW)
Assoc
zs
(cm)
Acoustic
zbp
(cm)
Parameter
zb
(cm)
z at max. Ipi
(cm)
2.7
deq(zb)
(cm)
fawf
(MHz)
2.04
2.04
Dim of Aaprt
X (cm)
1.1
Y (cm)
1.1
td
(microsec)
1.22
prr
(Hz)
390
pr at max. Ipi
(MPa)
0.61
Other
deq at max. Ipi
(cm)
Information
Focal
FLx (cm)
5.5
Length
FLy (cm)
5.5
Ipa.3 at MImax
(W/cm2)
7.8
Operating
Control
Conditions
9.2 ELECTROMAGNETIC COMPATIBILITY
9.2.1 Electromagnetic emissions
Guidance Manufacturer’s declaration - electromagnetic emissions
The BioCon-900S is intended for use in the electromagnetic environment specified below. The
customer or the user of the BioCon-900S should assure that it is used in such an environment.
Phenomenon
Test level /
requirement
Electromagnetic environment - guidance
RF Emissions CISPR 11
Group 1
The BioCon-900S uses RF energy only for its
WARNING
ALARA principle (As Low As Reasonably Achievable) should be employed for all medical ultrasound
exposure. Users can not adjust the acoustic output energy of the BioCon-900S. The output level is
below than the levels which were referred in AIUM remarks in 1992 and there were no reported
biological effects under the level. However, to minimize exposure, measurements should be kept as
short as possible. Refer to the acoustic output section for more information.

CUBEScanTM BioCon-900S Operator’s Manual
Page 52
internal function. Therefore, its RF emissions are
very low and are not likely to cause any
interference in nearby electronic equipment
RF Emissions CISPR 11
Class A
The BioCon-900S is suitable for use in all
establishments, other than domestic and those
directly connected to the public low-voltage
power supply network that supplies buildings
used for domestic purposes
Harmonic Current Emissions
IEC 61000-3-2
Class A
Voltage fluctuations/Flicker
emission
IEC 61000-3-3
Complies
9.2.2 Electromagnetic Immunity
Guidance Manufacturer’s declaration - electromagnetic immunity
The BioCon-900S is intended for use in the electromagnetic environment specified below. The customer
or the user of the BioCon-900S should assure that it is used in such an environment.
Immunity test
IEC 60601-1-2 Test level
Compliance
Electromagnetic environment -
Guidance
Electrostatic
discharge (ESD)
IEC 61000-4-2
±8kV Contact
± 2, ± 4, ± 8, ±15kV Air
In compliance
Floors should be wood, concrete or
ceramic tile. If floors are covered
with synthetic material, the relative
humidity should be at least 30%.
Electrical fast
transient/burst
IEC 61000-4-4
± 2 kV
100 kHz repetition frequency
In compliance
Mains power quality should be that
of a typical commercial or hospital
environment.
Surge
IEC 61000-4-5
Line to Line
± 0.5 kV, ± 1 kV
Line to Ground
± 0.5 kV, ± 1 kV, ± 2 kV
In compliance
Mains power quality should be that
of a typical commercial or hospital
environment.
Voltage dips
IEC 61000-4-11
0 % UT: 0.5 cycle
At 0°, 45°, 90°, 135°, 180°, 225°,
270° and 315°
In compliance
Mains power quality should be that
of a typical commercial or hospital
environment. If the user of the
BioCon-900S requires continued
operation during power mains
interruptions, it is recommended that
the BioCon-900S ultrasound system
be powered from an uninterruptible
power supply or a battery.
0 % UT; 1 cycle
and
70 % UT; 25/30 cycles
Single phase: at 0º
In compliance
Voltage
interruptions
IEC 61000-4-11
0 % UT for 250/300 cycle
In compliance
Power frequency
magnetic field
Immunity
IEC 61000-4-8
30 A/m
50 Hz & 60 Hz
In compliance
Power frequency magnetic fields
should be at levels characteristic of
a typical location in a typical
commercial or hospital environment.
9.2.3 RF Immunity
Immunity test
IEC 60601 test
level
Compliance
Electromagnetic environment
CUBEScanTM BioCon-900S Operator’s Manual
Page 53
Conducted RF
IEC 61000-4-6
3 V
0.15-80 MHz
6 V in ISM
bands
between 0.15
MHz and 80
MHz
80% AM at 1
kHz
3 V
0.15-80 MHz
6 V in ISM
bands
between 0.15
MHz and 80
MHz
80% AM at 1
kHz
Portable and mobile RF communications
equipment should be used no closer to any part
of the BioCon-900S, including cables, than the
recommended separation distance calculated
from the equation applicable to the frequency of
the transmitter.
Recommended separation distance
d =1.2 √𝐏
Radiated RF
IEC 61000-4-3
3 V/m
80MHz-2.7GHz
80% AM at 1
lHz
3 V/m
80MHz-2.7GHz
80% AM at 1 lHz
d = 1.2 √𝐏 80 MHz to 800 MHz
d =2.3 √𝐏 800 MHz to 2.7 GHz
where P is the maximum output power rating of
the transmitter in watts (W) according to the
transmitter manufacturer and d is the
recommended separation distance in meters (m).
Field strengths from fixed RF transmitters, as
determined by an electromagnetic site survey, a
should be less than the compliance level in each
frequency range. b
Interference may occur in the vicinity of
equipment marked with the following symbol :
NOTE 1) At 80MHz and 800MHz, the higher frequency range applies.
NOTE 2) These guidelines may not apply in all situations. Electromagnetic propagation is affected by
absorption and reflection from structures, objects and people.
a. Field strengths from fixed transmitters, such as base stations for radio (cellular/cordless) telephones
and land mobile radios, amateur radio, AM and FM radio broadcast and TV broadcast cannot be
predicted theoretically with accuracy. To assess the electromagnetic environment due to fixed RF
transmitters, an electromagnetic site survey should be considered. If the measured field strength in the
location in which the BioCon-900S is used exceeds the applicable RF compliance level above, the
BioCon-900S should be observed to verify normal operation. If abnormal performance is observed,
additional measures may be necessary, such as re-orienting or relocating the BioCon-900S.
b. Over the frequency range 0.5MHz to 80MHz, field strengths should be less than 3 V/m.
9.2.4 Recommended separation distance
Recommended Separation Distances between Portable and Mobile RF communications
equipment and the BioCon-900S
The BioCon-900S is intended for use in an electromagnetic environment in which radiated RF
disturbances are controlled. The customer or the user of BioCon-900S is can help prevent
electromagnetic interference by maintaining a minimum distance between portable and mobile RF
communications equipment (transmitters) and BioCon-900S as recommended below, according to the
maximum output power of the communications equipment.
RATED MAXIMUM
OUTPUT
POWER OF
SEPARATION DISTANCE ACCORDING TO FREQUENCY OF
TRANSMITTER (m)
150 kHz to 80 MH
80 MHz to 800 MHz
800 MHz to 2.5 GHz
CUBEScanTM BioCon-900S Operator’s Manual
Page 54
TRANSMITTER
(W)
d = 1.2√ 𝐏
d = 1.2√ 𝐏
d = 2.3√ 𝐏
0.01
0.12
0.12
0.23
0.1
0.38
0.38
0.73
1
1.2
1.2
2.3
10
3.8
3.8
7.3
100
12
12
23
For transmitters rated at a maximum output power not listed above, the recommended separation
distance d in meters (m) can be estimated using the equation applicable to the frequency of the
transmitter, where P is the maximum output power rating of the transmitter in watts (W) according to the
transmitter manufacturer.
NOTE: At 80 MHz and 800 MHz, the separation distance for the higher frequency range applies.
NOTE: These guidelines may not apply in all situations. Electromagnetic propagation is affected by
absorption and reflection from structures, objects and people.
9.2.5 Components conformance to standards
To maintain electromagnetic interference (EMI) within certified limits, the device must be used with the
cables, components specified or supplied by Mcube Technology. The use of cables or compoments other
than those specified or supplied may result in increased emissions or decreased immunity of the system.
EMC standards
Compoment
Max length
Power Cord
1.83 m(6ft)
Adapter
1 m (3.3ft)
9.3 EXCESSIVE TEMPERATURE TEST RESULT
Transducer type →
External use
Test to be applied ↓
Simulated use test
Temperature rise
The ambient temperature : 22.8 ℃
The temperature rise to: 24.6 ℃
Still air test
(no gel)
Temperature rise
The ambient temperature : 23.1 ℃
The temperature rise to: 25.5 ℃
9.4 SPECIFICATIONS OF COMPONENTS
9.4.1 WIRELESS CHARGING
Main Chipset
TI (BQ500210RGZ)
Coil type
1 Coil (A10)

CUBEScanTM BioCon-900S Operator’s Manual
Page 55
Power Input
1A / 60-80VA
Power Output
<5W (5V, 1A)
Charging efficiency
70%(Power max.)
Temperature sensor
NTCG163JF103FT1
LED Battery indicator
2LED (Yellow:1 / Green:1)
Operating frequency
(wireless charging function)
149-156 kHz
NOTE:
1. The output power of a wireless charging is lower than 5 W.
2. The distance for wireless charging between Charger and a probe is less than 10mm.
3. The probe has to be properly mounted on the Charger for wireless charging. See the section
“4.2 CHARGE THE BATTERY”, if the battery is not charging.
9.4.2 SPECIFICATION OF COMPONENTS
Probe
Item
Features
Bladder Volume Range
0 - 999ml
Accuracy
0-99ml±10ml, 100-999ml±10%
(According to the scanning instruction, and scanning on a Mcube
Technology tissue-equivalent bladder phantom.)
Scan time
Less than 3 sec
Power
MC-BA-01 (Lithium-ion rechargeable battery)
- Nominal Voltage: 3.6v
- Nominal capacity:5200mAh
Charging time: less than 6 hours
- Charged by the Charger
Number of scanning : approximately 1000 scans.
- For a new battery module fully charged.
- Tested under Mcube Technology’s test conditions.
Expected Service Life
7 years
Display
TFT-LCD
2.7 inch
Format : 240 X RGB X 320 Stripe
Patient ID Input
Virtual Keyboard
1D/2D Barcode (Optional)
User Interface
- LCD Icons
- 2 buttons
- Touch screen
Water Resistance
Rated at IPX3
Probe Head
-Transducer : Diameter: 14mm
-Sector scan
-Dual frequency (2MHz, 3.4MHz)
-B-mode scan image
-Scan angle : 120°
-Penetration depth(normal patient): 23cm
-Applied part: Probe Cap
-Type BF
Mode of Operation
- Continuous operation
Weight
540g with battery
CUBEScanTM BioCon-900S Operator’s Manual
Page 56
Charger
Item
Features
Use
Indoor
Power
AC/DC Adapter:
Manufacturer: MEAN WELL
Model: GSM60A12
Input: 100- 240VAC, 50/60Hz, 1.4-0.7A
Output: 12V 5.0 A, 60W MAX
Output
Wireless Power Transfer Charger
Insulation
Class I with protective earth
Water Resistance
IPX0
Mode of Operation
Continuous operation.
Weight
480g (without adapter and AC cord)
9.5 ENVIRONMENTAL CONDITIONS
CAUTION
Do not place the heavy object on the device. The device can be damaged.
Keep away from the humid or dusty place.
CAUTION
Do not place the heavy object on the device. The davice can be damaged.
Keep away from the humid or dusty place.
Use the device indoors only under the environmental conditions.
For additional protection of the device during a lightning storm, or when it is left unattended and unused
for long periods of time, unplug it from the wall outlet.
The immediate use of the probe which has been stored under 10℃ without warming may damage the
probe. So take it into a room where the temperature is over 10℃ and let BioCon-900S warm up for a
while. And then when the temperature of probe is over 10℃ you may use it.
If you are not using BioCon-900S more than 3 months, remove the battery to prevent it from
discharging and store it in accordance with the recommended conditions, and charge the battery every
6 months.
Contact your local distributor or Mcube Technology, when you need to remove or replace the battery.
Enviromental Specifications
Operating conditions
Use
Indoor
Ambient temperature range
+10 - +40℃ (+50 - +104℉)
Relative humidity
+30% - +75% non-condensing
Atmospheric pressure range
+700hPa - +1060hPa
Storage and transport conditions
Use
Indoor
Ambient temperature range
-20 - +60℃ (+14 - +140℉)
WARNING
Do not leave this device in places subject to extremely high temperatures such as a sealed vehicle
or in direct sunlight. This can cause a fire.
Do not place the device on an unstable surface. This can cause the device to fall or tip over and
cause injury.

CUBEScanTM BioCon-900S Operator’s Manual
Page 57
Relative humidity
+20% - +80% non-condensing
Atmospheric pressure range
+600hPa - +1060hPa
9.6 European Union Declaration of Conformity
This device complies with the essential requirements of the Radio Equipment directive: 2014 / 53 / EU. The
following test methods have been applied to prove presumption of conformity with the essential
requirements of the Radio Equipment directive: 2014/53/EU:
Manufacturer
Mcube Technology Co.,Ltd.
Products
CUBEScan Charger / Charger-001
Bladder Volume Measurement System / BioCon-900S
Product Description
WPT System
EU Directives
2014/53/EU – Radio Equipment Directive (RED)
Reference standards used for presumption of conformity:
Article Number
Requirement
External use
3.1a
Medical electrical equipment
IEC 60601-1 : 2005 + CORR. 1
(2006) + corr. 2 (2007)
EN 60601-1 : 2006 + A1 : 2013
RF Exposure
EN 62311:2008
3.1b
ElectroMagnetic Compatibility (EMC)
standard for radio equipment and services
EN 301 489-1 V2.1.1
EN 301 489-3 V2.1.1
3.2
Wireless power transmission systems,
using technologies other than radio
frequency beam, in the 19 - 21 kHz, 59 - 61
kHz, 79 - 90 kHz, 100 - 300 kHz, 6 765 - 6
795 kHz ranges
EN 303 417 V1.1.1

CUBEScanTM BioCon-900S Operator’s Manual
Page 58
10 GLOSSARY
Probe
The main device with the LCD display.
Charger
CUBEScan Charger; Charge a lithium-ion battery with a probe.
Transducer
Device that transforms one form of energy into another form of energy.
Ultrasound transducer transforms electric energy into acoustic energy and
vice versa. Transducer in this guide means ultrasound transducer.
B-mode
A kind of ultrasound imaging mode. Displays the brightness information
corresponding to the amplitude of the signal.
Pre-scan
General 2D real-time ultrasound scanning. 2D ultrasound images are
displayed continuously in live image basis.
This helps an operator locate bladder position and predicting the range of
residual urine.
Normal Scan
Gets 12-plane ultrasound images and calculates the residual urine in the
bladder (3D scanning).
Self-Test
Displays Self-test progress and results.
Phantom-Calibration
Displays phantom-calibration progress and results.
CUBEScanTM BioCon-900S Operator’s Manual
Page 59
11 SYMBOL DIRECTORY
Symbol
Description
Symbol
Description
Warning
Failure to observe the warning
could result in personal injury
or serious damage to the
system
Serial number
Caution
Failure to observe the
recommendations and
precautions may result in
system damage or failure
Catalog(Part) number
NOTE
Provide information to help you
use your device more
efficiently
Type BF applied part
(B= Body, F= Floating applied
part)
Operation instructions - Please
refer to the operator’s manual.
Degree of protection against
harmful ingress of water as
detailed in the IEC 60529:IPX3
- Protected against spraying
water
Manufactured date
Manufacturer
EC REP – Authorized
representative in the European
community
CE marked in accordance with
the Medical Device Directive
WEEE – Subject to waste
electrical and electronic
equipment regulations
Refer to local regulations for
disposal.
Tested to Federal
Communications Commission
requirements
Stand-by
Statement of prescription
Explanatory Sign – CLASS 1
LASER PRODUCT
UL – Underwriters
Laboratories certification mark
for electrical shock, fire, and
mechanical hazards only
EU's Restriction of Hazardous
Substances
MEDLINE Logo
Fragile item, Handle carefully
Temperature limitation
This Way Up
Humiditylimitation

CUBEScanTM BioCon-900S Operator’s Manual
Page 60
Use no hook
Atmospheric pressure
limitation
Keep dry
Do not use blades to open

CUBEScanTM BioCon-900S Operator’s Manual
Page 61
12 REFERENCES
AIUM: Medical Ultrasound Safety, American Institute of Ultrasound in Medicine, Laurel, MD, 1994.
AIUM: Acoustic Output Labeling Standard for Diagnostic Ultrasound Equipment: A Standard for How
Manufactures Should Specify Acoustic Output Data, Revision 1, American Institute of Ultrasound in
Medicine, Laurel, MD, 2008.
AIUM/NEMA: Acoustic Output Measurement Standard for Diagnostic Ultrasound Equipment, Revision 3.
NEMA Standards Publication UD 2-2004; American Institute of Ultrasound in Medicine, Laurel, MD;
National Electrical Association, Rosslyn, VA; 2004b.
Health Canada: “Guidelines for the safe use of diagnostic ultrasound,” Cat. H46-2/01-255E, Ministry of
Public Works and Government Services Canada, 2001.
Health Canada: Medical Devices Regulations SOR/98-282
MDD 93/42/EEC, Medical Device, Office for the Official Publications of the European Communities, 2003.
IEC 60601-1, Medical Electrical Equipment – Part 1: General Requirements for Basic Safety and Essential
Performance, International Electrotechnical Commission, 2012.
UL 60601-1, Medical Electrical Equipment – Part 1: General Requirements for Basic Safety and Essential
Performance, Underwriter Laboratories Inc, 2012.
CSA C22.2 No. 601.1B-90, Medical Electrical Equipment – Part 1: General Requirements for Basic Safety
and Essential Performance, Canadian Standards Association, 2012.
IEC 60601-2-37, Medical electrical equipment – Part 2-37: Particular requirements for the safety of
ultrasonic medical diagnostic and monitoring equipment, International Electrotechnical Commission, 2007.
ISO 10993-1, Biological Evaluation of Medical Devices Part 1: Evaluation and Testing with in a risk
management process, 2009.
FDA Guidance: Information for Manufacturers Seeking Marketing Clearance of Diagnostic Ultrasound
Systems and Transducers, 2008
FDA Guidance: General Principles of Software Validation; Final Guidance for Industry and FDA Staff, 2002.
Woo Sung Hong, Sun Young Ham, Tong-Wook Kim, Jeong-Seok Seo, Sang-Kuk Yang. Usefulness of a
Sonographic Bladder Scan for Uroflowmetry and the Evaluation of the Anxiety Level Associated with
Uroflowmetry. The Korean Journal of Urology 2007:48(06):633-637
Chung B, Lee T, Yang J H. The Diagnostic Value of Portable Bladder Volume Measurement (BVMS) with
Real Bladder Image in the Measurement of Bladder Volume According to the Different Angling of
Transducer. The Korean Journal of Urology 2006:47(06):1320-1326
Bodker B, Lose G. Postoperative urinary retention in gynecologic patients. Int Urogenecol J Pelvic Floor
Dsyfunct 2003;14:94-97
McNaughton-Collins M, Barry MJ. Managing patients with lower urinary tract symptoms suggestive of
benign prostatic hyperplasia. Am J Med 2005;118:1331-9

CUBEScanTM BioCon-900S Operator’s Manual
U.S. Distributor
Medline Industries, Inc.
One Medline Place
Mundelein, Illinois, 60060 USA
Tel: 1-800-MEDLINE
Website: www.medline.com
DongBang Acuprime
1 Forrest Units, Hennock Road East,
Marsh Barton, Exeter
EX2 8RU, U.K
Tel: +44 1392 829500
Fax: +44 1392 823232
Local Distributor
Manufacturer
Mcube Technology Co., Ltd.
#803, 123, Bonghwasan-ro,
Jungnang-gu, Seoul, Korea
Tel.: +82-2-3421-7780
Fax.: +82-2-3421-7076
E-mail: mcube@mcubetech.co.kr
Web site: www.mcubetech.co.kr
Revision Date : AUG.21.2018
MUM-BioCon-900S EN(Rev.1.0)
