Medtronic MiniMed 500RU User Manual manual
Medtronic MiniMed, Inc. manual
Contents
- 1. manual
- 2. final version of manual
manual
Confidential - DRAFT - Not to be copied or distributed D9195757-011 3/99
Welcome to the MiniMed User’s Guide for the model 500 Remote Programmer for the model 508
insulin pump!
The Model 500 Remote Programmer is an accessory item for the model 508 insulin pump that allows you
to program a bolus or suspend and restart your pump remotely! The Remote Programmer contains a
transmitter that sends signals to a receiver in your 508 pump. This is designed to add more freedom and
flexibility to your daily activities!
This user’s guide is designed with visual and printed information to help you learn to use your
programmer, however, working with your health professional will speed your familiarity of this tool.
Confidential - DRAFT - Not to be copied or distributed D9195757-011 3/99
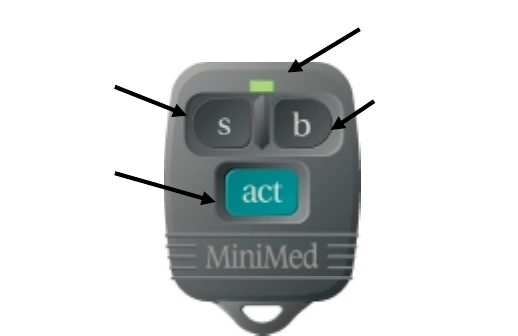
NEED TO KNOW USING THE ‘REMOTE’ PROGRAMMER:
The Remote Programmer is a
very simple and easy to use
device.
Three buttons control all
the programming:
• ‘S’: Suspends or
restarts your pump
• ‘B’: Allows you to set
an audio bolus
• ‘A’: activates your
programming choices.
The remote programmer
runs on a single A23
battery. The programmer
will go into ‘sleep mode’
when it is not being used
to help preserve battery
life.
About the LED
When the remote is in
“sleep mode”, green LED
will be off.
When the remote is
awake, the LED will
glow and flash very fast.
When the battery is low,
the LED will blink in a
series of 3 quick flashes
until the battery is
replaced.
Purpose: Allows the user, by way of ‘radio frequency’, to
suspend, re-start and program a normal bolus of insulin
without using the buttons on the 508 insulin pump.
Process:
1. From the TIME OF DAY screen press SEL until you
see Set Up II then press ACT. Continue to press
SEL until you reach ‘Set RF Device’ screen then
press ACT.
2. The word OFF will blink. Press the UP arrow until
the word ON appears and press ACT.
3. The word ID will be displayed on the screen. Use the
arrows to record the first six digits on the remote
programmer as the ID number. Press ACT after each
number to confirm and move to the next digit. By
pressing ACT after the last number is entered to
confirm. Your pump and remote programmer are
now linked.
Bolus Button
Suspend/Restart
Button
ACT Button
LED
Confidential - DRAFT - Not to be copied or distributed D9195757-011 3/99
You can have a
maximum of three active
remote programmers.
You may program them
following the same steps.
4. You have the ability to add the ID numbers for up to
three remote programmers. To add, delete or review
remote ID numbers, select this option at step four
above.
The pump screen will return to the TIME OF DAY
screen.
Confidential - DRAFT - Not to be copied or distributed D9195757-011 3/99
The remote programmer
will work at a distance up
to 18 inches.
The Audio Bolus feature
must be ON to set a bolus
using the remote
programmer.
Using the Remote Programmer to Deliver a Bolus:
Purpose: Allows you to deliver an audio bolus using the
remote programmer.
Process:
1. Press the A button on the RF Programmer for five
seconds to ‘wake-up’ the pump. When a link has
occurred the pump will beep and/or vibrate for two
seconds. You will now be able to program a Normal
bolus.
2. Press the B button as many times as you need to
choose the bolus amount. For example, five units
would be five presses of the B button. Each press
will result in a signal of a beep, vibration or both.
3. Press A to confirm the amount and the again to
activate the bolus.
If you make a mistake or decide not to use the Remote,
simply let the pump time out.
Using the RF Programmer to Suspend/Restart the
Pump:
1. Press and hold the A button on the Remote
Programmer for five seconds to ‘wake-up’ the pump.
When a link has occurred the pump will beep and/or
vibrate for two seconds.
2. To Suspend: Press the ‘S’ button once then press the
‘A’ button. You will hear three audible beeps,
vibrations or both confirming that the pump is in the
‘suspend mode.
3. To Restart: Press the ‘S’ button and then press ‘A’.
The pump will beep and or vibrate once and then
resume normal operations.
Confidential - DRAFT - Not to be copied or distributed D9195757-011 3/99
Device Care and Maintenance
INSTALLATION OF THE BATTERY
1. Place the Remote face down on a secure, flat surface.
2. Using a standard Phillips screwdriver, unscrew the rear panel. Remove the used battery and discard
properly.
3. Insert new battery cell according to diagram on Remote case.
4. Replace rear panel and screw to connect Remote components.
Your remote should start as soon as the battery are inserted. If this does not happen:
A. Check to see if the battery is inserted properly
B. If yes and it still does not turn on, try a new battery.
C. If the remote is still not on, call the 24 hour Clinical services Help Line for assistance: 1-
800-826-2099
If Your Remote is Dropped:
1. Check that the remote panels (front and rear) are still attached.
2. Press the A button to check operation.
If Your Remote Becomes Submerged in Water:
1. Pat the outside of the case until dry.
2. Following the procedure above to change the battery, unscrew the rear panel and dry out the two
sections.
3. Do not use HOT AIR to dry your remote as this may damage internal electronics.
4. If you need assistance, call the MiniMed Clinical Services Department at 1-800-826-2099.
Exposure to Extreme Temperatures:
1. Avoid exposure of your MiniMed remote to temperatures above 113 °F (45
°
C) or below 33°F (0.5
°
C)
2. Do not steam sterilize or autoclave your MiniMed remote.
Cleaning your Remote:
1. Use a damp (not wet) cloth and mild soap to clean the outside of your MiniMed remote.
2. Never use organic solvents, such as lighter fluid, nail polish remover or paint thinner to clean your
remote. Each time you change your battery, clean the compartment to remove any debris or lint that
may have accumulated in this area.
X-Rays, MRIs and CT Scans:
1. If you are going to have an X-ray, CT scan, MRI or any other type of radiation therapy, TAKE YOUR
PUMP AND REMOTE OFF.
Confidential - DRAFT - Not to be copied or distributed D9195757-011 3/99
FCC Notice
This device complies with Part 15 of the FCC Rules. Operation is subject to the following two conditions:
(1) This device may not cause harmful interference and (2) This device must accept any interference
received, including interference that may cause undesirable operation.
This device has been tested and found to comply with the limits for a Class B digital device, pursuant to
Part 15 of the FCC Rules. These limits are designed to provide reasonable protection against harmful
interference in a residential installation. This device generates, uses, and can radiate radio frequency
energy and, if installed and used in accordance with the instruction, may cause harmful interference to
radio communications. However, there is no guarantee that interference will not occur in a particular
installation. If this device does cause harmful interference to radio or television reception, the user is
encouraged to try to correct the interference by one or more of the following measures:
• Reorient or relocate the Remote Programmer
• Increase the separation between the Remote Programmer and the device that is receiving
interference
• Consult MiniMed’s Clinical Services Help Line if you have any questions.
Cautions: Any changes or modification not expressly approved by MiniMed could void your ability to
operate the equipment.
Confidential - DRAFT - Not to be copied or distributed D9195757-011 3/99

Confidential - DRAFT - Not to be copied or distributed D9195757-011 3/99
Indications
The MiniMed Model 500 Remote Programmer is intended for use with the model 508 Insulin Infusion Pump.
Contraindications
Pump therapy is not recommended for people who are unwilling or unable to perform at least four blood glucose tests per day.
Warnings
The Model 500 Remote Programmer is powered by a single A23 battery cell. To help ensure proper operation, please change
battery according when signaled.