Medtronic 7434A Patient Programmer User Manual manual
Medtronic, Inc. Patient Programmer manual
manual

User Manual
Rx Only
Itrel®EZ™Model 7434A Patient Programmer
9900213EN/197877_001/ccs 1/29/01 2:18 PM Page 1
9V
Programmer
Battery
Neurostimulator
Battery
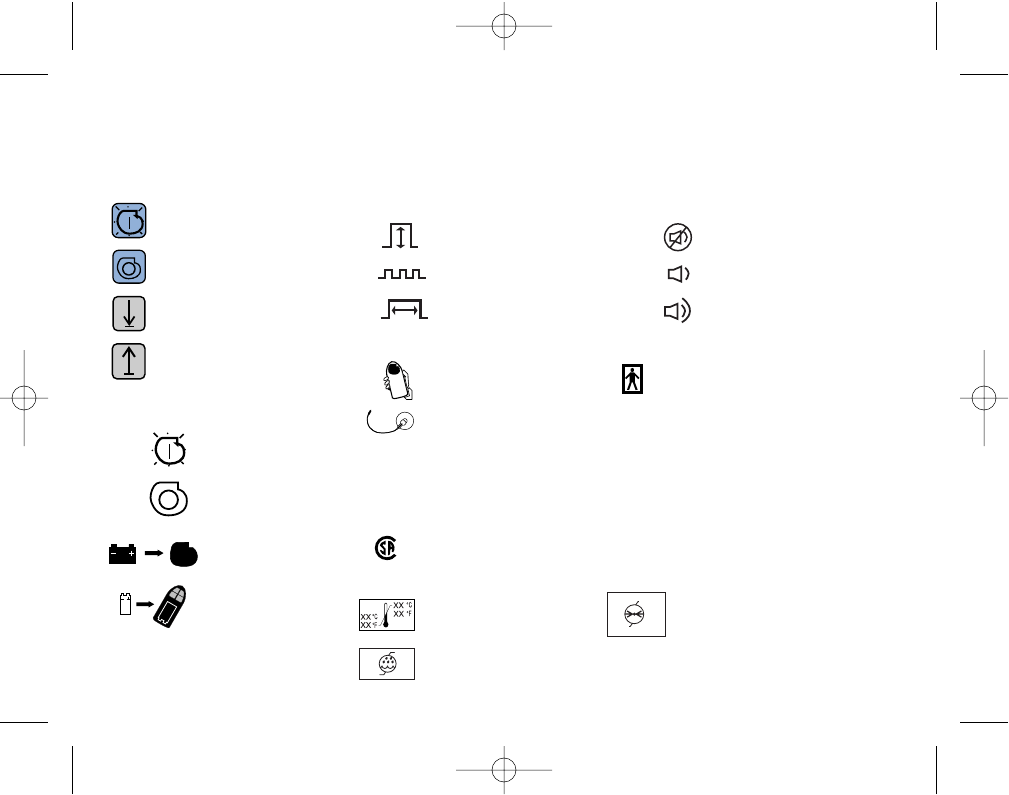
Explanation of Symbols on Products and Packaging
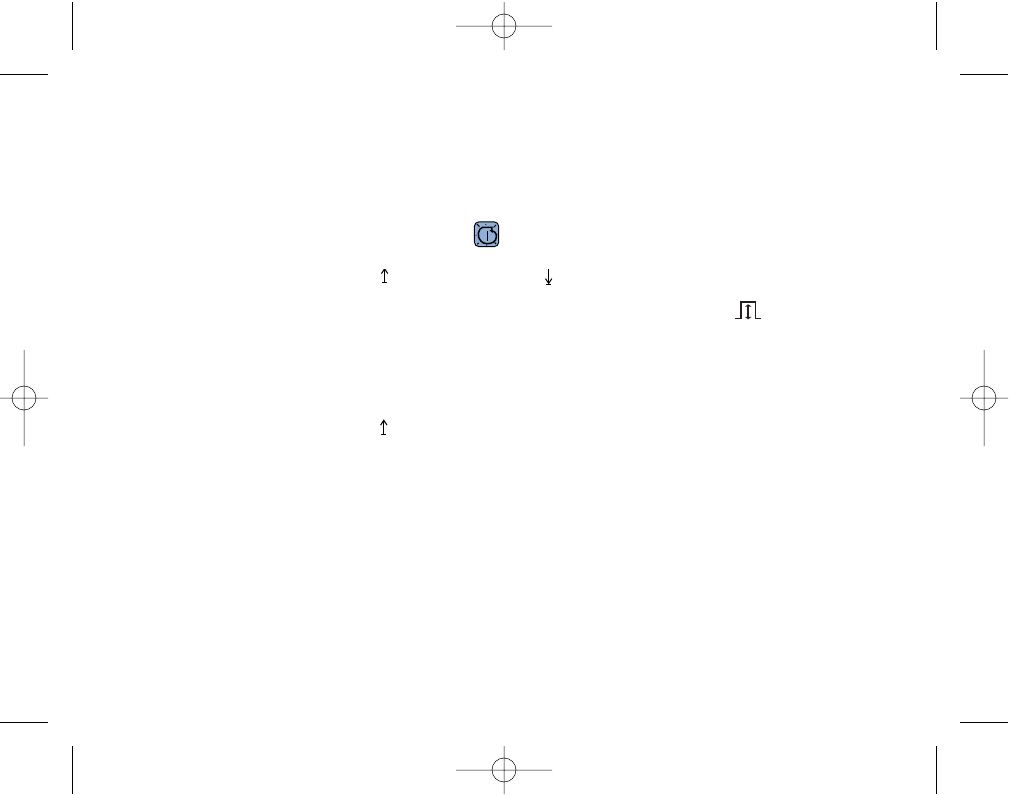
Keypad Symbols Stimulation Control
Switch Symbols
Status Light Symbols
Neurostimulator Off
Increase
Rate
Volume Off
High Volume
Neurostimulator On
Decrease
Amplitude
Pulse Width
Low Volume
Neurostimulator Off
Neurostimulator On
Beeper Volume Control
Switch Symbols
Miscellaneous Symbols
Positioning Symbol IEC 60601-1/EN60601-1,
Type BF Equipment
Antenna Connector
Conformité Européenne (European Conformity). This symbol means
that the device fully complies with European Directive 90/385/EEC.
For U.S. audiences only.
Equipment has been tested and accepted for listing under the
Canadian Standard Association, for distribution in Canada.
Storage Temperature Atmospheric Pressure
Relative Humidity
c
®
/
Refer to the appropriate product to see symbols that apply.
Risk Class 2
w
XX %
XX %
XXX hPa
XX.X in. Hg
XX hPa
XX.X
in. Hg
hPa
Attention, see accompanying
documents
9900213EN/197877_001/ccs 1/29/01 2:18 PM Page 2
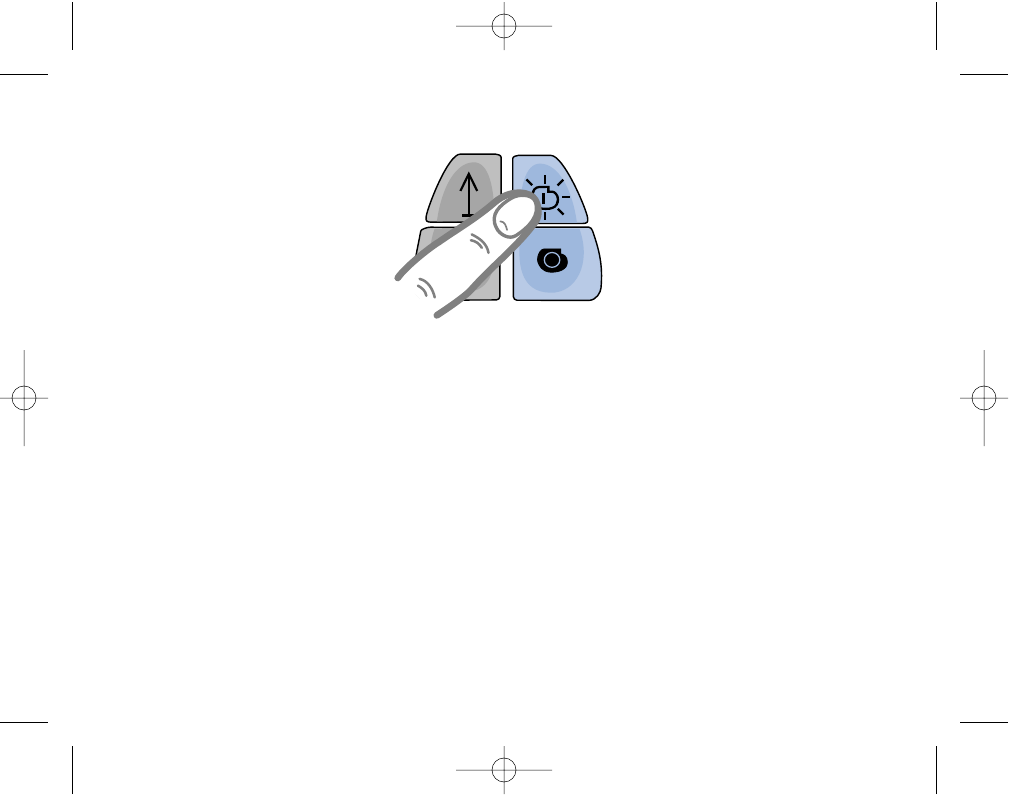
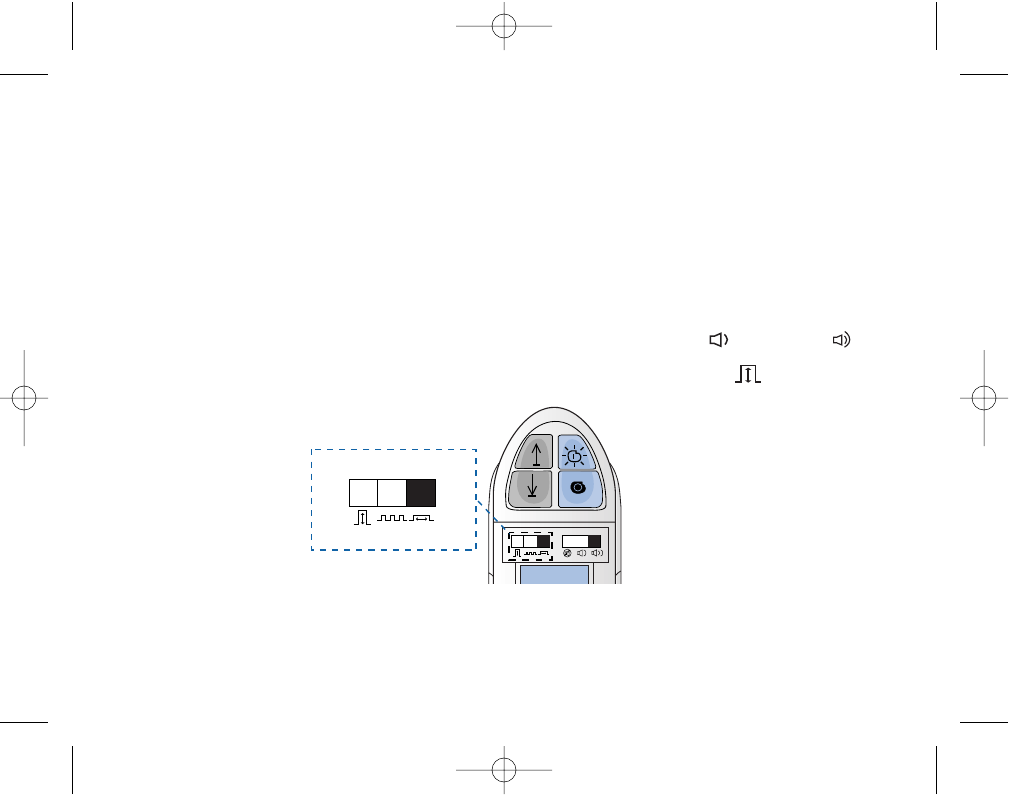
To turn the neurostimulator on:
a) Press the Neurostimulator
On key. Listen for the
confirmation beep.
b) Check that the
green Neurostimulator
On light is lit. This light
stays on for 8 seconds
after you release the key.
To turn the neurostimulator off:
a) Press the Neurostimulator
Off key. Listen for the
confirmation beep.
Medtronic® Itrel® EZ™
Model 7434A
9V
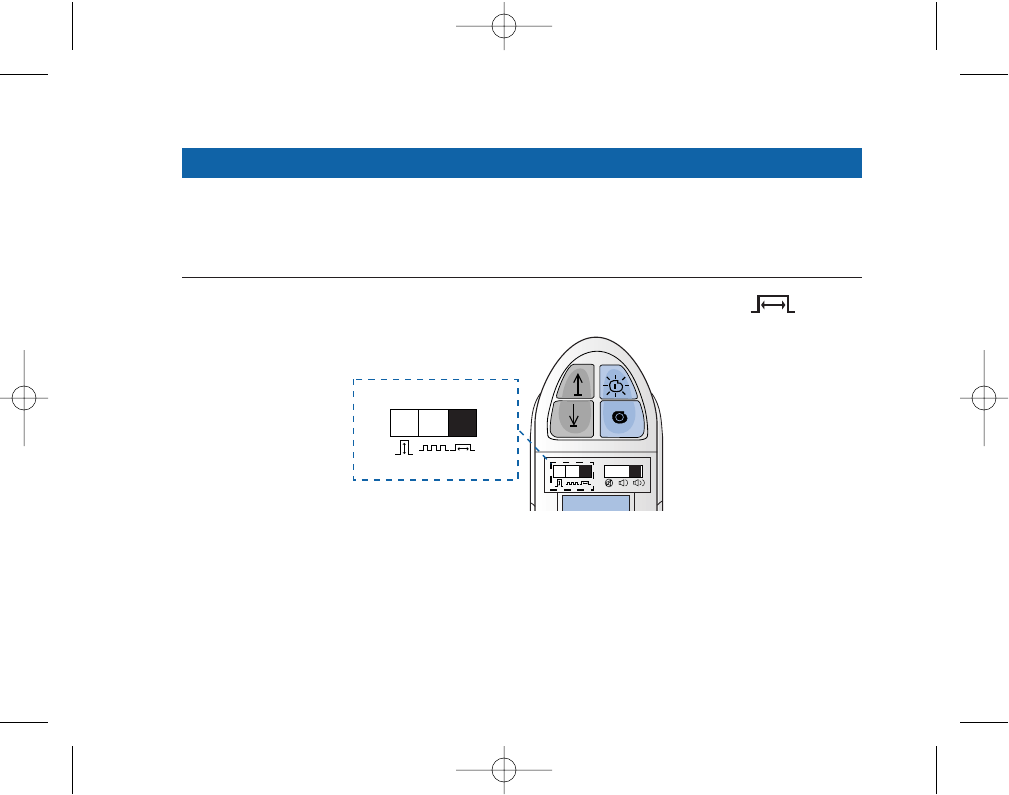
To turn the neurostimulator on or off:
Place the programmer over
your neurostimulator.
Itrel®EZ™Patient Programmer Quick Programming Guide
Green
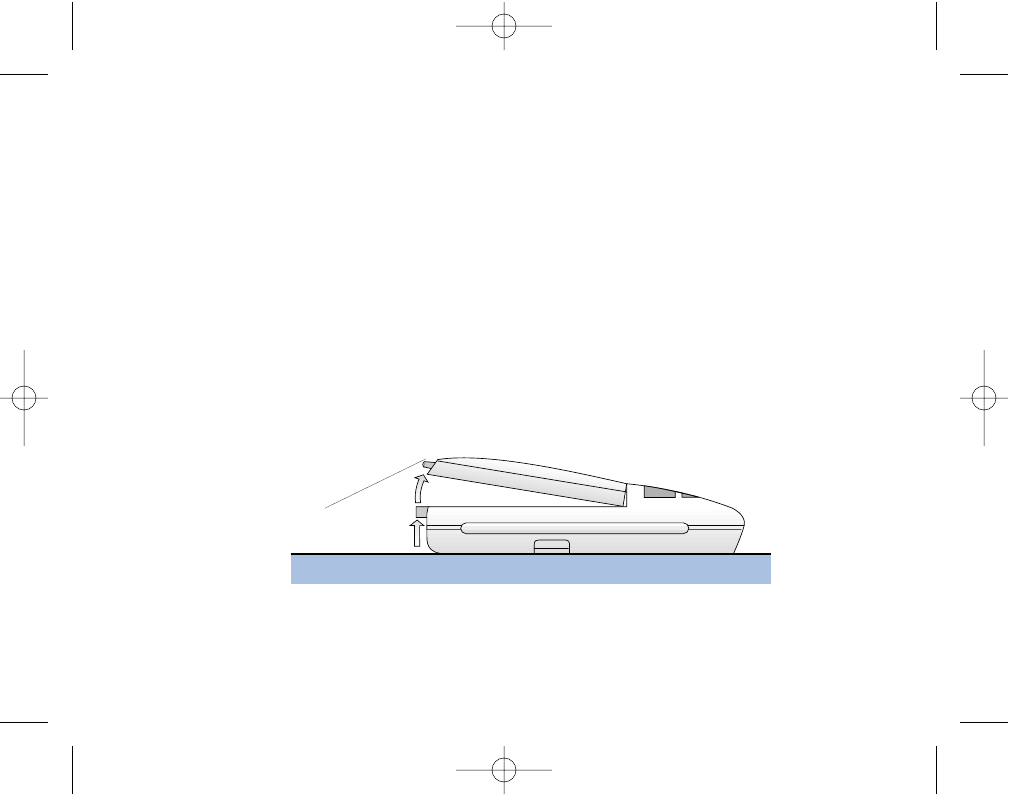
Neurostimulator
“On“ Light
b) Check that the
yellow Neurostimulator
Off light is lit. This light
stays on for 8 seconds after
you release the key.
Yellow
Neurostimulator
“Off“ Light
Back of Patient Programmer
2
3
1Location of
Neurostimulator
9900213EN/197877_001/ccs 1/29/01 2:18 PM Page 3
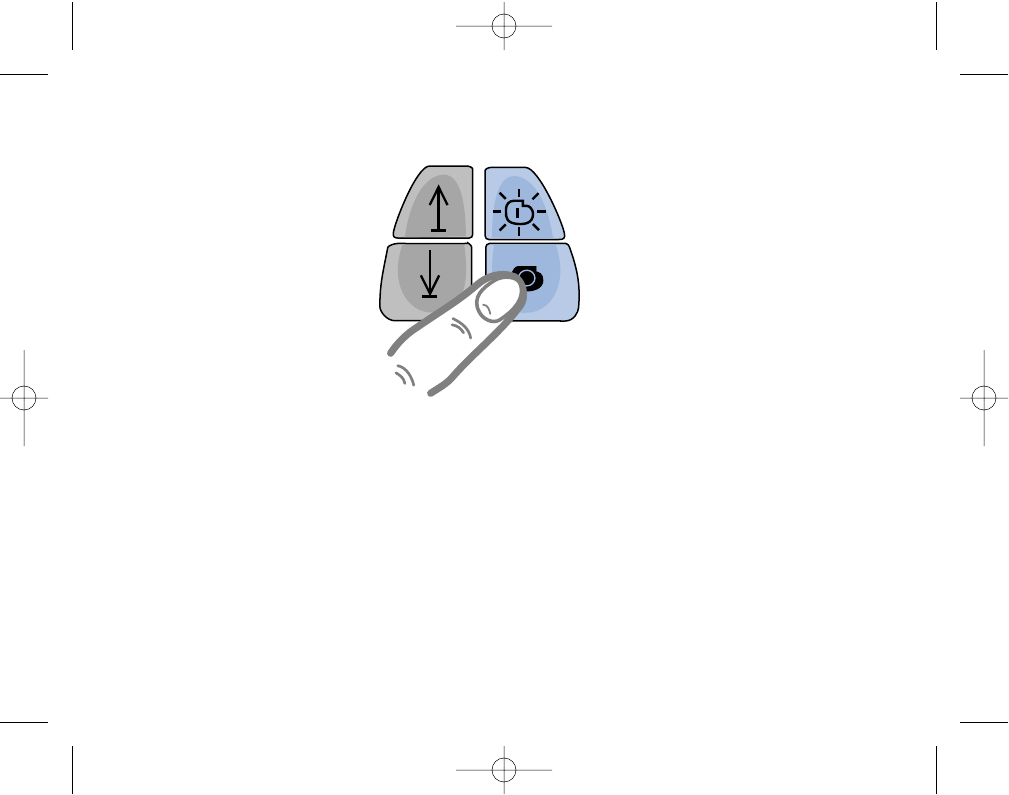
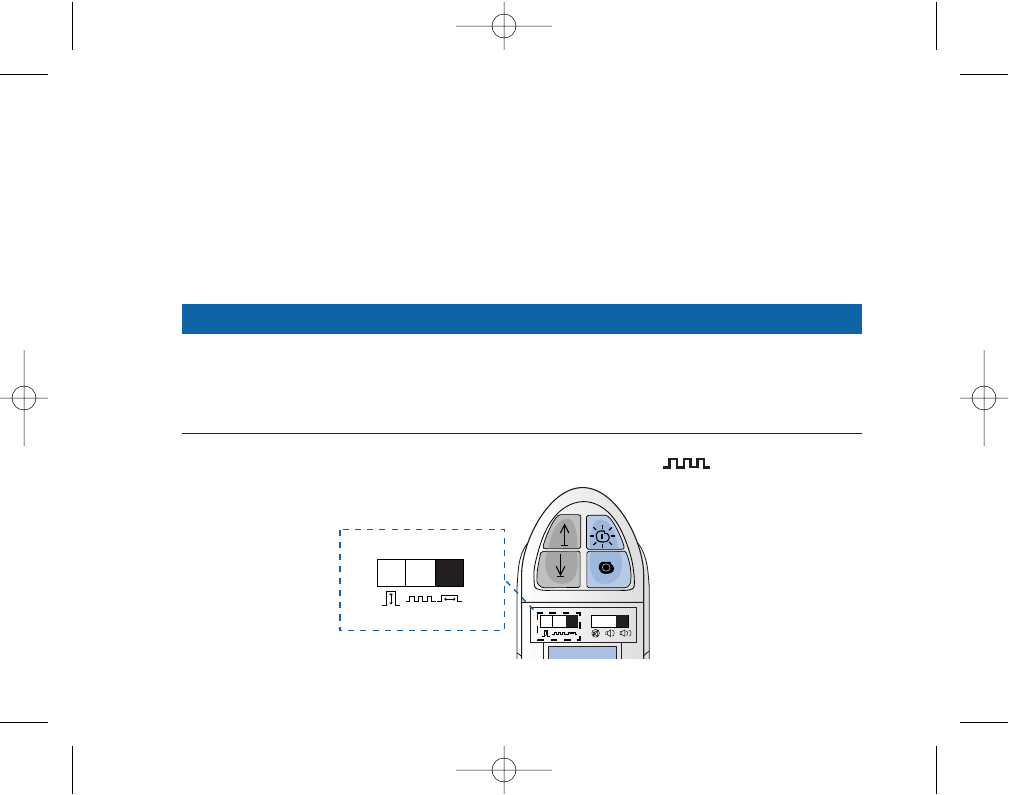
To adjust amplitude, rate, or pulse width:
Remove the battery compartment cover.
Select the
stimulation
setting:
amplitude ( ),
rate ( ), or
pulse width ( ).
Place the
programmer
over your
neurostimulator.
Press the neurostimulator
On key. Listen for the
confirmation beep.
+
l
SN
9V IEC-6LR61
Press the Increase ( ) or
the Decrease ( ) key
to make a change.
You should hear
one beep for
each change.
Repeat steps 2-5 for other
stimulation settings.
Replace the battery cover.
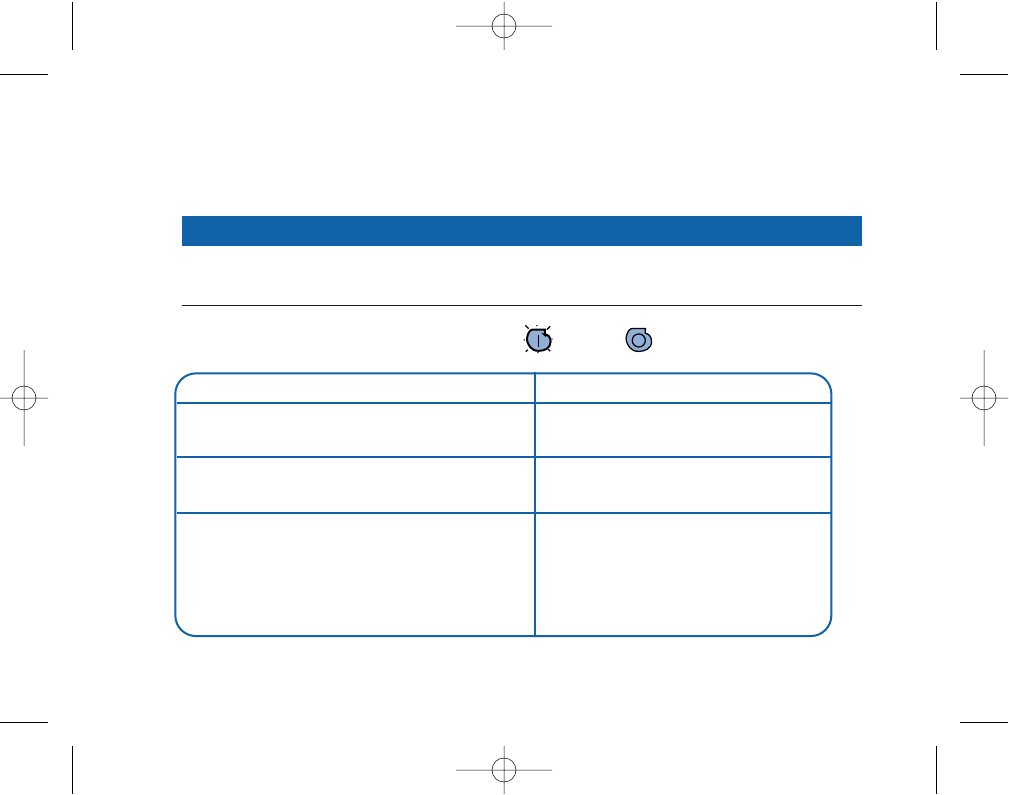
SOUND ACTION
One beep You have pressed the On/Off or
Increase/Decrease key and the
change was received by the
neurostimulator.
Three Indicates one of the following:
rapid • You tried to adjust the
beeps lowest neurostimulator beyond
theor highest settings.
• You tried to increase stimulation
with the neurostimulator
turned off.
5
6
2
3
4
1
If the patient programmer beeps:
9900213EN/197877_001/ccs 1/29/01 2:18 PM Page 4

A COMPANY DEDICATED TO PATIENTS
Medtronic was founded in 1949 by Earl Bakken, a graduate student in
electrical engineering, and his brother-in-law, Palmer J. Hermundslie. Today
Medtronic is the world leader in medical technology, pioneering therapies
that restore health, extend life, and alleviate pain.
From its modest beginnings in a 600-square-foot Minneapolis garage, we
have transformed Medtronic into a worldwide company that serves
customers in more than 120 countries. Each year, millions of patients are
treated with Medtronic products and therapies. We invest almost $500
million each year in research and development, working closely with the
world’s leading physicians and scientists to enhance our current products
and therapies, and to develop new ones. Although we are a large company,
individual patients and their needs are still the driving force behind what we
do and how we do it.
Our goal is to improve the quality of your life. This booklet, which provides
information about your stimulation system, is one small way we try to help.
Welcome to the Medtronic family. We wish you well.
9900213EN/197877_001/ccs 1/29/01 2:18 PM Page 5

9900213EN/197877_001/ccs 1/29/01 2:18 PM Page 6

CONTENTS
ABOUT THIS BOOKLET.................................................................. 1
INTRODUCTION ............................................................................... 3
Indications..................................................................................................3
Contraindications .....................................................................................3
Warnings .................................................................................................... 4
Precautions ................................................................................................ 6
Risks of Surgery ........................................................................................9
Possible Side Effects.............................................................................. 10
Changes in Therapy............................................................................... 10
Possible Device Complications ........................................................... 11
RECOVERING FROM SURGERY................................................. 12
Healing..................................................................................................... 12
Physical Therapy and Medications..................................................... 12
Activities...................................................................................................13
WHAT IS PAIN? ................................................................................ 15
WHAT IS STIMULATION AND HOW DOES IT
MANAGE PAIN?............................................................................. 15 i
9900213EN/197877_001/ccs 1/29/01 2:18 PM Page i

WHAT DOES YOUR STIMULATION SYSTEM
LOOK LIKE?..................................................................................... 17
HOW DOES YOUR STIMULATION SYSTEM WORK? ...........19
HOW DOES STIMULATION FEEL?............................................. 22
HOW IS YOUR ITREL 3 SYSTEM IMPLANTED?......................25
WHAT DOES THE PATIENT PROGRAMMER DO?................ 30
HOW DOES THE PATIENT PROGRAMMER WORK? ........... 31
PATIENT PROGRAMMER FEATURES ....................................... 32
Keypad...................................................................................................... 33
On/Off Keys ..................................................................................... 34
Increase and Decrease Keys ........................................................... 34
Control Switches .................................................................................... 35
Stimulation Control Switch ........................................................... 36
Beeper Volume Control Switch ..................................................... 37
Symbols and Status Lights................................................................... 38
Symbols.............................................................................................. 38
Status Lights...................................................................................... 38
ii
9900213EN/197877_001/ccs 1/29/01 2:18 PM Page ii

USING THE PATIENT PROGRAMMER ..................................... 41
Placing the Programmer over the Neurostimulator ....................... 41
Checking the Neurostimulator Battery ............................................. 43
Turning the Neurostimulator On and Off......................................... 45
Adjusting Your Stimulation .................................................................. 52
Programming Tips............................................................................ 53
Decreasing the Amplitude to the Lowest Setting........................ 56
Adjusting the Pulse Width.............................................................. 57
Adjusting the Rate............................................................................ 60
Adjusting the Amplitude ................................................................ 62
ACCESSORIES................................................................................... 65
Wrist Strap and Carrying Case ........................................................... 65
Detachable Antenna.............................................................................. 67
Attaching the Antenna over the Neurostimulator...................... 69
Connecting the Antenna to the Patient Programmer ................. 71
Disconnecting the Antenna............................................................. 71
Caring for the Antenna.................................................................... 73
Caring for Your Skin ........................................................................ 74
Using your Control Magnet (Optional) ............................................ 75
iii
9900213EN/197877_001/ccs 1/29/01 2:18 PM Page iii

CARING FOR YOUR PATIENT PROGRAMMER..................... 79
Battery Cover .......................................................................................... 79
Removing the Battery Cover .......................................................... 79
Replacing the Battery Cover .......................................................... 80
Identification Label................................................................................ 81
Checking the Programmer Battery..................................................... 83
Removing the Battery............................................................................ 85
Installing the Battery ............................................................................. 86
Cleaning and Care................................................................................. 88
Service ...................................................................................................... 90
Battery and Device Disposal................................................................ 90
TROUBLESHOOTING..................................................................... 92
LIVING WITH YOUR STIMULATION SYSTEM.................... 102
Patient Identification Card ................................................................. 102
When to Call Your Doctor................................................................... 104
Do’s and Don’ts .................................................................................... 106
Environmental Problems.................................................................... 108
Battery Information................................................................................112
Battery and Device Disposal.............................................................. 113
Medical and Dental Procedures........................................................ 114
iv
9900213EN/197877_001/ccs 1/29/01 2:18 PM Page iv

COMMONLY ASKED QUESTIONS........................................... 117
SPECIFICATIONS........................................................................... 123
SPECIAL NOTICE........................................................................... 124
LIMITED WARRANTY .................................................................. 125
GLOSSARY....................................................................................... 134
WARRANTY REGISTRATION CARD....................................... 139
QUICK PROGRAMMING GUIDE ............................................. 141
7General Warning
The Medtronic®Itrel®EZ™Model 7434A Patient Programmer (the
“Programmer“) is designed to program the adjustable parameters of the
Medtronic®Itrel®3 Implantable Neurostimulator (the “neurostimulator“).
Do not attempt to use the programmer on another device (for example, a
cardiac pacemaker). Radio signals from the patient programmer may
interfere with the performance of other implantable devices.
v
9900213EN/197877_001/ccs 1/29/01 2:18 PM Page v

FCC INFORMATION
The following is communications regulation information on the
Itrel®EZ™ Model 7434A Patient Programmer.
FCC ID: LF57434A
This device complies with Part 15 Rules. Operation is subject to
the following two conditions: (1) this device may not cause
harmful interference and (2) this device must accept any
interference received, including interference that may cause
undesired operation.
IMPORTANT: Changes or modifications to this product not authorized by
Medtronic, Inc., could void the FCC Certification and negate your
authority to operate this product.
9900213EN/197877_001/ccs 1/29/01 2:18 PM Page vi

ABOUT THIS BOOKLET
For over 30 years, stimulation has helped thousands of patients
manage their pain. This has also improved their quality of life.
Your stimulation system may be used with other pain treatments
like physical therapy or medicine. Stimulation will not cure your
pain. It may, however, reduce your pain to a tolerable level. As a
result, you may be able to resume your daily activities.
1
9900213EN/197877_001/ccs 1/29/01 2:18 PM Page 1

This booklet provides you with the following:
• Indications, contraindications, warnings, precautions, risks of
surgery, possible side effects, changes in therapy, and possible
device complications
• What to expect as you recover from surgery
• Definition of pain and stimulation
• Description of your implanted system and how it works to
manage your pain
• Description of your patient programmer, and how to use it and
care for it
• Steps to take to help you solve problems or identify when you
should call your doctor
• How to live with your stimulation system
• Answers to common questions
• Important terms that appear as bold in text; these terms are
listed in the Glossary at the end of this booklet.
Ask your doctor to explain anything that is unclear.
2
9900213EN/197877_001/ccs 1/29/01 2:18 PM Page 2

INTRODUCTION
Indications
The Medtronic®Itrel®3 System is indicated as an aid in the
management of chronic, intractable pain of the trunk or limbs.
Patients should be carefully selected to assure that their pain is of
physiologic origin. Also, patients must be appropriate candidates
for surgery.
7Caution
All other uses remain investigational.
Contraindications
Implantation of an Itrel 3 System is contraindicated for:
• Patients for whom trial stimulation is unsuccessful.
• Patients who are unable to properly operate the system.
3
9900213EN/197877_001/ccs 1/29/01 2:18 PM Page 3

Warnings
Case Damage—If the neurostimulator case is pierced, severe burns
could result.
Equipment Operation—Do not use potentially dangerous
equipment (cars, power tools, etc.) when your neurostimulator is
on. What may feel like a sudden increase in stimulation (“jolt“ or
“shock“) could cause you to lose control of the equipment you are
using. Turn the neurostimulator off and set the amplitude to the
lowest setting.
Postural Changes—As your spine moves, you may sense an
increase or decrease in the stimulation. It may seem as though the
neurostimulator is turning on or off. When you bend over or move
suddenly, you may even feel an uncomfortable “jolt“ or “shock.“
Pregnancy—Safety for use during pregnancy or delivery has not
been established.
4
9900213EN/197877_001/ccs 1/29/01 2:18 PM Page 4

Theft Detectors and Screening Devices—Use care when
approaching theft detectors and security arches (such as those
found in airports, libraries, and some department stores) as these
devices can cause momentary, uncomfortable, or painful
stimulation. Similarly, avoid airport security wands.
When approaching these devices do the following:
1. Show your patient identification card to security staff. Ask that
you be allowed to bypass the security device, request a hand
search, or ask that the security device be turned off.
2. If passing through the security device is unavoidable, turn the
neurostimulator off.
3. Reduce the amplitude to the lowest setting.
4. Approach the security device slowly. If any stimulation is felt,
back out of the security device immediately without changing
body position. If no stimulation is felt, move quickly through
to the other side.
5
9900213EN/197877_001/ccs 1/29/01 2:18 PM Page 5

Precautions
Patient Management—To ensure the most benefit from your
system, regular appointments with your doctor are recommended.
Medical Procedures—Some medical procedures can damage the
neurostimulation system or can cause changes to the system which
may produce discomfort, pain, or injury. Consult your doctor
about risks and benefits of procedures such as:
• Electrosurgery (surgery performed using electrical methods)
• Diathermy (heat treatment)
• Lithotripsy (the crushing of a blockage within the urinary tract
using electrical methods)
• Radiation therapy (that is, cancer treatment)
• Magnetic resonance imaging (MRI)—not recommended
• Defibrillation (electric shock to the heart)
6
9900213EN/197877_001/ccs 1/29/01 2:18 PM Page 6

Electromagnetic Interference (EMI)—Strong electrical fields, such
as those produced by radio towers or some industrial equipment,
can affect the function of your neurostimulator. This can cause
uncomfortable stimulation (a “jolt“ or “shock“). This problem is
called electromagnetic interference, or EMI.
High/Low Pressure Effects—The effects of high/low pressure
(that is, scuba diving, unpressurized airplanes) on patients with an
implanted neurostimulation system are unknown.
7
9900213EN/197877_001/ccs 1/29/01 2:18 PM Page 7

Home Appliances—Be sure that appliances and equipment are
properly installed and in good working condition before using
them.
Occupational Environments—Strong interference could cause
your neurostimulator to deliver inappropriate or additional
stimulation to your spinal cord. Turning the neurostimulator off
may reduce the effect of interference. Devices or equipment to
avoid are theft detectors, airport/security screening devices,
electric arc welding equipment, electric substations and power
generators, CB or ham radio antennas, electric induction heaters
used in industry to bend plastic, TV/radio transmitting towers, or
electric steel furnaces.
8
9900213EN/197877_001/ccs 1/29/01 2:18 PM Page 8

Risks of Surgery
Implanting the Itrel 3 System has the same risks as any other
neurostimulation implant procedure. These risks include:
• Spinal fluid leak, headache
• Fluid collection (seroma) or bruising (hematoma) at the
neurostimulator site
• Bleeding near the spinal cord (epidural hemorrhage or
hematoma) or paralysis
• Infection
9
9900213EN/197877_001/ccs 1/29/01 2:18 PM Page 9

Possible Side Effects
Side effects of spinal cord stimulation are usually mild and go
away when stimulation is turned off. Possible side effects include:
• Chest wall stimulation
• Uncomfortable stimulation
• Jolting or shocking sensation
• Pain at the surgery sites
Changes in Therapy
There may be changes in the level of your pain control over time.
In most cases, your doctor can correct these changes without
surgery. However, it is possible that surgery may be required.
10
9900213EN/197877_001/ccs 1/29/01 2:18 PM Page 10

Possible Device Complications
• There may be pain, redness, or swelling at the neurostimulator
site more than 6 weeks after surgery.
• The lead may move; surgery may be needed to reposition the
lead.
• The system may wear through your skin; this can cause an
infection or scarring.
• Pain control may decrease or stop due to device problems. One
example is the lead or extension wires could break.
Note: Do not twist or turn the system through your skin;
this can disconnect or damage the system.
• Your body may have an allergic response to implanted
materials.
11
9900213EN/197877_001/ccs 1/29/01 2:18 PM Page 11

RECOVERING FROM SURGERY
Healing
It takes several weeks to heal from surgery. You will feel some
discomfort from the incision(s). You will also have some pain at
the neurostimulator site for 2 to 6 weeks. This pain is normal.
Physical Therapy and Medications
Your physician may also prescribe physical therapy, medication, or
both to help manage your pain. Always follow your doctor’s
instructions for the therapy(ies) prescribed.
12
9900213EN/197877_001/ccs 1/29/01 2:18 PM Page 12

Activities
During your recovery (about 6 weeks), follow your doctor’s
advice. Avoid activities where you must bend, stretch, or twist
your body; this can move your lead and alter your stimulation.
To prevent lead movement, AVOID the following activities during
your recovery:
• Lying on your stomach
• Reaching over your head
• Turning from side to side
• Bending forward, backward, or from side to side
• Lifting more than 5 pounds
13
9900213EN/197877_001/ccs 1/29/01 2:18 PM Page 13

As you begin to feel better, you should be able to return to
activities such as:
• Bathing or showering
• Sexual activity
• Working at home or at your business
• Hobbies or other activities such as walking, gardening, cycling,
or swimming
• Traveling
Discuss any type of strenuous activity with your doctor first, to
avoid any possible damage to your system. Remember that
returning to your daily activities should make you feel better,
not worse.
Note: As you adjust to life with better pain control, you
may want to try activities that you could not perform before
your surgery. Discuss this with your doctor first.
14
9900213EN/197877_001/ccs 1/29/01 2:18 PM Page 14

WHAT IS PAIN?
Nerve signals from all over your body travel to your spinal cord,
and then to your brain. Your brain translates nerve signals into
feelings such as pressure, itching, tingling, or pain. It is your brain
that feels pain, not the area of your body where the signal started.
WHAT IS STIMULATION AND HOW DOES IT
MANAGE PAIN?
Stimulation delivers tiny electrical pulses to the spinal cord. This
blocks the pain signal as it travels to the brain. If the signal does
not reach the brain, the pain is not “felt.“
Note: Stimulation will not cure your pain nor will it block
sharp pain caused by a recent injury.
15
9900213EN/197877_001/ccs 1/29/01 2:18 PM Page 15
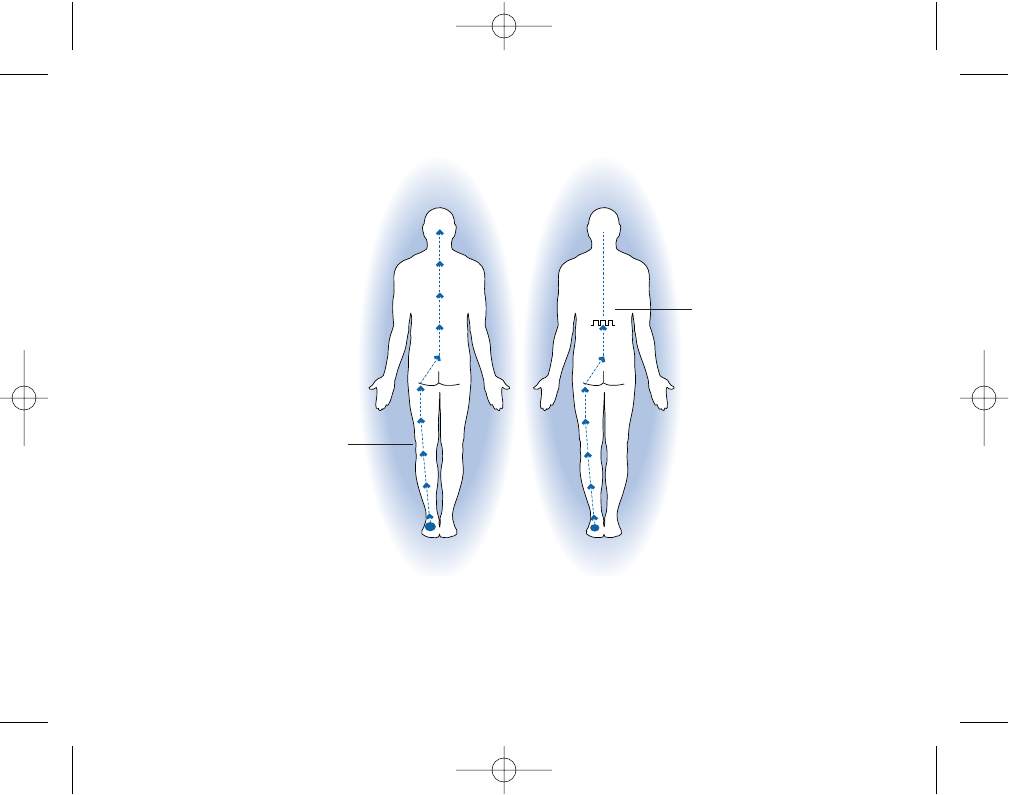
16
Stimulation blocks pain signals as they move to the brain.
Pain signal
moving to brain
is blocked by
stimulation
Pain signal is
moving to brain
from painful foot
9900213EN/197877_001/ccs 1/29/01 2:18 PM Page 16

WHAT DOES YOUR STIMULATION SYSTEM
LOOK LIKE?
A typical stimulation system has three implanted parts: one
neurostimulator, one lead, and one extension.
Neurostimulator: The neurostimulator is the power source of your
system. It contains a special battery and electronics to control the
stimulation you feel.
Note: In time, the battery inside your neurostimulator will
wear out. When this occurs, your neurostimulator will need
to be surgically replaced.
Lead: The lead (pronounced “leed“) is a thin wire covered with a
protective coating. The lead has small metal electrodes near the
tip. The lead is surgically placed with the metal electrodes near
your spinal cord. The electrodes transmit tiny electrical pulses to
the area where your pain signals will be blocked.
17
9900213EN/197877_001/ccs 1/29/01 2:18 PM Page 17
Extension: The extension is a thin wire placed under the skin. It
also is covered with a protective coating. The extension connects to
the neurostimulator at one end and to the lead at the other end.
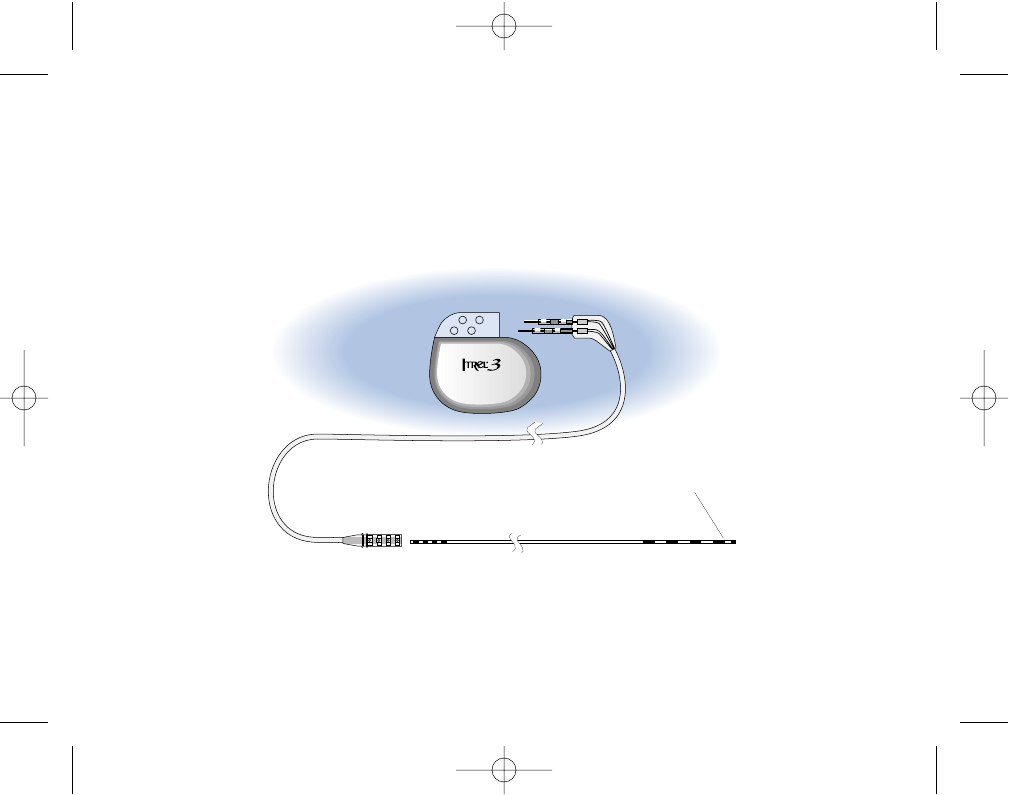
The parts of your stimulation system.
18
Extension
Neurostimulator
Lead
Electrode
9900213EN/197877_001/ccs 1/29/01 2:18 PM Page 18

HOW DOES YOUR STIMULATION SYSTEM WORK?
After your surgery, your doctor used a physician programmer (a
small computer) to send stimulation instructions to your
neurostimulator. These instructions control the stimulation you
feel.
The instructions are stored in your neurostimulator. If needed,
your doctor can use the programmer to change the instructions.
You have been given a patient programmer to use with your
system. It allows you to turn your neurostimulator on and off. It
also allows you to fine tune your stimulation. Your doctor or nurse
will explain how to use the patient programmer. Refer to “Using
the Patient Programmer,“ on page 41.
19
9900213EN/197877_001/ccs 1/29/01 2:18 PM Page 19

An optional control magnet can also be used to turn your
neurostimulator on and off. This magnet can also be used to start a
dosage of stimulation if programmed by your doctor. You cannot
use the control magnet to adjust amplitude.
If necessary, your doctor can disable the circuit that allows on/off
control with the magnet.
A special code inside your neurostimulator allows only
programming from the physician or patient programmer; other
devices, such as the control magnet, are not able to program your
neurostimulator.
20
9900213EN/197877_001/ccs 1/29/01 2:18 PM Page 20
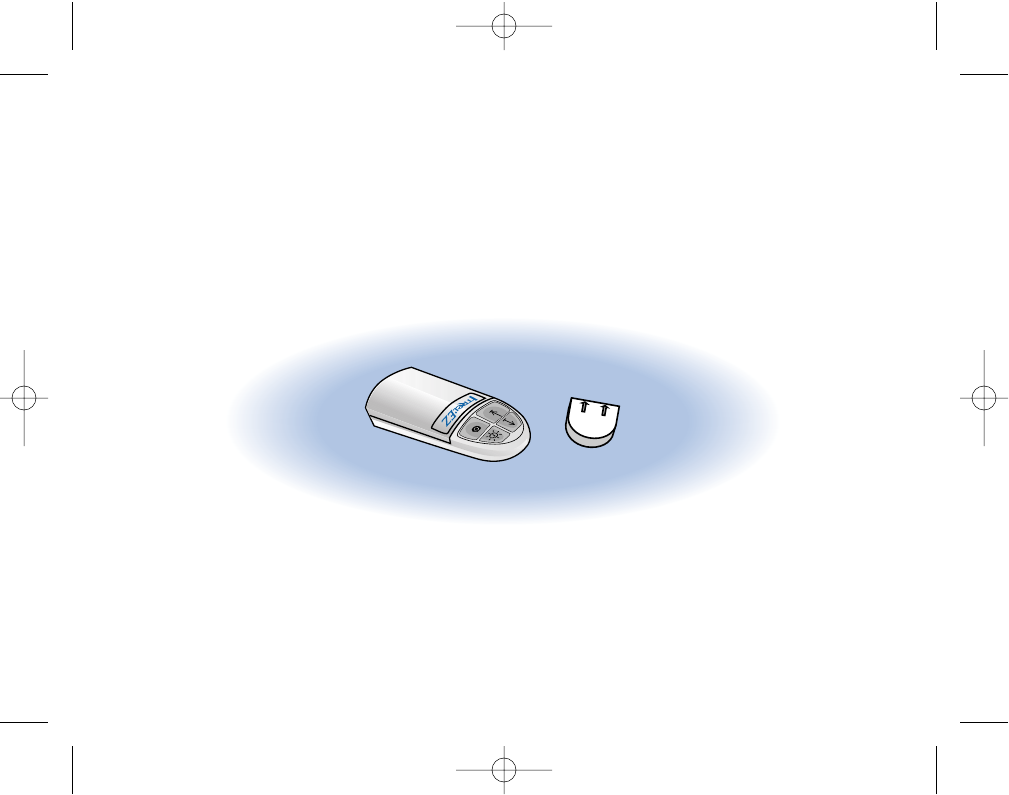
Neurostimulator controlling devices.
21
Itrel®EZ™Patient
Programmer Control
Magnet
9900213EN/197877_001/ccs 1/29/01 2:18 PM Page 21

HOW DOES STIMULATION FEEL?
Your neurostimulator sends tiny electrical pulses through the
extension to the lead. The electrical pulses move through the lead
and electrodes to the area where your pain signals will be blocked.
To most patients, these pulses feel like tingling in the pain area.
Sensations vary from patient to patient.
When your neurostimulator is turned on, the tingling slowly
increases until it levels off. When your neurostimulator is turned
off, the tingling slowly decreases until it stops.
22
9900213EN/197877_001/ccs 1/29/01 2:18 PM Page 22
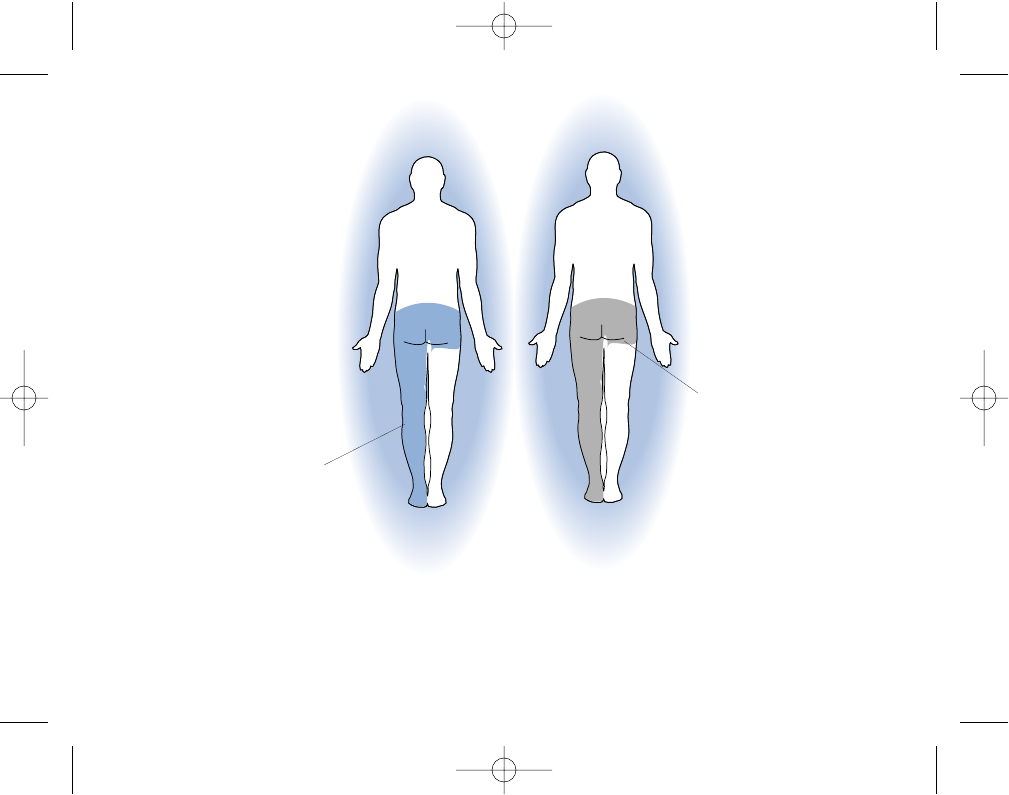
Stimulation feels like tingling in the area of pain.
23
Painful
Area
Stimulation
Area
9900213EN/197877_001/ccs 1/29/01 2:18 PM Page 23

As your spine moves, you may sense an increase or decrease in the
stimulation. It may seem as though the neurostimulator is turning
on or off. When you bend over or move suddenly, you may even
feel an uncomfortable “jolt“ or “shock.“
Do not be alarmed if these sudden changes in stimulation occur.
The instructions inside your neurostimulator have not changed.
Your movement has probably caused your spinal cord to move
closer to or farther from the lead electrodes. For a moment, the
stimulation may feel more or less intense than it should.
Sudden changes in stimulation like these are most common during
the recovery period. They usually decrease as you heal and the
lead becomes more secure in your spinal column.
24
9900213EN/197877_001/ccs 1/29/01 2:18 PM Page 24

HOW IS YOUR ITREL®3 SYSTEM IMPLANTED?
Implantation of your Itrel®3 System has four basic steps and
usually is done in one or two operations. The four steps are as
follows:
• Lead placement
• Screening
• Neurostimulator internalization
• Neurostimulator programming
During the lead placement, you may be under a local anesthetic.
The doctor will ask you to help determine when the lead is in the
correct place. You will know the lead is correctly placed when you
feel a tingling sensation in the area of your pain. This is the
sensation you will feel instead of pain when your Itrel®3 System is
blocking pain.
25
9900213EN/197877_001/ccs 1/29/01 2:18 PM Page 25

An external “screener“ device provides the energy for the trial
stimulation during the lead placement. If your doctor chooses to
internalize the system in one operation., the neurostimulator is
implanted after a successful lead placement.
If the procedure is done in two operations, you will have a trial
screening period of several days. Your doctor will use the
“screener“ to determine the most comfortable and effective
stimulation settings for you.
26
9900213EN/197877_001/ccs 1/29/01 2:18 PM Page 26
The neurostimulator is internalized while you are under local or
general anesthesia. This will occur after the screening period or, as
previously explained, immediately after the lead placement. The
doctor makes an incision in the skin, usually in the abdomen.
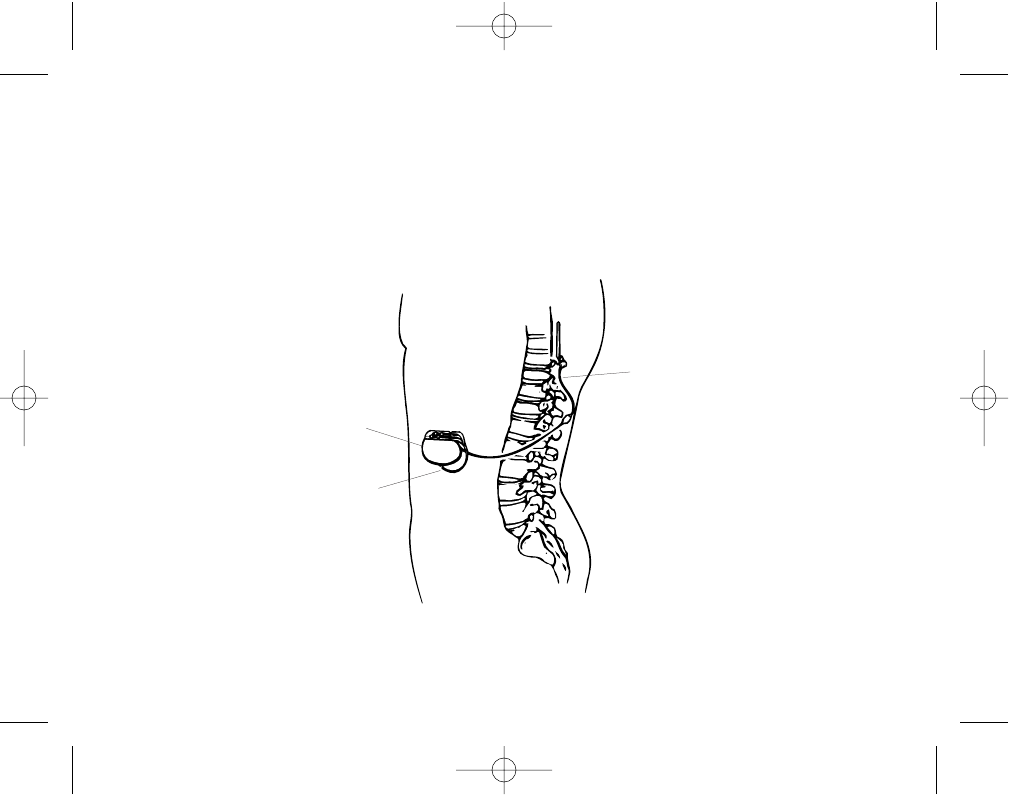
The neurostimulator is usually placed in the abdomen.
27
Neurostimulator
Extension
Lead
9900213EN/197877_001/ccs 1/29/01 2:18 PM Page 27

The neurostimulator is placed under the skin. The lead is then
connected to the neurostimulator via the extension (wire). Your
doctor will try to place the neurostimulator in an area that is most
comfortable and cosmetically acceptable.
After the internalization, your doctor will use the physician
programmer to program the neurostimulator to the therapy
settings that are appropriate to your needs. Your doctor may also
choose to program a SoftStart™/Stop stimulation. The SoftStart is a
feature that gradually increases the amplitude from zero (0) to the
programmed amplitude when your neurostimulator is turned on.
When you turn off the neurostimulator, SoftStop gradually
decreases the amplitude to zero (0) before turning off.
28
9900213EN/197877_001/ccs 1/29/01 2:18 PM Page 28

29
9900213EN/197877_001/ccs 1/29/01 2:18 PM Page 29
WHAT DOES THE PATIENT PROGRAMMER DO?
Use the patient programmer only with your implanted
neurostimulator. DO NOT use the programmer on other devices
(such as a cardiac pacemaker).
7Warning
Signals (telemetry) from the patient programmer may disrupt the function
of other implanted devices.
Your programmer is easy to use. You can use it to:
• Turn the neurostimulator on or off.
• Adjust the stimulation of your neurostimulator.
• Check the status of the neurostimulator battery and the
programmer battery.
• Confirm that the neurostimulator has received instructions
from the programmer.
30
9900213EN/197877_001/ccs 1/29/01 2:18 PM Page 30

HOW DOES THE PATIENT PROGRAMMER
WORK?
The patient programmer sends signals to your neurostimulator.
These signals tell the neurostimulator to turn on or off or to
change stimulation.
The neurostimulator also sends signals to the patient programmer.
Signals from the neurostimulator confirm changes you have made.
Signals also tell you the status of the neurostimulator battery.
The programmer placed over the neurostimulator.
31
Location of
Neurostimulator
9900213EN/197877_001/ccs 1/29/01 2:18 PM Page 31
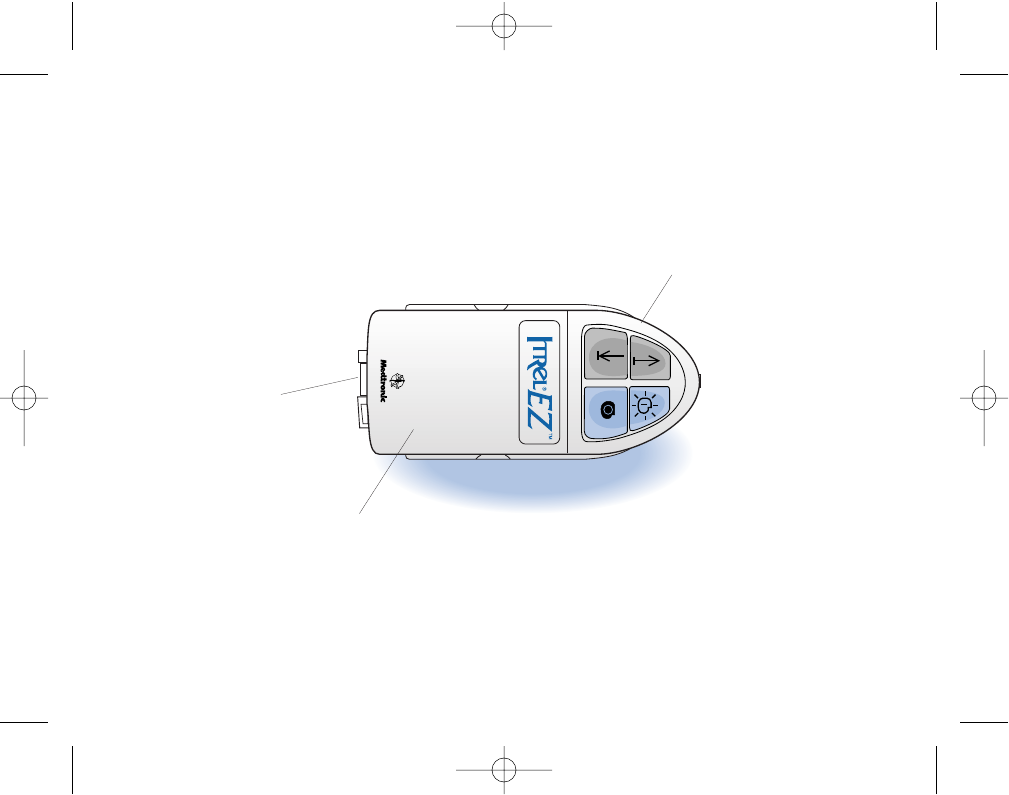
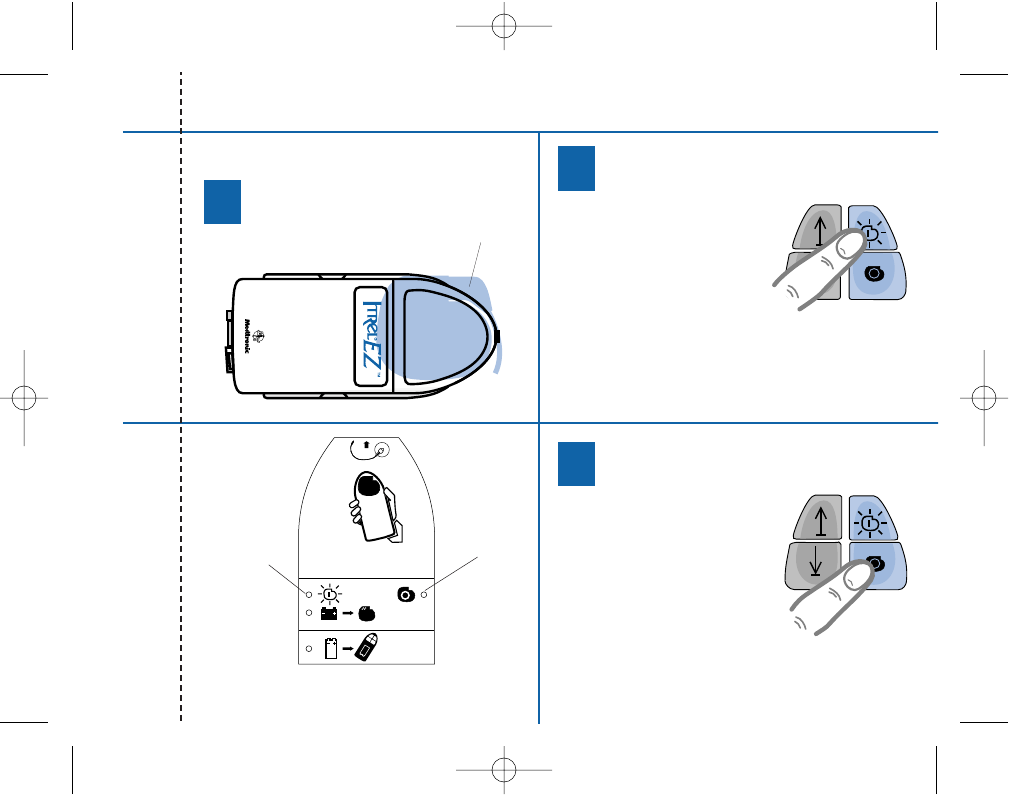
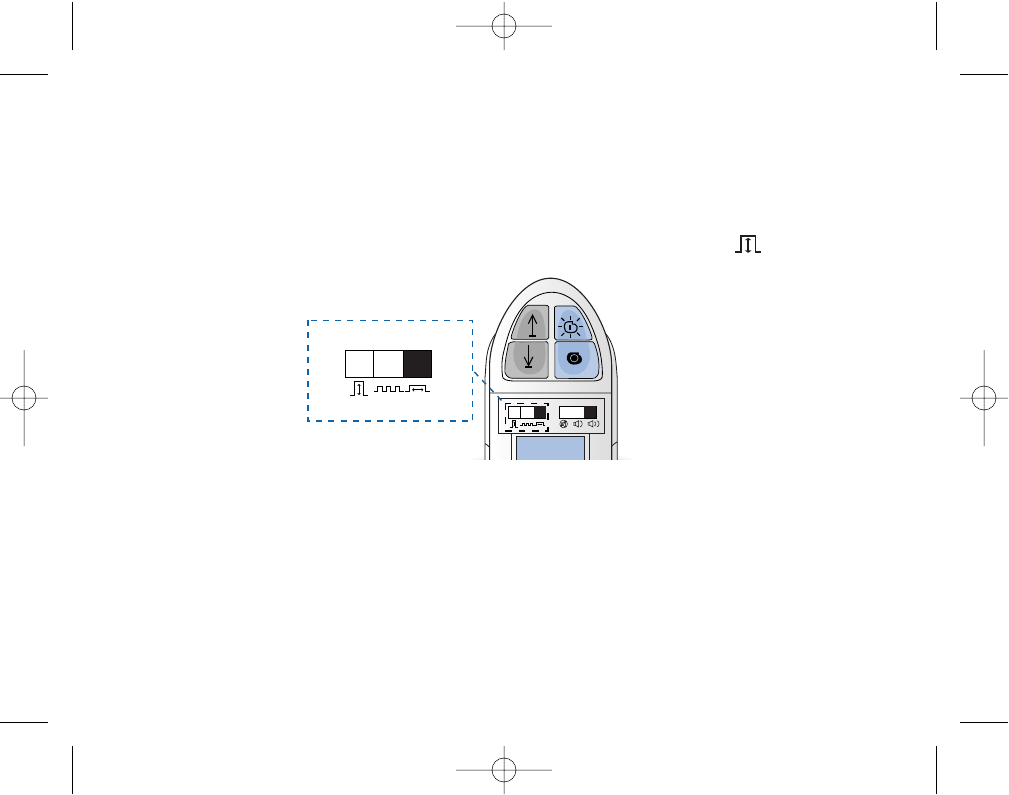
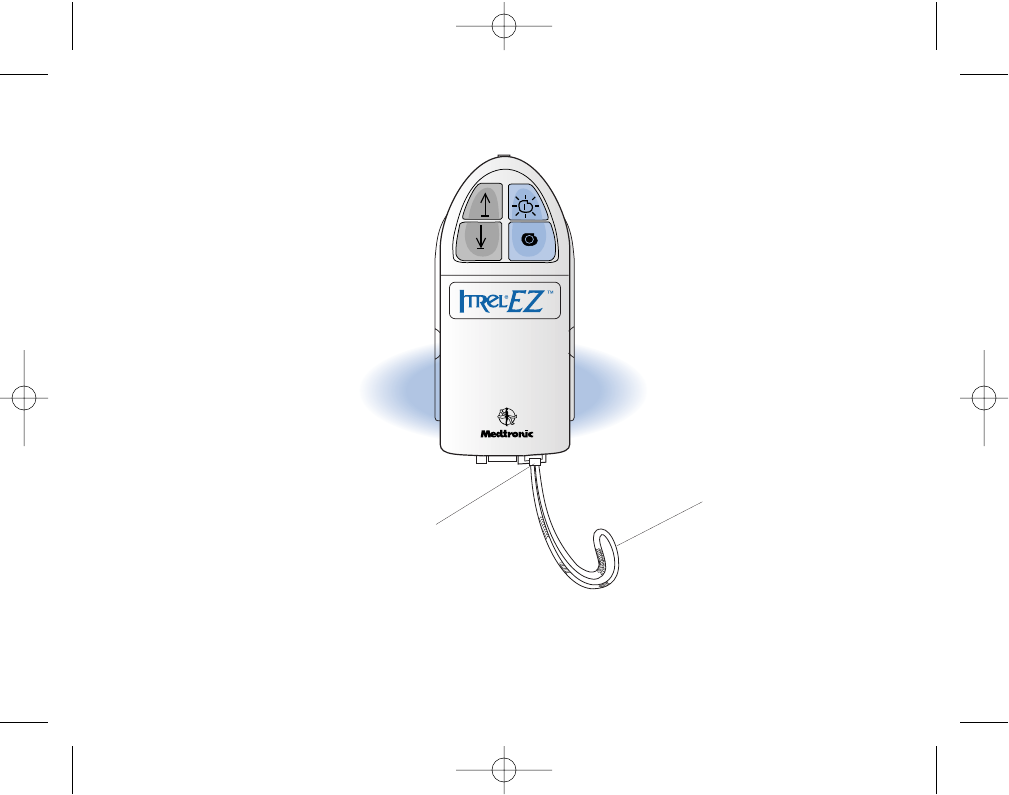
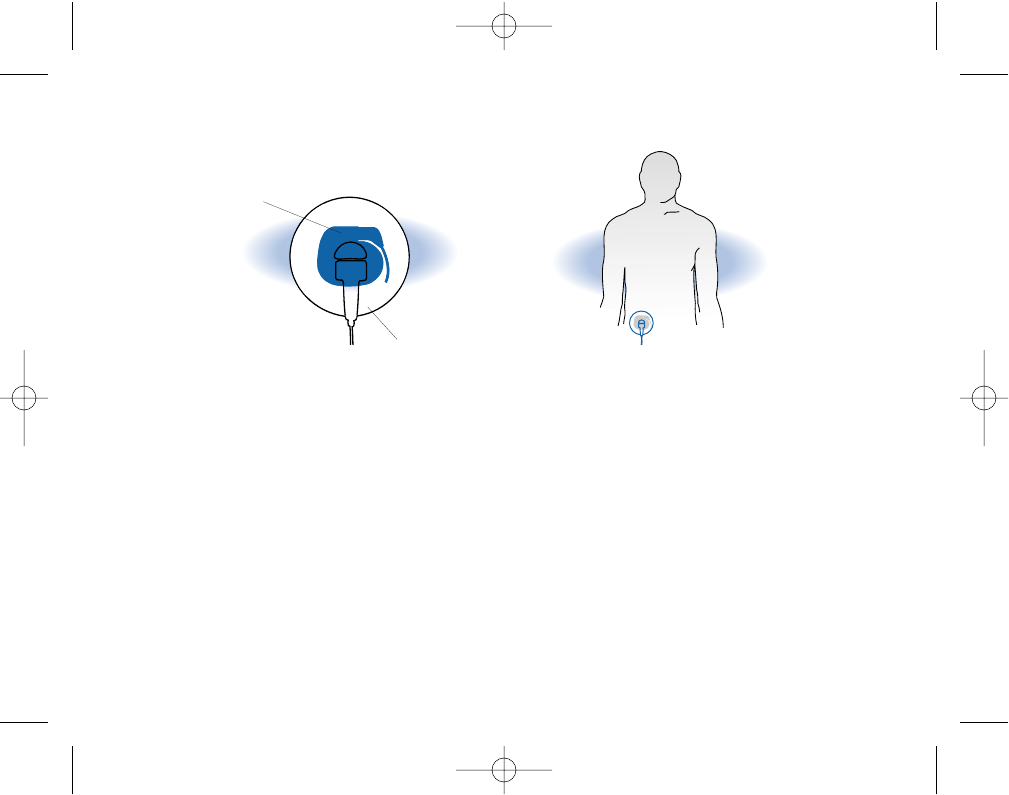
PATIENT PROGRAMMER FEATURES
This section describes the features of the patient programmer.
The patient programmer.
32
Keypad
Battery Cover
Battery Cover
Release Tab
9900213EN/197877_001/ccs 1/29/01 2:18 PM Page 32
Keypad
The keypad has 4 keys: Neurostimulator On and Off keys,
and Increase and Decrease keys.
The keypad.
33
Turns neurostimulator off
Increase and
Decrease Keys
Turns neurostimulator on
9900213EN/197877_001/ccs 1/29/01 2:18 PM Page 33
On and Off Keys
Press the On and Off keys to turn the neurostimulator on
and off.
Increase and Decrease Keys
AStimulation Control switch, under the battery cover, is used to
select the amplitude, rate, or pulse width. (See page 79 for
information on removing the battery cover.) Press the Increase
and/or Decrease key to adjust the amplitude, rate, or pulse
width within ranges set by your doctor.
34
9900213EN/197877_001/ccs 1/29/01 2:18 PM Page 34
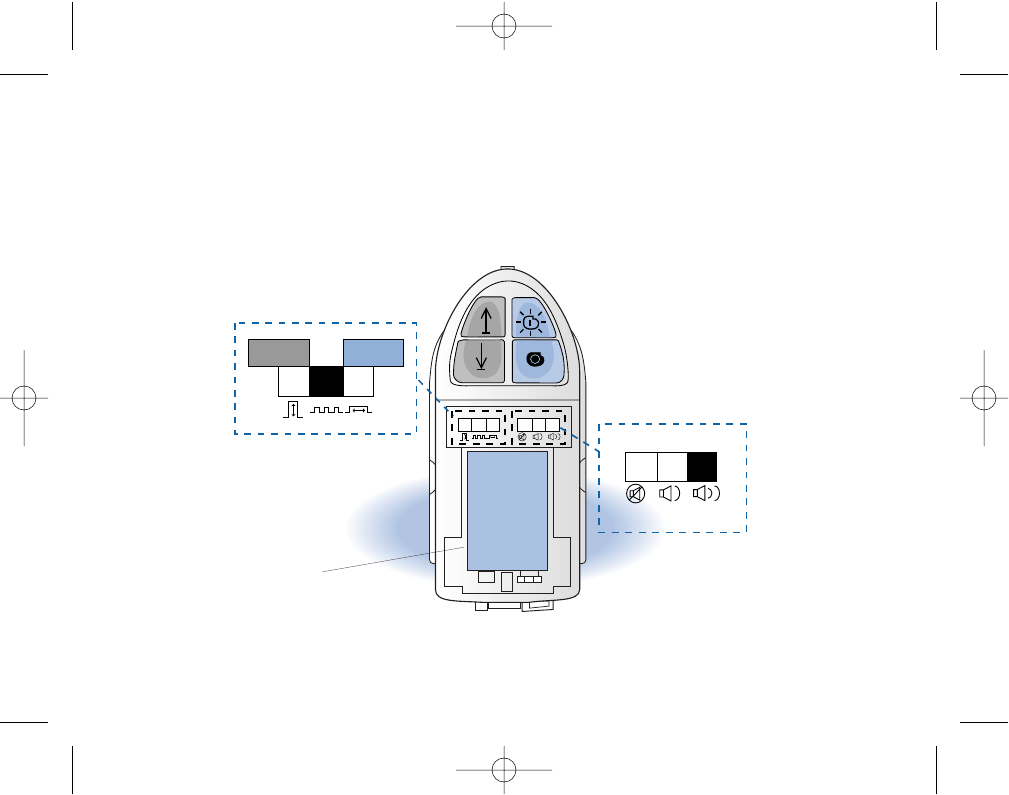
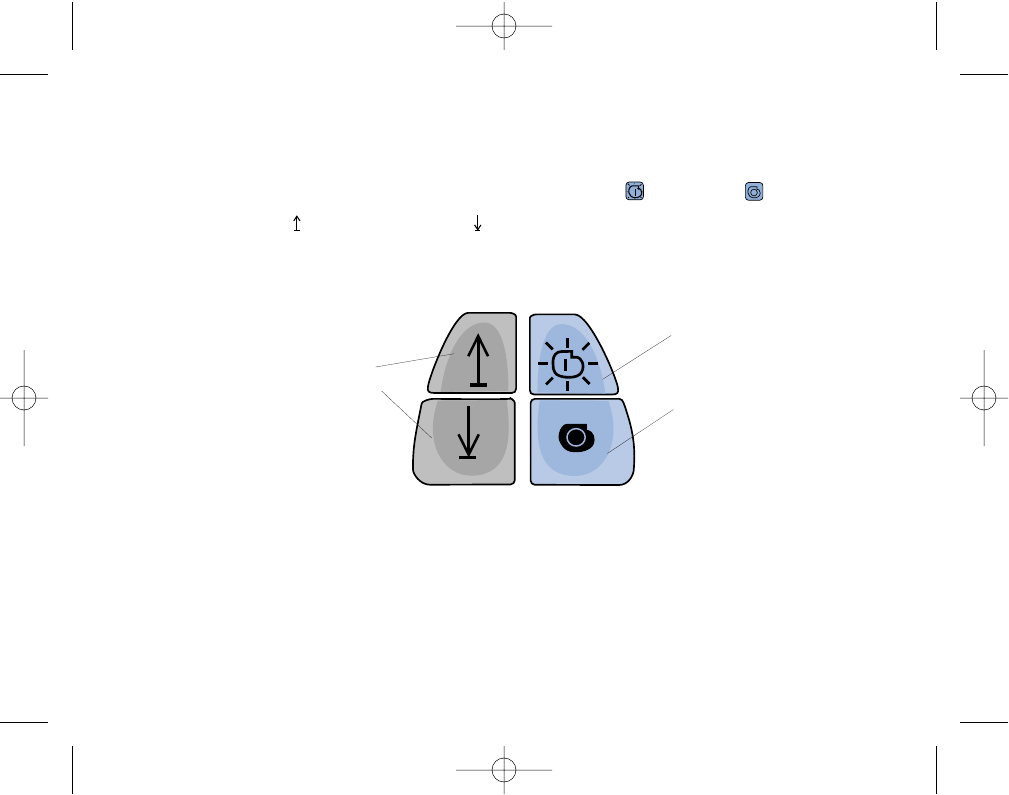
Control Switches
The control switches and battery are located under the battery cover.
For instructions on removing the battery cover, refer to page 79.
Control switches and battery.
+
l
SN
9V IEC-6LR61
35
Stimulation Control Switch
(Rate is selected)
Beeper Volume Control Switch
(High volume is selected)
Amplitude Rate Pulse
Width
Off Low High
Battery
9900213EN/197877_001/ccs 1/29/01 2:18 PM Page 35
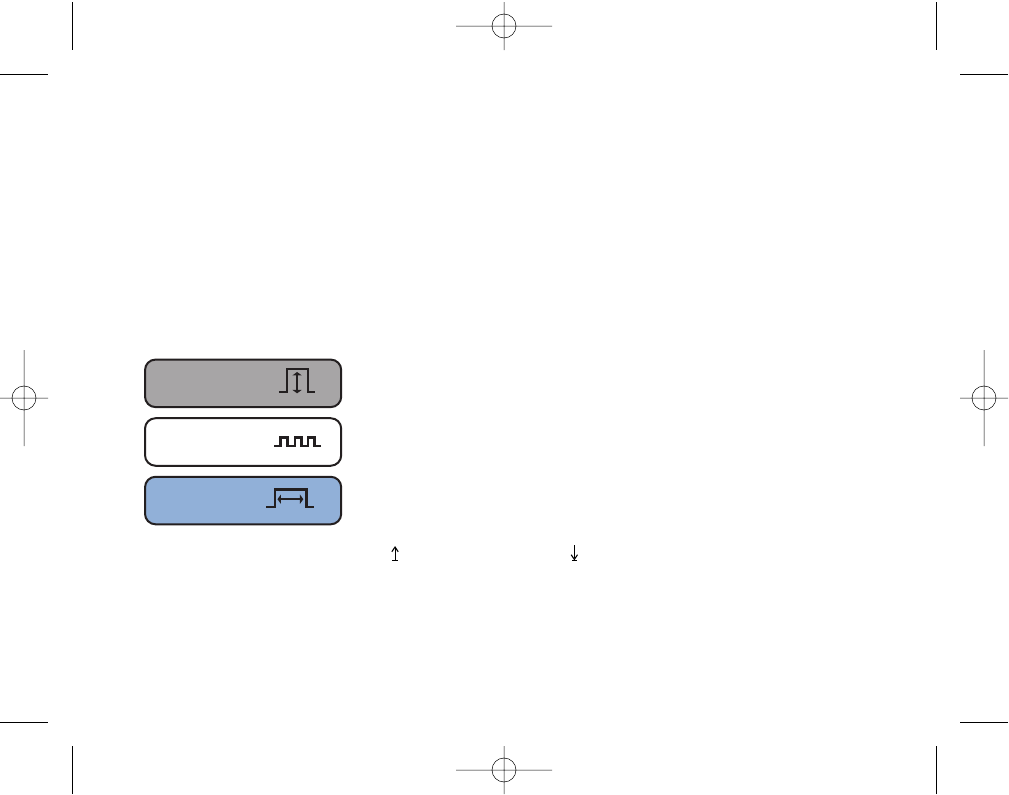
Stimulation Control Switch
Depending on the instructions your doctor has programmed into
your neurostimulator, you can adjust some or all of these settings
with the Stimulation Control switch: amplitude, rate, and pulse
width. Colors and symbols identify each setting (see below).
Changing these settings will help you find the highest level of
comfort and pain relief.
The amount or “volume“(strength or intensity)
of stimulation required to mask your pain.
This is the setting most often adjusted by patients.
The number of pulses per second; rate feels
like “tapping.“
The length or duration of the electrical pulse.
A longer pulse covers a larger area.
Note: The Increase and Decrease keys on your keypad
adjust the selected stimulation control.
36
Pulse Width
Rate
Amplitude
9900213EN/197877_001/ccs 1/29/01 2:18 PM Page 36
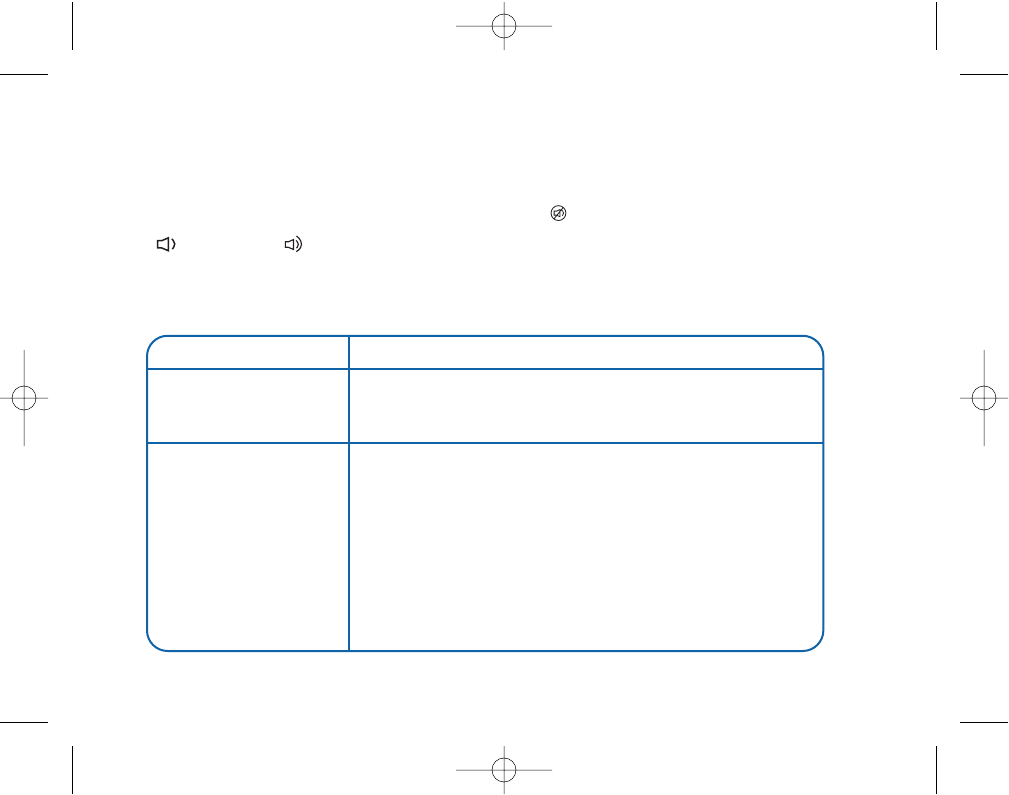
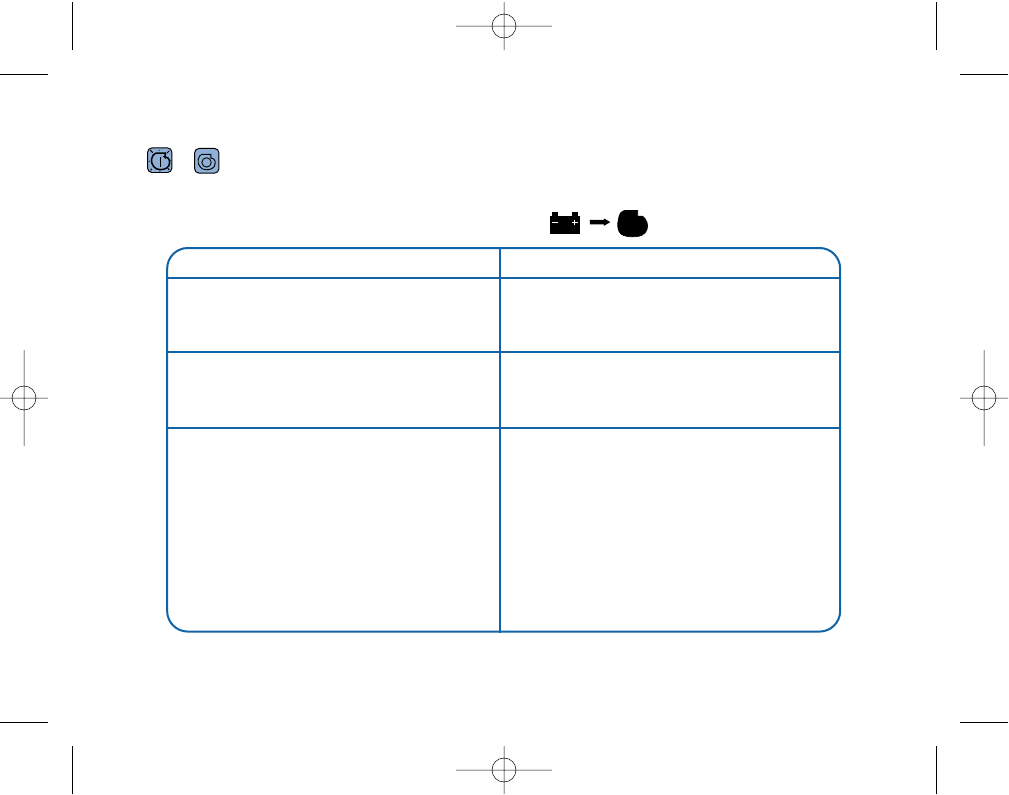
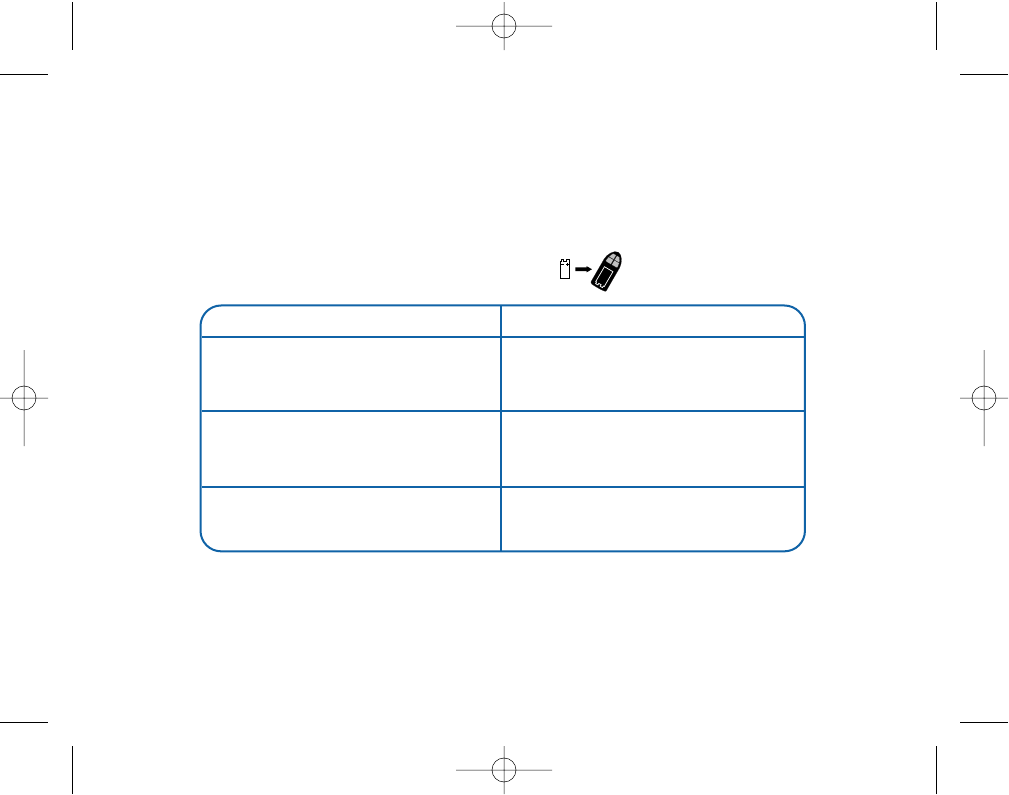
Beeper Volume Control Switch
The programmer beeps each time a change is received by your
neurostimulator. Turn the beeper Off or set the volume to Low
or High with the Beeper Volume Control switch.
(See Table 1.)
Table 1. Beeper description.
If you hear It means
One beep You have pressed the On/Off or Increase/Decrease
key and the change was successfully received by
your neurostimulator.
Three rapid beeps You tried to adjust the amplitude, pulse width, or
rate beyond the highest and lowest settings.
You tried to increase amplitude, rate, or pulse
width with the neurostimulator turned off.
You pressed On while your neurostimulator was in
“dose lockout.“ Some patients’ doctors set a lockout
period during which no stimulation is delivered.
You cannot adjust stimulation during the lockout.
37
9900213EN/197877_001/ccs 1/29/01 2:18 PM Page 37

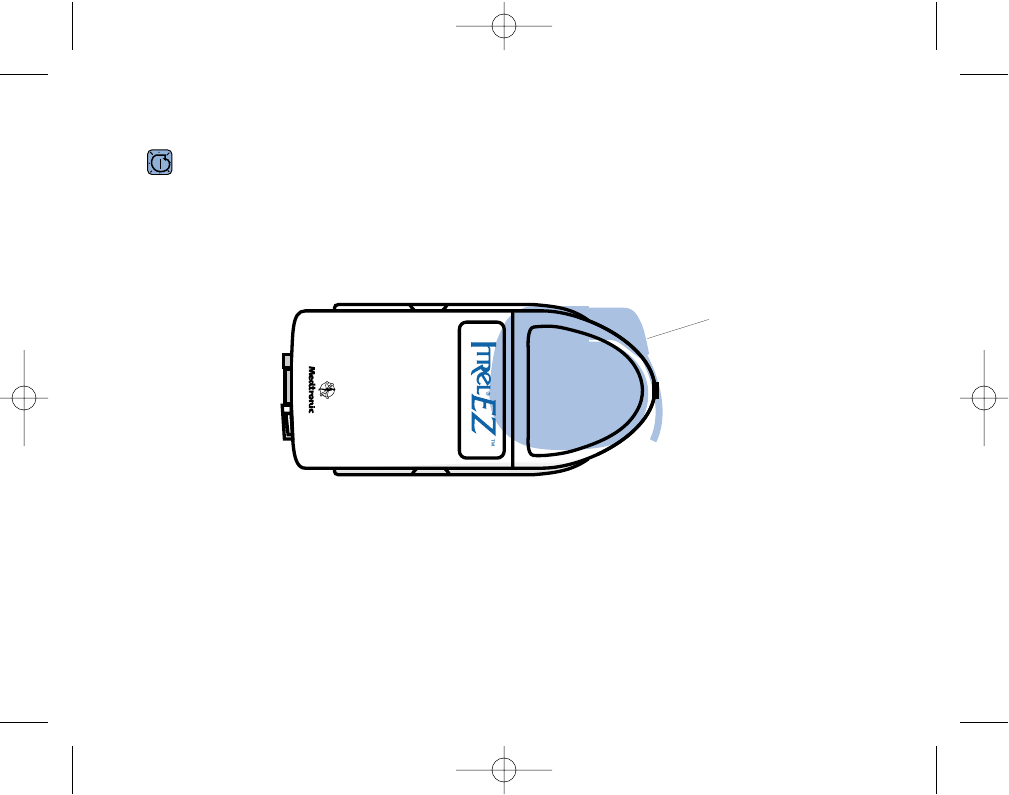
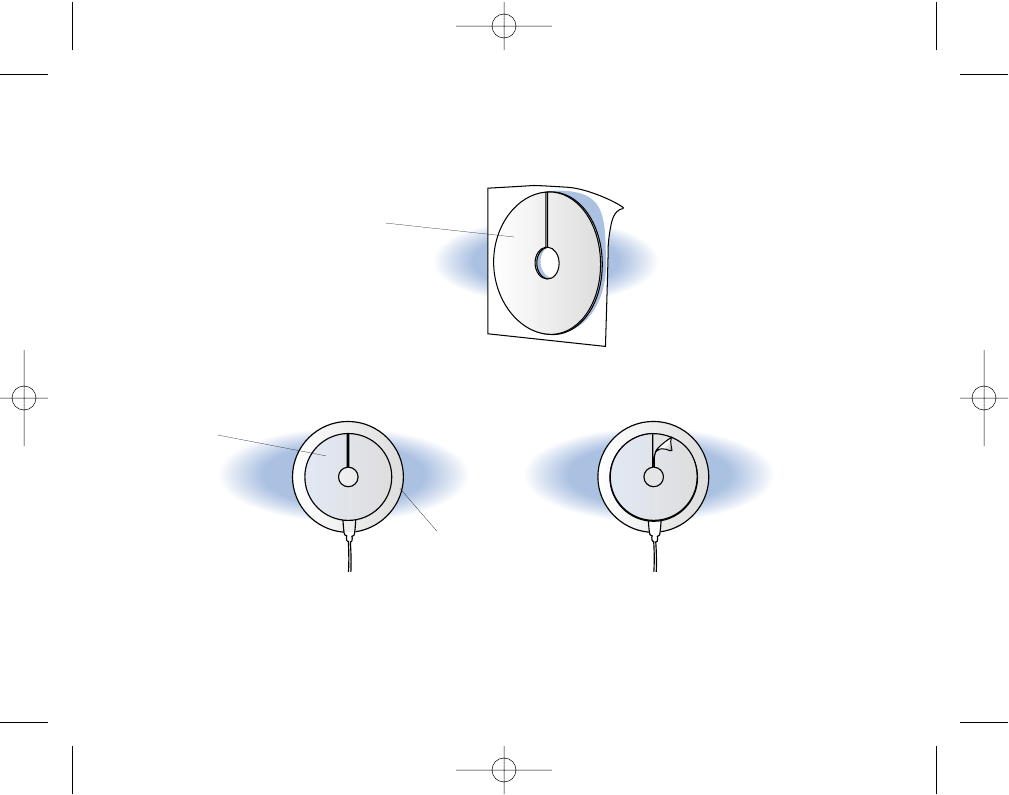
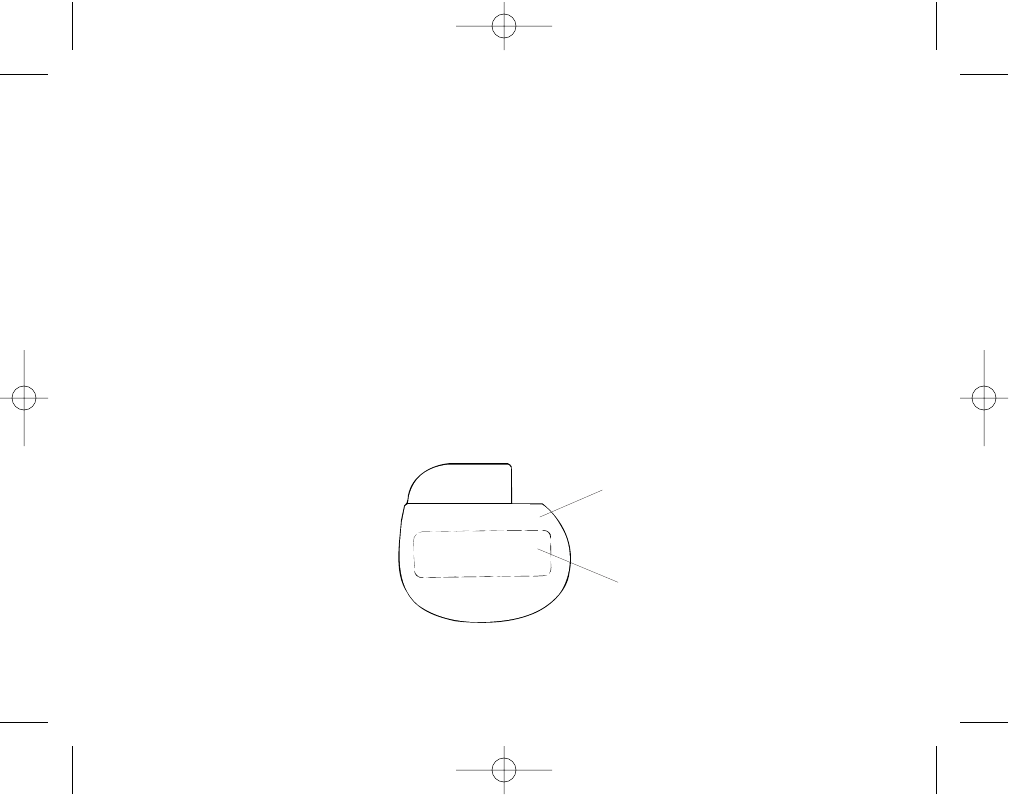
Symbols and Status Lights
The back of your programmer displays symbols and status lights.
These will help you during a programming session.
Symbols
A positioning symbol helps you align your programmer over the
neurostimulator.
An antenna symbol directs you to the detachable antenna
connector. An optional, detachable antenna can be plugged in
here.
Status Lights
When lit or blinking, the status lights tell you the following:
• Whether the neurostimulator is on or off
• The neurostimulator battery status
• The programmer battery status
38
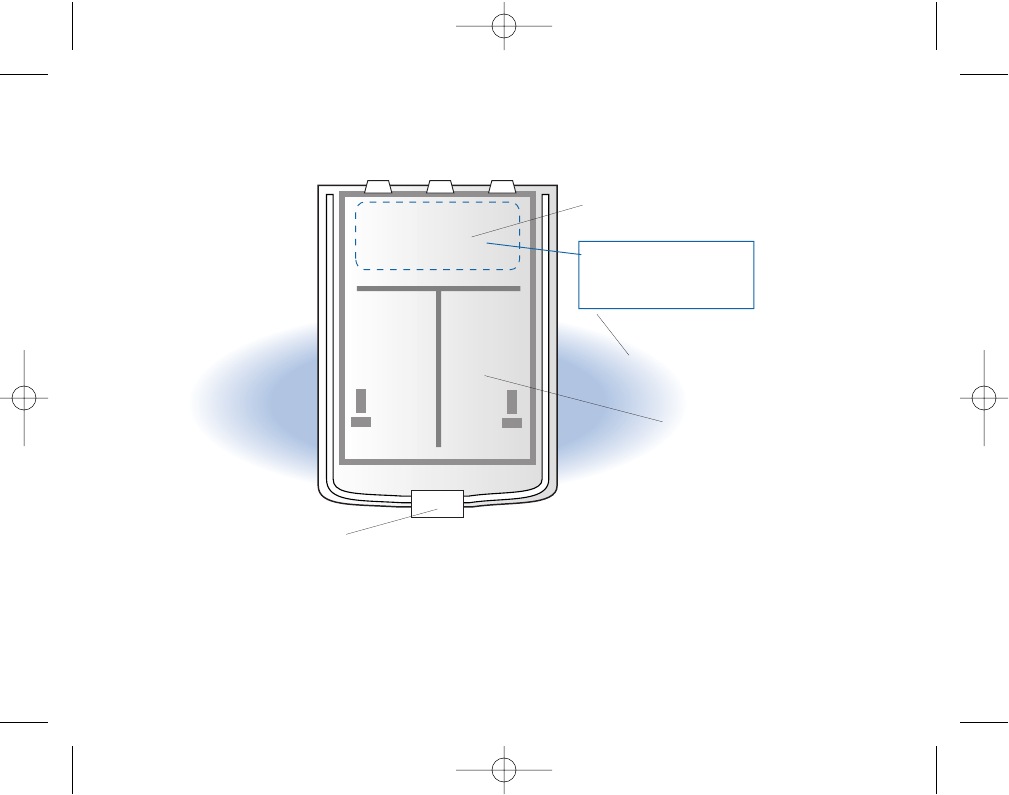
9900213EN/197877_001/ccs 1/29/01 2:18 PM Page 38
Symbols and status lights on the
back of the patient programmer.
Medtronic® Itrel® EZ™
Model 7434A
9V
39
Green
Programmer
Battery Light
Green
Neurostimulator
“On“ Light
Green
Neurostimulator
Battery Light
Yellow
Neurostimulator
“Off“ Light
Detachable
Antenna
Symbol Positioning
Symbol
9900213EN/197877_001/ccs 1/29/01 2:18 PM Page 39

40
9900213EN/197877_001/ccs 1/29/01 2:18 PM Page 40

USING THE PATIENT PROGRAMMER
This section is organized as follows:
• Placing the Programmer over the Neurostimulator
• Checking the Neurostimulator Battery
• Turning the Neurostimulator On and Off
• Adjusting Your Stimulation
Placing the Programmer over the Neurostimulator
Locate the neurostimulator implanted under your skin and hold
the programmer over it. Hold the programmer flat against your
skin or clothing so that the keypad is directly over your
neurostimulator. To send and receive signals, hold the
programmer steady over the neurostimulator for at least 1 second
while you press any key. When you align the programmer
correctly over the neurostimulator, two or more lights will shine.
41
9900213EN/197877_001/ccs 1/29/01 2:18 PM Page 41
If the beeper is on, it will beep.
The lights and beeper tell you that you have lined up the
programmer and neurostimulator and they are sending signals to
each other. If only the programmer battery light is lit and the
beeper does not beep, move the programmer an inch or two and
try again.
42
Note: A detachable
antenna is also available.
This is helpful for patients
who cannot reach their
neurostimulator. Refer to
“Accessories“ on page 65
for more information.
Position the programmer over the
neurostimulator.
(Place against clothing or skin.)
9900213EN/197877_001/ccs 1/29/01 2:18 PM Page 42
Checking the Neurostimulator Battery
The Neurostimulator Battery light on the back of the programmer
tells you the status of your neurostimulator battery.
See page 112 for information on what to do when your battery
runs down.
To check the neurostimulator battery:
1. Place the programmer over your neurostimulator. Hold the
programmer flat against your skin or clothing so that the
keypad is directly over your neurostimulator.
2. If your neurostimulator is off, press the Off key. If your
neurostimulator is on, press the On key. Hold the programmer
over the neurostimulator for at least 1 second.
3. Confirm that the green Neurostimulator Battery light on the
back of the programmer is lit. Refer to Table 2 for more
information about the Neurostimulator Battery light. 43
9900213EN/197877_001/ccs 1/29/01 2:18 PM Page 43
44
Note: Move indoors or into the shade if sunlight dims
the programmer lights.
Table 2. Neurostimulator Battery lights.
When this happens It Means
Green Neurostimulator Battery light Neurostimulator battery is OK.
is on for 8 seconds after pressing
any key.
Green Neurostimulator Battery light The neurostimulator battery is low.
is blinking for 8 seconds after Call your doctor’s office.
pressing any key.
Green Neurostimulator Battery light Reposition programmer and try again.
is off after pressing any key. Interference from electrical equipment
can cause lights to remain off. Move to
another room and try again.
If the light remains off, the neurostimu-
lator battery may need to be replaced.
The neurostimulator should be
reviewed with a physician programmer.
Contact your doctor immediately.
9900213EN/197877_001/ccs 1/29/01 2:18 PM Page 44

Turning the Neurostimulator On and Off
Turn your neurostimulator on when:
• You require pain relief, or
• You want to adjust the amplitude, rate, or pulse width.
Turn your neurostimulator off when:
• The amplitude is set at the lowest setting and you do not need
stimulation.
• You are using equipment that could be harmful to you or
others if you should receive a sudden shock (for example,
driving a car).
• You are having a medical or dental procedure. See
“Precautions,” page 6.
• You are passing though a theft detector or a security device
such as those used in department stores and airports.
45
9900213EN/197877_001/ccs 1/29/01 2:18 PM Page 45

Notes:
• Turning the neurostimulator off extends the battery life of
your neurostimulator. When the battery wears out, the
neurostimulator must be surgically replaced. You will want
to make it last as long as possible.
• Decreasing the amplitude to the lowest setting will not turn
off the neurostimulator.
7Caution
To avoid unpleasant stimulation, always decrease the amplitude to the
lowest setting:
• After turning your neurostimulator off.
• Before adjusting the rate or pulse width of your neurostimulator.
After rate or pulse width are set, slowly increase the amplitude to
your comfort level.
46
9900213EN/197877_001/ccs 1/29/01 2:18 PM Page 46
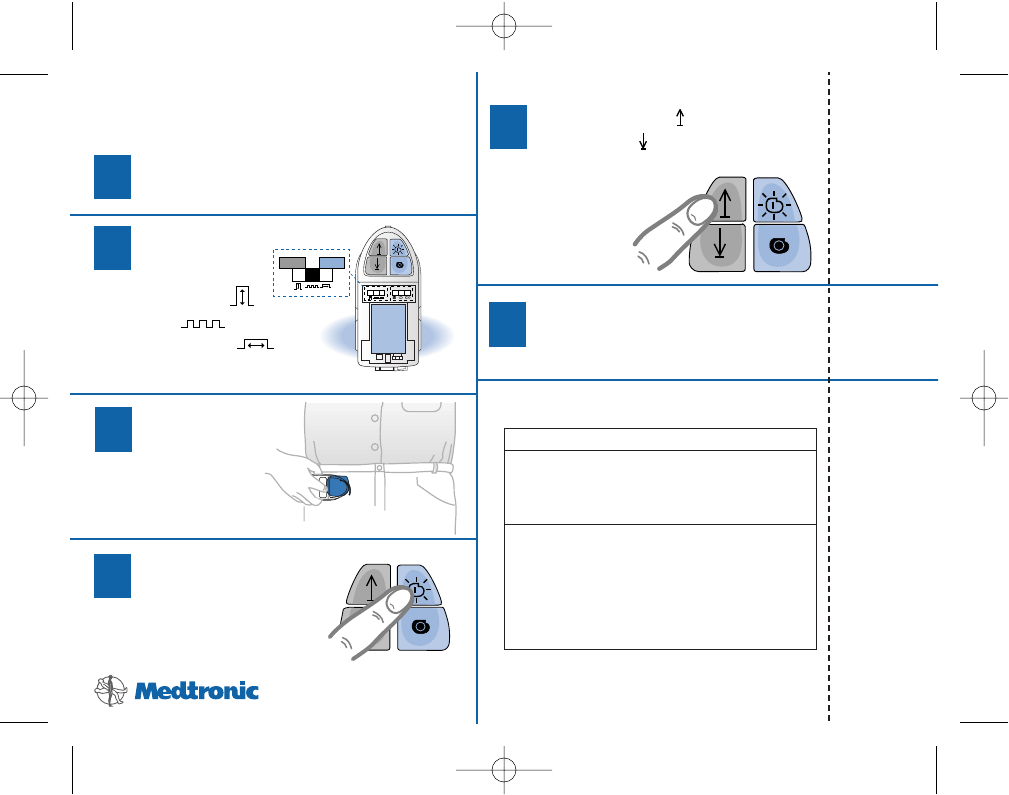
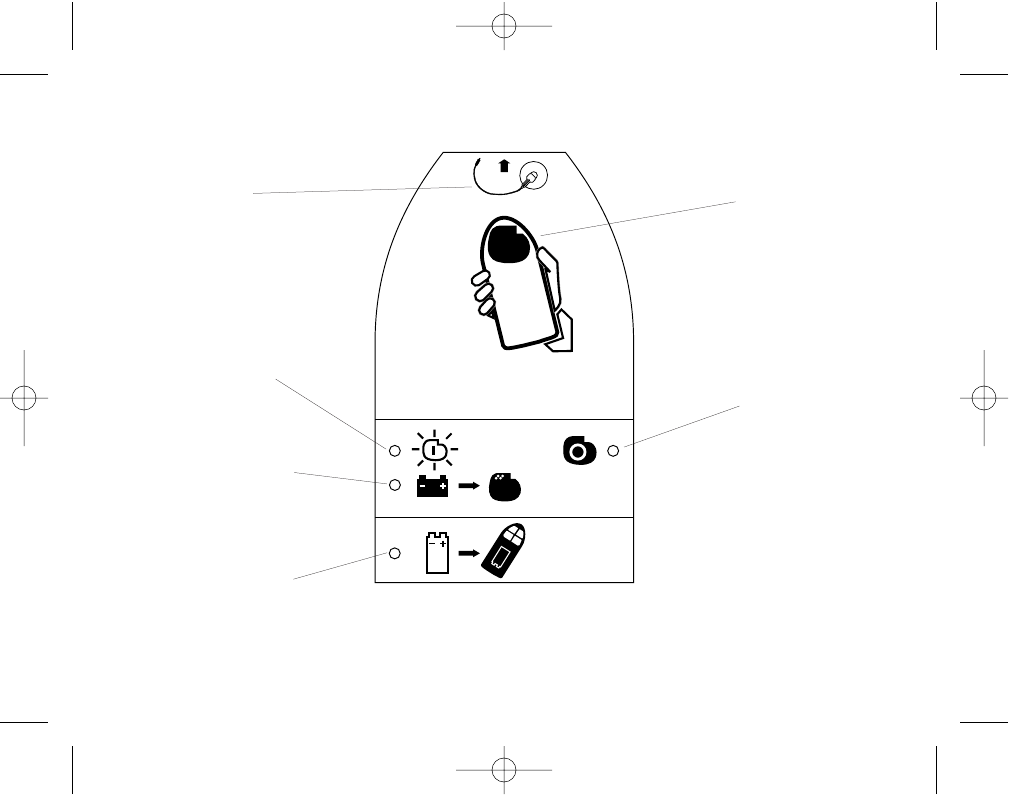
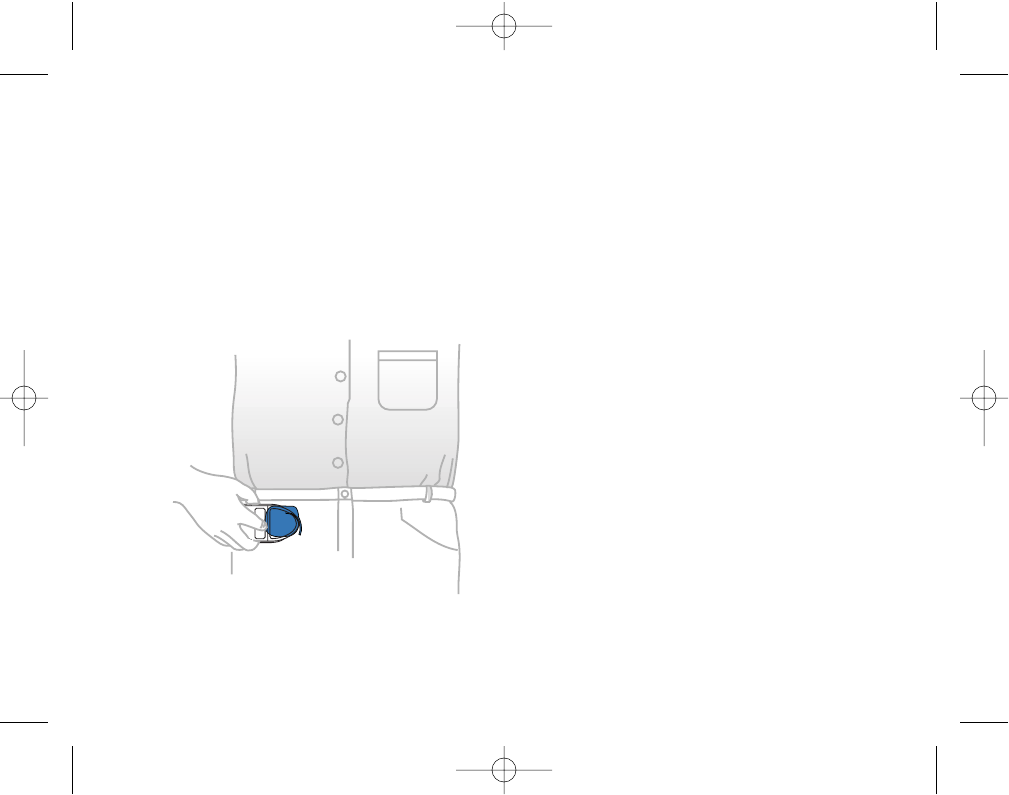
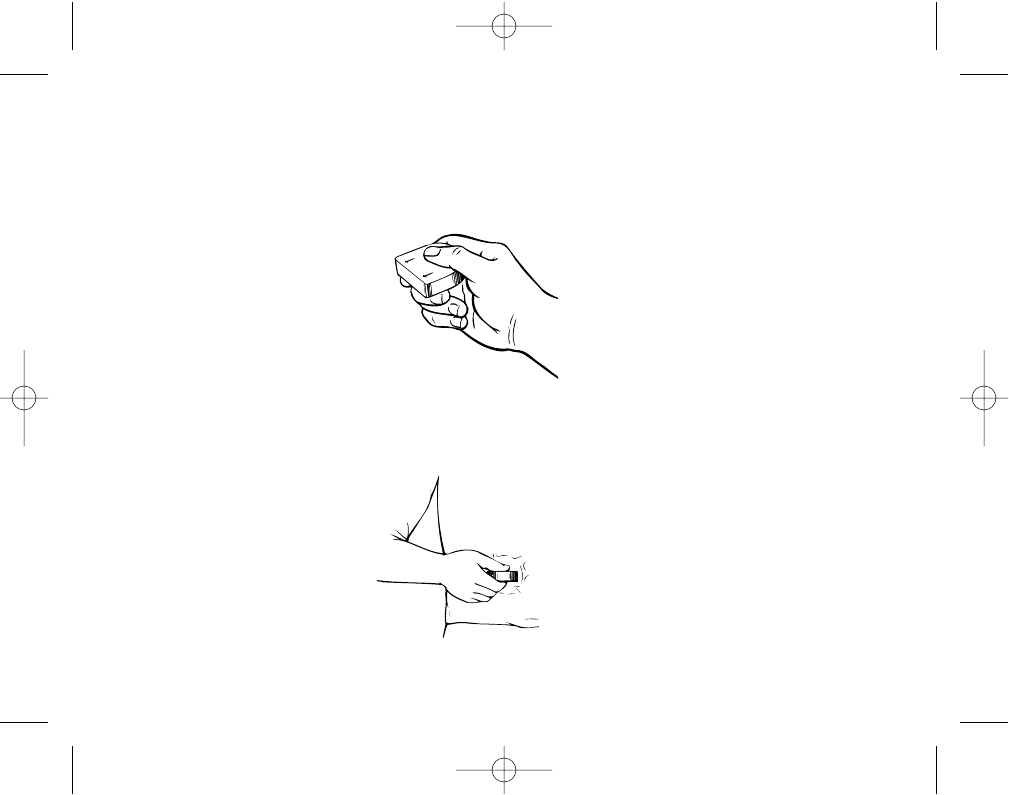
To turn the neurostimulator on:
1. Place the programmer over your neurostimulator. Hold the
programmer flat against your skin or clothing so that the
keypad is directly over your neurostimulator.
Place the programmer over the neurostimulator.
2. Press the Neurostimulator On key and hold the programmer
over the neurostimulator for 1 second. If the beeper is on, you
should hear one beep to confirm that a change has occurred.
47
Location of
Neurostimulator
9900213EN/197877_001/ccs 1/29/01 2:18 PM Page 47
Press the Neurostimulator On key.
3. Check that the green Neurostimulator On light on the back of
the programmer is lit; this indicates that the neurostimulator
was successfully turned on (see Table 3). This light stays on for
8 seconds after you release the key.
Note: The neurostimulator will turn on with the settings
last programmed.
48
9900213EN/197877_001/ccs 1/29/01 2:18 PM Page 48

To turn the neurostimulator off:
1. Place the programmer over your neurostimulator. Hold the
programmer flat against your skin or clothing so that the
keypad is directly over your neurostimulator.
Place the programmer over the neurostimulator.
2. Press the Neurostimulator Off key and hold the programmer
over the neurostimulator for 1 second. If the beeper is on, you
should hear one beep to confirm that a change has occurred.
49
Location of
Neurostimulator
9900213EN/197877_001/ccs 1/29/01 2:18 PM Page 49
Press the Neurostimulator Off key.
3. Check that the yellow Neurostimulator Off light on the back of
the programmer is lit; this indicates that the neurostimulator
was successfully turned off (see Table 3). This light stays on for
8 seconds after you release the key.
Note: Move indoors or into the shade if sunlight dims the
programmer lights.
50
9900213EN/197877_001/ccs 1/29/01 2:18 PM Page 50
4. Decrease the amplitude to the lowest setting (refer to pages 56 -
57 for instructions).
7Caution
To avoid unpleasant stimulation, always decrease the amplitude to the
lowest setting after turning your neurostimulator off.
Table 3. Neurostimulator On and Off lights.
When It Means
The green Neurostimulator On light is lit Neurostimulator is on.
for 8 seconds after pressing any key.
The yellow Neurostimulator Off light is lit Neurostimulator is off.
for 8 seconds after pressing any key.
Neither Neurostimulator On nor Off The programmer does not know
light is lit after pressing any key. if the neurostimulator is on or off
because it failed to communicate
with the neurostimulator.
Refer to “Troubleshooting,“ page 96.
51
9900213EN/197877_001/ccs 1/29/01 2:18 PM Page 51
52
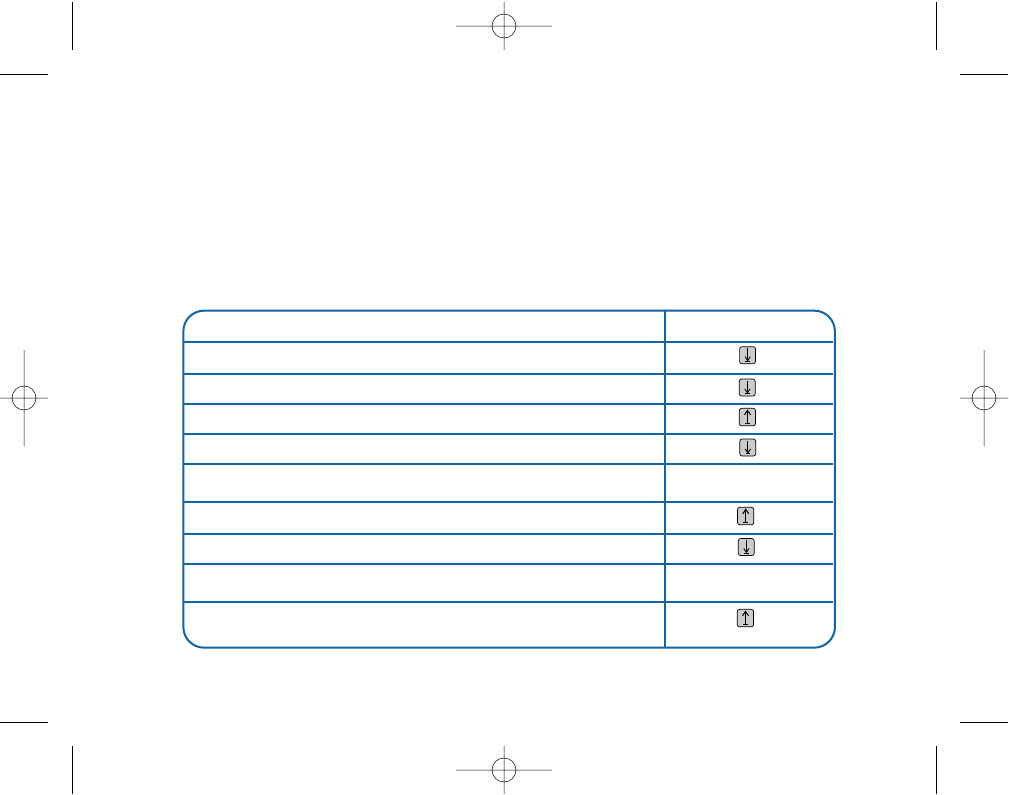
Adjusting Your Stimulation
Table 4 provides some general guidelines for when you should
adjust your stimulation. Your doctor will provide more complete
guidelines.
Table 4. When to adjust your stimulation.
Adjust the Amplitude Press This Key
Before you adjust rate or pulse width
After you turn the neurostimulator off
When the tingling is not strong enough
When the tingling is too strong
Adjust the Pulse Width Press This Key
If the tingling does not cover your pain area
If the tingling seems to cover too much area
Adjust the Rate Press This Key
If the tapping is uncomfortable
9900213EN/197877_001/ccs 1/29/01 2:18 PM Page 52
Programming Tips
The following tips are helpful when using the patient programmer.
7Caution
To avoid unpleasant stimulation, always decrease the amplitude to the
lowest setting:
• After turning your neurostimulator off.
• Before adjusting the rate or pulse width of your neurostimulator.
After rate or pulse width are set, slowly increase the amplitude to
your comfort level.
• Always set your neurostimulator to the lowest settings that
provide pain relief. The higher the settings, the faster your
neurostimulator battery will wear out. When the battery
wears out, the neurostimulator must be surgically replaced.
You will want to make it last as long as possible.
• Select amplitude, rate, or pulse width using the Stimulation
Control switch. The Increase and Decrease keys will
adjust the stimulation setting that you select.
53
9900213EN/197877_001/ccs 1/29/01 2:18 PM Page 53

• The neurostimulator must be on to increase amplitude, rate,
and pulse width. However, the neurostimulator may be either
on or off to decrease the amplitude, rate, or pulse width.
• Use the lights on the back of the programmer to confirm that a
change is taking place. The Neurostimulator On or Off lights,
the Programmer Battery light, and the Neurostimulator Battery
light should be lit after sending a change to the
neurostimulator. This confirms that the neurostimulator is
turned on or off, and that the neurostimulator and the
programmer batteries are OK. These lights stay on for
8 seconds after you release the key.
54
9900213EN/197877_001/ccs 1/29/01 2:18 PM Page 54

• If the beeper is on, the programmer will beep once for each
change that is programmed into your neurostimulator. Your
programmer will beep three times if you try to increase a
stimulation setting when the neurostimulator is off. It will also
beep three times if you have reached the lowest or highest
value for the selected setting (amplitude, rate, or pulse width).
The programmer will beep three times if you press On while the
system is in “dose lockout.“
• You can increase or decrease settings more quickly by pressing
and holding down the desired key. Every second, the
programmer will send a change to the neurostimulator.
55
9900213EN/197877_001/ccs 1/29/01 2:18 PM Page 55
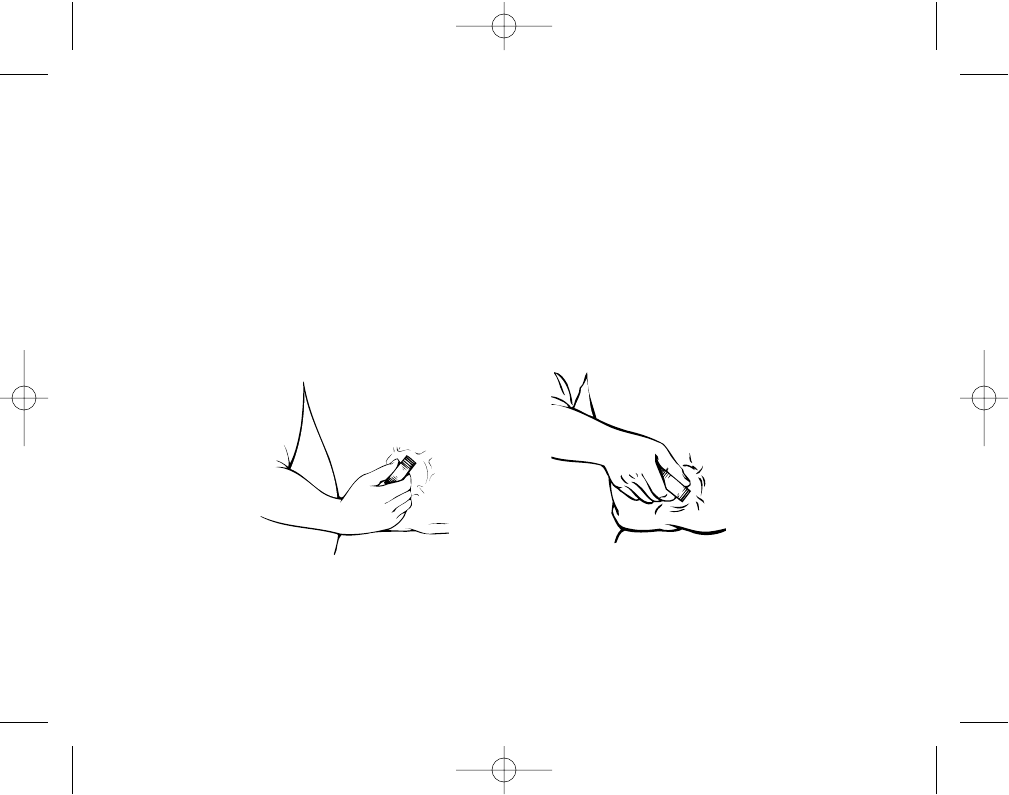
Decreasing the Amplitude to the Lowest Setting
Always decrease the amplitude to the lowest setting before
adjusting pulse width and rate or after turning your
neurostimulator off.
1. Remove the battery cover. (Refer to “Removing the Battery
Cover,” page 79.)
2. Move the Beeper Volume Control switch to Low or High .
3. Move the Stimulation Control switch to amplitude .
Move the Stimulation Control switch to amplitude.
R
61
56
9900213EN/197877_001/ccs 1/29/01 2:18 PM Page 56

57
4. Place the programmer over your neurostimulator. Hold the
programmer flat against your skin or clothing so that the
keypad is directly over your neurostimulator.
5. Press and hold the Decrease key until the programmer beeps
rapidly three times. This reduces the amplitude to the lowest
setting.
Note: The neurostimulator may be on or off when
decreasing amplitude.
6. Replace the battery cover. (Refer to “Replacing the Battery
Cover,” page 80.)
Adjusting the Pulse Width
1. Remove the battery cover. (Refer to “Removing the Battery
Cover,” page 79.)
2. Decrease the amplitude to the lowest setting as described on
page 56.
9900213EN/197877_001/ccs 1/29/01 2:18 PM Page 57
7Caution
To avoid unpleasant stimulation, always decrease the amplitude to the
lowest setting before adjusting the pulse width or rate of your
neurostimulator. After rate or pulse width is set, slowly increase the
amplitude to your comfort level.
3. Move the Stimulation Control switch to pulse width .
Move the Stimulation Control switch to pulse width.
6
1
58
9900213EN/197877_001/ccs 1/29/01 2:18 PM Page 58

4. Place the programmer over your neurostimulator. Hold the
programmer flat against your skin or clothing so that the
keypad is directly over your neurostimulator.
5. Press Neurostimulator On to turn on the neurostimulator.
6. Press the Increase or Decrease key to make a change.
7. Move the Stimulation Control switch to amplitude .
8. Place the programmer over your neurostimulator. Hold the
programmer flat against your skin or clothing so that the
keypad is directly over your neurostimulator.
9. Press the Increase key to assess the change. Repeat steps 2
through 9 until the change is acceptable.
10. Replace the battery cover. (Refer to “Replacing the Battery
Cover,” page 80.)
59
9900213EN/197877_001/ccs 1/29/01 2:18 PM Page 59
Adjusting the Rate
1. Remove the battery cover. (Refer to “Removing the Battery
Cover,” page 79.)
2. Decrease the amplitude to the lowest setting as described on
pages 56 - 57.
7Caution
To avoid unpleasant stimulation, always decrease the amplitude to the
lowest setting before adjusting the pulse width or rate of your
neurostimulator. After rate or pulse width is set, slowly increase the
amplitude to your comfort level.
3. Move the Stimulation Control switch to rate .
Move the Stimulation Control switch to rate.
6
1
60
9900213EN/197877_001/ccs 1/29/01 2:18 PM Page 60
4. Place the programmer over your neurostimulator. Hold the
programmer flat against your skin or clothing so that the
keypad is directly over your neurostimulator.
5. Press Neurostimulator On to turn on the neurostimulator.
6. Press the Increase or Decrease key to make a change.
7. Move the Stimulation Control switch to amplitude .
8. Place the programmer over your neurostimulator. Hold the
programmer flat against your skin or clothing so that the
keypad is directly over your neurostimulator.
9. Press the Increase key to assess the change. Repeat steps 2
through 9 until the change is acceptable.
10. Replace the battery cover. (Refer to “Replacing the Battery
Cover,” page 80.)
61
9900213EN/197877_001/ccs 1/29/01 2:18 PM Page 61
Adjusting the Amplitude
1. Remove the battery cover. (Refer to “Removing the Battery
Cover,” page 79.)
2. Move the Stimulation Control switch to amplitude .
Move the Stimulation Control switch to amplitude.
L
R61
62
9900213EN/197877_001/ccs 1/29/01 2:18 PM Page 62
3. Place the programmer over your neurostimulator. Hold the
programmer flat against your skin or clothing so that the
keypad is directly over your neurostimulator.
4. Press Neurostimulator On to turn on the neurostimulator.
5. Press the Increase or Decrease key to make a change.
6. Replace the battery cover. (Refer to “Replacing the Battery
Cover,” page 80.)
63
9900213EN/197877_001/ccs 1/29/01 2:18 PM Page 63

64
9900213EN/197877_001/ccs 1/29/01 2:18 PM Page 64

ACCESSORIES
Wrist Strap and Carrying Case
A wrist strap is packaged with the patient programmer and can be
used to help you avoid dropping it. The wrist strap is attached
near the battery cover release tab. A carrying case is also enclosed
with the programmer. Store the patient programmer in the
carrying case to protect it.
65
9900213EN/197877_001/ccs 1/29/01 2:18 PM Page 65
Location of the wrist strap attachment.
66
Wrist Strap
Attachment
Wrist
Strap
9900213EN/197877_001/ccs 1/29/01 2:18 PM Page 66
Detachable Antenna
A detachable antenna is available for patients who cannot reach
their neurostimulator. The patient programmer can be used to
program the neurostimulator as previously described. When
connected, the detachable antenna turns off the programmer’s
internal antenna.
7Caution
Do not attach the antenna over your neurostimulator incision using the
adhesive discs until the incision heals.
Note: When the detachable antenna is not used, keep the
rubber plug in the antenna connector of the patient
programmer. The rubber plug helps keep water out of the
programmer.
67
9900213EN/197877_001/ccs 1/29/01 2:18 PM Page 67

To keep the antenna in place, use the adhesive discs supplied with
the antenna. The adhesive discs are hypoallergenic. This helps
reduce the chance of irritation. If irritation occurs, consult your
doctor.
Replace the adhesive discs every day. Before replacing an old disc
with a fresh one, clean your skin using an antibacterial soap and
dry thoroughly.
68
9900213EN/197877_001/ccs 1/29/01 2:18 PM Page 68
Attaching the Antenna over the Neurostimulator
1. Remove adhesive disc from square sheet.
2. Attach disc to antenna coil. Remove protective covering.
69
Adhesive
Disc
Antenna
Coil
Adhesive
Disc
9900213EN/197877_001/ccs 1/29/01 2:18 PM Page 69
Note: The antenna must be properly lined up over the
neurostimulator for programming to occur. The
programmer’s internal antenna is disabled when the
antenna is properly connected.
4. Press antenna firmly in
place.
3. Position antenna over
neurostimulator as
shown.
70
Neurostimulator
Antenna
9900213EN/197877_001/ccs 1/29/01 2:18 PM Page 70

Connecting the Antenna to the Patient Programmer
1. Pull out the rubber plug on the patient programmer to reveal
the antenna connector.
Note: The antenna connector is located on the end of the
programmer near the keypad.
2. Insert the antenna’s metal plug into the antenna connector and
push the metal plug until it fits securely into place.
Disconnecting the Antenna
1. Grasp the plug and pull it straight out. Do not pull on the cable
because this may break the wires.
2. Insert the rubber plug into the antenna connector.
Note: Keep the rubber plug in the antenna connector when
not in use; this helps keep water out of the programmer.
71
9900213EN/197877_001/ccs 1/29/01 2:18 PM Page 71
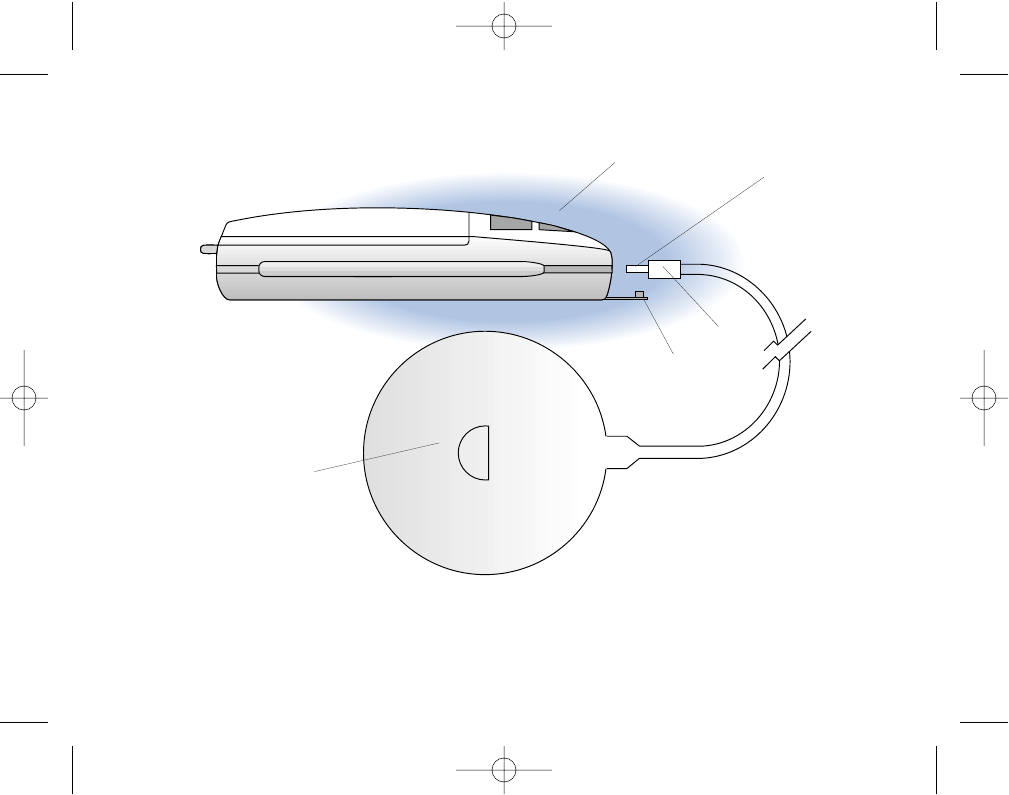
The detachable antenna and patient programmer.
72
Rubber
Plug
Antenna
Connector
Antenna
Metal
Plug
Keypad
9900213EN/197877_001/ccs 1/29/01 2:18 PM Page 72

Caring for the Antenna
If you use the detachable antenna, you should wash it daily with
mild soap and water.
Note: Do not allow the metal plug end of the cord to get
wet.
1. Disconnect the antenna from the programmer before cleaning.
2. Wash the antenna with mild soap and water.
3. Rinse the antenna. Make sure no soap remains on it.
4. Dry the antenna with a clean towel immediately after washing.
Note: When not in use, store the antenna in a plastic bag to
protect it from dust.
73
9900213EN/197877_001/ccs 1/29/01 2:18 PM Page 73
Caring for Your Skin
Skin may become irritated from the pressure of the antenna or
from an allergic reaction to the adhesive used to hold the antenna
in place. Therefore, it is very important to keep the skin in this
area clean and dry. Inspect the area every day to see that the skin
remains healthy.
7Caution
If you notice swelling or redness in the area where you place the antenna,
contact your doctor before using the antenna again.
Clean the skin over the neurostimulator with an antibacterial soap
and change the antenna adhesive discs daily.
If the discs irritate your skin, you may want to wear a soft, snug-
fitting undergarment to protect your skin and then tape the
antenna to the outside of the undergarment.
74
9900213EN/197877_001/ccs 1/29/01 2:18 PM Page 74
Using Your Control Magnet (Optional)
By briefly applying and then removing the optional control
magnet over your neurostimulator, you can turn it on or off. This
feature can be disabled by your doctor, however. If it is disabled,
the magnet will not turn the neurostimulator on or off.
Your implant site and the final placement of your neurostimulator
can vary from the examples shown in the following instructions.
Have your doctor show you how to locate or position the magnet
on your neurostimulator so that it is centered as shown in the
following figure.
Magnet properly centered over neurostimulator. 75
Neurostimulator
Control
Magnet
9900213EN/197877_001/ccs 1/29/01 2:18 PM Page 75
To turn the neurostimulator on or off, follow these steps:
Step 1. Grasp the magnet with the flat end away from you.
Step 2. Press the flat end of the magnet directly over and along the
length of the neurostimulator.
76
9900213EN/197877_001/ccs 1/29/01 2:18 PM Page 76
Step 3. Hold the magnet steady for 1 to 2 seconds.
Step 4. Remove the magnet.
If the magnet fails to turn the neurostimulator on or off, repeat
steps 3 and 4, holding the magnet against the neurostimulator in a
different position. Try a “1 o’clock“ or “4 o’clock“ position.
1 o’clock position 4 o’clock position
77
9900213EN/197877_001/ccs 1/29/01 2:18 PM Page 77

If your doctor has programmed the neurostimulator with the
SoftStart™/Stop feature, the magnet will automatically start the
increase or decrease. If the neurostimulator has been programmed
with a dosage of stimulation, the magnet will start the dose.
Note: Allow a few seconds for the SoftStart circuit to raise
the amplitude to the point where you can feel it.
If your doctor has programmed the neurostimulator with the
cycling feature and you use your magnet (or patient programmer)
to turn off the neurostimulator, your therapy will then stop. When
you reapply the magnet to turn on the neurostimulator again, your
therapy always starts at the beginning of the On cycle.
78
9900213EN/197877_001/ccs 1/29/01 2:18 PM Page 78
79
CARING FOR YOUR PATIENT PROGRAMMER
Battery Cover
When the battery cover is removed, you can replace the battery or
access the Stimulation Control switch.
Removing the Battery Cover
1. Hold the programmer with one hand.
2. Lift the battery cover release tab on the end of the programmer.
Lift off the cover.
Remove the battery cover.
Release Tab
9900213EN/197877_001/ccs 1/29/01 2:18 PM Page 79

Replacing the Battery Cover
1. Place the center hook on the edge of the cover into the center
slot in the programmer.
2. Lower the battery cover.
3. Press down the end of the cover to lock it in place.
Replace the battery cover.
80
9900213EN/197877_001/ccs 1/29/01 2:18 PM Page 80

Identification Label
Your patient programmer comes with an identification label.
1. Fill in the label (name, phone number, etc.) with permanent
ink.
2. Peel off the backing and stick the label to the inside of the
battery cover.
Note: Do not place the label over the ridges on the battery
cover.
81
9900213EN/197877_001/ccs 1/29/01 2:18 PM Page 81
Placement of the identification label in the battery cover.
82
Inside
Battery
Cover
Release
Tab
Place Label Here
Identification Label
9900213EN/197877_001/ccs 1/29/01 2:18 PM Page 82
Checking the Programmer Battery
A 9-volt battery provides the power for the patient programmer.
Use an alkaline battery for best performance and economy.
Notes:
• When not using the programmer for more than 4 weeks,
remove the battery to prevent possible damage to the device
due to battery leakage.
•Make sure that you always have a fresh 9-volt battery
so that you can turn your neurostimulator on and off
or adjust the stimulation settings when necessary.
• Do not use a rechargeable or zinc-air battery. The
programmer is designed to indicate its battery status with an
alkaline battery installed; other battery types may not give
accurate indications of the programmer’s battery status.
The Programmer Battery light is located on the back of the
programmer. It tells you the status of your programmer battery.
9V
83
9900213EN/197877_001/ccs 1/29/01 2:18 PM Page 83
To check the programmer battery: Press any key on the patient
programmer keypad. The green Programmer Battery light will
respond. Refer to Table 5 for more information about the
Programmer Battery light.
Table 5. Programmer Battery light.
When It Means
Green Programmer Battery Programmer battery is OK.
light is on for 8 seconds after
pressing any key.
Green Programmer Battery light Programmer battery is low.
is blinking after pressing Replace with new 9-volt
any key. battery.
Green Programmer Battery light Replace with new 9-volt
is off after pressing any key. battery.
9V
84
9900213EN/197877_001/ccs 1/29/01 2:18 PM Page 84
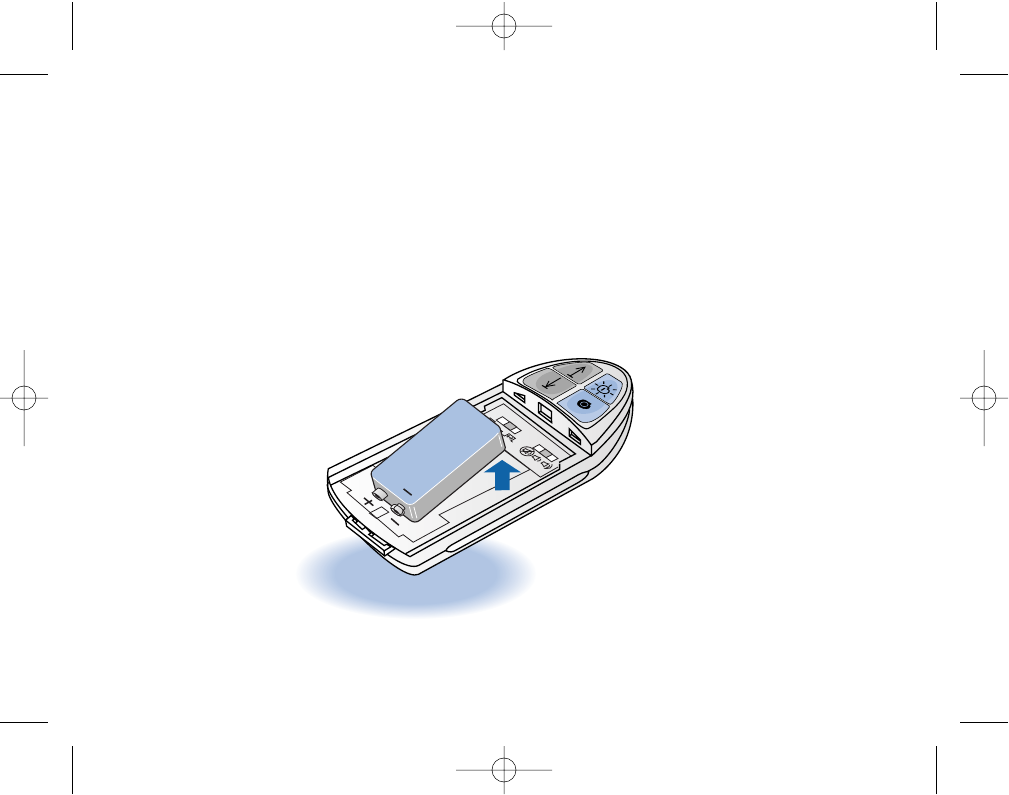
Removing the Battery
1. Remove the battery cover. (Refer to “Removing the Battery
Cover,” page 79.)
2. Place one finger on the edge of the battery between the Control
switches.
3. Lift the battery out of the compartment without using excessive
force.
Remove the battery.
SN
+
85
9900213EN/197877_001/ccs 1/29/01 2:18 PM Page 85

Installing the Battery
An alkaline battery is recommended for longer battery life.
1. Remove the battery cover (refer to page 79) and the old battery
(refer to page 85), if necessary.
2. Check the battery label for positive [+] and negative [-]
contacts. Match them with the [+] and [-] symbols in the
battery compartment.
3. Press the battery down fully into the battery compartment
without using excessive force.
Notes:
• Do not press any of the programmer’s keys during battery
insertion.
• The programmer performs a self-test when the battery is
inserted. A successful check is indicated by a single flash of
the status lights followed by a short beep. If this does not
occur, the self-test has failed. Refer to “Troubleshooting,“
page 96.
86
9900213EN/197877_001/ccs 1/29/01 2:18 PM Page 86
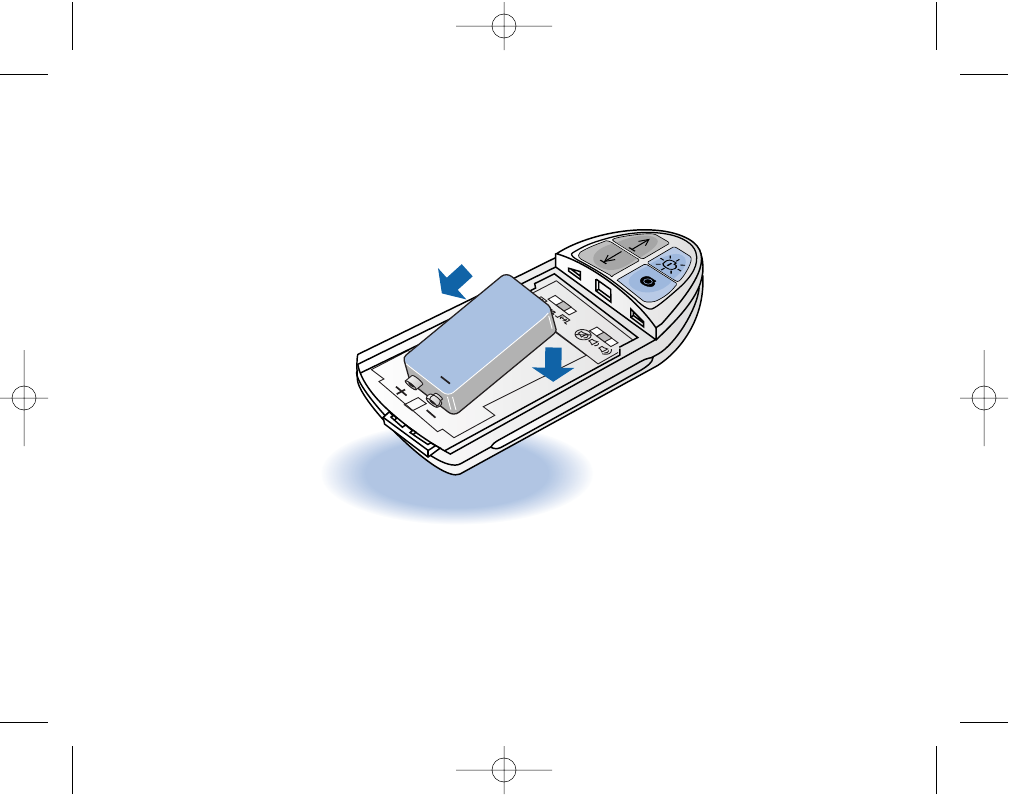
4. Replace the battery cover. (Refer to “Replacing the Battery
Cover,” page 80.)
Install the battery.
SN
+
3.
2.
87
9900213EN/197877_001/ccs 1/29/01 2:18 PM Page 87

Cleaning and Care
• Your patient programmer is a precision device; handle it with
care.
• Do not take apart or tamper with the programmer; this could
affect how it works.
• Protect the programmer from sharp blows or physical shocks.
• Clean the outside of the programmer with a slightly damp
cloth. Mild household cleaners will not damage the case or
labels.
• Your patient programmer is not waterproof. Do not allow
moisture to get inside the device.
• If you drop your patient programmer in water, refer to
“Troubleshooting,” page 101.
7Caution
Do not immerse the programmer in liquid. Do not clean it with bleach, nail
polish remover, or other similar substances.
88
9900213EN/197877_001/ccs 1/29/01 2:18 PM Page 88

• Clean the battery contacts periodically with a cotton swab
dampened with alcohol. Do not use a pencil eraser or
sandpaper.
• Replace low or depleted batteries to ensure proper operation.
• When not using the programmer for more than 4 weeks,
remove the battery to prevent possible corrosion of the patient
programmer due to battery leakage.
89
9900213EN/197877_001/ccs 1/29/01 2:18 PM Page 89

Service
The Itrel®EZ™Patient Programmer has been designed and tested
to provide long, trouble-free service. If repair or service is needed,
call Medtronic at 1-800-328-0810.
To register the programmer for service covered by the warranty,
complete and mail the warranty registration card. It is inserted in
this manual. The serial number is located on a label within the
battery compartment. It identifies each Itrel®EZ™Patient
Programmer. If you write or call Medtronic about your patient
programmer, refer to the serial number.
Battery and Device Disposal
Dispose of depleted programmer batteries and worn-out devices
according to local regulations.
90
9900213EN/197877_001/ccs 1/29/01 2:18 PM Page 90

91
9900213EN/197877_001/ccs 1/29/01 2:18 PM Page 91

TROUBLESHOOTING
This section will help you solve problems or identify when to call
your doctor. Problems are described in the left column. The blue
text in the right column lists possible causes of the problem
(Causes); the bold text in the right column describes how to correct
the problem (Action).
Note: If your problem is not solved after several attempts,
or if your problem is not described here, contact your
doctor.
Problem Causes and Action
You’re too 1. Turn the neurostimulator off.
uncomfortable 2. Reduce the amplitude, rate, and pulse width.
with your current 3. Turn the neurostimulator on.
stimulation to 4. Reset the rate and pulse width; reset amplitude last.
think about how
to change it.
92
9900213EN/197877_001/ccs 1/29/01 2:18 PM Page 92

Problem Causes and Action
No lights turn on after No battery or depleted battery.
you try to program your Replace the battery; use a new 9-volt battery.
neurostimulator.
Sunlight may be making the programmer lights
too dim.
If you are outdoors, move indoors or into the
shade.
Your programmer does No battery or depleted battery.
not respond to key Replace the battery; use a new 9-volt battery.
presses.
The Programmer Battery Programmer or detachable antenna is not aligned
light turns on, but none correctly over neurostimulator.
of the neurostimulator Move the programmer or antenna and try again.
lights are on.
93
9900213EN/197877_001/ccs 1/29/01 2:18 PM Page 93

Problem Causes and Action
The Neurostimulator The neurostimulator battery is low or depleted.
Battery light is blinking, Contact your doctor.
or it has been blinking
and is now off.
The programmer does Antenna not connected correctly.
not work with the Disconnect the antenna, plug it in, and try again.
detachable antenna
connected. The antenna is not aligned over the neurostimulator.
Refer to the instructions on page 69.
The antenna is broken.
Try programming without the detachable antenna.
Replace detachable antenna with a new one.
94
9900213EN/197877_001/ccs 1/29/01 2:18 PM Page 94

Problem Causes and Action
You want to check If the neurostimulator is off, push the Off key. The
your neurostimulator yellow Neurostimulator Off light should be lit.
without changing the If the neurostimulator is on, push the On key. The
setting. green Neurostimulator On light should be lit.
Refer to “Checking the Neurostimulator Battery“
on page 43 for more information.
All the lights on your One of the programmer’s keys may have been
programmer are on, pressed during battery installation.
and it does not respond Remove the battery for at least 3 seconds and then
when you press a key. replace it, making sure no keys are pressed during
battery installation.
95
9900213EN/197877_001/ccs 1/29/01 2:18 PM Page 95

Problem Causes and Action
The neurostimulator The programmer or detachable antenna is not aligned
lights are off when correctly over the neurostimulator.
you press any key. Move the programmer or antenna and try again.
The programmer was removed from the
neurostimulator too soon.
Hold the programmer over the neurostimulator for at
least 1 second after pressing a key.
Radio signals from appliances, computers,
machinery, etc. are affecting your programmer.
Move to a different room and try again.
Remove the detachable antenna and try again.
The status lights The programmer failed the self-test and/or one of the
do not flash and the programmer’s keys was pressed during battery
beeper does not installation.
beep when a fresh Remove battery, press any key, turn the beeper to
battery is installed. low or high, and insert a second fresh battery, making
sure no keys are pressed during battery installation.
The status lights should flash, and you should hear
one beep. If this does not occur, contact your doctor.
96
9900213EN/197877_001/ccs 1/29/01 2:18 PM Page 96

Problem Causes and Action
The beeper does not The beeper is not on.
sound. Only the Set the Beeper Volume Control switch to low or high
Programmer Battery volume and listen to be sure it is working.
light is on.
The programmer or detachable antenna is not
aligned correctly over the neurostimulator.
Move the programmer or antenna and try again.
The programmer was removed from the
neurostimulator too soon.
Hold the programmer over the neurostimulator for at
least 1 second.
Radio signals from appliances, computers,
machinery, etc. are affecting your programmer.
Move to a different room and try again.
Remove the detachable antenna and try again.
97
9900213EN/197877_001/ccs 1/29/01 2:18 PM Page 97

Problem Causes and Action
You feel a programming The programmer was too far away from the neuro-
change after pressing a stimulator. The neurostimulator might have received
key, but the beeper the signal to change but did not tell the programmer
didn’t beep and what it did.
the Neurostimulator Hold the programmer closer to your neurostimulator
On or Off lights and try again.
did not light.
An electrical appliance blocked your neurostimulator
radio signal from telling the lights and beeper to
turn on.
1. Move to another room. Press any key to check
the lights.
2. Move the programmer and try again.
The programmer was moved away too soon after
pressing the keys.
Hold the programmer over the neurostimulator for
at least 1 second after pressing a key.
98
9900213EN/197877_001/ccs 1/29/01 2:18 PM Page 98

Problem Causes and Action
You do not feel Your doctor programmed a feature called
stimulation right away SoftStart/Stop so that your stimulation will start
after turning your and stop gradually.
neurostimulator on, or Allow about 8 seconds for your neurostimulator to
you feel stimulation turn on and off.
after you turn the
neurostimulator off.
The programmer or detachable antenna is not aligned
correctly over your neurostimulator.
Move the programmer or antenna and try again.
Your amplitude is set at its lowest setting.
Slowly increase the amplitude until you feel
stimulation.
99
9900213EN/197877_001/ccs 1/29/01 2:18 PM Page 99

Problem Causes and Action
Your neurostimulator The programmer or detachable antenna is not
will not turn on. aligned correctly over the neurostimulator.
Move the programmer or antenna and try again.
The programmer was removed from the
neurostimulator too soon.
Hold the programmer closer to your neurostimulator
and try again. Hold the programmer over the
neurostimulator for at least 1 second. The green
Neurostimulator On light should be lit for 8 seconds
after the key is pressed. Try again.
Your amplitude is set at the lowest setting, and you
don’t feel the stimulation.
Slowly increase the amplitude until you feel
stimulation.
100
9900213EN/197877_001/ccs 1/29/01 2:18 PM Page 100

Problem Causes and Action
You spill fluid on your Dry it with a towel.
programmer.
Your programmer falls 1. Remove the programmer from water.
into water. 2. Briefly rinse the patient programmer with clean
tap water. Wipe it with a towel dampened
with clean tap water.
3. Remove the battery cover and battery. Shake the
programmer to remove as much water as possible.
4. Dry the battery compartment with a towel.
5. Allow the battery compartment to dry at room
temperature for as long as possible (24 hours
recommended).
6. Shake the programmer; if you see or hear water
inside, repeat steps 4 and 5.
7. When the programmer is dry, replace the battery
and cover.
8. If the programmer does not work properly, return
it to Medtronic for service.
Your programmer falls Try the programmer; it should work. If it does not
off a cabinet or table. work, return it to Medtronic for service. 101
9900213EN/197877_001/ccs 1/29/01 2:18 PM Page 101

LIVING WITH YOUR STIMULATION SYSTEM
Patient Identification Card
When you leave the hospital, your doctor will give you a
temporary identification card. This card supplies basic information
about your neurostimulator and identifies your doctor in the event
of an accident. Your identification card might allow you to bypass
security arches or wands such as those used in airports.
After Medtronic receives your device registration information from
your hospital, you will receive a permanent identification card.
Carry this card with you at all times. If you move, change doctors,
or lose your card, contact Medtronic Patient Services for a new card.
Patient Services
Medtronic Neurological
710 Medtronic Parkway, NE
Minneapolis, MN 55432-5604
Toll-free: (800) 510-6735
102
9900213EN/197877_001/ccs 1/29/01 2:18 PM Page 102
103
In case of an emergency, please notify:
Physician
Phone ( )
Medtronic Neurological, Minneapolis MN 55432-5604
Telephone: (763) 514-5000 Toll-Free: (800) 510-6735
Medical Device Temporary Identification
The bearer of this card has an implanted medical device
prescribed by his or her doctor.
Patient’s Name
Address
City State or Country
Phone ( )
Model Number
Serial Number
Implant Date
UC200000981EN / 182403-001
9900213EN/197877_001/ccs 1/29/01 2:18 PM Page 103

When to Call Your Doctor
Your doctor will schedule follow-up visits. Your doctor will check
your neurostimulator and make sure you are receiving the most
appropriate treatment. However, you should contact your doctor if
any of the following events occur:
• You have pain, redness, or swelling at the incision site later
than 6 weeks after surgery.
• Your neurostimulator is not working properly.
• You are not getting enough pain relief.
• You feel discomfort or pain during stimulation. Turn the
neurostimulator off first, then call your doctor.
• You feel no stimulation, “tingling,“ when the neurostimulator
is on.
• You cannot turn the neurostimulator on or off.
• You are unable to adjust stimulation with your patient
programmer.
104
9900213EN/197877_001/ccs 1/29/01 2:18 PM Page 104

• Stimulation changes or stops and your pain returns.
• The area of stimulation has changed dramatically (for example,
moving from your right leg to your left leg).
• The Neurostimulator Battery light on your patient programmer
is blinking.
• The Neurostimulator Battery light on your patient programmer
was blinking but is now off, regardless of which key you press.
105
9900213EN/197877_001/ccs 1/29/01 2:18 PM Page 105

Do’s and Don’ts
By following the guidelines listed below, you can ensure that your
patient programmer will function properly.
Do:
• Keep your patient programmer out of the reach of children.
• Use your patient programmer only as explained to you by your
doctor or as discussed in this manual.
• Handle your patient programmer with care. It is a sensitive
device that can be damaged by rough handling.
• Remove a worn-out battery from your patient programmer and
replace it with a new one. Worn-out batteries may damage
electronic circuits due to battery leakage.
• Keep a fresh 9-volt battery available so that you can turn your
neurostimulator on and off or adjust the stimulation settings
when needed.
106
9900213EN/197877_001/ccs 1/29/01 2:18 PM Page 106

• Turn your neurostimulator off when not in use. The
neurostimulator battery is not replaceable. When it wears out,
the neurostimulator must be surgically replaced, so you will
want to make it last as long as possible. Battery life is dependent
on the settings required to control your pain symptoms and on
how many hours per day you use your device.
• Go to all follow-up appointments. Reschedule if an appointment
is missed.
• Carry your patient identification card with you at all times.
Don’t:
7Warning
Do not use potentially dangerous equipment (cars, power tools, etc.) when
your neurostimulator is on. What may feel like a sudden increase in
stimulation (“jolt“ or “shock“) could cause you to lose control of the
equipment you are using. Turn the neurostimulator off and set the
amplitude to the lowest setting before using this type of equipment.
• Don’t do any strenuous activity, such as heavy lifting, extreme
twisting or bending, or running, without first talking to your
doctor. 107
9900213EN/197877_001/ccs 1/29/01 2:18 PM Page 107

Environmental Problems
Strong electrical fields, such as those produced by radio towers or
some industrial equipment, can affect the function of your
neurostimulator. This can cause uncomfortable stimulation
(a “jolt“ or “shock“). This problem is called electromagnetic
interference, or EMI.
7Warning
Electrical interference or a strong magnetic field (electromagnetic or from a
permanent magnet) could switch your neurostimulator on or off unless
your doctor has disabled the circuit that allows on/off control with the
magnet. If this happens, use your programmer to switch the
neurostimulator back on or off. Electrical interference should not change the
stimulation settings that are programmed into your neurostimulator.
Most household appliances and office equipment do not produce
interference strong enough to affect your neurostimulator.
108
9900213EN/197877_001/ccs 1/29/01 2:18 PM Page 108

You can normally operate the following household items and office equipment:
Note: Be sure that appliances and equipment are properly
installed and in good working condition before using them.
Microwave ovens
Televisions, AM/FM radios,
VCRs, etc.
Tabletop appliances such as
toasters, blenders, electric
can openers, and food
processors
Hand-held items such as
hair dryers, electric shavers,
and remote controls
Appliances such as washers,
dryers, garage door openers,
electric stoves, and vacuum
cleaners
Electric blankets and heating
pads
Personal computers, electric
typewriters, copiers, and fax
machines
109
9900213EN/197877_001/ccs 1/29/01 2:18 PM Page 109

Strong interference could cause your neurostimulator to deliver
inappropriate or additional stimulation to your spinal cord.
Turning the neurostimulator off may reduce the effect of
interference.
Devices or equipment to AVOID:
Theft detectors
Airport/security screening
devices
Electric arc welding
equipment
Electric substations and
power generators
CB or ham radio antennas
Electric induction heaters
used in industry to bend
plastic
TV/radio transmitting
towers
Electric steel furnaces
110
9900213EN/197877_001/ccs 1/29/01 2:18 PM Page 110

If you suspect that an electric or magnetic device is interfering
with your neurostimulator, move away from the device or, if
possible, turn the device off. Then use the patient programmer to
turn your neurostimulator on or off.
7Warning
Use care when approaching security arches or gates (such as those found in
airports, libraries, and some department stores) as these devices can cause
inappropriate or additional stimulation if you pass through them. Similarly,
avoid airport security wands.
When approaching security arches or gates, do the following:
1. Show your patient identification card to security staff. Ask that you be
allowed to bypass the security device, request a hand search, or ask that
the security device be turned off.
2. If passing through the security device is unavoidable, turn the
neurostimulator off.
3. Reduce the amplitude to the lowest setting.
111
9900213EN/197877_001/ccs 1/29/01 2:18 PM Page 111

112
4. Approach the security device slowly. If any stimulation is felt, back out
of the security device immediately without changing body position. If
no stimulation is felt, move quickly through to the other side.
Battery Information
Your neurostimulator operates on a sealed battery and, like all
batteries, it will not run indefinitely. To replace the battery, your
physician must replace the entire neurostimulator. This requires a
surgical procedure.
See page 43 for information on how to check the status of your
neurostimulator battery.
As the battery runs down, the stimulation may feel less intense,
more intense, or different. These changes are normal and are no
cause for alarm. When you feel this change in stimulation, make
an appointment with your doctor to have your neurostimulator
battery checked.
9900213EN/197877_001/ccs 1/29/01 2:18 PM Page 112
7Caution
If you have very low stimulation thresholds when your battery nears total
depletion, you may feel more intense stimulation. Adjust your
neurostimulator amplitude to a desired level or turn it off.
If the Neurostimulator Battery light on your patient programmer
flashes, your neurostimulator may need replacement. Make an
appointment with your doctor to have your neurostimulator
battery checked.
As the neurostimulator battery wears down, you may have to
increase the stimulation amplitude slightly to receive adequate
pain relief.
Battery and Device Disposal
Remove the neurostimulator before burial or cremation. In some
countries removal of battery-operated implantable devices is
mandatory because of environmental concerns; please check your
113
9900213EN/197877_001/ccs 1/29/01 2:18 PM Page 113

local regulations. Also, the cremation process causes the battery to
explode. Dispose of depleted batteries and worn-out devices
according to local regulations.
Medical and Dental Procedures
With proper precautions, most medical procedures are unlikely to
interfere with your neurostimulator. Always tell any medical staff
that you have an implanted stimulation system. Turn the
neurostimulator off and decrease your amplitude to its lowest
setting before all medical and dental procedures.
Some common medical and dental procedures that should not
affect your neurostimulator include:
• Diagnostic x-rays such as dental x-rays—Exception: some
x-rays that require tight enclosure of the area where your
neurostimulator is implanted (such as mammography) may
require adjustment to lessen pressure on your system.
114
9900213EN/197877_001/ccs 1/29/01 2:18 PM Page 114

• Dental drills and ultrasonic probes used to clean teeth—
Exception: These should not be placed directly over your
implant site.
• Therapeutic ultrasound and electrolysis—Exception: These
should not be used directly over your implant site.
7Caution
Some medical procedures can damage the neurostimulation system or can
cause changes to the system that may produce discomfort, pain, or injury.
Consult your doctor about risks and benefits of procedures such as:
• Electrosurgery (surgery performed by electrical methods)
• Diathermy (heat treatment)
• Lithotripsy (the crushing of a blockage within the urinary tract
using electrical methods)
• Radiation therapy (that is, cancer treatment)
• Magnetic resonance imaging (MRI)—not recommended
• Defibrillation (electric shock to the heart)
115
9900213EN/197877_001/ccs 1/29/01 2:18 PM Page 115

116
9900213EN/197877_001/ccs 1/29/01 2:18 PM Page 116

117
9900213EN/197877_001/ccs 1/29/01 2:18 PM Page 117

COMMONLY ASKED QUESTIONS
What does stimulation feel like?
The electrical pulses delivered by your neurostimulator usually
feel like tingling in the area of your pain.
Can I turn my neurostimulator on or off?
Yes. You can use your patient programmer or the control
magnet to turn your neurostimulator on and off.
Will I be able to adjust the stimulation?
Yes. You can use your patient programmer to fine tune the
amplitude, pulse width, and rate. However, this depends on
the instructions and limits your doctor has stored in your
neurostimulator.
118
9900213EN/197877_001/ccs 1/29/01 2:18 PM Page 118

What should I do if I have trouble turning my neurostimulator
on?
Be sure to wait at least 8 seconds to feel stimulation after
turning your neurostimulator on. If you do not feel any
stimulation after 8 seconds, try again to turn the neuro-
stimulator on while holding the patient programmer flat
against your skin or clothing so that the keypad is directly over
the neurostimulator. If you still cannot turn your neuro-
stimulator on, contact your doctor.
How long will the battery in my neurostimulator last?
The battery life of the neurostimulator depends on the number
of hours you use it each day and how strong the stimulation
must be to control your pain. Your doctor can give you an
estimate after your neurostimulator settings have been
determined.
119
9900213EN/197877_001/ccs 1/29/01 2:18 PM Page 119

Can the battery be recharged?
No.
How is the neurostimulator battery replaced?
The entire neurostimulator must be surgically replaced because
the neurostimulator’s battery is sealed within the device. This
replacement procedure usually does not include replacement of
the lead or extension.
How large is the neurostimulator?
The neurostimulator is oval and approximately 2.4 inches long,
2.2 inches wide, and 0.4 inches thick.
Will the neurostimulator show through my clothes?
Depending on your body build, the neurostimulator may
appear as a small bulge under the skin. However, your doctor
will try to place the neurostimulator in an area that is most
comfortable and cosmetically acceptable.
120
9900213EN/197877_001/ccs 1/29/01 2:18 PM Page 120

Will my system limit my activities?
Generally, no—you should be able to resume your normal
daily activities. However, be sure to consult your doctor before
undertaking any particularly strenuous activities such as heavy
lifting or extreme twisting or bending.
What happens if my neurostimulator stops working?
Stimulation will stop and your pain may return. If this
happens, contact your doctor.
Does the neurostimulator make any noise?
No.
What should I do if the stimulation changes or becomes painful?
Use your patient programmer or the control magnet to turn
your neurostimulator off and contact your doctor.
121
9900213EN/197877_001/ccs 1/29/01 2:18 PM Page 121

What does it mean if I can feel stimulation only sometimes?
Your doctor may have programmed your neurostimulator to
turn on and off at regular intervals. However, if you do not
receive adequate pain relief, contact your doctor.
Is it normal for the stimulation to increase or decrease when I
change position?
Generally, stimulation should feel constant. However, abrupt
movements or changes in posture can make the stimulation
feel more or less intense due to the position of the electrode(s)
relative to your spinal cord.
Will a microwave oven interfere with the neurostimulator?
No.
How often should my doctor check the neurostimulator?
Your neurostimulator should be checked once every 6 months.
However, your doctor may want to see you more or less often,
depending on your condition.
122
9900213EN/197877_001/ccs 1/29/01 2:18 PM Page 122

What happens at a follow-up visit?
Your doctor will assess any changes in your medical condition,
check your neurostimulator’s battery level, monitor any drugs
you are taking, and answer any questions you may have. As
your condition changes, your physician may also reprogram
your neurostimulator.
How often will I have to replace the battery in my patient
programmer?
Battery life depends on how often the programmer is used.
Typically, a patient can expect at least 3 months of use from a
new alkaline battery. Always keep a fresh battery available.
123
9900213EN/197877_001/ccs 1/29/01 2:18 PM Page 123

PATIENT PROGRAMMER SPECIFICATIONS
Power Source: 9-volt alkaline battery
(type 6LR61 or 6F22E)
Operating Temperature: 49° F to 110° F
9° C to 43° C
Storage Temperature: -40° F to 149° F
-40° C to 65° C
Relative Humidity: 30% to 75%
Atmospheric Pressure: 20.7 in. Hg to 31.3 in. Hg (700 hPa to 1060 hPa)
Programmer Size: Approximately 2.4 x 5.3 x 1.2 inches
(135 mm x 61 mm x 30 mm)
Programmer Weight: Approximately 6 oz (170 g)
(including battery)
Battery Life: 3 months (average) for an alkaline battery
Mode of Operation: Continuous
124
9900213EN/197877_001/ccs 1/29/01 2:18 PM Page 124

SPECIAL NOTICE
Medtronic®Neurostimulator kits consist of a neurostimulator and
tools to connect the neurostimulator to implantable extensions.
Neurostimulators are used with extensions, which are implanted in
the extremely hostile environment of the human body. Neuro-
stimulators may fail to function for a variety of causes including,
but not limited to, medical complications, body rejection phenomena,
or component failure. In addition, neurostimulators and tools may
be easily damaged by improper handling or use. For tools, Medtronic
disclaims all warranties, both express and implied, including, but
not limited to, any implied warranty of merchantability or fitness
for a particular purpose. Medtronic shall not be liable to any person
or entity for any medical expenses or any direct incidental or conse-
quential damages caused by any defect, failure, or malfunction of
any tool, whether a claim for such damage is based upon warranty,
contract, tort, or otherwise. No person has any authority to bind
125
9900213EN/197877_001/ccs 1/29/01 2:18 PM Page 125

Medtronic to any representation or warranty with respect to tools.
126
9900213EN/197877_001/ccs 1/29/01 2:18 PM Page 126

MEDTRONIC®NEUROLOGICAL
IMPLANTABLE NEUROSTIMULATOR
LIMITED WARRANTY
(U.S. Customers Only)
A. This Limited Warranty provides the following assurance to the
patient who receives a Medtronic® Itrel®3 Model 7425
Neurostimulator, hereafter referred to as Neurostimulator:
(1) Should the Neurostimulator fail to function within normal
tolerances due to a defect in materials or workmanship
within a period of one (1) year, commencing with the date of
implantation of the Neurostimulator, Medtronic will at its
option: (a) issue a credit to the purchaser of the replacement
Neurostimulator equal to the Purchase Price, as defined in `
requested as its replacement, or (b) provide a functionally
comparable replacement Neurostimulator at no charge.
127
9900213EN/197877_001/ccs 1/29/01 2:18 PM Page 127

(2) Battery cell depletion will occur with time and is not
considered to be a defect in materials or workmanship. The
batteries have a specified capacity which may deplete at
different rates depending on Neurostimulator settings and
requirements for neurostimulation functions. Therefore, no
representation is made that the Neurostimulator will last the
entire term of this Limited Warranty.
(3) As used herein, Purchase Price shall mean the lesser of the
net invoiced price of the original or current functionally
comparable, or replacement Neurostimulator.
B. To qualify for the Limited Warranty, these conditions must be
met:
(1) The Neurostimulator must be implanted prior to its “USE
BY“ date in conjunction with Medtronic leads or leads of
equal quality and comparable electrical characteristics.
(2) All device registration materials must be completed and
returned to Medtronic within thirty (30) days of
implantation of the Neurostimulator.
128
9900213EN/197877_001/ccs 1/29/01 2:18 PM Page 128

(3) Replaced Neurostimulators must be returned to Medtronic
within thirty (30) days of explantation and shall be the
property of Medtronic.
C. This Limited Warranty is limited to its express terms. In
particular:
(1) Except as expressly provided by this Limited Warranty,
MEDTRONIC IS NOT RESPONSIBLE FOR ANY DIRECT,
INCIDENTAL, OR CONSEQUENTIAL DAMAGES BASED
ON ANY DEFECT, FAILURE, OR MALFUNCTION OF THE
NEUROSTIMULATOR TO FUNCTION WITHIN NORMAL
TOLERANCES, WHETHER THE CLAIM IS BASED ON
WARRANTY, CONTRACT, TORT, OR OTHERWISE.
(2) This Limited Warranty is made only to the patient in whom
the Neurostimulator was originally implanted. AS TO ALL
OTHERS, MEDTRONIC MAKES NO WARRANTY,
EXPRESS OR IMPLIED, INCLUDING, BUT NOT LIMITED
TO, ANY IMPLIED WARRANTY OF MERCHANTABILITY
OR FITNESS FOR A PARTICULAR PURPOSE, WHETHER
ARISING FROM STATUTE, COMMON LAW, CUSTOM,
129
9900213EN/197877_001/ccs 1/29/01 2:18 PM Page 129

OR OTHERWISE. NO SUCH EXPRESS OR IMPLIED
WARRANTY TO THE PATIENT SHALL EXTEND BEYOND
THE PERIOD SPECIFIED IN A(1) ABOVE. THIS LIMITED
WARRANTY SHALL BE THE EXCLUSIVE REMEDY
AVAILABLE TO ANY PERSON.
(3) The exclusions and limitations set out above are not
intended to, and should not be construed so as to
contravene mandatory provisions of applicable law. If any
part or term of this Limited Warranty is held to be illegal,
unenforceable, or in conflict with applicable law by a court
of competent jurisdiction, the validity of the remaining
portions of the Limited Warranty shall not be affected, and
all rights and obligations shall be construed and enforced as
if this Limited Warranty did not contain the particular part
or term held to be invalid. This Limited Warranty gives the
patient specific legal rights. The patient may also have other
rights which vary from state to state.
130
9900213EN/197877_001/ccs 1/29/01 2:18 PM Page 130

(4) No person has any authority to bind Medtronic to any
representation, condition, or warranty except this Limited
Warranty.
(5) This Limited Warranty is not applicable to leads, extensions,
or accessories used with this Neurostimulator.
* This Limited Warranty is provided by Medtronic Neurological, 800 53rd Avenue NE, Minneapolis, MN 55421-1200. It
applies only in the United States. Areas outside the United States should contact their local Medtronic representative
for exact terms of the Limited Warranty.
131
9900213EN/197877_001/ccs 1/29/01 2:18 PM Page 131

MEDTRONIC®NEUROLOGICAL
ITREL®EZ™MODEL 7434A PATIENT PROGRAMMER
LIMITED WARRANTY
(U.S. Customers Only)
A. This Limited Warranty provides the following assurance to the
purchaser of the Medtronic®Itrel®EZ™Model 7434A Patient
Programmer, hereafter referred to as “Equipment“:
(1) Should the Equipment fail to function within normal
tolerances due to a defect in materials or workmanship
within a period of one (1) year, commencing with the
delivery of the Equipment to the purchaser, Medtronic will
at its option: (a) repair or replace any part or parts of the
Equipment; (b) issue a credit to the purchaser equal to the
Purchase Price, as defined in Subsection A(2), against the
purchase of the replacement Equipment or (c) provide a
functionally comparable replacement Equipment at no
charge.
132
9900213EN/197877_001/ccs 1/29/01 2:18 PM Page 132

(2) As used herein, Purchase Price shall mean the lesser of the
net invoiced price of the original, or current functionally
comparable, or replacement Equipment.
B. To qualify for Limited Warranty set forth in Section A(1), the
following conditions must be met:
(1) The Equipment must be returned to Medtronic within thirty
(30) days after discovery of the defect (Medtronic may, at its
option, repair the Equipment on site).
(2) The Equipment must not have been repaired or altered
outside of Medtronic's factory in any way which, in the
judgment of Medtronic, affects its stability and reliability.
The Equipment must not have been subjected to misuse,
abuse, or accident.
C. This Limited Warranty is limited to its express terms. In
particular:
(1) Except as expressly provided by this Limited Warranty,
MEDTRONIC IS NOT RESPONSIBLE FOR ANY DIRECT,
INCIDENTAL OR CONSEQUENTIAL DAMAGES BASED
133
9900213EN/197877_001/ccs 1/29/01 2:18 PM Page 133

ON ANY DEFECT, FAILURE, OR MALFUNCTION OF THE
EQUIPMENT, WHETHER THE CLAIM IS BASED ON
WARRANTY, CONTRACT, TORT, OR OTHERWISE.
(2) This Limited Warranty is made only to the purchaser of the
Equipment. AS TO ALL OTHERS, MEDTRONIC MAKES
NO WARRANTY, EXPRESS OR IMPLIED, INCLUDING,
BUT NOT LIMITED TO, ANY IMPLIED WARRANTY OF
MERCHANTABILITY OR FITNESS FOR A PARTICULAR
PURPOSE WHETHER ARISING FROM STATUTE,
COMMON LAW, CUSTOM, OR OTHERWISE. NO
EXPRESS OR IMPLIED WARRANTY TO THE PATIENT
SHALL EXTEND BEYOND THE PERIOD SPECIFIED IN
A(1) ABOVE. THIS LIMITED WARRANTY SHALL BE THE
EXCLUSIVE REMEDY AVAILABLE TO ANY PERSON.
134
9900213EN/197877_001/ccs 1/29/01 2:18 PM Page 134

(3) The exclusions and limitations set out above are not
intended to, and should not be construed so as to
contravene mandatory provisions of applicable law. If any
part or term of this Limited Warranty is held to be illegal,
unenforceable, or in conflict with applicable law by a court
of competent jurisdiction, the validity of the remaining
portions of the Limited Warranty shall not be affected, and
all rights and obligations shall be construed and enforced as
if this Limited Warranty did not contain the particular part
or term held to be invalid. This Limited Warranty gives the
purchaser specific legal rights. The purchaser may also have
other rights which vary from state to state.
(4) No person has any authority to bind Medtronic to any
representation, condition, or warranty except this Limited
Warranty.
* This Limited Warranty is provided by Medtronic Neurological, 800 53rd Avenue NE, Minneapolis, MN 55421-1200. It
applies only in the United States. Areas outside the United States should contact their local Medtronic representative
for exact terms of the Limited Warranty.
135
9900213EN/197877_001/ccs 1/29/01 2:18 PM Page 135

GLOSSARY
Amplitude—The amount or
“
volume
”
(strength or intensity) of
stimulation required to mask your pain. This setting is adjusted
most often by patients.
Beeper Volume Control Switch—The switch located under the
battery cover. It lets you turn the beeper Off or set the volume to
Low or High.
Control Magnet—An optional magnet that allows you to turn
your neurostimulation system on and off.
Electrode—The small metal conductor near the tip of the lead that
is placed near your spinal cord. Electrodes deliver tiny pulses of
electricity to the area where your pain signals will be blocked.
Electromagnetic Interference (EMI)—Interference caused by the
energy field generated by electrical or magnetic devices such as
136
9900213EN/197877_001/ccs 1/29/01 2:18 PM Page 136

airport security systems or television transmitting towers.
Extension—The thin wire that connects the neurostimulator to the
lead.
Lead—The wire with small metal electrodes near the tip that is
implanted near the nerves to be stimulated.
Neurostimulator—The power source of your system. It contains a
special battery and electronics to control the stimulation you feel.
Patient Programmer—The hand-held device that allows you to
turn your neurostimulator on and off and finely adjust some of the
stimulation settings programmed by your doctor.
Physician Programmer—The small computer your doctor uses to
send stimulation instructions to your neurostimulator.
Pulse Width—The length or duration of an electrical pulse.
137
9900213EN/197877_001/ccs 1/29/01 2:18 PM Page 137

9900213EN/197877_001/ccs 1/29/01 2:18 PM Page 138
NO POSTAGE
NECESSARY
IF MAILED
IN THE
UNITED STATES
BUSINESS REPLY MAIL
FIRST-CLASS MAIL PERMIT NO. 7611 MINNEAPOLIS, MN
POSTAGE WILL BE PAID BY ADDRESSEE
MEDTRONIC NEUROLOGICAL
DEVICE REGISTRATION MS N700
PO BOX 59262
MINNEAPOLIS MN 55459-9895
9900213EN/197877_001/ccs 1/29/01 2:18 PM Page 139
IMPORTANT: Please detach, fill out, and mail this card to register your programmer.
(The serial number is located under the 9-volt battery.)
Itrel® EZ™ Patient Programmer Model 7434A
Warranty Registration Card
Purchase Date:
(Mo)
(Last) (First)
(Area Code)
(Day) (Yr)
Name:
(Last) (First)
Name:
Address:
City:
Zip Code:
Zip Code:
Implant Physician Name:
Hospital Name:
State:
Address:
City: State:
Phone: () -
Phone: () -
-
Serial Number: NGL
-
9900213EN/197877_001/ccs 1/29/01 2:18 PM Page 140

9900213EN/197877_001/ccs 1/29/01 2:18 PM Page 141
Medtronic Neurological
800 53rd Avenue NE
Minneapolis, MN 55421-1200
USA
Internet: www.medtronic.com
Tel: (763) 514-5000
Toll-free: (800) 328-0810
FAX: (763) 514-5078
UC199900213 EN
PN197877-001 Rev. B
© Medtronic, Inc. 2001
All Rights Reserved
9900213EN/197877_001/ccs 1/29/01 2:18 PM Page 142