Megavision MV220HB TFT LCD MONITOR User Manual MV220HB UserMan
Megavision co., Ltd. TFT LCD MONITOR MV220HB UserMan
UserManual.wiki
>
Megavision
>
MV220HB User Manual
USERS MANUAL
Navigation menu
Upload a User Manual
Namespaces
Wiki Guide
HTML
PDF
Info
Views
User Manual
Discussion / Help
Navigation
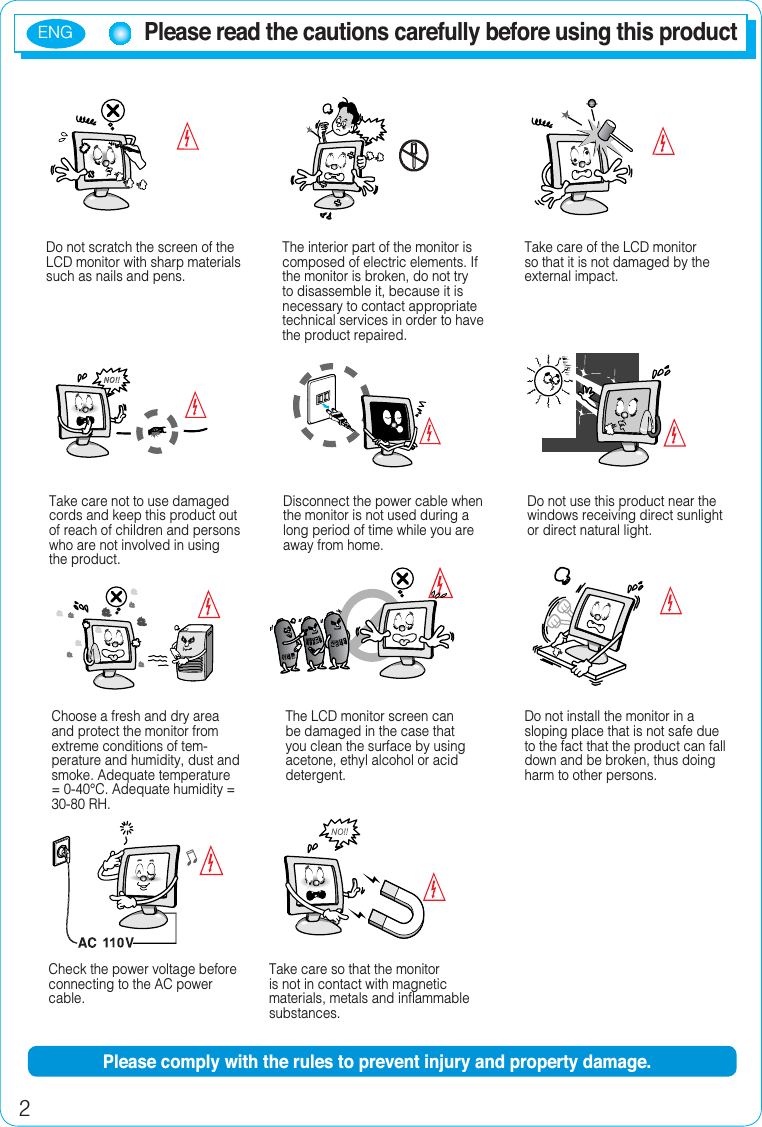
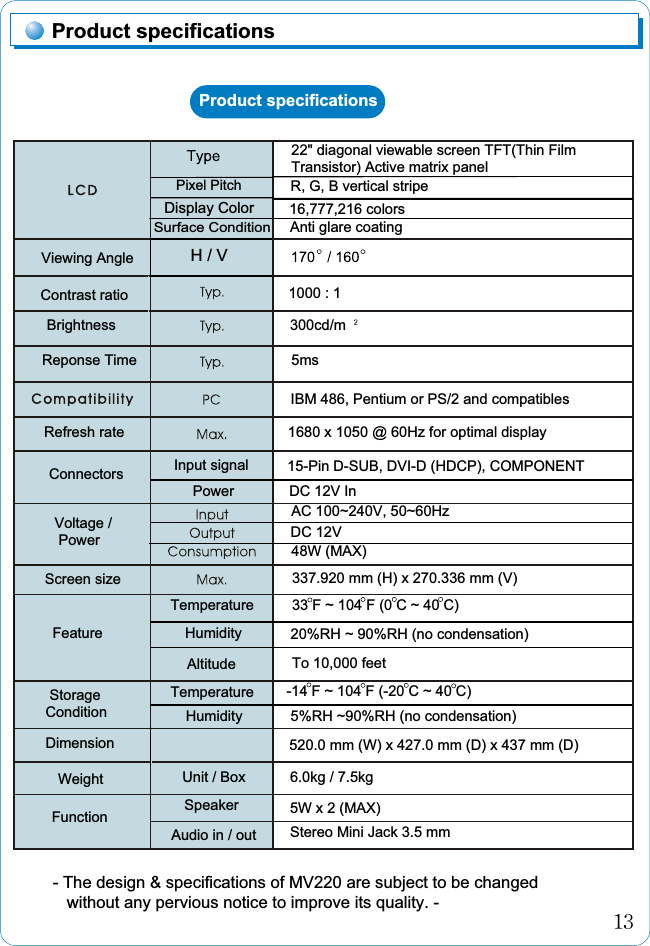
![ඖGIntroductionThank you for purchasing our monitor.ඖGProduct featuresGXPGThis product (MV220) has 22-inch flat surface (Color Active Matrix TFT LCD) with pixel size of 0.285 mm (H) x 0.285 mm (V) for ultra-precision, high resolutuion image.GYPGMV220 uses 22-inch TFT LCD (Thin Film Transistor - Liquid Crystal Display) panel and supports 1680 x 1050 maximum resolution.GZPGMV220 is a monitor whose deflection frequency is transformed automaticallyGGGGGup to 30~80KHz horizentally, 56~75Hz vertically.G[PGMV220 is compatible with IBM PC and Apple Macintosh.(A different adaptor is necessary for apple macintosh)G\PGMV220 features high definition display with its component input.(HD ready).GGGGGThe component input makes you enjoy movies and video game with high-definition display. (max. 720p)GG^PGMV220 has a power saving function less than 48W in power ON mode, less than 2W in stand by, and 1W in power off.G_PGMV220 supports DDC, Plug & Play mode.Product featuresڎWhat is 'Component input'?Component is a input port for high definition display signals, which is separated 3 signals with Brightness (Y), Color diferences (Pb, Pr) and and each signal is carried by 3 pieces of wire.Our monitor is a high-resolution monitor that has features of electromagneticwave blocking, reduction in electricity consumption and efficient use of space.This manual has been prepared to help you using this product adequately.It is recommendable to read this manual before using this product. In the case of some system requirements, it may not be compatiblewith Plug & Play. ENGG]PGMV220 supports HDCP (High bandwidth Contents Protection) for digital input (DVI).What is 'HDCP'?The initial letters of High band-width Contents Protection. HCDP gives users thepossible conection to HD signals for movies, video games, etc.](https://usermanual.wiki/Megavision/MV220HB/User-Guide-819496-Page-4.png)
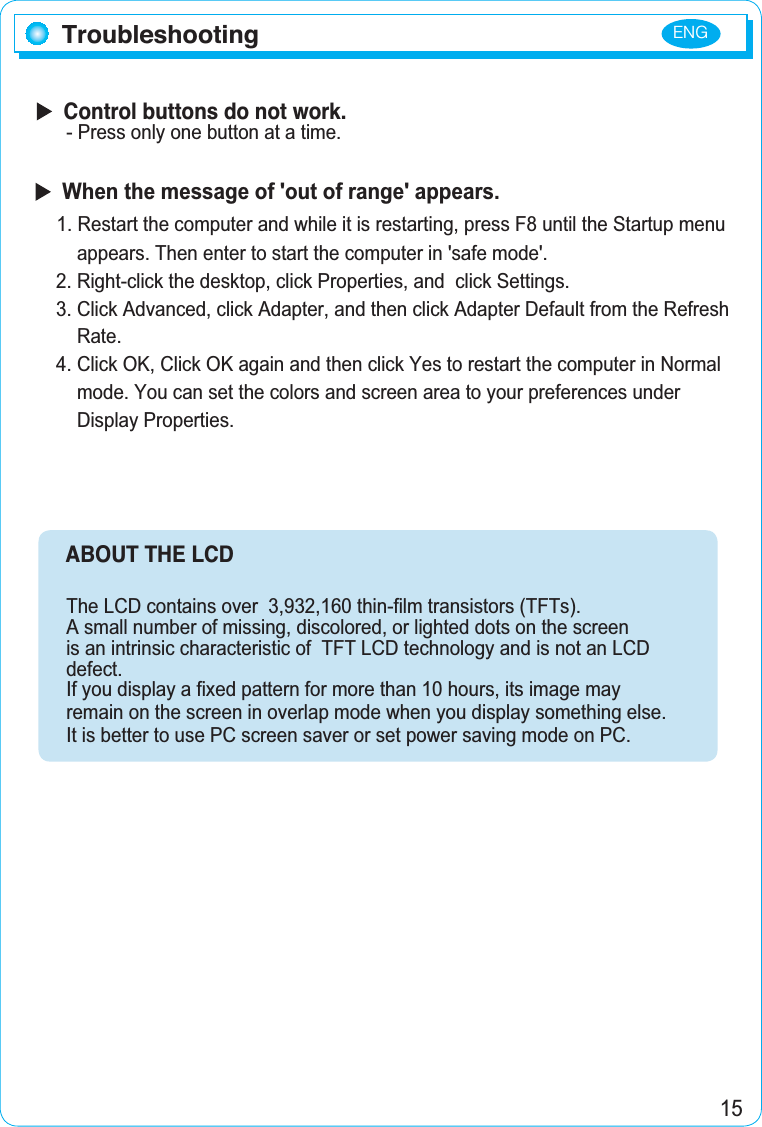
![][W_ZY][W][W^YW][W][W_WW_WW_WW_WWXWY[XWY[XWY[XX\YXY_WXY_WX[[WX]_W[_W]Y[Z\W[_W[WW[_W[_W]WW]WW]WW]WW^]_^]_^]__][XWY[XWY[`WWXW\WZ\UWo¡[`U^o¡ZXU\o¡ZXU\o¡ZXU\o¡Z^U\o¡Z^U`o¡Z\UYo¡Z^U`o¡[_UXo¡[]U`o¡[_U[o¡\]U\o¡]WUWo¡]^U\o¡][UWo¡_WUWo¡\\U`o¡]\UZo¡]^o¡^\o¡^Wo¡]Wo¡^Wo¡^\o¡^Zo¡\]o¡]Wo¡^Yo¡^\o¡]Wo¡^Wo¡^\o¡^\o¡]Wo¡^\o¡]Wo¡]Wo¡ZWUY[W\^UY_[Y\UX^\Y\UX^\Y_UZYYZXU\WWZXU\WWZ]UWWW[WUWWW\WUWWW[`U\WW]\UWWW^\UWWW^_U^\WXW_UWWWXW_UWWXZ\UWWXW]U\X[]UY\WTVTTVTRVTTVTTVRTVTTVTRVTSRVTRVRRVRRVRTVTTVTRVRRVRRVRRVRTVRTVRtXtYtZt[t\t]t^t_t`tXWtXXtXYtXZtX[tX\tX]tX^tX_tX`ڌڌthjpit}lzhTiming guideTiming guideThis product is a multi-frequency monitor. It functions in horizental frequencies from 30kHz to 80kHz and vertical frequencies from 56Hz to 75Hz. Due to tis design based on microprocessor, It offers the functions of automatic synchronization and automatic size. This monitor is equipped with 12 programmed configurations that are shown in the timing table. The followings are the ten configrations.* MV220 supports total 4 modes of display such as 480i, 480p, 720i, 720p in the component mode.ENG](https://usermanual.wiki/Megavision/MV220HB/User-Guide-819496-Page-12.png)
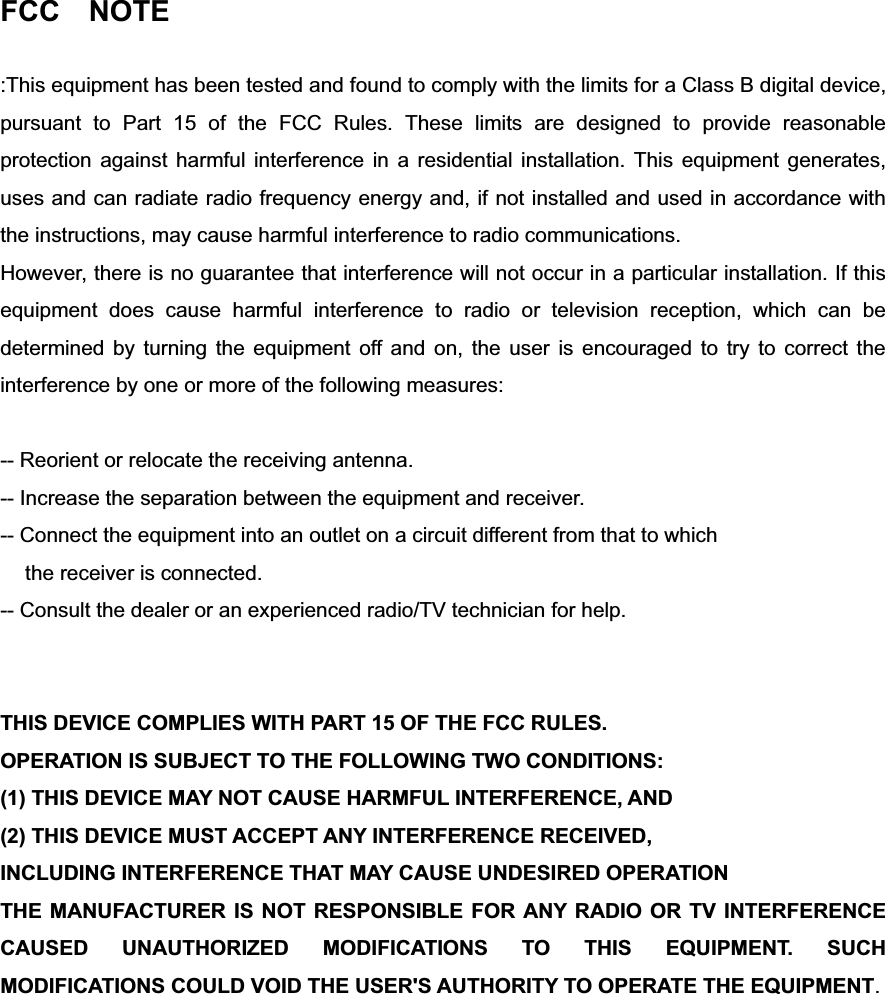
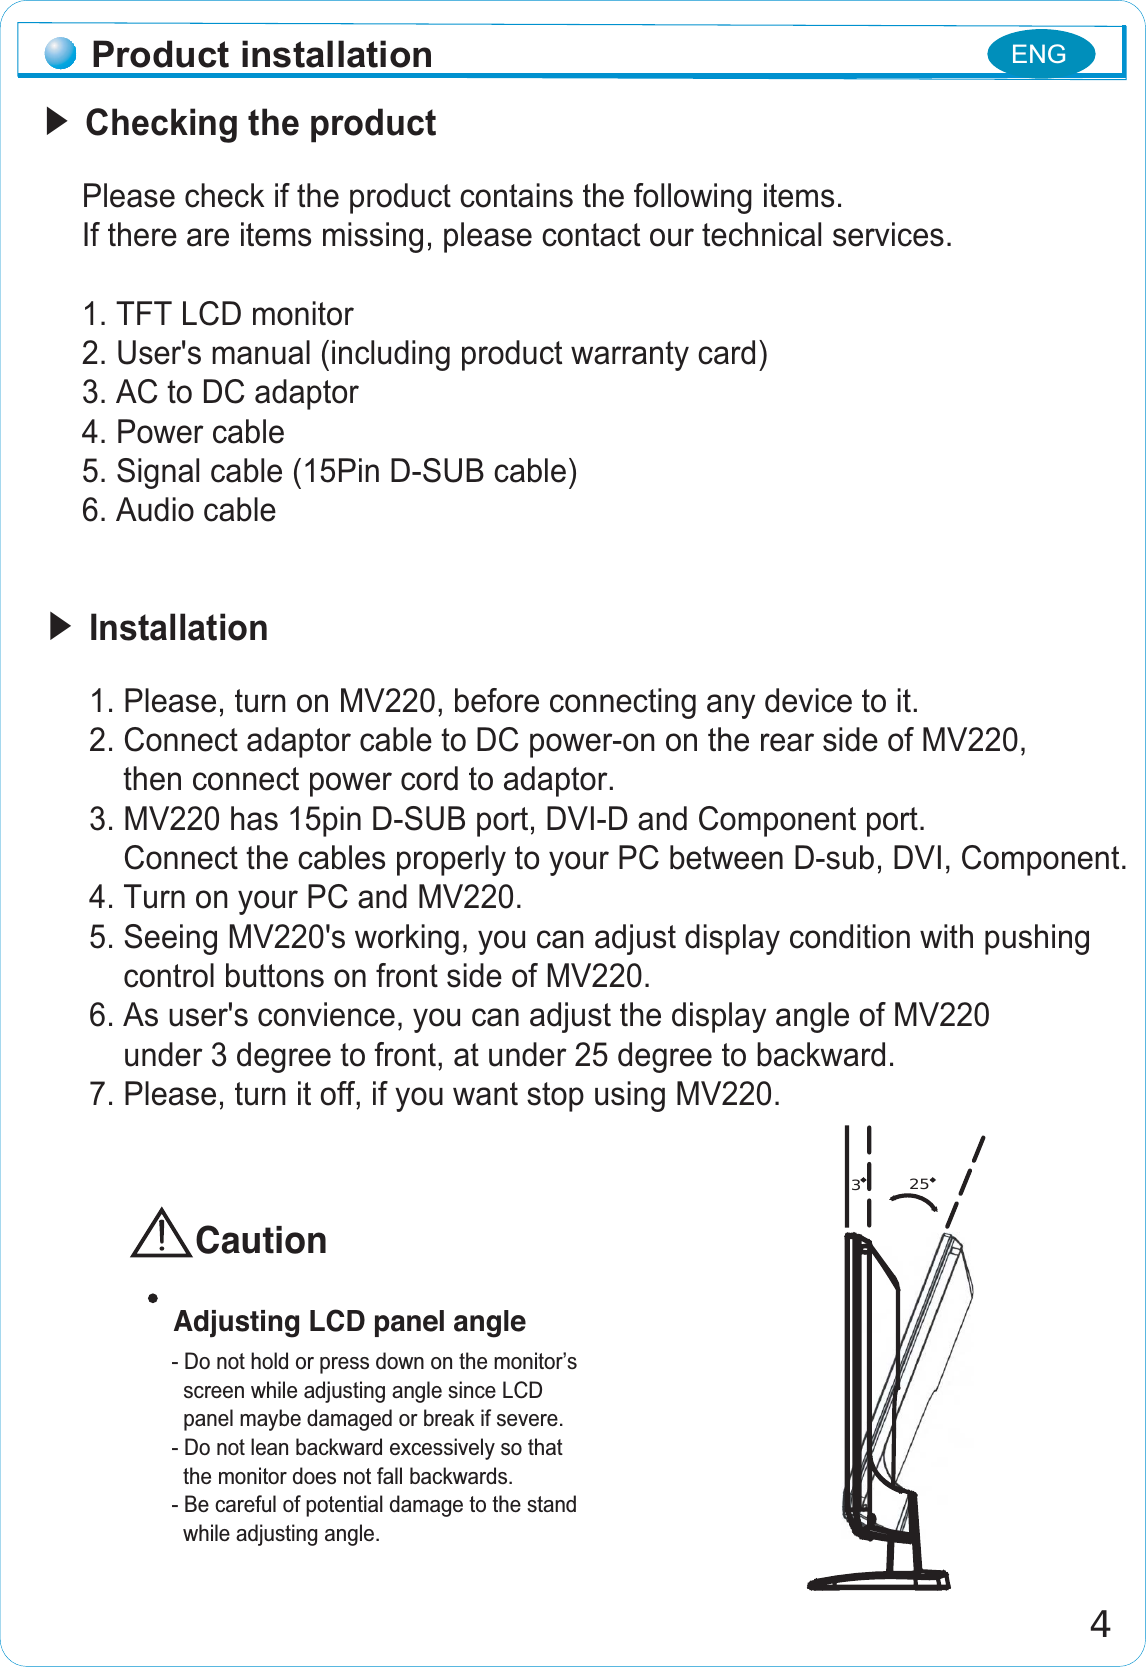
![{UtUkUzGGkGYT{UtUkUzGGkGYR{UtUkUzGkGYV[z{UtUkUzGkG[T{UtUkUzGkG[RkkjGjkkjGky{UtUkUzGGkGXT{UtUkUzGGkGXR{UtUkUzGkGXVZz{UtUkUzGkGZT{UtUkUzGkGZRRG\}GwnoGwGk{UtUkUzGGkGWT{UtUkUzGGkGWR{UtUkUzGkGWV\z{UtUkUzGkG\T{UtUkUzGkG\R{UtUkUzGjGz{UtUkUzGjR{UtUkUzGjTXYZ[\]^_`XWXXXYXZX[X\X]X^X_X`YWYXYYYZY[ඖڌڍGaGsOnP wGiOiP wGyOyPXYZඖComponentڴګڽ ګۍඖ15Pin D-SUBThis signal input terminals are for 15Pin D-SUB, DVI-D, Component.Please, connect the cables of each signal to your PC's input signal port.XYZ[\yniuGjnyGnnGniGnuGjnnzkho¡TzU}TzUzjs]^_`XWXXXYXZX[X\Input signal detailDVI-DPlease, turn off the monitor, before connecting the signal out ofthe system. ENG](https://usermanual.wiki/Megavision/MV220HB/User-Guide-819496-Page-13.png)