Megavision MV220HB TFT LCD MONITOR User Manual MV220HB UserMan
Megavision co., Ltd. TFT LCD MONITOR MV220HB UserMan
USERS MANUAL
Rev.02
1. Please read the cautions carefully before using this product.
2. Product feature
4. Names and operation of control buttons
5. OSD MENU Selection and operation
6. MENU function
7. Utilization message
8 Timing guide
9. Input signal detail
10. Product specification
11. Trouble shooting
3
4
5, 6
7
8, 9
10
11
12
13
14
ڌ
Table of Contents
1, 2
3. Product installation
ENG
ENG
2
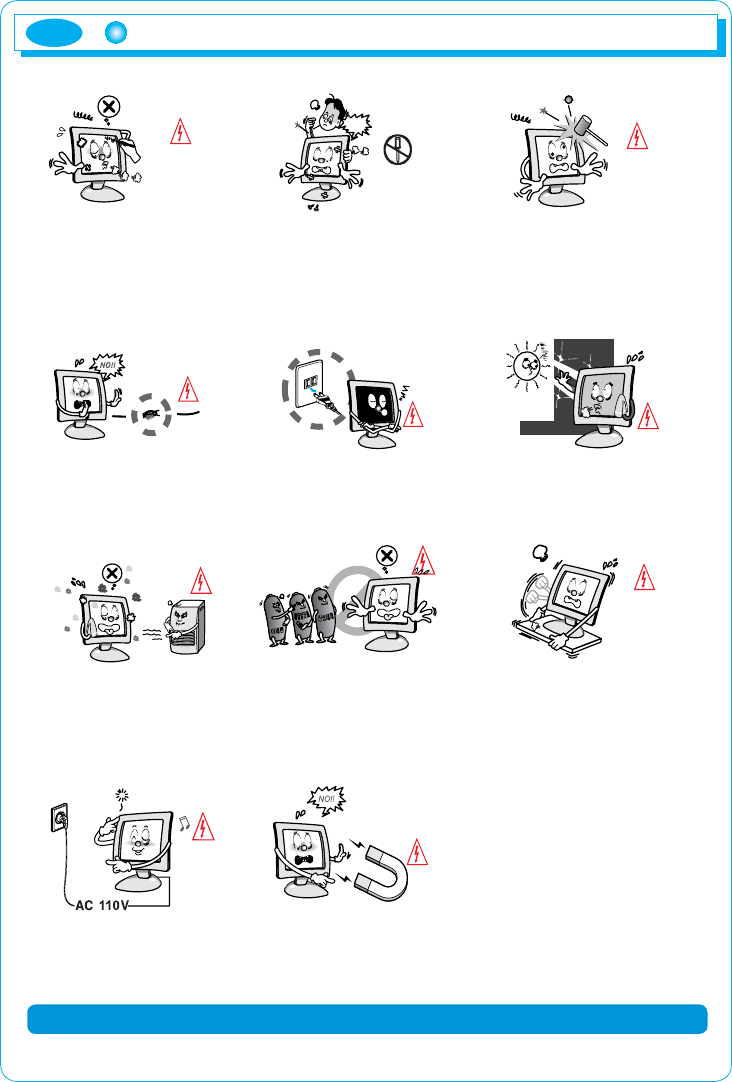
Please read the cautions carefully before using this product
Do not scratch the screen of the
LCD monitor with sharp materials
such as nails and pens.
The interior part of the monitor is
composed of electric elements. If
the monitor is broken, do not try
to disassemble it, because it is
necessary to contact appropriate
technical services in order to have
the product repaired.
Take care of the LCD monitor
so that it is not damaged by the
external impact.
Take care not to use damaged
cords and keep this product out
of reach of children and persons
who are not involved in using
the product.
Disconnect the power cable when
the monitor is not used during a
long period of time while you are
away from home.
Do not use this product near the
windows receiving direct sunlight
or direct natural light.
Choose a fresh and dry area
and protect the monitor from
extreme conditions of tem-
perature and humidity, dust and
smoke. Adequate temperature
= 0-40°C. Adequate humidity =
30-80 RH.
The LCD monitor screen can
be damaged in the case that
you clean the surface by using
acetone, ethyl alcohol or acid
detergent.
Do not install the monitor in a
sloping place that is not safe due
to the fact that the product can fall
down and be broken, thus doing
harm to other persons.
Check the power voltage before
connecting to the AC power
cable.
Take care so that the monitor
is not in contact with magnetic
materials, metals and inflammable
substances.
Please comply with the rules to prevent injury and property damage.
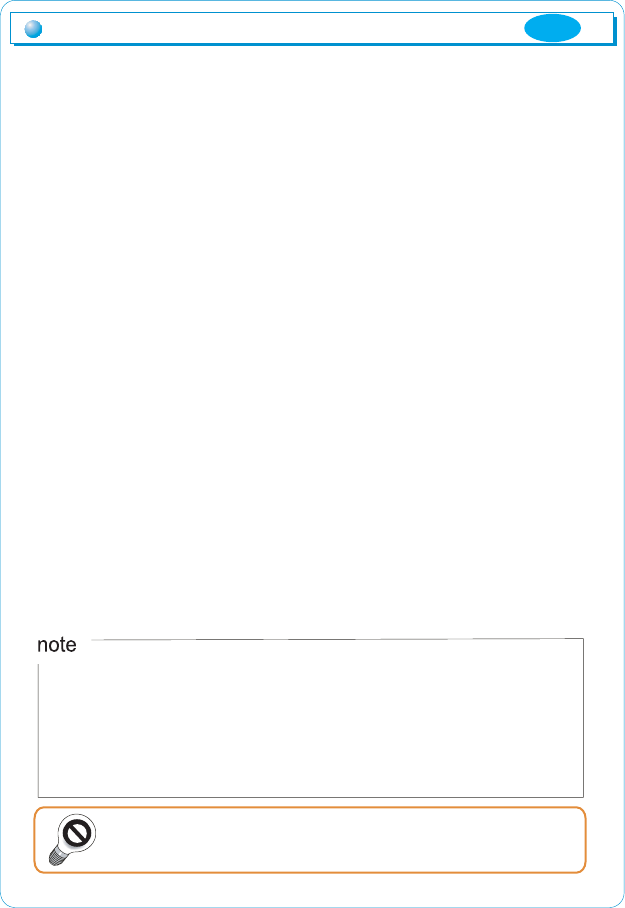
ඖGIntroduction
Thank you for purchasing our monitor.
ඖGProduct features
GXPGThis product (MV220) has 22-inch flat surface (Color Active Matrix TFT LCD) with
pixel size of 0.285 mm (H) x 0.285 mm (V) for ultra-precision, high resolutuion
image.
GYPGMV220 uses 22-inch TFT LCD (Thin Film Transistor - Liquid Crystal Display)
panel and supports 1680 x 1050 maximum resolution.
GZPGMV220 is a monitor whose deflection frequency is transformed automatically
GGGGGup to 30~80KHz horizentally, 56~75Hz vertically.
G[PGMV220 is compatible with IBM PC and Apple Macintosh.(A different adaptor
is necessary for apple macintosh)
G\PGMV220 features high definition display with its component input.(HD ready).
GGGGGThe component input makes you enjoy movies and video game with
high-definition display. (max. 720p)
G
G^PGMV220 has a power saving function less than 48W in power ON mode, less than
2W in stand by, and 1W in power off.
G_PGMV220 supports DDC, Plug & Play mode.
Product features
ڎ
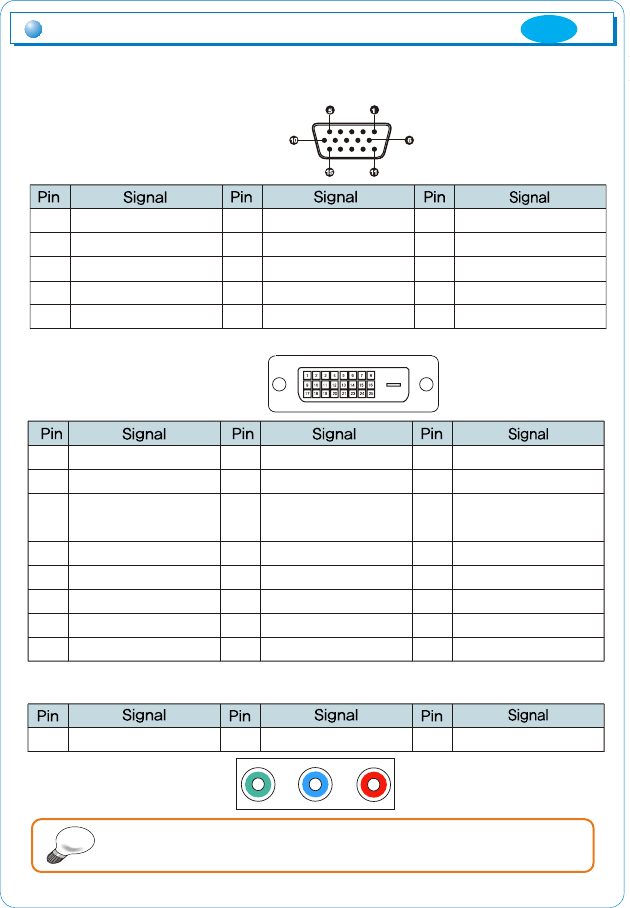
What is 'Component input'?
Component is a input port for high definition display signals, which is
separated 3 signals with Brightness (Y), Color diferences (Pb, Pr) and
and each signal is carried by 3 pieces of wire.
Our monitor is a high-resolution monitor that has features of electromagnetic
wave blocking, reduction in electricity consumption and efficient use of space.
This manual has been prepared to help you using this product adequately.
It is recommendable to read this manual before using this product.
In the case of some system requirements, it may not be compatible
with Plug & Play.
ENG
G]PGMV220 supports HDCP (High bandwidth Contents Protection) for digital input (DVI).
What is 'HDCP'?
The initial letters of High band-width Contents Protection. HCDP gives users the
possible conection to HD signals for movies, video games, etc.
൘ Checking the product
Product installation
4
ENG
Please check if the product contains the following items.
If there are items missing, please contact our technical services.
1. TFT LCD monitor
2. User's manual (including product warranty card)
3. AC to DC adaptor
4. Power cable
5. Signal cable (15Pin D-SUB cable)
6. Audio cable
൘ Installation
1. Please, turn on MV220, before connecting any device to it.
2. Connect adaptor cable to DC power-on on the rear side of MV220,
then connect power cord to adaptor.
3. MV220 has 15pin D-SUB port, DVI-D and Component port.
Connect the cables properly to your PC between D-sub, DVI, Component.
4. Turn on your PC and MV220.
5. Seeing MV220's working, you can adjust display condition with pushing
control buttons on front side of MV220.
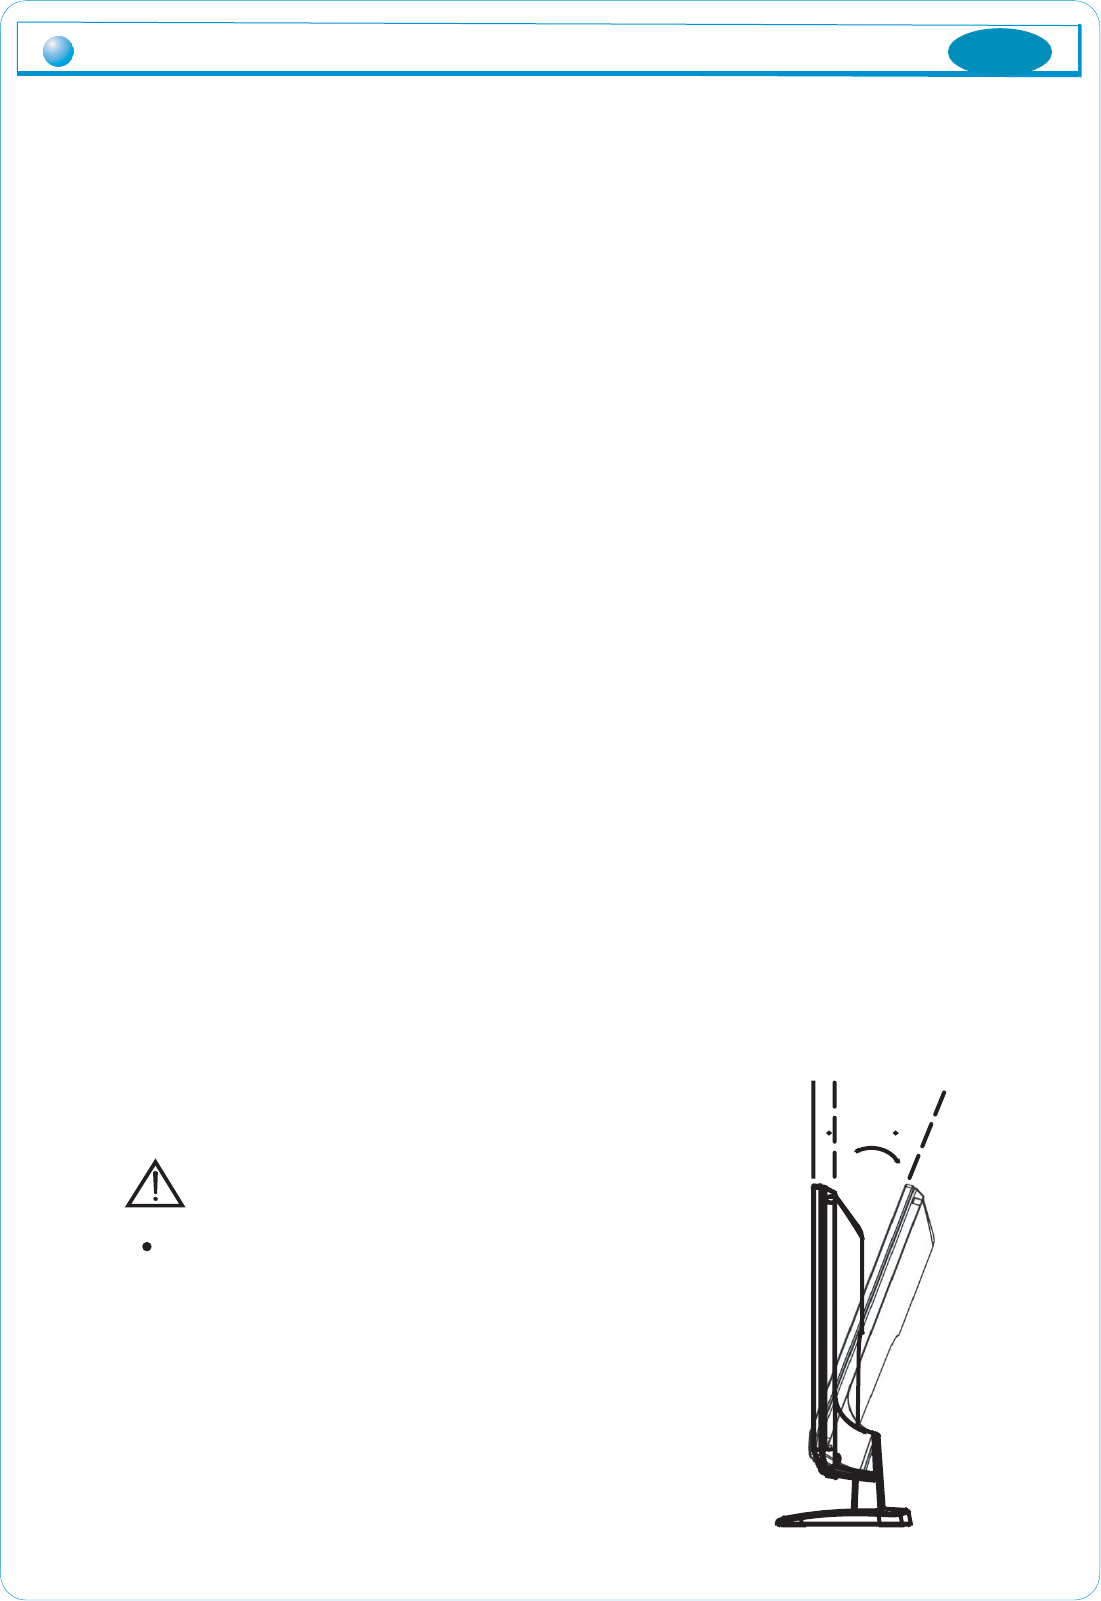
6. As user's convience, you can adjust the display angle of MV220
under 3 degree to front, at under 25 degree to backward.
7. Please, turn it off, if you want stop using MV220.
325
Caution
Adjusting LCD panel angle
- Do not hold or press down on the monitor’s
screen while adjusting angle since LCD
panel maybe damaged or break if severe.
- Do not lean backward excessively so that
the monitor does not fall backwards.
- Be careful of potential damage to the stand
while adjusting angle.
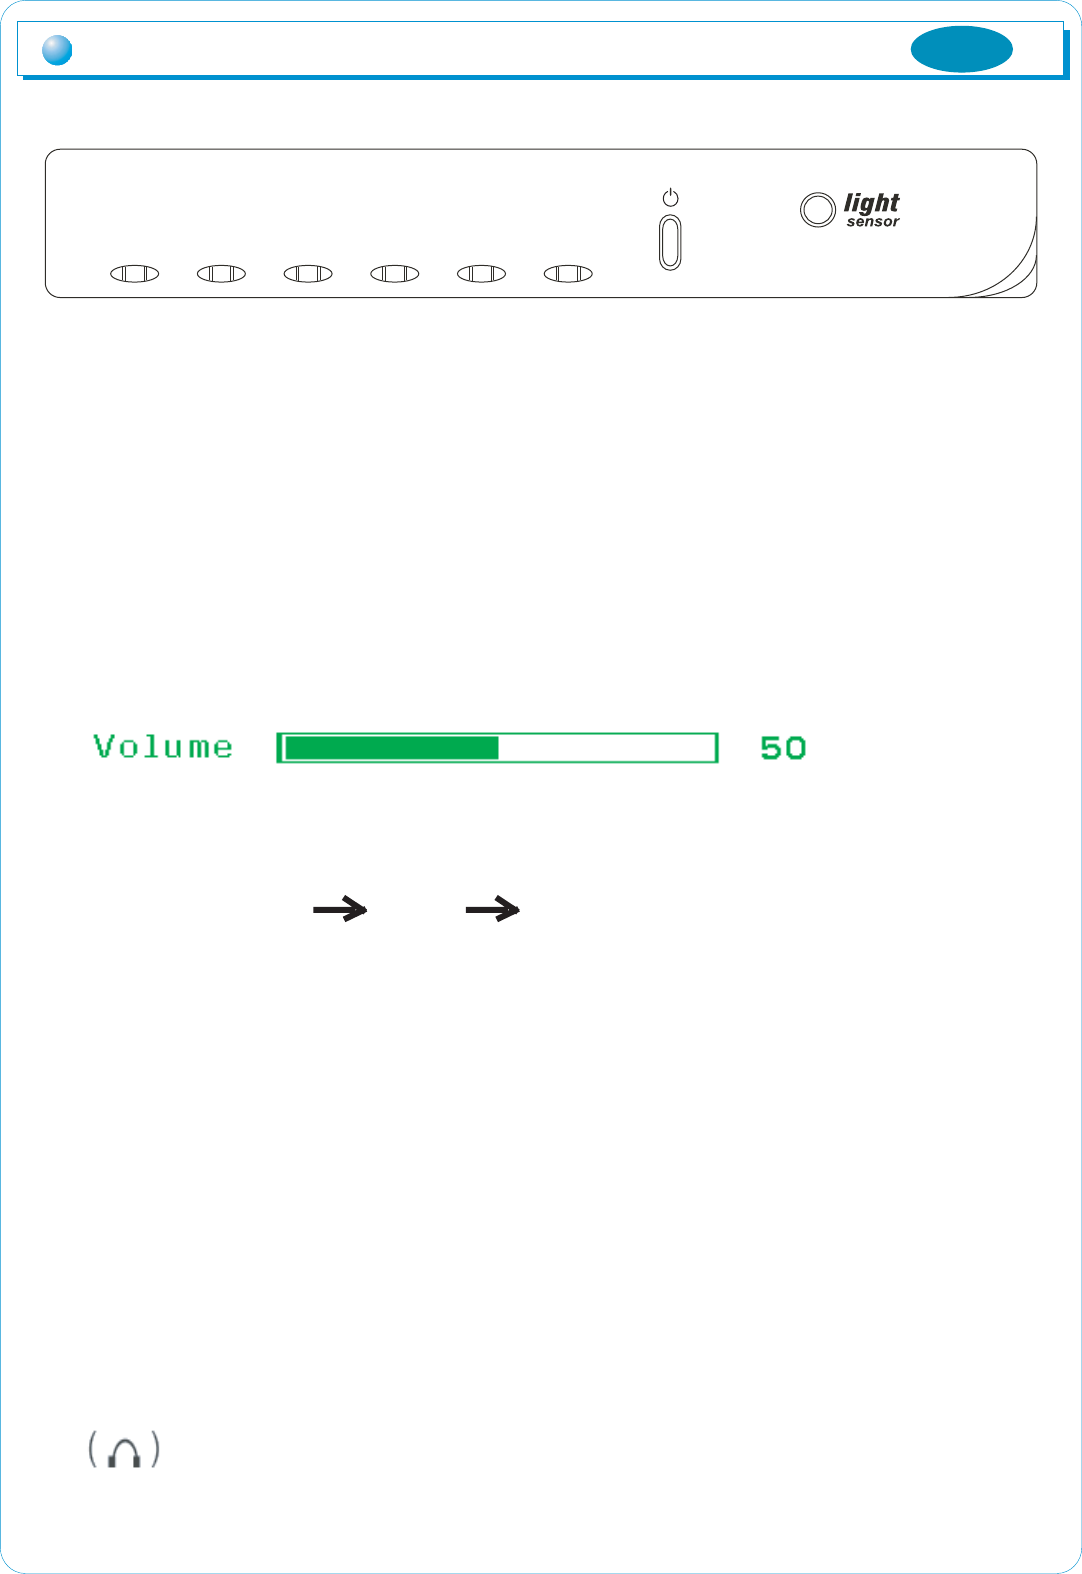
൘ Function of the buttons
'MENU'
Show the menu screen or makes it disappear, Moreover
'SELECT'
Select category within the menu window or excutes automatic screen adjustment.
- 'ൖ' / '൘'
Moves to the desired category within the menu window or adjusts the value of selected
category and adjust sound volume.
'MODE'
Changes the modes, the orders being changed are same as below.
'POWER'
If you push it, MV220 will turn on, flashing power indicater which shows the current
state of power. If you push the button again, MV220 turns off.
Also power indicater flashes in following cases
1. On the power saving function working
2. No signal input but cables connected
3. No signal input because of the disconnection of cable
4. All signal is out of range MV220 allowing
LIGHT SENSOR
Adjusts the value "AUTO BRIGHTNESS' (Please refer to next page)
Names and operation of control butto
MENU SELECT
ൖ
൘ MODE POWER
MENU SELECT
ൖ
൘ MODE POWER
5
ENG
RGB DVI COMPONENT
You can listen to any sound out of MV220 with using it.
Names and operation of control buttons
ڑ
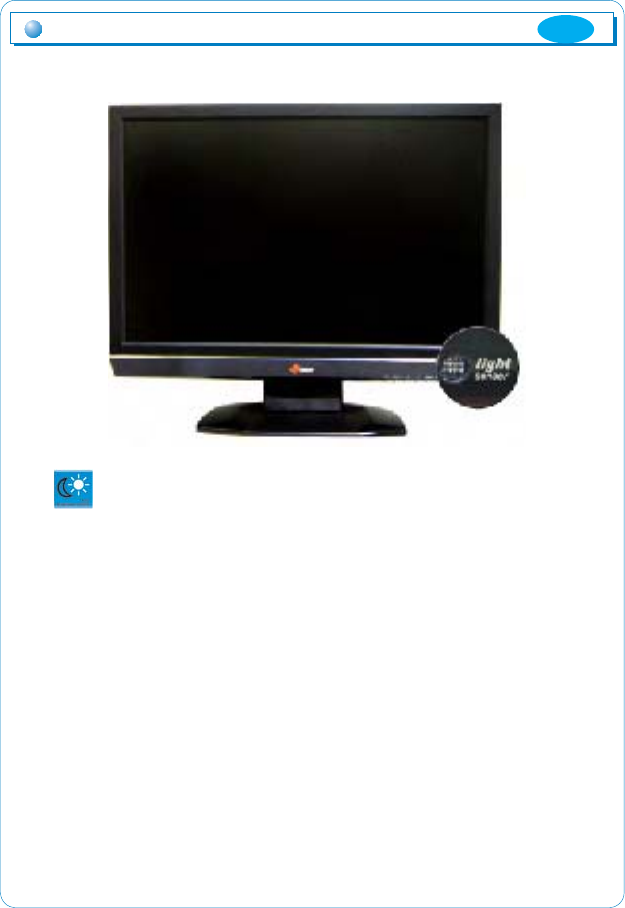
Auto Brightness Control
The product offers built-in function that automatically adjusts to
optimized brightness depending on the brightness of the area at the
vicinity. (At the time of purchase, this is set as On.)
* Refer to the screen category of the MENU function for detailed
method of use. (Page 10)
ENG
ENG
7
OSD MENU Selection and operation
You can select the OSD menu in the OSD window using all the control buttons
at the bottom of the screen. To change the current settings or adjust them for the
desired settings, follow the following steps.
1. Press the Menu button to open the OSD menu window.
2. Press the
W/X
button to move the item of desired main menu.
3. If you highlight the desired menu item, press the Select button.
4. Press the
W/X
button to move the desired submenu item.
5. If you highlight the submenu item, press the Select button.
6. Press the
W/X
button to modify the current value.
7. Press the Select button to save the modified value.
8. Push MENU button to exit to sub category, main category and menu screen
in this order.
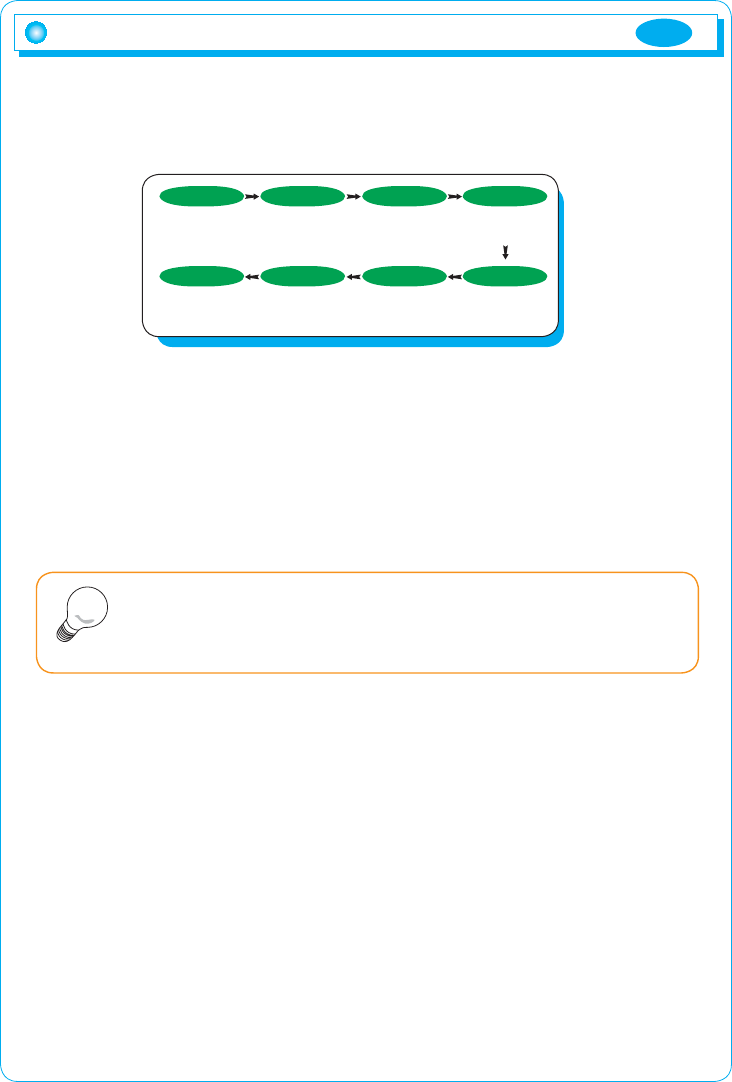
Main menu is configured as follows.
1. Screen
Factor in the brightness of the environment at the vicinity to adjust the brightness
of monitor, and also adjusts to the level desired by user, Manually adjusts screen
location, modulation and frequency.
2. Color
Manually, adjusts screen brightness, luminosity, color temperature and color
proportion.
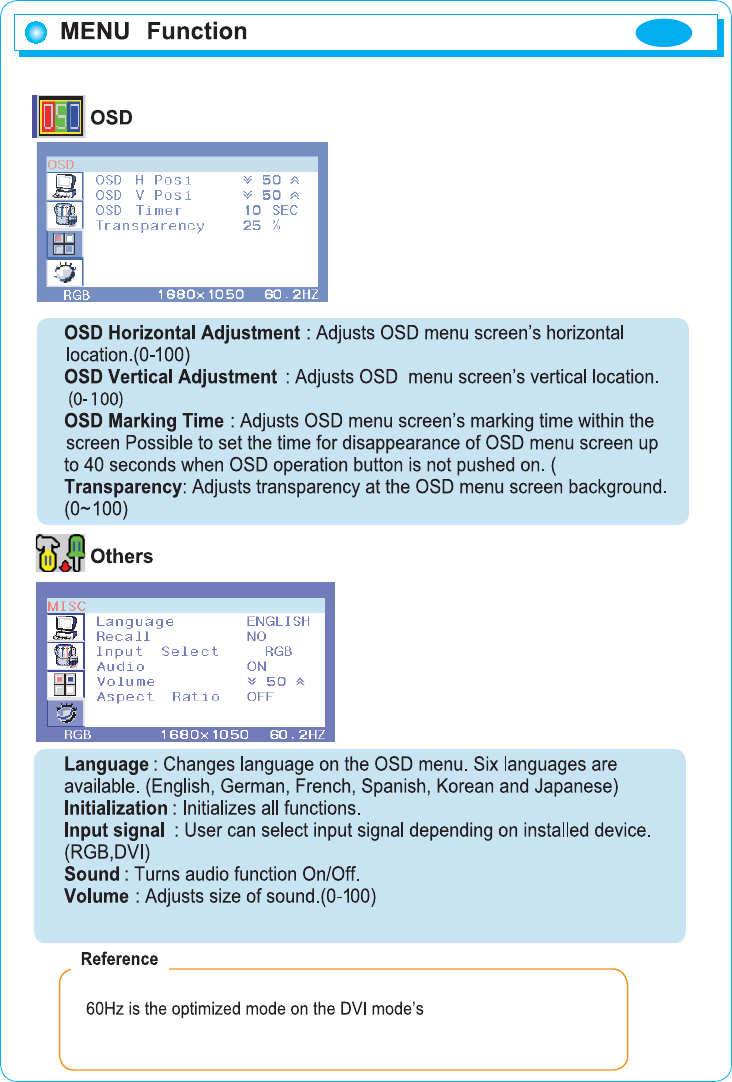
3. OSD
Adjusts the language used, the position of the menu screen, the display time of
the menu screen and the saturation of the menu screen.
4. Others
Adjusts the language on the menu screen, and initializes menu value. User is
able to select input signal, and adjust On/Off and value of audio function.
The OSD window will disappear within a few seconds if there is no
input in the OSD window. It does not appear when there is no input
signal.
Note
MENU SELECT
MENU SELECT SELECT
(select main
category )
(Close menu
screen)
(save set value) (select sub
category)
W / X
W / X
W / X
(Open menu
screen )
(move to main
category)
(move to sub
category )
(adjust set value)
8
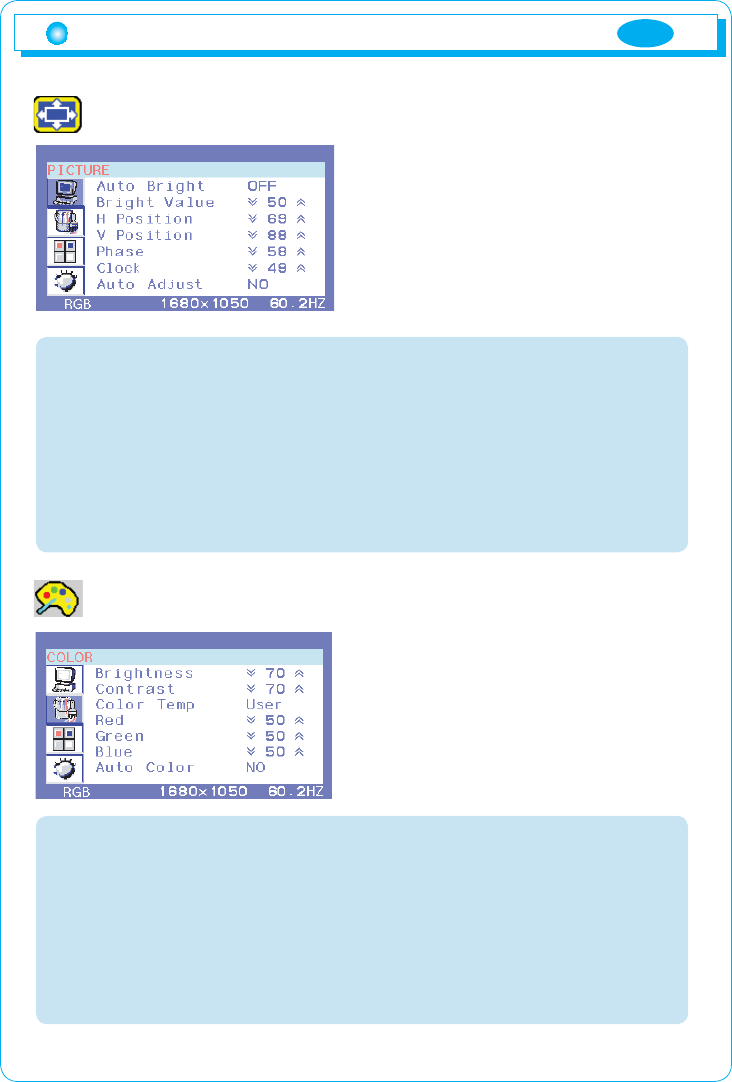
Screen
Automatic brightness: Turns automatic brightness function On/Off
Brightness adjustment: Adjusts standard value for automatic brightness
function (0-100)
Horizontal location: Adjusts horizontal location on screen .(0-100)
Vertical location: Adjusts vertical location on screen \.(0-100)
Modulation: Adjusts focus on the screen.(0-100)
Frequency: Adjusts pixel’s horizontal size.(0-100)
Automatic screen adjustment: Automatically adjusts screen’s location,
modulation and frequency.
Color
Brightness: Adjusts brightness.(0-100)
Luminosity: Adjusts luminosity.(0-100)
Level of color force: Adjusts to color vision desired by user.
(blue.red.user)
Red: Adjusts share of red.(0-100)
Green: Adjusts share of green.(0-100)
Blue: Adjusts share of blue.(0-100)
Automatic color adjustment: Automatically adjusts screen’s color.
MENU Function
ENG
ENG
9
10,20,30,40)
1680*1050 resolution.
Parts of the category are provided in the DVI mode’s screen, color menu.
Aspect Ratio : Selects display aspect with 4:3.
10
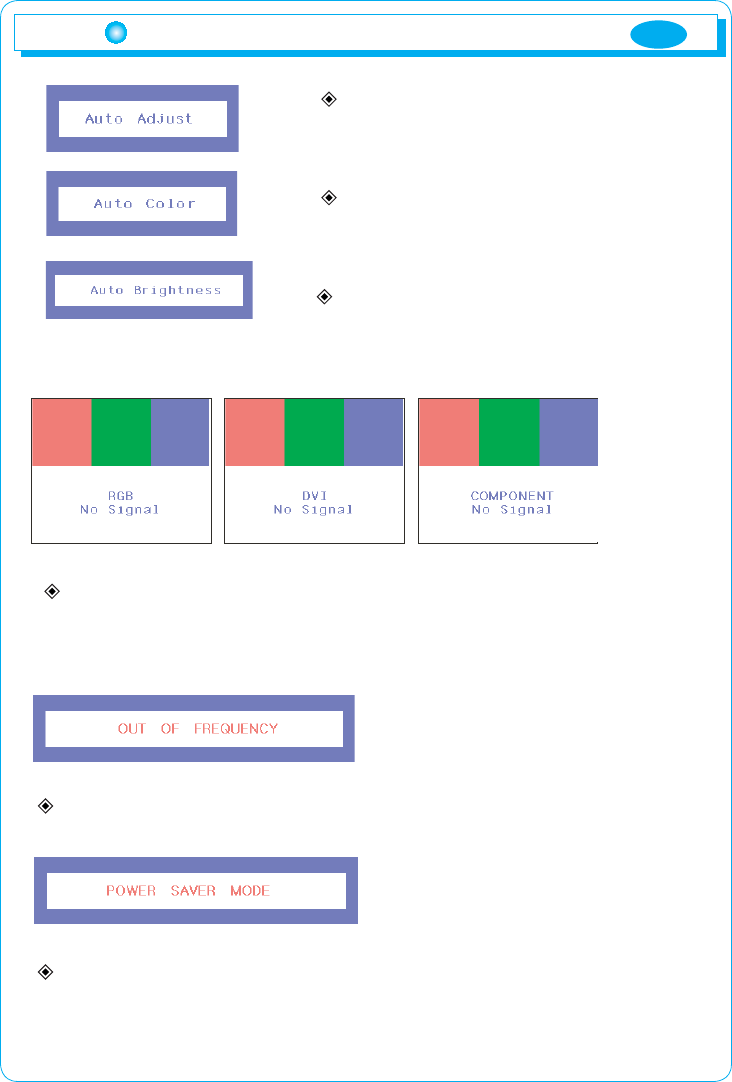
Explanation of message for utilization
Auto Adjustment
Appears when automatic screen adjustment
is executed on RGB mode.
Auto color Adjustment
Appears when automatic color Adjustment is
executed on RGB mode.
Auto Brightness
Appears when automatic brightness function is
executed.
No Signal (RGB, DVI, COMPONENT)
Appears when there is no PC input signal
Check cable connection .
OUT OF FREQUENCY
Appears when Video Mode is out of the permissible range.
POWER SAVER MODE
Appears when PC input signal is absent.
This message disappears automatically after five seconds.
Check PC power
ENG
][W
_ZY
][W
][W
^YW
][W
][W
_WW
_WW
_WW
_WW
XWY[
XWY[
XWY[
XX\Y
XY_W
XY_W
X[[W
X]_W
[_W
]Y[
Z\W
[_W
[WW
[_W
[_W
]WW
]WW
]WW
]WW
^]_
^]_
^]_
_][
XWY[
XWY[
`WW
XW\W
Z\UWo¡
[`U^o¡
ZXU\o¡
ZXU\o¡
ZXU\o¡
Z^U\o¡
Z^U`o¡
Z\UYo¡
Z^U`o¡
[_UXo¡
[]U`o¡
[_U[o¡
\]U\o¡
]WUWo¡
]^U\o¡
][UWo¡
_WUWo¡
\\U`o¡
]\UZo¡
]^o¡
^\o¡
^Wo¡
]Wo¡
^Wo¡
^\o¡
^Zo¡
\]o¡
]Wo¡
^Yo¡
^\o¡
]Wo¡
^Wo¡
^\o¡
^\o¡
]Wo¡
^\o¡
]Wo¡
]Wo¡
ZWUY[W
\^UY_[
Y\UX^\
Y\UX^\
Y_UZYY
ZXU\WW
ZXU\WW
Z]UWWW
[WUWWW
\WUWWW
[`U\WW
]\UWWW
^\UWWW
^_U^\W
XW_UWWW
XW_UWW
XZ\UWW
XW]U\
X[]UY\W
TVT
TVT
RVT
TVT
TVR
TVT
TVT
RVTSRVT
RVR
RVR
RVR
TVT
TVT
RVR
RVR
RVR
RVR
TVR
TVR
tX
tY
tZ
t[
t\
t]
t^
t_
t`
tXW
tXX
tXY
tXZ
tX[
tX\
tX]
tX^
tX_
tX`
ڌڌ
thj
pit
}lzh
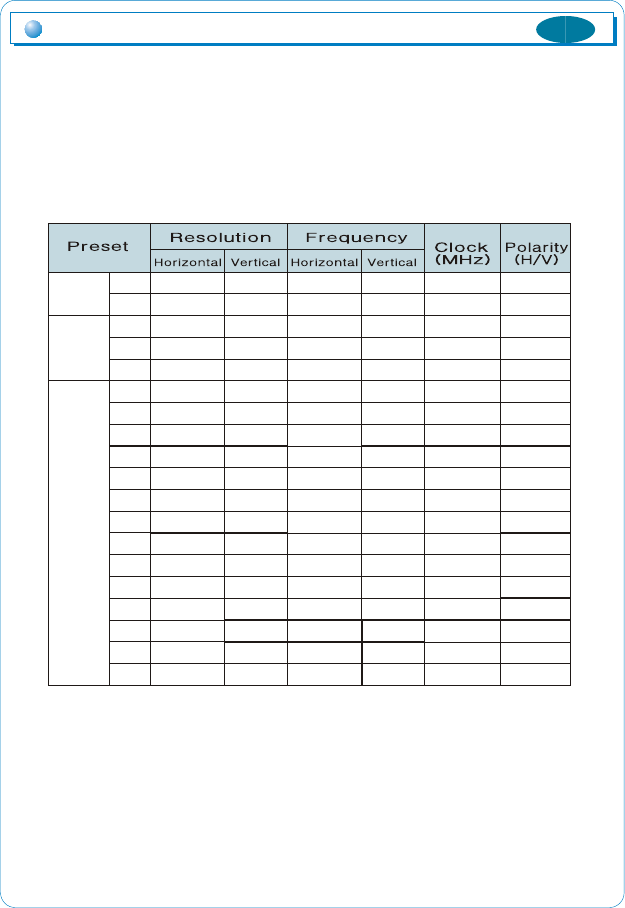
Timing guide
Timing guide
This product is a multi-frequency monitor.
It functions in horizental frequencies from 30kHz to 80kHz and vertical
frequencies from 56Hz to 75Hz. Due to tis design based on microprocessor,
It offers the functions of automatic synchronization and automatic size.
This monitor is equipped with 12 programmed configurations that are shown
in the timing table. The followings are the ten configrations.
* MV220 supports total 4 modes of display such as 480i, 480p, 720i, 720p in the
component mode.
ENG
{UtUkUzGGkGYT
{UtUkUzGGkGYR
{UtUkUzGkGYV[
z
{UtUkUzGkG[T
{UtUkUzGkG[R
kkjGj
kkjGk
y
{UtUkUzGGkGXT
{UtUkUzGGkGXR
{UtUkUzGkGXVZ
z
{UtUkUzGkGZT
{UtUkUzGkGZR
RG\}Gw
n
oGwGk
{UtUkUzGGkGWT
{UtUkUzGGkGWR
{UtUkUzGkGWV\
z
{UtUkUzGkG\T
{UtUkUzGkG\R
{UtUkUzGjGz
{UtUkUzGjR
{UtUkUzGjT
X
Y
Z
[
\
]
^
_
`
XW
XX
XY
XZ
X[
X\
X]
X^
X_
X`
YW
YX
YY
YZ
Y[
ඖ
ڌڍ
GaGsOnP wGiOiP wGyOyP
XYZ
ඖComponent
ڴګڽ ګۍ
ඖ15Pin D-SUB
This signal input terminals are for 15Pin D-SUB, DVI-D, Component.
Please, connect the cables of each signal to your PC's input signal port.
X
Y
Z
[
\
y
n
i
uGj
n
yGn
nGn
iGn
uGj
n
n
zkh
o¡TzU
}TzU
zjs
]
^
_
`
XW
XX
XY
XZ
X[
X\
Input signal detail
DVI-D
Please, turn off the monitor, before connecting the signal out of
the system.
ENG
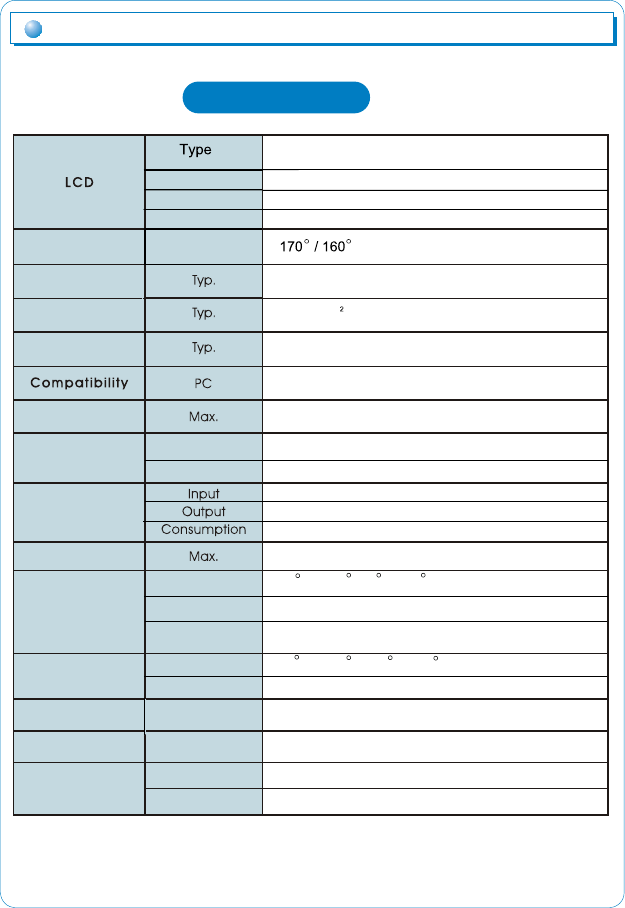
Product specifications
ڌڎ
Product specifications
Pixel Pitch
Display Color
Surface Condition
H / V
Temperature
Humidity
Altitude
Temperature
Humidity
Unit / Box
Weight
Function
Audio in / out
Speaker
Storage
Condition
Feature
Screen size
Voltage /
Power
Connectors
Refresh rate
Reponse Time
Brightness
Contrast ratio
Viewing Angle
22" diagonal viewable screen TFT(Thin Film
Transistor) Active matrix panel
R, G, B vertical stripe
16,777,216 colors
Anti glare coating
1000 : 1
300cd/m
5ms
IBM 486, Pentium or PS/2 and compatibles
1680 x 1050 @ 60Hz for optimal display
Input signal
Power
15-Pin D-SUB, DVI-D (HDCP), COMPONENT
DC 12V In
AC 100~240V, 50~60Hz
DC 12V
48W (MAX)
337.920 mm (H) x 270.336 mm (V)
33 F ~ 104 F (0 C ~ 40 C)
20%RH ~ 90%RH (no condensation)
To 10,000 feet
-14 F ~ 104 F (-20 C ~ 40 C)
5%RH ~90%RH (no condensation)
Dimension 520.0 mm (W) x 427.0 mm (D) x 437 mm (D)
6.0kg / 7.5kg
5W x 2 (MAX)
Stereo Mini Jack 3.5 mm
- The design & specifications of MV220 are subject to be changed
without any pervious notice to improve its quality. -
14
Troubleshooting
No power.
- Flip the power switch ON. The Power LED turns on.
- Make sure AC power cord is securely connected to the power jack and to a
power outlet.
Power on but no screen image.
- Make sure the video cable attached with this monitor is tightly secured to the
video output port on the back of the computer
- Adjust the brightness and contrast.
Image is unstable, unfocused.
- Use AUTO-TUNE to adjust automatically.
- If the image is still unstable after AUTO-TUNE processing, please adjust
PHASE manually to get image focused.
- Check whether the resolution or refresh rate in windows display setting is
beyond supported range (please refer to the specification of supported
mode.)
Flickering
- Not enough power is being supplied to the Monitor.
Connect the Monitor to a different outlet. If a surge protector is being used,
there may be too many devices plugged in.
- See Timing Guide in this manual with a list of refresh rates and frequency
settings showing the recommended setting for the Monitor.
Wrong or abnormal colors.
- If any colors (Red, Green, or Blue) are missing, check the video cable to make
sure it is securely connected. Loose pins in the cable connector could cause
a bad connection.
- Connect the Monitor to another computer.
- Check the graphics card for proper sync scheme (or sync polarities) to match
the Monitor's specifications.
Double (split) screen image
- Make sure your graphics card is set to Non-Interlaced mode.
Entire screen image rolls (scrolls) vertically.
- Make sure the input signals are within the LCD monitor's specified frequency
range. (Maximum : 1680
X
1050 @ 60Hz)
- Connect the video cable securely.
- Try the Monitor with another power source.
ENG

ENG
15
Control buttons do not work.
- Press only one button at a time.
ABOUT THE LCD
The LCD contains over 3,932,160 thin-film transistors (TFTs).
A small number of missing, discolored, or lighted dots on the screen
is an intrinsic characteristic of TFT LCD technology and is not an LCD
defect.
If you display a fixed pattern for more than 10 hours, its image may
remain on the screen in overlap mode when you display something else.
It is better to use PC screen saver or set power saving mode on PC.
Troubleshooting
When the message of 'out of range' appears.
1. Restart the computer and while it is restarting, press F8 until the Startup menu
appears. Then enter to start the computer in 'safe mode'.
2. Right-click the desktop, click Properties, and click Settings.
3. Click Advanced, click Adapter, and then click Adapter Default from the Refresh
Rate.
4. Click OK, Click OK again and then click Yes to restart the computer in Normal
mode. You can set the colors and screen area to your preferences under
Display Properties.
FCC NOTE
:This equipment has been tested and found to comply with the limits for a Class B digital device,
pursuant to Part 15 of the FCC Rules. These limits are designed to provide reasonable
protection against harmful interference in a residential installation. This equipment generates,
uses and can radiate radio frequency energy and, if not installed and used in accordance with
the instructions, may cause harmful interference to radio communications.
However, there is no guarantee that interference will not occur in a particular installation. If this
equipment does cause harmful interference to radio or television reception, which can be
determined by turning the equipment off and on, the user is encouraged to try to correct the
interference by one or more of the following measures:
-- Reorient or relocate the receiving antenna.
-- Increase the separation between the equipment and receiver.
-- Connect the equipment into an outlet on a circuit different from that to which
the receiver is connected.
-- Consult the dealer or an experienced radio/TV technician for help.
THIS DEVICE COMPLIES WITH PART 15 OF THE FCC RULES.
OPERATION IS SUBJECT TO THE FOLLOWING TWO CONDITIONS:
(1) THIS DEVICE MAY NOT CAUSE HARMFUL INTERFERENCE, AND
(2) THIS DEVICE MUST ACCEPT ANY INTERFERENCE RECEIVED,
INCLUDING INTERFERENCE THAT MAY CAUSE UNDESIRED OPERATION
THE MANUFACTURER IS NOT RESPONSIBLE FOR ANY RADIO OR TV INTERFERENCE
CAUSED UNAUTHORIZED MODIFICATIONS TO THIS EQUIPMENT. SUCH
MODIFICATIONS COULD VOID THE USER'S AUTHORITY TO OPERATE THE EQUIPMENT.