Melard Technologies SA806866R8 Rugged Handheld Computer with Integrated Wireless User Manual sa 2fcc
Melard Technologies Inc Rugged Handheld Computer with Integrated Wireless sa 2fcc
ex9 manual

October 2000 APREL Project No.:
Consulting
*
Research
*
Training
*
Certification
Testing Since 1981
FCC ID: ESD-SA806866R8
Exhibit 9
User’s Manual
User’s Guide
0-15-15-0022 REVD

Copyright 2000 Melard Technologies, Inc.
All rights reserved. This document may not, in whole or
part, be photocopied, reproduced, translated or reduced to
any electronic medium or machine readable form without
prior consent, in writing, from Melard Technologies, Inc.
Notice:
Melard Technologies reserves the right to make changes in
the product described in this manual at any time and
without notice.
Sidearm All-Terrain Handheld PC is a trademark of Melard
Technologies, Inc.
Microsoft, Windows and Windows CE are registered
trademarks of Microsoft Corp.
Intel is a registered trademark of Intel Corp.
This equipment conforms to FCC Parts 2 & 90
FCC Class B Part 15
This equipment has been tested and found to comply wi
th the limits for
a class A digital device, pursuant to Part 15 of the FCC Rules.
Operation is subject to the following conditions: (1) This device may
not cause harmful interference, and (2) this device must accept any
interference received, including int
erference that may cause undesired
operation. Class B limits are designed to provide reasonable
protection against harmful interference in a residential installation. This
equipment generates, uses and can radiate radio frequency energy
and, if not install
ed and used in accordance with the instructions, may
cause interference to radio communications. However, there is no
guarantee that interference will not occur in a particular installation. If
this equipment does cause harmful interference to radio or tel
evision
reception, which can be determined by turning the equipment off and
on, the user is encouraged to try to correct the interference by one or
more of the following measures:
• Reorient or relocate the receiving antenna.
• Increase the separation between the equipment and the receiver.
•
Connect the equipment into an outlet on a circuit different from
that to which the receiver is connected.
• Consult your dealer or an experienced technician for help.

Contents
Getting started...............................................................................1
Unpacking ................................................................................2
Power .............................................................................................4
Power options ..........................................................................5
Installing the main battery ........................................................6
Determining main battery condition..........................................6
Low power management..........................................................6
When the main battery becomes low... ....................................7
Charging the main battery.................................................7
Swapping the main battery................................................8
When the backup battery becomes low....................................9
Replacing the backup battery............................................9
Using the Sidearm.......................................................................10
Turning the Sidearm on and off.............................................. 11
Setting automatic power-off time..................................... 11
Understanding the indicators .................................................12
Using the stylus......................................................................13
Accessing the stylus .......................................................13
Calibrating the touchscreen ............................................14
Managing the display panel ...................................................14
Adjusting brightness........................................................14
Adjusting contrast ...........................................................14
Controlling backlighting...................................................15
Setting audio volume..............................................................15
Wireless communications (optional).......................................16
Integrated wireless modems ...........................................16
Sidearm’s wireless antenna ............................................16
Landline communications (optional).......................................16
Resetting the Sidearm............................................................16
Performing a soft reset....................................................17
Performing a full reset.....................................................17
Restoring unit back to factory settings ............................18
Maintaining the Sidearm.............................................................19
Cleaning the Sidearm.............................................................20
Disposing of batteries.............................................................20
Customer support...................................................................21
Availability.......................................................................21
Returning equipment for repair .......................................21
Sidearm specifications ...............................................................23
Limited one-year warranty – hardware...................................25
Introduction
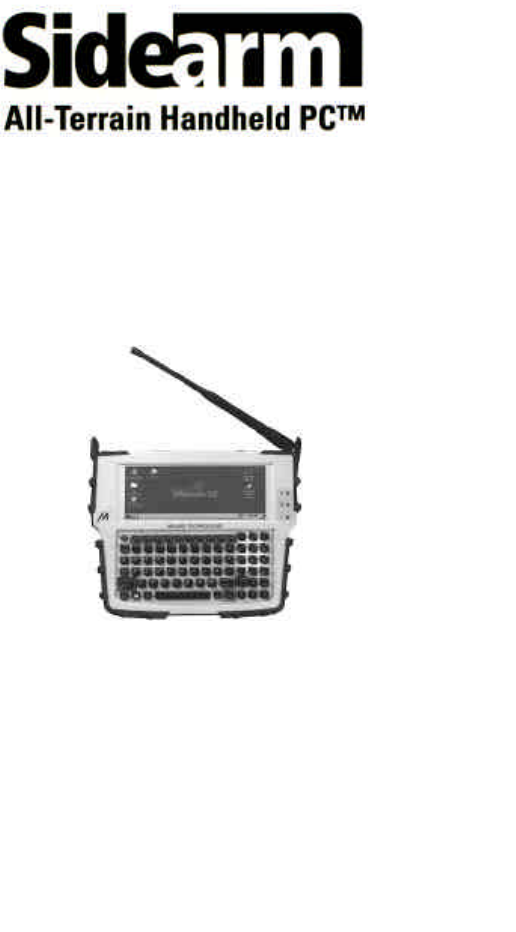
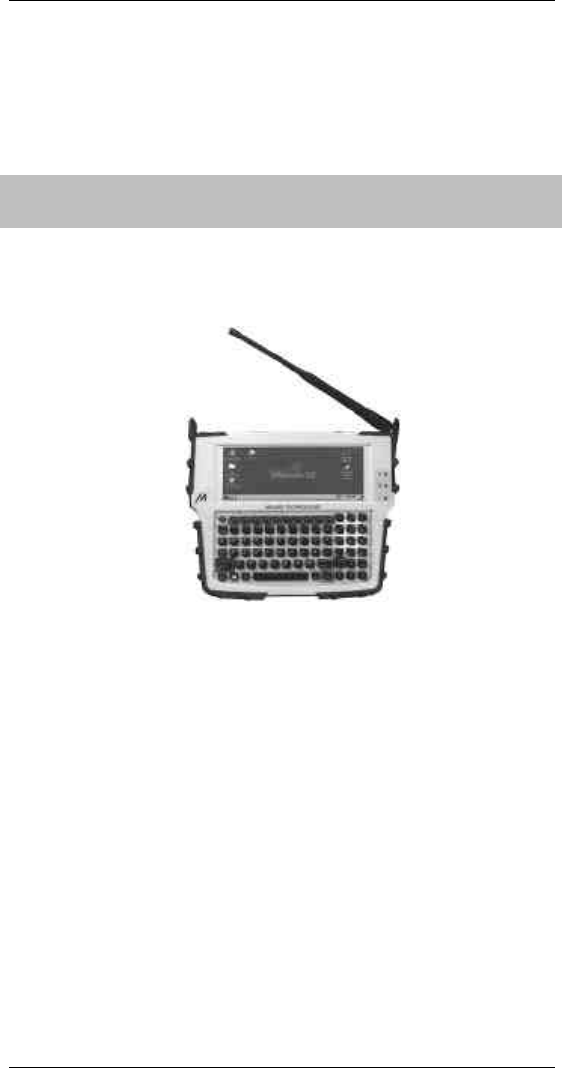
Melard Technologies’ Sidearm All-Terrain Handheld PC™
is a rugged, Microsoft Windows CE-based handheld
computer with integrated wireless communications. It
provides a compact and lightweight mobile computing
platform for field service operations.
System Features
n 640 x 240 touch-sensitive transflective display that
supports navigation with stylus (included) or finger.
n PC Card and CompactFlash slots.
n Integrated half-wave dipole antenna (optional).
n Internal V.90 56K modem (optional).
n IrDA infrared port.
n RS232 serial port with DB9 connector.
n USB host port.
n Power from rechargeable battery or AC adapter.
n Microphone for voice annotations.
n Speaker for audio output.
Hardware Features
n Santoprene bumpers.
n High impact PC-ABS plastic.

Getting started 1
Sidearm All-Terrain Handheld PC™ User’s Guide
Getting started

2 Getting started
User’s Guide Sidearm All-Terrain Handheld PC™
Unpacking
1. Inspect the shipping container for damage.
Note: If the container shows any signs of damage,
contact the carrier immediately.
2. Open the box and remove the components.
3. Assure all the components you ordered are included.
Note: If any items are missing, please contact Melard
Customer Support at (800) MELARD4 [1-800-635-
2734].
üü Description
o Sidearm All-Terrain Handheld PC™
o Main battery
o AC adapter & line cord
o Hand strap
o Stylus
üü Sidearm User’s Manual

Getting started 3
Sidearm All-Terrain Handheld PC™ User’s Guide
Precautions
n Carefully follow all instructions in this manual when
inserting or removing batteries, cables or external
devices.
n Always operate and store the Sidearm within the limits
of the temperature and environmental specifications in
this manual. Your Sidearm unit is highly water
resistant, which means it can be splashed with liquids.
The Sidearm is not waterproof in that it cannot be
immersed in liquid.
n Keep the original packaging in case the Sidearm needs
to be transported or shipped to Melard for service.
n DO use the supplied stylus or equivalent to utilize the
Sidearm’s touch screen feature. Use of ballpoint pens,
pencils and other sharp objects will cause permanent
damage to the unit’s touch screen.
n DO NOT use sharp or pointed objects on the keyboard,
doors or mechanisms. Doing so may cause permanent
damage to the unit.
n DO disconnect power and I/O cables by grasping the
cable connector.
n DO NOT disconnect power or I/O cables by pulling on
the cable itself.
n DO NOT allow foreign objects, debris or liquids to enter
any of the battery or external device openings.
n DO NOT attempt to open the case of the Sidearm, as
this will void your warranty.

4 Power for the Sidearm
User’s Guide Sidearm All-Terrain Handheld PC™
Power

Power for the Sidearm 5
Sidearm All-Terrain Handheld PC™ User’s Guide
Power options
The Sidearm can be powered from the rechargeable main
battery or from the AC adapter.
The main battery is recharged when the AC adapter is
connected to the Sidearm and a source of power.
The unit contains a non-rechargeable backup battery that
allows data to be retained for short periods of time when
the Sidearm is otherwise not powered (main battery
removed and AC adapter not connected).
Battery precautions
WARNING: Personal injury may result if batteries are not
handled in accordance with these instructions:
n Replace batteries ONLY with the same type. Failure to
replace with the same type may result in explosion.
Replacement batteries are available from Melard
Technologies.
n Follow manufacturer’s directions for disposing of used
batteries. (See page 20) NEVER burn batteries.
n If a battery becomes unusable, dispose of it
immediately.
n Do not subject batteries to impact.
n Do not allow children to handle or play with batteries.
n Keep batteries away from heat sources, including open
fires and direct sunlight. Never place batteries in
microwave ovens.
n Do not recharge batteries unless they are specifically
designed for recharging.
n Never disassemble a battery.
n Never solder or puncture a battery.
6 Power for the Sidearm
User’s Guide Sidearm All-Terrain Handheld PC™
Installing the main battery
1. Slide the battery into the battery slot on the right side of
the Sidearm as shown below.
2. Insert the rubber battery door and turn the lock tab to the
locked position.
Tip: If this is the first time you are using this battery,
charge it (see “Charging the battery,” later in this
chapter.
Determining main battery condition
To check the main battery’s condition:
n Open the Control Panel (Start / Settings / Control
Panel) and double-tap the power icon.
Low power management
The Sidearm automatically turns off if the main battery
becomes too weak to power the unit. When this happens,
recharge the main battery or replace it with a charged
battery (see next section).
CAUTION: If the main battery is removed for an
extended period, or if the main battery is installed but
remains depleted for an extended period, all data in
memory will be lost. For this reason, it’s a good idea to
keep a charged main battery in the unit at all times.
Power for the Sidearm 7
Sidearm All-Terrain Handheld PC™ User’s Guide
When the main battery becomes low...
When you see this message on the screen:
Main Batteries Very Low
it is time to charge or swap the battery.
Charging the main battery
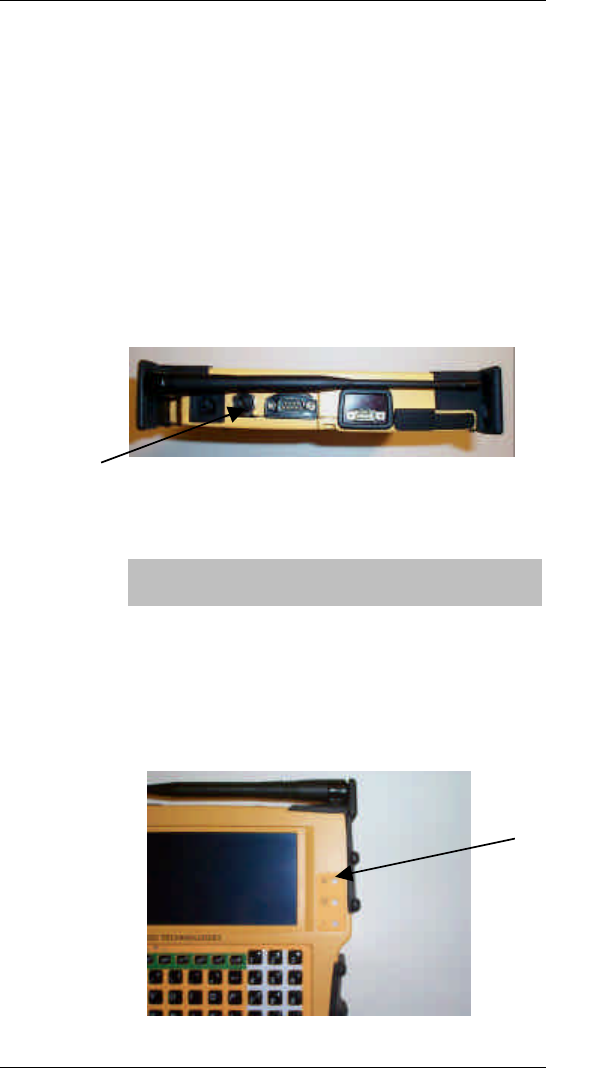
1. With the battery installed in the Sidearm, connect the AC
adapter to the Sidearm.
AC Adapter
Port
2. Plug the AC adapter into an electrical outlet.
Note: When the battery is depleted, it takes about 2
hours to fully recharge.
3. Monitor the Power LED:
n Orange => battery is charging.
Power LED

8 Power for the Sidearm
User’s Guide Sidearm All-Terrain Handheld PC™
4. When the battery is fully charged, you may remove the
AC adapter from the electrical outlet and disconnect it
from the Sidearm.
Swapping the main battery
1. Have a fully charged main battery available.
2. Save all files.
3. Turn off the Sidearm’s power (see page 12).
4. Disconnect all cables attached to the Sidearm.
5. Remove the low battery:
a. Turn the lock tab and remove the battery door.
b. Pull the battery out.
6. Insert the charged battery:
a. Slide the battery into the battery slot.
b. Insert the battery door and turn the lock tab.
Note: If the main battery is removed and the Sidearm
is not powered by the AC adapter, the internal backup
battery will maintain data for a short period of time
while swapping the main battery. However, the backup
battery does not provide enough power to operate the
Sidearm.
Power for the Sidearm 9
Sidearm All-Terrain Handheld PC™ User’s Guide
When the backup battery becomes low...
When you see this message on the screen:
Replace Backup Batteries
it is time to replace the backup battery.
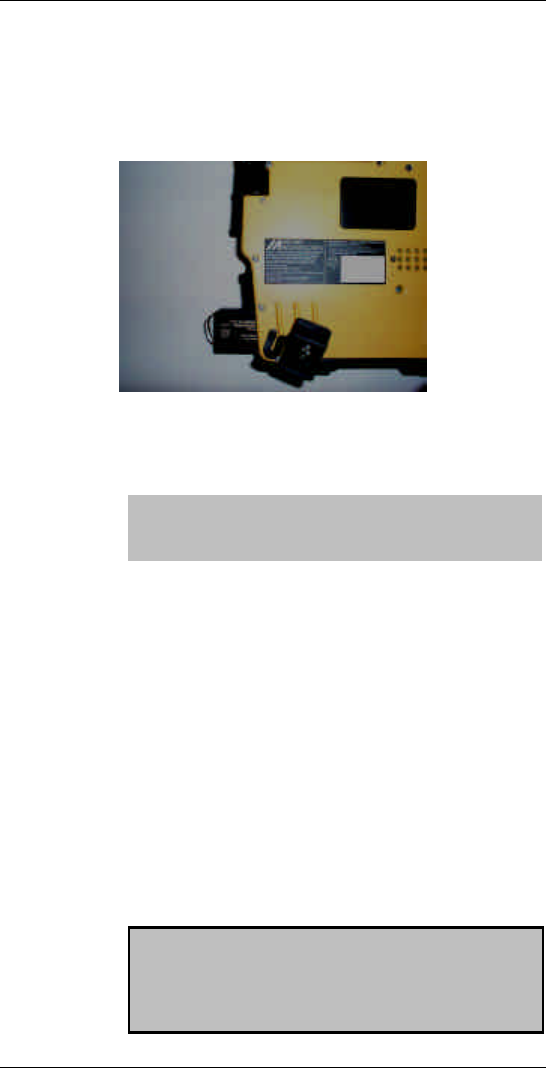
Replacing the backup battery
1. Have a fully charged main battery in the Sidearm.
2. Save all files.
3. Turn off the Sidearm’s power (see page 12).
4. Disconnect all cables attached to the Sidearm.
5. Remove the backup battery :
a. Remove backup battery door.
b. Slide the battery out.
6. Insert the new backup battery:
a. Slide the battery into the backup battery slot.
b. Replace the backup battery door.
Backup Battery
Door

10 Using the Sidearm
User’s Guide Sidearm All-Terrain Handheld PC™
Using the Sidearm

Using the Sidearm 11
Sidearm All-Terrain Handheld PC™ User’s Guide
Turning the Sidearm on and off
Note: After you install the main battery for the first
time, the Sidearm is automatically turned on. You may
need to adjust the display for best visibility (see next
section).
The power button is located on the upper left hand corner
of the Sidearm keyboard.
n To turn the Sidearm on: Press the power button.
n To turn the Sidearm off: Press the power button.
Setting automatic power-off time
When there is no user activity for a certain period, the
Sidearm automatically turns off. Here’s how to set the
power-off time:
1. Open the Control Panel (Start / Settings / Control
Panel).
2. Double-tap the Power icon.
3. Tap the Power Off tab.
4. Select a power-off time.
Power
Button
12 Using the Sidearm
User’s Guide Sidearm All-Terrain Handheld PC™
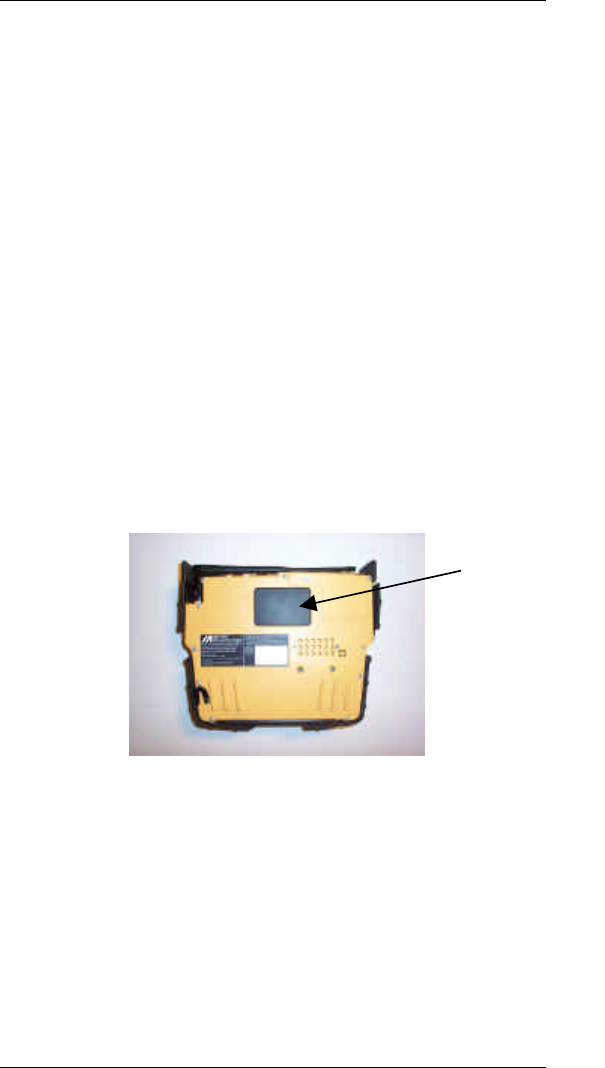
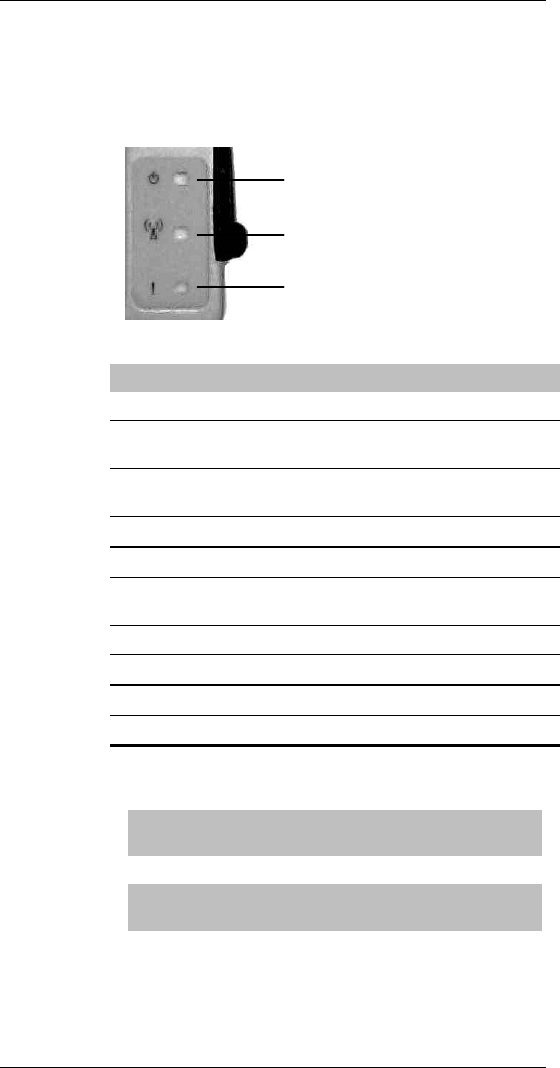
Understanding the indicators
Three indicator lights (LEDs to the right of the display)
provide information about system status.
Power
Network
Alert
LED Status Meaning
Power Off AC adapter not in use.
Orange AC adapter in use and battery is
charging.
Blinking orange AC adapter in use and battery
not installed.
Green AC adapter in use.
Network Off Wireless modem off.
Orange Wireless modem
communications active.
Green Wireless modem on.
Blinking green Wireless message received.
Alert Blinking green Custom use by applications.
All other Custom use by applications.
Note: Power lights are not active when the Sidearm is
operating on battery power.
Note: Wireless modem indicators may vary depending
on network.

Using the Sidearm 13
Sidearm All-Terrain Handheld PC™ User’s Guide
Using the stylus
The Sidearm’s display is touch-sensitive. Using the
supplied stylus, you can interact with icons and
applications appearing in the display.
Using the stylus is similar to using a desktop PC’s mouse
and on-screen cursor. Unlike a mouse, you use the stylus
by placing it directly on the Sidearm’s display screen:
n Tap to select items and activate options (equivalent to
clicking with a mouse).
n Double-tap to open applications and documents
(equivalent to double-clicking with a mouse).
n Drag to move items, and to select areas or multiple
items (equivalent to dragging with a mouse).
Accessing the stylus
The stylus is stored along the edge below the keyboard. To
remove the stylus, simply snap it out of this location.
Tip: To prevent loss of the stylus, always return it to its
storage location when it is not in use.
Stylus

14 Using the Sidearm
User’s Guide Sidearm All-Terrain Handheld PC™
Calibrating the touchscreen
For best performance, occasionally recalibrate the
touchscreen:
1. Press and hold the MELARD key , then press the
C key.
2. Use the arrow keys to highlight the Stylus icon, then
press ENTER.
3. In the Stylus Properties window:
a. Press the TAB key to select the Double Tap tab.
b. Press the RIGHT-ARROW key to select the Calibration
tab.
c. Press the TAB key to select the Recalibrate button.
d. Press the ENTER key.
Managing the display panel
Adjusting brightness
Tip: Lower brightness levels to extend battery life.
With Sidearm power on:
n To increase panel brightness: Press and hold the SHIFT
key, then press the F3 key.
n To decrease panel brightness: Press and hold the SHIFT
key, then press the F4 key.
Adjusting contrast
With Sidearm power on:
n To increase panel contrast: Press and hold the SHIFT key,
then press the F1 key.
n To decrease panel contrast: Press and hold the SHIFT
key, then press the F2 key.

Using the Sidearm 15
Sidearm All-Terrain Handheld PC™ User’s Guide
Controlling backlighting
CAUTION: Extended use of backlight will reduce
battery life.
n To manually turn backlighting on or off: Press the
BACKLIGHTING button .
n To have backlighting automatically turn off:
1. Open the Control Panel (Start / Settings / Control
Panel).
2. Double-tap the Display icon.
3. In the Display Properties window, tap the Backlight
tab.
4. Activate the desired options and set the corresponding
turn-off times.
5. Tap OK.
n To have backlighting automatically turn on:
1. Open the Backlight tab in the Display Properties
window (see above).
2. Tap the Advanced... button.
3. Activate the desired options.
4. Tap OK.
Setting audio volume
With Sidearm power on:
n To increase audio volume: Press and hold the SHIFT key,
then press the F5 key.
n To decrease audio volume: Press and hold the SHIFT key,
then press the F6 key.

16 Using the Sidearm
User’s Guide Sidearm All-Terrain Handheld PC™
Wireless communications (optional)
Using wireless modems
The Sidearm supports fully integrated wireless modems for
multiple data networks. It is not necessary to manually turn
the wireless modem on or off; the appropriate application
software will automatically activate the wireless modem
when required.
Positioning the wireless antenna
For the wireless systems, Sidearm uses a half-wave dipole
antenna that is secured to the top right edge of the display
screen. The antenna is strategically placed to optimize
wireless coverage. For best coverage while using Sidearm,
position the antenna in the upright position.
Unauthorized antenna modifications could damage the
Sidearm and may violate FCC regulations.
In order to comply with the FCC RF Exposure
requirements, this device must be operated with a minimum
separation distance of 4 cm between the bystanders, parts
of the user other than the extremities, and the antenna in its
intended upright vertical operating position.
Landline communications (optional)
The optional 56K v.90 landline modem is accessible via the
standard sealed RJ-11 connector located on the top of the
unit.
A combination RJ-11 / RJ-45 connector is available.
Ethernet connectivity (10BaseT/10Base2) is optional and
supported via this connector.
Resetting the Sidearm
Certain conditions require that you reset the Sidearm:
n After restoring data from a host PC.
n After installing new software.

Using the Sidearm 17
Sidearm All-Terrain Handheld PC™ User’s Guide
n If the operating system doesn’t respond.
n If you can’t turn on the Sidearm using the power
button.
Two methods for resetting are provided. Use the method
appropriate for the condition you encounter:
n To preserve data in memory (a “warm boot”), use the
soft reset.
n To recover from a complete failure, use the full reset.
Tip: To prevent loss of documents and data, perform
regular backups by copying files to a host PC or
storage card.
Performing a soft reset
1. Because you could lose open files or unsaved data, close
open documents and applications.
2. Locate the reset button (small hole to the right of the
power button).
3. Using the stylus, gently press the reset button.
Performing a full reset
Before performing a full reset, try to recover the system
using other methods:
n Assure the battery is inserted properly and locked.
n Install a battery known to be charged.
n Connect the AC adapter to the Sidearm.
n Try a soft reset (see previous section).
CAUTION: A full reset will likely erase all user-specific
data, documents and programs from memory. If
possible, backup all files to your host PC or storage
card before performing a full reset.

18 Using the Sidearm
User’s Guide Sidearm All-Terrain Handheld PC™
1. Locate the reset button (small hole to the right of the
power button).
2. Press and hold the BACKLIGHT button .
3. Using the stylus, press the reset button.
Restoring unit back to factory settings
CAUTION: Restoring unit back to factory settings will
erase all user-specific data, documents and programs
from memory.
1. Disconnect AC power if applied.
2. Remove main battery and backup battery for about one
minute.
3. Replace main battery.
4. Replace backup battery.

Maintaining the Sidearm 19
Sidearm All-Terrain Handheld PC™ User’s Guide
Maintaining the Sidearm

20 Maintaining the Sidearm
User’s Guide Sidearm All-Terrain Handheld PC™
Cleaning the Sidearm
n ALWAYS turn off the Sidearm and disconnect the AC
adapter before cleaning. Make sure all doors are closed
tight.
n Clean the case, keyboard, bumpers and screen with a
soft, slightly damp cloth. Use a mild detergent to
remove oils, ink, etc.
n DO NOT use chemical cleaners, abrasives or solvents on
the Sidearm.
n If the connectors get dirt/sand/dust lodged in them, use a
blast of clean, dry air to dislodge and remove the debris.
Disposing of batteries
Never subject batteries to extreme heat or dispose of in a
fire. The batteries should not be dropped or subjected to
strong mechanical shock. Lithium Ion and NiMH cells
contain alkaline electrolyte which can cause injury. In the
event that electrolyte comes in contact with skin or eye,
immediately flush with fresh water and seek medical
advice.
Under federal, state and local laws, it may be illegal to
dispose of old batteries by placing them in the trash. In
such cases the batteries may need to be recycled. Check
with your local government offices for information on
where to recycle or dispose of old batteries. If you cannot
locate this information contact Melard Technologies
Customer Support for assistance.

Maintaining the Sidearm 21
Sidearm All-Terrain Handheld PC™ User’s Guide
Customer support
Telephone number (800) MELARD4 (635-2734)
(914) 273-4488
Fax number (914) 273-1775
Availability
Standard Customer Support is provided, between 9:00 a.m.
to 5:00 p.m. (EST) during the week, free of charge to
Melard’s customers. Melard also offers service options that
provide support beyond the standard hours.
If you encounter problems with your Sidearm, please read
through this manual before calling Melard. You may be
able to resolve it yourself.
Note: If you are a corporate user, your company may
have its own policies regarding troubleshooting and
reporting. In that case, please follow your company’s
instructions.
If you need to call Melard, please have the following
information available:
n Sidearm and its major peripherals.
n Serial Number of your Sidearm.
n Name and Version of software you are using.
n Description of the problem you are having.
Returning equipment for repair
If the Client Support Representative is unable to solve your
problem over the phone, it may be necessary to return your
equipment for service.
The Client Support Representative will authorize the return
of your equipment by issuing you a Return Merchandise
Authorization (RMA) number.
CAUTION: Always call Melard Client Support before
returning anything. Failure to obtain an RMA number
before returning your equipment can result in lengthy
delays in repairing your computer and possibly the
refusal of your equipment at the receiving point.

22 Maintaining the Sidearm
User’s Guide Sidearm All-Terrain Handheld PC™
Before returning your system to Melard, back up your files
by copying to a host PC or to a PC Card.
Pack your Sidearm in its original shipping container or in a
sturdy corrugated box. Cushion it with bubble-wrap or
foam material. When returning any item for repair, always
include:
n Your name and your company name, if applicable.
n Return mailing address.
n Detailed description of the problem.
n Name and telephone number of person directly
responsible for maintaining the equipment, in case our
Repair Department has any questions.
n Packing list of items being returned.
Write the RMA number in large, clear characters on the
outside of the box.
All items returned to Melard for repair must be shipped
prepaid. For your protection, it is highly recommended that
the computer be insured for its full replacement value when
shipped. Melard is not responsible for damage to
equipment during shipment from the customer’s site to the
service center(s), whether the equipment is in or out of
warranty.
Mail equipment to: Melard Technologies
28 Kaysal Court
Armonk, NY 10504
ATTN: Service Center
RMA # XXXXXX
When you ship your equipment always use a shipping
carrier with the capability to trace packages. Please note
that Standard U.S. Mail is not traceable. Items will be
returned after repair by a carrier chosen by Melard
Technologies.
Sidearm specifications 23
Sidearm All-Terrain Handheld PC™ User’s Guide
Sidearm specifications

24 Sidearm specifications
User’s Guide Sidearm All-Terrain Handheld PC™
Size/weight Height: 8.66 in.
Width: 7.25 in.
Depth: 1.5 in.
Weight: 2.4 lbs. with battery
Processor Intel StrongARM 206 MHz. processor
Memory 16 MB RAM expandable
16 MB ROM expandable
Power Li-ion rechargeable battery
Internal short-term backup battery (non-recharge)
AC charger/adapter (Input 100-240VAC, 50-60HZ;
output12V, 3.75A)
Keyboard 75-key QWERTY keyboard
Display 640 x 240 color or mono transflective display (6.5"
wide)
Touch sensitive
Backlighting
Expansion One Type III or Type II PC Card slot
One CF+ CompactFlash slot
Interfaces RS232 serial interface (DB9 connector)
USB port
RJ-11 port
Microphone
Speaker
Communications V.90 56K modem
IrDA 115K and 4Mbps infrared communications
Wireless modem (optional)
Pre-loaded software Windows CE 2.12
Utilities
Environmental Operating Temperature:
-20°C (-4°F) to 60°C (140°F)
Storage Temperature:
-40°C (-22°F) to 70°C (158°F)
Industry approvals UL/CSA
FCC Part 15 Class B
Applicable International approvals
Accessories (included) AC adapter
Rechargeable Li-ion battery
Hand strap
Stylus
User manual
Options Docking station (AC/DC vehicle mountable)
Holster/Case

Warranty 25
Sidearm All-Terrain Handheld PC™ User’s Guide
Limited one-year warranty – hardware
Melard warrants that the hardware products it manufactures will be free
from defects in materials and workmanship. The warranty term is one
year beginning on the date of shipment. This warranty includes the
computer, port replicating docking stations, battery and all integrated
peripherals such as radios, modems, and PC Cards. Accessories such as
AC adapters, vehicle adapters, carry cases, and any external devices not
specified in this or additional warranties are covered for ninety (90) days
from the date of shipment.
This warranty does not cover damage due to external causes, including
accident, abuse, misuse, problems with electrical power, servicing not
authorized by Melard, usage not in accordance with product instructions,
failure to perform required preventive maintenance, and problems caused
by use of parts and components not supplied by Melard.
Melard will repair or replace products covered under this limited warranty
that are returned to Melard's product service facility. To request warranty
service, customer must call Melard's Customer Technical Support within
the warranty period. If warranty service is required, Melard will issue a
Return Material Authorization (RMA) Number. An RMA number is valid
for 15 days from the date it was issued. All returns without an RMA
number or with an expired RMA number will be refused. Customer must
ship the products back to Melard in their original or equivalent packaging,
prepay shipping charges, and insure the shipment or accept the risk of loss
or damage during shipment. All product returns should be shipped to:
Melard Technologies
28 Kaysal Court
Armonk, NY 10504
ATTN: Service Center
RMA # XXXXXX
Merchandise returned to Melard as defective is tested by Melard upon
receipt. If Melard finds any such product to be working properly, the
sender shall be charged a fee for testing, verification and handling. If the
Melard warranty label is removed, damaged or covered, the product will
be treated as out-of-warranty product.
Melard will return the repaired or replacement products freight prepaid to
addresses within the continental U.S. or Canada. Shipments to other
locations will be made via customer’s choice of carrier and shipped either
freight collect or billed directly to customer’s account.
continued

26 Warranty
User’s Guide Sidearm All-Terrain Handheld PC™
Melard uses new and reconditioned parts made by various manufacturers
in performing warranty repairs and building replacement products. All
repairs or replacements are warranted for ninety (90) days from the date of
repair or the remainder of the original warranty.
THIS WARRANTY GIVES SPECIFIC LEGAL RIGHTS WHICH VARY
FROM STATE TO STATE (OR JURISDICTION TO JURISDICTION).
MELARD'S RESPONSIBILITY FOR MALFUNCTIONS AND
DEFECTS IN HARDWARE IS LIMITED TO REPAIR AND
REPLACEMENT AS SET FORTH IN THIS WARRANTY
STATEMENT. ALL EXPRESS AND IMPLIED WARRANTIES FOR
THE PRODUCT, INCLUDING BUT NOT LIMITED TO ANY
IMPLIED WARRANTIES OF AND CONDITIONS OF
MERCHANTABILITY AND FITNESS FOR A PARTICULAR
PURPOSE, ARE LIMITED IN DURATION TO THE WARRANTY
PERIOD SET FORTH ABOVE AND NO WARRANTIES, WHETHER
EXPRESS OR IMPLIED, WILL APPLY AFTER SUCH PERIOD.
MELARD DOES NOT ACCEPT LIABILITY BEYOND THE
REMEDIES SET FORTH IN THIS WARRANTY STATEMENT OR
LIABILITY FOR INCIDENTAL OR CONSEQUENTIAL DAMAGES,
INCLUDING, WITHOUT LIMITATION, ANY LIABILITY FOR
PRODUCTS NOT BEING AVAILABLE FOR USE OR FOR LOST
DATA OR SOFTWARE.
SOME STATES (OR JURISDICTIONS) DO NOT ALLOW
LIMITATIONS ON HOW LONG AN IMPLIED WARRANTY LASTS
OR THE EXCLUSION OR LIMITATION OF INCIDENTAL OR
CONSEQUENTIAL DAMAGES. IN THESE STATES (OR
JURISDICTIONS) THE PRECEDING EXCLUSION OR LIMITATION
MAY NOT APPLY.