Mercury Networks QUANTUM1000 Quantum 1000 Base Station User Manual Part 2
Mercury Networks, LLC Quantum 1000 Base Station Users Manual Part 2
Contents
- 1. Users Manual Part 1
- 2. Users Manual Part 2
Users Manual Part 2

Quantum 1000 Base Station User
3.
Grounding and Lightning Requirements
Proper lightning protection requires t
protection built into the PureWave equipment. The primary protectors offer the surge currents a direct
path to earth ground versus the undesirable “sneak” paths it may find through the equip
Properly installed and grounded primary protectors will dramatically increase the surge withstanding
capabilities of the PureWave equipment. Surges that exceed the maximum ratings of the primary
protector devices will eventually cause them to fail,
short or open, as the application warrants, such that further surges will not damage the end equipment.
While a failed primary protector still results in a service outage, it does prevent further damage
more expensive end equipment.
A Base Station that is installed outdoor on the tower or mast (ODU) is especially vulnerable to lightning
surges. Good surge mitigation practice starts with the lightning rod and its connection to a proper sized
down conductor.
The ground down conductor should be as straight as possible and avoid incidental contact with other
conductors such that it represents the path of least resistance to earth ground from the lightning rod. The
tower/mast is also earth grounded to
safety, and generally presents a less desirable path to ground to surge currents. ODU equipment and
external primary protection devices are mounted to the tower/mast and should be bonded t
at the same point on the down conductor. This practice is intended to avoid ground loop currents that may
flow from differences in potential between the tower/mast structure and down conductor while large surge
currents are flowing in them r
espectively. Good surge mitigation practice also makes use of shielded
cables with peripheral shield grounding to minimize potentials induced on circuit conductors.
These cables should also be secured to the tower/mast at regular intervals to create
from conductors which are carrying surge currents. This practice avoids incidental contact or possible
insulation breakdown from high surge potentials.
A Base Station that is installed indoor units (IDU) requires similar protection as
(ODU). Primary protection devices are installed on all cables just prior to entry of the facility and bonded
to an earth ground stake. Likewise, the cable shields are grounded at the entry panel which should be
bonded to the same e
arth ground stake.
IDU equipment may also be vulnerable to surges entering via the AC power connection and steps should
be taken to install a proper AC Surge Suppressor device to complete a well protected installation.
3.1
Lightning Protection Installation
The following are considered to be the main elements that constitute the components of a lightning
protection scheme.
Lightning Rod
Base Station and Antenna Grounding
Down Conductor
Coaxial and/or Cat 5 Cable Shield Grounding
Quantum 1000 Base Station User
Guide
Rev 1.1, Page
Grounding and Lightning Requirements
Proper lightning protection requires t
he use of external primary protectors to complement the secondary
protection built into the PureWave equipment. The primary protectors offer the surge currents a direct
path to earth ground versus the undesirable “sneak” paths it may find through the equip
Properly installed and grounded primary protectors will dramatically increase the surge withstanding
capabilities of the PureWave equipment. Surges that exceed the maximum ratings of the primary
protector devices will eventually cause them to fail,
however these devices are generally designed to fail
short or open, as the application warrants, such that further surges will not damage the end equipment.
While a failed primary protector still results in a service outage, it does prevent further damage
A Base Station that is installed outdoor on the tower or mast (ODU) is especially vulnerable to lightning
surges. Good surge mitigation practice starts with the lightning rod and its connection to a proper sized
The ground down conductor should be as straight as possible and avoid incidental contact with other
conductors such that it represents the path of least resistance to earth ground from the lightning rod. The
tower/mast is also earth grounded to
keep its conductive elements at earth potential (0V) for personnel
safety, and generally presents a less desirable path to ground to surge currents. ODU equipment and
external primary protection devices are mounted to the tower/mast and should be bonded t
at the same point on the down conductor. This practice is intended to avoid ground loop currents that may
flow from differences in potential between the tower/mast structure and down conductor while large surge
espectively. Good surge mitigation practice also makes use of shielded
cables with peripheral shield grounding to minimize potentials induced on circuit conductors.
These cables should also be secured to the tower/mast at regular intervals to create
physical separation
from conductors which are carrying surge currents. This practice avoids incidental contact or possible
insulation breakdown from high surge potentials.
A Base Station that is installed indoor units (IDU) requires similar protection as
the outdoor installation
(ODU). Primary protection devices are installed on all cables just prior to entry of the facility and bonded
to an earth ground stake. Likewise, the cable shields are grounded at the entry panel which should be
arth ground stake.
IDU equipment may also be vulnerable to surges entering via the AC power connection and steps should
be taken to install a proper AC Surge Suppressor device to complete a well protected installation.
Lightning Protection Installation
Components
The following are considered to be the main elements that constitute the components of a lightning
Base Station and Antenna Grounding
Coaxial and/or Cat 5 Cable Shield Grounding
Rev 1.1, Page
38 of 70
he use of external primary protectors to complement the secondary
protection built into the PureWave equipment. The primary protectors offer the surge currents a direct
path to earth ground versus the undesirable “sneak” paths it may find through the equip
ment.
Properly installed and grounded primary protectors will dramatically increase the surge withstanding
capabilities of the PureWave equipment. Surges that exceed the maximum ratings of the primary
however these devices are generally designed to fail
short or open, as the application warrants, such that further surges will not damage the end equipment.
While a failed primary protector still results in a service outage, it does prevent further damage
to the
A Base Station that is installed outdoor on the tower or mast (ODU) is especially vulnerable to lightning
surges. Good surge mitigation practice starts with the lightning rod and its connection to a proper sized
The ground down conductor should be as straight as possible and avoid incidental contact with other
conductors such that it represents the path of least resistance to earth ground from the lightning rod. The
keep its conductive elements at earth potential (0V) for personnel
safety, and generally presents a less desirable path to ground to surge currents. ODU equipment and
external primary protection devices are mounted to the tower/mast and should be bonded t
o earth ground
at the same point on the down conductor. This practice is intended to avoid ground loop currents that may
flow from differences in potential between the tower/mast structure and down conductor while large surge
espectively. Good surge mitigation practice also makes use of shielded
cables with peripheral shield grounding to minimize potentials induced on circuit conductors.
physical separation
from conductors which are carrying surge currents. This practice avoids incidental contact or possible
the outdoor installation
(ODU). Primary protection devices are installed on all cables just prior to entry of the facility and bonded
to an earth ground stake. Likewise, the cable shields are grounded at the entry panel which should be
IDU equipment may also be vulnerable to surges entering via the AC power connection and steps should
be taken to install a proper AC Surge Suppressor device to complete a well protected installation.
The following are considered to be the main elements that constitute the components of a lightning
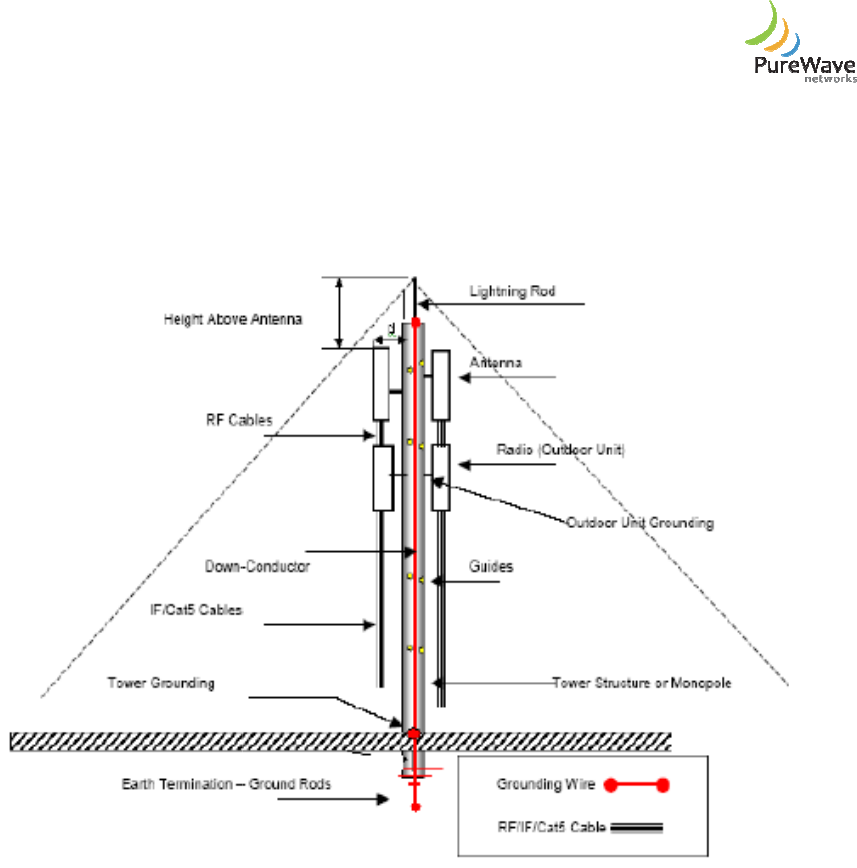
Quantum 1000 Base Station User
Figure 41, d
emonstrates graphically how these elements are applied to an overall lightning design.
Please note that this is simply a generic diagram and that each individual installation may have its own
specific requirements which may differ from the diagram. The key
The main items will be outlined in more detail in the following sections.
Figure
3.2 Lightning Rod
The Lightning Rod must be welded to the mast
constructed of a steel pointed tip and is in general installed at the highest point of the tower. It operates to
intercept the downward moving lightning strike by launching an upward going attachment spark.
attachment is achieved, the bulk of the lightning current follows the ionized path. In this way, the lightning
rod diverts the lightning away from equipment on the tower.
If the lightning rod is not installed at the highest point on the tower, t
highest point (usually a radio) is the most likely attachment point.
A Class I lightning rod (air terminal) is 3/8
inch copper or 5/8-
inch aluminum. Con
(stranded or strips) and materials (aluminum or copper). Since most soils contain acid or alkaloid
compounds that react with aluminum, any aluminum used must not come in contact with the so
Lightning rods (air terminals) 24 inches or higher should be used.
Quantum 1000 Base Station User
Guide
Rev 1.1, Page
emonstrates graphically how these elements are applied to an overall lightning design.
Please note that this is simply a generic diagram and that each individual installation may have its own
specific requirements which may differ from the diagram. The key
point to note is the overall concept.
The main items will be outlined in more detail in the following sections.
Figure
41 - A Typical Lightning Protection Design
The Lightning Rod must be welded to the mast
structure and to a down conductor. This should be
constructed of a steel pointed tip and is in general installed at the highest point of the tower. It operates to
intercept the downward moving lightning strike by launching an upward going attachment spark.
attachment is achieved, the bulk of the lightning current follows the ionized path. In this way, the lightning
rod diverts the lightning away from equipment on the tower.
If the lightning rod is not installed at the highest point on the tower, t
he equipment that is connected to the
highest point (usually a radio) is the most likely attachment point.
A Class I lightning rod (air terminal) is 3/8
-inch copper or 1/2-
inch aluminum, while Class II calls for 1/2
inch aluminum. Con
ductor sizes vary accordingly, also depending on their composition
(stranded or strips) and materials (aluminum or copper). Since most soils contain acid or alkaloid
compounds that react with aluminum, any aluminum used must not come in contact with the so
Lightning rods (air terminals) 24 inches or higher should be used.
Rev 1.1, Page
39 of 70
emonstrates graphically how these elements are applied to an overall lightning design.
Please note that this is simply a generic diagram and that each individual installation may have its own
point to note is the overall concept.
structure and to a down conductor. This should be
constructed of a steel pointed tip and is in general installed at the highest point of the tower. It operates to
intercept the downward moving lightning strike by launching an upward going attachment spark.
Once the
attachment is achieved, the bulk of the lightning current follows the ionized path. In this way, the lightning
he equipment that is connected to the
inch aluminum, while Class II calls for 1/2
-
ductor sizes vary accordingly, also depending on their composition
(stranded or strips) and materials (aluminum or copper). Since most soils contain acid or alkaloid
compounds that react with aluminum, any aluminum used must not come in contact with the so
il.

Quantum 1000 Base Station User
Referring to figure 41
above, the “Height Above Antenna” above the highest item of equipment (generally
the antenna) must be at least twice the distance (2 x d) between the outer surfa
tower. This will ensure a “protection cone” of 60 degrees around the tower (30 degrees each side from
the lightning rod). In areas of high lightning activity, the “Height Above Antenna” should be increased to
up 5 times the distance.
3.3 Down Conductor
The purpose of the Down conductor is to provide the shortest and most direct path to the earth.
grounding of the down conductor to earth must be of ground resistance no more than 5 ohms.
3.4 Co-
axial and/or Cat 5 Cable Shield Grounding
The purpose of the Shield grounding is to minimize the potentials induced on circuit conductors plus keep
the cable shields at earth potential (0V) for personnel safety.
All ground lugs must be properly bonded to the grounding system of the protected comp
all Antenna cables. Prior to entry into any facility, the cables must be properly grounded to the building
primary ground system at the building entrance panel.
In case of an indoor installed Base Station then this will apply to the co
Station to the Antenna. This is because these co
the indoor and the outdoor.
In the case of an outdoor installed Base Station, then this will apply to the Cat 5 cab
connection to the Base Station. In the case of an installation of the Base Station, it is the Cat 5 cable and
the power that provide the inter-
connections between the indoor and the outdoor.
3.5
Grounding and Bonding
The National Electric Code r
equires that any accessible metallic surface of electronic equipment be
connected to earth ground for personnel safety. Earth ground connections are achieved by direct
connections to the AC power ground at the IDU and by a grounding lug on the ODU. A Craft
attach a proper size wire to the ODU ground lug during installation, else the ODU chassis will float at
whatever potential appears at the shield connection of the coax.
3.6
Recommended Connection of a Bonded Ground
We will now examine the conce
pt of a bonded ground. Bonded connections for reliable, gas tight joints
between conductors require removal of all paint from both contact surfaces and holding them together
under high pressure such as with a bolt or screw. The use of toothed washers is al
cause the conductive surfaces to bite into each other for improved connectivity and eliminate movement
of the conductors due to vibration.
Quantum 1000 Base Station User
Guide
Rev 1.1, Page
above, the “Height Above Antenna” above the highest item of equipment (generally
the antenna) must be at least twice the distance (2 x d) between the outer surfa
ce of the item and the
tower. This will ensure a “protection cone” of 60 degrees around the tower (30 degrees each side from
the lightning rod). In areas of high lightning activity, the “Height Above Antenna” should be increased to
The purpose of the Down conductor is to provide the shortest and most direct path to the earth.
grounding of the down conductor to earth must be of ground resistance no more than 5 ohms.
axial and/or Cat 5 Cable Shield Grounding
The purpose of the Shield grounding is to minimize the potentials induced on circuit conductors plus keep
the cable shields at earth potential (0V) for personnel safety.
All ground lugs must be properly bonded to the grounding system of the protected comp
all Antenna cables. Prior to entry into any facility, the cables must be properly grounded to the building
primary ground system at the building entrance panel.
In case of an indoor installed Base Station then this will apply to the co
-
axial cables that connect the Base
Station to the Antenna. This is because these co
-axial cables provide the only inter-
connection between
In the case of an outdoor installed Base Station, then this will apply to the Cat 5 cab
le and power
connection to the Base Station. In the case of an installation of the Base Station, it is the Cat 5 cable and
connections between the indoor and the outdoor.
Grounding and Bonding
equires that any accessible metallic surface of electronic equipment be
connected to earth ground for personnel safety. Earth ground connections are achieved by direct
connections to the AC power ground at the IDU and by a grounding lug on the ODU. A Craft
attach a proper size wire to the ODU ground lug during installation, else the ODU chassis will float at
whatever potential appears at the shield connection of the coax.
Recommended Connection of a Bonded Ground
pt of a bonded ground. Bonded connections for reliable, gas tight joints
between conductors require removal of all paint from both contact surfaces and holding them together
under high pressure such as with a bolt or screw. The use of toothed washers is al
so recommended to
cause the conductive surfaces to bite into each other for improved connectivity and eliminate movement
Rev 1.1, Page
40 of 70
above, the “Height Above Antenna” above the highest item of equipment (generally
ce of the item and the
tower. This will ensure a “protection cone” of 60 degrees around the tower (30 degrees each side from
the lightning rod). In areas of high lightning activity, the “Height Above Antenna” should be increased to
The purpose of the Down conductor is to provide the shortest and most direct path to the earth.
The
grounding of the down conductor to earth must be of ground resistance no more than 5 ohms.
The purpose of the Shield grounding is to minimize the potentials induced on circuit conductors plus keep
All ground lugs must be properly bonded to the grounding system of the protected comp
onents along with
all Antenna cables. Prior to entry into any facility, the cables must be properly grounded to the building
axial cables that connect the Base
connection between
le and power
connection to the Base Station. In the case of an installation of the Base Station, it is the Cat 5 cable and
equires that any accessible metallic surface of electronic equipment be
connected to earth ground for personnel safety. Earth ground connections are achieved by direct
connections to the AC power ground at the IDU and by a grounding lug on the ODU. A Craft
sperson must
attach a proper size wire to the ODU ground lug during installation, else the ODU chassis will float at
pt of a bonded ground. Bonded connections for reliable, gas tight joints
between conductors require removal of all paint from both contact surfaces and holding them together
so recommended to
cause the conductive surfaces to bite into each other for improved connectivity and eliminate movement
Quantum 1000 Base Station User
3.7
Single Point Grounding Concept
Extensive analysis and investigation of installations has led to
the majority of the failures is likely to be the presence of multi
and in the huts. Single point grounding these elements will eliminate ground voltage differentials
will dramatically increase the equipment survivability during surges.
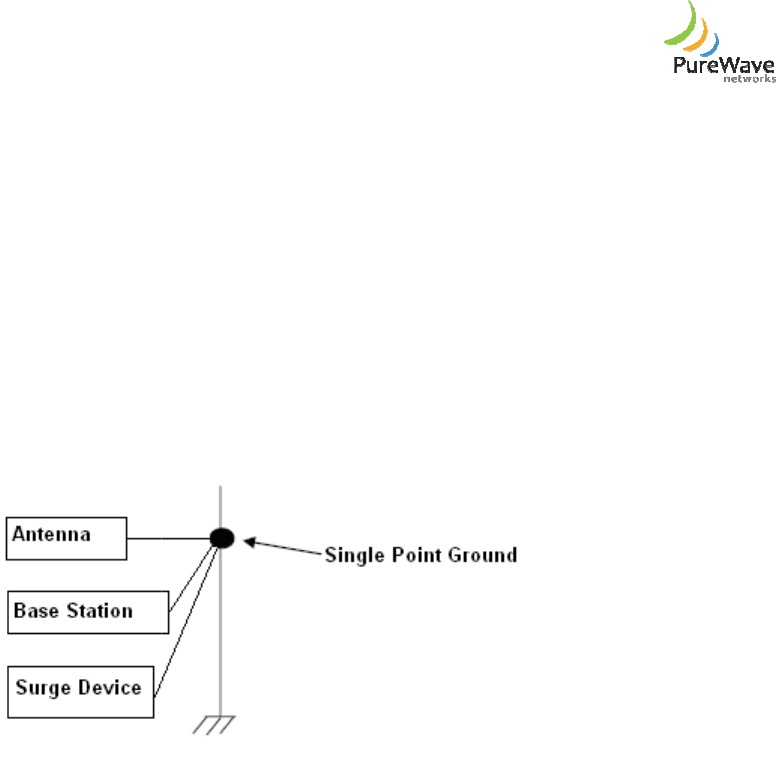
Single point grounding requires that the grounding leads from the antenna, Base Station and Surge
Protection devices for a particular sector, are bonded together at the same point on the tower down
conductor. It is not necessary to bond all the sectors tog
individual sector have the same ground point on the tower.
In the equipment hut, in the event of an indoor installation of the Base Station then the chassis ground of
the Base Station and all the Surge Protection
figure 42).
Figure
It is important to note that the following ground guidelines are followed during installations:
1.
Surge Protection devices generally
ground wire length when finished connecting it to the single point earth ground
2.
Never loop or coil up the ground wire, always connect it straight to ground.
3.
A good earth ground impedance is less than
4.
Measure ground impedance at the point where the protector ground wire is connected and not at
the ground rod.
5.
Avoid sharp bends. Connect the ground wire as straight as possible.
6.
Connect the protector ground wire and equipment ground (both power g
ground) to a single common ground.
7.
Make sure all connections are fastened securely and are tight.
8.
Never install protectors during a storm and always follow your local safety codes.
Quantum 1000 Base Station User
Guide
Rev 1.1, Page
Single Point Grounding Concept
Extensive analysis and investigation of installations has led to
the belief that the root cause at the heart of
the majority of the failures is likely to be the presence of multi
-
point grounding of equipment on the towers
and in the huts. Single point grounding these elements will eliminate ground voltage differentials
will dramatically increase the equipment survivability during surges.
Single point grounding requires that the grounding leads from the antenna, Base Station and Surge
Protection devices for a particular sector, are bonded together at the same point on the tower down
conductor. It is not necessary to bond all the sectors tog
ether but to ensure the components of any
individual sector have the same ground point on the tower.
In the equipment hut, in the event of an indoor installation of the Base Station then the chassis ground of
the Base Station and all the Surge Protection
Devices grounds must be grounded at the same point (see
Figure
42 - Single Point Grounding Concept
It is important to note that the following ground guidelines are followed during installations:
Surge Protection devices generally
connect to ground by using a ground wire. Cut any extra
ground wire length when finished connecting it to the single point earth ground
Never loop or coil up the ground wire, always connect it straight to ground.
A good earth ground impedance is less than
1.0 ohm.
Measure ground impedance at the point where the protector ground wire is connected and not at
Avoid sharp bends. Connect the ground wire as straight as possible.
Connect the protector ground wire and equipment ground (both power g
round and telecomm.
ground) to a single common ground.
Make sure all connections are fastened securely and are tight.
Never install protectors during a storm and always follow your local safety codes.
Rev 1.1, Page
41 of 70
the belief that the root cause at the heart of
point grounding of equipment on the towers
and in the huts. Single point grounding these elements will eliminate ground voltage differentials
and this
Single point grounding requires that the grounding leads from the antenna, Base Station and Surge
Protection devices for a particular sector, are bonded together at the same point on the tower down
ether but to ensure the components of any
In the equipment hut, in the event of an indoor installation of the Base Station then the chassis ground of
Devices grounds must be grounded at the same point (see
It is important to note that the following ground guidelines are followed during installations:
connect to ground by using a ground wire. Cut any extra
Measure ground impedance at the point where the protector ground wire is connected and not at
round and telecomm.
Never install protectors during a storm and always follow your local safety codes.
Quantum 1000 Base Station User
3.8
Lightning and Surge Protection
PureWave
recommends that Surge Protection Devices are installed to protect the Base Station.
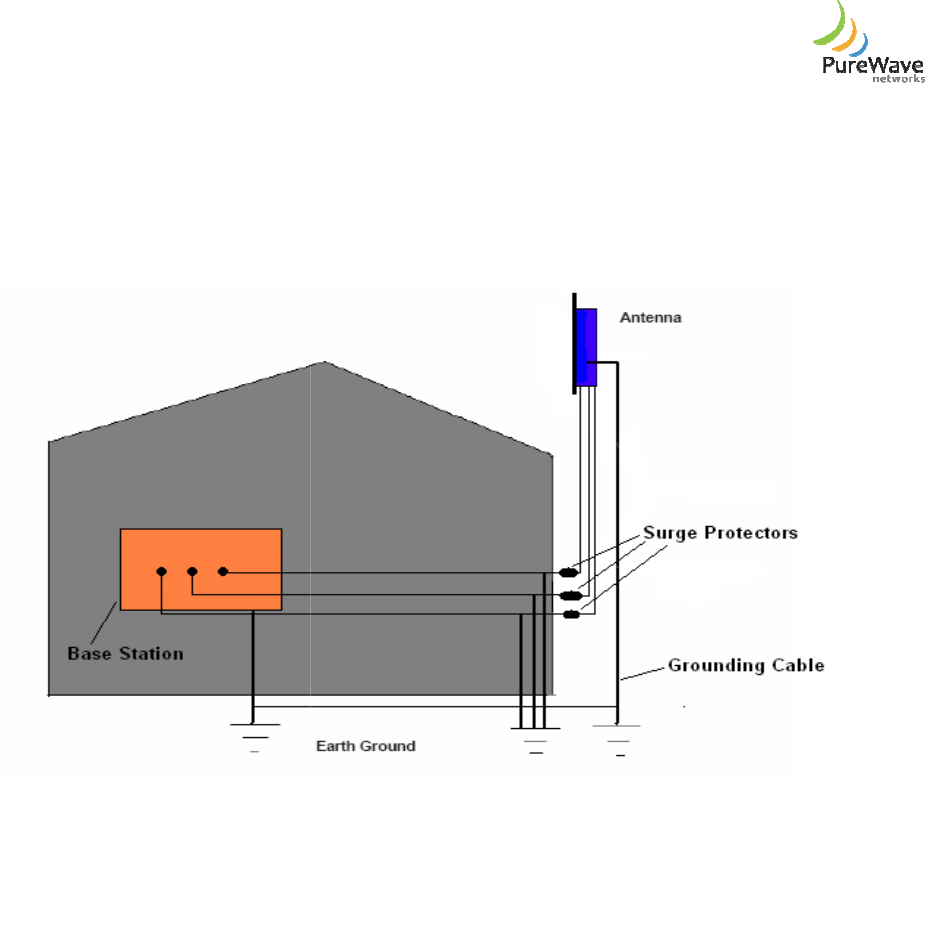
For an indoor installation of the Base Station these “Surge Protectors” devices would be installed at the
entrance to the building that “houses” the Base Station (see fig
Figure 43 -
Indoor Installed Base Station Relative to Position of Lightning Protectors
Such a device will provide protection to the Base Station in the event of a “surge event” entering the Base
Station through the RF port.
Two recommended devices are:
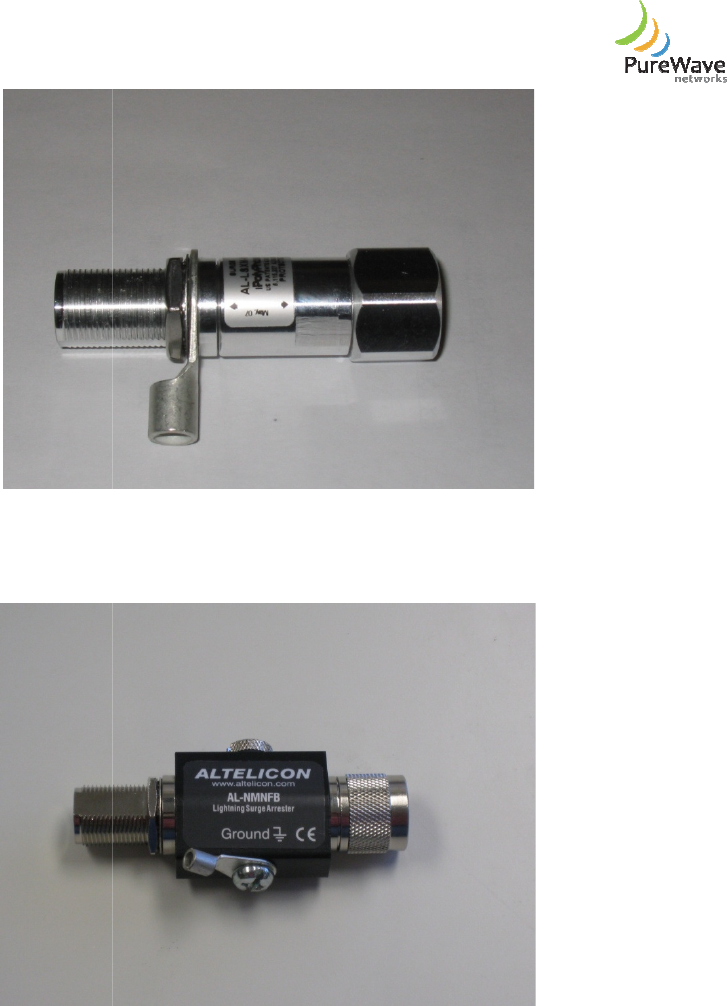
• PolyPhaser Model AL-
LSXM
DC block. This is a uni-
directional device.
• Altelicon Model AL-
NMNFB
bi-directional device.
Quantum 1000 Base Station User
Guide
Rev 1.1, Page
Lightning and Surge Protection
recommends that Surge Protection Devices are installed to protect the Base Station.
For an indoor installation of the Base Station these “Surge Protectors” devices would be installed at the
entrance to the building that “houses” the Base Station (see fig
ure 43).
Indoor Installed Base Station Relative to Position of Lightning Protectors
Such a device will provide protection to the Base Station in the event of a “surge event” entering the Base
LSXM
-ME (see figure 44). This is a 2GHz to 6GHz in-
line surge filter with a
directional device.
NMNFB
-9 (see figure 45). This is a DC to 6GHz in-
line surge filter.
Rev 1.1, Page
42 of 70
recommends that Surge Protection Devices are installed to protect the Base Station.
For an indoor installation of the Base Station these “Surge Protectors” devices would be installed at the
Indoor Installed Base Station Relative to Position of Lightning Protectors
Such a device will provide protection to the Base Station in the event of a “surge event” entering the Base
line surge filter with a
line surge filter.
This is a
Quantum 1000 Base Station User
Figure 44 -
PolyPhaser Model AL
Figure 45 –
Altelicon Model AL
Care must be undertaken when installing the surge protectors. I
irrelevant as to the direction of installation. If the device is uni
ensure that the protected side of the surge protector is connected to the Base Station. In the case
Polyphasor the N-
type male connection is connected directly to the Base Station output and the N
female connection is connected to the Base Station to Antenna cable. The male to female design of the
surge protector means that it is very diffic
ground wire is connected to the ground lug that is provided with the surge unit (see figure 4
Quantum 1000 Base Station User
Guide
Rev 1.1, Page
PolyPhaser Model AL
-LSXM-ME
Surge Protector (with ground lug)
Altelicon Model AL
-NMNFB-9
Surge Protector (with ground lug)
Care must be undertaken when installing the surge protectors. I
f the device is bi-
directional then it is
irrelevant as to the direction of installation. If the device is uni
-
directional therefore it must be installed to
ensure that the protected side of the surge protector is connected to the Base Station. In the case
type male connection is connected directly to the Base Station output and the N
female connection is connected to the Base Station to Antenna cable. The male to female design of the
surge protector means that it is very diffic
ult to incorrectly connect. In addition it is recommended that a
ground wire is connected to the ground lug that is provided with the surge unit (see figure 4
Rev 1.1, Page
43 of 70
Surge Protector (with ground lug)
Surge Protector (with ground lug)
directional then it is
directional therefore it must be installed to
ensure that the protected side of the surge protector is connected to the Base Station. In the case
of the
type male connection is connected directly to the Base Station output and the N
-type
female connection is connected to the Base Station to Antenna cable. The male to female design of the
ult to incorrectly connect. In addition it is recommended that a
ground wire is connected to the ground lug that is provided with the surge unit (see figure 4
6).
Quantum 1000 Base Station User
Figure 46 -
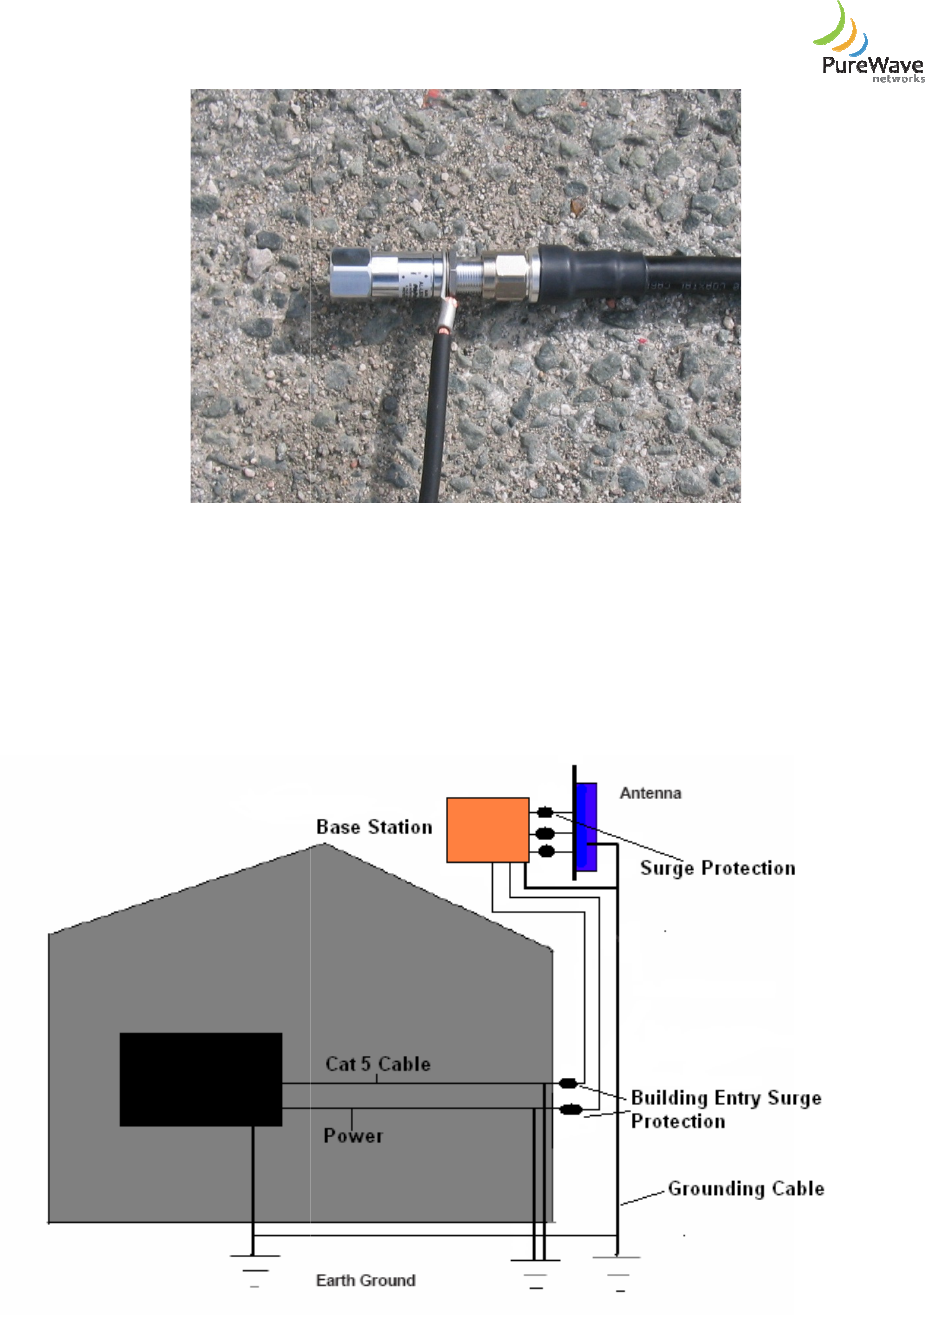
PolyPhaser Surge Protector Connected to Cable with Ground Cable Attached
Actu
al installation will depend upon the tower specifics. General tower installation practices would have a
large ground bar or plate just at the cable entrance to the building and the Surge Protectors would be
either attached directly or via the ground wire t
directly attached to the Base Station and then appropriate ground connections can be made.
In the event that the Base Station Radio is installed outside then it is recommended to install the surge
protection unit(s) between the Base Station and the Antenna.
Figure 47 -
Outdoor Installed Base Station Relative to Position of Lightning Protectors
Quantum 1000 Base Station User
Guide
Rev 1.1, Page
PolyPhaser Surge Protector Connected to Cable with Ground Cable Attached
al installation will depend upon the tower specifics. General tower installation practices would have a
large ground bar or plate just at the cable entrance to the building and the Surge Protectors would be
either attached directly or via the ground wire t
o this plate/bar. Alternatively the Surge Protectors can be
directly attached to the Base Station and then appropriate ground connections can be made.
In the event that the Base Station Radio is installed outside then it is recommended to install the surge
protection unit(s) between the Base Station and the Antenna.
Outdoor Installed Base Station Relative to Position of Lightning Protectors
Rev 1.1, Page
44 of 70
PolyPhaser Surge Protector Connected to Cable with Ground Cable Attached
al installation will depend upon the tower specifics. General tower installation practices would have a
large ground bar or plate just at the cable entrance to the building and the Surge Protectors would be
o this plate/bar. Alternatively the Surge Protectors can be
directly attached to the Base Station and then appropriate ground connections can be made.
In the event that the Base Station Radio is installed outside then it is recommended to install the surge
Outdoor Installed Base Station Relative to Position of Lightning Protectors
Quantum 1000 Base Station User
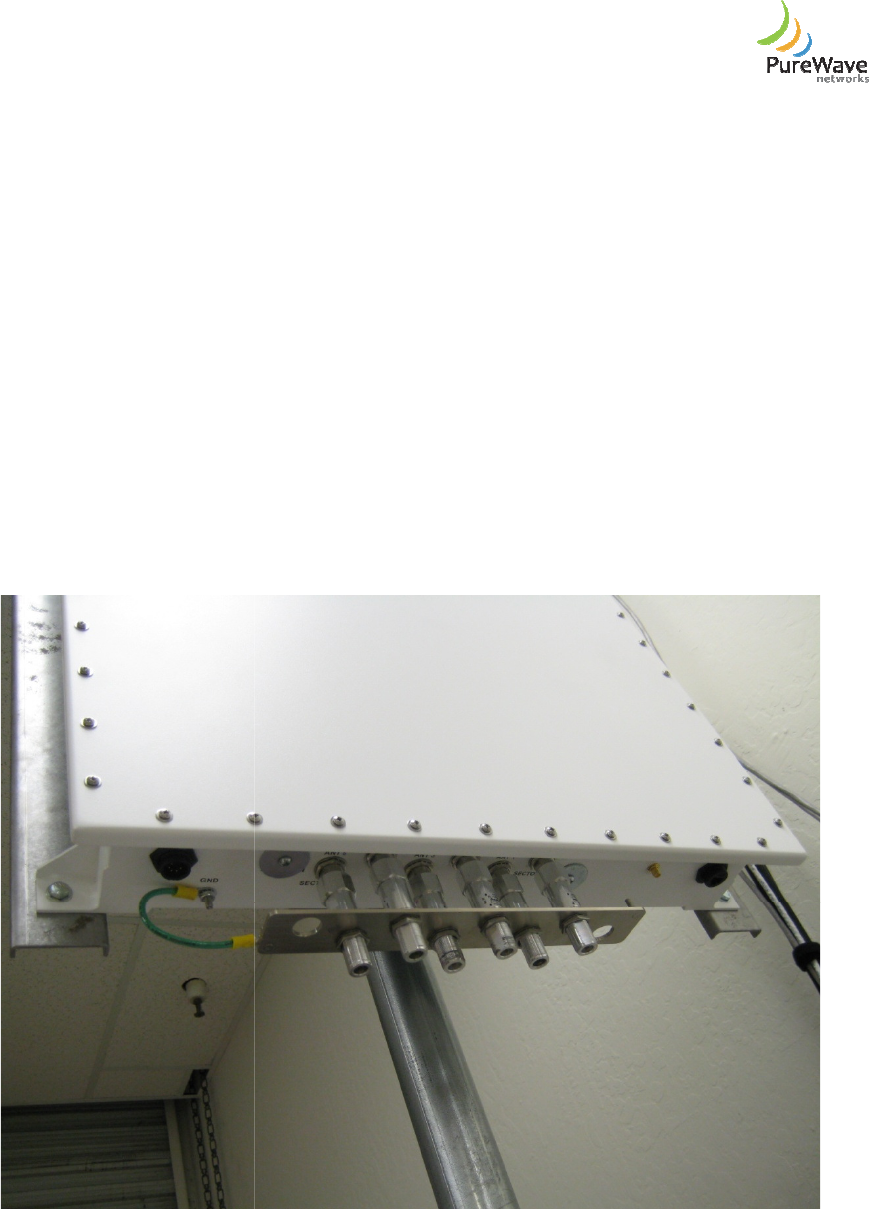
These “RF” surge protection devices will provide the Customer with two advantages (see figure 4
1)
To protect the Base Station in the event of a “surge event” entering the Bas
RF port.
2)
It provides a mechanism to effectively “ground” together the Base Station, the RF surge protector
and the antenna.
In the case of an outdoor installation, it is recommended that suitable building entry surge protection is
co
nsidered and the equipment installer may want to consider based upon individual installation
requirements.
Note:
Please ensure that appropriate weather protection is applied to all outdoor
Protection devices.
Surge protection devices for both the
built into the unit. No further devices are required to protect the unit. In addition, for an appropriate fee,
PureWave provides a RF lightning surge protection kit. This includes the RF surg
a “ground bar” which acts as a means to ground all the devices. Please refer to figure 4
of this kit when installed.
Figure 48 -
Installed
Quantum 1000 Base Station User
Guide
Rev 1.1, Page
These “RF” surge protection devices will provide the Customer with two advantages (see figure 4
To protect the Base Station in the event of a “surge event” entering the Bas
e Station through the
It provides a mechanism to effectively “ground” together the Base Station, the RF surge protector
In the case of an outdoor installation, it is recommended that suitable building entry surge protection is
nsidered and the equipment installer may want to consider based upon individual installation
Please ensure that appropriate weather protection is applied to all outdoor
Surge protection devices for both the
Cat 5 and the power connections to the Base Station are already
built into the unit. No further devices are required to protect the unit. In addition, for an appropriate fee,
PureWave provides a RF lightning surge protection kit. This includes the RF surg
e protection devices and
a “ground bar” which acts as a means to ground all the devices. Please refer to figure 4
8
Installed
PureWave provides a RF lightning surge protection kit
Rev 1.1, Page
45 of 70
These “RF” surge protection devices will provide the Customer with two advantages (see figure 4
7).
e Station through the
It provides a mechanism to effectively “ground” together the Base Station, the RF surge protector
In the case of an outdoor installation, it is recommended that suitable building entry surge protection is
nsidered and the equipment installer may want to consider based upon individual installation
Please ensure that appropriate weather protection is applied to all outdoor
Surge
Cat 5 and the power connections to the Base Station are already
built into the unit. No further devices are required to protect the unit. In addition, for an appropriate fee,
e protection devices and
8
for an example
PureWave provides a RF lightning surge protection kit
Quantum 1000 Base Station User
4. Weather
Protection
PureWave recommends that appropriate weather protection sealing and the application of an anti
material is applied to all “outdoor” installed elements of the system.
seals the junction between two conn
prevents vibrations from loosening the interface.
4.1 Weather Sealing
There are a range of commercially available weather protection “kits” that provide all the necessary
components in
addition to full instructions on “how to” weather protect. A generic weather sealing concept
will be adopted rather than a specific one.
The following universal weatherproofing kit was used:
Name:
Universal Weatherproofing Kit
Part #: 488136
Descripton:
Weatherproofing tape kit. Each kit contains (6) rolls of 2
rolls of 3/4" x 66' black electrical tape & (1) roll of 2" x 20' black electrical tape.
Manufacturer:
Andrew Networks (P/N 221213)
Distributor:
Tessco (http
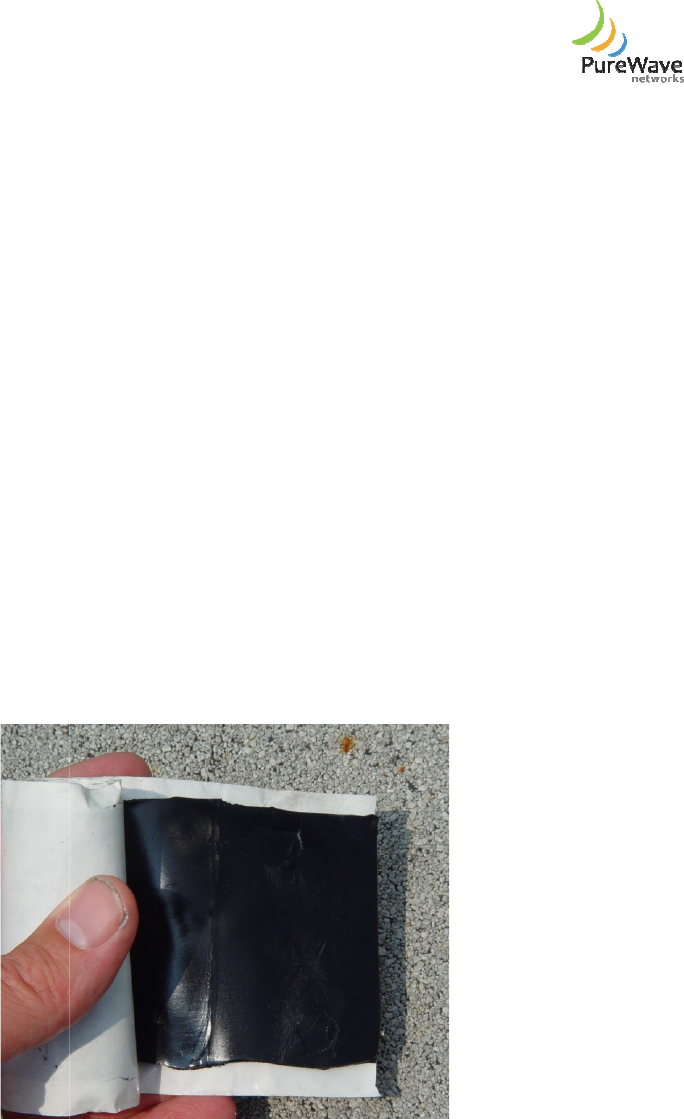
The butyl tape is shown below in figure 4
Figure
The general procedure to install is:
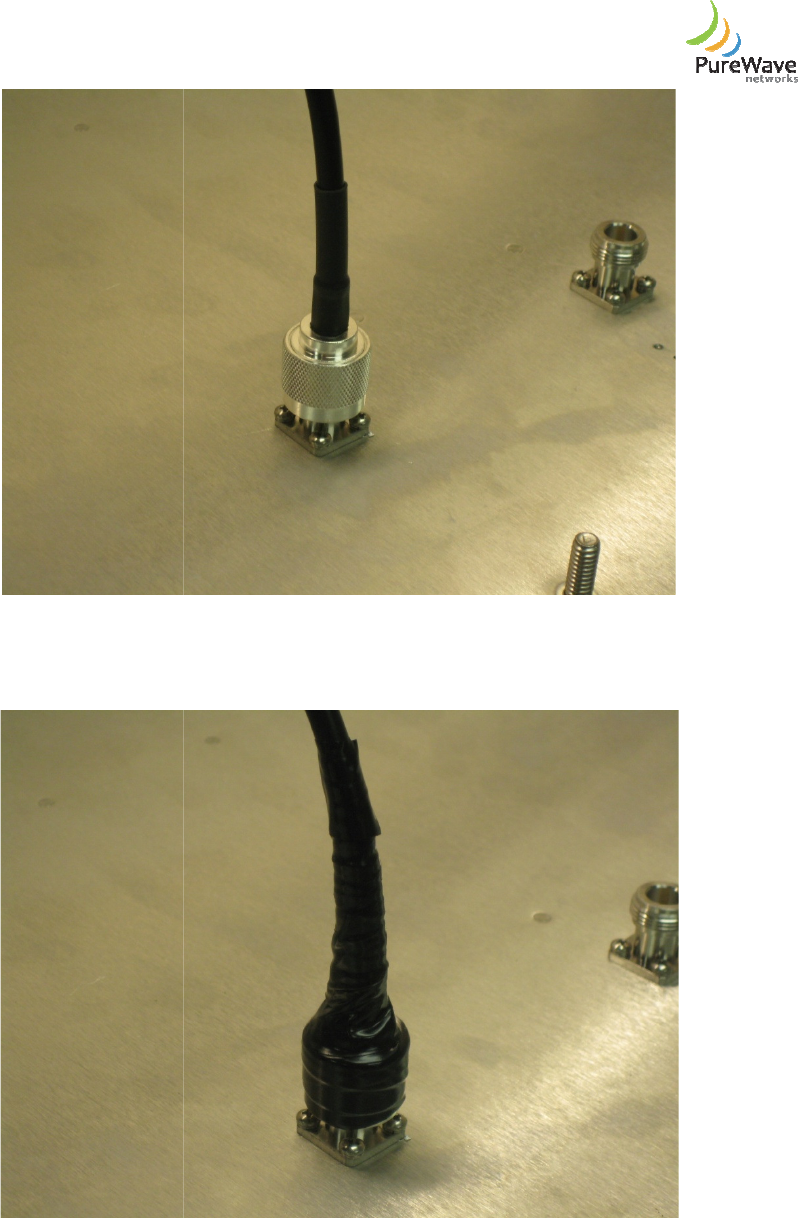
1)
Completely wrap the connection with the smaller 3/4inch smaller electrical (plastic) tape. Ensure
that the tape extends back up the cable to cover the entire connector and that the tape overlays
itself by approximately half a width (figures
Quantum 1000 Base Station User
Guide
Rev 1.1, Page
Protection
PureWave recommends that appropriate weather protection sealing and the application of an anti
material is applied to all “outdoor” installed elements of the system.
Weatherproofing tape kits flawlessly
seals the junction between two conn
ectors. It not only protects the connection from water damage, it also
prevents vibrations from loosening the interface.
There are a range of commercially available weather protection “kits” that provide all the necessary
addition to full instructions on “how to” weather protect. A generic weather sealing concept
will be adopted rather than a specific one.
The following universal weatherproofing kit was used:
Universal Weatherproofing Kit
Weatherproofing tape kit. Each kit contains (6) rolls of 2
-
1/2" x 24" butyl tape, (2)
rolls of 3/4" x 66' black electrical tape & (1) roll of 2" x 20' black electrical tape.
Andrew Networks (P/N 221213)
Tessco (http
://www.tessco.com)
The butyl tape is shown below in figure 4
9.
Figure
49 - Butyl Tape Weather Protection
Completely wrap the connection with the smaller 3/4inch smaller electrical (plastic) tape. Ensure
that the tape extends back up the cable to cover the entire connector and that the tape overlays
itself by approximately half a width (figures
50 and 51).
Rev 1.1, Page
46 of 70
PureWave recommends that appropriate weather protection sealing and the application of an anti
-seize
Weatherproofing tape kits flawlessly
ectors. It not only protects the connection from water damage, it also
There are a range of commercially available weather protection “kits” that provide all the necessary
addition to full instructions on “how to” weather protect. A generic weather sealing concept
1/2" x 24" butyl tape, (2)
rolls of 3/4" x 66' black electrical tape & (1) roll of 2" x 20' black electrical tape.
Completely wrap the connection with the smaller 3/4inch smaller electrical (plastic) tape. Ensure
that the tape extends back up the cable to cover the entire connector and that the tape overlays
Quantum 1000 Base Station User
Figure
Quantum 1000 Base Station User
Guide
Rev 1.1, Page
Figure 50 - Connection to Antenna
Figure
51 - Plastic (Electrical) Tape Applied
Rev 1.1, Page
47 of 70
Quantum 1000 Base Station User
2)
Cut a length of the butyl such that it will completely cover the connection. Wrap the tape around
the connector and press into place. Ensure that there are no gaps
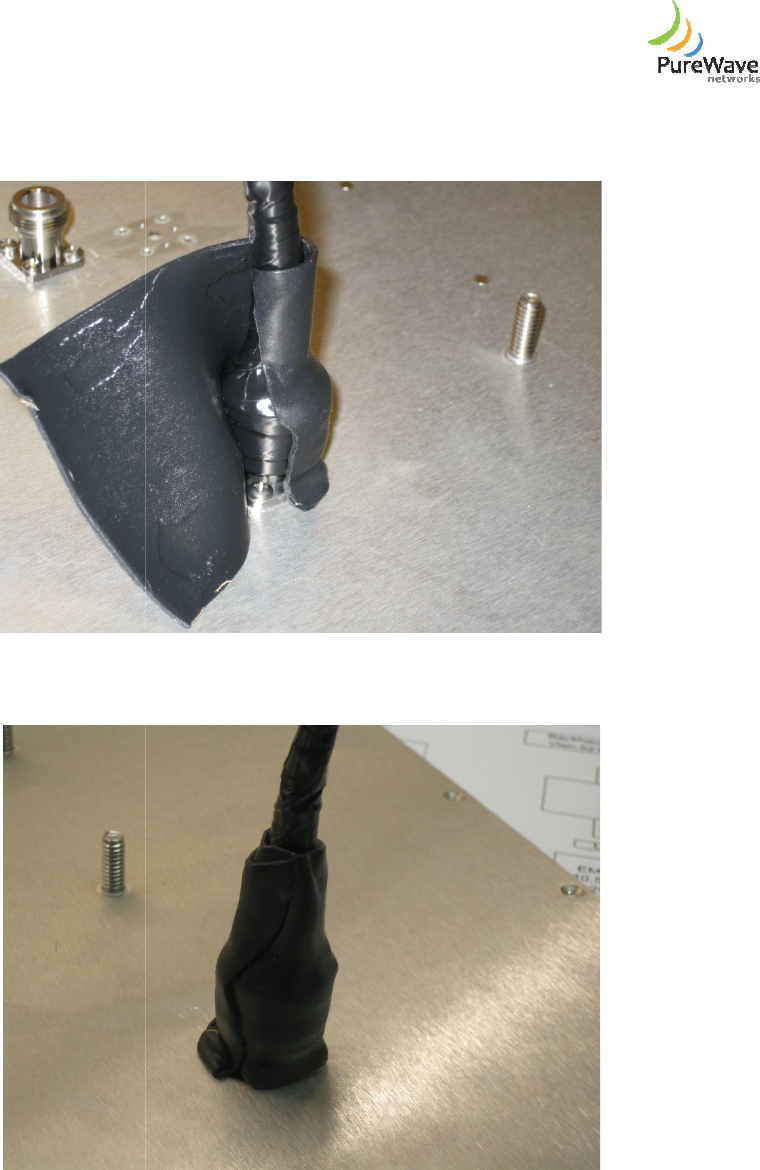
Figure
3)
Completely wrap the “wrapped assembly” with the larger 2 inch electrical (plastic) tape. Ensure
that the tape extends back up the cable to cover the entire
itself by approximately half a width (figure 5
Quantum 1000 Base Station User
Guide
Rev 1.1, Page
Cut a length of the butyl such that it will completely cover the connection. Wrap the tape around
the connector and press into place. Ensure that there are no gaps
(figures 52
and 5
Figure
52 - Butyl Tape Being Applied
Figure 53 - Butyl Tape Applied
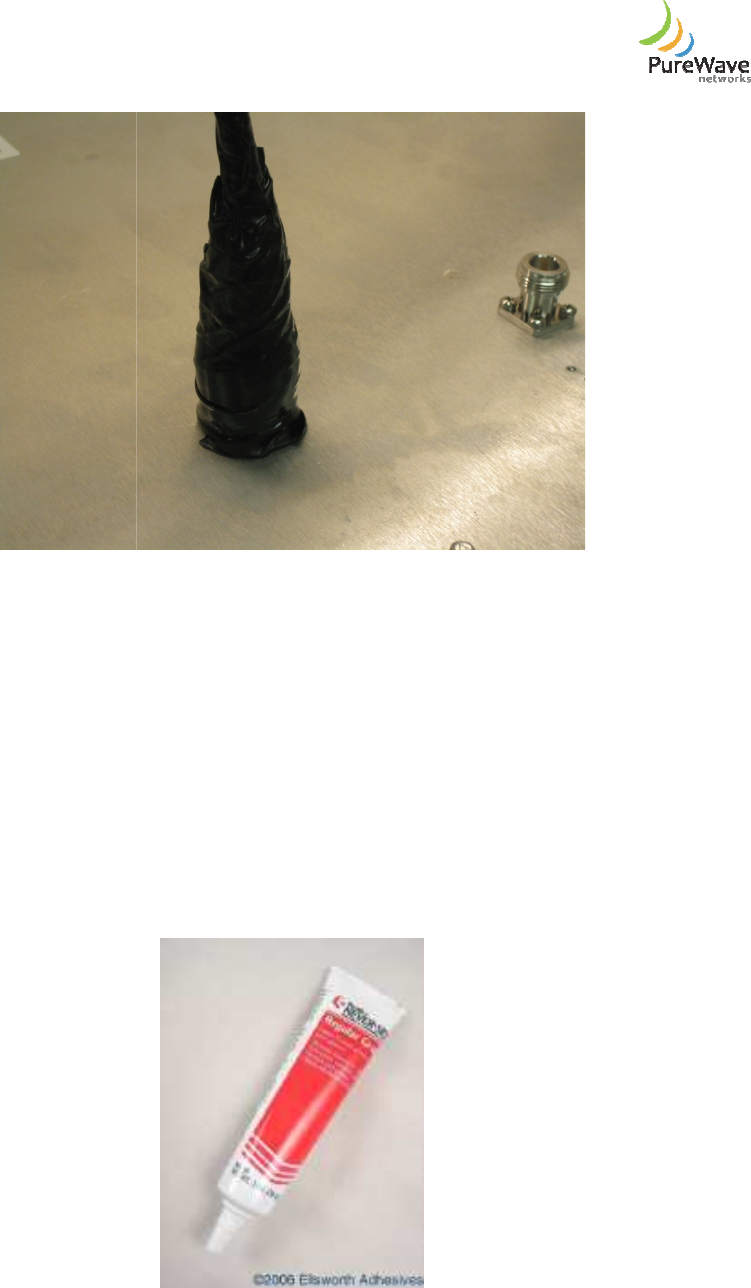
Completely wrap the “wrapped assembly” with the larger 2 inch electrical (plastic) tape. Ensure
that the tape extends back up the cable to cover the entire
butyl tape and that the tape overlays
itself by approximately half a width (figure 5
4).
Rev 1.1, Page
48 of 70
Cut a length of the butyl such that it will completely cover the connection. Wrap the tape around
and 5
3).
Completely wrap the “wrapped assembly” with the larger 2 inch electrical (plastic) tape. Ensure
butyl tape and that the tape overlays
Quantum 1000 Base Station User
Figure
4.2 Anti-Seize
It is also suggested that a suitable anti
suitable lubricant is recommended below.
Name: NEVER-
SEEZ® Regular Grade Lubricant 1OZ
Part #: V057940-
8A
Descripton: NEVER-
SEEZ® regular grade lubricant is an anti
pressure lubricant
and seizure up to 1800ºF.
Distributor:
Ellsworth Adhesives (http://www.ellsworth.com)
Quantum 1000 Base Station User
Guide
Rev 1.1, Page
Figure
54- Second Plastic Tape Applied
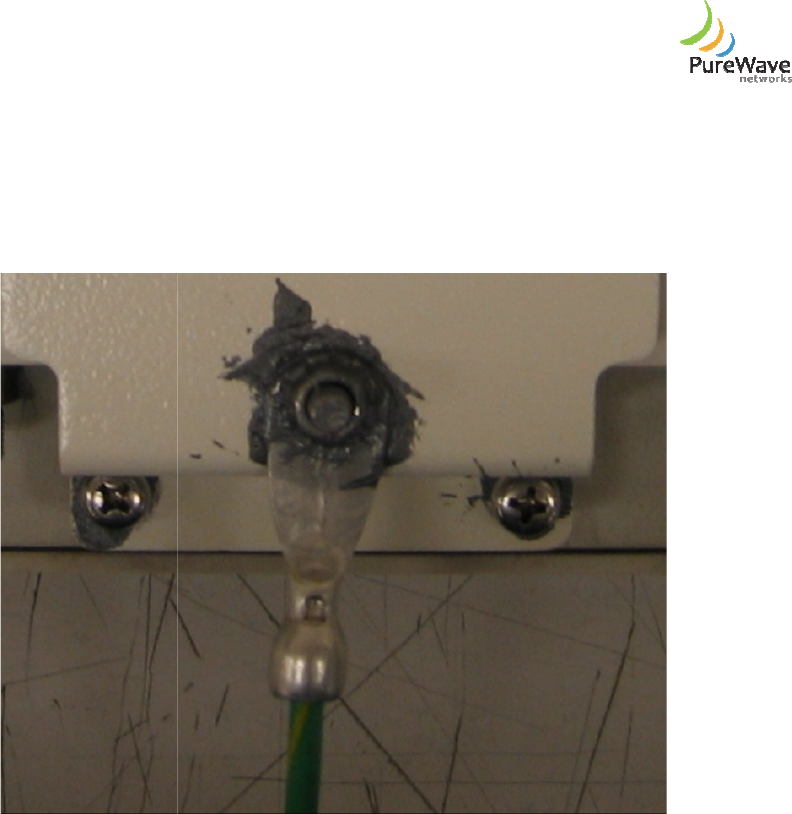
It is also suggested that a suitable anti
-
corrosion lubricant is applied to all exposed metal surfaces. A
suitable lubricant is recommended below.
SEEZ® Regular Grade Lubricant 1OZ
(figure 55)
8A
SEEZ® regular grade lubricant is an anti
-
seize compound and extreme
pressure lubricant
in a 1 ounce tube. Protect
metal parts against rust, corrosion
and seizure up to 1800ºF.
Ellsworth Adhesives (http://www.ellsworth.com)
Figure 55 - Anti-Seize Lubricant
Rev 1.1, Page
49 of 70
corrosion lubricant is applied to all exposed metal surfaces. A
seize compound and extreme
metal parts against rust, corrosion
Quantum 1000 Base Station User
To apply the material then the exposed metal surface is simply “painted” with the lubricant such
exposed metal surfaces are completely covered (see figure 5
Note:
These types of lubricants tend to be “messy” and “sticky”
their
intended application. Always read the labels or instructions provided and take nec
pre-cautions during application.
Quantum 1000 Base Station User
Guide
Rev 1.1, Page
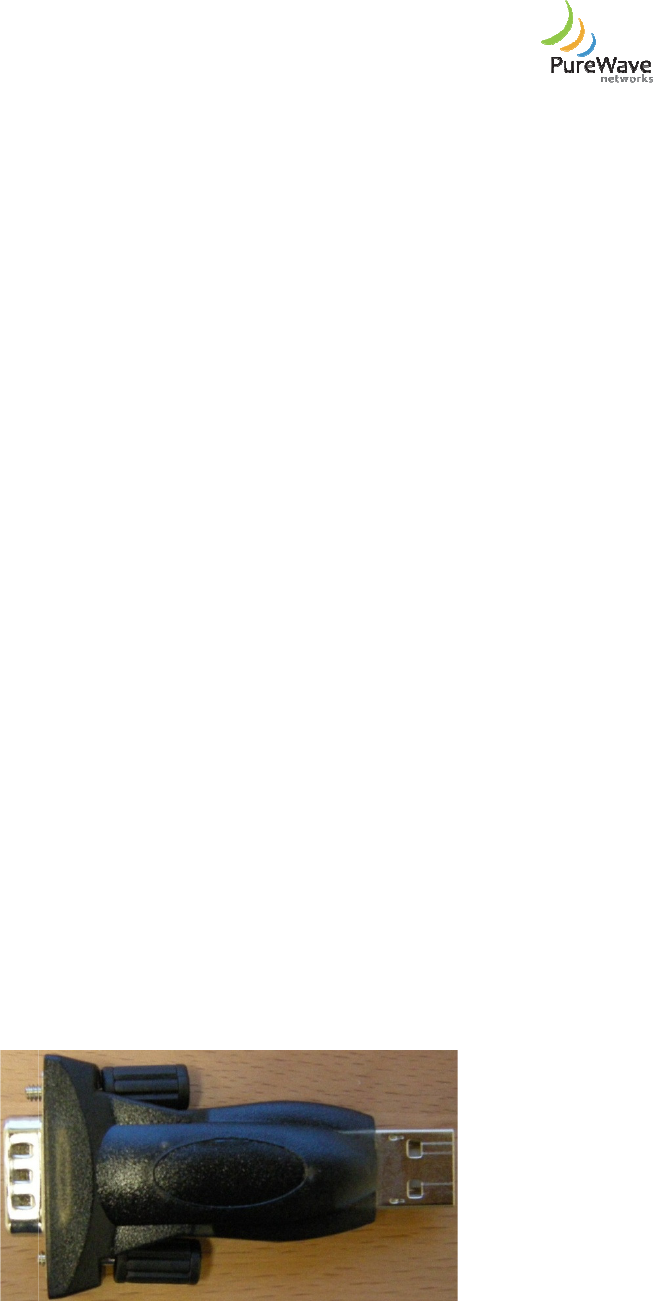
To apply the material then the exposed metal surface is simply “painted” with the lubricant such
exposed metal surfaces are completely covered (see figure 5
6).
These types of lubricants tend to be “messy” and “sticky”
to apply
due to t
intended application. Always read the labels or instructions provided and take nec
Figure 56 - Anti-Seize Applied
Rev 1.1, Page
50 of 70
To apply the material then the exposed metal surface is simply “painted” with the lubricant such
that all
due to t
he nature of
intended application. Always read the labels or instructions provided and take nec
essary
Quantum 1000 Base Station User
5.
Base Station Bring
5.1 Overview
This section describes how the operator may power
system initialization. The
PureWave
and ensure
general system integrity
5.2
Connect to the Base Station
There are three RJ45 Ethernet ports to connect and hence access the Base Station.
RS232: This is the serial interface to the Base Station. This interface will be primarily used for “out of the
box” configuration and debug purposes.
E-
NET 1: This Gigabit Ethernet port provides the data traffic backhaul interface that should be connecte
to the Service Provider’s network equipment. This port allows in
E-
NET 2: This Gigabit Ethernet port provides an out
can be used for daisy chaining to another bas
Camera.
The procedure to connect to the Base Station is:
•
Terminate the antenna ports ANT 1 and ANT 2 as directed.
•
Connect and Power on the Base Station.
•
Connect a “straight” Cat 5 Ethernet cabl
directly to your PC or to your switch.
•
To get access to Base Station CLI (Command Line Interface) you will need the following
hardware that come with the install kit. These are as follows:
RJ45 cable.
DB9 male connector (Modem Adapter).
DB9 female to DB9 female adapter.
Optional: Serial to USB connector. Most laptop nowadays comes with USB connection instead of serial
connection. If your PC/laptop has serial connection then you won’t need this adapter. If not, then you will
need to get serial to USB adapter to access the
Figure
Quantum 1000 Base Station User
Guide
Rev 1.1, Page
Base Station Bring
-up
This section describes how the operator may power
-
up the PureWave Base Station and verify proper
PureWave
Base Station CLI (Command Line Interface)
will be used to confi
general system integrity
.
Connect to the Base Station
There are three RJ45 Ethernet ports to connect and hence access the Base Station.
RS232: This is the serial interface to the Base Station. This interface will be primarily used for “out of the
box” configuration and debug purposes.
NET 1: This Gigabit Ethernet port provides the data traffic backhaul interface that should be connecte
to the Service Provider’s network equipment. This port allows in
-
band management of the Base Station.
NET 2: This Gigabit Ethernet port provides an out
-of-
band management interface. In addition, this port
can be used for daisy chaining to another bas
e station or to connect to an external device such as a web
The procedure to connect to the Base Station is:
Terminate the antenna ports ANT 1 and ANT 2 as directed.
Connect and Power on the Base Station.
Connect a “straight” Cat 5 Ethernet cabl
e between the E-
NET 1 port on the Base Station and the
directly to your PC or to your switch.
To get access to Base Station CLI (Command Line Interface) you will need the following
hardware that come with the install kit. These are as follows:
DB9 male connector (Modem Adapter).
DB9 female to DB9 female adapter.
Optional: Serial to USB connector. Most laptop nowadays comes with USB connection instead of serial
connection. If your PC/laptop has serial connection then you won’t need this adapter. If not, then you will
need to get serial to USB adapter to access the
BS CLI (figure 57).
Figure
57 – Serial to USB adapter (DB9 Male)
Rev 1.1, Page
51 of 70
up the PureWave Base Station and verify proper
will be used to confi
gure
RS232: This is the serial interface to the Base Station. This interface will be primarily used for “out of the
NET 1: This Gigabit Ethernet port provides the data traffic backhaul interface that should be connecte
d
band management of the Base Station.
band management interface. In addition, this port
e station or to connect to an external device such as a web
NET 1 port on the Base Station and the
To get access to Base Station CLI (Command Line Interface) you will need the following
Optional: Serial to USB connector. Most laptop nowadays comes with USB connection instead of serial
connection. If your PC/laptop has serial connection then you won’t need this adapter. If not, then you will
Quantum 1000 Base Station User
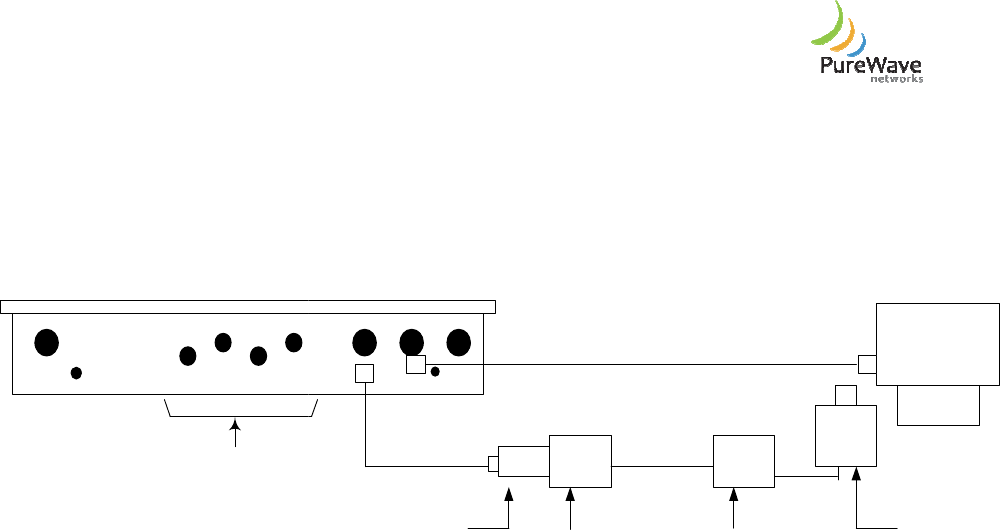
Plug one end of a “straight” Cat 5 Ethernet cable into the RS232 port on the Base Station and the other
end into the RJ45 to Modem adapter. Connect the other end of this Modem
and connect this DB9 serial cable to a USB adapter that connect to your laptop. Please refer to figure
for the physical layout.
Antenna Section
ANT 1
ANT 2
ANT 3
ANT
4
POWER
GND
Quantum 1000
Base Station
Figure
5.3 Configure the Bas
e Station
The Base Station can be configured using its CLI. To access the CLI then connection is made via any
standard serial communications protocol, such as Hyper Terminal.
To access the Base Station CLI through Hyper Terminal Setup please follow the
This assumes a PC that is operating on Windows 2000/XP.
1)
Start HyperTerminal by clicking on ‘
>HyperTerminal’.
2)
In Hyper Terminal create a "
or via the menu within HyperTerminal "
3)
Type in a name for the connection (for example, test).
4) Under "connect using
" select "
the appropriate com port.
5) Set "Bits per second
" to 38400.
6) Set "Data Bits" to 8.
7) Set “Parity” to None
8) Set "Stop Bits" to 1.
9) Set "Flow control
" to Xon / Xoff
10) Click OK -
the hyper terminal screen should appear.
To login into the Base Station CLI then use the followin
Login: customer
Password: 12345
Quantum 1000 Base Station User
Guide
Rev 1.1, Page
Plug one end of a “straight” Cat 5 Ethernet cable into the RS232 port on the Base Station and the other
end into the RJ45 to Modem adapter. Connect the other end of this Modem
adapter to a DB9 serial cable
and connect this DB9 serial cable to a USB adapter that connect to your laptop. Please refer to figure
4
RS232 E-NET 1 E-NET 2
GPS ANT
DB9 Female to DB9
Female Cable
RJ 45
Ethernet Cable
RJ 45 to Male Adapter .
Modem DB9
Female to DB
Female Cable
RJ 45
Ethernet Cable
Modem
Figure
58 – Base Station Serial Connection
e Station
The Base Station can be configured using its CLI. To access the CLI then connection is made via any
standard serial communications protocol, such as Hyper Terminal.
To access the Base Station CLI through Hyper Terminal Setup please follow the
steps as outlined below.
This assumes a PC that is operating on Windows 2000/XP.
Start HyperTerminal by clicking on ‘
Start -> Programs -> Accessories -
> Communications
In Hyper Terminal create a "
new connection" this can be done by clicking the
Hypertrm.exe
or via the menu within HyperTerminal "
File: NewConnection".
Type in a name for the connection (for example, test).
" select "
Direct to Com 6
" if the available com port is com 6 otherwise select
" to 38400.
" to Xon / Xoff
the hyper terminal screen should appear.
To login into the Base Station CLI then use the followin
g information:
Rev 1.1, Page
52 of 70
Plug one end of a “straight” Cat 5 Ethernet cable into the RS232 port on the Base Station and the other
adapter to a DB9 serial cable
and connect this DB9 serial cable to a USB adapter that connect to your laptop. Please refer to figure
58
Serial to USB
Adapter
Laptop
Female to DB
9
Female Cable
The Base Station can be configured using its CLI. To access the CLI then connection is made via any
steps as outlined below.
> Communications
-
Hypertrm.exe
icon
" if the available com port is com 6 otherwise select
Quantum 1000 Base Station User
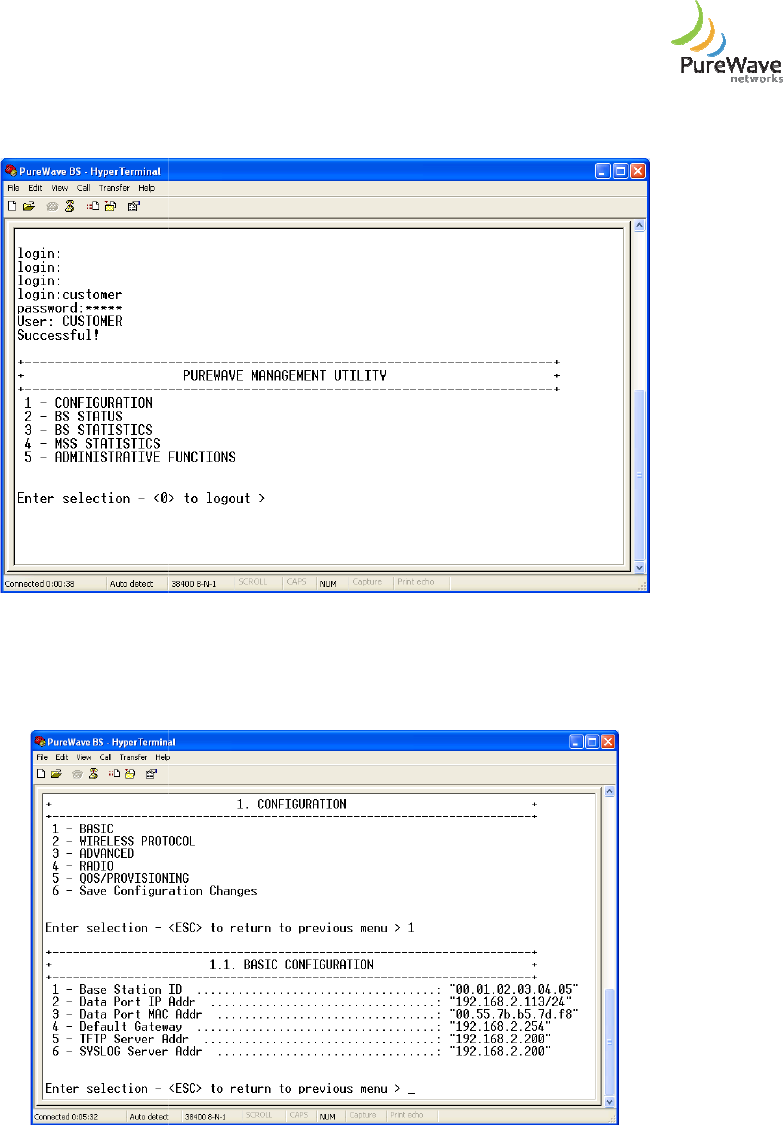
After you successfully login, you will see “
Figure 59 -
Hyper Terminal Login window to Base Station CLI
1) Select
1 (CONFIGURATION)
Station (figure 60).
Figure
2) From the
1.1 BASIC CONFIGURATION
Station IP address for
Management purposes. You must use “Quotations” when changing the IP
address and specify the class of the subnet mask after the slash.
The default BS IP Address is 192.168.2.101/24
Quantum 1000 Base Station User
Guide
Rev 1.1, Page
After you successfully login, you will see “
PUREWAVE MANAGEMENT UTILITY
” Dialog box (figure
Hyper Terminal Login window to Base Station CLI
1 (CONFIGURATION)
from the menu and follow the steps carefully to configure the Base
Figure
60 - Base Station CLI Basic Configuration
1.1 BASIC CONFIGURATION
menu, select 2
(DATA PORT IP Addr). T
Management purposes. You must use “Quotations” when changing the IP
address and specify the class of the subnet mask after the slash.
The default BS IP Address is 192.168.2.101/24
Rev 1.1, Page
53 of 70
” Dialog box (figure
59).
from the menu and follow the steps carefully to configure the Base
(DATA PORT IP Addr). T
his is Base
Management purposes. You must use “Quotations” when changing the IP
Quantum 1000 Base Station User
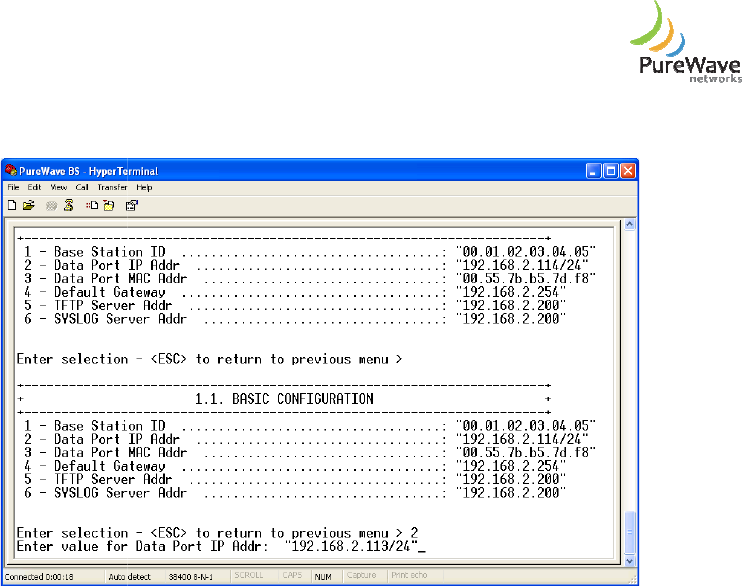
For example to change the BS IP address to 192.168.2.113/24, then enter th
figure 61.
Figure
3)
The User is free to change the
SYSLOG Server Addr
(option #6). These will depend upon the Customer’s own network
configuration.
4)
Please note that you will not be able to change the
MAC Addr
(option #3) addresses.
5)
Hit the <ESC> to return to the
“Save” any changes.
6) Select 2 (
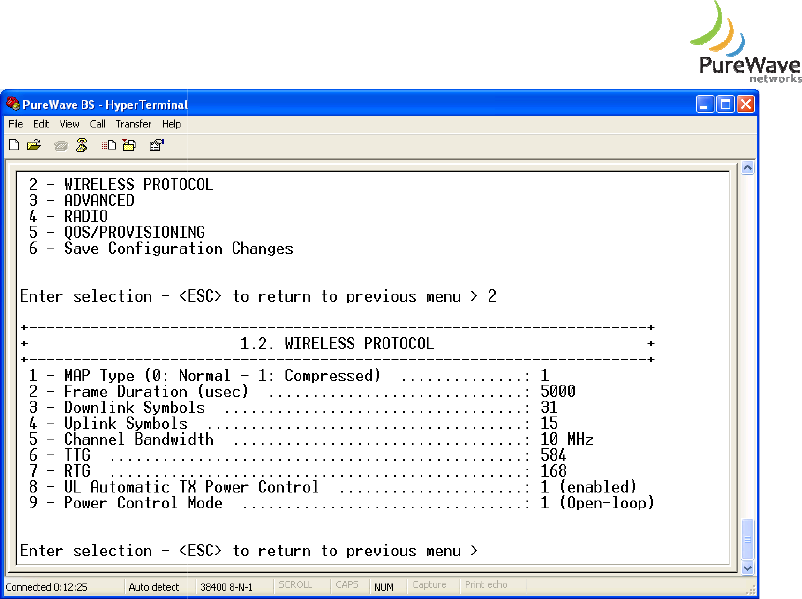
WIRELESS PROTOCOL
following two settings (figure
purposes.
•
UL Automatic TX Power Control
• Power C
ontrol Mode
Quantum 1000 Base Station User
Guide
Rev 1.1, Page
For example to change the BS IP address to 192.168.2.113/24, then enter th
e information as
Figure
61 - Base Station CLI IP Address Change
The User is free to change the
Default Gateway (option #3),
TFTP Server Addr
(option #6). These will depend upon the Customer’s own network
Please note that you will not be able to change the
Base Station ID
(option #1) and
(option #3) addresses.
Hit the <ESC> to return to the
1.1 BASIC CONFIGURATION
menu. You will be prompted to
WIRELESS PROTOCOL
) from the 1.1 BASIC CONFIGURATION
menu and verify the
following two settings (figure
62
). You cannot change the variables so this is simply for verification
UL Automatic TX Power Control
should be set to 1 (enabled)
ontrol Mode
should be set to 1 (Open-loop)
Rev 1.1, Page
54 of 70
e information as
(option #5), and
(option #6). These will depend upon the Customer’s own network
(option #1) and
Data Port
menu. You will be prompted to
menu and verify the
). You cannot change the variables so this is simply for verification
Quantum 1000 Base Station User
Figure 62
-
7)
Hit the <ESC> to return to the
“Save” any changes.
8) Select #3 (
ADVANCED CONFIGURATION
verify the following two settings (figure
•
Auto Default Provisioning
• Auto Start
is set for 1 (enabled)
If these variables are not set as expected then select the relevant option and change these
enabled state.
Quantum 1000 Base Station User
Guide
Rev 1.1, Page
-
Base Station CLI IP Wireless Protocol Check
Hit the <ESC> to return to the
1.1 BASIC CONFIGURATION
menu. You will be prompted to
ADVANCED CONFIGURATION
) from the
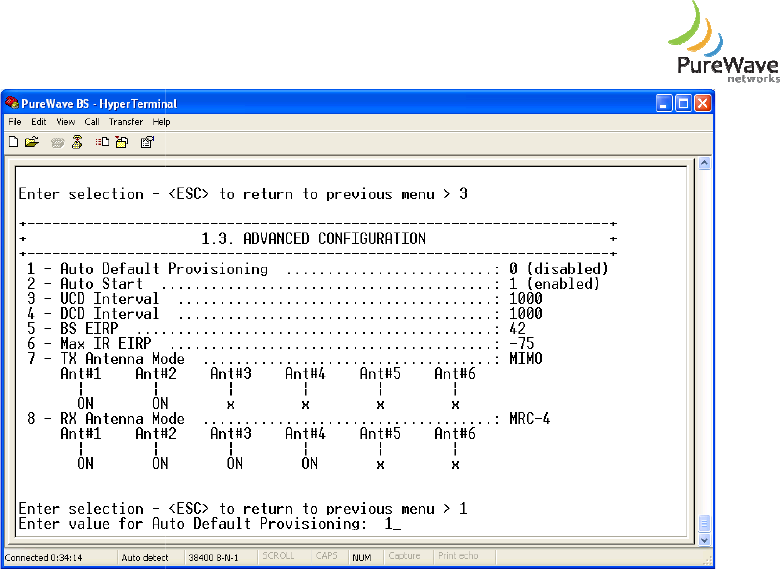
1.1 BASIC CONFIGURATION
verify the following two settings (figure
63).
Auto Default Provisioning
is set for 1 (enabled)
is set for 1 (enabled)
If these variables are not set as expected then select the relevant option and change these
Rev 1.1, Page
55 of 70
menu. You will be prompted to
1.1 BASIC CONFIGURATION
menu and
If these variables are not set as expected then select the relevant option and change these
to the
Quantum 1000 Base Station User
Figure
63
9)
Hit the <ESC> to return to the
“Save” any changes.
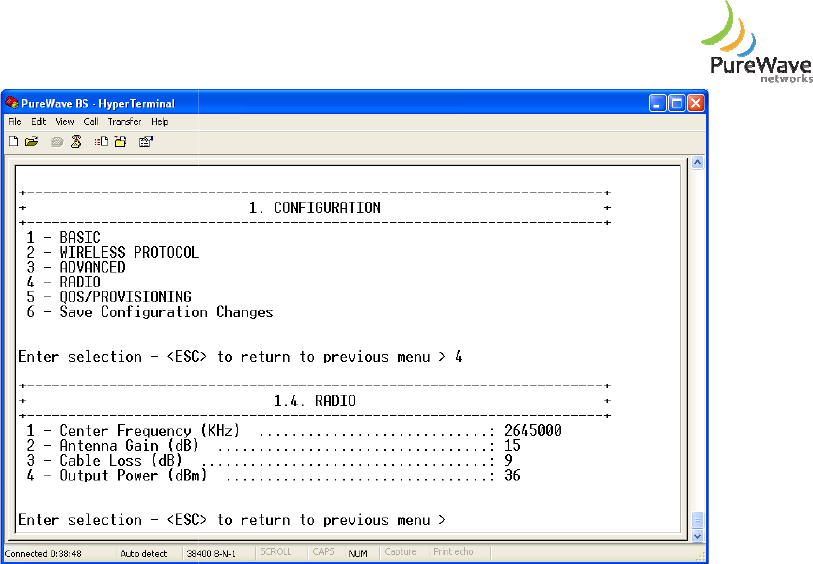
10) Select #4 (RADIO
) from the
parameters. It is important that you set all 4 parameters especially the Frequency (this much
match with the CPEs) and the Output Power (figure
• 1 (
Center Frequency (KHz)).
with the CPEs. If the User wishes to change this then please provide the required
frequency is KHz.
• 2 (
Antenna Gain (dB)
• 3 (Cable Loss (dB)
). This is a loss of the cable (in dB’s) from the Base Station to the
Antenna.
• 4 (
Output Power (dBm)
Maximum output power should be set to 36.
Quantum 1000 Base Station User
Guide
Rev 1.1, Page
63
- Base Station CLI Advanced Configuration
Hit the <ESC> to return to the
1.1 BASIC CONFIGURATION
menu. You will be prompted to
) from the
1.1 BASIC CONFIGURATION
menu and assign the
parameters. It is important that you set all 4 parameters especially the Frequency (this much
match with the CPEs) and the Output Power (figure
64).
Center Frequency (KHz)).
This is the frequency of the Base Station and it must match
with the CPEs. If the User wishes to change this then please provide the required
Antenna Gain (dB)
). This is the gain (in dB) for the antenna that is being used.
). This is a loss of the cable (in dB’s) from the Base Station to the
Output Power (dBm)
). This is the output power in dBm. By default it is set at 6.
Maximum output power should be set to 36.
Rev 1.1, Page
56 of 70
menu. You will be prompted to
menu and assign the
following radio
parameters. It is important that you set all 4 parameters especially the Frequency (this much
This is the frequency of the Base Station and it must match
with the CPEs. If the User wishes to change this then please provide the required
). This is the gain (in dB) for the antenna that is being used.
). This is a loss of the cable (in dB’s) from the Base Station to the
). This is the output power in dBm. By default it is set at 6.
Quantum 1000 Base Station User
Figure
64
11)
Hit the <ESC> to return to the
“Save” any changes.
Quantum 1000 Base Station User
Guide
Rev 1.1, Page
64
- Base Station CLI Radio Configuration
Hit the <ESC> to return to the
1.1 BASIC CONFIGURATION
menu. You will be prompted to
Rev 1.1, Page
57 of 70
menu. You will be prompted to

Quantum 1000 Base Station User
Quantum
Quantum 1000 Base Station User
Guide
Rev 1.1, Page
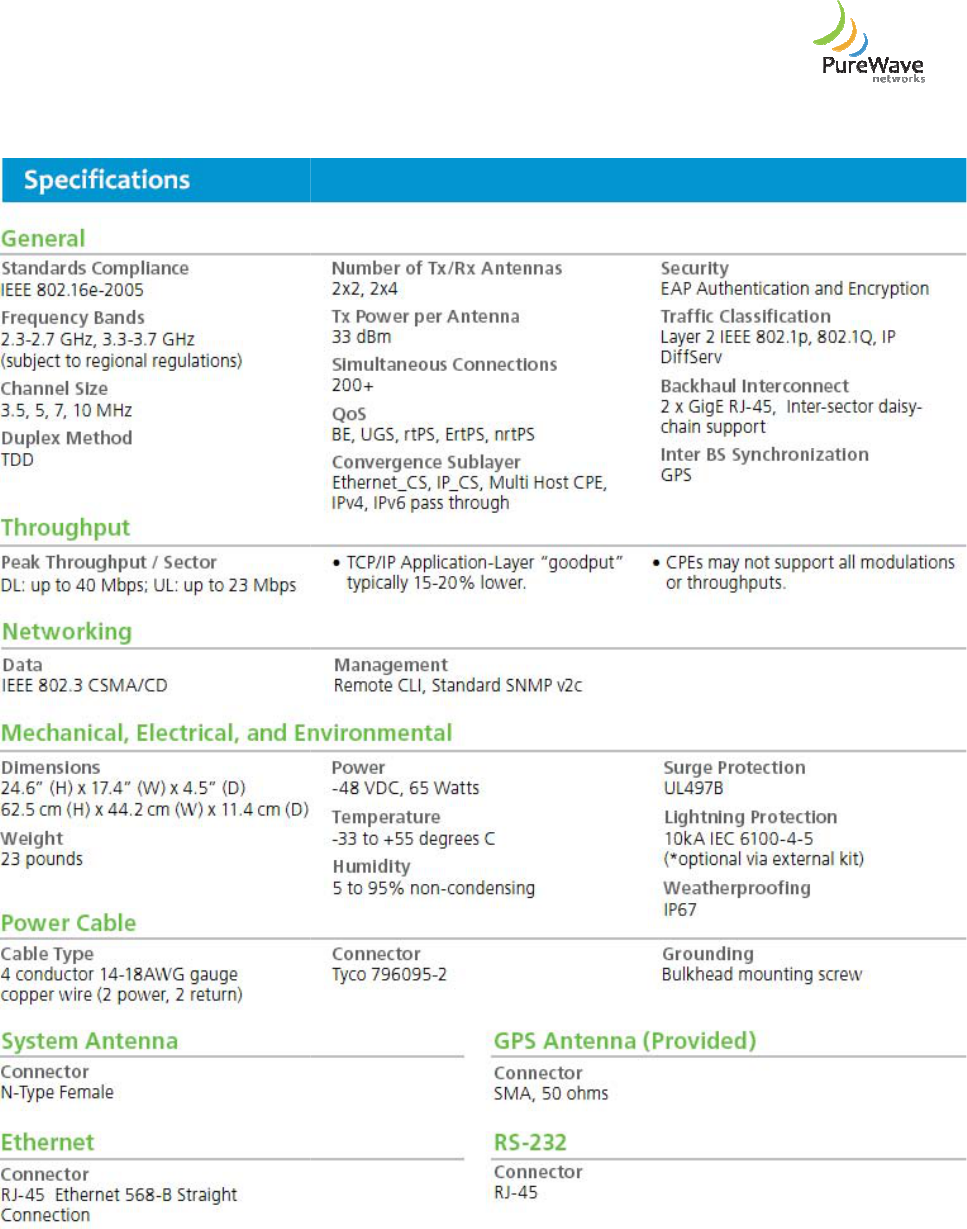
Appendix A
Quantum
1000
Base Station
Data Sheet
Rev 1.1, Page
58 of 70
Quantum 1000 Base Station User
Quantum 1000 Base Station User
Guide
Rev 1.1, Page
Rev 1.1, Page
59 of 70

Quantum 1000 Base Station User
4 (Quad) Antenna Panel
Quantum 1000 Base Station User
Guide
Rev 1.1, Page
Appendix B
4 (Quad) Antenna Panel
Data Sheet
Rev 1.1, Page
60 of 70

Quantum 1000 Base Station User
Electrical
Polarization
Input Impedance
Mechanical
Dimensions (LxWxD)
Weight
Antenna Elements
Connectors
Radome
Model
Frequency
(GHz)
Peak Gain
(per antenna)
2.5A
2.40
2.50
2.63
2.5C
2.40
2.50
2.63
3.5A
3.5
3.6
3.7
Quantum 1000 Base Station User
Guide
Rev 1.1, Page
Vertical
50 ohm
25.54” x 20.33” x 1.75”
12.1 lbs
4
N-Type Female x 4
Kydex T Plastic, Light Grey
Azimuth
Elevation
Peak Gain
(per antenna)
(dBi)
Beamwidth
(3 dB)
Peak Gain
(per antenna)
(dBi)
Beamwidth
14.2 63° 14.4
14.6 68° 14.6
13.9 72° 14.7
14.3 112°
14.0 117°
14.3 117°
17.5 68° 17.4
17.3 71° 17.3
17.2 60° 17.1
Rev 1.1, Page
61 of 70
Elevation
Beamwidth
(3 dB)
14°
13°
12°
8°
8°
8°
Quantum 1000 Base Station User
225
240
255
270
285
300
315
-130
-140
-150
-160
-170
180
170
160
150
140
130
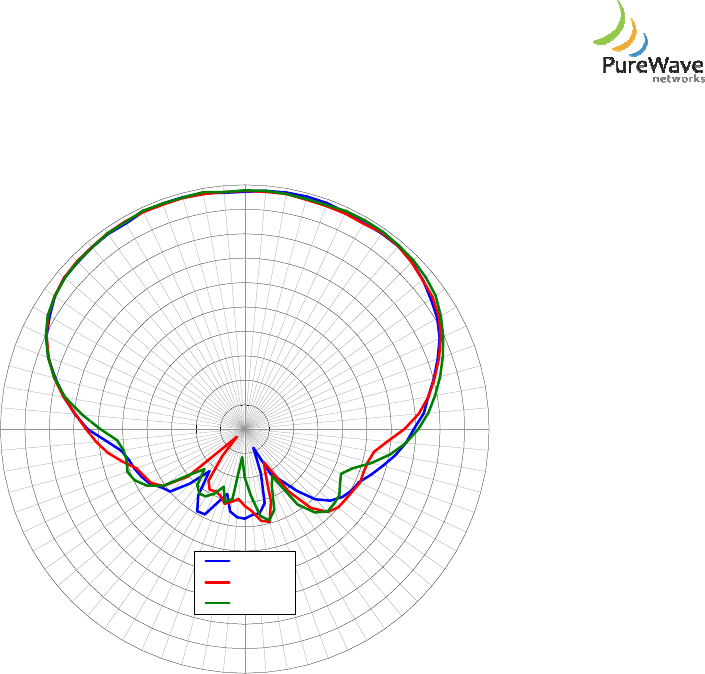
2.40 GHz
2.48 GHz
2.60 GHz
Quantum 1000 Base Station User
Guide
Rev 1.1, Page
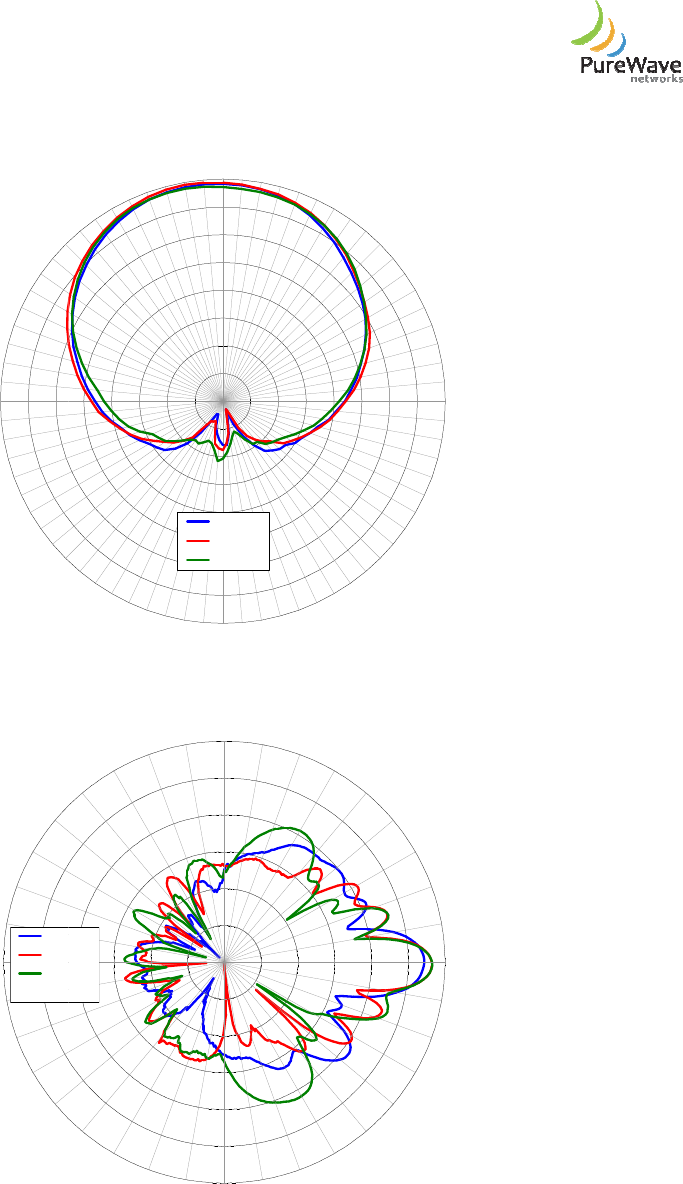
Model 2.5A
Azimuth
-25
-20
-15
-10
-5
0
5
10
15
0
15
30
45
60
75
90
105
120
135
150
165
180
195
210
330
345
2.40 GHz
2.50 GHz
2.63 GHz
Elevation
-40
-30
-20
-10
0
10
20
90
80
70
60
50
40
30
20
10
0
-10
-20
-30
-40
-50
-60
-70
-80
-90
-100
-110
-120
-130
130
120
110
2.40 GHz
2.48 GHz
2.60 GHz
Rev 1.1, Page
62 of 70
Quantum 1000 Base Station User
225
240
255
270
285
300
315
Quantum 1000 Base Station User
Guide
Rev 1.1, Page
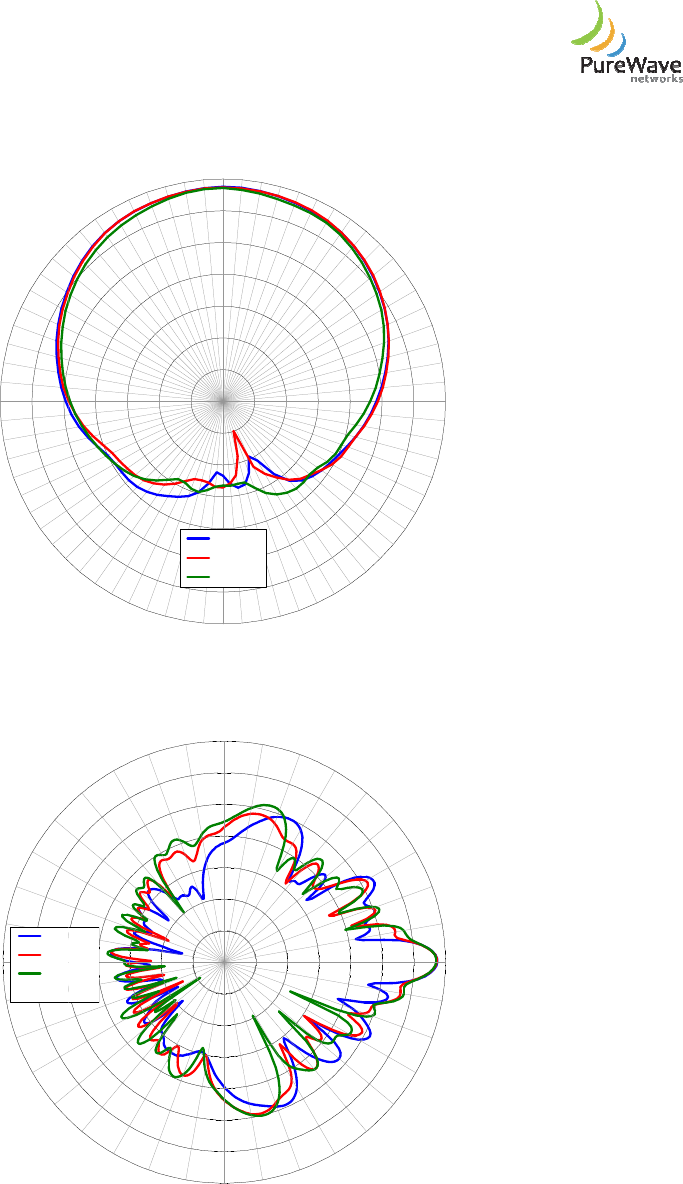
Model 2.5 C
Azimuth
-35
-30
-25
-20
-15
-10
-5
0
5
10
15
0
15
30
45
60
75
90
105
120
135
150
165
180
195
210
330
345
2.40 GHz
2.50 GHz
2.60 GHz
Rev 1.1, Page
63 of 70
Quantum 1000 Base Station User
225
240
255
270
285
300
315
-130
-140
-150
-160
-170
180
170
160
150
140
130
3.50 GHz
3.60 GHz
3.70 GHz
Quantum 1000 Base Station User
Guide
Rev 1.1, Page
Model 3.5 A
Azimuth
-50
-40
-30
-20
-10
0
10
20
0
15
30
45
60
75
90
105
120
135
150
165
180
195
210
330
345
3.50 GHz
3.60 GHz
3.70 GHz
Elevation
-50
-40
-30
-20
-10
0
10
20
90
80
70
60
50
40
30
20
10
0
-10
-20
-30
-40
-50
-60
-70
-80
-90
-100
-110
-120
-130
130
120
110
3.50 GHz
3.60 GHz
3.70 GHz
Rev 1.1, Page
64 of 70

Quantum 1000 Base Station User
Cable Terminations
Quantum 1000 Base Station User
Guide
Rev 1.1, Page
Appendix C
Cable Terminations
Rev 1.1, Page
65 of 70
Quantum 1000 Base Station User
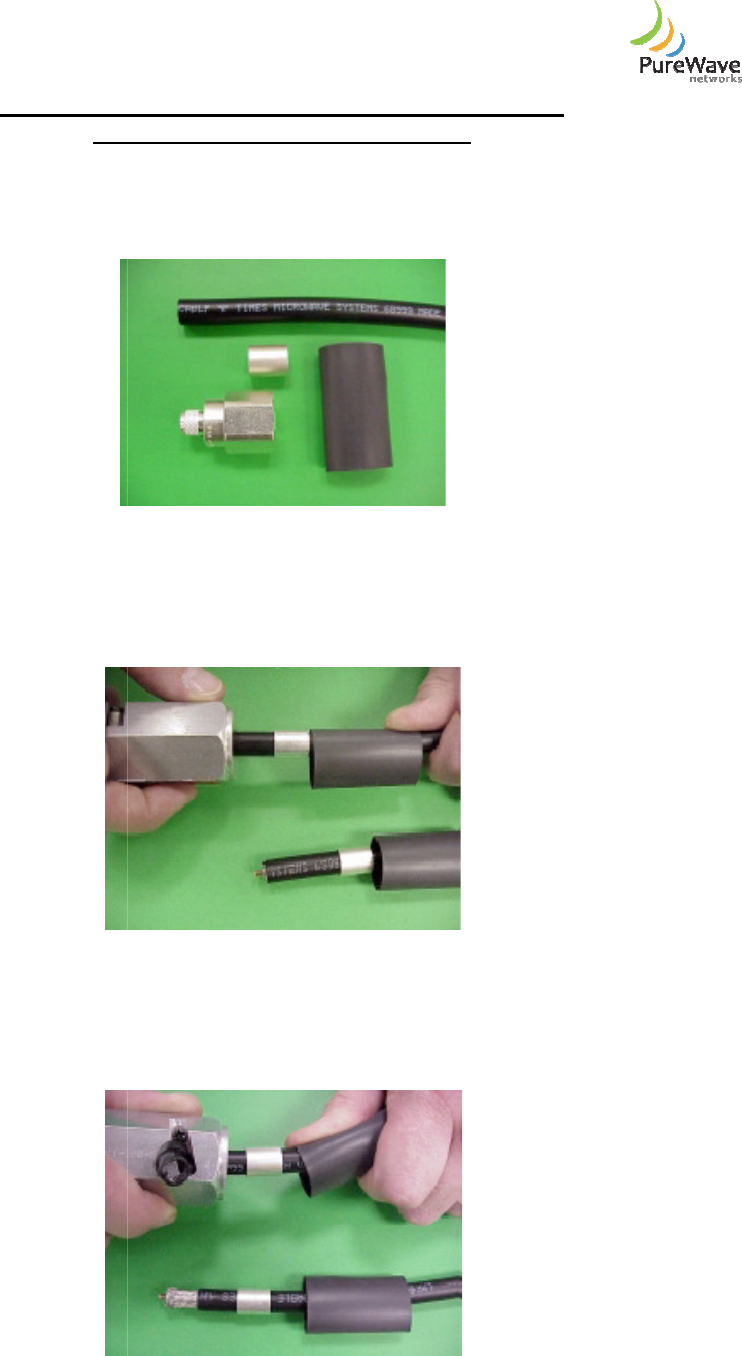
EZ-400-
NMH Connector
Times Microwave Cable LMR
This installation procedure has been re
1.
Flush cut the cable squarely.
2.
Slide the heat shrink boot and crimp ring onto the
prep/strip tool by inserting the cable into End 1 and rotating the tool. Remove any residual plastic
from the center conductor.
3.
Insert the cable into End 2 of the ST
plastic jacket.
Quantum 1000 Base Station User
Guide
Rev 1.1, Page
NMH Connector
Installation Procedure on
Times Microwave Cable LMR
-400
This installation procedure has been re
-
produced in its entirety from the Times Microwave website.
Flush cut the cable squarely.
Slide the heat shrink boot and crimp ring onto the
cable. Strip the cable end using the ST
prep/strip tool by inserting the cable into End 1 and rotating the tool. Remove any residual plastic
Insert the cable into End 2 of the ST
-400-EZ prep/strip tool and rotate
the tool to remove the
Rev 1.1, Page
66 of 70
produced in its entirety from the Times Microwave website.
cable. Strip the cable end using the ST
-400-EZ
prep/strip tool by inserting the cable into End 1 and rotating the tool. Remove any residual plastic
the tool to remove the
Quantum 1000 Base Station User
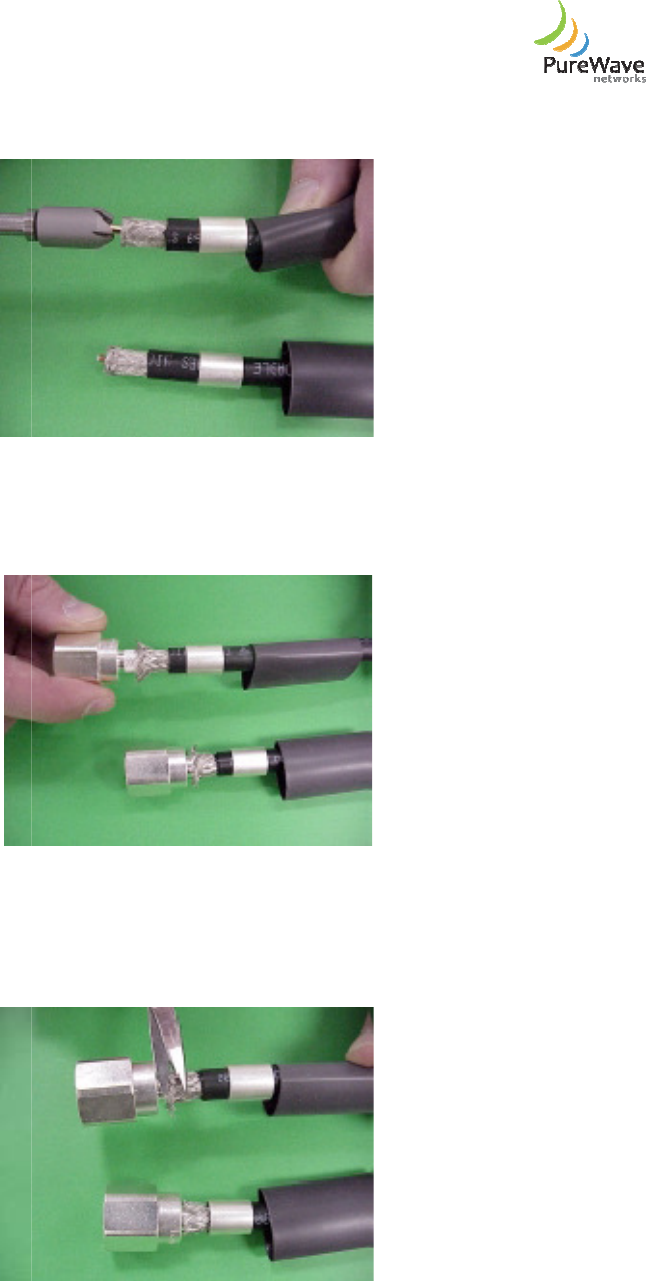
4.
Debur the center conductor using
5.
Flare the braid slightly and push the connector body onto the cable until the connector snaps into
place, then slide the crimp ring forward
6.
Temporarily slide the crimp ring back, and remove the connector body
excess braid at the crease line, then remount the
it butts up against the
connector body
Quantum 1000 Base Station User
Guide
Rev 1.1, Page
Debur the center conductor using
the DBT-01 deburring tool.
Flare the braid slightly and push the connector body onto the cable until the connector snaps into
place, then slide the crimp ring forward
creasing the braid.
Temporarily slide the crimp ring back, and remove the connector body
from the cable to trim the
excess braid at the crease line, then remount the
connector and slide the crimp ring forward until
connector body
Rev 1.1, Page
67 of 70
Flare the braid slightly and push the connector body onto the cable until the connector snaps into
from the cable to trim the
connector and slide the crimp ring forward until
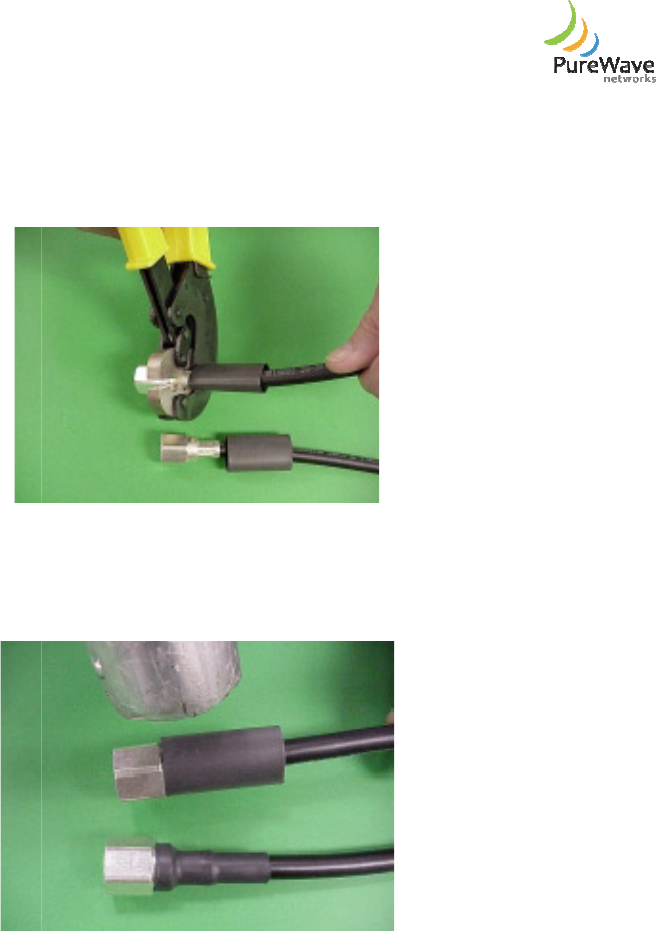
Quantum 1000 Base Station User
7.
Position either the heavy duty HX
400/300 crimp tool directly behind and adjacent to the connector body, and crimp the connector.
The HX-
4 crimp tool automatically relea
8.
Position the heat shrink boot as far forward on the connector body as
with the coupling nut and use a heat gun to
Quantum 1000 Base Station User
Guide
Rev 1.1, Page
Position either the heavy duty HX
-4 crimp tool with the appropriate dies
(.429” hex) or the CT
400/300 crimp tool directly behind and adjacent to the connector body, and crimp the connector.
4 crimp tool automatically relea
ses when the crimp is complete.
Position the heat shrink boot as far forward on the connector body as
possible, without interfering
with the coupling nut and use a heat gun to
form a weather tight seal.
Rev 1.1, Page
68 of 70
(.429” hex) or the CT
-
400/300 crimp tool directly behind and adjacent to the connector body, and crimp the connector.
possible, without interfering
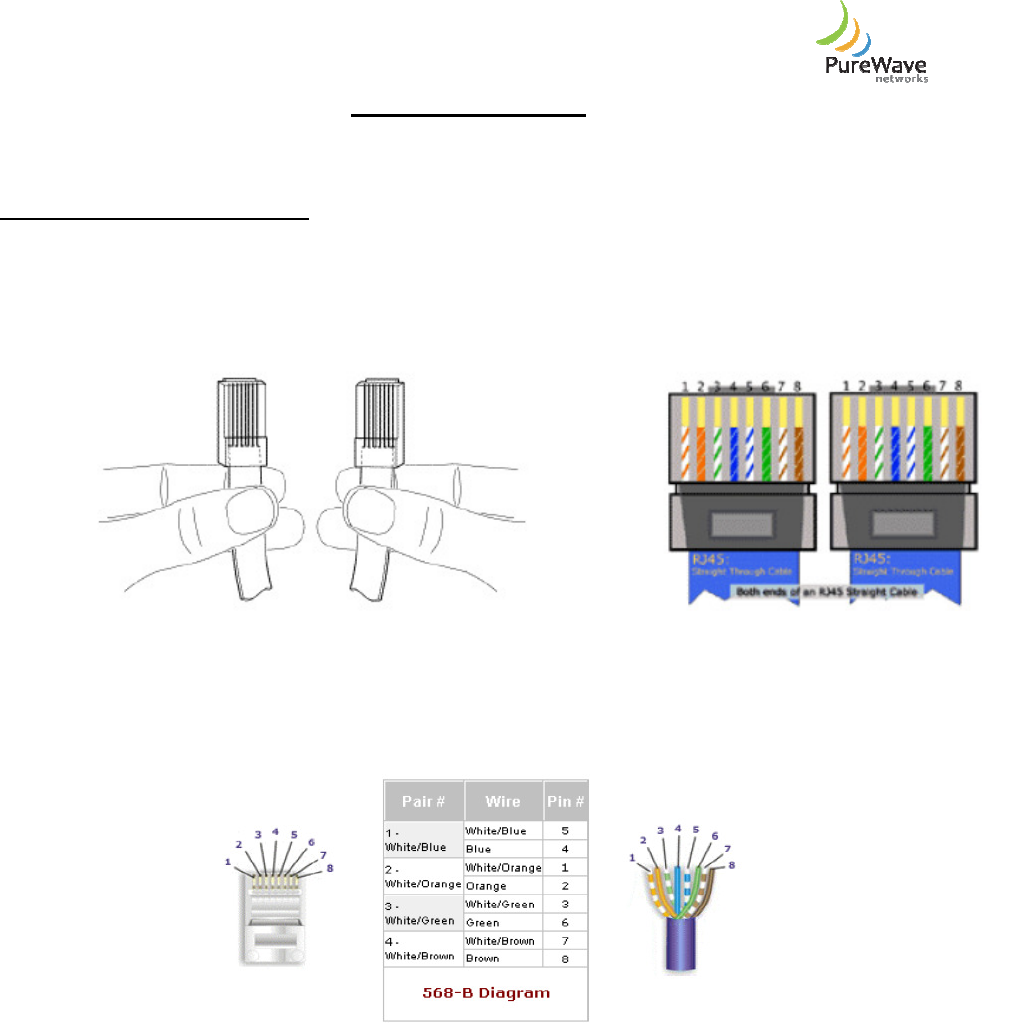
Quantum 1000 Base Station User
Identifying the RJ-45 Cable Type
To identify the RJ-
45 cable type, hold the two ends of the cable next to each other so you can see the
colored wires inside the ends, as shown. In a straight
sequence at
both ends of the cable.
When making a straight-
through cable using Cat 5E, it is mandatory that you follow the 568
shown below. Otherwise, you risk the possibility of damaging the
Quantum 1000 Base Station User
Guide
Rev 1.1, Page
Ethernet Cat 5 Cable
45 cable type, hold the two ends of the cable next to each other so you can see the
colored wires inside the ends, as shown. In a straight
-
through cable, the colored wires are in the same
both ends of the cable.
through cable using Cat 5E, it is mandatory that you follow the 568
shown below. Otherwise, you risk the possibility of damaging the
equipment.
Rev 1.1, Page
69 of 70
45 cable type, hold the two ends of the cable next to each other so you can see the
through cable, the colored wires are in the same
through cable using Cat 5E, it is mandatory that you follow the 568
-B standard
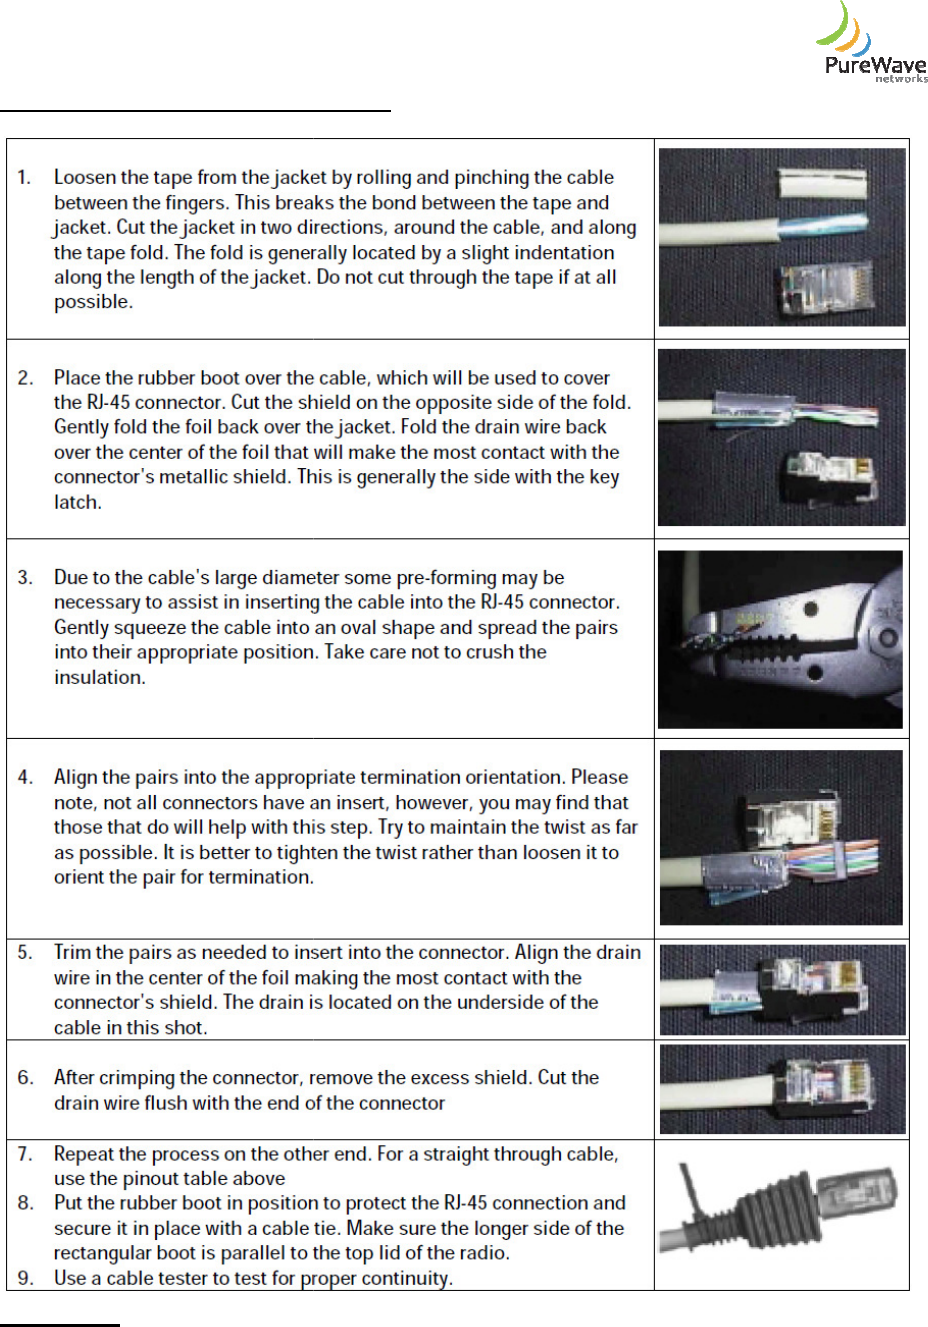
Quantum 1000 Base Station User
Termination of the Cat 5E Shielded Cable
Please Note:
You must use shielded Cat 5
contact with the metal RJ-
45 connector.
Quantum 1000 Base Station User
Guide
Rev 1.1, Page
Termination of the Cat 5E Shielded Cable
You must use shielded Cat 5
e
cables and make certain that the drain wire has a good
45 connector.
Rev 1.1, Page
70 of 70
cables and make certain that the drain wire has a good