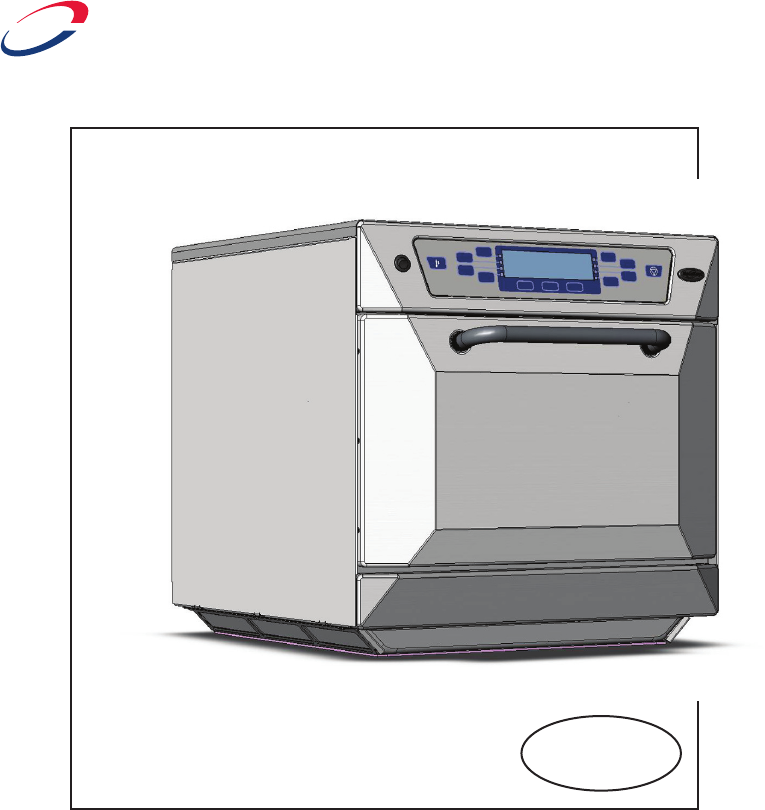
Merrychef 412SMTV6DK Microwave Combination Oven User Manual
Merrychef Limited Microwave Combination Oven
User Manual
Se advierte a los usuarios que el mantenimiento y las reparaciones deben ser realizadas por un agente de servicio
autorizado de Merrychef usando refacciones genuinas Merrychef. Merrychef no tiene ninguna obligación con respecto a
cualquier producto que no haya sido instalado correctamente; ajustado, operado ni mantenido de acuerdo con los códigos
nacionales o locales o a las instrucciones proporcionadas con el producto, o sobre cualquier producto cuyo número de
serie haya sido borrado, destruido o retirado, o cualquier producto modicado o reparado con partes no autorizadas o por
agentes no autorizados. Para obtener una lista de agentes de servicio autorizados, por favor consulte la última hoja en
el interior de este folleto. La información contenida aquí (incluyendo especicaciones de diseño y de partes) puede ser
reemplazada y esta sujeta a cambio sin previo aviso.
MENUKEY2
412s Version X.X
Instrucciones de Instalación y Operación
Users are cautioned that maintenance and repairs should be performed by a Merrychef authorized service agent using
genuine Merrychef replacement parts. Merrychef will have no obligation with respect to any product that has been improperly
installed, adjusted, operated or not maintained in accordance with national and local codes or installation instructions provided
with the product, or any product that has its serial number defaced, obliterated or removed, or which has been modied or
repaired using unauthorized parts or by unauthorized service agents. For a list of authorized service agents, please refer
to the inside back page of this booklet. The information contained herein ( including design and parts specications ) may
be superseded and is subject to change without notice.
Installation and operating instructions
IMPORTANT INFORMATION
READ BEFORE USE
INFORMACION IMPORTANTE
LEA ANTES DE USAR EL APARATO
Merrychef
®
®

2
Safety instructions .............................................3
Installation instructions .......................................6
Introduction ........................................................8
Main features ................................................9-10
Usingtheovenforthersttime .................. 11-12
RunningaProgram ..........................................13
Operatinginstructions:Manualmode .............. 14
Operatinginstructions:Programmode ......15 -17
MenuKey:Changingovenprograms .............18
Daily cleaning 1, 2 Cool Down Mode & 3 ....19-21
Technicalspecication .....................................22
a)Donotattempttooperatethisovenwiththe
door open since open-door operation can result
inharmfulexposuretomicrowaveenergy.Itis
importantnottodefeatortamperwiththesafety
interlocks.
b) Do not place any object between the oven front
face and the door or allow soil or cleaner resi-
duetoaccumalateonsealingsurfaces.
PRECAUTIONS TO AVOID POSSIBLE EXPOSURE
TO EXCESSIVE MICROWAVE ENERGY
c)Donotoperatetheovenifitisdamaged.
Itisparticularlyimportantthattheoven
door closes properly and that there is no
damagetothe(1)door(bent)
(2)hingesandlatches(brokenor
loosened)(3)doorsealsandsealing
surfaces.
d) The oven should not be adjusted or
repairedbyanyoneexceptproperly
qualiedservicepersonnel
PLEASE READ THE FOLLOWING
SAFETY INSTRUCTIONS CAREFULLY
Merrychef USA
2227 Welbilt Boulevard
New Port Richey
FL 34655
Phone:1-(727)375-1944
Fax:1-(727)569-1574
e-mail:info@merrychefusa.com
3
When using electrical appliances basic safety
precautions should be followed, including the
following:
WARNING To reduce the risk of burns, electric shock,
re,injurytopersons,orexposuretoexcessive
microwaveenergy:
1. Read all instructions before using the appliance.
2.Readandfollowthespecic“PRECAUTIONSTO
AVOID POSSIBLE EXPOSURE TO EXCESSIVE
MICROWAVE ENERGY” FOUND ON
PAGE 2.
3.Thisappliancemustbegrounded.Connectonlyto
a properly grounded outlet.
See“GROUNDINGINSTRUCTIONS”foundonpage
4.
4. Install or locate this appliance only in accordance
with the provided installation instructions
5.Someproductssuchaswholeeggsandsealed
containers—forexample,closedjars—mayexplode
and should not be heated in this oven.
6. Use this appliance only for its intended use as
describedinthemanual.Donotusecorrosive
chemicalsorvaporsinthisappliance.Thistypeof
ovenisspecicallydesignedtoheat,cookordryfood.
It is not designed for industrial or laboratory use.
7. This appliance should not be used by children.
8.Donotoperatethisapplianceifithasadamaged
cord or plug, if it is not working properly, or if it has
beendamagedordropped.
9.Thisapplianceshouldbeservicedonlybyqualied
service personnel. Contact the nearest authorized
servicefacilityforexamination,repairoradjustment.
10 Do not cover or block any openings on the
applianceincludingairvents/ltersandsteamoutlet.
11 Do not store this appliance outdoors. Do not use
thisproductnearwater—–forexample,neara
kitchensink,inawetbasement,ornearaswimming
pool, and the like.
12.Donotimmersethecordorpluginwater.
13.Keepthecordawayfromheatedsurfaces.
14. Do not let cord hang over edge of table or counter.
15. Either:
i) When cleaning surfaces of door and oven
thatcometogetheronclosingthedoor,use
onlymildnon-abrasivesoaps,ordetergents
applied with a sponge or soft cloth.
ii) When separate cleaning instructions
are provided, see door surface cleaning
instructions.
IMPORTANT SAFETY INSTRUCTIONS
SAVE THESE INSTRUCTIONS
iii)Ifmaterialsinsidetheovenshouldignite,keep
oven door closed, turn oven off, and disconnect
the power cord , or shut off power at the fuse or
circuit breaker panel.
iv) Do not use the cavity for storage purposes. Do
not leave paper products, cooking utensils or
food in the cavity when not in use.
17.DONOToperateusingmicrowaveonlyorcombina-
tion function without food or liquid inside the oven as
thismayresultinoverheatingandmaycausedamage.
18.NEVERremovetheexterioroftheoven.
19.NEVERremoveanyxedinternalpartsoftheoven.
20.NEVERtamperwiththecontrolpanel,door,seals,
or any other part oven.
21.DONOTobstructairvents/ltersorsteamoutlet.
22. NEVER hang dish towels or cloths on any part of
the oven.
23.Ifthedoorsealsaredamaged,theovenmustbe
repaired by an approved Service Agent.
24.IfthepowercableisdamagedinanywayitMUST
be replaced by an approved Service Agent.
25. When handling hot liquids, foods, and containers,
care should be taken to avoid scalds and burns.
26.Whenheatingliquidsusingmicrowaveonlyorcom-
bination function, the contents should be stirred prior to
heating to avoid eruptive boiling.
27. Feeding bottles and baby food jars should be
opened when heating, the contents stirred or shaken
andthetemperaturecheckedpriortoconsumptionto
avoid burns.
28. Never use the oven to heat alcohol, e.g. brandy,
rumetc.Also,foodcontainingalcoholcanmoreeasily
catchreifoverheated.
29.Neverattempttodeepfryintheoven.
16.Toreduceriskofreinthecavity:
i) Do not overcook food. Carefully attend
appliance if paper, plastic or other
combustiblematerialsareplacedinsidethe
oven to facilitate cooking.
ii)Removewiretwist-tiesfrompaperorplastic
bags before placing bag in oven

4
For all cord connected appliances:
GROUNDING INSTRUCTIONS
Thisappliancemustbegrounded.Intheeventofanelectricalshortcircuit,groundingreducestheriskof
electric shock by providing an escape wire for the electric current. This appliance is equipped with a cord
havingagroundingwirewithagroundingplug.Theplugmustbepluggedintoanoutletthatisproperly
installed and grounded.
WARNING—Improperuseofthegroundingcanresultintheriskofelectricshock.
ConsultaqualiedelectricianorServicemanifthegroundinginstructionsarenotcompletelyunderstoodorif
doubtexistsastowhethertheapplianceisproperlygrounded.
Donotuseanextensioncord.Ifthepowersupplycordistooshort,haveaqualiedelectricianor
servicemaninstallanoutletneartheappliance.
Forapermanentlyconnectedappliance:
GROUNDING INSTRUCTIONS
Thisappliancemustbeconnectedtoagrounded,metallic,permanentwiringsystem,oranequipment
groundingconductorshouldberunwiththecircuitconductorsandconnectedtotheequipmentgrounding
terminalorleadontheappliance.
ELECTRICAL INSTALLATION
In case of Radio or Television Interference
Thisequipmentgeneratesandusesradiofrequencyenergyandifnotinstalledandoperated
correctly,instrictaccordancewiththemanufacturer’sinstructions,maycauseharmful
interferencetoauthorizedradiocommunicationservices.
IthasbeentypetestedandfoundtocomplywiththelimitsforPart18.307conductedemissionsfor
consumerequipmentandPart18.305radiatedemissions,whicharedesignedtoprovidereasonable
protection against such interference. However, there is no guarantee that interference will not occur in a
particularinstallation.Ifthisequipmentdoescauseinterferencetoradioortelevisionreception,whichcanbe
determinedbyturningtheequipmentoffandon,theuserisencouragedtotryandcorrecttheinterferenceby
oneormoreofthefollowingmeasures:
1) Re-orientate the receiving antenna.
2)Relocatethemicrowavewithrespecttothereceiver.
3)Plugthemicrowaveintoadifferentoutletsothatthereceiverandmicrowaveareondifferentbranch
circuits.
Ifnecessarytheusershouldconsultthedealeroranexperiencedradio/televisiontechnicianforadditional
suggestions.
Note:Modicationsshouldonlybecarriedoutbythemanufacturerorauthorizedrepresentativetoensure
continuingconformance.
POWER SUPPLY: CIRCUIT BREAKERS
If the oven is connected to a ground fault detection device, it is required that the GFP or GFEP will allow a
minimumof30milliampsgroundcurrentwithoutinterruptingthecircuit.

5
1. Readthismanualbeforeusingyouroven.
2. As with all electrical appliances, it is wise to have the electrical connections inspect-
ed periodically.
3. The oven interior and door seals should be cleaned frequently, following the instruc-
tions described in the CLEANING section.
4. Thereisnoneedtoswitchoffyourovenaftereachfunctionbutremembertoswitch
off at the end of the day or period of operation.
5. Microwaveenergyshouldnotbeusedtodrylinenorwarmplates.
6. Aswithanycookingappliance,careshouldbetakentoavoidcombustionofthe
itemswithintheoven.
PRECAUTIONS TO BE OBSERVED
7. Ensure food is placed in the centre of the oven cavity for best results.
8. Whenusingthemicrowaveonlyfunction,coverthefoodtopreventsplashingthe
walls of the cavity.
9. Foodincombustibleplasticorpapercontainersshouldonlybeusedinmicrowave
only function and checked frequently to avoid the possibility of ignition.
10. Itemsshouldbeunwrappedwhenusingconvectionandcombinationfunctions.
11. Eggs and whole hard-boiled eggs should notbeheatedusingthemicrowaveorcom-
binationfunctionastheymayexplode.
12. Food with a skin, e.g. potatoes, apples, sausages, etc. should be pierced before
heating.
13. Foodshouldnotbeheatedinacompletelysealedcontainerasthebuild-upofsteam
maycauseittoexplode.
14. Excessfatshouldberemovedduring‘roasting’andbeforeliftingheavycontainers
fromtheoven.
15. In the event of glass breaking or shattering within the oven, ensure that food is totally
free of glass particles. If in doubt, dispose of any food that was in the oven at the
timeofthebreakage.
If smoke is observed:
Switch off
Isolatefromtheelectricalsupply
Keepthedoorclosedtostieanyames
6
Removepackingmaterialandprotectivelmfromtheoven.
Included inside your oven: Rack
Upperandlowerimpingerplates
LOCATION AND POSITIONING
Checkforobvioussignsoftransitdamage.
Ifnecessary,informthefreightcompanyIMMEDIATELY.
Chooseasiteawayfrommajorheatsources.
DO NOTpositionsothathotairisdrawninfromfryers,grills,griddles,
etc.
Aheatbarriertotheheightoftheovenmustbeinstalledifsitednext
to a burner, stove or range.
Note:
The air intake is located
under each side of the oven,
even with the clearance
specied below it is important
that airow is as cool as
possible and not
pre-heated by other
appliances such as fryers,
grills and griddles as this
will deteriorate the life and
performance of the oven.
PlacetheovenonaatsurfacethatisLEVEL,STRONGand
STABLE.
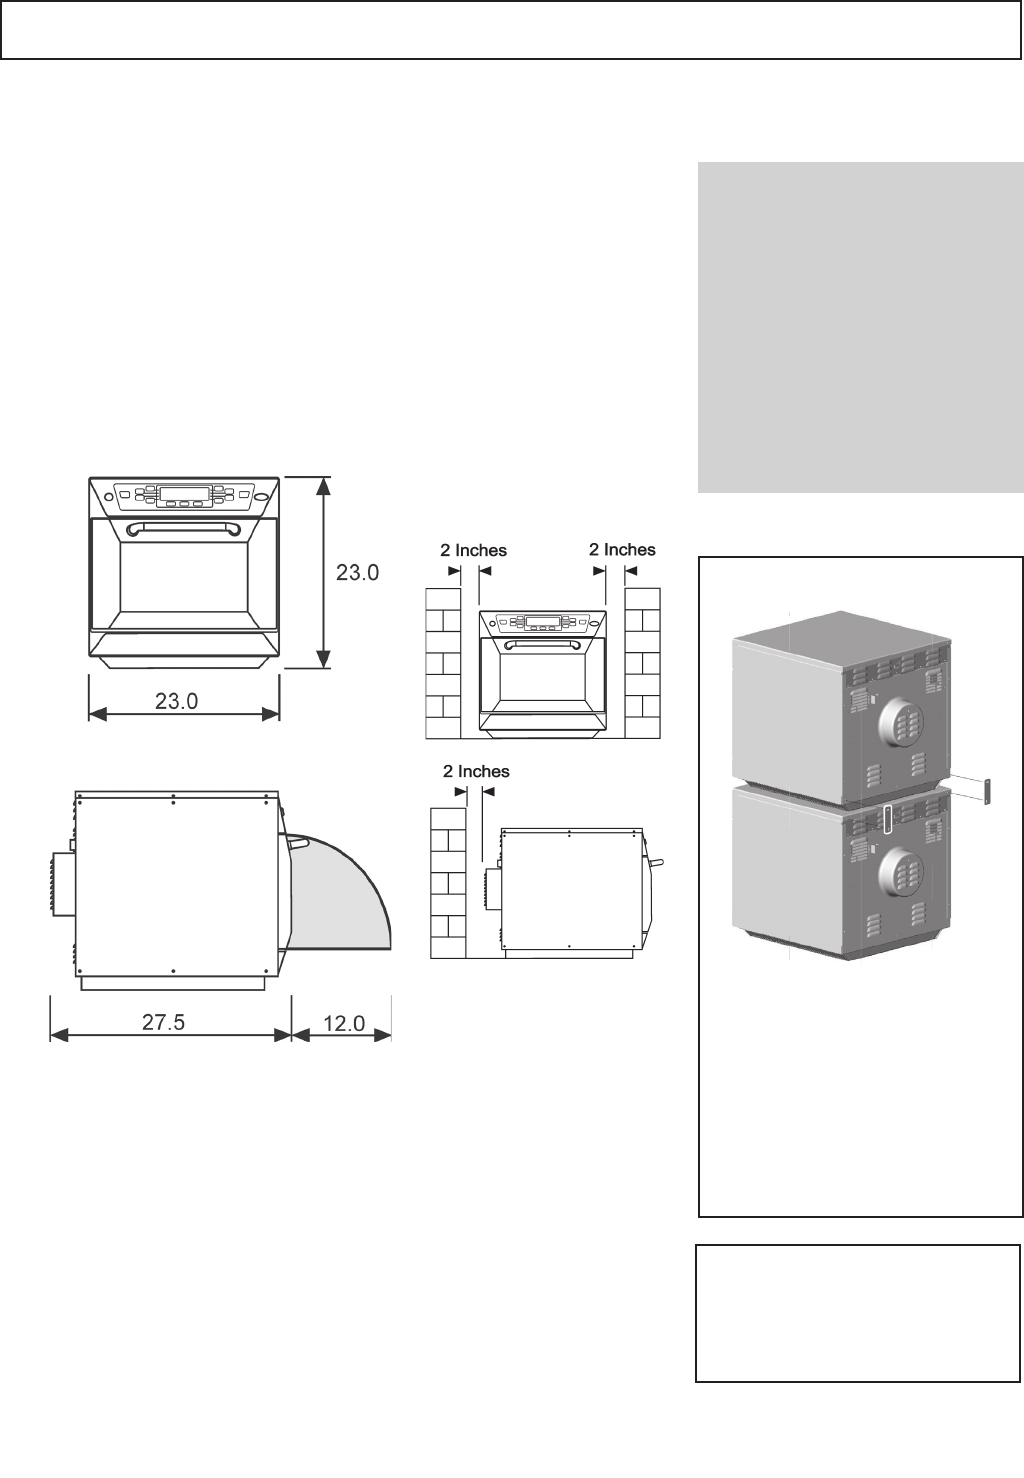
Allowaminimumclearanceof2inches(50mm)totherear,topand
each side to allow air to circulate freely.
The air intake is located under each side of the oven, even with the
clearancespeciedabove,itisimportantthatairowisascoolas
possible and not pre-heated by other appliances such as fryers, grills
or griddles.
Allowaminimumof2inches(50mm)clearanceabovetheovenfor
hot air to escape.
Allowsufcientclearance,12inches(305mm)infrontoftheovenfor
the door to open fully.
Donotafxlabels/stickerstoovenotherthanthoseappliedor
approvedbythemanufacturer.
WARNING:
Check that the
AIR FILTERS are in place
prior to operation
(seeMAINFEATURES)
INSTALLATION
Position the oven with at least the
minimum clearances shown
Position the oven with at least the
minimum clearances shown
Dimensions in inches
Always ensure that ovens are
secured together as shown using
stacking plate Part No. DV0178
(2required).
THIS OVEN MUST NOT BE
STACKED MORE THAN
TWO HIGH.
STACKING
7
Manufacturer’sinstructionsshouldbecheckedtodeterminethesuitabilityofindividualcon-
tainers or utensils using each of the cooking functions.
DoNOTplacemetaltraysorcontainersontheBOTTOMoftheovenasarcingmayoccur.
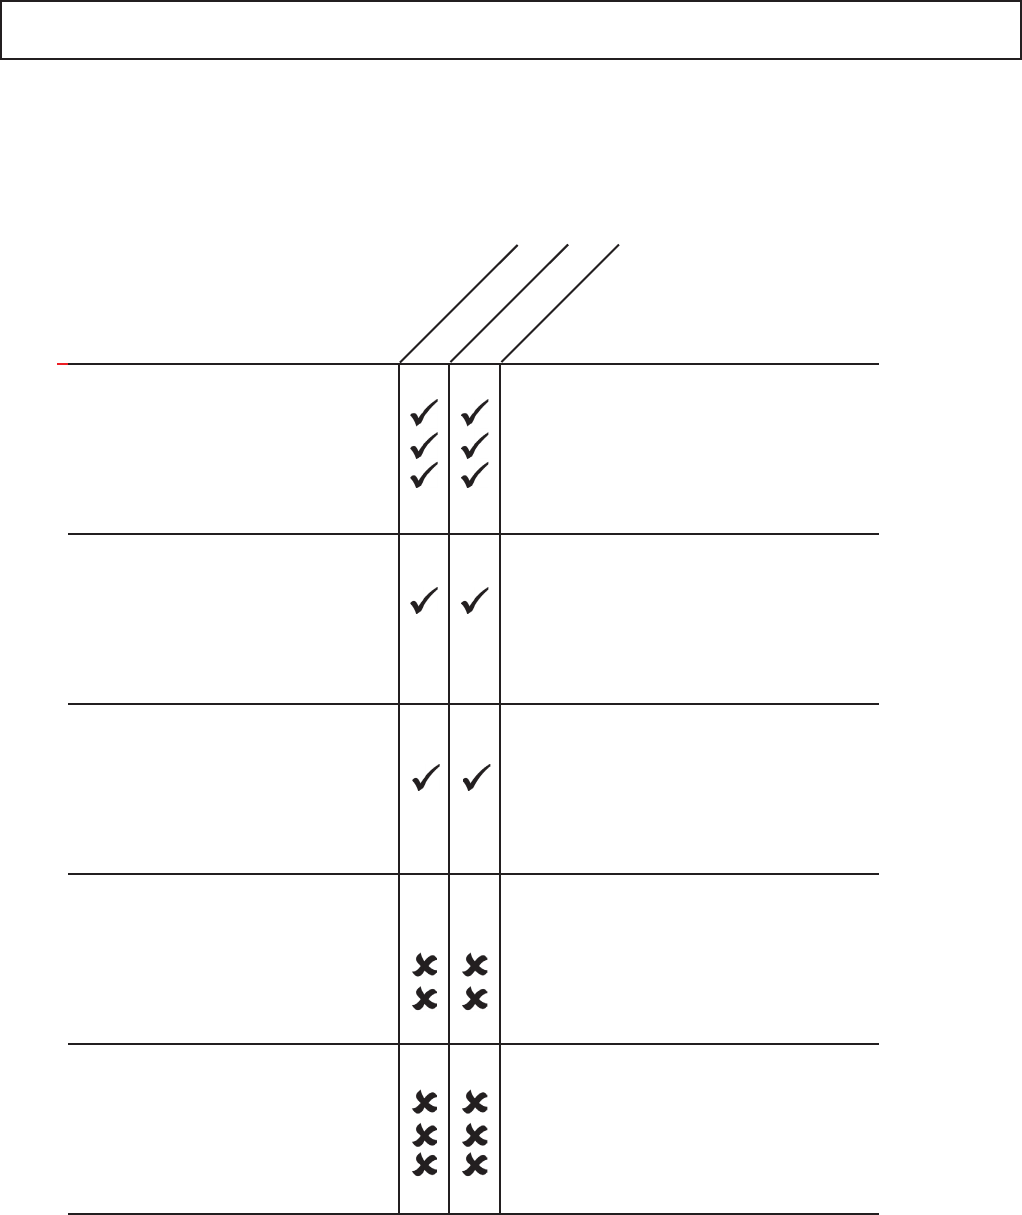
The following chart provides general guidelines:
SUITABLE COOKING UTENSILS
IMPORTANT
Theovenwillaccomodate¼sizebun/sheetpans.Metalsheetpansmaybeusedwhen
placedonthespecialvitreousenamelshelfrailsONLY.
Heat resistant containers
Metallic & Foil Trays
Plastic containers
Disposables
Other utensils
Donotuseitemswithmetallic
decoration.
Metallictraysmayonlybeused
when placed on the vitreous rack
in the oven cavity
(SeeIMPORTANTNote)
Dual-ovenable plastic containers
(uptocertaintemperatures)arenow
available.
Checkmanufacturer’sinstructions
before use
No kitchen utensil should be left in
food while it is cooking
Toughened glass
Vitreousceramics
Earthenware
(porcelain, crockery, china etc.)
Metallic trays
DO NOT USE ANY OTHER
METAL OR FOIL CONTAINERS
Rigid, boilable, plastic
containers
Combustibles (paper,card,etc)
Microwave-suitableclinglm
Tie tags
Cutlery
Temperatureprobes
combination
convection only
DO NOT USE disposable
packagingormetalfoil
containers
DO NOT USE
8
Thisovenoffersoperatorstheexibilityofcombinationcookingwithadditionalcontrolover
fanspeedandmicrowavepower.
Combinationcookingenableshighqualityresultstobeachievedinafractionofthetime
taken by conventional cooking, particularly when baking, browning, roasting, grilling or
producing gratinee dishes.
Onceestablished,preciseinstructionsforcombinationorconvectioncookingofselected
itemsmaybeprogrammedintotheovensmemorysothattheycanberepeatedeasily
andaccurately.Upto256programscanbestoredandsimplyrecalledbypressingthe
appropriatenumber(1-256).
Multi-Stage Programming
Theovencontrolsofferevengreaterexibilitybyallowingmulti-stageprogramming.This
enablestheexactconditionsrequiredforqualityresultstobesetaccordingtothefood
type.
Programscanhaveupto6stageseachwithitsowntime,fanspeedandmicrowavepower
settings.
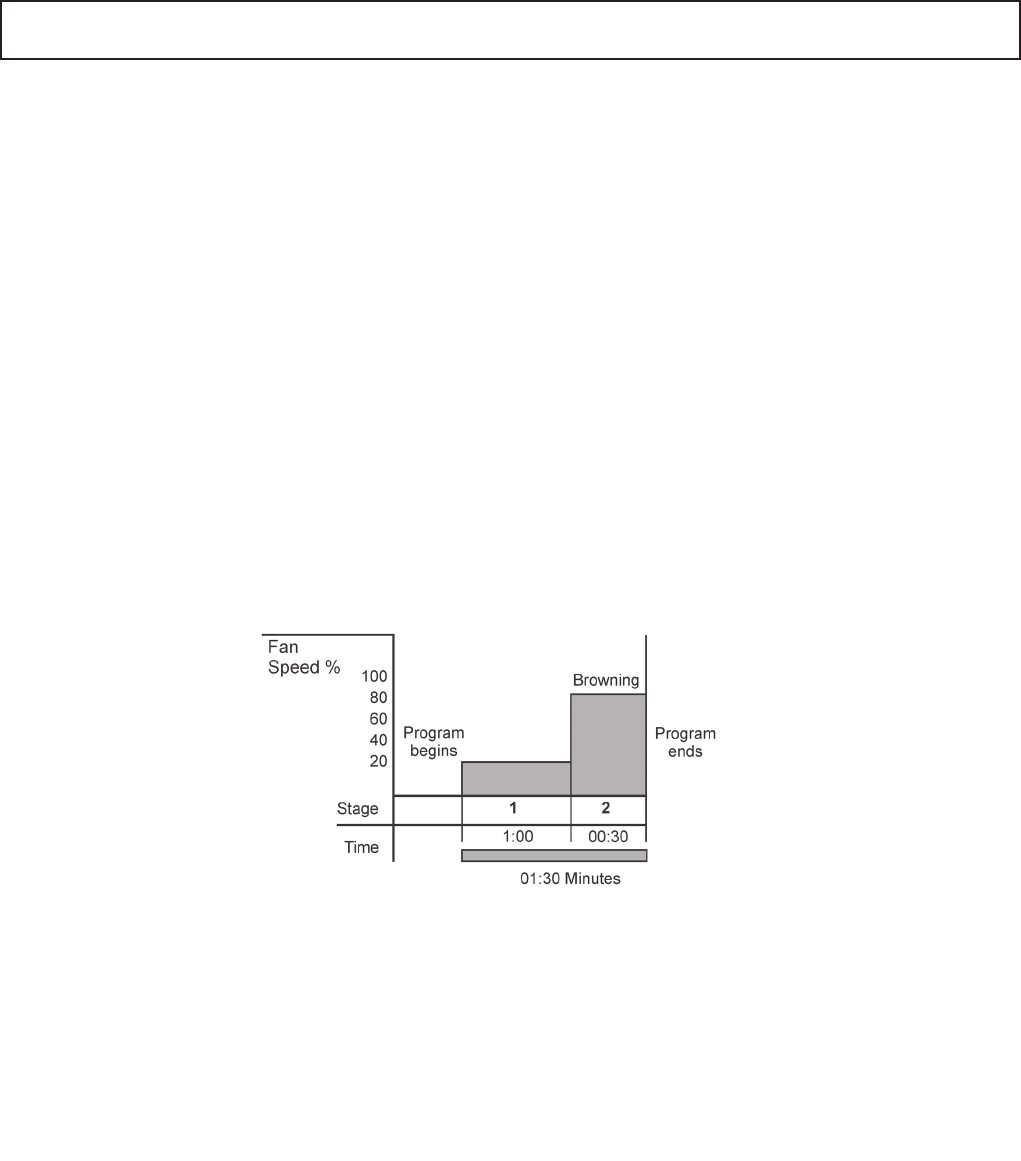
Asimple2-stageprogramisshown:
With the oven set to pre-heat at 500°F.
Stage1Thecookingstagebeginsbyapplyingagentlefanspeedof20%for1minute.
Stage 2 The fan speed is increased to 80% for 30seconds to brown the food.
Thisisonlyoneexampleofaninnitenumberofpossiblemulti-stageprogramshatcanbe
created and stored.
The instructions outlined in this guide are intended to ensure the safety and long life of your Merrychef oven.
INTRODUCTION
9
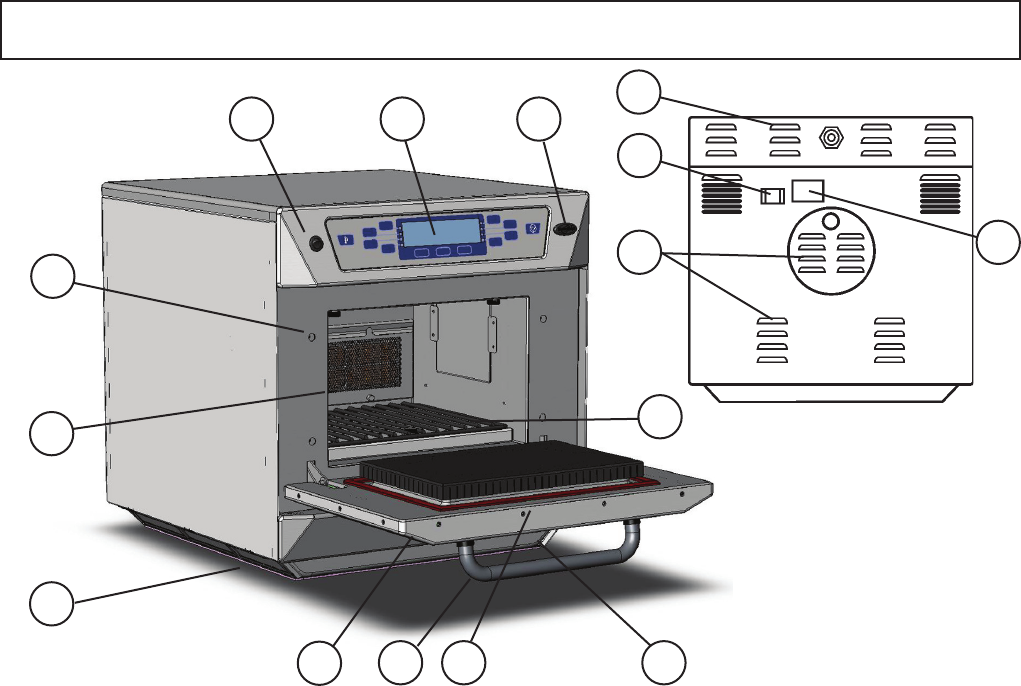
AIR OUTLETS
These vents on the rear panels enable air which has
beenusedtocoolinternalcomponentstoescape.It
willnotallowmicrowaveenergytoescapeintothe
environment.Theymustbekeptfreefromobstruc-
tion.
OVEN CAVITY
Thecavityisconstructedfromstainlesssteeland
vitreousenamelledpanels.Itmustbekeptclean
(seeCLEANING).
CONVECTION FAN, GREASE FILTER & CATA-
LYTIC CONVERTOR
The convection fan, which is located behind the
catalyticconvertorpullsairinthroughthelter
whichremovesthemajorityofthesmokefromthe
airow.Theairisthenheatedandreturnedtothe
cavitythroughtheimpingerplatestoproducean
evenheatpatternintheoven.Thislayoutminimises
areas where grease build up can occur. Great care
should be taken when cleaning this area of the oven
-pleasenotethecleaningrequirementsonsee
CLEANING.
Themetalgreaseltergrillcoveringthefanmustbe
keptcleanandfreeofdebris(SeeCLEANING)
AIR INLET FILTERS ( LEFT & RIGHT )
Situated at the left and right hand side of the base
atthefront.Thesearepartoftheventilationsystem
andmustbekeptfreeofobstructionandcleanedon
a daily basis.
DOOR HANDLE
This is a rigid bar which is pulled downwards and
towards you to open.
CONTROL PANEL
See page 10.
ON/OFF SWITCH
WhenswitchedON,thecontrolpanelwillilluminate.
Thefanandventilationsystemwillalsooperate.
RATING PLATE
Found on the rear panel, this states the serial
number,modeltype&electricalspecications.
DOOR
Thisisaprecision-madeenergybarrierwiththreemi-
crowavesafetyinterlocks.Itmustbekeptclean(see
CLEANING section). The door should NOT be used
to support heavy dishes.
DOOR SEALS
These ensure a tight seal around the door. They
should be kept clean and checked regularly for signs
ofdamage.Attherstsignofweartheyshouldbe
replaced by a Merrychef approved Service Agent.
STEAM VENT(onrearofoven)
Thisenablessteamtoescapeandpreventsbuildup
ofcondensation.Itwillnotallowmicrowaveenergyto
escape.
MenuKey 2
Changestheprogramsontheoven(SeeMenuKey
sectionfordownloadingprogramsonaMenuKey).
RACK
Shouldberemoveddailyforcleaning
(seeCLEANINGsection).
1
2
3
4
5
7
8
9
10
11
12
6
13
MAIN FEATURES
3
6
9
2
4
127
5 10 4
Rear view
13
11
8
1
1
10
CAT 005
CAT 006
CAT 007
CAT 008
CAT 001
CAT 002
CAT 003
CAT 004
CATEGORIES
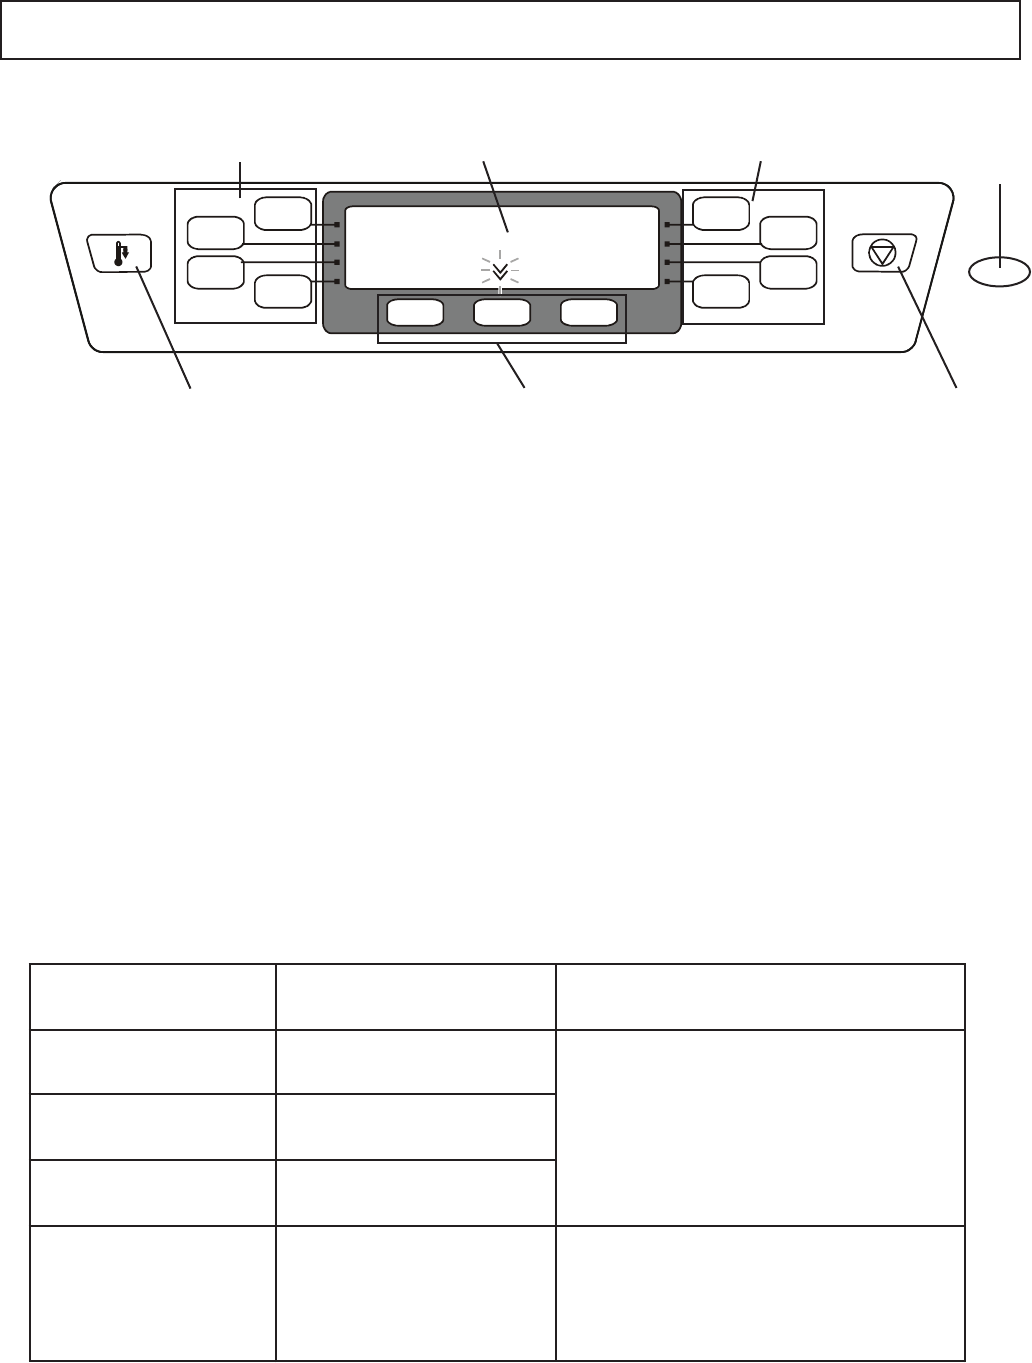
DISPLAY PANEL
Shows the principal functions of the oven.
Whencooking,thetimeremainingcountsdown.
Alsodisplayserrormessagesandoventemperature.
Whenstoringandrecallingaprogramthedisplay
indicatestheprogramnumberanddetails.
FUNCTION PADS
The function pads select options shown in the DISPLAY
PANEL.
CONTROL PANEL
FUNCTION PADS DISPLAY PANEL MenuKeY
SOCKET
CANCEL PADCOOL DOWN
PAD
FUNCTION PADS
MenuKey 2
TheMenuKeySystemautomaticallychangesallthe
cookingprogramswithanelectronickeyandallows
programnamestobeidentied
COOL DOWN PAD
Puts the oven into Cool Down Mode, see Cleaning 2
page 20.
CANCEL PAD
Cancelsalltimedcookingcycles,pre-programmed
operationsandstopsthemicrowaveenergy.Itdoesnot
altertheoventemperature.Iftheovenishot,foodwill
continuetocookandshouldberemovedfromtheoven
immediately.Thispadwillalsocancelanyincorrect
operations.Itwillnoteraseprograms.
FUNCTION PADS
DisplayPanelErrormessages
Message Condition Possible cause
ERROR MAGNETRON 1
ERROR MAGNETRON 2
Magnetron 1 has overheated
Magnetron 2 has overheated
ERROR MAGNETRON 1 & 2 Magnetron 1 and 2 have
overheated
CAVITY SENSOR ERROR Cavitytemperatureexceeds
morethan50°Cabove
PREHEATtemperature
setting during cook cycle
BlockedAirlter(s)
Oven located near hot air sources
Ovenbeingusedempty
Call Service Engineer
Indicatescombustion(re)inovencavity
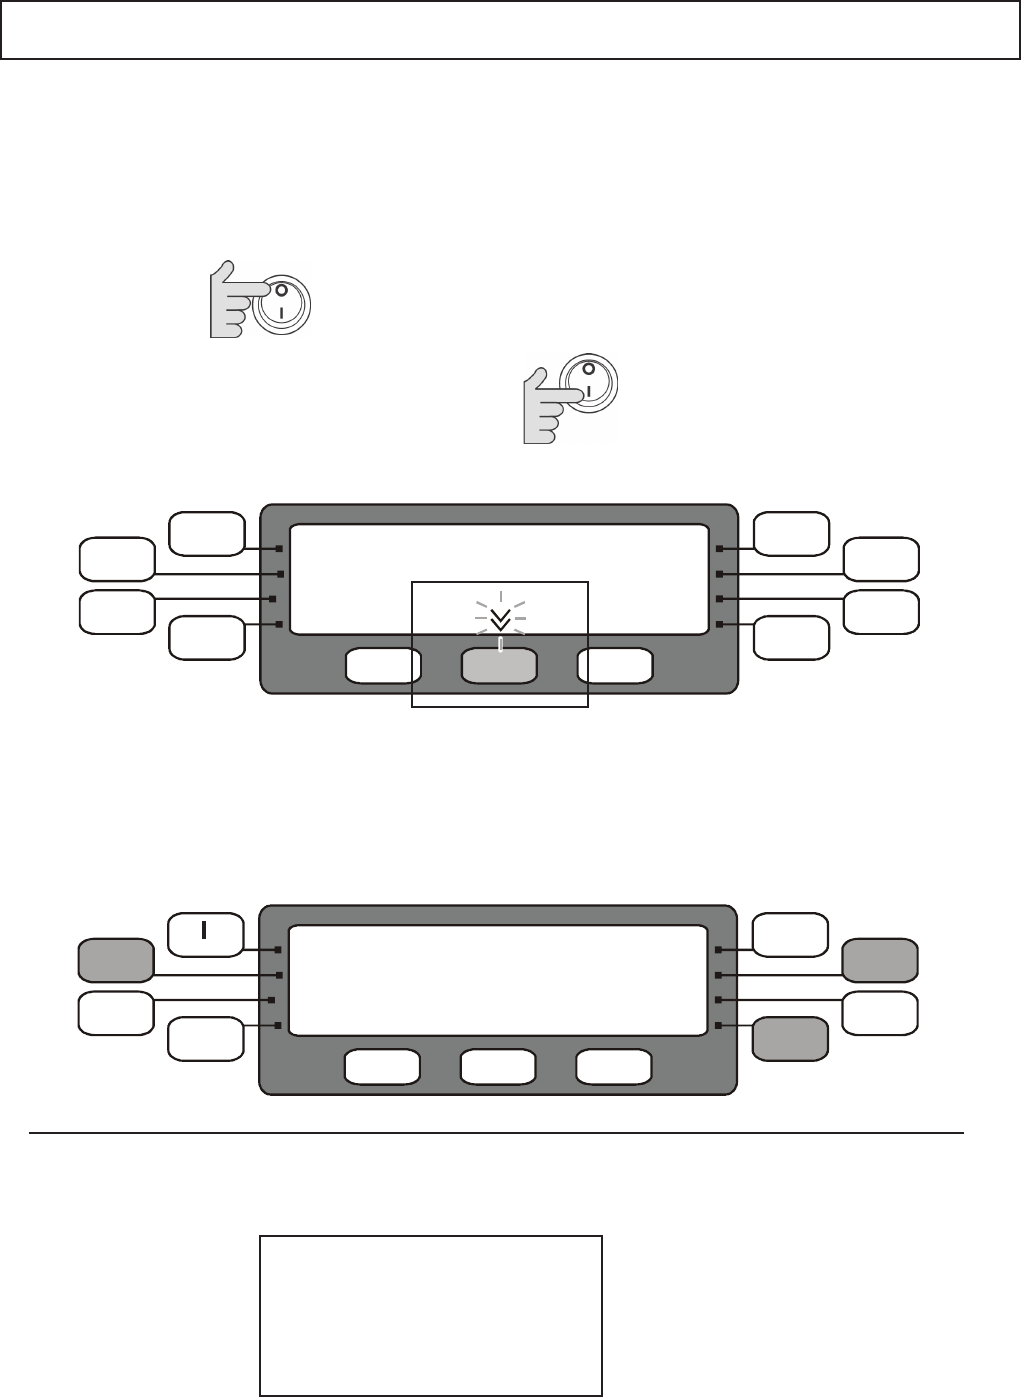
11
Switch the oven ONandimmediatelypressthe
Edit Preheat Temp function key to display OVEN
TEMPERATURE.
(Note:thisscreenisavailablefor5seconds)
2
3
Switch oven OFF
1
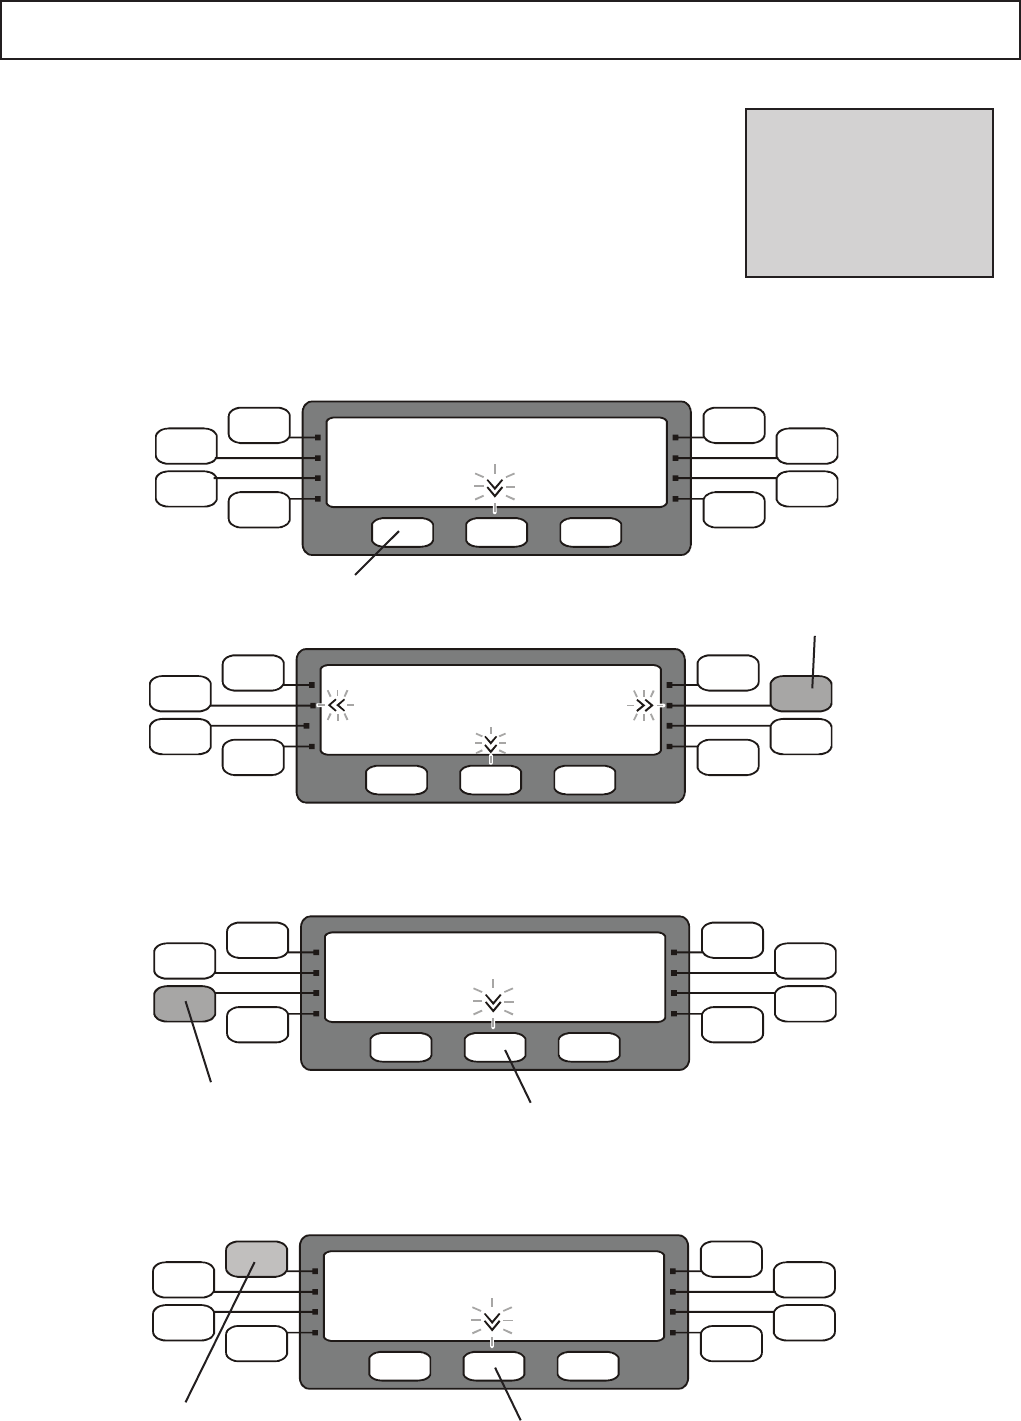
USING THE OVEN FOR THE FIRST TIME 1
ThecurrentovenPREHEATtemperatureisdisplayedandthiscanbeincresedor
decreased by pressing the function pads on each side of the display. Press and hold
forrapidchange.PresstheSavefunctionpadtosavethesettemperatureandexit.
TheovenhasaconstantoperatingtemperatureforcookingshownasthePREHEAT
TEMPERATURE in the display when the oven is switched on.
WhenthecoldovenisswitchedonitheatsuptothePREHEATtemperaturebefore
cookingwithprogramscancommence.Thistemperatureissetinitiallyat525°F.
TochangethePREHEATtemperaturewithintherange212°F to 525°F
Startupsequenceandovenspecication
Whentheovenisswitchedoninformationabouttheovenisdisplayedfor2-3secondsfollowedbytheMERRYCHEF
logo/EditPreheat&EditOvenProlescreenfor5seconds.
Oven on time: 00001 Hours
Magnetron on Time: 00000
Door Operations: 00000
Software Version: 1.9LD
MenuKey Code: 000
MenuKey Checksum: 4741
SETTING THE PREHEAT OVEN TEMPERATURE
+ >>
Save
>>
<< - 525 F°
OVEN TEMPERATURE
Note:Thedisplayedlogomaybedifferent
ifprogramshavebeenenteredfromaMenuKey
OVEN INFORMATION
Note:Thedisplayedlogomaybedifferent
ifprogramshavebeenenteredfromaMenuKey
EditPreheatTemp
merrychef
12
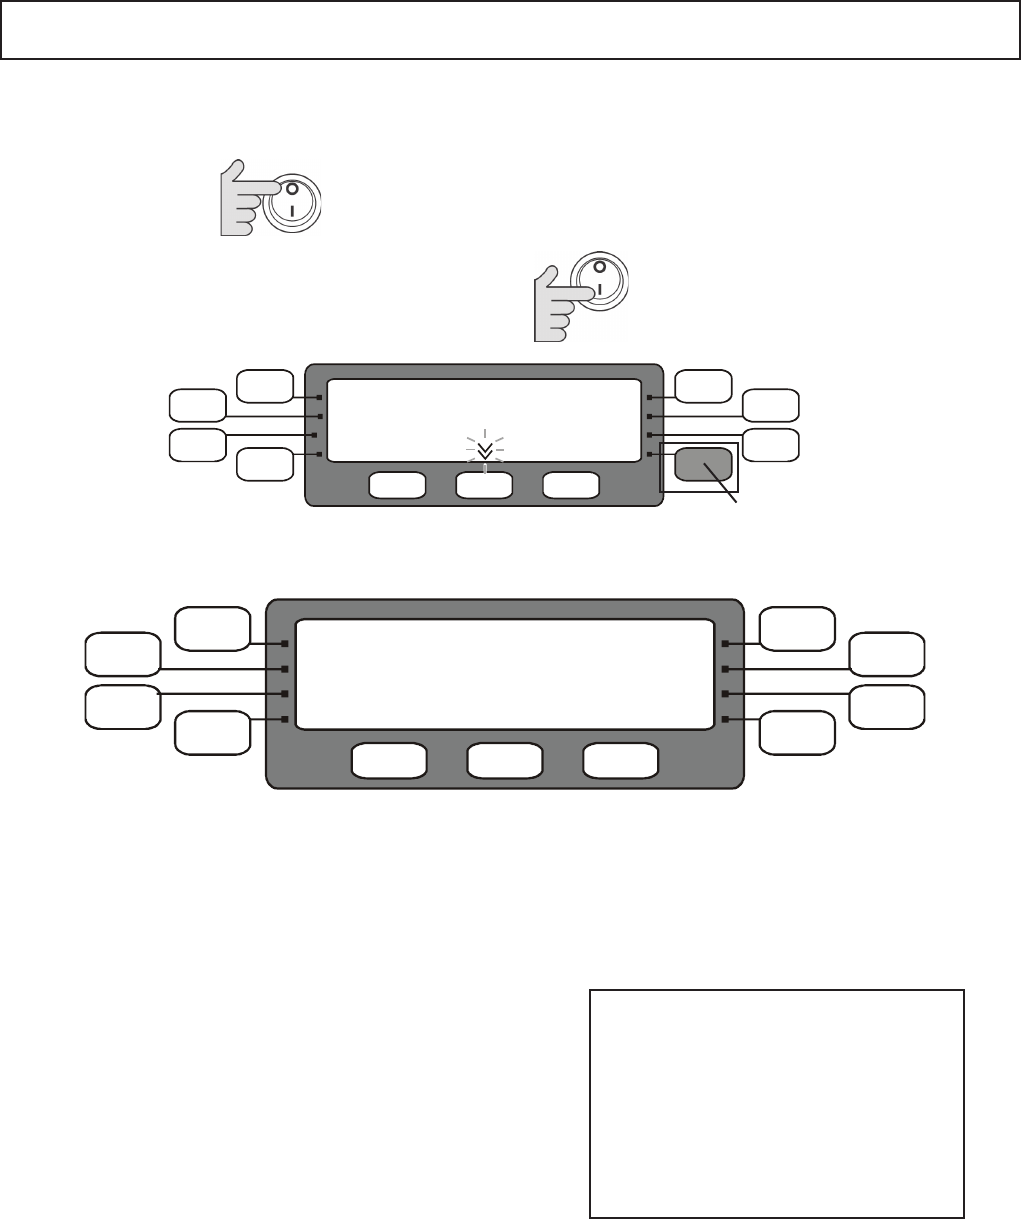
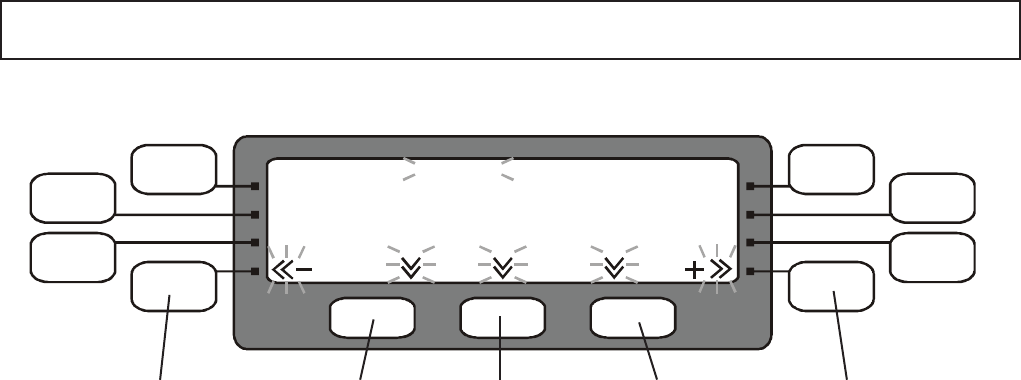
USING THE OVEN FOR THE FIRST TIME 2
Theovenprolesetsthefollowingfactors:operatingtemperaturescale(CentigradeorFahrenheit),
OvenMode,Programprotection,Bleepsound&LowerTemperatureBand.
SETTING THE OVEN PROFILE
Switch the oven ONandimmediatelypresstheLower
Right (EditOvenproleishiddeninthedisplay)
function key to display OVEN PROFILE.
(Note:thisscreenisavailablefor5seconds)
2
Switch oven OFF
1
1
PROGRAM MODE
OFF Programsareprotectedandcannotbeedited.
ON AllowsProgramstobeeditedandadded,
MenuKey can be created
2
TEMP SCALE
ThedisplayshowsthecurrentOventemperature
scale, Centigrade °C or Fahrenheit °F.
3
SOUNDER VOLUME
Thelengthoftheaudiblewarning‘bleep’volume
canbeadjustedfrom1 to 5(maximum).
5LOWER BAND Temperature
The rangeoftemperaturelowerthanthe
PREHEATtemperatureinsidewhichtheoven
programswillstilloperate30-150°F(15-75°C)
Please note:
The Oven MODE default settings
are PROGRAM MODE OFF and
MANUAL MODE OFF.
PROGRAM MODE ON allows oven
settings to be altered and should only
beusedtoestablishoreditprograms
ortosaveprogramstoaMenuKey.
MANUAL MODE
OFF Manual controls are disabled. Only pre-set
Programscanbeused
ON Manual controls operate the oven directly
fromthecontrolpanel
Press Savetosavethesettingsandexit
4
Note:Thedisplayedlogomaybedifferent
ifprogramshavebeenenteredfromaMenuKey
EditPreheatTemp
merrychef
Edit Oven Prole
Lower Band 100 :°F
Save
>>
Tempscale:°F
ProgramMode:OFF
Manual Mode: OFF
Sounder Vol: 1
OVEN PROFILE
The display shows the current OVEN PROFILE setting, press the corresponding pad to cycle through
the options available then press Savetostorethediplayedsettingsandexitthisscreen.

13
CAT 005
CAT 006
CAT 007
CAT 008
Pizza
Donuts
CAT 003
Breads
CATEGORIES
Breads
PROG 053
PROG 054
PROG 055
PROG 056
Ciabatta
Roll
Croissant
Prog 052
RUNNING A PROGRAM
Upto256namedCookingProgramsareavailablein16Categorygroups.EachCategory
groupcancontainupto16programs.Programscanbeloadedintotheovenmemoryfroma
MenuKeyorenteredfromthecontrolpanel.
Presstheprogrampadyouwishtoactivateto
start cooking, thecategory&programname
andtheremainingcookingtimeappearinthe
display.
Whenthetimereaches“00:00”thedisplayshowscooking
completedandaudiblesignalwillbegiven.
Removethefoodfromtheovenandclosethedoor.
Theovenheatsupuptoitspre-settemperaturethiswilltake
approximately20minutes.
Thedisplaywillshowthecurrentovencavitytemperature.
The display will show the CATEGORIES screen when
cookingtemperatureisreached.
1Switch the oven ON
3
2Taking all the necessary precautions to en-
sure you do not burn yourself, place the food
into the hot oven cavity and close the door.
Always keep the period that the door is open
toaminimum.
Programscanbehalted
and cancelled at any
timebypressingthe
CANCEL key.
Note:
When the cycle is interrupted or
stoppedtheovenwillremainat
thepre-settemperatureandthe
food inside the oven will continue
to cook
Hot surface
hazard
Using a cooking program Press this pad for the second group of 8
programsinthiscategory
(Programs057-064)
Press this pad to start cooking us-
ingtheprogramRoll shown in the
display
ProgramCategory
Name:Breads
Press this pad for the second set of Cat-
egorygroups(009to016)
Press this pad to display the
programsinthiscategory
Breads
Select a Program Category e.g. Breads
To start cooking select a Program Name e.g. Roll
example: Category BREADS, Program ROLL
BREADS
ROLL
01:35

14
CAT 005
CAT 006
CAT 007
CAT 008
CAT 001
CAT 002
CAT 003
CAT 004
CATEGORIES
OPERATING INSTRUCTIONS: MANUAL MODE
Theovencanbeoperatedinmanual
orprogrammedmode.Inordertouse
themanualcontrolsMANUALMODE
should be set to ON in the oven
prole.
See SETTING THE OVEN PROFILE
item3onPage12toenablethis
feature.
WARNING:
DO NOT APPLY MICROWAVE ENERGY WHEN OVEN IS EMPTY
DO NOT USE THE OVEN WITHOUT
CLEAN AIR FILTERS IN POSITION
Tofamiliarizeyourselfwiththecontrolsplaceaheatproofbowl
containingapproximately2.5pintsofwaterintheoven.
To enter MANUAL MODE press the Lower
Right Hand Function Pad under the display
(IfthisscreendoesnotappearMANUAL
MODEisOFFandmustbechangedtoON
see Page 12 SETTING THE OVEN PRO-
FILE)
Whenthetimereaches“00:00”thedisplayshowscooking
completedandaudiblesignalwillbegiven.
Removethefoodfromtheovenandclosethedoor.
Theovenheatsupuptoitspreheattemperaturethiswill
takeapproximately20minutes.
Thedisplaywillshowthecurrentovencavitytemperature.
The display will show the CATEGORIES screen when
cookingtemperatureisreached.
1Switch the oven ON
2
3Taking all the necessary precautions to ensure
you do not burn yourself, place the food into the
hot oven cavity and close the door.
Note:
When the cycle is
interrupted or stopped the
ovenwillremainatthe
preheattemperatureand
the food inside the oven
will continue to cook
Hot surface
hazard
Using Manual Mode
Manual Mode
Theremainingcookingtimeappearsinthedisplay.
Enter the cooking TIME by pressing the +/- pads:
Start
Time:00:00
Fan: 050%
PWR:000%
ClearTime
MANUAL MODE
Increase or decrease the fan speed
(in5%steps)usethe-/+pads
To change FAN speed
To change Microwave power PWR Increase or decrease the Microwave power
(in10%steps)usethe-/+pads
Press START Pad to begin cooking
Always keep the period that the door is open
toaminimum.
COOKING COMPLETE
PLEASE REMOVE PRODUCT
e.g.For2minutes35secondsenter02:35
Start
Time:00:00
Fan: 050%
PWR:000%
ClearTime
MANUAL MODE
Press and hold the +/- Pad
will increase/decrease the
timerapidly.
15
CAT 005
CAT 006
CAT 007
CAT 008
CAT 001
CAT 002
CAT 003
CAT 004
CATEGORIES
PROG 037
PROG 038
PROG 039
PROG 040
PROG 033
PROG 034
PROG 035
PROG 036
EDIT PROG INFO
Eachprogramcancompriseuptoeightstages,allowingateach,independ-
entcontrolofStagetime,MicrowavepowerlevelandFanspeed.However,
programsmustbeusedwithcaution,sinceifthefoodtocookvariesinweight
ordensity,adequatelycookedfoodmaynotbeachieved.Therefore,itisvital
thatallfoodpreparedforserviceshouldbecheckedtoensurethatcoretem-
peratures have been achieved.
ProgramscanalsobesavedtoaMenuKeyseePage18.
Someexperimentation
will be required to
determinethecorrect
programforaparticular
product.
Pre-programmingallowsrepetitivecookingprocedurestobestoredforease
of use.
PROGRAMMING NUMBER PADS 1
Press this pad to display
theprogramsinthiscat-
egory e.g. CAT 003
Storing a program
Select EDIT A PROGRAM
Select EDIT SCREEN
EDIT SCREEN
EDIT CATEGORY NAME
CREATE MENUKEY
EDIT A PROGRAM
EDIT
CAT 005
CAT 006
CAT 007
CAT 008
CAT 001
CAT 002
CAT 003
CAT 004
EDIT PROG INFO
Press this pad for the second set of
Categorygroups(009to016)
SelecttheCATEGORYfortheprogram
Press this pad for the second set of
Categorygroups(041to048)
Press this pad to display
theprogramsinthiscat-
egory e.g. PROG 003
Select the PROGRAM to be added or edited
16
PROGRAMMING NUMBER PADS 2
PROG 033
ProgramName:
ProgramTemperature:OFF TotalTime:00:00
BACK SAVE
FORWARD
Time 00.00 00.00 00.00 00.00 00.00 00.00
Fan 050% 050% 050% 050% 050% 050%
Pwr 000% 000% 000% 000% 000% 000%
Stg 1 Stg 2 Stg 3 Stg 4 Stg 5 Stg 6
Editoraddindividualprogramstagesettings
moves to the previous
stage setting
saves the
program
moves to the next
stage setting
decreases
the Time, Fan Speed & Power
stage setting selected
increases
the Time, Fan Speed
& Power stage setting
selected
e.g. Program 33
PROGRAM NAME
To edit the Program name use the BACK and FORWARD function pads to select the Program Name
( the name will ash when selected ) then press the + Function pad to go to the Name screen see
Editing a Name Page 17
TO EDIT A PROGRAM STAGE
UsethelowerrighthandfunctionpadFORWARDtomovetoStage1oftheprogram(Stg1)theTimeset-
tingwillash
SettingtheTime(Time):
Usethe+/-padstoenterthecookingtimein1secondsteps
Pressandholdthe+/-padwillincrease/decreasethetimerapidly.
Fanspeed(Fan):
UsethelowerrighthandfunctionpadFORWARDtomovetoStage1FanSpeed
TheFanspeedcanbeincreasedanddecreasedin5%steps(10%to100%)usingthe+/-pads
Microwavepower(Pwr):
UsethelowerrighthandfunctionpadFORWARDtomovetoStage1MicrowavePower
Themicrowavepowercanbeincreasedordecreasedin10%steps.(0%to100%)
using the +/- pads
Thedefaultsettingis50%microwavepower
TomovetoStage2(Stg2)oftheprogramusetheLowerrighthandPadFORWARD.Repeattheprocedure
forStage1foreachprogramstageasrequired.TogobackastepusetheLowerlefthandfunctionPad
BACK.
WhentheprogramiscompletePressSAVEtostoretheprogramandreturntotheOvenreadytocook
CATEGORIES Menu.
17
CAT 005
CAT 006
CAT 007
CAT 008
CAT 001
CAT 002
CAT 003
CAT 004
EDIT A CATEGORY
CAT 005
CAT 006
CAT 007
CAT 008
CAT 001
CAT 002
CAT 003
CAT 004
CAT 005
CAT 006
CAT 007
CAT 008
CAT 001
CAT 002
CAT 003
CAT 004
CATEGORIES
EDIT CATEGORY NAME
CREATE MENUKEY
EDIT A PROGRAM
EDIT
PROGRAMMING NUMBER PADS 3
Select EDIT A CATEGORY NAME
TO ADD or EDIT A CATEGORY NAME
To enter a new character use NEXTtomovetheashing
cursor to the position to be edited and press the corresponding
function pad for the character required and press ENT to select
it :
e.g. for D press the top left pad 4 times then ENT
Tobackspace,movebackacharacterpress BACK
To delete the selected character press DEL
SelecttheCategoryNametobe
edited e.g. CAT 001
S T U V W X Y Z
1 2 3 4 5 6 7 8 9 0
&x-+/,:
A B C D E F CAT 001
G H I J K L
M N O P Q R
CategoryName:
ENTDEL BACK SAVE NEXT
moves ashing
cursor to the left
saves the
name
moves ashing
cursor to the right
deletes the
character at the
ashing cursor
enters the
selected
character
Select EDIT SCREEN
EDIT SCREEN
To store the new NAME Press SAVE
For a space press
next twice to leave the
character blank
To Edit a Category or Program name
18
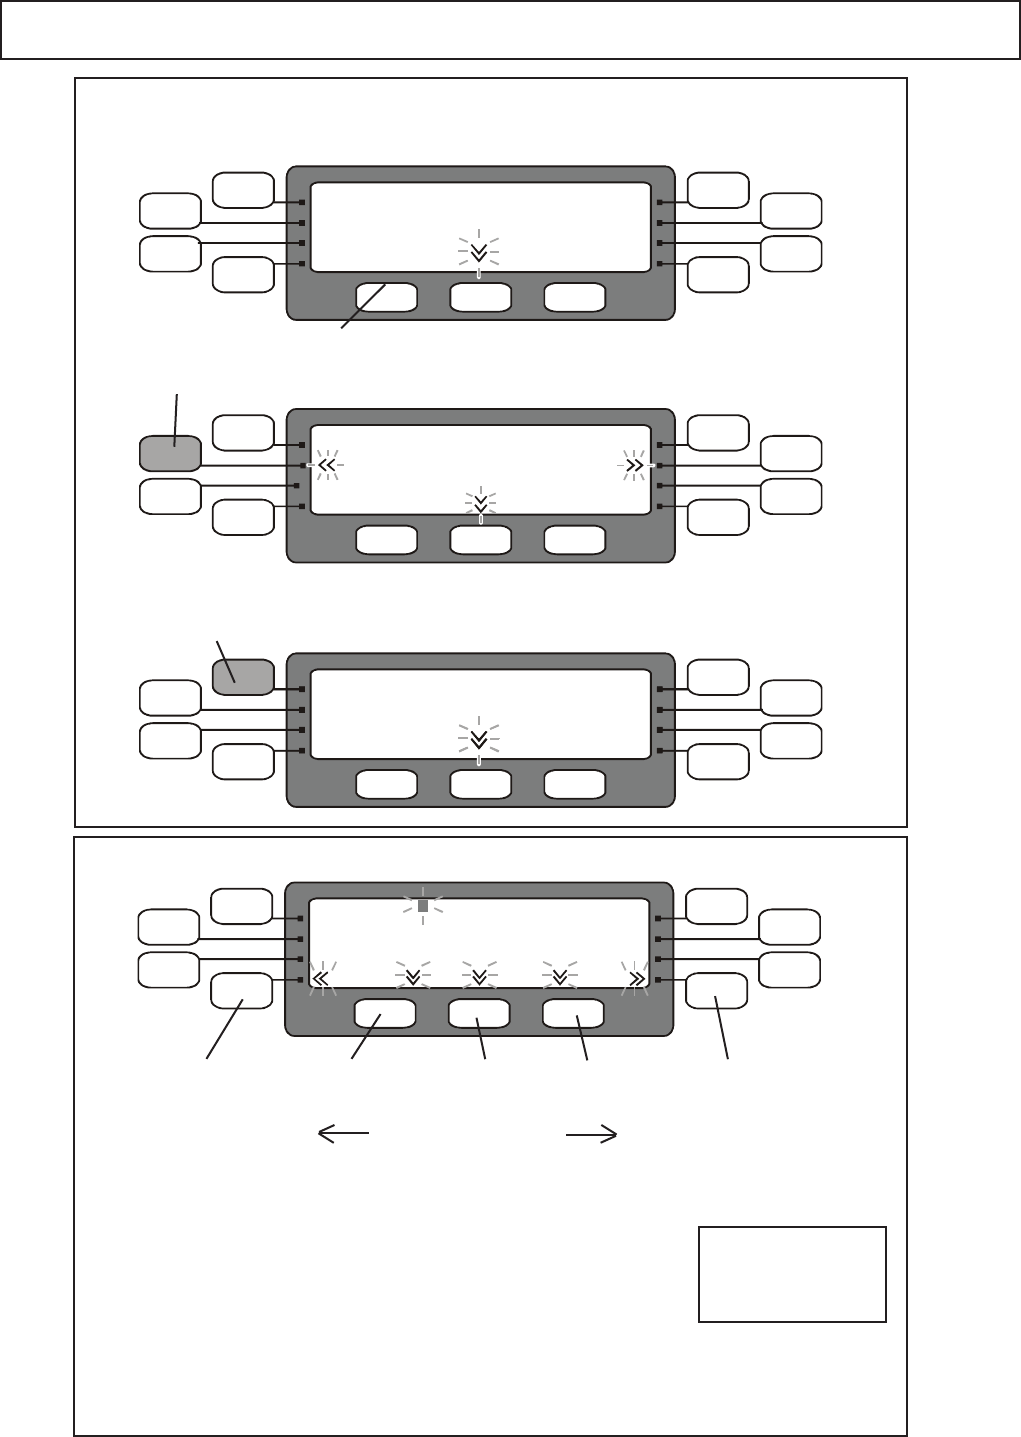
MenuKey : CHANGING OVEN MENU PROGRAMS
1
2
3
Lift the MenuKey cover in the top front panel of
the oven and put the key in the slot.
TheMenuKeySystemautomaticallychangesallthecookingprograms
ontheovenfromapre-programmedelectronickey.
To change the menus on the oven:
Ensure the power switch is OFF.
With the key still in place switch the power switch ON.
Theovenwillnowgothroughtheprogramdownload
sequence by displaying the following:
MENUKEY2
MenuKey Detected
Please Wait
WARNING
DownloadingfromaMenuKeywillclear
alltheexistingprograms
Check that the key has the correct
number/codefortheprogramsyouwant
toloadintotheovenmemory
Donotremovethekey
during download sequence
as this could corrupt
the data on the key
CopyingProgramsfrom
MenuKey to Oven
RemovetheMenuKeyandkeepinasafeplace.
Thedisplaybrieywillshowthefollowing:OvenModelNo.,Software&MenuKeySerialNo.
TheOvenwillthencommenceheatinguptothePREHEATtemperaturereadytocook.
VerifyingPrograms
Copied Successsfully MenuKey Copied
Successfully
4
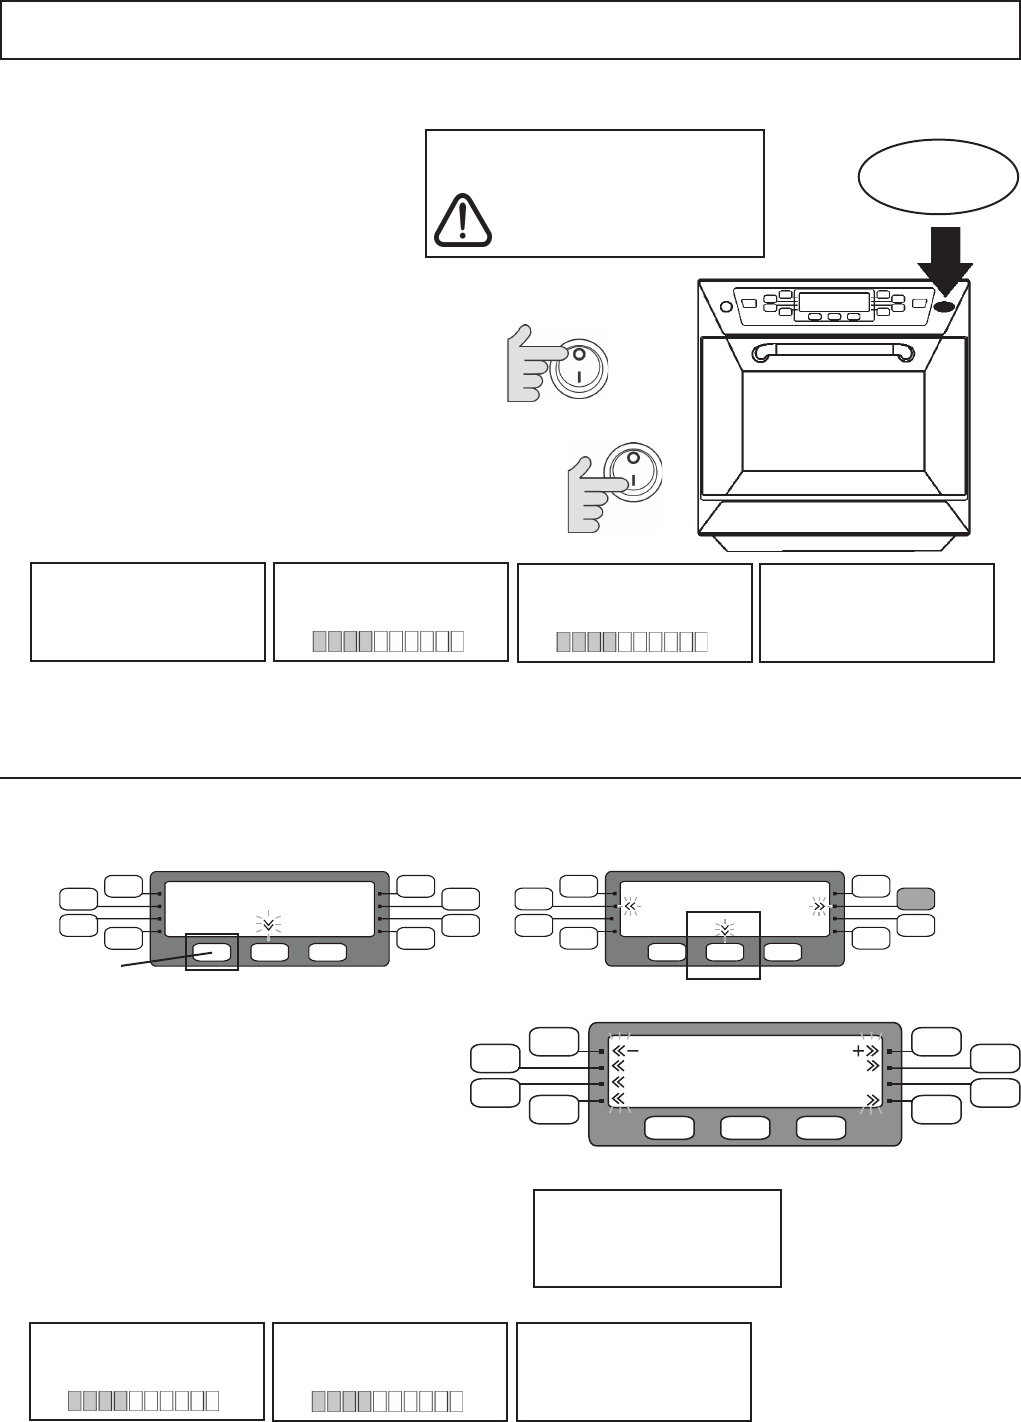
Saving Programs to a MenuKey
EDIT CATEGORY NAME
CREATE MENUKEY
EDIT A PROGRAM
EDIT
CAT 005
CAT 006
CAT 007
CAT 008
CAT 001
CAT 002
CAT 003
CAT 004
CATEGORIES
In the CATEGORIES screen select EDIT SCREEN(Padnamehidden)thenselect CREATE MENUKEY
CopyingProgramsfrom
Oven to MenuKey VerifyingPrograms
Copied Correctly MenuKey Copied
Successfully
The Display returns to the CATEGORIES screen and the Oven will heat up to the PREHEAT
temperaturereadytocook.
SettheProgramModetoON or OFF,
Set Manual Mode to ON or OFF:
EntertheLowerBandtemperaturesetting45-135°F
SettheovenTemperatureScale°C or °F
1
2
3
4
EDIT SCREEN
5
Insert a MenuKey and press START to copy the
programs.
The display shows the following:
Foranexplanationofthefollowingfeaturessee
SettingtheOvenProlePage12
EnteranumberfortheMenuKeyCodetoidentify
the new MenuKey, use the +/- Function Pads.
WARNING
Any programs already
on the key will be deleted
START
MenuKey Code: 000
Program Mode : ON Temperature Scale : °F
Manual Mode: OFF
Cooking Range: OFF
MENUKEY PROFILE
19
CLEANING: 1
For the oven to operate at peak efciency, the cavity, door and air lters and grease lter must
be kept clean.
Adailycleaningroutinewillensurethatyoucomplywiththerequiredhygienestandardsandwillhelp
tomaintainandprolongtheefciencyofyouroven.
FollowtheSAFETYINSTRUCTIONSatthebeginningofthismanual.
Faultsarisingfromneglector
misuseincludingusewithoutclean
ltersinplacearenotcovered
by the guarantee. Service visits
as a result of such faults will be
chargeable.
Hot surface
Hazard
WARNING: DO NOT use caustic cleaners on any part of the oven or oven
cavity as it will cause permanent damage to the Catalytic Convertors
DO NOT use the oven without clean air lters and cavity grease lter in place
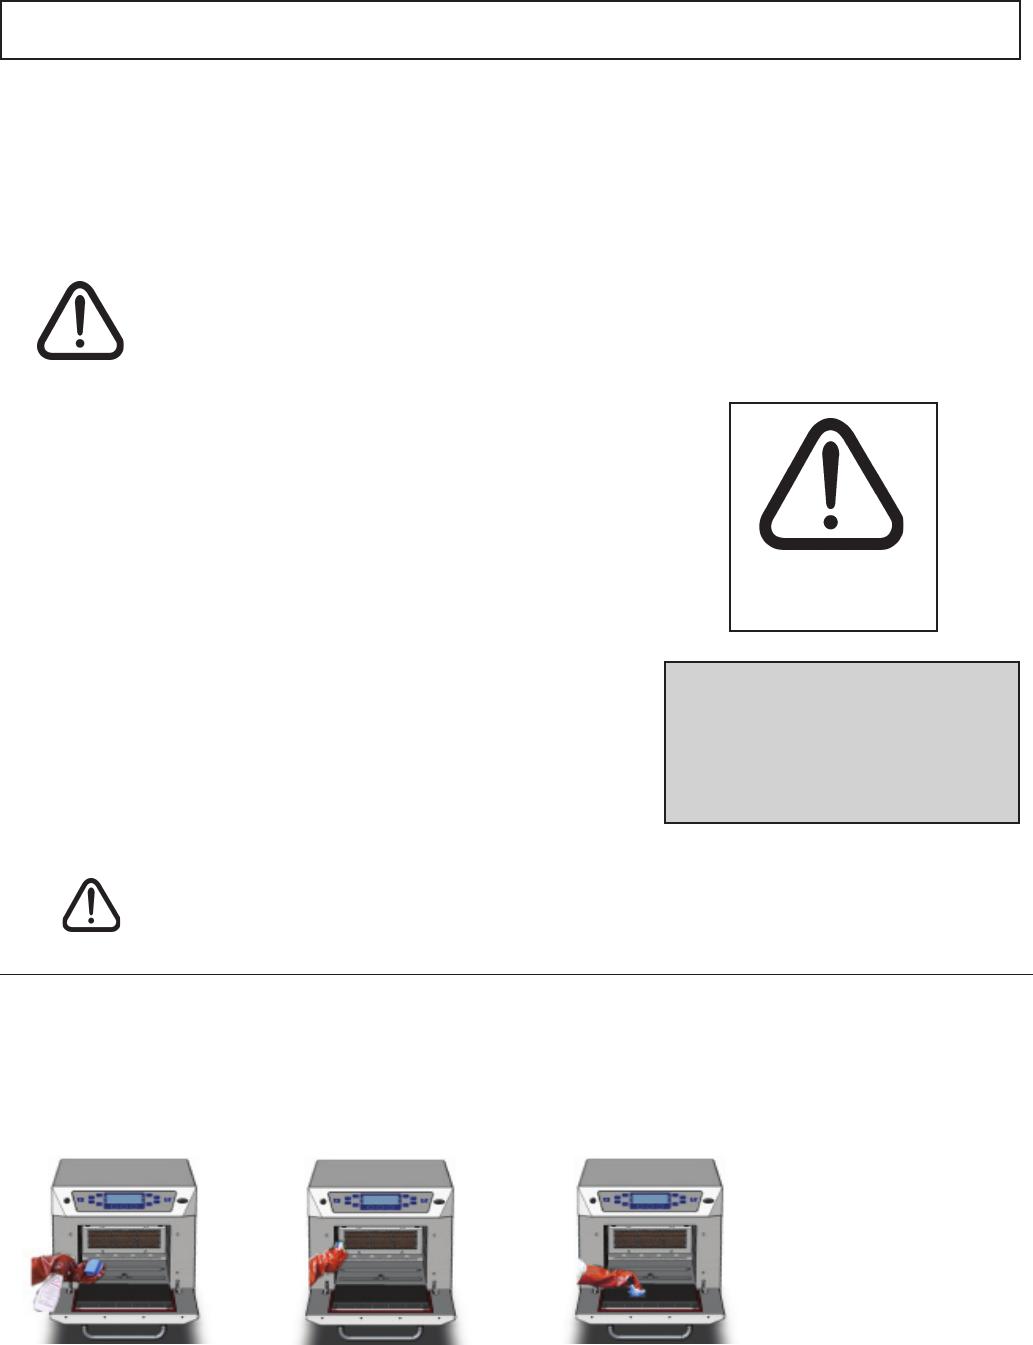
1.
Spray Merrychef Oven
Protector onto the
sponge
START UP: OVEN COATING PROCEDURE ( clean oven )
4.
Switch on the oven and
pre–heat. When the oven
has reached operating
temperatureitwilltake
about30minstocurethe
Oven Protector.
3.
Spread Oven Protector
lightly onto the internal
surface of the oven door
2.
Spread Oven Protector
lightly onto all internal
surfaces of the oven
Note: oven protector turns light brown when cured
• ALWAYS switch off at the electrical supply before
cleaning
• Complete COOL DOWN procedure and allow the
oven and accessories to cool before commencing
cleaning
• As required wipe out spillages with disposable
paper wipes
• NEVER use steel wool, knives or harsh abrasives
on any part of the oven
As with all electrical appliances, it is wise to have the
electrical connections inspected periodically.
20
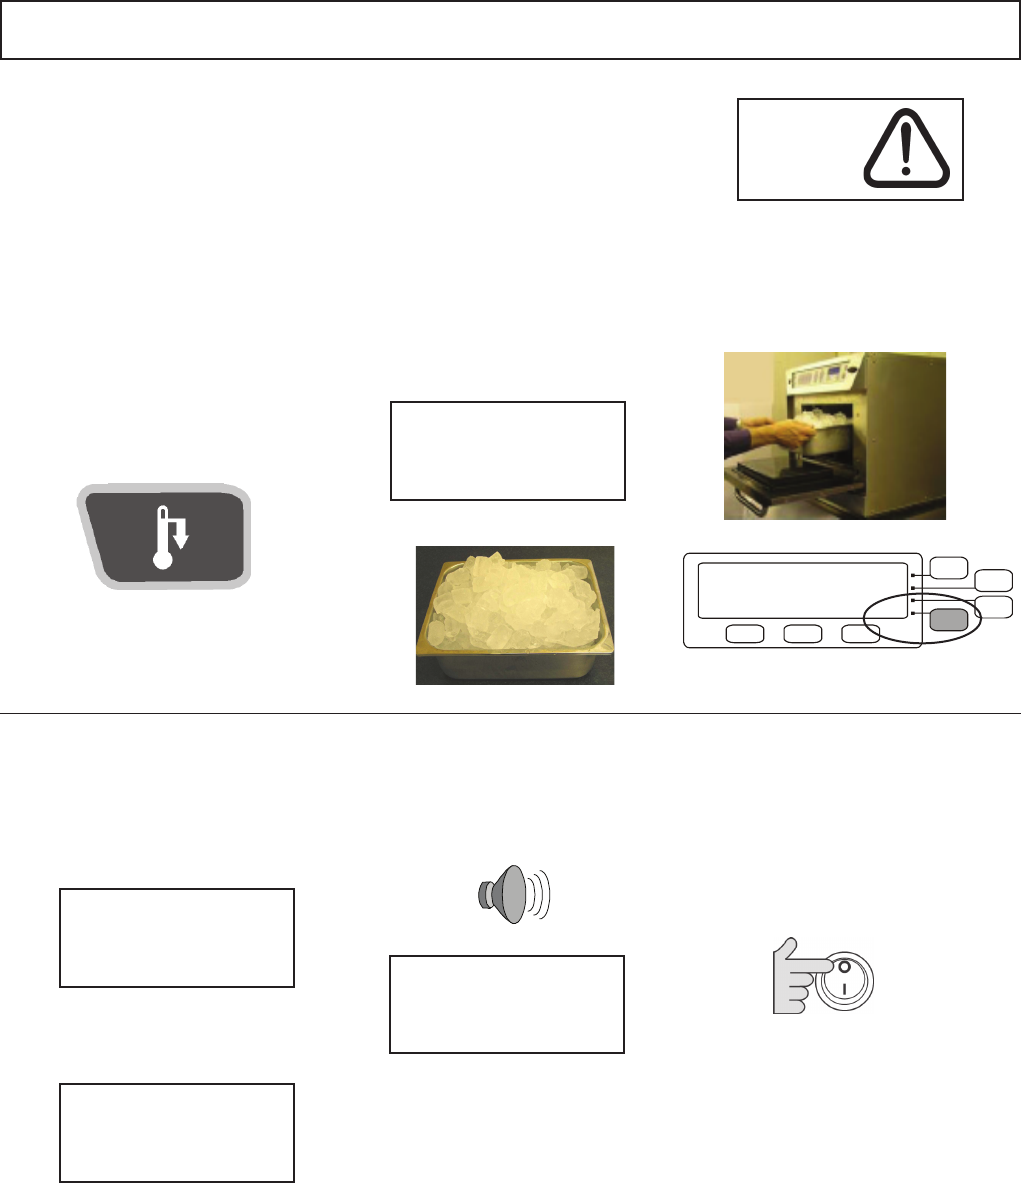
1.
With the Oven hot,
press and hold the
PREHEAT pad on the
control panel for 5 sec-
onds to disable heating
and start the cool down
cycle.
3.
Close the door and
Press function key to
Start.
2.
Taking all necessary
precautions place
a suitable heaped
container of ice, into the
cavity.
4.
The oven now cools the
oven cavity. This process
willtakeapproximately
30minutes.
5.
Waituntilthemessage
below is displayed.
6.
Switch the oven OFF.
The oven is now ready
for cleaning.
See: CLEANING
INSTRUCTIONS.
CLEANING: 2
COOL DOWN PROCEDURE: ( 30 minutes approx. )
Equipment:–CoolingtraylledwithIce. Hot surface
Hazard
alternating warning
( spanish )
COOL DOWN MODE
PLACE LOAD IN CAVITY
AND PRESS START
COOL DOWN MODE
OVEN HOT
PLEASE WAIT
COOL DOWN MODE
HORNO CALIENTE
PLEASE WAIT
Turn oven off
and ensure
Air Filters are clean
start >>
Start
>>
21
CLEANING: 3
• ALWAYS switch off at the electrical supply and allow oven to cool before cleaning
• CAUTION: Allow the oven and accessories to cool before commencing cleaning
*Whenreplacingimpingerplatesandthecavitygreaselter
usermngerpressuretotightenfasteners
DO NOT USE TOOLS
DO NOT
USE TOOLS
WARNING: DO NOT use caustic cleaners on any part of the oven or oven
cavity as it will cause permanent damage to the Catalytic Convertors
DO NOT spray directly into the fan opening at the rear of the oven
Equipment:Merrychefovencleaner,MerrychefOvenProtector,heatproofgloves,protectiverubbergloves,
non–abrasivenylonscrubpad,cleaningtowelandcloths,eyeprotectionanddustmask(optional)
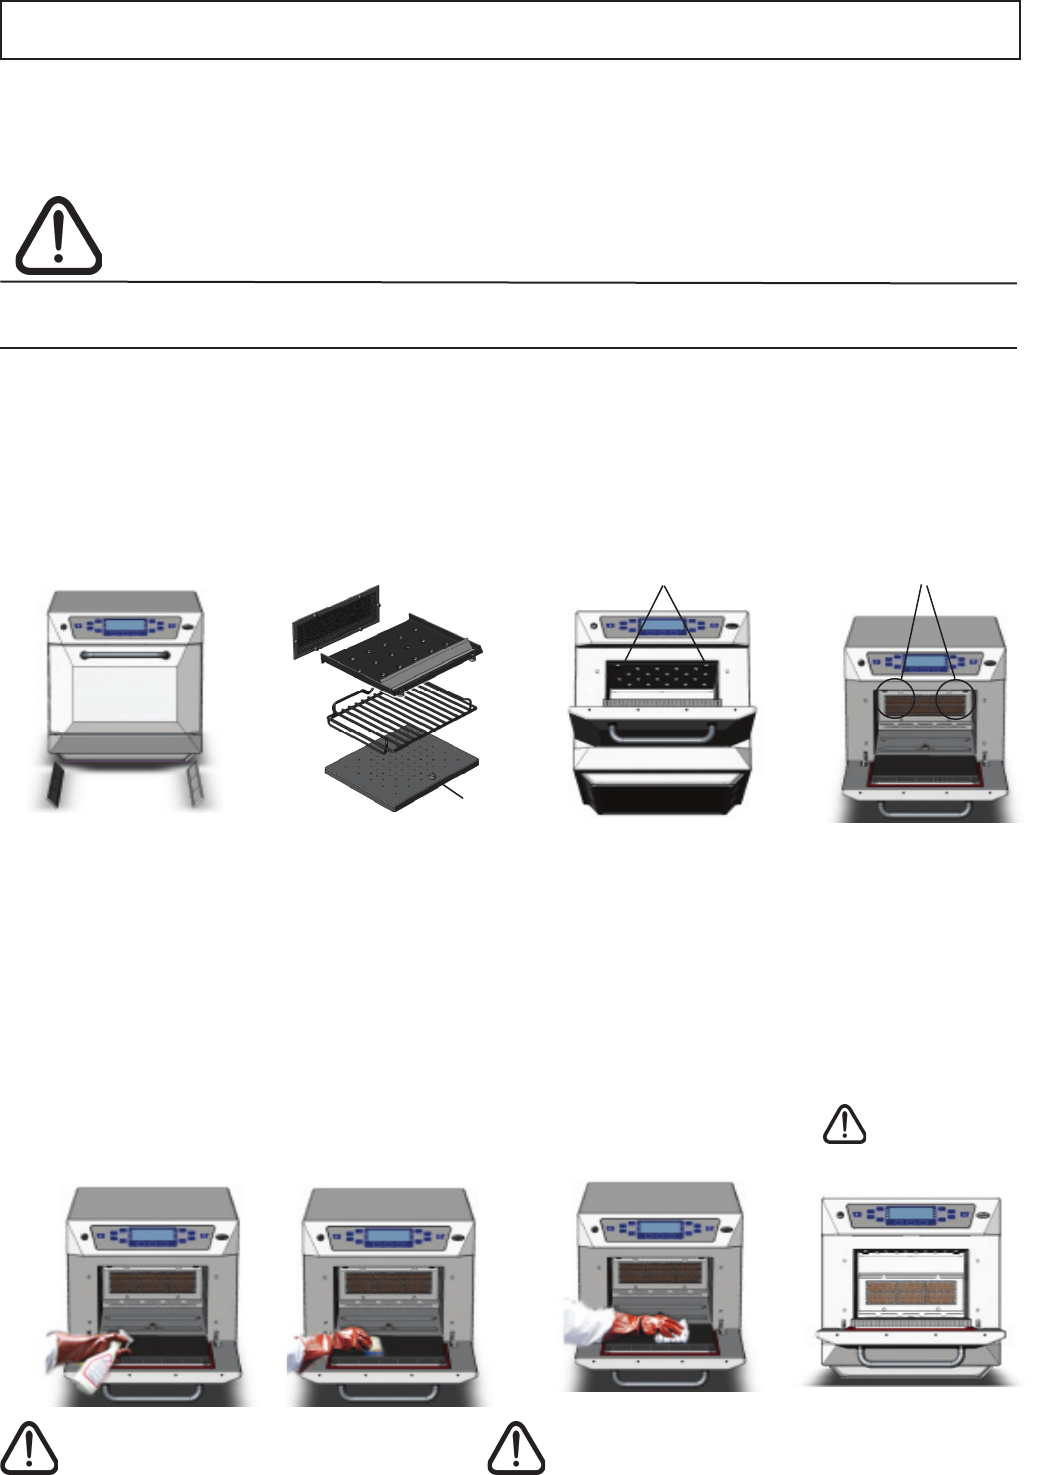
COLD OVEN: CLEANING INSTRUCTIONS ( following cool down )
Washallpartsinwarmsoapywater.Washoffusingacleanclothandplentyof
clean,warmwater.Dryusingafresh,cleancloth.
Removetopimpingerplate
Removetherackandlift
outbottomimpingerplate
Undo fasteners
Toremovegreaselter
push down and lift out
3.
Wash off using a clean
cloth and plenty of clean
warmwatertorinsetop,
sides and back of oven.
Dry using a fresh clean
cloth or paper towel.
Wipe the outside of the
ovenwithadampcloth.
1.
Wear protective rubber
gloves and protective
glasses carefully spray
Merrychef Oven Cleaner
onto the internal surfaces
oftheovenexceptdoor
seals.
DO NOT spray directly
into the fan opening at
the rear of the oven
2.
Fordifcultareasleave
tosoakfor10minutes.
Leave the oven door
open during cleaning.
Use a non–abrasive
nylon scrub pad/sponge
to clean all internal sur-
faces and the inside of
the door.
4.
Replace clean oven
parts
Grease Filter*
Top plate*
Bottomplate*
Airltersx2
CAUTION: Wear protective rubber gloves when cleaning the oven
Removeairlters
both sides
Oven Parts and lters
& Oven Cavity
Ifthedoorsealsaredamaged,theoven
mustberepairedbyanapprovedServicer.
DO NOT use the oven without clean
air lters and cavity grease lter in place

22
Merrychef 412s
Height
( inches )
Width
( inches )
Depth
( inches )
23.023.0 27.5
Microwave
Power output
( watts )
Convection
Power output
( watts )
1800 5200
Wt.
( lb.s)
187
Pt No. 32Z3558 Issue 01
Power supply ( See Product Rating Label )
External Dimensions
Merrychef and Menukey are registered trademarks of Merrychef Ltd.
TECHNICAL SPECIFICATIONS
Approved Service Agent
2P & G 208V ac 60Hz 30A
240V ac 60Hz 30A
412SMTV6_
Service RequiredModel No.
This device complies with Part 18 of the FCC rules