Mertik Maxitrol and KG B6R Handset of remote electronic ignition and control system for gas applications User Manual GV60 symax II OI EN 28 10 2013 Draft indd
Mertik Maxitrol GmbH & Co. KG Handset of remote electronic ignition and control system for gas applications GV60 symax II OI EN 28 10 2013 Draft indd
Contents
- 1. Instructions part 1
- 2. Instructions part 2
- 3. Compliance statements
Instructions part 2
OPERATING INSTRUCTIONS FOR OEM USE ONLY
© 2013 Mertik Maxitrol GmbH & Co. KG, All Rights Reserved.
16 / 28
SETTING CELSIUS OR FAHRENHEIT
1 2
ON
AM
PM
OFF
To change between °C and °F, press
and buttons simultaneously.
NOTE: Choosing °F results in a 12 hour
clock. Choosing °C results in a
24 hour clock.
SETTING THE TIME
1 2
ON
AM
PM
OFF
1. Press and buttons simultane-
ously. Hour fl ashes.
2. To select hour press or button.
3. Press and buttons simultane-
ously. Minutes fl ash.
4. To select minutes press or but-
ton.
5. To confi rm press and buttons
simultaneously or wait.
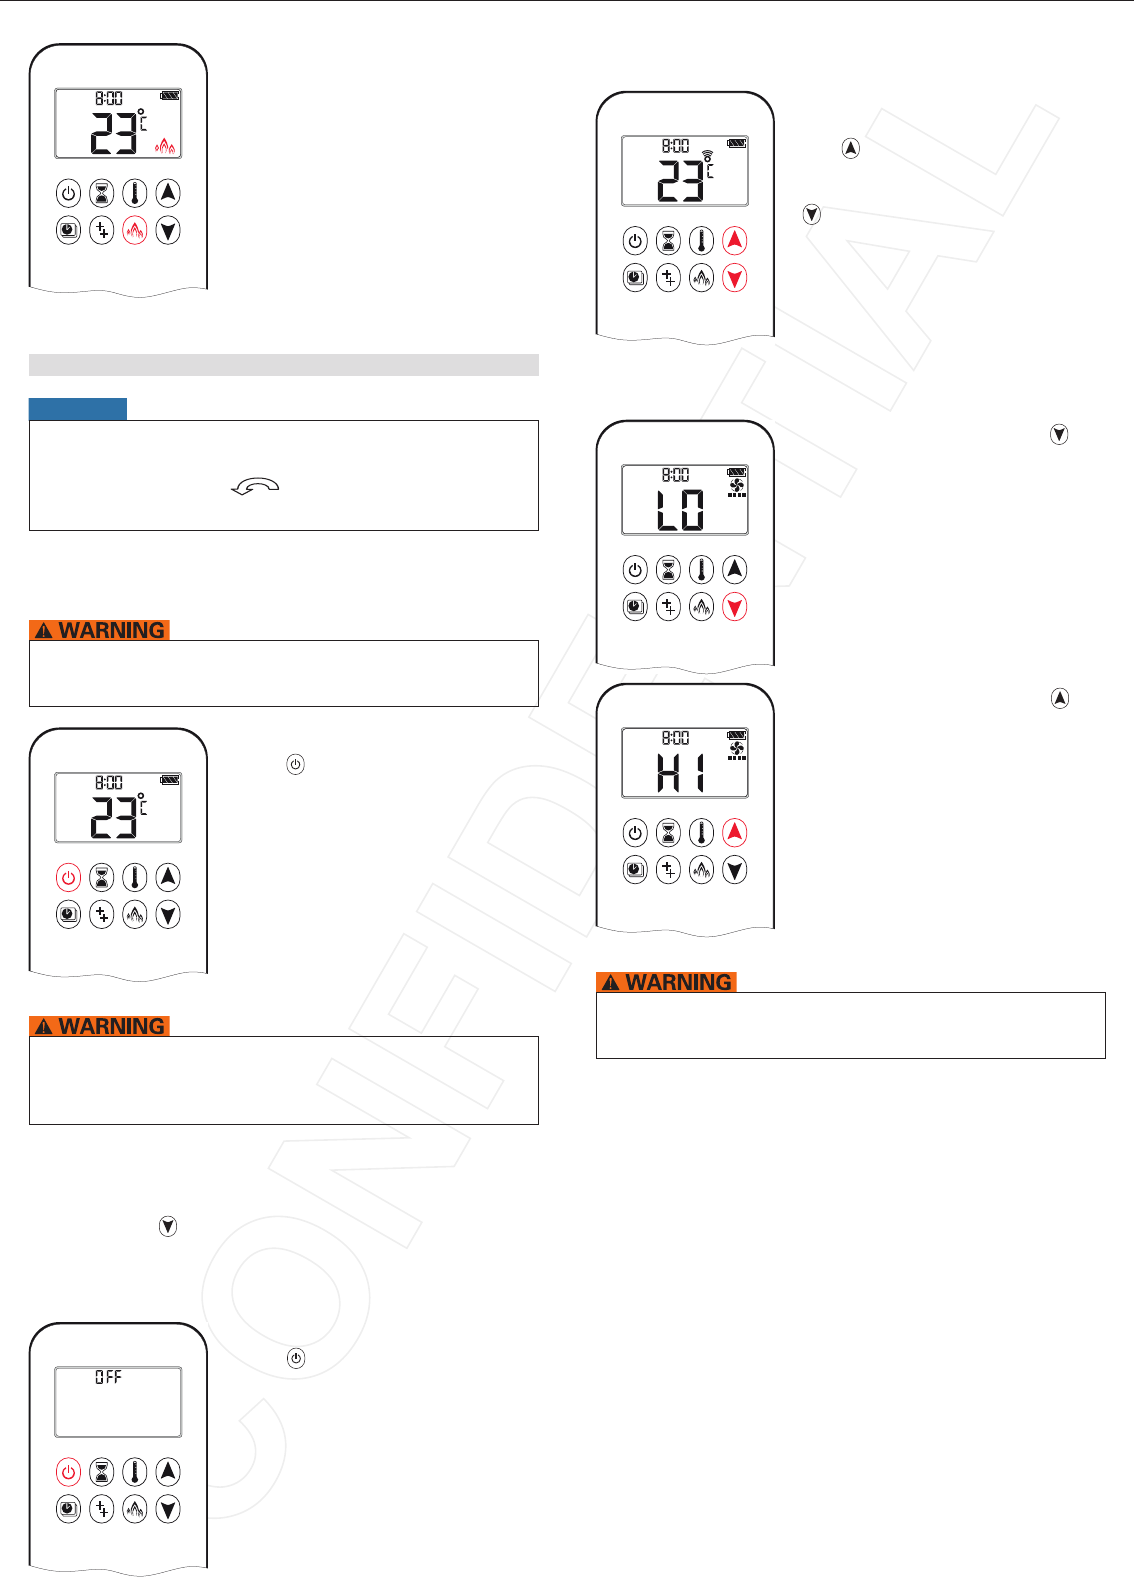
MODES OF OPERATION
1 2
ON
AM
PM
OFF
Enter Mode
Press the appropriate mode button.
Exit Mode
1. Press the same mode button again to
change to Manual mode.
2. Press or button to change to
Manual mode.
3. Press a different mode button to
change to that mode.
1 2
ON
AM
PM
OFF
Thermostatic Mode
The room temperature is measured and
compared to the set temperature. The
fl ame height is then automatically ad-
justed to achieve the set temperature.
1 2
ON
AM
PM
OFF
Program Mode
Programs 1 and 2, each can be pro-
grammed to go ON and OFF at specifi c
times at a set temperature.
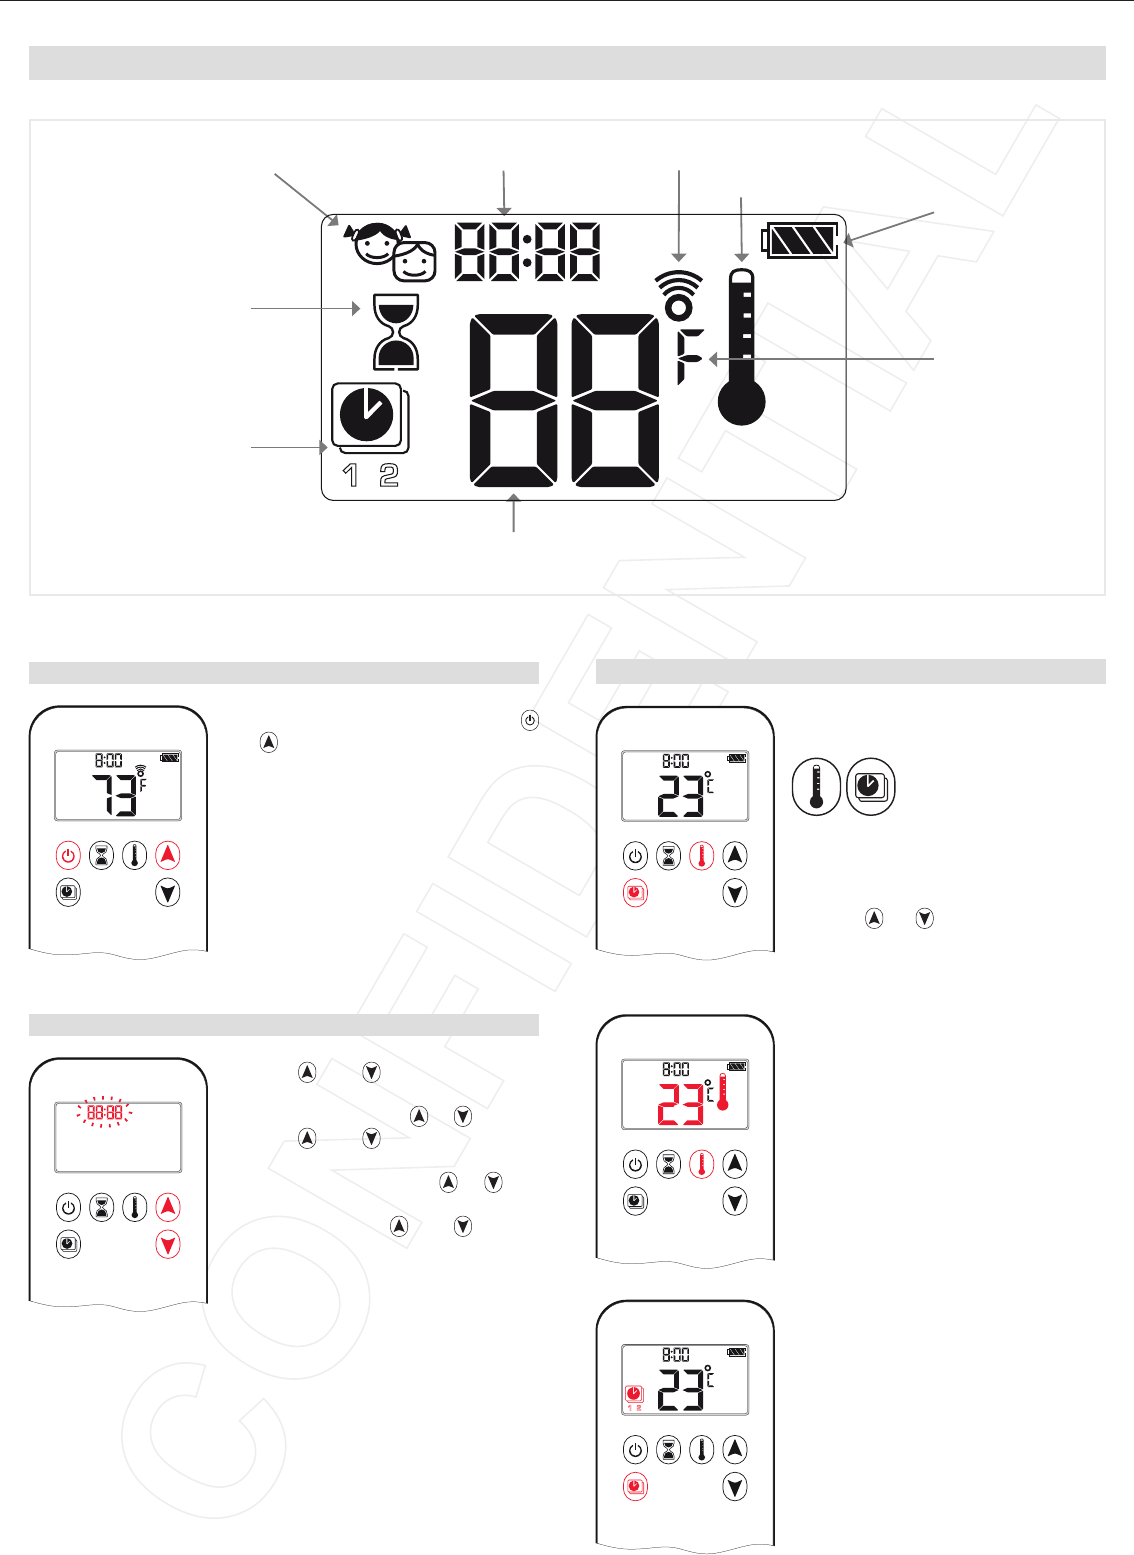
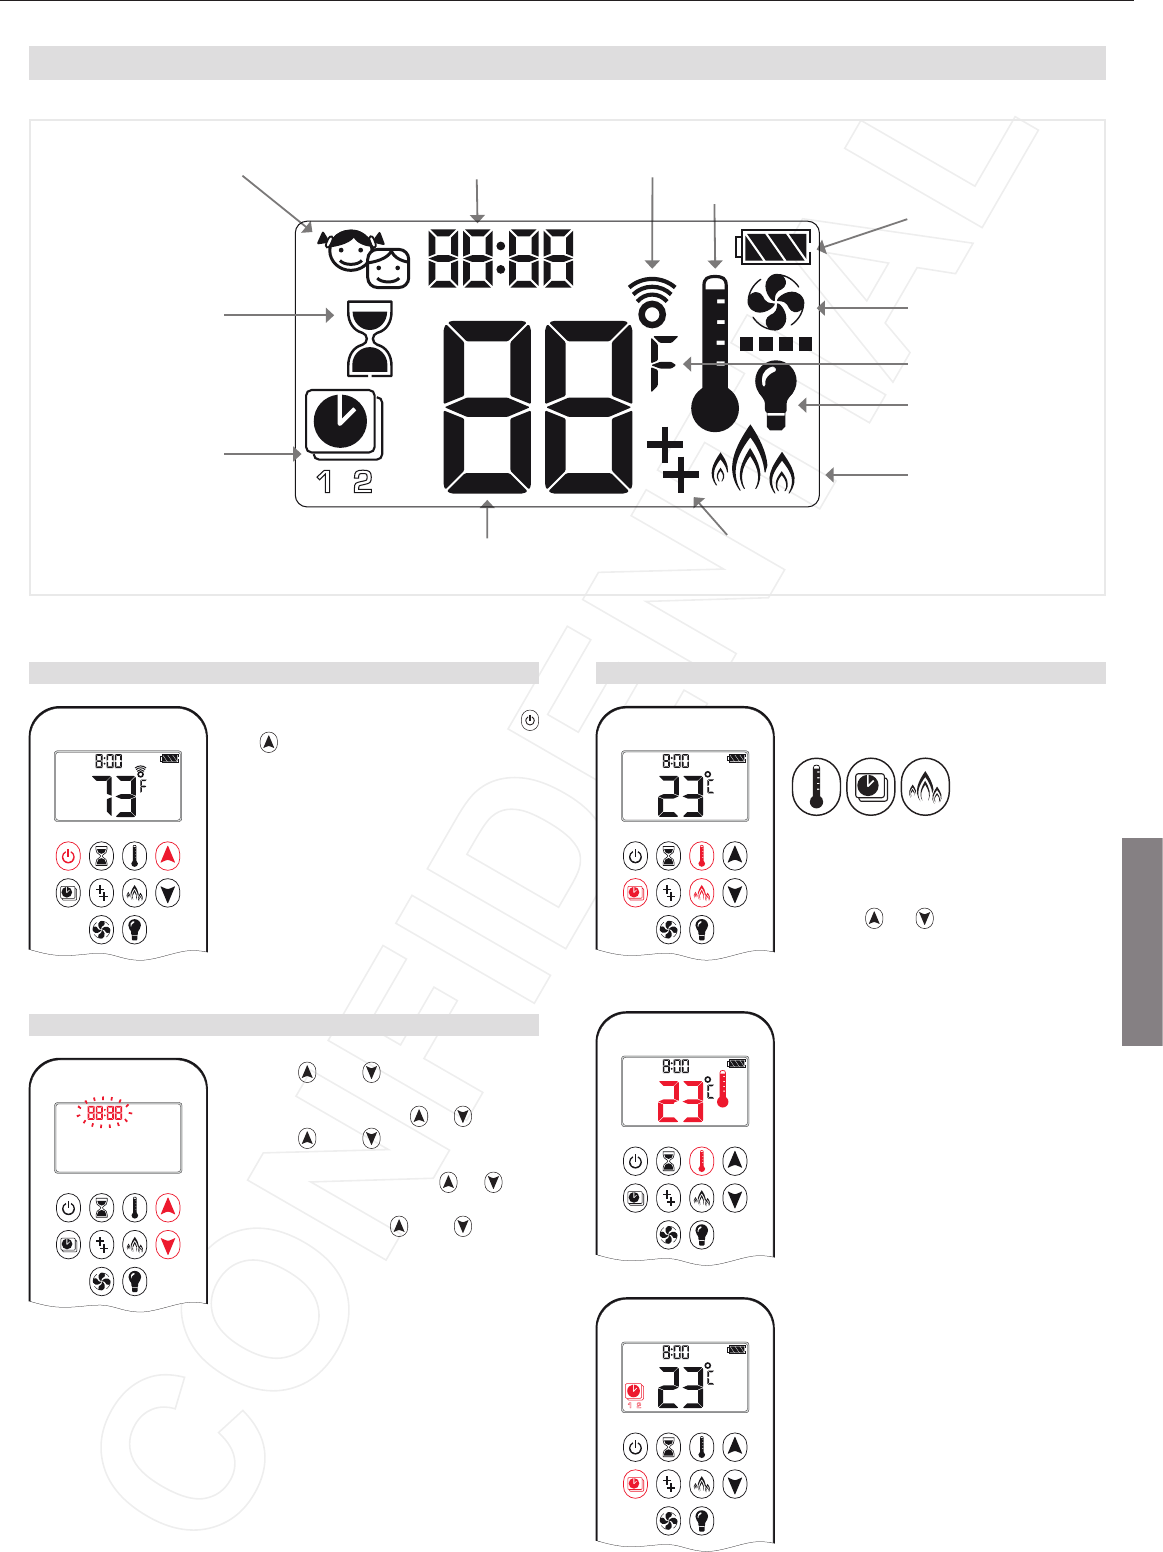
6-SYMBOL
Figure 21: 6-symbol Display
Program Mode
Temperature
Time
Countdown Timer
Battery Status
Signal Indicator Child Proof
Thermostatic Mode
1 2
ON
AM
PM
OFF
°F or °C
OPERATING INSTRUCTIONS FOR OEM USE ONLY
© 2013 Mertik Maxitrol GmbH & Co. KG, All Rights Reserved.
17 / 28
6-SYMBOL
MANUAL MODE (HANDSET)
NOTICE
BEFORE OPERATING
1. Make sure MANUAL knob on the GV60 Valve is in the ON,
full counterclockwise position.
2. Place the ON/OFF switch (if equipped) in the “I” (ON position).
TO TURN ON FIRE
When pilot ignition is confi rmed, motor turns automatically to
maximum fl ame height.
1 2
ON
AM
PM
OFF
Handset
▪ Press button until a short beep con-
fi rms the start sequence has begun;
release button.
▪ Continuing beeps confi rm ignition is in
process.
▪ Rotating circle is shown on display un-
til ignition sequence is complete.
▪ There is main gas fl ow once pilot igni-
tion is confi rmed.
▪ Handset automatically goes into Man-
ual mode after main burner ignition.
If the pilot does not stay lit after several tries, turn the main valve
knob to OFF and follow the instructions “TURN OFF GAS TO
APPLIANCE” (page 28).
Standby Mode (Pilot Flame)
Handset
▪
Press and hold
button
to set appliance to pilot fl ame.
TO TURN OFF FIRE
1 2
ON
AM
PM
OFF
Handset
▪ Press
button to turn off
.
NOTE: There is a 5 sec delay before
the next ignition is possible.
FLAME HEIGHT ADJUSTMENT
1 2
ON
AM
PM
OFF
Handset
▪ To increase fl ame height press and
hold button.
▪ To decrease fl ame height or to set ap-
pliance to pilot fl ame, press and hold
button.
DESIGNATED LOW FIRE AND HIGH FIRE
AM
▪ To go to low fi re, double-click but-
ton. “LO” is displayed.
NOTE: Flame goes to high fi re fi rst be-
fore going to low fi re.
AM
▪ To go to high fi re, double-click but-
ton. “HI” is displayed.
If the appliance will not operate, follow the instructions “TURN
OFF GAS TO APPLIANCE”
(page 28)
.
THERMOSTATIC MODE
1 2
ON
AM
PM
OFF
ON:
Press button. Thermostat icon dis-
played, preset temperature displayed
briefl y, and then room temperature dis-
played.
OFF:
1. Press button.
2. Press or button to enter Manual
mode.
3. Press button to enter Countdown
Timer mode.
1 2
ON
AM
PM
OFF
SETTING:
1. Press button and hold until Ther-
mostat icon displayed, temperature
fl ashes.
2. To adjust SET temperature press
or button.
3. To confi rm press button or wait.
OPERATING INSTRUCTIONS FOR OEM USE ONLY
© 2013 Mertik Maxitrol GmbH & Co. KG, All Rights Reserved.
18 / 28
1 2
ON
AM
PM
OFF
Time SETTING:
1. Press button and hold until , ,
displayed, hour fl ashes.
2. To select hour press or button.
3. To confi rm press button. ,
dis-
played, minutes fl ash.
4. To select minutes press or but-
ton.
1 2
ON
AM
PM
OFF
5. To confi rm press button. , ,
displayed, hour fl ashes.
6. To select hour, press or button.
7. To confi rm press button. , ,
displayed, minutes fl ash.
8. To select minutes press or but-
ton.
NOTE: If you stop programming at this point, program 2 remains
deactivated.
NOTE: Programs 1 and 2 use the same ON (Thermostatic) and
OFF temperatures.
1 2
ON
AM
PM
OFF
1.
To continue to program
, press
button. ,
,
displayed, hour
fl ashes.
2. To select hour press or button.
3. To confi rm press button. ,
,
displayed, minutes fl ash.
4. To select minutes, press or but-
ton.
5. To confi rm press button. ,
,
displayed, hour fl ashes.
6. To select hour, press or button.
7. To confi rm press button. ,
,
displayed, minutes fl ash.
8. To select minutes, press or but-
ton.
9. To confi rm press button or wait.
NOTE: Programs and
use the same ON and OFF tempera-
tures. Once an ON and/or OFF temperature has been
set, that temperature becomes the new default setting.
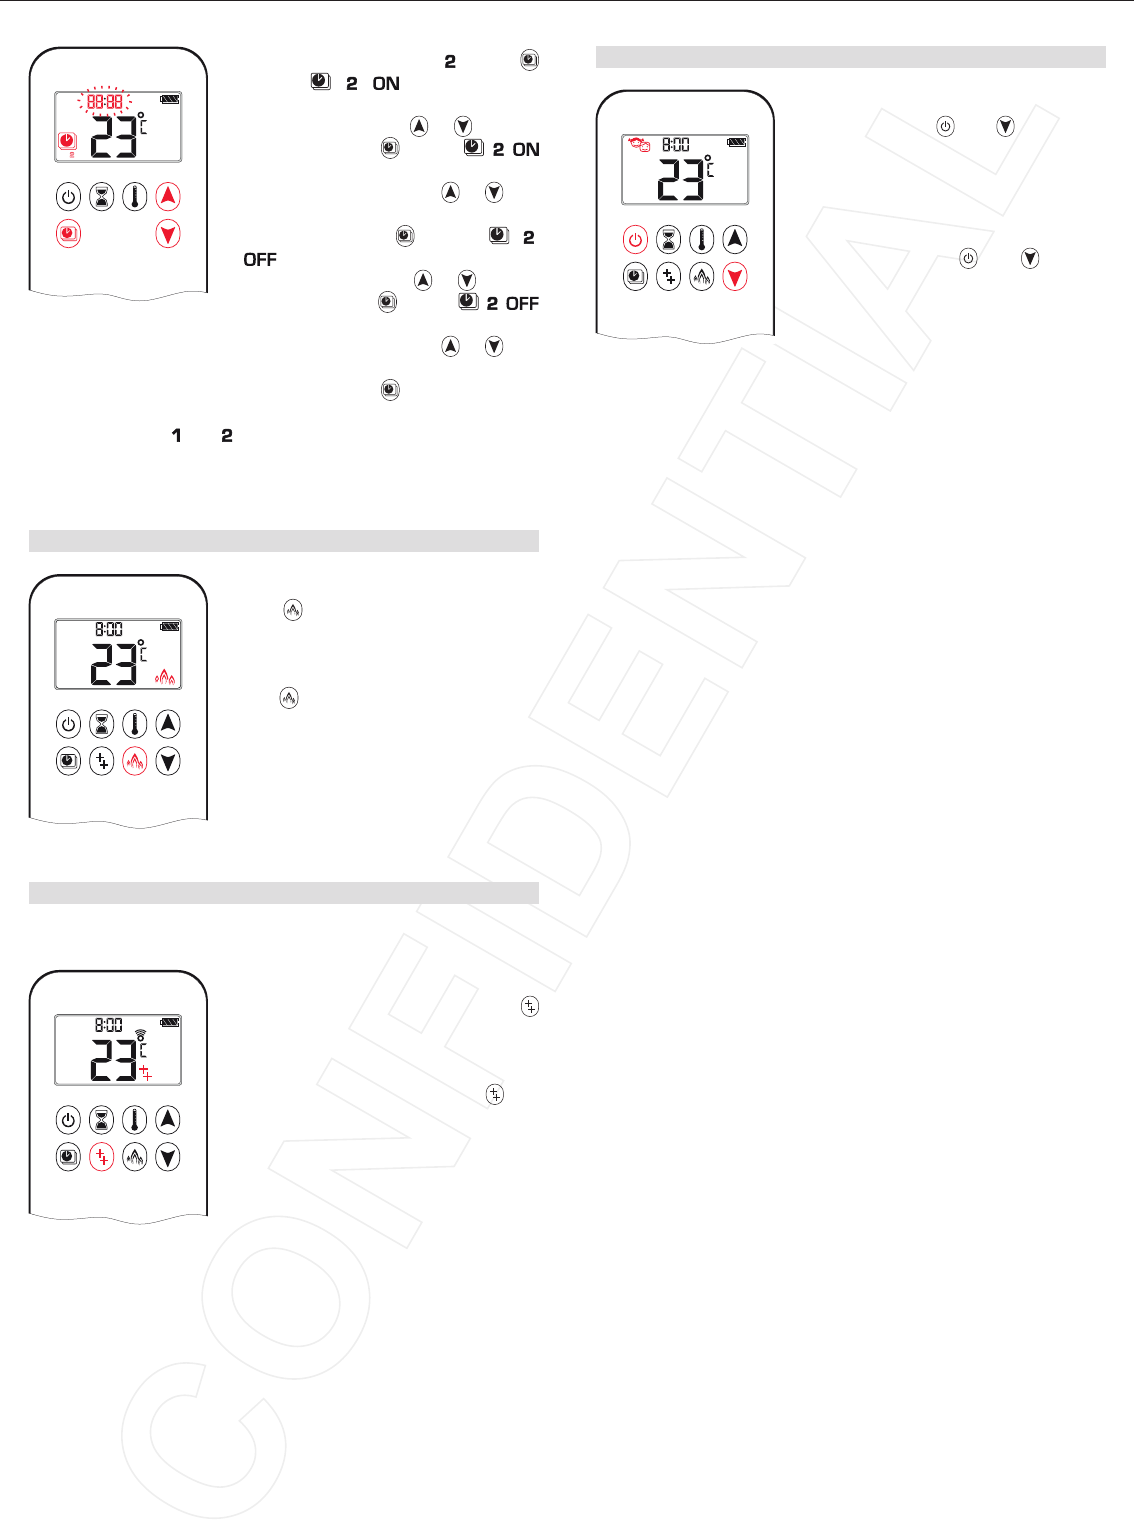
CHILD PROOF
1 2
ON
AM
PM
OFF
ON:
To activate press and buttons si-
multaneously. Children icon displayed
and the handset is rendered inoper-
able, except for the OFF function.
OFF:
To deactivate press and buttons
simultaneously. Children icon disap-
pears.
COUNTDOWN TIMER
1 2
ON
AM
PM
OFF
ON/SETTING:
1. Press and hold button until hour-
glass icon displayed and hour fl ashes.
2. To select hour press or button.
3. To confi rm press button. Minutes
fl ash.
4. To select minutes press or button.
5. To confi rm press button or wait.
OFF:
Press button, hourglass and count-
down time disappear.
NOTE: At end of countdown time period, the fi re turns OFF. The
CountdownTimer only works in Manual, Thermostatic, and
Random modes. Maximum countdown time is 9 hours.
PROGRAM MODE
NOTE: The set temperature for Thermostatic Mode is the tem-
perature for the ON time in Program Mode. Changing
the Thermostatic Mode set temperature also changes
the ON time temperature in Program Mode.
1 2
ON
AM
PM
OFF
ON:
Press button. , or
, ON or OFF
displayed.
1 2
ON
AM
PM
OFF
OFF:
1. Press or or button to enter
Manual mode.
2. Press button to enter Thermostatic
mode.
3. Press Random icon button to enter
Random mode.
1 2
ON
AM
PM
OFF
PROGRAM Temperature SETTING:
1. Press button and hold until ,
, Set temperature (Thermostatic)
displayed.
2. To continue press button. ,
displayed, temperature fl ashes and
wait.
3. To select OFF temperature press
or button.
4. To confi rm press button or wait.
NOTE: The ON (Thermostatic) and OFF set temperatures are
the same for each day.
Program Mode
OPERATING INSTRUCTIONS FOR OEM USE ONLY
© 2013 Mertik Maxitrol GmbH & Co. KG, All Rights Reserved.
19 / 28
1 2
ON
AM
PM
OFF
SETTING CELSIUS OR FAHRENHEIT
1 2
ON
AM
PM
OFF
To change between °C and °F, press
and buttons simultaneously.
NOTE: Choosing °F results in a 12 hour
clock. Choosing °C results in a
24 hour clock.
SETTING THE TIME
1 2
ON
AM
PM
OFF
1. Press and buttons simultane-
ously. Hour fl ashes.
2. To select hour press or button.
3. Press and buttons simultane-
ously. Minutes fl ash.
4. To select minutes press or but-
ton.
5. To confi rm press and buttons
simultaneously or wait.
MODES OF OPERATION
1 2
ON
AM
PM
OFF
Enter Mode
Press the appropriate mode button.
Exit Mode
1. Press the same mode button again to
change to Manual mode.
2. Press or button to change to
Manual mode.
3. Press a different mode button to
change to that mode.
1 2
ON
AM
PM
OFF
Thermostatic Mode
The room temperature is measured and
compared to the set temperature. The
fl ame height is then automatically ad-
justed to achieve the set temperature.
1 2
ON
AM
PM
OFF
Program Mode
Programs 1 and 2, each can be pro-
grammed to go ON and OFF at specifi c
times at a set temperature.
8-SYMBOL
Figure 22: 8-symbol Display
Program Mode
Temperature
Time
Auxiliary Feature
Countdown Timer
Battery Status
Signal Indicator Child Proof
Random Mode
Thermostatic Mode
°F or °C
8-SYMBOL
OPERATING INSTRUCTIONS FOR OEM USE ONLY
© 2013 Mertik Maxitrol GmbH & Co. KG, All Rights Reserved.
20 / 28
AM
Random Mode
Flame height changes automatically.
NOTE: Mains adapter recommended.
MANUAL MODE (HANDSET)
NOTICE
BEFORE OPERATING
1. Make sure MANUAL knob on the GV60 Valve is in the ON,
full counterclockwise position.
2. Place the ON/OFF switch (if equipped) in the “I” (ON position).
TO TURN ON FIRE
When pilot ignition is confi rmed, motor turns automatically to
maximum fl ame height.
1 2
ON
AM
PM
OFF
Handset
▪ Press button until a short beep con-
fi rms the start sequence has begun;
release button.
▪ Continuing beeps confi rm ignition is in
process.
▪ Rotating circle is shown on display un-
til ignition sequence is complete.
▪ There is main gas fl ow once pilot igni-
tion is confi rmed.
▪ Handset automatically goes into Man-
ual mode after main burner ignition.
If the pilot does not stay lit after several tries, turn the main valve
knob to OFF and follow the instructions “TURN OFF GAS TO
APPLIANCE” (page 28).
Standby Mode (Pilot Flame)
Handset
▪
Press and hold
button
to set appliance to pilot fl ame.
TO TURN OFF FIRE
1 2
ON
AM
PM
OFF
Handset
▪ Press
button to turn off
.
NOTE: There is a 5 sec delay before
the next ignition is possible.
FLAME HEIGHT ADJUSTMENT
1 2
ON
AM
PM
OFF
Handset
▪ To increase fl ame height press and
hold button.
▪ To decrease fl ame height or to set ap-
pliance to pilot fl ame, press and hold
button.
DESIGNATED LOW FIRE AND HIGH FIRE
AM
▪ To go to low fi re, double-click but-
ton. “LO” is displayed.
NOTE: Flame goes to high fi re fi rst be-
fore going to low fi re.
AM
▪ To go to high fi re, double-click but-
ton. “HI” is displayed.
If the appliance will not operate, follow the instructions “TURN
OFF GAS TO APPLIANCE”
(page 28)
.

OPERATING INSTRUCTIONS FOR OEM USE ONLY
© 2013 Mertik Maxitrol GmbH & Co. KG, All Rights Reserved.
21 / 28
1 2
ON
AM
PM
OFF
OFF:
1. Press or or button to enter
Manual mode.
2. Press button to enter Thermostatic
mode.
3. Press Random icon button to enter
Random mode.
1 2
ON
AM
PM
OFF
PROGRAM Temperature SETTING:
1. Press button and hold until ,
, Set temperature (Thermostatic)
displayed.
2. To continue press button. ,
displayed, temperature fl ashes and
wait.
3. To select OFF temperature press
or button.
4. To confi rm press button or wait.
NOTE: The ON (Thermostatic) and OFF set temperatures are
the same for each day.
1 2
ON
AM
PM
OFF
Time SETTING:
1. Press button and hold until , ,
displayed, hour fl ashes.
2. To select hour press or button.
3. To confi rm press button. ,
dis-
played, minutes fl ash.
4. To select minutes press or but-
ton.
1 2
ON
AM
PM
OFF
5. To confi rm press button. , ,
displayed, hour fl ashes.
6. To select hour, press or button.
7. To confi rm press button. , ,
displayed, minutes fl ash.
8. To select minutes press or but-
ton.
NOTE: If you stop programming at this point, program 2 remains
deactivated.
NOTE: Programs 1 and 2 use the same ON (Thermostatic) and
OFF temperatures.
THERMOSTATIC MODE
1 2
ON
AM
PM
OFF
ON:
Press button. Thermostat icon dis-
played, preset temperature displayed
briefl y, and then room temperature dis-
played.
OFF:
1. Press button.
2. Press or button to enter Manual
mode.
3. Press button to enter Countdown
Timer mode.
4. Press button to enter Random mode.
1 2
ON
AM
PM
OFF
SETTING:
1. Press button and hold until Ther-
mostat icon displayed, temperature
fl ashes.
2. To adjust SET temperature press
or button.
3. To confi rm press button or wait.
COUNTDOWN TIMER
1 2
ON
AM
PM
OFF
ON/SETTING:
1. Press and hold button until hour-
glass icon displayed and hour fl ashes.
2. To select hour press or button.
3. To confi rm press button. Minutes
fl ash.
4. To select minutes press or but-
ton.
5. To confi rm press button or wait.
OFF:
Press button, hourglass and count-
down time disappear.
NOTE: At end of countdown time period, the fi re turns OFF. The
CountdownTimer only works in Manual, Thermostatic, and
Random modes. Maximum countdown time is 9 hours.
PROGRAM MODE
NOTE: The set temperature for Thermostatic Mode is the tem-
perature for the ON time in Program Mode. Changing
the Thermostatic Mode set temperature also changes
the ON time temperature in Program Mode.
1 2
ON
AM
PM
OFF
ON:
Press button. , or
, ON or OFF
displayed.
8-SYMBOL
OPERATING INSTRUCTIONS FOR OEM USE ONLY
© 2013 Mertik Maxitrol GmbH & Co. KG, All Rights Reserved.
22 / 28
CHILD PROOF
1 2
ON
AM
PM
OFF
ON:
To activate press and buttons si-
multaneously. Children icon displayed
and the handset is rendered inoper-
able, except for the OFF function.
OFF:
To deactivate press and buttons
simultaneously. Children icon disap-
pears.
1 2
ON
AM
PM
OFF
1.
To continue to program
, press
button. ,
,
displayed, hour
fl ashes.
2. To select hour press or button.
3. To confi rm press button. ,
,
displayed, minutes fl ash.
4. To select minutes, press or but-
ton.
5. To confi rm press button. ,
,
displayed, hour fl ashes.
6. To select hour, press or button.
7. To confi rm press button. ,
,
displayed, minutes fl ash.
8. To select minutes, press or but-
ton.
9. To confi rm press button or wait.
NOTE: Programs and
use the same ON and OFF tempera-
tures. Once an ON and/or OFF temperature has been
set, that temperature becomes the new default setting.
RANDOM FLAME
AM
ON:
Press button. Random icon dis-
played.
OFF:
Press button. Random icon disap-
pears.
NOTE: Mains adapter recommended.
AUXILIARY FEATURE
Upon ignition burner 1 is ON and burner 2 is in the last setting.
1 2
ON
AM
PM
OFF
OFF:
To switch the burner OFF, press the
button (Auxiliary icon disappears).
ON:
To switch a burner ON, press the but-
ton.
NOTE: The latching solenoid valve cannot operate manually. If
the receiver battery runs down it will remain in the last
operating position.
Program Mode
OPERATING INSTRUCTIONS FOR OEM USE ONLY
© 2013 Mertik Maxitrol GmbH & Co. KG, All Rights Reserved.
23 / 28
SETTING CELSIUS OR FAHRENHEIT
1 2
ON
AM
PM
OFF
To change between °C and °F, press
and buttons simultaneously.
NOTE: Choosing °F results in a 12 hour
clock. Choosing °C results in a
24 hour clock.
SETTING THE TIME
1 2
ON
AM
PM
OFF
1. Press and buttons simultane-
ously. Hour fl ashes.
2. To select hour press or button.
3. Press and buttons simultane-
ously. Minutes fl ash.
4. To select minutes press or but-
ton.
5. To confi rm press and buttons
simultaneously or wait.
MODES OF OPERATION
1 2
ON
AM
PM
OFF
Enter Mode
Press the appropriate mode button.
Exit Mode
1. Press the same mode button again to
change to Manual mode.
2. Press or button to change to
Manual mode.
3. Press a different mode button to
change to that mode.
1 2
ON
AM
PM
OFF
Thermostatic Mode
The room temperature is measured and
compared to the set temperature. The
fl ame height is then automatically ad-
justed to achieve the set temperature.
1 2
ON
AM
PM
OFF
Program Mode
Programs 1 and 2, each can be pro-
grammed to go ON and OFF at specifi c
times at a set temperature.
10-SYMBOL
Figure 23: 10-symbol Display
Light
Fan
Program Mode
Temperature
Time
Auxiliary Feature
Countdown Timer
Battery Status
Signal Indicator Child Proof
Random Mode
Thermostatic Mode
1 2
ON
AM
PM
OFF
°F or °C
10-SYMBOL
OPERATING INSTRUCTIONS FOR OEM USE ONLY
© 2013 Mertik Maxitrol GmbH & Co. KG, All Rights Reserved.
24 / 28
AM
Random Mode
Flame height changes automatically.
NOTE: Mains adapter recommended.
MANUAL MODE (HANDSET)
NOTICE
BEFORE OPERATING
1. Make sure MANUAL knob on the GV60 Valve is in the ON,
full counterclockwise position.
2. Place the ON/OFF switch (if equipped) in the “I” (ON position).
TO TURN ON FIRE
When pilot ignition is confi rmed, motor turns automatically to
maximum fl ame height.
1 2
ON
AM
PM
OFF
Handset
▪ Press button until a short beep con-
fi rms the start sequence has begun;
release button.
▪ Continuing beeps confi rm ignition is in
process.
▪ Rotating circle is shown on display un-
til ignition sequence is complete.
▪ There is main gas fl ow once pilot igni-
tion is confi rmed.
▪ Handset automatically goes into Man-
ual mode after main burner ignition.
If the pilot does not stay lit after several tries, turn the main valve
knob to OFF and follow the instructions “TURN OFF GAS TO
APPLIANCE” (page 28).
Standby Mode (Pilot Flame)
Handset
▪
Press and hold
button
to set appliance to pilot fl ame.
TO TURN OFF FIRE
1 2
ON
AM
PM
OFF
Handset
▪ Press
button to turn off
.
NOTE: There is a 5 sec delay before
the next ignition is possible.
FLAME HEIGHT ADJUSTMENT
1 2
ON
AM
PM
OFF
Handset
▪ To increase fl ame height press and
hold button.
▪ To decrease fl ame height or to set ap-
pliance to pilot fl ame, press and hold
button.
DESIGNATED LOW FIRE AND HIGH FIRE
AM
▪ To go to low fi re, double-click but-
ton. “LO” is displayed.
NOTE: Flame goes to high fi re fi rst be-
fore going to low fi re.
AM
▪ To go to high fi re, double-click but-
ton. “HI” is displayed.
If the appliance will not operate, follow the instructions “TURN
OFF GAS TO APPLIANCE”
(page 28)
.
OPERATING INSTRUCTIONS FOR OEM USE ONLY
© 2013 Mertik Maxitrol GmbH & Co. KG, All Rights Reserved.
25 / 28
1 2
ON
AM
PM
OFF
OFF:
1. Press or or button to enter
Manual mode.
2. Press button to enter Thermostatic
mode.
3. Press Random icon button to enter
Random mode.
1 2
ON
AM
PM
OFF
PROGRAM Temperature SETTING:
1. Press button and hold until ,
, Set temperature (Thermostatic)
displayed.
2. To continue press button. ,
displayed, temperature fl ashes and
wait.
3. To select OFF temperature press
or button.
4. To confi rm press button or wait.
NOTE: The ON (Thermostatic) and OFF set temperatures are
the same for each day.
1 2
ON
AM
PM
OFF
Time SETTING:
1. Press button and hold until , ,
displayed, hour fl ashes.
2. To select hour press or button.
3. To confi rm press button. ,
dis-
played, minutes fl ash.
4. To select minutes press or but-
ton.
1 2
ON
AM
PM
OFF
5. To confi rm press button. , ,
displayed, hour fl ashes.
6. To select hour, press or button.
7. To confi rm press button. , ,
displayed, minutes fl ash.
8. To select minutes press or but-
ton.
NOTE: If you stop programming at this point, program 2 remains
deactivated.
NOTE: Programs 1 and 2 use the same ON (Thermostatic) and
OFF temperatures.
THERMOSTATIC MODE
1 2
ON
AM
PM
OFF
ON:
Press button. Thermostat icon dis-
played, preset temperature displayed
briefl y, and then room temperature dis-
played.
OFF:
1. Press button.
2. Press or button to enter Manual
mode.
3. Press button to enter Countdown
Timer mode.
4. Press button to enter Random
mode.
1 2
ON
AM
PM
OFF
SETTING:
1. Press button and hold until Ther-
mostat icon displayed, temperature
fl ashes.
2. To adjust SET temperature press
or button.
3. To confi rm press button or wait.
COUNTDOWN TIMER
1 2
ON
AM
PM
OFF
ON/SETTING:
1. Press and hold button until hour-
glass icon displayed and hour fl ashes.
2. To select hour press or button.
3. To confi rm press button. Minutes
fl ash.
4. To select minutes press or but-
ton.
5. To confi rm press button or wait.
OFF:
Press button, hourglass and count-
down time disappear.
NOTE: At end of countdown time period, the fi re turns OFF. The
CountdownTimer only works in Manual, Thermostatic, and
Random modes. Maximum countdown time is 9 hours.
PROGRAM MODE
NOTE: The set temperature for Thermostatic Mode is the tem-
perature for the ON time in Program Mode. Changing
the Thermostatic Mode set temperature also changes
the ON time temperature in Program Mode.
1 2
ON
AM
PM
OFF
ON:
Press button. , or
, ON or OFF
displayed.
10-SYMBOL
OPERATING INSTRUCTIONS FOR OEM USE ONLY
© 2013 Mertik Maxitrol GmbH & Co. KG, All Rights Reserved.
26 / 28
RANDOM FLAME
AM
ON:
Press button. Random icon dis-
played.
OFF:
Press button. Random icon disap-
pears.
NOTE: Mains adapter recommended.
AUXILIARY FEATURE
Upon ignition burner 1 is ON and burner 2 is in the last setting.
1 2
ON
AM
PM
OFF
OFF:
To switch the burner OFF, press the
button (Auxiliary icon disappears).
ON:
To switch a burner ON, press the but-
ton.
NOTE: The latching solenoid valve cannot operate manually. If
the receiver battery runs down it will remain in the last
operating position.
CHILD PROOF
1 2
ON
AM
PM
OFF
ON:
To activate press and buttons si-
multaneously. Children icon displayed
and the handset is rendered inoper-
able, except for the OFF function.
OFF:
To deactivate press and buttons
simultaneously. Children icon disap-
pears.
1 2
ON
AM
PM
OFF
1.
To continue to program
, press
button. ,
,
displayed, hour
fl ashes.
2. To select hour press or button.
3. To confi rm press button. ,
,
displayed, minutes fl ash.
4. To select minutes, press or but-
ton.
5. To confi rm press button. ,
,
displayed, hour fl ashes.
6. To select hour, press or button.
7. To confi rm press button. ,
,
displayed, minutes fl ash.
8. To select minutes, press or but-
ton.
9. To confi rm press button or wait.
NOTE: Programs and
use the same ON and OFF tempera-
tures. Once an ON and/or OFF temperature has been
set, that temperature becomes the new default setting.
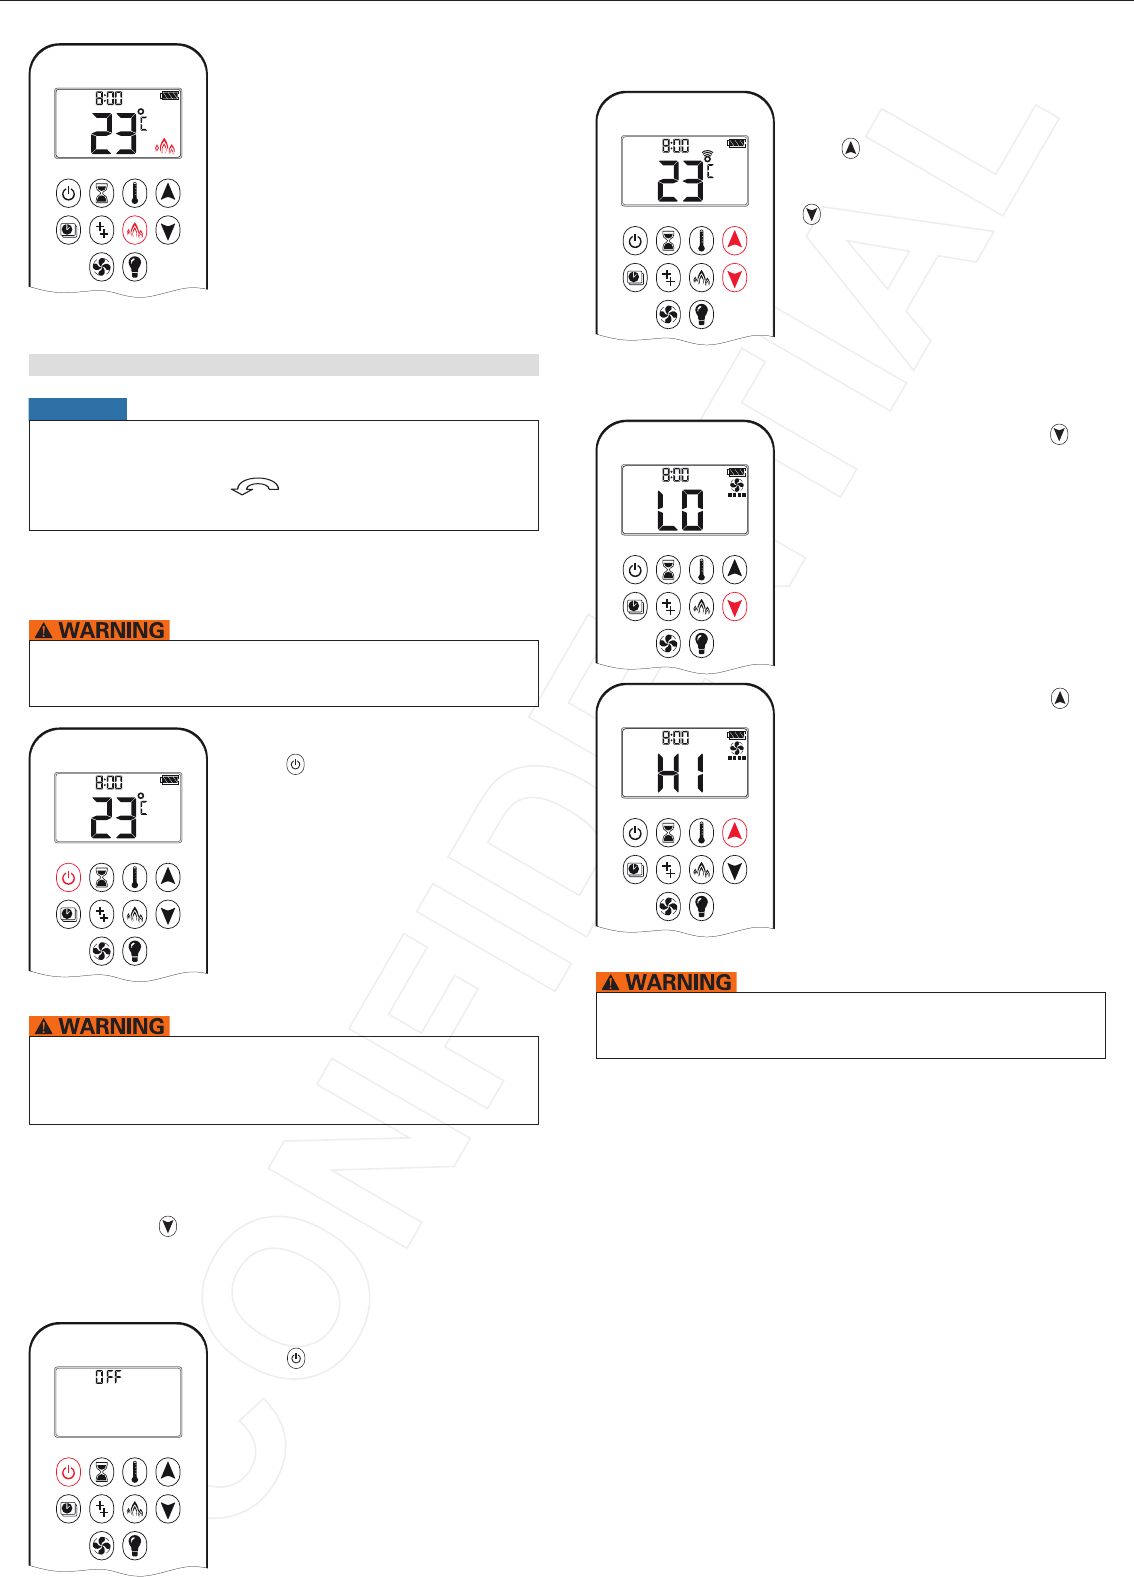
CIRCULATING FAN OPERATION
AM
NOTE: SETTING only. Fan is switched
ON automatically when gas
opens. Circulating fan has 4
speed levels from low (1 bar) to
high (4 bars).
SETTING:
1. Press button and hold until fan
icon fl ashes.
2. Press button to increase fan speed
and button to decrease fan speed.
3. To confi rm setting either press but-
ton or wait (Fan icon displayed).
OFF:
Press button until all 4 speed level
bars disappear.
LIGHT/DIMMER OPERATION
AM
ON:
Press button (light icon displayed).
Light is on at preset level.
OFF:
Press button (light icon disappears).
SETTING:
1. Press button and hold until light
icon fl ashes.
2. To adjust light between 20…100 %
press or button.
3. To confi rm setting either press but-
ton or wait (Light icon displayed).
NOTE: The Light works independently of the Pilot fl ame. If you
want the light ON but no fl ame, press button.
OPERATING INSTRUCTIONS FOR OEM USE ONLY
© 2013 Mertik Maxitrol GmbH & Co. KG, All Rights Reserved.
27 / 28
TOUCH PAD / WALL SWITCH
To Turn ON Appliance
▪ Press button (see fi gure 24) until a short beep con-
fi rms the start sequence has begun; release button.
▪ Continuing beeps confi rm the ignition is in process.
▪ Once pilot ignition is confi rmed, there is main gas fl ow.
If the pilot does not stay lit after several tries, turn the main
valve knob to OFF and follow the instructions “TO TURN OFF
GAS TO APPLIANCE” (page 28).
STANDBY MODE (PILOT FLAME)
▪ Press and hold (small fl ame) button to set appliance at pilot
fl ame.
To Turn OFF Appliance
▪ Press button.
Flame Height Adjustment
▪ Press and hold (large fl ame) button to increase fl ame height.
▪ Press and hold (small fl ame) button to decrease fl ame height
or to set appliance at pilot fl ame.
▪ For fi ne adjustment tap (large fl ame) or (small fl ame) button.
If the appliance will not operate, follow the instructions “TO
TURN OFF GAS TO APPLIANCE”
(page 28)
.
TO OPEN AND CLOSE SOLENOID VALVE/BURNER
▪ Upon ignition Main Burner and Decorative Burner are ON.
▪ Simultaneously press the and (small fl ame) buttons
to switch the Decorative Burner OFF.
▪ Simultaneously press and (large fl ame) buttons but-
tons to switch Decorative Burner ON.
NOTE: The latching solenoid valve cannot operate manually. If
the receiver battery runs down it will remain in the last
operating position. During normal operation the solenoid
valve will be reset to the ON position when the GV60 is
switched OFF remotely.
Figure 25: Switch Panel
A) Increase fl ame height
B) ON/OFF
C) Decrease fl ame height
SWITCH PANEL
To Turn ON Appliance
▪ Press “B” button (see fi gure 25) until a short beep confi rms the
start sequence has begun; release button.
▪ Continuing beeps confi rm the ignition is in process.
▪ Once pilot ignition is confi rmed, there is main gas fl ow.
If the pilot does not stay lit after several tries, turn the main
valve knob to OFF and follow the instructions “TO TURN OFF
GAS TO APPLIANCE” (page 28).
STANDBY MODE (PILOT FLAME)
▪ Press and hold “C” button to set appliance at pilot fl ame.
To Turn OFF Appliance
▪ Press “B” button.
Flame Height Adjustment
▪ Press and hold “A” button to increase fl ame height.
▪ Press and hold “C” button to decrease fl ame height or to set
appliance at pilot fl ame.
▪ For fi ne adjustment tap button “A” or “C” button.
If the appliance will not operate, follow the instructions “TO
TURN OFF GAS TO APPLIANCE”
(page 28)
.
Increase fl ame height
ON-OFF
Decrease fl ame height
Figure 24: Touch Pad / Wall Switch
OPERATING INSTRUCTIONS FOR OEM USE ONLY
© 2013 Mertik Maxitrol GmbH & Co. KG, All Rights Reserved.
28 / 28
MANUAL OPERATION
(Only possible, when MANUAL knob is used)
Access to the pilot burner is only required for ignition with a match.
When turning main valve knob, do not force. Knob has a slip
clutch that clicks until the end stops are reached. This allows for
manual fl ame height adjustment as well as adjustment to pilot
standby position.
1. STOP! Read the safety information included before proceeding.
2. Turn main valve knob to the
OFF
, full clockwise position.
3. Turn MANUAL knob to the
MAN
, full clockwise position.
4. Place ON/OFF switch (if equipped) in O (OFF position).
5. Wait fi ve (5) minutes to clear out any gas. Verify that no gas
is in the area around the appliance, including near the fl oor.
If you detect gas STOP! Follow “WHAT TO DO IF YOU
SMELL GAS” in the safety information on page 2. If no gas
is present, proceed to step 6.
6. Place ON/OFF switch (if equipped) in “
I
” (ON position).
7. With the MANUAL knob in
MAN
position a manual pilot valve
operator and piezo ignitor (optional) are accessible.
8. Fully push down manual pilot valve operator and hold in, to
start pilot gas fl ow (see fi gure 25).
Ignition with match:
Immediately light the pilot with a match, while continuing to
hold in the manual pilot valve operator for about one (1) minute
after the pilot is lit. Release manual pilot valve operator. If pilot
does not stay lit, wait fi ve (5) minutes and repeat.
Ignition with piezo ignitor:
Change the ignition cable from the receiver to the valve (see
fi gure 25). Push in the piezo ignitor to ignite. If pilot does not
stay lit, wait fi ve (5) minutes and repeat.
If the pilot does not stay lit after several tries, turn the gas
control knob (main valve knob) to OFF and proceed to step 12.
Figure 25: Combination control, cover
8 Wire
Receiver jack
Microswitch
MANUAL knob
in MAN position
Main valve knob
in OFF position
Manual pilot
valve operator
Piezo ignitor
(optional)
ON/OFF switch
(optional) in
ON Position
Connection
piezo ignitor tab
2.8 x 0.8 mm
9. If applicable, replace pilot access panel before proceeding.
10. Turn MANUAL knob to the
ON
, full counterclockwise
position.
11. Turn main valve knob to the full
ON
, full counterclockwise
position.
12. If the appliance will not operate, follow the instructions “TO
TURN OFF GAS TO APPLIANCE” (below).
TO TURN OFF GAS TO APPLIANCE
1. Place ON/OFF switch (if equipped) in
O (OFF position).
2. If gas control is accessible turn main valve knob to the OFF full
clockwise position.
3. Replace appliance access cover (if applicable).
AUTOMATIC TURN DOWN
3 Hour No Communication Function
▪ The valve will turn to pilot fl ame if there is no communication
between handset and receiver for a 3 hour period. The fi re will
continue to function normally when communication is restored.
Receiver Overheating
(only if module is connected)
▪ Valve turns to pilot fl ame if the temperature in the receiver is
higher than 140 °F (60 °C). The main burner turns back ON
(manually or in thermostatic mode) only when the temperature
is below 140 °F (60 °C).
1 Hour Turn Down for Special Receiver
(bedroom fi replaces only)
▪ The valve will turn to pilot fl ame if there is no change in fl ame
height over a 1 hour period.
AUTOMATIC SHUT OFF
Countdown Timer
▪ At end of countdown time period, the fi re turns OFF. The Count-
downTimer only works in Manual, Thermostatic, and Random
modes. Maximum countdown time is 9 hours.
Low Battery Receiver
▪ With low battery power in the receiver the system shuts off the
fi re completely. This will not happen if the power supply is inter-
rupted.
Five Day Shut Off
(CSA version)
▪ The system shuts off the fi re completely if there is no change in
fl ame height for 5 days.
2nd Thermocouple Shut Off
▪ 2nd thermocouple Option: The system shuts OFF the fi re if the
main burner does not completely ignite approximately 20 sec-
onds after ignition or after pushing button.
NOTE: Before the next ignition there is a 2 minute waiting period.
Exclusive Distributor North America for Mertik Maxitrol
Maxitrol Company, Inc.
23555 Telegraph Rd., PO Box 2230,
Southfield, MI 48037-2230, USA
Tel: +1 248-356-1400, Fax: +1 248-356-0829
www.maxitrol.com
Mertik Maxitrol GmbH & Co. KG
Warnstedter Str. 3, 06502 Thale, Germany
Tel: + 49 3947 400-0, Fax: + 49 3947 400-200
www.mertikmaxitrol.com
RR
GV60-II.OI-EN-10.2013-Symax