Mettler Toledo TI001 RFID Reader/Writer User Manual Titration Excellence
Mettler-Toledo GmbH RFID Reader/Writer Titration Excellence
UserManual.wiki
>
Mettler Toledo
>
TI001 User Manual
user manual
Navigation menu
Upload a User Manual
Namespaces
Wiki Guide
HTML
PDF
Info
Views
User Manual
Discussion / Help
Navigation

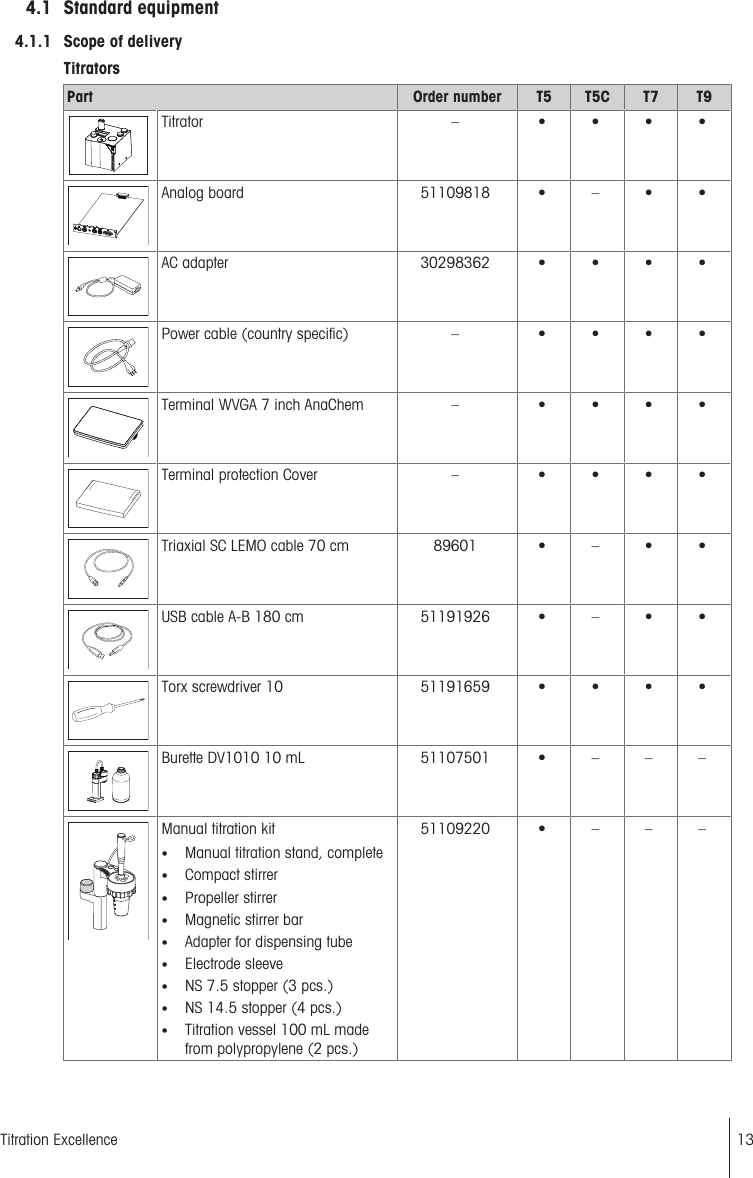


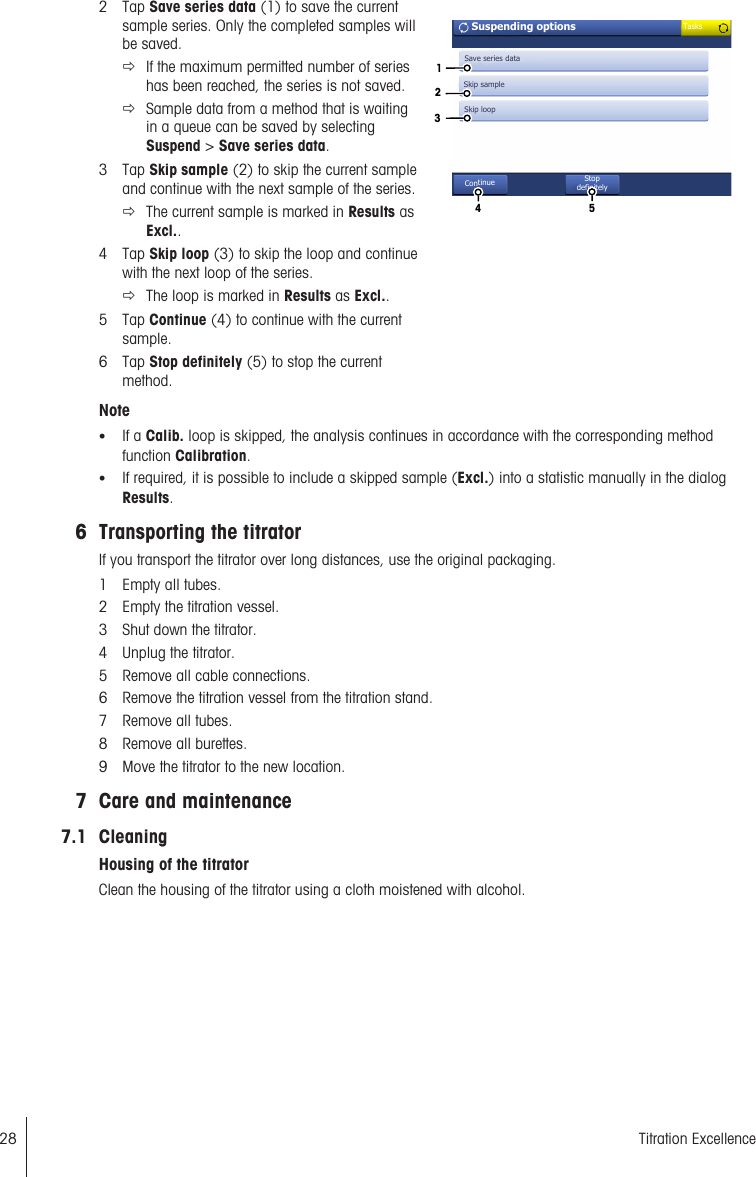
![5.2.2 Rinsing and filling the buretteTo fill the burette and tubes with titrant and remove any air bubbles from the system, rinse the burette threetimes with titrant with the manual operation Rinse.§The titrator is prepared as described in [Preparation}Page23].1 To ensure that the system has no leaks, check all tubes and closing points for firm seating.2 Make sure that the free end of the dispensing tube for the titrant is placed in the titration vessel or anothercontainer.3 Tap Manual > Burette > Rinse.ðThe dialog Rinse opens.4 Set Titrant to NaOH 0.1mol/L.5 Set Cycles to "3".6 To start the rinse procedure, tap Start.ðThe rinse procedure starts and an animation shows the progress.7 When the rinse procedure is complete, tap OK.ðThe dialog Rinse opens.ðThe burette is filled and the tubes are free of air bubbles.5.2.3 Calibrating and testing the sensorThe following describes how to calibrate a pH sensor or carry out a sensor test.Preparation1 Make sure no analysis is running on the titrator.2 Connect the plug of the sensor (DGi115-SC) to the port "SENSOR" of the titrator.3 Insert the sensor into the titration head.4 Prepare three titration vessels containing buffer solutions (pH 4.01, 7.00 and 9.21).5.2.3.1 Calibrate the sensor1 Tap Methods > New > Standard method templates > Calibration.ðA list of method functions appears.2 Tap Sample (Calib).ðThe dialog Sample (Calibration) opens.3 Make sure Sensor is set to DGi115-SC.4 Make sure the settings for the buffer are as listed below.Buffer 1: 4.01Buffer 2: 7.00Buffer 3: 9.215 Tap OK > SaveðThe new method is saved in the method list, with the next free ID and with the title Calibration.6 Tap Start.ðThe dialog Start analysis opens.7 To ensure that the system has no leaks, check all tubes and closing points for firm seating.8 Tap Start.ðThe system asks you to attach the titration vessel with sample 1 to the titration arm.9 Attach the titration vessel with the buffer solution with pH 4.01 to the titration arm and tap OK.ðThe measurement starts after the stirring time.ðDuring the measurement the online screen displays the time, the measured value in [mV] and acurve.ðDuring the calibration, the system will output a record on the printer.ðWhen the measurement is completed, the system asks you to attach the titration vessel with the nextsample to the titration arm.24 Titration Excellence](https://usermanual.wiki/Mettler-Toledo/TI001/User-Guide-3661700-Page-26.png)
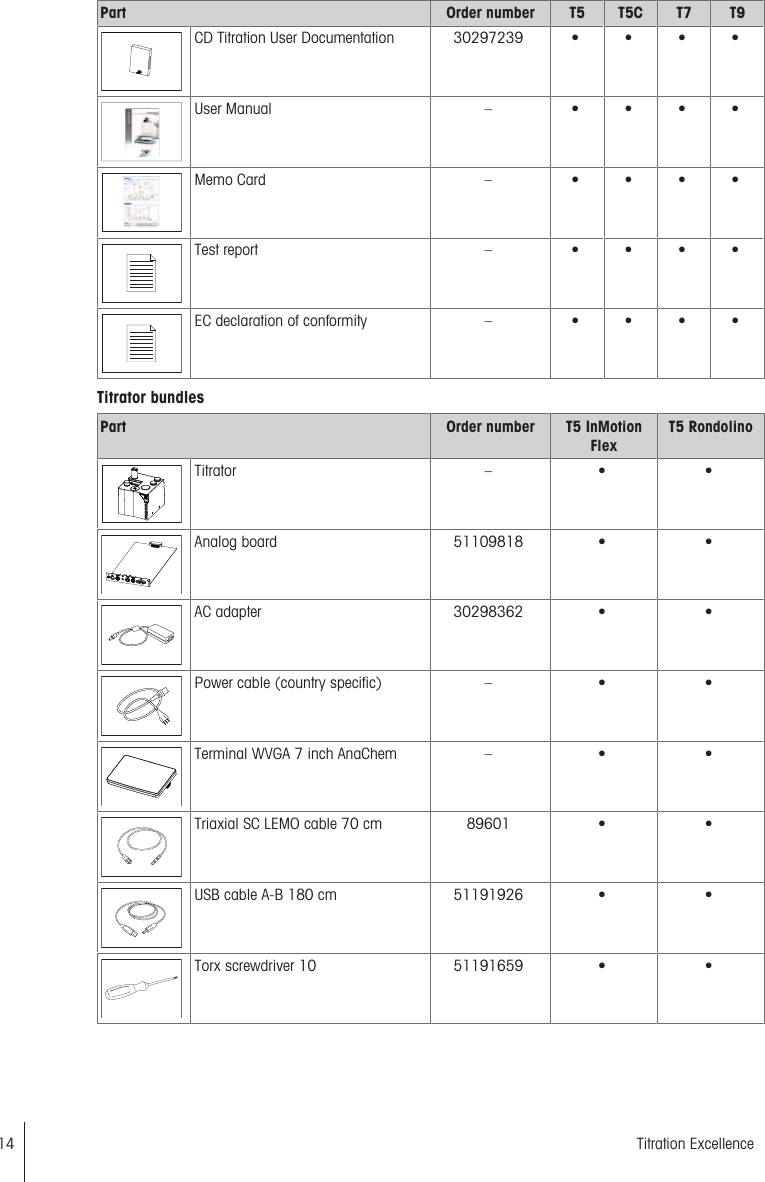
![10 Remove the titration vessel from the titration arm.11 Rinse the electrode with deionized water.12 Repeat the last 3 steps for the buffer solution with pH 7.00 and the buffer solution with pH 9.21.ðWhen the calibration is completed, the calibration data is automatically copied to the setup.5.2.3.2 Test the pH-sensor1 Tap Methods > New > Standard method templates > Sensor test.ðA list of method functions appears.2 Tap Sample (Calib).ðThe dialog Sample (Calibration) opens.3 Make sure Sensor is set to DGi115-SC.4 Make sure the settings for the buffer are as listed below.Buffer 1: 4.01Buffer 2: 7.00Buffer 3: 9.215 Tap OK > SaveðThe new method is saved in the method list with the next free ID and with the title Sensor test.6 Tap Start.ðThe dialog Start analysis opens.7 To ensure that the system has no leaks, check all tubes and closing points for firm seating.8 Tap Start.ðThe system asks you to attach the titration vessel with sample 1 to the titration arm.9 Attach the tiration vessel with the buffer solution with pH 4.01 to the titration arm and tap OK.ðThe measurement starts after the stirring time.ðDuring the measurement the online screen displays the time, measurement in [mV] and the curve.ðDuring the pH-sensor test, the system will output a record on the printer.ðWhen the measurement is completed, the system asks you to attach the titration vessel with the nextsample to the titration arm.10 Remove the titration vessel from the titration arm.11 Rinse the electrode with deionized water.12 Repeat the last 3 steps for the buffer solution with pH 7.00 and the buffer solution with pH 9.21.ðWhen the pH-sensor test is completed, the data is automatically copied to the setup.5.2.4 Determining the titer1 Weigh about 50 mg of potassium hydrogen phthalate and dissolve it in a titration vessel containingdeionized water.2 Tap Methods > New > Standard method template > Titer with EQP.ðA list of method functions appears.3 Tap Sample (Titer).4 Set the parameter Entry to Before and tap OK.5 Tap Titration (EQP) > Termination.6 Activate After number of recognized EQPs, set Number of EQPs to 1 and tap OK.7 To exit the method function, tap OK8 To save the new method, tap Save.9 To ensure that the system has no leaks, check all tubes and closing points for firm seating.10 Tap Start.ðThe Start analysis dialog opens.11 Enter the sample size.25Titration Excellence](https://usermanual.wiki/Mettler-Toledo/TI001/User-Guide-3661700-Page-27.png)
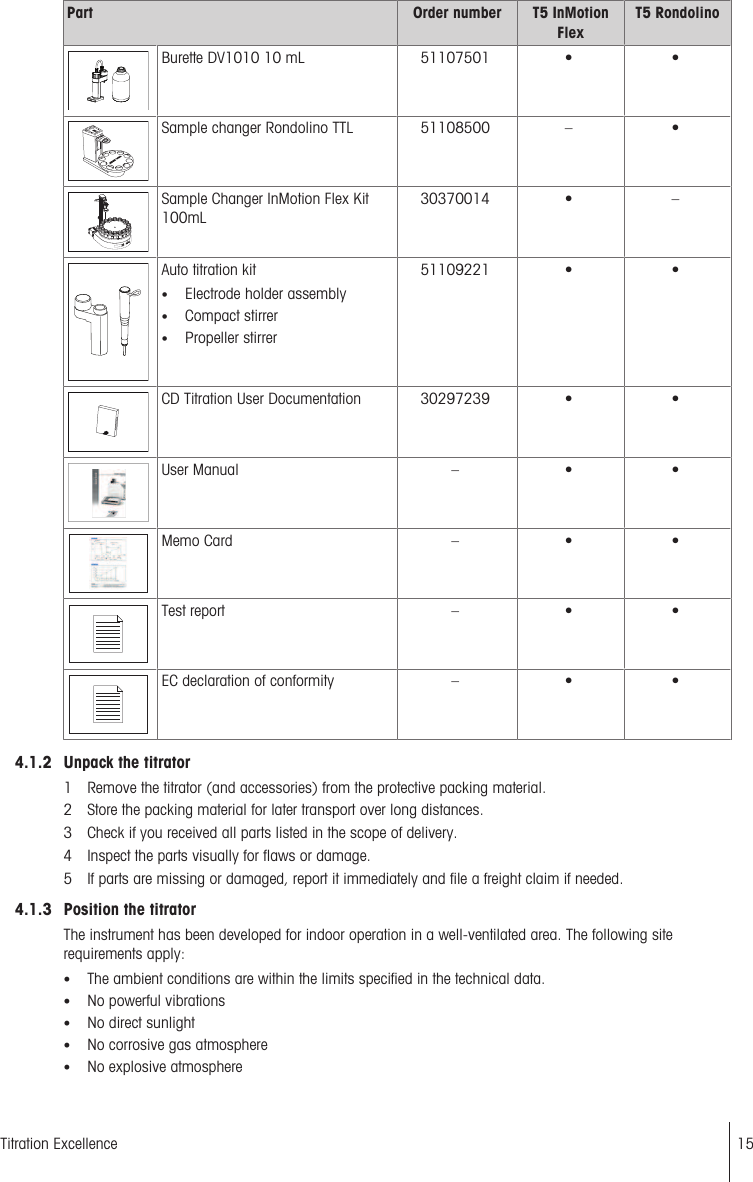
![12 Tap Start.ðThe titer determination begins.ðThe titrator asks you to add sample 1/1.13 Attach the titration vessel with potassium hydrogen phthalate solution to the titration head and tap OK.ðThe titration starts after the stirring time.ðDuring the titer determination, the online screen displays the measured pH values over the titratedvolume in [mL].ðAfter the titer determination is completed, the titer is copied to the setup.14 After the titer determination is completed, rinse the sensor with deionized water.5.2.5 Run an EQP titration5.2.5.1 Prepare the sample1 Fill 5 ml HCl (0.1 mol/L) into a titration vessel and dilute it with approx. 50mL deionized water.2 Attach the titration vessel to the titration arm.5.2.5.2 Configure the method1 Tap Methods > New > Standard method template > EQP.2 Tap Title.3 Enter a title for the new method in the field Title and tap OK.4 Tap Sample.5 In the parameter ID 1 enter your choice of ID for the sample to be analyzed.6 Set Entry type to Volume.7 Set Lower limit to 6.0mL.8 Set Upper limit to 50.0mL.9 Set Entry to Before and tap OK.10 Tap Titration (EQP) > Termination.11 Activate the parameter After number of recognized EQPs, set Number of EQPs to 1 and tap OK.12 To exit the method function, tap OK.13 Tap Calculation R1.14 Tap Result proposals.15 Select the result Content with the unit mol/L.ðThe main parameters in the method function Calculation R1 are filled in automatically.16 Set M [g/mol] to Hydrochloric acid and tap OK.17 Tap Calculation R2.18 Tap Delete.19 Tap Save.5.2.5.3 Create an indirect shortcut1 Tap Start.ðThe Start analysis window opens.2 Tap AddToHome.ðThe Shortcut parameters window opens.3 Enter a name for the shortcut in Description.4 Make sure Immediate start is deactivated.5 Tap Save.ðThe home screen with the new shortcut opens.5.2.5.4 Perform the analysis1 To ensure that the system has no leaks, check all tubes and closing points for firm seating.26 Titration Excellence](https://usermanual.wiki/Mettler-Toledo/TI001/User-Guide-3661700-Page-28.png)
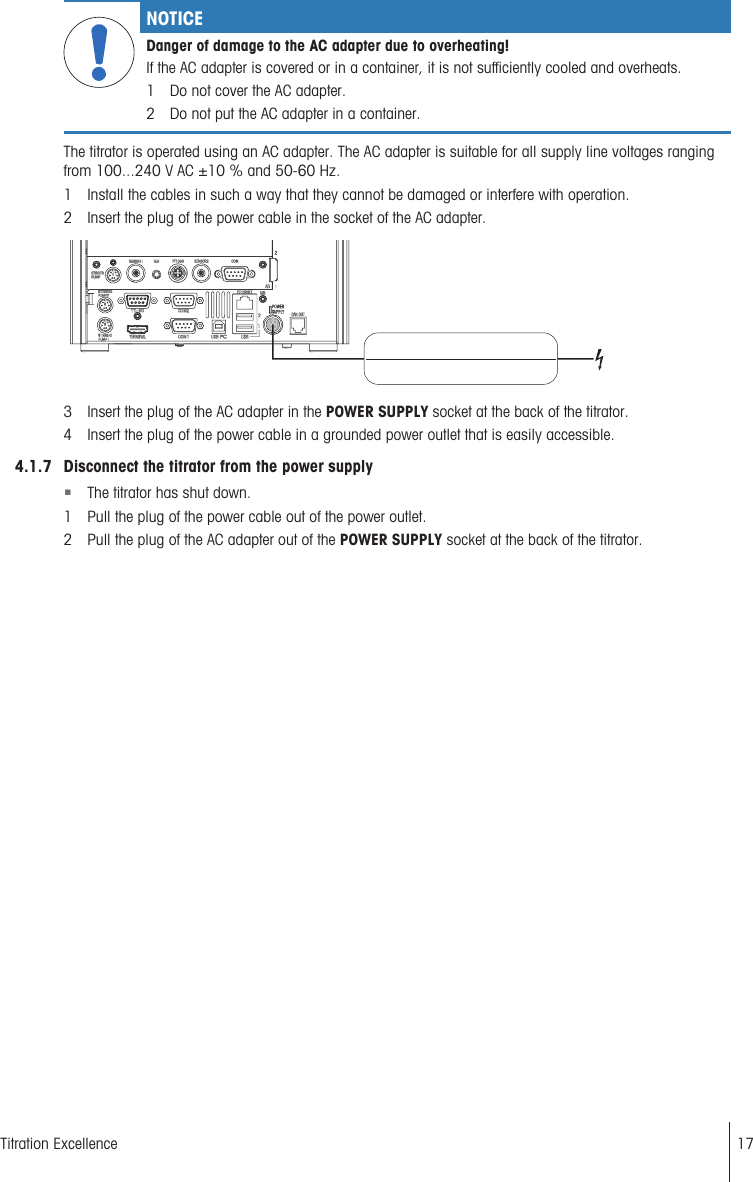
![2 Select the shortcut on the home screen.ðThe dialog Start analysis opens.3 In the parameter Enter sample size enter the sample size.4 Tap Start.ðYou are prompted to add the sample.5 If the titration vessel is not attached to the titration arm, attach the titration vessel containing the HClsolution to the titration arm and tap OK.ðThe titration starts after the pre-stirring period.ðDuring the titration, the screen displays the measured pH values over the titrated volume in [mL].ðAfter the titration, a record is printed.ðAll results are saved.6 After the titration, rinse the sensor with deionized water.7 To view the saved result, tap Home > Results.5.3 Stopping MethodsAnalyses or series of analyses that are in progress can be interrupted or terminated by the user in order tointervene in the analysis process or by the titrator itself.The options available in the event of an interruption of the analysis procedure are listed below.5.3.1 Suspending or stopping an ongoing analysis (GT or BI) by the userIf you wish to make changes when an analysis or series is in progress, you can suspend the relevantmethod as follows:1 Tap Suspend(1) to suspend the currentanalysis.ðThe dialog Suspending options opens.Time remainingSuspendSamplesTasks1SpeedResultsStir27Titration Excellence](https://usermanual.wiki/Mettler-Toledo/TI001/User-Guide-3661700-Page-29.png)