Microsoft BH-217 Bluetooth headset User Manual Nokia BH 217 UG en
Microsoft Mobile Oy Bluetooth headset Nokia BH 217 UG en
Manual
Nokia Bluetooth Headset BH-217
Issue 1
7
8
1
3
5
2
4
6
12
14
13
9
11
10

ENGLISH
DECLARATION OF CONFORMITY
Hereby, NOKIA CORPORATION declares that
this BH-217 product is in compliance with
the essential requirements and other
relevant provisions of Directive 1999/5/EC. A
copy of the Declaration of Conformity can be
found at http://www.nokia.com/phones/
declaration_of_conformity/.
© 2010 Nokia. All rights reserved.
Nokia, Nokia Connecting People and the
Nokia Original Accessories logo are
trademarks or registered trademarks of
Nokia Corporation. Nokia tune is a sound
mark of Nokia Corporation. Other product
and company names mentioned herein may
be trademarks or tradenames of their
respective owners.
Reproduction, transfer, distribution, or
storage of part or all of the contents in this
document in any form without the prior
written permission of Nokia is prohibited.
Nokia operates a policy of continuous
development. Nokia reserves the right to
make changes and improvements to any of
the products described in this document
without prior notice.
Bluetooth is a registered trademark of
Bluetooth SIG, Inc.
To the maximum extent permitted by
applicable law, under no circumstances shall
Nokia or any of its licensors be responsible
for any loss of data or income or any special,
incidental, consequential or indirect
damages howsoever caused.
The contents of this document are provided
"as is". Except as required by applicable law,
no warranties of any kind, either express or
implied, including, but not limited to, the
implied warranties of merchantability and
fitness for a particular purpose, are made in
relation to the accuracy, reliability or
contents of this document. Nokia reserves
the right to revise this document or
withdraw it at any time without prior notice.
The availability of products may vary by
region. For more information, contact your
Nokia dealer. This device may contain
commodities, technology or software
subject to export laws and regulations from
the US and other countries. Diversion
contrary to law is prohibited.

ENGLISH
Introduction
With the Nokia Bluetooth Headset
BH-217, you can make and answer
calls hands-free with your compatible
mobile device.
Read this user guide carefully before
using the headset. Also, read the user
guide for the device that you connect
to the headset.
This product may contain small parts.
Keep them out of the reach of small
children.
Warning: The connector of
the clip and car cradle may
contain a small amount of
nickel. Persons who are sensitised to
nickel may have symptoms from
prolonged skin contact with the
connector.
Bluetooth wireless technology
Bluetooth wireless technology allows
you to connect compatible devices
without cables. The headset and the
other device do not need to be in line
of sight, but they should be within 10
metres (33 feet) of each other.
Connections may be subject to
interference from obstructions, such
as walls, or other electronic devices.
The headset is compliant with the
Bluetooth Specification 2.1 + EDR
supporting the Headset Profile 1.1 and
Hands-Free Profile 1.5. Check with the
manufacturers of other devices to
determine their compatibility with
this device.

ENGLISH
Get started
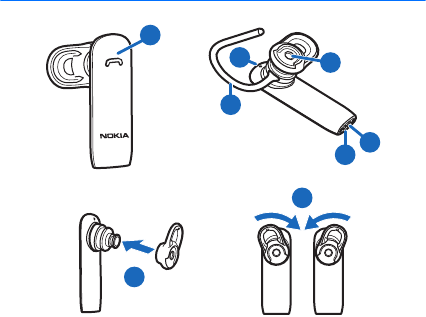
The headset contains the following
parts shown on the title page:
multifunction key (1), earloop (2),
indicator light (3), earpiece (4),
microphone (5), and charger
connector (6).
Before using the headset, you must
charge the battery and pair the
headset with a compatible device.
Parts of the device are magnetic. Metallic
materials may be attracted to the device.
Do not place credit cards or other
magnetic storage media near the device,
because information stored on them may
be erased.
Charge the battery
Before charging the battery, carefully
read “Battery and charger
information”.
1. Connect the charger to a wall
outlet.
2. Connect the charger cable to the
charger connector.
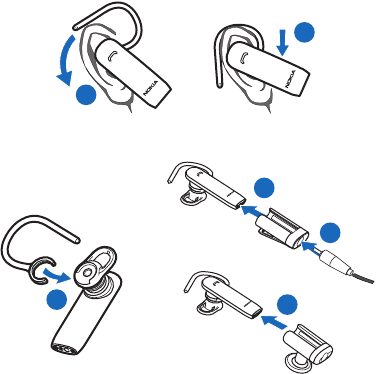
To charge the headset when it is in
the clip or car cradle, insert the
lower end of the headset into the
clip or car cradle (12), and connect
the charger cable to the charger
connector on the clip or cradle
(13).
The red indicator light is displayed
during charging. Charging the
battery fully may take up to 2
hours.
3. When the battery is fully charged,
the green indicator light is
displayed. Disconnect the charger
from the headset (or from the clip
or car cradle), then from the wall
outlet.
When you unplug a charger, hold
and pull the plug, not the cord.

ENGLISH
The fully charged battery has power
for up to 5 hours of talk time. When
you keep the headset in the clip or car
cradle, the fully charged battery has
power for up to 3 months of standby
time. When you use the headset
without the clip or cradle, the standby
time is up to 100 hours.
To check the battery charge when the
headset is not connected to a charger,
press the multifunction key when the
headset is connected to a mobile
device. If the indicator light is green,
the charge level is sufficient. If the
light is yellow, you may need to
recharge the battery soon. If the light
is red, recharge the battery.
When the battery charge is low, the
headset beeps every 5 minutes, the
red indicator light flashes, and if voice
prompts are activated, there is an
audible notification. If voice prompts
are activated, there is also an audible
notification when the battery is
completely discharged.
Switch the headset on
Remove the headset from the clip or
car cradle. If the headset is not in the
clip or cradle, press the multifunction
key. The headset beeps, and the green
indicator light flashes slowly while the
headset tries to connect to the last or
two last connected devices.
When the headset is connected to at
least one device and is ready for use,
the blue indicator light flashes slowly.
If the headset has not been paired
with a device, it automatically enters
pairing mode.
Switch the headset off
Place the headset into the clip or car
cradle, or press and hold the
multifunction key for about 5 seconds.
The headset beeps, and the red
indicator light is briefly displayed.

ENGLISH
If the headset is not connected to a
device within about 30 minutes, it
switches off automatically.
Pair and connect the headset
Before using the headset, you must
pair and connect it to a compatible
device.
You can pair the headset with up to
eight devices, but you can connect it
to a maximum of two devices at a
time.
To pair and connect the headset to a
device:
1. Make sure your mobile device is
switched on and the headset is off.
2. If the headset has not been
previously paired with a device,
switch on the headset. The headset
enters pairing mode, and the blue
indicator light starts to flash
quickly.
If the headset has been previously
paired with a device, make sure the
headset is switched off and not
placed in the clip or car cradle, and
press and hold the multifunction
key for about 5 seconds until the
blue indicator light starts to flash
quickly.
3. Within about 3 minutes, activate
Bluetooth on your device, and set it
to search for Bluetooth devices. For
details, see the user guide of your
mobile device.
4. Select the headset from the list of
found devices.
5. If necessary, enter the passcode
0000 to pair and connect the
headset to your device.
In some devices, you may need to
make the connection separately
after pairing.

ENGLISH
When the headset is connected to at
least one device and is ready for use,
the blue indicator light flashes slowly.
To manually connect the headset to
the last used device, press and hold
the multifunction key for about 2
seconds (when no other device is
connected), or make the connection in
the Bluetooth menu of the device.
You may be able to set your device so
that the headset connects to it
automatically. To activate this feature
in a Nokia device, modify the paired
device settings in the Bluetooth menu.
Basic use
Change the earpad
The headset may be provided with
different sized earpads. Select the
earpad that fits the best and is the
most comfortable for your ear.
To change the earpad, pull the current
earpad from the earpiece, and push
the new earpad into place (7).
Place the headset on the ear
To use the headset with the earloop,
attach the earloop to it (11). To detach
the earloop, gently pull it from the
headset.
You can rotate the earpad to keep the
headset securely in the ear (8). For
example, if you use the headset on the
right ear, you may need to rotate the
earpad to the right for the best fit. If
you wear an earring, make sure it is
not accidentally attached to the
earpad.
To place the headset on the ear, slide
the earloop behind your ear (9), and
gently push the earpiece against your

ENGLISH
ear. Point the headset towards your
mouth (10).
Store in the clip or car cradle
When you do not keep the headset on
your ear, store it in the clip or car
cradle. When the headset is in the clip
or cradle, it is switched off. When you
remove the headset from the clip or
cradle, the headset automatically
switches on.
To place the headset into the clip or
cradle, slide the headset into place
(14). To remove the headset, slide it
out.
Install the car cradle
When you install the cradle in a car,
make sure it does not interfere with or
hinder the steering or braking systems
or other systems used in the operation
of the vehicle (for example, airbags) or
disturb your field of vision while
driving. Check that the deployment of
the airbag is not blocked or impaired
in any way.
To install the car cradle, peel off the
protective sheet from the cradle, and
press the cradle against a flat surface
so that it stays firmly in place. Do not
install the cradle in a place where you
might come in contact with it in the
event of an accident or collision.
Use the car cradle
When you use the headset with the
cradle in a car, obey all local laws.
Always keep your hands free to
operate the vehicle while driving. Your
first consideration while driving
should be road safety. Only operate
the headset or car cradle if it is safe to
do so under all driving conditions.
Periodically check that the adhesive at
the bottom of the car cradle is firmly
attached, especially if the ambient
temperature changes a lot. It is

ENGLISH
recommended that you do not leave
the car cradle inside the vehicle in
direct sunlight or in excessive heat.
Adjust volume
The headset automatically adjusts the
volume according to ambient noise. To
manually adjust the volume, use the
volume controls of the connected
device.
The selected volume level is saved for
the device that is currently connected
to the headset.
Calls
To make a call, use your mobile device
in the normal way when the headset is
connected to it.
To redial the number you last called (if
your mobile device supports this
feature with the headset), when no
call is in progress, press the
multifunction key twice when the
headset is not in the clip or car cradle.
To activate voice dialling (if your
mobile device supports this feature
with the headset), when no call is in
progress, press and hold the
multifunction key for about 2 seconds
when the headset is not in the clip or
cradle. Proceed as described in the
user guide of the mobile device.
To answer a call, remove the headset
from the clip or cradle. If the headset
is not in the clip or cradle, press the
multifunction key. To reject a call,
press the multifunction key twice, or
place the headset into the clip or
cradle.
To end a call, place the headset into
the clip or cradle, or press the
multifunction key when the headset is
not in the clip or cradle.
To switch a call between the headset
and a compatible connected device,
press and hold the multifunction key
for about 2 seconds.

ENGLISH
Connect to two devices
The headset can be connected to two
devices at the same time.
Pair and connect to two devices
To pair the headset with two devices,
switch on the headset, activate
pairing mode, and pair it with the first
device. Switch off the headset,
activate pairing mode, and pair it with
the second device.
To connect the headset to the two
devices, switch the headset off and
back on.
Handle calls
If the headset can connect to two
devices at the same time and you use
redialling or voice dialling, the call is
made on the device that you last used
to make a call when the headset was
connected to it.
To answer a call on one connected
device and end the active call on the
other device, press the multifunction
key.
To answer a call on one connected
device and put the active call on hold
on the other device, press and hold the
multifunction key for about 2 seconds.
To end the active call on one
connected device and make the call
on hold active on the other device,
press the multifunction key.
To switch between the active call on
one device and the call on hold on the
other device, press and hold the
multifunction key for about 2 seconds.
Activate or deactivate voice
prompts
Make sure the headset is switched off
and not placed in the clip or car
cradle. Press and hold the
multifunction key for about 5 seconds,

ENGLISH
and press and hold the multifunction
key again for about 2 seconds.
When you activate the prompts, the
green indicator light flashes once.
When you deactivate the prompts, the
yellow light flashes once. In both
cases, there is also an audible
notification.
Clear pairings
To clear the pairings from the headset,
switch off the headset, and press and
hold the multifunction key for about 8
seconds. The headset beeps twice, the
red and green indicator lights
alternate, and the headset enters
pairing mode.
Troubleshooting
If you cannot connect the headset to
your compatible device, make sure the
headset is charged, switched on, and
paired with the device.
Battery and charger information
This device has an internal,
nonremovable, rechargeable battery. Do
not attempt to remove the battery from
the device as you may damage the
device. This device is intended for use
when supplied with power from the
following chargers: AC-3, AC-4, AC-5,
AC-8, DC-4 and DC-9. The exact charger
model number may vary depending on
the type of plug. The plug variant is
identified by one of the following: E, X,
AR, U, A, C, K, or B. The battery can be
charged and discharged hundreds of
times, but it will eventually wear out.
Talk and standby times are estimates
only. Actual times are affected by, for
example, device settings, features being
used, battery condition, and temperature.

ENGLISH
If the battery has not been used for a
long time, to begin charging, you may
need to connect the charger, then
disconnect and reconnect it.
If the battery is completely discharged, it
may take several minutes before the
charging indicator is displayed.
When your charger is not in use, unplug
it from the electrical plug and the device.
Do not leave a fully charged battery
connected to a charger, as overcharging
may shorten the battery's lifetime. If left
unused, a fully charged battery will lose
its charge over time.
Always keep the battery between 15°C
and 25°C (59°F and 77°F). Extreme
temperatures reduce the capacity and
lifetime of the battery. A device with a
hot or cold battery may not work
temporarily.
Do not dispose of batteries in a fire as
they may explode. Dispose of batteries
according to local regulations. Recycle
when possible. Do not dispose as
household waste.
Use the charger for its intended purpose
only. Improper use or use of unapproved
chargers may present a risk of fire,
explosion, or other hazard, and may
invalidate any approval or warranty. If
you believe the charger is damaged, take
it to a service centre for inspection before
continuing to use it. Never use a
damaged charger. Only use the charger
indoors.
Take care of your device
Handle your device, charger and
accessories with care. The following
suggestions help you protect your
warranty coverage.
• Keep the device dry. Precipitation,
humidity, and all types of liquids or
moisture can contain minerals that
corrode electronic circuits. If your
ENGLISH
device gets wet, allow it to dry
completely.
• Do not use or store the device in dusty
or dirty areas. Moving parts and
electronic components can be
damaged.
• Do not store the device in high
temperatures. High temperatures can
shorten the life of the device, damage
the battery, and warp or melt plastics.
• Do not store the device in cold
temperatures. When the device
warms to its normal temperature,
moisture can form inside the device
and damage electronic circuits.
• Do not attempt to open the device.
• Do not drop, knock, or shake the
device. Rough handling can break
internal circuit boards and
mechanics.
• Only use a soft, clean, dry cloth to
clean the surface of the device.
• Do not paint the device. Paint can
clog the moving parts and prevent
proper operation.
Recycle
Always return your used electronic
products, batteries, and packaging
materials to dedicated collection points.
This way you help prevent uncontrolled
waste disposal and promote the recycling
of materials. Check product
environmental information and how to
recycle your Nokia products at
www.nokia.com/werecycle, or with a
mobile device, www.nokia.mobi/
werecycle.
The crossed-out wheeled-bin
symbol on your product, battery,
literature, or packaging reminds
you that all electrical and
electronic products, batteries,
and accumulators must be taken to
separate collection at the end of their
working life. This requirement applies in
the European Union. Do not dispose of
these products as unsorted municipal

ENGLISH
waste. For more information on the
environmental attributes of your device,
see www.nokia.com/ecodeclaration.
FCC/Industry Canada notice
This device complies with Part 15 of the FCC
Rules. Operation is subject to the following
two conditions: 1. This device may not cause
harmful interference; and 2. This device
must accept any interference received,
including interference that may cause
undesired operation. This equipment has
been tested and found to comply with the
limits for a Class B digital device, pursuant to
Part 15 of the FCC Rules. These limits are
designed to provide reasonable protection
against harmful interference in a residential
installation. This equipment generates, uses
and can radiate radio frequency energy and,
if not installed and used in accordance with
the instructions, may cause harmful
interference to radio communications.
However, there is no guarantee that
interference will not occur in a particular
installation. If this equipment does cause
harmful interference to radio or television
reception, which can be determined by
turning the equipment off and on, the user is
encouraged to try to correct the interference
by one or more of the following measures:
Reorient or relocate the receiving antenna.
Increase the separation between the
equipment and receiver. Connect the
equipment into an outlet on a circuit
different from that to which the receiver is
connected. Consult the dealer or an
experienced radio/TV technician for help.
NOTE: FCC Radiation Exposure Statement:
This equipment complies with FCC radiation
exposure limits set forth for an uncontrolled
environment. This transmitter must not be
co-located or operating in conjunction with
any other antenna or transmitter. NOTE:
Changes or modifications not expressly
approved by Nokia could void the user's
authority to operate the equipment.