Microsoft NHL-9 GSM 900/1800/1900 Cellular Telephone w/Bluetooth User Manual Manual 1
Microsoft Mobile Oy GSM 900/1800/1900 Cellular Telephone w/Bluetooth Manual 1
UserManual.wiki
>
Microsoft
>
NHL-9 User Manual
>
Manual 1
Contents
1.
Manual 1
2.
Manual 2
Manual 1
Navigation menu
Upload a User Manual
Namespaces
Wiki Guide
HTML
PDF
Info
Views
User Manual
Discussion / Help
Navigation
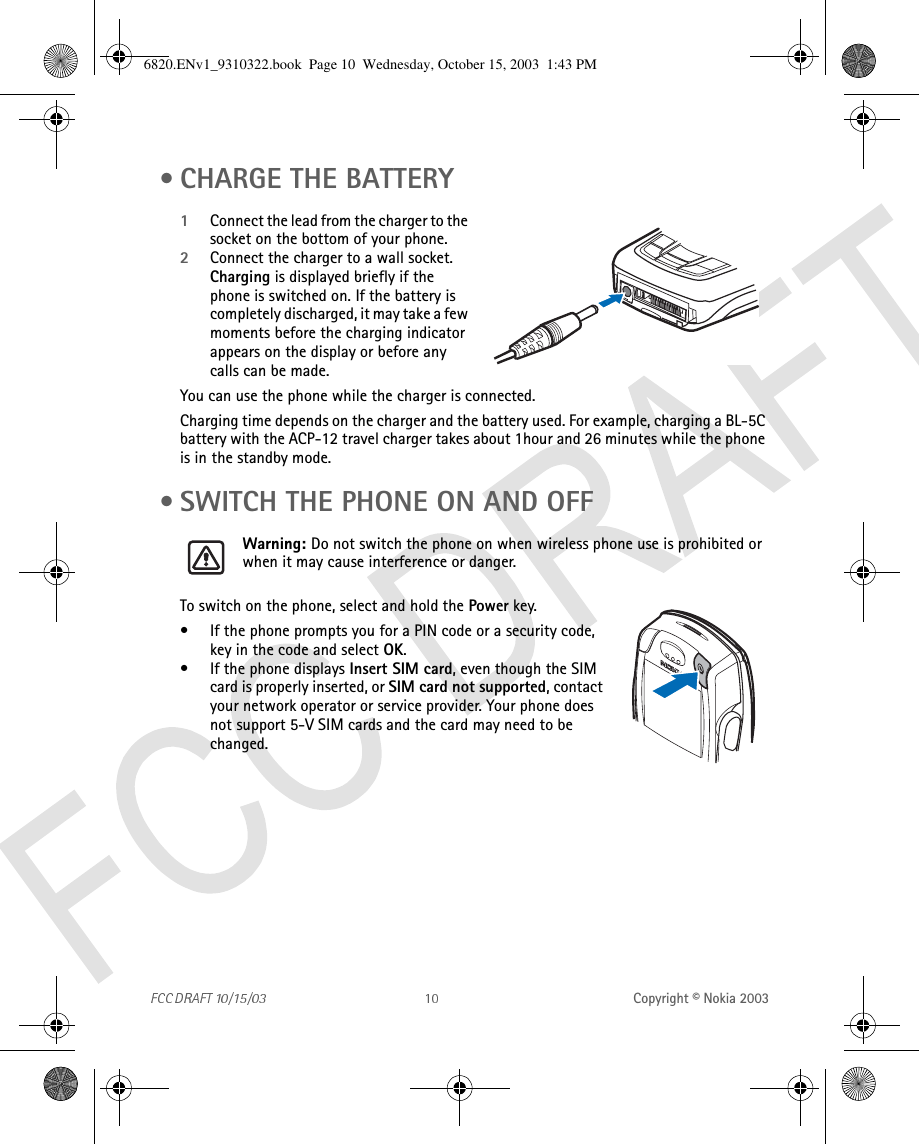
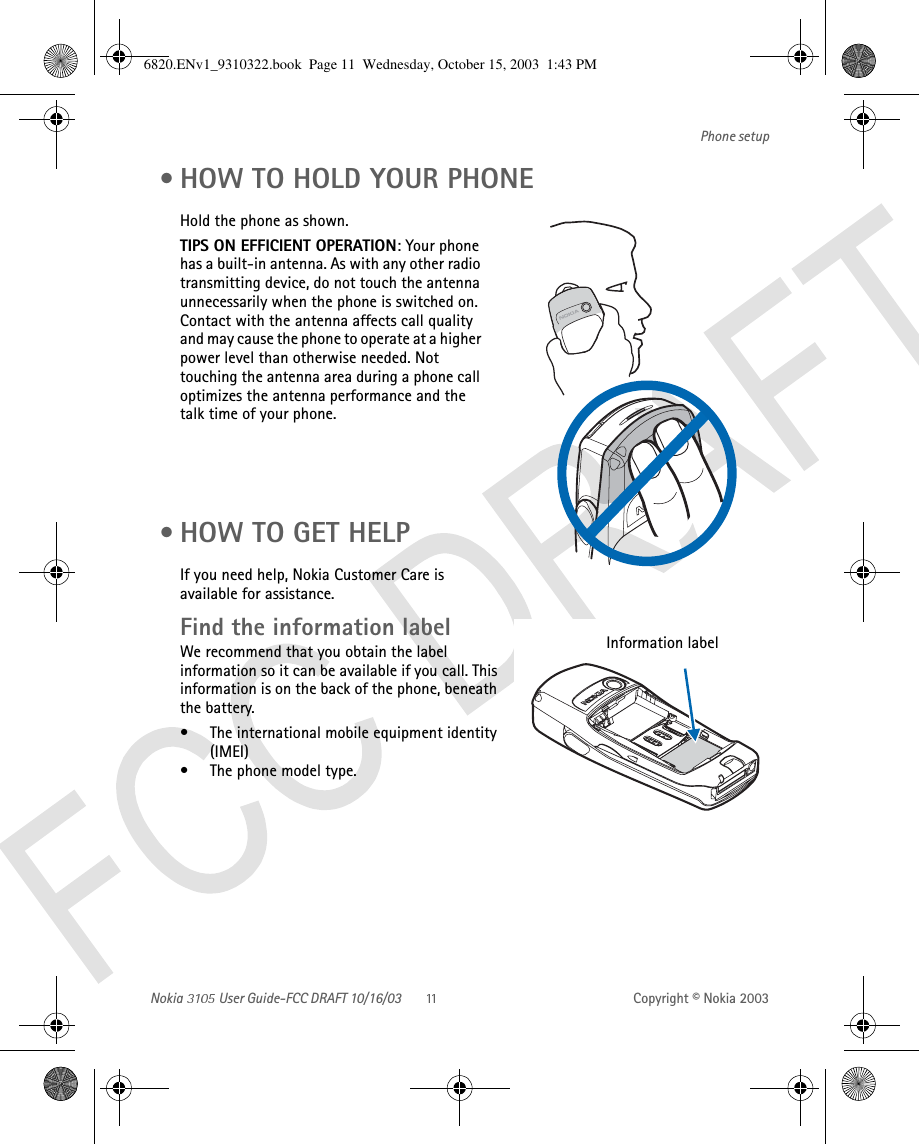
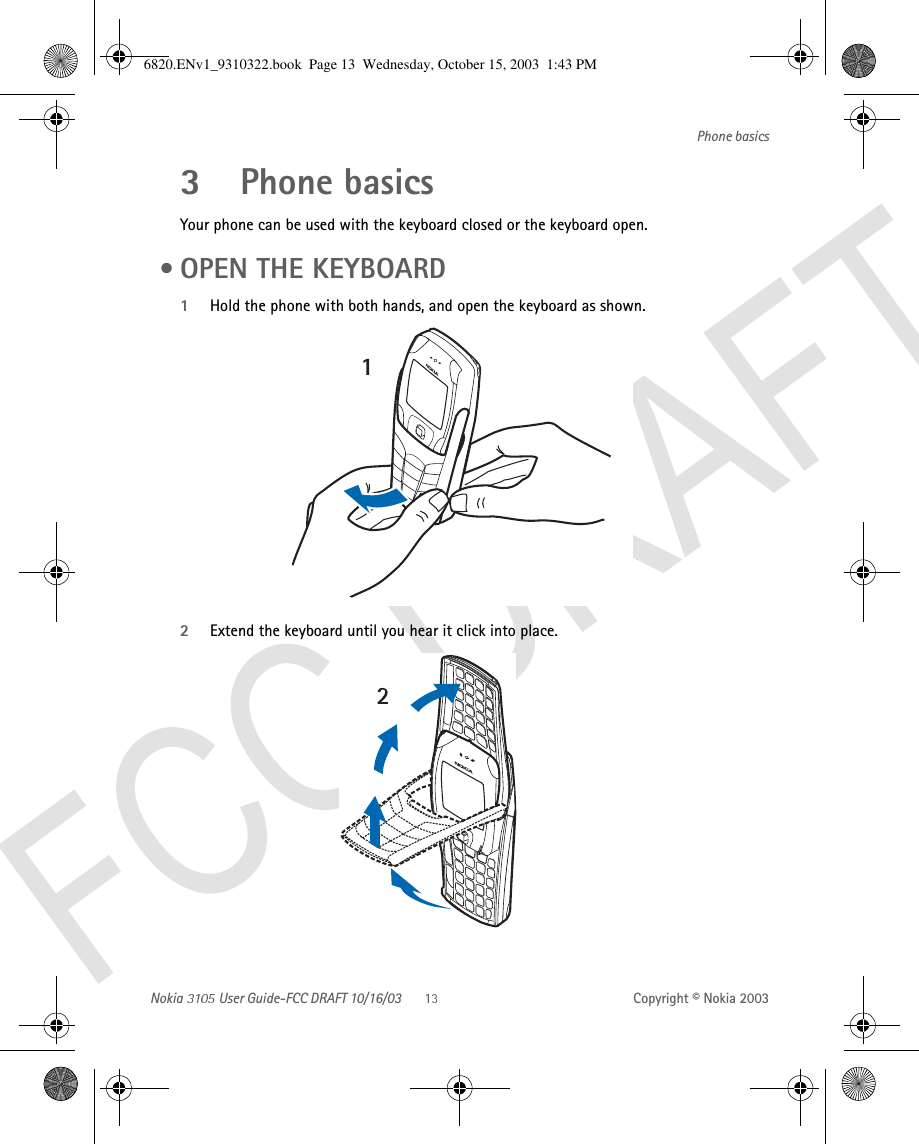
![[ i ]For your safety . . . . . . . . . . . . . . . . . . . . . . . . . . . . . . . . . . 1Quick Guide. . . . . . . . . . . . . . . . . . . . . . . . . . . . . . . . . . . . . 41 Welcome to Nokia . . . . . . . . . . . . . . . . . . . . . . . . . . . . . . . .5About your phone . . . . . . . . . . . . . . . . . . . . . . . . . . . . . . . . . . . . . . . . . . . .5Overview of phone functions . . . . . . . . . . . . . . . . . . . . . . . . . . . . . . . . . . .5Register your phone . . . . . . . . . . . . . . . . . . . . . . . . . . . . . . . . . . . . . . . . . .6Network services . . . . . . . . . . . . . . . . . . . . . . . . . . . . . . . . . . . . . . . . . . . . .6Accessibility solutions . . . . . . . . . . . . . . . . . . . . . . . . . . . . . . . . . . . . . . . . .7Shared memory . . . . . . . . . . . . . . . . . . . . . . . . . . . . . . . . . . . . . . . . . . . . . .72 Phone setup. . . . . . . . . . . . . . . . . . . . . . . . . . . . . . . . . . . . .8Connectors . . . . . . . . . . . . . . . . . . . . . . . . . . . . . . . . . . . . . . . . . . . . . . . . . .8Install SIM card and battery . . . . . . . . . . . . . . . . . . . . . . . . . . . . . . . . . . . .8Charge the battery. . . . . . . . . . . . . . . . . . . . . . . . . . . . . . . . . . . . . . . . . . .10Switch the phone on and off . . . . . . . . . . . . . . . . . . . . . . . . . . . . . . . . . .10How to hold your phone . . . . . . . . . . . . . . . . . . . . . . . . . . . . . . . . . . . . . .11How to get help . . . . . . . . . . . . . . . . . . . . . . . . . . . . . . . . . . . . . . . . . . . . .113 Phone basics . . . . . . . . . . . . . . . . . . . . . . . . . . . . . . . . . . .13Open the keyboard. . . . . . . . . . . . . . . . . . . . . . . . . . . . . . . . . . . . . . . . . . .13Key functions (keyboard closed). . . . . . . . . . . . . . . . . . . . . . . . . . . . . . . .15Key functions (keyboard open) . . . . . . . . . . . . . . . . . . . . . . . . . . . . . . . . .16About the four-way joystick. . . . . . . . . . . . . . . . . . . . . . . . . . . . . . . . . . .17The standby mode . . . . . . . . . . . . . . . . . . . . . . . . . . . . . . . . . . . . . . . . . . .17Customize the Go to menu . . . . . . . . . . . . . . . . . . . . . . . . . . . . . . . . . . . .18Switch the keyboard lights on or off . . . . . . . . . . . . . . . . . . . . . . . . . . . .18Keypad lock (keyguard) . . . . . . . . . . . . . . . . . . . . . . . . . . . . . . . . . . . . . . .21Over-the-air settings service . . . . . . . . . . . . . . . . . . . . . . . . . . . . . . . . . .224 Call functions . . . . . . . . . . . . . . . . . . . . . . . . . . . . . . . . . .23Make a call. . . . . . . . . . . . . . . . . . . . . . . . . . . . . . . . . . . . . . . . . . . . . . . . .23Answer or reject an incoming call . . . . . . . . . . . . . . . . . . . . . . . . . . . . . .24Active call options . . . . . . . . . . . . . . . . . . . . . . . . . . . . . . . . . . . . . . . . . . .255 Text Entry . . . . . . . . . . . . . . . . . . . . . . . . . . . . . . . . . . . . .266820.ENv1_9310322.book Page i Wednesday, October 15, 2003 1:43 PM](https://usermanual.wiki/Microsoft/NHL-9.Manual-1/User-Guide-371860-Page-3.png)
![[ ii ]Write text with keyboard open . . . . . . . . . . . . . . . . . . . . . . . . . . . . . . . . 26Write text with keyboard closed. . . . . . . . . . . . . . . . . . . . . . . . . . . . . . . 276 The menu . . . . . . . . . . . . . . . . . . . . . . . . . . . . . . . . . . . . . 29Scroll to a menu function . . . . . . . . . . . . . . . . . . . . . . . . . . . . . . . . . . . . 29Use a shortcut to access a menu function. . . . . . . . . . . . . . . . . . . . . . . 297 Messages . . . . . . . . . . . . . . . . . . . . . . . . . . . . . . . . . . . . . 30Text messages (SMS) . . . . . . . . . . . . . . . . . . . . . . . . . . . . . . . . . . . . . . . . 30Archive folder and custom folders . . . . . . . . . . . . . . . . . . . . . . . . . . . . . 33Text and picture templates . . . . . . . . . . . . . . . . . . . . . . . . . . . . . . . . . . . 33Manage distribution lists . . . . . . . . . . . . . . . . . . . . . . . . . . . . . . . . . . . . 33Text message counter . . . . . . . . . . . . . . . . . . . . . . . . . . . . . . . . . . . . . . . 34Multimedia messages . . . . . . . . . . . . . . . . . . . . . . . . . . . . . . . . . . . . . . . 34Delete messages. . . . . . . . . . . . . . . . . . . . . . . . . . . . . . . . . . . . . . . . . . . . 37E-mail messages . . . . . . . . . . . . . . . . . . . . . . . . . . . . . . . . . . . . . . . . . . . 38Instant messaging . . . . . . . . . . . . . . . . . . . . . . . . . . . . . . . . . . . . . . . . . . 40Voice messages . . . . . . . . . . . . . . . . . . . . . . . . . . . . . . . . . . . . . . . . . . . . 44Info messages. . . . . . . . . . . . . . . . . . . . . . . . . . . . . . . . . . . . . . . . . . . . . . 45Message settings . . . . . . . . . . . . . . . . . . . . . . . . . . . . . . . . . . . . . . . . . . . 45Settings for e-mail. . . . . . . . . . . . . . . . . . . . . . . . . . . . . . . . . . . . . . . . . . 46Font size setting. . . . . . . . . . . . . . . . . . . . . . . . . . . . . . . . . . . . . . . . . . . . 47Service commands . . . . . . . . . . . . . . . . . . . . . . . . . . . . . . . . . . . . . . . . . . 488 Call register . . . . . . . . . . . . . . . . . . . . . . . . . . . . . . . . . . . 49Recent calls lists . . . . . . . . . . . . . . . . . . . . . . . . . . . . . . . . . . . . . . . . . . . 49Timers and counters. . . . . . . . . . . . . . . . . . . . . . . . . . . . . . . . . . . . . . . . . 499 Contacts . . . . . . . . . . . . . . . . . . . . . . . . . . . . . . . . . . . . . . 51Contacts settings . . . . . . . . . . . . . . . . . . . . . . . . . . . . . . . . . . . . . . . . . . . 51Add contacts . . . . . . . . . . . . . . . . . . . . . . . . . . . . . . . . . . . . . . . . . . . . . . 51Search for a contact . . . . . . . . . . . . . . . . . . . . . . . . . . . . . . . . . . . . . . . . 52Delete contacts . . . . . . . . . . . . . . . . . . . . . . . . . . . . . . . . . . . . . . . . . . . . 53Edit or delete details in contacts . . . . . . . . . . . . . . . . . . . . . . . . . . . . . . 53My presence . . . . . . . . . . . . . . . . . . . . . . . . . . . . . . . . . . . . . . . . . . . . . . . 54Copy contacts. . . . . . . . . . . . . . . . . . . . . . . . . . . . . . . . . . . . . . . . . . . . . . 566820.ENv1_9310322.book Page ii Wednesday, October 15, 2003 1:43 PM](https://usermanual.wiki/Microsoft/NHL-9.Manual-1/User-Guide-371860-Page-4.png)
![[ iii ]Send and receive business cards . . . . . . . . . . . . . . . . . . . . . . . . . . . . . . .56Speed dial. . . . . . . . . . . . . . . . . . . . . . . . . . . . . . . . . . . . . . . . . . . . . . . . . .57Voice dial . . . . . . . . . . . . . . . . . . . . . . . . . . . . . . . . . . . . . . . . . . . . . . . . . .57save numbers on the SIM card . . . . . . . . . . . . . . . . . . . . . . . . . . . . . . . . .58Caller groups . . . . . . . . . . . . . . . . . . . . . . . . . . . . . . . . . . . . . . . . . . . . . . .5910 Settings. . . . . . . . . . . . . . . . . . . . . . . . . . . . . . . . . . . . . . .60Profiles . . . . . . . . . . . . . . . . . . . . . . . . . . . . . . . . . . . . . . . . . . . . . . . . . . . .60Chat and my presence settings . . . . . . . . . . . . . . . . . . . . . . . . . . . . . . . .60Tone settings . . . . . . . . . . . . . . . . . . . . . . . . . . . . . . . . . . . . . . . . . . . . . . .61Display settings . . . . . . . . . . . . . . . . . . . . . . . . . . . . . . . . . . . . . . . . . . . . .61Time and date settings . . . . . . . . . . . . . . . . . . . . . . . . . . . . . . . . . . . . . . .62Personal shortcuts . . . . . . . . . . . . . . . . . . . . . . . . . . . . . . . . . . . . . . . . . . .63Connectivity . . . . . . . . . . . . . . . . . . . . . . . . . . . . . . . . . . . . . . . . . . . . . . . .63EGPRS modem settings . . . . . . . . . . . . . . . . . . . . . . . . . . . . . . . . . . . . . . .67Call settings . . . . . . . . . . . . . . . . . . . . . . . . . . . . . . . . . . . . . . . . . . . . . . . .67Phone settings . . . . . . . . . . . . . . . . . . . . . . . . . . . . . . . . . . . . . . . . . . . . . .68Enhancement settings. . . . . . . . . . . . . . . . . . . . . . . . . . . . . . . . . . . . . . . .69Security settings . . . . . . . . . . . . . . . . . . . . . . . . . . . . . . . . . . . . . . . . . . . .69Restore factory settings . . . . . . . . . . . . . . . . . . . . . . . . . . . . . . . . . . . . . .7111 Gallery. . . . . . . . . . . . . . . . . . . . . . . . . . . . . . . . . . . . . . . .7212 Camera . . . . . . . . . . . . . . . . . . . . . . . . . . . . . . . . . . . . . . .74Camera settings . . . . . . . . . . . . . . . . . . . . . . . . . . . . . . . . . . . . . . . . . . . . .74Take a photo. . . . . . . . . . . . . . . . . . . . . . . . . . . . . . . . . . . . . . . . . . . . . . . .74Record a video clip . . . . . . . . . . . . . . . . . . . . . . . . . . . . . . . . . . . . . . . . . .7513 Organizer. . . . . . . . . . . . . . . . . . . . . . . . . . . . . . . . . . . . . .76Alarm clock . . . . . . . . . . . . . . . . . . . . . . . . . . . . . . . . . . . . . . . . . . . . . . . .76Calendar . . . . . . . . . . . . . . . . . . . . . . . . . . . . . . . . . . . . . . . . . . . . . . . . . . .76To-do list . . . . . . . . . . . . . . . . . . . . . . . . . . . . . . . . . . . . . . . . . . . . . . . . . .78Notes . . . . . . . . . . . . . . . . . . . . . . . . . . . . . . . . . . . . . . . . . . . . . . . . . . . . .78Wallet . . . . . . . . . . . . . . . . . . . . . . . . . . . . . . . . . . . . . . . . . . . . . . . . . . . . .79Synchronization . . . . . . . . . . . . . . . . . . . . . . . . . . . . . . . . . . . . . . . . . . . . .8114 Applications . . . . . . . . . . . . . . . . . . . . . . . . . . . . . . . . . . .846820.ENv1_9310322.book Page iii Wednesday, October 15, 2003 1:43 PM](https://usermanual.wiki/Microsoft/NHL-9.Manual-1/User-Guide-371860-Page-5.png)
![[ iv ]Games . . . . . . . . . . . . . . . . . . . . . . . . . . . . . . . . . . . . . . . . . . . . . . . . . . . . 84Applications . . . . . . . . . . . . . . . . . . . . . . . . . . . . . . . . . . . . . . . . . . . . . . . 85Extras . . . . . . . . . . . . . . . . . . . . . . . . . . . . . . . . . . . . . . . . . . . . . . . . . . . . 8615 Services . . . . . . . . . . . . . . . . . . . . . . . . . . . . . . . . . . . . . . 89Main steps for using services . . . . . . . . . . . . . . . . . . . . . . . . . . . . . . . . . 89How to set up the phone for a service . . . . . . . . . . . . . . . . . . . . . . . . . . 8916 SIM services . . . . . . . . . . . . . . . . . . . . . . . . . . . . . . . . . . . 9517 PC Connectivity. . . . . . . . . . . . . . . . . . . . . . . . . . . . . . . . . 96PC Suite . . . . . . . . . . . . . . . . . . . . . . . . . . . . . . . . . . . . . . . . . . . . . . . . . . 96Data communications applications . . . . . . . . . . . . . . . . . . . . . . . . . . . . 9718 Enhancements. . . . . . . . . . . . . . . . . . . . . . . . . . . . . . . . . . 98Safety . . . . . . . . . . . . . . . . . . . . . . . . . . . . . . . . . . . . . . . . . . . . . . . . . . . . 98Enhancements for your phone . . . . . . . . . . . . . . . . . . . . . . . . . . . . . . . . 9819 Reference Information. . . . . . . . . . . . . . . . . . . . . . . . . . . 100Battery information . . . . . . . . . . . . . . . . . . . . . . . . . . . . . . . . . . . . . . . . 100Care and maintenance. . . . . . . . . . . . . . . . . . . . . . . . . . . . . . . . . . . . . . 101Traffic safety. . . . . . . . . . . . . . . . . . . . . . . . . . . . . . . . . . . . . . . . . . . . . . 101Operating environment . . . . . . . . . . . . . . . . . . . . . . . . . . . . . . . . . . . . . 101Electronic devices . . . . . . . . . . . . . . . . . . . . . . . . . . . . . . . . . . . . . . . . . 102Potentially explosive environments . . . . . . . . . . . . . . . . . . . . . . . . . . . 103Vehicles. . . . . . . . . . . . . . . . . . . . . . . . . . . . . . . . . . . . . . . . . . . . . . . . . . 103Emergency calls . . . . . . . . . . . . . . . . . . . . . . . . . . . . . . . . . . . . . . . . . . . 10420 Technical information . . . . . . . . . . . . . . . . . . . . . . . . . . . 10621 Nokia One-Year Limited Warranty . . . . . . . . . . . . . . . . . . 107Appendix A Message from the CTIA. . . . . . . . . . . . . . . . . 113Appendix B Message from the FDA . . . . . . . . . . . . . . . . . 117Index . . . . . . . . . . . . . . . . . . . . . . . . . . . . . . . . . . . . . . . 1236820.ENv1_9310322.book Page iv Wednesday, October 15, 2003 1:43 PM](https://usermanual.wiki/Microsoft/NHL-9.Manual-1/User-Guide-371860-Page-6.png)