Microsoft NPM-2NX Dual band, quadri mode cellular telephone User Manual en6340 ug 1 4title
Microsoft Mobile Oy Dual band, quadri mode cellular telephone en6340 ug 1 4title
UserManual.wiki
>
Microsoft
>
NPM-2NX User Manual
>
Users Guide
Contents
1.
Users Guide
2.
Revised user guide text
Users Guide
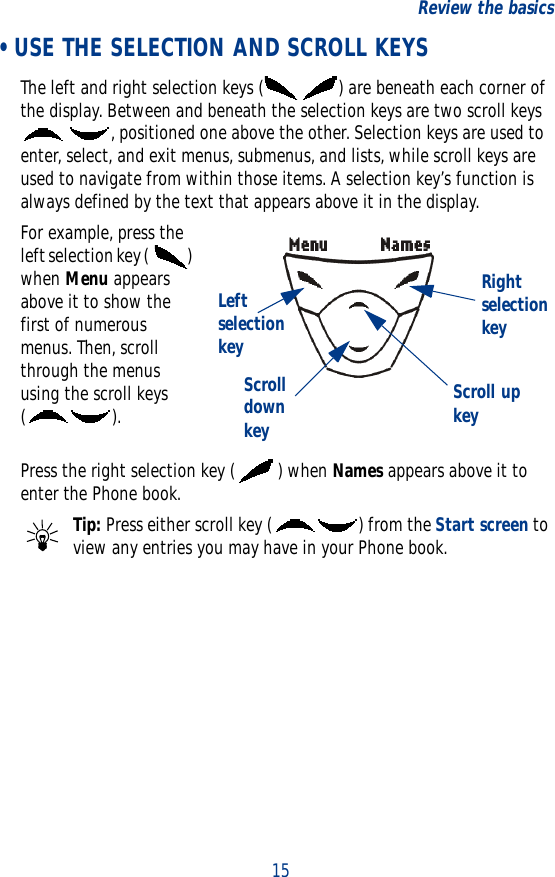
Navigation menu
Upload a User Manual
Namespaces
Wiki Guide
HTML
PDF
Info
Views
User Manual
Discussion / Help
Navigation
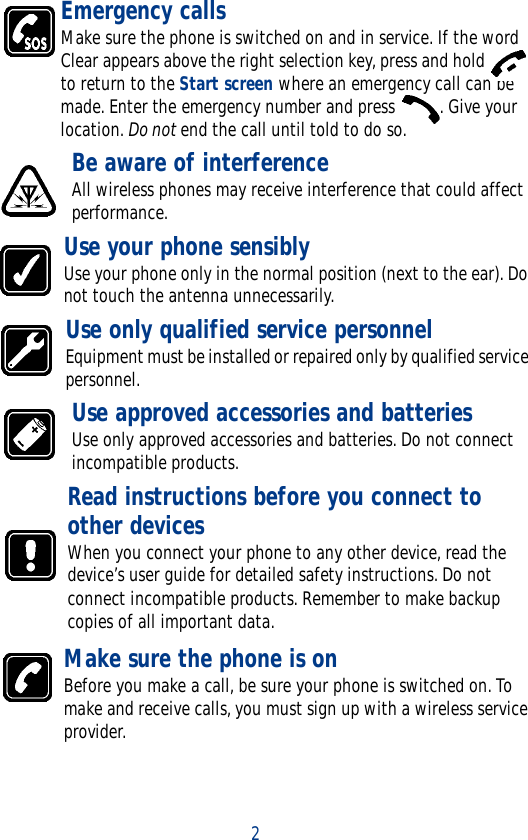
![Phone notesMy [Model] informationInformation sourceMy number Wireless providerPhone serial number (ESN) On back of your phone, beneath the batteryIMEIVoicemail number Wireless providerWireless provider customer care Wireless providerMessage center number Wireless providerDefault recipient number (also known as the e-mail gateway)Wireless provider](https://usermanual.wiki/Microsoft/NPM-2NX.Users-Guide/User-Guide-219697-Page-1.png)
![The wireless phone described in this guide is approved for use in GSM, TDMA, and AMPS networks.LEGAL INFORMATIONPart No. _________, Issue No. ___©2001 Nokia Mobile Phones. All rights reserved.Nokia is a registered trademark of Nokia Corporation.Printed in Canada __/2001Nokia, Nokia Connecting People and the Original Accessories logos are trademarks of Nokia Corporation and/or its affiliates.US Patent No 5818437 and other pending patents.T9 text input software Copyright ©1999-2001. Tegic Communications, Inc. All rights reserved.Includes RSA BSAFE cryptographic or security protocol software from RSA Security. The information contained in this user guide was written for Nokia phone [Model]. The right to make changes and improvements to any of the products described in this guide without prior notice is reserved.EXPORT CONTROLSThis product contains commodities, technology or software exported from the United States in accordance with the Export Administration regulations. Diversion contrary to U.S. law is prohibited.FCC/INDUSTRY CANADA NOTICEYour phone may cause TV or radio interference (for example, when using a telephone in close proximity to receiving equipment). The FCC or Industry Canada can require you to stop using your telephone if such interference cannot be eliminated. If you require assistance, contact your local service facility. This device complies with part 15 of the FCC rules. Operation is subject to the condition that this device does not cause harmful interference.](https://usermanual.wiki/Microsoft/NPM-2NX.Users-Guide/User-Guide-219697-Page-2.png)
![iContents1 Safety first . . . . . . . . . . . 1Safety guidelines . . . . . . . . . 1Quick guide to functions . . 3Menu shortcuts . . . . . . . . . . 42 Welcome to Nokia . . . . . . 5Get the most out of this guide . . . . . . . . . 5Sign up with a wireless provider . . . . . . . 6Before you contact Nokia . . . . . . . . . . . 6About the antenna . . . . . . . 73 Review the basics . . . . . . 8An illustrated view of the [Model] . . . . . . 8Remove the back cover . . . . 9Install the SIM card . . . . . . 9Install the battery . . . . . . . . 9Charge the battery . . . . . .10Remove the battery . . . . .11Important battery information . . . . .12Switch on the phone . . . .12The Start screen . . . . . . . .13Use the selection and scroll keys . .15Adjust call volume . . . . . .16Make and answer calls . . .16Help text . . . . . . . . . . . . . .17Navigate your phone’s menus . . . . . . . . . 17Menu shortcuts . . . . . . . . 194 Your phone’s keypad . . . 23Enter characters and numbers . 235 Phone book . . . . . . . . . . 26Open the Phone book . . . . 26Customize your Phone book . . . . . . . . 30Caller groups . . . . . . . . . . . 30Your phone’s memory . . . 31Copy Phone book entries . 33Business cards . . . . . . . . . 34View service numbers . . . 35Call Log . . . . . . . . . . . . . . . 356 Use voicemail . . . . . . . . 40Save your voice mailbox number . . . 40Call and setup your voicemail . . . . 40Automate voicemail with dialing codes . . . . . . 417 Advanced features . . . . . 43In-call options . . . . . . . . . 43Call waiting . . . . . . . . . . . . 45Call forwarding . . . . . . . . . 46Voice dial . . . . . . . . . . . . . 48Voice command . . . . . . . . 50Voice Recorder . . . . . . . . . 51](https://usermanual.wiki/Microsoft/NPM-2NX.Users-Guide/User-Guide-219697-Page-5.png)
![ii1-touch dialing . . . . . . . . .53International dialing . . . . .548 Customize your phone . . 55Set the display language .55Profiles . . . . . . . . . . . . . . . .55Audio settings . . . . . . . . . .58Download a ringing tone .59Accessibility solutions . . . .60For TTY Users . . . . . . . . . . .61Optional headset . . . . . . . .639 Manage phone security . 64Lock and unlock the keypad . . . . . . .64Security levels . . . . . . . . . .64Fixed dialing . . . . . . . . . . .65Access codes . . . . . . . . . . .6510 Messages . . . . . . . . . . . 69Tips for composing a message . . . .70Write and send a message 71Read messages . . . . . . . . .72E-mail . . . . . . . . . . . . . . . . .73Compose and send e-mail 75Picture messages . . . . . . . .75Templates . . . . . . . . . . . . . .77Organize yourmessages with folders . . .79Erase messages . . . . . . . . .81Predictive text . . . . . . . . . .8211 Your personal organizer 84Wallet . . . . . . . . . . . . . . . . .84Create a wallet card . . . . .86Calendar . . . . . . . . . . . . . . 90Set the time and date . . . 94Alarm clock . . . . . . . . . . . . 95Use the Calculator . . . . . . 9712 Your phone and other devices . . . . . 99Infrared basics . . . . . . . . . 99Send and receive information . . . . 100PC Connectivity . . . . . . . 10113 The wireless Internet . 103The Services menu . . . . . 103WAP settings . . . . . . . . . 104Launch the browser . . . . 10414 Fun and games . . . . . 110Games main menu . . . . . 110Start a game . . . . . . . . . . 11115 Accessories . . . . . . . . 11216 Reference information 115Batteries and chargers . . 115Important safety information . . . . . 11717 Care and maintenance 121Troubleshooting . . . . . . . 12218 Frequently Asked Questions (FAQ) 12319 Glossary . . . . . . . . . . . 12520 [Model] Technical information . 12921 Nokia One-YearLimited Warranty . . . . 13022 Index . . . . . . . . . . . . . 135](https://usermanual.wiki/Microsoft/NPM-2NX.Users-Guide/User-Guide-219697-Page-6.png)

![5Welcome to Nokia2Welcome to NokiaCongratulations on your purchase of the Nokia [Model] mobile phone. The [Model] can be connected to a PC, laptop, or other device using the data cable or built-in IR port. For more information, please refer to the PC Connectivity Guide, which can be downloaded from the Internet along with Nokia PC Suite as follows:1Go to www.nokia.com and click on the United States hyperlink under Mobile Phones.2Select Phones, and then PC Downloads. From there you can download the software and documentation to help integrate the [Model] with your computer • GET THE MOST OUT OF THIS GUIDEFollow graphic cluesIcons appear throughout this guide to alert you of important information or to provide useful tips.Tip: Indicates a shortcut or alternate method of doing something.Note: Explains a feature or points out an important concept.Important: Indicates critical information on using a feature.Caution: Warns you when you may lose information.Warning: Helps to avoid injury, phone, or property damage.Look for updatesFrom time to time, this guide is updated to reflect changes. The latest version may be available at Nokia’s Internet site. Go to www.nokia.com and click on the United States hyperlink under Mobile Phones. Select Phones, and then PC Downloads.](https://usermanual.wiki/Microsoft/NPM-2NX.Users-Guide/User-Guide-219697-Page-12.png)

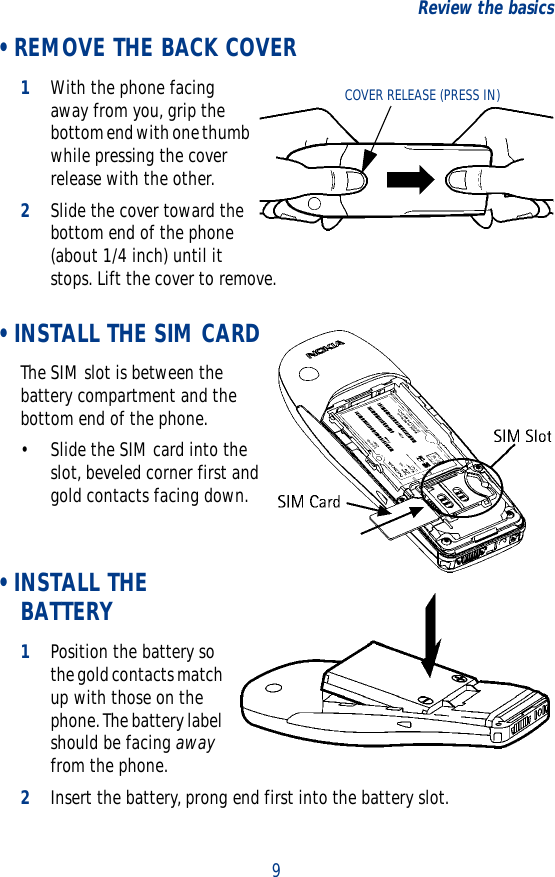
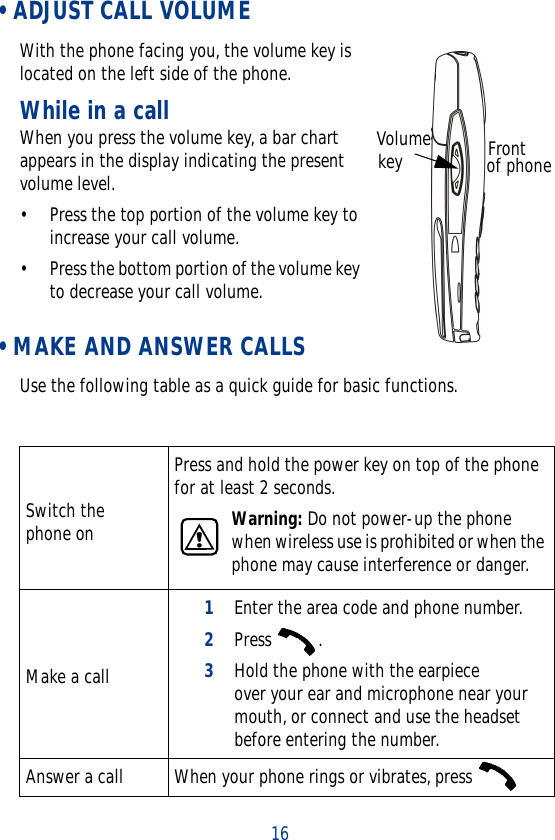
![83 Review the basics • AN ILLUSTRATED VIEW OF THE [Model]FRONTDisplay screenSelection and Scroll keys End keyTalk keyNumber keysMicrophoneEarphoneLEFT SIDEBOTTOMTOPVolume controlInternal antennaPower KeyHeadset/TTY/Data cable ConnectorCharger JackIR port](https://usermanual.wiki/Microsoft/NPM-2NX.Users-Guide/User-Guide-219697-Page-15.png)

![17Review the basics •HELP TEXTThe [Model] displays brief descriptions of most features. To do this, help text must be activated.Activate/deactivate help text1At the Start screen, press Menu 4-4-6 (Settings - Phone settings - Help text activation).2After a brief pause, On and Off appear in the display.3Scroll to On or Off and press Select. • NAVIGATE YOUR PHONE’S MENUSNavigate the menus and submenus in your phone using the scroll method or a shortcut.Use the scroll method• At the Start screen, press Menu, then page through the menus using the scroll keys ( ).End a call Press Turn Keyguard on Press Menu . With Keyguard on it’s virtually impossible to make an accidental callTurn Keyguard off Press Unlock Silence a callORDecline a callYou can mute the ringing tone of an incoming call without terminating the call. Press Silence and the ringing tone is muted. After pressing Silence, you then have the option to Decline the call](https://usermanual.wiki/Microsoft/NPM-2NX.Users-Guide/User-Guide-219697-Page-24.png)
![25Your phone’s keypadSwitch between ABC and 123 modes•Press and hold until the icon in the upper left corner of the display switches from Abc to 123 (or from 123 to Abc).Switch between uppercase and lowercase text• Press to alternate between upper case (ABC), lower case (abc), and sentence case (Abc) while in text mode.Available special characters.,‘ ? ! “ - ()@ / : _ ; +&%*=<>>£$¥¤[]{ } \~^ î ¿ § # l](https://usermanual.wiki/Microsoft/NPM-2NX.Users-Guide/User-Guide-219697-Page-32.png)
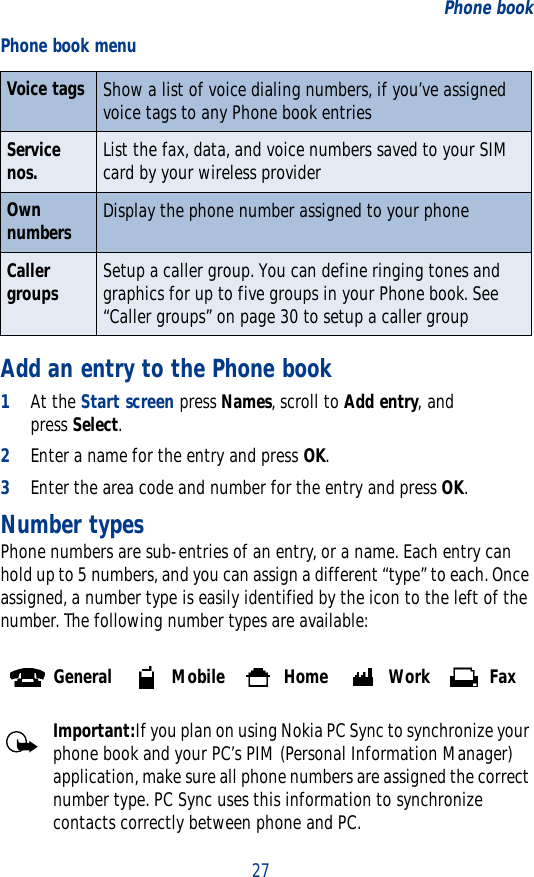
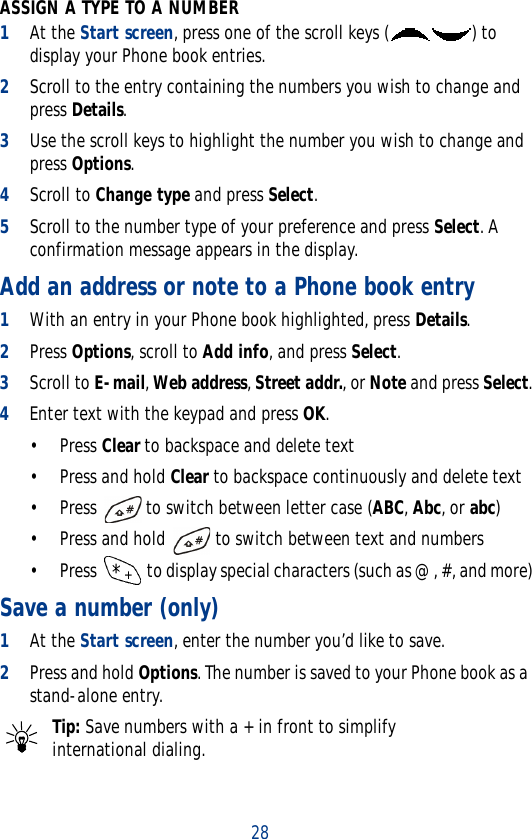
![265 Phone bookOne of the most useful features in the [Model] is its powerful Phone book. You can store up to 500 names and their associated web, e-mail, and street addresses within the Phone book. Each name, or entry as it is called, has room for up to 5 numbers of various types and 3 text entries. • OPEN THE PHONE BOOK1At the Start screen, press Names. The submenus in the following table appear in the display. Use the scroll keys ( ) to highlight an option. Press Select ( ) to activate an option or enter its submenu.Phone book menuFind Search for a name in your Phone book or list the names and select from the listAdd entry Add a new entry (name and number) to your Phone bookEdit name Edit an existing name in your Phone bookAdd number Add a number to an existing entry in your Phone bookErase Erase names and numbers in your Phone book one by one or all at onceCopy Copy entries from SIM card to Phone or vica versa. You have the option to copy entries one by one or all at onceSettings Change how you view the Phone book, check your memory status, and select which memory to use1-touch dialing Show a list of 1-touch dialing numbers, if you’ve assigned any to keys 1-9](https://usermanual.wiki/Microsoft/NPM-2NX.Users-Guide/User-Guide-219697-Page-33.png)


![51Advanced featuresFound: <command> appears in the display and the command is performed.EXECUTE A VOICE COMMAND WITH THE HEADSETAfter you’ve associated a voice tag with a command, you can execute a voice command with the optional HDC-9P headset attached.1At the Start screen, press and hold the remote button on the headset. The phone beeps and Please speak now appears in the display.2Pronounce the tag for one of the four available commands.Found: <command> appears in the display and the command is performed.Tip: You can also engage voice command by pressing and holding the down volume key on the side of the phone.Change or erase an existing voice command tag1At the Start screen, press Menu 5-2 (Voice - Voice command).2After a brief pause, the list of voice commands appear in the display.3Scroll to the command with the tag you wish to modify and press Select.4Scroll to Change or Erase and press Select.a) If you selected Change, press Start, then record the new tag.b) If you selected Erase, press OK and the selected tag is erased. • VOICE RECORDERThe [Model] can record both voice memos and phone conversations. The total of all recordings stored in your phone can’t exceed 3 minutes. If you’re running out of memory and try to record, you’re asked to erase a recording before proceeding.](https://usermanual.wiki/Microsoft/NPM-2NX.Users-Guide/User-Guide-219697-Page-58.png)
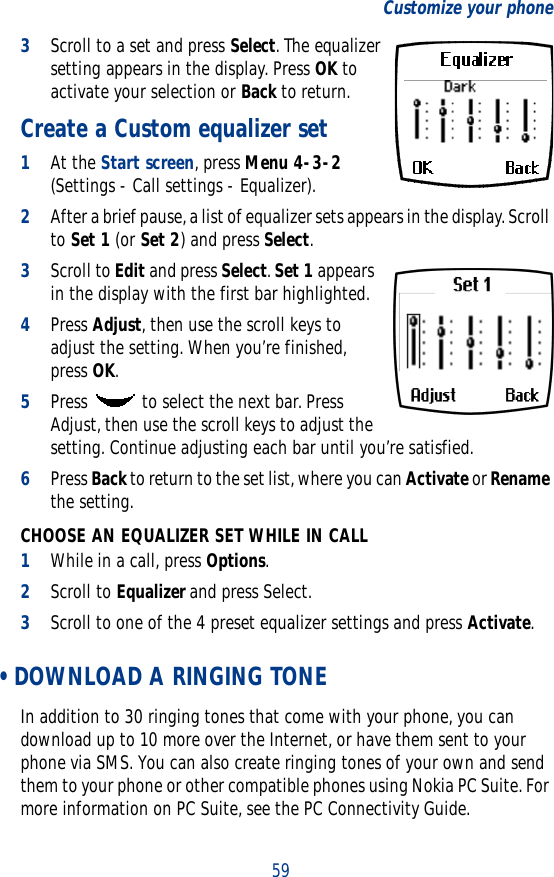
![58IF YOU SELECTED TTY/TDD•Use TTY - Enable the use of a TTY/TDD device. Scroll to Yes or No and press Select.Note: If the loopset is enabled, you’ll be asked to disable the loopset before enabling TTY/TDD. Press Yes to disable the loopset (thus enabling TTY/TDD). Press No to leave the loopset enabled. • AUDIO SETTINGSMuch like a stereo, you can customize the audio for your [Model]. Choose from a list of equalizer presets or create a custom set of your own. Choose an equalizer set1At the Start screen, press Menu 4-3-2 (Settings - Call settings - Equalizer).2After a brief pause, the following equalizer sets appear in the display.Equalizer setsNormal Switches the Equalizer offBright Amplifies higher frequenciesDark Amplifies lower frequenciesLoudness Amplifies both higher and lower, but not middle frequenciesSet 1 Customizable equalizer settingSet 2 Customizable equalizer setting](https://usermanual.wiki/Microsoft/NPM-2NX.Users-Guide/User-Guide-219697-Page-65.png)

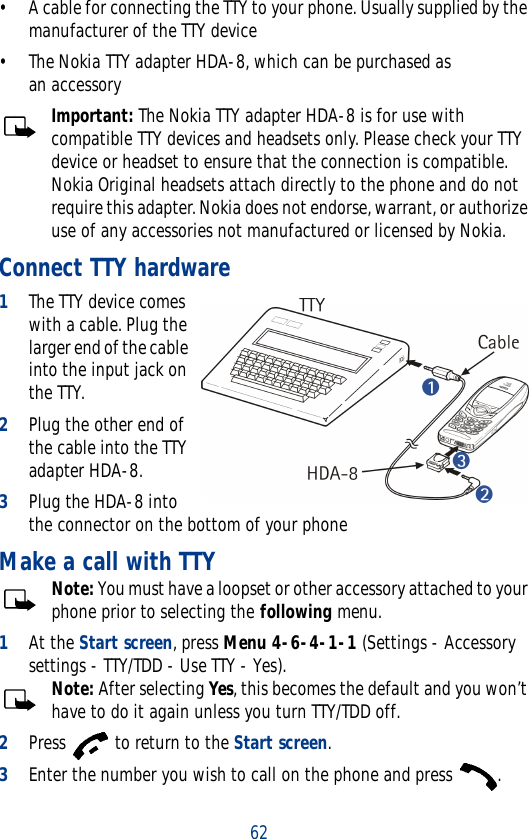
![61Customize your phoneLPS-1 Mobile Inductive LoopsetThe LPS-1 loopset gives hearing-impaired users access to digital telephony for the first time. People using a T-coil equipped hearing aid can make and receive calls without noise interference.HOW THE LOOPSET WORKSThe LPS-1 transmits sound to any hearing aid equipped with a T-coil. The sound from the phone is amplified and background noise is eliminated.Wear it around your neck, connect it to your phone, and speak directly toward the microphone on the loopset.For more details on its use, refer to the booklet that comes with the LPS-1.Note: The Loopset can be purchased separately as an accessory.Other accessibility featuresBesides an intuitive interface and TTY/TDD capabilities, other accessibility features of the [Model] include:• A nib, or raised dot on top of the five key for keypad reference• Tactile feedback whenever you press a key• The ability to send and receive short messages• 1-touch dialing • FOR TTY USERSUntil now, most mobile phones were incompatible with TTY devices while in digital mode. Your [Model] is fully compliant with TTY devices in all modes.WHAT YOU’LL NEEDIn addition to the [Model], you’ll need the following for TTY communication:• A TTY device that is “cellular ready” or “cellular compatible”](https://usermanual.wiki/Microsoft/NPM-2NX.Users-Guide/User-Guide-219697-Page-68.png)


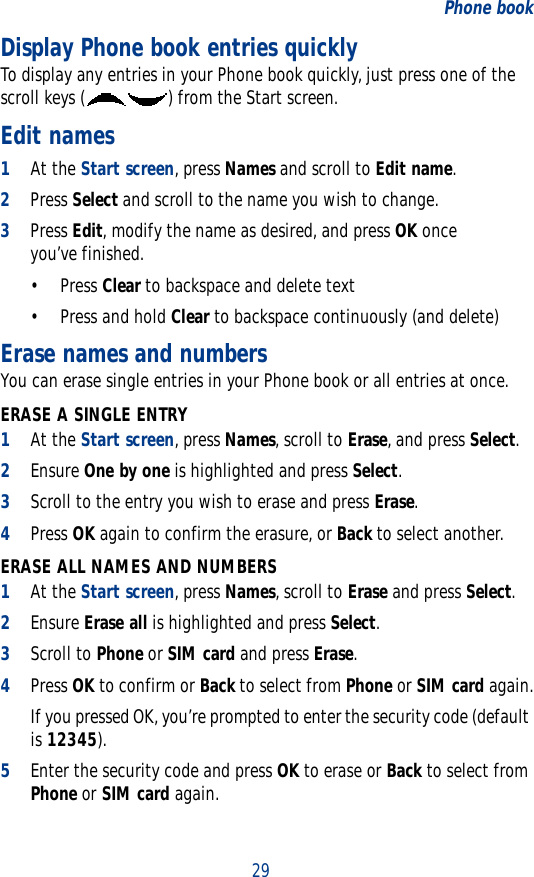
![71MessagesUse four-way scrollingNavigate special characters using the 2, 4, 6, and 8 keys much as you would a joystick. Once a character is highlighted press to insert the character into your message. • WRITE AND SEND A MESSAGE1At the Start screen, press Menu 01-1 (Messages - Write message).2After a brief pause, the message entry screen appears in the display.Special characters.,‘ ? ! “ - ()@ / : _ ; +&%*=<>>£$¥¤[]{ } \~^ î ¿ § # lScroll upScroll rightScroll leftScroll downInsert character](https://usermanual.wiki/Microsoft/NPM-2NX.Users-Guide/User-Guide-219697-Page-78.png)
![723Compose a message using the keypad, then press Options.4Scroll to Send and press Select.5Enter the recipient’s phone number, including the area code, and press OK. Your message is sent.Tip: Press Find to retrieve a number from your Phone book. • READ MESSAGESWhen you receive a message, your phone beeps and Message received appears in the display as well as the unopened letter icon ( ).1Press Show to read the message, or press Exit to move the message to your inbox.2If you have more than one message, scroll to the message of your choice and press Select to view the message.Note: When you have unopened messages in your inbox, is shown in the upper left corner of the Start screen as a reminder.3Use the scroll keys to view the whole message if necessary. Tip: Keep scrolling to view other information, such as the sender number and time the message was sent.4Once you’re finished, press Back to move the message to the Inbox, or press Options for other choices, such as Reply or Forward.Message linkingThe [Model] can receive messages longer than 160 characters. Messages this long are actually divided into parts and delivered in sequence. However, you can start reading the first part of the message before the rest of the message arrives.](https://usermanual.wiki/Microsoft/NPM-2NX.Users-Guide/User-Guide-219697-Page-79.png)
![75Messages10 Scroll until Rename sending profile appears in the display and press Select.11 Enter a name for the profile (such as “e-mail”) and press OK. • COMPOSE AND SEND E-MAILNote: See “Tips for composing a message” on page 70 for ways to write messages faster.1At the Start screen, press Menu 01-1 (Messages - Write message).After a brief pause, the message entry screen appears in the display.2Compose your message using the keypad and press Options. 3Scroll to Sending options and press Select. 4Scroll to Sending profile and press Select.5Scroll to the profile for sending e-mail, and press Select.6The gateway, or default recipient number should appear in the display. Press Options, scroll to Accept and press Select.7Enter the recipient’s e-mail address and press OK, or press Find to retrieve it from your Phone book. Your e-mail is sent. • PICTURE MESSAGESThe [Model] comes with ten pre-loaded pictures and five empty storage slots (15 total). You can, however, over-write any of the ten pictures that came with your phone. Pictures can be attached to a message and sent via SMS to compatible phones. Picture messages behave the same as text messages, but pictures take up more space than text.Note: You cannot send a picture message via e-mail.](https://usermanual.wiki/Microsoft/NPM-2NX.Users-Guide/User-Guide-219697-Page-82.png)
![8411 Your personal organizerThe [Model] has many useful features for organizing your everyday life, including a calendar, to-do list, and alarm clock. It also has a calculator that can easily convert domestic and foreign currency, plus a new feature called Wallet for making purchases on-line. In this chapter you’ll learn how to use your phone as a personal digital assistant. • WALLETYou can store credit card information and other personal data in a wallet card, and then fetch this information with your WAP browser for on-line purchases. Wallet also uses digital signature for signing and verifying transactions. WAP purchases and digital signature capabilities are dependent upon your wireless provider.Notes about wallet security• To protect yourself against unauthorized purchases, you can require a code to be entered each time you use Wallet. See “Activate code request” on page 85 for instructions.• Your phone has other security features, including a PIN code that can protect your phone against unauthorized use. If you activate PIN code request, your phone asks for the code each time it is turned on. Without the proper code, your phone cannot be used (except for emergency calls). See “PIN code request” on page 66 for more info.Wallet time-outIf Wallet is open for longer than 5 minutes without any user interaction (keypresses), a query appears in the display asking if you’d like to keep Wallet open, or exit. If you don’t respond within 5 seconds, the wallet application closes and your phone returns to the Start screen.](https://usermanual.wiki/Microsoft/NPM-2NX.Users-Guide/User-Guide-219697-Page-91.png)
![99Your phone and other devices12 Your phone and other devicesThe [Model] is capable if interacting with, or connecting to a variety of devices using IR (infrared) or the DLR-3P serial cable.The [Model] can exchange information with other phones, desktop and laptop PCs, and handheld devices. It can also function as a wireless modem when connected to PCs and handheld devices. • INFRARED BASICSYour phone can send and receive certain types of data by way of the phone’s infrared (IR) port. Transmission and reception must be to or from a Infrared Data Association (IrDA) compatible phone or device.The [Model] is a Class 1 Laser Product.Important: The preferable distance between two devices in an infrared connection is from 3 inches to 3 feet. There must be no obstructions between the two devices and both IR ports must be pointed at each other.Enable infrared communicationsBefore you can receive information (business cards, calendar or to-do list notes) or make an infrared connection to a PC or handheld device: 1Make sure that the IR ports of the two devices are pointing at each other.2Press Menu 9 (Infrared).After a brief pause, IR reception activated appears in the display, and the IR icon appears in the upper left corner of the Start screen.3Have the user of the sending device select the desired IR function to start data transfer.If data transfer does not start within 2 minutes, the connection is cancelled. You must activate IR communications on your phone again.](https://usermanual.wiki/Microsoft/NPM-2NX.Users-Guide/User-Guide-219697-Page-106.png)
![101Your phone and other devicesSend calendar notes You can send and receive calendar notes using the same basic procedures as those found in the section “Send a business card to another device” on page 100. SEND A CALENDAR NOTE TO ANOTHER DEVICEFrom the selected calendar day’s day list:1Scroll to the note you wish to send and press Options.2Scroll to Send note and press Select. 3Point the infrared ports at each other.4Scroll to Send via IR and press Select to start data transfer.Receive business cards or calendar notes from other devicesYou can receive business cards and calendar notes from another compatible phone or handheld device. Before the user of the other phone or devices sends you a card:1Point the two IR ports at each other. 2Press Menu 9 (Infrared), after a brief pause IR reception activated appears in the display.3When you see the message Business card received, press Show.4Press Options to select Save or Discard, and press Select. • If you press Save, you see the confirmation message Business card saved. • If you press Discard, you see the question Discard business card?. Press OK to discard the information. • PC CONNECTIVITYYou can make a serial connection between the [Model] and PC using the DLR-3P serial cable. This cable is available for purchase as an accessory, or may be included in your sales package.](https://usermanual.wiki/Microsoft/NPM-2NX.Users-Guide/User-Guide-219697-Page-108.png)
![102Once you establish this connection, you can access your phone information from your PC, or use your phone as a wireless modem.It may also be possible to make this same serial connection between your phone and an Infrared-equipped laptop or IR-equipped desktop PC using your phone’s infrared port.Nokia PC Suite™Once your phone is connected to your PC, you can use the various components of Nokia PC Suite to:• Make a backup copy of the data in your phone (Content Copier)• Edit phone book names and numbers, profiles, and settings via your PC's keyboard (Phone Editor)• Create ringing tones and transfer them to your phone (PC Composer)• Create caller group icons or pictures for use with picture messaging (PC Editor)• Synchronize the Phone book and reminders with PIM applications such as Microsoft Outlook, Outlook Express, and Lotus Organizer (PC Sync)Please refer to the Nokia PC Suite User Guide and PC/PDA Connectivity Guide for installation and setup instructions.Modem SetupYou can use the [Model] as a wireless modem with your laptop computer or handheld device, giving you access to the Internet (for e-mail and Web browsing) or corporate networks wherever you are. For more information on modem setup for PCs and handheld devices, please refer to the Nokia PC Suite User Guide and PC/PDA Connectivity Guide.Download softwareSoftware and accompanying documentation can be downloaded from the Internet at www.nokia.com. Click on the United States hyperlink under Mobile Phones. Select Phones, and then PC Downloads. From there, you can download software to help integrate the [Model] with your computer.](https://usermanual.wiki/Microsoft/NPM-2NX.Users-Guide/User-Guide-219697-Page-109.png)
![105The wireless InternetNavigate a WAP pageELEMENTS COMMON TO MOST PAGES1Highlight the data entry field and press Select. 2Enter the text requested by the data entry field and press OK. The text you entered is now displayed between the brackets.3Scroll to the link that requires an action (For example: get forecast?) and press Select.Header line - Shows the current location.Active hyperlink - Highlighted and awaiting a press of Select. Hyperlink - Used to Navigate to other cards or sites. Scroll to select the link and click Select.Text - Use the scroll keys to move through the text. The cursor will automatically jump to the next hyperlink to activate it.Selection list - Text in brackets. Press Select to display additional choices or links.Options/Back - Displays a card’s options menu and/or the browser menu. Back takes you back to the previous page.Data entry field - An ellipse in brackets [...]. Used when user input is required (example: city name, stock symbol, etc.). To edit this field, perform the following steps:](https://usermanual.wiki/Microsoft/NPM-2NX.Users-Guide/User-Guide-219697-Page-112.png)
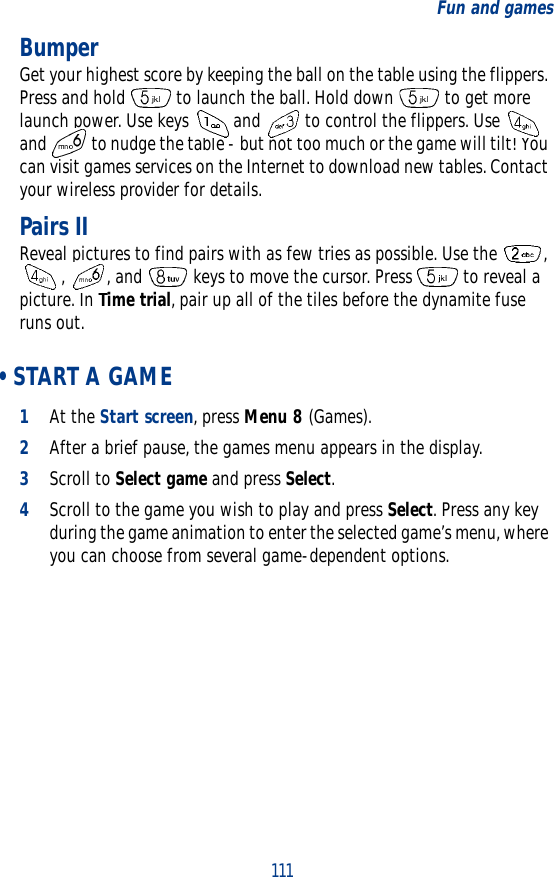
![11014 Fun and gamesThe [Model] is programmed with four interesting and challenging games, some of which can be played via IR against another opponent.Warning: Do not switch on the phone to use this function when wireless phone use is prohibited or when it may cause interference and danger. • GAMES MAIN MENUPress Menu 8 (Games) at the Start screen. After a brief pause you’re presented with the following menu.1Select game - Select from Snake II, Sugarbowl, Bumper, and Pairs II.2Settings - Control game sounds, lights, and shakes.Note: Game sounds only applies to games and doesn’t affect other features in your phone.Snake IIFeed the snake with as many goodies as possible and watch it grow. Use the , , , and keys to maneuver the snake toward food. The longer the snake’s tail grows, the higher your score. You can choose from a clear field, or select from five different mazes. If the snake runs into its own tail or one of the walls, the game is over. You can visit Nokia game services on the Internet to download new mazes. Contact your wireless provider for details.Pass ‘n rushPlay the role of head coach. Select the plays for your team and watch the action unfold. Choose from a quick match, full game, or scenario.](https://usermanual.wiki/Microsoft/NPM-2NX.Users-Guide/User-Guide-219697-Page-117.png)


![124Q. How do I download a custom ringing tone?A. You can send tones to your phone over the Internet, using SMS, or you can create custom tones and send them to your phone or another compatible phone using PC Suite. Call your wireless provider for more information.Q. Where is my phone’s model number and Serial number?A. On the information label, which is on back of the phone under the battery. The model number of this phone is [Model].Q. How do I change the contrast on the display?A. The [Model] contrast is set for optimal performance at the factory and cannot be changed.Q. Can I replace the front cover?A. The front cover should only be removed or replaced by qualified service personnel.](https://usermanual.wiki/Microsoft/NPM-2NX.Users-Guide/User-Guide-219697-Page-131.png)
![127Glossaryringing option The way your phone plays (or does not play) the selected ringing tone when you have an incoming call. For example; ascending, descending.ringing tone The tone that your phone plays (or doesn’t play) when you have an incoming call. The [Model] has 40available ringing tones.ringing volume The audible level of your phone’s ringing tones.screen or display Your phone’s display.scroll To move through a list of names, menu items, and so on; by pressing the scroll (up/down) key. Each new selection or option is highlighted as it is selected.selection keys The keys under the lower left and right corners of your phone’s display. These keys are defined by the text above them, inside the display.SIM Subscriber Identity Module.SMS Short Message Service. A service whereby short messages (typically around 160 characters) can be sent and received via your phone.URL Universal Resource Locator. A specific address or location on the Internet such as www.nokia.comvoice mail A system maintained by your wireless provider to record voice messages when you’re unable to answer a call.Term Definition](https://usermanual.wiki/Microsoft/NPM-2NX.Users-Guide/User-Guide-219697-Page-134.png)
![129[Model] Technical information20 [Model] Technical informationWeight 125 grams (4.4 ounces) with BLB-3 mAh Li-ion Battery Wireless networks AMPS 800/TDMA 800 and1900, GSM 1900Size (volume) 6.7 cubic inches (110 cc)Frequency range (Tx) AMPS - 824 - 849 MhzTDMA 800: 824 - 849TDMA 1900: 1850 - 1910 MhzGSM 1900: 1850 - 1910 MhzFrequency range (Rx) AMPS - 869 - 894 MhzTDMA 800: 869 - 894TDMA 1900: 1930 to 1990 MhzGSM 1900: 1930 - 1990Tx output power 1 W (Max)Battery voltage 3.6 vdcaTalk/Standby timea. Operation times are network dependentGSM: 4.7 - 9.5 hours/ max. 34 daysTDMA: 2.6 - 5.9 hours/ max. 25 days](https://usermanual.wiki/Microsoft/NPM-2NX.Users-Guide/User-Guide-219697-Page-136.png)

![[ 135 ]22 IndexNumerics1-touch dialingassign a key . . . . . . . .53change numbers . . . . .53erase numbers . . . . . .54make a call . . . . . . . .53[Model], illustrated . . .. . .8Aabc and 123 modesswitching between . . .25access codes . . . . . . . . .65accessibilityaccessibility solutions .60alternate formats . . . .60contact . . . . . . . . . . .60features . . . . . . . . . .61mobile inductive loopset 61other features . . . . . .61TTY . . . . . . . . . . . . .61website . . . . . . . . . .60accessoriesbattery . . . . . . . . . .112cigarette lighter charger . . . . .112complete car kit . . . .114data cable dlr-3p . . .114desktop charging stand . . . . .112headset kit (HDC-9P) .113leather carrying case .114loopset lps-1 . . . . . .113mobile holder . . . . . .114rapid travel charger . .113spare battery charger .112accessory profiles . . . . . .57activateautomatic redial . . . . .48call forwarding . . . . . .46help text . . . . . . . . . .17loopset . . . . . . . . . . .57predictive text . . . . . .82TTY/TDD . . . . . . . . . .57voice command . . . . .50voice recorder . . . . . .52adding folders . . . . . . . .80advanced features . . . . .43alarmsetting . . . . . . . . . . .95snooze . . . . . . . . . . .96turning off . . . . . . . .96alarm clock . . . . . . . . . .95antenna . . . . . . . . . . . .117about . . . . . . . . . . . . .7contact with . . . . . . . .7definition . . . . . . . .125jack for external use .125location . . . . . . . . . . .7proper position . . . . .117](https://usermanual.wiki/Microsoft/NPM-2NX.Users-Guide/User-Guide-219697-Page-142.png)
![[ 136 ] unauthorized use . . . 121assign a number type . . . 28assigning voice tags . . . . 48audio setttings . . . . . . . 58automate voicemail . . . . 41automatic redial . . . . . . 47Bback cover, removing . . . . 9batterycharging . . . . . . . . . 10important information 12information . . . . . . 115installing . . . . . . . . . . 9operating range . . . . 116prolonging life . . . . . 12removal . . . . . . . . . . 11temperature range . . 116voltage . . . . . . . . . 129battery charger, spare . 112birthday note . . . . . . . . 91business cardscreating . . . . . . . . . . 34receiving . . . . . 34, 101sending . . . . . . 34, 100Ccalculatorcurrency conversion . . 98options . . . . . . . . . . 97using . . . . . . . . . . . . 97calendar4-way scrolling . . . . . 90birthday note . . . . . . 91call note . . . . . . . . . 91date notes . . . . . . . . 91jump to date . . . . . . . 91meeting note . . . . . . 91memo note . . . . . . . . 91month view . . . . . . . 90note options . . . . . . . 92note types . . . . . . . . 91opening . . . . . . . . . . 90saving notes . . . . . . . 91send note . . . . . . . . . 93view notes . . . . . . . . 92view received notes . . 94call duration . . . . . . . . . 39show on screen . . . . . 39viewing . . . . . . . . . . 39call forwarding . . . . . . . 46activate . . . . . . . . . . 46cancelling . . . . . . . . 47definition . . . . . . . . . 46options . . . . . . . . . . 46call logabout . . . . . . . . . . . 35call duration . . . . . . . 39clear call lists . . . . . . 38clear call timers . . . . . 39view call duration . . . 39view dialed calls . . . . 37view missed calls . . . . 35view received calls . . . 37call note . . . . . . . . . . . . 91](https://usermanual.wiki/Microsoft/NPM-2NX.Users-Guide/User-Guide-219697-Page-143.png)
![[ 137 ]call timers, clearing . . . .39call waiting . . . . . . . . . .45end both calls . . . . . .45end the active call . . . .45end the active call only 45reject a call . . . . . . . .45reject a waiting call . . .45switch between calls . .45when receiving an incoming call . . . . .45with call on hold . . . . .46callsending . . . . . . . . . . .45forwarding . . . . . . . .46ignoring . . . . . . . . . . .3making . . . . . . . . . . .16redial last . . . . . . . . . .3rejecting . . . . . . . . . .45cancel call forwarding . . .47car charger . . . . . . . . .112car kit . . . . . . . . . . . . .114carrying case . . . . . . . .114charge the battery . . . . .10chargerconnecting . . . . . . . .10information . . . . . . .115clear call lists . . . . . . . . .38clockalarm . . . . . . . . . . . .95set the date . . . . . . . .95show/hide . . . . . . . . .94time format . . . . . . . .95compose a picture message . . . . . . .76compose e-mail . . . . . . .75connect TTY hardware . . .62connecting to a PC . . . .101connectors, illustrated . . . .8contacting Nokia . . . . . . .6content copier (pc suite) 102cover, removing . . . . . . . .9currencyconverting . . . . . . . . .98exchange rate . . . . . .98to foreign . . . . . . . . .98to home . . . . . . . . . .98currency conversion . . . .98customer careCanada . . . . . . . . . . . .7USA . . . . . . . . . . . . . .7Ddata cable . . . . . . . . . .114data synchronization . .102date, setting . . . . . . . . . .95deactivate automatic redial . . . . . . .48definition of terms . . . .125desktop charging stand .112dialed calls, viewing . . . .37digital data . . . . . . . . .102display language . . . . . . .55](https://usermanual.wiki/Microsoft/NPM-2NX.Users-Guide/User-Guide-219697-Page-144.png)
![[ 138 ] dlr-3p . . . . . . . . . . . . . 114downloadconnectivity software . . . . 102, 103pictures . . . . . . . . . . 76ringing tones . . . . . . 59Ee-mail . . . . . . . . . . . . . 73compose and send . . . 75important numbers . . 74setup an e-mail profile 74end both calls . . . . . . . . 45end the active call . . . . . 45enteringaddresses . . . . . . . . . 28names and numbers . . 27notes, to phonebook . . 28number types . . . . . . 27text . . . . . . . . . . . . 23equalizer . . . . . . . . . . . . 58choose a set . . . . . . . 58customize . . . . . . . . 59settings . . . . . . . . . . 58while in a call . . . . . . 59erase1-touch dialing numbers . . . . . 54messages . . . . . . . . . 81voice memos . . . . . . . 52voice tags . . . . . . . . 49ESNdefinition of . . . . . . 125location on the phone . . 6FFAQ . . . . . . . . . . . . . . 125fixed dialing . . . . . . . . . 65folders . . . . . . . . . . . . . 79adding . . . . . . . . . . . 80list of . . . . . . . . . . . 80removing . . . . . . . . . 80four-way scrollingcalendar . . . . . . . . . 90special characters 24, 71frequency range . . . . . 129Gglossary of terms . . . . . 125Hheadsetconnect . . . . . . . . . . 63connecting . . . . . . . . 63headset kit . . . . . . . . . 113hearing impaired solutions . . . . . 61help text . . . . . . . . . . . . 17Iicons . . . . . . . . . . . . . . . 5illustrated view . . . . . . . . 8IMEIdefinition of . . . . . . 126location on the phone . . 6](https://usermanual.wiki/Microsoft/NPM-2NX.Users-Guide/User-Guide-219697-Page-145.png)
![[ 139 ]in-call options . . . . . . . .43Infrared connections . . . .99interference . . . . . . . . . . .2international dialing . . . .54IR activating . . . . . . . . .99connecting to a PC . .101IR status . . . . . . . . .100receiving a business card . . . . . .101sending a business card . . . . . .100sending a reminder note . . . . .101Jjump to a date . . . . . . . .91Kkeypadillustrated view . . . . . .8keys, selection . . . . . . . .15Llanguagesavailable . . . . . . . . . .55setting . . . . . . . . . . .55shortcut . . . . . . . . . .21lithium ion battery . . . .112loopsetdescription . . . . . . .113how it works . . . . . . .61lps-1 . . . . . . . . . . . . . . .61Mmeeting note . . . . . . . . .91memo note . . . . . . . . . .91memoryphone . . . . . . . . . . .32phone and sim . . . . . .32select . . . . . . . . . . . .32SIM card . . . . . . . . . .32menu shortcuts . . . . . . .19menus, phone . . . . . . . . .17messageserasing . . . . . . . . . . .81folders . . . . . . . . . . .79forwarding . . . . . . . .73message center number 69message icons . . . . . .69message linking . . . . .72moving . . . . . . . . . . .81reading . . . . . . . . . . .72replying to . . . . . . . .73save to folders . . . . . .79view saved . . . . . . . .79write and send . . . . . .71missed calls . . . . . . . . . .35mobile holder . . . . . . . .114mobile inductive loopset .61modem setup . . . . . . . .102moving messages . . . . . .81Nname and no. view . . . . .30name list view . . . . . . . .30](https://usermanual.wiki/Microsoft/NPM-2NX.Users-Guide/User-Guide-219697-Page-146.png)
![[ 140 ] navigationof phone menus . . . . . 17using scroll method . . 17using shortcuts . . . . . 18network servicesabout . . . . . . . . . . . . 6Nokia pc suite . . . . . . . 102number types . . . . . . . . 27Ooptionswhile in a call . . . . . . 43with a call active and one on hold 44with a call on hold . . . 44with one call active . . 43Ppc composer . . . . . . . . 102pc connectivity . . . . . . 101pc suite . . . . . . . . . . . 102instructions . . . . . . 102pc composer . . . . . . 102pc sync . . . . . . . . . 102pc sync . . . . . . . . . . . . 102personal organizer . . . . . 84phone help . . . . . . . . . . 17phone securityaccess codes . . . . . . . 65fixed dialing . . . . . . . 65lock the keypad . . . . . 64security code . . . . . . 65security levels . . . . . . 64phone size . . . . . . . . . 129phone weight . . . . . . . 129picture messagescompose and send . . . 76modifying . . . . . . . . 77when received . . . . . . 76PIN 2 code . . . . . . . . . . 67PIN codechanging . . . . . . . . . 67PIN code request . . . . 66playback a voice memo . 52power on your phone . . . 12power, transmit . . . . . . 129predictive textactivate . . . . . . . . . . 82add new words . . . . . 83definition . . . . . . . . . 82language . . . . . . . . . 82write with . . . . . . . . 82predictive text input . . . 70primary numberassigning . . . . . . . . . 30copying . . . . . . . . . . 33definition . . . . . . . . . 30profilesaccessory . . . . . . . . . 57custom options . . . . . 56customizing . . . . . . . 55headset . . . . . . . . . . 57list of . . . . . . . . . . . 55loopset . . . . . . . . . . 57](https://usermanual.wiki/Microsoft/NPM-2NX.Users-Guide/User-Guide-219697-Page-147.png)
![[ 141 ]selecting . . . . . . . . . .55timed . . . . . . . . . . . .56tty/tdd . . . . . . . . . . .57PUK codes . . . . . . . . . . .68Rrapid travel charger . . .113read messages . . . . . . . .72receive a TTY call . . . . . .63received calls . . . . . . . . .37record a phone conversation . . . .53record a voice memo . . . .52recorded memos, viewing 52reference informationbatteries and chargers 115reject a call . . . . . . . . . .45reminders . . . . . . . . . .101remove the battery . . . . .11removing folders . . . . . . .80ringing tonesdiscarding . . . . . . . . .60download . . . . . . . . .59receiving . . . . . . . . . .60Ssafety guidelines . . . . . . .1saveaddresses . . . . . . . . .28calendar notes . . . . . .91notes, to phonebook . .28numbers only . . . . . . .28phonebook entries . . . .27ringing tones . . . . . . .60scroll keyshow to use . . . . . . . .15scroll method . . . . . . . . .17securityfixed dialing . . . . . . .65lock the keypad . . . . .64security code . . . . . . .65security levels . . . . . .64selection keyshow to use . . . . . . . .15sendingcalendar notes . . . . . .93e-mail . . . . . . . . . . .73messages . . . . . . . . .71picture messages . . . .75template messages . . .78set the display language .55setupvoicemail . . . . . . . . .40your headset . . . . . . .63shortcuts . . . . . . . . .18, 19call log menu . . . . . . .19games menu . . . . . . .22messages menu . . . . .19organizer menu . . . . .22profiles menu . . . . . . .19settings menu . . . . . .20voice menu . . . . . . . .22show/hide clock . . . . . . .94](https://usermanual.wiki/Microsoft/NPM-2NX.Users-Guide/User-Guide-219697-Page-148.png)
![[ 142 ] SIM cardcapacity . . . . . . . . . . 31copying entries . . . . . 33emergency calls . . . . 120if rejected . . . . . . . . 68installing . . . . . . . . . . 9non-owner . . . . . . . . 64PIN code . . . . . . . . . 66removing . . . . . . . . . 11security levels . . . . . . 64selecting memory . . . . 32service numbers . . . . . 35size, phone . . . . . . . . . 129software download . . . 102spare battery charger . . 112special charactersavailable characters . . 71four-way scrolling . . . 71speed dialing . . . . . . . . . 53assign a key . . . . . . . 53make a call . . . . . . . . 53standby time . . . . . . . . 129start screendescription . . . . . . . . 13returning to . . . . . . . 14switch between calls . . . 45switch on your phone . . . 12switching letter case . . . 25Ttalk time . . . . . . . . . . . 129technical information . . 129templatescreating custom . . . . 79sending . . . . . . . . . . 78terms . . . . . . . . . . . . . 125time format . . . . . . . . . 95timed profiles . . . . . . . . 56transmitfrequency . . . . . . . . 129power . . . . . . . . . . 129troubleshooting . . . . . . 122TTY connect hardware . . . 62end a call . . . . . . . . . 63illustration . . . . . . . . 62make a call . . . . . . . . 62receive a call . . . . . . 63turn on your phone . . . . 12Uupdates, to user guide . . . 5user guidesrequesting alternate formats . . . . 60updates to . . . . . . . . . 5Vvoice commandadding tags . . . . . . . 50and the volume key . . 51available commands . . 50erase . . . . . . . . . . . . 51replace command . . . 51shortcut . . . . . . . . . . . 4](https://usermanual.wiki/Microsoft/NPM-2NX.Users-Guide/User-Guide-219697-Page-149.png)
![[ 143 ]use with headset .49, 51voice dialchange or erase a tag .49notes about voice tags .48using . . . . . . . . . . . .49voice recorder . . . . . . . .51erase memos . . . . . . .52playback a memo . . . .52playback memos . . . . .52record a memo . . . . . .52record a phone conversation . . .53view memos . . . . . . .52view recorded memos .52voice tags . . . . . . . . . . .48assign . . . . . . . . . . .48assigning . . . . . . . . .48change or erase . . . . .49changing . . . . . . . . . .49displaying . . . . . . . . .49erasing . . . . . . . . . . .49for voice commands . .50notes . . . . . . . . . . . .48voicemailautomating . . . . . . . .41save mailbox number . .40setup . . . . . . . . . . . .40using . . . . . . . . . . . .40volume, adjusting . . . . . .16Wwalletcode request . . . . . . .85create a card . . . . . . .86personal note options .88personal notes . . . . . .87time-out . . . . . . . . . .84wallet code . . . . . . . .85weight, phone . . . . . . .129wireless modem setup . .102wireless network services .6wireless networks . . . . .129write and send a message 71](https://usermanual.wiki/Microsoft/NPM-2NX.Users-Guide/User-Guide-219697-Page-150.png)