Microsoft RX-34 Internet Tablet User Manual Gagarin UG draft 9254711 101106
Microsoft Mobile Oy Internet Tablet Gagarin UG draft 9254711 101106
Manual
Nokia Nxxx User guide
9254711
DRAFT 2006-10-13 EN
Gagarin_UG_draft_9254711_101106.fm Page 1 Friday, October 13, 2006 6:36 AM
PART NO. 9254711, ISSUE NO. 1
The crossed-out wheeled bin means that within the European Union the
product must be taken to separate collection at the product end-of-life.
This applies to your device but also to any enhancements marked with
this symbol. Do not dispose of these products as unsorted municipal
waste. For more information, see product Eco-Declaration or country
specific information at www.nokia.com.
© 2006 Nokia. All rights reserved.
Nokia, Nokia Connecting People, Nseries, and Nxxx are trademarks or
registered trademarks of Nokia Corporation. Nokia tune is a sound mark
of Nokia Corporation. Other product and company names mentioned
herein may be trademarks or tradenames of their respective owners.
Reproduction, transfer, distribution, or storage of part or all of the
contents in this document in any form without the prior written
permission of Nokia is prohibited.
This product is licensed under the MPEG-4 Visual Patent Portfolio
License (i) for personal and noncommercial use in connection with
information which has been encoded in compliance with the MPEG-4
Visual Standard by a consumer engaged in a personal and
noncommercial activity and (ii) for use in connection with MPEG-4
video provided by a licensed video provider. No license is granted or
shall be implied for any other use. Additional information, including
that related to promotional, internal, and commercial uses, may be
obtained from MPEG LA, LLC. See http://www.mpegla.com.
The information contained in this user guidde was written for the Nokia
Nxxx product. Nokia operates a policy of ongoing development. Nokia
reserves the right to make changes and improvements to any of the
products described in this document without prior notice.
TO THE MAXIMUM EXTENT PERMITTED BY APPLICABLE LAW, UNDER NO
CIRCUMSTANCES SHALL NOKIA OR ANY OF ITS LICENSORS BE
RESPONSIBLE FOR ANY LOSS OF DATA OR INCOME OR ANY SPECIAL,
INCIDENTAL, CONSEQUENTIAL OR INDIRECT DAMAGES HOWSOEVER
CAUSED.
THE CONTENTS OF THIS DOCUMENT ARE PROVIDED "AS IS". EXCEPT AS
REQUIRED BY APPLICABLE LAW, NO WARRANTIES OF ANY KIND,
EITHER EXPRESS OR IMPLIED, INCLUDING, BUT NOT LIMITED TO, THE
IMPLIED WARRANTIES OF MERCHANTABILITY AND FITNESS FOR A
PARTICULAR PURPOSE, ARE MADE IN RELATION TO THE ACCURACY,
RELIABILITY OR CONTENTS OF THIS DOCUMENT. NOKIA RESERVES THE
RIGHT TO REVISE THIS DOCUMENT OR WITHDRAW IT AT ANY TIME
WITHOUT PRIOR NOTICE.
The availability of particular products and applications for these products
may vary by region. Please check with your Nokia dealer for details, and
availability of language options.
Export controls
This device may contain commodities, technology or software subject to
export laws and regulations from the US and other countries. Diversion
contrary to law is prohibited.
FCC/INDUSTRY CANADA NOTICE
Your device may cause TV or radio interference (for example, when using
a telephone in close proximity to receiving equipment). The FCC or Industry
Canada can require you to stop using your telephone if such interference
cannot be eliminated. If you require assistance, contact your local service
facility. This device complies with part 15 of the FCC rules. Operation is
subject to the following two conditions: (1) This device may not cause
harmful interference, and (2) this device must accept any interference
received, including interference that may cause undesired operation. Any
changes or modifications not expressly approved by Nokia could void the
user's authority to operate this equipment.
Gagarin_UG_draft_9254711_101106.fm Page 2 Friday, October 13, 2006 6:36 AM

© 2006 Nokia. All rights reserved.
Contents
For your safety...........................................5
Overview .....................................................7
Nokia support on the web .................................................. 7
Touch screen........................................................................... 7
Task navigator.................................................................8
Application title area.................................................... 8
Status indicator area ....................................................8
Minimize and close buttons ....................................... 9
Application area...........................................................10
Toolbar ............................................................................10
Home view.............................................................................10
Device control.......................................................................11
Stylus...............................................................................11
Calibrate the touch screen........................................11
Hardware keys ..............................................................12
Text input methods.............................................................12
On-screen keyboard....................................................13
Full-screen finger keyboard......................................14
Handwriting recognition ...........................................14
Text input settings.......................................................14
Volume control.....................................................................14
Device lock ............................................................................15
Change the lock code.................................................15
Lock touch screen and keys..............................................15
Memory management........................................................15
Memory card.................................................................16
Back up and restore data..........................................17
Help.........................................................................................18
Search for information......................................................18
Internet connections ...............................19
Connectivity settings .........................................................19
WLAN connection...............................................................19
Mobile phone connection.................................................21
Bluetooth wireless technology................................22
Select a phone..............................................................22
Manually create connection ....................................23
Disable wireless connections...........................................24
Browse the web........................................25
Open and browse web pages...........................................25
Manage bookmarks ............................................................26
Web communication ...............................27
Accounts................................................................................27
Presence.................................................................................28
Contacts.................................................................................28
Instant messaging...............................................................29
Internet call ..........................................................................30
Nokia Internet Call Invitation (Beta) .....................30
Gagarin_UG_draft_9254711_101106.fm Page 3 Friday, October 13, 2006 6:36 AM

© 2006 Nokia. All rights reserved.
Web camera ..................................................................31
E-mail .....................................................................................31
Create an e-mail account .........................................32
Retrieve and read e-mail messages........................33
Create and send e-mail messages ..........................34
Define basic e-mail settings.....................................34
Define advanced settings ..........................................34
Inbox folder ...................................................................36
Outbox folder................................................................36
Sent folder .....................................................................36
Drafts folder ..................................................................36
Media player ........................................... 37
Media sources.......................................................................37
Internet radio........................................................................37
UPnP media servers.............................................................38
File formats ...........................................................................38
Other applications .................................. 40
RSS feed reader....................................................................40
Images ....................................................................................40
Tools......................................................... 41
Application manager ..........................................................41
Connection manager..........................................................41
Control panel........................................................................41
File manager.........................................................................42
Utilities and games..................................43
Calculator..............................................................................43
Clock .......................................................................................43
Notes.......................................................................................43
PDF reader.............................................................................43
Sketch.....................................................................................43
Games.....................................................................................43
PC connectivity ........................................44
Software update..................................................................44
Battery information ................................45
Charging and discharging.................................................45
Nokia battery authentication guidelines......................46
Care and maintenance ............................48
Additional safety information................49
Open source software notice..................50
Gagarin_UG_draft_9254711_101106.fm Page 4 Friday, October 13, 2006 6:36 AM
© 2006 Nokia. All rights reserved. 5
For your safety
Read these simple guidelines. Not following them may be
dangerous or illegal. Read the complete user guide for
further information.
SWITCH ON SAFELY Do not switch the device
on when wireless device use is prohibited or
when it may cause interference or danger.
ROAD SAFETY COMES FIRST Obey all local
laws. Always keep your hands free to operate
the vehicle while driving. Your first
consideration while driving should be road
safety.
INTERFERENCE All wireless devices may be
susceptible to interference, which could affect
performance.
SWITCH OFF IN HOSPITALS Follow any
restrictions. Switch the device off near medical
equipment.
SWITCH OFF IN AIRCRAFT Follow any
restrictions. Wireless devices can cause
interference in aircraft.
SWITCH OFF WHEN REFUELING Do not use
the device at a refueling point. Do not use near
fuel or chemicals.
SWITCH OFF NEAR BLASTING Follow any
restrictions. Do not use the device where
blasting is in progress.
USE SENSIBLY Use only in the normal
position as explained in the product
documentation.
QUALIFIED SERVICE Only qualified personnel
may repair this product.
ENHANCEMENTS AND BATTERIES Use only
approved enhancements and batteries. Do not
connect incompatible products.
Gagarin_UG_draft_9254711_101106.fm Page 5 Friday, October 13, 2006 6:36 AM
© 2006 Nokia. All rights reserved. 6
WATER-RESISTANCE Your device is not
water-resistant. Keep it dry.
BACK-UP COPIES Remember to make
back-up copies or keep a written record of all
important information stored in your device.
CONNECTING TO OTHER DEVICES When
connecting to any other device, read its user
guide for detailed safety instructions. Do not
connect incompatible products.
Network services
Contact your service provider for additional instructions
for the use of network services and information on what
charges will apply. Some networks may have limitations
that affect how you can use network services.
Your service provider may have requested that certain
features be disabled or not activated in your device. Your
device may also have a special configuration.
Shared memory
The following features in this device may share memory:
bookmarks; image, audio, and video files; notes, sketch,
and other files; contacts; e-mail messages; and
applications. Use of one or more of these features may
reduce the memory available for the remaining features
sharing memory. Your device may display a message that
the memory is full when you try to use a shared memory
feature. In this case, delete some of the information or
entries stored in the shared memory features before
continuing.
Gagarin_UG_draft_9254711_101106.fm Page 6 Friday, October 13, 2006 6:36 AM
© 2006 Nokia. All rights reserved.
Overview
7
Overview
Model number: Nokia Nxxx-1.
Hereinafter referred to as Nokia Nxxx.
Nokia Nxxx provides easy broadband access to the internet
through a wireless LAN (WLAN)/Wi-Fi or Bluetooth
connection with compatible mobile phones. Its wide
screen and portable size make it optimal for enjoying the
web and internet communications away from your laptop
or desktop.
Your compatible WLAN access point must be compliant
with the IEEE 802.11b or 802.11g standard.
Read this user guide carefully before using your device.
Read also the quick start guide provided with the device
and the user guide of your compatible phone, which
provides important safety and maintenance information.
The availability of some applications, configurations, and
settings may vary according to the software version or
your country and sales region.
Nokia support on the web
Check www.nokia.com/support or your local Nokia web
site for the latest version of the guide, additional
information, downloads, and services related to your Nokia
product.
Check also www.nokia.com/nxxx to explore the device
online features.
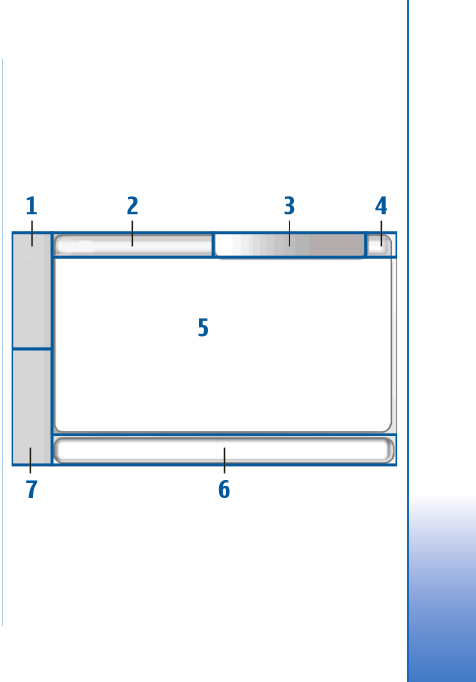
Touch screen
The touch screen consists of the task navigator (1), the
application title area (2), the status indicator area (3), the
minimize and close buttons (4), the application area (5),
the toolbar (6), and the application switcher (7).
Gagarin_UG_draft_9254711_101106.fm Page 7 Friday, October 13, 2006 6:36 AM
© 2006 Nokia. All rights reserved.
Overview
8
Task navigator
The task navigator (1) includes icons that you can tap to
open new applications and switch between running
applications.
To select an option in a menu, tap it. Alternatively, scroll
to the desired option in a menu using the and
hardware keys and press to open it. To close the menu,
press , or tap another area of the screen.
The task navigator contains the following items by default.
To change the items, tap and select Tools >
Control panel > Navigation. For more information, see the
device help.
First item: web browser—Tap to access internet
functions such as Open new browser window and
Manage bookmarks.
Second item: contacts—Tap to access functions such
as View contacts, View inbox, New e-mail message,
New Internet call, New chat, and Set presence. When you
receive new e-mail or chat messages, authorization
requests and responses, or group chat invitations, the icon
is highlighted and the menu is updated. The information of
these events is displayed at the bottom of the menu.
Applications—Tap for access to all installed
applications. To change the structure of the menu, select
Tools > Control panel > Navigation.
Application switcher—The application switcher (7)
contains icons of currently open applications. The icons of
the four most recently launched applications are shown
on the application switcher. To see all running
applications, tap . If several instances of an
application are open (for example, multiple web browser
windows), the group has one application icon.
To change to an application, tap the icon of the
application in the application switcher. If you hold the
stylus down on an icon, a tool tip is shown.
Leaving applications running in the background increases
the demand on battery power and reduces the battery life.
Application title area
The application title area (2) displays the name of the
active application and the open file. To open the
application menu, tap the title, or press .
Status indicator area
Tap the icons in the status indicator area to get more
information or perform tasks related to a specific
function. The status indicator area (3) may contain the
following icons:
Gagarin_UG_draft_9254711_101106.fm Page 8 Friday, October 13, 2006 6:36 AM
© 2006 Nokia. All rights reserved.
Overview
9
indicates how much charge is left in the battery. The
more bars the icon contains, the more charge is left. To
view the estimated battery time left, tap the icon.
The internet connection icon indicates the status and type
of the internet connection and allows you to open and
close an internet connection. indicates that a WLAN
connection is active, that a packet data connection
(for example, GPRS) is active, that a data call
connection (for example, GSM data call) is active, that
there is no internet connection, or that the device is in
the offline mode where no connections are allowed.
indicates that a WLAN connection is active, but the device
did not receive an IP address from the network. Your
connection to the internet is limited.
indicates the volume level and allows you to adjust the
master volume and other sound settings. The more bars the
icon contains, the higher the volume. When the sounds are
muted, the icon is .
indicates the level of display brightness and allows you
to adjust the display settings.
The presence icon indicates your presence status and
allows you to adjust the presence settings. The icon is
visible only after you have created an account for internet
call and instant messaging service. indicates that you
are online, that you are away, that you are invisible,
or that you are offline.
indicates that the device is connected to a PC through
a USB cable.
indicates that you have set an alarm in the Clock
application.
The status indicator area makes it possible to display
multiple status icons simultaneously. If you have, for
example, installed your own status indicators and want to
display more than seven items at a time, they will be
shown on several lines. When there are additional lines,
they can be accessed by tapping the arrow icon.
To change the icons in the status indicator area, tap
and select Tools > Control panel > Navigation > Status bar.
If you replace the contact icon in the task navigator with
a different task navigator icon, you receive information
about new chat messages, authorization requests and
responses, or group chat invitations to .
Minimize and close buttons
Every application has the minimize and close buttons (4).
If you tap , the current application is hidden and the
underlying application is shown. To bring the minimized
application back to the top, tap its icon in the application
switcher.
If you tap , the current application or application
window closes. To close an application, you can also
Gagarin_UG_draft_9254711_101106.fm Page 9 Friday, October 13, 2006 6:36 AM
© 2006 Nokia. All rights reserved.
Overview
10
select Close from the application menu, press for
a second, or tap the close button in the application
switcher menu.
Application area
When you open an application from the task navigator, the
application is displayed in the application area (5). If there
are currently no open applications, the applets you
selected in the Home menu are displayed in the application
area.
Toolbar
The toolbar (6) contains the command buttons of the
active application.
Home view
When you switch on the device, the home view is
displayed. The home view contains various applets (small
utilities) that you can open, close, and rearrange. You can
also install new applets using the Application manager.
The following applets are available in your device:
Clock—Displays the time in digital or analog format. The
date format depends on the regional settings. To set the
time and date, tap the clock, and select Clock > Tools >
Date and time settings....
Internet radio—Select an internet radio channel from the
list. The content of the list comes from the Media player
application, where you can add and remove radio
channels.
RSS feed reader—Shows the number of unread news
articles and lists the latest headlines when you subscribe
to a news service. The subscription is made in the RSS feed
reader application. To view an article, tap its headline. To
refresh the article list from the web, tap . To stop the
refresh, tap .
Speed contacts—Allows you to quickly get in contact
with a selected group of people. To select the contacts to
be displayed on the applet, select Home > Applet settings >
Speed contacts.
Web shortcut—To set the web page that opens when you
tap the shortcut image, select Home > Applet settings >
Web shortcut. The functions of this feature may vary
depending on the product package.
Internet search—Enables you to look for a requested
piece of information. Enter the search string in the search
field and tap .
Gagarin_UG_draft_9254711_101106.fm Page 10 Friday, October 13, 2006 6:36 AM
© 2006 Nokia. All rights reserved.
Overview
11
To set the background image for the home view, select
Home > Tools > Set background image.... The background
may display a solid color, an image, or both.
To personalize the look and feel of your device, select
Home > Tools > Themes....
To add or remove applets from the application area, select
Home > Select applets..., and mark or unmark the desired
applet.
To arrange applets in the home view, select Home >
Edit layout. In the layout mode you can rearrange the
applets by dragging them. You can also resize some applets
in the layout mode. To accept the layout, tap . To
discard the changes you made, tap .
Device control
You can control the device in two ways: tap the screen
with the stylus or press the hardware keys on the device.
Stylus
Using the stylus enables different functions depending on
the context. The stylus can be used in the following ways:
• Single tap—To activate controls and other interactive
interface components, tap them once with the stylus. A
single tap may open a list, activate a button in a dialog
or a link on a web page, select a check box, and
activate a text input method from a text field.
• Highlight and activate—To highlight an item, tap it
once with the stylus. To activate or open the item, tap
it again.
• Multiple selection—To select consecutive items, place
the stylus on a non-highlighted item, and drag the
stylus over the items. To add more items to the
selection, place the stylus on a non-highlighted item
and drag the stylus over the items. To remove a
selection, tap a single item.
• Drag and drop—To drag an item, hold the stylus down
on a highlighted item, drag the item to its new
location, and release the stylus. To drag and drop
multiple items, perform a multiple selection, and start
the drag from the highlighted item.
• Tap and hold—To activate a context-sensitive menu,
briefly hold the stylus down on an item.
Calibrate the touch screen
If the touch screen responds inaccurately, you may need
to calibrate it. Select Home > Tools > Screen calibration. If
the touch screen does not respond at all, you can also
access this function by pressing in the home view
and using and to navigate in the menu. Follow the
instructions on the screen.
Gagarin_UG_draft_9254711_101106.fm Page 11 Friday, October 13, 2006 6:36 AM
© 2006 Nokia. All rights reserved.
Overview
12
A small number of missing, discolored, or bright dots may
appear on the screen. This is a characteristic of this type of
display. Some displays may contain pixels or dots that
remain on or off. This is normal, not a fault.
Hardware keys
A keypress refers to the press and release of a key. Some
actions depend on the length of the keypress.
Power key—A short keypress opens the
Device mode dialog. A long keypress turns the device on or
off.
, Zoom keys—A short keypress changes the
zoom level of the current view, and adjusts the volume in
audio applications.
Full-screen key—A short keypress switches
between full screen and normal screen modes.
Scroll key—A short keypress moves the focus from one
item to another in the respective direction. A long keypress
in the web browser scrolls the content of the active page
or frame. Press the center of the scroll key to activate the
highlighted item, and to accept confirmation notes.
Escape key—A short keypress closes menus and
dialogs and rejects confirmation notes. In the web browser
this key acts as a back button. A long keypress closes the
topmost dialog or application.
Menu key—A short keypress opens and closes the
application menu.
Swap key—A short keypress activates the
application switcher menu. A long keypress displays the
home view of the device.
Text input methods
You can enter letters, numbers, and special characters in
two ways. The keyboards allow you to tap characters with
the stylus or your fingers. Handwriting recognition allows
you to write characters directly onto the screen using the
stylus as a pen.
To begin text input, tap any text field with the stylus or
your fingers. The text input area appears on the touch
screen and displays one of the keyboards or the
handwriting recognition area, depending on the
previously used text input method.
To switch between text input methods, tap on the
keyboards or handwriting recognition view, and select
Input method and the desired option. Start writing.
Your device can complete words based on the built-in
dictionary for the selected text input language. The device
also learns new words from your input.
Gagarin_UG_draft_9254711_101106.fm Page 12 Friday, October 13, 2006 6:36 AM
© 2006 Nokia. All rights reserved.
Overview
13
On-screen keyboard
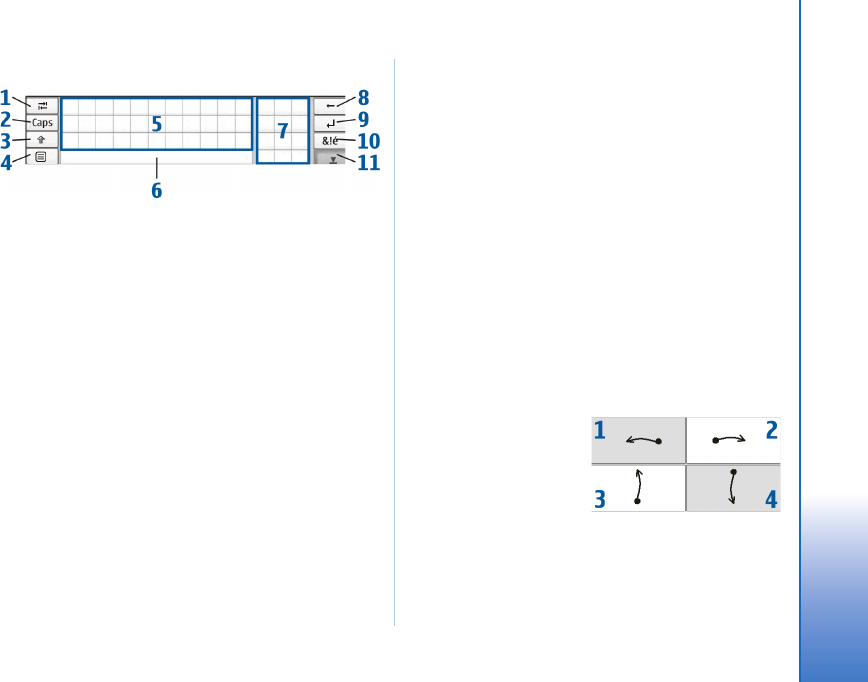
• Tabulator key (1)—Adds a tabulator space or moves the
cursor to the next available text input field.
• [Caps] (2)—Locks the uppercase characters of the
keyboard. In the handwriting recognition mode,
switches between the normal and special character
recognition modes.
• Shift key (3)—Allows you to enter an uppercase
character in the on-screen keyboard mode when you
write in lowercase. When you tap this key in the
handwriting recognition mode, the last lowercase
character switches to uppercase, and vice versa.
• Input menu key (4)—Opens the text input menu, which
includes commands such as Edit > Copy, Cut, and Paste.
You can also access the text input settings from the
text input menu.
• On-screen keyboard (5)
• Space bar (6)—Inserts a space. This area also shows
word completion.
• Numeric keyboard (7)—When you press the shift key,
the most common special characters are displayed in
this area.
• Backspace key (8)—Deletes the character to the left of
the cursor.
• Enter key (9)—Moves the cursor to the next row or text
input field. Additional functions are based on the
current context (for example, in the web address field
of the web browser, it acts as a go button).
• Special character key (10)—Opens a view, in which you
can select from commonly used special characters,
symbols, and language character accents.
• Close (11)—Closes the on-screen keyboard and
handwriting recognition input area.
To use handwriting gestures on top of the on-screen
keyboard, do the following:
Draw gesture 1 for a
backspace or gesture 2
for a space. Draw gesture
3 on a letter to switch
between uppercase and
lowercase letters or
gesture 4 to add a line
break.
Gagarin_UG_draft_9254711_101106.fm Page 13 Friday, October 13, 2006 6:36 AM
© 2006 Nokia. All rights reserved.
Overview
14
Full-screen finger keyboard
To begin text input with the finger keyboard, tap the text
input field with your fingers. The finger keyboard opens in
the full screen mode.
The finger keyboard displays buttons and functions similar
to the other text input methods; however, not all of the
special characters are available.
To close the finger keyboard, tap in the upper right
corner of the keyboard.
To change the finger keyboard settings, tap , and select
Tools >Control panel > Text input settings > Thumb board.
When using the finger keyboard, use only clean hands and
regularly clean the touch screen by wiping the screen
gently with a dry, soft cloth.
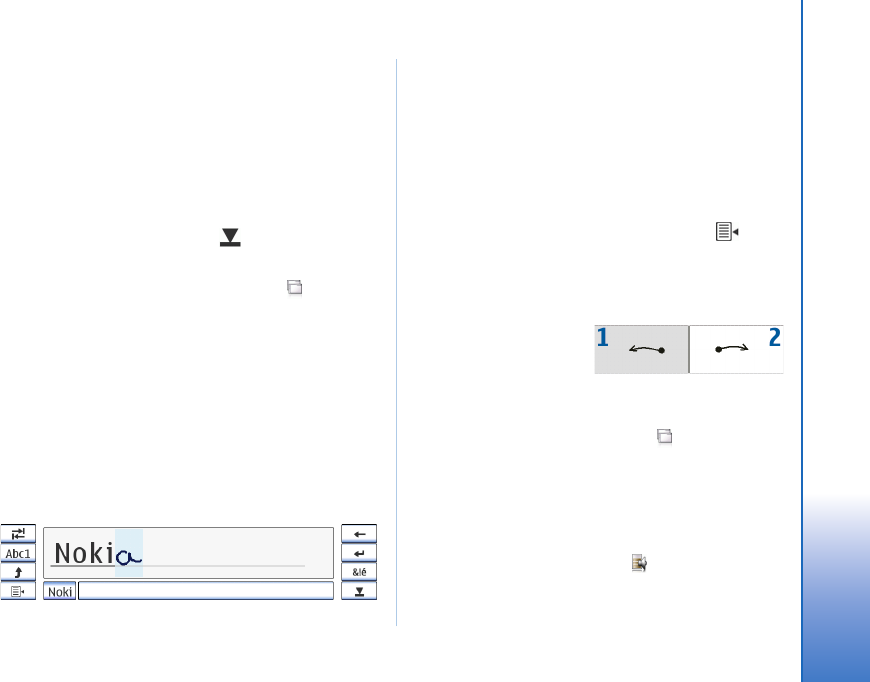
Handwriting recognition
You can use the stylus as a pen to write text. Write legible,
upright characters on the text input area, and leave a small
horizontal gap between each character. Do not use cursive
writing.
To write common characters and numbers (default mode),
write words as you normally write them.
To write special characters, tap [Abc1] in the left pane of
the input area, and write the characters as you normally
write them.
To insert new characters in and after words, draw them in
the intended positions.
To teach the device your handwriting style, tap on the
on-screen keyboard, and select Tools > Teach.
To use handwriting gestures on the handwriting
recognition area, do the following:
Draw gesture 1 for a
backspace or gesture 2
for a space.
Text input settings
To define the text input settings, tap , and select
Tools > Control panel > Text input settings. For more
information, see the device help.
Volume control
To adjust the master volume, tap to access the sound
settings. To decrease or increase the volume, drag the
Gagarin_UG_draft_9254711_101106.fm Page 14 Friday, October 13, 2006 6:36 AM
© 2006 Nokia. All rights reserved.
Overview
15
volume slider to the desired position. The master volume
overrides all other volume settings in the device.
Warning: Listen to music at a moderate level.
Continuous exposure to high volume may
damage your hearing. Do not hold the device
near your ear when the loudspeaker is in use,
because the volume may be extremely loud.
Device lock
To prevent unauthorized use of your device, change the
lock code, and set the device to automatically lock after a
certain time-out period.
To lock the device, briefly press , select Lock device, and
tap OK. To unlock the device, enter the lock code, and tap
OK.
To edit the device lock settings, tap , and select Tools >
Control panel > Device lock.
To set the time-out period, tap Autolock period, and select
the desired time.
Change the lock code
To change the lock code, do the following:
1. Tap , and select Tools > Control panel > Device lock >
Change lock code.
2. Enter the current lock code (the default code is
12345), and tap OK.
3. Enter the new code, and tap OK.
4. Enter the new code again, and tap OK.
If you tap Cancel in any of these dialogs, the device
lock code is not changed.
Keep the new code secret and in a safe place separate
from your device.
Note: If you lose the device lock code, you must
take the device to a Nokia authorized service
facility. To unlock the device, the software must
be reloaded, and all data you have saved in the
device may be lost.
Lock touch screen and keys
To lock the touch screen and keys, briefly press , and
select Lock touch screen and keys > OK. To unlock the touch
screen and keys, press and .
Memory management
To view current user memory consumption, tap , and
select Tools > Control panel > Memory.
Gagarin_UG_draft_9254711_101106.fm Page 15 Friday, October 13, 2006 6:36 AM
© 2006 Nokia. All rights reserved.
Overview
16
To view the amount of free and used memory, select the
Storage page.
To use part of the memory card as additional virtual
memory for running applications, open the Virtual page,
and select Extend virtual memory. Additional virtual memory
is always tied to the memory card that you are currently
using in the internal memory card slot.
Heavy usage of the extended virtual memory may affect
the durability of the memory card.
Important: Do not remove the memory card in
the middle of an operation when the card is
being accessed. Removing the card in the middle
of an operation may damage the memory card as
well as the device, and data stored on the card
may be corrupted.
To free memory, delete data in File manager or other
applications. To find and delete files of a certain size, use
the Search application.
The applications display error messages when you try to
move, copy, or save files, and when there is not enough
memory on the device or the memory card.
Memory card
Your device has two memory card slots. There is an internal
slot under the back cover and another slot under the
memory card cover on the front corner of the device. Both
memory cards can be inserted and removed when the
device is powered (hot swap feature).
The supported memory card formats are as follows:
• MultiMediaCard (MMC), (full size)
• Reduced Size MMC (with adapter)
• SD card (full size)
• miniSD card (with adapter)
• microSD card (with adapter)
This device does not support the write protection feature
of SD cards.
Use only compatible MultiMediaCards (MMC), Reduced
Size MultiMediaCards, SD cards, microSD cards, or miniSD
cards approved by Nokia for use with this device. Nokia
uses approved industry standards for memory cards, but
some brands may not be fully compatible with this device.
Incompatible cards may damage the card and the device
and corrupt data stored on the card.
The size limit is 2 GB. You can only use FAT 16/32
formatted compatible memory cards with this device.
To view and manage the contents of the memory card, tap
, select File manager, and tap the memory card in the
folder list.
Gagarin_UG_draft_9254711_101106.fm Page 16 Friday, October 13, 2006 6:36 AM
© 2006 Nokia. All rights reserved.
Overview
17
To rename a memory card, select File manager >
Memory card > Rename....
To format a memory card, select File manager >
Memory card > Format.... All data is permanently deleted
from the memory card.
Back up and restore data
You can back up data to a compatible memory card and
restore it, if necessary. The backup appears as a folder on
the memory card. You can also secure the backups with a
password.
To back up data, do the following:
1. Tap , and select Tools > Backup/Restore >
New backup.
2. In the Backup selection dialog, change the name of the
backup; tap the name, and enter a new one. If both
memory cards are installed, define the desired location
of the backup using a choice list.
3. In the Data selection dialog, select whether you want to
back up all data or only the specified data types.
To protect the backup with a password, tap
Protect with password, enter twice the password you
want to use, and tap OK.
To restore data, do the following:
1. Tap , and select Tools > Backup/Restore.
2. Select the backup on the memory card that you want
to restore. Tap Restore.
If you have protected the backup with a password, the
Password needed dialog is displayed. Enter the
password, and tap OK.
To delete an unnecessary backup, select the backup and
tap Delete.
Important: To ensure that the E-mail application
works properly, always back up settings and e-
mail messages. Restore its backup when no
settings or e-mail messages are present in the
application, for example, directly after updating
the software on your device.
The following information, for example, is not backed up:
• theme settings, when you restore backups from
previous product versions,
• Bluetooth connectivity settings,
• installed applications, and
•browser settings.
Gagarin_UG_draft_9254711_101106.fm Page 17 Friday, October 13, 2006 6:36 AM
© 2006 Nokia. All rights reserved.
Overview
18
Help
Your Nokia Nxxx offers device help, which provides
additional information on key features, applications, and
dialogs of the device.
To access help from the task navigator, tap , and select
Help.
To access help from an application, tap the application
title, and select the help command from the menu (usually
under the Tools menu).
To browse help topics, tap the following:
or to see other help topics if you have recently
viewed several help topics
to see a list of recently viewed help topics
to search for the text that you have entered in the
search field.
To access help related to the contents of a dialog (context-
sensitive help), tap the [?] button on the dialog.
Search for information
To search for items on your device, do the following:
1. Tap , and select Search.
2. Enter a search word or multiple search words. The
more search words you use, the more accurate the
search results.
3. If needed, limit the search to e-mail messages,
contacts, or bookmarks; or select all items on your
device. To set additional search options, tap Options.
4. To start the search, tap OK. Results appear in the
Search results window.
To stop the search at any time, tap on the toolbar.
The search function in your device operates with Boolean
AND logic, which means that all search words must
match. If you get too few results, limit the number of
search words and options. The search function is not
case-sensitive.
Gagarin_UG_draft_9254711_101106.fm Page 18 Friday, October 13, 2006 6:36 AM
© 2006 Nokia. All rights reserved.
Internet connections
19
Internet connections
Your device allows you to access the internet either
through a wireless LAN (WLAN) or a mobile phone that
supports Bluetooth wireless technology.
Connectivity settings
To edit and create internet connections and to adjust
connection creation logic, tap , and select Tools >
Control panel > Connectivity.
On the General page, define the following settings:
Connect automatically—Select which connections are used
automatically. This setting applies only to networks and
connections you have saved in your device.
Search interval—Define how often connections are searched
in the background.
Tip: Once you have saved one or more
WLAN(s) in Tools >Control panel >
Connectivity > Connections, the device
searches for those connections every 10
minutes by default, while there is no ongoing
connection. To disable the search in the
background in order to save battery power, set
the search interval value to Never.
On the Idle times page, select the time after which the
internet connection ends automatically if the connection
is not used. Use Packet data idle time for packet-switched
data connections (such as GPRS), Data call idle time for
circuit-switched data calls (such as GSM data call), and
WLAN idle time for connections created through a WLAN
access point.
Note: Time-based charges may apply to the
internet connections. Check with your
service provider, and adjust the idle times
accordingly.
Note: The network may also have idle timers
that may cause the internet connection to
break, regardless of the idle timers of the
device.
WLAN connection
When you access an application that requires an internet
connection, the device uses the WLAN connections you
have saved by default. If you have not saved any
connections or they are unavailable, you are asked to
select the connection (internet access point) to use. You
can save the network after selecting it from the list.
Gagarin_UG_draft_9254711_101106.fm Page 19 Friday, October 13, 2006 6:36 AM
© 2006 Nokia. All rights reserved.
Internet connections
20
However, if your WLAN network name is set as hidden, you
must configure the settings manually.
To define WLAN connections manually, tap , and select
Tools >Control panel > Connectivity > Connections > New.
The welcome page of the internet setup wizard is
displayed. Tap Next to proceed to the
Connection setup: Name and type dialog.
1. Define the following settings:
Connection name—Enter a descriptive name for the
connection.
Connection type:—Select WLAN
2. Tap Next. The device asks whether you want to scan for
available WLAN networks. Tap Yes to start the scan, or
No to skip it.
If you select Yes, all available WLAN networks are shown
after the scan with information about each WLAN
connection:
•Security level of WLAN connection:
—No security (for example, a public access point in
an airport)
—Medium security (wired equivalent privacy WEP
authentication)
—High security (Wi-Fi protected access WPA
authentication, including WPA1 and WPA2)
The security level of the network affects the settings
that are shown when you tap Next.
The security icon does not indicate that the data
transmission between the gateway and the content server
(or place where the requested resource is stored) is secure.
The service provider secures the data transmission
between the gateway and the content server.
•Name of the WLAN network
•WLAN signal strength
• if the WLAN network is already defined for an
internet connection setup that you have saved in the
device
Select the desired connection and tap Next.
If you select No, the following settings are shown:
Network name (SSID)—Enter the name of the WLAN
network. If you are the administrator of the network,
ensure that the name of the network is unique. When
you connect to the internet over WLAN, the
connection is based on this information. If the field is
dimmed and cannot be edited, the scanned SSID
contains characters entered in an unknown character
set, and not standard character sets (UTF-8) as the
device expects.
Network is hidden—You must select this option if the
name of your WLAN is hidden. When this option is
Gagarin_UG_draft_9254711_101106.fm Page 20 Friday, October 13, 2006 6:36 AM
© 2006 Nokia. All rights reserved.
Internet connections
21
selected, your device actively searches for the hidden
WLAN when you establish an internet connection.
Network mode-Select the Infrastructure or Ad hoc mode.
The infrastructure mode is used with the internet
connections.
Security method—Select None (no security), WEP
(medium security), WPA pre-shared key (high security),
or WPA with EAP (high security).
Important: Always enable one of the available
encryption methods to increase the security of
your wireless LAN connection. Using
encryption reduces the risk of unauthorized
access to your data.
Fill in the security settings, if requested, and tap Next.
3. Tap Finish to save the settings. To define advanced
settings, tap Advanced.
Tip: You may need to define advanced
settings, for example, if your internet access
point requires the use of proxies.
Some places, like France, have restrictions on the use of
wireless LAN. Check with your local authorities for more
information.
Features using wireless LAN, or allowing such features to
run in the background while using other features, increase
the demand on battery power and reduce the battery life.
Mobile phone connection
Before you can connect to the internet over a cellular
network, you must do the following:
• Subscribe to the desired data service with your cellular
service provider
• Acquire proper internet settings from your cellular
service provider.
Tip: Your device includes a settings database
(Mobile operator setup wizard) with
predefined settings of some cellular service
providers.
Note: All cellular operators and settings are
not listed, and some settings may also be out
of date.
• Pair a compatible mobile phone with your device. Your
device needs an external modem (phone), which is
connected to your device with Bluetooth wireless
technology.
Gagarin_UG_draft_9254711_101106.fm Page 21 Friday, October 13, 2006 6:36 AM
© 2006 Nokia. All rights reserved.
Internet connections
22
Bluetooth wireless technology
This device is compliant with Bluetooth Specification 2.0
supporting the following profiles: DUN (Dial-up
Networking Profile), FTP (File Transfer Profile) client only,
SAP (SIM Access Profile), HID (Human Interface Device
Profile), SPP (Serial Port Profile), and OPP (Object Push
Profile). To ensure interoperability between other devices
supporting Bluetooth technology, use Nokia approved
enhancements for this model. Check with the
manufacturers of other devices to determine their
compatibility with this device.
There may be restrictions on using Bluetooth technology in
some locations. Check with your local authorities or
service provider.
Features using Bluetooth technology, or allowing such
features to run in the background while using other
features, increase the demand on battery power and
reduce the battery life.
A Bluetooth connection does not require that the
compatible phone and the Nokia Nxxx be in line of sight,
but both devices should be within 10 meters (32 feet) of
each other. Connections can be subject to interference
from obstructions, such as walls or other electronic
devices.
Do not create connections to devices using Bluetooth
technology that you do not trust.
Select a phone
To select a phone to be used for internet connection, tap
and select Tools > Control panel > Phone. Although only
one device can be selected as a phone at a time, you can
pair several devices with your Nokia Nxxx. To pair a phone
with your Nokia Nxxx, do the following:
1. Activate a Bluetooth connection on your mobile
phone.
2. Tap New. The Select a device dialog opens, and your
device begins to search for compatible devices that
support Bluetooth wireless technology.
3. Select the desired phone from the list of found
devices, and tap OK. Your device generates a passcode.
4. In the Pair with device dialog, use the generated
passcode or replace it with a passcode of your own.
Define whether the paired device should be trusted
(your phone can connect to the Nokia Nxxx without
notification) or not after it is paired, select or unselect
Set as trusted device. Tap OK, and enter the same
passcode on your compatible phone.
Gagarin_UG_draft_9254711_101106.fm Page 22 Friday, October 13, 2006 6:36 AM
© 2006 Nokia. All rights reserved.
Internet connections
23
5. After successful pairing, the mobile operator setup
wizard is presented. Use it for saving your internet
connection settings. If you have already saved the
settings or plan to save them later from the
Control panel, tap Cancel. You can access the wizard
afterwards by tapping and selecting Tools >
Control panel. In the control panel, select Control panel >
Tools > Mobile operator setup wizard....
6. Tap Finish to save the settings.
Tip: Set your Nokia Nxxx as a trusted device from
the Bluetooth connectivity menu of your phone.
This way you allow your Nokia Nxxx to access your
phone, and you do not have to confirm the
connection every time you activate it. For more
information, refer to the user guide of your phone.
If you change the Bluetooth connectivity name of
your phone, it is not updated to your Nokia Nxxx
automatically. To update the name, pair the Nokia
Nxxx with your phone again.
Manually create connection
To define mobile phone connections manually, tap and
select Tools >Control panel > Connectivity > Connections >
New. The welcome page of the internet setup wizard is
displayed. Tap Next to proceed to the
Connection setup: Name and type dialog.
1. In the Connection setup: Name and type dialog, define
the following settings:
Connection name—Enter a descriptive name for the
connection.
Connection type:—Select the type of network service
over which you want to access the internet. To use a
packet-switched data service in a cellular network,
such as GPRS (network service), select Packet data. To
use a circuit-switched data service in a cellular
network, such as HSCSD (high-speed circuit-switched
data; network service), select Data call.
2. You must select the network manually if you have not
paired a compatible mobile phone with your device.
Select the type of cellular network over which the
internet connection takes place: GSM/UMTS or CDMA.
3. In the connection setup dialog, define the following
settings:
Access point name—Enter the name of the internet
access point. Obtain the name from your internet
service provider. This setting is only shown if you
selected packet-switched data connection (such as
GPRS) and your phone uses a GSM cellular network.
Gagarin_UG_draft_9254711_101106.fm Page 23 Friday, October 13, 2006 6:36 AM
© 2006 Nokia. All rights reserved.
Internet connections
24
Dial-up number—Enter the modem telephone number of
the internet access point.
User name—Enter a user name, if required. The user
name is usually provided by the internet service
provider.
Password—Enter a password, if required. The password
is usually provided by the internet service provider.
Prompt password at every login—Select this option if you
want to enter your password every time you log on to
an internet server, or if you do not want to save your
password in the device.
Tip: It is common in GPRS packet data
networks that the access point name is internet
or it is left blank, the dial-up number is *99#,
and the user name and password may be left
blank. For CDMA packet data network settings,
contact your service provider.
4. Tap Finish to save the settings. To define advanced
settings, tap Advanced. For more information, see the
device help.
Disable wireless connections
To disable WLAN and Bluetooth connections, briefly press
, select Offline mode, and tap OK.
To enable connections, briefly press , select
Normal mode, and tap OK.
Note: In the offline mode, you cannot use
features that require a network or Bluetooth
connection. To use the features, you must
first set the device back to normal mode. If
the device has been locked, enter the lock
code.
Gagarin_UG_draft_9254711_101106.fm Page 24 Friday, October 13, 2006 6:36 AM
© 2006 Nokia. All rights reserved.
Browse the web
25
Browse the web
To open the browser, tap , and select
Open new browser window or a bookmark.
Before you can connect to the internet, you must define
the proper internet connection settings. For detailed
instructions, see “Internet connections”, p. 19.
Important: Use only services that you trust and
that offer adequate security and protection
against harmful software.
Open and browse web pages
To open a web page, tap the address field at the bottom of
the screen, enter the address with the on-screen keyboard,
and tap .
If you saved a bookmark of a web page that you want to
visit, tap , and select the desired bookmark.
To reload the page, hold the stylus down briefly on and
select Reload. To stop loading the page, tap .
To browse and scroll a web page, drag a page in the desired
direction with the stylus, use the scroll keys, or drag the
scroll bars on the right side and bottom of the screen.
To browse recently visited pages, tap or .
A cache is a memory location that is used to store data
temporarily. If you have tried to access or have accessed
confidential information requiring passwords, empty the
cache after each use. The information or services you have
accessed are stored in the cache. To empty the cache,
select Web > Tools > Clear > Cache.
To view a page in a larger or smaller size, press or
. To select a predefined zoom level from the
application menu, select Web > View > Zoom and the
desired zoom level.
To view the web page in full screen size, press . To
return to normal view, press again.
To view the web page in optimized size, select Web >
View > Optimized view. The web page is fit to the width of
the screen; text and images are zoomed and scaled
differently, if necessary.
To change the web browser settings, select Web > Tools >
Settings. For more information, see the device help.
To add a bookmark to the current web page, hold the
stylus down on the web page for a second, and select
Add bookmark... from the context-sensitive menu.
Gagarin_UG_draft_9254711_101106.fm Page 25 Friday, October 13, 2006 6:36 AM
© 2006 Nokia. All rights reserved.
Browse the web
26
To save a link as a bookmark, hold the stylus down on the
link for a second, and select Add link to Bookmarks....
Manage bookmarks
To manage the bookmarks you saved in the device, tap ,
and select Manage bookmarks. In the bookmark manager,
you can add, move, copy, rename, delete, and open
bookmarks and folders.
The bookmark folders are shown on the left, and the
bookmarks in the selected folder on the right. To open a
folder and a bookmark contained in it, tap the folder, and
tap the bookmark twice.
Your device may have some bookmarks or links preinstalled
for or may allow access to sites provided by third parties
not affiliated with Nokia. Nokia does not endorse or
assume any liability for these sites. If you choose to access
them, you should take the same precautions, for security
or content, as you would with any internet site.
Gagarin_UG_draft_9254711_101106.fm Page 26 Friday, October 13, 2006 6:36 AM
© 2006 Nokia. All rights reserved.
Web communication
27
Web communication
To communicate over the web, you must have an active
network connection and registered user accounts and
passwords for internet call, instant messaging, and e-mail
services with service providers outside Nokia.
You can have multiple accounts for internet call and
instant messaging services. By default, your device
supports the Jabber and Google Talk services. You can also
create a new account for Jabber and Google Talk services
if you do not have an existing one.
It is recommended to use wireless LAN connection for
internet calls.
Accounts
To access the account setup wizard, tap , and select
Tools > Control panel > Accounts > New.
To complete and save the account settings, define the
following:
1. Account setup: Welcome—Tap Next to begin the account
setup.
2. Account setup: Service—Select the desired service from
the list, and tap Next.
3. Account setup: Select—Select Jabber or Google Talk
service. You are asked to confirm whether you want to
start using an existing Jabber or Google Talk account
with this device, or create a new account. If you select
to create a new Jabber or Google Talk account, you
need an active internet connection, because you
register the new account online.
If you selected to create a new Google Talk account,
tap Next to open a web page where a new Gmail
account can be created. After you have successfully
created the new account, return to the wizard.
4. Account setup: User name, define the following user
settings:
User name—Enter the user name for the account. If you
are defining a Google Talk user name, enter the full
Gmail user name (everything before @gmail.com).
Password—Enter a password for the account.
Verify password—Enter the password again. This option
is only available if you selected to create a new Jabber
account.
To define the advanced settings for the selected
account, tap Advanced. All accounts do not
Gagarin_UG_draft_9254711_101106.fm Page 27 Friday, October 13, 2006 6:36 AM
© 2006 Nokia. All rights reserved.
Web communication
28
necessarily have advanced settings. For more
information, see the device help.
To save the account settings, tap Finish.
To edit the settings of an account, set your presence status
to Off, select the account, and tap Edit. To delete an
account, select the account, and tap Delete.
Presence
Presence is a network service that allows you to share your
status with those who have access to the service and
request it.
When you create and register an account for internet call
and instant messaging service, your presence status is
connected to that account. Your presence status can be
one of the following:
On—You are displayed as “online” to all the contacts
that have access to your presence information. You are
able to send and receive communication
Away—You are displayed as “away” to all the contacts
that have access to your presence information. You are
able to send and receive communication.
Invisible—You are displayed as “offline” to all the
contacts that have access to your presence information.
However, you are still able to start communication with
your contacts. All services do not necessarily support this
status.
Off—You are disconnected you from the presence
server and cannot receive communication.
To change your presence status, tap on the status
indicator area. Selecting a presence status sets the status
to all your accounts at the same time.
To define your presence settings, tap , and select
Tools > Control panel > Presence.
Contacts
To manage contact information and start
communications with your contacts, tap , and select
View contacts.
The main view of Contacts displays the contact
information in two panes: the left pane lists available
groups, and the content pane on the right shows the
contacts of the selected group and their presence status.
To add a contact, select Contacts > Contact >
New contact....
To group contacts, drag them into the desired groups. You
can assign a contact to many groups, and a group can
contain many contacts.
Gagarin_UG_draft_9254711_101106.fm Page 28 Friday, October 13, 2006 6:36 AM
© 2006 Nokia. All rights reserved.
Web communication
29
To create a new group of contacts, select Contacts >
Group > New group.
To search for a contact, tap in the toolbar. Enter the
search words, and tap .
Select a contact from the list, and tap it. In the Contact
dialog, tap an available channel for communication:
to give a call to the contact
to chat with the contact
to send an e-mail message to the contact
Before you can start to communicate with your contacts,
you need to send an authorization request or response. An
authorization request is normally sent automatically when
you add a new contact. When a recipient receives an
authorization request and accepts it, the sender sees the
recipient’s presence status and can start communication.
When you remove a contact from your address book, the
authorization is also removed.
Instant messaging
This application allows you to instantly communicate with
people over the internet. To use this feature, you must have
an active network connection, a registered instant
messaging account with a service provider, and a presence
status that allows sending and receiving messages. By
default, your device supports the Jabber and Google Talk
services.
To access the Instant messaging application, tap , and
select New chat.
If you have not defined an account, you are requested to
do so. Follow the instructions on the screen to complete
and save the account settings.
To enter a chat room, select Chat > Enter chat room.... In the
Enter chat room dialog, enter the name of the chat room in
the Room name field, or select the room from the list of
previously used rooms. To join the chat room, tap OK.
If the chat room is protected by a password, the
Enter password dialog is displayed. To join the protected
chat, enter the correct password, and tap OK.
To write and send a chat message, tap the text field in the
chat toolbar, enter the message, and tap .
To add smileys to your messages, tap and select the
desired smiley.
The most recent message is always displayed at the
bottom of the list.
To end the chat, tap in the upper right corner of the
screen.
Gagarin_UG_draft_9254711_101106.fm Page 29 Friday, October 13, 2006 6:36 AM
© 2006 Nokia. All rights reserved.
Web communication
30
Internet call
Internet call is based on voice over internet protocol (VoIP)
that allows you to make and receive calls over the internet.
To use this feature, you must have an active network
connection, a registered internet call account with a
service provider, and a presence status that allows
receiving calls (On or Away).
Warning: Emergency calls are not supported.
To access the Internet call application, tap ,
and select New Internet call.
If you have not defined an account, you are requested to
do so. Follow the instructions on the screen to complete
and save the account settings.
You can only have one internet call at a time. No group or
conference calls are possible.
The Incoming call dialog is displayed when you receive an
incoming internet call. To answer the call, tap . To reject
the call, tap . To silence the call, tap . To block the
call, tap , and select Block caller. All incoming call
requests from that caller are rejected, and you receive no
indication of them.
To adjust the volume of an internet call, drag the volume
slider with the stylus. To mute a call, tap below the
volume slider. When the call is muted, you can listen to
what the other person is saying, but that person cannot
hear your voice. To unmute the call, tap the icon again.
Warning: Do not hold the device near your ear
when the loudspeaker is in use, because the
volume may be extremely loud.
To end an internet net call, tap . When you end a call,
a call summary is displayed.
All recent calls are registered in a log. The log remains in
the device as long as the device is powered on. If the
device is rebooted, the log is deleted.
Nokia Internet Call Invitation (Beta)
Nokia Nxxx also supports internet calls with video. See
www.nokia.com/nxxx for more information about
services supporting video calls.
With Nokia Internet Call Invitation (Beta) you can invite
contacts to internet voice and video calls through chat or
e-mail. This feature supports communication between a
Nokia Nxxx device and a compatible PC or two Nokia
Nxxx devices. You need to have an internet connection to
set up and use this feature.
1. To set up Nokia Internet Call Invitation (Beta), tap ,
select Nokia Instant Video/Voice Call - Send invitation,
and tap OK.
Gagarin_UG_draft_9254711_101106.fm Page 30 Friday, October 13, 2006 6:36 AM
© 2006 Nokia. All rights reserved.
Web communication
31
2. Enter a desired display name shown to your contacts
and tap OK.
After a successful setup, you can invite contacts to
internet voice or video calls through chat or e-mail by
tapping and selecting
Nokia Instant Video/Voice Call - Send invitation.
In second time use, you can call your invited contacts
directly through the contacts list (after your contact has
also set up the feature). Tap and select
View contacts.
Web camera
You can use the web camera to send video stream in the
call handling application. If video call has not been
activated, the application shows video stream in idle view
as a preview.
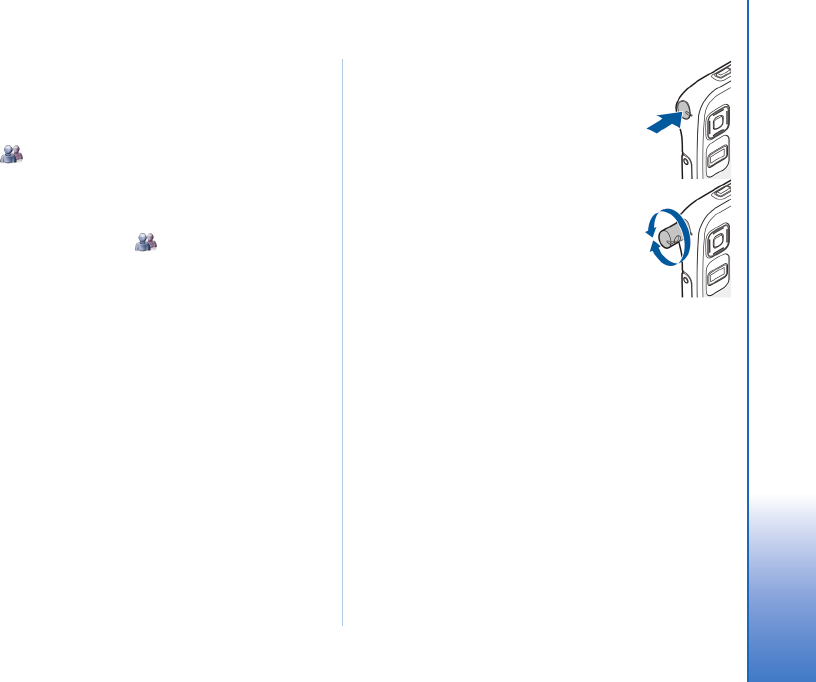
The web camera is located in the upper
left corner of your device.
To launch the web camera, press the
camera inwards in its slot and it pops out.
You can rotate the camera forwards and
backwards.
To define whether the call idle camera
preview is launched when the camera is
launched, in the internet call application,
select Tools > Settings and select or
unselect the Start when camera opened:
box.
In the internet call application, if a call is active and you
launch the web camera, the video preview is displayed
unless you have unselected the Start when camera opened:
box.
E-mail
To send and receive e-mail messages, you must have an
active internet connection and a registered e-mail
account with a service provider. For appropriate settings,
contact the e-mail service provider.
Gagarin_UG_draft_9254711_101106.fm Page 31 Friday, October 13, 2006 6:36 AM

© 2006 Nokia. All rights reserved.
Web communication
32
Create an e-mail account
To create an e-mail account, do the following:
1. Tap , and select View inbox. The e-mail account
setup wizard opens.
If you already saved settings for a remote e-mail
account, select E-mail > Accounts > New account... to
create a new e-mail account.
2. Select E-mail account setup 1/4 and from the following
settings:
Account name—Enter a descriptive name for your
account.
Account type—Select the e-mail protocol that your
e-mail service provider recommends. This setting can
be selected only once and cannot be changed after you
save the account settings or exit the wizard. Tap Next.
3. Select E-mail account setup 2/4 and from the following
settings:
Name—Enter your name. The name is shown in the
sender field of the messages that you send.
User name—Enter your user name given to you by your
e-mail service provider. The user name is needed when
you log in to your mailbox.
Password—Enter your password. The password is
needed when you log in to your mailbox. If you leave
this field empty, you are prompted for a password
when you try to connect to your mailbox on the
e-mail server.
E-mail address—Enter the e-mail address given to you
by your e-mail service provider. The address must
contain the @ character. Replies to your messages are
sent to this address. Tap Next.
4. Select E-mail account setup 3/4 and from the following
settings:
Incoming server—Enter the host name or IP address of
the POP3 or IMAP4 server that receives your e-mail.
Outgoing server (SMTP)—Enter the host name or IP
address of the server through which your e-mail is
sent. Tap Next.
Simple mail transfer protocol (SMTP) servers are used
when sending e-mail. To be able to send e-mail, you
must define the SMTP host name or IP address, which
you obtain from the service provider of the connection
you use.
Use connection-specific SMTP servers:—Select this option
if you want to use connection specific SMTP servers
for sending e-mail messages.
Gagarin_UG_draft_9254711_101106.fm Page 32 Friday, October 13, 2006 6:36 AM
© 2006 Nokia. All rights reserved.
Web communication
33
Tip: The SMTP host name or IP address may be
different from the host name or IP address of
the incoming server (POP3 or IMAP4). For
example, when you access your internet service
provider e-mail over a cellular network, you
may need to utilize the SMTP server of the
cellular network. Thus, you may need to
configure as many mailboxes as you have
internet access networks, each mailbox having
a different SMTP host name or IP address.
SMTP servers:—Select this option and Configure if you
want to configure connection specific servers. Tap
Next.
5. Select E-mail account setup 4/4 and tap Advanced to
define optional e-mail settings, or tap Finish to
complete the mailbox setup.
It is very common that you need to modify the
advanced settings. For more information, see the
device help.
Retrieve and read e-mail messages
E-mail messages sent to you are not automatically
received by your device, but by your remote mailbox on the
e-mail server. To read your e-mail messages, you must first
connect to the mailbox and retrieve the messages.
To retrieve e-mail messages from a remote mailbox, select
E-mail > New Message > Send & receive, or tap in the
toolbar. This option retrieves messages from all accounts
set for the device.
If you want to receive messages only from a specific
account, in the application main view, hold the stylus on
the for a second, and select the desired account.
If you have e-mail messages in the Outbox folder, these
messages are sent simultaneously.
To retrieve the contents of a selected message, tap the
message header. You can set the device to only download
message headers. If the mailbox type is IMAP4, you can
also download a message without attachments. To open a
message, tap the header of the message twice.
To disconnect from a mailbox, tap the internet connection
icon on the status indicator area, and select
Disconnect. The internet connection ends.
To open an unread message from the task navigator, tap
, and select the desired message.
Important: Exercise caution when opening
messages. E-mail messages may contain
malicious software or otherwise be harmful to
your device or PC.
Gagarin_UG_draft_9254711_101106.fm Page 33 Friday, October 13, 2006 6:36 AM
© 2006 Nokia. All rights reserved.
Web communication
34
Create and send e-mail messages
To create a new e-mail message, do the following:
1. Tap , and select New e-mail message.
2. Write the recipient’s e-mail address. Add a semicolon
(;) or a comma (,) to separate multiple recipients. If the
recipients are in Contacts, tap , and select the
recipients from the list.
3. Fill in the subject, and write the message. To send the
message, tap .
Define basic e-mail settings
To edit various e-mail options, select E-mail > Tools >
Settings... and from the following:
Updating page
Update automatically—Define whether messages are
retrieved automatically or not.
Setting the device to retrieve e-mail automatically may
involve the transmission of large amounts of data through
you service provider’s network. Contact your service
provider for information about data transmission charges.
Update when connected via—Define which connection type
is used to update automatically.
Update interval—Define how often messages are updated.
The default value is 15 minutes.
Play sound when message arrives—Define whether a sound
is played when new message arrives.
Composing page
Default message format—Select the type of messages that
you can write and send with your device. The options are
Formatted text (HTML) and Plain text.
Include original in reply—Select this option to include the
original message when replying to a message.
Request read receipt—Select this option to receive a
notification after the recipient opens your message. You
can only receive a notification if the recipient’s e-mail
application supports this feature.
Clean-up page
Clean-up Sent folder—Define here whether you want the
sent folder to be emptied or not.
Remove messages older than—Define here the clean-up
interval. The default value is 30 days.
Define advanced settings
Select E-mail> Accounts > Manage.... Select the account
you wish to edit, proceed to the last page, and tap
Gagarin_UG_draft_9254711_101106.fm Page 34 Friday, October 13, 2006 6:36 AM

© 2006 Nokia. All rights reserved.
Web communication
35
Advanced after you have finished defining your basic
e-mail account settings. The Advanced settings for dialog
allows you to set incoming, outgoing, and other options for
your e-mail account.
Please contact your service provider for appropriate
settings.
Incoming page
RetrieveMessages is only available if the mailbox type is
IMAP4.
Leave messages on server—Select this option if you want to
leave messages on the server after you retrieve them to
your device. This option is only available if the mailbox
type is POP3.
No. of messages to retrieve—Define the number of new
message headers you want to display in the inbox folder. If
you retrieve new headers and the total amount of headers
in the inbox folder exceeds this limit, the older headers are
removed. This option is only available if the mailbox type
is IMAP4.
Password authentication—Select this option to encrypt the
sending of passwords to an e-mail server. This option is
only available if the mailbox type is POP3. This option is
automatically set to Normal if the account type is IMAP4.
Security—Specify a security setting for the server
connection for incoming e-mail messages. The options are
none, TLS, and SSL.
Incoming e-mail port—Enter the port number of the
incoming e-mail server. Normally you do not have to
change the default value.
Outgoing page
SMTP authentication—Select the authentication method
for the SMTP server. Some SMTP servers require that the
user is authenticated before e-mail can be sent.
User name—Enter your user name for the SMTP server. By
default, your device displays the user name you have
entered for the incoming server in E-mail account setup 2/4.
Password—Enter your password for the SMTP server. By
default, your device displays the password you have
entered for the incoming server inE-mail account setup 2/4.
Security—Specify a security setting for the server
connection for outgoing e-mail messages. The options are
none, TLS, and SSL.
Outgoing e-mail port—Enter the port number of the
outgoing e-mail server. Normally you do not have to
change the default value.
Gagarin_UG_draft_9254711_101106.fm Page 35 Friday, October 13, 2006 6:36 AM
© 2006 Nokia. All rights reserved.
Web communication
36
Security page
Encrypt messages by default—Select this option if you want
to encrypt the e-mail messages you create.
Digitally sign messages by default—Select this option if you
want to sign digitally the e-mail messages. Using this
option requires a certificate that authenticates your
identity and verifies to the recipient that the message is
from you.
Display security indication for:—Select the situations in
which the security indication is displayed. The options are
All encrypted and digitally signed messages,
All untrusted digital IDs.
Inbox folder
The Inbox folder contains received messages. The headers
of unread messages are shown in bold.
Tap to send a new message.
Tap to reply to a message.
Tap to send a reply to the sender of a message and to
the recipients in the CC field.
Tap to forward a message.
Tap to delete a message.
Tap to send all unsent messages and receive all new
messages.
To search for a message, select E-mail > Tools >
Search messages....
Outbox folder
Messages waiting to be sent are saved temporarily in the
Outbox folder. The status of each message is shown next
to the message header. To send the selected message
again, tap .To cancel the sending of the selected
message, tap .
Sent folder
After a message is sent, it is moved to the Sent folder. To
specify the cleaning up of the Sent folder, select
E-mail > Tools > Settings... > Clean-up.
Define the following:
Clean-up Sent folder—Select this option to allow automatic
deletion of sent messages.
Remove messages older than—Select how often the sent
messages are deleted.
Drafts folder
In the Drafts folder, you can save unfinished messages or
messages that you want to send later.
Gagarin_UG_draft_9254711_101106.fm Page 36 Friday, October 13, 2006 6:36 AM

© 2006 Nokia. All rights reserved.
Media player
37
Media player
The Media player application makes it possible to
experience media. You can listen to music and other audio
files stored on your device or a compatible memory card (if
inserted) and audio streams from the internet. You can
also watch video clips stored on your device or memory
card, or watch streaming videos from the internet.
Through the media player, you can also stream content
from available Universal Plug and Play (UPnP) media
servers. Tap , and select Media player.
Media sources
You can access and launch media clips by using the media
player Library. The media player scans your device and your
memory cards automatically (when inserted). The found
media clips and the available UPnP media servers are
displayed in the Library automatically.
Scanning the memory card takes some time, so content in
the card may not be available immediately after inserting
the card.
The media player library includes the following top
categories by default:
•Music—Includes audio media stored locally. You can
browse your audio clips by different categories, for
example, by album or by artist.
•Video—Includes video media stored locally.
•Internet radio—Includes links to radio streams.
UPnP media servers also appear on the list if they are
available.
Internet radio
With Internet radio you can listen to internet radio
channels or any other compatible audio streams. The
internet radio supports MP3 file format, and ASX, M3U,
PLS, RAM, RPM, WAX, and WPL playlists.
Internet radio does not necessarily support all features of
a file format or all the variations of file formats.
There are two ways to add a radio channel to the list from
the web browser, depending on the format of the stream.
1. In the web browser, search for the desired radio
channel stream, hold the stylus down on the link for a
second, and use the context sensitive menu.
Gagarin_UG_draft_9254711_101106.fm Page 37 Friday, October 13, 2006 6:36 AM
© 2006 Nokia. All rights reserved.
Media player
38
Select the Add link to media library... menu item if it is on
the menu. The radio channel is added to the list of radio
channels in the media library.
If the Add link to media library... menu item is not
provided, select Copy link location.
2. In Media player, add Tools > Add radio channel to library...
Tap the web address field, and paste the link of the
radio channel stream. Select to save the link to the
stream as a radio channel, and tap OK.
To listen to a radio channel, select Media player > Library >
Internet radio and the desired channel from the list, and
tap .
To stop listening, tap .
To adjust the volume, tap , and drag the slider with the
stylus. To close the volume control dialog, tap anywhere
outside it.
UPnP media servers
Universal Plug and Play (UPnP) technology allows devices
to connect seamlessly and simplifies the implementation
of networks for data sharing, communications, and
entertainment in the home environment.
UPnP media servers are available for most operating
systems and many hardware platforms and enable you to
store and share your media files (pictures, video, audio,
and multimedia files).
Your Nokia Nxxx functions as a UPnP client and can
auto-detect UPnP media servers as long as they are
connected to the same local network as your device and
are configured accordingly.
File formats
The media player application supports M3U and PLS
playlist file formats. Some other playlists, such as ASX,
WAX, WPL, and WVX are supported only partially.
The supported audio file formats are: AAC, AMR, AWB,
M4A, MP2, MP3, RA, WAV, and WMA.
The supported network streamable audio formats are:
AAC, AMR, AWB, M4A, MP2, MP3, RA, and WAV.
Streaming performance depends on the bandwidth
availability.
Gagarin_UG_draft_9254711_101106.fm Page 38 Friday, October 13, 2006 6:36 AM
© 2006 Nokia. All rights reserved.
Media player
39
The supported video file formats are:
Media player does not necessarily support all features of a
file format or all the variations of file formats.
Extension Container Video Audio Resolution
Up To
*.AVI
Audio
Video
Interleave
MPEG4
(SP L2) MP3 VGA
(640x480)
*.AVI
Audio
Video
Interleave
H.263
(Profile 0,
Level 10)
MP3 VGA
(640x480)
*.3GP 3GPP MPEG4
(SP L2) AAC QCIF
(176x144)
*.3GP 3GPP MPEG4
(SP L2) AMR QCIF
(176x144)
*.3GP 3GPP
H.263
(Profile 0,
Level 10)
AAC QCIF
(176x144)
*.3GP 3GPP
H.263
(Profile 0,
Level 10)
AMR QCIF
(176x144)
*.MP4 MPEG4 AAC CIF (352x288)
*.MPE
*.MPEG
*.MPG
MPEG1 MP2 CIF (352x288)
*.RM
*.RV
*.RMVB
RealMedia RealVideo RealAudio QVGA
(320x240)
Gagarin_UG_draft_9254711_101106.fm Page 39 Friday, October 13, 2006 6:36 AM
© 2006 Nokia. All rights reserved.
Other applications
40
Other applications
RSS feed reader
You can receive and read RSS news feeds from service
providers. The service provider may be a news agency,
entertainment site, or an individual who writes an online
diary or journal.
Tap , and select RSS feed reader. The news folders and
feeds you have created are shown on the left. There may
also be predefined folders and feeds.
To subscribe to a news feed, do the following:
1. In the web browser, search for a link labeled XML or
RSS and tap the link. Alternatively, use the context-
sensitive menu to copy the address of the link. Hold the
stylus down on the link for a second, and select
Copy link location.
2. In RSS feed reader, tap on the application toolbar,
and paste the address of the news feed to the Add feed
dialog.
The RSS feed reader supports the following file formats:
Rich Site Summary, RDF Site Summary, Really Simple
Syndication (all are also known as RSS), and Atom.
To refresh all feeds or only the selected one, tap on the
application toolbar, and select the desired option. The
articles of the selected feeds are updated, and the old
articles are deleted if you have not saved them for later
use.
To stop the refreshing, press , or tap . To set the
refresh method of news articles, select Refresh feeds.
You can update the feeds automatically, update when
connected to WLAN or any other network, and select the
update interval. If the setting to update the feeds
automatically is disabled, the feeds are not refreshed
automatically.
Images
To view images stored on your device, compatible mobile
phone, or memory card, tap , and select Images.
The image viewer supports the following file formats:
BMP, GIF, ICO, JPE, JPEG, JPG, PNG, SVG Tiny, TIF, TIFF, and
WBMP. The image viewer does not necessarily support all
variations of a file format.
Gagarin_UG_draft_9254711_101106.fm Page 40 Friday, October 13, 2006 6:36 AM
© 2006 Nokia. All rights reserved.
Tools
41
Tools
Application manager
With Application manager, you can install new applications
and other extensions from the application catalogs
(repositories) on the internet and from the inbox, web
links, or the File manager. You can also view and update
installed packages and uninstall them.
Tap , and select Tools > Application manager.
Important: Only install and use applications and
other software from trusted sources.
Connection manager
To monitor and manage connections established with the
device, tap , and select Tools > Connection manager.
Control panel
To perform configuration and customization tasks, tap ,
and select Tools > Control panel. Select from the following
functions and settings:
About product—View information about your device and
end-user licenses.
Accounts—Define account settings for internet call and
instant messaging services.
Bluetooth—Change the Bluetooth connectivity name of
your Nokia Nxxx device, and set its visibility.
Certificate manager—View and manage digital certificates
on your device.
Connectivity—Define which internet connections are used
automatically. Set idle times for all connection types.
Create and edit internet access points.
Date and time—Select the home city, date, time, and
enable or disable the daylight savings zone option.
Device lock—Turn on the automatic device lock, set the
time-out period, and change the device lock code.
Display—Change the brightness of the display, set the
automatic lock for touch screen and keys, switch the LED
lights off or on, and define how soon the display
brightness decreases to save power and how soon the
display is turned off.
Hardware keyboard—Configure items related to an external
hardware keyboard supporting Bluetooth wireless
technology.
Gagarin_UG_draft_9254711_101106.fm Page 41 Friday, October 13, 2006 6:36 AM

© 2006 Nokia. All rights reserved.
Tools
42
Language & region—Select your region and device language.
Memory—View the memory status of the device and the
inserted memory card.
Navigation—Customize the content of the task navigator
area, and modify the menu.
Phone—Pair a phone with your device.
Presence—Select your presence status, and set the
auto-away period.
Screen calibration—Calibrate the touch screen.
Sounds—Set the master volume, or mute all device sounds.
Select the level of system alerts, key sounds, and touch
screen sounds.
Text input settings—Teach the device your handwriting style,
set default and alternative text input languages, set
character recognition speed, and turn word completion on
or off.
Themes—Customize the look and feel of your device.
To open a function or a group of settings, tap it once.
To restore original factory settings, select Control panel >
Tools > Restore original settings.... This function does not
affect the content you have created, security codes,
passwords, the device language, or game scores. However,
it removes, for example, account user names defined for
instant messaging and internet call.
To clear user data from the device, select Control panel >
Tools > Clear user data.... This function does not affect the
applications you have installed.
To install connection settings from the mobile operator
database, select Control panel > Tools >
Mobile operator setup wizard....
File manager
In File manager, you can move, copy, rename, delete, and
open files and folders available in the device, paired
devices using Bluetooth technology and supporting file
transfer, or memory cards inserted in them.
The File manager also displays the shared content of
available UPnP media servers.
Tap , and select File manager. The main folders are
shown on the left and the subfolders and files on the
right.
Gagarin_UG_draft_9254711_101106.fm Page 42 Friday, October 13, 2006 6:36 AM
© 2006 Nokia. All rights reserved.
Utilities and games
43
Utilities and games
Calculator
Note: This calculator has limited accuracy and is
designed for simple calculations.
To access the calculator, tap , and select Utilities >
Calculator.
Clock
To set the date and time, select an analog or digital clock,
set alarms, and access language and regional settings, tap
, and select Utilities > Clock, or tap the date and time on
the right of the screen.
Notes
To create and save text notes, and send them through
e-mail, tap , and select Utilities > Notes.
The notes application supports the following file formats:
ascii (plain text with no formatting) and .note.html
(formatted text). The application does not support the full
.html file format.
PDF reader
To view documents in portable document format (PDF),
tap , and select Utilities > PDF reader.
Sketch
To draw simple images and send them through e-mail, tap
, and select Utilities > Sketch. All sketches are saved in
.png format.
Games
Your device has a set of games.
To start a game, tap , and select Games and the desired
game. In the game start-up screen, tap Play.
For more information on how to use the tools, utilities,
and games in your device, see the device help.
Gagarin_UG_draft_9254711_101106.fm Page 43 Friday, October 13, 2006 6:36 AM
© 2006 Nokia. All rights reserved.
PC connectivity
44
PC connectivity
You can connect your device to a compatible PC with the
supplied Nokia Connectivity Cable DKE-2 (USB). Use the
USB data cable to transfer files to a compatible memory
card and to update the latest software on your device.
When the USB cable is connected, the memory card(s) of
your Nokia Nxxx is listed as a mass storage device on your
PC, and is displayed on your device. To be able to
transfer files from the PC to the device, you must have a
compatible memory card installed in the device.
When the USB cable is connected, you cannot access the
information on the memory card with your device.
However, you can transfer files from your PC to the
memory card, and view the contents of the memory card
on your PC.
Important: Do not remove the USB cable in the
middle of an operation when the device is being
accessed. Removing the cable in the middle of
an operation may damage the memory card as
well as the device, and data stored may be
corrupted. When you are finished with file
transfer, do not just pull the USB cable from the
PC, but follow the proper procedures to
disconnect your device from the PC. For more
information, see the user guide of your PC.
Software update
To be able to update the software on your device, you
must first install the Nokia Internet Tablet Software
Update Wizard on your compatible PC. You must also
have the USB cable and a fully charged battery for your
device.
For more information on the software update, check
www.nokia.com/nxxx.
Tip: To check the version number of the current
software on your device, tap , and select
Tools > Control panel > About product.
Gagarin_UG_draft_9254711_101106.fm Page 44 Friday, October 13, 2006 6:36 AM

© 2006 Nokia. All rights reserved.
Battery information
45
Battery information
Charging and discharging
Your device is powered by a rechargeable battery. The
battery can be charged and discharged hundreds of times,
but it will eventually wear out. When the operating and
standby times are noticeably shorter than normal, replace
the battery. Use only Nokia approved batteries, and
recharge your battery only with Nokia approved chargers
designated for this device.
If a replacement battery is being used for the first time or
if the battery has not been used for a prolonged period, it
may be necessary to connect the charger, then disconnect
and reconnect it to begin charging the battery.
Unplug the charger from the electrical plug and the device
when not in use. Do not leave a fully charged battery
connected to a charger, since overcharging may shorten its
lifetime. If left unused, a fully charged battery will lose its
charge over time.
If the battery is completely discharged, it may take several
minutes before the charging indicator appears on the
display.
Use the battery only for its intended purpose. Never use
any charger or battery that is damaged.
Do not short-circuit the battery. Accidental
short-circuiting can occur when a metallic object such as
a coin, clip, or pen causes direct connection of the positive
(+) and negative (-) terminals of the battery. (These look
like metal strips on the battery.) This might happen, for
example, when you carry a spare battery in your pocket or
purse. Short-circuiting the terminals may damage the
battery or the connecting object.
Leaving the battery in hot or cold places, such as in a
closed car in summer or winter conditions, will reduce the
capacity and lifetime of the battery. Always try to keep
the battery between 15°C and 25°C (59°F and 77°F). A
device with a hot or cold battery may not work
temporarily, even when the battery is fully charged.
Battery performance is particularly limited in
temperatures well below freezing.
Do not dispose of batteries in a fire as they may explode.
Batteries may also explode if damaged. Dispose of
batteries according to local regulations. Please recycle
when possible. Do not dispose as household waste.
Do not dismantle or shred cells or batteries. In the event
of a battery leak, do not allow the liquid to come in
contact with the skin or eyes. In the event of such a leak,
Gagarin_UG_draft_9254711_101106.fm Page 45 Friday, October 13, 2006 6:36 AM
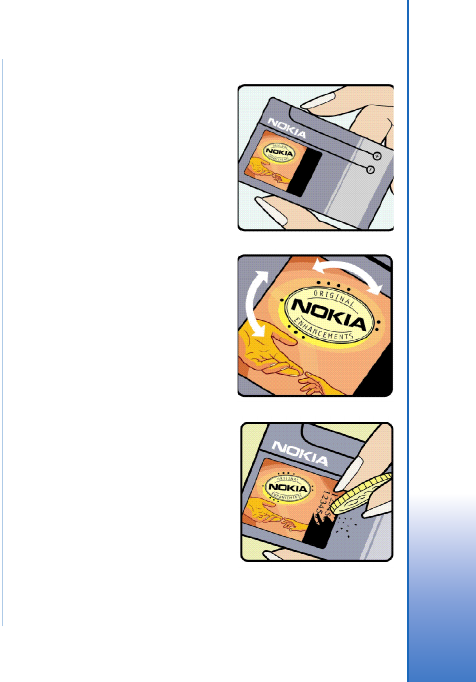
© 2006 Nokia. All rights reserved.
Battery information
46
flush your skin or eyes immediately with water, or seek
medical help.
Nokia battery authentication
guidelines
Always use original Nokia batteries for your safety. To
check that you are getting an original Nokia battery,
purchase it from an authorized Nokia dealer, look for the
Nokia Original Enhancements logo on the packaging, and
inspect the hologram label using the following steps:
Successful completion of the four steps is not a total
assurance of the authenticity of the battery. If you have
any reason to believe that your battery is not an authentic,
original Nokia battery, you should refrain from using it,
and take it to the nearest authorized Nokia service point or
dealer for assistance. Your authorized Nokia service point
or dealer will inspect the battery for authenticity. If
authenticity cannot be verified, return the battery to the
place of purchase.
Authenticate hologram
1When looking at the
hologram on the label, you
should see the Nokia
connecting hands symbol
from one angle and the
Nokia Original
Enhancements logo when
looking from another angle.
2When you angle the
hologram left, right, down,
and up, you should see 1, 2,
3, and 4 dots on each side
respectively.
3Scratch the side of the label
to reveal a 20-digit code, for
example,
12345678919876543210.
Turn the battery so that the
numbers are facing upwards.
The 20-digit code reads
starting from the number at
the top row followed by the
bottom row.
Gagarin_UG_draft_9254711_101106.fm Page 46 Friday, October 13, 2006 6:36 AM
© 2006 Nokia. All rights reserved.
Battery information
47
4 Confirm that the 20-digit
code is valid by following the
instructions at
www.nokia.com/
batterycheck.
What if your battery is not authentic?
If you cannot confirm that your Nokia battery with the
hologram on the label is an authentic Nokia battery, please
do not use the battery. Take it to the nearest authorized
Nokia service point or dealer for assistance. The use of a
battery that is not approved by the manufacturer may be
dangerous and may result in poor performance and
damage to your device and its enhancements. It may also
invalidate any approval or warranty applying to the device.
To find out more about original Nokia batteries, visit
www.nokia.com/battery.
Gagarin_UG_draft_9254711_101106.fm Page 47 Friday, October 13, 2006 6:36 AM

© 2006 Nokia. All rights reserved.
Care and maintenance
48
Care and maintenance
Your device is a product of superior design and
craftsmanship and should be treated with care. The
following suggestions will help you protect your warranty
coverage.
• Keep the device dry. Precipitation, humidity, and all
types of liquids or moisture can contain minerals that
will corrode electronic circuits. If your device does get
wet, remove the battery, and allow the device to dry
completely before replacing it.
• Do not use or store the device in dusty, dirty areas. Its
moving parts and electronic components can be
damaged.
• Do not store the device in hot areas. High temperatures
can shorten the life of electronic devices, damage
batteries, and warp or melt certain plastics.
• Do not store the device in cold areas. When the device
returns to its normal temperature, moisture can form
inside the device and damage electronic circuit boards.
• Do not attempt to open the device other than as
instructed in this guide.
• Do not drop, knock, or shake the device. Rough
handling can break internal circuit boards and fine
mechanics.
• Do not use harsh chemicals, cleaning solvents, or
strong detergents to clean the device.
• Do not paint the device. Paint can clog the moving
parts and prevent proper operation.
• Use a soft, clean, dry cloth to clean any lenses, such as
camera, proximity sensor, and light sensor lenses.
• Use chargers indoors.
• Always create a backup of data you want to keep, such
as contacts and calendar notes.
• To reset the device from time to time for optimum
performance, power off the device and remove the
battery.
These suggestions apply equally to your device, battery,
charger, or any enhancement. If any device is not working
properly, take it to the nearest authorized service facility
for service.
Gagarin_UG_draft_9254711_101106.fm Page 48 Friday, October 13, 2006 6:36 AM

© 2006 Nokia. All rights reserved.
Additional safety information
49
Additional safety
information
Small children
Your device and its enhancements may contain small
parts. Keep them out of the reach of small children.
Operating environment
This device meets RF exposure guidelines when used either
in the normal use position or when positioned at least
1.0 centimeters (3/8 inches) away from the body. When a
carry case, belt clip, or holder is used for body-worn
operation, it should not contain metal and should position
the device the above-stated distance from your body.
To transmit data files or messages, this device requires a
quality connection to the network. In some cases,
transmission of data files or messages may be delayed
until such a connection is available. Ensure the above
separation distance instructions are followed until the
transmission is completed.
Parts of the device are magnetic. Metallic materials may
be attracted to the device. Do not place credit cards or
other magnetic storage media near the device, because
information stored on them may be erased.
Gagarin_UG_draft_9254711_101106.fm Page 49 Friday, October 13, 2006 6:36 AM

© 2006 Nokia. All rights reserved.
Open source software notice
50
Open source software
notice
This product includes certain software originating from
third parties that is subject to 1. the GNU Library/Lesser
General Public License (LGPL), 2. the GNU General Public
License (GPL), and 3. different and/or additional copyright
licenses, disclaimers, acknowledgements, and notices. The
LGPL, GPL and said certain other licenses are available at
www.nokia.com/support/xxx. You may obtain a complete
corresponding machine-readable copy of the source code
of such software under the LGPL and the GPL at
www.nokia.com/support/xxx. Alternatively, Nokia offers to
provide such source code to you on CD-ROM for a charge
covering the cost of performing such distribution, such as
the cost of media, shipping, and handling, upon written
request to Nokia at:
Source Code Requests
Multimedia
Nokia Corporation
P.O.Box 407
FI-00045 Nokia Group
FINLAND
This offer is valid for a period of three (3) years from the
date of the distribution of this product by Nokia. Please
refer to the exact terms of the LGPL and the GPL regarding
your rights under said licenses.
This software is based in part on the work of the
Independent JPEG Group.
The Graphics Interchange Format© is the Copyright
property of CompuServe Incorporated. GIF SM is a Service
Mark property of CompuServe Incorporated.
This product includes software developed by:
• Computing Services at Carnegie Mellon University
(http://www.cmu.edu/computing/)
• Tommi Komulainen <Tommi.Komulainen@iki.fi>
• The Australian National University
• The OpenSSL Project for use in the OpenSSL Toolkit
(http://www.openssl.org/)
• Gregory M. Christy
• Pedro Roque Marques
• Eric Rosenquist, Strata Software Limited
• The XFree86 Project, Inc (http://www.xfree86.org/)
and its contributors
• The FreeType Team
Gagarin_UG_draft_9254711_101106.fm Page 50 Friday, October 13, 2006 6:36 AM

© 2006 Nokia. All rights reserved. 51
Nokia One-Year Limited
Warranty
Nokia Inc. (“Nokia”) warrants that this cellular phone
(“Product”) is free from defects in material and workmanship
that result in Product failure during normal usage, according
to the following terms and conditions:
1. The limited warranty for the Product extends for ONE (1)
year beginning on the date of the purchase of the Product.
This one year period is extended by each whole day that the
Product is out of your possession for repair under this
warranty.
2. The limited warranty extends only to the original
purchaser (“Consumer”) of the Product and is not
assignable or transferable to any subsequent purchaser/
end-user.
3. The limited warranty extends only to Consumers who
purchase the Product in the United States of America.
4. During the limited warranty period, Nokia will repair, or
replace, at Nokia’s sole option, any defective parts, or any
parts that will not properly operate for their intended use
with new or refurbished replacement items if such repair
or replacement is needed because of product malfunction
or failure during normal usage. No charge will be made to
the Consumer for any such parts. Nokia will also pay for
the labor charges incurred by Nokia in repairing or
replacing the defective parts. The limited warranty does
not cover defects in appearance, cosmetic, decorative or
structural items, including framing, and any non-
operative parts. Nokia’s limit of liability under the limited
warranty shall be the actual cash value of the Product at
the time the Consumer returns the Product for repair,
determined by the price paid by the Consumer for the
Product less a reasonable amount for usage. Nokia shall
not be liable for any other losses or damages. These
remedies are the Consumer’s exclusive remedies for
breach of warranty.
5. Upon request from Nokia, the Consumer must prove the
date of the original purchase of the Product by a dated
bill of sale or dated itemized receipt.
6. The Consumer shall bear the cost of shipping the Product
to Nokia. Nokia shall bear the cost of shipping the Product
back to the Consumer after the completion of service
under this limited warranty.
7. The Consumer shall have no coverage or benefits under
this limited warranty if any of the following conditions
are applicable:
a) The Product has been subjected to abnormal use,
abnormal conditions, improper storage, exposure to
moisture or dampness, unauthorized modifications,
unauthorized connections, unauthorized repair,
Gagarin_UG_draft_9254711_101106.fm Page 51 Friday, October 13, 2006 6:36 AM
© 2006 Nokia. All rights reserved.
52
misuse, neglect, abuse, accident, alteration, improper
installation, or other acts which are not the fault of
Nokia, including damage caused by shipping.
b) The Product has been damaged from external causes
such as collision with an object, or from fire, flooding,
sand, dirt, windstorm, lightning, earthquake or damage
from exposure to weather conditions, an Act of God,
or battery leakage, theft, blown fuse, or improper use
of any electrical source, damage caused by computer
or internet viruses, bugs, worms, Trojan Horses,
cancelbots or damage caused by the connection to
other products not recommended for interconnection
by Nokia.
c) Nokia was not advised in writing by the Consumer of
the alleged defect or malfunction of the Product
within fourteen (14) days after the expiration of the
applicable limited warranty period.
d) The Product serial number plate or the enhancement
data code has been removed, defaced or altered.
e) The defect or damage was caused by the defective
function of the cellular system or by inadequate signal
reception by the external antenna, or viruses or other
software problems introduced into the Product.
8. Nokia does not warrant uninterrupted or error-free
operation of the Product. If a problem develops during
the limited warranty period, the Consumer shall take the
following step-by-step procedure:
a) The Consumer shall return the Product to the place of
purchase for repair or replacement processing.
b) If “a” is not convenient because of distance (more than
50 miles) or for other good cause, the Consumer shall
ship the Product prepaid and insured to Nokia.
See www.nokiausa.com/support for the address of
the repair center nearest you.
c) The Consumer shall include a return address, daytime
phone number and/or fax number, complete
description of the problem, proof of purchase and
service agreement (if applicable). Expenses related to
removing the Product from an installation are not
covered under this limited warranty.
d) The Consumer will be billed for any parts or labor
charges not covered by this limited warranty. The
Consumer will be responsible for any expenses related
to reinstallation of the Product.
e) Nokia will repair the Product under the limited
warranty within 30 days after receipt of the Product. If
Nokia cannot perform repairs covered under this
limited warranty within 30 days, or after a reasonable
number of attempts to repair the same defect, Nokia at
its option, will provide a replacement Product or
refund the purchase price of the Product less a
reasonable amount for usage. In some states the
Consumer may have the right to a loaner if the repair
of the Product takes more than ten (10) days.
Gagarin_UG_draft_9254711_101106.fm Page 52 Friday, October 13, 2006 6:36 AM

© 2006 Nokia. All rights reserved. 53
Please contact the Customer Service Center at Nokia at
the telephone number listed at the end of this warranty
if you need a loaner and the repair of the Product has
taken or is estimated to take more than ten (10) days.
f) If the Product is returned during the limited warranty
period, but the problem with the Product is not covered
under the terms and conditions of this limited
warranty, the Consumer will be notified and given an
estimate of the charges the Consumer must pay to
have the Product repaired, with all shipping charges
billed to the Consumer. If the estimate is refused, the
Product will be returned freight collect. If the Product
is returned after the expiration of the limited warranty
period, Nokia’s normal service policies shall apply and
the Consumer will be responsible for all shipping
charges.
9. You (the Consumer) understand that the product may
consist of refurbished equipment that contains used
components, some of which have been reprocessed. The
used components comply with Product performance and
reliability specifications.
10. ANY IMPLIED WARRANTY OF MERCHANTABILITY, OR
FITNESS FOR A PARTICULAR PURPOSE OR USE, SHALL BE
LIMITED TO THE DURATION OF THE FOREGOING LIMITED
WRITTEN WARRANTY. OTHERWISE, THE FOREGOING
LIMITED WARRANTY IS THE CONSUMER’S SOLE AND
EXCLUSIVE REMEDY AND IS IN LIEU OF ALL OTHER
WARRANTIES, EXPRESS OR IMPLIED. NOKIA SHALL NOT
BE LIABLE FOR SPECIAL, INCIDENTAL, PUNITIVE OR
CONSEQUENTIAL DAMAGES, INCLUDING BUT NOT
LIMITED TO LOSS OF ANTICIPATED BENEFITS OR PROFITS,
LOSS OF SAVINGS OR REVENUE, LOSS OF DATA, PUNITIVE
DAMAGES, LOSS OF USE OF THE PRODUCT OR ANY
ASSOCIATED EQUIPMENT, COST OF CAPITAL, COST OF
ANY SUBSTITUTE EQUIPMENT OR FACILITIES, DOWNTIME,
THE CLAIMS OF ANY THIRD PARTIES, INCLUDING
CUSTOMERS, AND INJURY TO PROPERTY, RESULTING
FROM THE PURCHASE OR USE OF THE PRODUCT OR
ARISING FROM BREACH OF THE WARRANTY, BREACH OF
CONTRACT, NEGLIGENCE, STRICT TORT, OR ANY OTHER
LEGAL OR EQUITABLE THEORY, EVEN IF NOKIA KNEW OF
THE LIKELIHOOD OF SUCH DAMAGES. NOKIA SHALL NOT
BE LIABLE FOR DELAY IN RENDERING SERVICE UNDER
THE LIMITED WARRANTY, OR LOSS OF USE DURING THE
PERIOD THAT THE PRODUCT IS BEING REPAIRED.
11. Some states do not allow limitation of how long an
implied warranty lasts, so the one year warranty limitation
may not apply to you (the Consumer). Some states do not
allow the exclusion or limitation of incidental and
consequential damages, so certain of the above
limitations or exclusions may not apply to you (the
Consumer). This limited warranty gives the Consumer
specific legal rights and the Consumer may also have other
rights which vary from state to state.
Gagarin_UG_draft_9254711_101106.fm Page 53 Friday, October 13, 2006 6:36 AM

© 2006 Nokia. All rights reserved.
54
12. Nokia neither assumes nor authorizes any authorized
service center or any other person or entity to assume for
it any other obligation or liability beyond that which is
expressly provided for in this limited warranty including
the provider or seller of any extended warranty or service
agreement.
13. This is the entire warranty between Nokia and the
Consumer, and supersedes all prior and
contemporaneous agreements or understandings, oral or
written, relating to the Product, and no representation,
promise or condition not contained herein shall modify
these terms.
14. This limited warranty allocates the risk of failure of the
Product between the Consumer and Nokia. The
allocation is recognized by the Consumer and is reflected
in the purchase price.
15. Any action or lawsuit for breach of warranty must be
commenced within eighteen (18) months following
purchase of the Product.
16. Questions concerning this limited warranty may be
directed to:
Nokia Inc.
Telephone: 1-888-NOKIA-2U (1-888-665-4228)
Facsimile: (813) 249-9619
TTY/TDD Users Only: 1-800-24-NOKIA (1-800-246-
6542)
Website: www.nokiausa.com/support
Gagarin_UG_draft_9254711_101106.fm Page 54 Friday, October 13, 2006 6:36 AM