Microtek Technology FILESCAN716W Business Card Scanner User Manual
Shanghai Microtek Technology Co.,ltd. Business Card Scanner
User manual
FS716W OSD User Manual
1 Preface
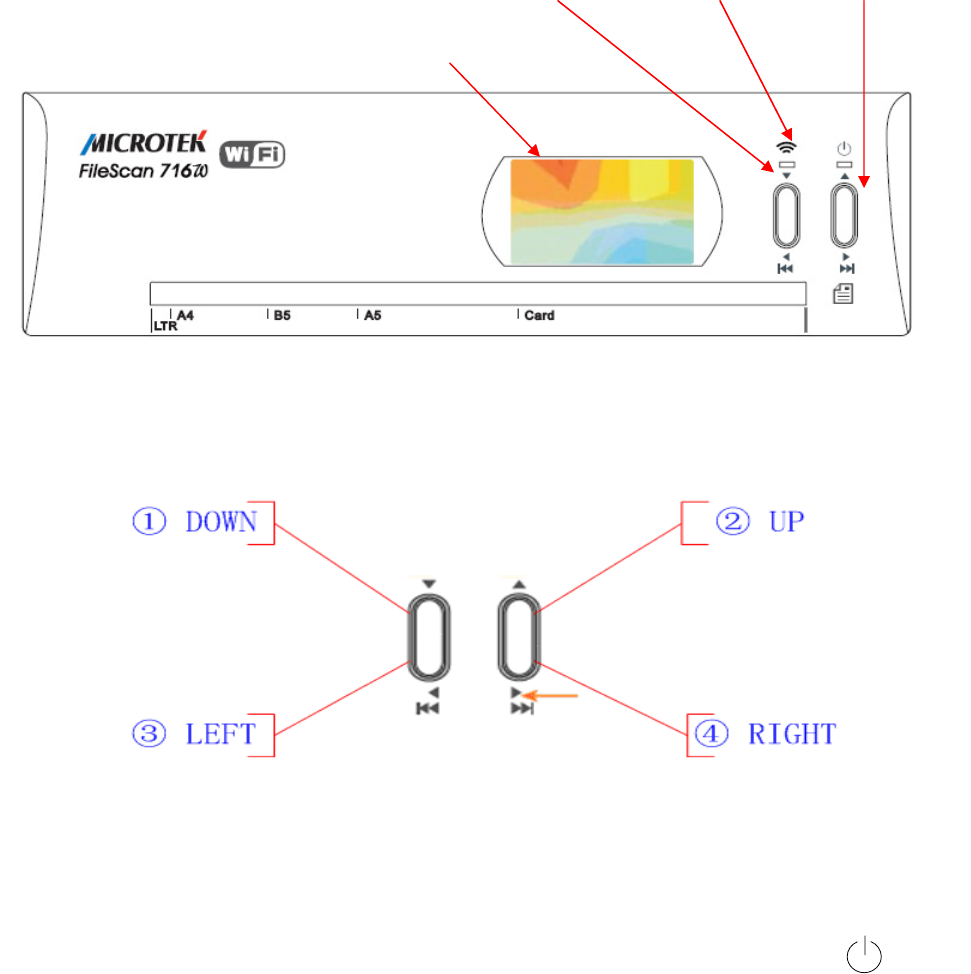
1.1 Scanner Outlook
Status Indicator WiFi Key Key
LCD
1.2 Function Keys Description
There are total 4 keys resided on top of the scanner
①DOWN : Select
②UP : Select, if this key is being pressed longer than 3s Æ Power ON/OFF( )
③LEFT : Return; Double arrows means key being pressed longer than 3s Æ
entering SETUP
④RIGHT : OK, Double arrows means key being pressed longer than 3s Æ can
also turn off the scanner.
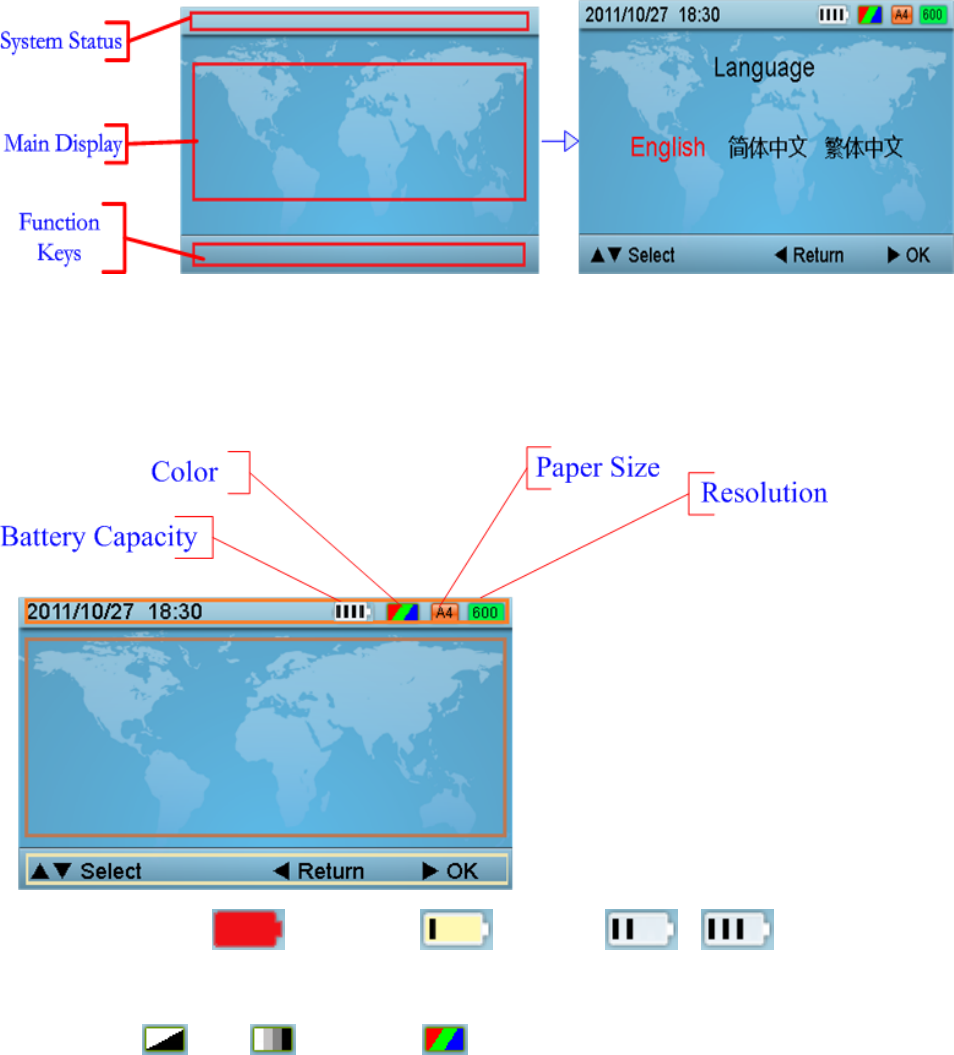
1.3 Display
1.3.1 Display Area Description
1.3.2 System Status Description
Battery Capacity: Red alarm, Pre-alarm, 、 (4 Bars =
100% - Fully charged).
Color Mode: B/W, Grayscale, Color
Resolution: 150dpi、200dpi、300dpi、600dpi。
Paper Size: A4 (Document), A5 (Photo), A8 (Business Card)
2 User Interface
2.1 System Boot-up (Starting)
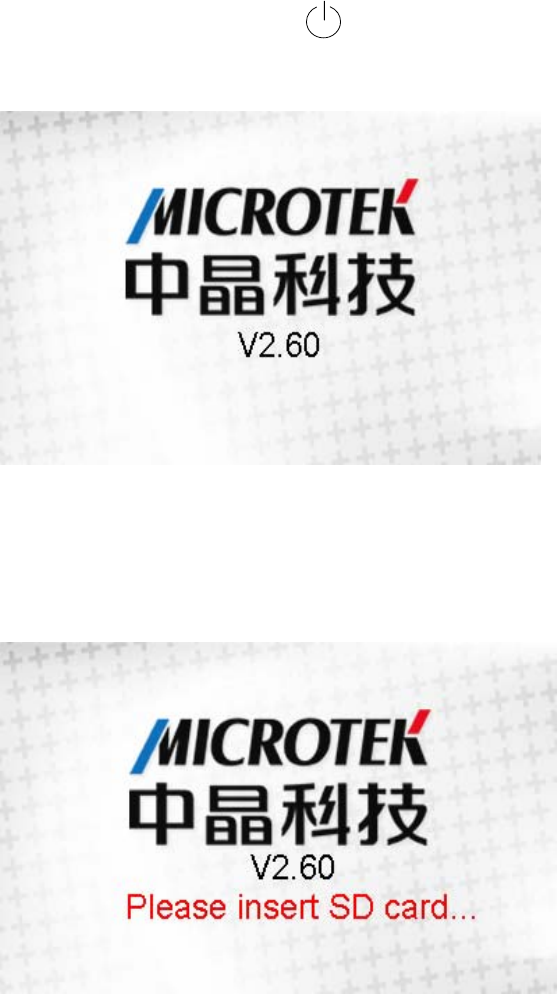
When scanner off, Press ( ) longer than 3s to turn on the scanner, “Microtek
Logo” is shown below, system boot-up time is around 1~2s.
(Figure 1)
System starting, when finished, will switch to main display (Figure 2).
During power on, if SD card is not inserted, a reminder will be shown on the display
(Figure 1.1),
(Figure 1.1)
and after SD card’s been inserted in, will switch to main display automatically (Figure
2). FS716W operation will not continue without properly inserted a mass
storage SD card!
Note : To avoid damage or malfunction on the SD card, please insert SD card in
before turning power on of FS716W and not pulling SD card out during
operation are highly recommended !!!
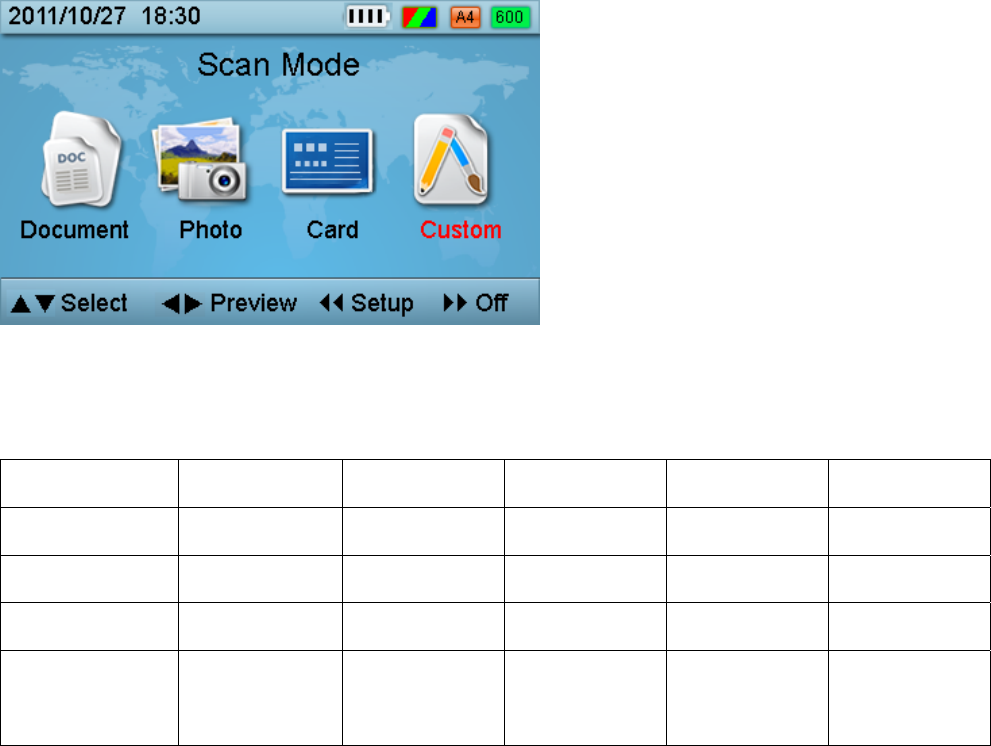
2.2 System Main Display
Figure 2 displays different scan modes, preview, and set-up functions. If no keys are
pressed within 30s, system shall go into Stand by mode (LEDs, + LCD backlights are
turned off). During stand-by, should any key be pressed or paper inserted the system
will return to normal operation mode. However, if stand-by is over 3 minutes period
(when USB is connected with PC – scanner is configured as U-Disk, the 3 minute
stand-by time period shall be extended to 5 minutes), system will shut down
automatically so to save power.
(Figure 2)
a. Press ①② key to select scan mode, such as: document, photo, business
card or customized. The customization is described as follows:
Mode Color Paper Size Resolution Pages Format
Document Grayscale A4 300 Duplex PDF
Photo Color A5 300 Simplex JPEG
Business Card B/W A8 600 Duplex JPEG
Custom/
Default Setting
User Define/
Color
User Define/
A4
User Define/
300
User Define/
Duplex
User Define/
JPEG
The Custom set-up interface is shown in Figure 7. When entered into Custom mode,
user can define his/her own settings.
b. In System Main Display, press ③④key to preview images saved in the SD
Card (Figure 3)

c. In System Main Display, press ③ longer than 3s to enter System Set-up (Figure
6); press ④ or ( ) longer than 3s to turn off scanner.
2.3 Image Preview Display
(Figure 3)
Full screen to preview images, key functions in this display are described below :
a. Press ①② key to select images (previous, next)
b. Press ③ key to return to System Main Display (Figure 2).
c. If no operations after 10s, will return to System Main Display (Figure 2)
d. Press ④ key to delete previewed image, system will ask for confirmation as
shown below :
e. Press ④ key again to confirm the delete, Press ③ key to cancel delete.
2.4 Scan Confirmation
The system provides two kinds of scanning. 1. Auto, 2. Manual. In Auto scanning,
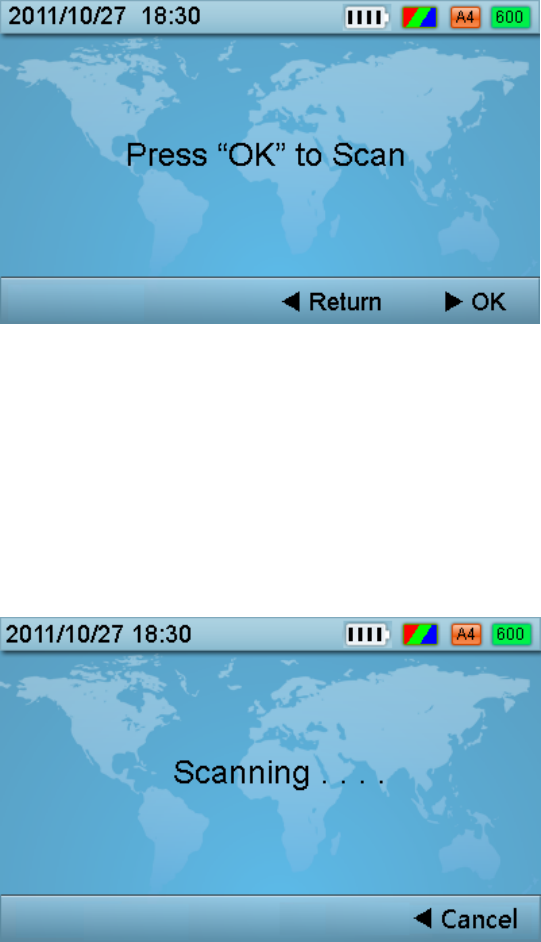
user just insert the paper to the scanner, it will scan automatically according to the
selected scan mode settings. In manual feed, when paper is detected by the paper
sensor, the following display is shown for user to confirm the scanning.
(Figure 4)
a. Press ④ key to confirm to start scan, Scanning… is shown in Figure 5.
b. During scanning, press ③ key to cancel scan, paper is withdrawn rapidly, system
goes back to Figure 2.
2.5 Scanning Display
(Figure 5)
When scanner detects scan media in the scan slot, the system will check whether
Auto scanning is set or not, if so, the system will start Auto scan according to the
selected scan mode settings. User can press ③ key to cancel scan. The system
goes back to Figure 2.
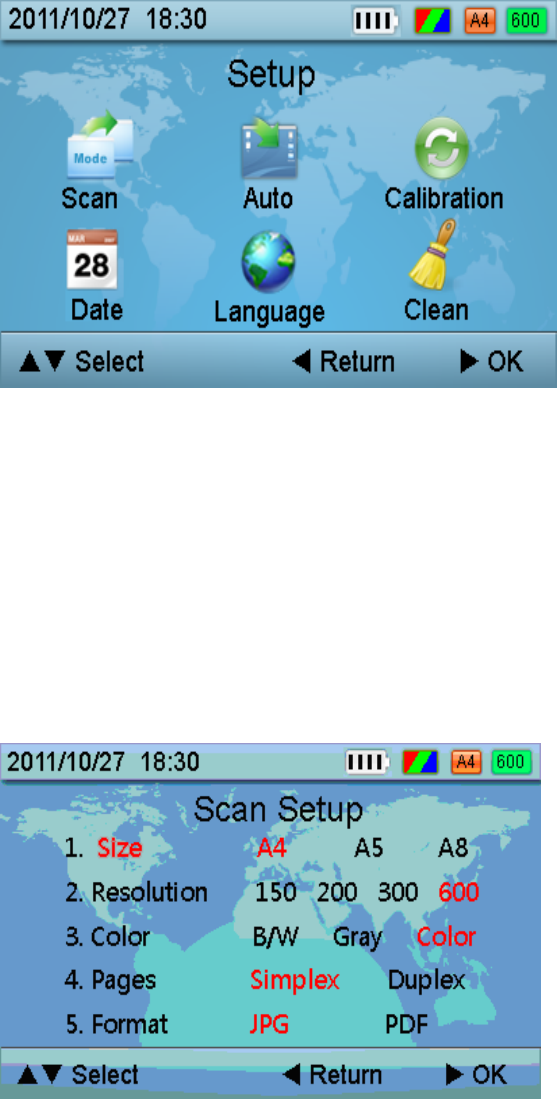
2.6 System Set-up
In System Set-up manual (Figure 6), user can do all the settings on Scan modes,
Auto Scan, Calibration, Date, Language and Clean.
(Figure 6)
a. In System Set-up, press ①② to select item. When select finished, press ④
to confirm (after confirmation, display will jump into the selected item display)
b. Press ③ to return to previous level.
2.7 Scan Mode (Custom) Setting
In Custom Scan Mode setting, User can select paper size, resolution, color, pages
and format settings.
(Figure 7)
a. Press ①② key first to select paper size, resolution, color, pages or format,
then press ④key to confirm. Press ③ key to return to Figure 6.
b. After paper size, resolution, color, pages or format being selected, press
①②key to choose desired parameter, then press ④to confirm, press ③ back
to step a.
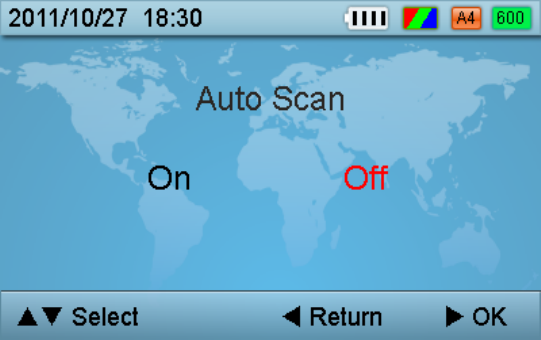
2.8 Auto Scan Setting
(Figure 8)
a. Press ①② key to Turn Auto Scan on/off, then press ④key to confirm.
b. Press ③ key to return to Figure 6.
2.9 Calibration
The scanner Calibration has been accomplished after manufacturing, and the
calibration data was saved in the scanner flash memory. It will not be altered for
different PCs, thus, re-calibrate is not necessary. However, under any circumstances,
the scanned image quality is not acceptable; user can do calibration on his/her own.
Please do calibration as described in Figure 9, and make sure the arrow on
calibration paper is facing the scanner when inserting calibration paper.
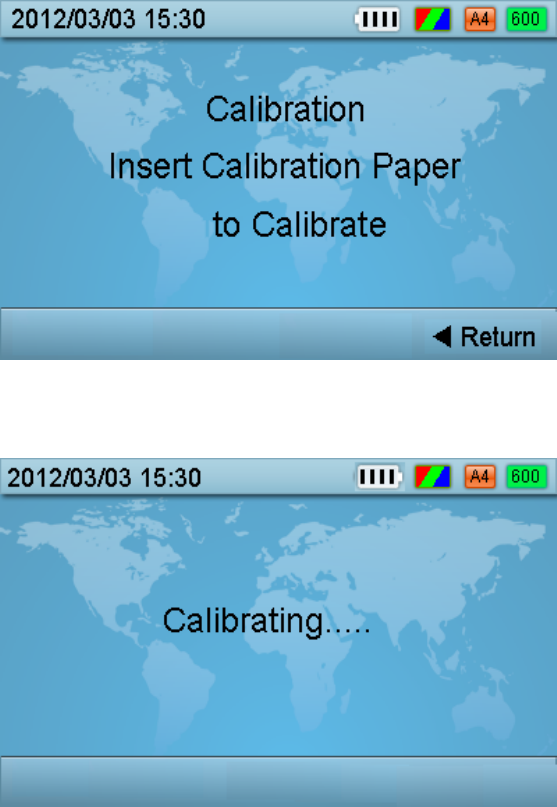
(Figure 9)
a. Calibration begins automatically :
(Figure 9.1)
b. When calibration is finished, will return to system setup display automatically
(Figure 6).
2.10 Connection Method Display
The FS716W can only provide U-DISK connection mode with PC.
Scanning with PC connected (USB) is not allowed. However, when USB is
Connected with PC or N/B, the scanner will automatically be configured as U-Disk
mode (Figure 10) :.
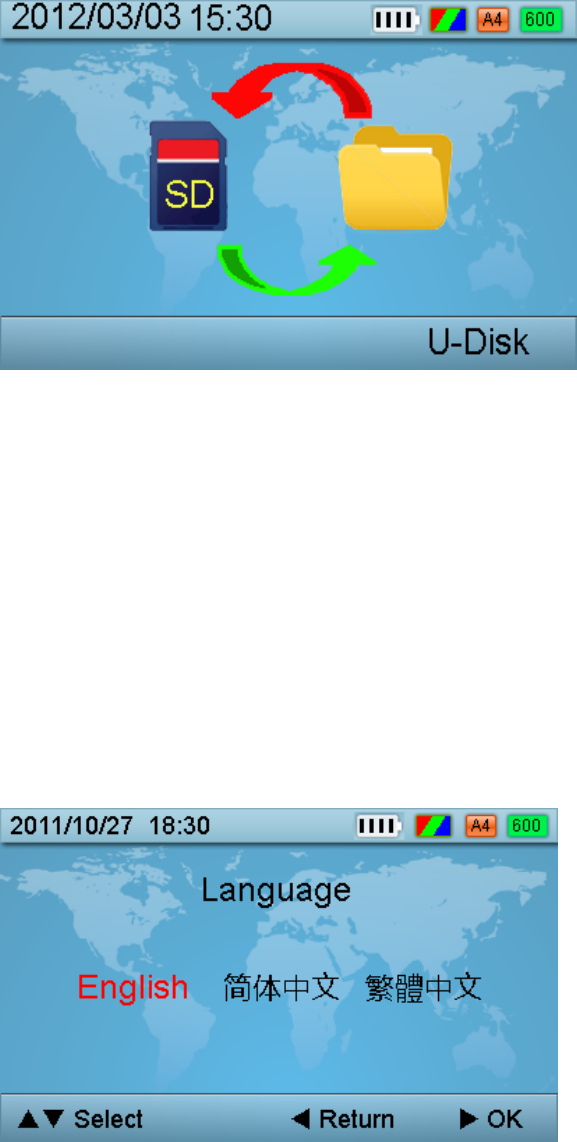
(Figure 10)
Images (in the SD card) preview and saving are allowed in PC. The SD card, after
scanner is powered off, can also be removed from the scanner for PC to backup files.
When USB is disconnected from PC, SCAN mode is then set automatically. Normal
scan operation is resumed.
2.11 System Language Setting
The system provides English, Simplified and Traditional Chinese three languages.
After language selection, the language displayed will be changed accordingly.
(Figure 11)
a. Press ①② key to select language, press ④ to confirm.
b. Press ③ key to return to Figure 6.
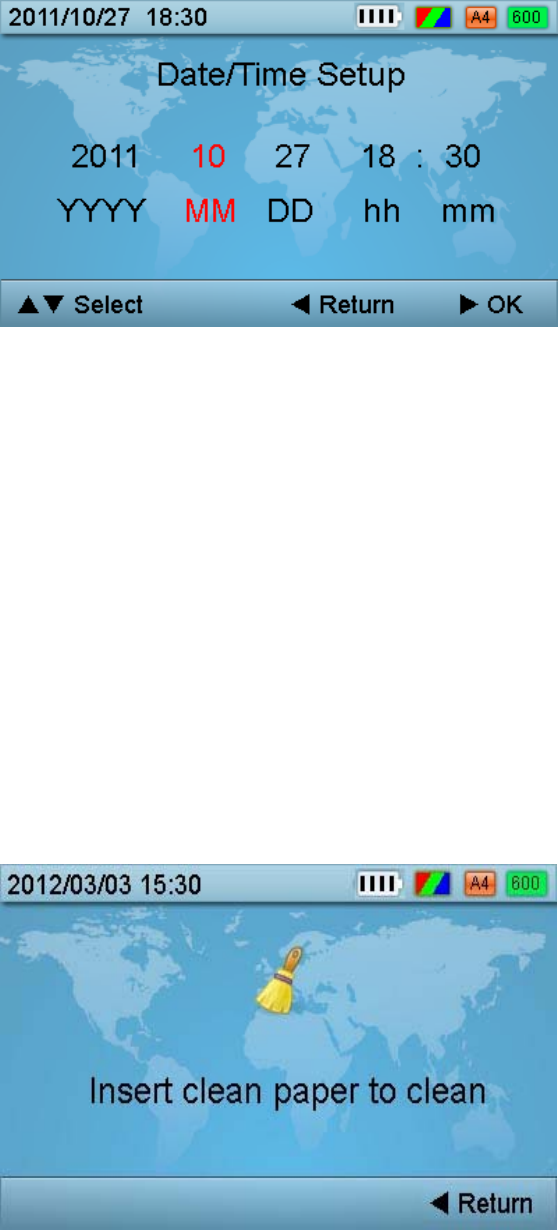
2.12 Date/Time Setting
(Figure 12)
Firstly, press ①②key to select item (Year, Month, Day, Hour, Minute) to modify,
press ④key to confirm, Secondly, press ①②key to adjust.
a. Press ①② key to select item, press ④ key to confirm, press ③ key to
return to Figure 6.
b. In step a. after selected item confirmed, press ①key to decrease value by 1 (-1);
press ② increase value by 1 (+1),press ④ to confirm,press ③back to step a.
2.13 Clean
If CIS inside FS716W is dirty, the scanned image quality is affected. User can use
clean paper to clean up the CIS glass thru cleaning function. Follow instruction in
Figure 13 to finish cleaning process.
(Figure 13)

a. Cleaning begins automatically :
(Figure 13.1)
b. When cleaning is finished, will return to system setup display automatically
(Figure 6).
2.14 WiFi
FS716W is equipped with a mini WiFi module internally for wireless data/image
transmission. The images in SD card can be wireless transmitted to any WiFi
equipped machine. In the same area, one FS716W can transmit data/image up to 8
different WiFi equipped machines at the same time.
In the system main display (Figure 2), press ① longer than 3s to get into WiFi
mode (Figure 14):
(Figure 14)

Normally, it will take about 30s to get WiFi module connected with iPAD, N/B or any
WiFi equipped machine. The SSID is set as “MyFly2012-xxxxxxxx”, the original PW is
“88888888”. Once connected, open Internet explorer, hit any “Character” key on the
keyboard + 《Return 》, will jump into Wireless AP automatically, user can
view/transmit contents in the SD card without any efforts at all. In the AP, user can
change SSID and PW as his/her own wishes.
Should no data transmission (Internet explorer closed) for 5 minutes under WiFi
mode, FS716W will turn off the scanner automatically so to save power. This is to
prevent user from forgetting to turn off WiFi by selecting “Return” at the right corner.
During WiFi mode (Figure 14), should anyone wants to reset the WiFi module to
factory default settings, can press the ① longer than 3s to achieve such task.
Note : Scanning is not allowed under WiFi mode.
3. Battery Charging
There are three battery charging conditions for FS716W :
a. When scanner is powered off, use USB cable to connect with any PC or N/B to
charge battery.
b. When scanner is powered off, use USB cable to connect with USB +5V adapter to
charge battery.
c. During scanner power on, use USB cable to connect with USB +5V adapter to
charge battery, in the mean time, scan function is allowed.
4. LED Status Indication
Left LED Status Indication
Item System Status LED Indication Remark
1 Scan
Confirmation GREEN Manual Scan Mode
2 Scanning ORANGE
3 System SETUP RED
4 Calibrating RED
Right LED Status Indication
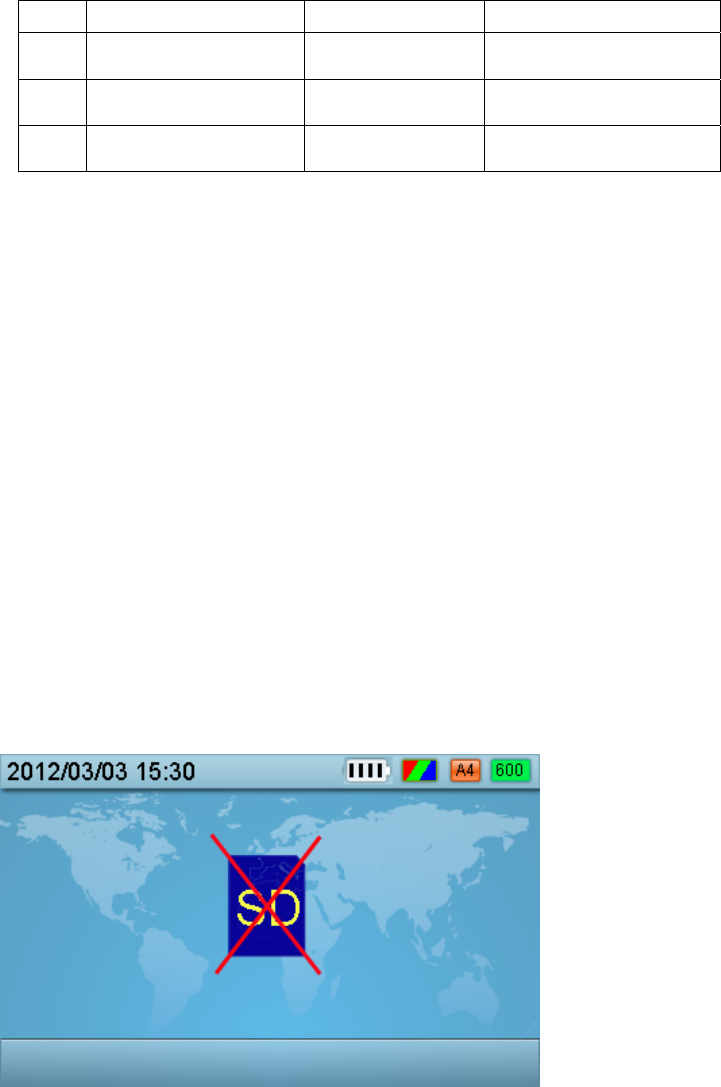
5. SD Card
5.1 Format
FS716W only supports SD card in FAT and FAT32 format.
Should a new SD card is not formatted as one of the above; the card needs to be
formatted as either FAT or FAT32.
5.2 Status
If a SD card is not working properly, or, if being pulled out of the system during normal
operation of FS716W, the LCD shall display as shown in Figure 15. Should the SD
card is inserted back into the system at this time; the display will jump to the System
Main Display as shown in Figure 2.
(Figure 15)
Note: Please avoid inserting or removing SD card with power on of FS716W so
to protect SD card from damaging or malfunctioning.
Item System Status LED Indication Remark
1 Charge Complete GREEN
2 Charging RED
3 Stand By ORANGE Not in Charging
Changes or modifications not expressly approved by the party responsible for
compliance could void the user's authority to operate the equipment.
This equipment has been tested and found to comply with the limits for a Class
B digital device, pursuant to Part 15 of the FCC Rules. These limits are
designed to provide reasonable protection against harmful interference in a
residential installation. This equipment generates uses and can radiate radio
frequency energy and, if not installed and used in accordance with the
instructions, may cause harmful interference to radio communications.
However, there is no guarantee that interference will not occur in a particular
installation. If this equipment does cause harmful interference to radio or
television reception, which can be determined by turning the equipment off and
on, the user is encouraged to try to correct the interference by one or more of
the following measures:
-- Reorient or relocate the receiving antenna.
-- Increase the separation between the equipment and receiver.
-- Connect the equipment into an outlet on a circuit different from that to which
the receiver is connected.
-- Consult the dealer or an experienced radio/TV technician for help
FCC Radiation Exposure Statement
The antennas used for this transmitter must be installed to provide a
separation distance of at least 20 cm from all persons and must be co‐located
for operating in conjunction with any other antenna or transmitter.