Mileseey Technology MC180001 Bluetooth Laser Distance Meter User Manual
Shenzhen Mileseey Technology Co., Ltd Bluetooth Laser Distance Meter Users Manual
User guide
R2B User Manual
Product Overview
Thank you for purchasing and using MileSeey
handheld laser distance meter, please read
the manual carefully before using.
Mileseey product model R2B is a handheld
Laser Distance Meter integrated with
measuring wheel and laser level.
Thanks to robust housing, compact inner
structure,R2B offers the perfect features of
IP65 waterproof, drop-resistance and super
long lifespan. With 2.4 inch HD colored
display, it enables user to read the data
easily.
Adopting the most cutting-edge technologies
of 3D measurement, curve measurement,
angle marking function, R2B solved a variety
of difficulties for all users.
R2B has 15 functions to satisfy different
measuring needs and greatly improved
user experience.
11 12
10
13
Battery installation and using instructions
Laser Distance Meter
Safety Instructions
The device is categorized into Class 2 laser
product. DO NOT stare at laser directly or
shoot at others or it will cause damage to
eyes.
The product is in accordance with strict
standards and regulations through the
development and manufacturing, but still
can’t entirely exclude the possibility of
interference to other devices, may cause
discomfort to human and animals.
Please DO NOT use this product under
explosive or corrosive environment.
Please DO NOT use this product near
medical devices.
Warning
a,
b,
Please DO NOT use this product on the
plane.
For the safe use of this handheld laser
distance meter, please read below instructions
carefully.
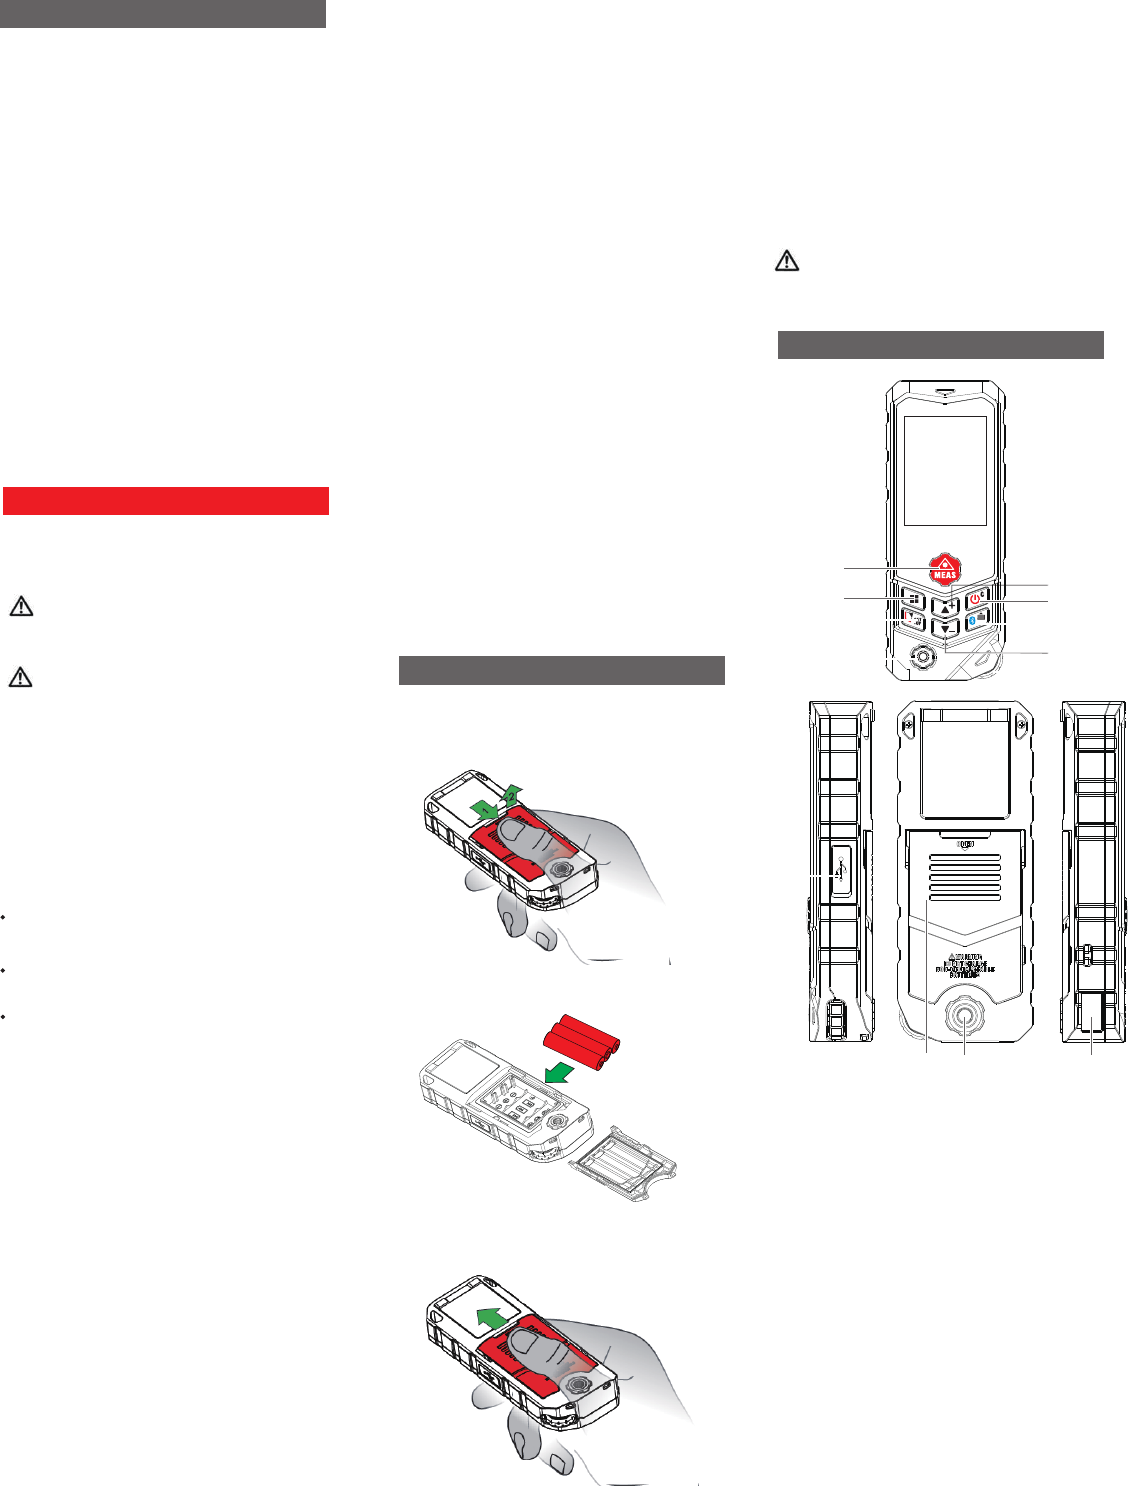
Press the battery cover and slide down to
unlock it first, then uplift it to open. (The
battery cover is tight for waterproof purpose,
please open it with some strength)
1. Measuring Button
Short press to measure/confirm.
Long press to continuous measurement mode
2. Function Button
Press this button to function menu, select
functions by up and down key, press measure
button to confirm.
3. Setup, Turn on/off laser level Button
Short press to setup menu, select setup options
by up and down key, press measure button to
confirm.
4. Wheel Measurement Button
Short press to turn on/off wheel measurement
5. Up/Add Button
Press this button to page up/Add
6.ON/OFF/Return Button
Long press to turn on/off, short press to
return to Single measurement
After the battery is placed, cover and hold the
battery door, press and slide to the top, the
cover can be sealed.
Insert 3* AAA rechargeable batteries, Ni-MH
observing correct polarity.
if the equipment is used in a manner not
specified by the manufacturer, the protection
provided by the equipment may be impaired.
The standard batteries are 3 pieces of AAA
NI-MH rechargeable batteries, common dry
batteries are workable (Do not charge
non-rechargeable batteries). Charge the NI-MH
batteries by connecting the charging port and
adapter or PC with the USB-C cable.
Warning: ①Do not charge non-rechargeable
batteries to avoid any accidents. ②Do not use
rechargeable batteries and non-rechargeable
batteries at the same time to avoid any
accidents. MileSeey will not be responsible for
accident due to charging dry batteries.
Laser distance meter may heat up when
charging, it's normal, has no effect on the
device performance and service life. If it is not
used for a long time, remove the batteries and
keep it in dry place.
Appearance
2
1
3
6
5
7
8
49
Warning:
Do not use aggressive cleaning agents or
solutions. Use only a clean, soft cloth for
cleaning.
FCC Statements:
This equipment has been tested and found to
comply with the limits for a Class B digital
device, pursuant to Part 15 of the FCC Rules.
These limits are designed to provide
reasonable protection against harmful
interference in a residential installation.
This equipment generates, uses and can
radiate radio frequency energy. However,
there is no guarantee that interference will not
occur in a particular installation. If this
equipment does cause harmful interference to
radio or reception, which can be determined
by turning the equipment off and on, the user
is encouraged to try to correct the interference
by one or more of the following measures:
• Reorient or relocate the receiving antenna.
• Increase the separation between the
equipment and receiver.
• Connect the equipment into an outlet on a
circuit different from that to which the receiver
is connected.
1,Disposal
Everyone is responsible for environmental
protection.
It’s prohibited to dispose used batteries
together with household waste, please
collect used batteries to designated waste
station.
This product must not be recycled with
household waste. Dispose of the product
appropriately in accordance with the national
regulations in your country.
2,Scope of Responsibility
MileSeey will not be responsible for the
damages caused by improper use below:
*Using the product without instruction;
*Use of accessories from other
manufacturers without approval from
MileSeey ;
*Carrying out modification or conversion
of the product.
• Consult the dealer or an experienced
technician for help.
This device complies with part 15 of the FCC
Rules. Operation is subject to the following two
conditions:
1) This device may not cause harmful
interference, and
2) This device must accept any interference
received, including interference that my cause
undesired operation.
MODIFICATION: Any changes or modifications
not expressly approved by the grantee of this
device could void the user’s authority to operate
the device.

Wheel Measurement
Single/Continuous Measurement
Area Measurement
Volume
V
MEAS
Pythagoras (2-point)
7. Send data by Bluetooh / Historical record
Short press to turn on Bluetooth (manually)/
transfer data to App.
Long press to check historical record
8. Down/Subtract Button
Press this button to page down/subtract
9. Wheel
In wheel measurement mode, move the
wheel along the measuring path to measure
distance.
12. Tripod Screw Hole
13. Laser Line Emitting Hole
11. Battery Compartment
Notes: Each time when turning on wheel
measuring, first direction that wheel
measured is calculated as positive data,
the opposite direction measured is
calculated as negative.
10. USB-C Port
Instruction for icons
Pythagoras (3-point)②
Auto level
Auto height
α
Pythagoras (3-point)①
α
α
α
Trapezoid measurement①
Trapezoid measurement②
3D measuring: P2P
Laser Line Marking Function
Setup menu explanation
①Bluetooth
Short press to switch on Bluetooth (automatically
/manually), and turn off Bluetooth.
Bluetooth (Automatic mode), measured
data will be transfered to App automatically.
Bluetooth (Manual mode), measured date
will be transferred to the App by pressing
manually.
When the icon turns gray, Bluetooth is off.
④
⑤ ⑥
① ② ③
A
⑦
M
A
② Measuring units
Short press to switch measuring units between
m/ft/in/ft+in
③Reference
Short press to change measuring reference
⑥Chinese/English Voice broadcast.
Short press to select Chinese/English voice
broadcast.
⑤Rotary screen settings
Short press to activate/de-activate the screen
rotary settings for Portrait & Landscape view
(only available in Single/Continuous
measurement)
⑦Voice
Short press to turn the Voice Broadcast ON/OFF.
④Digital Level
Press to activate d , the electronicigital level
tilt sensor makes it easier to achieve horizontal
alignment with the real-time measuring angle.
Triangle Area Measurement
S
Operation Instructions
The device will enter Single distance
measurement mode when it is powered ON,
short press to select measuring mode, the
reminding of the red flashing line shows the
line to be measured.
※The measuring data should be different due
to different Reference settings. The Rear is
the default reference.
Front Tripod Rear
It can be used to measure the diagonal of
the house, horizontal lines, and stake out
purposes.
Long press to activate Continuous
measurement, aiming at the target and
press to stop, the Minimum and
Maximum data will be displayed
accordingly.
※The continuous measurement will stop
automatically after 5 minutes.
Continuous Measurement
Single Distance Measurement
The device will enter Single distance
measurement mode when it is powered ON,
press after aiming at target to get result
at bottom of the screen.
Interface
Measuring mode
display
Measuring
reference
Bluetooth
Angle display
Battery status
A Measuring interface:
Digital tilt
display
To be
measured line
B Measuring data interface:
Measuring mode
display
Measuring
reference
Bluetooth
Angle display
Battery status
Digital tilt
display
Final result display
First line display
Second line display
Third line display
Measuring
sequence
number
Measuring
sequence
number
3
Power on the device, measure in the
certain distance within ±2mm accuracy, it
can work properly.
Press to select Area measurement ,
according to the red flashing line, press
to get the ① distance (Length) from the target
point, press again to get ② distance(Width)
from the second target point, Area will be
calculated and displayed accordingly.
Area Measurement
Volume Measurement
Press to select Volume measurement ,
according to the red flashing line, press to
get ① distance (Length) from the target point,
press again to get ② distance (Width) from
the second target point, press the third time
to get ③ distance (Height), the Volume will be
calculated and displayed accordingly.
Press to activate wheel measurement,
scroll the wheel from the start point to
end point, press to stop.
※The wheel measurement can be used in
Single measurement, Area measurement
and Volume measurement.
Note: When starting the wheel measurement,
please keep an eye on right direction of the
wheel.
Wheel Measurement
V
MEAS
0.513
0.428
0.445
0.458
5.088
5.088
5.104
25.969
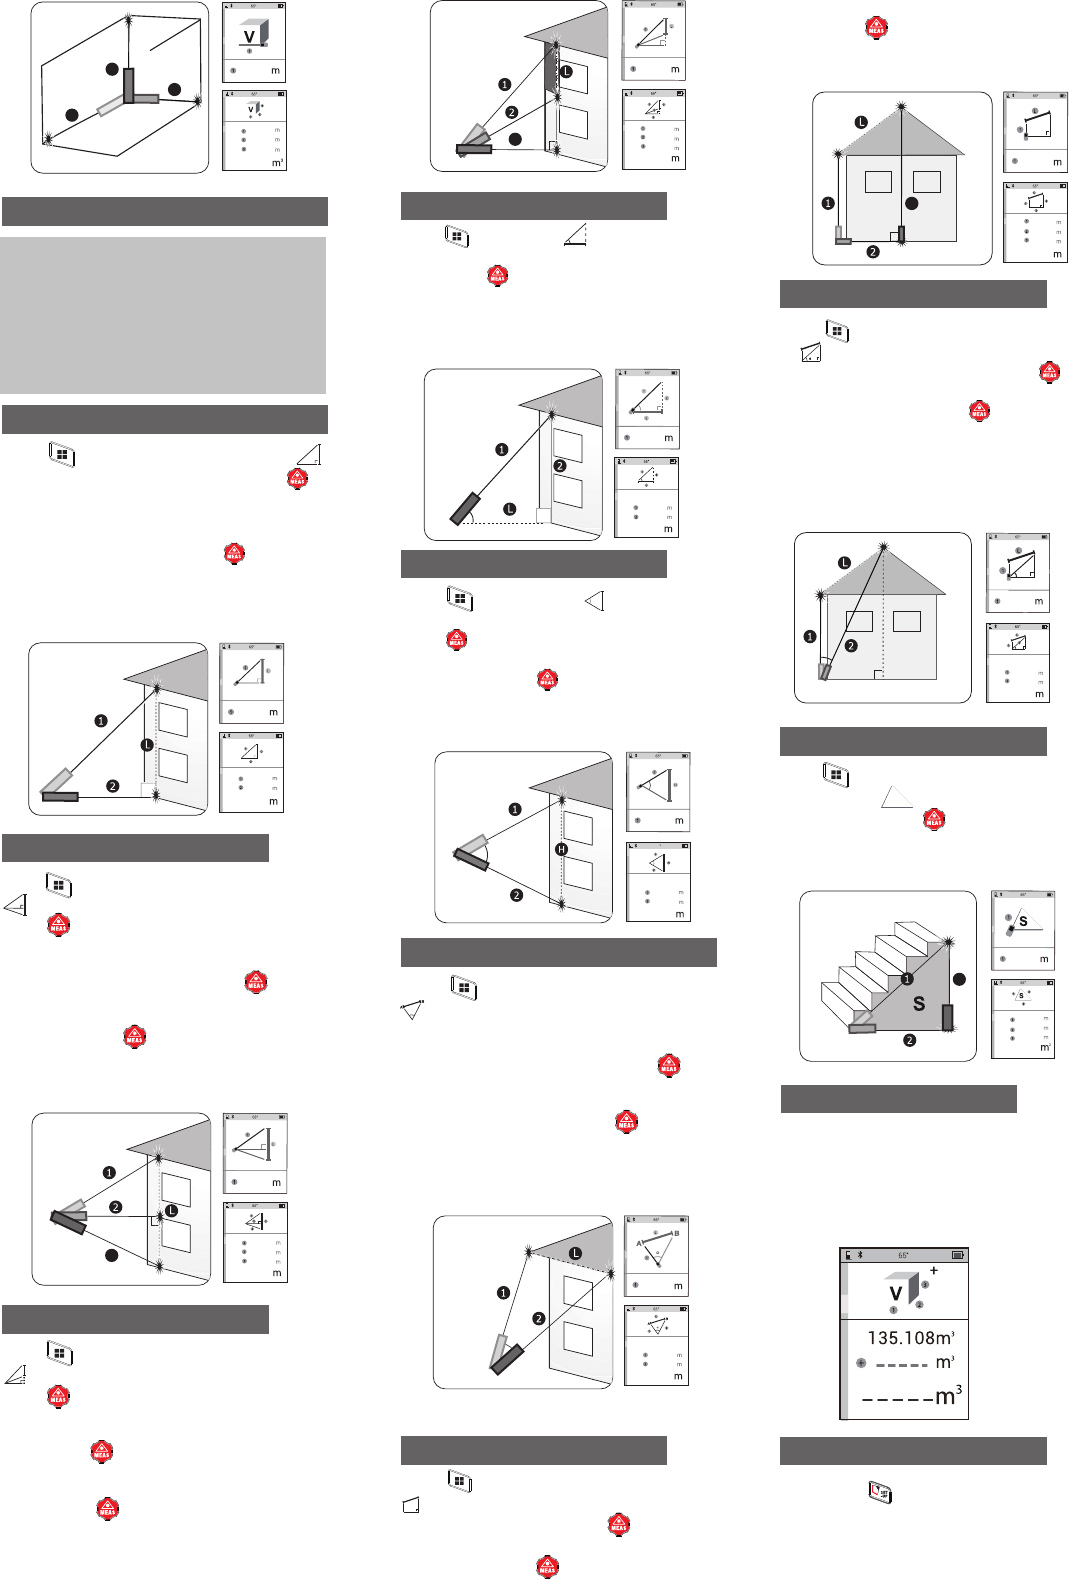
Tips for Pythagorean Measurement
All Pythagoras measurement can be
applied to different directions of applications ,
only to ensure that the right-angle side is
perpendicular to the measured object.
Note: According to the Pythagorean
Theorem, the right-angle side cannot be
greater than the hypotenuse; otherwise
there is a calculation error.
Pythagoras (2-point)
1
2
3
3.507
3.728
2.998
39.196
3.507
Press to select Pythagoras (2-point) ,
according to the red flashing line, press to
Pythagoras (3-point)②
Pythagoras (3-point)①
Press to select Pythagoras (3-point)①
, according to the red flashing line,
press to get the hypotenuse① from the
first target point, rotate around the center of
the Reference to the direction perpendicular
to the measurement target, press to get
distance of vertical edge②, rotate a second
time by the same baseline and target at the
third point, press to get the second
hypotenuse③, the distance between the first
and third point L will be calculated and
displayed accordingly.
Press to select Pythagoras (3-point)②
,according to the red flashing line,
press to get the hypotenuse ① from the
first target point, rotate around the center
of the Reference to aim at second target
point, press to get ② hypotenuse, rotate
the second time by the same baseline to the
direction perpendicular to the measurement
target, press to get ③ distance of vertical
edge, the distance tween the first and
second point L will be calculated and
displayed accordingly.
Auto Level
Press to Auto level ,according to
the red flashing line, aiming at first target
point, press to get the angle between
hypotenuse and horizontal edge,
hypotenuse ①,vertical length ② and
horizontal length L, all the data will be
displayed at bottom of the screen.
α
11.926
8.038
8.810
11.926
7.872
5.130
6.404
9.804
7.872
3
get the hypotenuse ① from the first target
point, rotate around the center of the
Reference to the direction perpendicular to
the measurement target, press to get
distance of vertical edge ②, the second
distance of vertical edge L will be calculated
and displayed accordingly.
7.550
5.403
4.262
2.911
3
7.550
Auto Height
Press to Auto height ,according to the
red flashing line, aiming at first target point,
press to get hypotenuse ①, rotate around
the center of the Reference to aim at second
target point, press to get hypotenuse②,
the angle between two hypotenuses, the length
of ①②, vertical length H , all the data will be
displayed at bottom of the screen.
Point-to-Point (P2P) Measurement
Press to Point-to-Point Measurement
,a message“please wait....”shows up,
please keep the device still until the message
disappear. According to the red flashing line,
aiming at the first target point, press to get
the distance① from the first target point; rotate
around the center of the Reference, aiming at
the second target point, press to get the
distance②,the angle between two hypotenuses,
the length of ①② and the distance between
these two points are displayed on the screen
orderly.
Note: if calibration fails, please return and
recalibrate.
Trapezoid measurement 1
Press to select Trapezoid Measurement ①
, according to the red flashing line, aiming
at the first target point, press to get the
first right-angle length①;aiming at the second
target point, press to get the second
right-angle length②;aiming at the third target
point, press to get the third right-angle
length③,the calculated length of the forth
hypotenuse is displayed on the screen.
α
α
α
°
39.8
5.246
3.358
4.030
5.246
α
°
60.0
6.540
6.540
6.540
6.540
60.0
α°
1.8
11.749
5.160
6.593
11.749
4.934
2.578
7.634
3.733
4.934
3
Under the mode of Single distance, Area,
Volume measurement, after get the first
measuring result, press the Add or Subtract
button to make add/subtract calculations on
the basis of previous and current record, the
result is displayed on the screen.
Add/Subtract Function
Triangular Area Measurement
Press to select Triangular area
measurement , according to the red
flashing line, press to measure three
lines of the triangle ①②③, the triangular
area will be calculated and displayed orderly.
S
Laser Line Marking Function
Short press to enter the Laser Line
Marking Function, mark the red laser line on
the target, the real-time angle of laser line is
displayed on the screen, and it varies with
the angle of device.
2.903
2.085
1.735
1.789
2.903
3
Trapezoid measurement 2
α
Press to select Trapezoid Measurement
② , according to the red flashing line,
aiming at the first target point, press to get
the first right-angle length ①;aiming at the
second target point, press to get the
second diagonal length②; the angle between
diagonal and horizontal line, the length of first
right-angle①, the length of diagonal② and the
length of hypotenuse are displayed on the
screen.
α
°
α
α
12.6
4.340
11.313
11.198
4.340
Note:
1. When you're using "line-laser" function,
please keep the left side surface (the same
side as line-laser) of the device parallel to the
Measuring Range(m)
Triangular Area
Measurement
Pythagoras (3-point) ①
Trapezoid
Measurement ①
0.2-40/60/80/100
-5
±(2.0mm+5x10 D)
√
√
√
Specification
Measuring
accuracy
Continuous
Measurement
Area Measurement
√
√
Pythagoras (2-point) √
Pythagoras (3-point) ②√
Auto Height √
Bluetooth 4.0
Auto Level √
Rotary screen
Single Distance
Measurement
5‰
Volume
Measurement √
2.4 inch HD colored
±(0.3°+0.1°+0.01*D)
4
2
1
Wheel Measurement
Accuracy
Trapezoid
Measurement ②
Point to Point (P2P)
Measurement
Laser Line Marking
Function √
Add/Subtract √
Tilt Sensor
Tilt Accuracy
√
√
√
√
√
√
screen
Display Screen
Wheel Measurement √
3
2. The angle of the laser line displayed on
screen is not absolutely accurate, because of
environment and inevitable and slight improper
operation. The angle is for reference only. If you
need highly accurate laser line, please use
more accurate angle measuring tools.
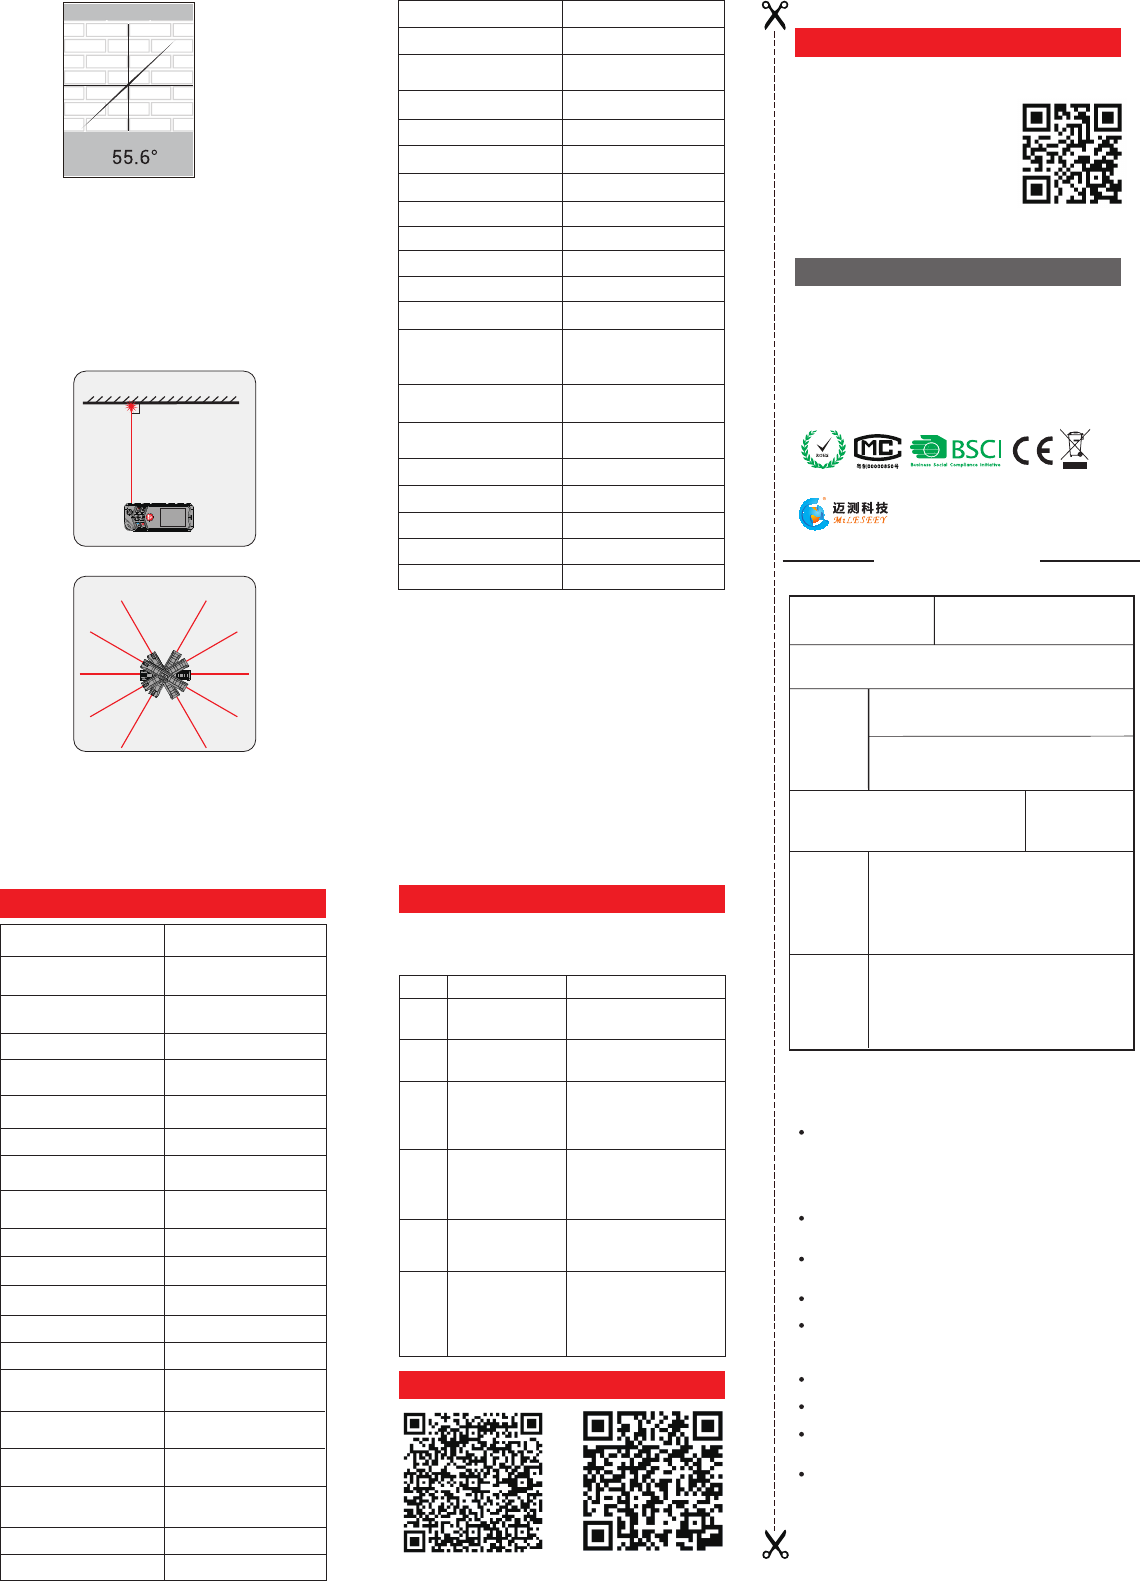
Top
Figure A
Front
0°
30°
60°-60°
-30°
30°-30°
-60°60°
0°
Figure B
wall, the angle of the line to horizon is
displayed on screen(Figure A). Head up and
head down the device, to project the line at
different angles.(Figure B)
Do not turn the head of the device left or right,
or it will cause incorrect angle readings.
Trouble shooting
All information will be showed as code or
“Error”, the following are all codes and
corresponding explain and solution.
Andriod APP
IOS APP
Refer to user manual,
repeat the procedures.
255
256
Calculation error
Received signal
too weak or
measurement
time too long
Received signal
too strong.
Out of measuring
range
204
Measuring the distance
within measurement
range.
Code Cause Corrective Measure
220 Low battery Replace batteries or
charge the batteries
Hardware error
Switch on/off the device,
if the symbol still
appears after several
times, please contact
with your dealer.
261
500
Improve the reflective
surface. (Use target
plate, or don't aim at
strong light)
Improve the reflective
surface. (Use target
plate, white paper)
Class 2
Laser Type 630-670nm,<1mW
Memory
Auto Power off
Protection Class
m / ft / in / ft+in
Front/Tripod/Rear
50 values
After 180s of inactivity
Measuring Unit
Laser Class
IP65
Measuring Reference
Voice Broadcast Chinese/English
BPI AAA 800
(NI-MH rechargeable battery)
3*AAA alkraine battery powered
Battery Type
Charging Interface
Storage Temperature
Altitude up to 2000m
Humidity 0-95%
Size(mm) 137x55x26
-20℃~70℃(-4°F~158°F)
Operating
Temperature
Weight(g) 132
0℃~+40℃(32°F~+104°F)
USB-C
4. Tilt Accuracy
0.1° is caused by temperature, D is +/- 0~45°, eg: at normal
temperature the accuracy is +/-0.3° at angle of 0°,at
abnormal temperature the accuracy is +/-0.85° at angle of 45° .
1. Measuring Range
The Rear is the default reference. The maximum range shall
be different according to different models. The actual range
refers to the package.
Measuring Accuracy (“D” is the measured length)2.
If measuring under favorable conditions, such as smooth
surface, proper temperature and indoor lighting, the device
is able to work within certain range as indicated.
Maximum deviation occurs under unfavorable conditions
such as bright sunlight or when measuring to poorly reflecting
or very rough surfaces.
Tips: In case of bright sunlight and bad reflection of the object,
please use the target plate or reflector.
3. Wheel Measurement Accuracy
Note: Please keep the device moving smoothly while
measuring,
Mileseey Pro APP Download
The product specifications are subject to
change without notice, all final interpretation
rights were reserved by Mileseey Technology
Co., Ltd. All trademarks, product images,
technical parameters are properties of
Mileseey Technology Co., Ltd. All rights
reserved.
Copyrights
Fax: +86 755 86701592
Email: info@mileseey.net
Contact Us
Shenzhen Mileseey Technology Co., LTD.
Telephone: +86 755 86329055
Website: www.mileseey.net
Add.: 6/F, Building 9,
Zhongguan Honghualing
Industrial South Park II, 1213
Liuxian Ave, Taoyuan Street, Nanshan District,
Shenzhen, 518055, P.R. China.
Model name
Date of purchase
User Info
User Name
Address &Tel.
warranty period
Dealer
Dealer’s name, address, tel.
Serial Number
Fault
Description
Invoice Code
Warranty Card
Warranty period
This laser distance meter has two years warranty in the
precondition of non-artificial damage.
Within the warranty period, certain maintenance
costs will be charged under following cases
Damages caused by improper usage or maintenance of the
tool;
The tool had been disassembled or mended by
non-authorized third party;
Without the warranty card or the purchase invoice;
The serial number on the warranty card is different with the
one on product;
The serial number has been altered or abraded;
Damaged by any force majeure factors;
Replacement of the worn out accessories;
Damages caused by the abnormal factors such as the
temperature/humidity in usage;
Damages caused by the improper operation.
Please send the tool with warranty card &
purchase invoice to local dealer if maintenance
needed. The warranty card will not be reissued
if lost; please keep it carefully for maintenance.
Warranty Terms