Mipro Electronics Co MT-90 Wireless Mixer User Manual MA909 2CE194
Mipro Electronics Co Ltd Wireless Mixer MA909 2CE194
Contents
- 1. Users Manual Part 1
- 2. Users Manual Part 2
- 3. Users Manual Part 3
Users Manual Part 2
a)
b)
c) d)
SCAN
SENSITIVITY
+
NOISE
AF
RFCHANNEL
ACT
-
VOLUME
SCAN
SENSITIVITY
+
NOISE
AF
RF
CHANNEL
ACT
-
VOLUME
SCAN
SENSITIVITY
+
NOISE
AF
RFCHANNEL
ACT
-
VOLUME
SCAN
SENSITIVITY
+
NOISE
AF
RFCHANNEL
ACT
-
VOLUME
SCAN
SENSITIVITY
+
NOISE
AF
RF
CHANNEL
ACT
-
VOLUME
SCAN
SENSITIVITY
+
NOISE
AF
RF
CHANNEL
ACT
-
VOLUME
SCAN
SENSITIVITY
+
NOISE
AF
RF
CHANNEL
ACT
-
VOLUME
SCAN
SENSITIVITY
+
NOISE
AF
RF
CHANNEL
ACT
-
VOLUME
a)
b)
c) d)
-5-
1.Whentochangechannels:
(a)Inordertoavoidexitingchannelinterference",donotchangechannelswhile
multiplechannelsareinuse.
(b)A"_"symbolonthedisplayindicatesthatitisablankfrequency.Thismeansthe
channelisunavailablebecauseofinterference.Proceeduntilanothernumeric
valueappears.
2.Whennottochangechannels:
(a)Thecurrentchannelisbeinginterferedwithorthereisachannelmalfunction.
(B)Toavoidinterferencewhenusingmultiplechannels.
(a)ThissystemincorporatesanadvancedPLL-synthesizedoscillatordesignwhichis
preprogrammedwith16switchablefrequencies.Theusermayfreelyselectany
ofthepreprogrammedfrequencies.
1.Functions:
B. SWITCHABLECHANNELFUNCTIONS
2.HowToSelectaFrequency:
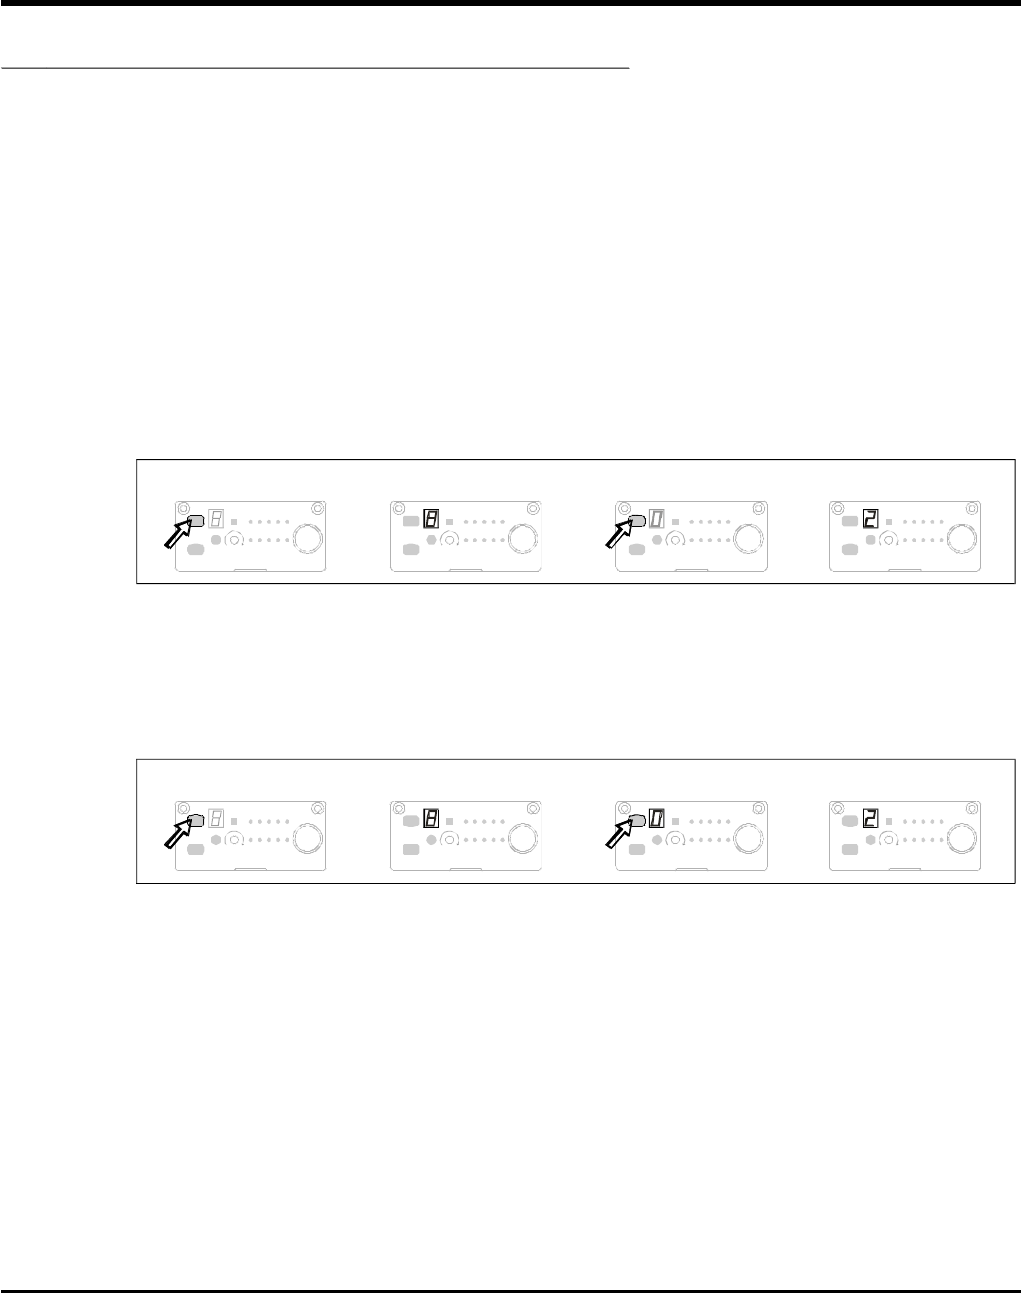
(a)AutoScanningFrequencySetup:HolddowntheSCANbutton(A5)and
releasewhenthechannelindicator(A6)startstoflash.Itwillflashforatotal
of6times.ToactivatetheAutoScanfunction,presstheSCANbuttononce
whilethechannelindicatorisflashing.Anopenfrequencywillautomaticallybe
scannedandsaved/locked.*Note:TheAutoScanfunctionworksonlywhile
thechannelindicatorisflashing(6times).
Whendoneitwillautosaved/locked.
LEDdisplayflashes.
Pressandhold"SCAN"button
for1second.
Press"SCAN"buttonagainandrelease
willautoscanforanopenfrequency.
(b)ManualFrequencySetup:HolddowntheSCANbutton(A5)andrelease
whenthechannelindicator(A6)startstoflash.Itwillflashforatotalof6
times.Whilethechannelindicatorisflashing,pressandholdtheSCAN
buttonuntilthedesiredfrequencyisdisplayed(theywillincrementin
ascendingorder).Releasethebuttontoautomaticallysave/lockthefrequency.
Press"SCAN"buttonandhold,
frequencywillchangeeverytwoflashes. Whendoneitwillautosaved/locked.
LEDdisplayflashes.
Pressandhold"SCAN"button
for1second.
OperatingManual
WIRELESSMIXER
Notes:
1.
2.
3.
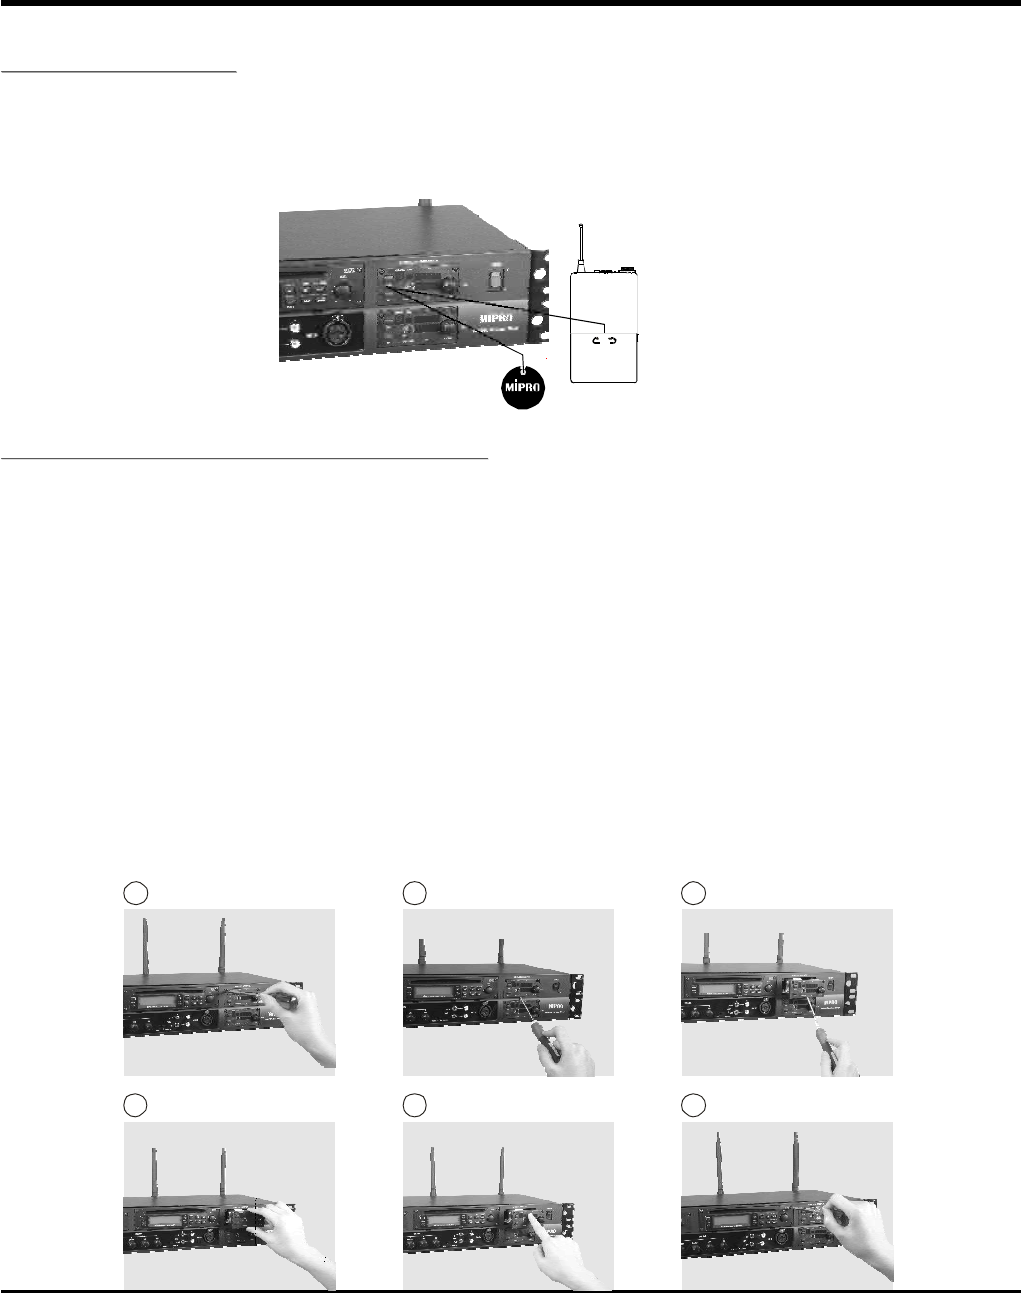
Upto2receivermodulescanbeinstalled.
Eachreceivermoduleisequippedwith"PILOTONE"and"NOISELOCK"dual-squelch
circuitrythateliminatesnoiseinterference.
Installing/changingmodules:
B
A
D
C
FE
A.Removethetwomountingscrewsfromtheexistingreceivermoduleorblank
cover(FigureA).
B.Usingascrewdriver,gentlyprythemoduleoutward(FigureB).
C.Removetheexistingmodulebyslidingitout(FigureC).
D.Installnewreceivermodulebyslidingitin(FigureD).
E.Pushthemoduleallthewayintothemixerslot(FigureE).
F.Securewiththetwomountingscrews(FigureF).
ACT
-6-
C.ACTButton
1.Holdthetransmittertobeprogrammedabout20cmfromtheACTbuttonwiththe"ACT"
markingofthetransmitterfacingtheACTbutton.
2.PresstheACTbutton.ThetransmitterisprogrammedwhentheRFmetershowsafull
signal.
D.ReceiverModuleInstallation
OperatingManual
WIRELESSMIXER
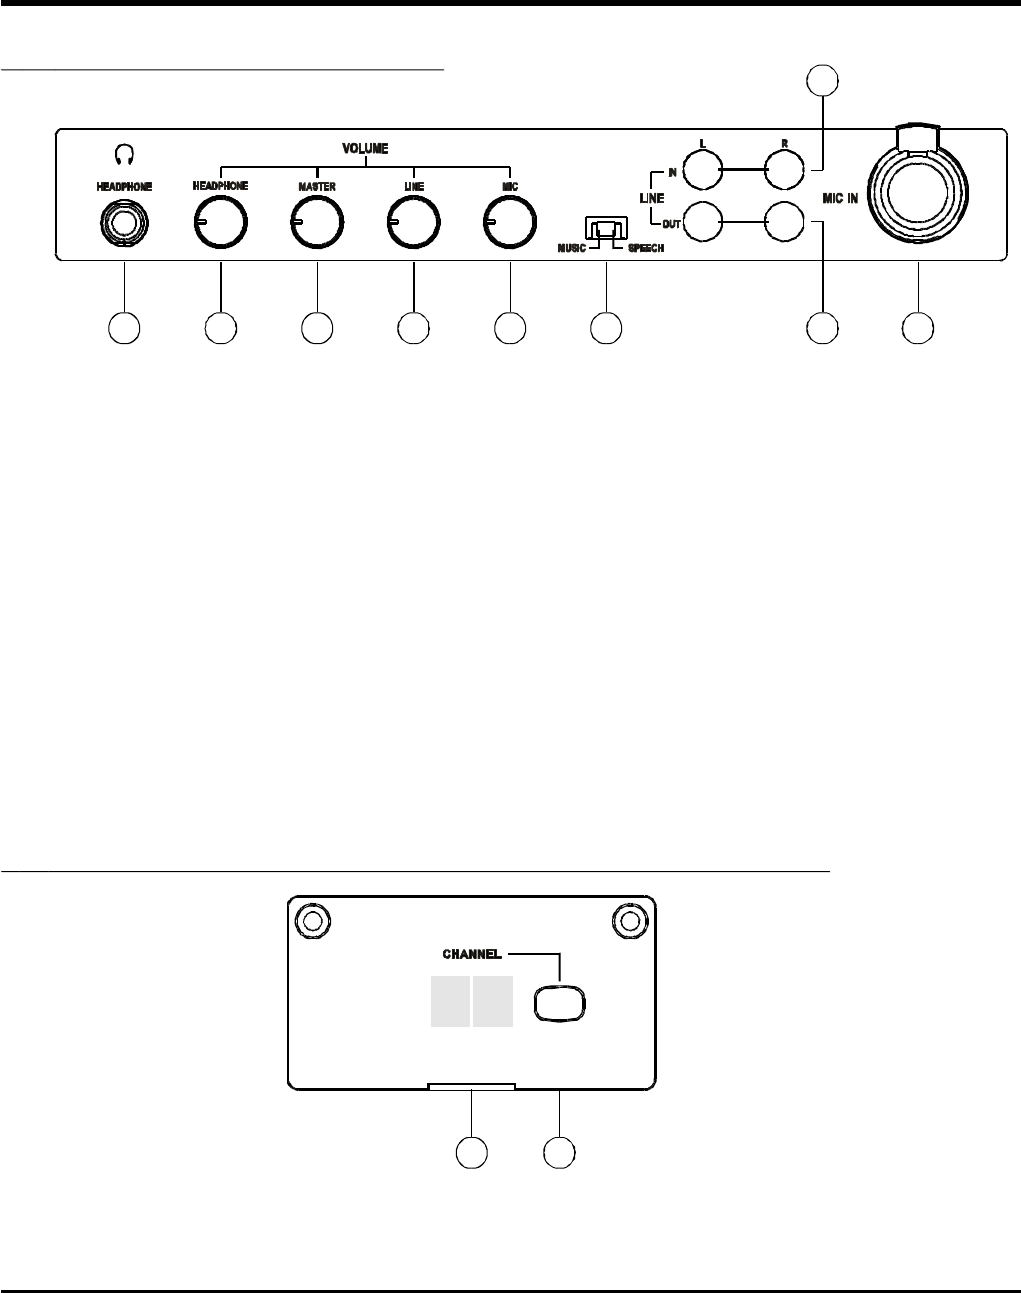
EControlPanelFunctions:、
-7-
(E1)HeadphoneJack:Stereoheadphonejacktomonitorthemixeroutput.
(E2)HeadphoneVolumeControl:Separatelycontrolstheheadphonevolume.
(E3)MasterVolumeControl:Controlstheoveralloutputvolumeofmixer.
(E4)LINEINVolumeControl:SeparatelycontrolstheLINEIN(E7)volume.
(E5)MICVolumeControl:Separatelycontrolsthewiredmicrophone(E9)volume.
(E6)MUSIC/SPEECHSwitch:Tochangemicrophoneinputlevelsformusicorspeech
applications.SwitchingtoSPEECHdecreasesthemicrophoneinputlevel.
(E7)LINEINInputJacks:Leftandrightunbalancedaudioinputjacks.
(E8)LINEOUTJacks:Leftandrightaudiooutputjacks.
(E9)MICIN:Balanced/unbalancedwiredmicrophoneinputjack.
E1 E2 E3 E4 E5 E6
E7
E8 E9
FWirelessInterlinkingTransmitter-PartsandFunctions、
(F1)Frequencyswitchbutton:Selectstransmitterfrequency.
(F2)Transmitterfrequencydisplay.
F2 F1
OperatingManual
WIRELESSMIXER
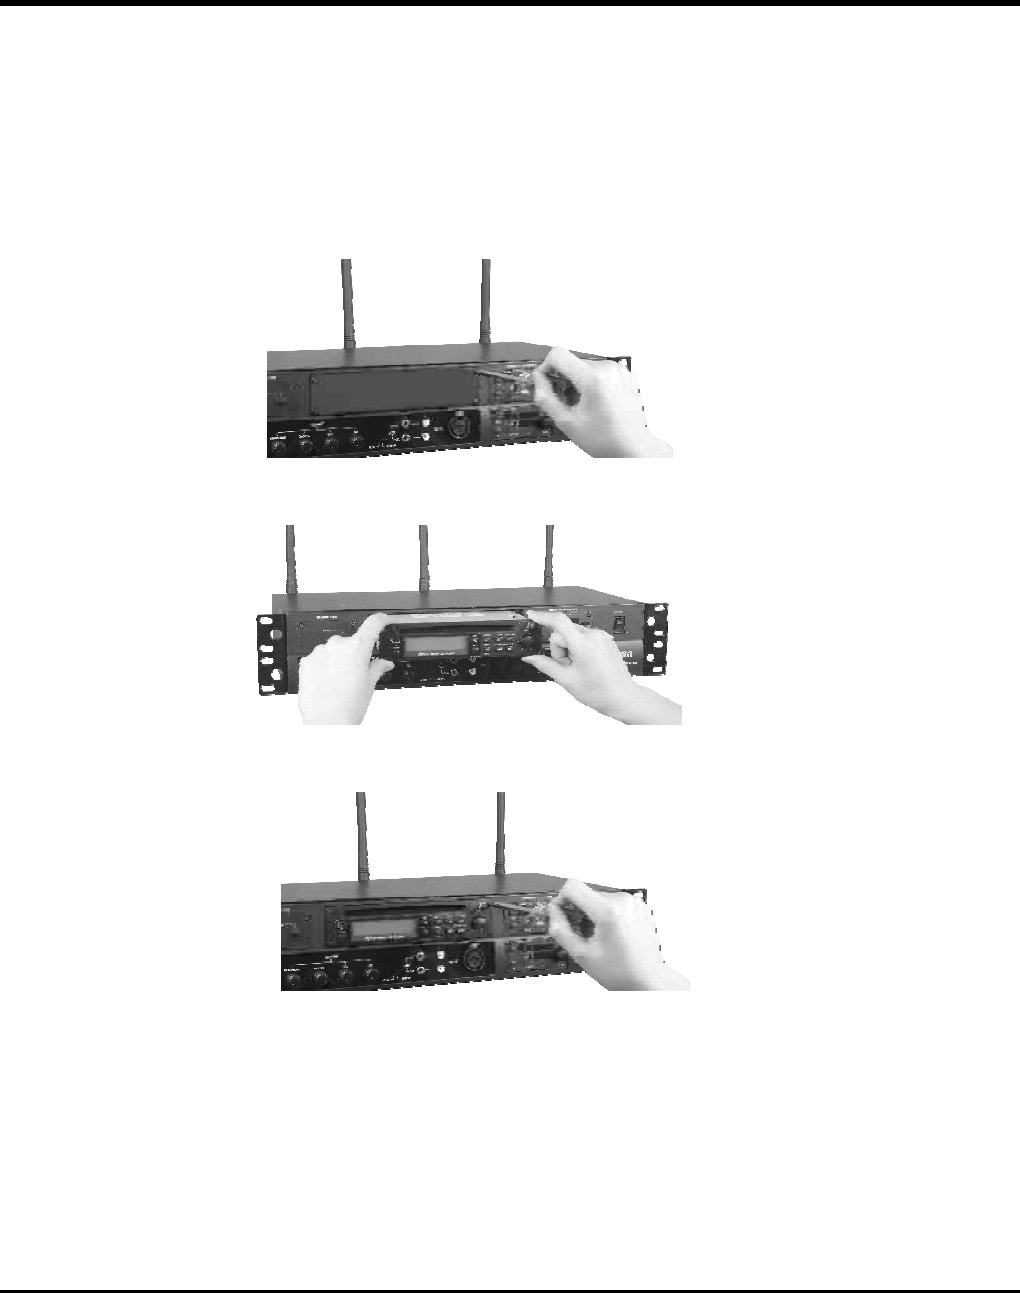
2installation:.CDPlayer
A.
B.
C.
Removescrewsholdingtheblankpanelandremovethepanel(seeFig.3-1)
InserttheCDplayerintothemixer(seeFig.3-2)
Reinstallscrewstosecuretheplayer(seeFig.3-3)
-8-
OperatingManual
WIRELESSMIXER
Fig.3-1
Fig.3-2
Fig.3-3