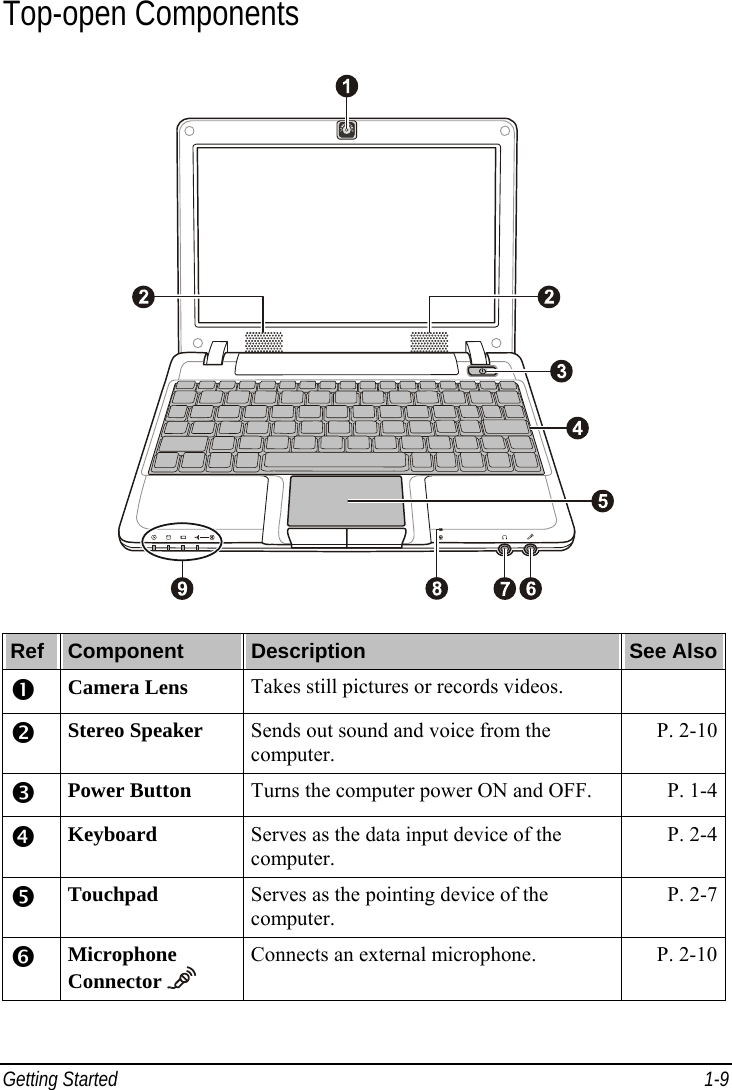
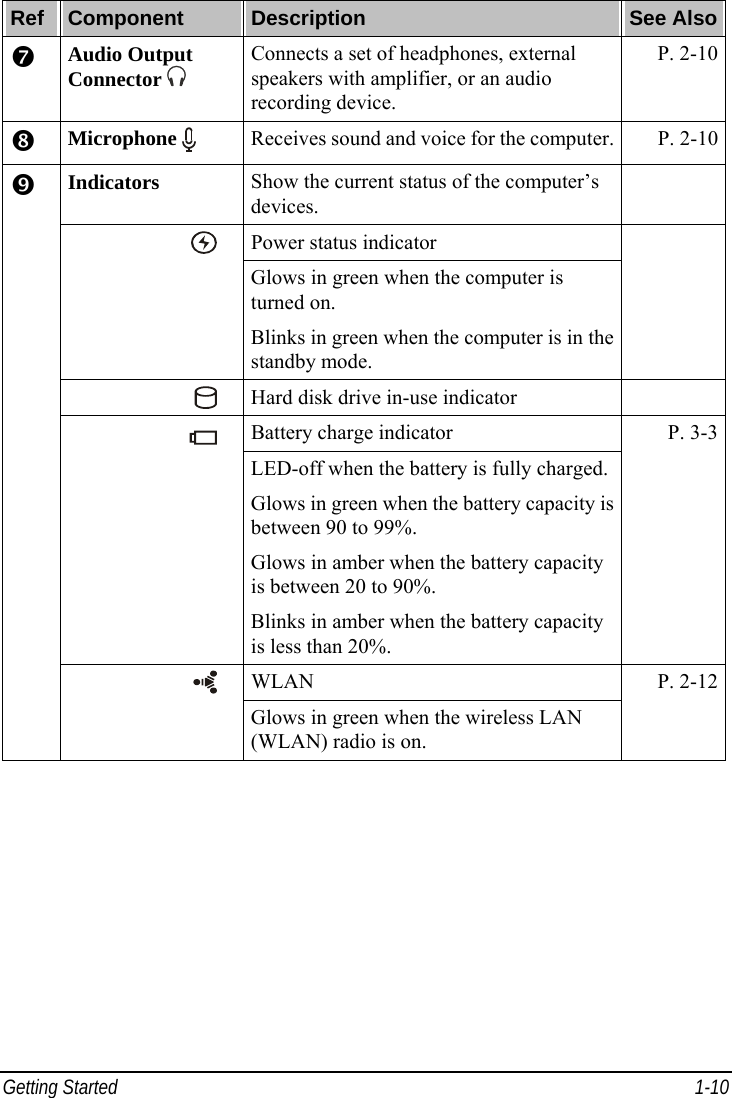
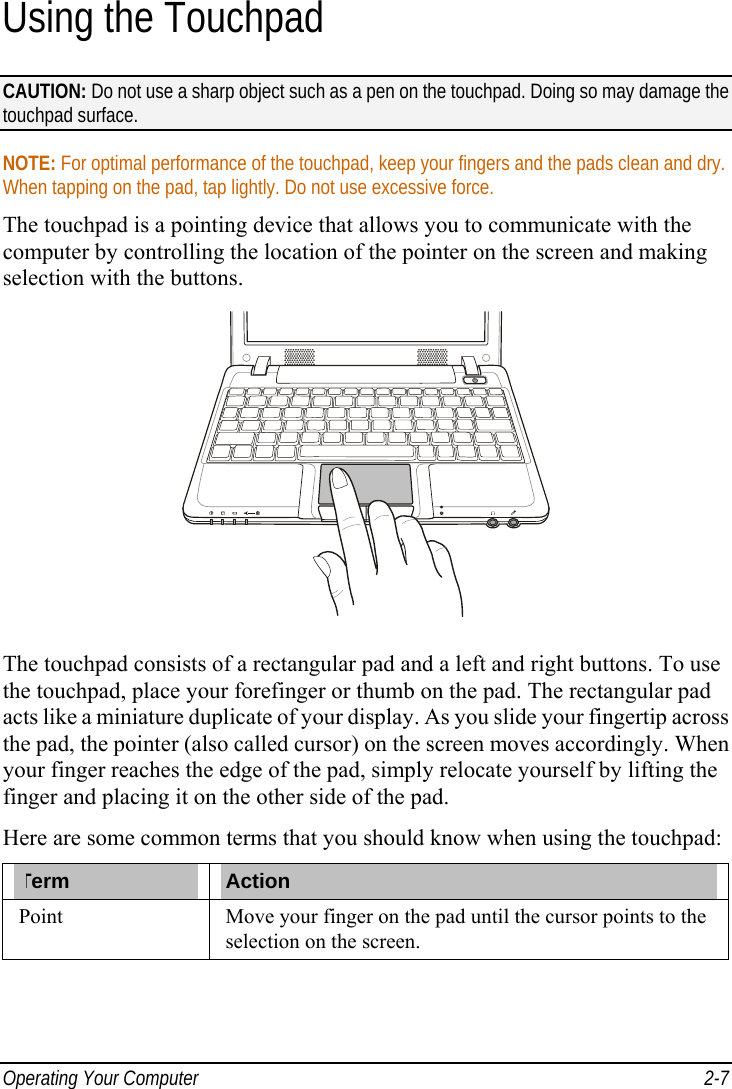
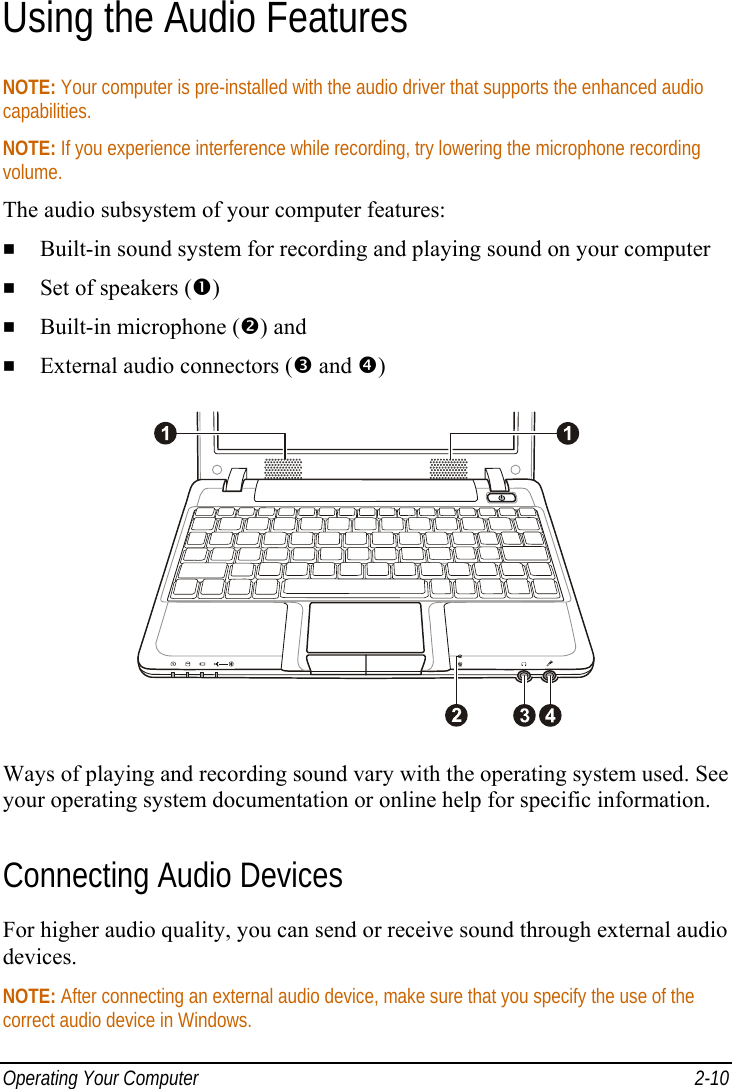
Mitac Digital Technology 00D221WQ Laptop PC User Manual UserManual EC 900 OK
Mitac International Corporation Laptop PC UserManual EC 900 OK
UserManual.wiki
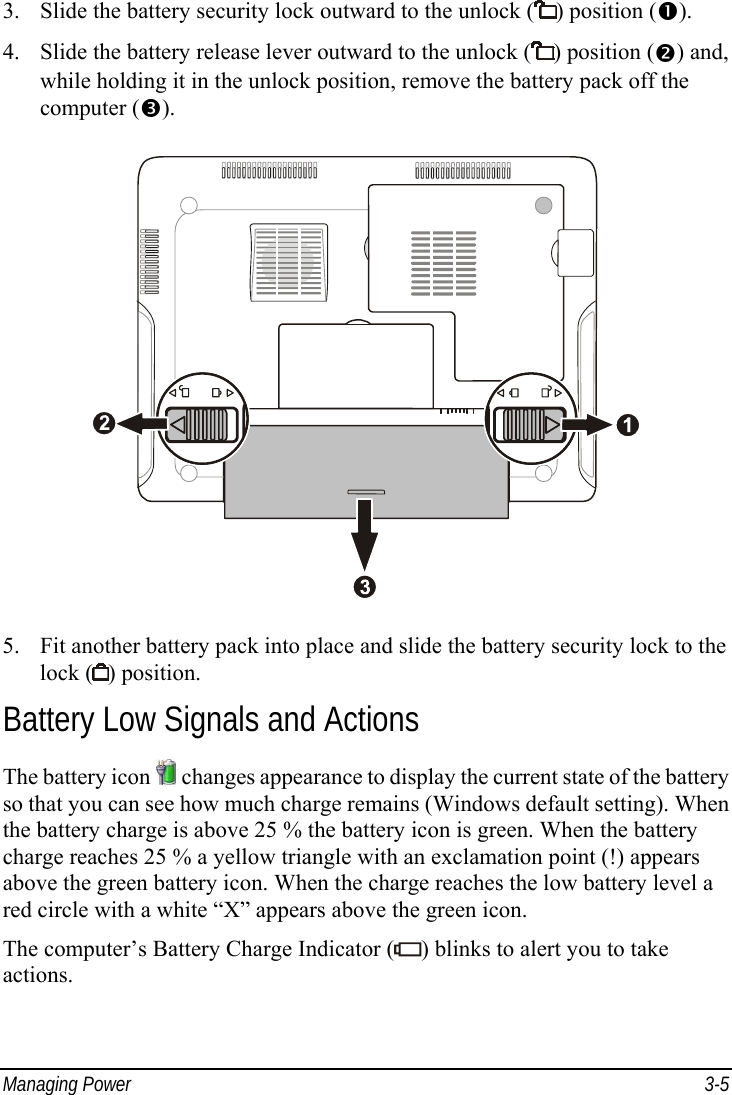
>
Mitac Digital Technology
>
00D221WQ User Manual
User Manual
Navigation menu
Upload a User Manual
Namespaces
Wiki Guide
HTML
PDF
Info
Views
User Manual
Discussion / Help
Navigation
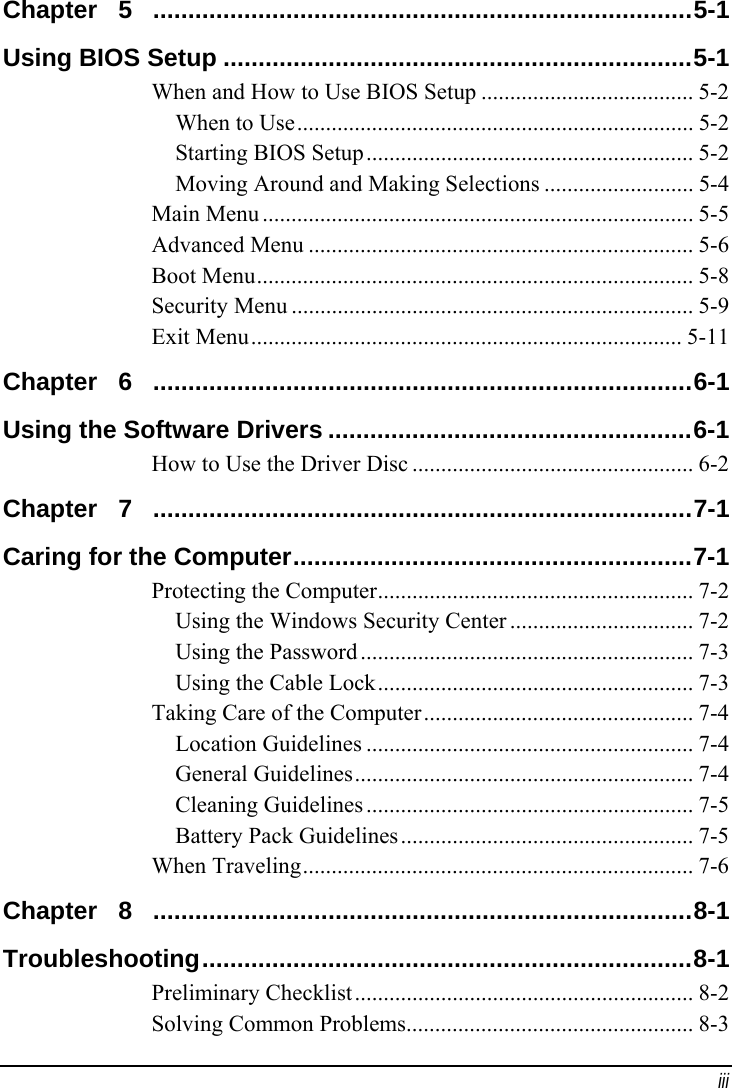


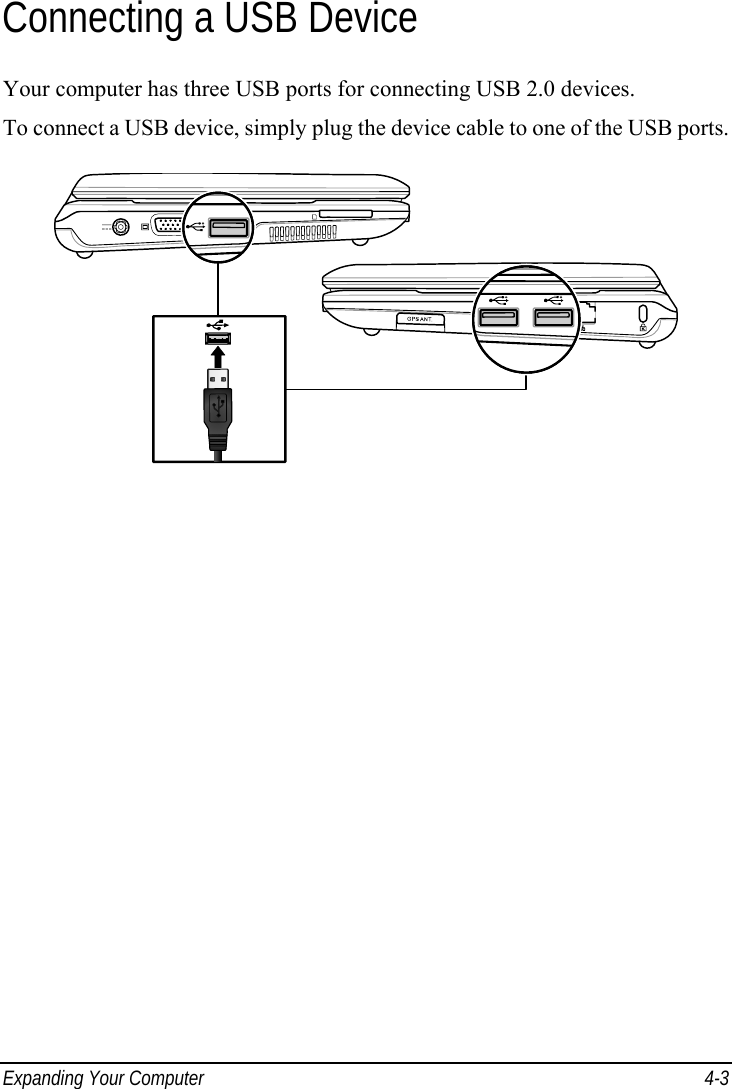
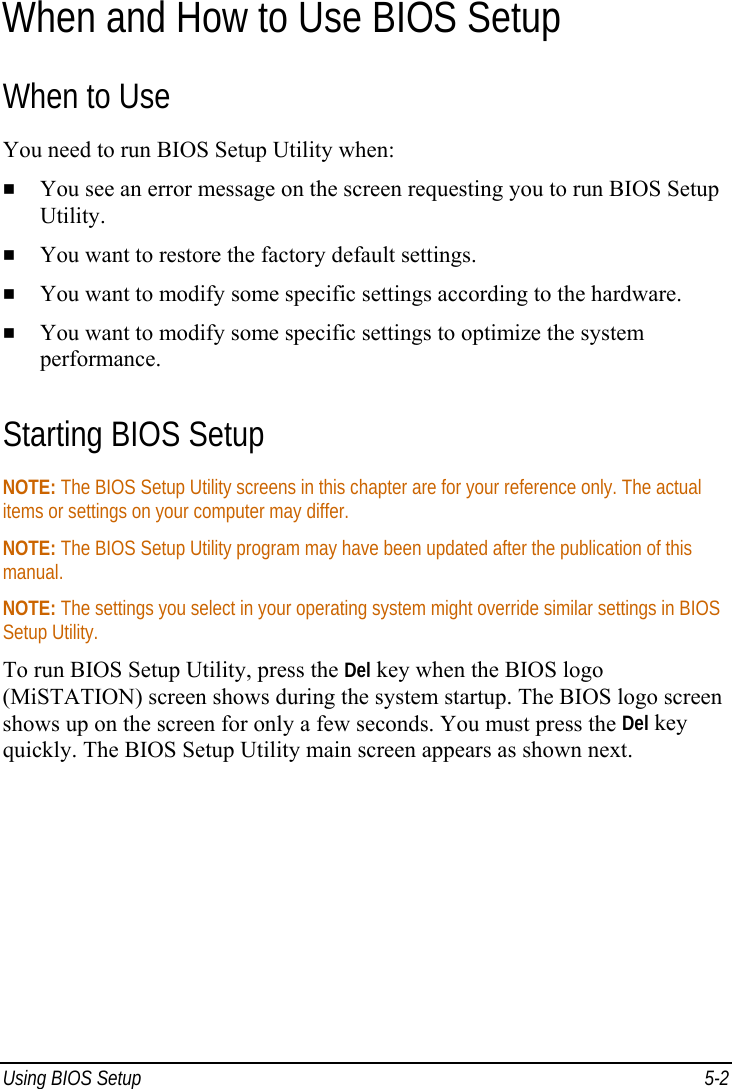
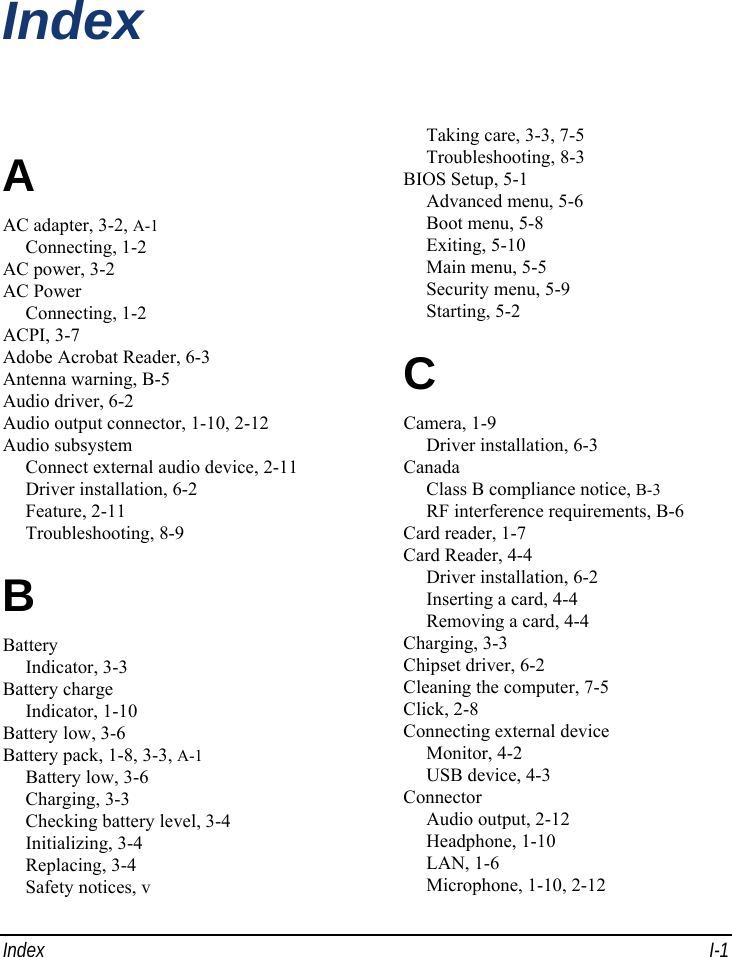
![Using BIOS Setup 5-3 Main Advanced Boot Security Exit System Overview AMIBIOS Version :R0.22 Build Date :08/15/08 EC Version :R0.21A Processor Intel (R) Atom (TM) CPU N270 @ 1.60GHz Speed :1600MHz Count :1 System Memory Size :1016MB System Time [03:21:17] System Date [Thu 09/18/2008] Use [ENTER], [TAB] or [SHIFT-TAB] to select a field. Use [*] or [-] to configure system time. Select Screen ↑↓ Select Item +- Change Field Tab Select Field F1 General Help F10 Save and Exit ESC EXIT V02.61 (c)Copyright 1985-2006, American Megatrends, Inc. The BIOS Setup Utility screen can be divided into four areas: On the top is the menu bar containing the titles of the available menus. Each menu title brings a specific menu. The left column of the menu displays the menu items. The top-right of the menu provides more detailed information when a menu item is highlighted. The right column of the menu provides keyboard instructions for moving around and making selections. When a menu item is highlighted.](https://usermanual.wiki/Mitac-Digital-Technology/00D221WQ/User-Guide-1024427-Page-50.png)
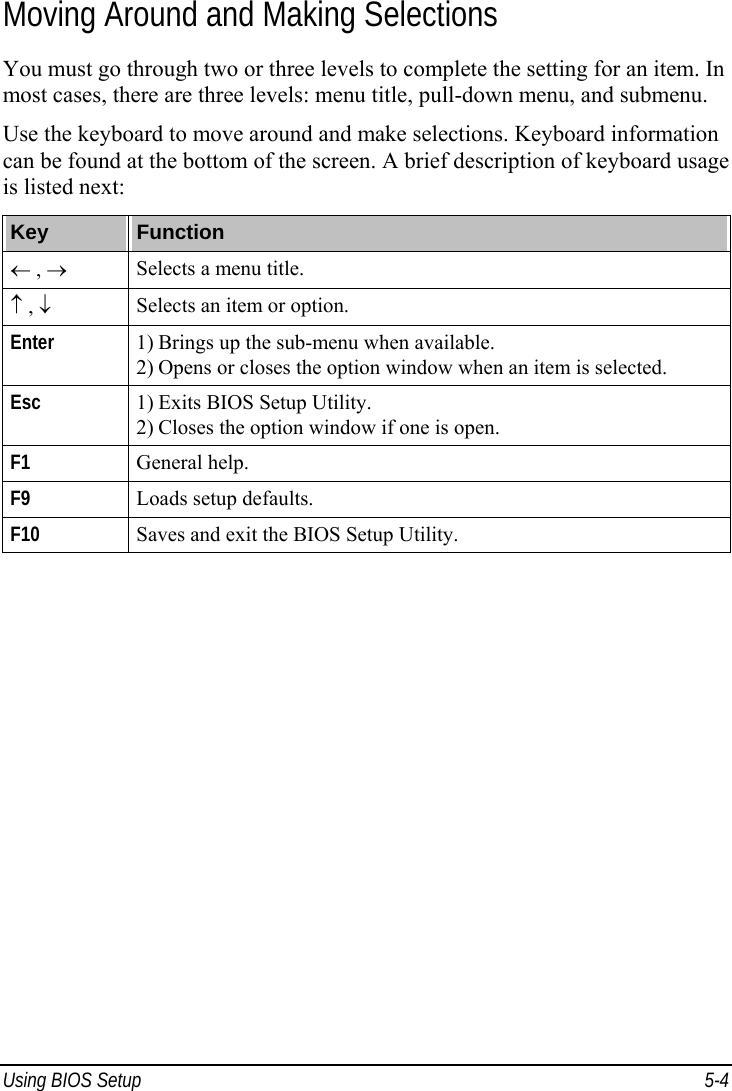
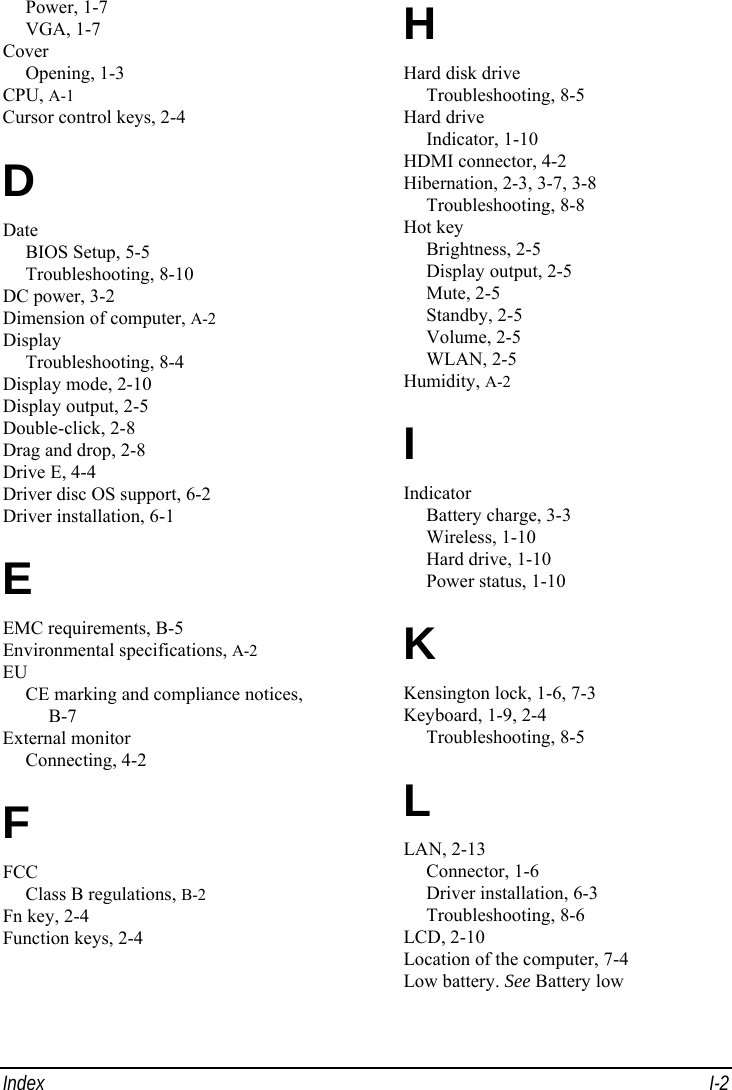
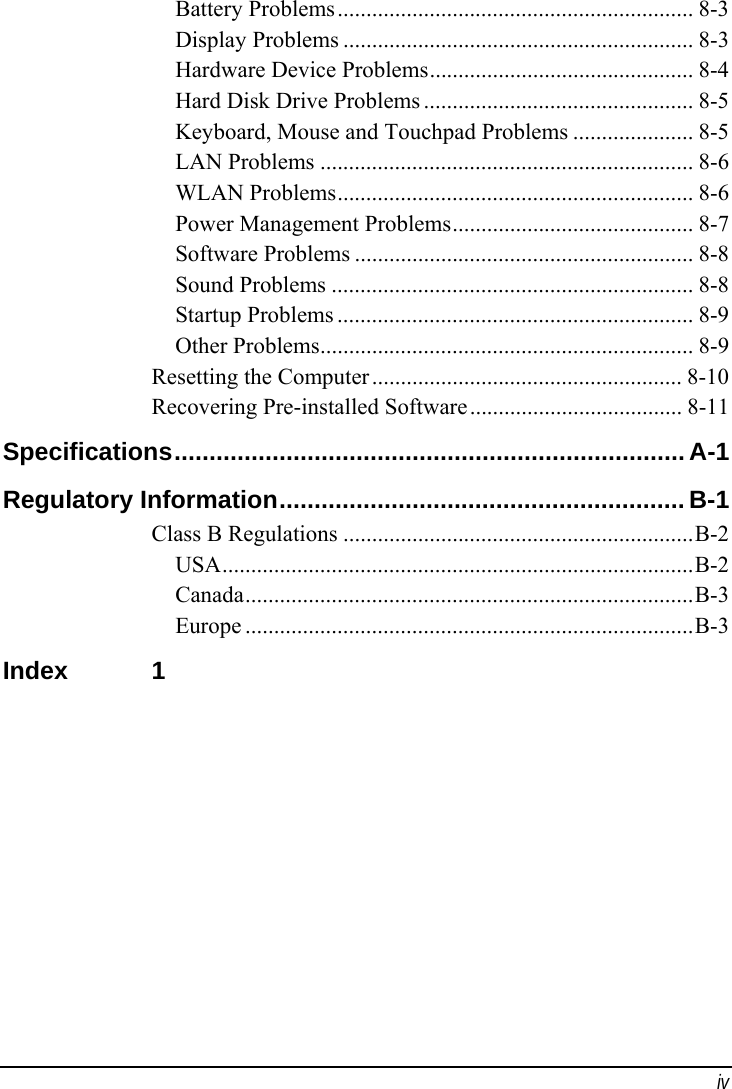
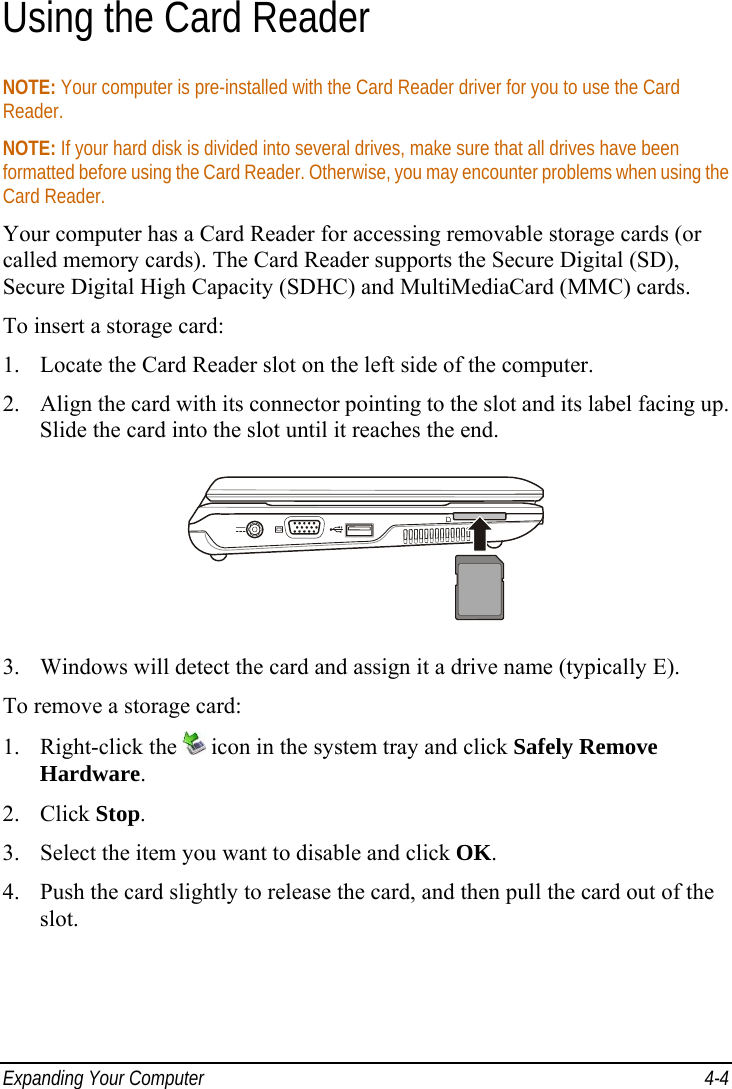
![Using BIOS Setup 5-5 Main Menu The Main menu contains the system date and time settings as well as shows the basic configuration of the system. Main Advanced Boot Security Exit System Overview AMIBIOS Version :R0.22 Build Date :08/15/08 EC Version :R0.21A Processor Intel (R) Atom (TM) CPU N270 @ 1.60GHz Speed :1600MHz Count :1 System Memory Size :1016MB System Time [03:21:17] System Date [Thu 09/18/2008] Use [ENTER], [TAB] or [SHIFT-TAB] to select a field. Use [*] or [-] to configure system time. Select Screen ↑↓ Select Item +- Change Field Tab Select Field F1 General Help F10 Save and Exit ESC EXIT V02.61 (c)Copyright 1985-2006, American Megatrends, Inc. System Time sets the system time. System Date sets the system date.](https://usermanual.wiki/Mitac-Digital-Technology/00D221WQ/User-Guide-1024427-Page-52.png)
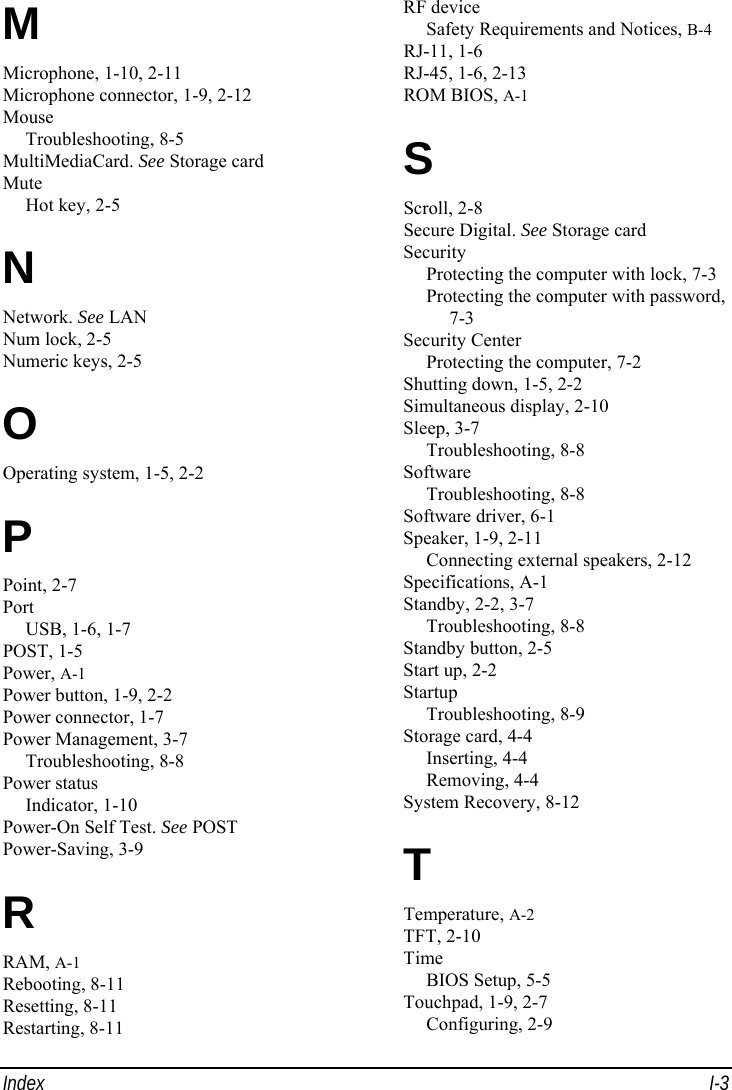
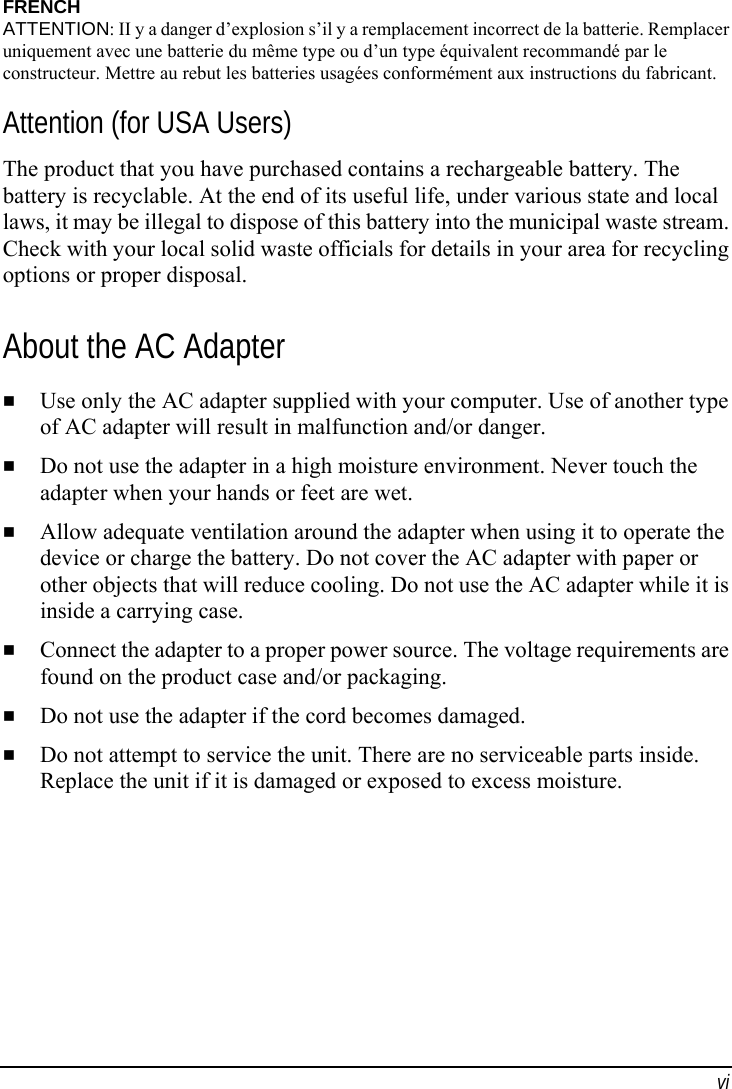
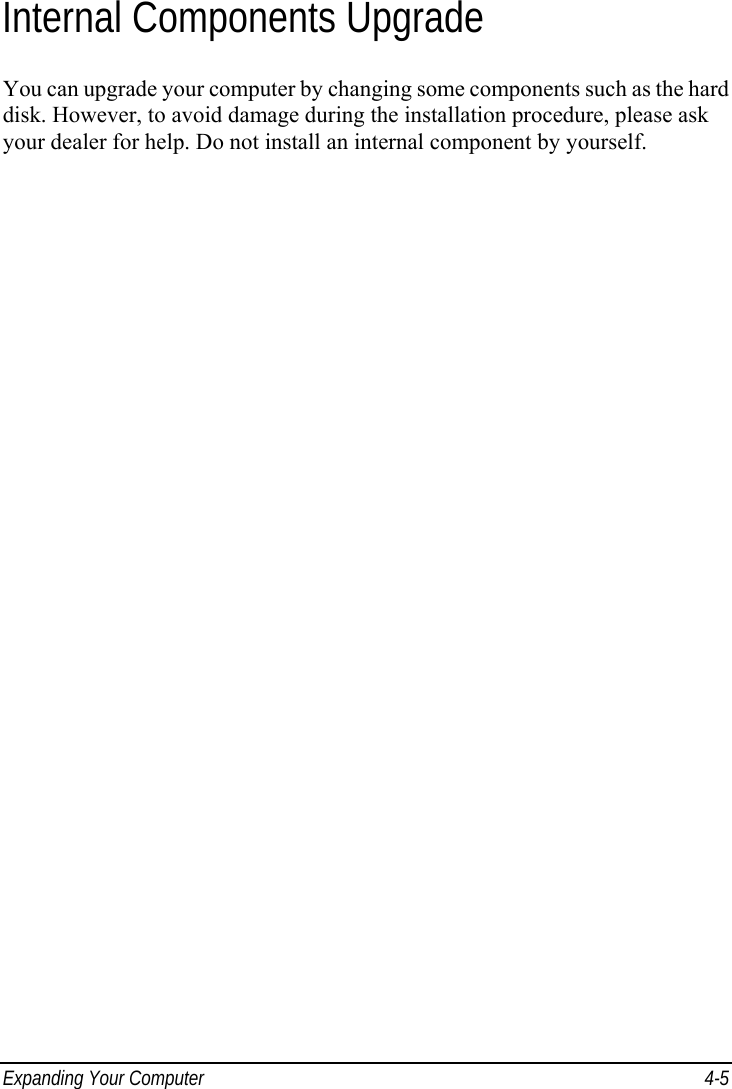
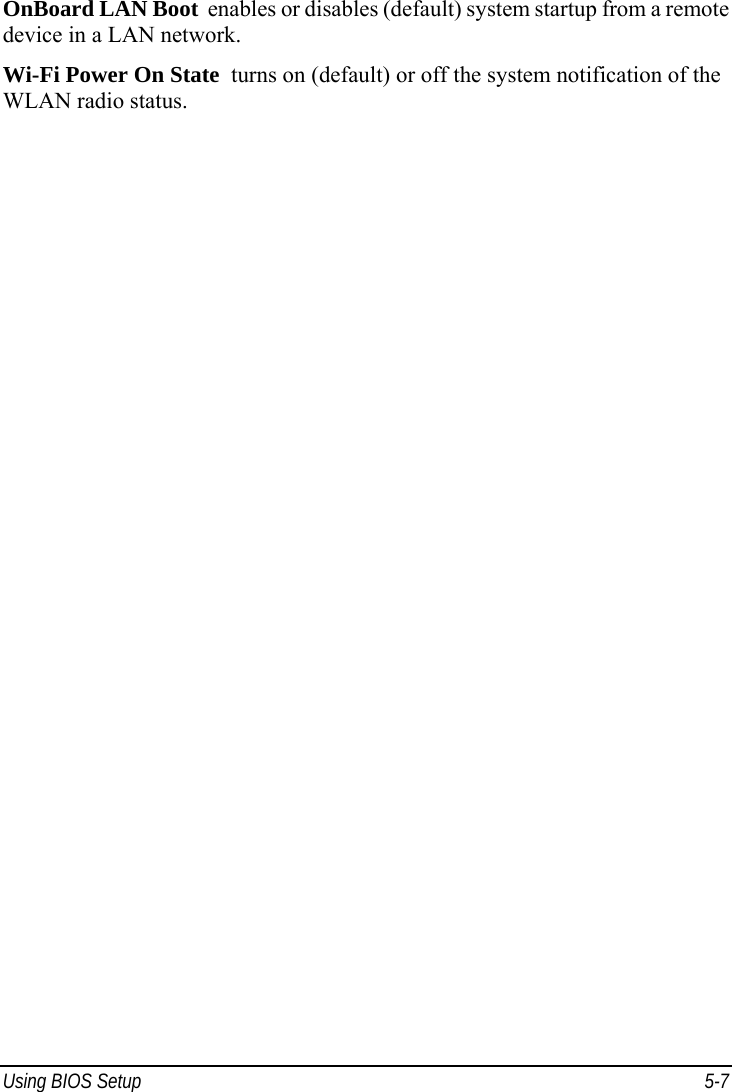
![Using BIOS Setup 5-6 Advanced Menu The Advanced menu contains various system settings. Main Advanced Boot Security Exit Advanced Settings WARNING: Setting wrong values in below sections may cause system to malfunction. ► IDE Configuration ► USB Configuration iPOD Charge [Enable] OnBoard LAN [Enable] OnBoard LAN Boot [Enable] Wi-Fi Power On State [On] Configure the IDE device(s). Select Screen ↑↓ Select Item Enter Go to Sub Screen F1 General Help F10 Save and Exit ESC EXIT V02.61 (c)Copyright 1985-2006, American Megatrends, Inc. IDE Configuration sets the auto detection of the hard disk drive in your system. Primary IDE Master/Primary IDE Slave sets the type of the hard disk drive. IDE Detect Time Out (Sec) sets the time for the system to stop detecting the hard disk drive. USB Configuration enables or disables the system’s support for the USB port in DOS mode. Legacy USB Support enables (default) or disables the USB port in DOS mode. iPOD Charge enables or disables (default) charging via the USB port when the system is in Standby or Hibernation mode. OnBoard LAN enables (default) or disables the system’s LAN feature.](https://usermanual.wiki/Mitac-Digital-Technology/00D221WQ/User-Guide-1024427-Page-53.png)
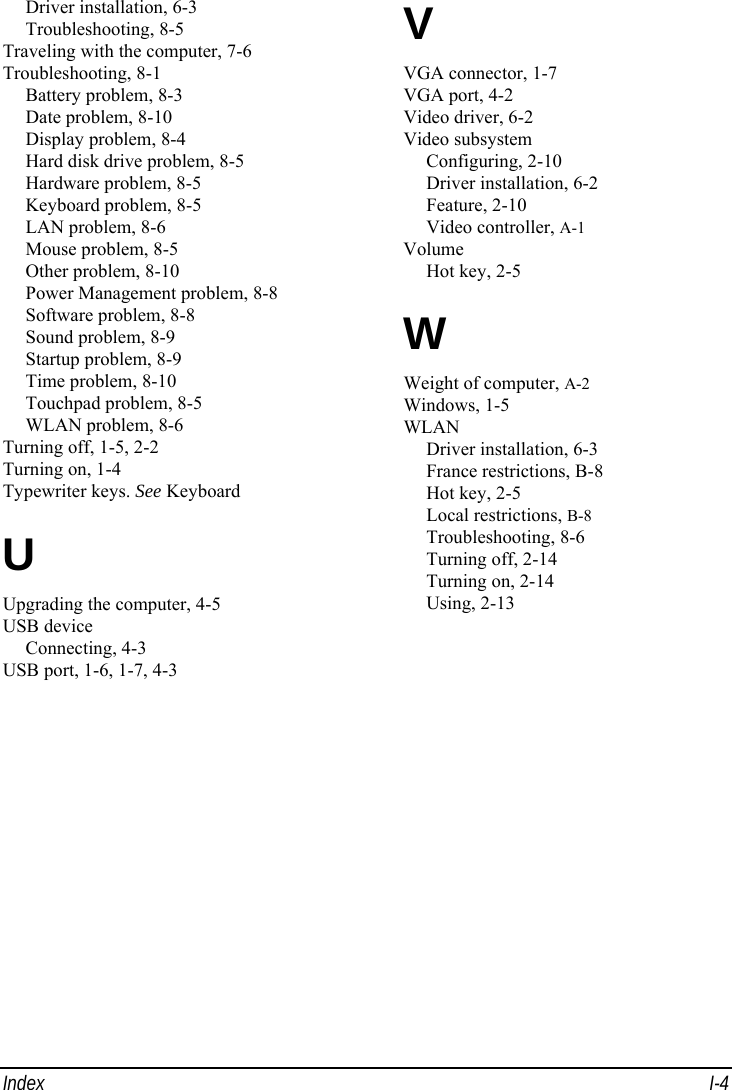
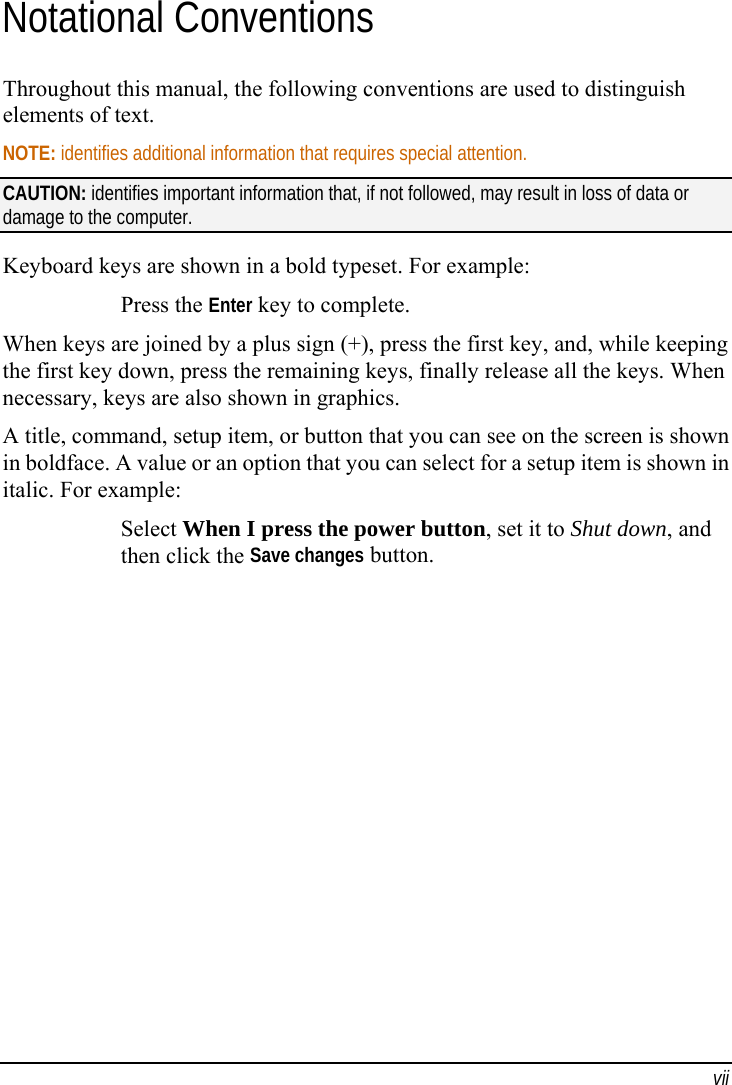
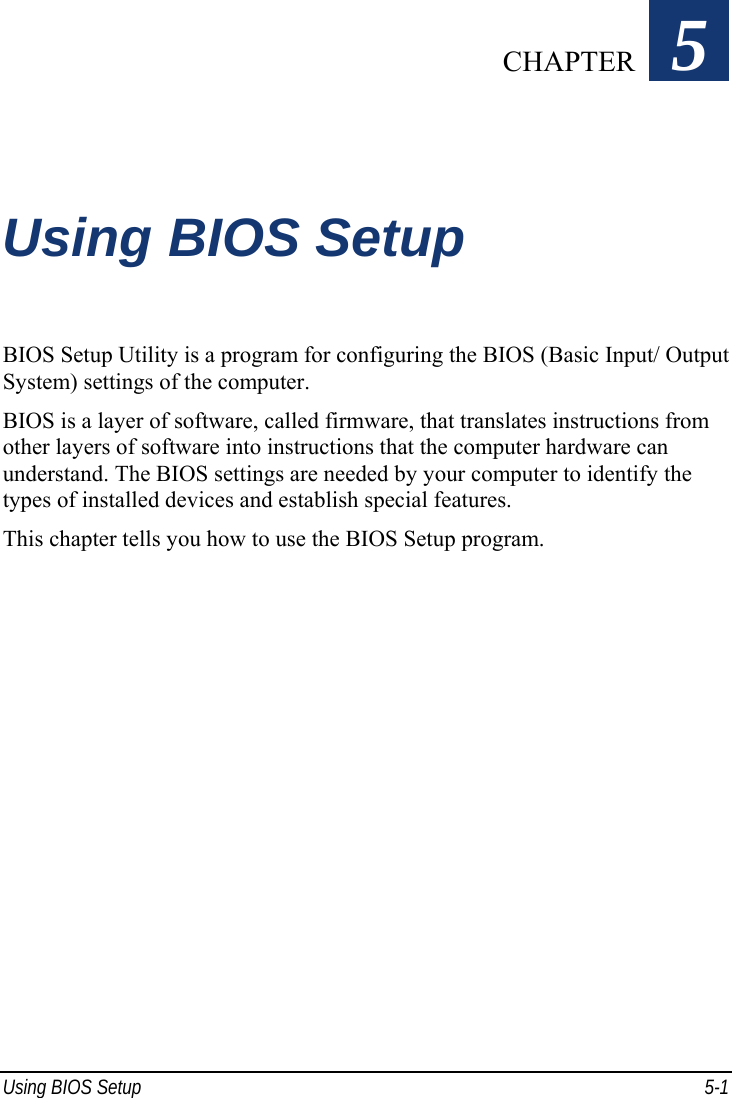
![Using BIOS Setup 5-9 Security Menu The Security menu contains the security settings, which safeguard your system against unauthorized use. Main Advanced Boot Security Exit Security Settings Supervisor Password :Not Installed User Password :Not Installed Change Supervisor Password Change User Password Boot Sector Virus protection [Enabled]Install or Change the password. Select Screen ↑↓ Select Item Enter Go to Sub Screen F1 General Help F10 Save and Exit ESC EXIT V02.61 (c)Copyright 1985-2006, American Megatrends, Inc. Supervisor/User Password shows whether you have set the supervisor/user password for the system. Change Supervisor/User Password creates or changes the supervisor/user password. When typing the password, first make sure that Num Lock is off, and then type the password in the entry fields and press Enter. Confirm your password by typing it again and pressing Enter. You can set the supervisor/user password to be required for starting up the system and/or entering BIOS Setup. NOTE: You can set the user password only when the supervisor password has been set. NOTE: If both the supervisor and user passwords are set, you can enter any of them for starting up the system and/or entering BIOS Setup. However, the user password only allows you to view/change the settings of certain items. Boot Sector Virus Protection helps prevent computer viruses by protecting the hard disk boot sector (partition table) from any change if enabled. Default is disabled.](https://usermanual.wiki/Mitac-Digital-Technology/00D221WQ/User-Guide-1024427-Page-56.png)