Mitac Digital Technology N564 Tablet User Manual
Mitac International Corporation Tablet
User Manual

User Manual
N564

1
Table of contents
Your device at a glance................................................................. 2
Charging the battery ..................................................................... 3
Turning the device ON and OFF ................................................... 4
Sleep mode ............................................................................ 5
Airplane mode ........................................................................ 5
Installing a memory card ............................................................... 5
Connecting to a computer ............................................................. 6
Mounting the device ...................................................................... 6
Using the cradle ..................................................................... 6
Using the mount ..................................................................... 7
Navigating on the screen .............................................................. 8
Home screen ................................................................................ 8
Customizing your device ............................................................... 9
Wireless network connection .................................................. 9
Bluetooth connection ............................................................ 10
Caring for your device ................................................................. 10
Troubleshooting .................................................................... 10
Caring for your device ...........................................................11
Regulatory information ................................................................ 12
FCC ...................................................................................... 12
IC .......................................................................................... 14
CE ........................................................................................ 14
WEEE ................................................................................... 15
Safety precautions ................................................................ 15
2
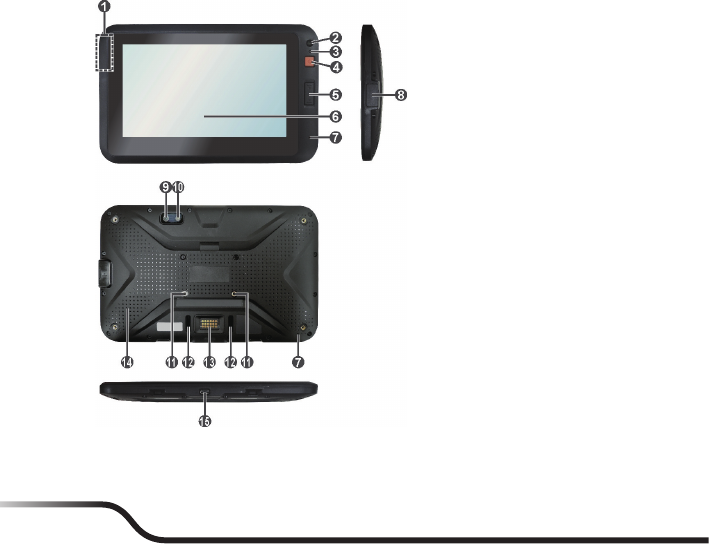
Your device at a glance
Note: Depending on the specic model purchased, the color and look of your device and accessories may not exactly
match the graphics shown in this document.
❶NFC sensor*
❷Front camera lens*
❸Light sensor*
❹Power button
❺Volume buttons
❻Touch screen
❼Microphone
❽Memory card slot
❾Rear camera lens*
❿Flash*
⓫Screw for cradle
⓬Socket for cradle
⓭Dock connector
⓮Speaker
⓯Micro-USB connector
*For selected models only
3
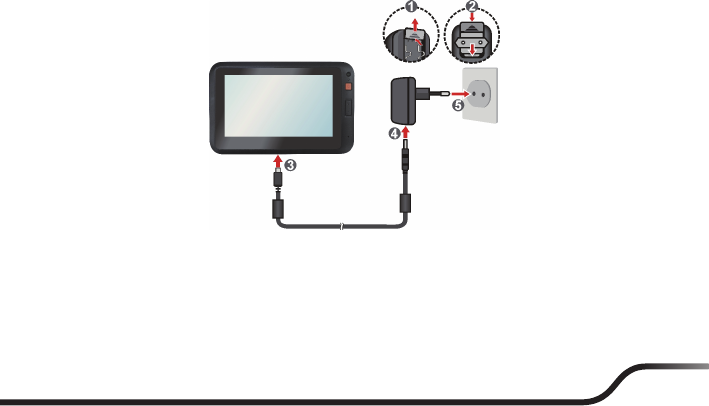
Charging the battery
Note: Use only the charger supplied with your device. Use of another type of charger will result in malfunction and/or
danger.
When charging the battery for the very rst time, you should charge it for at least 8
hours (using the AC charger) with your device turned off.
1. Push the tap outwards, plug the converter to the AC charger and then push the
tap inwards to lock the converter in place (❶).
2. Open the connector cover on your device and connect the charger cable to the
Micro-USB connector (❷).
3. Plug the AC charger into a wall outlet (❸).
4
CAUTION: For optimal performance of the lithium battery:
yDo not charge the battery where the temperature is high (e.g. in direct sunlight).
yRecharge the battery when it is nearly discharged. When recharging, make sure that the battery is fully charged.
Doing so can extend the battery life.
yIf you will not use the product for a long period of time (over one month) or nd the discharge/recharge time has
been shortened, be sure to fully discharge the battery rst before recharging it. You are also advised to fully
discharge and recharge the battery once every 1~2 months.
yFailure to follow the battery usage instructions could cause damage to your device, battery and even bodily injury
or property damage and will void the warranty.
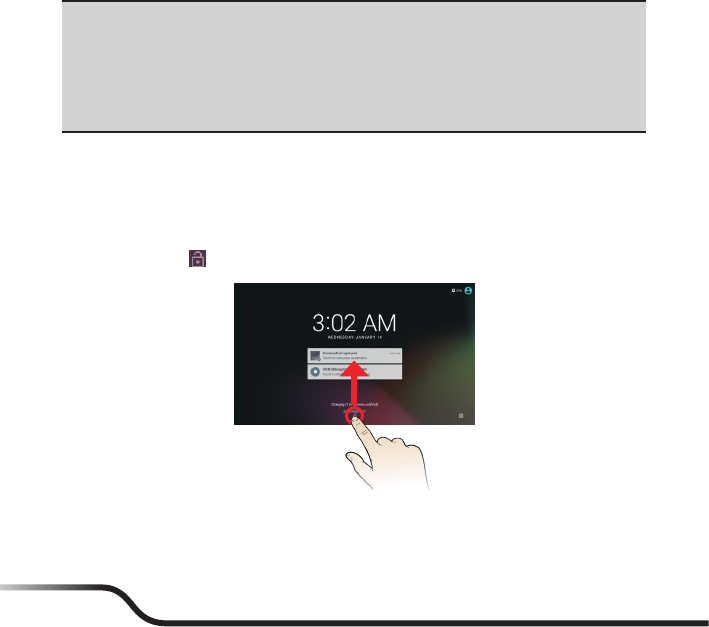
Turning the device ON and OFF
1. Press and hold the Power button for about 2 seconds to turn on your device.
Wait for the boot screen to display.
2. The Home screen will display and the device is in Lock mode by default. Drag
the Lock icon ( ) upwards. The device is ready for use.
3. To turn off the devide, press and hold the Power button until the option window
displays. Then tap Power off.
Note: You can also choose to restart the device by selecting Restart from the option window.
5
Sleep mode
Your device will automatically switch off the screen after 1 minute (by default) of
inactivity. You can manually switch off the screen by pressing the Power button
briey.
To resume the screen, press the Power button briey and then unlock the device
by dragging the Lock icon ( ) upwards.
To change the settings, tap on the desktop Settings Display Sleep.
Airplane mode
When you are in an airplane or in the area where data transferring is not allowed,
enable Airplane mode. You will be able to use many of your device’s applications
(such as playing games or listening music), but all wireless radios, including
wireless networks and Bluetooth, on the device are turned off – it cannot send or
receive data.
To enable Airplane mode: press and hold the Power button until the option window
displays. Then tap Airplane mode. The icon in the status bar indicates that
Airplane mode is on.
To disable Airplane mode: tap on the desktop Settings More in Wirelss
& networks, and tap the Airplane mode switch to turn it off.
Installing a memory card
CAUTION: Do not apply pressure to the center of the memory card.
Slide the cover latch to open the cover on the left side of the device to locate the
memory card slot. Noting the card orientation, hold the card (MicroSD) by the
edges and gently insert it into the slot.
To remove a card, rst unmount it from the device by tapping on the desktop
Settings Storage & USB. Locate the desired storage item and tap . Wait
6
until the card is safety unmounted. Then gently push the top edge of the card
inwards to release it, and pull it out of the slot.
Note: Inserting the card in the reverse direction may cause damage.
Note: The manufacturer does not guarantee the product’s compatibilities with the storage cards from all manufacturers.
Note: If you encounter access problems with your memory card, please visit the website http://www.sdcard.org/
consumers/formatter_3/ and use the "SD Formatter 3.0 for SD/SDHC/SDXC" tool to format your memory card.
Connecting to a computer
Connect the Micro-USB end of the USB cable to your device and the other end to
a USB port in your computer.
Note: When connected to the computer, your device will not be charged. When data synchronization is in progress, your
device will consume instead of charging battery power.
Mounting the device
Depending on your model, a cradle and/or a mount may be provided for your
device. Follow the illustrations to mount your device.
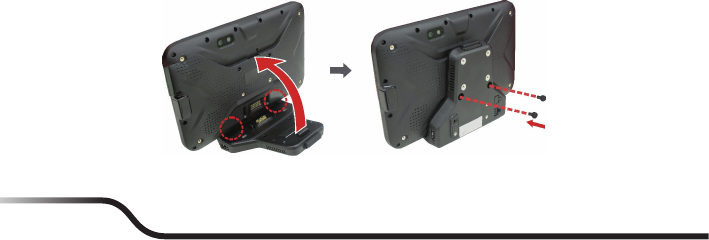
Using the cradle
Follow the illustrations to install the cradle:
7
The cradle allows you to:
yCharge the device via the AC charger or the car charger.
yConnect the device to a computer via the USB cable.
yConnect an external USB storage (such as a USB ash drive).
yConnect to headphones.
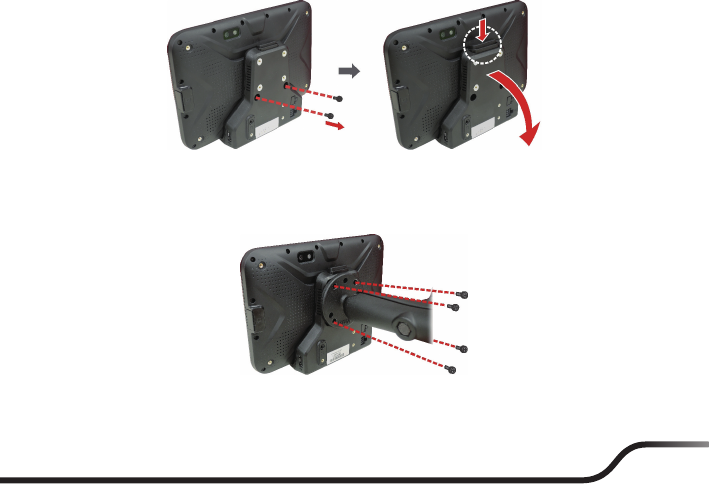
Follow the illustrations to release the cradle:
Using the mount
Follow the illustration to install the mount onto the cradle:

8
Navigating on the screen
To operate your device, touch the screen with your nger.
You can perform the following actions:
yTap: Touch the screen once with your nger to open items or select onscreen
buttons or options.
yTap and hold: Tap and hold on the desired item to open the pop-up menu
that contains the available options for the item (for example, the Copy/Move/
Rename options for a le in File Manager).
yDrag: Tap and hold on the item and then move it to the target position without
releasing your nger.
ySlide: Drag your nger vertically or horizontally across the screen.
yDrag to the left/right to switch to the next/previous item on the list.
yDrag to the top/bottom to scroll up/down the screen.
Note: Not all slide gestures are applicable to all applications.
yMulti-touch gestures: Move your ngers apart or together on the screen to
zoom in or out while viewing a picture or a web page.
Note: Not all multi-touch gestures are applicable to all applications.
yRotating the screen: For most applications, you can automatically change the
screen orientation, from portrait to landscape and vise versa, by turning the
device sideways.
Note: Rotating the screen is not applicable to all applications.
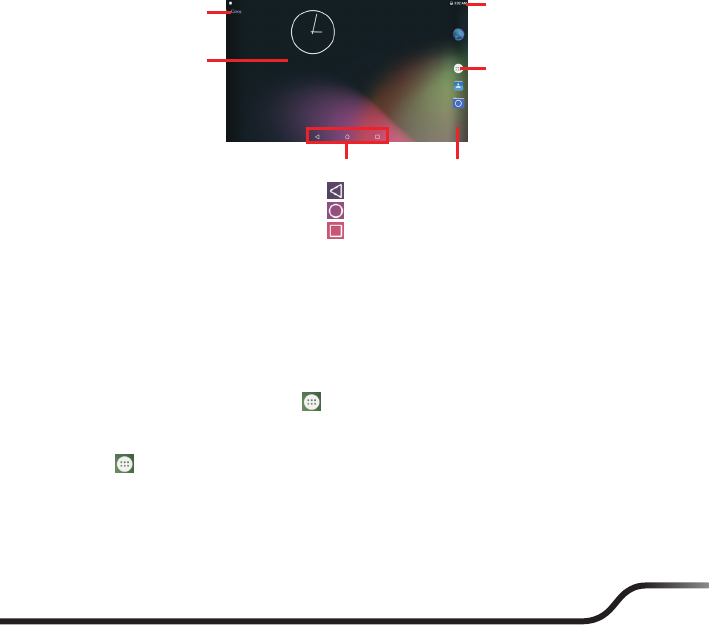
Home screen
The Home screen is your starting place for tasks, providing quick access to
frequently used applications and settings.
To display the Home screen, tap at any time.
9
Status Bar
Quick Launcher
Shortcuts/widgets
Desktop All Apps button
Soft keys
Back
Home
Recent Apps
The soft keys may be in hidden mode at times. Simply tap where the keys are
located to bring out the keys again.
Customizing your device
You can customise the device through the Settings menu, including personalizing
the Home screen, changing the display and sound settings, conguring the
connection settings, and more.
To access the Settings menu, tap on the desktop Settings.
Wireless network connection
1. Tap on the desktop Settings WLAN.
2. Tap the WLAN switch to turn it on. The device will automatically scan for
available wireless networks.
3. Tap a wireless network to connect.
4. If you select an open network, you will be automatically connected to the
network.
10
If you select a network that is secured with WEP, enter the key and then tap
CONNECT.
5. When your device is connected to a wireless network, the WIFI icon ( ) will
appear in the status bar indicating the signal strength (number of bands that
light up).
Bluetooth connection
To pair a Bluetooth device for sharing data:
1. Tap on the desktop Settings Bluetooth.
2. Tap the Bluetooth switch to turn it on. The device will automatically scan for
available Bluetooth devices.
Note: By default, your device is not in visible mode when Bluetooth is turned on. If you need to enter visible mode: tap
Bluetooth and then tap your device name. The default visibility timeout is 2 minutes.
3. Tap a device from the list to initiate pairing.
4. On your device, the passkey is displayed. Make sure the same passkey is
displayed on the other device and then tap PAIR. Then tap PAIR on your
device to conrm pairing if necessary.
Caring for your device
Troubleshooting
Note: If you encounter a problem you cannot solve, contact an authorised service centre for assistance.
Power does not switch on when using battery power.
The remaining battery power may be too low to run your device. Charge the
battery.
Screen responds slowly.
Make sure that your device is not running out of battery power. If the problem still
persists, restart your device.

11
Screen freezes.
Restart your device.
Screen is hard to read.
Make sure that the backlight of the display is set to a high-enough brightness.
Cannot establish a connection with a computer.
yMake sure that your device and your computer are both switched on before
trying to establish a connection.
yMake sure that the cable is securely plugged into the USB port on your
computer and on your device. Connect the USB cable directly to your
computer—do not run the cable through a USB hub.
yRestart your device before connecting the cable. Always disconnect your
device before you restart your computer.
Caring for your device
Taking good care of your device will ensure trouble-free operation and reduce the
risk of damage to your device.
yKeep your device away from excessive moisture and extreme temperatures.
yAvoid exposing your device to direct sunlight or strong ultraviolet light for
extended periods of time.
yDo not place anything on top of your device or drop objects on your device.
yDo not drop your device or subject it to severe shock.
yDo not subject your device to sudden and severe temperature changes. This
could cause moisture condensation inside the unit, which could damage your
device. In the event of moisture condensation, allow the device to dry out
completely before use.
yThe screen surface can easily be scratched. Avoid touching it with sharp
objects. Non-adhesive generic screen protectors designed specically for use
on portable devices with LCD panels may be used to help protect the screen
from minor scratches.

12
yNever clean your device with it powered on. Use a soft, lint-free cloth to wipe
the screen and the exterior of your device.
yDo not use paper towels to clean the screen.
yNever attempt to disassemble, repair or make any modications to your device.
Disassembly, modication or any attempt at repair could cause damage to your
device and even bodily injury or property damage and will void any warranty.
yDo not store or carry ammable liquids, gases or explosive materials in the
same compartment as your device, its parts or accessories.
yTo discourage theft, do not leave the device and accessories in plain view in an
unattended vehicle.
yDo not expose the device to extreme heat or direct sunlight for prolonged
periods. Overheating may damage the device.
Regulatory information
yFor regulatory identication purposes, the product series is assigned a model
number of N564.
yRadio frequency:
yWLAN: 802.11 b/g/n (2.4 GHz)
yGPS + GLONASS: 1574 – 1610 MHz
yNFC: 13.56 MHz
FCC
Federal Communication Commission Interference Statement
This device complies with Part 15 of the FCC Rules. Operation is subject to the
following two conditions: (1) This device may not cause harmful interference, and
(2) this device must accept any interference received, including interference that
may cause undesired operation.

13
This equipment has been tested and found to comply with the limits for a Class B
digital device, pursuant to Part 15 of the FCC Rules. These limits are designed
to provide reasonable protection against harmful interference in a residential
installation. This equipment generates, uses and can radiate radio frequency
energy and, if not installed and used in accordance with the instructions, may
cause harmful interference to radio communications. However, there is no
guarantee that interference will not occur in a particular installation. If this
equipment does cause harmful interference to radio or television reception, which
can be determined by turning the equipment off and on, the user is encouraged to
try to correct the interference by one of the following measures:
yReorient or relocate the receiving antenna.
yIncrease the separation between the equipment and receiver.
yConnect the equipment into an outlet on a circuit different from that to which the
receiver is connected.
yConsult the dealer or an experienced radio/TV technician for help.
FCC Caution:
yAny changes or modications not expressly approved by the party responsible
for compliance could void the user's authority to operate this equipment.
yThis transmitter must not be co-located or operating in conjunction with any
other antenna or transmitter.
Radiation Exposure Statement:
This device meets the government’s requirements for exposure to radio waves.
This device is designed and manufactured not to exceed the emission limits for
exposure to radio frequency (RF) energy set by the Federal Communications
Commission of the U.S. Government.
The exposure standard for wireless device employs a unit of measurement known
as the Specic Absorption Rate, or SAR. The SAR limit set by the FCC is 1.6W/
kg. *Tests for SAR are conducted using standard operating positions accepted by
the FCC with the device transmitting at its highest certied power level in all tested
frequency bands.
Note: The country code selection is for non-US model only and is not available to
all US model. Per FCC regulation, all WiFi product marketed in US must xed to
US operation channels only.
14
IC
yThis device complies with Industry Canada license-exempt RSS standard(s).
Operation is subject to the following two conditions:
yThis device may not cause interference.
yThis device must accept any interference, including interference that may
cause undesired operation of the device.
yThis Class B digital apparatus complies with Canadian ICES-003.
yThis device and its antenna(s) must not be co-located or operating in
conjunction with any other antenna or transmitter, except tested built-in radios.
yThe County Code Selection feature is disabled for products marketed in the US/
Canada.
yLe présent appareil est conforme aux CNR d'Industrie Canada applicables
aux appareils radio exempts de licence. L'exploitation est autorisée aux deux
conditions suivantes:
yL'appareil ne doit pas produire de brouillage.
yL'utilisateur de l'appareil doit accepter tout brouillage radioélectrique subi,
même si le brouillage est susceptible d'en compromettre le fonctionnement.
yCet appareil numérique de la classe B est conforme à la norme NMB-003 du
Canada.
yCet appareil et son antenne ne doivent pas être situés ou fonctionner en
conjonction avec une autre antenne ou un autre émetteur, exception faites des
radios intégrées qui ont été testées.
yLa fonction de sélection de l'indicatif du pays est désactivée pour les produits
commercialisés aux États-Unis et au Canada.
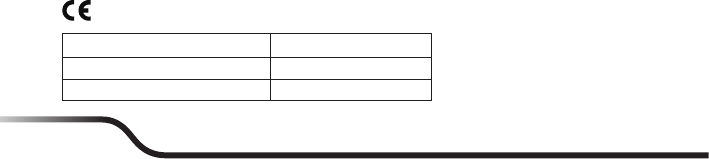
CE
Frequency Band Power
WLAN 2.4 GHz 20 dBm
Bluetooth 10 dBm
15
Ensure all protective covers of your electronic device are covered before using the
device. Electrostatic discharge or ingress of water could have an impact on the
performance of your device, which may cause malfunctions and/or damages to the
device.
WEEE
This product must not be disposed of as normal household waste, in
accordance with the EU directive for waste electrical and electronic
equipment (WEEE - 2012/19/EU). Instead, it should be disposed of by
returning it to the point of sale, or to a municipal recycling collection point.
Safety precautions
To prevent possible hearing damage, do not listen at high volume levels for
long periods.
About charging
yUse only the charger supplied with your device. Use of another type of charger
will result in malfunction and/or danger.
yThis product is intended to be supplied by a LISTED Power Unit marked with
“LPS”, “Limited Power Source” and output rated + 5 V dc / 2.0 A.
yUse a specied battery in the equipment.
About the charger
yDo not use the charger in a high moisture environment. Never touch the
charger when your hands or feet are wet.
yAllow adequate ventilation around the charger when using it to operate the
device or charge the battery. Do not cover the charger with paper or other
objects that will reduce cooling. Do not use the charger while it is inside a
carrying case.
yConnect the charger to a proper power source. The voltage requirements are
found on the product case and/or packaging.

16
yDo not use the charger if the cord becomes damaged.
yDo not attempt to service the unit. There are no serviceable parts inside.
Replace the unit if it is damaged or exposed to excess moisture.
About the battery
yUse a specied battery in the equipment.
yCAUTION: This unit contains a non-replaceable internal Lithium Ion battery.
The battery can burst or explode, releasing hazardous chemicals. To reduce
the risk of re or burns, do not disassemble, crush, puncture, or dispose of in
re or water.
yImportant instructions (for service personnel only)
yCaution: Risk of explosion if battery is replaced by an incorrect type.
Dispose of used batteries according to the instructions.
yReplace only with the same or equivalent type recommended by the
manufacturer.
yThe battery must be recycled or disposed of properly.
yUse the battery only in the specied equipment.

17
Revision: R00
(April, 2017)
Trademark
All brand and product names are trademarks or registered trademarks of their
respective companies.
Disclaimer
Specications and documents are subject to change without notice.
Note
Not all models are available in all regions.
Not all features are available on all models.
Depending on the specic model purchased, the colour and look of your device
and accessories may not exactly match the graphics shown in this document. The
screenshots and other presentations shown in this document are for reference
only.