Mitel Deutschland 68743AA142D-01 1.9 GHz DECT Phone, portable part User Manual BA Aastra 142d V04 NA GB 1F9454
Mitel Deutschland GmbH 1.9 GHz DECT Phone, portable part BA Aastra 142d V04 NA GB 1F9454
UserManual.wiki
>
Mitel Deutschland
>
68743AA142D-01 User Manual
>
142d UserMan
Contents
1.
UserMan
2.
142d UserMan
142d UserMan
Navigation menu
Upload a User Manual
Namespaces
Wiki Guide
HTML
PDF
Info
Views
User Manual
Discussion / Help
Navigation
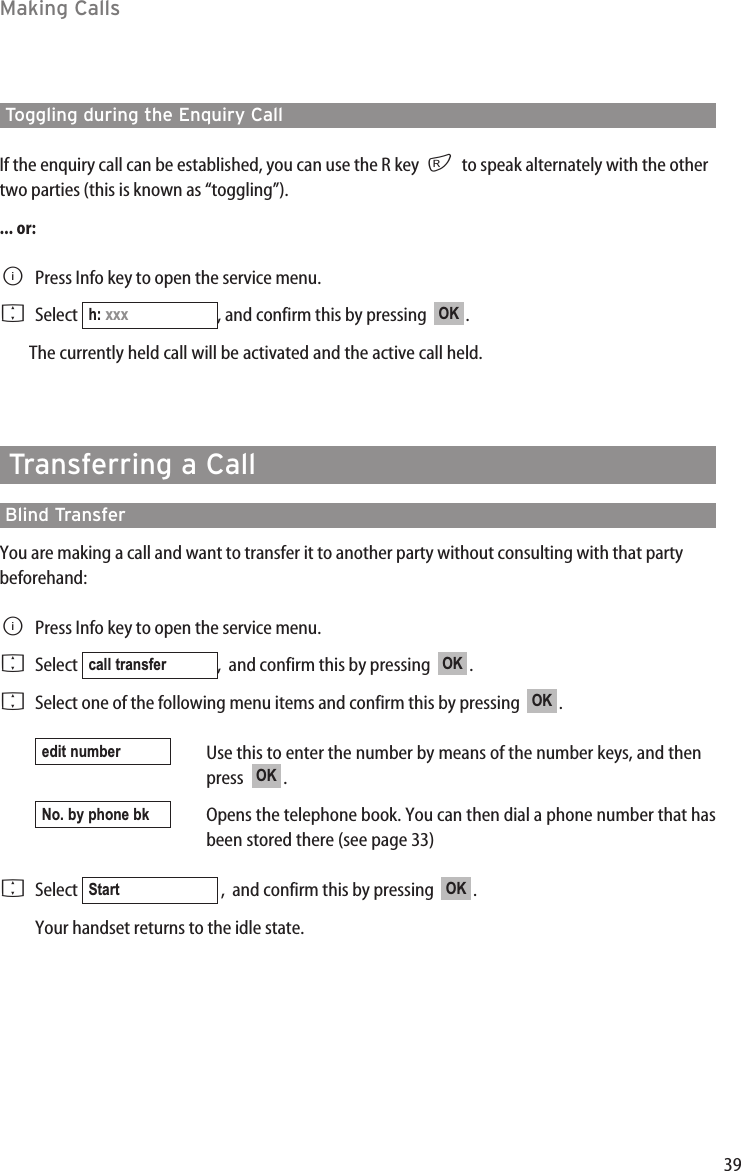
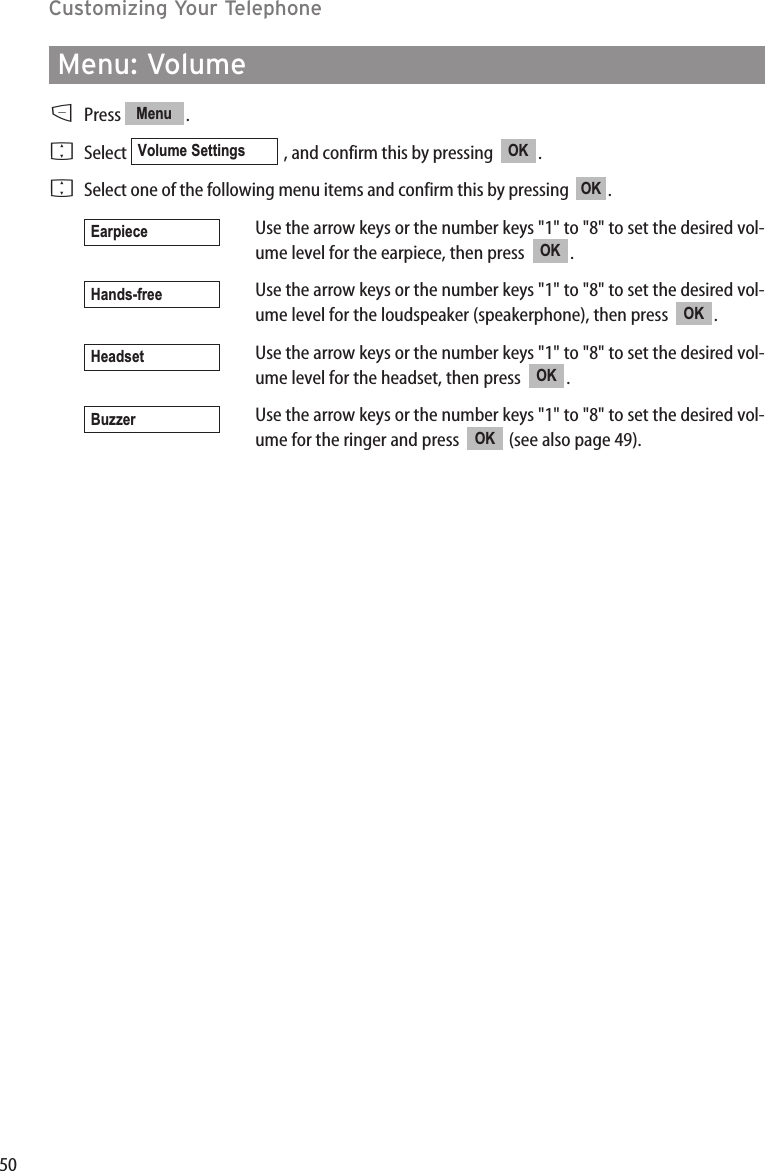
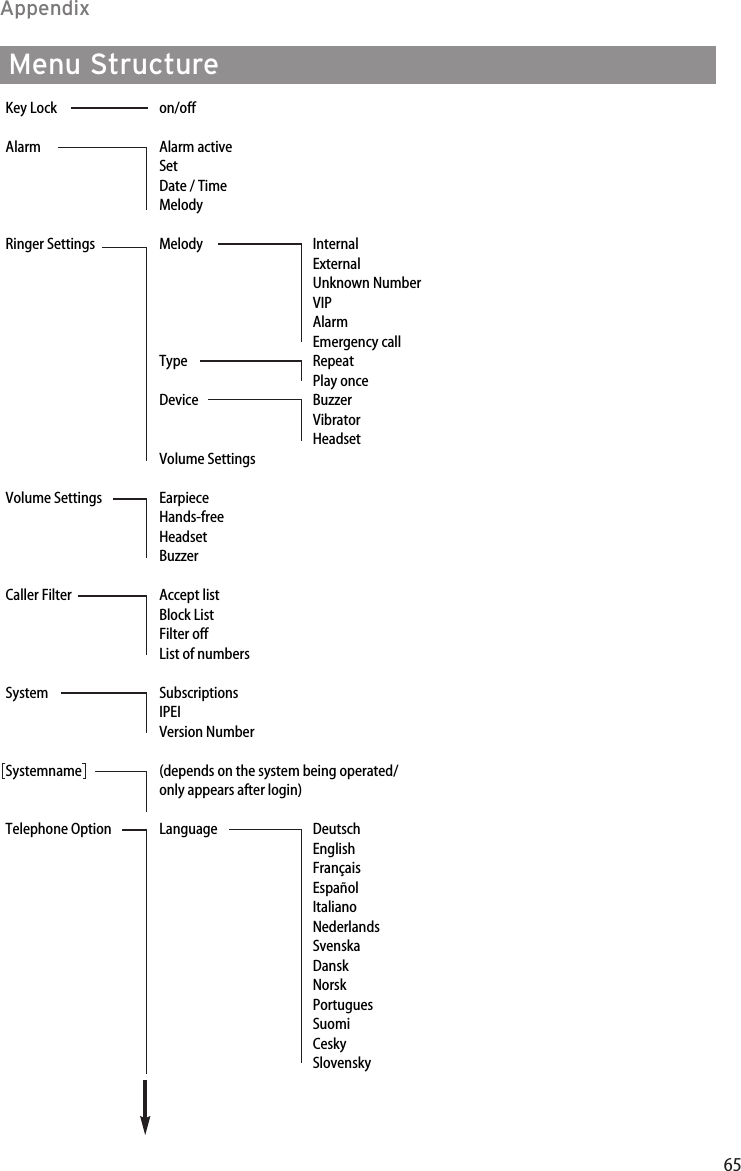
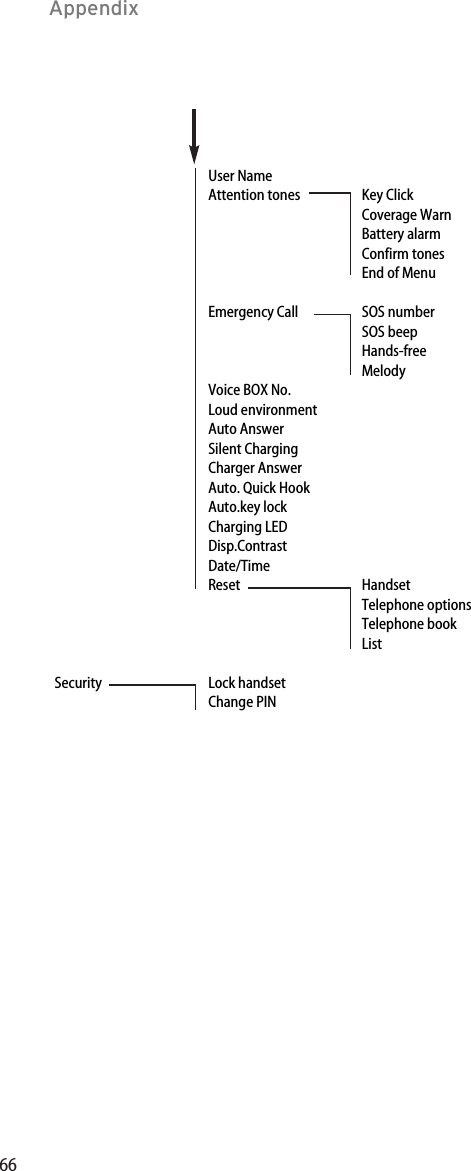
![iiiTable of ContentsEditing Lists ............................................................................................................................41Local Telephone Book: New Entry…………………………………………………………41Local Telephone Book: Editing an Entry …………………………………………………42Local Telephone Book: Creating a Quick Call Entry …………………………………………43Editing the Redial List ……………………………………………………………………44Editing the Caller List ……………………………………………………………………45Info Key ................................................................................................................................46Voice Mailbox / Caller List ………………………………………………………………46Checking Your Voice Mailbox …………………………………………………………46Checking Your Caller List ………………………………………………………………46Customizing Your Telephone...................................................................................................47Menu: Alarm ……………………………………………………………………………47Menu: Ringer Settings……………………………………………………………………48Menu: Volume …………………………………………………………………………50Menu: Caller Filter ………………………………………………………………………51Menu: System …………………………………………………………………………52Menu: [System name]……………………………………………………………………53Menu: Telephone Options ………………………………………………………………55Menu: Security …………………………………………………………………………59Appendix.................................................................................................................................60Default Settings …………………………………………………………………………60Important Information about the Batteries ………………………………………………61Care and Maintenance …………………………………………………………………62Environmental Characteristics and Disposal ………………………………………………62Limited Warranty ………………………………………………………………………63Technical Data …………………………………………………………………………64Menu Structure …………………………………………………………………………65Index of Key Words………………………………………………………………………67](https://usermanual.wiki/Mitel-Deutschland/68743AA142D-01.142d-UserMan/User-Guide-1086737-Page-5.png)

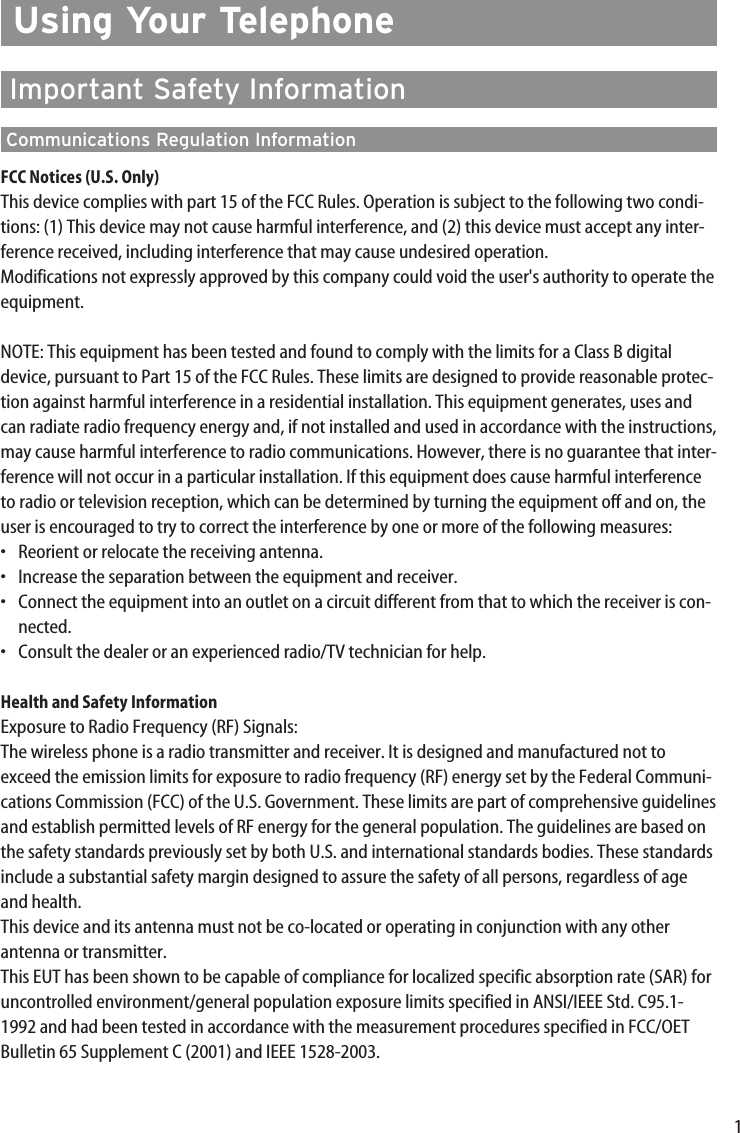

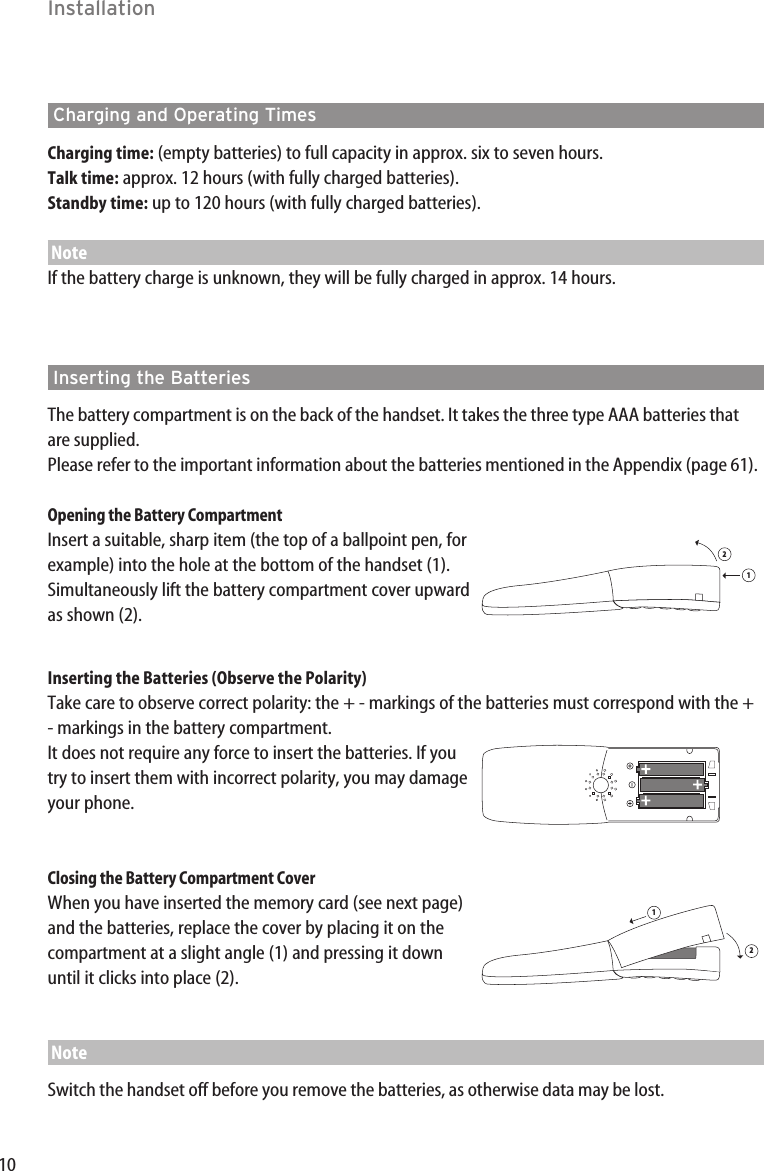


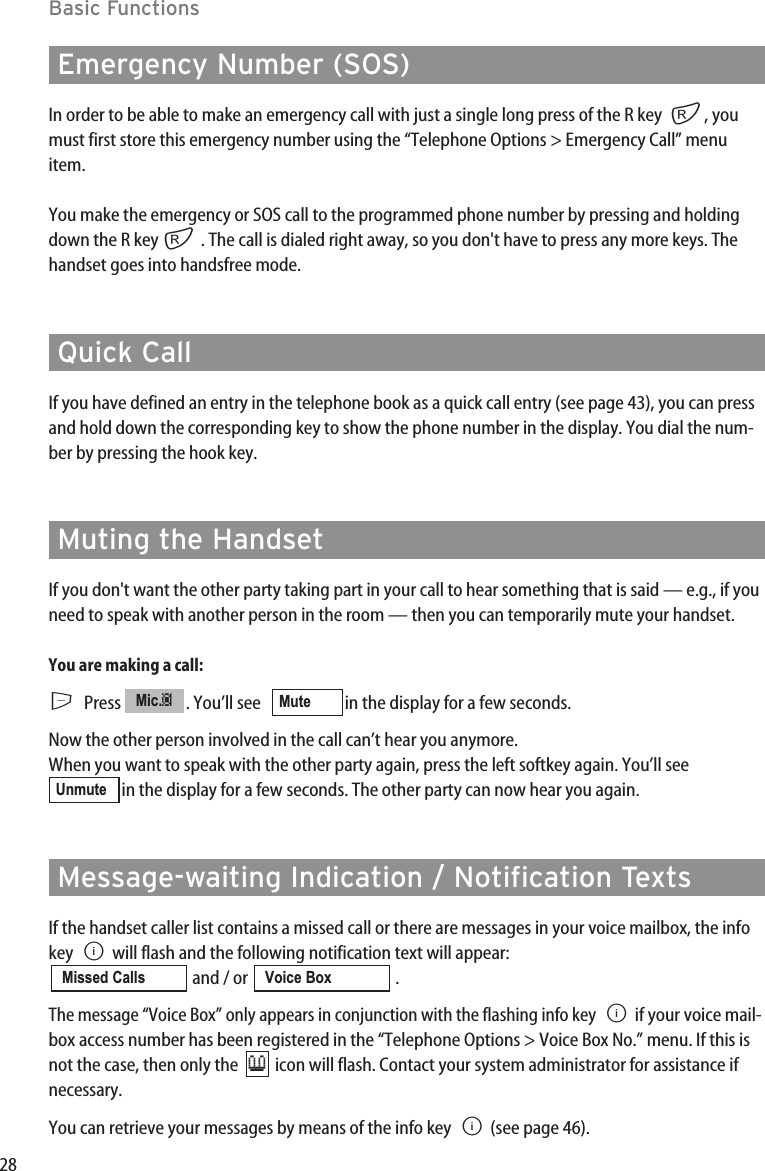
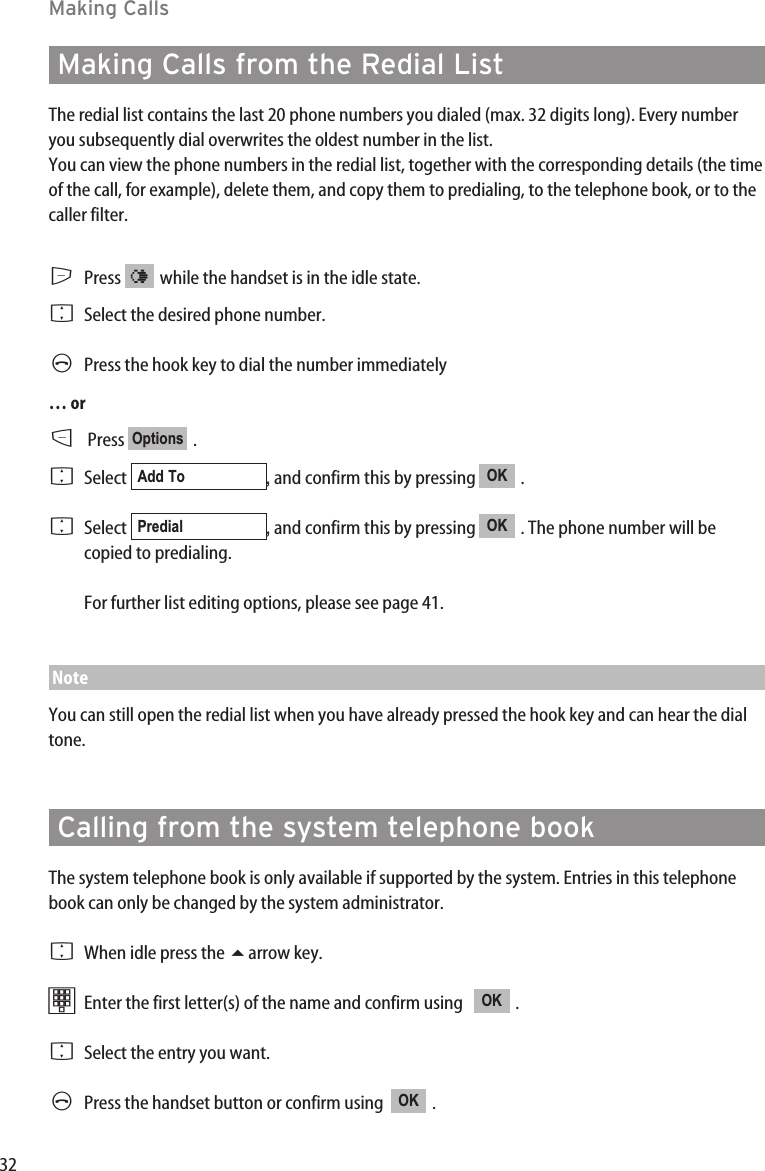
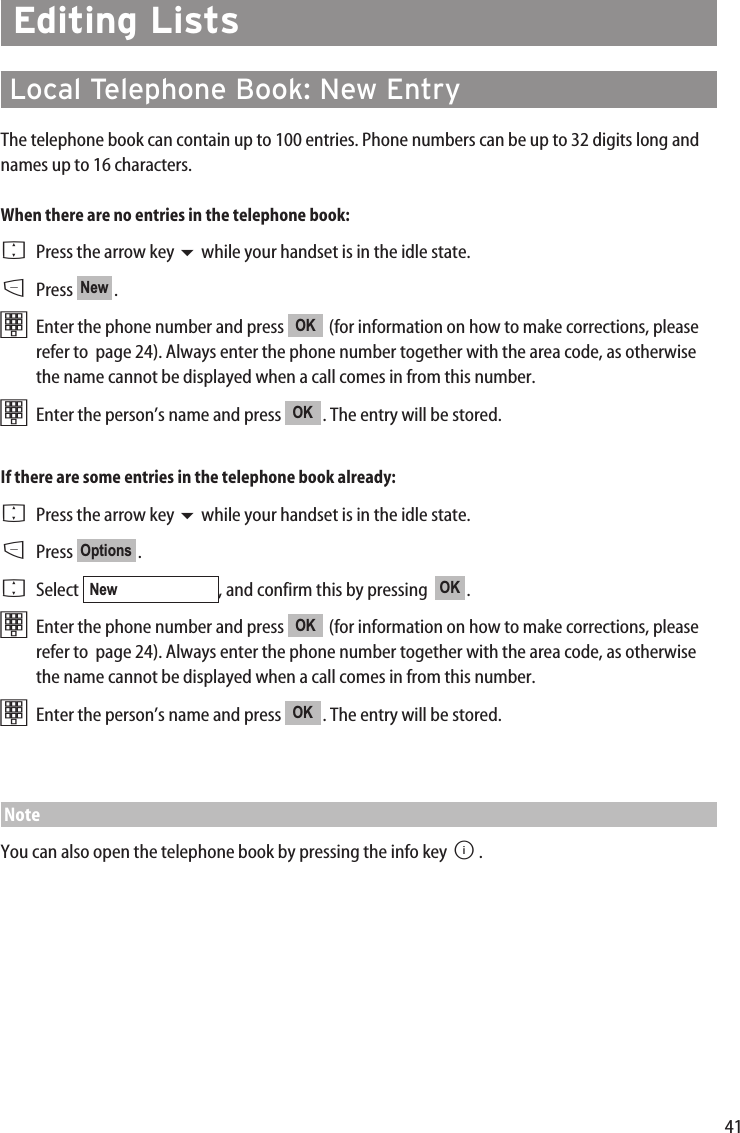
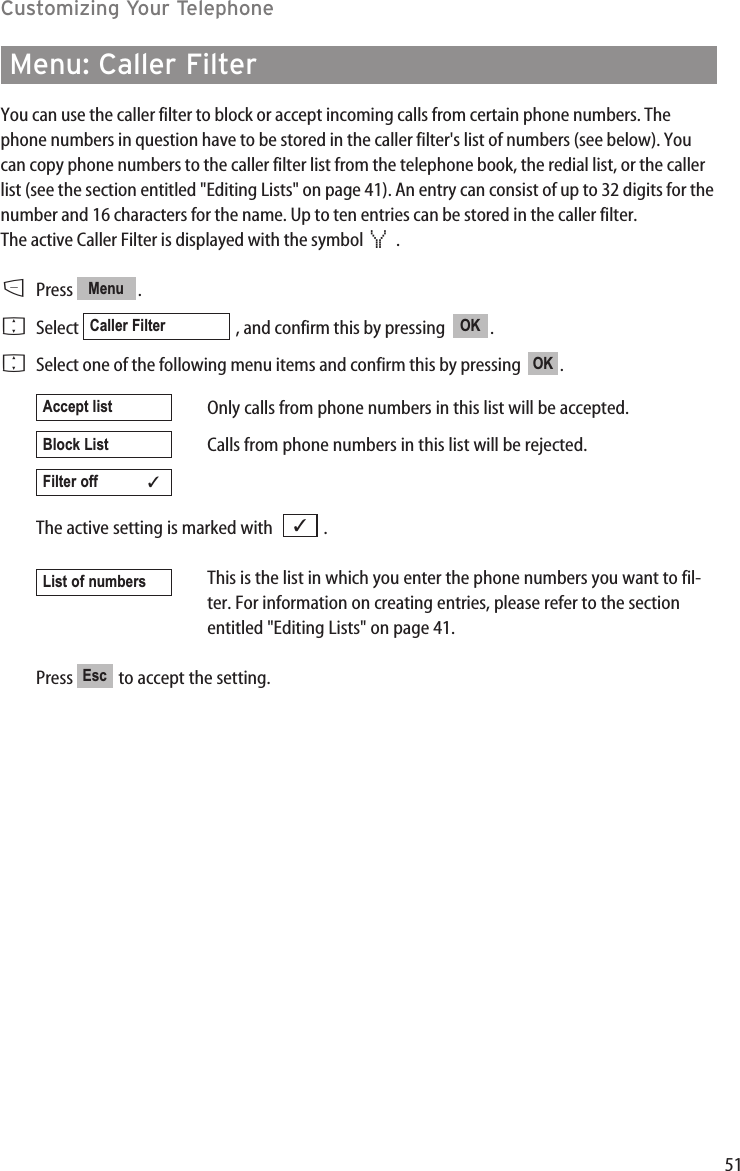
![21Menu ControlExample: Main MenuPress the softkey to open the main menu.The following items are available:- Key Lock- Alarm- Ringer Settings- Volume Settings- Caller Filter- System- [System name] (the communications system menu/switching functions: Only appears when youare logged into such a system)- Telephone Options- SecurityUse the arrow keys to highlight an entry. Press to open a submenu. For further descriptions,please refer to the section entitled “Customizing Your Telephone”.You select the submenu item (Key Lock, Alarm, etc.) in exactlythe same way. Please refer to the menu structure on page 65.Confirm your selection by pressing .Use the arrow keys to select one of the submenu itemsMelody, Type, Device and Volume Settings, e.g., Type, andpress . OKOKOKMenuMenuKey LockAlarmRinger SettingsOK ‘ EscMenuKey LockAlarmRinger SettingsOK ‘ EscRinger SettingsMelodyTypeDeviceOK ‘ Esc](https://usermanual.wiki/Mitel-Deutschland/68743AA142D-01.142d-UserMan/User-Guide-1086737-Page-27.png)
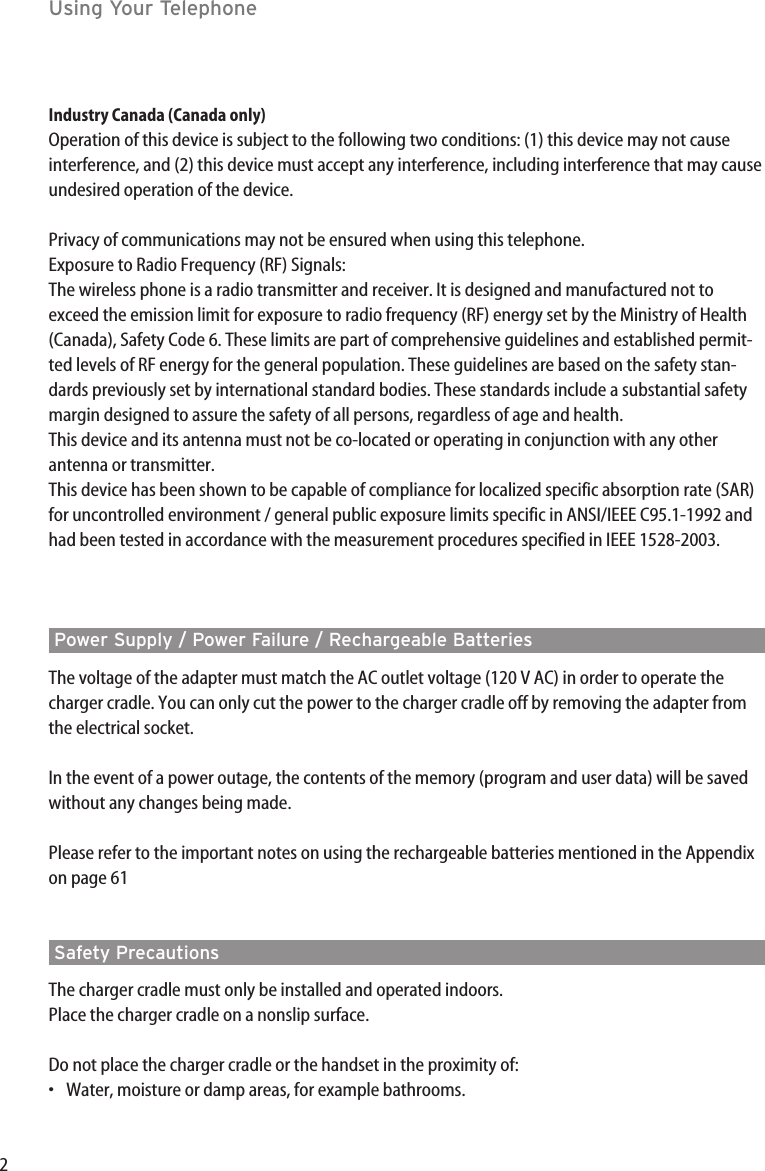
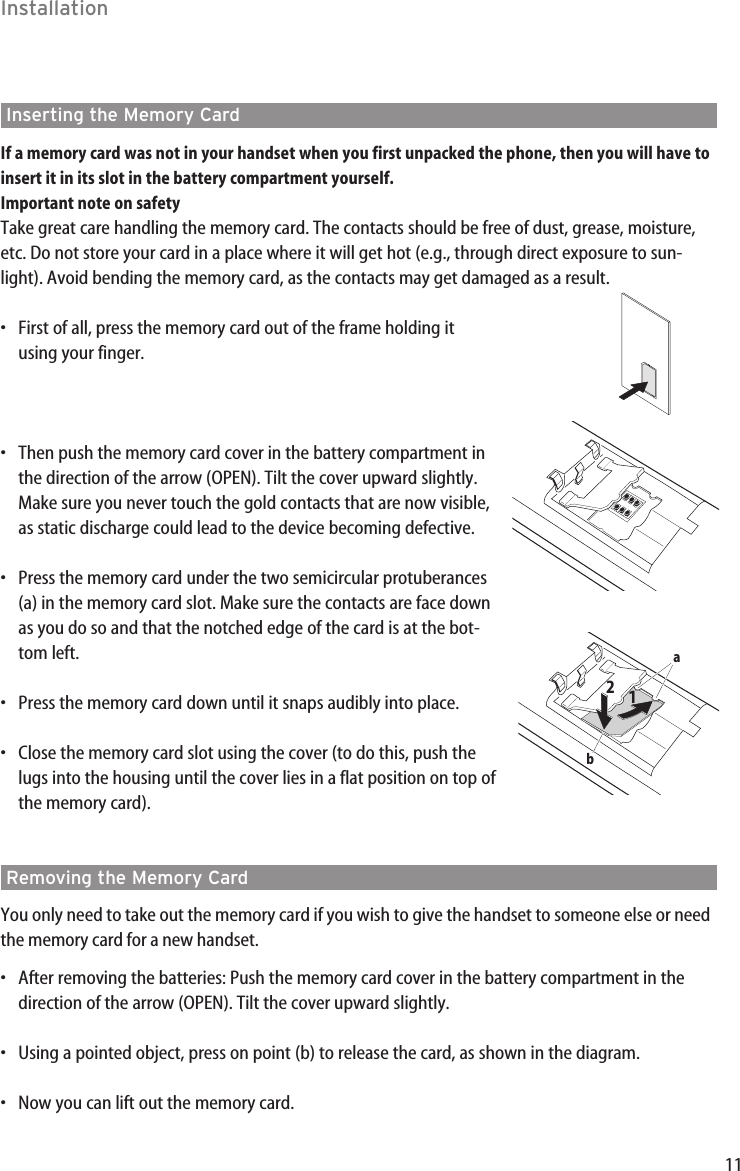
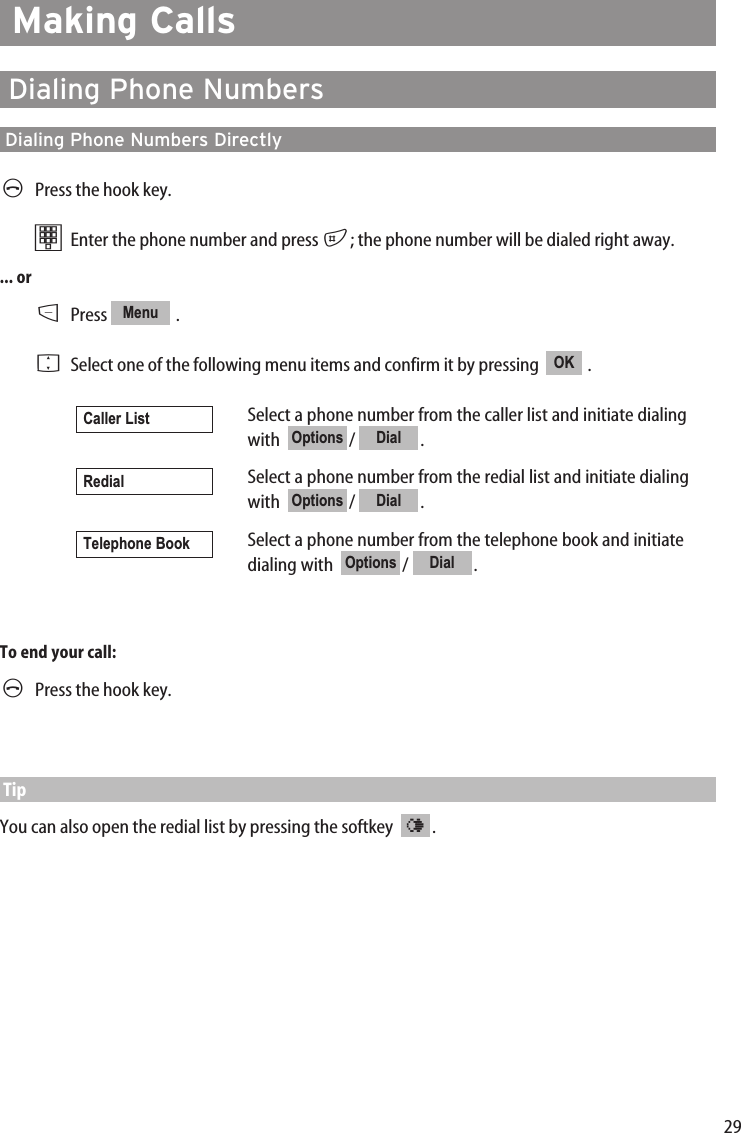
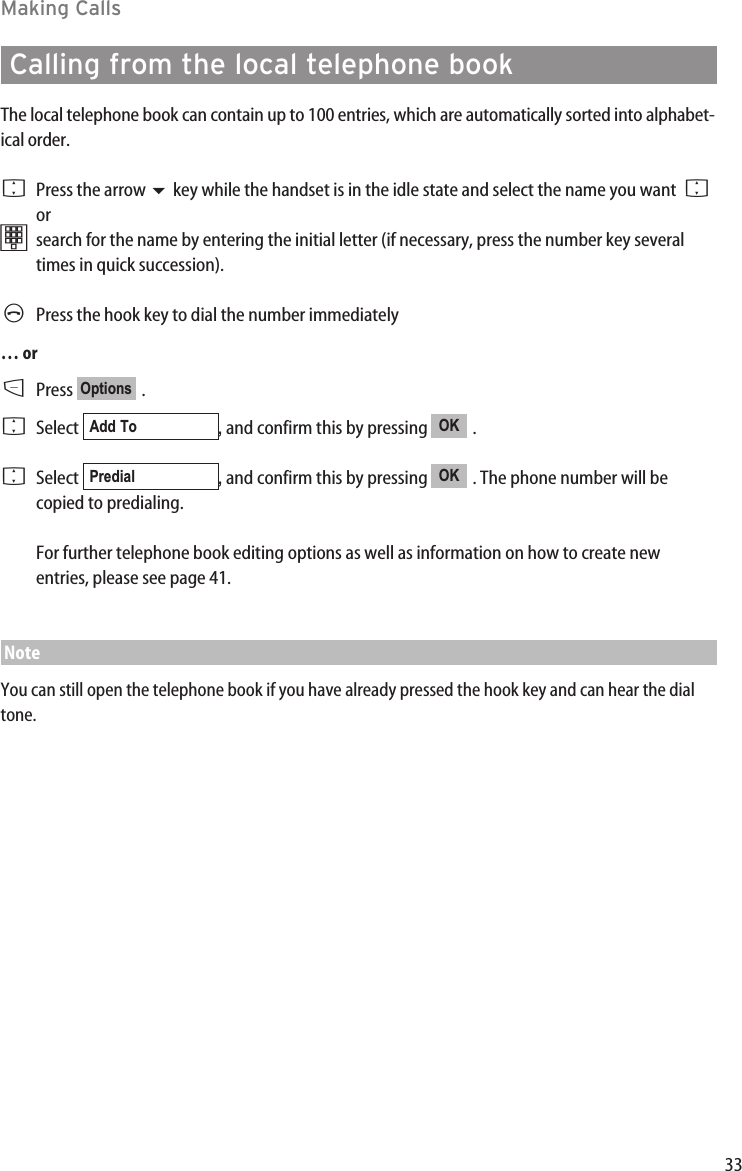
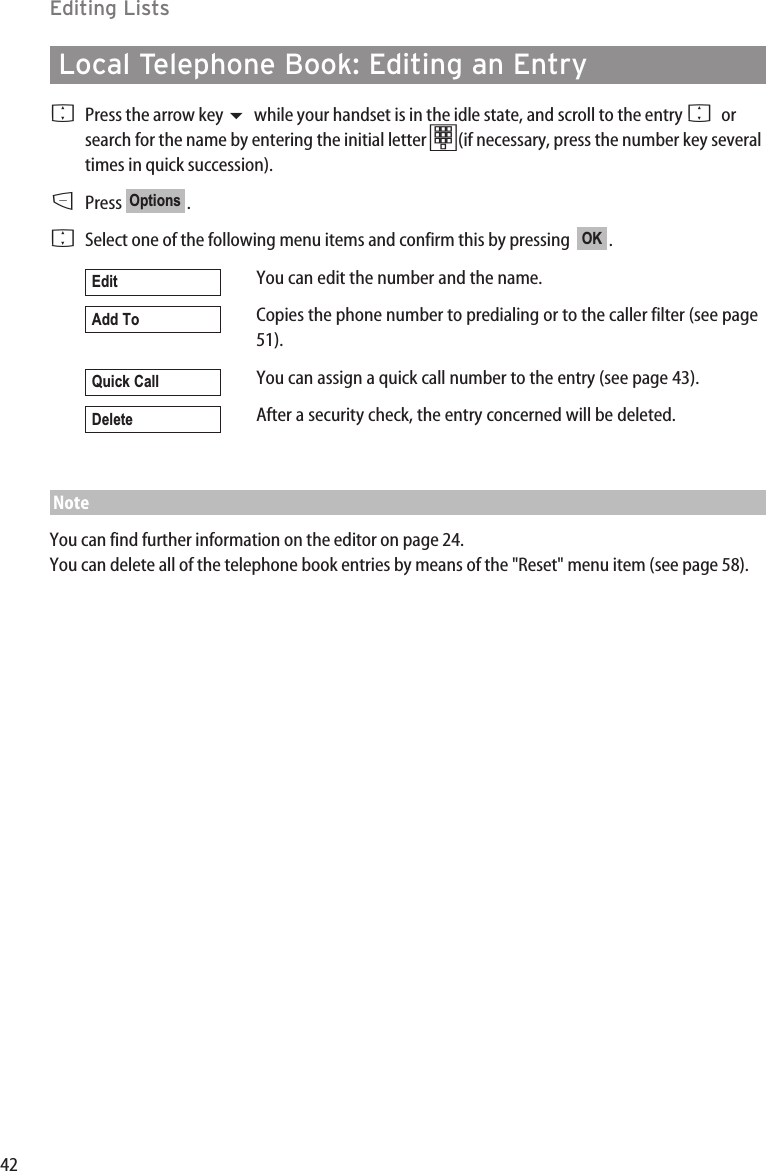
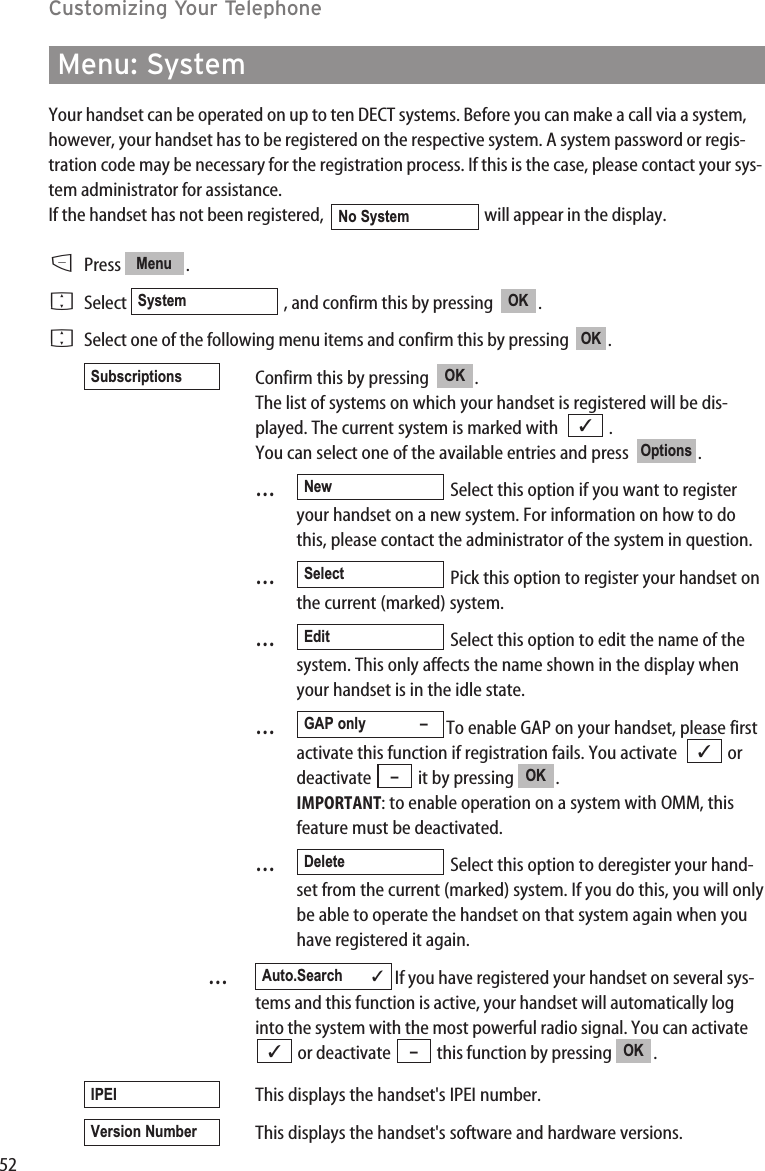
![24Menu ControlThe EditorEntering Names / Phone NumbersYou can use the editor to enter new names or numbers in lists, or edit them (e.g., in the telephonebook).The maximum length a phone number can have is 32 digits, and the maximum length of names is16 characters. Key Upper-case letter Lower-case letter1? ! 1 - + * / = & ( ) % ¿ ¡ ? ! 1 - + * / = & ( ) % ¿ ¡2A B C 2 Ä Å À Á Ã Æ Ç a b c 2 ä å à á ã æ ç3D E F 3 È É Ê Ë d e f 3 è é ê 4G H I 4 Í Ì Î Ï g h i 4 í ì î ï5JKL5 j k l 56M N O 6 Ñ Ö Ò Ó Ô Õ Ø m n o 6 ñ ö ò ó ô õ ø7P Q R S 7 ß p q r s 7 ß 8T U V 8 Ü Ù Ú Û t u v 8 ü ù ú û9WXYZ 9 w x y z 90Space , . 0 : ; _ ” ‘ ˆ ˜ Space , . 0 : ; _ ” ‘ ˆ ˜ ✳Toggle upper/lower case Toggle upper/lower case## @ €$ £ ¥ § < > { | } [ \ ] # @ €$ £ ¥ § < > { | } [ \ ]](https://usermanual.wiki/Mitel-Deutschland/68743AA142D-01.142d-UserMan/User-Guide-1086737-Page-30.png)

![27Basic FunctionsAdjusting the Earpiece Volume during a CallLet’s say you’re making a call using the earpiece, the loudspeaker, or a headset.You use the arrow keys or the number keys to adjust the volume.A single press increases or decreases the volume by one level, e.g., . In addition, the bar indicator shows the selected volume level.You can also press the corresponding key a number of times to adjust the volume to one of eightlevels. The minimum and maximum values are indicated by means of an special tone. The changed setting only applies temporarily for the duration of the connection (it can be changedto a default setting using ). You edit the basic settings for the earpiece in a menu (see page50).Switching the Ringer OffIf you don't want to be disturbed — e.g., because you’re in a meeting — you can switch the ringeroff (in which case you will see in the display). You perform this setting by pressing the star key *and holding it down until you hear a tone andappears in the display. To switch the ringer on again, press and hold down the star key *again.Alternatively, you can switch the ringer off by deactivating the “Buzzer” (ringer) item in the “VolumeSettings > Device” menu. You’ll then see in the display.BacklightThe backlight is activated every time you press a key, and it remains on for approximately ten seconds. Adjusting the Display ContrastYou can change the display contrast in order to adjust it to local lighting conditions. You perform thesettings in the “Telephone Options” menu (see page 57).‹Buzzer Off‹OK]]]]]|||Volume:3](https://usermanual.wiki/Mitel-Deutschland/68743AA142D-01.142d-UserMan/User-Guide-1086737-Page-33.png)

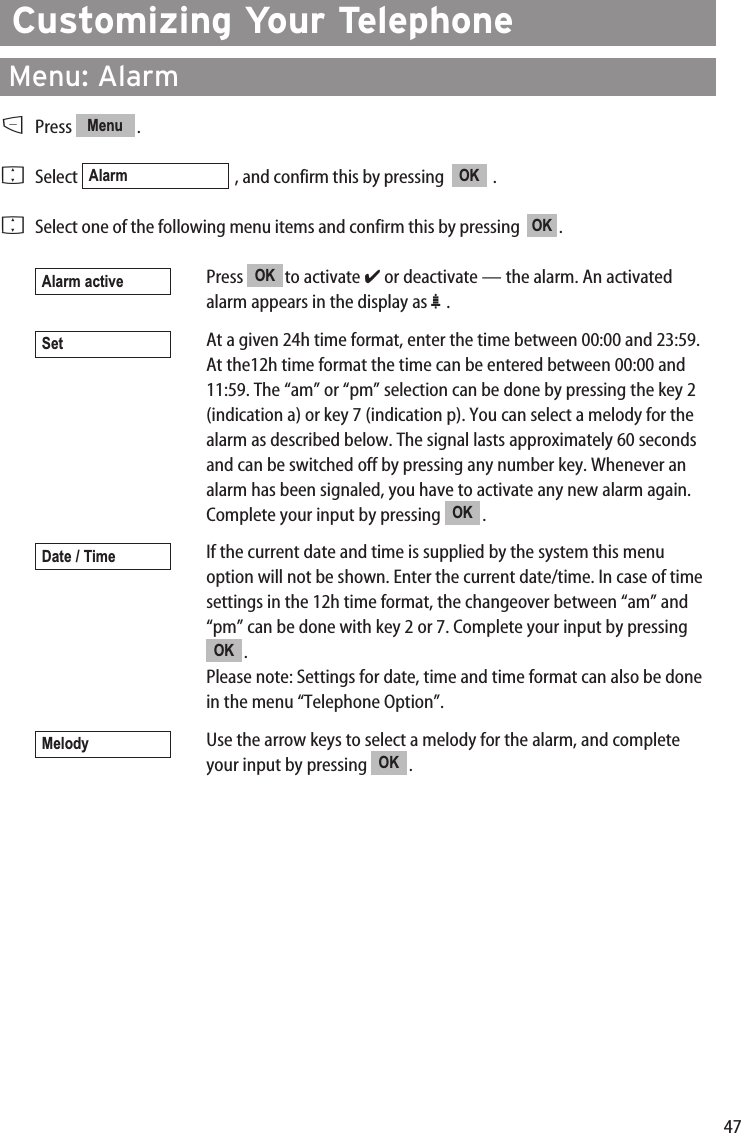


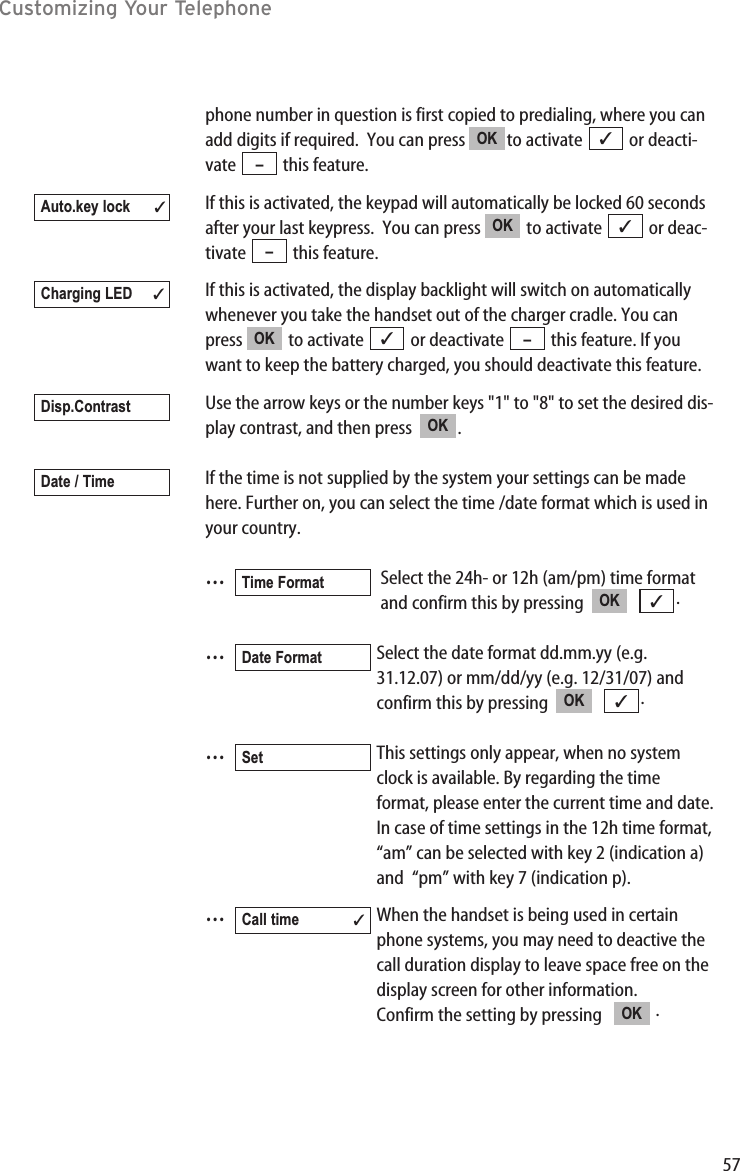
![53Customizing Your TelephoneMenu: [System name]This accesses the communications system menu. This menu is only available when the handset hasbeen logged into a system. The entries and features that are actually available may differ from thosedescribed in this user guide as they are dependent on specific conditions. If necessary, contact yoursystem administrator.DPress and hold . orPress , select , and confirm this by pressing .FSelect one of the following menu items and confirm this by pressing .Confirm one of the following menu items by pressing .…Use the number keys to enter the phonenumber, and then press .…Opens the telephone book. You can then diala phone number stored there (see page 33)Confirm one of the following menu items by pressing .…This is the type of call forwarding.Press and select one of the available options: ""off","immediately","busy", "no answer", or "busy no answer". Confirm your choice bypressing .…Press and select whether you want tocopy a phone number from the telephone book or enter a phonenumber using the number keys. This procedure is described in"New call" above.…Press and specify the duration of thedelay until the incoming call is forwarded. Select one of the avail-able delays (0 - 32 seconds), and confirm your choice by pressing.…Press to save your settings. Call forward-ing has now been configured.…Press and select the time to wait untilyou are reminded about a held call or whether you want to disa-ble the function.…Press and disable the “Call waiting”function. Call waiting protectionOKCall waitingOKHold ringbackOKsave!OKOK0 [sec]OKNoOKOKOffOKcall forwardingNo. by phone bkOKedit numberOKnew callOKOK[System name]Menu Menu](https://usermanual.wiki/Mitel-Deutschland/68743AA142D-01.142d-UserMan/User-Guide-1086737-Page-59.png)

![55Customizing Your TelephoneMenu: Telephone OptionsYou’ll find all the individual settings for your handset in this menu.DPress .FSelect , and confirm this by pressing .FSelect one of the following menu items and confirm this by pressing .Select one of the available languages for your display, and confirm thisby pressing . The following languages are available:- Deutsch - English - Français- Español - Italiano - Nederlands- Svenska - Dansk - Norsk- Portugues - Suomi - Cesky- Slovensky.The selected language then applies to all of the handset's local menus.Under certain circumstances, the language setting of the communica-tions system may differ from the setting for the handset. This willaffect the texts displayed in the [System name] menu (see page 53).Enter a name for your handset. This is the name that is displayed whenyour handset is in the idle state. Your system administrator may haveallocated a name to it already. For information on entering characters,please refer to page 24.These are the short, acoustic signals that your handset emits to drawyour attention to specific events. You can press to activate or deactivate them.…If this is activated, every keypress will beacoustically confirmed.…If this is activated, an attention tone will beemitted once every ten seconds if you approach the limits of theradio reception area and are in danger of losing contact.…If this is activated, an attention tone will beemitted once every 30 seconds when the battery charge gets toolow. You have approximately three more minutes before beingdisconnected.…If this is activated, a tone will be emitted toconfirm that a procedure has been carried out successfully.…If this is activated, a tone will be emittedwhen the end of a list has been reached.End of Menu ✓Confirm tones ✓Battery alarm ✓Coverage warn ✓Key Click ✓–✓OKAttention tonesUser NameOKLanguageOKOKTelephone OptionMenu](https://usermanual.wiki/Mitel-Deutschland/68743AA142D-01.142d-UserMan/User-Guide-1086737-Page-61.png)
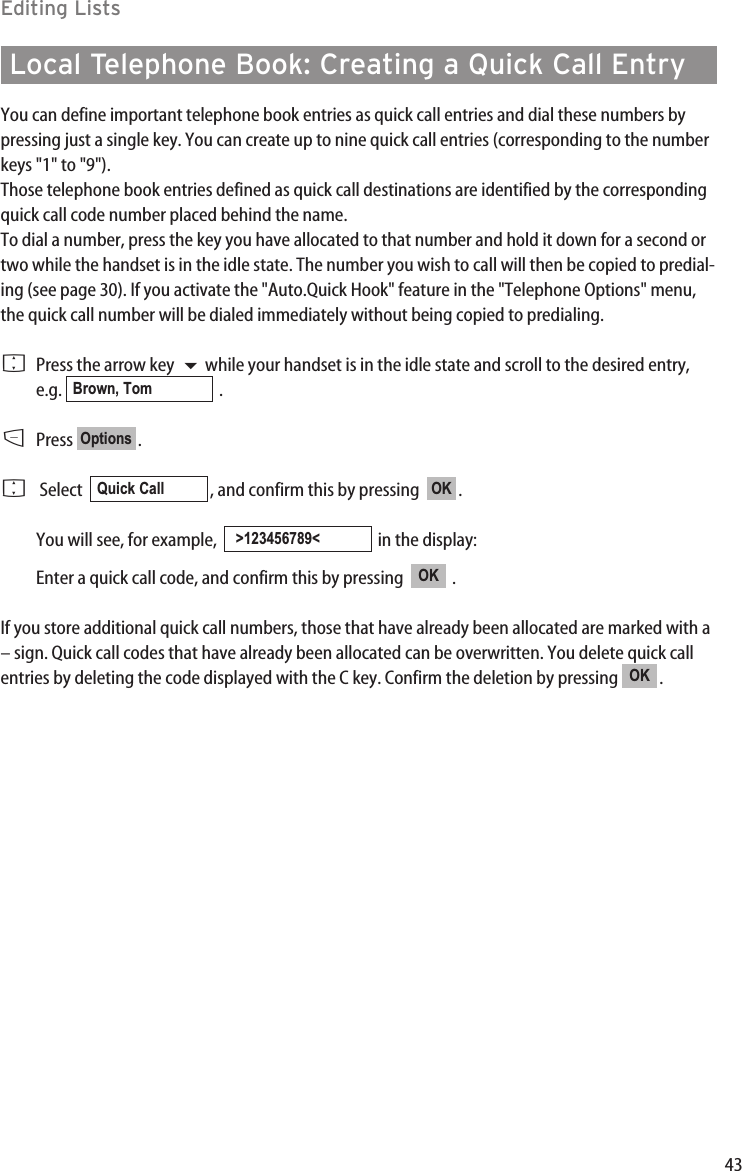
![68AppendixLLanguage...........................................................55Local telephone book......................................33Local Telephone Book: New Entry.................41Lock handset .....................................................59Loud environment............................................56MMain menu (example) .....................................21Maintenance .....................................................62Making a call during a conversation .............38Making Calls ......................................................29Melodies.............................................................48Melody................................................................56Memory Card.......................................................4Menu...................................................................21Menu control.....................................................21Menu structure .................................................65Menu: Alarm......................................................47Menu: Caller filter .............................................51Menu: Ringer settings......................................48Menu: System....................................................52Menu: Telephone options...............................55Menu: Volume...................................................50Menu: [System name]......................................53Message-waiting indication...........................28Microphone off ...............................................36Muting the handset .........................................28NName for your handset....................................55Notification Texts .............................................28OOptions during a call...........................36, 37, 38PPower failure .......................................................2Power supply.......................................................2QQuick dial...............................................28, 31, 43RRechargeable batteries......................................2Redial list .....................................................32, 44Registering the handset..................................13Registration.......................................................52Removing the memory card...........................11Reset ...................................................................58Ringer .................................................................49Ringer on/off.....................................................27SSafety precaution................................................1Scope of delivery.................................................7Setting up the charger cradle...........................7Silent Charging .................................................56Softkeys and other keys ..................................16SOS......................................................................28SOS beep............................................................56Subscriptions.....................................................52Switching the handset on/off ........................25Switching the ringer off ..................................27System................................................................52System name.....................................................53System telephone book ..................................32TTechnical data...................................................64Telephone book................................................23Telephone Book / editor..................................23Telephone options ...........................................55Time / Date ...........................................25, 47, 57Toggling.............................................................39Transferring a call.............................................39UUnlocking the handset ....................................59User.....................................................................55Using your telephone ........................................1VVersion Number................................................52VIP .......................................................................48Voice mailbox....................................................46](https://usermanual.wiki/Mitel-Deutschland/68743AA142D-01.142d-UserMan/User-Guide-1086737-Page-74.png)