Mitel Deutschland 69107AA312W-01 312w User Manual QG A312w DE GB FR DIN A6
Mitel Deutschland GmbH 312w QG A312w DE GB FR DIN A6
UserMan
Aastra 312w
Quick Guide
Kurzbedienungsanleitung
Manuel d’utilisation succinct
QG A312w DE, GB, FR DIN A6 11.04.2008 15:09 Uhr Seite A

QG A312w DE, GB, FR DIN A6 11.04.2008 15:09 Uhr Seite B
1
Thank you for choosing an Aastra product. Our product stands for the highest quality demands,
teamed with first-class design.
This Quick Guide will help you using your Aastra 312w. The complete User Guide is available on our
website www.aastra.com and provide answers to all your most important questions (f. x. informa-
tion about ”Registering a handset“, ”Setting up a SIP server“ or hints for using the ”Tools for
troubleshooting“.
If you should require any additional technical support, or if you would like information about other
Aastra products please contact the person responsible for your system or your retailer first.
We hope that you will enjoy using your Aastra 312w.
Before Use!
Please charge the battery at least 3 hours before using the phone.
If the handset is placed into the charger with a completely empty battery, no display information
will appear unless a certain battery capacity is reached. This may take a few minutes and is no mal-
function.
Welcome to Aastra
English
QG A312w DE, GB, FR DIN A6 11.04.2008 15:09 Uhr Seite 1
2
Using the phone
Safety instructions
Correct use/declaration of conformity
The Aastra 312w is a handset for calling via SIP in a WLAN.
The CE mark on the product confirms its conformity to the technical guidelines for user safety and
electromagnetic compatibility, valid at the time of issuing the corresponding declaration of confor-
mity according to European directive 99/5/EC.
The declaration of conformity can be viewed online at http://www.aastra.com
Like every cordless phone, this handset uses radio signals which do not always guarantee a connec-
tion establishment in all circumstances. Therefore as a rule you should never rely solely on cordless
phones for essential communication (e.g. medical emergencies).
Electricity supply/power failure/battery
This product requires an AC supply for the use of the charging point. The electricity can only be dis-
connected from the charging point when the mains adapter is taken out of the socket.
If there is a power failure, all saved information (program and user data) is retained without
changes.
Important advice on the battery can be found in the section “Precautions when handling the bat-
tery”.
Safety
The charging point can only be installed and used in a closed building.
Place the charging point on a non-slip mat.
Do not install the charging point and the handset near:
• Water, moisture or damp areas (e.g. bathroom)
• Sources of heat, direct sunlight or unventilated areas
• Devices, which produce strong magnetic fields, electronic devices, fluorescent lamps, computers,
radio devices, televisions or fax/phone devices
• Areas where the device could be covered, or where its ventilation could be obstructed, or where
water could run into it
• Dusty areas, and areas which are subject to vibrations, jolting or extreme temperature fluctua-
tions.
The following advice must be observed without fail when installing, connecting and operating the
phone:
• Position the connecting cable where it will not cause accidents.
QG A312w DE, GB, FR DIN A6 11.04.2008 15:09 Uhr Seite 2
3
English
Using the phone
• Only connect the connecting cable to the intended sockets.
• Only connect authorized accessories.
• Only use the mains adapter plug supplied (ID no.: 23-001066-00).
• Research has shown that in certain cases portable phones, which are switched on, can influence
medical devices. Therefore when using portable phones within medical facilities, comply with the
regulations of the institution concerned.
• Never
- open the charging point or the handset (except for the battery cover) yourself.
- touch the plug contacts with sharp or metallic objects.
- carry the charging point by the connecting cable.
• Only clean your telephone with a slightly damp cloth.
• Do not use your phone in areas where there is the danger of explosion.
Install and keep the handset and accessories out of the reach of children.
Advice for hearing aid users
Before using the handset, hearing aid users should be aware that the radio signal will engage with
the hearing aid and could cause an unpleasant buzzing noise at sufficient volumes.
QG A312w DE, GB, FR DIN A6 11.04.2008 15:09 Uhr Seite 3
4
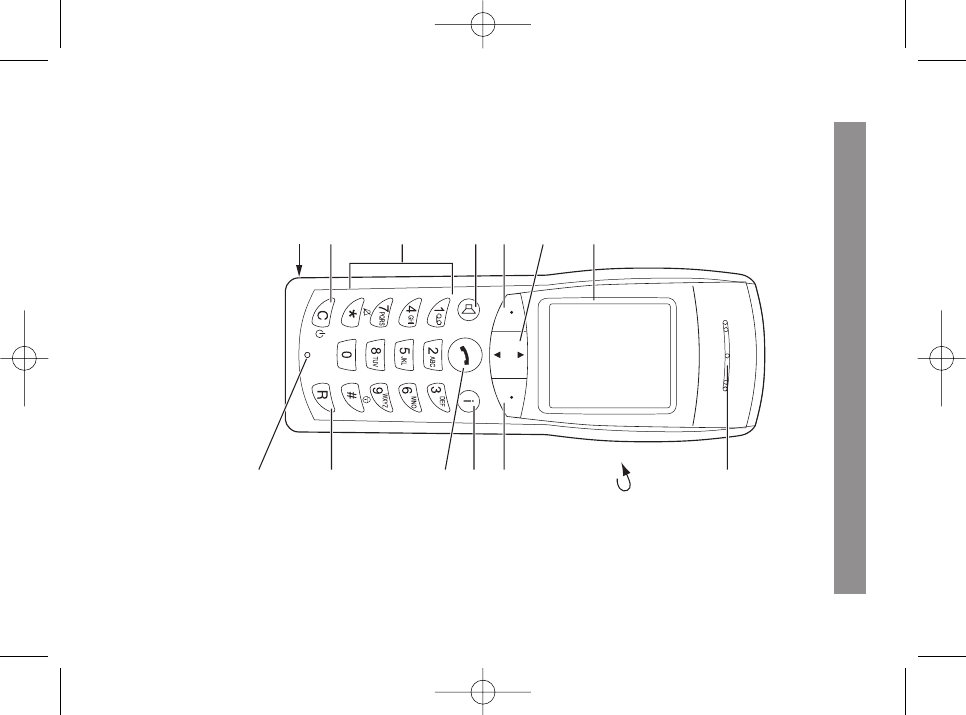
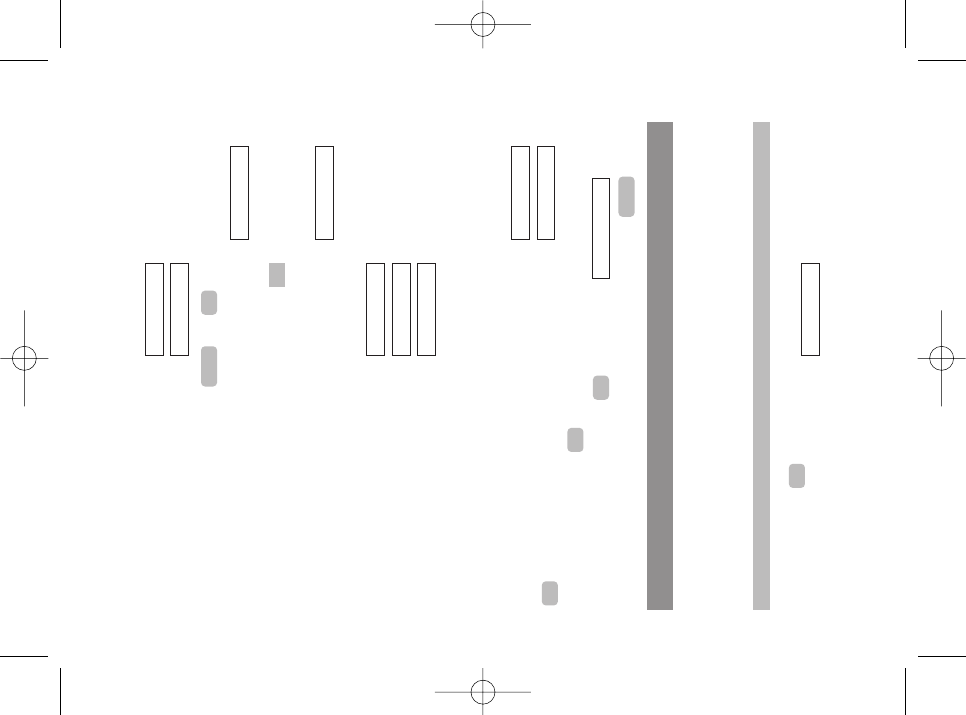
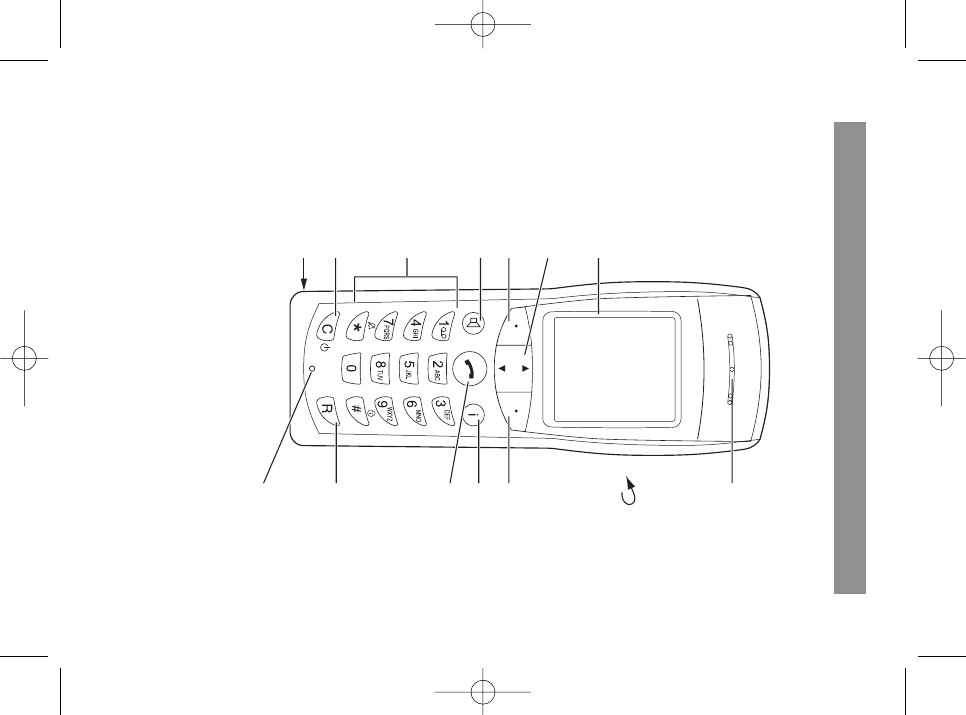
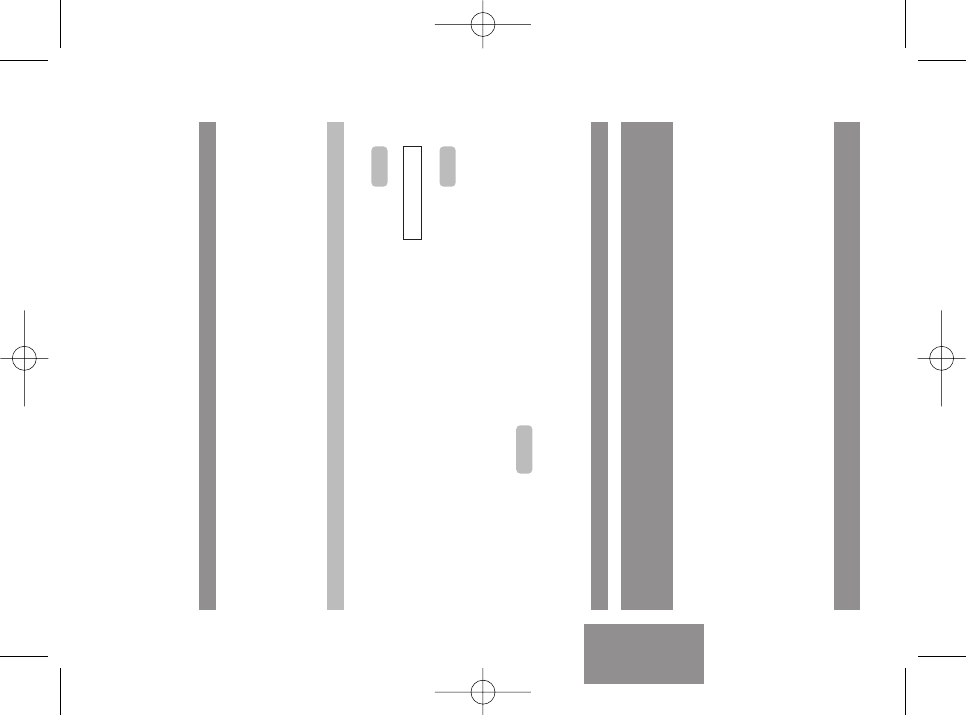
Handset:
Display
Earpiece
Reverse:
Loudspeaker
Softkey Softkey
Info button
Signal button (R button)
Handset button
Speakerphone/
hands-free
Number pad
Delete key/
ON/OFF button
Microphone
Arrow keys
Connection for headset USB-Schnittstelle
(für Service und spätere A
Diagram
QG A312w DE, GB, FR DIN A6 11.04.2008 15:09 Uhr Seite 4
5
English
Diagram
Softkeys – the function of an individual button is depicted in the display
depending on status. If there are only two possibilities, they are divided
between the left and right softkeys. If there are more possibilities, the softkey
will then appear.
From the idle state, this button opens the telephone book.
Within a menu or a list, you can scroll up or down using the arrow keys.
Signal button/R button: Query button.
Speakerphone/hands-free button. Switches the inbuilt loudspeaker on (button
lights up) and off.
Info button:
Pressing the button quickly when in the idle state opens the caller list.
The button flashes if new calls have been received in your absence.
The C button is used to correct entries. Pressing and holding the button in the
idle state turns the handset on/off.
Handset button: Equivalent to “answer” and/or “hang up” on a standard phone.
Number buttons are used for direct entry of call numbers and names.
The pound button is used for entering the pound sign.
Pressing and holding the button in idle state: Switches on the key lock.
The asterisk button is used for entering the asterisk sign.
Pressing and holding the button in idle state: Switches the ringer (buzzer)
on/off.
All buttons are illuminated.
Options
DE
F
r
H
B
C
A
0…9
#
*
Buttons on the handset
QG A312w DE, GB, FR DIN A6 11.04.2008 15:09 Uhr Seite 5
6
Installation
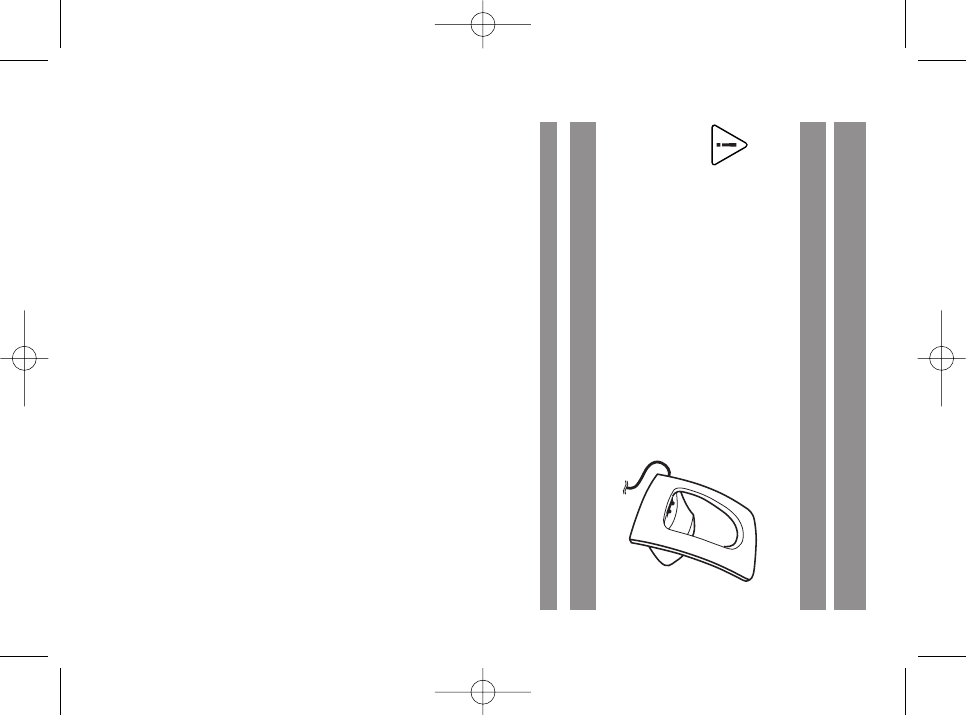
Putting the charging point into operation
In order to be able to put your phone into operation, you need to plug in the mains cable for the
charging point.
Safety instruction
Only use the intended mains adapter plug
with type designation ID no. 23-001066-00 for
the charging point.
Plug the mains cable plug into the socket on the charging sta-
tion, and then plug the mains adapter plug into a mains
socket.
Putting handset into operation
Precautions when handling the battery
It is imperative that you read the safety precautions before you use the battery for the first time.
Ensure that these safety precautions and all other operating instructions remain available for future
reference.
This device contains a Li-Ion battery pack. Not complying with any of the following regulations
when using the battery will lead to the danger of overheating, fire and explosion.
• The battery is firmly attached to the battery compartment cover. Never try to remove the bat-
tery from the cover.
• Never use another charging station for your handset.
• Never try to use the battery to supply power for any device other than this handset.
• Never use or leave the battery near an open flame.
• Never put the battery into a microwave, throw it into a fire or subject it to intense heat in any
other form.
• Never carry or store the battery with electrically conductive articles (necklaces, leads etc.)
• Never try to dismantle the battery, or modify it in any way, and never subject it to strong blows.
• Never submerge the battery in fresh or salt water.
• Never use or store the battery in direct sunlight, in a vehicle parked in the blazing sun or in any
other location where there are high temperatures.
• If you ever notice discharge of liquid, an unusual smell, heat development, coloring, deforma-
tion or any other abnormal condition while you are using, charging or storing the battery,
remove the battery from the handset immediately and keep it away from open flames.
Wall power supply
QG A312w DE, GB, FR DIN A6 11.04.2008 15:09 Uhr Seite 6
7
English
Installation
• The battery fluid could damage your sight. If you accidentally get battery fluid in your eyes,
wash them out immediately with clean tap water and then seek medical attention.
• If the battery is used by children, make sure that a responsible adult tells the children about the
precautions and the correct handling instructions, and ensure that the children handle the bat-
tery correctly.
• If battery fluid accidentally gets on your clothes or skin, wash the affected area immediately
with clean tap water. Extended contact with the battery fluid can cause skin irritation.
Precautions during use
• The battery is only designed for use with this handset.
• Only use the charging point supplied to charge the battery.
• New batteries are not charged up. Therefore you must charge the battery before using it for the
first time.
• The use of the battery in a cold environment can shorten the expected battery life of a fully
loaded battery. Charge the battery in a place where the temperature is in the region of 10°C to
35°C. Charging in a place outside of this temperature area can lead to charging time being
longer than normal, or could even lead to failure of the charging process.
• A very limited battery life after full charging indicates that the operational life of the battery has
expired. Replace the battery (complete with the battery compartment cover) with a new one.
• Never wipe the battery with thinners, petroleum ether, alcohol or other liquid products, or with
chemically treated wipes. This can lead to deformation of the battery, and to operational fail-
ure.
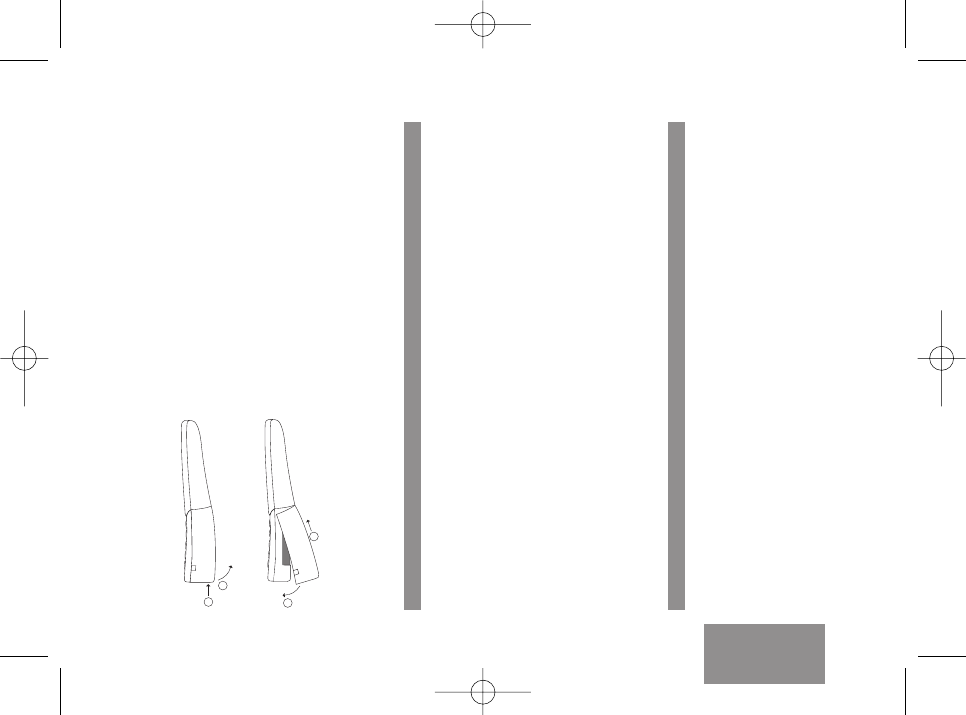
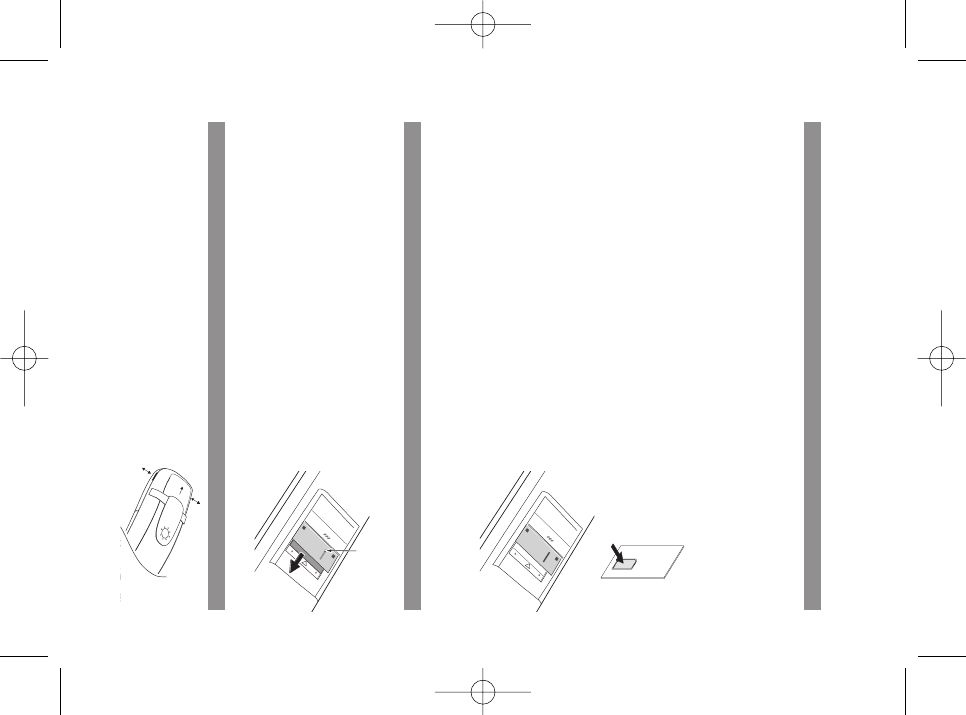
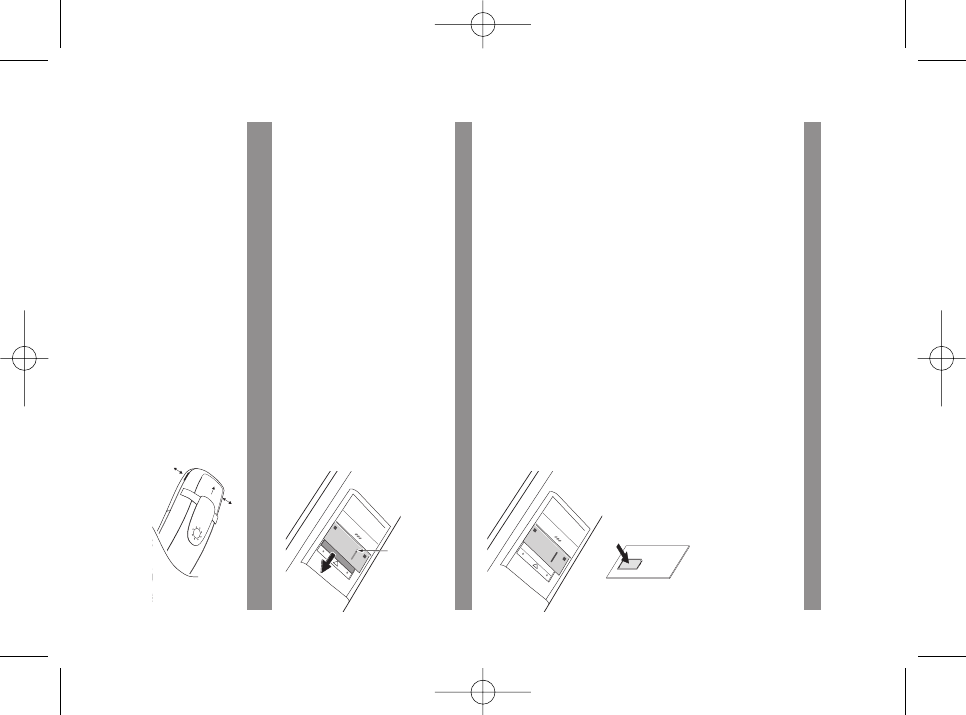
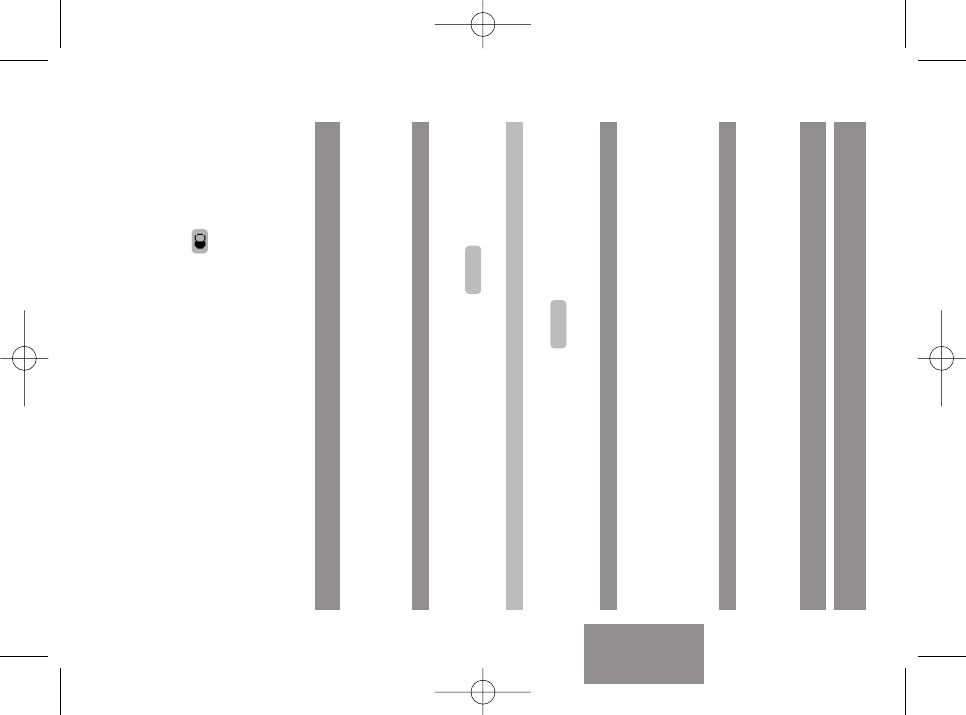
Inserting the battery
The battery is firmly attached to the battery compartment cover of the handset. To start operation,
insert the battery as shown in the following sketch.
Inserting the battery
After inserting the MEM card (see next page), if not already
inserted: Set the cover at a slight angle (1) and click it
down (2) until it is firmly locked into place.
Removing the battery
To release the battery cover, take a suitable pointed object
(e.g. biro) and press it into the hole at the base of the
handset (1). At the same time, lift the cover upwards as
shown in the sketch (2).
1
2
1
2
QG A312w DE, GB, FR DIN A6 11.04.2008 15:09 Uhr Seite 7
8
Inserting the MEM card
If the MEM card is supplied separately, you will need to insert this into the battery compartment.
Safety instruction
The MEM card must be handled with great care. The contacts must be free from dust, moisture,
grease etc. Do not store the MEM card in warm areas (e.g. with direct exposure to sunlight). Do not
bend the MEM card, this could destroy the contacts.
• First press the MEM card out of the larger frame using your finger.
• Push the MEM card under the metal clip (gray in the diagram)
with the contact surfaces on the bottom and the slanted edge to
the back. Ensure that the MEM card is inserted far enough. If in
the correct position it will lie flat in the cavity and will be secured
against slipping by the two raised sections in the casing.
Never touch the shiny gold contact. Static discharge can lead to
device defects.
Removing the MEM card
You must only remove the MEM card if you want to give the handset to someone else, or if you
need the MEM card for a new handset.
• After detaching the battery cover:
Insert a pointed object (e.g. an unbent paper clip) into the back
end of the slot in the metal clip and push the MEM card under
this cover. Ensure that you do not touch the contacts, either
underneath the metal clip or on the MEM card.
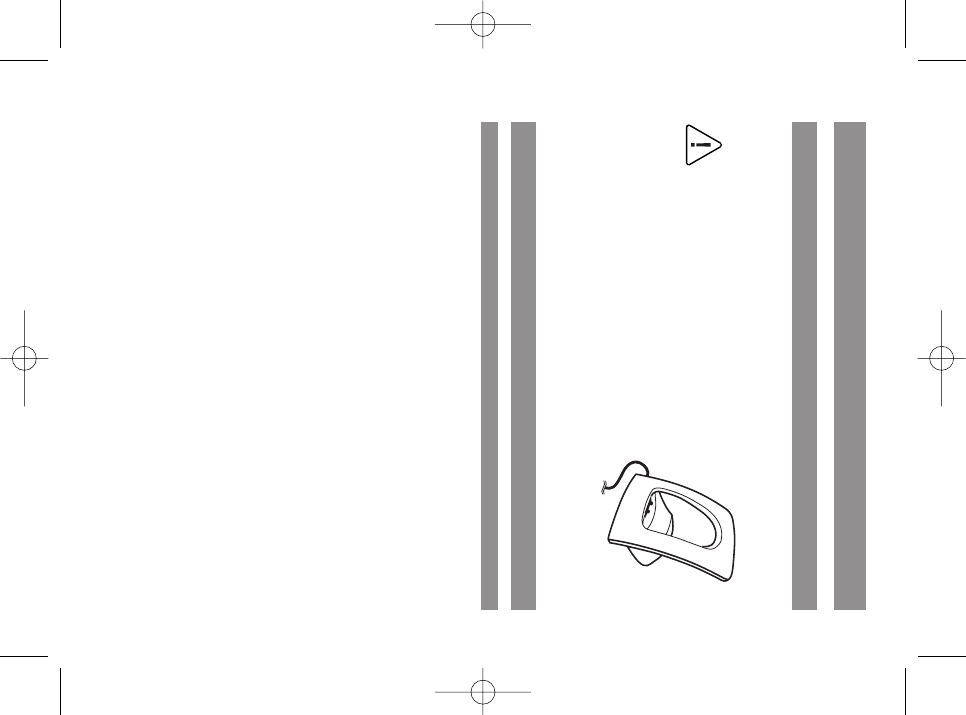
Attaching/removing the belt clip
Push the adapter clip over the reverse side of the handset
until the clip locks into place in the side openings. To remove
the belt clip, pull the clips apart slightly.
Installation
QG A312w DE, GB, FR DIN A6 11.04.2008 15:09 Uhr Seite 8
9
English
Display screen, softkeys and buttons
The display
Symbols in the upper display row:
Quality of the radio connection (four columns – secure radio connection;
only one column – insecure radio connection).
Microphone switched off.
Battery status.
You have programmed and activated a local alarm time.
The “Do not disturb” function is activated.
Call diversion activated.
The ring tone is switched off.
The PIN protection for administrator entries is deactivated.
There is no connection from the handset to an access point (AP).
New entry in the call list.
Symbols in the lower display row (related to the buttons):
Softkey for redialing
Softkey for the telephone book
Menu Softkey for the main menu
Softkey to cancel the keypad lock
Softkey (control buttons) to scroll up or down in lists
Softkey (control buttons) to move the entry cursor
Softkey (control buttons) to set the ringer volume and handset volume (during calls and/or
during connection)
QG A312w DE, GB, FR DIN A6 11.04.2008 15:09 Uhr Seite 9
10
Softkeys and buttons
Both of the buttons underneath the display and the arrow keys are known as softkeys. The func-
tions assigned to the buttons are shown in the bottom display row. The button function changes
automatically according to the particular operational status of the handset.
Softkey: Arrow keys
Symbols will be displayed above the arrow keys, which represent their functions at that particular
time:
Pressing the arrow key up and/or down opens the telephone book.
When entering call numbers or text you can make changes by moving the cursor. The
arrow keys move the cursor one space along when pressed once quickly. If you keep the
key pressed down, the cursor will continue to move until the key is released.
When a selection list is displayed (e.g. telephone book or menu) move the cursor bar to the
desired entry with the arrow keys.
Handset/loudspeaker/headset:
Adjust the volume to the desired level with the arrow keys. The settings will be shown
numerically and graphically.
Softkey: OK
You can confirm the selected function with . If there is a possibility to switch a function, the
switching process will be carried out using this button. In the display, active settings (ON) will be
designated by a “✓” at the level of the corresponding term in the display frame; for inactive set-
tings (OFF), a “—” will appear, or the position will be empty.
Softkey: Back
With you can leave the section of the menu that is currently displayed. The display then
shows the selection in the previous menu, or the current idle state or connection display.
Softkey: Redialing ¤
Enables selections to be made from the redialing list.
Back
OK
Display screen, softkeys and buttons
QG A312w DE, GB, FR DIN A6 11.04.2008 15:09 Uhr Seite 10
11
English
Display screen, softkeys and buttons
Handset button
According to the current status of the phone (e.g. idle state, in conversation or in editor mode) the
handset button has the following functions:
... In idle state:
The dialing tone is established.
... When there is an incoming call:
The call is accepted.
... During a conversation:
The conversation is ended and/or the connection is broken down.
... If you are browsing a list, e.g. of caller numbers or the redialing list etc, or numbers have been
entered:
The call number is dialed.
Loudspeaker button
Activates speakerphone/hands-free function.
When the speakerphone/hands-free function is switched on, this button is illuminated.
Info button (i)
This button can be used to access the caller list. If there are new entries in the caller list, the info
button flashes.
C button
The C button has a number of functions. The function is dependent on the current status of the
phone (e.g. in idle state, during a conversation or in editor mode etc.) and the length of time for
which the button is pressed. The following functions can be implemented:
... If the device is switched off:
Quick press or pressing and holding the button: The device is switched on.
... In idle state:
Pressing and holding the button: Handset is powering off.
... When entering text or call numbers:
Quickly pressing the button: Deletes the character to the left of the cursor.
Pressing and holding the button: Deletes the entire entry.
... During the display of lists (e.g. call list):
Quickly pressing the button: Deletes the entry.
QG A312w DE, GB, FR DIN A6 11.04.2008 15:09 Uhr Seite 11
12
Display screen, softkeys and buttons
Signal button (R)
Quickly pressing the button during a connection: A query is initiated.
#-button
Pressing and holding the button in idle state: Switches the key lock on.
The key lock is switched off again by pressing the softkey and the #button within five sec-
onds.
*-button
Pressing and holding the button in idle state: Switches the buzzer/ringer on or off.
Pressing the button quickly whilst entering text (e.g. names for telephone book entries): Switches
from upper to lower case letters, or vice versa.
Number buttons
The number buttons can be used for the direct entry of call numbers and names, and alpha numer-
ics (vanity numbers).
When entering text, you can use the arrow keys to move the entry position to the beginning or end
of the entry. The C button deletes individual numbers/characters. The procedure can be aborted
using .
Softkey: Menu
Quickly pressing the button in idle state: The handset menu is opened.
Back
QG A312w DE, GB, FR DIN A6 11.04.2008 15:09 Uhr Seite 12
13
English
Basic functions
Switching the handset on/off
Once the battery has been charged for the first time, your handset will be switched on automatically
and is ready for use. You can switch off your handset to maintain the battery life for longer.
Switching off the handset
CPress and hold the C button.
Switching on the handset
CPress the C button.
Key lock
Switch the key lock on before carrying the handset in your pocket. This will prevent a call number
being dialed accidentally.
If you receive a call, the key lock will be switched off for the duration of the call. You can accept the
call using the handset button.
Turning the key lock on
#Press and hold the pound button in the idle state.
The symbol will appear over the left softkey.
Turning the key lock off
DPress the softkey - > To unlock press #
#Press the pound key within five seconds to deactivate the lock.
Switching the hands-free function on/off
Pressing the loudspeaker button Hin the idle state (the handset is then ready to dial) or during a
connection turns the loudspeaker on or off.
Setting the handset volume during a conversation
You are having a conversation (using the handset, loudspeaker or headset).
Volume settings can be carried out using the arrow keys or number keys 1-7. The current setting is
displayed graphically. The altered setting is only temporarily valid for the existing connection. If the
temporary setting is confirmed using , it is valid as the new basic setting for further connec-
tions.
OK
QG A312w DE, GB, FR DIN A6 11.04.2008 15:09 Uhr Seite 13
14
Basic functions
Switching the ringer off
If you do not want to be disturbed (e.g. during a meeting), you can switch off the ringer (only the
ringer via the loudspeaker). To do this, press the *button until you hear a noise and
appears on the display.
To turn the ring tone back on, press and hold the *button again.
Alternatively, you can also use the menu “Audio > Ringer settings > Ringer device” to deactivate the
entry “Buzzer”, then the symbol will also appear in the display.
Handset not attainable
When the “Do not disturb” function is activated, your handset is no longer attainable. However, calls
are still noted in your call list (as long as the call number is transferred). You will not be disturbed but
you can see calls, giving you the opportunity to return important calls if necessary.
Illumination
The illumination is activated each time a button is pressed and remains switched on for the set time
(can be set in the menu “Display > Illumination > Keypad”).
Change the display contrast
In order to adjust the display to on-site illumination/brightness, you can change the contrast. The
setting can be made in the menu “Display > Contrast”.
Handset secrecy button
If you do not want the person you are on the phone with to hear what you are saying e.g. to another
person in the room, you can momentarily activate the secrecy button.
You are in the middle of a conversation
DPress . The symbol appears in the display.
The person you are talking to on the phone cannot hear what you are saying anymore.
When you want to talk to the person again, press the left softkey once more. The person you are on
the phone with can hear what you are saying again.
Mute
QG A312w DE, GB, FR DIN A6 11.04.2008 15:09 Uhr Seite 14
15
English
Calling
Dialing the call number
All calls described in this section that are initiated by pressing the handset button Acan also be
carried out in the hands-free mode using the loudspeaker button H.
Dialing call number with predial
When using predial, you have the opportunity to correct your entries before dialing.
tEnter the call number in the idle state.
APress the handset button to dial.
Dialing call number with direct dialing
APress the handset button.
tEnter the call number and end it with ; the number will be dialed immediately.
Note
Please enter the call number quickly, because four seconds after the last number is entered dialing will
be started even if has not been pressed. If numbers have not been entered completely, the
wrong number will be dialed.
To end the conversation:
APress the handset button.
Calling from the redialing list
The 10 most recently dialed call numbers are saved in the redialing list. Each new number that is
dialed overwrites the oldest entry in the list.
You can see the call numbers in the redialing list and call up the corresponding details (e.g. call
time).
DIn the idle state, press .
FSelect the desired call number.
APress the handset button to dial immediately.
Dial
Dial
QG A312w DE, GB, FR DIN A6 11.04.2008 15:09 Uhr Seite 15
16
Calling
Calling from the telephone book
The telephone book can save a maximum of 100 entries, which are automatically placed in alphabeti-
cal order.
FIn the idle state, press the arrow key .
FSelect the desired name
APress the handset button to dial immediately.
Calling from the caller list
When you press the info button Ba list of calls that have not been accepted will be displayed.
You can see the call numbers in the caller list and call up the corresponding details (e.g. call time).
BPress the info button in the idle state.
FSelect the desired call number.
APress the handset button to dial immediately.
Accepting calls
During the call you can…
D… Reject the call using the softkey (if so, caller hears busy tone).
APress the handset button to accept the call.
Putting a conversation on hold
You are in the middle of a conversation.
rPress the signal button. The conversation is put on hold.
Getting back to a held conversation
rPress the signal button. You will be reconnected with the person on the other end of the
phone.
Reject
QG A312w DE, GB, FR DIN A6 11.04.2008 15:09 Uhr Seite 16
17
English
Calling
Accept call waiting
If you receive another call during a connection, you will hear a call waiting signal. You accept the call
as follows.
rPress the signal button. The active call is put on hold.
or
APress the handset button. The waiting call is accepted, the first connection is separated.
Calling another contact during a conversation
Making a query call
You are in the middle of a conversation.
rPress the signal button – the first conversation is put on hold.
tEnter the call number with the number buttons and finish it with (or wait 4 sec).
To end the query, and to return to the held connection:
E Press .
FSelect .
E Press . You will be reconnected with the person you were originally speaking to.
Note
When entering the call number, if you do not press any buttons for 4 seconds, the number you have
entered up until that point will be dialed. Subsequent dialing is not possible.
If you disconnect the query conversation with the handset button A, the held conversation
appears again using a call-back function, as long as the participant has not already hung up.
During the query: Toggle
If the connection is achieved, you can use the signal button rto talk to either of the other people
in the conversations as you choose (toggle).
rThe conversation that is currently on hold will be activated, and the other conversation put on
hold.
OK
Disconnect
Options
Dial
QG A312w DE, GB, FR DIN A6 11.04.2008 15:09 Uhr Seite 17
18
Calling / The telephone book
Transferring a call
You are conducting a query conversation and are currently “toggling” between calls (see above):
APress the handset button – the conversation will be transferred.
The telephone book
New entry
The telephone book can save 100 entries: Call numbers of up to 32 numbers, names of up to 16 char-
acters.
FIn the idle state, press the arrow key .
E Press .
FSelect and confirm with .
tEnter the name and use the arrow key to proceed to enter the call number.
tEnter the call number and press . The entry will be saved.
OK
OK
New
Options
QG A312w DE, GB, FR DIN A6 11.04.2008 15:09 Uhr Seite 18
19
English
Phone settings
Menu: Audio
EPress .
FSelect and confirm with .
FSelect one of the following menu items and confirm with .
Select one of the following menu items and confirm with .
Select a melody using the arrow keys and confirm using .
Select the desired ringer volume with the arrow keys and con-
firm with .
Select the appropriate entry with the arrow keys and switch
on or off using .
…Ringer via the loudspeaker
…Call with vibration alert
…Call signal in the headset
Leave the menu using .
Select the appropriate entry with the arrow keys and switch on
or off using .
…Acoustic acknowledgement of pressing a key.
…Acoustic acknowledgement of successful
programming.
…Warning signal for low battery capacity
…Warning signal for fluctuation radio signal at
the range limit.
Leave the menu using .
Select one of the following menu items and confirm with .
…Select the desired volume with the arrow keys
and confirm with .
OK
Earpiece
OK
Volume
Back
Range alarm
✓
Battery alarm
✓
Confirm tones
✓
Key click
✓
OK
–
✓
Signal tones
Back
Headset
✓
Vibrator
✓
Buzzer
✓
OK
–
✓
Ringer device
OK
Ringer volume
OK
Melody
OK
Ringer settings
OK
OK
Audio
Menu
QG A312w DE, GB, FR DIN A6 11.04.2008 15:09 Uhr Seite 19
20
Phone settings
…Select the desired volume with the arrow keys
and confirm with .
Note
If the handset is in energy saving mode (the display is off), the first time a button is pressed it will
not be acknowledged by a “key click”.
Menu: Display
EPress .
FSelect and confirm using .
FSelect one of the following menu items and confirm with .
Select the desired contrast with the arrow keys and confirm with .
You can set the time for which the illumination should stay on. Please
consider that long illumination times result in increased energy con-
sumption, which will be at the cost of the standby time of the handset.
You can determine the length of display illumination while the device
is in the charging point using the setting “Charging light”.
…Settings range 10 sec to 240 sec in set steps
…Settings range “Off” to 240 sec in set steps
…Settings range 1 sec to 240 sec in set steps,
“On” and “Off”.
Using the arrow keys you can choose one of six motifs as a background
image that will be shown as a screen saver.
Select the desired background image or “No image” and confirm with
.
You can choose between two text sizes for the presentation of menu
contents. Select the desired text size with the arrow keys and confirm
with . Use to end the settings.
…
…
Large font
Small font
✓
Back
OK
Font
OK
Background
Charging light
Keypad
Display
Illumination
OK
Contrast
OK
OK
Display
Menu
OK
Loudspeaker
QG A312w DE, GB, FR DIN A6 11.04.2008 15:09 Uhr Seite 20
21
English
Appendix
Appendix
Advice for disposal
To avoid any negative effects for the environment and public health which could arise from the dis-
posal of electrical and electronic devices, which contain dangerous substances, the directives of the
European Parliament and the Council
• Directive 2002/96/EC “Electrical and Electronic Equipment” and
• Directive 2002/95/EC “Restriction of use of certain hazardous substances in electrical and elec-
tronic equipment”
are legally regulated in all countries of the EU.
The legislation is primarily aimed at avoiding waste of electrical and electronic devices, but is also
aimed at reusing, recycling and other forms of utilization of these types of waste in order to reduce
the amount of waste thrown away and to lower the amount of harmful substances from electrical
and electronic devices in the waste.
The product that you have purchased has been developed according to state of the art technology
with regard to the environment and recycling, and therefore complies with the requirements of the
European directives.
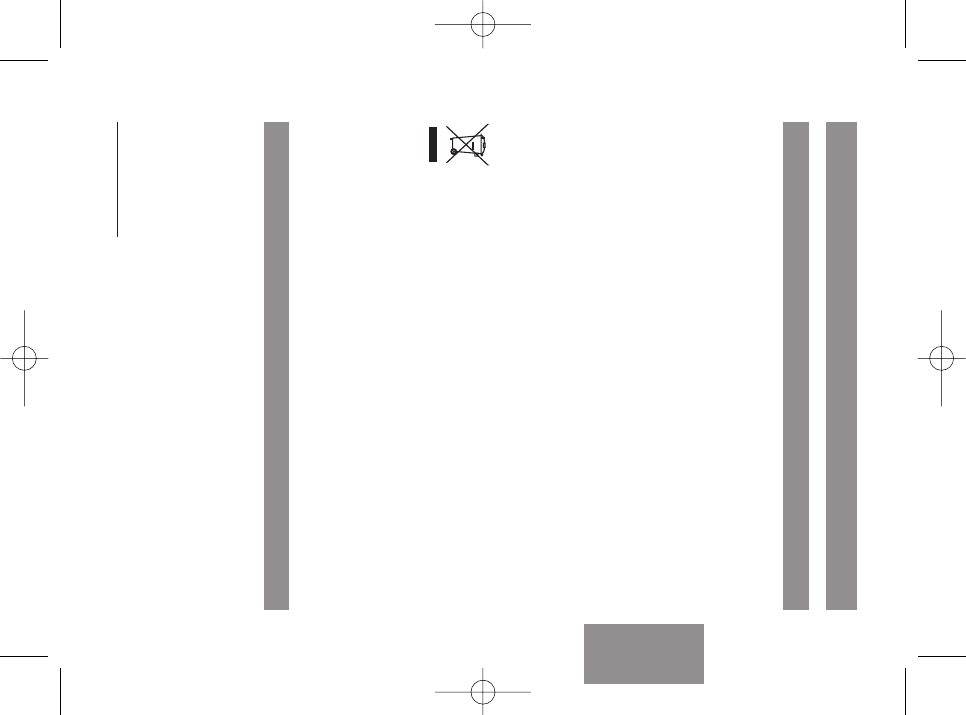
The product is labeled with the symbol displayed here. This symbol means that when the
owner of the product wants to dispose of it, they are obliged to do so in a waste collec-
tion that is separate from the unsorted municipal waste collection. In order to do this,
suitable facilities have been established for the return of old electrical and electronic
devices. Old devices can be brought to these public return points free of charge. Please
find out the location of the return points from the information provided by the authori-
ties responsible from waste disposal in the towns and municipalities.
Warning! Old electrical devices do not belong in household waste.
Please hand them in to the recognized return points free of charge.
Declaration of conformity
CE Marking
This device fulfils the requirements of the EU directive:
1999/5/EC Directive on Radio Equipment and Telecommunications Terminal Equipment and the rec-
iprocal recognition of their conformity.
Conformity with the abovementioned directive is confirmed by the CE mark on the device.
The declaration of conformity can be viewed online at the following address:
http://www.aastra.com
QG A312w DE, GB, FR DIN A6 11.04.2008 15:09 Uhr Seite 21
22
Appendix
FCC Notices (U.S. Only)
This device complies with part 15 of the FCC Rules. Operation is subject to the following two condi-
tions:
(1) This device may not cause harmful interference, and (2) this device must accept any interference
received, including interference that may cause undesired operation.
Modifications not expressly approved by this company could void the user's authority to operate the
equipment.
NOTE: This equipment has been tested and found to comply with the limits for a Class B digital
device, pursuant to Part 15 of the FCC Rules. These limits are designed to provide reasonable protec-
tion against harmful interference in a residential installation. This equipment generates, uses and
can radiate radio frequency energy and, if not installed and used in accordance with the instructions,
may cause harmful interference to radio communications. However, there is no guarantee that inter-
ference will not occur in a particular installation. If this equipment does cause harmful interference
to radio or television reception, which can be determined by turning the equipment off and on, the
user is encouraged to try to correct the interference by one or more of the following measures:
• Reorient or relocate the receiving antenna.
• Increase the separation between the equipment and receiver.
• Connect the equipment into an outlet on a circuit different from that to which the receiver is
connected.
• Consult the dealer or an experienced radio/TV technician for help.
Health and Safety Information
Exposure to Radio Frequency (RF) Signals:
The wireless phone is a radio transmitter and receiver. It is designed and manufactured not to
exceed the emission limits for exposure to radio frequency (RF) energy set by the Federal Communi-
cations Commission (FCC) of the U.S. Government. These limits are part of comprehensive guidelines
and establish permitted levels of RF energy for the general population. The guidelines are based on
the safety standards previously set by both U.S. and international standards bodies. These standards
include a substantial safety margin designed to assure the safety of all persons, regardless of age
and health.
This device and its antenna must not be co-located or operating in conjunction with any other
antenna or transmitter.
This EUT has been shown to be capable of compliance for localized specific absorption rate (SAR) for
uncontrolled environment/general population exposure limits specified in ANSI/IEEE Std. C95.1-
1992 and had been tested in accordance with the measurement procedures specified in FCC/OET
Bulletin 65 Supplement C (2001) and IEEE 1528-2003.
QG A312w DE, GB, FR DIN A6 11.04.2008 15:09 Uhr Seite 22
23
English
Appendix
Industry Canada (Canada only)
Operation of this device is subject to the following two conditions: (1) this device may not cause
interference, and (2) this device must accept any interference, including interference that may cause
undesired operation of the device.
Privacy of communications may not be ensured when using this telephone.
Exposure to Radio Frequency (RF) Signals:
The wireless phone is a radio transmitter and receiver. It is designed and manufactured not to
exceed the emission limit for exposure to radio frequency (RF) energy set by the Ministry of Health
(Canada), Safety Code 6. These limits are part of comprehensive guidelines and established permit-
ted
levels of RF energy for the general population. These guidelines are based on the safety standards
previously set by international standard bodies. These standards include a substantial safety
margin designed to assure the safety of all persons, regardless of age and health.
This device and its antenna must not be co-located or operating in conjunction with any other
antenna or transmitter.
This device has been shown to be capable of compliance for localized specific absorption rate (SAR)
for uncontrolled environment / general public exposure limits specific in ANSI/IEEE C95.1-1992 and
had been tested in accordance with the measurement procedures specified in IEEE 1528-2003.
QG A312w DE, GB, FR DIN A6 11.04.2008 15:09 Uhr Seite 23
24
Appendix
Menu tree
Audio Ringer settings Melody
Ringer volume
Ringer device Buzzer
Vibrator
Headset
Signal tones Key click
Confirm tones
Battery alarm
Range alarm
Volume Earpiece
Loudspeaker
Headset
Display Contrast
Illumination Display
Keypad
Charging light
Background
Font Small font
Large font
Phone options Do not disturb
Call wait. off
Auto answer
Auto key lock
Silent charg.
User name *
Country options Language English
Deutsch
Français
Italiano
Español
Dansk
Nederlands
Svenska
Suomi
Norsk
Polski
Country per DHCP
Germany
Switzerland
France
USA
Canada
Ti DHCP
QG A312w DE, GB, FR DIN A6 11.04.2008 15:09 Uhr Seite 24
25
English
Switzerland
France
USA
Canada
Time zone per DHCP
Africa
Asia
Australia
Europe
North America
South America
Time format Date format
Time format
Call diversion Unconditional
Busy
By time
Call number
Alarm Active
Set
System Network Profiles *
Tools Ping
Traceroute
Site survey *
Roaming info
Info
Syslog
Accounts * Info
PIN *
Software Version
Update Check now
Settings
Licences
* different system settings are protected by means of the administrator PIN
QG A312w DE, GB, FR DIN A6 11.04.2008 15:09 Uhr Seite 25

26
QG A312w DE, GB, FR DIN A6 11.04.2008 15:09 Uhr Seite 26
1
Vielen Dank, dass Sie sich für ein Produkt von Aastra-DeTeWe entschieden haben. Unser Produkt
steht für höchste Qualitätsansprüche, gepaart mit hochwertigem Design.
Diese Kurzbedienungsanleitung hilft Ihnen beim ersten Umgang mit dem Aastra 312w. Die kom-
plette Bedienunganleitung finden Sie auf unserer Webseite www.aastra.com . Alle wichtigen Fra-
gen zum Betrieb des Telefons werden dort erläutert (z. B. das „Einbuchen des Mobilteils“, wie Sie
den „SIP-Server einrichten“ und die „Werkzeuge zur Fehlersuche“ benutzen können).
Sollten Sie darüber hinaus weitere technische Unterstützung benötigen oder Informationen über
andere Aastra-DeTeWe-Produkte wünschen, wenden Sie sich bitte zunächst an Ihren Systemverant-
wortlichen oder Ihren Händler.
Wir wünschen Ihnen viel Freude mit Ihrem Aastra 312w.
Vor der Nutzung!
Bitte laden Sie die Batterie mindestens 3 Stunden bevor Sie das Gerät erstmalig nutzen.
Wenn Sie ein völlig entladenes Gerät in die Ladeschale stellen, kann das Display ausgeschaltet
bleiben, bis eine gewisse Kapazität erreicht wurde. Dies kann einige Minuten dauern und ist keine
Fehlfunktion.
Willkommen bei Aastra-DeTeWe
Deutsch
QG A312w DE, GB, FR DIN A6 11.04.2008 15:09 Uhr Seite 1

2
Umgang mit dem Telefon
Sicherheitshinweise
Bestimmungsgemäße Verwendung / Konformitätserklärung
Das Mobilteil Aastra 312w ist ein Mobilteil zum Telefonieren via SIP in einem WLAN.
Das CE-Zeichen auf dem Produkt bestätigt seine Konformität zu den technischen Richtlinien zur
Benutzersicherheit und elektromagnetischen Verträglichkeit, gültig zum Zeitpunkt der Ausstellung
der entsprechenden Konformitätserklärung nach europäischer Direktive 99/5/EC.
Die Konformitätserklärung ist unter http://www.aastra.com im Internet einzusehen.
Wie jedes schnurlose Telefon verwendet dieses Mobilteil Funksignale, die nicht immer unter allen
Umständen einen Verbindungsaufbau garantieren. Generell sollten Sie daher bei unentbehrlicher
Kommunikation (z. B. medizinische Notfälle) nie ausschließlich auf schnurlose Telefone vertrauen.
Stromversorgung / Netzausfall / Akku
Dieses Produkt benötigt eine Wechselstromversorgung für den Betrieb der Ladestation. Der Strom
ist an der Ladestation nur abzuschalten, indem das Netzteil aus der Steckdose gezogen wird.
Bei Stromausfall bleiben alle Speicherinhalte (Programm- und Anwenderdaten) ohne Änderung
erhalten.
Wichtige Hinweise zum Akku finden Sie im Abschnitt „Vorsichtsmaßregeln bei der Handhabung des
Akkus“.
Sicherheit
Die Ladestation darf nur in einem geschlossenen Gebäude aufgestellt und betrieben werden.
Stellen Sie die Ladestation auf eine rutschfeste Unterlage.
Ladestation und Mobilteil nicht aufstellen in der Nähe von:
• Wasser, Feuchtigkeit oder feuchten Orten (z. B. Bad)
• Hitzequellen, direkter Sonneneinstrahlung oder ungelüfteten Orten
• Geräten, die starke, magnetische Felder erzeugen, Elektrogeräten, Leuchtstofflampen, Compu-
tern, Radiogeräten, Fernsehern oder Telefax- und Telefongeräten
• Orten, an denen das Gerät verdeckt werden kann, seine Lüftung behindert wird, Flüssigkeit hinein
gelangen kann
• staubigen Orten, und Orten, die Schwingungen, Erschütterungen oder extremen Temperatur-
schwankungen ausgesetzt sind.
QG A312w DE, GB, FR DIN A6 11.04.2008 15:09 Uhr Seite 2
3
Deutsch
Umgang mit dem Telefon
Beachten Sie beim Aufstellen, Anschließen und Bedienen des Telefons unbedingt die folgenden Hin-
weise:
• Verlegen Sie die Anschlusskabel unfallsicher!
• Schließen Sie die Anschlusskabel nur an die dafür vorgesehenen Dosen an.
• Schließen Sie nur zugelassenes Zubehör an.
• Verwenden Sie nur das mitgelieferte Steckernetzgerät (ID No.: 23-001066-00).
• Die Forschung hat gezeigt, dass in bestimmten Fällen medizinische Geräte durch eingeschaltete
tragbare Telefone beeinflusst werden können. Halten Sie deshalb bei der Verwendung tragbarer
Telefone innerhalb medizinischer Einrichtungen die Bestimmungen der jeweiligen Institute ein.
• Niemals
- die Ladestation oder das Mobilteil (bis auf den Akkufachdeckel) selbst öffnen!
- die Steckkontakte mit spitzen und metallischen Gegenständen berühren!
- die Ladestation am Anschlusskabel tragen!
• Reinigen Sie Ihr Telefon nur mit einem leicht feuchten Tuch.
• Benutzen Sie Ihr Telefon nicht in explosionsgefährdeten Bereichen.
Mobilteil und Zubehör außer Reichweite von kleinen Kindern aufstellen bzw. aufbewahren.
Hinweis für Träger von Hörgeräten
Träger von Hörgeräten sollten vor Nutzung des Mobilteiles beachten, dass Funksignale in Hörgeräte
einkoppeln und bei ausreichender Stärke einen unangenehmen Brummton verursachen können.
QG A312w DE, GB, FR DIN A6 11.04.2008 15:09 Uhr Seite 3
4
Mobilteil:
Display
Hörkapsel
Rückseite:
Lautsprecher
Softkey Softkey
Info-Taste
Signaltaste (R-Taste)
Hörertaste
Lauthören/
Freisprechen
Ziffernblock
Löschtaste/
EIN/AUS-Taste
Mikrofon
Pfeiltasten
Anschluss für Headset USB-Schnittstelle
(für Service und später
Übersicht
QG A312w DE, GB, FR DIN A6 11.04.2008 15:09 Uhr Seite 4
5
Deutsch
Übersicht
Softkeys - die Funktion einer einzelnen Taste wird zustandsabhängig im Display
dargestellt. Bei nur zwei Möglichkeiten verteilen sie sich auf den linken und
rechten Softkey, bei weiteren Möglichkeiten erscheint dann der Softkey
.
Aus dem Ruhezustand heraus wird das Telefonbuch geöffnet.
Innerhalb eines Menüs oder einer Liste blättern Sie mit den Pfeiltasten.
Signaltaste / R-Taste: Rückfrage-Taste.
Lauthören/Freisprechen-Taste. Schaltet den eingebauten Lautsprecher ein
(Taste leuchtet) und aus.
Info-Taste:
Kurzer Tastendruck im Ruhezustand öffnet die Anruferliste.
Die Taste blinkt bei neuen Anrufen in Abwesenheit.
C-Taste zur Korrektur von Eingaben. Ein langer Tastendruck im Ruhezustand
schaltet das Mobilteil ein/aus.
Hörertaste: Entspricht „Hörer abnehmen“ bzw. „Hörer auflegen“ an einem her-
kömmlichen Telefon.
Ziffern-Tasten zur Direkteingabe von Rufnummern und Namen.
Raute-Taste zur Eingabe des „Raute“ - Zeichens.
Langer Tastendruck im Ruhezustand: Einschalten der Tastensperre.
Stern-Taste zur Eingabe des „Stern“ - Zeichens.
Langer Tastendruck im Ruhezustand: Ein-/Ausschalten des Ruftons (Summer).
Alle Tasten sind beleuchtet.
Option
DE
F
r
H
B
C
A
0…9
#
*
Tasten am Mobilteil
QG A312w DE, GB, FR DIN A6 11.04.2008 15:09 Uhr Seite 5
6
Installation
Ladestation in Betrieb nehmen
Damit Sie Ihr Telefon in Betrieb nehmen können, müssen Sie das Netzkabel für die Ladestation ein-
stecken.
Sicherheitshinweis
Nur das vorgesehene Steckernetzgerät mit
der Typbezeichnung ID No.: 23-001066-00 für
die Ladestation verwenden!
Stecken Sie den Stecker des Netzkabels in die Buchse an der
Ladestation und anschließend das Steckernetzgerät in eine
Netzsteckdose.
Mobilteil in Betrieb nehmen
Vorsichtsmaßregeln bei der Handhabung des Akkus
Lesen Sie unbedingt die Sicherheitsmaßregeln durch, bevor Sie die erstmalige Verwendung des
Akkus durchführen. Bewahren Sie diese Sicherheitsmaßregeln und alle Instruktionen für die Bedie-
nung griffbreit für spätere Nachschlagzwecke auf.
Dieses Gerät enthält einen Li-Ion-Akkupack. Nichteinhaltung einer der folgenden Vorsichtsmaßre-
geln bei der Verwendung des Akkus führt zu Überhitzungs-, Feuer- und Explosionsgefahr.
• Der Akku ist fest mit der Akufachabdeckung verbunden. Versuchen Sie niemals, den Akku dar-
aus zu entfernen.
• Verwenden Sie niemals eine andere Ladestation für Ihr Mobilteil.
• Versuchen Sie niemals die Verwendung des Akkus für die Stromversorgung eines anderen Gerä-
tes als diese Mobilteil.
• Verwenden und belassen Sie den Akku niemals in der Nähe offener Flammen.
• Setzen Sie den Akku niemals in einen Mikrowellenherd ein, werfen Sie ihn nicht in ein Feuer,
und setzen Sie ihn nicht auf andere Weise starker Hitze aus.
• Tragen oder lagern Sie niemals den Akku gemeinsam mit elektrisch leitenden Artikeln (Halsket-
ten, Bleistiftminen usw.)
• Versuchen Sie niemals ein Zerlegen des Akkus, modifizieren Sie diesen niemals auf irgend eine
Weise, und setzen Sie ihn niemals starken Stößen aus.
• Tauchen Sie den Akku niemals in Frisch- oder Salzwasser ein.
• Verwenden oder belassen Sie den Akku niemals in direktem Sonnenlicht, in einem im prallen
Sonnenlicht geparkten Fahrzeug oder an einem anderen Ort mit hohen Temperaturen.
• Sollten Sie jemals Flüssigkeitsaustritt, ungewöhnlichen Geruch, Wärmeentwicklung, Verfär-
bung, Verformung oder eine andere abnormale Bedingung feststellen, während Sie den Akku
verwenden, aufladen oder aufbewahren, entfernen Sie den Akku unverzüglich aus dem Mobil-
teil, und halten Sie ihn entfernt von offenen Flammen.
Steckernetzteil
QG A312w DE, GB, FR DIN A6 11.04.2008 15:09 Uhr Seite 6

Deutsch
7
Installation
• Die Akkuflüssigkeit kann Ihr Sehvermögen beschädigen. Sollte jemals Akkuflüssigkeit verse-
hentlich in Ihre Augen gelangen, spülen Sie Ihre Augen sofort mit reinem Leitungswasser, und
wenden Sie sich danach an einen Arzt.
• Falls der Akku von Kindern verwendet werden soll, stellen Sie sicher, dass ein verantwortlicher
Erwachsener die Kinder in die Vorsichtsmaßregeln und richtigen Handhabungsinstruktionen
einführt, und achten Sie darauf, dass die Kinder den Akku richtig handhaben.
• Sollte Akkuflüssigkeit versehentlich auf Ihre Kleidung oder Haut gelangen, spülen Sie die
betroffene Stelle sofort mit reinem Leitungswasser. Längerer Kontakt mit der Akkuflüssigkeit
kann zu Hautentzündung führen.
Vorsichtsmaßregeln während der Verwendung
• Der Akku ist nur für die Verwendung mit diesem Mobilteil ausgelegt.
• Verwenden Sie nur die mitgelieferte Ladestation für das Aufladen.
• Ein neuer Akku ist nicht aufgeladen. Sie müssen ihn daher aufladen, bevor Sie diesen erstmalig
verwenden.
• Die Verwendung eines Akkus in kalter Umgebung kann die von einer vollen Ladung erwartete
Betriebsdauer verkürzen. Laden Sie den Akku an einem Ort auf, an dem die Temperatur im
Bereich von 10° C bis 35° C liegt. Ein Aufladen außerhalb dieses Temperaturbereichs kann zu
längerer als normaler Ladedauer oder sogar zu einem Versagen des Ladevorganges führen.
• Sehr begrenzte Betriebsdauer nach einer vollen Ladung weist darauf hin, dass die Lebensdauer
des Akkus abgelaufen ist. Ersetzen Sie den Akku (komplett mit dem Akkufachdeckel) durch
einen neuen.
• Wischen Sie den Akku niemals mit Verdünner, Waschbenzin, Alkohol oder anderen flüchtigen
Mitteln oder chemisch behandelten Tüchern ab. Anderenfalls kann es zu Verformung des Akkus
und zu Fehlbetrieb kommen.
Akku einsetzen
Der Akku ist fest in den Akkudeckel des Mobilteils eingeklebt. Zur Inbetriebnahme setzen Sie den
Akku ein, wie in der folgenden Skizze dargestellt.
Akku einsetzen
Nach dem Einlegen der MEM-Card (s. nächste Seite), sofern
nicht bereits eingelegt: Setzen Sie den Deckel leicht schräg
an (1) und klappen Sie ihn herunter (2) bis er deutlich ein-
rastet.
Akku entnehmen
Zum Entriegeln des Akkudeckels nehmen Sie einen geeig-
neten spitzen Gegenstand (z. B. Kugelschreiber) und drü-
cken diesen in das Loch im Boden des Mobilteils (1).
Heben Sie, wie skizziert, gleichzeitig den Deckel nach oben
(2).
1
2
1
2
QG A312w DE, GB, FR DIN A6 11.04.2008 15:09 Uhr Seite 7
8
MEM-Card einlegen
Sofern die MEM-Card ihrem Gerät separat beiliegt, müssen Sie diese im Akkufach einlegen.
Sicherheitshinweis!
Die MEM-Card muss mit größter Sorgfalt behandelt werden. Die Kontakte müssen frei von Staub,
Feuchtigkeit, Fett usw. sein. Lagern Sie die MEM-Card nicht an warmen Orten (z. B. mit Sonnenbe-
strahlung). Verbiegen Sie die MEM-Card nicht; die Kontakte könnten zerstört werden.
• Drücken Sie zunächst die MEM-Card mit dem Finger aus dem grö-
ßeren Rahmen heraus.
• Schieben Sie die MEM-Card mit den Kontaktflächen nach unten
und der abgeschrägten Kante nach hinten unter die Metallklam-
mer (in der Abbildung grau). Achten Sie darauf, dass die MEM-
Card weit genug eingeschoben ist. In der korrekten Position liegt
sie flach in der Vertiefung und wird durch die beiden Erhebungen
im Gehäuse gegen Verrutschen gesichert .
Berühren Sie niemals die goldglänzenden Kontakte! Statische
Entladungen können zum Gerätedefekt führen.
MEM-Card entnehmen
Die MEM-Card müssen Sie nur herausnehmen, wenn Sie das Mobilteil weitergeben möchten oder
die MEM-Card für ein neues Mobilteil brauchen.
• Nach Abnehmen des Akkudeckels:
Schieben Sie mit Hilfe eines spitzen Gegenstandes wie z. B. einer
aufgebogenen Büroklammer, den Sie in das hintere Ende des
Schlitzes in der Metallklammer einführen, die MEM-Card unter
dieser Abdeckung hervor. Achten Sie darauf, die Kontakte unter
der Metallklammer sowie auf der MEM-Card nicht zu berühren.
Gürtelclip anbringen / entfernen
Schieben Sie den Adapterbügel über die Rückseite des Mobil-
teils bis die Bügel in die seitlichen Öffnungen desselben ein-
rasten. Zum Entfernen des Gürtelclips ziehen Sie die Bügel
leicht auseinander.
Installation
QG A312w DE, GB, FR DIN A6 11.04.2008 15:09 Uhr Seite 8
Deutsch
9
Displayanzeigen, Softkeys und Tasten
Das Display
Symbole in der oberen Displayzeile:
Qualität der Funkverbindung (vier Säulen - sichere Funkverbindung; nur eine Säule - unsi-
chere Funkverbindung).
Mikrofon abgeschaltet.
Ladezustand des Akkus.
Sie haben eine lokale Alarmzeit programmiert und aktiviert.
Das Merkmal „Nicht stören“ ist aktiviert.
Rufumleitung aktiv.
Der Rufton ist ausgeschaltet.
Der PIN-Schutz für Administrator-Eingaben ist aufgehoben.
Das Mobilteil hat keine Verbindung zu einem Accesspoint (AP).
Neuer Eintrag in der Anrufliste.
Symbole in der untersten Displayzeile (zugehörig zu den Tasten):
Softkey für die Wahlwiederholung
Softkey für das Telefonbuch
Menü Softkey für das Hauptmenü
Softkey zum Aufheben des Tastenschutzes
Softkey (Steuertasten) zum Blättern in Listen
Softkey (Steuertasten) zum Verschieben des Eingabecursors
Softkey (Steuertasten) zum Verstellen der Rufton- und Hörerlautstärke (bei Anruf bzw. wäh-
rend der Verbindung)
QG A312w DE, GB, FR DIN A6 11.04.2008 15:09 Uhr Seite 9
10
Displayanzeigen, Softkeys und Tasten
Softkeys und Tasten
Die beiden Tasten unterhalb des Displays sowie die Pfeiltasten werden als Softkeys bezeichnet. Die
den Tasten zugeordneten Funktionen werden in der untersten Displayzeile angezeigt. Die Tasten-
funktion ändert sich automatisch entsprechend dem jeweiligen Betriebszustand des Mobilteils.
Softkey: Pfeiltasten
Oberhalb der Pfeiltasten werden Ihnen Symbole angezeigt, die die jeweilige Funktionalität der
Pfeiltasten kennzeichnen:
Pfeiltaste nach oben bzw. unten öffnet das Telefonbuch.
Bei der Eingabe von Rufnummern oder Texten können Sie Änderungen durch Verschieben
eines Cursors vornehmen. Die Pfeiltasten verschieben den Cursor bei einmaligem kurzen
Drücken um eine Stelle. Halten Sie die Taste gedrückt wird der Cursor bis zum Loslassen der
Taste weiterbewegt.
Bei Anzeige einer Auswahlliste (z. B. Telefonbuch oder Menü) steuern Sie den Cursorbalken
mit den Pfeiltasten zum gewünschten Eintrag.
Hörer / Lautsprecher / Headset:
Mit den Pfeiltasten stellen Sie die gewünschte Lautstärke ein. Die Einstellung wird nume-
risch sowie grafisch angezeigt.
Softkey: OK
Mit bestätigen Sie die ausgewählte Funktion. Ist bei einer Funktion lediglich eine Umschalt-
möglichkeit vorhanden, wird durch diese Taste umgeschaltet. Im Display werden aktive Einstellun-
gen (EIN) durch ein „✓“ auf Höhe des jeweiligen Begriffs am Displayrand gekennzeichnet; bei nicht
aktiven Einstellungen (AUS) erscheint dort ein „—“ bzw. ist diese Stelle leer.
Softkey: Zurück
Mit verlassen Sie jeweils den angezeigten Menüabschnitt. Das Display zeigt anschließend
die Auswahl des vorherigen Menüzweigs oder das aktuelle Ruhe- bzw. Verbindungsdisplay.
Softkey: Wahlwiederholung ¤
Ermöglicht die Auswahl aus der Wahlwiederholliste.
Zurück
OK
QG A312w DE, GB, FR DIN A6 11.04.2008 15:09 Uhr Seite 10
11
Deutsch
Displayanzeigen, Tasten und Softkeys
Hörertaste
Je nach aktuellem Zustand des Telefons z. B. Ruhezustand, im Gespräch, im Editiermodus hat die
Hörertaste folgende Funktionen:
... im Ruhezustand:
Es wird eine Leitung belegt.
... während eines kommenden Anrufs:
Der Anruf wird angenommen.
... während eines Gesprächs:
Das Gespräch wird beendet bzw. die Verbindung wird abgebaut.
... befinden Sie sich in Listen z. B. Anruf- oder Wahlwiederholliste usw. oder sind Ziffern eingegeben
worden:
Die Rufnummer wird gewählt.
Lautsprechertaste
Aktiviert Lauthören / Freisprechen.
Wenn Lauthören / Freisprechen eingeschaltet ist, leuchtet diese Taste.
Infotaste (i)
Über diese Taste können Sie die Anruferliste erreichen. Wenn sich neue Einträge in der Anruferliste
befinden, blinkt die Infotaste.
C-Taste
Die C-Taste ist mit Mehrfachfunktionen ausgestattet. Es wird je nach aktuellem Zustand des Tele-
fons z. B. Ruhezustand, im Gespräch, im Editiermodus usw. zwischen kurzem oder langem Tasten-
druck unterschieden. Folgende Funktionen wurden realisiert:
... ist das Gerät ausgeschaltet:
kurzer oder langer Tastendruck: Das Gerät wird eingeschaltet.
... im Ruhezustand:
langer Tastendruck: Das Gerät wird abgeschaltet.
... bei Eingabe von Text oder Rufnummern:
kurzer Tastendruck: Löscht ein einzelnes Zeichen links vom Cursor,
langer Tastendruck: Löscht den kompletten Eintrag.
... während der Anzeige von Listen (z. B. Anrufliste):
kurzer Tastendruck: Löscht den Eintrag.
QG A312w DE, GB, FR DIN A6 11.04.2008 15:09 Uhr Seite 11
12
Displayanzeigen, Tasten und Softkeys
Signaltaste (R)
Kurzer Tastendruck während einer Verbindung: Es wird eine Rückfrage eingeleitet.
Ta st e #
Langer Tastendruck im Ruhezustand: Schaltet die Tastensperre ein.
Die Tastensperre wird wieder ausgeschaltet durch Drücken des Softkeys und der Taste #
innerhalb von fünf Sekunden.
Ta st e *
Langer Tastendruck im Ruhezustand: Schaltet den Summer/Rufton an bzw. aus.
Kurzer Tastendruck während einer Texteingabe (z. B. Namen für Telefonbucheintrag): Umschaltung
von Groß- auf Kleinbuchstaben bzw. umgekehrt.
Zifferntasten
Die Zifferntasten dienen zur Direkteingabe von Rufnummern und Namen, ABC-Bedruckung (Vanity
- Rufnummern).
Bei der Texteingabe verschieben Sie mit den Pfeiltasten die Eingabeposition zum Anfang oder Ende
des Eintrages. Die Taste Clöscht einzelne Ziffern/Zeichen. Mit wird die Prozedur abge-
brochen.
Softkey: Menü
Kurzer Tastendruck im Ruhezustand: Das Menü des Mobilteils wird geöffnet.
Zurück
QG A312w DE, GB, FR DIN A6 11.04.2008 15:09 Uhr Seite 12
Deutsch
13
Grundlegende Funktionen
Mobilteil ein- / ausschalten
Ihr Mobilteil ist nach der Erstladung des Akkus automatisch eingeschaltet und betriebsbereit. Sie
können Ihr Mobilteil ausschalten, um den Ladezustand des Akkus länger zu erhalten.
Mobilteil ausschalten
CDrücken Sie die C-Taste - langer Tastendruck.
Mobilteil einschalten
CDrücken Sie die C-Taste.
Tastensperre
Schalten Sie zuvor die Tastensperre ein, wenn Sie ein Mobilteil in der Tasche mit sich tragen. Damit
verhindern Sie, dass versehentlich eine Rufnummer gewählt wird.
Erhalten Sie einen Anruf, wird die Tastensperre für die Dauer des Anrufes ausgeschaltet. Den Anruf
nehmen Sie mit der Hörertaste an.
Tastensperre einschalten
#Im Ruhezustand die Raute-Taste lange drücken.
Über dem linken Softkey wird angezeigt.
Tastensperre ausschalten
DDrücken Sie den Softkey -> Zum Entsperren # drücken
#Drücken Sie innerhalb von fünf Sekunden die Raute-Taste um die Sperre zu deaktivieren.
Freisprechen ein/ausschalten
Ein Tastendruck auf die Lautsprecher-Taste Him Ruhezustand (das Mobilteil ist dann wahlbereit)
oder während einer Verbindung schaltet den Lautsprecher ein bzw. aus.
Hörerlautstärke einstellen während des Gesprächs
Sie führen ein Gespräch (mit dem Hörer, Lautsprecher oder Headset).
Das Einstellen der Lautstärke geschieht durch die Pfeiltasten oder die Zifferntasten 1 - 7. Die aktuelle
Einstellung wird grafisch angezeigt. Die veränderte Einstellung gilt nur temporär für die bestehende
Verbindung. Wird die temporäre Einstellung mit bestätigt, gilt diese als neue Grundeinstellung
für weitere Verbindungen.
OK
QG A312w DE, GB, FR DIN A6 11.04.2008 15:09 Uhr Seite 13
14
Grundlegende Funktionen
Rufton ausschalten
Wollen Sie (z. B. bei einer Besprechung) nicht gestört werden, können Sie den Rufton (nur Rufton
über den Lautsprecher) ausschalten. Drücken Sie hierzu die *-Taste so lange, bis Sie einen Ton
hören und im Display erscheint.
Um den Tonruf wieder einzuschalten drücken Sie erneut lange auf die *-Taste.
Alternativ können Sie auch im Menü „Audio > Ruftoneinstell. > Ruftongerät“ den Eintrag „Summer“
deaktivieren - auch dann erscheint im Display das Symbol .
Mobilteil nicht erreichbar
Mit dem Merkmal „Nicht stören“ ist Ihr Mobilteil nicht mehr erreichbar. Anrufe werden aber weiter-
hin in Ihrer Anrufliste vermerkt (sofern die Rufnummer übertragen wurde).
Sie werden nicht gestört, haben aber weiterhin den Überblick um bei wichtigen Rufnummern ggf.
zurückzurufen.
Beleuchtung
Die Beleuchtung wird bei jedem Tastendruck aktiviert und bleibt für eine einstellbare Zeit einge-
schaltet (Einstellung im Menü „Anzeige > Beleuchtung > Tastatur“).
Displaykontrast ändern
Um das Display der örtlichen Beleuchtung /Helligkeit anzupassen, können Sie den Kontrast ändern.
Die Einstellung erfolgt im Menü „Anzeige > Kontrast“.
Mobilteil stummschalten
Soll Ihr Gesprächspartner nicht mithören, was Sie z. B. mit einer Person im Raum besprechen, kön-
nen Sie Ihr Mobilteil vorübergehend stummschalten.
Sie sind im Gespräch
DDrücken Sie . Im Display erscheint das Symbol .
Ihr Gesprächspartner am Telefon kann Sie nicht mehr hören.
Wollen Sie wieder mit Ihrem Gesprächspartner sprechen drücken Sie den linken Softkey erneut. Ihr
Gesprächspartner am Telefon hört Sie wieder.
Mic aus
QG A312w DE, GB, FR DIN A6 11.04.2008 15:09 Uhr Seite 14
Deutsch
15
Telefonieren
Rufnummer wählen
Alle in diesem Abschnitt beschriebenen Anrufe die durch Drücken der Hörertaste Abeginnen, kön-
nen auch im Freisprechmodus mit der Lautsprechertaste Hdurchgeführt werden.
Rufnummer mit Wahlvorbereitung wählen
Mittels der Wahlvorbereitung haben Sie die Möglichkeit Ihre Eingaben vor der Wahl zu korrigieren.
tRufnummer im Ruhezustand eingeben.
AHörertaste zum Wählen drücken.
Rufnummer mit direkter Wahl wählen
ADrücken Sie die Hörertaste.
tRufnummer eingeben und mit abschließen; die Rufnummer wird sofort gewählt.
Hinweis
Geben Sie bitte die Rufnummer zügig ein, da vier Sekunden nach Eingabe der letzten Ziffer die Wahl
gestartet wird auch wenn nicht gedrückt wurde. Unvollständig eingegebene Rufnummern
führen zur Falschwahl.
Zum Beenden des Gesprächs:
ADrücken Sie die Hörertaste.
Anrufen aus der Wahlwiederholungs-Liste
In der Wahlwiederholungs-Liste werden die 10 zuletzt gewählten Rufnummern (max. 32 Stellen)
gespeichert. Jede weitere gewählte Rufnummer überschreibt den jeweils ältesten Eintrag in der
Liste.
Sie können die Rufnummern der Wahlwiederholungs-Liste ansehen und sich die entsprechenden
Details (z. B. Anrufzeit) anzeigen lassen.
DIm Ruhezustand drücken.
FGewünschte Rufnummer auswählen.
AHörertaste zur sofortigen Wahl drücken.
Wählen
Wählen
QG A312w DE, GB, FR DIN A6 11.04.2008 15:09 Uhr Seite 15
16
Telefonieren
Anrufen aus dem Telefonbuch
Das Telefonbuch kann maximal 100 Einträge aufnehmen, die automatisch alphabetisch sortiert wer-
den.
FIm Ruhezustand die Pfeiltaste drücken.
FDen gewünschten Namen auswählen
AHörertaste zur sofortigen Wahl drücken.
Anrufen aus der Anruferliste
Wenn Sie die Info-Taste Bdrücken wird Ihnen eine Liste der nicht angenommenen Anrufe ange-
zeigt.
Sie können die Rufnummern der Anruferliste ansehen und sich die entsprechenden Details (z. B.
Anrufzeit) anzeigen lassen.
BIm Ruhezustand Info-Taste drücken.
FGewünschte Rufnummer auswählen.
AHörertaste zur sofortigen Wahl drücken.
Anruf annehmen
Noch während des Anrufs können Sie…
D… mit dem Softkey den Anruf abweisen (ggf. Besetztton beim Anrufer).
AZum Entgegennehmen des Anrufs drücken Sie die Hörertaste.
Ein Gespräch halten
Sie führen ein Gespräch.
rSignaltaste drücken. Das Gespräch wird gehalten.
Gehaltenes Gespräch zurückholen
rSignaltaste drücken. Sie sind wieder mit dem Gesprächspartner verbunden.
Abweis
QG A312w DE, GB, FR DIN A6 11.04.2008 15:09 Uhr Seite 16
Deutsch
17
Telefonieren
Anklopfen annehmen
Erhalten Sie während einer Verbindung einen weiteren Anruf hören Sie einen Anklopfton. Den Anruf
nehmen Sie wie folgt entgegen.
rSignaltaste drücken. Das aktive Gespräch wird gehalten.
oder
AHörertaste drücken. Die anklopfende Verbindung wird angenommen, die erste Verbindung
getrennt.
Während eines Gesprächs einen weiteren
Gesprächspartner anrufen
Ein Rückfragegespräch führen
Sie führen ein Gespräch.
rSignaltaste drücken - das erste Gespräch wird gehalten.
tRufnummer mit den Zifferntasten eingeben, Eingabe mit abschließen (oder 4 s war-
ten).
Um die Rückfrage zu beenden und zur gehaltenen Verbindung zurückzukehren:
Edrücken.
Fauswählen.
Edrücken. Sie sind wieder mit dem ersten Gesprächspartner verbunden.
Hinweis
Wenn Sie bei der Rufnummerneingabe für 4 Sekunden keine Taste drücken wird die bis dahin einge-
gebene Rufnummer gewählt. Eine sog. Nachwahl ist nicht möglich.
Trennen Sie das Rückfraggespräch mit der Hörertaste Ameldet sich das gehaltene Gespräch mit
einem Rückruf sofern der Teilnehmer noch nicht aufgelegt hat.
Während der Rückfrage: Makeln
Kommt die Verbindung zu Stande, können Sie mit der Signaltaste rwechselweise mit den
Gesprächspartnern sprechen (Makeln).
rDas derzeit gehaltene Gespräch wird aktiviert und das andere Gespräch wird gehalten.
OK
Trennen
Option
Wählen
QG A312w DE, GB, FR DIN A6 11.04.2008 15:09 Uhr Seite 17
18
Telefonieren
Gespräch übergeben
Sie führen ein Rückfragegespräch und befinden sich im Zustand „Makeln“ (s. o.):
AHörertaste drücken - das Gespräch wird übergeben.
Das Telefonbuch
Neuer Eintrag
Das Telefonbuch kann 100 Einträge aufnehmen: Rufnummern bis 32 Ziffern, Namen bis 16 Zeichen.
FIm Ruhezustand die Pfeiltaste drücken.
Edrücken.
Fauswählen und mit bestätigen.
tNamen eingeben und mit der Pfeiltaste zur Rufnummerneingabe weiterschalten.
tRufnummer eingeben und drücken. Der Eintrag wird gespeichert.
OK
OK
Neu
Option
QG A312w DE, GB, FR DIN A6 11.04.2008 15:09 Uhr Seite 18
Deutsch
19
Telefon einstellen
Menü: Audio
Edrücken.
Fauswählen und mit bestätigen.
FEinen der folgenden Menüpunkte auswählen und mit bestätigen.
Einen der folgenden Menüpunkte auswählen und mit bestätigen.
Mit den Pfeiltasten eine Melodie auswählen und mit
bestätigen.
Mit den Pfeiltasten die gewünschte Lautstärke für den Rufton
auswählen und mit bestätigen.
Mit den Pfeiltasten entsprechenden Eintrag auswählen und
mit ein- oder ausschalten .
…Rufton über den Lautsprecher
…Anruf mit Vibrationsalarm
…Anrufsignalisierung im Headset
Mit verlassen Sie das Menü.
Mit den Pfeiltasten entsprechenden Eintrag auswählen und mit
ein- oder ausschalten .
…Akustische Quittung für eine Tastenbetätigung.
…Akustische Quittung bei einer erfolgreichen
Programmierung.
…Warnsignal bei geringer Akkukapazität.
…Warnsignal bei schwachem Funksignal an der
Reichweitengrenze.
Mit verlassen Sie das Menü.
Einen der folgenden Menüpunkte auswählen und mit bestätigen.
…Mit den Pfeiltasten die gewünschte Lautstärke
auswählen und mit bestätigen.
OK
Hörer
OK
Lautstärke
Zurück
Reichweite
✓
Batteriealarm
✓
Quitt.töne
✓
Tastenklick
✓
–
✓
OK
Hinweistöne
Zurück
Headset
✓
Vibrator
✓
Summer
✓
–
✓
OK
Ruftongerät
OK
Lautstärke
OK
Melodie
OK
Ruftoneinstell.
OK
OK
Audio
Menü
QG A312w DE, GB, FR DIN A6 11.04.2008 15:09 Uhr Seite 19

20
Telefon einstellen
…Mit den Pfeiltasten die gewünschte Lautstärke
auswählen und mit bestätigen.
Hinweis
Ist das Mobilteil im Stromspar-Modus (Display ist aus) wird die erste Tastenbetätigung nicht mit
einem „Tastenklick“ quittiert.
Menü: Anzeige
Edrücken.
Fauswählen und mit bestätigen.
FEinen der folgenden Menüpunkte auswählen und mit bestätigen.
Mit den Pfeiltasten den gewünschten Kontrast auswählen und mit
bestätigen.
Sie können Zeiten einstellen, für die die Beleuchtung eingeschaltet
bleiben soll. Bedenken Sie bitte, dass lange Beleuchtungszeiten einen
erhöhten Stromverbrauch zur Folge haben, der zu Lasten der Bereit-
schaftszeit des Mobilteils geht. Mit der Einstellung „Ladelicht“ können
Sie die Dauer der Displaybeleuchtung bei Ablage in der Ladestation
festlegen.
…Einstellbereich 10 s bis 240 s in festen Schritten
…Einstellbereich „Aus“ bis 240 s in festen
Schritten
…Einstellbereich 1 s bis 240 s in festen Schritten,
„Ein“ und „Aus“.
Sie können mit den Pfeiltasten aus sechs Motiven ein Hintergrundbild
auswählen, das im Ruhedisplay angezeigt wird.
Gewünschtes Hintergrundbild oder „Kein Bild“ auswählen und mit
bestätigen.
Für die Darstellung des Menüinhaltes stehen zwei Schriftgrößen zur
Auswahl. Mit den Pfeiltasten die gewünschte Schriftgröße auswählen
und mit bestätigen. Mit die Einstellung beenden.
…
…
Große Schrift
Kleine Schrift
✓
Zurück
OK
Zeichensatz
OK
Hintergrundbild
Ladelicht
Tastatur
Anzeige
Beleuchtung
OK
Kontrast
OK
OK
Anzeige
Menü
OK
Lautsprecher
QG A312w DE, GB, FR DIN A6 11.04.2008 15:09 Uhr Seite 20
21
Deutsch
Anhang
Anhang
Hinweise für die Entsorgung
Zur Vermeidung möglicher Auswirkungen bei der Entsorgung von Elektro- und Elektronikgeräten
enthaltenen gefährlichen Stoffen auf die Umwelt und die menschliche Gesundheit wurden die
Richtlinien des Europäischen Parlamentes und des Rates
• Richtlinie 2002/96/EG „Elektro-und Elektronik-Altgeräte“ und
• Richtlinie 2002/95/EG „Beschränkung der Verwendung bestimmter gefährlicher Stoffe in Elektro-
und Elektronikgeräten“
in allen Ländern der EU national gesetzlich geregelt.
Die Gesetzgebung bezweckt vorrangig die Vermeidung von Abfällen von Elektro- und Elektronikge-
räten und darüber hinaus die Wiederverwendung, die stoffliche Verwertung und andere Formen der
Verwertung solcher Abfälle, um die zu beseitigende Abfallmenge zu reduzieren sowie den Eintrag
von Schadstoffen aus Elektro- und Elektronikgeräten in Abfälle zu verringern.
Das von ihnen erworbene Produkt wurde nach dem heutigen Stand der Technik umwelt- -und recy-
clingorientiert entwickelt und entspricht damit den Vorgaben der europäischen Richtlinien.
Das Produkt ist mit dem abgebildeten Symbol gekennzeichnet. Dieses Symbol ver-
pflichtet den Besitzer des Produktes bei Entsorgungswunsch dieses einer vom unsor-
tierten Siedlungsabfall getrennten Erfassung (Sammlung) zuzuführen. Dazu wurden
geeignete Einrichtungen für die Rückgabe von Elektro- -und Elektronik-Altgeräten
geschaffen. An diesen öffentlIchen Rücknahmestellen können die Altgeräte kostenfrei
angeliefert werden (Bringsystem). Die Standorte der Rücknahmestellen entnehmen Sie
bitte den Informationen der für die Entsorgung zutändigen Stellen der Städte und
Gemeinden.
Achtung! Elektroaltgeräte gehören nicht in den Hausmüll.
Geben Sie diese kostenfrei an den bekannten Rücknahmestellen ab.
Konformitätserklärung
CE-Zeichen
Dieses Gerät erfüllt die Anforderungen der EU-Richtlinie:
1999/5/EG Richtlinie über Funkanlagen und Telekommunikationsendeinrichtungen und die gegen-
seitige Anerkennung ihrer Konformität.
Die Konformität mit der o. a. Richtlinie wird durch das CE-Zeichen auf dem Gerät bestätigt.
Die Konformitätserklärung kann unter folgender Adresse im Internet eingesehen werden:
http://www.aastra.com
QG A312w DE, GB, FR DIN A6 11.04.2008 15:09 Uhr Seite 21

22
Anhang
FCC Notices (U.S. Only)
This device complies with part 15 of the FCC Rules. Operation is subject to the following two condi-
tions:
(1) This device may not cause harmful interference, and (2) this device must accept any interference
received, including interference that may cause undesired operation.
Modifications not expressly approved by this company could void the user's authority to operate the
equipment.
NOTE: This equipment has been tested and found to comply with the limits for a Class B digital
device, pursuant to Part 15 of the FCC Rules. These limits are designed to provide reasonable protec-
tion against harmful interference in a residential installation. This equipment generates, uses and
can radiate radio frequency energy and, if not installed and used in accordance with the instructions,
may cause harmful interference to radio communications. However, there is no guarantee that inter-
ference will not occur in a particular installation. If this equipment does cause harmful interference
to radio or television reception, which can be determined by turning the equipment off and on, the
user is encouraged to try to correct the interference by one or more of the following measures:
• Reorient or relocate the receiving antenna.
• Increase the separation between the equipment and receiver.
• Connect the equipment into an outlet on a circuit different from that to which the receiver is
connected.
• Consult the dealer or an experienced radio/TV technician for help.
Health and Safety Information
Exposure to Radio Frequency (RF) Signals:
The wireless phone is a radio transmitter and receiver. It is designed and manufactured not to
exceed the emission limits for exposure to radio frequency (RF) energy set by the Federal Communi-
cations Commission (FCC) of the U.S. Government. These limits are part of comprehensive guidelines
and establish permitted levels of RF energy for the general population. The guidelines are based on
the safety standards previously set by both U.S. and international standards bodies. These standards
include a substantial safety margin designed to assure the safety of all persons, regardless of age
and health.
This device and its antenna must not be co-located or operating in conjunction with any other
antenna or transmitter.
This EUT has been shown to be capable of compliance for localized specific absorption rate (SAR) for
uncontrolled environment/general population exposure limits specified in ANSI/IEEE Std. C95.1-
1992 and had been tested in accordance with the measurement procedures specified in FCC/OET
Bulletin 65 Supplement C (2001) and IEEE 1528-2003.
QG A312w DE, GB, FR DIN A6 11.04.2008 15:09 Uhr Seite 22
23
Deutsch
Anhang
Industry Canada (Canada only)
Operation of this device is subject to the following two conditions: (1) this device may not cause
interference, and (2) this device must accept any interference, including interference that may cause
undesired operation of the device.
Privacy of communications may not be ensured when using this telephone.
Exposure to Radio Frequency (RF) Signals:
The wireless phone is a radio transmitter and receiver. It is designed and manufactured not to
exceed the emission limit for exposure to radio frequency (RF) energy set by the Ministry of Health
(Canada), Safety Code 6. These limits are part of comprehensive guidelines and established permit-
ted
levels of RF energy for the general population. These guidelines are based on the safety standards
previously set by international standard bodies. These standards include a substantial safety
margin designed to assure the safety of all persons, regardless of age and health.
This device and its antenna must not be co-located or operating in conjunction with any other
antenna or transmitter.
This device has been shown to be capable of compliance for localized specific absorption rate (SAR)
for uncontrolled environment / general public exposure limits specific in ANSI/IEEE C95.1-1992 and
had been tested in accordance with the measurement procedures specified in IEEE 1528-2003.
QG A312w DE, GB, FR DIN A6 11.04.2008 15:09 Uhr Seite 23
24
Anhang
Audio Ruftoneinstell. Melodie
Lautstärke
Ruftongerät Summer
Vibrator
Headset
Hinweistöne Tastenklick
Quitt.-töne
Batteriealarm
Reichweite
Lautstärke Hörer
Lautsprecher
Headset
Anzeige Kontrast
Beleuchtung Anzeige
Tastatur
Ladelicht
Hintergrundbild
Zeichensatz Kleine Schrift
Große Schrift
Telefonoptionen Nicht stören
Anklopfschutz
Auto-Abheben
Auto.Tastensp.
Stilles Laden
Benutzername *
Länderoptionen Sprache English
Deutsch
Français
Italiano
Español
Dansk
Nederlands
Svenska
Suomi
Norsk
Polski
Land per DHCP
Germany
Switzerland
France
USA
Canada
Zeitzone per DHCP
Menübaum
QG A312w DE, GB, FR DIN A6 11.04.2008 15:09 Uhr Seite 24
25
Deutsch
Anhang
France
USA
Canada
Zeitzone per DHCP
Afrika
Asien
Australien
Europa
Nordamerika
Südamerika
Zeitformat Datumsformat
Zeitformat
Rufumleitung Sofort
Besetzt
Nach Zeit
Rufnummer
Wecker Aktiv
Einstellen
System Netzwerk Profile *
Werkzeuge Ping
Traceroute
Site-Survey *
Roaming-Info
Info
Syslog
Zugangsdaten * Info
PIN *
Software Version
Update Jetzt prüfen
Einstellungen
Lizenzen
* (teilweise) gesichert durch Administrator-PIN
QG A312w DE, GB, FR DIN A6 11.04.2008 15:09 Uhr Seite 25

26
QG A312w DE, GB, FR DIN A6 11.04.2008 15:09 Uhr Seite 26

1
Française
Nous vous remercions d'avoir choisi un produit Aastra-DeTeWe. Sa qualité est garantie par la satis-
faction des exigences les plus strictes et une conception parfaite.
Ce Guide rapide vous aidera à utiliser votre téléphone Aastra 312w. Un Guide de l'utilisateur com-
plet est disponible sur notre site Web www.aastra.com, qui fournit également des réponses à vos
principales questions (p. ex. avec des informations sur « L'enregistrement d'un combiné », « La con-
figuration d'un serveur SIP » ou des conseils d'utilisation des « Outils de dépannage »).
Par ailleurs, si vous avez besoin d'une assistance technique supplémentaire ou si vous voulez obte-
nir des informations sur les autres produits Aastra-DeTeWe, veuillez vous adresser au responsable
du système ou à votre revendeur.
Nous espérons que votre Aastra 312w vous donnera entière satisfaction.
Avant toute utilisation!
Veuillez charger la batterie au moins 3 heures avant d’utiliser le combiné.
Si le combiné est placé sur le chargeur avec une batterie totalement vide, aucune information ne
sera affichée sur l’écran à moins qu‘une certaine capacité de charge ait été atteinte. Ceci peut pren-
dre quelques minutes, il ne s’agit pas d’un disfonctionnement.
Bienvenue chez Aastra-DeTeWe
QG A312w DE, GB, FR DIN A6 11.04.2008 15:09 Uhr Seite 1
2
Familiarisation avec le téléphone
Consignes de sécurité
Utilisation conforme aux dispositions et déclaration de conformité
Le combiné Aastra 312w sert à téléphoner via SIP dans un réseau WLAN.
Le marquage CE apposé sur le produit certifie sa conformité aux directives techniques relatives à la
sécurité de l'utilisateur et la compatibilité électromagnétique, valables au moment de l'établisse-
ment de la déclaration de conformité correspondante respectant la directive européenne 99/5/CE.
Vous pouvez consulter la déclaration de conformité sur notre site Web http://www.aastra.com.
Comme tous les téléphones sans fil, ce combiné utilise les signaux radio qui ne garantissent pas tou-
jours l'établissement d'une connexion. En règle générale, si vous devez impérativement passer une
communication (par exemple, en cas d’urgence médicale), vous ne devez donc jamais vous fier à
100 % aux téléphones sans fil.
Alimentation électrique / Panne de secteur / Accumulateurs
Pour fonctionner, la station de recharge de ce produit requiert une alimentation en courant alterna-
tif. Elle doit être coupée uniquement en retirant l'adaptateur secteur de la prise électrique.
En cas de panne de secteur, l’intégralité du contenu de la mémoire (données du programme et de
l'utilisateur) demeure inchangé.
Pour plus d’informations sur les accumulateurs, voir la section « Mesures de sécurité lors de la mani-
pulation des accumulateurs ».
Sécurité
La station de recharge ne doit être installée et utilisée que dans un bâtiment fermé.
Posez la station de recharge sur une surface non glissante.
La station de recharge et le combiné doivent être tenus :
• à l'abri de l'eau et de l'humidité et hors des environnements humides (par exemple, salle de bains) ;
• à l'abri des sources de chaleur et des rayons de soleil directs et hors des environnements non ven-
tilés ;
• loin des appareils générant des champs magnétiques puissants, des équipements électriques, des
lampes fluorescentes, des ordinateurs, des postes de radio, des téléviseurs, des télécopieurs ou
des téléphones ;
• hors des environnements dans lesquels l'appareil peut être recouvert, où sa ventilation peut être
empêchée et où des liquides peuvent pénétrer dans l'appareil ;
• à l'abri de la poussière et hors des environnements soumis à des vibrations, des secousses ou des
écarts extrêmes de température.
QG A312w DE, GB, FR DIN A6 11.04.2008 15:09 Uhr Seite 2
3
Familiarisation avec le téléphone
Lors de l'installation, du raccordement et de l'utilisation du téléphone, respectez scrupuleusement
les consignes suivantes :
• Tirez le câble de raccordement avec précaution !
• Raccordez le câble uniquement aux prises prévues à cet effet.
• Raccordez uniquement les accessoires autorisés.
• Utilisez uniquement l'adaptateur secteur fourni (ID n° 23-001066-00).
• Des études ont montré que, dans des cas précis, les téléphones portables allumés peuvent pertur-
ber le fonctionnement des appareils médicaux. Aussi devez-vous respecter les dispositions pré-
vues quant à l'utilisation des téléphones portables au sein des établissements de santé.
• Ne jamais
- ouvrir la station de recharge ou le combiné (à l'exception du couvercle du compartiment des
accumulateurs) !
- mettre les connecteurs en contact avec des objets pointus et métalliques !
- saisir la station de recharge par le câble de raccordement !
• Nettoyez le téléphone uniquement à l'aide d'un chiffon légèrement humide.
• N'utilisez pas le téléphone dans des zones exposées à des risques d'explosion.
Installez et tenez le combiné et les accessoires hors de portée des petits enfants.
Remarque à l'attention des porteurs de prothèses auditives
Les porteurs de prothèses auditives doivent noter, avant d'utiliser le téléphone, que les signaux
radio peuvent interférer avec ces appareils et causer un bourdonnement désagréable.
Française
QG A312w DE, GB, FR DIN A6 11.04.2008 15:09 Uhr Seite 3
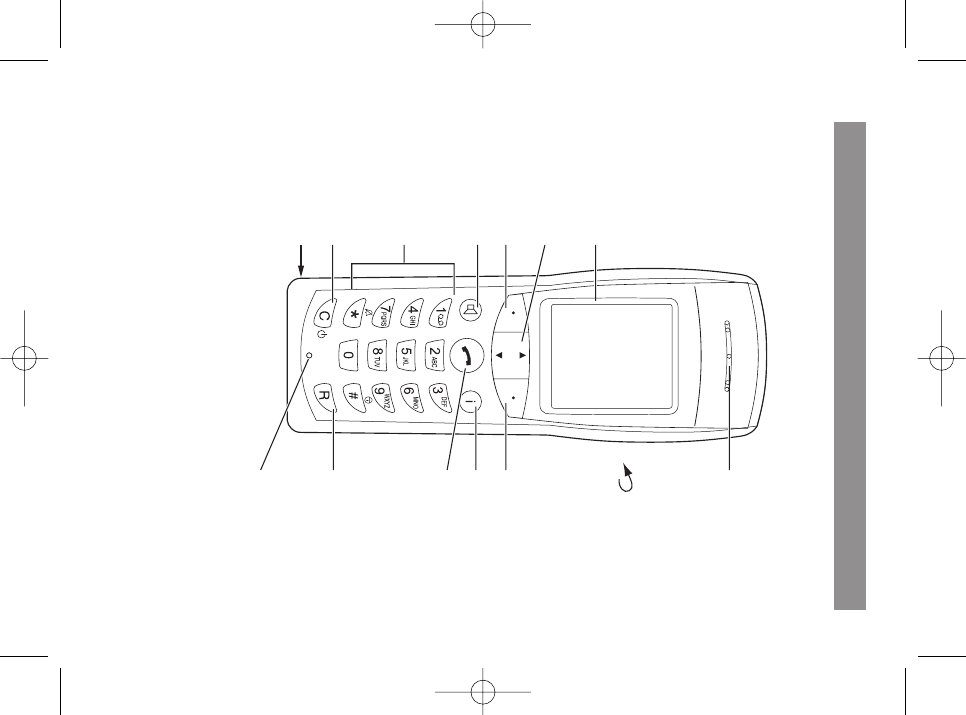
4
Combiné :
Écran
Écouteur
Face arrière :
Haut-parleur
Touche de fonction Touche de fonction
Touche d'informations
Touche de signalisation
(touche R)
Touche de communication
Haut-parleur /
Mains libres
Clavier numérique
Touche d'effacement/
MARCHE/ARRÊT
Microphone
Touches fléchées
Raccordement pour le
microcasque
USB-Schnittstelle
(für Service und spätere Anwe
Vue d'ensemble
QG A312w DE, GB, FR DIN A6 11.04.2008 15:09 Uhr Seite 4
5
Vue d'ensemble
Touches de fonction : l’écran affiche la fonction, dépendante de la situation,
d’une touche particulière. Si deux possibilités sont offertes, elles correspondent
aux touches de fonction droite et gauche. Si davantage de possibilités sont pro-
posées, la touche de fonction s'affiche.
En veille, appuyez sur cette touche pour ouvrir le répertoire.
Dans un menu ou une liste, faites défiler les entrées à l'aide des touches flé-
chées.
Touche de signalisation / touche R : touche de rappel
Touche Haut-parleur / Mains libres : elle active (touche éclairée) ou désactive le
haut-parleur intégré.
Touche d'informations :
En veille, appuyez brièvement sur la touche pour ouvrir la liste des appelants.
La touche clignote en cas de nouvel appel en absence.
Touche d'effacement permettant la correction des entrées : en veille, appuyez
longuement sur la touche pour activer/désactiver le combiné.
Touche de communication : elle correspond aux touches Décrocher et Raccro-
cher sur un téléphone ordinaire.
Touches numériques permettant la saisie directe de numéros d'appel et de
noms
Touche dièse permettant la saisie du signe dièse.
En veille, appuyez longuement sur la touche pour activer le verrouillage du cla-
vier.
Touche étoile permettant la saisie du signe étoile.
En veille, appuyez longuement sur la touche pour activer/désactiver la mélodie
(sonnerie).
Toutes les touches sont éclairées.
Option
DE
F
r
H
B
C
A
0…9
#
*
Touches du combiné
Française
QG A312w DE, GB, FR DIN A6 11.04.2008 15:09 Uhr Seite 5
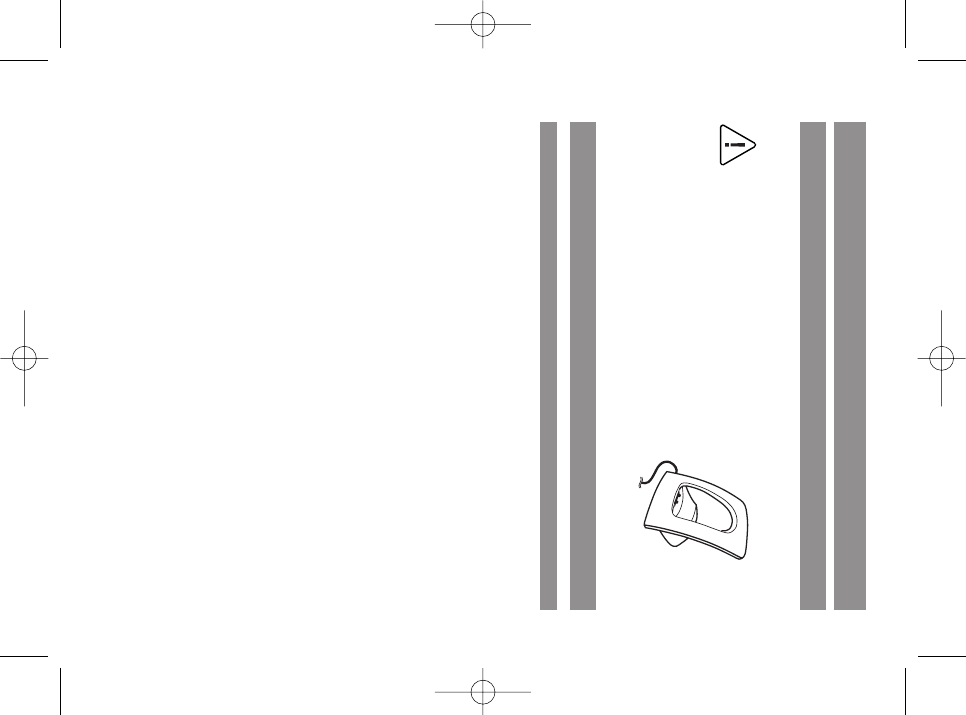
6
Installation
Mise en service de la station de recharge
Pour pouvoir mettre le téléphone en service, branchez le câble réseau de la station de recharge.
Consigne de sécurité
Utilisez uniquement l'adaptateur secteur
prévu (ID n° 23-001066-00) pour la station de
recharge !
Enfichez la prise mâle du câble réseau dans la
prise femelle de la station de recharge, puis l'adaptateur sec-
teur dans une prise de courant.
Mise en service du combiné
Mesures de sécurité lors de la manipulation des accumulateurs
Lisez impérativement les mesures de sécurité avant la première utilisation des accumulateurs. À des
fins de consultation ultérieure, conservez à portée de main ces mesures de sécurité et toutes les ins-
tructions d'utilisation.
Cet appareil contient un bloc d’accumulateurs Li-ion. Le non-respect de l'une des mesures de sécu-
rité suivantes lors de l'utilisation des accumulateurs entraîne un risque de surchauffe, d'incendie et
d'explosion.
• Les accumulateurs sont solidaires du couvercle de leur compartiment. Ne tentez jamais d'ôter
les accumulateurs.
• N'utilisez jamais une autre station de recharge pour le combiné.
• Ne tentez jamais d'utiliser les accumulateurs pour l'alimentation électrique d'un autre appareil
que ce combiné.
• N'utilisez et ne laissez jamais les accumulateurs à proximité immédiate des flammes.
• Ne passez jamais les accumulateurs au micro-ondes, ne les jetez pas dans le feu et ne les expo-
sez pas, de quelque manière que ce soit, à une forte chaleur.
• Ne transportez ni ne stockez jamais les accumulateurs avec des articles conducteurs électrique-
ment (colliers, mines de crayon en graphite, etc.)
• Ne tentez jamais de diviser les accumulateurs, de les modifier de quelque manière que ce soit
et de les exposer à de fortes secousses.
• Ne plongez jamais les accumulateurs dans l'eau douce ou salée.
• N'utilisez ni ne laissez jamais les accumulateurs exposés à la lumière directe du soleil, dans un véhi-
cule stationné en plein soleil ou dans un autre emplacement soumis à des températures élevées.
• Si jamais vous constatez un écoulement, une odeur inhabituelle, une production de chaleur, un
changement de couleur, une déformation ou une autre condition anormale, lors de l'utilisation,
du chargement ou de la conservation des accumulateurs, ôtez-les immédiatement du combiné
et tenez-les éloignés des flammes directes.
Adaptateur secteur
QG A312w DE, GB, FR DIN A6 11.04.2008 15:09 Uhr Seite 6
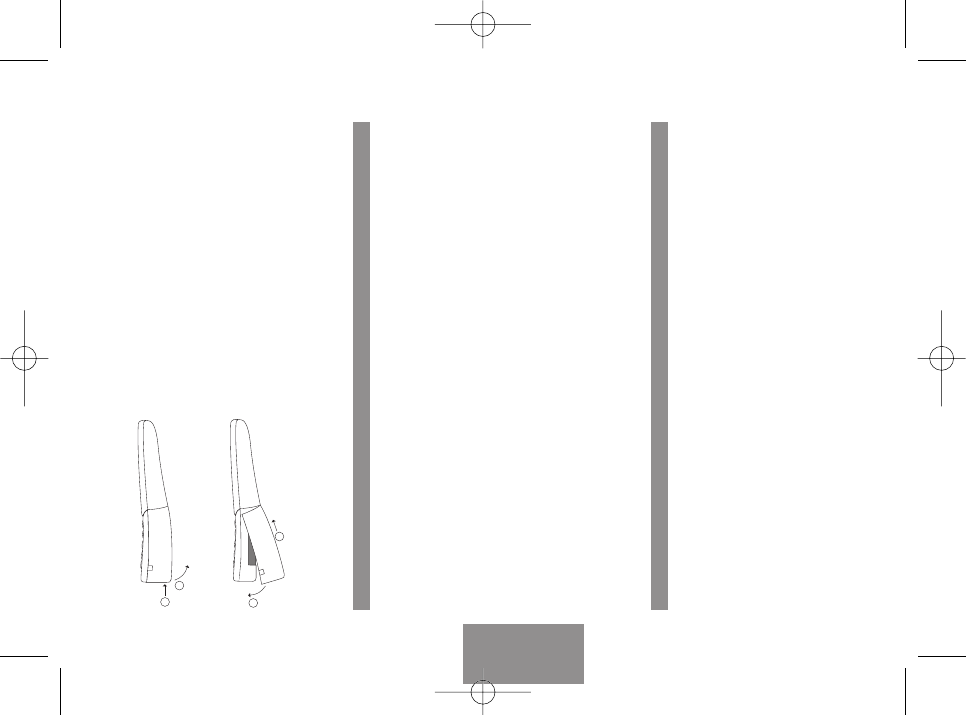
7
Installation
• Le fluide des accumulateurs peut altérer votre acuité visuelle. En cas de contact avec les yeux,
rincez immédiatement et abondamment à l'eau claire, puis consultez un médecin.
• Si des enfants doivent utiliser les accumulateurs, assurez-vous qu'un adulte responsable ait
informé les enfants des mesures de sécurité et des instructions correctes de manipulation et
veillez à ce que les enfants manipulent correctement les accumulateurs.
• En cas de contact du fluide des accumulateurs avec vos vêtements ou votre peau, rincez immé-
diatement et abondamment à l'eau claire. Un contact prolongé avec ce fluide peut entraîner
une inflammation de la peau.
Mesures de sécurité lors de l'utilisation
• Les accumulateurs sont destinés exclusivement à l'utilisation avec ce combiné.
• Utilisez uniquement la station de recharge fournie pour effectuer le chargement.
• Des nouveaux accumulateurs ne sont pas chargés. Vous devez donc les charger avant leur pre-
mière utilisation.
• L'utilisation des accumulateurs dans un environnement froid peut réduire la durée de fonction-
nement attendue après un chargement complet. Chargez les accumulateurs dans un environ-
nement dont la température est comprise entre 10°C et 35°C. Un chargement effectué hors de
cette plage de températures peut entraîner un temps de chargement rallongé, voire un échec
du chargement.
• Une durée de fonctionnement très limitée après un chargement complet indique la fin de la
durée de vie des accumulateurs. Remplacez à neuf les accumulateurs (complètement, avec le
couvercle de leur compartiment).
• N'essuyez jamais les accumulateurs avec un chiffon traité chimiquement ou imbibé de diluant,
d'essence de lavage, d'alcool ou d'autres solvants. Cela pourrait entraîner la déformation des
accumulateurs et un dysfonctionnement.
Insertion des accumulateurs
Les accumulateurs sont solidement collés au couvercle du compartiment du combiné. Pour mettre
le téléphone en service, insérez les accumulateurs comme le montrent les illustrations suivantes.
Insertion des accumulateurs
Après l'insertion de la carte MEM (voir page suivante), dans
la mesure où elle n'est pas déjà présente : Engagez le cou-
vercle de manière légèrement inclinée (1) et refermez-le
(2) jusqu'à ce qu'il soit bien enclenché.
Retrait des accumulateurs
Pour déverrouiller le couvercle du compartiment des accu-
mulateurs, utilisez un objet pointu approprié (par exemple,
un stylo bille) et insérez-le dans le trou situé sur la base du
combiné (1). Simultanément, soulevez le couvercle,
comme illustré (2).
Française
1
2
1
2
QG A312w DE, GB, FR DIN A6 11.04.2008 15:09 Uhr Seite 7
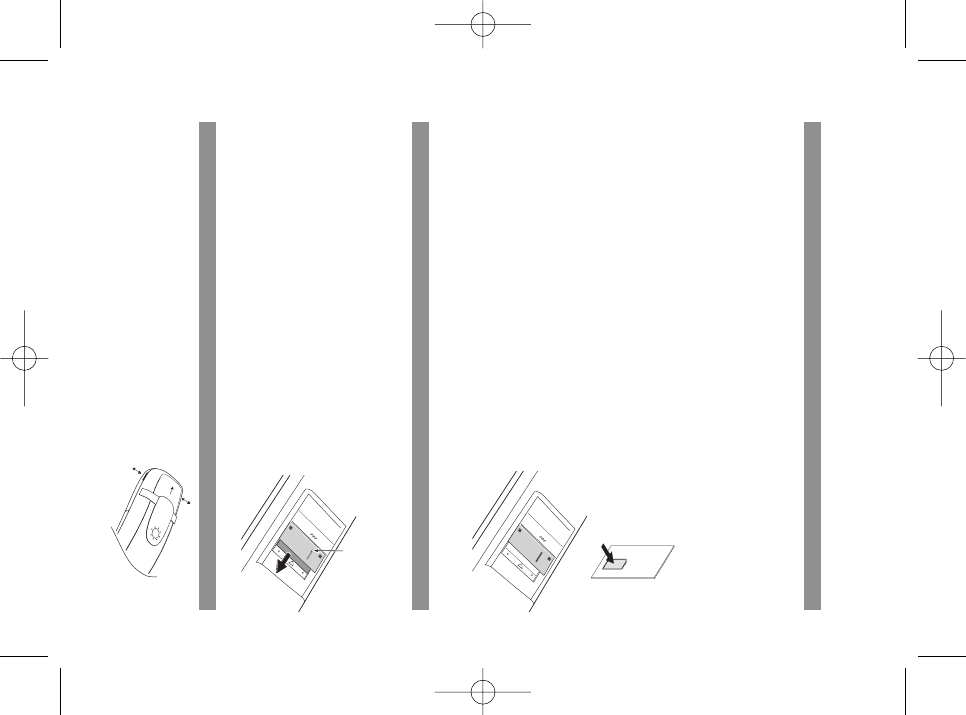
8
Insertion de la carte MEM
Si la carte MEM est fournie séparément, vous devez la positionner dans le compartiment des accu-
mulateurs.
Consigne de sécurité !
Vous devez manipuler la carte MEM avec précaution. Les connecteurs doivent être exempts de pous-
sière, d'humidité, de graisse, etc. Ne stockez pas la carte MEM dans des environnements chauds (par
exemple, en plein soleil). Ne tordez pas la carte MEM ; les connecteurs risqueraient d'être détruits.
• Commencez par enlever la carte MEM de son cadre, par simple
pression avec le doigt.
• Placez la carte MEM sous les agrafes métalliques (en gris dans
l'illustration), connecteurs vers le bas et bord biseauté vers l'arriè-
re. Veillez à suffisamment enclencher la carte MEM. En position
correcte, elle est à plat dans son logement, les deux butées empê-
chant tout glissement.
Ne touchez jamais les connecteurs dorés ! Des décharges sta-
tiques peuvent entraîner un dysfonctionnement de l'appareil.
Retrait de la carte MEM
Vous ne devez retirer la carte MEM que si vous voulez transmettre le combiné ou utiliser la carte
MEM pour un nouveau combiné.
• Après le retrait du couvercle du compartiment des accumulateurs :
À l'aide d'un objet pointu (tel qu'un trombone déplié) que vous
introduisez dans la partie arrière de la fente des agrafes métal-
liques, faites sortir la carte MEM de dessous ce couvercle. Veillez à
ne pas toucher les connecteurs situés sous les agrafes métalliques
et sur la carte MEM.
Fixation/Retrait du clip ceinture
Faites glisser le clip sur la face arrière du combiné jusqu’à
enclencher les crochets dans les ouvertures latérales. Pour
retirer le clip, écartez légèrement les crochets.
Installation
QG A312w DE, GB, FR DIN A6 11.04.2008 15:09 Uhr Seite 8
9
Affichage à l'écran, touches de
fonction et touches
Écran
Icônes figurant sur la ligne supérieure de l'écran :
Qualité de la liaison (quatre colonnes : bonne liaison ; une colonne : mauvaise liaison)
Microphone désactivé
État de charge des accumulateurs.
Réveil programmé et activé (heure de l’alarme locale).
Mode « Ne pas déranger » activé.
Transfert d’appel actif.
La tonalité est désactivée.
La protection par code confidentiel des données de l’administrateur est déverrouillée.
Il n’y a pas de liaison entre le combiné et un AP.
Nouvelle entrée dans la liste des appels.
Icônes figurant sur la ligne inférieure de l'écran (correspondances avec les touches) :
Touche de fonction pour la répétition du dernier numéro composé (bis)
Touche de fonction pour le répertoire
Menu Touche de fonction pour le menu principal
Touche de fonction pour le déverrouillage du clavier
Touches de fonction (touches de commande) pour le défilement des listes
Touches de fonction (touches de commande) pour le déplacement du curseur de saisie
Touches de fonction (touches de commande) pour le réglage du volume de la mélodie et
du combiné (en cas d'appel et en cours de connexion)
Française
QG A312w DE, GB, FR DIN A6 11.04.2008 15:09 Uhr Seite 9

10
Touches de fonction et touches
Les touches de fonction désignent les deux touches situées sous l’écran, ainsi que les touches flé-
chées. Les fonctions attribuées à ces touches s'affichent sur la ligne inférieure de l'écran. Elles
varient automatiquement en fonction de l’état de fonctionnement actuel du combiné.
Touche de fonction : Touches fléchées
Au-dessus des touches fléchées sont affichées des icônes qui indiquent la fonctionnalité actuelle
des touches fléchées :
Pour ouvrir le répertoire, appuyez sur la touche fléchée Haut ou Bas.
Lors de la saisie de numéros d’appel ou de textes, vous pouvez apporter des modifications
en déplaçant un curseur. Pour déplacer le curseur d’un emplacement vers l’avant ou l'arriè-
re, appuyez brièvement sur une touche fléchée. Pour déplacer le curseur en continu, main-
tenez la touche appuyée jusqu'à ce qu’il atteigne l'emplacement souhaité.
Pour sélectionner l’entrée souhaitée dans une liste de sélection (par exemple, répertoire ou
menu), déplacez le curseur à l’aide des touches fléchées.
Combiné / Haut-parleur / Microcasque :
Sélectionnez le volume souhaité à l’aide des touches fléchées. Le réglage s’affiche numéri-
quement et graphiquement.
Touche de fonction : OK
La touche . permet de valider la fonction sélectionnée. Si une fonction ne présente qu’une
seule possibilité de commutation, cette touche permet la commutation. Sur le bord de l’écran, les
réglages actifs (ON) sont signalés par une coche “✓” au niveau de la fonction actuelle, tandis que
les réglages inactifs (OFF) sont signalés par “—” ou par un espace vide.
Touche de fonction : Retour
La touche permet de quitter le point de menu actuellement affiché. L’écran affiche ensuite
le point de menu précédemment sélectionné, l’écran de veille ou l’état actuel de la liaison.
Touche de fonction : Bis ¤
Cette touche permet la sélection à partir de la liste des derniers numéros composés.
Touche de communication
Selon l’état actuel du téléphone (par exemple, veille, conversation ou mode éditeur), la touche de
communication possède les fonctions suivantes :
Retour
OK
Affichage à l'écran, touches de fonction et touches
QG A312w DE, GB, FR DIN A6 11.04.2008 15:09 Uhr Seite 10
11
Française
Affichage à l'écran, touches de fonction et touches
... En veille :
La ligne est occupée.
... En cas d’appel entrant :
L’appel est accepté.
... Lors d’une conversation :
La conversation est terminée ou la liaison est déconnectée.
... Si vous vous trouvez dans des listes (par exemple, liste des appels ou des derniers numéros compo-
sés) ou si vous avez entré des chiffres :
Le numéro d’appel est composé.
Touche du haut-parleur
Cette touche active le haut-parleur / l’option Mains libres.
Lorsque le haut-parleur ou l’option Mains libres est activé, cette touche est allumée.
Touche d’informations (i)
Cette touche permet accéder à la liste des appelants. Lorsque de nouvelles entrées y figurent, la
touche d’informations clignote.
Touche C
La touche C est multifonction. Selon l’état actuel du téléphone (par exemple, veille, conversation ou
mode éditeur), les fonctions varient selon que l’appui sur la touche est bref ou long. Voici les fonc-
tions de la touche C :
... Si l’appareil est désactivé
Appuyez brièvement ou longuement sur la touche pour activer l’appareil.
... En veille :
Appuyez longuement sur la touche pour désactiver l’appareil.
... En cas de saisie de textes ou de numéros d’appel :
Appuyez brièvement sur la touche pour effacer un caractère à gauche du curseur.
Appuyez longuement sur la touche pour effacer l’entrée complète.
... Lors de l’affichage de listes (par exemple, liste des appels) :
Appuyez brièvement sur la touche pour effacer l’entrée.
QG A312w DE, GB, FR DIN A6 11.04.2008 15:09 Uhr Seite 11
12
Affichage à l'écran, touches de fonction et touches
Touche de signalisation (R)
En cours de connexion, appuyez brièvement sur la touche pour effectuer un rappel.
Touche #
En veille, appuyez longuement sur la touche pour activer le verrouillage du clavier.
Le verrouillage du clavier est de nouveau désactivé en cas d'appui sur la touche de fonction et
sur la touche #dans les cinq secondes.
Touche *
En veille, appuyez longuement sur la touche pour activer/désactiver la sonnerie/mélodie.
Lors de la saisie d’un texte (par exemple, nom dans le répertoire), appuyez brièvement sur la touche
pour passer des minuscules aux majuscules et inversement.
Touches numériques
Les touches numériques permettent la saisie directe de numéros d'appel et de noms, impression
ABC (numéros d’appel Vanity).
Lors de la saisie du texte, déplacez la position de saisie au début ou à la fin de l’entrée à l’aide des
touches fléchées. La touche C supprime des chiffres/caractères. interrompt la procédure.
Touche de fonction : Menu
En veille, appuyez brièvement sur la touche pour ouvrir le menu du combiné.
Retour
QG A312w DE, GB, FR DIN A6 11.04.2008 15:09 Uhr Seite 12
13
Fonctions de base
Activation/désactivation du combiné
Après le premier chargement des accumulateurs, le combiné est automatiquement activé et prêt à
fonctionner. Vous pouvez désactiver le combiné pour conserver plus longtemps l’état de charge des
accumulateurs.
Désactivation du combiné
CAppuyez longuement sur la touche C.
Activation du combiné
CAppuyez sur la touche C.
Verrouillage du clavier
Pensez à activer le verrouillage du clavier lorsque vous transportez le combiné dans une poche. Cela
vous empêche de composer un numéro d’appel par inadvertance.
En cas d’appel entrant, le verrouillage du clavier est désactivé pour la durée de l’appel. Pour accepter
l’appel, appuyez sur la touche de communication.
Activation du verrouillage du clavier
#En veille, appuyez longuement sur la touche dièse.
Au-dessus de la touche de fonction gauche s’affiche .
Désactivation du verrouillage du clavier
DAppuyez sur la touche de fonction -> Pour déverrouiller, appuyez sur #
#Dans les cinq secondes, appuyez sur la touche dièse pour désactiver le verrouillage.
Activation/désactivation de l’option Mains libres
Pour activer ou désactiver le haut-parleur, appuyez sur la touche Haut-parleur Hen veille (vous
pouvez alors composer le numéro) ou en cours de connexion.
Réglage du volume du combiné lors d'une conversation
Vous êtes en conversation (avec le combiné, le haut-parleur ou le microcasque).
Pour régler le volume, appuyez sur les touches fléchées ou sur les touches 1 - 7. Le réglage actuel
s'affiche graphiquement.
Le réglage modifié n’est valable que temporairement, pour la connexion existante. Si vous appuyez
sur pour valider le réglage temporaire, ce dernier devient le nouveau réglage de base pour les
communications suivantes.
OK
Française
QG A312w DE, GB, FR DIN A6 11.04.2008 15:09 Uhr Seite 13
14
Fonctions de base
Désactivation de la mélodie
Si vous ne voulez pas être dérangé (par exemple, en réunion), vous pouvez désactiver la mélodie
(uniquement la mélodie via le haut-parleur). Pour ce faire, maintenez la touche *appuyée jus-
qu’à entendre une sonnerie et voir s’afficher à l’écran.
Pour réactiver la mélodie, appuyez longuement sur la touche *.
Vous pouvez également désactiver l’entrée Sonnerie dans le menu Audio > Réglage mélodies >
Appareil d'appel. Là encore, l’icône s’affiche à l’écran..
Combiné inaccessible
Le mode Ne pas déranger rend le combiné inaccessible. Toutefois, les appels continuent à être enregis-
trés dans la liste des appels (dans la mesure où le numéro d'appel a été transmis). Vous n’êtes pas
dérangé mais êtes informé des numéros d'appel importants que vous devez éventuellement rappeler.
Éclairage
L’éclairage est activé à chaque appui sur une touche et reste activé pendant une durée réglable
(réglage dans le menu Affichage > Éclairage > Clavier).
Modification du contraste de l'écran
Pour adapter l’écran à l’éclairage / la luminosité ambiant, vous pouvez modifier le contraste, dans le
menu Affichage > Contraste.
Coupure du microphone du combiné
Si vous ne voulez pas que votre correspondant entende, par exemple, que vous êtes en réunion avec
une personne, vous pouvez couper temporairement le microphone du combiné.
Vous êtes en conversation.
DAppuyez sur la touche . L’icône s’affiche à l’écran.
Votre correspondant ne peut plus vous entendre. Si vous voulez lui reparler, appuyez de nouveau
sur la touche de fonction gauche. Votre correspondant vous entend de nouveau.
Muet
QG A312w DE, GB, FR DIN A6 11.04.2008 15:09 Uhr Seite 14
15
Téléphonie
Composition du numéro d'appel
Tous les appels décrits dans cette section sont acceptés en appuyant sur la touche de communica-
tion A, et peuvent être effectués avec l’option Mains libres via la touche du haut-parleur H.
Composition du numéro d’appel en mode de numérotation sans décrocher
Grâce au mode de numérotation sans décrocher, vous pouvez corriger vos entrées avant de composer.
tEn veille, entrez le numéro d’appel.
AAppuyez sur la touche de communication pour composer.
Composition du numéro d’appel en mode de numérotation directe
AAppuyez sur la touche de communication.
tEntrez le numéro d'appel et terminez par ; le numéro d'appel est immédiatement
composé.
Remarque
Veuillez entrer rapidement le numéro d’appel car la numérotation démarre quatre secondes après la
saisie du dernier chiffre, même si vous n’avez pas appuyé sur . Des numéros d’appel incomplets
sont des faux numéros.
Pour terminer la conversation :
AAppuyez sur la touche de communication.
Appel à partir de la liste des derniers numéros composés
Dans la liste des derniers numéros composés figurent les 10 derniers numéros d’appel composés.
Chaque numéro d’appel suivant composé remplace la plus ancienne entrée de la liste.
Vous pouvez afficher les numéros d’appel de la liste des derniers numéros composés et leurs détails
correspondants (par exemple, heure de l'appel).
DEn veille, appuyez sur .
FSélectionnez le numéro d'appel souhaité.
AAppuyez sur la touche de communication pour composer immédiatement.
Compo
Compo
Française
QG A312w DE, GB, FR DIN A6 11.04.2008 15:09 Uhr Seite 15
16
Téléphonie
Appel à partir du répertoire
Le répertoire peut enregistrer au maximum 100 entrées, automatiquement classées par ordre alpha-
bétique.
FEn veille, appuyez sur la touche fléchée .
FSélectionnez le nom souhaité.
AAppuyez sur la touche de communication pour composer immédiatement.
Appel à partir de la liste des appelants
Lorsque vous appuyez sur la touche d’informations B, une liste des appels non acceptés s’affiche.
Vous pouvez afficher les numéros d’appel de la liste des appelants et leurs détails correspondants
(par exemple, heure de l'appel).
BEn veille, appuyez sur la touche d’informations.
FSélectionnez le numéro d'appel souhaité.
AAppuyez sur la touche de communication pour composer immédiatement.
Prise d’appel
Pendant l'appel, vous pouvez…
D… refuser l’appel en appuyant sur la touche de fonction (l’appelant entend éventuel-
lement une tonalité d’occupation) ;
A… accepter l’appel en appuyant sur la touche de communication.
Mise en attente d’une conversation
Vous êtes en conversation.
rAppuyez sur la touche de signalisation. La conversation est mise en attente.
Reprise d'une conversation mise en attente
rAppuyez sur la touche de signalisation. Vous êtes de nouveau connecté avec votre correspon-
dant.
Refus
QG A312w DE, GB, FR DIN A6 11.04.2008 15:09 Uhr Seite 16
17
Téléphonie
Prise d’un appel quand le signal d’appel sonne
Si vous recevez un nouvel appel alors que vous êtes déjà en ligne, un signal d’appel retentit. Pour
prendre l’appel, vous pouvez :
rAppuyer sur la touche de signalisation. La conversation en cours est mise en attente.
Ou
AAppuyer sur la touche de communication. L'appel indiqué par le signal est alors pris et la premi-
ère communication est interrompue.
Appel d’un autre correspondant lors d’une conversation
Double appel
Vous êtes en conversation.
rAppuyez sur la touche de signalisation. La première conversation est mise en attente.
tEntrez le numéro d'appel à l’aide des touches numériques et terminez la saisie par (ou
attendez 4 secondes).
Pour mettre fin au second appel et rétablir la conversation mise en attente :
E Appuyez sur .
FSélectionnez .
E Appuyez sur . Vous êtes de nouveau connecté avec votre premier correspondant.
Remarque
Lors de la saisie du numéro d’appel, si vous n'appuyez sur aucune touche pendant 4 secondes, le
numéro d’appel entré jusqu'ici est composé. Aucune post-sélection n’est possible.
Si vous terminez le double appel en appuyant sur la touche de communicationA, la conversation
mise en attente est signalée par un rappel dans la mesure où votre premier correspondant n’a pas
encore raccroché.
Pendant le rappel : Basculer
Si la connexion est établie, vous pouvez parler tour à tour à vos correspondants (basculer) à l’aide de
la touche de signalisation r.
rLa conversation alors mise en attente est activée et l’autre conversation est mise en attente.
OK
Déconnecter
Options
Compo
Française
QG A312w DE, GB, FR DIN A6 11.04.2008 15:09 Uhr Seite 17
18
Téléphonie
Transfert d’appel
Vous êtes en double appel, en mode Basculer (voir ci-avant) :
AAppuyez sur la touche de communication. La conversation est transférée.
Répertoire
Nouvelle entrée
Le répertoire peut enregistrer au maximum 100 entrées : des numéros d'appel comptant jusqu'à 32
chiffres, des noms comportant jusqu'à 16 caractères.
FEn veille, appuyez sur la touche fléchée .
E Appuyez sur .
FSélectionnez , puis validez en appuyant sur .
tEntrez le nom et passez à la saisie du numéro d'appel à l'aide de la touche fléchée .
tEntrez le numéro d'appel, puis appuyez sur . L'entrée est enregistrée.
Remarque
Entrez toujours le numéro d’appel avec le préfixe pour que le nom s'affiche en cas d'appel.
OK
OK
Nouveau
Options
QG A312w DE, GB, FR DIN A6 11.04.2008 15:09 Uhr Seite 18
19
Réglage du téléphone
Menu: Audio
EAppuyez sur .
FSélectionnez , puis validez en appuyant sur .
FSélectionnez l'un des points de menu suivants, puis validez en appuyant sur .
Sélectionnez l'un des points de menu suivants, puis validez en
appuyant sur .
Sélectionnez une mélodie à l'aide des touches fléchées, puis
validez en appuyant sur .
Sélectionnez le volume souhaité de la mélodie à l'aide des
touches fléchées, puis validez en appuyant sur .
Sélectionnez l’entrée souhaitée à l'aide des touches fléchées,
puis validez l’activation ou la désactivation en
appuyant sur .
…Mélodie via le haut-parleur
…Signalisation de l’appel par des vibrations
…Signalisation de l’appel dans le microcasque
Quittez le menu en appuyant sur .
Sélectionnez l’entrée souhaitée à l'aide des touches fléchées, puis vali-
dez l’activation ou la désactivation en appuyant sur .
…
Confirmation acoustique de l’appui sur une touche.
…Confirmation acoustique en cas de
programmation réussie
…Signal d’avertissement en cas d'épuisement de
la capacité des accumulateurs
…Signal d’avertissement en cas de faiblesse du
signal radio en raison de la portée limitée
Quittez le menu en appuyant sur .
Sélectionnez l'un des points de menu suivants, puis validez en
appuyant sur .
…Sélectionnez le volume souhaité à l'aide des
touches fléchées, puis validez en appuyant
sur .
OK
Combiné
OK
Volume
Retour
Portée
✓
Batterie vide
✓
Confirm ton.
✓
Bip Touches
✓
OK
–
✓
Tonalité infos
Retour
Microcasque
✓
Vibreur
✓
Sonnerie
✓
OK –
✓
Appareil d’appel
OK
Volume d’appel
OK
Mélodie
OK
Régl. mélodies
OK
OK
Audio
Menu
Française
QG A312w DE, GB, FR DIN A6 11.04.2008 15:09 Uhr Seite 19
20
Réglage du téléphone
…Sélectionnez le volume souhaité à l'aide des
touches fléchées, puis validez en appuyant
sur .
Remarque
Si le combiné est en mode économie d’électricité (écran éteint), le premier appui sur une touche
n’est pas confirmé par un bip Touches.
Menu : Affichage
EAppuyez sur .
FSélectionnez , puis validez en appuyant sur .
FSélectionnez l'un des points de menu suivants, puis validez en appuyant sur .
Sélectionnez le contraste souhaité à l'aide des touches fléchées, puis
validez en appuyant sur .
Vous pouvez régler la durée pendant laquelle l’éclairage doit rester activé.
Veuillez tenir compte du fait que plus les durées d’éclairage sont longues, plus
la consommation électrique est élevée, ce qui a une incidence sur l'autonomie
du combiné. Grâce au réglage Témoin de charge, vous pouvez déterminer la
durée de l’éclairage de l’écran en cas de dépôt sur la station de recharge.
…Plage de réglage allant de 10 s à 240 s par
incréments fixes
…Plage de réglage allant de Arrêt à 240 s par
incréments fixes
…Plage de réglage allant de 1 s à 240 s par
incréments fixes, Mar(che) et Arrêt
Vous pouvez sélectionner une image d'arrière-plan parmi six modèles
à l’aide des touches fléchées. Cette image s'affiche sur l’écran en veille.
Sélectionnez l'image d'arrière-plan souhaitée ou Pas d'image, puis vali-
dez en appuyant sur .
Pour la représentation du contenu du menu, vous disposez de deux
tailles de police. Sélectionnez la taille de police souhaitée à l'aide des
touches fléchées, puis validez en appuyant sur . Terminez le
réglage en appuyant sur .
…
…
Grande police
Petite police
✓
Retour
OK
Police
OK
Image de fond
Témoin de charge
Clavier
Affichage
Éclairage
OK
Contraste
OK
OK
Affichage
Menu
OK
Haut-parleur
QG A312w DE, GB, FR DIN A6 11.04.2008 15:09 Uhr Seite 20
21
Annexe
Annexe
Remarques relatives à l’élimination des déchets
Pour éviter les conséquences possibles sur l’environnement et la santé publique lors de l’élimination
des substances dangereuses contenues dans les équipements électriques et électroniques, les direc-
tives du Parlement européen et du Conseil :
• directive 2002/96/CE, Déchets d'équipements électriques et électroniques
• directive 2002/95/CE, Limitation de l’utilisation de certaines substances dangereuses dans les
équipements électriques et électroniques
ont été appliquées légalement au niveau national dans tous les pays membres de l’Union euro-
péenne.
La législation vise en priorité la prévention des déchets d’équipements électriques et électroniques
mais aussi la réutilisation, le recyclage des matériaux et d’autres formes de recyclage de tels déchets,
afin de diminuer la quantité de déchets à éliminer, et enfin, la réduction de la présence dans les
déchets de substances dangereuses issues des équipements électriques et électroniques.
Le produit que vous avez acheté est à la pointe de la technologie actuelle, orientée respect de l'envi-
ronnement et recyclage et répond ainsi aux prescriptions des directives européennes.
Sur le produit figure l’icône illustrée. Elle oblige le propriétaire de ce produit, désireux de
l’éliminer, à effectuer une collecte séparée des déchets collectifs non triés. Pour ce faire,
des structures appropriées ont été créées pour la restitution des déchets d'équipements
électriques et électroniques. Des équipements à mettre au rebut peuvent être livrés gra-
tuitement aux centres de collecte publics (service d’enlèvement). Pour connaître les
emplacements des centres de collecte, veuillez contacter les autorités responsables de
l’élimination des déchets dans les villes et les régions.
Attention ! Les équipements électriques ne doivent pas être jetés parmi les ordures ménagères ordi-
naires. Déposez-les gratuitement au centre de collecte près de chez vous.
Déclaration de conformité
Marquage CE
Cet appareil répond aux exigences de la directive européenne :
1999/5/CE, Directive concernant les équipements hertziens et les équipements terminaux de télé-
communications et la reconnaissance mutuelle de leur conformité.
La conformité aux dispositions ci-avant est attestée par le marquage CE sur le téléphone.
Vous pouvez consulter la déclaration de conformité sur notre site Web, à l'adresse suivante :
http://www.aastra.com
Française
QG A312w DE, GB, FR DIN A6 11.04.2008 15:09 Uhr Seite 21

22
Annexe
FCC Notices (U.S. Only)
This device complies with part 15 of the FCC Rules. Operation is subject to the following two condi-
tions:
(1) This device may not cause harmful interference, and (2) this device must accept any interference
received, including interference that may cause undesired operation.
Modifications not expressly approved by this company could void the user's authority to operate the
equipment.
NOTE: This equipment has been tested and found to comply with the limits for a Class B digital
device, pursuant to Part 15 of the FCC Rules. These limits are designed to provide reasonable protec-
tion against harmful interference in a residential installation. This equipment generates, uses and
can radiate radio frequency energy and, if not installed and used in accordance with the instructions,
may cause harmful interference to radio communications. However, there is no guarantee that inter-
ference will not occur in a particular installation. If this equipment does cause harmful interference
to radio or television reception, which can be determined by turning the equipment off and on, the
user is encouraged to try to correct the interference by one or more of the following measures:
• Reorient or relocate the receiving antenna.
• Increase the separation between the equipment and receiver.
• Connect the equipment into an outlet on a circuit different from that to which the receiver is
connected.
• Consult the dealer or an experienced radio/TV technician for help.
Health and Safety Information
Exposure to Radio Frequency (RF) Signals:
The wireless phone is a radio transmitter and receiver. It is designed and manufactured not to
exceed the emission limits for exposure to radio frequency (RF) energy set by the Federal Communi-
cations Commission (FCC) of the U.S. Government. These limits are part of comprehensive guidelines
and establish permitted levels of RF energy for the general population. The guidelines are based on
the safety standards previously set by both U.S. and international standards bodies. These standards
include a substantial safety margin designed to assure the safety of all persons, regardless of age
and health.
This device and its antenna must not be co-located or operating in conjunction with any other
antenna or transmitter.
This EUT has been shown to be capable of compliance for localized specific absorption rate (SAR) for
uncontrolled environment/general population exposure limits specified in ANSI/IEEE Std. C95.1-
1992 and had been tested in accordance with the measurement procedures specified in FCC/OET
Bulletin 65 Supplement C (2001) and IEEE 1528-2003.
QG A312w DE, GB, FR DIN A6 11.04.2008 15:09 Uhr Seite 22
23
Française
Annexe
Industry Canada (Canada only)
Operation of this device is subject to the following two conditions: (1) this device may not cause
interference, and (2) this device must accept any interference, including interference that may cause
undesired operation of the device.
Privacy of communications may not be ensured when using this telephone.
Exposure to Radio Frequency (RF) Signals:
The wireless phone is a radio transmitter and receiver. It is designed and manufactured not to
exceed the emission limit for exposure to radio frequency (RF) energy set by the Ministry of Health
(Canada), Safety Code 6. These limits are part of comprehensive guidelines and established permit-
ted
levels of RF energy for the general population. These guidelines are based on the safety standards
previously set by international standard bodies. These standards include a substantial safety
margin designed to assure the safety of all persons, regardless of age and health.
This device and its antenna must not be co-located or operating in conjunction with any other
antenna or transmitter.
This device has been shown to be capable of compliance for localized specific absorption rate (SAR)
for uncontrolled environment / general public exposure limits specific in ANSI/IEEE C95.1-1992 and
had been tested in accordance with the measurement procedures specified in IEEE 1528-2003.
QG A312w DE, GB, FR DIN A6 11.04.2008 15:09 Uhr Seite 23
24
Arborescence du menu
Annexe
Audio Réglage mélodies Mélodie
Volume
Appareil d’appel Sonnerie
Vibreur
Microcasque
Tonalité infos Bip Touches
Confirm ton.
Batterie vide
Portée
Volume Combiné
Haut-parleur
Microcasque
Affichage Contraste
Éclairage Affichage
Clavier
Témoin charge
Image de fond
Police Petite police
Grande police
Options tél. Ne pas dérang.
Mise att. dés
Décro. auto
Verrouill. auto
Charge silence
Nom utilisateur *
Options pays Langue English
Deutsch
Français
Italiano
Español
Dansk
Nederlands
Svenska
Suomi
Norsk
Polski
Pays par DHCP
Allemagne
Suisse
France
Etats-Unis
Canada
Fuseau horaire par DHCP
QG A312w DE, GB, FR DIN A6 11.04.2008 15:09 Uhr Seite 24
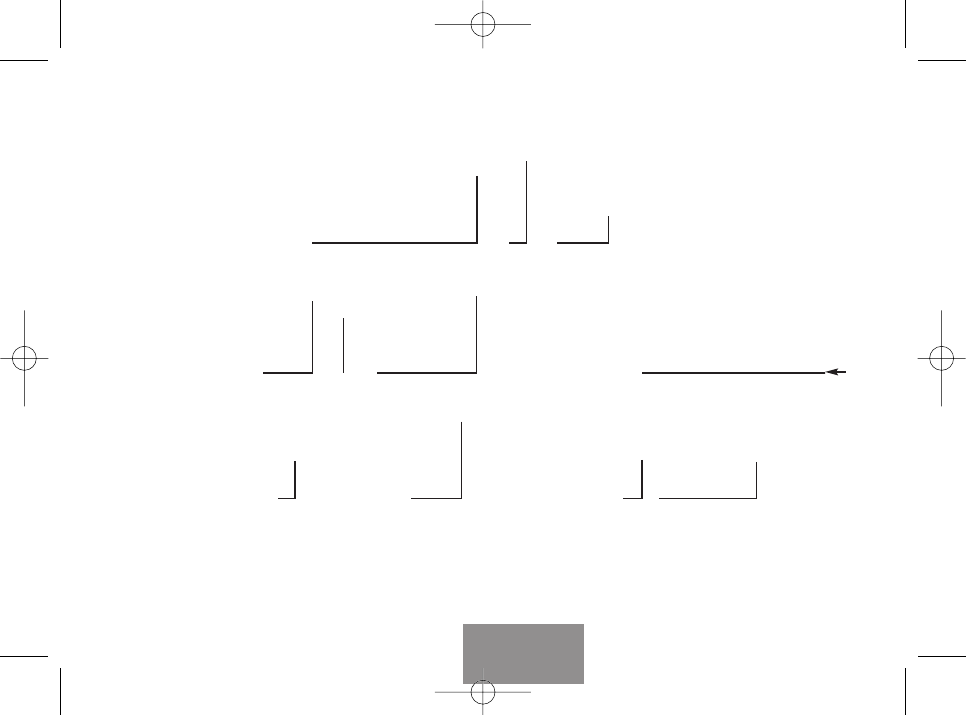
25
Française
Suisse
France
Etats-Unis
Canada
Fuseau horaire par DHCP
Afrique
Asie
Australie
Europe
Amérique du Nord
Amérique du Sud
Format heure Format date
Format heure
Renvoi d'appels Immédiat.
Occupé
Selon l'heure
Numéro d’appel
Réveil Activé
Configurer
Système Réseau Profils *
Outils Ping
Traceroute
Site survey *
Info itinér.
Info
Syslog
Comptes * Info
Code PIN *
Logiciel Version
Mise à jr logic. Vérifier imméd.
Paramètres
Licences
* (partiellement) protégés par un code confidentiel de l’administrateur
QG A312w DE, GB, FR DIN A6 11.04.2008 15:09 Uhr Seite 25
www.aastra.com
Mat.-No. 69028.017 Rev. 02
As off 04/2008 • The right for technical modifications is reserved
Stand 04.2008 • Technische Änderungen vorbehalten
Etat : 04.2008 • Sous réserve de modifications
Aastra 312w
QG A312w DE, GB, FR DIN A6 11.04.2008 15:09 Uhr Seite U4