Mitel Deutschland 69126OP27DS-01 Aastra Phone 142 US User Manual QG Aastra Phone 142 V01 1 US
Mitel Deutschland GmbH Aastra Phone 142 US QG Aastra Phone 142 V01 1 US
UserManual.wiki
>
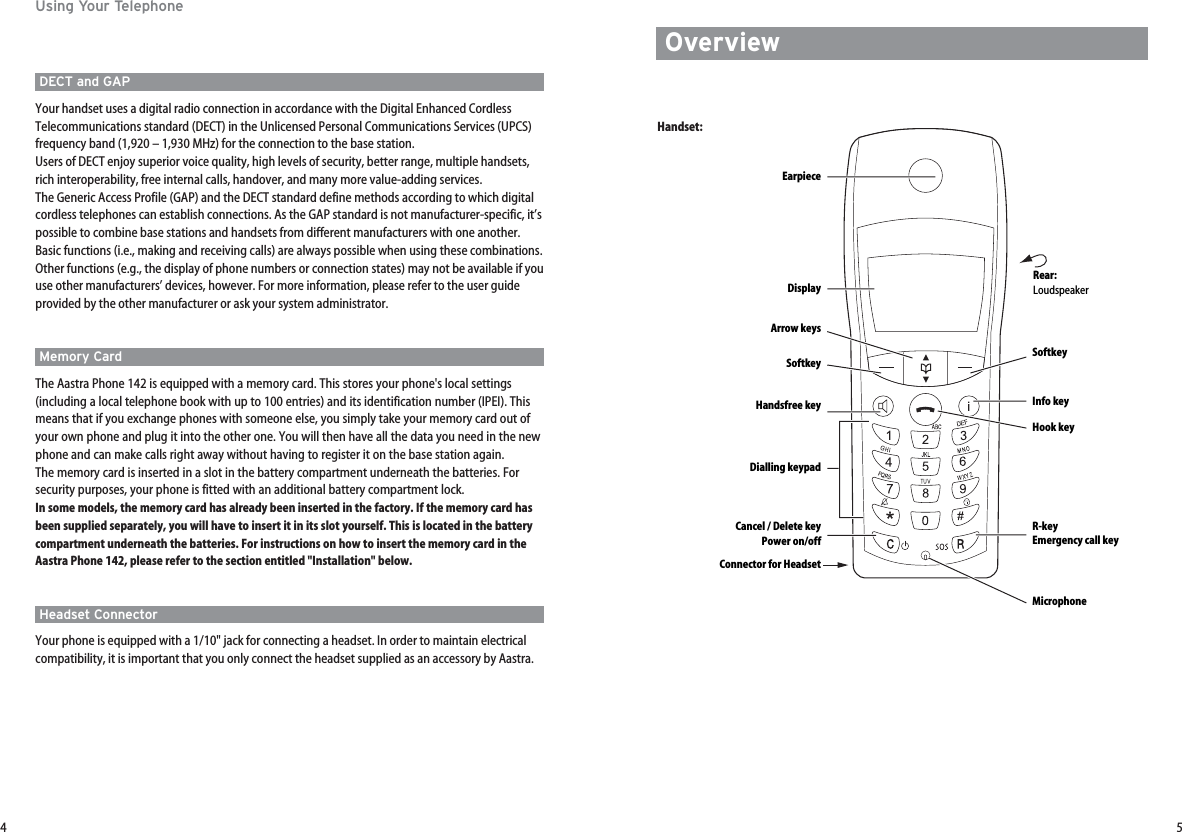
Mitel Deutschland
>
69126OP27DS 01 User Manual
UserMan
Navigation menu
Upload a User Manual
Namespaces
Wiki Guide
HTML
PDF
Info
Views
User Manual
Discussion / Help
Navigation
![1716Basic FunctionsEmergency Number (SOS)In order to be able to make an emergency call with just a single long press of the R key r, youmust first store this emergency number using the “Telephone Options > Emergency Call” menuitem.You make the emergency or SOS call to the programmed phone number by pressing and holdingdown the R key r. The call is dialed right away, so you don't have to press any more keys. Thehandset goes into handsfree mode.Quick CallIf you have defined an entry in the telephone book as a quick call entry (see see User Guide availableon our website www.aastra.com), you can press and hold down the corresponding key to show thephone number in the display. You dial the number by pressing the hook key.Muting the HandsetIf you don't want the other party taking part in your call to hear something that is said — e.g., if youneed to speak with another person in the room — then you can temporarily mute your handset.You are making a call:DPress . You’ll see in the display for a few seconds.Now the other person involved in the call can’t hear you anymore.When you want to speak with the other party again, press the left softkey again. You’ll seein the display for a few seconds. The other party can now hear you again.Message-waiting Indication / Notification TextsIf the handset caller list contains a missed call or there are messages in your voice box, the info keyBwill flash and the following notification text will appear: and / or . The message “Voice Box” only appears in conjunction with the flashing info key Bif your voice boxaccess number has been registered in the “Telephone Options > Voice Box No.” menu. If this is notthe case, then only the icon will flash. Contact your system administrator for assistance if neces-sary.You can retrieve your messages by means of the info key B(see User Guide available on our web-site www.aastra.com).≥Voice BoxMissed CallsMic. onMic. offMik.‡Basic FunctionsAdjusting the Earpiece Volume during a CallLet’s say you’re making a call using the earpiece, the loudspeaker, or a headset.You use the arrow keys or the number keys to adjust the volume.A single press increases or decreases the volume by one level, e.g., . In addition, the bar indicator shows the selected volume level.You can also press the corresponding key a number of times to adjust the volume to one of eightlevels. The minimum and maximum values are indicated by means of an special tone. The adjusted settings are only valid for the current call. You edit the basic settings for the earpiece ina menu (see User Guide available on our website www.aastra.com).Switching the Ringer OffIf you don't want to be disturbed — e.g., because you’re in a meeting — you can switch the ringeroff (in which case you will see in the display). You perform this setting by pressing the star key *and holding it down until you hear a tone andappears in the display. To switch the ringer on again, press and hold down the star key *again.Alternatively, you can switch the ringer off by deactivating the “Buzzer” item in the “Volume Set-tings > Device” menu. You’ll then see in the display.BacklightThe backlight is activated every time you press a key, and it remains on for approximately eight sec-onds. Adjusting the Display ContrastYou can change the display contrast in order to adjust it to local lighting conditions. You perform thesettings in the “Telephone Options” menu (see User Guide available on our websitewww.aastra.com).‹Buzzer Off‹]]]]]|||Volume:3](https://usermanual.wiki/Mitel-Deutschland/69126OP27DS-01/User-Guide-738291-Page-10.png)