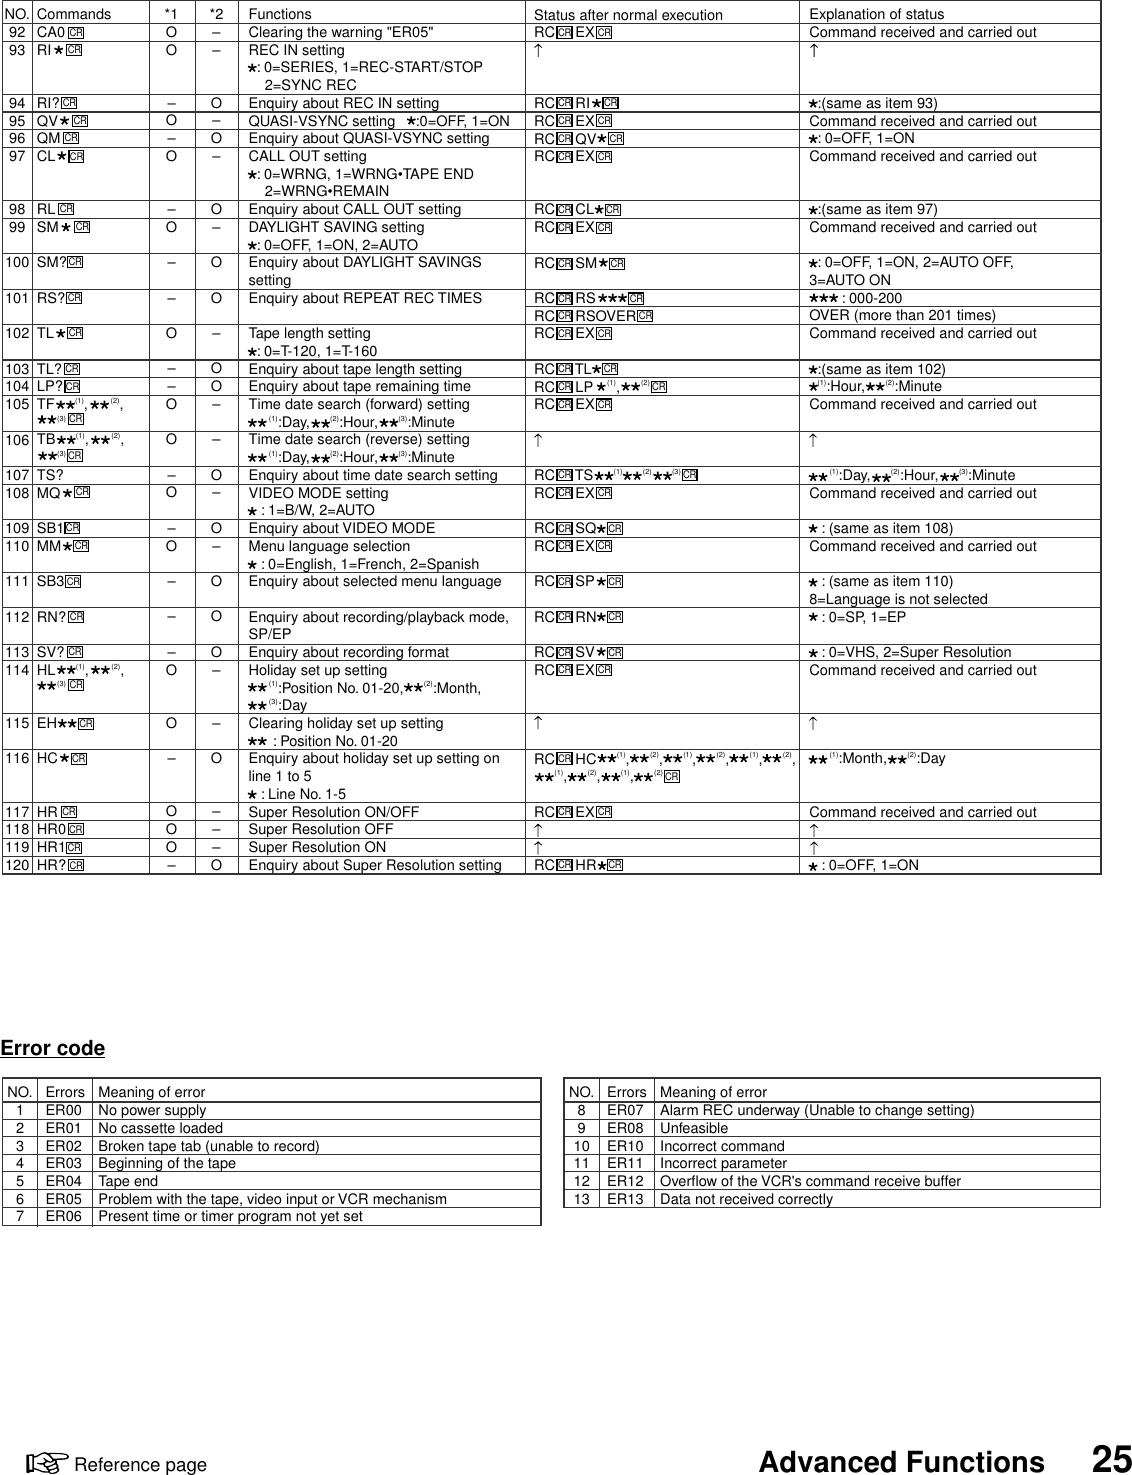
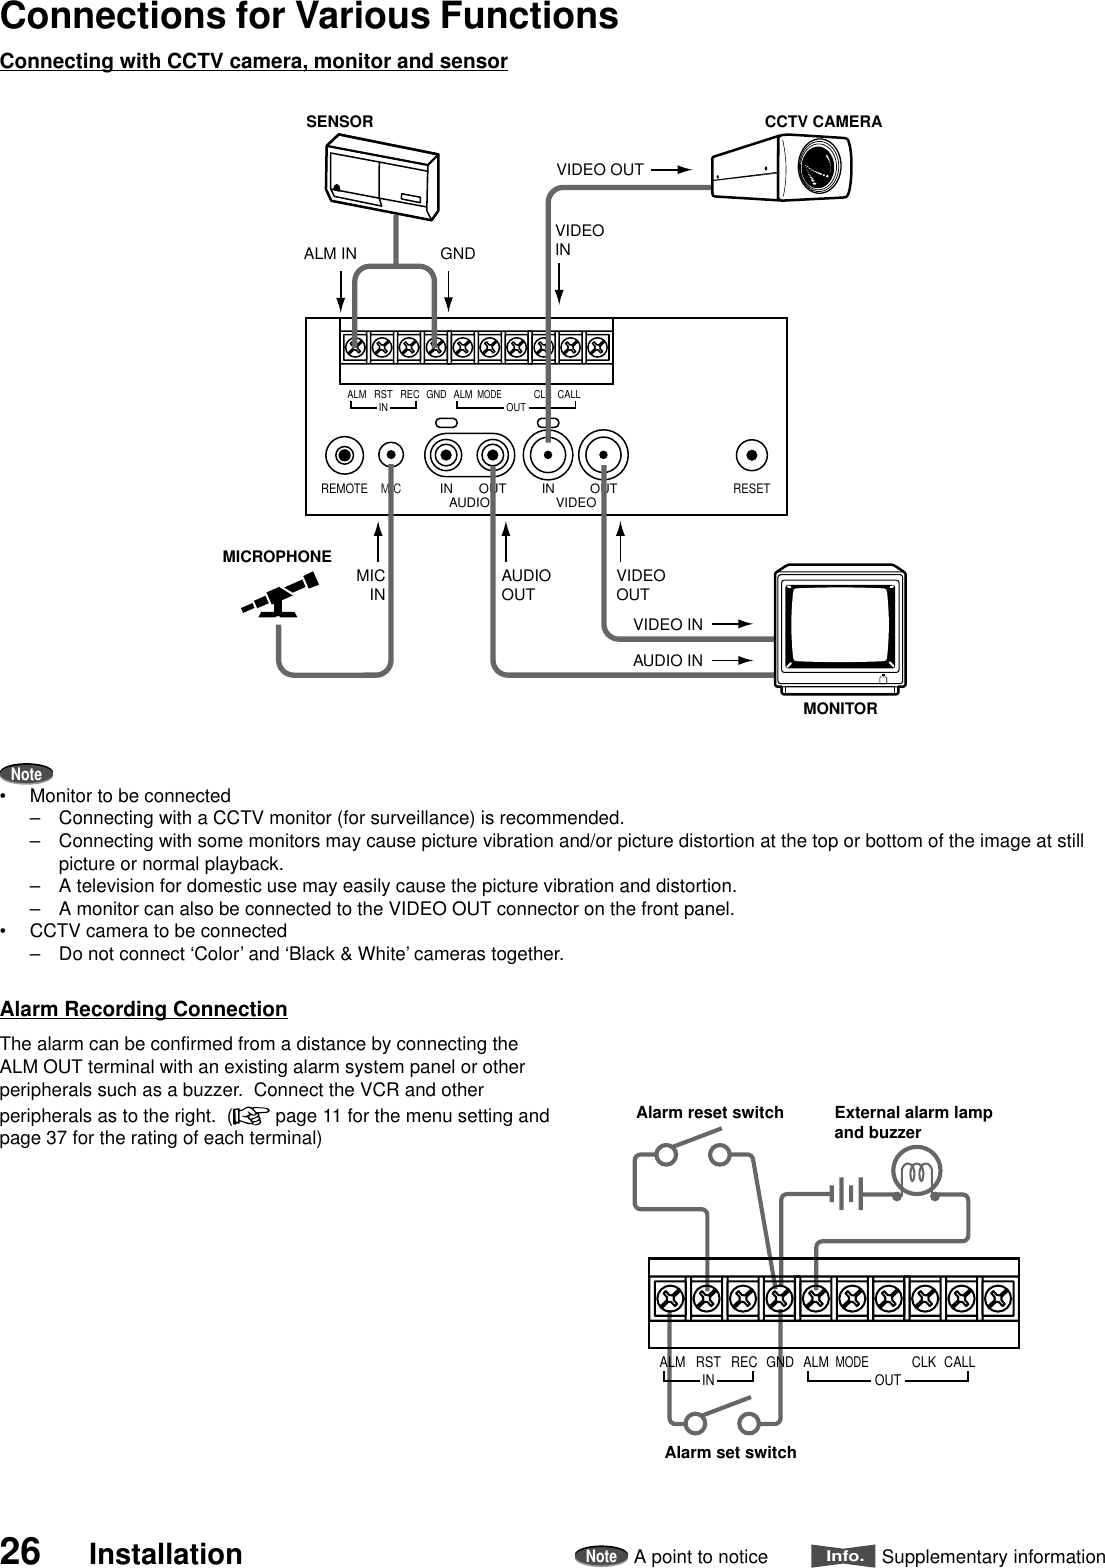
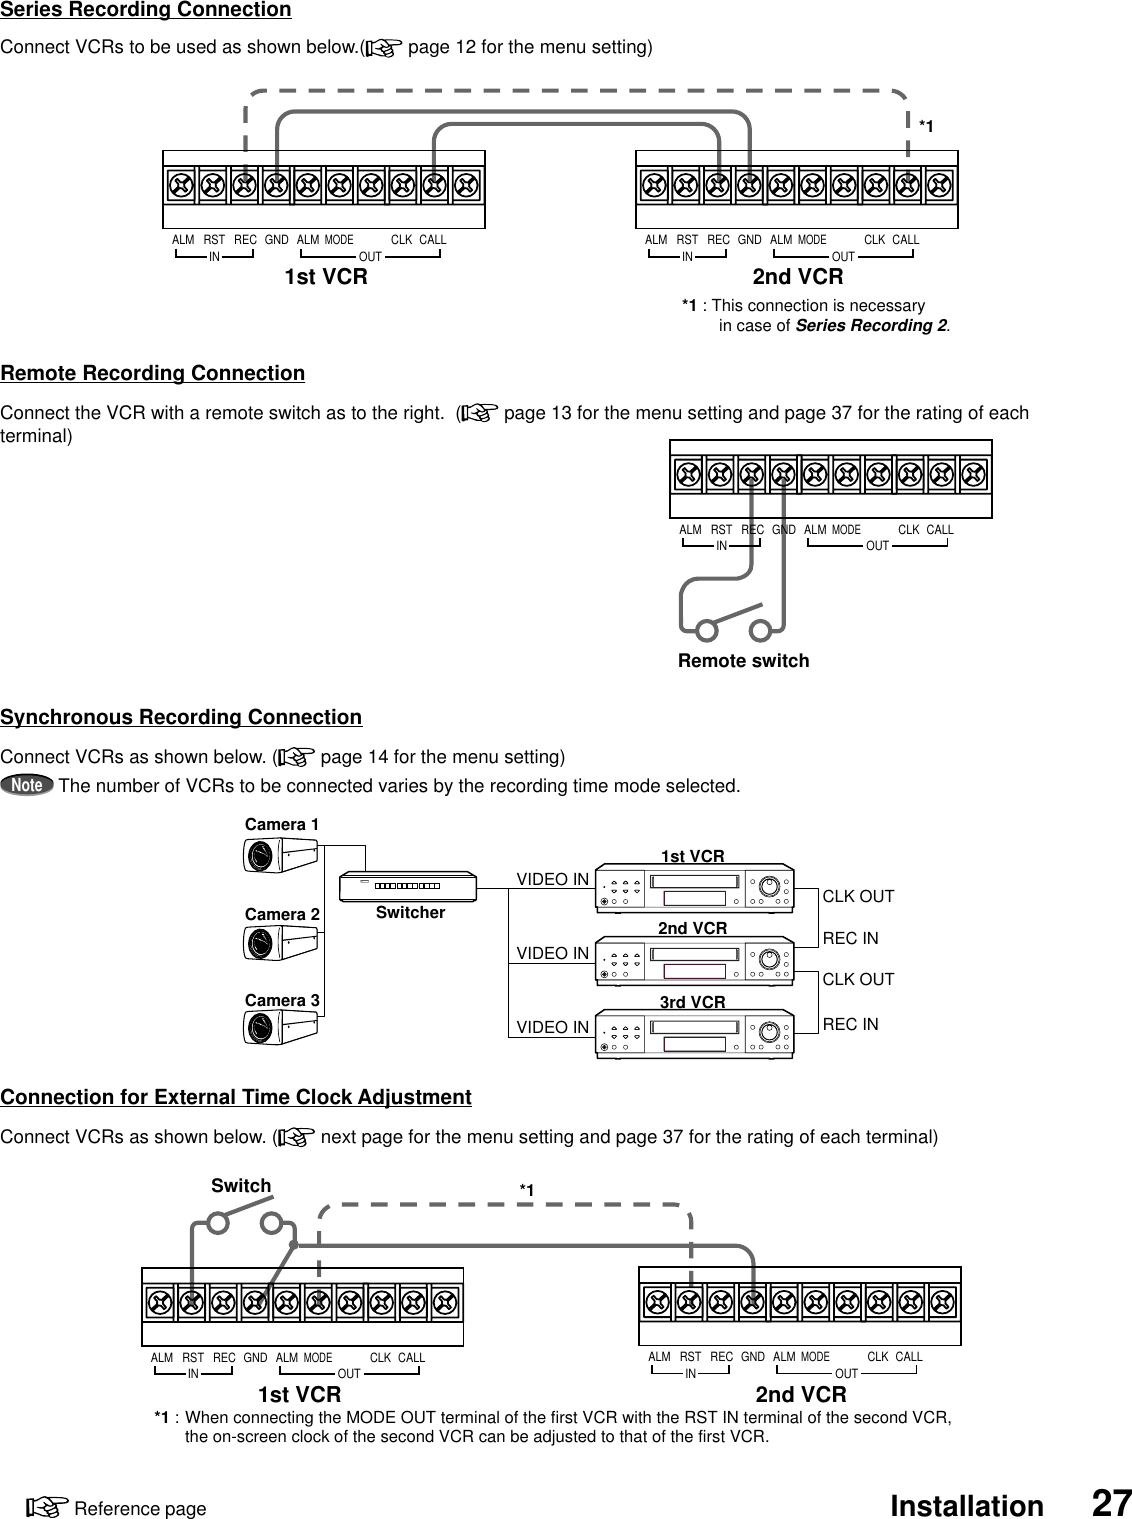
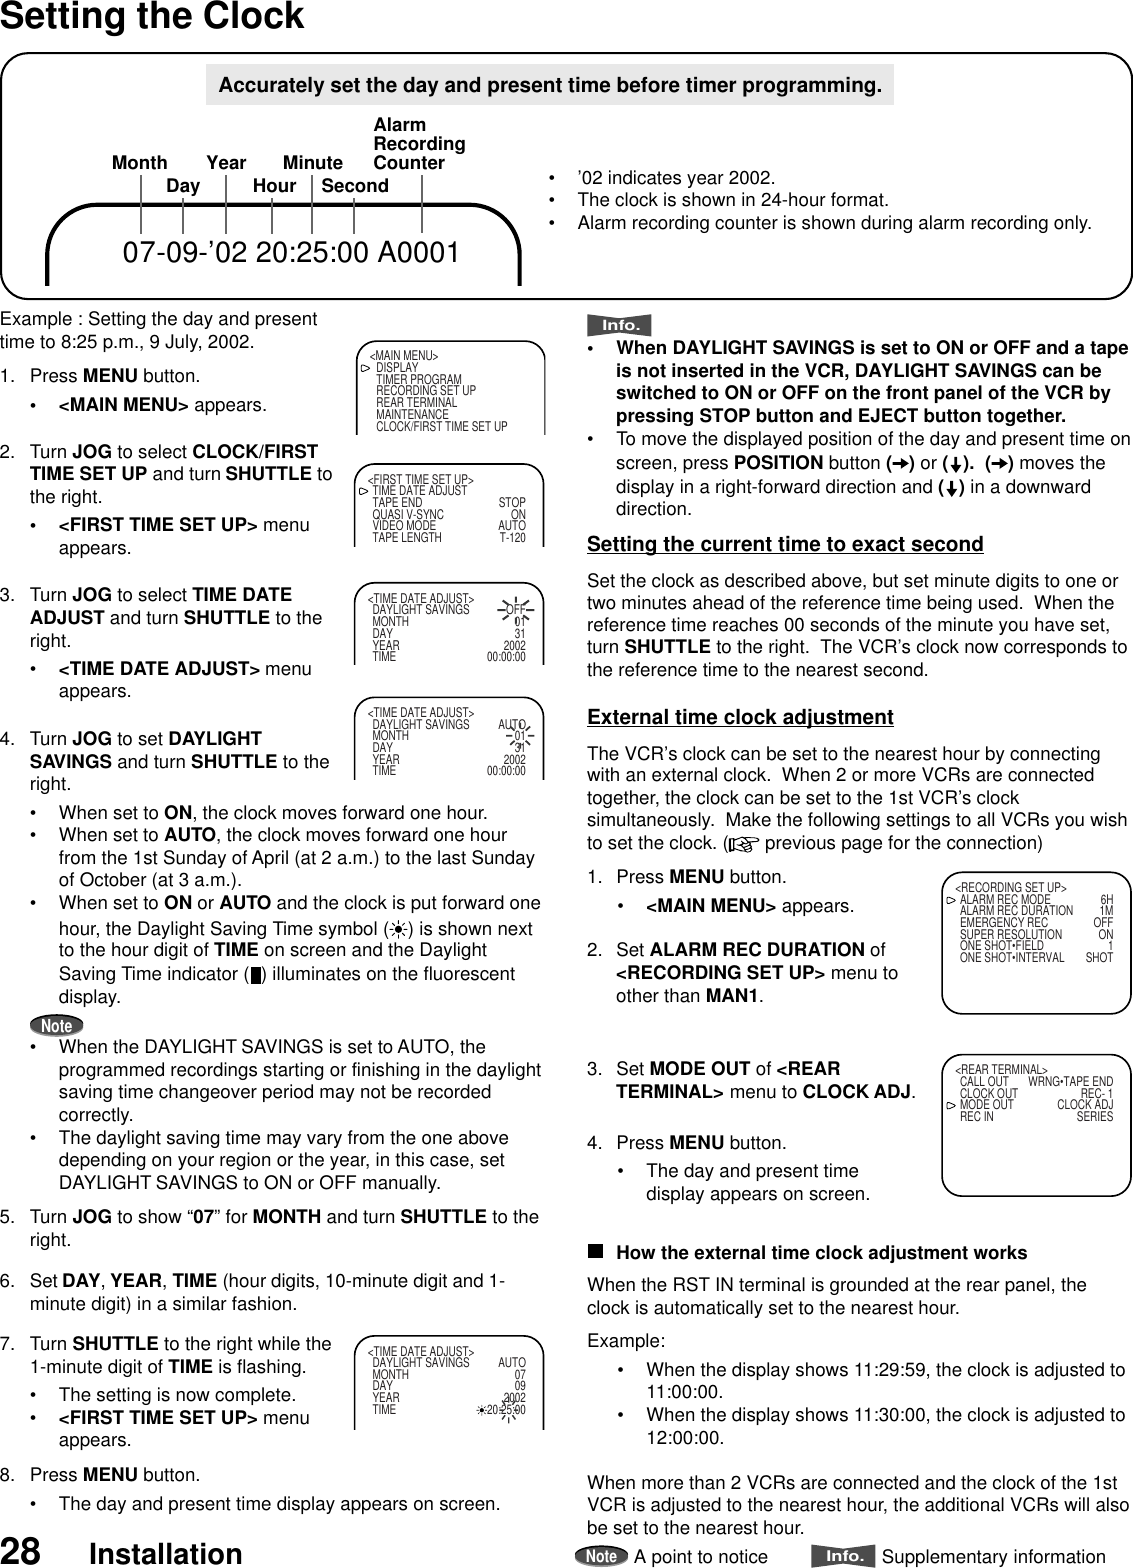
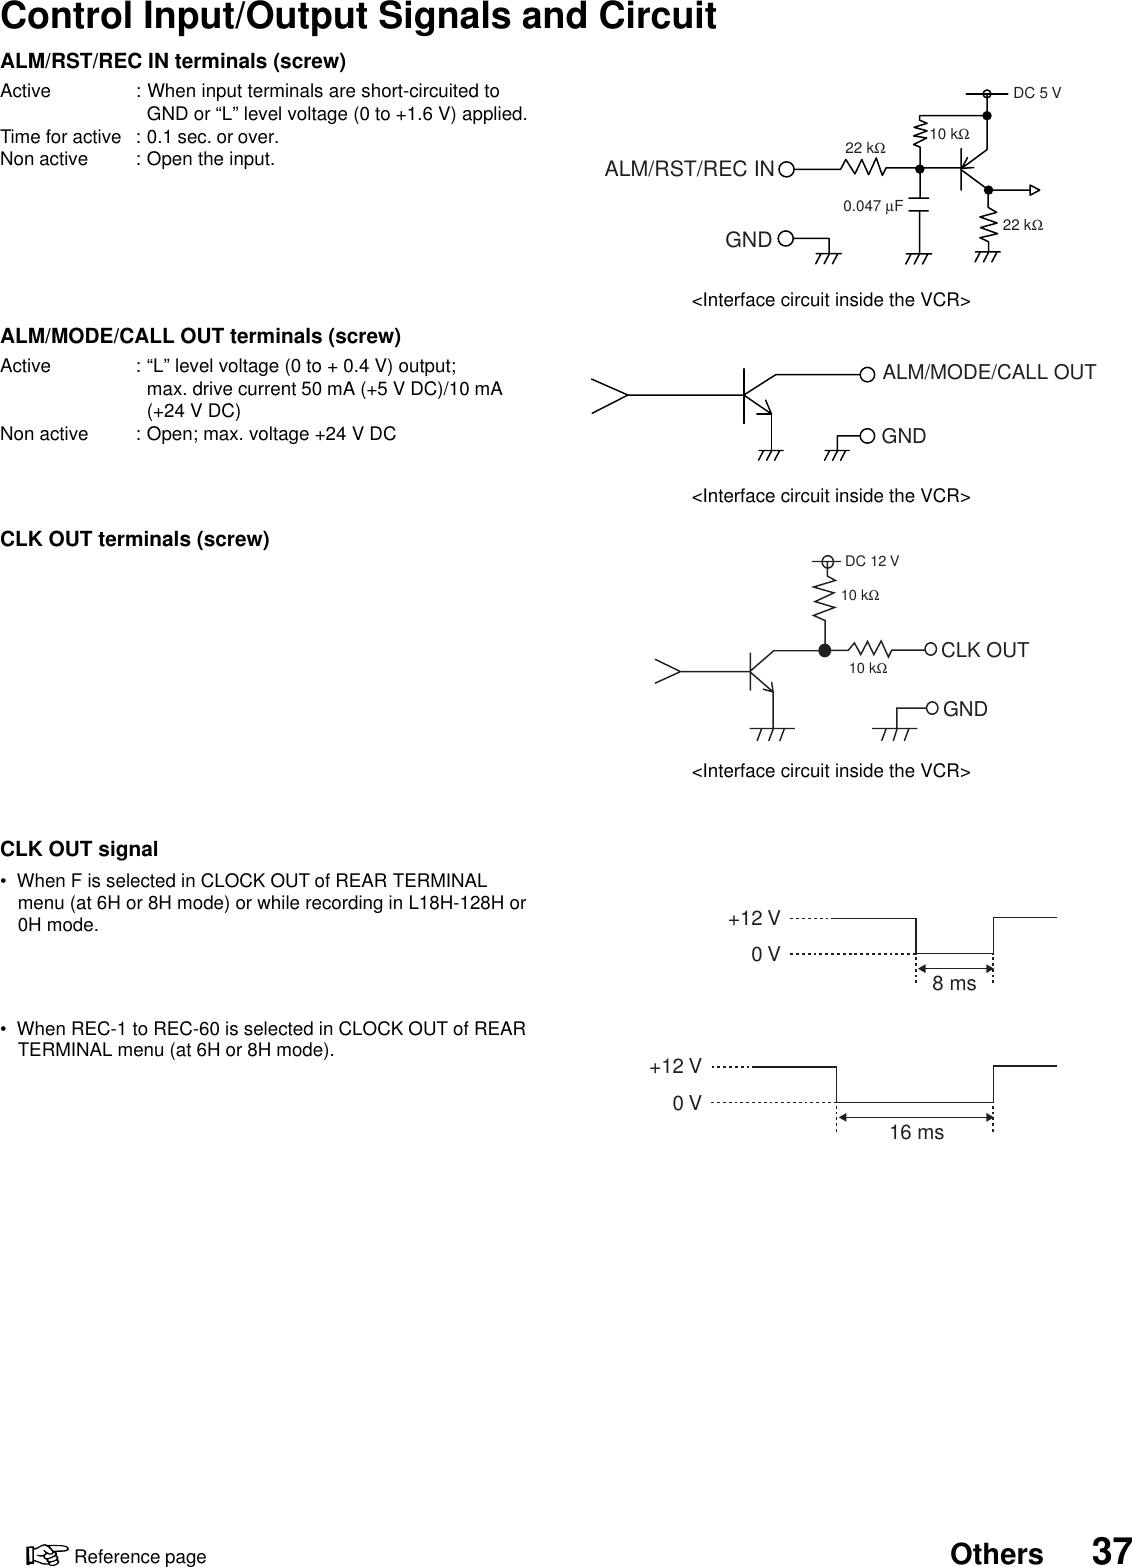
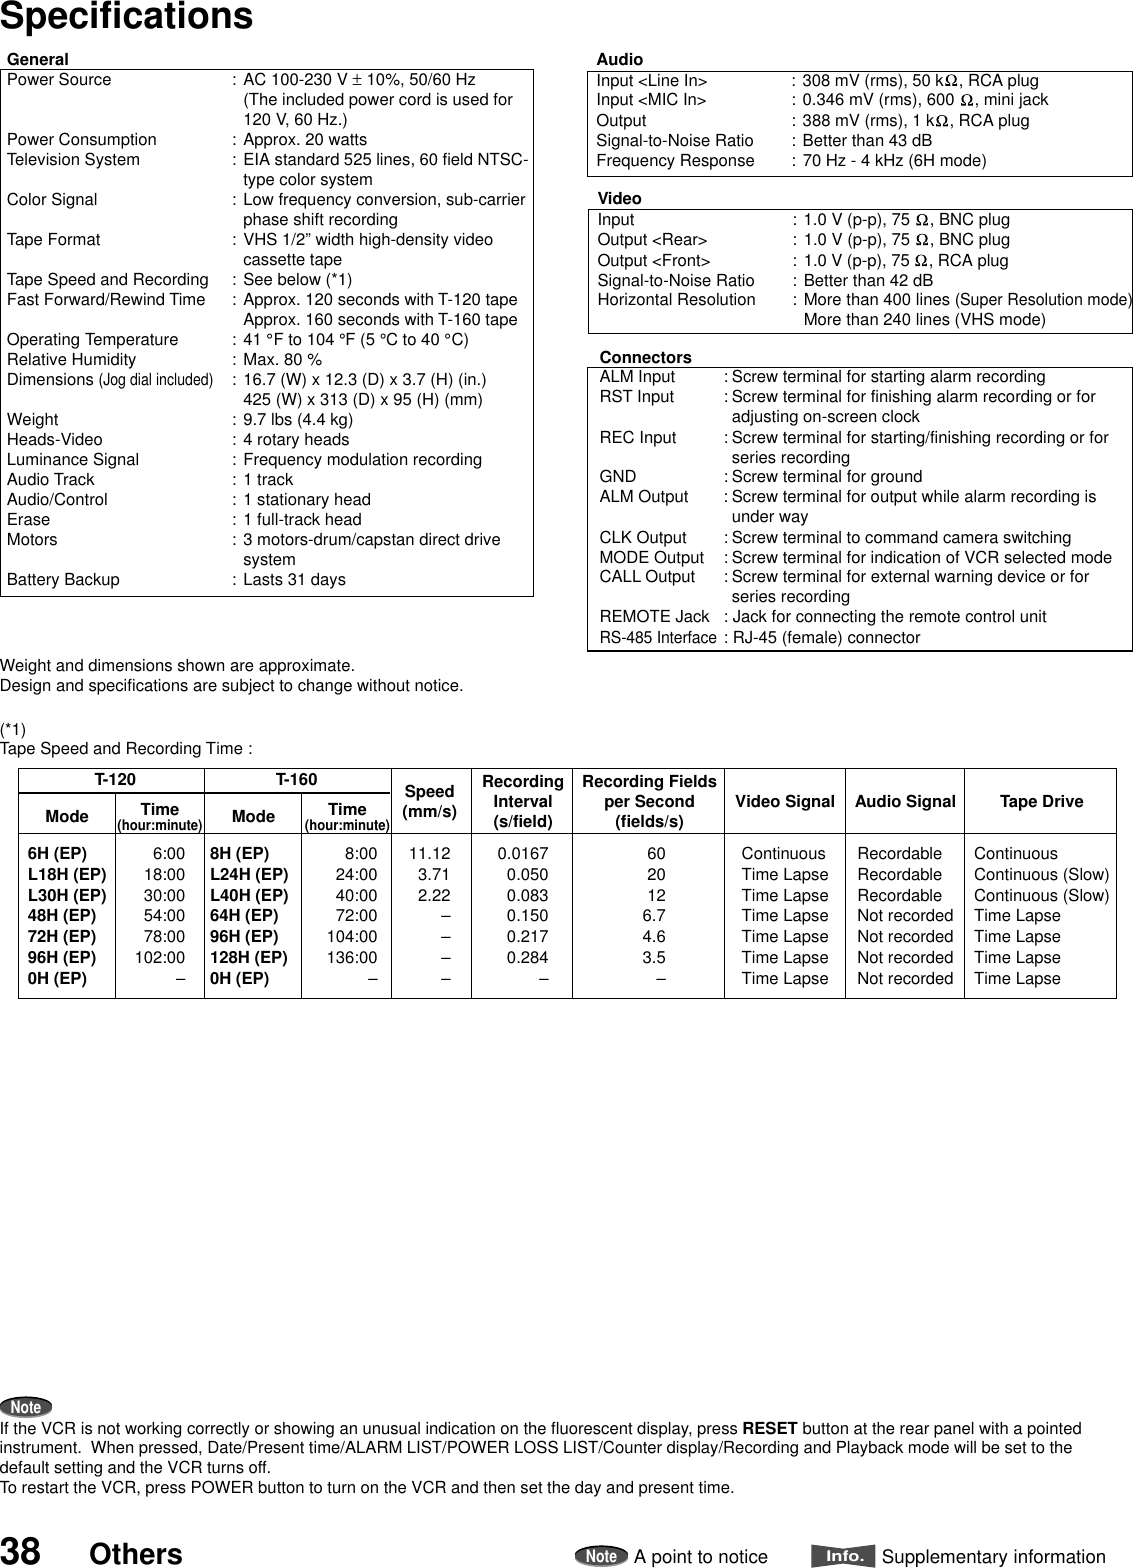
Mitsubishi Electric 485SR Time Lapse VCR User Manual KR4024TN 00 cover

Mitsubishi Electric Corp Time Lapse VCR KR4024TN 00 cover

users manual

Ultrak Corporate Headquarters:1301 Waters Ridge Drive, Lewisville, TX 75057(800)796-2288 • (972)353-6500 • FAX (972)353-6670KR4096HN-ATIME LAPSE VIDEOCASSETTE RECORDEROPERATIONINSTRUCTIONS
iWARNINGRISK OF ELECTRIC SHOCKDO NOT OPENWARNING: TO REDUCE THE RISK OF ELECTRICSHOCK, DO NOT REMOVE COVER (OR BACK).NO USER-SERVICEABLE PARTS INSIDE.REFER SERVICING TO QUALIFIED SERVICEPERSONNEL.The lightning flash with arrowheadsymbol, within an equilateral triangle, isintended to alert the user to thepresence of uninsulated “dangerousvoltage” within the product’s enclosurethat may be of sufficient magnitude toconstitute a risk of electric shock.The exclamation point within anequilateral triangle is intended to alertthe user to the presence of importantoperating and maintenance (servicing)instructions in the literatureaccompanying the appliance.WARNING:TO PREVENT FIRE OR SHOCK HAZARD, DONOT EXPOSE THIS APPLIANCE TO RAIN ORMOISTURE.CAUTION:TO PREVENT ELECTRIC SHOCK DO NOT USETHIS (POLARIZED) PLUG WITH AN EXTENSIONCORD, RECEPTACLE OR OTHER OUTLETUNLESS THE BLADES CAN BE FULLY INSERTEDTO PREVENT BLADE EXPOSURE.La fléche symbolisant l’éclair dans untriangle équilateral a pour objet de tirerl’attention de l’utilisateur sur le fait, qu’il y ades “tensions dangereuses” non-isolées àl’intérieur de l’enceinte du produit quipeuvent être suffisamment impor-tantespour conduire au risque d’électrocution.Le point d’exclamation au sein d’un triangleéquilateral a pour objet de tirer l’attention del’utilisateur sur le fait qu’il y a desinstructions de mise en service etd’entretien (de réparation) dans les fichesdescriptives de l’apprareil qui doiventobligatoirement être respectées.AVERTISSEMENT:AFIN D’ÉVITER TOUT RISQUE D’INCENDIE OUD’ÉLECTROCUTION, NE PAS EXPOSER CETAPPAREIL À LA PLUIE NI À L’HUMIDITÉ.ATTENTION:POUR PRÉVENIR LES CHOCS ÉLECTRIQUES NEPAS UTILISER CETTE FICHE POLARISÉE AVEC UNPROLONGATEUR, UNE PRISE DE COURANT OUUNE AUTRE SORTIE DE COURANT, SAUF SI LESLAMES PEUVENT ÊTRE INSÉRÉES À FOND SANSEN LAISSER AUCUNE PARTIE À DÉCOUVERT.AVERTISSEMENTDANGER D’ÉLECTROCUTIONNE PAS OUVRIRAVERTISSEMENT: POUR ÉLIMINER TOUT RISQUED’ÉLECTRO-CUTION, NE PAS OUVRIR LE COUVERCLE(OU LA PARTIE ARRIÈRE).  AUCUNE PIECE RÉPARABLEPAR L’UTILISATEUR NE SE TROUVE À L’INTÉRIEUR.POUR TOUTE INTERVENTION D’ENTRETIEN OU DERÉPARATION SE CONFIER AUX TECHNICIENSQUALIFIÉS.
Important SafeguardsPlease read all these instructions carefully regarding your VCR before you begin operating it.Follow all warnings and instructions marked on the VCR.1 Read InstructionsAll the safety and operating instructions should be read beforethe product is operated.2 Retain InstructionsThe safety and operating instructions should be retained forfuture reference.3 Heed WarningsAll warnings on the product and in the operating instructionsshould be adhered to.4 Follow InstructionsAll operating and use instructions should be followed.5 CleaningUnplug this product from the wall outlet before cleaning.  Donot use liquid cleaners or aerosol cleaners.  Use a damp clothfor cleaning.6 AttachmentsDo not use attachments not recommended by the productmanufacturer as they may cause hazards.7 Water and MoistureDo not use this product near water — for example, near a bathtub, wash bowl, kitchen sink, laundry tub, in a wet basement,or near a swimming pool, and the like.8 AccessoriesDo not place this product on an unstable cart, stand, tripod,bracket, or table.  The product may fall, causing serious injuryto a child or adult, and serious damage to the product.  Useonly with a cart, stand, tripod, bracket, or table recommendedby the manufacturer, or sold with the product.  Any mounting ofthe product should follow the manufacturer’s instructions, andshould use a mounting accessory recommended by the manu-facturer.9A product and cart combination should be moved with care.Quick stops, excessive force, and uneven surfaces maycause the product and cart combination to overturn.11 Power SourcesThis product should be operated only from the type of powersource indicated on the marking label.  If you are not sure ofthe type of power supply to your home, consult your productdealer or local power company.  For products intended to op-erate from battery power, or other sources, refer to the operat-ing instructions.12 Grounding or PolarizationThis video product is equipped with a 3-wire grounding-typeplug, a plug having a third (grounding) pin.  This plug will onlyfit into a grounding-type power outlet.  This is safety feature.  Ifyou are unable to insert the plug into the outlet, contact yourelectrician to replace your obsolete outlet.  Do not defeat thesafety purpose of the grounding-type plug.13 Power-Cord ProtectionPower-supply cords should be routed so that they are not likelyto be walked on or pinched by items placed upon or againstthem, paying particular attention to cords at plugs, conven-ience receptacles, and the point where they exit from the prod-uct.14 LightningFor added protection for this product during a lightning storm,or when it is left unattended and unused for long periods oftime, unplug it from the wall outlet and disconnect the antennaor cable system.  This will prevent damage to the product dueto lightning and power-line surges.15 OverloadingDo not overload wall outlets, extension cords, or integral con-venience receptacles as this can result in fire risk or electricshock.16 Object and Liquid EntryNever push objects of any kind into this product through open-ings as they may touch dangerous voltage points or short-outparts that could result in a fire or electric shock.  Never spillliquid of any kind on the product.17 ServicingDo not attempt to service this product yourself as opening orremoving covers may expose you to dangerous voltage or otherhazards.  Refer all servicing to qualified service personnel.18 Damage Requiring ServiceUnplug this product from the wall outlet and refer servicing toqualified service personnel under the following conditions:(a) When the power-supply cord or plug is damaged.(b) If liquid has been spilled, or objects have fallen into theproduct.(c) If the product has been exposed to rain or water.(d) If the product does not operate normally by following theoperating instructions.  Adjust only those controls that arecovered by the operating instructions as an improper ad-justment of other controls may result in damage and willoften require extensive work by a qualified technician torestore the product to its normal operation.(e) If the product has been dropped or damaged in any way.(f) When the product exhibits a distinct change in perform-ance – this indicates a need for service.10 VentilationSlots and openings in the cabinet are provided for ventilationand to ensure reliable operation of the product and to protect itfrom overheating, and these openings must not be blocked orcovered.  The openings should never be blocked by placingthe product on a bed, sofa, rug, or other similar surface.  Thisproduct should not be placed in a built-in installation such as abookcase or rack unless proper ventilation is provided or themanufacturer’s instructions have been adhered to.ii
19 Replacement PartsWhen replacement parts are required, be sure the service tech-nician has used replacement parts specified by the manufac-turer or have the same characteristics as the original part.Unauthorized substitutions may result in fire, electric shock orother hazards.20 Safety CheckUpon completion of any service or repairs to this product, askthe service technician to perform safety checks to determinethat the product is in proper operating condition.21 HeatThe product should be situated away from heat sources suchas radiators, heat registers, stoves, or other products (includ-ing amplifiers) that produce heat.INFORMATIONThis equipment has been tested and found to comply withthe limits for a Class B digital device, pursuant to Part 15of the FCC Rules.  These limits are designed to providereasonable protection against harmful interference in aresidential installation.  This equipment generates, uses,and can radiate radio frequency energy and, if not in-stalled and used in accordance with the instructions, maycause harmful interference to radio communications.However, there is no guarantee that interference will notoccur in a particular installation.  If this equipment doescause harmful interference to radio or television recep-tion, which can be determined by turning the equipmentoff and on, try to correct the interference by one or moreof these measures:• Reorient or relocate the receiving antenna• Increase the separation between the equipment andreceiver• Connect the equipment into an outlet on a differentcircuit than the receiver is connected• Consult the dealer or an experienced radio/TV tech-nician for helpChanges or modifications not expressly approved by the partyresponsible for compliance could void the user’s author-ity to operate the equipment.iiiImportant Safeguards (Cont.)INFORMATIONThis Class B digital apparatus complies with Canadian ICES-003.INFORMATIONCet appareil numérique de la classe B est conforme à lanorme NMB-003 du Canada.NoteA point to noticeInfo.Supplementary information
Introduction 1Reference pageCaution and CareCONDENSATION IS THE ENEMY OF VIDEO RECORDERSWHAT IS CONDENSATION?1. When a very cold drink is poured into a glass, the water droplets which form on the outer surface of the glass are an example ofcondensation.2. If the VCR is exposed to a rapid increase in temperature (such as warming it in a cold room or after transporting it from a coldlocation to a warm one) condensation may form on the tape transport mechanism inside the VCR.  By heating the inside of theVCR, it can dry up the moisture and prevent damage to the VCR or video tape from condensation.  To do this, plug the VCR inand switch the VCR POWER to ON.  Leave the VCR on for at least 2 hours before using it for recording or playback.CONDENSATION IS LIKELY TO OCCUR WHEN:1. The VCR is moved inside from outdoors or from a cold room to a warm one.2. A cold room is heated quickly.3. Humidity is high.Note• Avoid using the VCR where cold air (e.g., from an air conditioner) will blow directly on it.Never place anything containing water on top of the VCR; (e.g., vases, cups, etc.).Heavy objects (e.g., TV) should never be placed on the VCRNEVER TOUCH OR INSERT ANY OBJECT INSIDE THE VCRTouching the inside of the cabinet or inserting foreign objects of any kind not only creates a safety hazard but can also causeextensive damage.PROTECT THE POWER CORDDamage to the power cord may cause fire or shock hazard.  When unplugging the power cord, hold it by the plug only and pull outcarefully.UNPLUG THE POWER CORD DURING A LONG ABSENCETurn the power off and unplug the power cord during a long absence.MAINTAIN GOOD VENTILATIONDo not obstruct the ventilation holes on the VCR.  For maximum ventilation, place the unit on a hard level surface only, and ensure itis not covered during use.WHEN NOT IN USEWhen you finish operating the VCR, always unload the cassette and turn the VCR off.CABINET CARENever use petroleum-based cleaners.  Clean with a soft cloth moistened with soap and water and wipe dry.  PVC cables or leadsshould not be left in contact with the cabinet surface for long periods.INSTALLATION LOCATIONFor excellent performance and lasting reliability, install in a location that is:1. Well ventilated, out of direct sunlight and away from direct heat.2. A solid, vibration-free surface.3. Free from high humidity, excessive dust and away from magnetic fields.NoteNever move the VCR without first removing the tape.CARE OF THE VIDEO CASSETTE TAPES• Avoid vibration or shock.• Do not place near a strong magnetic field (e.g., a motor, transformer or magnet).• Never place or store in direct sunlight.• Avoid dusty places.• Place the cassette in its case and store vertically.• Never store tape in high humidity.WARNING:The included power cord is used for 120 V, 60 Hz.Never connect any outlet or power supply having a different voltage or frequency.
2IntroductionNoteA point to noticeInfo.Supplementary informationFeaturesUp to 96 hours of recording: in addition to regular 6-hour recording modes, it has 18-, 30-, 48-, 72- and 96-hour time lapsemodes (using T-120 tape).Audio RecordingHigh Resolution and Image QualityRemote operation by RS-485 controllerAutomatic Head CleaningEasy Menu Setting on ScreenEasy Cueing with Alarm RecordingOne Button Recording CheckAll or Part Front Panel LockProtection against Power FailureVariety of Search FunctionsContentsImportant Safeguards .............................................ii - iiiIntroductionCaution and Care ......................................................... 1Features ....................................................................... 2Controls and Functions ................................................ 3Front View............................................................................ 3Fluorescent Display ............................................................. 4Rear View ............................................................................ 5Basic FunctionsLoading/Unloading a Tape ........................................... 6Manual Recording ........................................................ 7Playback ...................................................................... 8Adjusting the Clock ...................................................... 9Advanced FunctionsRecording Techniques................................................ 10Timer Recording ................................................................ 10Alarm Recording................................................................ 11Emergency Recording ....................................................... 12Series Recording ............................................................... 12Remote Recording ............................................................ 13Repeat Recording ............................................................. 13One Shot/Interval Recording ............................................. 13Synchronous Recording .................................................... 14Additional Features .................................................... 15Memory Backup in Case of Power Failure ........................ 15After a Power Failure......................................................... 15Displaying/Clearing the Power Loss List ........................... 15Displaying/Clearing the Alarm List..................................... 15Tape Usage and Elapsed Time of VCR ............................. 16Lock Function .................................................................... 16Special Effects Playback............................................ 16Still Picture ........................................................................ 16Shuttle Ring ....................................................................... 16Shuttle Hold ....................................................................... 16Direct Shuttle Ring ............................................................ 16Frame or Field Playback ................................................... 17Adjustment during Playback ...................................... 17Tracking Adjustment .......................................................... 17Vertical Adjustment ............................................................ 17Searching Techniques ................................................ 18Counter Memory Stop ....................................................... 18Skip Search ....................................................................... 18Index Search ..................................................................... 18Time Date Search.............................................................. 19Using RS-485 Interface .............................................. 20Configuring the Time Lapse VCR ...................................... 20RS-485 Setting .................................................................. 20Connecting to a RS-485 Controller ................................... 20Commands from RS-485 Controller .................................. 21Commands and Responses .............................................. 22InstallationConnections for Various Functions ............................ 26Connecting with CCTV Camera, Monitor and Sensor ....... 26Alarm Recording Connection ............................................ 26Series Recording Connection ............................................ 27Remote Recording Connection ......................................... 27Synchronous Recording Connection ................................. 27Connection for External Time Clock Adjustment ............... 27Setting the Clock ........................................................ 28Setting the Menus ...................................................... 29Menu Chart ........................................................................ 29Language Selection ........................................................... 30Main Menu ......................................................................... 30Display ............................................................................... 30Timer Program................................................................... 30Recording Set Up .............................................................. 30Rear Terminal .................................................................... 31Maintenance ...................................................................... 31First Time Set Up ............................................................... 32RS-485 .............................................................................. 32OthersRemote Controller (Optional) ..................................... 33Before Calling for Service .......................................... 34Warning Display ......................................................... 36Control Input/Output Signals and Circuit.................... 37Specifications ............................................................. 38Recording Options for Various Needs• Daily/weekly/holiday timer recording• Alarm recording• Series recording• Remote recording• Repeat recording• One shot/Interval recording• Synchronous recordingSpecial Playback Features• Still picture• Speed search using shuttle ring• Frame-by-frame and field-by-field playback using jogdialAccessories1 User’s manual1 Power cord1 Warranty card
Introduction 3Reference pageControls and FunctionsFront ViewLock buttonPress to lock the VCR into the current mode.REC/PLAY MODE buttonsPress to select the recording or playback speed.TRACKING buttonsPress to reduce/eliminate the noise during playback, slowplayback, etc.POSITION/VERTICAL ADJUST buttons• When the day and present time display is shown on themonitor screen, press the top button to move the displayto the right forward or bottom button to move it down.During an alarm recording or if an warning is displayed onscreen, the day and present time display cannot bemoved.• If screen images are blurred vertically during still picture orspecial effects playback, press to reduce/eliminate thepicture vibration.Cassette Loading SlotCassette is inserted in this slot for loading.EJECT buttonPress to remove the cassette.JOG dialUse to forward/reverse a tape frame-by-frame (field-by-field)or to set the menus.SHUTTLE ringWhen the VCR is in stop mode, turn to the right to forward atape or to the left to rewind.Also, use for special effects playback or to set the menus.RECORD buttonPress to begin recording.VIDEO OUT connectorOutput connector for video signal (RCA pin).  Connect amonitor here.COUNTER RESET buttonPress to reset the counter to “00000”.SEARCH buttonPress to display the <SEARCH FUNCTION> menu.Fluorescent Display next pageMENU buttonWhen the VCR is turned on, press to display the <MAINMENU>.  Press again to exit the menu.When the VCR is turned off, press this button for more than3 seconds to adjust the VCR’s time and date.POWER buttonPress to turn the VCR POWER on or off.TIMER RECORD buttonPress to start timer recording, when you have programmedyour VCR to record.PAUSE/SHUTTLE HOLD buttonDuring recording, press to stop the tape movementtemporarily.  Press again to continue the recording.During playback, press to obtain a still picture.During special effects playback using SHUTTLE ring, pressto fix the playback speed.PLAY buttonWhen the VCR is in stop mode, press to playback apreviously recorded tape.During recording, press for more than 1.5 seconds to checkrecording function.STOP buttonPress to stop all tape related functions.TRACKING POSITIONVERTICAL ADJUSTVIDEO OUT RESETREC/PLAYMODESEARCHEJECTMENU POWERTIMER RECORDPAUSESHUTTLE HOLDPLAYSTOPRECORDCOUNTER
4IntroductionNoteA point to noticeInfo.Supplementary informationControls and Functions (Cont.)Fluorescent Display (Counter Memory Stop/Month) indicatorIlluminates during the counter memory stop.Also, illuminates when the month (of time and date) is beingentered via the front panel. (Power Loss) indicatorIlluminates when the VCR is turned on after a power failureoccurs during recording. (Alarm Recording) indicatorFlashes during alarm recording and stays on when the alarmrecording is finished. (Time Date Search/Day) indicatorIlluminates during the time date search.Also, illuminates when the day (of time and date) is beingentered via the front panel. (Index Search) indicatorFlashes when recording an index signal and illuminatesduring the index number setup and the index search. (Indexnumber is shown on the Recording and Playback Modedisplay.) (Skip Search) indicatorIlluminates during the skip search. (Daylight Saving Time) indicatorIlluminates when “DAYLIGHT SAVINGS” is set to “ON”.,   (Tape Speed) indicatorIndicates the tape speed.SP is standard play; EP is extended play. (Super Resolution) indicatorIlluminates during the recording, during the playback using atape recorded in Super Resolution mode and when a taperecorded in Super Resolution mode is inserted to the VCR,providing “SUPER RESOLUTION” in “RECORDING SETUP” menu is set to “ON”. (Repeat) indicatorIlluminates when “TAPE END” in “FIRST TIME SET UP”menu is set to “REPEAT” or “ALARM•PROT”. (Cassette Status) indicatorIlluminates when a tape is inserted. (Timer Recording) indicatorIlluminates when the VCR is in stand-by for timer recordingor during timer recording. (Tape Remaining) indicatorIndicates the position on the tape.  S indicates the Start ofthe tape and E indicates the End of the tape.Counter/Clock displayWhile the VCR is turned on, indicates the relative position onthe tape. (The Counter stops counting where no recording ismade on the tape.)  When it is off, (when set) the clock (24-hour format) is shown.Recording and Playback Mode/Index Number displayDisplays the number corresponding to a selected recordingor playback mode.  The mode shown here varies by the“TAPE LENGTH” setting (T-120 or T-160) setting in “FIRSTTIME SET UP” menu.  Also, displays the index numberduring the index number setup and the index search. (Emergency Recording) indicatorIlluminates when “EMERGENCY REC” in “RECORDINGSET UP” menu is set to “ON”.Lock/Lock All indicator      : illuminates when all buttons (except RECORDbutton and EJECT button) are locked.   : illuminates when all buttons are locked. (Playback) indicatorIlluminates during playback. (Recording) indicatorIlluminates during recording.
Introduction 5Reference pageRear ViewAC power socketThis socket connects to the power cord.  Insert the cordfirmly.Input terminalsALM INUse for alarm recording.  The alarm sensor is connectedhere.RST INUse to stop alarm recording.• When “ALARM REC DURATION” in “RECORDINGSET UP” menu is set to “MAN1”, the alarm recordingstops when a signal is input to this terminal.  The alarmreset switch is connected here.• When set to other than “MAN1”, it can be used toadjust the VCR’s clock.REC INUse to start/stop recording or for series recording.GNDWhen a lead connected to other terminals requires a ground,connect the ground lead here.Output terminalsALM OUTUse to indicate an alarm recording to an external alarm.MODE OUTUse to indicate the VCR’s mode of operation.• When “MODE OUT” in “REAR TERMINAL” menu isset to “CLOCK ADJ”, the clock of all connected VCR’scan be adjusted. (  page 28)CLK OUTUse to control an external camera switcher.CALL OUTUse to indicate when a tape reaches its end duringrecording or if there has been a problem during recording.Battery BoxBattery is stored here.Note• This VCR contains a special battery.  Consult your dealerto replace it.REMOTE jackRemote control is possible by connecting the remote controlunit (R-9100) here.  (  page 33)MIC IN jackInput jack for a microphone rated at 600  impedance.AUDIO IN connectorAudio input connector (RCA pin).AUDIO OUT connectorAudio output connector (RCA pin).VIDEO IN connectorInput connector for video signal (BNC connector).  Connectcameras here.VIDEO OUT connectorOutput connector for video signal (BNC connector).Connect a monitor here.RESET button page 38RS-485 IN terminal (RJ-45 connector)Input terminal to connect with a RS-485 controller.RS-485 OUT terminal (RJ-45 connector)Output terminal to connect with other time lapse VCR withRS-485 interface.TERMINATE switchUse to setup the termination (only when using the RS-485terminal).ON : use to turn on the termination.OFF : use to turn off the termination.For the rating of each connector at the rear panel of VCR, page 37.AUDIO VIDEOOUT OUTINREMOTE MICINRESETALM RSTINREC GND ALMMODECLKOUTCALLBATTERYOPENRS-485ONINOUTTERMINATEOFFNoteEnsure the power cord is not plugged into the outlet before connecting to any rear terminals.Warning:The included power cord is used for 120 V, 60 Hz.Never connect to any outlet or power supply having a different voltage or frequency.
6NoteA point to noticeInfo.Supplementary informationBasic FunctionsTapes can be loaded into your VCR as long as the VCR isplugged into an outlet.  Even if the VCR is turned off, loading atape will automatically cause it to turn on.  Use only videocassette tapes marked   or  .Important notice:• Use high grade (HG) tapes for super resolutionrecording.  We recommend to use S-VHS tapes forsuper resolution recording at L18H-L40H mode.• It is recommended to use T-120 tape.  Do not usetapes longer than T-160.Loading1. Insert the tape into the cassette slotby holding it so that the long narrowedge with the contents label facestowards you.• The Cassette Status indicatorilluminates on the fluorescentdisplay when the tape isinserted.Note• Your VCR has a protection circuitwhich will eject the tape if it is loadedimproperly.  If the VCR ejects thetape, remove it completely andcheck that the long narrow edge withthe contents label is facing towardsyou, and the clear plastic windowthat shows the video tape is facingupwards.  Wait a few seconds, andtry inserting the tape again.Info.• The VCR automatically turns on when the tape is loaded,AUTO POWER ON.• The VCR automatically plays back the tape if the eraseprevention tab is removed, AUTO PLAY.• You cannot insert a tape when all of the VCR’s all buttonsare locked and the Lock All indicator ( ) is illuminating.Unloading1. Press EJECT button on the front panelof the VCR.2. Remove the tape.Note• When ejecting the tape during recording, press STOP buttononce to stop recording and then press EJECT button tounload the tape.• You cannot eject a tape when all of the VCR’s buttons arelocked and the Lock All indicator ( ) is illuminating.Info.• The VCR will eject a tape even if the power to the VCR isturned off (as long as the VCR is plugged into an outlet),POWER OFF EJECT.erasepreventiontabLoading/Unloading a Tape6HL18HL30H48H72H96H0H5035202015151Recordingtime mode Number oftape use8HL24HL40H64H96H128H0H4530105331Recordingtime mode Number oftape useIn case of T-120 setting In case of T-160 settingEJECTINCORRECTPreventing accidental eraseTapes come with an erase preventiontab which, when removed, prevents thetape’s contents from being erased orrecorded over.  If the tape you insert inthe VCR has the erase prevention tabremoved, your VCR will automaticallyeject it if you attempt to record on it.Note• We recommend that you take any broken or torn tapes to aprofessional for repair.  The adhesives on many commontypes of tape could damage the head of your VCR.Recommended number of tape useIt is recommended that the cassette tape be replaced with a newone depending on the recording time mode and type of tapeused.  Providing TAPE LENGTH of FIRST TIME SET UP menu isset to the same type the tape you use.
7Reference page Basic Functions1. Turn on the VCR and peripheral devices.2. Load a tape with an eraseprevention tab intact.Steps 3 to 7 for activating Super Resolution recording mode.3. Press MENU button.•<MAIN MENU> appears.4. Turn JOG to select RECORDING SETUP and turn SHUTTLE to the right.•<RECORDING SET UP> menuappears.5. Turn JOG to select SUPERRESOLUTION and turn SHUTTLE tothe right.6. Turn JOG to select ON and turnSHUTTLE to the right.7. Press MENU button.• The day and present time displayappears on screen.8. Press REC/PLAY MODE button to selectthe desired recording mode.Refer to Recording/playback time onthe next column for the actualrecording/playback time .9. Press RECORD button to begin recording.10. Press STOP button to stop recording.Note• If the tape you insert in your VCR has the erase preventiontab removed, your VCR will automatically eject it if youattempt to record on it.• The RECORD button will not function unless a tape is in stopor pause mode.• A tape recorded by this VCR may not be played back correctlyby another VCR.Info.• Press the PAUSE button to momentarily stop recording.Press it again to resume recording.  To protect the tape, thepause mode is automatically cancelled after about 5 minutes.  page 32 for the VCR’s function when the tape reaches itsend during recording.Manual RecordingREC/PLAYMODERECORDSTOP<MAIN MENU>DISPLAYTIMER PROGRAMRECORDING SET UPREAR TERMINAL<RECORDING SET UP>ALARM REC MODE 6HALARM REC DURATION 1MEMERGENCY REC OFFSUPER RESOLUTION OFFONE SHOT•FIELD 1ONE SHOT•INTERVAL SHOT<RECORDING SET UP>ALARM REC MODE 6HALARM REC DURATION 1MEMERGENCY REC OFFSUPER RESOLUTION OFFONE SHOT•FIELD 1ONE SHOT•INTERVAL SHOT<RECORDING SET UP>ALARM REC MODE 6HALARM REC DURATION 1MEMERGENCY REC OFFSUPER RESOLUTION ONONE SHOT•FIELD 1ONE SHOT•INTERVAL SHOTRecording/playback timeAudio recording/playbackThe 2H (playback only), 6H, 8H modes and the modes with theletter “L” (L18H, L24H, L30H and L40H) are for audio recordingand playback on the linear track.Note• Audio will not be recorded if cables for audio are notconnected to the AUDIO IN connector or the microphone isnot connected to the MIC IN jack.• The longer the recording mode is set, the worse the soundquality gets.  In L30H or L40H mode, the sound quality is ofthe degree that the speaking voice can be heard.Recording Check FunctionWhen the VCR is recording, press the PLAY button for more than1.5 seconds and then release.  The tape will rewind a little andthen playback the recording just made.  When the tape reachesthe position where the PLAY button was pressed, the VCR startsrecording again.* is for playback onlyT-120 T-160TAPE LENGTHsetting2H*6HL18HL30H48H72H96H2:006:0018:0030:0054:0078:00102:002:408:0024:0040:0072:00104:00136:002H*8HL24HL40H64H96H128HRecordingtime modeTAPE LENGTHsettingRecordingtime mode(hours : minutes)
8NoteA point to noticeInfo.Supplementary informationBasic Functions1. Turn on the VCR and peripheral devices.2. Load a pre-recorded tape.3. Repeat steps 3 to 7 in ManualRecording for activating Super Resolutionplayback mode.4. Press REC/PLAY MODE button to selectthe desired playback mode.5. Press PLAY button to start playback.• If noise occurs during playback, adjustthe tracking,   page 17.6. Press STOP button to stop playback.Info.• VCR automatically plays back the tape of which the eraseprevention tab removed, AUTO PLAY.Note• Playback modeWhen TAPE LENGTH in FIRST TIME SET UP menu is setto T-120, the playback mode is switched in the order of 6H L18H   L30H   48H   72H   96H   0H   6H... (fora tape recorded in the recording mode longer than 6Hmode).When TAPE LENGTH in FIRST TIME SET UP menu is setto T-160, the playback mode is switched in the order of 8H L24H   L40H   64H   96H   128H   0H   8H...(for a tape recorded in the recording mode longer than 8Hmode).– A tape recorded in SP mode using other VCR can onlybe played back in 2H mode.• Picture jitter or noise may occur when the tape is playedback in L18H, L24H, L30H or L40H mode even if the tapewas recorded in its respective mode.• When a pre-recorded tape is used for recording, the colorednoise may appear on the beginning of the playback picture.• There is normal sound playback only when a tape recorded in6H, 8H, L18H, L24H, L30H or L40H mode is played back inits respective mode.  page 18-19 to find a picture you wish to view.When the tape reaches its end during playback/fastforwardingVCR’s function varies by the setting of TAPE END in the FIRSTTIME SET UP menu.  page 32 for TAPE END setting.VCR’s functionFastForwardPlaybackTAPE ENDsettingSTOP or REWINDREPEAT orALARM•PROTStopVCR automatically rewindsto the beginning of the tapeand stops.StopStopREC/PLAYMODESTOPPLAYRewinding a tapeWhile the tape is stopped, turn SHUTTLE to the left.To stop rewinding, press STOP button.Fast forwarding a tapeWhile the tape is stopped, turn SHUTTLE to the right.To stop fast forwarding, press STOP button.Info.• The fast forward/rewind time of a T-120 tape is approximately2 minutes, however, the time varies by the type of a tape youuse.Audio playback and picture quality2H/6HPlayback modeAudioplayback VerygoodPictureQuality48H-128HL18H-L40HNotavailableGoodGoodGoodVerygoodPlayback
9Reference page Basic FunctionsJOG dialSHUTTLE ringInfo.   Use of JOG dial and SHUTTLE ring for menu settingJOG dial•Use JOG by placing a finger in the indent and turning.• Turning JOG to the right moves the selection forward.Turning it to the left moves the selection back.• If the selection is not flashing, turn JOG to the right to movethe cursor ( ) down one position then to the left to moveback to your selection.SHUTTLE ring• If you turn SHUTTLE to the right/left end and release it,SHUTTLE comes back to the center position automatically.• Navigate to the next menu layer by turning SHUTTLE to theright. Return to the previous menu layer by turningSHUTTLE to the left.Adjusting the ClockYou can adjust the VCR’s clock from the front panel, even thoughthe VCR is turned off.  This function lets you to set the informationin the order of time, month, day and year.  The hour time isentered twice.  This is due to the daylight saving time.Example : Setting the day and present time to 10:38 a.m., 11thDecember, 2002.1. When the VCR and peripheral devicesare turned off, press MENU button formore than 3 seconds.• The hour digits of the clock on thefluorescent display starts flashing.2. Turn JOG to set the hour digits.When the flashing item is same as thecurrent time, turn SHUTTLE withoutturning JOG.3. Turn SHUTTLE to the right to make the10-minute digit flash and turn JOG toadjust.4. Turn SHUTTLE to the right to make the 1-minute digit flash and turn JOG to adjust.To finish the clock adjustment now,press MENU button for more than 3seconds.5. Turn SHUTTLE to the right to make themonth digits flash and turn JOG to adjust.• The Month indicator ( ) illuminates.6. Turn SHUTTLE to the right to make theday digits flash and turn JOG to adjust.• The Day indicator ( ) illuminates.7. Turn SHUTTLE to the right to make theyear digits flash and turn JOG to adjust.8. Turn SHUTTLE to the right.• The VCR’s clock is set now.9. Repeat steps 1 and 2 and turn SHUTTLE to the left to exitafter hour mark is entered the second time.Note• Time and Date information can also be entered via the MenuSystem (FIRST TIME SETUP/TIME DATE ADJUST).When adjusting the clock to the exact secondSet the clock as described to the left, but set 1-minute digit to oneor two minutes ahead of the reference time being used.  After thestep 7 to the left, when reference time reaches 00 second of theminute you have chosen, turn SHUTTLE to the right.  The VCR’sclock now corresponds to the reference time to the nearestsecond.
10 Advanced FunctionsNoteA point to noticeInfo.Supplementary informationRecording Techniques<PROGRAM TO RECORD>DW START END HR1 --- --:-- --:-- ------2 --- --:-- --:-- ------3 --- --:-- --:-- ------4 --- --:-- --:-- ------5 --- --:-- --:-- ------6 --- --:-- --:-- ------7 --- --:-- --:-- ------8 --- --:-- --:-- ------165432 1) Program numberUp to 8 programs can be set.2) Day of the week display• Display HLD to apply HOLIDAY SET UP setting (  next page).• Display SPL to apply SPECIAL DW setting (  next page).• Display DAY to record at the programmed time everyday.3) Recording start-time4) Next day indicator (•)Recording continues to the following day.5) Recording end-time6) Recording mode• Recording mode varies by the TAPE LENGTH setting of FIRSTTIME SET UP menu.  See the table shown to the left.• Timer recording will not be performed when set to SKIP.Info.  •  Time is displayed in 24-hour format.Accurately preset the day and present time before timer programming. (  page 9 or 28)Timer Recording<MAIN MENU>DISPLAYTIMER PROGRAMRECORDING SET UPREAR TERMINALMAINTENANCECLOCK/FIRST TIME SET UP<TIMER PROGRAM>PROGRAM TO RECORDHOLIDAY SET UPSPECIAL DW MON-SAT<PROGRAM TO RECORD>DW START END HR1 DAY 08:00 20:00 L30EP2 --- --:-- --:-- ------3--- --:-- --:-- ------<PROGRAM TO RECORD>DW START END HR1 DAY 08:00 20:00 L30EP2 --- --:-- --:-- ------3 --- --:-- --:-- ------<PROGRAM TO RECORD>DW START END HR1 DAY 08:00 20:00 L30EP2 TUE --:-- --:-- ------3 --- --:-- --:-- ------<PROGRAM TO RECORD>DW START END HR1 DAY 08:00 20:00 L30EP2 TUE 12:00 --:-- ------3 --- --:-- --:-- ------<PROGRAM TO RECORD>DW START END HR1 DAY 08:00 20:00 L30EP2 TUE 12:00 15:00 ------3 --- --:-- --:-- ------<PROGRAM TO RECORD>DW START END HR1 DAY 08:00 20:00 L30EP2 TUE 12:00 15:00 L18EP3 --- --:-- --:-- ------<PROGRAM TO RECORD>DW START END HR1 DAY 08:00 20:00 L30EP2TUE 12:00 15:00 L18EP3 --- --:-- --:-- ------Example : Setting number 2 to L18H mode timer recording from12:00 to 15:00 every Tuesday.1. Press MENU button.•<MAIN MENU> appears.2. Turn JOG to select TIMER PROGRAMand turn SHUTTLE to the right.•<TIMER PROGRAM> menu appears.3. When the cursor ( ) is next toPROGRAM TO RECORD, turnSHUTTLE to the right.•<PROGRAM TO RECORD> menuappears.4. Turn JOG to select the programnumber and turn SHUTTLE to the rightto select.5. In the DW column, turn JOG to selectthe Day of the Week. Turn SHUTTLE tothe right to select.6. In the START column, turn JOG toselect the hour digits of the start time.Turn SHUTTLE to the right when done.Set the 10-minutes digit and 1-minute digit in a similar fashion.7. In the END column, turn JOG to selectthe hour digits of the end time. TurnSHUTTLE to the right when done.Set the 10-minute digit and 1-minutedigit in a similar fashion.8. In the HR column, turn JOG to selectthe RECORDING mode.Setup step 9 to make recording while the REC IN terminal isgrounded.  If not, go to step 10.9. Press MENU button.• The program you are currentlysetting is highlighted.• Press MENU button again tocancel.10. Turn SHUTTLE to the right when done. (Cursor flashing willstop.)• If the program has not been set completely, the DWcolumn will continue to flash.Repeat steps 4 to 10 to set 2 or more programs at once.11. Press MENU button.• The day and present time display appears on screen.12. Press TIMER RECORD button.• The VCR is turned off and the Timer Recording indicator() illuminates on the fluorescent display.When TIMER RECORD button is pressed during theprogrammed period, the VCR starts recordingimmediately.Info.When the Timer Recording indicator ( ) starts flashing, check forthe following conditions:a) A tape is not inserted.b) A tape without erase prevention tab is inserted.c) Day and present time has not been set.d) Timer program has not been set.e) Menu item has been set (flashing).– Remedy -1. Press TIMER RECORD button to turn off the Timer Recordingindicator( ).2. a) Insert a tape.b) Insert a tape with erasure prevention tab intact.c) Set the day and present time (  page 9 or 28)d) Confirm the program.e) Turn SHUTTLE to the right to stop flashing.3. Press TIMER RECORD button to turn on the Timer Recordingindicator.Info.• To erase a program:Select the program number you wish to erase, turn SHUTTLEto the right (DW column flashes) and then turn SHUTTLE tothe left.T-120T-160 8EP   L24EP   L40EP   64EP96EP   128EP   0EP   SKIP6EP   L18EP   L30EP   48EP72EP   96EP   0EP   SKIP
11Advanced FunctionsReference pageAlarm RecordingIf an alarm occurs, the VCR switches to alarm recording.page 26 for alarm recording connectionExample)When ALARM REC MODE is set to L30H andALARM REC DURATION is 10 min.Alarm signal inputL30HRecording10 minRecording Alarm Recording<MAIN MENU>DISPLAYTIMER PROGRAMRECORDING SET UPREAR TERMINALMAINTENANCECLOCK/FIRST TIME SET UP<RECORDING SET UP>ALARM REC MODE 6HALARM REC DURATION 1MEMERGENCY REC OFFSUPER RESOLUTION ONONE SHOT•FIELD 1<RECORDING SET UP>ALARM REC MODE 6HALARM REC DURATION 1MEMERGENCY REC OFFSUPER RESOLUTION ONONE SHOT•FIELD 1<RECORDING SET UP>ALARM REC MODE L30HALARM REC DURATION 1MEMERGENCY REC OFFSUPER RESOLUTION ONONE SHOT•FIELD 1<RECORDING SET UP>ALARM REC MODE L30HALARM REC DURATION 1MEMERGENCY REC OFFSUPER RESOLUTION ONONE SHOT•FIELD 1<RECORDING SET UP>ALARM REC MODE L30HALARM REC DURATION 10MEMERGENCY REC OFFSUPER RESOLUTION ONONE SHOT•FIELD 1Special day of the weekSet the recording period by specifying the start and end day ofthe week for timer recording.1. Display <TIMER PROGRAM> menu.2. Turn JOG to select SPECIAL DW andturn SHUTTLE to the right.3. Turn JOG to set the start and end dayof the week, and turn SHUTTLE to theright.4. Press MENU button.• The day and present time display appears on screen.Note• Start day of the week and end day of the week cannot beidentical.When the recording period of 2 or more programs areoverlappedThe VCR always gives priority to the higher-numbered program.Note• To make sure that the HOLIDAY SET UP setting is appliedcorrectly, set a timer program with HLD in DW column to thehigher-numbered program.<TIMER PROGRAM>PROGRAM TO RECORDHOLIDAY SET UPSPECIAL DW MON-SATHoliday set upUp to 20 days per year can be set for Holiday for when the timerrecording will be performed, or if HR in PROGRAM TORECORD menu is set to SKIP, the timer recording will not beperformed during the programmed period.1. Display <TIMER PROGRAM> menu.2. Turn JOG to select HOLIDAY SET UPand turn SHUTTLE to the right.•<HOLIDAY SET UP> menuappears.3. Turn JOG to move the cursor ( ) andturn SHUTTLE to the right.• Each time JOG is turned to the right, the cursor movestowards right-forward direction.4. Turn JOG to select the month you want, and turn SHUTTLEto the right.5. Turn JOG to select the day you want, and turn SHUTTLE tothe right.Repeat steps 3 to 5 to set 2 or more days at once.6. Press MENU button.• The day and present time display appears on screen.Info.• To erase the pre-set month and day, turn SHUTTLE to theleft while the month item is flashing.<HOLIDAY SET UP>01/01 01/15 02/11 03/2204/29 05/03 05/04 05/0507/20 09/15 09/23 10/1011/03 11/23 12/23 - - / - -- - / - - - - / - - - - / - - - - / - -MONTH / DAY1. Press MENU button.• <MAIN MENU> appears.2. Turn JOG to select RECORDING SETUP and turn SHUTTLE to the right.•<RECORDING SET UP> menuappears.3. When the cursor ( ) is next to ALARMREC MODE, turn SHUTTLE to theright.4. Turn JOG to set the alarm recordingmode you want and turn SHUTTLE tothe right.5. Turn JOG to select ALARM RECDURATION and turn SHUTTLE to theright.6. Turn JOG to set the alarm recordingduration you want and turn SHUTTLEto the right.• When set to MAN 1, alarmrecording continues until RST IN terminal is grounded.• When set to MAN 2, alarm recording continues while ALMIN terminal is grounded.7. Press MENU button.• The day and present time display appears on screen.Info.• The index signal is automatically recorded when an alarmrecording begins. (The Index indicator ( ) flashes on thefluorescent display).• Even if an alarm recording is proceeding, the new alarmrecording starts when the next alarm signal is input.  (Whilean index signal is being recorded and then the next alarmsignal is input, the second signal may not be detected duringskip or index search.)• An alarm recording continues until its end during timerrecording, even if the timer recording end-time is reached.• An alarm recording will be cancelled if the tape reaches its end.• If the interval between two alarm recording start-times is tooshort, the skip or index search may not function correctly. (for the minimum interval between two alarm recording start-times, go to page 18)
12 Advanced FunctionsNoteA point to noticeInfo.Supplementary informationAlarm recording counter01-01-’02 09:30:00 A0001<RECORDING SET UP>ALARM REC MODE L30HALARM REC DURATION 10MEMERGENCY REC ONSUPER RESOLUTION ONONE SHOT•FIELD 1ONE SHOT•INTERVAL SHOTEmergency RecordingThe VCR automatically starts an alarm recording when an alarmsignal is input even if the VCR is in stop mode, turned off or instand-by for timer recording.  After an emergency recording, theVCR automatically returns to its original state.1. After step 6 of Alarm Recording, turnJOG to select EMERGENCY REC andturn SHUTTLE to the right.2. Turn JOG to select ON and turnSHUTTLE to the right.• The Emergency Recording indicator() illuminates on the fluorescent display.Display during alarm recording• During the alarm recording, the alarmrecording counter will automatically bedisplayed on screen if DISPLAY MODE( page 30) is set to 1, 2 or 3.• The Alarm Recording indicator ( ) onthe fluorescent display flashes duringalarm recording and stays on when thealarm recording is finished.• The alarm recording counter shows up to 9999 alarmrecordings, then it is reset to 0000 and continues counting.• When initializing the alarm recording list, the alarm recordingcounter will also be reset.Series Recording 1Series recording is possible if two or more of these units areconnected.  When the first VCR’s tape reaches its end or anerror occurs on VCR, the second VCR automatically beginsrecording.1. Press MENU button.• <MAIN MENU> appears.2. Turn JOG to select REAR TERMINALand turn SHUTTLE to the right.•<REAR TERMINAL> menuappears.Step 3 and 4 on 1st VCR only:3. When the cursor ( ) is next to CALLOUT, turn SHUTTLE to the right.4. Turn JOG to select WRNG•TAPE ENDand turn SHUTTLE to the right.Step 5 and 6 on 2nd VCR only:5. Turn JOG to select REC IN and turnSHUTTLE to the right.6. Turn JOG to select SERIES and turnSHUTTLE to the right.7. Press MENU button.• The day and present time display appears on screen.<MAIN MENU>DISPLAYTIMER PROGRAMRECORDING SET UPREAR TERMINALMAINTENANCE<REAR TERMINAL>CALL OUT WRNGCLOCK OUT REC- 1MODE OUT RECREC IN REC-START/STOP<REAR TERMINAL>CALL OUT WRNGCLOCK OUT REC- 1MODE OUT RECREC IN REC-START/STOP<REAR TERMINAL>CALL OUT WRNG•TAPE ENDCLOCK OUT REC- 1MODE OUT RECREC IN REC-START/STOP<REAR TERMINAL>CALL OUT WRNGCLOCK OUT REC- 1MODE OUT RECREC IN REC-START/STOP<REAR TERMINAL>CALL OUT WRNGCLOCK OUT REC- 1MODE OUT RECREC IN SERIES<MAIN MENU>DISPLAYTIMER PROGRAMRECORDING SET UPREAR TERMINALMAINTENANCECLOCK/FIRST TIME SET UP<FIRST TIME SET UP>TIME DATE ADJUSTTAPE END STOPQUASI V-SYNC ONVIDEO MODE AUTOTAPE LENGTH T-120<FIRST TIME SET UP>TIME DATE ADJUSTTAPE END STOPQUASI V-SYNC ONVIDEO MODE AUTOTAPE LENGTH T-120<FIRST TIME SET UP>TIME DATE ADJUSTTAPE END REWINDQUASI V-SYNC ONVIDEO MODE AUTOTAPE LENGTH T-120Series Recording 2Series Recording 2 provides a function: when the first VCR’s tapereaches its end, the second VCR automatically begins recording.When the tape in second VCR finishes, the first VCR startsrecording again.  (The two VCRs keep recording one afteranother.)  Setup both 1st and 2nd VCRs as in the steps below.1. Repeat step 1 to 6 of Series Recording 1.Steps 3 to 6 must be set to both 1st and 2nd VCRs.2. Turn SHUTTLE to the left.• <MAIN MENU> appears.3. Turn JOG to select CLOCK/FIRSTTIME SET UP and turn SHUTTLE tothe right.•<FIRST TIME SET UP> menuappears.4. Turn JOG to select TAPE END and turnSHUTTLE to the right.5. Turn JOG to select REWIND and turnSHUTTLE to the right.6. Press MENU button.• The day and present time display appears on screen.  page 27 for series recording connectionNote• Timer or emergency recording function cannot be used withseries recording at the same time.Recording Techniques (Cont.)
13Advanced FunctionsReference page<MAIN MENU>DISPLAYTIMER PROGRAMRECORDING SET UPREAR TERMINALMAINTENANCE<RECORDING SET UP>ALARM REC MODE 6HALARM REC DURATION 1MEMERGENCY REC OFFSUPER RESOLUTION ONONE SHOT•FIELD 1ALARM REC MODE 6HALARM REC DURATION 1MEMERGENCY REC OFFSUPER RESOLUTION ONONE SHOT•FIELD 1ONE SHOT•INTERVAL 10SALARM REC MODE6HALARM REC DURATION 1MEMERGENCY REC OFFSUPER RESOLUTION ONONE SHOT•FIELD 5ONE SHOT•INTERVAL 10SALARM REC DURATION 1MEMERGENCY REC OFFSUPER RESOLUTION ONONE SHOT•FIELD 5ONE SHOT•INTERVAL 10SOne shot/Interval RecordingOne shot recording allows you to control the number of fields tobe recorded when the RECORD button is pressed or the REC INterminal is grounded.  Interval recording is made at the selectednumber of fields and at the selected interval.1. Press REC/PLAY MODE button on the front panel to set therecording mode to 0H.2. Press MENU button.•<MAIN MENU> appears.3. Turn JOG to select RECORDING SETUP and turn SHUTTLE to the right.•<RECORDING SET UP> menuappears.4. Turn JOG to select ONE SHOT•FIELDand turn SHUTTLE to the right.5. Turn JOG to select the number ofrecording field and turn SHUTTLE tothe right.6. Turn JOG to select ONESHOT•INTERVAL and turn SHUTTLEto the right.For one shot recording, setup step 7 only:7. Turn JOG to select SHOT and turnSHUTTLE to the right.For interval recording, setup step 8 only:8. Turn JOG to select the recordinginterval and turn SHUTTLE to the right.9. Press RECORD button.• The one shot recording will be on standby mode.• The VCR starts the interval recording with the interval timeselected in step 8 above.10. To start one shot recording, press RECORD button again orswitch the REC IN terminal on the rear panel to the ground.ALARM REC DURATION 1MEMERGENCY REC OFFSUPER RESOLUTION ONONE SHOT•FIELD 5ONE SHOT•INTERVAL SHOTALARM REC DURATION 1MEMERGENCY REC OFFSUPER RESOLUTION ONONE SHOT•FIELD 5ONE SHOT•INTERVAL 30SRemote RecordingThis function permits you to control the start/end of recordingfrom the remote place.  The VCR starts recording while the RECIN terminal is grounded.1. Display <REAR TERMINAL> menu.2. Set REC IN to REC-START/STOP.3. Press MENU button.• The day and present time displayappears on screen.page 27 for remote recording connection.Note• An index signal will not be recorded during remote recording.• Series or timer recording function cannot be used with remoterecording at the same time.Repeat RecordingWith this function, when the tape reaches its end duringrecording, the VCR rewinds the tape and starts recording again.1. Press MENU button.•<MAIN MENU> appears.2. Turn JOG to select CLOCK/FIRSTTIME SET UP and turn SHUTTLE tothe right.•<FIRST TIME SET UP> menuappears.3. Turn JOG to select TAPE END and turnSHUTTLE to the right.4. Turn JOG to select REPEAT orALARM•PROT and turn SHUTTLE tothe right.Refer to the table below forREPEAT and ALARM•PROT.Repeat indicator ( ) illuminates onthe fluorescent display.5. Press MENU button.• The day and present time display appears on screen.<REAR TERMINAL>CALL OUT WRNG•TAPE ENDCLOCK OUT REC- 1MODE OUT RECREC IN REC-START/STOP<MAIN MENU>DISPLAYTIMER PROGRAMRECORDING SET UPREAR TERMINALMAINTENANCECLOCK/FIRST TIME SET UP<FIRST TIME SET UP>TIME DATE ADJUSTTAPE END STOPQUASI V-SYNC ONVIDEO MODE AUTOTAPE LENGTH T-120BUZZER WRNG<FIRST TIME SET UP>TIME DATE ADJUSTTAPE END STOPQUASI V-SYNC ONVIDEO MODE AUTOTAPE LENGTH T-120BUZZER WRNG<FIRST TIME SET UP>TIME DATE ADJUSTTAPE END REPEATQUASI V-SYNC ONVIDEO MODE AUTOTAPE LENGTH T-120BUZZER WRNGTAPE ENDsettingREPEATREWINDALARM•PROTSTOP The tape stops.When there are alarmrecordings on tape When there is NO alarmrecording on tapeThe tape stops.(*)The tape is rewoundautomatically to thebeginning and thenrecording is resumed.The tape is rewound automatically to thebeginning (except in timer recording) andthen stops.The tape is rewound automatically to thebeginning and then recording is resumed(also recording over existing alarms).When the tape reaches its end during recordingThe following functions are automatically engaged when the tapeends during recording.* To repeat recording on the same tape again, eject the tapeonce and reinsert.
14 Advanced FunctionsNoteA point to noticeInfo.Supplementary informationSynchronous RecordingA number of camera images can be mixed together through acamera switcher and then recorded separetely onto severalVCRs.  A camera is assigned to each VCR with the VCRrecording only the camera image it has been assigned.  Thisallows recording without gaps.If you have 3 VCRs, the video signal from 3 cameras can berecorded separetely by connecting the switcher as shown below:1. Press MENU button.•<MAIN MENU> appears.2. Turn JOG to select REAR TERMINALand turn SHUTTLE to the right.•<REAR TERMINAL> menuappears.3. Turn JOG to select REC IN and turnSHUTTLE to the right.Steps 4 to 7 on VCR1 only:4. Turn JOG to select SERIES or REC-START/STOP and turn SHUTTLE tothe right.• If the recording start signal isavailable on the switcher, selectSYNC REC.5. Turn JOG to select CLOCK OUT andturn SHUTTLE to the right.6. Turn JOG to select T/L-REC and turnSHUTTLE to the right.7. Turn JOG to select F and turnSHUTTLE to the right.Step 8 on all VCRs except VCR1:8. Turn JOG to select SYNC REC andturn SHUTTLE to the right.9. Press MENU button.• The day and present time appears on screen.page 27 for synchronous recording connection.REC REC RECREC REC RECREC REC RECCAMERA1 CAMERA2 CAMERA3 CAMERA1 CAMERA2 CAMERA3 CAMERA1 CAMERA2V-SYNCSWITCHER / switching  cameras/ recording  start signalVCR1 / recording/ clock outVCR2 / recording/ clock outVCR3 / recording/ clock outVCRRecording time modeL18H, L24HL30H, L40H 35Number of camerasMultiple of 3Multiple of 5<MAIN MENU>DISPLAYTIMER PROGRAMRECORDING SET UPREAR TERMINALMAINTENANCE<REAR TERMINAL>CALL OUT WRNG•TAPE ENDCLOCK OUT REC- 1MODE OUT RECREC IN SERIES<REAR TERMINAL>CALL OUT WRNG•TAPE ENDCLOCK OUT REC- 1MODE OUT RECREC IN SERIES<REAR TERMINAL>CALL OUT WRNG•TAPE ENDCLOCK OUT REC- 1MODE OUT RECREC IN REC-START/STOP<REAR TERMINAL>CALL OUT WRNG•TAPE ENDCLOCK OUT REC- 1MODE OUT RECREC IN SERIES<REAR TERMINAL>CALL OUT WRNG•TAPE ENDCLOCK OUT T/L REC- 1MODE OUT RECREC IN SERIES<REAR TERMINAL>CALL OUT WRNG•TAPE ENDCLOCK OUT T/L REC- FMODE OUT RECREC IN SERIES<REAR TERMINAL>CALL OUT WRNG•TAPE ENDCLOCK OUT REC- 1MODE OUT RECREC IN SYNC RECNote• The recording mode must be set to L18H, L24H, L30H orL40H.• The suitable number of VCRs and cameras to be connectedare shown below:Recording Techniques (Cont.)
15Advanced FunctionsReference pageAdditional FeaturesMemory backup in case of power failureThis VCR includes a built-in backup memory, so the preset dayand present time will remain in memory even if there is a powerfailure.  However, if the power cord is disconnected for a longperiod of time (2-3 months), the present time may not beaccurate.  In this case, set the clock again.Info.• The battery is fully charged if the VCR’s power cord isplugged into the outlet for 40 or more hours per week.• If the battery is fully charged, even if the power cord is notplugged in, the following settings will remain in memory forup to 31 days:– The day and present time display– Timer program– Alarm list/Power loss list– Number of tape uses/Elapsed time of the VCR– Counter display– Recording/Playback modeNote• When ALARM REC DURATION of the RECORDING SETUP menu is set to MAN1 or MAN2 and a power failureoccurs during the alarm recording, the VCR may not returnto the alarm recording mode when the power comes backon.After a power failureIf a power failure occurs during manual,timer or alarm recording, the VCR willreturn to the recording mode when thepower comes back on.  The Power Failuresymbol (X) will be displayed for about 1minute on screen and the Power Lossindicator ( ) will illuminate on thefluorescent display when the power comesback on.  If a power failure occurs while theVCR’s power is on, the VCR will turn on byitself when the power comes back on.Displaying/clearing the power loss listDisplaying the power loss listThe power failure start time is logged in the VCR’s Power LossList.  To view the list, please follow the steps listed below.1. Press MENU button.•<MAIN MENU> appears.2. Turn JOG to select MAINTENANCEand turn SHUTTLE to the right.•<MAINTENANCE> menu appears.3. Turn JOG to select POWER LOSSLIST and turn SHUTTLE to the right.•<POWER LOSS LIST> appears.4. Press MENU button.• The day and present time appearson screen.Note• Up to 3 power failure start times will be displayed.  If morethan 3 failures have occurred, the first start time and the last2 start times will be displayed on the list.01-01-’02   TUE00:00:00 X L30<MAINTENANCE>POWER LOSS LISTALARM LISTALL MENU INITIALIZEPOWER LOSS LIST CLEARALARM LIST CLEAR<REPEAT REC TIMES> 0<ELAPSED TIME> 0H<POWER LOSS LIST>01 01-31-’02  00:000203Clearing the power loss list1. Select POWER LOSS LIST CLEAR in<MAINTENANCE> menu and turnSHUTTLE to the right.2. Turn SHUTTLE to the left to clear thelist.•<MAINTENANCE> menu appears.To exit the menu without clearingthe list, press MENU button.3. Press MENU button.• Once the list is cleared, the Power Loss indicator ( ) willgo off.Displaying/clearing the alarm listDisplaying the alarm listThe alarm recording start time/date are logged in the VCR’sAlarm List.  To view the list, please follow the steps listed below.1. Press MENU button.•<MAIN MENU> appears.2. Turn JOG to select MAINTENANCEand turn SHUTTLE to the right.•<MAINTENANCE> menu appears.3. Turn JOG to select ALARM LIST andturn SHUTTLE to the right.•<ALARM LIST> appears.4. Press MENU button.• The day and present time appearson screen.Note• Maximum of 9,999 alarm recording start times will becounted.• Up to 8 alarm recording start times/dates will be displayed.If more than 8 alarm recordings have occurred, the first starttime and the last 7 start times will be displayed on the list.Clearing the alarm list1. Select ALARM LIST CLEAR in<MAINTENANCE> menu and turnSHUTTLE to the right.2. Turn SHUTTLE to the left to clear thelist.•<MAINTENANCE> menu appears.To exit the menu without clearingthe list, press MENU button.3. Press MENU button.• Once the list is cleared, the Alarm Recording indicator() on the fluorescent display will go off.  POWER LOSS LIST CLEARTurn the SHUTTLE RINGthen POWER LOSS LISTwill be cleared.<MAINTENANCE>POWER LOSS LISTALARM LISTALL MENU INITIALIZEPOWER LOSS LIST CLEARALARM LIST CLEAR<REPEAT REC TIMES> 0<ELAPSED TIME> 0H<ALARM LIST>0001 01-31-’02 00:000002000300040005000600070008  ALARM LIST CLEARTurn the SHUTTLE RINGthen ALARM LIST will becleared.
16 Advanced FunctionsNoteA point to noticeInfo.Supplementary informationSpecial Effects PlaybackThe following convenient functions are available.  Audio output ismuted during special effects playback.Still picture1. Press PAUSE button during playback.• Press PAUSE button again to resume the playback.Shuttle ringBy turning the SHUTTLE ring during still picture, you can obtain avariety of playback speeds as shown below.1. Turn SHUTTLE to the right or left during still picture.• The playback speed varies by the angle of SHUTTLE ring.• When SHUTTLE ring is released, it comes back to thecenter position and the playback picture stays at still.Shuttle holdWhen the SHUTTLE ring is released, the playback speed can befixed to one selected.1. Turn SHUTTLE to the right or left to obtain a desired playbackspeed, then press PAUSE button.2. Release SHUTTLE.Cancelling the shuttle hold playback1. Press PAUSE button once to go back to the still picture andpress once again to return to the playback.Direct shuttle ringBy turning the SHUTTLE ring during playback, you can obtainsome of special effects playback as shown below.Tape usage and elapsed time of VCRREPEAT REC TIMES indicates how many times a tape hasbeen recorded over since it was firstinserted.ELAPSED TIME indicates the total time the VCR hasbeen used for recording or playback.1. Press MENU button.•<MAIN MENU> appears.2. Turn JOG to select MAINTENANCEand turn SHUTTLE to the right.•<REPEAT REC TIMES> and<ELAPSED TIME> are shown atthe bottom of the <MAINTENANCE> menu.3. Press MENU button.• The day and present time display appears on screen.Note• <REPEAT REC TIMES> is:– counted when the tape ends during recording (exceptwhen TAPE END of FIRST TIME SET UP menu is set toSTOP)– memorized even if the VCR is turned off– reset when a tape is inserted– shown up to 200 times.  OVER is shown if exceeds 200times.• <ELAPSED TIME> is shown up to 89,999 hours.Lock functionEach time the LOCK button is pressed, the Lock/Lock Allindicator illuminates on the fluorescent display in the order of       (No display)       ...  All or some of thebuttons on the front panel of VCR are locked, and the VCR iskept in the current condition.  To release the lock, press LOCKbutton until nothing is displayed on the fluorescent display.: All buttons except RECORD button and EJECTbutton are locked.: All buttons are locked.(No display): No buttons are locked.Additional Features (Cont.)(  ) indicates the playback speed ofthe recorded tape in 2H mode.15(7)9(5)211/71/151/30 89101175615(7)9(5)311/71/151/3043211 Reverse high speed search2 Reverse speed search3 Reverse fast playback (x3)4 Reverse playback5 Reverse slow6 Still7 Slow playback8 Normal playback9 Fast playback (x2)10 Forward speed search11 Forward high speed search(  ) indicates the playback speed ofthe recorded tape in 2H mode.15(7)9(5)9(5)275615(7)343211 Reverse high speed search2 Reverse speed search3 Reverse fast playback (x3)4 Normal playback5 Fast playback (x2)6 Forward speed search7 Forward high speed search<MAINTENANCE>POWER LOSS LISTALARM LISTALL MENU INITIALIZEPOWER LOSS LIST CLEARALARM LIST CLEAR<REPEAT REC TIMES> 0<ELAPSED TIME> 0H
17Advanced FunctionsReference pageAdjustment during PlaybackTracking adjustmentIf noise appears in the picture during playback, reverse/forwardslow playback, fast playback, reverse playback, frame or fieldplayback, you can reduce or eliminate it by adjusting thetracking.How to adjust during playback1. Press TRACKING button (+) or (–) to achieve the bestpicture.How to adjust during reverse/forward slow playback,fast playback, reverse playback, frame or field playback1. During still picture, turn SHUTTLE to obtain the respectiveplayback mode.If noise appears in frame or field playback, set to slowplayback.2. While turning SHUTTLE, press PAUSE button.• The playback picture is fixed at the selected speed.3. Release SHUTTLE.4. Press TRACKING button (+) or (–) to achieve the bestpicture.Initializing the trackingThe tracking will be reset to its initial setting by pressing bothTRACKING buttons (+) and (–) together during playback.Note• Adjust the tracking at each playback mode or the type ofplayback (fast playback, reverse playback, etc.), since themethod of tracking adjustment varies.• Although the tracking is adjusted during reverse playback orreverse slow playback, the noise may remain on screen.If noise appearsTRACKINGFrame or field playback1. To forward frames or fields one by one, turn JOG during stillpicture.• Turn to the right to forward.• Turn to the left to reverse.To forward frames or fields continuously, keep turning JOGduring still picture.• Keep turning to the right to forward frames (fields)continuously.• Keep turning to the left to reverse frames (fields)continuously.To stop frame or field playback, release JOG.• The playback picture stays at still.Note• Noise bars may appear on the picture while switchingbetween forward and reverse frame or field playback.• When a picture recorded in 6H or 8H mode is played back inL18H, L24H, L30H or L40H mode, noise may appear onscreen after the adjustment.• The noise bars will move continuously when a TRACKINGbutton is depressed.Vertical adjustment (picture vibration at the top andbottom)The picture vibration during still picture, fast playback orplayback at L18H-128H or 0H mode can be reduced oreliminated by the following steps.How to adjust1. Press PAUSE button during playback.2. Press VERTICAL ADJUST button (+) or (–) to reduce oreliminate the picture vibration.Initializing the vertical adjustmentThe vertical adjustment will be reset to its initial setting bypressing both VERTICAL ADJUST buttons (+) and (–) togetherduring still picture, fast playback or playback at L18H-128H or 0Hmode.Note• Horizontal vibration cannot be corrected with VERTICALADJUST buttons.•VERTICAL ADJUST buttons will not work, when QUASI V-SYNC of FIRST TIME SET UP menu is set to OFF.• The picture vibration during still picture, frame or fieldplayback may not be adjusted with VERTICAL ADJUSTbuttons.When the picture is vibratingPOSITIONVERTICAL ADJUST
18 Advanced FunctionsNoteA point to noticeInfo.Supplementary information<SEARCH FUNCTION>COUNTER MEMORY STOPSKIP SEARCHINDEX SEARCH 1TIME DATE SEARCHUse JOG to adjust,turn the SHUTTLE RING     or      to execute.Press STOP to exit.Reverse direction Fast forward direction-255 -2 -1Present position+2+1 +255Alarm RecordingSearching TechniquesThe various search functions help you find pictures you wish toview.Counter memory stopRewinds a tape until the counter on the fluorescent displayreaches “00000” and stops.1. Press SEARCH button once.•<SEARCH FUNCTION> menuappears and COUNTER MEMORYSTOP is highlighted.• The Counter Memory Stop indicator() illuminates on the fluorescentdisplay.2. Turn SHUTTLE to the right.• The VCR starts rewinding the tape.To quit while rewinding, press STOP button.To exit the <SEARCH FUNCTION> menu withoutrewinding, press STOP button.Note• When the counter on the fluorescent display indicates“00000”, COUNTER MEMORY STOP of the SEARCHFUNCTION menu cannot be selected.Skip searchDuring fast forwarding or rewinding, the VCR plays back a tape(at 2H, 6H or 8H mode) for about 4 seconds where an indexsignal is recorded.  This process is repeated until the end orbeginning of the tape is reached.1. Press SEARCH button until SKIPSEARCH is highlighted.• The Skip Search indicator ( )illuminates on the fluorescentdisplay.2. Turn SHUTTLE to the right or left.• Turning to the right proceeds the search in the forwarddirection.• Turning to the left proceeds the search in the reversedirection.To quit while searching, press STOP button.To exit the <SEARCH FUNCTION> menu withoutsearching, press STOP button.3. When you find a picture you wish to view, press PLAY button.Note• The index signal may be difficult to locate in some recordingconditions.• Audio output is muted during the skip search.<SEARCH FUNCTION>COUNTER MEMORY STOPSKIP SEARCHINDEX SEARCHTIME DATE SEARCHTurn the SHUTTLE RING     or      to executePress STOP to exit.Info.• Skip search or index search may not function if the intervalbetween two alarm recording start-times is too short.  Thetable below indicates the minimum interval between two alarmrecording start-times for the skip or index search to workcorrectly.Index searchDuring fast forwarding or rewinding, the VCR will search for anindex signal you have selected.  When the index signal is found,the VCR will play back in still picture.1. Press SEARCH button until INDEXSEARCH is highlighted.• The Index Search indicator ( )illuminates on the fluorescentdisplay.2. Turn JOG to select an index number(between 1 and 255) you wish to find.To exit the <SEARCH FUNCTION>menu without searching, pressSTOP button.3. Turn SHUTTLE to the right or left to start searching.• Turning SHUTTLE to the right  proceeds the search in theforward direction.• Turning SHUTTLE to the left proceeds the search in thereverse direction.• The index number shown on the fluorescent display willdecrease one by one as each index signal goes by.To quit while searching, press STOP button.Note• The index signal may be difficult to locate in some recordingconditions.Info.  How to count index number• Index number is the count from the present position.  Theindex number of one alarm recording before the presentposition is “-1”.  One after is “+1”.• Maximum count is ±255 alarm recordings.Minimum intervalbetween two alarmrecording start-timesAlarmrecordingmode6H(8H)L18H(L24H)L30H(L40H)approx. 15 sec.approx. 2 min.approx. 2 min.(  ) appears when TAPE LENGTH is set to T-160.ALARMRECORDING ALARMRECORDINGPresent positionIndexFast forwardFast forwardIndexApprox. 4 sec.playback Approx. 4 sec.playbackFast forward<SEARCH FUNCTION>COUNTER MEMORY STOPSKIP SEARCHINDEX SEARCHTIME DATE SEARCHTurn the SHUTTLE RINGto execute.Press STOP to exit.
19Advanced FunctionsReference page<SEARCH FUNCTION>COUNTER MEMORY STOPSKIP SEARCHINDEX SEARCHTIME DATE SEARCHTurn the SHUTTLE RINGto go the search menu.Press STOP to exit.<TIME DATE SEARCH>TIME 00:00DATE 13DIRECTION REVERSEUse JOG to adjust,and ENTER.<TIME DATE SEARCH>TIME 03:25DATE 24DIRECTION FORWARDUse JOG to adjust,and ENTER to start.Time date searchYou can easily find a picture recorded at specific date and time.1. Press SEARCH button until TIMEDATE SEARCH is highlighted.• The Time Date Search indicator ( )illuminates on the fluorescentdisplay.2. Turn SHUTTLE to the right.•<TIME DATE SEARCH> menuappears.3. Turn JOG to set hour digits of TIMEyou wish to find and turn SHUTTLE tothe right.To exit the <TIME DATE SEARCH>menu without searching, turnSHUTTLE to the left several times.4. Set 10-minute digit and 1-minute digit of TIME, DATE andDIRECTION in a similar fashion.• Searches in the forward direction ofthe tape when DIRECTION is set toFORWARD.• Searches in the reverse direction ofthe tape when DIRECTION is set toREVERSE.5. Turn SHUTTLE to the right to startsearching.• When the recorded picture is found, it is shown at stillpicture.To quit while searching, press STOP button.Note• An index mark is written on a tape at each hour (1:00, 2:00and so on) during recording.  The time date search cannot beresumed if the index mark of the hour (set in step 3) is notrecorded on a tape.Example: When the VCR recorded from 8:15 to 17:30 on atape, only pictures recorded between 9:00 and 17:30 can befound using the time date search.• The time date search may not function correctly, if you use atape with a poor recording quality or with alarm recordingsrecorded at several recording mode.• The time date search will not function when using a taperecorded with other VCRs or a tape recorded without settingthe current day and time.Info.• When the desired part of the tape is not found in the selecteddirection, the VCR automatically searches in the oppositedirection.
20 Advanced FunctionsNoteA point to noticeInfo.Supplementary informationUsing RS-485 InterfaceConfiguring the Time Lapse VCRImportant notice:• Before connecting the hardware, unplug the powercord of the VCR from the wall outlet, and turn the RS-485 controller power off.Connecting the VCRs to a RS-485 controller1. Connect the cable to the RS-485 terminal of the RS-485controller.2. Connect the other end of cable to RS-485 IN terminal on theVCR.3. Connect the other end of the cable to RS-485 OUT terminalof the 1st VCR and the other end of cable to RS-485 INterminal on the 2nd VCR.4. Continue this process until the last (up to 127) VCR isconnected.Note• RS-485 remote control is through a RJ-45 connector on therear panel.  RS-485 remote connection requires two wires.One wire connects to the RS-485 RXA and the other connectsto the RS-485 RXB.  Connect RXS and RXB externally, or setthe TERMINATE switch to ON.  If more than two units areconnected, connect only one VCR with RXS and RXBexternally, or set the TERMINATE switch to ON.• Twist the wires together to help eliminate noise from thesignal.RS-485 SettingSet the RS-485 interface board setting by using the on screenmenu of the VCR.1. Press MENU button.•<MAIN MENU> appears.2. Turn JOG to select CLOCK/FIRSTTIME SET UP and turn SHUTTLE tothe right.•<FIRST TIME SET UP> menuappears.3. Turn JOG to select RS-485 and turnSHUTTLE to the right.•<RS-485> menu appears.4. Change the parameter value by turningJOG to the left or right and turnSHUTTLE to the right to store the newvalue.5 Repeat step 4 until all of the items are set.•<FIRST TIME SET UP> menu appears after setting VCRGROUP.6. Press MENU button.• The day and present time display appears on screen.Note• Set TRANSMISSION RATE to the same value as thecontrolling RS-485 controller.• When VCRs have a unique VCR ADDRESS (from VCR01 toVCR127), VCRs can be controlled remotely via a RS-485controller.• When the group number (from 01 to 15) is set, the multipleVCRs set to the same number will be controlled at the sametime.Connecting to a RS-485 ControllerPhysical protocol of RS-485Data communication settingsSynchronization AsynchronousTransmittion rate 1200/2400/4600/9600/19200 bpsStart bit length 1bitStop bit length 1bitData length 8bitParity bit NilNote• When the RS-485 controller sends the command to theVCR, enable the RS-485 driver of the controller to send thedata before sending Start bit (before T=1bit or more).<MAIN MENU>DISPLAYTIMER PROGRAMRECORDING SET UPREAR TERMINAL<FIRST TIME SET UP>TIME DATE ADJUSTTAPE END STOPQUASI V-SYNC ONVIDEO MODE AUTOTAPE LENGTH T-120BUZZER WRNGRS-485<RS-485>TRANSMISSION RATE 9600STATUS OFFVCR ADDRESS VCR01VCR GROUP NONE<RS-485>TRANSMISSION RATE 9600STATUS OFFVCR ADDRESS VCR01VCR GROUP NONERS-485ONINOUTTERMINATEOFFAUDIO VIDEOOUT OUTINREMOTE MICINRESETALM RSTINREC GND ALMMODECLKOUTCALLBATTERYOPENRS-485ONINOUTTERMINATEOFFAUDIO VIDEOOUT OUTINREMOTE MICINRESETALM RSTINREC GND ALMMODECLKOUTCALLBATTERYOPENRS-485ONINOUTTERMINATEOFFAUDIO VIDEOOUT OUTINREMOTE MICINRESETALM RSTINREC GND ALMMODECLKOUTCALLBATTERYOPENRS-485 Controller1st VCR2nd VCR127th VCRTo RS-485 terminalTo RS-485 IN terminalTo RS-485 OUT terminalTo RS-485 IN terminalTo RS-485 OUT terminalTo RS-485 IN terminalTo RS-485 OUT terminalTo RS-485 IN terminalRS-485 INRJ-45 connector12345678RS-485 OUTRJ-45 connector12345678No.12345678Pin AssignmentNO CONNECTIONNO CONNECTIONRXSRXB (Data –)NO CONNECTIONRXA (Data +)NO CONNECTIONNO CONNECTIONData enableRXBRXACommand data DRDataenableCommanddataStartbit StopbitTD0 D1 D2 D3 D4 D5 D6 D7
21Advanced FunctionsReference pageCommands from RS-485 ControllerThe commands sent from the RS-485 controller to the VCR andresponses produced by the VCR are detailed in this section.• Input the “VCR ADDRESS (eg. VCR01)” that you want tocontrol and “, (comma)” before inputting the command code.• When you want to control all the VCRs set to the samegroup number, input “GROUP (eg. GRP01)” that you want tocontrol and “, (comma)” before inputting the commandcodes.• When you want to control all connected VCRs, input “ALL”and “, (comma)” before inputting the command codes.*CR  indicates carriage return code (0DH).Example 1:Fast forward the tape in the VCR of the ID number VCR02.*CR  indicates carriage return code (0DH).*2Status or error code will be sent from the VCR whenSTATUS in the RS-485 menu is set to ON.Example 2:When the VCRs from VCR28 to VCR34 are set to GROUP03,and switch on the all VCR of the GROUP number 03.*CR  indicates carriage return code (0DH).* When the commands are sent for the group of VCRs, statusor error code will not be sent from the VCRs.Example 3:Set the clock of the all VCR connected to 12:27.*CR  indicates carriage return code (0DH).* When the commands are send for ALL VCRs, status or errorcode will not be sent from the VCR.Sending commandsfrom the RS-485 controllerStatus or error codefrom the VCR to RS-485 controllerMeaningsCommand for fast forwarding(VCR02)Command received (VCR02) *2Command carried out (VCR02) *2VCR02, FF  CRVCR02, RC  CR  *2VCR02, EX  CR  *2Format : CommandCodesVCR ADDRESS,GROUP or ALLParameter1,Parameter2,,ParameternCRFormat : CommandCodesVCR ADDRESSParameter1,Parameter2,,ParameternCRCommand :  Commands set to the VCR.Status  :  Response codes from the VCR to outside.Sending commandsfrom the RS-485 controllerStatus or error codefrom the RS-485 controllerMeaningsCommand for setting all VCRs’ clock at 12:27ALL,SC12,27  CRGRP03,PW1  CR Power ON commandSending commandsfrom the RS-485 controllerStatus or error codefrom the VCR to RS-485 controllerMeanings
22 Advanced FunctionsNoteA point to noticeInfo.Supplementary informationNO.123456789101112131415161718192021222324252627282930313233CommandsPWPW0PW1EJSPPBRPFFRWRCCMPUPU0PU1FARALKLK0LK1SFSRIFIRINTRTR0TR1TPSSLOLMCRCTFunctionsPower ON/OFFPower OFFPower ONEjectStopPlaybackReverse playbackFast forwardRewindRecordingCounter memory stopPause ON/OFFPause OFFPause ONFrame adavance (when still)Reverse frame adavance (when still) Lock OFFLock ONLock All ONSkip search (forward)Skip search (reverse)Index search (forward)(       =001-255)Index search (reverse)(       =001-255)Enquiry about current index No.(during index search)Timer recording ON/OFF Timer recording OFF Timer recording ONEnquiry about current executing timerprogram No.Enquiry about current VCR statusLock ON/OFF or Lock All ON/OFF    :0=OFF, 1=ONEnquiry about current lock status andlock modeCounter resetEnquiry about current counter displayvalueExplanation of statusCommand received and carried outIndex No. is        =001-255 Command received and carried outTimer program No. is    =1-8  (Note)ER08,when not timer recordingPower off, cassette inPower off, cassette outPower on, cassette inPower on, cassette outFast forward underwayRewind underwayRecording underwayRecording pause underwayPlayback underwayReverse playback underwayForward speed search underwayReverse speed search underwayStill underwayCounter memory stop underwaySkip search (fast forward) underwaySkip search (rewind) underwayPlayback during skip searchIndex search (fast forward) underwayIndex search (rewind) underwayRewind during repeat recordingAlarm recording underwayTimer recording underwayStandby for timer recordingTimer recording error underwayTime date search standby underwayTime date FF search underwayTime date REW search underwayTime date search or point adjustmentunderwayRecording check underwayAlarm recording Index writing underwayTime date index writing underwayOneshot recording underwayFrame advance underwayReverse frame advance underwayCommand received and carried out   : 0=Lock off, 1=Lock on     2=Lock All onCommand received and carried out             =00000-99999Status after normal executionRC     EXRC     IDRC     EXRC     TNRC     ST00RC     ST01RC     ST02RC     ST03RC     ST04RC     ST05RC     ST06RC     ST07RC     ST08RC     ST09RC     ST10RC     ST11RC     ST12RC     ST13RC     ST14RC     ST15RC     ST16RC     ST17RC     ST18RC     ST19RC     ST20RC     ST21RC     ST22RC     ST23RC     ST24RC     ST25RC     ST26RC     ST27     RC     ST29RC     ST30RC     ST31RC     ST32RC     ST33RC     ST34RC     EXRC     LM   RC     EXRC     CT*1OOOOOOOOOOOOOOOOOOOOOOO–OOO––O–O–*2–––––––––––––––––––––––O–––OO–O–OCR CR CRCRCR CRCRCR CRCR CRCR CRCR CRCR CRCR CRCR CRCR CRCR CRCR CRCR CRCR CRCR CRCR CRCR CRCR CRCR CRCR CRCR CRCR CRCR CRCR CRCR CRCR CRCR CRCR CRCR CRCR CRCR CRCR CRCR CRCR CRCR CRCR CRCR CRCR CRCR CRCR CRCR CRCRCRCRCRCRCRCRCRCRCRCRCRCRCRCRCRCRCRCRCRCRCRCRCRCRCRCRCRCRCRCRCRUsing RS-485 Interface (Cont.)Commands and Responses•CR  indicates carriage return code (0DH).• indicates one character or number. (eg.   indicates three characters or numbers.)• *1: the command available for “ALL” VCRs or the “GROUP” of the VCRs. (All commands are available for controlling the specifiedVCR ADRESS.)• *2: the command for which the VCR sends the status even when the STATUS in RS-485 menu is set to OFF.
23Advanced FunctionsReference pageNO.34353637383940414243444546474849CommandsMCMDDPDPPISD     (1),      (2),         (3) DTSC     (1),      (2)TMTDPS     (1),      (2)LCDP131    PG   (1),   (2),         (3),        (4),        (5),         (6),             (7),    (8)          DPPMDP131    CADPDW   (1),   (2) FunctionsSwitch over REC/PLAY mode to        = 006, L18, L30, 048, 072, 096,000Enquiry about current REC/PLAY modeChange menu to the next layerSwitch screen page to        :   000=present time display100=MAIN MENU110=DISPLAY menu120=SEARCH FUNCTION menu121=TIME DATE SEARCH menu130=TIMER PROGRAM menu131=PROGRAM TO RECORD menu132=HOLIDAY SET UP menu 140=RECORDING SET UP menu150=REAR TERMINAL menu160=MAINTENANCE menu161=POWER LOSS LIST162=ALARM LIST163=ALL MENU INITIALZE164=POWER LOSS LIST CLEAR165=ALARM LIST CLEAR170=FIRST TIME SET UP menu171=TIME DATE ADJUST menu172=RS-485 menuEnquiry about current screen pageCurrent date setting     (1):Month,      (2):Day,         (3) :YearEnquiry about current dateCurrent time setting     (1):Hour,      (2):MinuteEnquiry about current timeEnquiry about power failure symbolTime and date display position          (1):Horizontal=01-30 (mode 1,size large)=01-52 (mode 1,size small)=01-39 (mode 2,3 size large)=01-62 (mode 2,3 size small)          (2):Vertical=01-37 (mode 1,size large or small)=01-35 (mode 2,3 size large or small)Enquiry about time and date displaypositionTimer program setting     (1)Program No.=1-8     (2):Day of the week (0=SUN, 1=MON, 2=TUE, 3=WED, 4=THU, 5=FRI, 6=SAT,7=DAY, 8=SPL,9=HLD)          (3):Rec. starting hour=00-23          (4):Rec. starting minute=00-59          (5):Rec. ending hour=00-23          (6):Rec. ending minute=00-59               (7):Rec. time mode= 006, L18, L30, 048,072, 096, 000, SKP     (8):REC mode 1=EP, 3=EP/EXT (EXT= external timer recording)Enquiry about setting contents of timerprogram No. (     =1-8)Clear contents of timer program No. (     =1-8)Setting the special day of the week     (1):Start day of the week (0-6)     (2):End day of the week (0-6)0=SUN, 1=MON, 2=TUE, 3=WED,4=THU, 5=FRI, 6=SATStatus after normal exectionRC     EXRC     MD        (1)RC     EXRC     ON        (1)   (2)RC     EXRC     TD     (1),     (2),     (3),   (4)RC     EXRC     TI     (1),     (2),     (3)RC     MKRC     EXRC     LT     (1),     (2)RC     EXRC     MP   (1),   (2),         (3),         (4),         (5),         (6),             (7)      (8)RC     EX(Cannot accept this command when    (1)and    (2)are the same number)Explanation of statusCommand received and carried out        (1): (same as item 34)Command received and carried out       (1):(same as item 37),050=LANGUAGE SELECT   (2)      : 0=Setting completed,            1=Setting underwayCommand received and carried out     (1),-      (3):(same as item 39)  (4):Day of the week0=SUN, 1=MON, 2=TUE,3=WED, 4=THU, 5=FRI, 6=SATCommand received and carried out     (1):Hour,     (2):Minute,     (3):Second  : 0=Not Displayed, 1=DisplayedCommand received and carried out     (1),       (2) : (same as item 44)Command received and carried out(Note) An error (ER08) will occur if anattempt is made to program a timer program number that has already been set. Clear thetimer program contents with the "CA   "command and then retry.   (1),-   (8) (=same as item 46)Command received and carried out*1O–OO–O–O––O–O–OO*2–O––O–O–OO–O–O––CR CRCR CRCRCR CRCR CRCR CRCRCRCRCRCR CRCR CRCR CRCR CRCR CRCR CRCR CRCRCRCRCRCRCRCRCRCRCRCRCRCR CRCRCRCRCRCRSend the commands no. 46 and 48 when the VCR is in STOP mode.
24 Advanced FunctionsNoteA point to noticeInfo.Supplementary informationNO.505152535455565758596061626364656667686970717273747576777879808182838485868788899091CommandsDW?AMAS1ADAS0EMEM0EM1AS2TEFS0DMDM?CH0CH1FS1CO   (1),      (2)ROMORMCUCU?BLBL?STBZBRFS2BPOSOFOIOI?ANATCAPNPTPCMIHM?WNFunctionsEnquiry about setting of the special day of the weekAlarm recording mode setting     =06, 18, 30Enquire of alarm recording mode settingAlarm REC duration setting  :0=MAN1, 1=MAN2, 2=15S, 3=30S, 4=45S, 5=1M, 6=2M, 7=5M, 8=10MEnquiry about alarm REC duration settingEmergency REC ON/OFFEmergency REC OFFEmergency REC ONEnquiry about emergency REC settingTape end movement setting  : 0=STOP, 1=REWIND, 2=REPEAT,    3=ALARM•PROT (protect)       Enquiry about tape end movement setDisplay mode setting   =1-4 Enquiry about display mode settingSet date character display size "SMALL"Set date character display size "LARGE"Enquiry about date character display sizeClock out setting   (1):0=REC, 1=T/L REC     (2):01, 02, 03, 04, 05, 10, 15, 20, 25,        30, 50, 60, 00(output by field)Enquiry about clock out settingMode out setting  : 0=REC, 1=PLAY, 2=POWER,    3=TAPE IN, 4=TAPE REMAIN,    5=CLOCK ADJEnquiry about MODE OUT settingCALL OUT setting    :0=OFF, 1=ONReceive the command only when thesignal at the CALL OUT terminal is switched to the active condition.Enquiry about CALL OUT settingBlue Back setting    : 0=OFF, 1=ONEnquiry about Blue Back settingSet menu item to flash    :0=OFF, 1=ONBuzzer setting  : 0=WRNG, 1=WRNG•TAPE END,    2=WRNG•REMAIN, 3=OFFBuzzer ON/OFF setting    :0=OFF, 1=ONEnquiry about buzzer settingEnquiry about buzzer statusOne shot field setting     : 01, 02, 03, 04, 05, 10, 20, 30Enquiry about one shot field settingOneshot interval setting  : 0=SHOT, 1=10S, 2=15S, 3=30S    4=45S, 5=1M, 6=2M, 7=3MEnquiry about one shot interval settingEnquiry about current alarm REC. No.Enquiry about alarm list  : 0=about the first alarm recording    1-7=about the last to seventh last           alarm recordingClearing alarm listEnquiry about current power loss No.Enquiry about power loss list  : 0=about the first power loss    1=about the second last power loss    2=about the last power lossClearing power loss listInitializing the menu settingEnquiry about the elapsed timeEnquiry about warning informationStatus after normal executionRC     DW  (1),   (2)RC     EXRC     AMRC     EXRC     APRC     EXRC     EGRC     EXRC     TERC     EXRC     DMRC     EXRC     CZRC     EXRC     CD   (1),      (2)RC     EXRC     MRRC     EX RC     CURC     EXRC     BLRC     EX RC     EX RC     BZRC     SWRC     EXRC     SDRC     EXRC     OIRC     ANRC     AT         (1),         (2),         (3),         (4),         (5)RC     EXRC     PNRC     PT         (1),         (2),         (3),         (4),         (5)RC     EXRC     HMRC     WNExplanation of status    (1):Start day (of the week) (0-6)     (2):End day (of the week) (0-6)0=SUN, 1=MON, 2=TUE, 3=WED,4=THU, 5=FRI, 6=SATCommand received and carried out      =06, 18, 30Command received and carried out   :(same as item 53)Command received and carried out   :0=OFF, 1=ONCommand received and carried out  :(same as item 59)Command received and carried out  =1-4Command received and carried outCommand received and carried out  : 0=SMALL, 1=LARGECommand received and carried out  (1),     (2):(same as item 66)Command received and carried out  : (same as item 68)Command received and carried out  : 0=OFF, 1=ONCommand received and carried out  : 0=OFF, 1=ONCommand received and carried outCommand received and carried out  : (same as item 75)  : 0=OFF (not ring), 1=ON (ring)Command received and carried out     :(same as item 79)Command received and carried out  :(same as item 81)            =0000-9999     (1):Month,     (2):Day,     (3):Year,     (4):Hour,     (5):MinuteCommand received and carried out     =00-99     (1):Month,     (2):Day,     (3):Year,     (4):Hour,     (5):MinuteCommand received and carried out               :=hour     :Warning No.00=no malfunction, 01=tape end03=video input missing04=clogged head05=reel rotation trouble06=loading motor trouble07=capstan motor trouble08=drum motor trouble, 09=tape loose10=switching power short, 11=cut tape*1–O–O–OOO–O–O–OO–O–O–O–O–OOO––O–O–––O––OO––*2O–O–O–––O–O–O––O–O–O–O–O–––OO–O–OOO–OO––OOCR CR CRCR CRCR CRCR CRCR CRCR CRCR CRCR CRCR CRCR CRCR CRCR CRCR CRCR CRCR CRCR CRCR CRCR CRCR CRCR CRCRCR CRCR CRCR CRCR CRCR CRCR CRCR CRCRCR CRCRCRCR CRCR CRCR CRCR CRCR CRCR CRCR CRCRCRCRCRCRCRCRCRCRCRCRCRCRCRCRCRCRCRCRCRCRCRCRCRCRCRCRCRCRCRCRCRCRUsing RS-485 Interface (Cont.)
25Advanced FunctionsReference pageNO.9293949596979899100101102103104105106107108109110111112113114115116117118119120CommandsCA0RIRI?QVQMCLRLSMSM?RS?TLTL?LP?TF     (1),      (2),     (3)TB     (1),      (2),     (3)TS?MQSB1MMSB3RN?SV?HL     (1),      (2),     (3)EHHCHRHR0HR1HR?FunctionsClearing the warning "ER05"REC IN setting  : 0=SERIES, 1=REC-START/STOP    2=SYNC RECEnquiry about REC IN settingQUASI-VSYNC setting     :0=OFF, 1=ONEnquiry about QUASI-VSYNC settingCALL OUT setting  : 0=WRNG, 1=WRNG•TAPE END    2=WRNG•REMAINEnquiry about CALL OUT settingDAYLIGHT SAVING setting  : 0=OFF, 1=ON, 2=AUTOEnquiry about DAYLIGHT SAVINGS settingEnquiry about REPEAT REC TIMESTape length setting  : 0=T-120, 1=T-160Enquiry about tape length settingEnquiry about tape remaining timeTime date search (forward) setting     (1):Day,     (2):Hour,     (3):MinuteTime date search (reverse) setting     (1):Day,     (2):Hour,     (3):MinuteEnquiry about time date search settingVIDEO MODE setting   : 1=B/W, 2=AUTOEnquiry about VIDEO MODEMenu language selection   : 0=English, 1=French, 2=SpanishEnquiry about selected menu languageEnquiry about recording/playback mode,SP/EPEnquiry about recording formatHoliday set up setting     (1):Position No. 01-20,     (2):Month,     (3):DayClearing holiday set up setting      : Position No. 01-20Enquiry about holiday set up setting online 1 to 5   : Line No. 1-5Super Resolution ON/OFFSuper Resolution OFFSuper Resolution ONEnquiry about Super Resolution settingStatus after normal executionRC     EXRC     RIRC     EXRC     QVRC     EXRC     CLRC     EXRC     SMRC     RSRC     RSOVERRC     EXRC     TLRC     LP      (1),         (2)RC     EXRC     TS     (1)     (2)     (3)RC     EXRC     SQRC     EXRC     SPRC     RNRC     SVRC     EXRC     HC     (1),     (2),     (1),     (2),     (1),     (2),     (1),     (2),     (1),     (2)RC     EXRC     HRExplanation of statusCommand received and carried out  :(same as item 93)Command received and carried out  : 0=OFF, 1=ONCommand received and carried out  :(same as item 97)Command received and carried out  : 0=OFF, 1=ON, 2=AUTO OFF,3=AUTO ON        : 000-200OVER (more than 201 times)Command received and carried out  :(same as item 102)  (1):Hour,     (2):MinuteCommand received and carried out     (1):Day,     (2):Hour,     (3):MinuteCommand received and carried out   : (same as item 108)Command received and carried out   : (same as item 110)8=Language is not selected   : 0=SP, 1=EP   : 0=VHS, 2=Super ResolutionCommand received and carried out     (1):Month,     (2):DayCommand received and carried out   : 0=OFF, 1=ON*1OO–O–O–O––O––OO–O–O–––OO–OOO–*2––O–O–O–OO–OO––O–O–OOO––O–––OCR CR CRCR CRCR CRCR CRCR CRCR CRCR CRCR CRCR CRCR CRCRCRCR CRCR CRCR CRCR CRCR CRCR CRCR CRCR CRCR CRCR CRCR CRCR CRCR CRCR CRCRCRCRCRCRCRCRCRCRCRCRCRCRCRCRCRCRCRCRCRCRCRCRCRCRCRCRNO.1234567ErrorsER00ER01ER02ER03ER04ER05ER06Meaning of errorNo power supplyNo cassette loadedBroken tape tab (unable to record)Beginning of the tapeTape endProblem with the tape, video input or VCR mechanismPresent time or timer program not yet setNO.8910111213ErrorsER07ER08ER10ER11ER12ER13Meaning of errorAlarm REC underway (Unable to change setting)UnfeasibleIncorrect commandIncorrect parameterOverflow of the VCR's command receive bufferData not received correctlyError code
26 InstallationNoteA point to noticeInfo.Supplementary informationConnections for Various FunctionsAlarm Recording ConnectionThe alarm can be confirmed from a distance by connecting theALM OUT terminal with an existing alarm system panel or otherperipherals such as a buzzer.  Connect the VCR and otherperipherals as to the right.  (  page 11 for the menu setting andpage 37 for the rating of each terminal)Alarm set switchAlarm reset switch External alarm lampand buzzerRSTINREC GND ALMALMMODECLKOUTCALLAUDIO VIDEOOUT OUTINREMOTEINRESETRSTINREC GND ALMALMMODECLKOUTCALLMICVIDEOOUTAUDIOOUTMICINVIDEO INAUDIO INSENSOR CCTV CAMERAALM IN GNDVIDEOINVIDEO OUTMONITORMICROPHONEConnecting with CCTV camera, monitor and sensorNote• Monitor to be connected– Connecting with a CCTV monitor (for surveillance) is recommended.– Connecting with some monitors may cause picture vibration and/or picture distortion at the top or bottom of the image at stillpicture or normal playback.– A television for domestic use may easily cause the picture vibration and distortion.– A monitor can also be connected to the VIDEO OUT connector on the front panel.• CCTV camera to be connected– Do not connect ‘Color’ and ‘Black & White’ cameras together.
27InstallationReference pageSwitcher1st VCRVIDEO INVIDEO INVIDEO INCLK OUTREC INCLK OUTREC IN2nd VCR3rd VCRCamera 1Camera 2Camera 3Synchronous Recording ConnectionConnect VCRs as shown below. (  page 14 for the menu setting)NoteThe number of VCRs to be connected varies by the recording time mode selected.Connection for External Time Clock AdjustmentConnect VCRs as shown below. (  next page for the menu setting and page 37 for the rating of each terminal)2nd VCR1st VCRSwitchRSTINREC GND ALMALMMODECLKOUTCALL RSTINREC GND ALMALMMODECLKOUTCALL*1 : When connecting the MODE OUT terminal of the first VCR with the RST IN terminal of the second VCR,the on-screen clock of the second VCR can be adjusted to that of the first VCR.*1Remote Recording ConnectionConnect the VCR with a remote switch as to the right.  (  page 13 for the menu setting and page 37 for the rating of eachterminal)Remote switchRSTINREC GND ALMALMMODECLKOUTCALLSeries Recording ConnectionConnect VCRs to be used as shown below.(  page 12 for the menu setting)*1 : This connection is necessary         in case of Series Recording 2.*11st VCRRSTINREC GND ALMALMMODECLKOUTCALL2nd VCRRSTINREC GND ALMALMMODECLKOUTCALL
28 InstallationNoteA point to noticeInfo.Supplementary informationExample : Setting the day and presenttime to 8:25 p.m., 9 July, 2002.1. Press MENU button.• <MAIN MENU> appears.2. Turn JOG to select CLOCK/FIRSTTIME SET UP and turn SHUTTLE tothe right.• <FIRST TIME SET UP> menuappears.3. Turn JOG to select TIME DATEADJUST and turn SHUTTLE to theright.•<TIME DATE ADJUST> menuappears.4. Turn JOG to set DAYLIGHTSAVINGS and turn SHUTTLE to theright.• When set to ON, the clock moves forward one hour.• When set to AUTO, the clock moves forward one hourfrom the 1st Sunday of April (at 2 a.m.) to the last Sundayof October (at 3 a.m.).• When set to ON or AUTO and the clock is put forward onehour, the Daylight Saving Time symbol ( ) is shown nextto the hour digit of TIME on screen and the DaylightSaving Time indicator ( ) illuminates on the fluorescentdisplay.Note• When the DAYLIGHT SAVINGS is set to AUTO, theprogrammed recordings starting or finishing in the daylightsaving time changeover period may not be recordedcorrectly.• The daylight saving time may vary from the one abovedepending on your region or the year, in this case, setDAYLIGHT SAVINGS to ON or OFF manually.5. Turn JOG to show “07” for MONTH and turn SHUTTLE to theright.6. Set DAY, YEAR, TIME (hour digits, 10-minute digit and 1-minute digit) in a similar fashion.7. Turn SHUTTLE to the right while the1-minute digit of TIME is flashing.• The setting is now complete.•<FIRST TIME SET UP> menuappears.8. Press MENU button.• The day and present time display appears on screen.Setting the Clock<MAIN MENU>DISPLAYTIMER PROGRAMRECORDING SET UPREAR TERMINALMAINTENANCECLOCK/FIRST TIME SET UP<FIRST TIME SET UP>TIME DATE ADJUSTTAPE END STOPQUASI V-SYNC ONVIDEO MODE AUTOTAPE LENGTH T-120<TIME DATE ADJUST>DAYLIGHT SAVINGS OFFMONTH 01DAY 31YEAR 2002TIME 00:00:00• ’02 indicates year 2002.• The clock is shown in 24-hour format.• Alarm recording counter is shown during alarm recording only.<TIME DATE ADJUST>DAYLIGHT SAVINGS AUTOMONTH 01DAY 31YEAR 2002TIME 00:00:00<TIME DATE ADJUST>DAYLIGHT SAVINGS AUTOMONTH 07DAY 09YEAR 2002TIME 20:25:00Accurately set the day and present time before timer programming.MonthDay Year HourAlarmRecordingCounterSecondMinute07-09-’02 20:25:00 A0001<RECORDING SET UP>ALARM REC MODE 6HALARM REC DURATION 1MEMERGENCY REC OFFSUPER RESOLUTION ONONE SHOT•FIELD 1ONE SHOT•INTERVAL SHOT<REAR TERMINAL>CALL OUT WRNG•TAPE ENDCLOCK OUT REC- 1MODE OUT CLOCK ADJREC IN SERIESInfo.• When DAYLIGHT SAVINGS is set to ON or OFF and a tapeis not inserted in the VCR, DAYLIGHT SAVINGS can beswitched to ON or OFF on the front panel of the VCR bypressing STOP button and EJECT button together.• To move the displayed position of the day and present time onscreen, press POSITION button () or ( ).  ( ) moves thedisplay in a right-forward direction and () in a downwarddirection.Setting the current time to exact secondSet the clock as described above, but set minute digits to one ortwo minutes ahead of the reference time being used.  When thereference time reaches 00 seconds of the minute you have set,turn SHUTTLE to the right.  The VCR’s clock now corresponds tothe reference time to the nearest second.External time clock adjustmentThe VCR’s clock can be set to the nearest hour by connectingwith an external clock.  When 2 or more VCRs are connectedtogether, the clock can be set to the 1st VCR’s clocksimultaneously.  Make the following settings to all VCRs you wishto set the clock. (  previous page for the connection)1. Press MENU button.•<MAIN MENU> appears.2. Set ALARM REC DURATION of<RECORDING SET UP> menu toother than MAN1.3. Set MODE OUT of <REARTERMINAL> menu to CLOCK ADJ.4. Press MENU button.• The day and present timedisplay appears on screen.How the external time clock adjustment worksWhen the RST IN terminal is grounded at the rear panel, theclock is automatically set to the nearest hour.Example:• When the display shows 11:29:59, the clock is adjusted to11:00:00.• When the display shows 11:30:00, the clock is adjusted to12:00:00.When more than 2 VCRs are connected and the clock of the 1stVCR is adjusted to the nearest hour, the additional VCRs will alsobe set to the nearest hour.
29InstallationReference pageSet the menus by the following steps.1. Press MENU button.•<MAIN MENU> appears.2. Turn JOG to the left or right to select the desired item.• When turned to the right, the cursor moves downward.• When turned to the left, the cursor moves upward.3. Turn SHUTTLE to the right.• The desired item is selected and the menu appears.4. Turn JOG to the left or right to select item.5. Turn SHUTTLE to the right, then the setting item flashes.6. Turn JOG to the left or right to change the setting.7. Turn SHUTTLE to the right to set.8. Press MENU button.• The day and present time display appears.Setting the Menus01-01-’02  16:26:48<MAIN MENU>DISPLAYTIMER PROGRAMRECORDING SET UPREAR TERMINALMAINTENANCECLOCK/FIRST TIME SET UPUse JOG to select,and ENTER.Press MENU to exit.<DISPLAY>DISPLAY MODE 2TIME DATE SIZE SMALLBLUE BACK OFFe.g.<MODE 2>01-01-’01   MON00:00:00    L30<TIMER PROGRAM>PROGRAM TO RECORDHOLIDAY SET UPSPECIAL DW MON-SAT<RECORDING SET UP>ALARM REC MODE 6HALARM REC DURATION 1MEMERGENCY REC OFFSUPER RESOLUTION ONONE SHOT•FIELD 1ONE SHOT•INTERVAL SHOT<REAR TERMINAL>CALL OUT WRNG•TAPE ENDCLOCK OUT REC- 1MODE OUT RECREC IN SERIES<MAINTENANCE>POWER LOSS LISTALARM LISTALL MENU INITIALIZEPOWER LOSS LIST CLEARALARM LIST CLEAR<REPEAT REC TIMES> 0<ELAPSED TIME> 0H<FIRST TIME SET UP>TIME DATE ADJUSTTAPE END STOPQUASI V-SYNC ONVIDEO MODE AUTOTAPE LENGTH T-120BUZZER WRNGRS-485<TIME DATE ADJUST>DAYLIGHT SAVINGS OFFMONTH 01DAY 01YEAR 2002TIME 00:00:00<POWER LOSS LIST>01 01-01-’02 00:000203<ALARM LIST>0001 01-01-’02 00:000002000300040005000600070008  ALL MENU INITIALIZETurn the SHUTTLE RINGthen all MENU will beinitialized.  POWER LOSS LIST CLEARTurn the SHUTTLE RINGthen POWER LOSS LISTwill be cleared.  ALARM LIST CLEARTurn the SHUTTLE RINGthen ALARM LIST will becleared.<PROGRAM TO RECORD>DW START END HR1 DAY 12:00 15:00 L30EP2 TUE 12:00 15:00 L18EP3 WED 12:00 15:00 6EP4 THU 12:00 15:00 6EP5 FRI 12:00 15:00 L30EP6 HLD 12:00 15:00 SKIP7 SUN 12:00 15:00 L30EP8 SPL 20:00 22:00 SKIP<HOLIDAY SET UP>01/01 01/15 02/11 03/2204/29 05/03 05/04 05/0507/20 09/15 09/23 10/1011/03 11/23 12/23 - - / - -- - / - - - - / - - - - / - - - - / - -MONTH / DAY<RS-485>TRANSMISSION RATE 9600STATUS OFFVCR ADDRESS VCR01VCR GROUP NONEThe Day and Present Time DisplayJOG dialSHUTTLE ringMENU buttonMenu Chart
30 InstallationNoteA point to noticeInfo.Supplementary informationSetting the Menus (Cont.)DISPLAYSetting the display mode  (DISPLAYMODE)1 : Shows date and present time.2 : Shows date, day of the week,present time and recording mode.3 : Displays nothing.  In case of  alarmrecording, displays same items asDISPLAY MODE 2.4 : Displays nothing.<DISPLAY>DISPLAY MODE 1TIME DATE SIZE SMALLBLUE BACK OFFe.g.<MODE 1>07-09-’02 00:00:00MonthDay YearHourAlarmRecordingCounter*SecondMinute07-09-’02 20:25:00 A0001DISPLAY MODE 1MonthDayDay ofthe WeekYearHourAlarmRecordingCounter*SecondMinute07-09-’02 TUE A000120:25:00       6RecordingModeDISPLAY MODE 2 and 3RECORDING SET UPSetting the alarm recording mode(ALARM REC MODE)Sets the alarm recording time mode.• Providing TAPE LENGTH in FIRSTTIME SET UP menu is set to T-120.When JOG is turned, the display willbe switched in the order of 6H L18H   L30H   6H   ...• Providing TAPE LENGTH in FIRST TIME SET UP menu is setto T-160.When JOG is turned, the display will be switched in the orderof 8H   L24H   L40H   8H   ...Setting the alarm recording  duration (ALARM RECDURATION)Sets the duration of the alarm recording period.  When JOG isturned, the display will be switched in the order of 1M (minute) 2M   5M   10M   MAN1   MAN2   15S (second)   30S 45S   1M   ...Setting the emergency recording (EMERGENCY REC)ON : Starts alarm recording when the ALM IN terminal isgrounded while the VCR is recording, in stop mode,turned off or in stand-by mode for timer recording.OFF : Starts alarm recording when the ALM IN terminal isgrounded during recording.Setting the super resolution (SUPER RESOLUTION)ON : Recording/playback is made at over 400 lines ofresolution.OFF : Recording/playback is made at VHS mode.<RECORDING SET UP>ALARM REC MODE 6HALARM REC DURATION 1MEMERGENCY REC OFFSUPER RESOLUTION ONONE SHOT•FIELD 1ONE SHOT•INTERVAL SHOTTIMER PROGRAM   page 10, Timer Recording.ENGLISHFRANÇAISESPAÑOLUse JOG to select,and ENTER .LANGUAGE SELECTIONThe menu which appears on screen offers 3 languages, English(ENGLISH), Spanish (ESPAÑOL) or French (FRANÇAIS).This menu appears by pressing MENU button, when the VCR isturned on for the first time after the purchase or when RESETbutton is pressed during use.1. Press MENU button.• The menu as shown to the rightappears.2. Turn JOG to select the desiredlanguage.3. Turn SHUTTLE to the right.•<MAIN MENU> in the selected language appears onscreen.4. Press MENU button to exit.Note• After first time setup and selection of the language to be used,the only way to go back and access the main menu in thethree languages is to PRESS the RESET button found on therear panel.  The RESET button can be accessed with a smallpointed object.  Once the RESET button is pressed, repeatsteps 1 to 4 above.MAIN MENUDISPLAYSets the display format of the dateand present time on screen.TIMER PROGRAMSets the timer recording.RECORDING SET UPSets the alarm recording mode,alarm recording duration and emergency recording, etc.REAR TERMINALSets the frequency division ratio of CLOCK OUT, output signalof CALL OUT terminal and MODE OUT terminal, etc.MAINTENANCEDisplays the power loss list and alarm list, etc.  Also, initializesall menu settings, clears the power loss list and alarm list.CLOCK/FIRST TIME SET UPSets the present time and the operation at the tape end, etc.<MAIN MENU>DISPLAYTIMER PROGRAMRECORDING SET UPREAR TERMINALMAINTENANCECLOCK/FIRST TIME SET UPUse JOG to select,and ENTER.Press MENU to exit.* shown when DISPLAY MODE 1, 2 or 3 is selected.Setting the size of letter for date and present time display(TIME DATE SIZE)SMALL : The size of the letters become small.LARGE : The size of the letters become large.Setting the background color (BLUE BACK)ON : The blue colored screen overlays on the recordedpicture when the menu is displayed on the monitor.OFF : The recorded picture is overlaid with the menu display.Note• When the setting is OFF and the video signal is not input, theblue colored screen overlays on the recorded picture whenthe menu is displayed on the monitor.• When the setting is ON and the video signal is not input, thebackground color will be in blue.  Also, the warning “NOSIGNAL” flashes on screen and “noSIg” flashes on thefluorescent display during recording.
31InstallationReference page<MAINTENANCE>POWER LOSS LISTALARM LISTALL MENU INITIALIZEPOWER LOSS LIST CLEARALARM LIST CLEAR<REPEAT REC TIMES> 0<ELAPSED TIME> 0HALL MENU INITIALIZETurn the SHUTTLE RINGthen all MENU will beinitialized.MAINTENANCEDisplaying the power loss list(POWER LOSS LIST) page 15Displaying the alarm list (ALARMLIST) page 15Initializing all menu settings (ALL MENU INITIALIZE)All menus will be initialized except timer programs.1. Press MENU button.•<MAIN MENU> appears.2. Turn JOG to select MAINTENANCE and turn SHUTTLE tothe right.•<MAINTENANCE> menu appears.3. Turn JOG to select ALL MENUINITIALIZE and turn SHUTTLE tothe right.•<ALL MENU INITIALIZE> menuappears.4. Turn SHUTTLE to the left.• The setting of all menus (except TIMER PROGRAM) willreturn to its initial setting.5. Press MENU button.• The day and present time display appears on screen.Clearing the power loss list (POWER LOSS LIST CLEAR) page 15Clearing the alarm list (ALARM LIST CLEAR) page 15Displaying number of tape use (REPEAT REC TIMES) page 16Displaying the elapsed time of VCR (ELAPSED TIME) page 16REAR TERMINALSetting the operation mode of theCALL OUT terminal (CALL OUT)Sets the mode of call signal output fromthe CALL OUT terminal.  If anyabnormalities occur with the VCRduring recording, the call signal isoutput from the CALL OUT terminal onthe rear panel regardless of CALL OUTsetting.WRNG•TAPE END : The VCR outputs a call signal when thetape reaches its end during recording orwhen a malfunction occurs during recording.The VCR’s function when the tape endsdepends on the setting of TAPE END inFIRST TIME SET UP menu (  next page).WRNG•REMAIN : The VCR outputs a call signal when amalfunction occurs during recording or whenthe tape has approximately 9 minutes (at 6Hmode) left during recording.WRNG : The VCR outputs a call signal only when amalfunction occurs during recording.Setting the recording mode and frequency division ratio(CLOCK OUT)Sets the recording mode and the frequency division ratio of clockpulse output from the CLOCK OUT terminal.• Setting the recording mode during the clock pulse outputREC : When recording in any mode.T/L REC : When recording in time-lapse mode (L18H-128Hor 0H).• Setting the frequency division ratio of the clock pulse output.When JOG is turned, the display will be switched in the orderof 1   2   3   4   5   10   15   20   25   30   50 60   F (field)   1   ...The numbers 1 to 60 indicate the number of frames at 6Hrecording mode and the number of fields at time lapserecording modes.  (One frame consists of two fields.)  Whenset to F (field), one field is selected.Setting the operation mode of the MODE OUT terminal(MODE OUT)A mode signal is output under the following circumstances.REC : During recording.PLAY : During playback.POWER : While the VCR is turned on.TAPE IN : When a tape is inserted in the VCR.TAPE REMAIN: When the tape has approximately 9 minutes (at6H mode) left.CLOCK ADJ : When the clock indicates “00(min.):00(s)”.(The signal is output for 1 second only.)Setting the operation mode of REC IN terminal (REC IN)SERIES : Recording starts when the REC IN terminalis grounded.REC-START/STOP: Recording continues while the REC INterminal is grounded.  If the signal is inputfor a short period, the VCR may not startrecording.SYNC REC : The video signal from the multiple of 3 or 5cameras can be recorded separately byconnecting a switcher (  page 14 for themenu setting and page 27 for theconnection).Setting the number of fields in oneshot recording (ONESHOT•FIELD)Sets the number of recorded fields in the oneshot recordingmode. When JOG is turned, the display will be switched in theorder of 1   2   3   4   5   10   20   30   1   ...Setting the interval time in the oneshot recording (ONESHOT•INTERVAL)Sets the interval time in the oneshot recording mode.  When JOGis turned, the display will be switched in the order of SHOT 10S (second)   15S   30S   45S   1M (minute)   2M 3M   SHOT   ...<REAR TERMINAL>CALL OUT WRNG•TAPE ENDCLOCK OUT REC- 1MODE OUT RECREC IN SERIES
32 InstallationNoteA point to noticeInfo.Supplementary informationRS-485Setting the transmission rate(TRANSMISSION RATE)When JOG is turned, the display will beswitched in the order of 9600 (bps) 19200   1200   2400   4600 9600   ...Setting of status (STATUS)ON : The status will be sent from the VCR when thecommand for the specified VCR ADRESS is send.OFF : The status will not be sent from the VCR when thecommand for the specified VCR ADRESS is send.For the commands which are specified in *2 column ofthe Commands and Responses on page 21 to 24, theVCR sends the status even when STATUS is set toOFF.Setting the ID number of the VCR (VCR ADDRESS)When JOG is turned, the display will be switched in the order ofVCR01   VCR02   .....   VCR126   VCR127.Note• Assign a different VCR ADRESS for each connected VCRs.Setting the group number of the VCR (VCR GROUP)When JOG is turned, the display will be switched in the order ofNONE   GRP01   GRP02   .....   GRP14   GRP15.<RS-485>TRANSMISSION RATE 9600STATUS OFFVCR ADRESS VCR01VCR GROUP NONEFIRST TIME SET UPSetting the present time, date andDaylight Saving Time settings (TIMEDATE ADJUST) page 28Setting operation of VCR when thetape reaches its end during recordingor playback (TAPE END)The VCR’s function when the tape reaches its end duringrecording is as follows.STOP : The tape stops, the indication “End” appears onthe fluorescent display and “TAPE END” onscreen.  When CALL OUT is set toWRNG•TAPE END, a call signal is output fromthe CALL OUT terminal.REWIND : Rewinds the tape to the beginning and stops(except during timer recording).  When CALLOUT is set to WRNG•TAPE END and a tapereaches its end, a call signal is output for 2seconds from the CALL OUT terminal.REPEAT : Rewinds the tape to the beginning and resumesthe recording.  When CALL OUT is set toWRNG•TAPE END and a tape reaches its end,a call signal is output for 2 seconds from theCALL OUT terminal.ALARM•PROT (alarm protection) :If any alarm recordings are present on the tapeand the tape stops, the indication “End” appearson the fluorescent display and “TAPE END” onscreen.  When CALL OUT is set toWRNG•TAPE END, a call signal is output fromthe CALL OUT terminal.  If there is no alarmrecording, the VCR rewinds the tape to thebeginning and resumes the recording. Go to page 8 for the VCR’s function when the tape reachesits end during playback.Setting Quasi-V-sync on or off (QUASI V-SYNC)ON : Quasi-V-sync. signal is inserted to the video outputsignal in the special effects playback (  page 16) ornormal playback in L18H-128H or 0H mode.OFF : Quasi-V-sync. signal is not inserted.Note• Some multiplexers may require QUASI V-SYNC to be OFFin order to work properly.Setting the playback/recording color mode (VIDEO MODE)AUTO : The VCR automatically switches the circuits accordingto type of the input/playback video signal, color orblack & white.B/W : Select for recording or playback in black & white.Setting the tape length (TAPE LENGTH)T-120 : Select when using a T-120 tape.T-160 : Select when using a T-160 tape.Setting to sound buzzer during warning (BUZZER)WRNG : The buzzer sounds when there is anymalfunction in the VCR.WRNG•TAPE END : The buzzer sounds when there is anymalfunction in the VCR or the tapereaches its end.<FIRST TIME SET UP>TIME DATE ADJUSTTAPE END STOPQUASI V-SYNC ONVIDEO MODE AUTOTAPE LENGTH T-120BUZZER WRNGRS-485WRNG•REMAIN : The buzzer sounds when there is anymalfunction in the VCR or the tape hasapproximately 9 minutes (at 6H mode) left.OFF : The buzzer does not sound.Note• To stop the buzzer:Press MENU button once. If <MAIN MENU> appears, pressMENU button again to exit the menu.  When the VCR islocked, press LOCK button to unlock the VCR, then thebuzzer stops.Setting the Menus (Cont.)
33OthersReference pageRemote Controller (Optional)Remote JackCircuit1) Resistor : Metal film resistor 1/4 W, resistance tolerance ± 1%Temperature factor ± 100 PPM/°C2) Button switch : Momentary, ON resistor 200    or under3) Connector MJ : Miniature jack, 2.5 mm in diameter, comply with JISC6560Operational conditions1) Isolation resistor : 200 M  or over (in connector MJ)2) Floating capacity : 0.1 µF or under (in connector MJ)3) Environmental temperature : 5-40 °C (common with VCR)4) Relative temperature : Max. 80 % (common with VCR)Remote control switch functionsShielded cableMJ1234567891011121362 kΩ13 kΩ15 kΩ16 kΩ20 kΩ22 kΩ27 kΩ30 kΩ36 kΩ43 kΩ56 kΩ75 kΩ100 kΩSW SW SW SW SW SW SW SW SW SW SW SW SWPosition12345678EJECTSTOPRECORDINGPAUSEPLAYBACKREVERSE PLAYBACKFAST FORWARDREWINDFunctionPosition910111213FORWARD FRAME SHIFTREVERSE FRAME SHIFT(+) REC/PLAY MODE(–) REC/PLAY MODE(Not available)FunctionThe optional remote controller (R-9100) provides remote operation of the VCR.  Connect to the REMOTE terminal at the VCR’s rearpanel before use.PLAY EJECTSP/EPSTOP REC  PAUSE/STILL FR ADVREVFR ADVFF//REWREC/PLAY MODESTOP buttonREV PLAY buttonREC/PLAY MODE(–) (+) buttonPAUSE/STILL buttonFR ADV buttonFF buttonPLAY button(Not available)EJECT buttonREC buttonREV FR ADV buttonREW buttonREVPLAY
34 OthersNoteA point to noticeInfo.Supplementary informationBefore Calling for ServiceSymptomInstallationNo power supplied to VCR.The VCR POWER is ON but the VCRdoes not operate.No picture is obtained on the MONITORscreen.The picture is not clear on the monitor.• Has the power cord been disconnected from the outlet?• Is the Lock or Lock All indicator ( /) illuminated?Press LOCK button on the front panel several times to unlock the VCR.• Is the Timer Recording indicator ( ) illuminated?Press TIMER RECORD button on the front panel to cancel the timer recording.• Is the Lock or Lock All indicator ( /) illuminated?Press LOCK button on the front panel several times to unlock the VCR.• Safety devices are in operation.Press RESET button on the rear panel using a pointed instrument.  And thenturn the power on again.• Is the monitor or the camera connected correctly?Check the connection.• Is the connecting cable properly connected, or is the cable defective?Check the connection and also check the snapping of a wire in the cable.• Is the camera focused?See the user’s manual for your camera and focus the camera correctly.Function/operationNo operation when any tape operationbutton is pressed.The present time is not correct even ifusing the VCR everyday.The power cord has been disconnectedfor less than 31 days but the presenttime has been reset.A tape cannot be loaded.Remedy• Is the Lock or Lock All indicator ( / ) illuminated?Press LOCK button on the front panel several times to unlock the VCR.• Is a cassette inserted?Make sure the power cord is connected to the outlet for approximately 40 ormore hours per week when using it everyday.Make sure the power cord is connected to the outlet for approximately 40 ormore hours per week when using it everyday.• The reserved contents may be erased even within 31 days depending on thecharging time of the power failure compensation circuit.Set the present time setting again.• Is the Lock All indicator ( ) illuminated?Press LOCK button on the front panel once to unlock the VCR.RecordingRecording does not work by pressingthe RECORD button.Recording cannot be stopped bypressing the STOP button.Repeat recording does not work.• Is the Lock All indicator ( ) illuminated?Press LOCK button on the front panel once to unlock the VCR.• Has the cassette’s erasure prevention tab been broken off?Load the cassette with its erasure prevention tab intact.• Has the tape run out?Rewind the tape or load a new tape.• Is the Lock or Lock All indicator ( / ) illuminated?Press LOCK button on the front panel several times to unlock the VCR.• Is the VCR in timer recording mode (Timer recording indicator ( ) is illuminating)?Press TIMER RECORD button once.• Is the Repeat indicator ( ) illuminated?Set TAPE END in the FIRST TIME SET UP menu to REPEAT orALARM•PROT.When TAPE END in the FIRST TIME SET UP menu is set to ALARM•PROT,repeat recording does not work using a tape with an alarm recording.When a tape reaches its end during the emergency recording (recordingstarted  while the VCR is stopped or the VCR power is off), the VCR rewindsthe tape and stops (recording does not start again) even though TAPE END inthe FIRST TIME SET UP menu is set to REPEAT.When you find any problem with this VCR, first check the following.  If you still cannot solve the problem, stop using the VCR, unplugit from an outlet and contact your dealer.
35OthersReference pageRecording (continued)No operation when the PLAY button ispressed.Noise bars in the picture duringplayback.Playback speed is fast or slow.The picture vibrates at the top andbottom when in still picture mode.Clear camera pictures during recordingbut during playback the picture is notclear.Timer recording does not operate.Alarm recording does not work.• Is the Lock or Lock All indicator ( / ) illuminated?Press LOCK button on the front panel several times to unlock the VCR.• Is a cassette inserted?• Has the tape run out?Adjust the tracking by pressing TRACKING buttons on the front panel.Adjust the playback speed by pressing REC/PLAY MODE buttons on the frontpanel.Adjust the picture by pressing VERTICAL ADJUST buttons on the front panel.• The video heads may be clogged.Eject the cassette, insert it again and wait for more than 5 seconds.  Repeatthis step for 4 to 5 times.  If this does not correct the problem contact yourdealer.• Have the day and present time been set accurately?Set the day and present time again.• Have the recording start-time, recording end-time and the recording mode beenset accurately?Confirm the settings on the <PROGRAM TO RECORD>.• Is the Timer Recording indicator ( ) illuminated?If not, press TIMER RECORD button on the front panel to stand by the timerrecording.• Is the external switch connected correctly?Check the connection.• Is the Emergency Recording indicator ( ) illuminated?Set EMERGENCY REC in the RECORDING SET UP menu to ON.PlaybackSymptom Remedy
36 OthersNoteA point to noticeInfo.Supplementary informationWarning DisplaySelf-diagnostic functionThis VCR uses a self-diagnostic function to detect an internal malfunction during recording.  When a malfunction occurs in the VCRduring recording, the indicator corresponding to each malfunction illuminates on the fluorescent display and/or on screen.The type of malfunction corresponding to the indicator and countermeasures are given below.When the tape endsWhen the tape reaches its end during recording, “End” illuminates on the fluorescent display and “TAPE END” illuminates on screen.The warning indicators will not illuminate, if TAPE END in FIRST TIME SET UP menu is set to REPEAT, ALARM•PROT (when noalarm recording is made) or REWIND.Lack of video signal inputThe indicator “NO SIGNAL” appears on screen and “noSIg” flashes on the fluorescent display when the VCR cannot get any videoinput signal during recording.  The video input signal will not be obtained in case of any malfunction such as a broken video cable orPOWER to the camera is turned off.To turn off the indicatorRemedyFluorescentdisplay MonitorThe tape ends during recording.CauseTAPE ENDNO SIGNALCHECK Tape/deck troubleduring recordingLack of video signal inputduring recording Check for looseconnections.Rewind the tape orpress the EJECT buttonFirst, check the cassette.  If there seems to be nothing wrong withthe cassette, try the recording operation again.  If the indicator“CHECK” is still displayed on the monitor, replace the cassette witha new one and try the operation again.  If this does not clear theindicator unplug the power cord and contact your dealer.When a video signal is restored or therecording mode is cleared, the indicator on the fluorescent display and screen turns off.Turn off the indicator on the fluorescentdisplay and screen by pressing theEJECT button or rewinding the tape.EndnoSIg(the displaystarts flashing)
37OthersReference pageControl Input/Output Signals and Circuit16 ms+12 V0 V8 ms+12 V0 VCLK OUT signal•  When F is selected in CLOCK OUT of REAR TERMINALmenu (at 6H or 8H mode) or while recording in L18H-128H or0H mode.•  When REC-1 to REC-60 is selected in CLOCK OUT of REARTERMINAL menu (at 6H or 8H mode).CLK OUT terminals (screw)DC 12 V10 kΩGNDCLK OUT10 kΩ<Interface circuit inside the VCR>ALM/MODE/CALL OUT terminals (screw)Active : “L” level voltage (0 to + 0.4 V) output;max. drive current 50 mA (+5 V DC)/10 mA(+24 V DC)Non active : Open; max. voltage +24 V DCGNDALM/MODE/CALL OUT<Interface circuit inside the VCR>ALM/RST/REC IN terminals (screw)Active : When input terminals are short-circuited toGND or “L” level voltage (0 to +1.6 V) applied.Time for active : 0.1 sec. or over.Non active : Open the input.DC 5 V10 kΩ22 kΩ22 kΩ0.047 µFGNDALM/RST/REC IN<Interface circuit inside the VCR>
38 OthersNoteA point to noticeInfo.Supplementary informationSpecificationsWeight and dimensions shown are approximate.Design and specifications are subject to change without notice.NoteIf the VCR is not working correctly or showing an unusual indication on the fluorescent display, press RESET button at the rear panel with a pointedinstrument.  When pressed, Date/Present time/ALARM LIST/POWER LOSS LIST/Counter display/Recording and Playback mode will be set to thedefault setting and the VCR turns off.To restart the VCR, press POWER button to turn on the VCR and then set the day and present time.ConnectorsALM Input : Screw terminal for starting alarm recordingRST Input : Screw terminal for finishing alarm recording or foradjusting on-screen clockREC Input : Screw terminal for starting/finishing recording or forseries recordingGND : Screw terminal for groundALM Output : Screw terminal for output while alarm recording isunder wayCLK Output : Screw terminal to command camera switchingMODE Output : Screw terminal for indication of VCR selected modeCALL Output : Screw terminal for external warning device or forseries recordingREMOTE Jack : Jack for connecting the remote control unitRS-485 Interface: RJ-45 (female) connectorVideoInput : 1.0 V (p-p), 75  , BNC plugOutput <Rear> : 1.0 V (p-p), 75  , BNC plugOutput <Front> : 1.0 V (p-p), 75  , RCA plugSignal-to-Noise Ratio : Better than 42 dBHorizontal Resolution : More than 400 lines (Super Resolution mode)More than 240 lines (VHS mode)AudioInput <Line In> : 308 mV (rms), 50 k , RCA plugInput <MIC In> : 0.346 mV (rms), 600  , mini jackOutput : 388 mV (rms), 1 k , RCA plugSignal-to-Noise Ratio : Better than 43 dBFrequency Response : 70 Hz - 4 kHz (6H mode)GeneralPower Source : AC 100-230 V ± 10%, 50/60 Hz(The included power cord is used for120 V, 60 Hz.)Power Consumption : Approx. 20 wattsTelevision System : EIA standard 525 lines, 60 field NTSC-type color systemColor Signal : Low frequency conversion, sub-carrierphase shift recordingTape Format : VHS 1/2” width high-density videocassette tapeTape Speed and Recording : See below (*1)Fast Forward/Rewind Time : Approx. 120 seconds with T-120 tapeApprox. 160 seconds with T-160 tapeOperating Temperature : 41 °F to 104 °F (5 °C to 40 °C)Relative Humidity : Max. 80 %Dimensions (Jog dial included): 16.7 (W) x 12.3 (D) x 3.7 (H) (in.)425 (W) x 313 (D) x 95 (H) (mm)Weight : 9.7 lbs (4.4 kg)Heads-Video : 4 rotary headsLuminance Signal : Frequency modulation recordingAudio Track : 1 trackAudio/Control : 1 stationary headErase : 1 full-track headMotors : 3 motors-drum/capstan direct drivesystemBattery Backup : Lasts 31 days(*1)Tape Speed and Recording Time :ModeT-120 T-1606H (EP)L18H (EP)L30H (EP)48H (EP)72H (EP)96H (EP)0H (EP)Time(hour:minute)Speed(mm/s)11.123.712.22––––RecordingInterval(s/field)0.01670.0500.0830.1500.2170.284–Recording Fieldsper Second(fields/s)6020126.74.63.5–Tape DriveContinuousContinuous (Slow)Continuous (Slow)Time LapseTime LapseTime LapseTime LapseAudio SignalRecordableRecordableRecordableNot recordedNot recordedNot recordedNot recordedVideo SignalContinuousTime LapseTime LapseTime LapseTime LapseTime LapseTime Lapse6:0018:0030:0054:0078:00102:00–Mode8H (EP)L24H (EP)L40H (EP)64H (EP)96H (EP)128H (EP)0H (EP)Time(hour:minute)8:0024:0040:0072:00104:00136:00–

Navigation menu