Mitsubishi Electric CP-C60DW Digital Color Printer User Manual 05 En
Mitsubishi Electric Corp Digital Color Printer 05 En
UserManual.wiki
>
Mitsubishi Electric
>
CP C60DW User Manual
User Manual-En
Navigation menu
Upload a User Manual
Namespaces
Wiki Guide
HTML
PDF
Info
Views
User Manual
Discussion / Help
Navigation
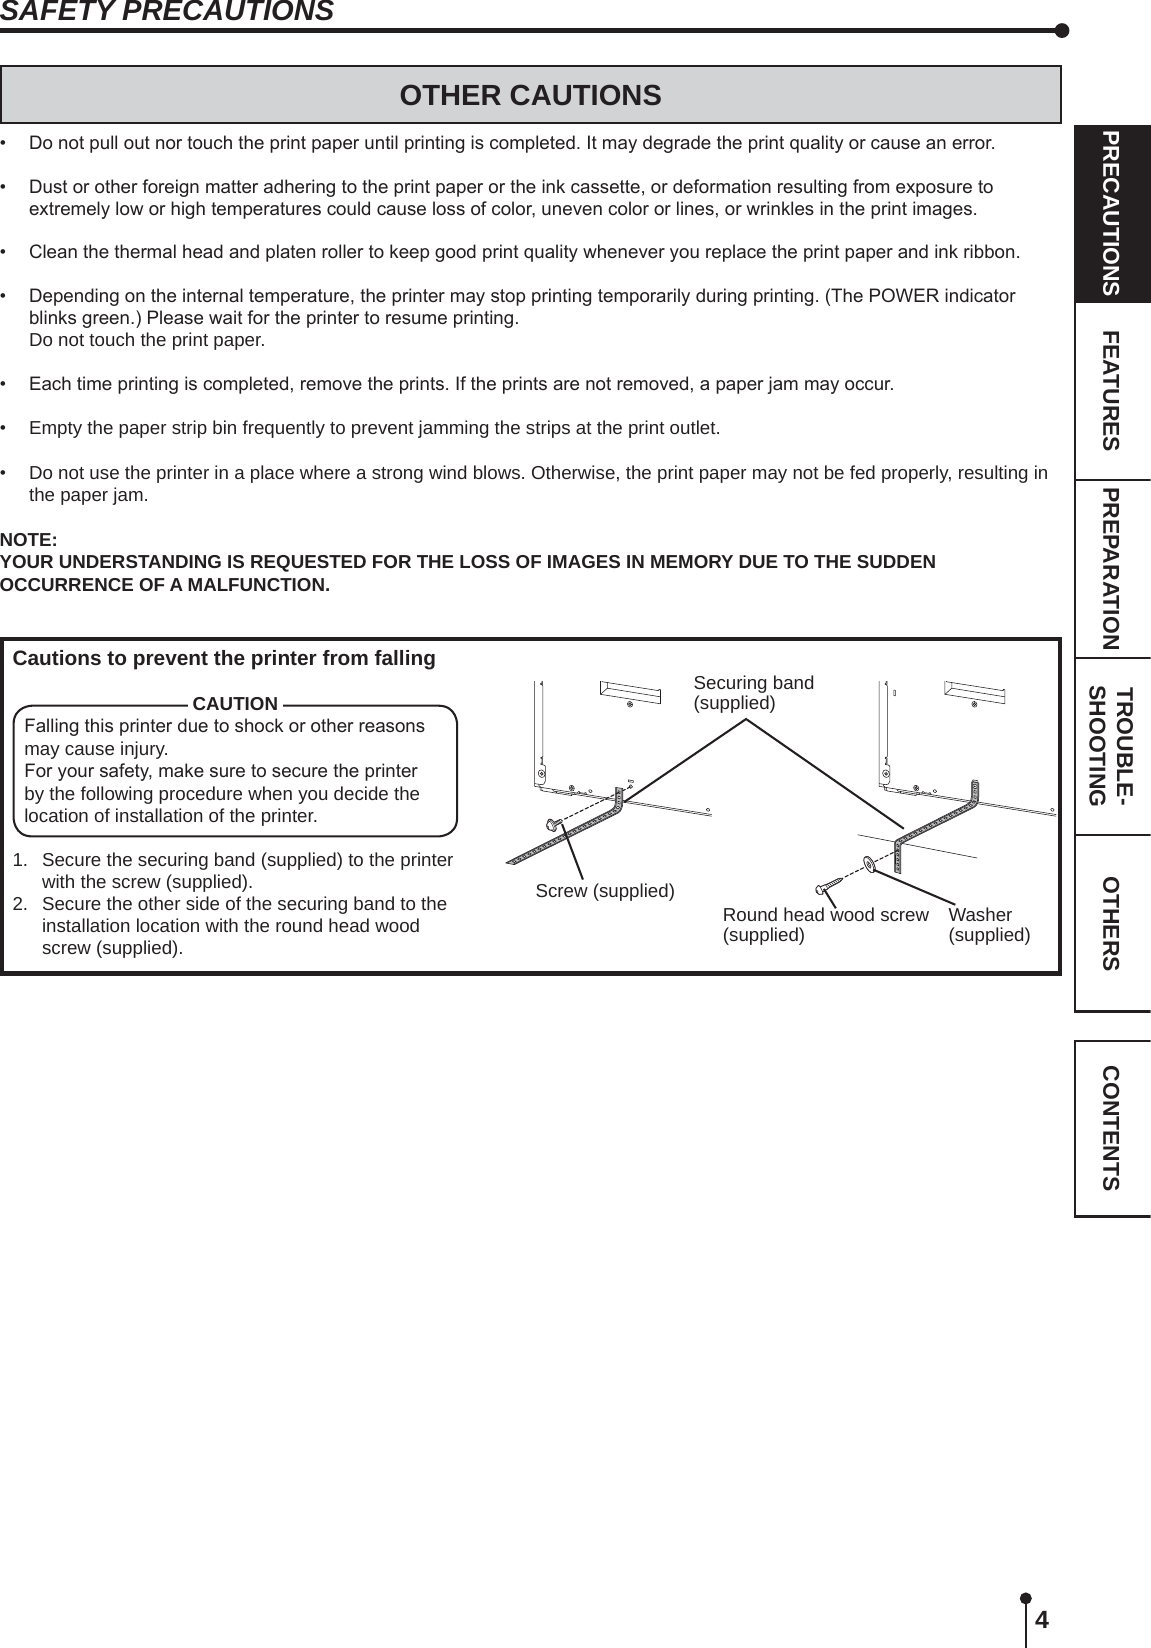
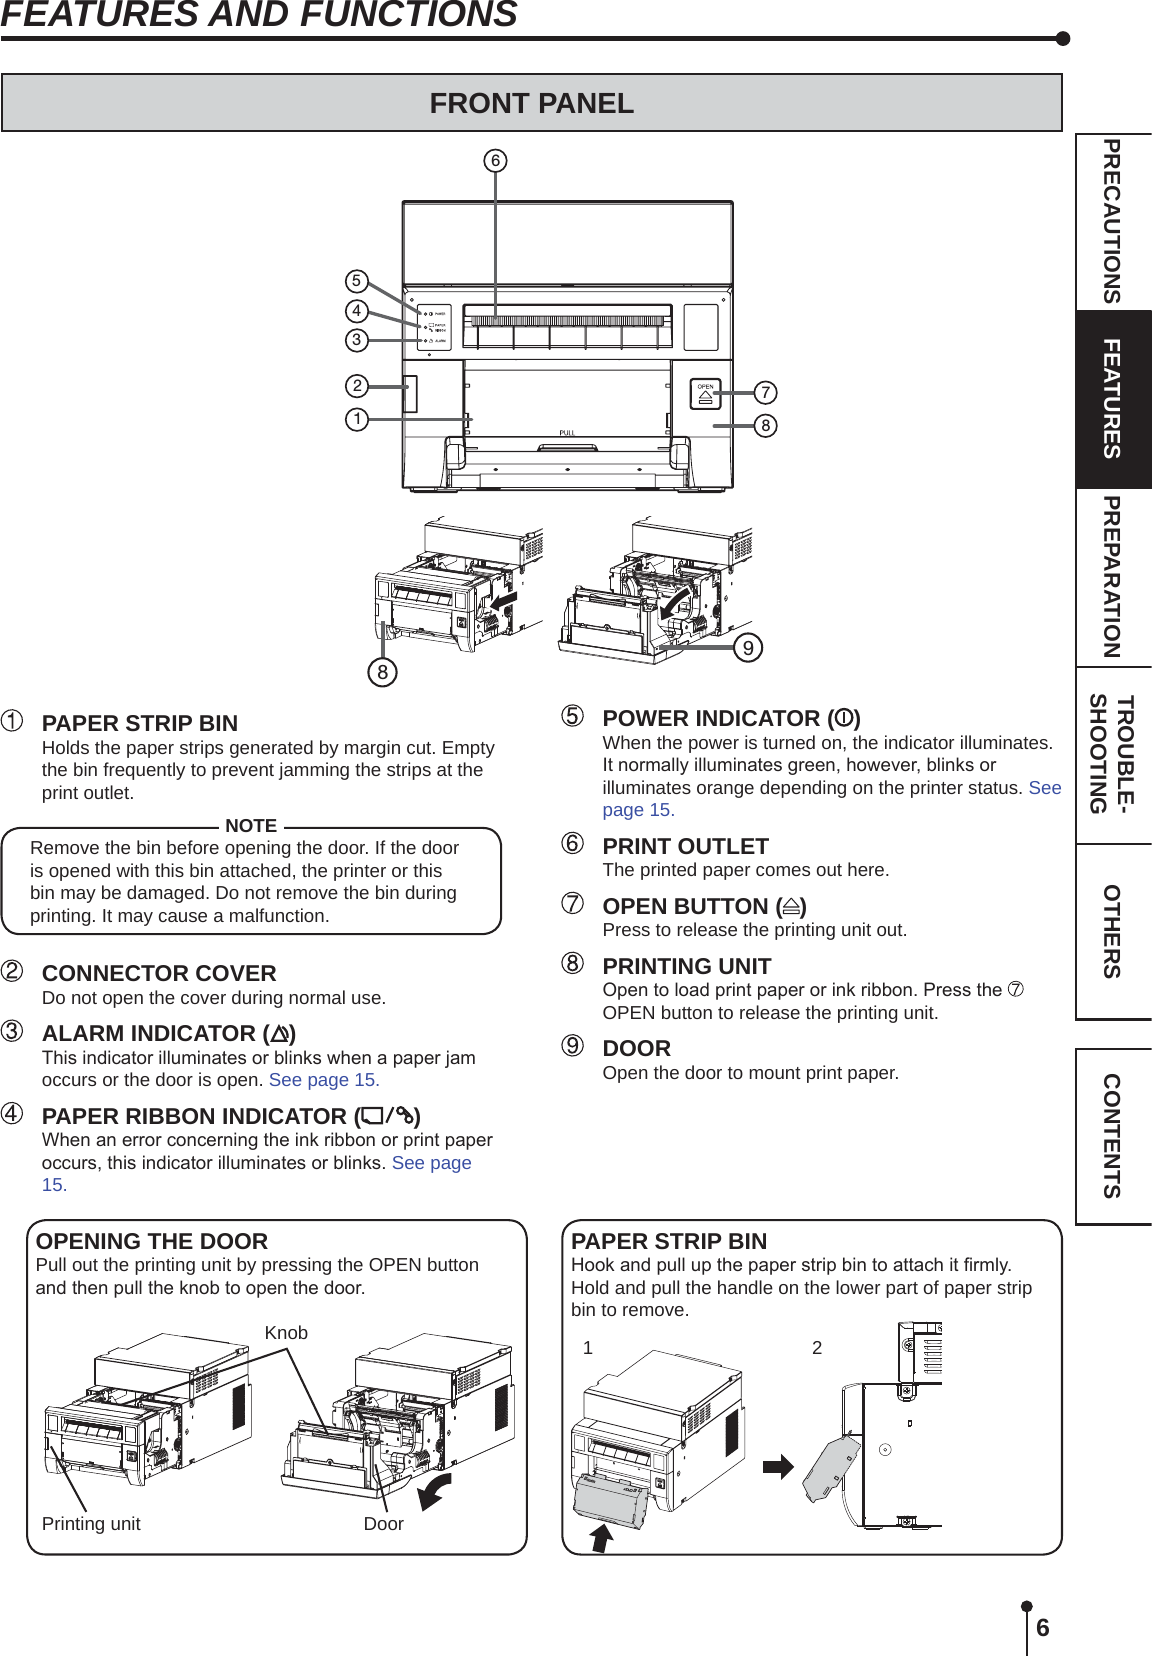
![2OTHERSPRECAUTIONS FEATURES PREPARATION TROUBLE-SHOOTING CONTENTSIn the interest of safety, please observe the following precautions:POWER REQUIREMENTThis Digital Color Printer is designed to operate on 120 V AC 50/60 Hz in the U.S.A. and Canada, and 220 V - 240 V AC 50/60 Hz in Europe. Never connect to any outlet or power supply having a different voltage or frequency.WARNING : THIS APPARATUS MUST BE EARTHED.PROTECTIVE MEASURESIF ABNORMALITIES ARISE, .....8VHRIWKHXQLWGXULQJHPLVVLRQRIVPRNHRUDEQRUPDOVRXQGVZLWKRXWDGRSWLQJFRXQWHUPHDVXUHVLVGDQJHURXV,QVXFKDFDVHunplug the power cord from the source outlet immediately, and request maintenance service from the sales dealer.NEVER INSERT ANY OBJECT INTO THE UNIT)RUHLJQREMHFWVRIDQ\NLQGLQVHUWHGLQWRWKLVXQLWFRQVWLWXWHDVDIHW\KD]DUGDQGFDQFDXVHH[WHQVLYHGDPDJHDO NOT PLACE ANYTHING ON THE DIGITAL COLOR PRINTERHeavy objects placed on the Digital Color Printer can cause damage or obstruct proper ventilation.PROTECT THE POWER CORD'DPDJHWRWKHSRZHUFRUGPD\FDXVH¿UHRUVKRFNKD]DUG:KHQXQSOXJJLQJKROGE\WKHSOXJRQO\DQGUHPRYHFDUHIXOO\DO NOT PLACE WATER CONTAINERS ON THE UNIT'RQRWSODFHÀRZHUYDVHVDQGRWKHUZDWHUKROGLQJFRQWDLQHUVRQWKHGHYLFH,IIRUVRPHUHDVRQZDWHUVHHSVWRWKHLQVLGHRIthe unit, unplug the power cord from the source outlet, and contact the sales dealer. If used without corrective measures, the unit may be damaged.“In the interest of safety, avoid handling of liquids near the unit.”DO NOT REMOVE THE CABINET7RXFKLQJLQWHUQDOSDUWVLVGDQJHURXVEHVLGHVLWPD\OHDGWRPDOIXQFWLRQ&RQWDFWWKHVDOHVGHDOHUWRFDUU\RXWLQWHUQDOFKHFNVand adjustments. Before opening the cover for eliminating a jammed paper, etc., be sure to disconnect the power cord plug.UNPLUG THE POWER CORD DURING A LONG ABSENCETurn off the main power switch and unplug the power cord during a long absence.WHEN TRANSPORTING THE UNIT:KHQWUDQVSRUWLQJWKHXQLWUHPRYHWKHLQNULEERQDQGSULQWSDSHUIURPWKHXQLWSee “INSTRUCTIONS FOR TRANSPORTATION” on page 18.WHEN MOVING THE UNIT&KHFNWKDWWKHSULQWLQJXQLWLVFORVHG¿UPO\$QGSD\DWWHQWLRQQRWWRSUHVVWKH23(1EXWWRQDFFLGHQWDOO\:KHQWKHSULQWLQJXQLWLVQRWFORVHG¿UPO\RU\RXSUHVVWKH23(1EXWWRQDFFLGHQWDOO\WKHSULQWLQJXQLWPD\RSHQ,WFDQFDXVHLQMXU\RUGDPDJHBE CAREFUL AROUND PRINT PAPER EXIT SLOTDon’t insert your hand or any material into the paper exit slot during printing.Do not touch the cutter blade inside the paper exit slot.2WKHUZLVH\RXU¿QJHUZLOOEHLQMXUHGDO NOT TOUCH THE THERMAL HEAD EXCEPT WHEN CLEANINGDo not touch the thermal head (located inside the unit) except when cleaning.They are heated to high temperature and may cause burns or injury when touched.Also, malfunction caused by static electricity may occur.WHEN PLACING THE PRINT PAPER, KEEP THE PRINT PAPER UPRIGHTWhen you put the print paper sideways on a table, etc., it may roll and fall. This may cause injury.CONNECTION CABLESUse the provided power cord.SAFETY PRECAUTIONS](https://usermanual.wiki/Mitsubishi-Electric/CP-C60DW/User-Guide-2173521-Page-5.png)
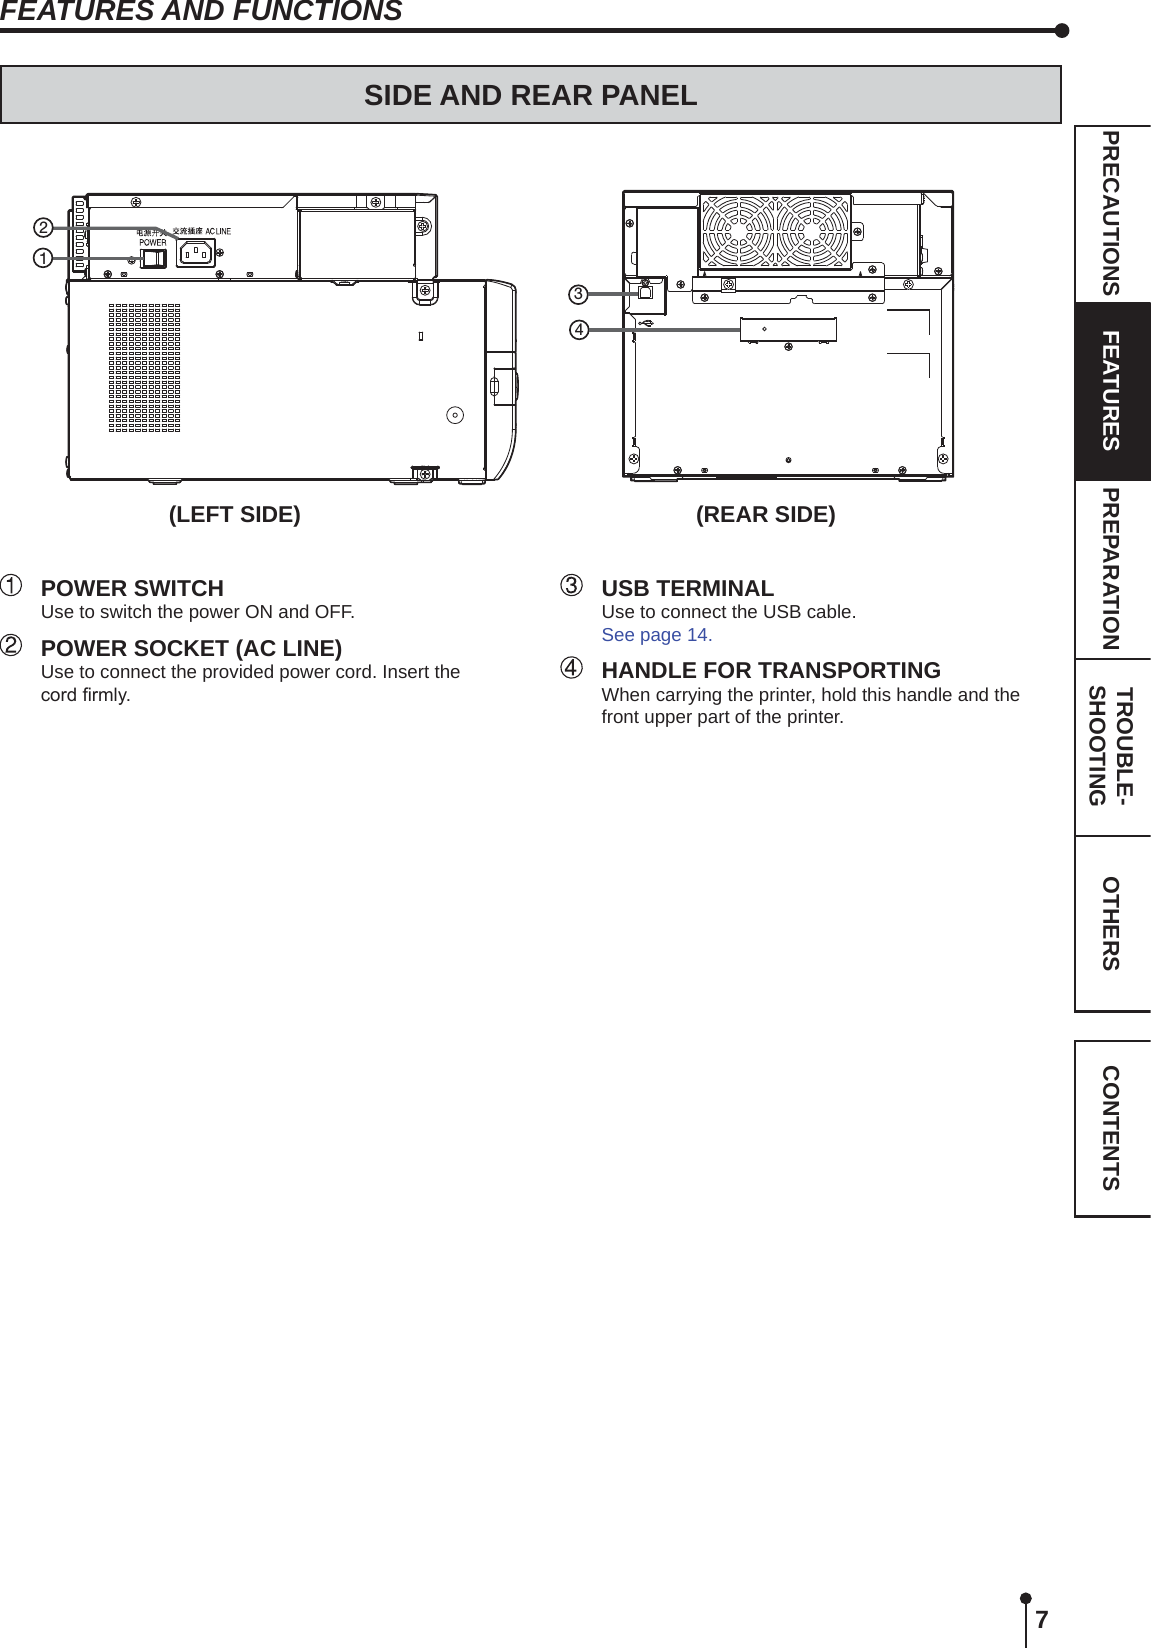
![3OTHERSPRECAUTIONS FEATURES PREPARATION TROUBLE-SHOOTING CONTENTSREMOVE THE PAPER STRIP BIN WHEN OPENING OR CLOSING THE DOORWhen you open or close the door with the paper strip bin installed, the bin may be removed and fall. This may cause injury or damage. Also, the chips generated by margin cut may jam at the paper exit slot.DO NOT LEAVE THE PRINTING UNIT OPENWhen the printer is moved with the printing unit open, it may cause injury or damage.CLOSE THE PRINTING UNIT FIRMLY7DNHFDUHQRWWRSLQFK\RXUKDQGZKHQFORVLQJWKHSULQWLQJXQLW:KHQWKHSULQWLQJXQLWLVQRWFORVHG¿UPO\LWPD\RSHQGXULQJtransportation and it may cause injury or damage.DO NOT PUSH DOWN ON THE PRINTING UNIT OR THE DOORIf you push down on the printing unit or the door when they are open, this unit may fall and it can cause damage or injury.INSTALLATION LOCATIONSMAINTAIN GOOD VENTILATIONVentilation slots and holes are provided on the rear and both sides of this unit. Place the unit on a hard and level surface and NHHSDVSDFHEHWZHHQWKHXQLWDQGWKHZDOOVWRHQVXUHSURSHUYHQWLODWLRQ:KHQSXWWLQJWKHXQLWRQWKHV\VWHPUDFNWDNHDVSDFHEHWZHHQWKHXQLWDQGWKHEDFNDQGVLGHVRIWKHUDFNSUITABLE LOCATIONS$YRLGVKDN\SODFHVRUKRWVSULQJVDUHDVZKHUHK\GURJHQVXO¿GHDQGDFLGLFLRQVDUHOLNHO\WREHJHQHUDWHGAVOID PLACES WITH HIGH HUMIDITY AND DUSTDo not place the unit at a high humidity and dusty locations. They can cause extensive damage to this unit. Avoid places where WKHXQLWLVOLNHO\WREHH[SRVHGWRRLO\IXPHVDQGYDSRUVAVOID PLACES LIKELY TO BE EXTREMELY HOTPlaces exposed to direct sunlight, or near heating appliances can attain extremely high temperatures, which may deform the cabinet, or can become a prime cause of damage.PLACES THE UNIT ON A HORIZONTAL LEVEL7KHXQLWLVOLNHO\WREHDIIHFWHGLILWLVSODFHGLQVODQWHGFRQGLWLRQVRULQDQXQVWDEOHSODFHVPROTECT AGAINST DEW FORMATION,QH[WUHPHO\FROGUHJLRQVLIWKHXQLWLVPRYHGTXLFNO\IURPDQH[WUHPHO\FROGSODFHWRZDUPHURQHGHZLVOLNHO\WREHIRUPHG,Idew is formed, printing is not possible.OPERATING AMBIENT TEMPERATURE RANGEThe operating ambient temperature range is 10°C - 35°C (50°F - 95°F) and the humidity of 30% - 80% RH. When using the unit RQWKHV\VWHPUDFNEHVXUHWRNHHSWKLVDPELHQWWHPSHUDWXUHLQVLGHWKHUDFN'HSHQGLQJRQWKHLQWHUQDOWHPSHUDWXUHLWPD\WDNHVRPHWLPHWRVWDUWSULQWLQJFOR LONG OPERATING LIFEUNSUITABLE MATERIALS FOR THE DIGITAL COLOR PRINTER&RDWÀDNLQJDQGGHIRUPDWLRQDUHOLNHO\WRRFFXULIWKHXQLWLVZLSHGZLWKFKHPLFDOGXVWHUVEHQ]LQHWKLQQHURUDQ\RWKHUVROYHQWLIrubber or PVC items are left in contact with the unit for extended duration, or if the unit is sprayed with insecticide.CARE OF THE CABINETUnplug and clean with a soft cloth slightly moistened with a mild soap and water solution. Allow to dry completely before operating. Never use petroleum base solutions or abrasive cleaners.HEAD ABRASION7KHWKHUPDOKHDGOLNHWKHYLGHRKHDGZHDUVRXW:KHQLWLVDEUDGHGLWEHFRPHVKDUGWRSULQWRXW¿QHGHWDLOVRIWKHSLFWXUH,Qsuch a case, it is necessary to replace the thermal head. Consult with the sales dealer for replacing the head.CONNECTING DEVICES5HDGWKRURXJKO\³2SHUDWLQJ3UHFDXWLRQV´RIWKHLQVWUXFWLRQERRNOHWVIRUWKHGHYLFHVFRQQHFWHGZLWKWKH'LJLWDO&RORU3ULQWHU7KHpower cord must be disconnected after printing is over.CAUTION ON RELOCATING:KHQWUDQVSRUWLQJWKLVXQLWPDNHVXUHLWLVQRWOLNHO\WREHVXEMHFWHGWRLPSDFWV7KH\FDQEHDSULPHFDXVHIRUGDPDJH)XUWKHUPDNHVXUHWRGLVFRQQHFWWKHSRZHUFRUGIURPWKHSRZHURXWOHWDQGWKHFDEOHVIURPWKHFRQQHFWHGGHYLFHVSAFETY PRECAUTIONS](https://usermanual.wiki/Mitsubishi-Electric/CP-C60DW/User-Guide-2173521-Page-6.png)

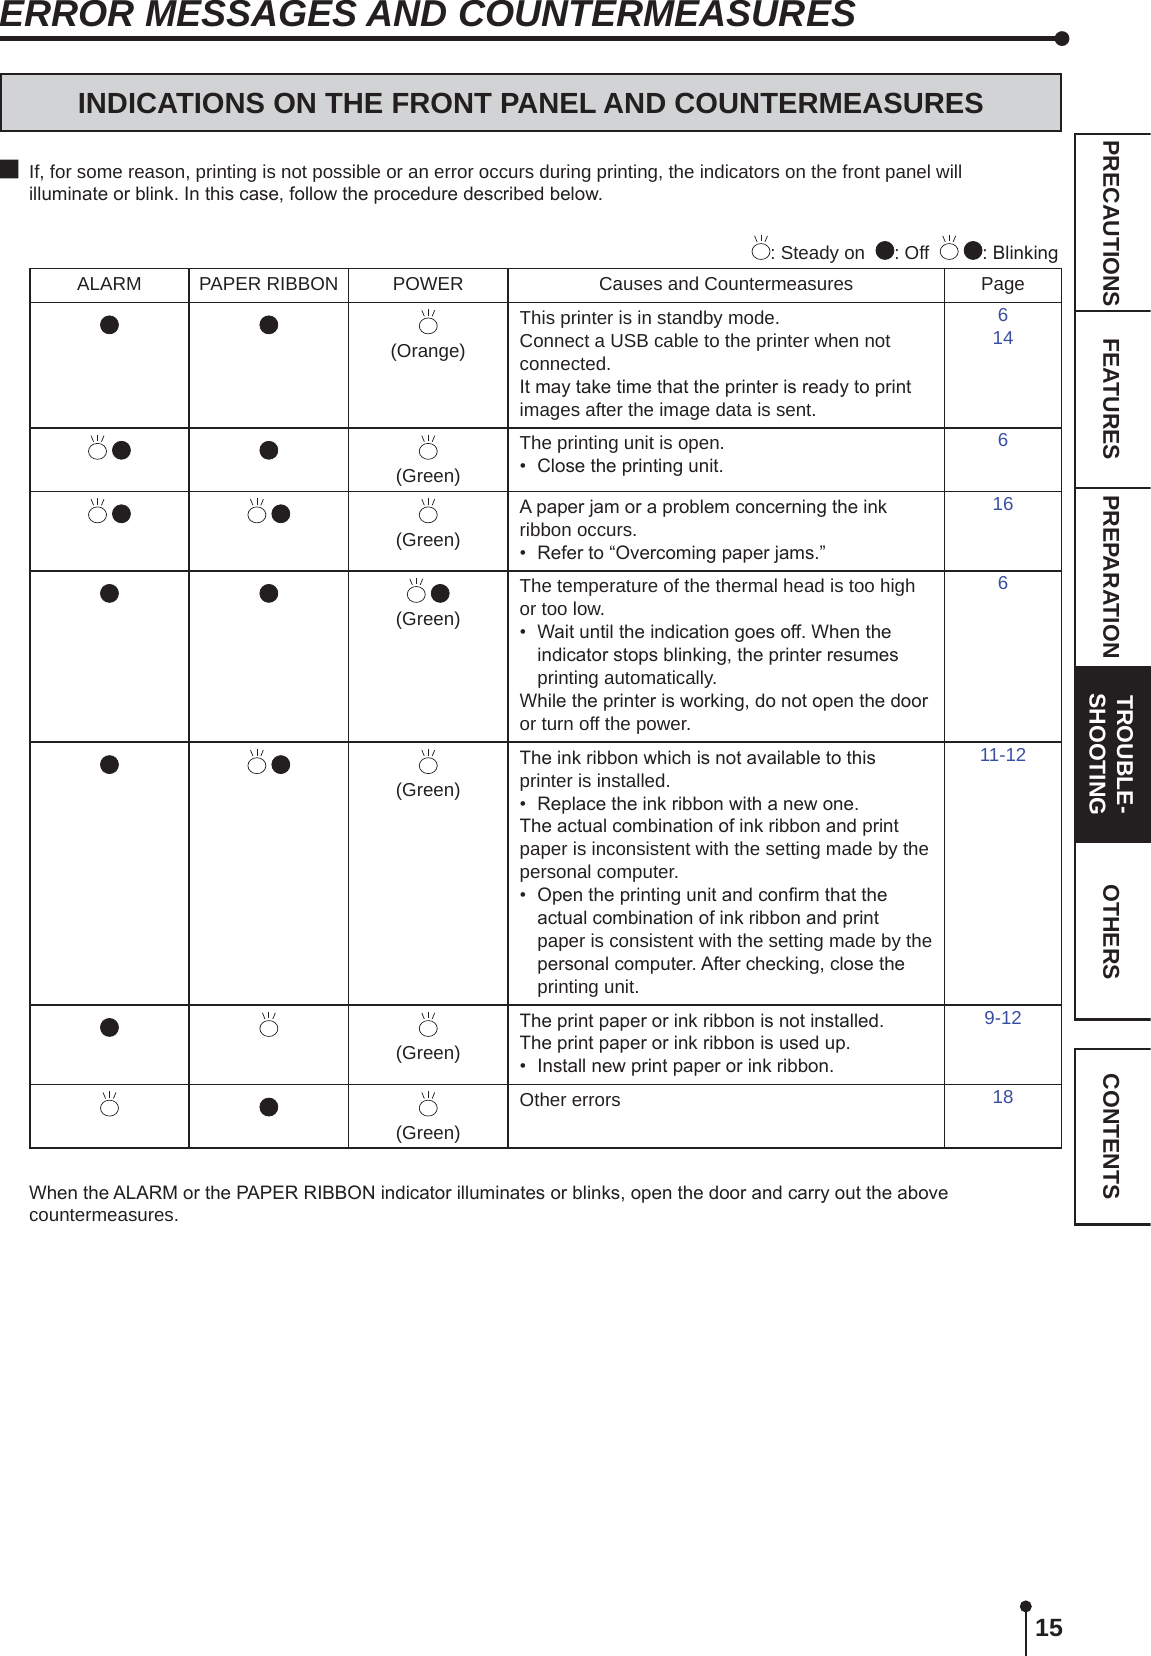
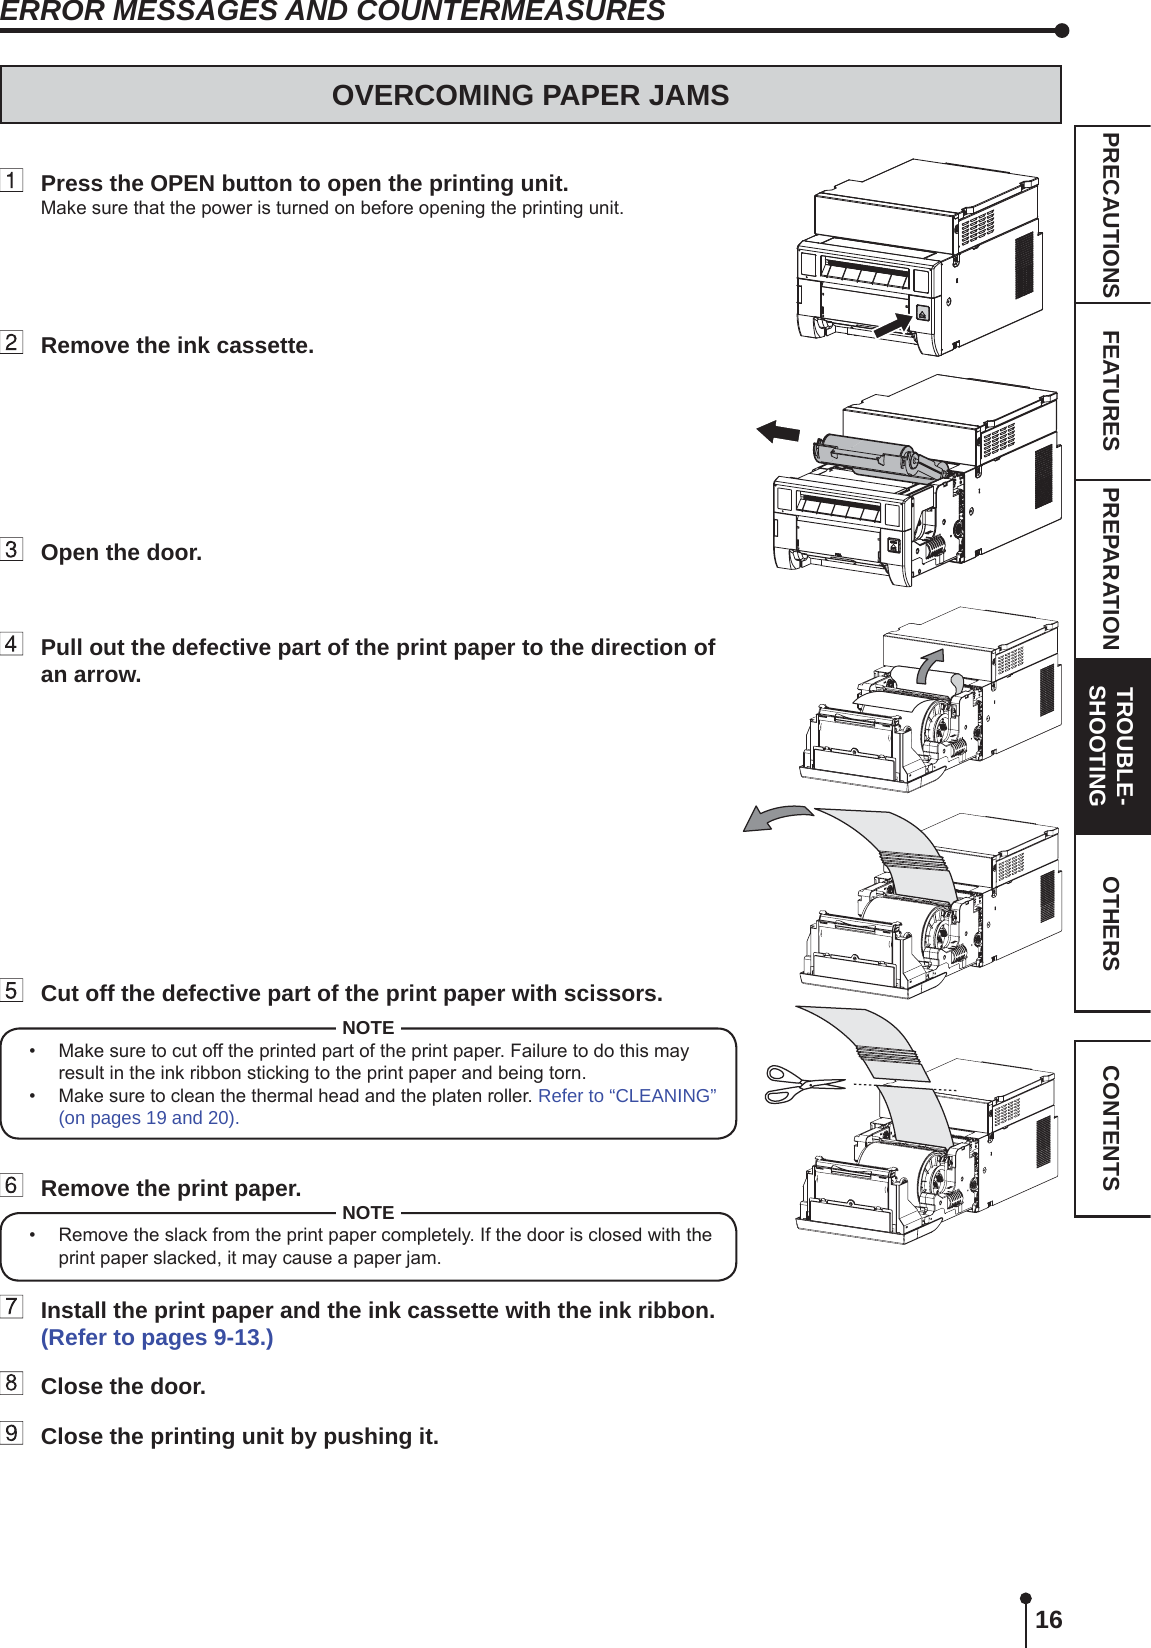
![18PREPARATION TROUBLE-SHOOTINGFEATURESPRECAUTIONS OTHERS CONTENTSINSTRUCTIONS FOR TRANSPORTATIONWhen transporting this unit for some reason such as repair, follow the instructions below.1. Use the original packaging.7KHJHQXLQHSDFNDJHXQLWPD\QRWHQGXUHPRUHWKDQRQHURXQGWULS,IWKHXQLWLVWUDQVSRUWHGZLWKWKHSDFNDJHXQLWPRUHthan one round trip, it may not be guaranteed.3XUFKDVHDQRWKHUSDFNDJHXQLWZKHQWUDQVSRUWLQJWKLVXQLWDJDLQ3DFNWKHXQLWZLWKWKHDFFHVVRULHVLQNULEERQDQGSULQWSDSHUUHPRYHG &ORVHWKHSULQWLQJXQLW¿UPO\:KHQFORVLQJWKHSULQWLQJXQLWSXVKLWXQWLODFOLFNLVKHDUGCAUTION:KHQWKHSULQWLQJXQLWLVQRWFORVHG¿UPO\RU\RXSUHVVWKH23(1EXWWRQDFFLGHQWDOO\WKHSULQWLQJXQLWPD\RSHQ,WFDQcause injury or damage. 3. If the ink ribbon, print paper, or ink cassette can not be taken out, consult with your dealer.ERROR MESSAGES AND COUNTERMEASURESBEFORE CALLING FOR SERVICE)RUWKHIROORZLQJV\PSWRPVFKHFNWKHXQLWDJDLQEHIRUHFDOOLQJIRUVHUYLFHSymptom &KHFN5HPHG\The power is not turned on. Is the power cord plug disconnected from the outlet?ĺ &RQQHFWWKHSRZHUFRUGSOXJWRWKHRXWOHW¿UPO\ĺ 7KHSURWHFWLYHFLUFXLWPD\EHZRUNLQJ7XUQRIIWKHSRZHUDQGZDLWIRUabout two minutes. Then turn on the power again.The printing unit doesn’t open. Are you turning off the power during printing procedure?ĺ 7XUQRQWKHSRZHUDQGWKHQRSHQWKHSULQWLQJXQLWThe image is not printed. Is the PAPER RIBBON indicator or the ALARM indicator illuminating or EOLQNLQJ"ĺ 5HIHUWR³2YHUFRPLQJSDSHUMDPV´Is the appropriate size of data sent to this unit?ĺ 0DNHVXUHWKDWWKHDSSURSULDWHVL]HRILPDJHGDWDLVVHQWWRWKLVXQLW,VWKHSULQWSDSHURUWKHLQNULEERQXVHGXS"ĺ &KHFNWKHP,VWKHSULQWLQJXQLWVHW¿UPO\"ĺ 6HWWKHSULQWLQJXQLW¿UPO\ĺ :KHQWKHLQGLFDWRUVNHHSLOOXPLQDWLQJRUEOLQNLQJWKRXJKWKHDERYHRSHUDWLRQVDUHSHUIRUPHGUHPRYHWKHLQNULEERQDQGSULQWSDSHUDQGreinstall them.An error can not be resolved. ĺ 7XUQRIIDQGRQWKHSRZHURIWKHSULQWHUZLWKWKHSULQWLQJXQLWVHW¿UPO\This printer starts initialization.ĺ 3UHVVWKHVZLWFKLQVLGHRIWKHKROHRIWKHIURQWSDQHOZLWKDWKLQVWLFNRUWKHOLNHIRUVHFRQGVRUPRUHSwitch](https://usermanual.wiki/Mitsubishi-Electric/CP-C60DW/User-Guide-2173521-Page-21.png)
![MITSUBISHI ELECTRIC EUROPE B.V.Spanish Branch (Barcelona)Ctra. de Rubí, 76-80 - Apdo. 42008190-Sant Cugat del Vallés - (Barcelona) SpainPhone +34 93 565 3154 FAX +34 93 589 4388German BranchGothaer Strasse 8, 40880 Ratingen ; Postfach 1548, 40835 Ratingen ; GermanyPhone +49 (2102) 486-9250 FAX +49 (2102) 486-7320Manufactured by Mitsubishi Electric (Malaysia) Sdn. Bhd.3/2.DZDVDQ3HULQGXVWULDQ6HQDL,,6HQDL-RKRU'DUXO7DN]LP0DOD\VLDPlease contact the nearest Mitsubishi sales branch to get DOC (Declaration of Conformity) of the EC Directive 1999/5/EC.WE919C182A9](https://usermanual.wiki/Mitsubishi-Electric/CP-C60DW/User-Guide-2173521-Page-25.png)