Mitsubishi Electric CP-C60DW Digital Color Printer User Manual 05 En
Mitsubishi Electric Corp Digital Color Printer 05 En
User Manual-En
DIGITAL COLOR PRINTER
MODEL
CP-C60DW-WE
OPERATION MANUAL
THIS OPERATION MANUAL IS IMPORTANT
TO YOU.
PLEASE READ IT BEFORE USING YOUR
DIGITAL COLOR PRINTER.
Hereby, Mitsubishi Electric Corporation, declares that this digital color printer is in
compliance with the essential requirements and other relevant provisions of Directive
1999/5/EC.
OTHERSPRECAUTIONS FEATURES PREPARATION TROUBLE-
SHOOTING CONTENTS
WARNING :
TO PREVENT FIRE OR SHOCK HAZARD, DO NOT EXPOSE THIS APPLIANCE TO RAIN
OR MOISTURE.
INFORMATION
This Class A digital apparatus complies with Canadian ICES-003.
CAUTION :
TO REDUCE THE RISK OF ELECTRIC
SHOCK,
DO NOT REMOVE COVER (OR BACK)
NO USER-SERVICEABLE PARTS INSIDE
REFER SERVICING TO QUALIFIED SERVICE
PERSONNEL.
RISK OF ELECTRIC SHOCK
DO NOT OPEN
CAUTION
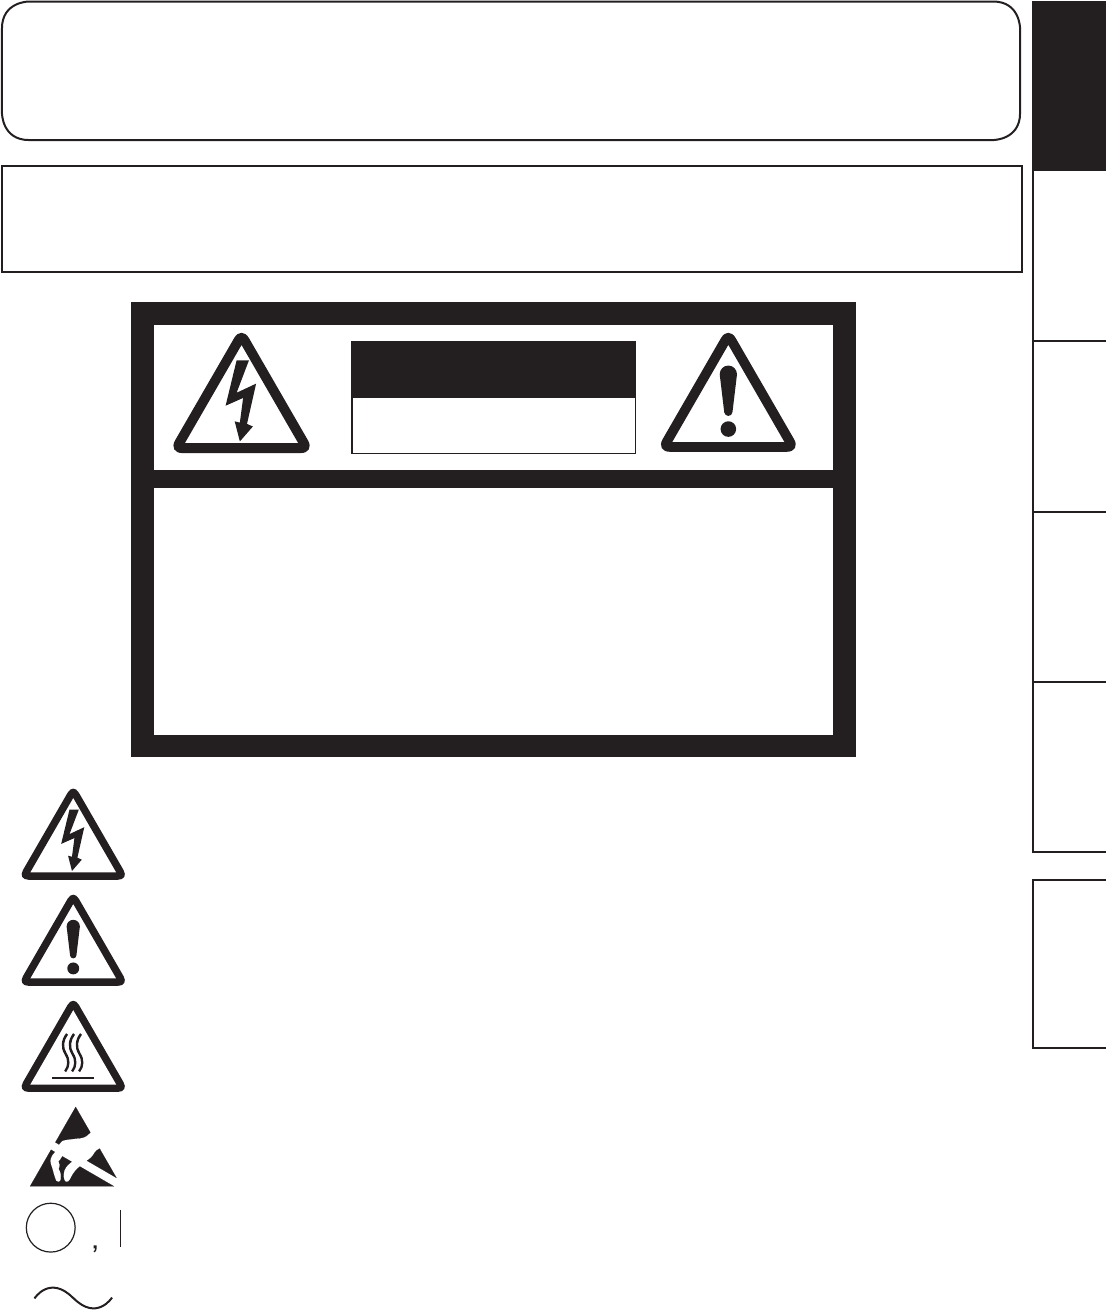
7KHOLJKWQLQJÀDVKZLWKDUURZKHDGV\PEROZLWKLQDQHTXLODWHUDOWULDQJOHLVLQWHQGHG
to alert the user to the presence of uninsulated “dangerous voltage” within the
SURGXFW¶VHQFORVXUHWKDWPD\EHRIVXI¿FLHQWPDJQLWXGHWRFRQVWLWXWHWKHULVNRI
HOHFWULFVKRFN
The exclamation point within an equilateral triangle is intended to alert the user to
the presence of important operating and maintenance (servicing) instructions in the
literature accompanying the appliance.
7KH³&DXWLRQKRWVXUIDFH´V\PEROLQGLFDWHVWKDWWKHPDUNHGLWHPPD\EHKRWDQG
should not be touched.
The “Electro Static Discharge (ESD) warning” symbol indicates that trouble (including
equipment malfunction) due to static electricity may occur in certain conditions.
The “OFF/ON” symbol indicates connection to or disconnection from the mains, at
least for mains switches.
The “Alternating current” symbol indicates that the equipment is suitable for
alternating current only.
WARNING:
Use the included AC power cord so as not to interfere with radio and television reception.
If you use other cables, it may cause interference with radio and television reception.
OTHERSPRECAUTIONS FEATURES PREPARATION TROUBLE-
SHOOTING CONTENTS
CAUTION:
&KDQJHVRUPRGL¿FDWLRQVQRWH[SUHVVO\DSSURYHGE\WKHSDUW\UHVSRQVLEOHIRUFRPSOLDQFHFRXOGYRLG
the user’s authority to operate the equipment.
NOTE:
This equipment has been tested and found to comply with the limits for a Class A digital device,
pursuant to Part 15 of the FCC Rules. These limits are designed to provide reasonable protection
against harmful interference when the equipment is operated in a commercial environment. This
equipment generates, uses, and can radiate radio frequency energy and, if not installed and used in
accordance with the instruction manual, may cause harmful interference to radio communications.
2SHUDWLRQRIWKLVHTXLSPHQWLQDUHVLGHQWLDODUHDLVOLNHO\WRFDXVHKDUPIXOLQWHUIHUHQFHLQZKLFKFDVH
the user will be required to correct the interference at his or her own expense.
This device complies with Industry Canada licence-exempt RSS standard(s). Operation is subject to the
following two conditions:
(1) this device may not cause interference, and
(2) this device must accept any interference, including interference that may cause undesired
operation of the device.
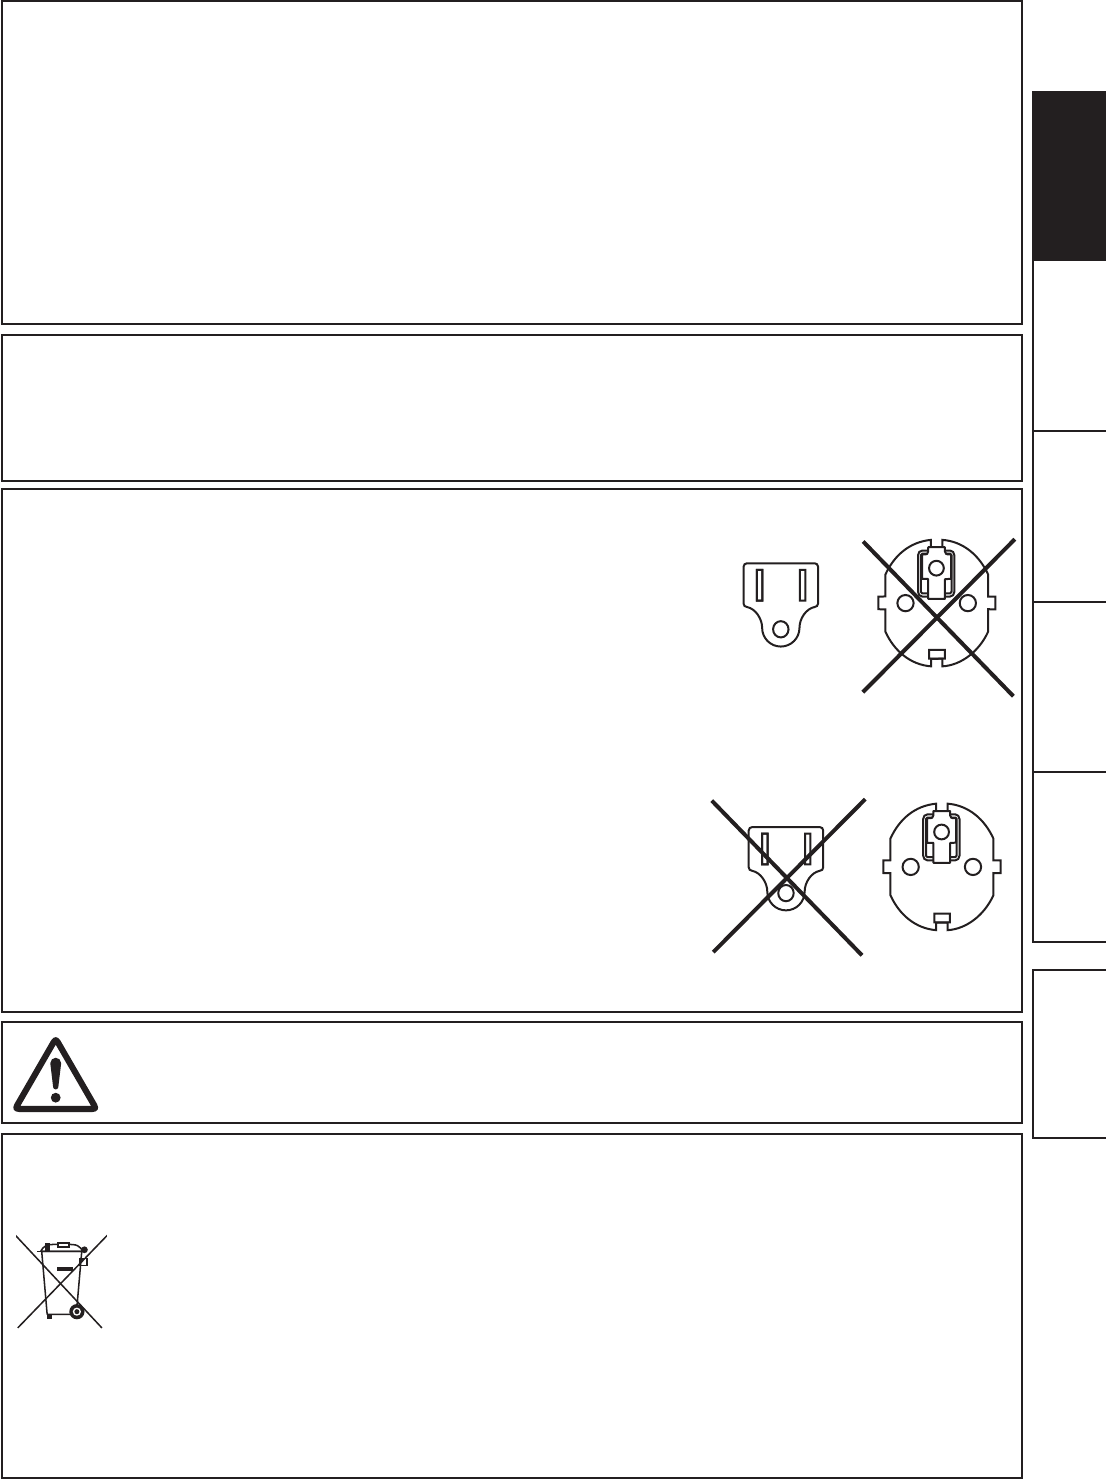
WARNING:
In the USA or Canada, use the AC power cord according to the recommendations as
below, in order to comply with UL60950-1 and CAN/CSA C22.2 No. 60950-1-03.
Connect to the 120 V receptacle of the room or the host equipment.
The AC power cord should be UL or CSA approved and consist of type SVT, size
16 or 18AWG, length 2 m or shorter cord with IEC60320-1/C13 type, 125 V 10 A or
higher rating connector and NEMA 5-15 type, 125 V 10 A or higher rating plug.
8VHWKH$&SRZHUFRUGDVVSHFL¿HGDERYHVRDVQRWWRLQWHUIHUHZLWKUDGLRDQG
television reception.
If you use other cables, it may cause interference with radio and television reception.
WARNING:
In Europe, use the AC power cord according to the recommendations as below, in
order to comply with EN60950-1.
Connect to the 230 V receptacle of the room or the host equipment.
The AC power cord should be VDE approved and consist of core size 0.75 mm
2
or
bigger, length 2 m or shorter cord with IEC60320-1/C13 type, 250 V 10 A or higher
rating connector and CEE(7)VII type, 250 V 10 A or higher rating plug.
8VHWKH$&SRZHUFRUGDVVSHFL¿HGDERYHVRDVQRWWRLQWHUIHUHZLWKUDGLRDQG
television reception.
If you use other cables, it may cause interference with radio and television reception.
WARNING:
7KHVRFNHWRXWOHWVKDOOEHLQVWDOOHGQHDUWKHHTXLSPHQWDQGVKDOOEHHDVLO\DFFHVVLEOH
1RWH7KLVV\PEROPDUNLVIRU(8FRXQWULHVRQO\
7KLVV\PEROPDUNLVDFFRUGLQJWRWKHGLUHFWLYH(&$UWLFOH,QIRUPDWLRQIRUXVHUVDQG$QQH[,9DQGRU
to the directive 2006/66/EC Article 20 Information for end-users and Annex II.
Your MITSUBISHI ELECTRIC product is designed and manufactured with high quality materials and
components which can be recycled and/or reused.
This symbol means that electrical and electronic equipment, batteries and accumulators, at their end-of-life,
should be disposed of separately from your household waste.
If a chemical symbol is printed beneath the symbol shown above, this chemical symbol means that the battery
or accumulator contains a heavy metal at a certain concentration. This will be indicated as follows:
Hg: mercury (0,0005%), Cd: cadmium (0,002%), Pb: lead (0,004%)
In the European Union there are separate collection systems for used electrical and electronic products,
batteries and accumulators.
Please, dispose of this equipment, batteries and accumulators correctly at your local community waste
collection/recycling centre.
Please, help us to conserve the environment we live in!

1
OTHERSPRECAUTIONS FEATURES PREPARATION TROUBLE-
SHOOTING CONTENTS
CONTENTS
Contents .................................................................................................1
Safety precautions ..................................................................................2-4
8QSDFNLQJ...............................................................................................5
Features and functions ...........................................................................6-7
Front panel ..............................................................................................6
Side and rear panel .................................................................................7
Before operation .....................................................................................8-14
Printer setup procedure ...........................................................................8
Print paper installation .............................................................................9-10
,QNULEERQLQVWDOODWLRQ ..............................................................................11-12
+DQGOLQJRISDSHULQNULEERQVHW ...........................................................13
Connection with USB data signal equipment ..........................................14
Error messages and countermeasures ..................................................15-18
Indications on the front panel and countermeasures ..............................15
Overcoming paper jams ..........................................................................16
5HSDLULQJDWRUQLQNULEERQ ......................................................................17
Before calling for service .........................................................................18
Instructions for transportation ..................................................................18
Cleaning .................................................................................................19-20
6SHFL¿FDWLRQV .........................................................................................21
CONTENTS

2
OTHERSPRECAUTIONS FEATURES PREPARATION TROUBLE-
SHOOTING CONTENTS
In the interest of safety, please observe the following precautions:
POWER REQUIREMENT
This Digital Color Printer is designed to operate on 120 V AC 50/60 Hz in the U.S.A. and Canada, and 220 V - 240 V AC 50/60
Hz in Europe. Never connect to any outlet or power supply having a different voltage or frequency.
WARNING : THIS APPARATUS MUST BE EARTHED.
PROTECTIVE MEASURES
IF ABNORMALITIES ARISE, .....
8VHRIWKHXQLWGXULQJHPLVVLRQRIVPRNHRUDEQRUPDOVRXQGVZLWKRXWDGRSWLQJFRXQWHUPHDVXUHVLVGDQJHURXV,QVXFKDFDVH
unplug the power cord from the source outlet immediately, and request maintenance service from the sales dealer.
NEVER INSERT ANY OBJECT INTO THE UNIT
)RUHLJQREMHFWVRIDQ\NLQGLQVHUWHGLQWRWKLVXQLWFRQVWLWXWHDVDIHW\KD]DUGDQGFDQFDXVHH[WHQVLYHGDPDJH
DO NOT PLACE ANYTHING ON THE DIGITAL COLOR PRINTER
Heavy objects placed on the Digital Color Printer can cause damage or obstruct proper ventilation.
PROTECT THE POWER CORD
'DPDJHWRWKHSRZHUFRUGPD\FDXVH¿UHRUVKRFNKD]DUG:KHQXQSOXJJLQJKROGE\WKHSOXJRQO\DQGUHPRYHFDUHIXOO\
DO NOT PLACE WATER CONTAINERS ON THE UNIT
'RQRWSODFHÀRZHUYDVHVDQGRWKHUZDWHUKROGLQJFRQWDLQHUVRQWKHGHYLFH,IIRUVRPHUHDVRQZDWHUVHHSVWRWKHLQVLGHRI
the unit, unplug the power cord from the source outlet, and contact the sales dealer. If used without corrective measures, the
unit may be damaged.
“In the interest of safety, avoid handling of liquids near the unit.”
DO NOT REMOVE THE CABINET
7RXFKLQJLQWHUQDOSDUWVLVGDQJHURXVEHVLGHVLWPD\OHDGWRPDOIXQFWLRQ&RQWDFWWKHVDOHVGHDOHUWRFDUU\RXWLQWHUQDOFKHFNV
and adjustments. Before opening the cover for eliminating a jammed paper, etc., be sure to disconnect the power cord plug.
UNPLUG THE POWER CORD DURING A LONG ABSENCE
Turn off the main power switch and unplug the power cord during a long absence.
WHEN TRANSPORTING THE UNIT
:KHQWUDQVSRUWLQJWKHXQLWUHPRYHWKHLQNULEERQDQGSULQWSDSHUIURPWKHXQLWSee “INSTRUCTIONS FOR
TRANSPORTATION” on page 18.
WHEN MOVING THE UNIT
&KHFNWKDWWKHSULQWLQJXQLWLVFORVHG¿UPO\$QGSD\DWWHQWLRQQRWWRSUHVVWKH23(1EXWWRQDFFLGHQWDOO\:KHQWKHSULQWLQJXQLW
LVQRWFORVHG¿UPO\RU\RXSUHVVWKH23(1EXWWRQDFFLGHQWDOO\WKHSULQWLQJXQLWPD\RSHQ,WFDQFDXVHLQMXU\RUGDPDJH
BE CAREFUL AROUND PRINT PAPER EXIT SLOT
Don’t insert your hand or any material into the paper exit slot during printing.
Do not touch the cutter blade inside the paper exit slot.
2WKHUZLVH\RXU¿QJHUZLOOEHLQMXUHG
DO NOT TOUCH THE THERMAL HEAD EXCEPT WHEN CLEANING
Do not touch the thermal head (located inside the unit) except when cleaning.
They are heated to high temperature and may cause burns or injury when touched.
Also, malfunction caused by static electricity may occur.
WHEN PLACING THE PRINT PAPER, KEEP THE PRINT PAPER UPRIGHT
When you put the print paper sideways on a table, etc., it may roll and fall. This may cause injury.
CONNECTION CABLES
Use the provided power cord.
SAFETY PRECAUTIONS

3
OTHERSPRECAUTIONS FEATURES PREPARATION TROUBLE-
SHOOTING CONTENTS
REMOVE THE PAPER STRIP BIN WHEN OPENING OR CLOSING THE DOOR
When you open or close the door with the paper strip bin installed, the bin may be removed and fall. This may cause injury or
damage. Also, the chips generated by margin cut may jam at the paper exit slot.
DO NOT LEAVE THE PRINTING UNIT OPEN
When the printer is moved with the printing unit open, it may cause injury or damage.
CLOSE THE PRINTING UNIT FIRMLY
7DNHFDUHQRWWRSLQFK\RXUKDQGZKHQFORVLQJWKHSULQWLQJXQLW:KHQWKHSULQWLQJXQLWLVQRWFORVHG¿UPO\LWPD\RSHQGXULQJ
transportation and it may cause injury or damage.
DO NOT PUSH DOWN ON THE PRINTING UNIT OR THE DOOR
If you push down on the printing unit or the door when they are open, this unit may fall and it can cause damage or injury.
INSTALLATION LOCATIONS
MAINTAIN GOOD VENTILATION
Ventilation slots and holes are provided on the rear and both sides of this unit. Place the unit on a hard and level surface and
NHHSDVSDFHEHWZHHQWKHXQLWDQGWKHZDOOVWRHQVXUHSURSHUYHQWLODWLRQ:KHQSXWWLQJWKHXQLWRQWKHV\VWHPUDFNWDNHD
VSDFHEHWZHHQWKHXQLWDQGWKHEDFNDQGVLGHVRIWKHUDFN
SUITABLE LOCATIONS
$YRLGVKDN\SODFHVRUKRWVSULQJVDUHDVZKHUHK\GURJHQVXO¿GHDQGDFLGLFLRQVDUHOLNHO\WREHJHQHUDWHG
AVOID PLACES WITH HIGH HUMIDITY AND DUST
Do not place the unit at a high humidity and dusty locations. They can cause extensive damage to this unit. Avoid places where
WKHXQLWLVOLNHO\WREHH[SRVHGWRRLO\IXPHVDQGYDSRUV
AVOID PLACES LIKELY TO BE EXTREMELY HOT
Places exposed to direct sunlight, or near heating appliances can attain extremely high temperatures, which may deform the
cabinet, or can become a prime cause of damage.
PLACES THE UNIT ON A HORIZONTAL LEVEL
7KHXQLWLVOLNHO\WREHDIIHFWHGLILWLVSODFHGLQVODQWHGFRQGLWLRQVRULQDQXQVWDEOHSODFHV
PROTECT AGAINST DEW FORMATION
,QH[WUHPHO\FROGUHJLRQVLIWKHXQLWLVPRYHGTXLFNO\IURPDQH[WUHPHO\FROGSODFHWRZDUPHURQHGHZLVOLNHO\WREHIRUPHG,I
dew is formed, printing is not possible.
OPERATING AMBIENT TEMPERATURE RANGE
The operating ambient temperature range is 10°C - 35°C (50°F - 95°F) and the humidity of 30% - 80% RH. When using the unit
RQWKHV\VWHPUDFNEHVXUHWRNHHSWKLVDPELHQWWHPSHUDWXUHLQVLGHWKHUDFN
'HSHQGLQJRQWKHLQWHUQDOWHPSHUDWXUHLWPD\WDNHVRPHWLPHWRVWDUWSULQWLQJ
FOR LONG OPERATING LIFE
UNSUITABLE MATERIALS FOR THE DIGITAL COLOR PRINTER
&RDWÀDNLQJDQGGHIRUPDWLRQDUHOLNHO\WRRFFXULIWKHXQLWLVZLSHGZLWKFKHPLFDOGXVWHUVEHQ]LQHWKLQQHURUDQ\RWKHUVROYHQWLI
rubber or PVC items are left in contact with the unit for extended duration, or if the unit is sprayed with insecticide.
CARE OF THE CABINET
Unplug and clean with a soft cloth slightly moistened with a mild soap and water solution. Allow to dry completely before
operating. Never use petroleum base solutions or abrasive cleaners.
HEAD ABRASION
7KHWKHUPDOKHDGOLNHWKHYLGHRKHDGZHDUVRXW:KHQLWLVDEUDGHGLWEHFRPHVKDUGWRSULQWRXW¿QHGHWDLOVRIWKHSLFWXUH,Q
such a case, it is necessary to replace the thermal head. Consult with the sales dealer for replacing the head.
CONNECTING DEVICES
5HDGWKRURXJKO\³2SHUDWLQJ3UHFDXWLRQV´RIWKHLQVWUXFWLRQERRNOHWVIRUWKHGHYLFHVFRQQHFWHGZLWKWKH'LJLWDO&RORU3ULQWHU7KH
power cord must be disconnected after printing is over.
CAUTION ON RELOCATING
:KHQWUDQVSRUWLQJWKLVXQLWPDNHVXUHLWLVQRWOLNHO\WREHVXEMHFWHGWRLPSDFWV7KH\FDQEHDSULPHFDXVHIRUGDPDJH
)XUWKHUPDNHVXUHWRGLVFRQQHFWWKHSRZHUFRUGIURPWKHSRZHURXWOHWDQGWKHFDEOHVIURPWKHFRQQHFWHGGHYLFHV
SAFETY PRECAUTIONS
4
OTHERSPRECAUTIONS FEATURES PREPARATION TROUBLE-
SHOOTING CONTENTS
OTHER CAUTIONS
'RQRWSXOORXWQRUWRXFKWKHSULQWSDSHUXQWLOSULQWLQJLVFRPSOHWHG,WPD\GHJUDGHWKHSULQWTXDOLW\RUFDXVHDQHUURU
'XVWRURWKHUIRUHLJQPDWWHUDGKHULQJWRWKHSULQWSDSHURUWKHLQNFDVVHWWHRUGHIRUPDWLRQUHVXOWLQJIURPH[SRVXUHWR
H[WUHPHO\ORZRUKLJKWHPSHUDWXUHVFRXOGFDXVHORVVRIFRORUXQHYHQFRORURUOLQHVRUZULQNOHVLQWKHSULQWLPDJHV
&OHDQWKHWKHUPDOKHDGDQGSODWHQUROOHUWRNHHSJRRGSULQWTXDOLW\ZKHQHYHU\RXUHSODFHWKHSULQWSDSHUDQGLQNULEERQ
'HSHQGLQJRQWKHLQWHUQDOWHPSHUDWXUHWKHSULQWHUPD\VWRSSULQWLQJWHPSRUDULO\GXULQJSULQWLQJ7KH32:(5LQGLFDWRU
EOLQNVJUHHQ3OHDVHZDLWIRUWKHSULQWHUWRUHVXPHSULQWLQJ
Do not touch the print paper.
(DFKWLPHSULQWLQJLVFRPSOHWHGUHPRYHWKHSULQWV,IWKHSULQWVDUHQRWUHPRYHGDSDSHUMDPPD\RFFXU
Empty the paper strip bin frequently to prevent jamming the strips at the print outlet.
Do not use the printer in a place where a strong wind blows. Otherwise, the print paper may not be fed properly, resulting in
the paper jam.
NOTE:
YOUR UNDERSTANDING IS REQUESTED FOR THE LOSS OF IMAGES IN MEMORY DUE TO THE SUDDEN
OCCURRENCE OF A MALFUNCTION.
SAFETY PRECAUTIONS
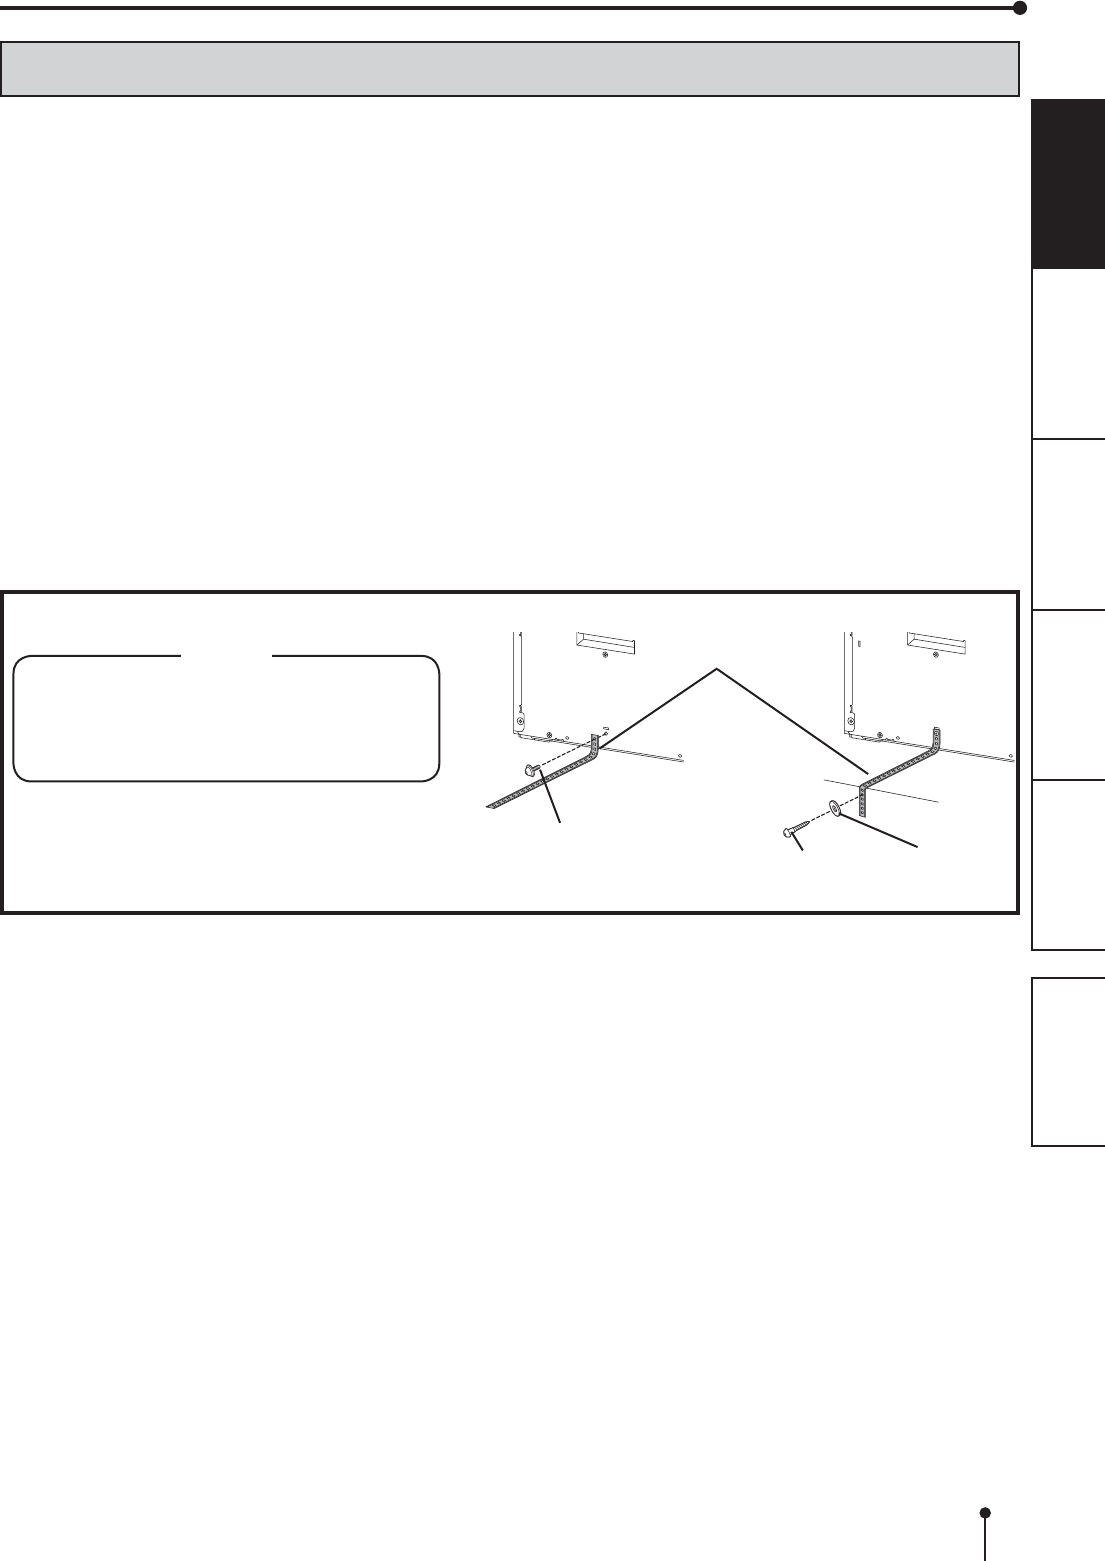
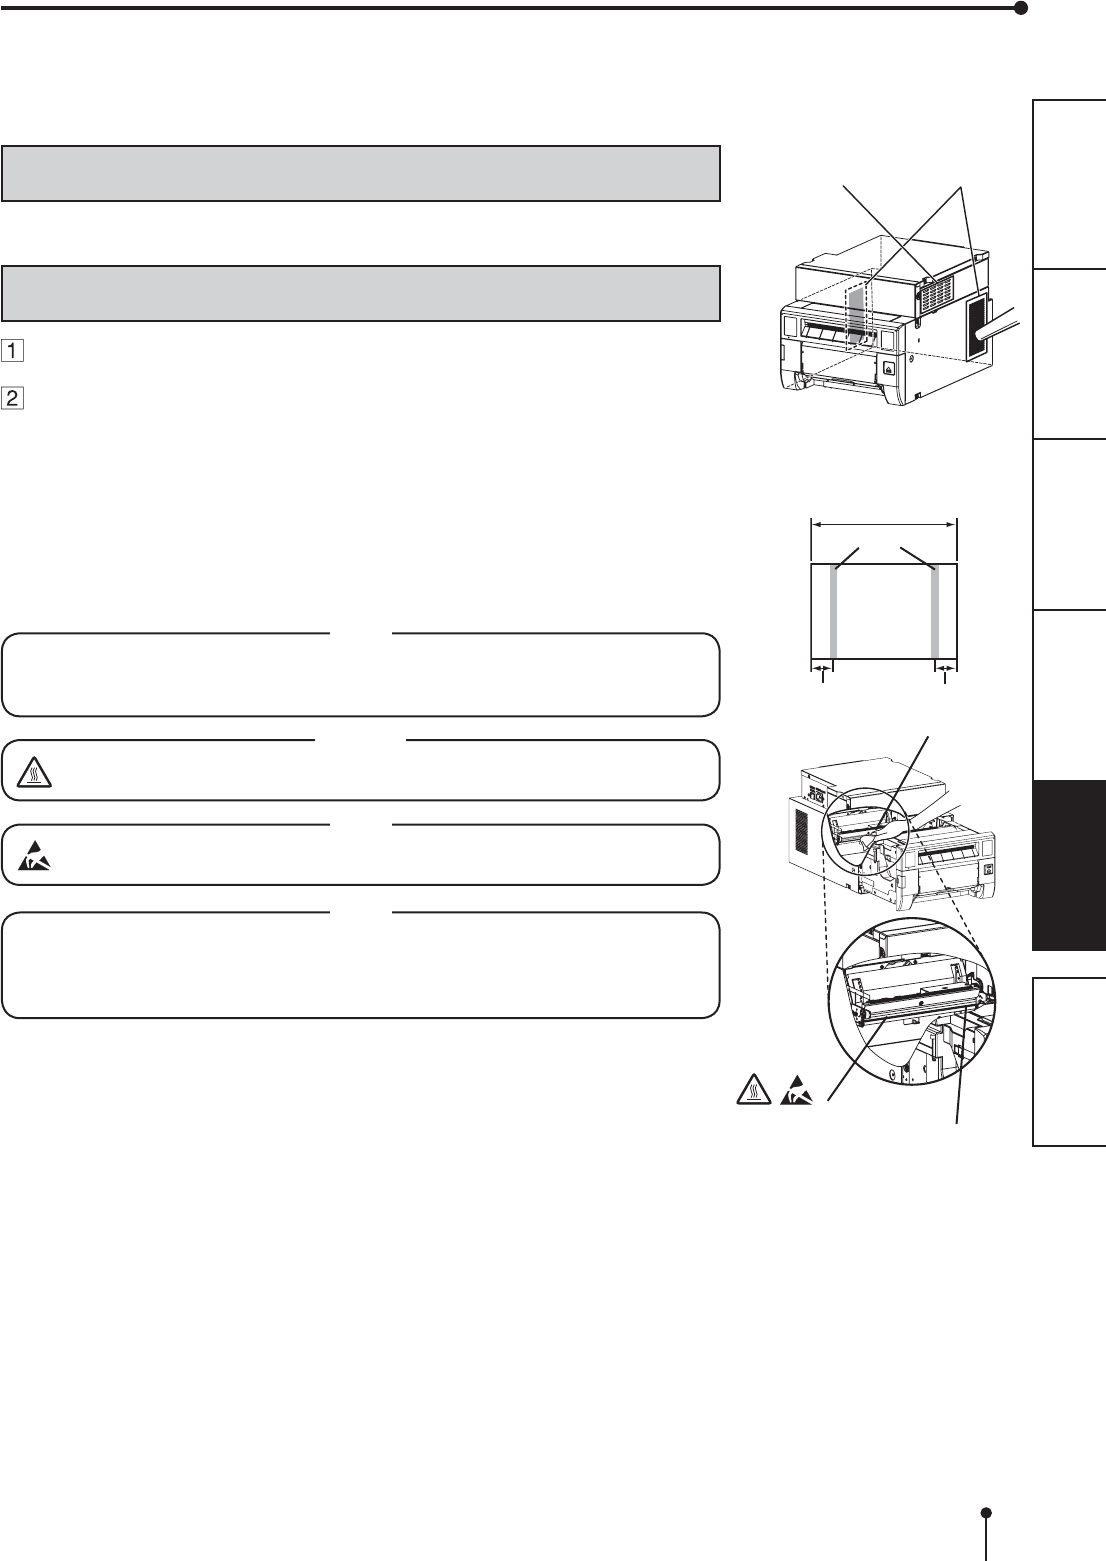
Securing band
(supplied)
Cautions to prevent the printer from falling
CAUTION
)DOOLQJWKLVSULQWHUGXHWRVKRFNRURWKHUUHDVRQV
may cause injury.
)RU\RXUVDIHW\PDNHVXUHWRVHFXUHWKHSULQWHU
by the following procedure when you decide the
location of installation of the printer.
1. Secure the securing band (supplied) to the printer
with the screw (supplied).
2. Secure the other side of the securing band to the
installation location with the round head wood
screw (supplied).
Screw (supplied)
Round head wood screw
(supplied) Washer
(supplied)
5
OTHERSPRECAUTIONS FEATURES PREPARATION TROUBLE-
SHOOTING CONTENTS
UNPACKING
UNPACKING
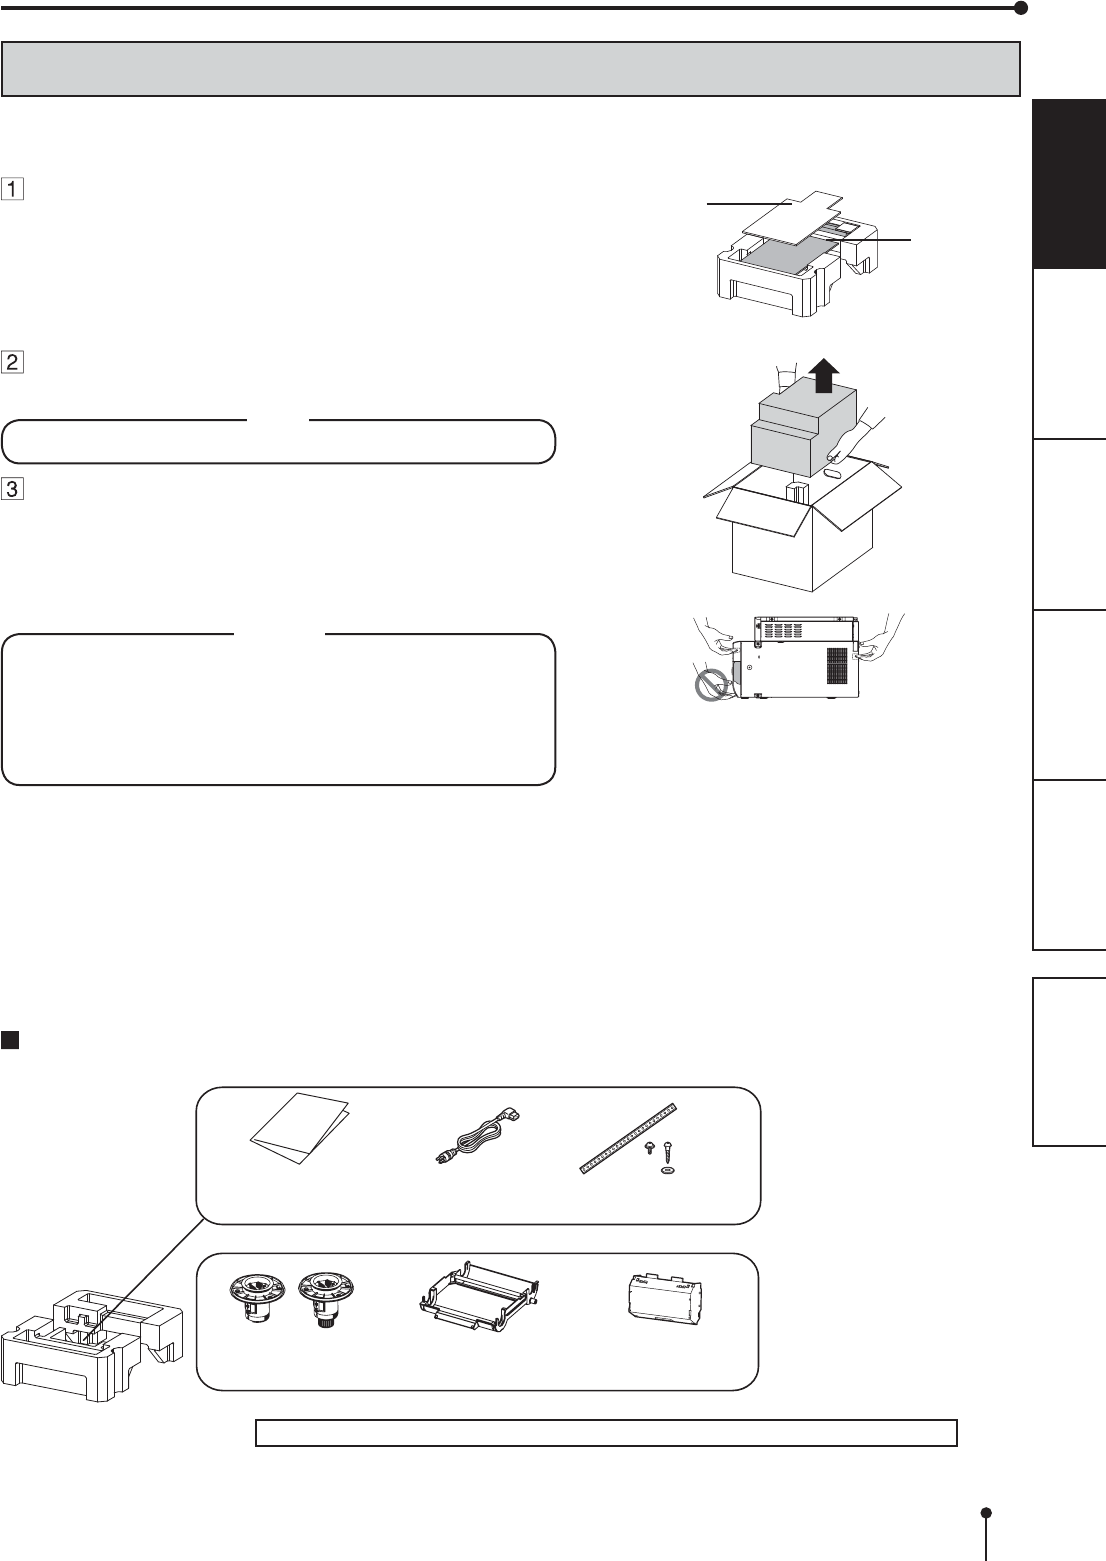
7DNHWKHSULQWHURXWRIWKHER[E\WKHIROORZLQJSURFHGXUHV0DNHVXUHWRFKHFNWKHDFFHVVRULHV
CONTENTS
7KHDFFHVVRULHVLWHPVDUHSODFHGLQWKHWRSFXVKLRQ&KHFNDOOLWHPVDUHLQFOXGHG
4XLFNVHWXS
guide
Paper strip bin3DSHUÀDQJHV
Power cord
,QNFDVVHWWH
0DNHVXUHWRUHPRYHWKHSURWHFWLYHPDWHULDOVIURPWKHLQNFDVVHWWHDQGSDSHUÀDQJHV
Open the printer box from the top and remove
the top cushion containing the accessories out
of the box.
5HPRYHWKHSURWHFWLYHFDUGERDUGDQGWKHQWDNHWKHDFFHVVRULHV
out of the cushion.
Carefully pull the printer up and out of the box.
3XOOWKHSULQWHUVWUDLJKWXSDVVKRZQLQWKH¿JXUH
NOTE
3ULQWHUZHLJKVDERXWNJ+DQGOHLWZLWKFDUH
Unwrap the packing.
Remove the protective materials for transportation such as
protective sheet.
Remove the paper strip bin before carrying the printer.
Hold the printer by the front and rear handle as illustrated in the
drawing.
CAUTION
'RQRWFDUU\WKHSULQWHUZLWKWKHSDSHUVWULSELQDWWDFKHGDQG
by holding the part under the paper strip bin. The paper strip
bin may be removed and fall. It may cause injury or damage.
:KHQWKHSULQWLQJXQLWLVQRWFORVHG¿UPO\RU\RXSUHVVWKH
OPEN button accidentally, the printing unit may open. It can
cause injury or damage.
These are contained in the printing unit.
Protective
cardboard Accessories
Securing band
Screws, Washer
6
OTHERSPRECAUTIONS FEATURES PREPARATION TROUBLE-
SHOOTING CONTENTS
FEATURES AND FUNCTIONS
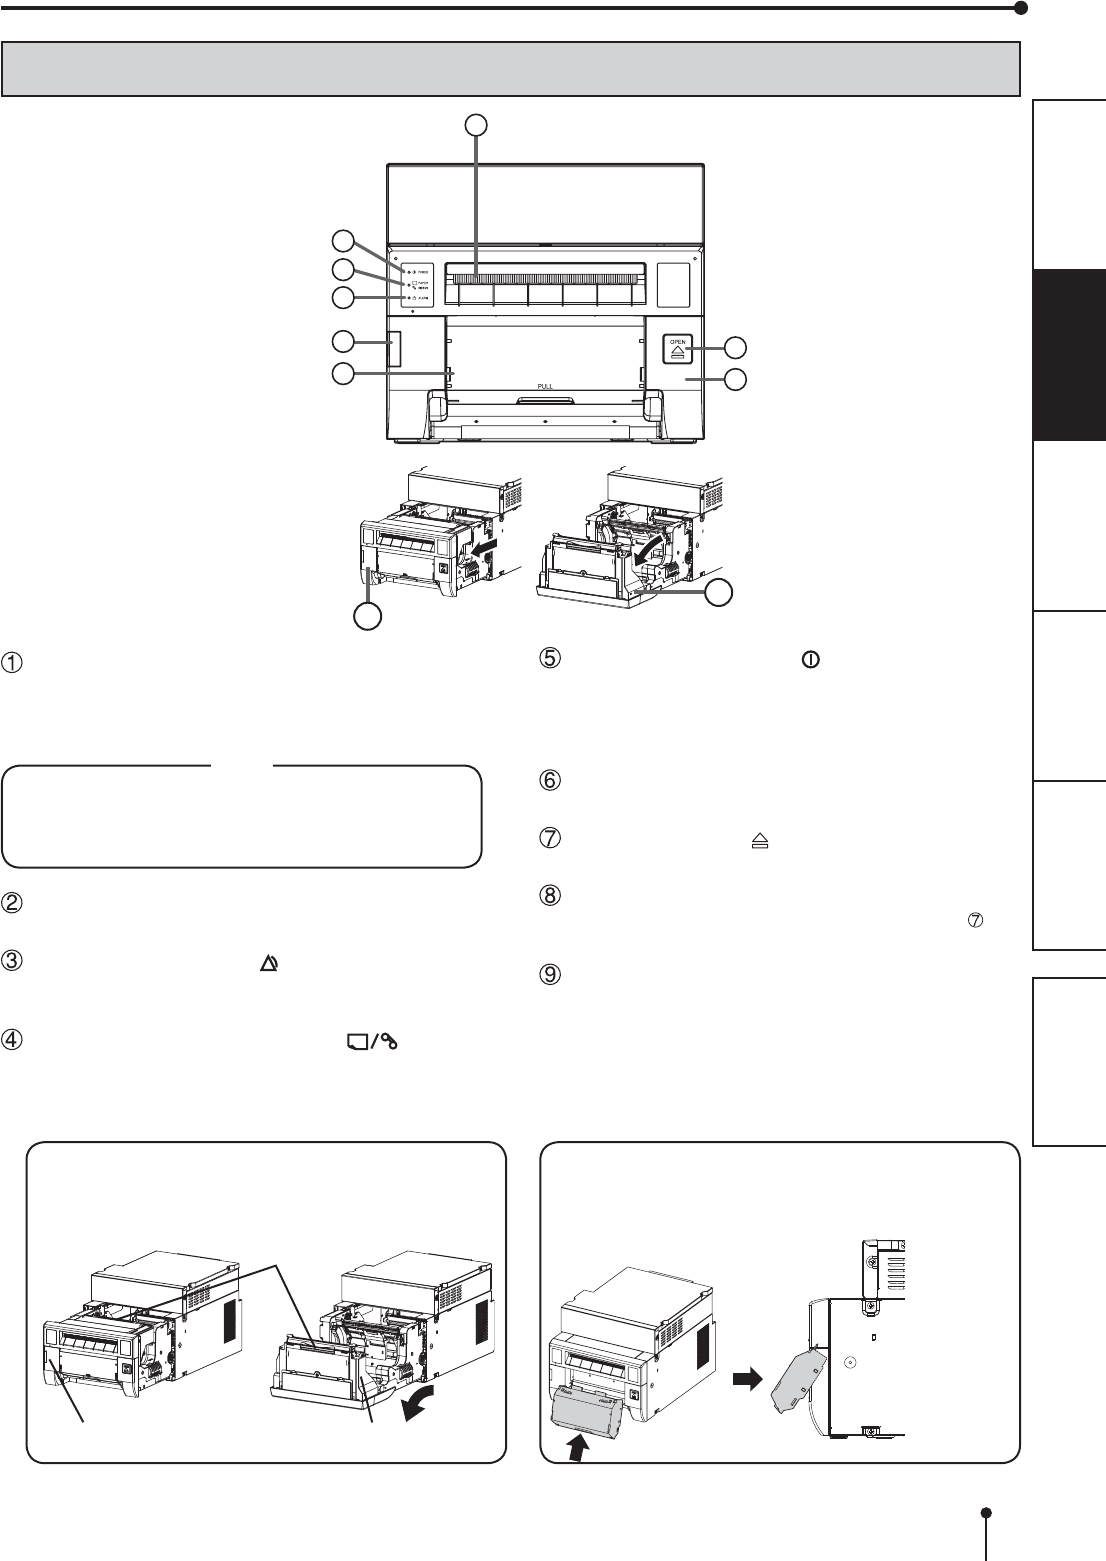
FRONT PANEL
PAPER STRIP BIN
Holds the paper strips generated by margin cut. Empty
the bin frequently to prevent jamming the strips at the
print outlet.
NOTE
Remove the bin before opening the door. If the door
is opened with this bin attached, the printer or this
bin may be damaged. Do not remove the bin during
printing. It may cause a malfunction.
CONNECTOR COVER
Do not open the cover during normal use.
ALARM INDICATOR ( )
7KLVLQGLFDWRULOOXPLQDWHVRUEOLQNVZKHQDSDSHUMDP
occurs or the door is open. See page 15.
PAPER RIBBON INDICATOR ( )
:KHQDQHUURUFRQFHUQLQJWKHLQNULEERQRUSULQWSDSHU
RFFXUVWKLVLQGLFDWRULOOXPLQDWHVRUEOLQNVSee page
15.
1
5
3
4
2
6
7
8
POWER INDICATOR ( )
When the power is turned on, the indicator illuminates.
,WQRUPDOO\LOOXPLQDWHVJUHHQKRZHYHUEOLQNVRU
illuminates orange depending on the printer status. See
page 15.
PRINT OUTLET
The printed paper comes out here.
OPEN BUTTON ( )
Press to release the printing unit out.
PRINTING UNIT
2SHQWRORDGSULQWSDSHURULQNULEERQ3UHVVWKH
OPEN button to release the printing unit.
DOOR
Open the door to mount print paper.
8
9
OPENING THE DOOR
Pull out the printing unit by pressing the OPEN button
DQGWKHQSXOOWKHNQREWRRSHQWKHGRRU
Printing unit Door
Knob
PAPER STRIP BIN
+RRNDQGSXOOXSWKHSDSHUVWULSELQWRDWWDFKLW¿UPO\
Hold and pull the handle on the lower part of paper strip
bin to remove.
12
7
OTHERSPRECAUTIONS FEATURES PREPARATION TROUBLE-
SHOOTING CONTENTS
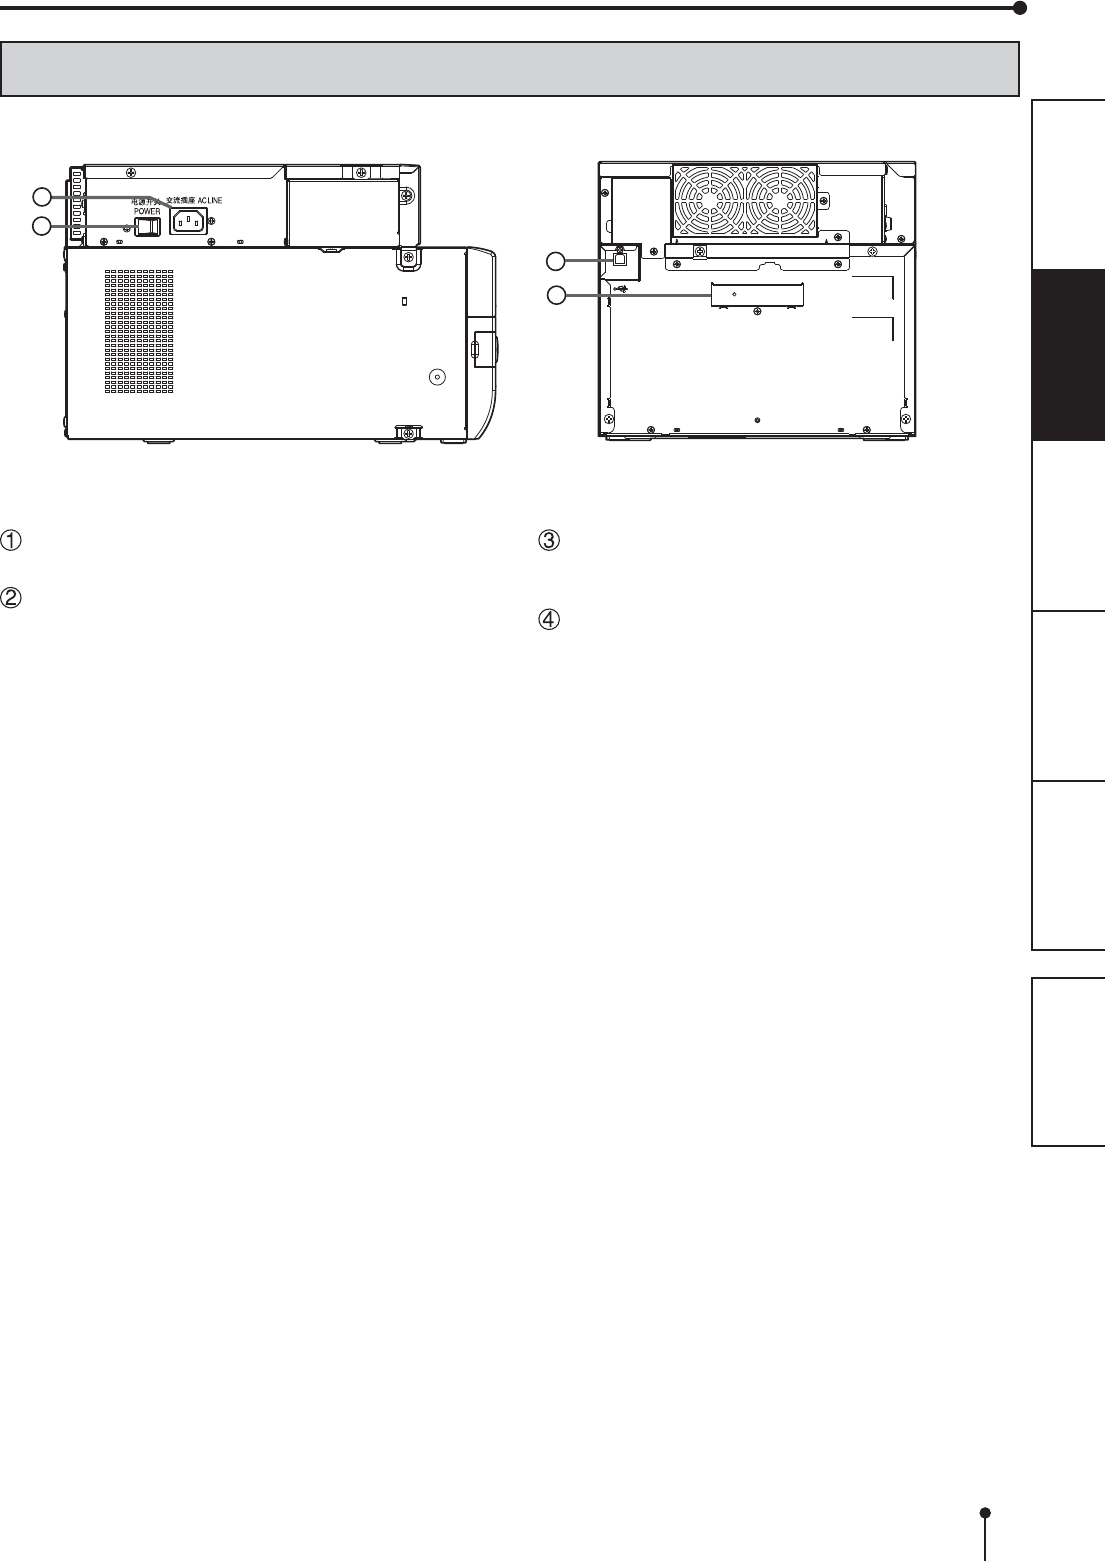
POWER SWITCH
Use to switch the power ON and OFF.
POWER SOCKET (AC LINE)
Use to connect the provided power cord. Insert the
FRUG¿UPO\
SIDE AND REAR PANEL
FEATURES AND FUNCTIONS
USB TERMINAL
Use to connect the USB cable.
See page 14.
HANDLE FOR TRANSPORTING
When carrying the printer, hold this handle and the
front upper part of the printer.
3
4
(LEFT SIDE) (REAR SIDE)
2
1

8
OTHERSPRECAUTIONS FEATURES PREPARATION TROUBLE-
SHOOTING CONTENTS
BEFORE OPERATION
PRINTER SETUP PROCEDURE
Before printing, follow the printer setup listed below.
Install the print paper to this printer. (See pages 9 to 10.)
Install the ink ribbon to this printer. (See pages 11 to 12.)
Connect the printer to a personal computer. (See page 14.)
0DNHVXUHWRFORVHWKHSULQWLQJXQLWZKHQWKHVHWXSSURFHGXUHLVFRPSOHWHG
9
OTHERSPRECAUTIONS FEATURES PREPARATION TROUBLE-
SHOOTING CONTENTS
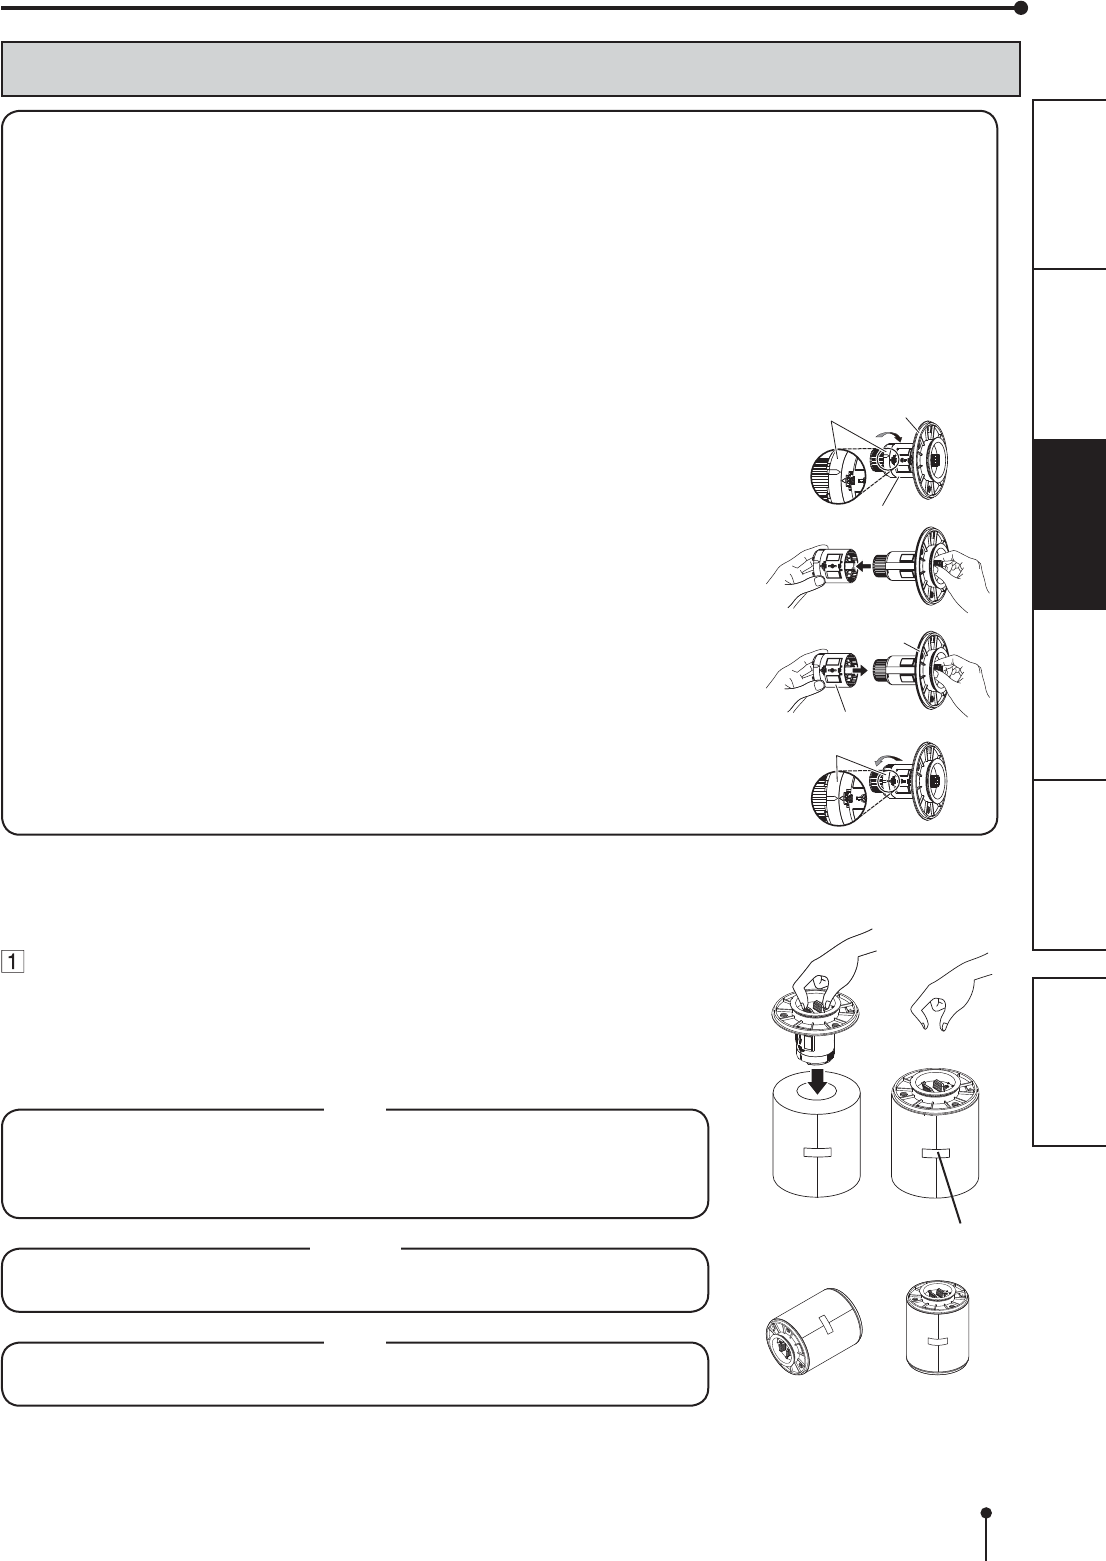
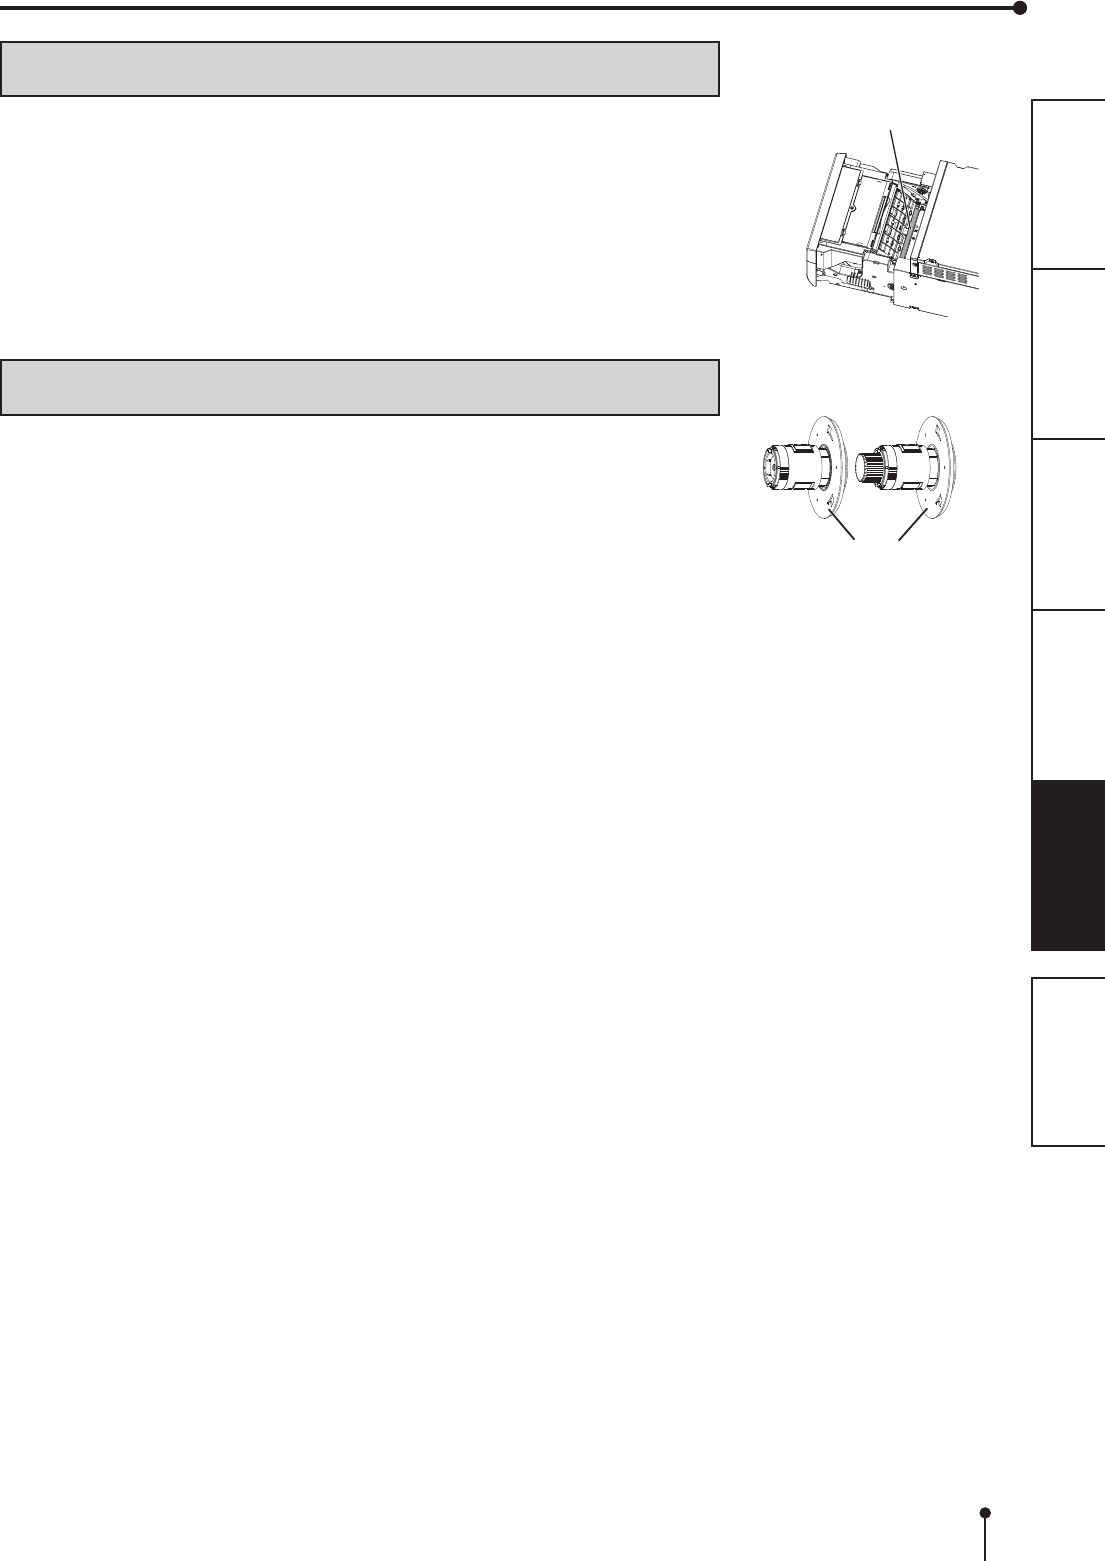
PRINT PAPER INSTALLATION
6WLFNHU
INCORRECT CORRECT
BEFORE OPERATION
:KHQ\RXSULQWLPDJHVZLWKWKLVXQLWPDNHVXUHWRXVHWKHGHGLFDWHGSDSHU
The applicable roll paper to this unit is as follows.
Paper width: 152 mm, inner diameter of core of roll paper: about 59 mm (default setting)
Paper width: 152 mm, inner diameter of core of roll paper: about 51 mm
%HIRUH\RXXVHWKHUROOSDSHUKDYLQJWKHFRUHZLWKWKHLQQHUGLDPHWHURIDERXWPPPDNHVXUHWRUHPRYHWKH
DWWDFKPHQWVRQWKHSDSHUÀDQJHV.HHSWKHUHPRYHGDWWDFKPHQWV7KH\DUHQHFHVVDU\ZKHQ\RXXVHWKHSULQWSDSHU
having the core with the inner diameter of about 59 mm.
<How to remove attachment>
8QORFNWKHDWWDFKPHQWE\WXUQLQJWKHULQJOLJKWJUD\DVVKRZQLQWKH¿JXUH
5HPRYHWKHDWWDFKPHQWZKLOHSLQFKLQJWKHODWFKHVRIWKHSDSHUÀDQJH
<How to attach attachment>
$WWDFKWKHDWWDFKPHQWZKLOHSLQFKLQJWKHODWFKHVRIWKHSDSHUÀDQJH
/RFNWKHDWWDFKPHQWE\WXUQLQJWKHULQJOLJKWJUD\DVVKRZQLQWKH¿JXUH
$WWDFKWKHVXSSOLHGSDSHUÀDQJHVWRERWKVLGHVRIWKHSULQW
paper.
:KHQ\RXSLQFKWKHODWFKHVRQWKHSDSHUÀDQJHWKHVWRSSHUVUHWUDFWLQWRWKHVKDIW
$WWDFKWKHÀDQJHVWRWKHSULQWSDSHUZLWKWKHVWRSSHUVUHWUDFWHG
0DNHVXUHWKDWWKHÀDQJHVDUHDWWDFKHGWRWKHSULQWSDSHUVHFXUHO\DQGUHOHDVHWKH
latches.
NOTE
7DNHFDUHQRWWRSLQFK\RXU¿QJHUV
'RQRWUHPRYHWKHVWLFNHURQWKHSULQWSDSHUUROO\HW
'RQRWORRVHQWKHSDSHUUROO$Q\VODFNLQWKHSULQWSDSHUPD\GHJUDGHWKHSULQW
quality.
CAUTION
:KHQSODFLQJWKHSULQWSDSHUNHHSWKHSULQWSDSHUXSULJKW
When you put the print paper sideways, it may roll and fall. This may cause injury.
NOTE
)LQJHUSULQWVRUGXVWRQWKHSDSHU¶VVXUIDFHPD\GHJUDGHSULQWTXDOLW\DQGFDXVH
paper jams.
Ring Paper
ÀDQJH
Attachment
Paper
ÀDQJH
Ring
Attachment
10
OTHERSPRECAUTIONS FEATURES PREPARATION TROUBLE-
SHOOTING CONTENTS
Install the print paper into the unit.
Place the printing paper in the correct orientation.
0DNHVXUHWKHSDSHUUROOLV¿UPO\LQVWDOOHG
CAUTION
Do not push down on the printing unit or the door.
If you push down on the printing unit or the door when they are open, this unit may
fall and it can cause damage or injury.
Roller
Print paper
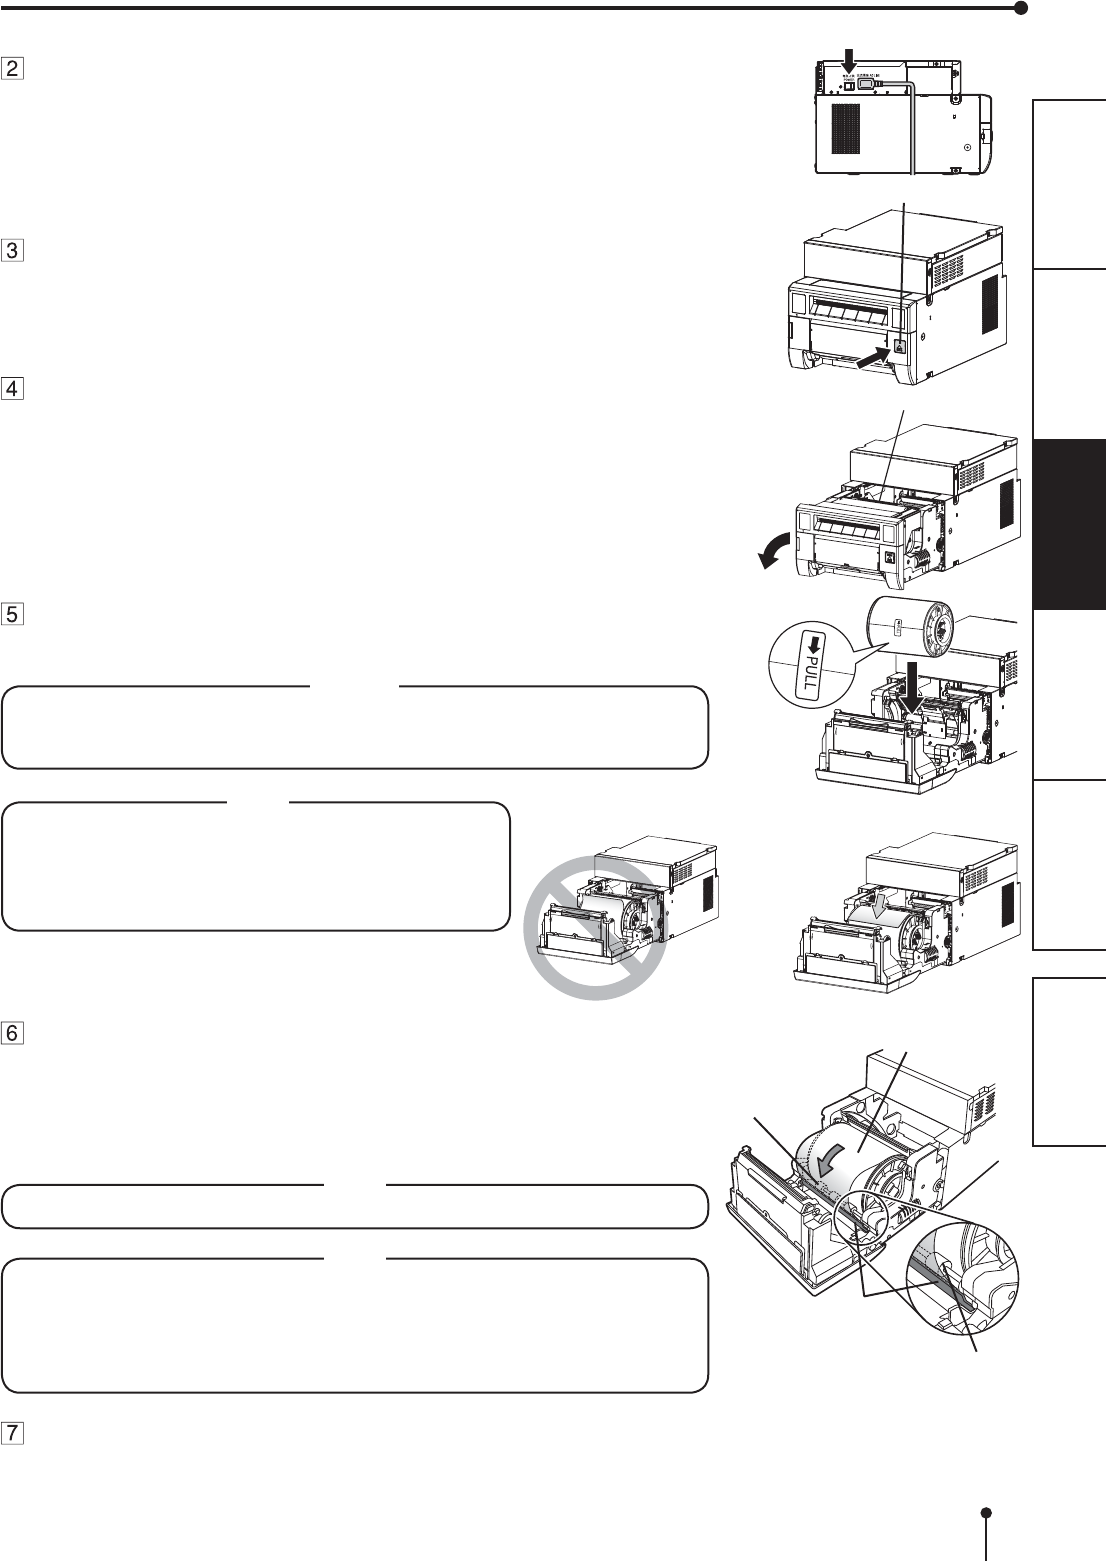
Remove the sticker and insert the print paper between the roller
and guide as shown right to feed it. When the buzzer sounds,
stop the paper feeding.
5HPRYHWKHVWLFNHUEHIRUHLQVHUWLQJWKHSULQWSDSHUEHWZHHQUROOHUDQGJXLGH0DNH
sure to insert the paper straight.
Buzzer continues to sound until the printing unit is closed.
NOTE
.HHSWKHUROOHUVFOHDQ'LUWRQWKHUROOHUVPD\SURGXFHSRRUSULQWTXDOLW\
NOTE
:KHQWDNLQJWKHSULQWSDSHURXWSXOOLWXSWRZDUG\RXE\KROGLQJWKHSDSHU
ÀDQJHV
0DNHVXUHWRWXUQRQWKHSRZHUEHIRUHUHSODFLQJWKHSULQWSDSHU
0DNHVXUHWRHOLPLQDWHDQ\VODFNIURPWKHSULQWSDSHU,I\RXFDUU\RXWWKH
IROORZLQJVWHSVZLWKRXWHOLPLQDWLQJWKHVODFNWKHSULQWSDSHUPD\EHGDPDJHG
Close the door.
Guide
Press the POWER switch on the side panel to turn on the
power.
After the POWER indicator’s color has changed from orange to
green, press the OPEN button to release the printing unit out.
Remove the paper strip bin and then pull the knob to open the
door.
Direction of paper insertion
BEFORE OPERATION
POWER switch
Knob
OPEN button
Roller
NOTE
0DNHVXUHWRWXUQRQWKHSRZHUEHIRUHLQVWDOOLQJWKH
print paper. Otherwise, a paper jam may occur.
/RDGWKHSDSHUUROOVORZO\LQWRWKHXQLW,ILWLVGURSSHG
along the ditches, the unit or accessories may be
damaged.
11
OTHERSPRECAUTIONS FEATURES PREPARATION TROUBLE-
SHOOTING CONTENTS
BEFORE OPERATION
INK RIBBON INSTALLATION
$IWHULQVWDOOLQJWKHSULQWSDSHULQVWDOOWKHLQNFDVVHWWHLQWRWKLVXQLW
%HIRUHLQVWDOOLQJWKHLQNFDVVHWWHLQWRWKLVXQLWORDGWKHLQNULEERQLQWKHLQNFDVVHWWH
,WLVUHFRPPHQGHGWRFOHDQWKHWKHUPDOKHDGWRNHHSJRRGSULQWTXDOLW\ZKHQ\RXUHSODFH
WKHSULQWSDSHUDQGLQNULEERQ
NOTE
3ODFHWKHLQNFDVVHWWHRQDÀDWVXUIDFHZKHQORDGLQJWKHLQNULEERQ
6HOHFWDSODFHWKDWLVIUHHRIGXVWZKHQORDGLQJWKHLQNULEERQ'XVWRUGLUW
VHWWOLQJRQWKHLQNULEERQUHVXOWVLQSRRUSULQWTXDOLW\
0DNHVXUHWKDWWKHVKDIWVRIWKHLQNULEERQ¿WLQWRWKHLQNFDVVHWWH¿UPO\
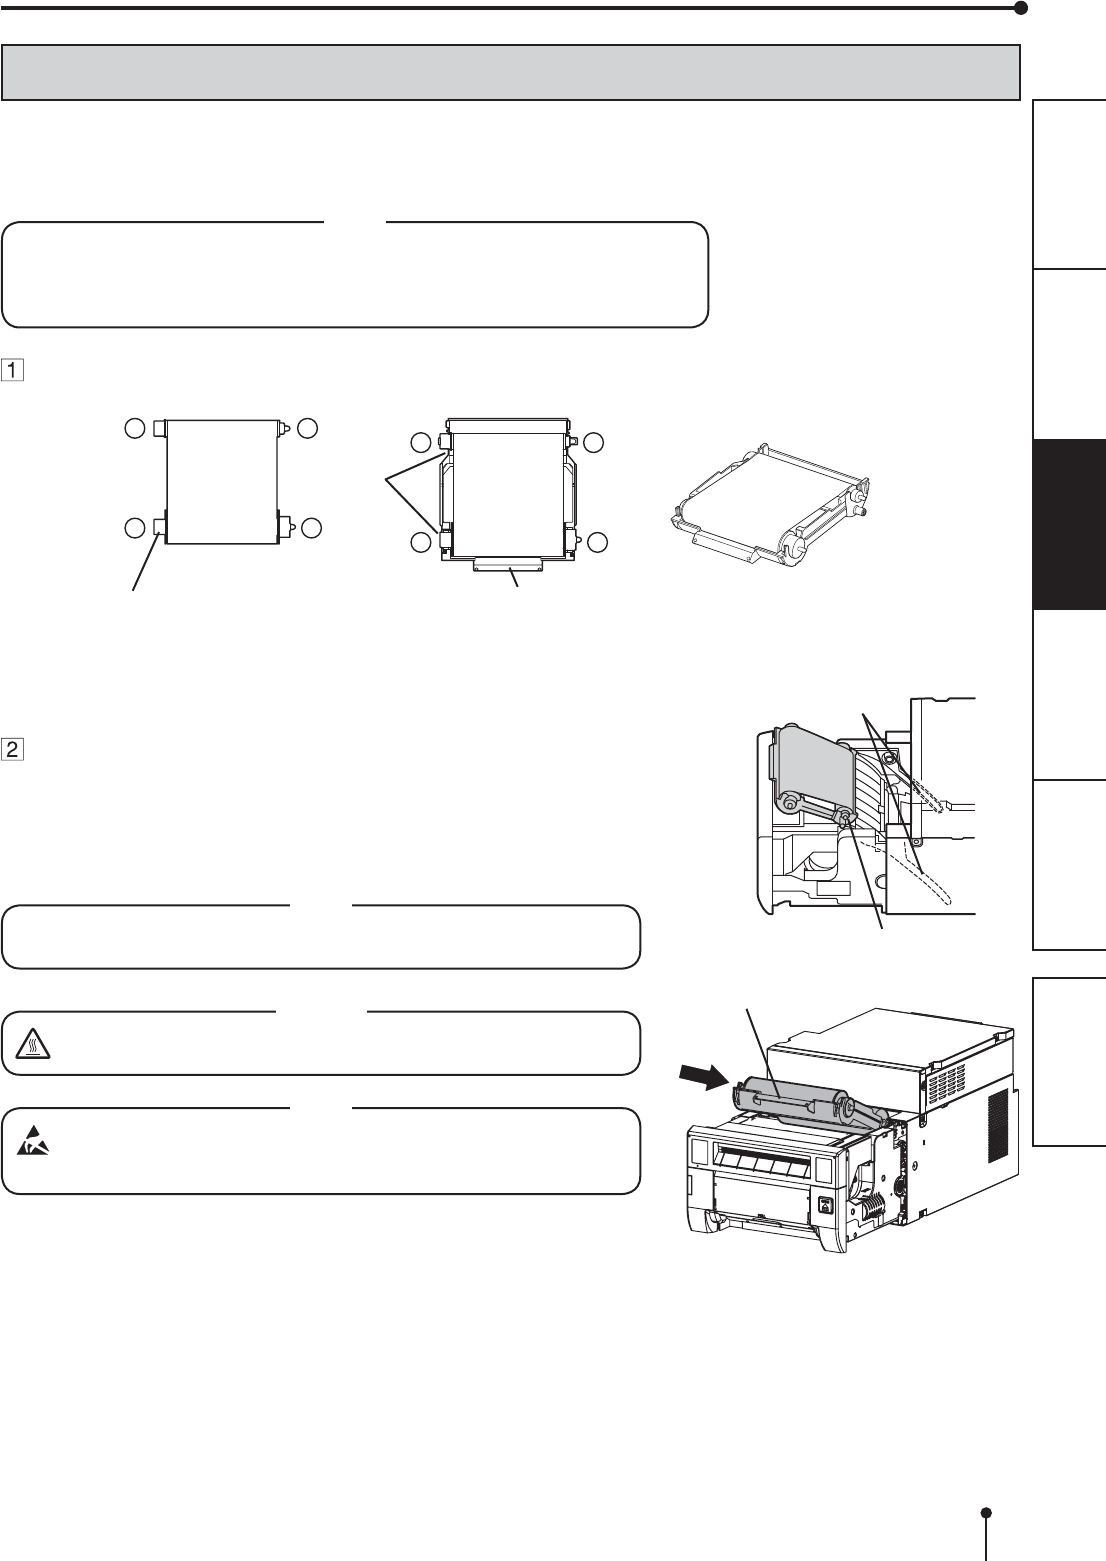
Load the ink ribbon in the ink cassette as shown below.
0DNHVXUHWRORDGLWLQWKHFRUUHFWSRVLWLRQ
34
1 2
34
1 2
,QNULEERQ
Shaft ,QNFDVVHWWH
Handle
Ditch
0DNHVXUHWRVHWWKHLQNULEERQUROOHUWRWKHGLWFKHV¿UPO\
7XUQWKHVKDIWWRHOLPLQDWHDQ\VODFN
Place the ink cassette containing the ink ribbon in the
position as shown in the illustration.
7RLQVHUWWKHLQNFDVVHWWHDOLJQWKHSURWUXVLRQVRQERWKVLGHVRIWKH
cassette with the right and left guides inside the printing unit and slide it in
a slanting direction.
0RXQWWKHLQNFDVVHWWHWRWKHEDFN¿UPO\E\KROGLQJWKHKDQGOH
NOTE
Do not touch the thermal head.
Fingerprints or dust on the thermal head will degrade the print quality.
CAUTION
Do not touch the thermal head right after printing because it is
extremely hot. Otherwise you may get burned or injured.
NOTE
Note that the thermal head is quite sensitive to static electricity. When
you touch the thermal head while carrying static electricity on your
body, the thermal head may be damaged.
Handle
Protrusion
Guides
12
OTHERSPRECAUTIONS FEATURES PREPARATION TROUBLE-
SHOOTING CONTENTS
BEFORE OPERATION
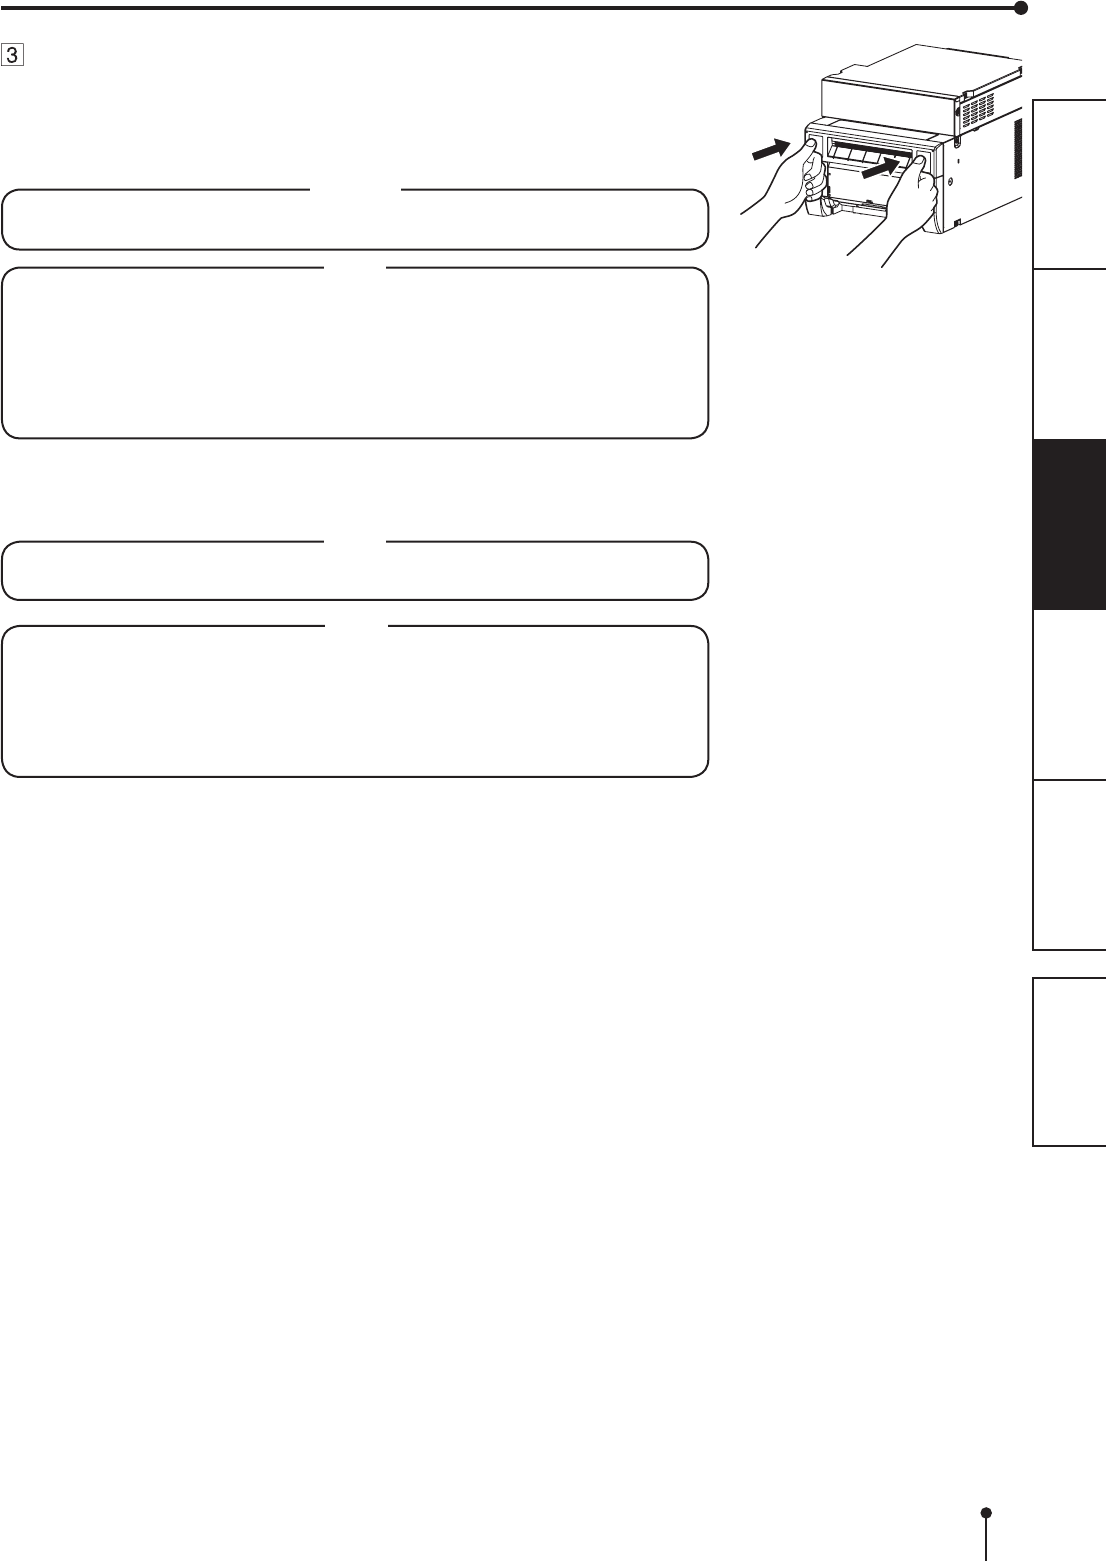
Push the printing unit to close.
Close the printing unit by pushing the right and left sides of the unit from the front
with both hands.
When a new paper is loaded and the printing unit is closed with the power turned
on, the paper will be automatically fed and cut.
CAUTION
When closing the printing unit, be careful not to get your hands caught
between the printer and the printing unit. Otherwise, you may get injured.
NOTE
:KHQFORVLQJWKHSULQWLQJXQLWSXVKLWXQWLODFOLFNLVKHDUG
,IWKH3$3(55,%%21LQGLFDWRULOOXPLQDWHVZKHQWKHSULQWLQJXQLWLVFORVHGWKH
print paper may have not been installed correctly.
,QWKLVFDVHRSHQWKHSULQWLQJXQLWWRPDNHVXUHWKDWWKHSULQWSDSHUKDVEHHQ
installed correctly. Then close the printing unit again.
:KHQWKHSDSHUUROOLVUHLQVWDOOHGPRUHWKDQWKUHHWLPHVWKHSULQWSDSHUPD\EH
XVHGXSHDUOLHUWKDQWKHLQNULEERQ
Installation of the print paper and the ink ribbon is completed.
NOTE
0DNHVXUHWRUHSODFHWKHSULQWSDSHUDQGWKHLQNULEERQVLPXOWDQHRXVO\$ODUJH
amount of print paper may remain depending on the used condition.
NOTE
(PSW\WKHSDSHUVWULSELQIUHTXHQWO\WRSUHYHQWMDPPLQJWKHVWULSVDWWKHSULQW
RXWOHW:KHQHYHU\RXUHSODFHWKHSDSHUDQGLQNULEERQPDNHVXUHWRWKURZ
away the paper strips in the paper strip bin.
:KHQHYHU\RXUHSODFHWKHSULQWSDSHUDQGWKHLQNULEERQFOHDQWKHWKHUPDO
head and the platen roller. For the cleaning procedures, see “CLEANING” (on
pages 19 and 20).

13
OTHERSPRECAUTIONS FEATURES PREPARATION TROUBLE-
SHOOTING CONTENTS
BEFORE OPERATION
HANDLING OF PAPER / INK RIBBON SET
BEFORE PRINTING
)LQJHUSULQWVRUGXVWRQWKHSDSHUSULQWLQJVXUIDFHPD\SURGXFHSRRUSULQWTXDOLW\DQGFDXVHSDSHUMDPV
:KHQWKHSULQWSDSHURULQNULEERQLVDEUXSWO\WUDQVIHUUHGIURPDFRROSODFHWRDKRWSODFHYDSRURUGHZLVJHQHUDWHG
on the surface, which causes paper jams or degraded print quality. Leave the print paper in the room to stabilize its
temperature before use.
,I\RXUHSHDWWKH35,173$3(5,167$//$7,21SURFHGXUHPRUHWKDQWKHGHVLJQDWHGQXPEHURIWLPHVWKHLQGLFDWHG
number of prints may not be made. In addition, if you replace the print paper before it is used up, the indicated number of
prints may not be made.
AFTER PRINTING
,IWKHSDSHUDEVRUEVQRQYRODWLOHRUJDQLFVROYHQWVDOFRKROHVWHUNHWRQHHWFWKHSULQWPD\EHGLVFRORUHG
'LVFRORUDWLRQRISULQWVLVDFFHOHUDWHGLIWKHSULQWSDSHUFRPHVLQWRFRQWDFWZLWKVRIWYLQ\OFKORULGHVXFKDVWUDQVSDUHQW
tape.
$YRLGVWRULQJSULQWVLQGLUHFWVXQOLJKWRUSODFHVZLWKKLJKKXPLGLW\
STORAGE OF PAPER / INK RIBBON SET
'RQRWVWRUHWKHSULQWSDSHUDQGLQNULEERQLQWKHFRQWDLQHUPDGHRIVRIWSRO\YLQ\OFKORULGH7KH\PD\EHGLVFRORUHG
because of chemical reaction.
6WRUHWKHSULQWSDSHUDQGLQNULEERQRXWRIGLUHFWVXQOLJKWDQGDZD\IURPKHDWLQJDSSOLDQFHVLQDFRROGDUNSODFHZKHUH
WKHWHPSHUDWXUHLVÛ&WRÛ&DQGWKHKXPLGLW\LVWR5+
14
OTHERSPRECAUTIONS FEATURES PREPARATION TROUBLE-
SHOOTING CONTENTS
NOTE
5HIHUWRWKHIROORZLQJZHEVLWHWRFKHFNWKHSULQWHULQIRUPDWLRQ
http://www.MitsubishiElectric.co.jp/vcp/
BEFORE OPERATION
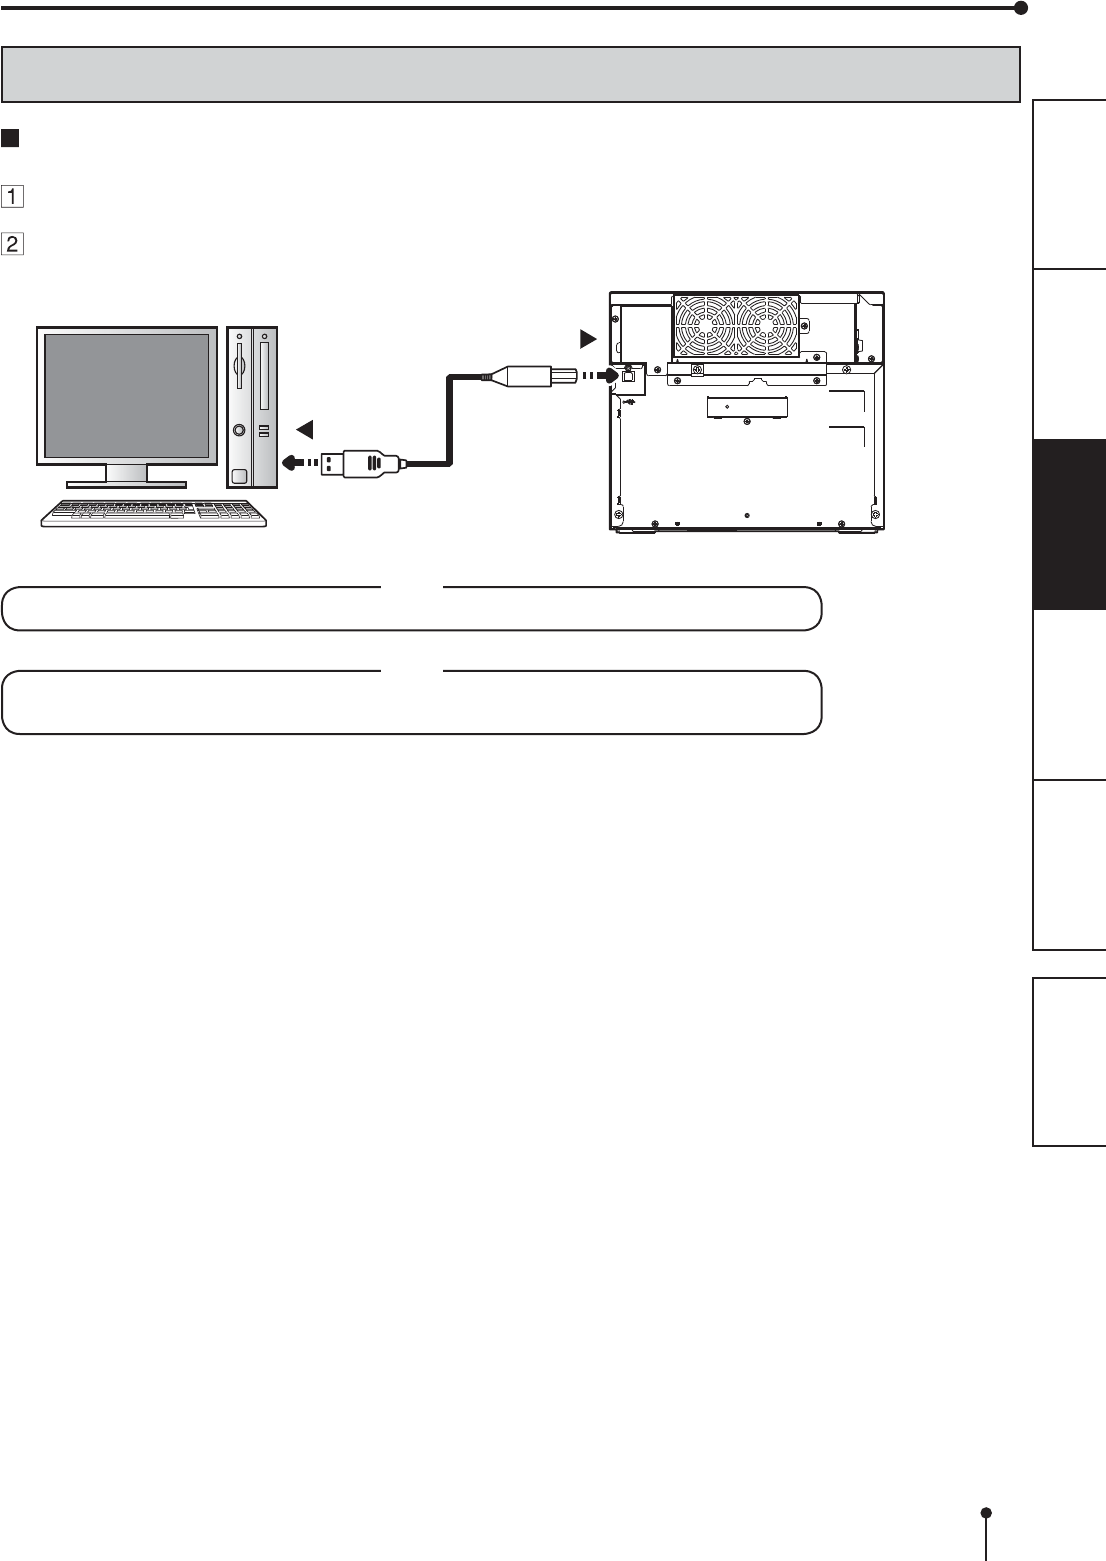
CONNECTION WITH USB DATA SIGNAL EQUIPMENT
To USB port
Personal computer Digital color printer
To USB port
NOTE
$86%FDEOHLVQRWVXSSOLHGZLWKWKLVXQLW8VHWKH86%FHUWL¿HGFDEOHRIPRUOHVVLQOHQJWK
CONNECTING TO PERSONAL COMPUTER (EXAMPLE)
&KHFNWKDWWKHSULQWHULVWXUQHGRQEHIRUHFRQQHFWLQJSURFHGXUH
Turn on the power of a personal computer.
Connect the printer and a personal computer with a USB cable.
15
PREPARATION TROUBLE-
SHOOTING
FEATURESPRECAUTIONS OTHERS CONTENTS
ERROR MESSAGES AND COUNTERMEASURES
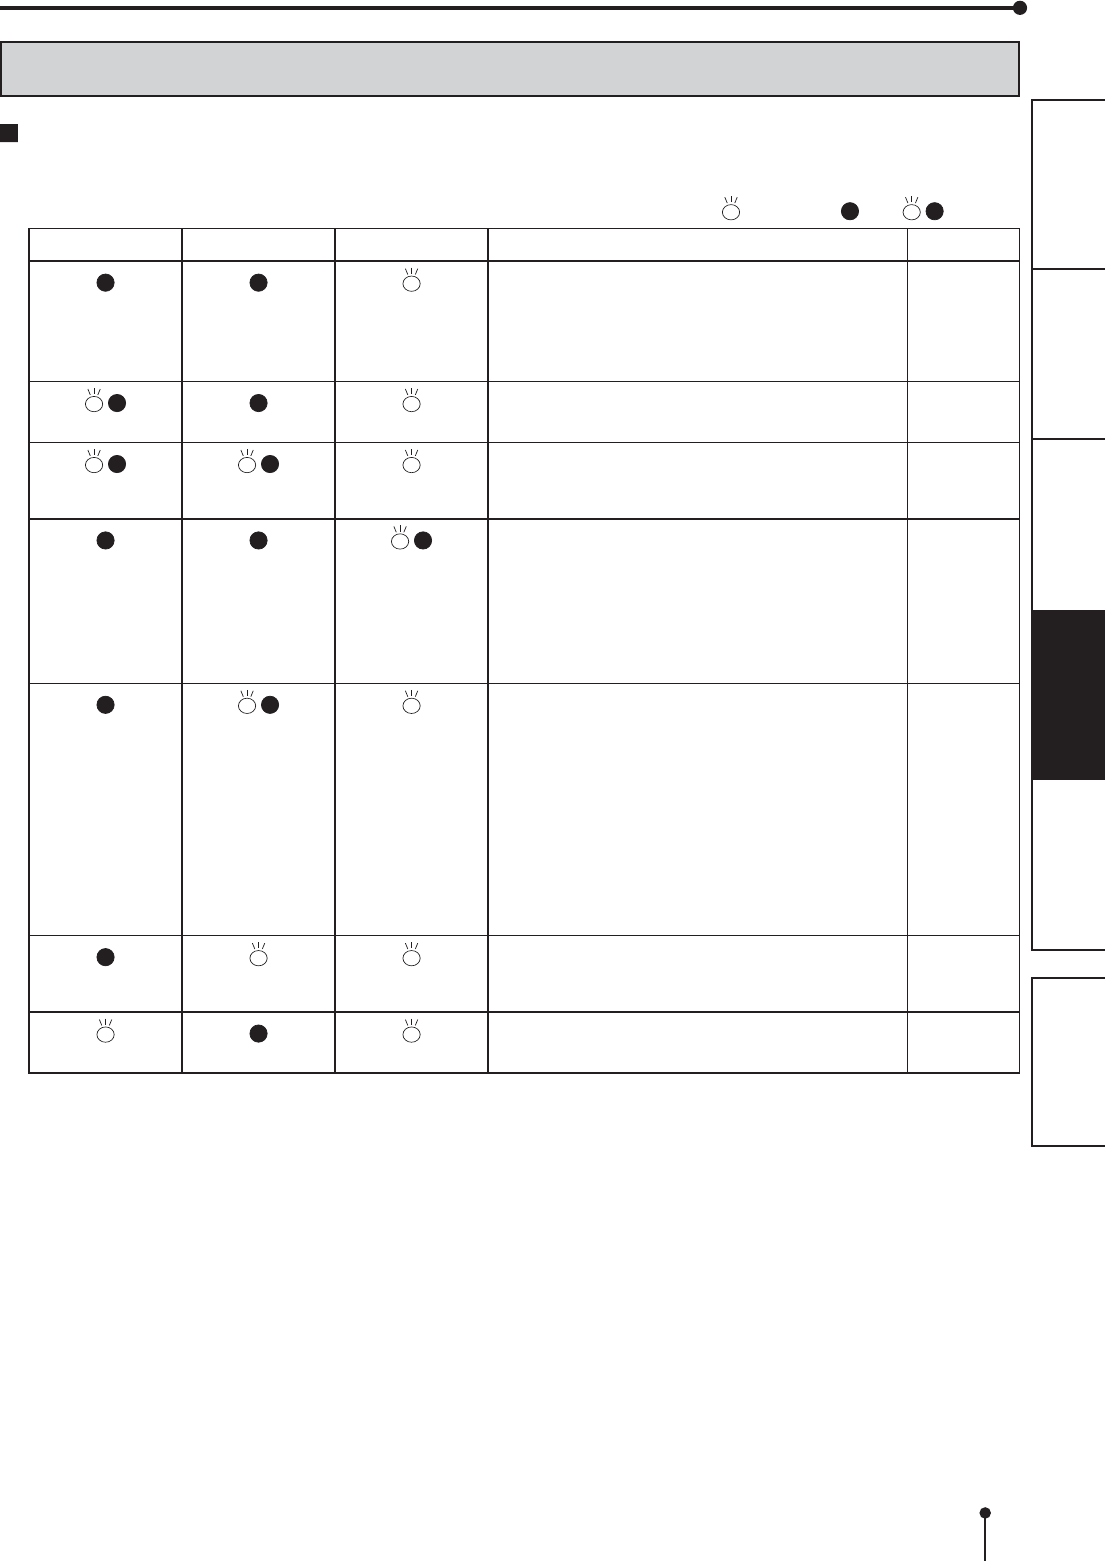
INDICATIONS ON THE FRONT PANEL AND COUNTERMEASURES
If, for some reason, printing is not possible or an error occurs during printing, the indicators on the front panel will
LOOXPLQDWHRUEOLQN,QWKLVFDVHIROORZWKHSURFHGXUHGHVFULEHGEHORZ
: Steady on : Off %OLQNLQJ
ALARM PAPER RIBBON POWER Causes and Countermeasures Page
(Orange)
This printer is in standby mode.
Connect a USB cable to the printer when not
connected.
,WPD\WDNHWLPHWKDWWKHSULQWHULVUHDG\WRSULQW
images after the image data is sent.
6
14
(Green)
The printing unit is open.
&ORVHWKHSULQWLQJXQLW
6
(Green)
$SDSHUMDPRUDSUREOHPFRQFHUQLQJWKHLQN
ribbon occurs.
5HIHUWR³2YHUFRPLQJSDSHUMDPV´
16
(Green)
The temperature of the thermal head is too high
or too low.
:DLWXQWLOWKHLQGLFDWLRQJRHVRII:KHQWKH
LQGLFDWRUVWRSVEOLQNLQJWKHSULQWHUUHVXPHV
printing automatically.
:KLOHWKHSULQWHULVZRUNLQJGRQRWRSHQWKHGRRU
or turn off the power.
6
(Green)
7KHLQNULEERQZKLFKLVQRWDYDLODEOHWRWKLV
printer is installed.
5HSODFHWKHLQNULEERQZLWKDQHZRQH
7KHDFWXDOFRPELQDWLRQRILQNULEERQDQGSULQW
paper is inconsistent with the setting made by the
personal computer.
2SHQWKHSULQWLQJXQLWDQGFRQ¿UPWKDWWKH
DFWXDOFRPELQDWLRQRILQNULEERQDQGSULQW
paper is consistent with the setting made by the
SHUVRQDOFRPSXWHU$IWHUFKHFNLQJFORVHWKH
printing unit.
11-12
(Green)
7KHSULQWSDSHURULQNULEERQLVQRWLQVWDOOHG
7KHSULQWSDSHURULQNULEERQLVXVHGXS
,QVWDOOQHZSULQWSDSHURULQNULEERQ
9-12
(Green)
Other errors 18
:KHQWKH$/$50RUWKH3$3(55,%%21LQGLFDWRULOOXPLQDWHVRUEOLQNVRSHQWKHGRRUDQGFDUU\RXWWKHDERYH
countermeasures.
16
PREPARATION TROUBLE-
SHOOTING
FEATURESPRECAUTIONS OTHERS CONTENTS
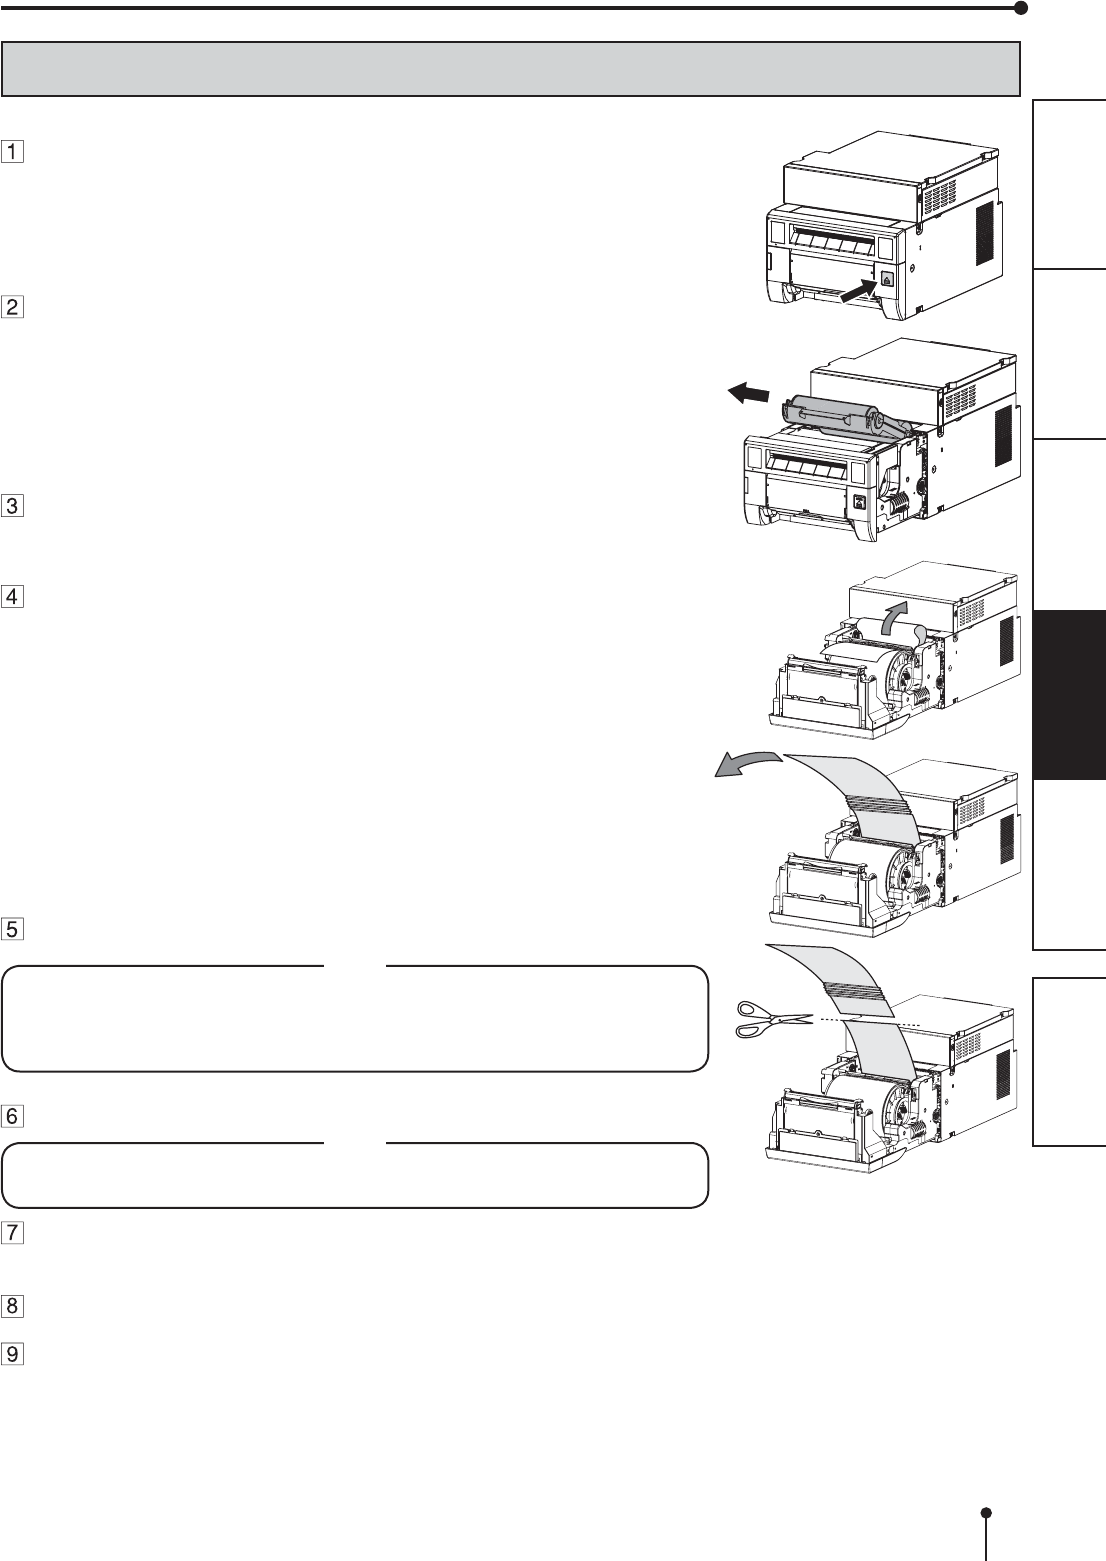
OVERCOMING PAPER JAMS
ERROR MESSAGES AND COUNTERMEASURES
Press the OPEN button to open the printing unit.
0DNHVXUHWKDWWKHSRZHULVWXUQHGRQEHIRUHRSHQLQJWKHSULQWLQJXQLW
Remove the ink cassette.
Open the door.
Pull out the defective part of the print paper to the direction of
an arrow.
Cut off the defective part of the print paper with scissors.
NOTE
0DNHVXUHWRFXWRIIWKHSULQWHGSDUWRIWKHSULQWSDSHU)DLOXUHWRGRWKLVPD\
UHVXOWLQWKHLQNULEERQVWLFNLQJWRWKHSULQWSDSHUDQGEHLQJWRUQ
0DNHVXUHWRFOHDQWKHWKHUPDOKHDGDQGWKHSODWHQUROOHURefer to “CLEANING”
(on pages 19 and 20).
Remove the print paper. NOTE
5HPRYHWKHVODFNIURPWKHSULQWSDSHUFRPSOHWHO\,IWKHGRRULVFORVHGZLWKWKH
SULQWSDSHUVODFNHGLWPD\FDXVHDSDSHUMDP
Install the print paper and the ink cassette with the ink ribbon.
(Refer to pages 9-13.)
Close the door.
Close the printing unit by pushing it.
17
PREPARATION TROUBLE-
SHOOTING
FEATURESPRECAUTIONS OTHERS CONTENTS
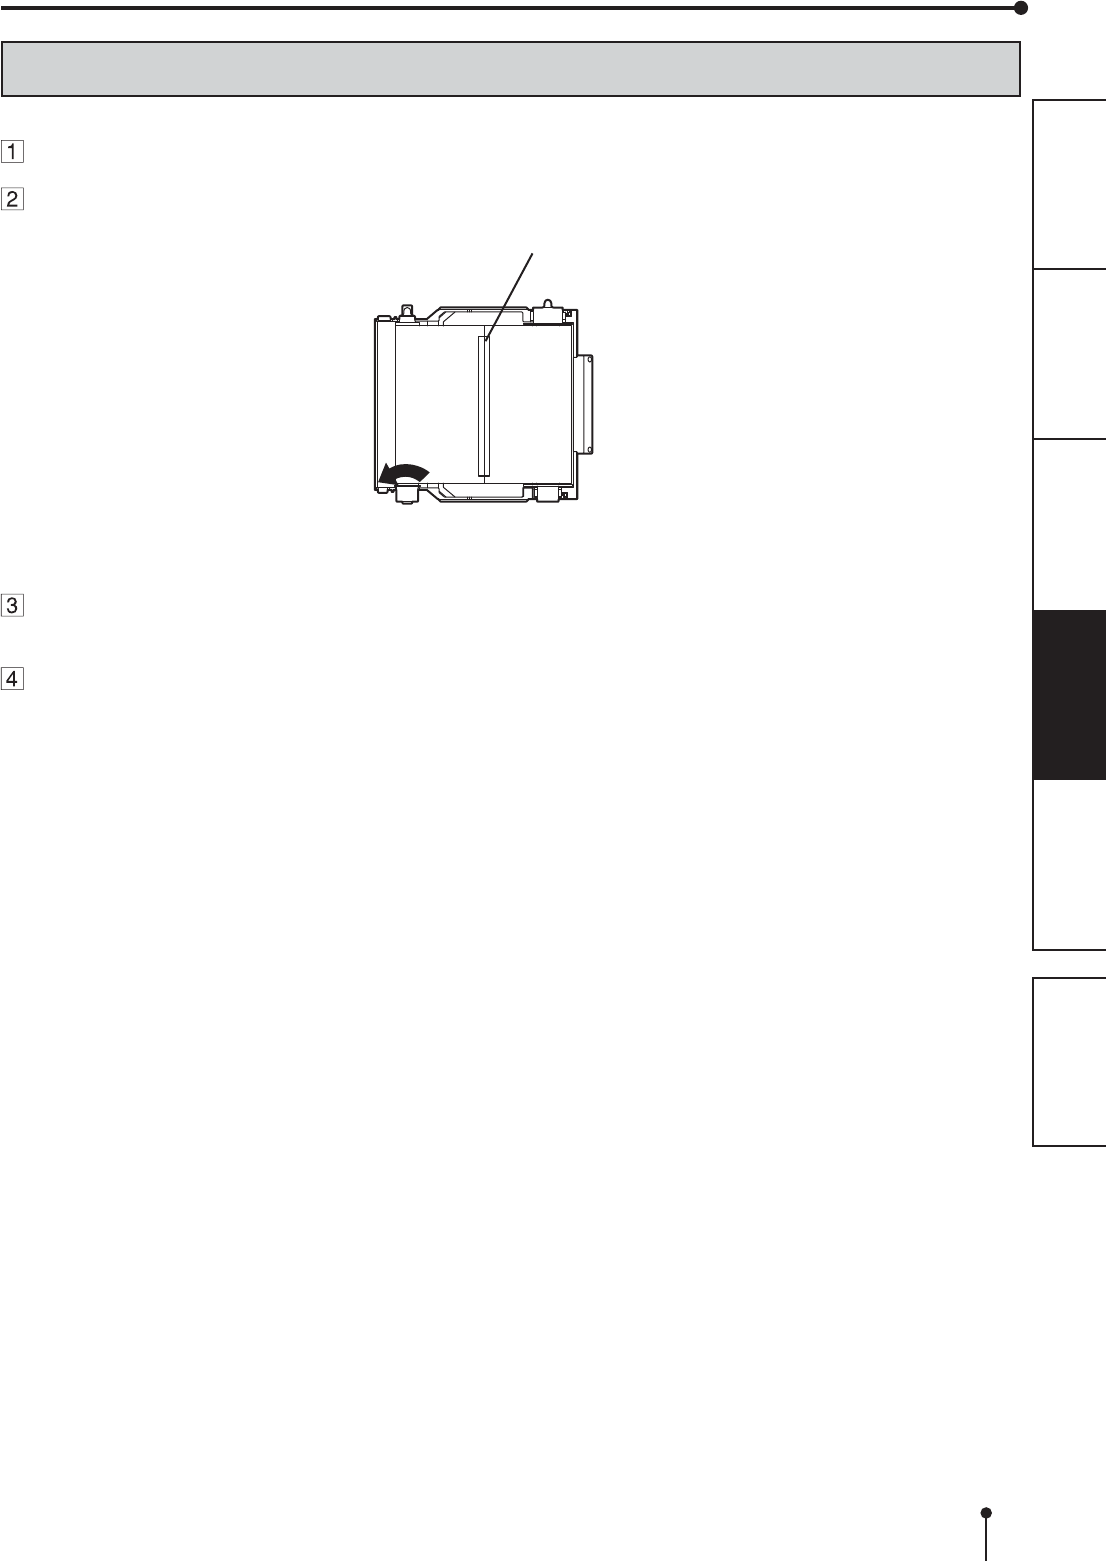
REPAIRING A TORN INK RIBBON
3RVLWLRQWKHLQNFDVVHWWHZLWKWKHWRUQLQNULEERQRQDÀDWFOHDQVXUIDFH
Place a piece of transparent adhesive cellophane tape on the center of the ink ribbon.
ERROR MESSAGES AND COUNTERMEASURES
Wind the shaft of the ink ribbon in the direction of the arrow so that the cellophane tape is not
seen.
Install the ink cassette in the printer.
Cellophane tape
Direction to turn
the shaft
18
PREPARATION TROUBLE-
SHOOTING
FEATURESPRECAUTIONS OTHERS CONTENTS
INSTRUCTIONS FOR TRANSPORTATION
When transporting this unit for some reason such as repair, follow the instructions below.
1. Use the original packaging.
7KHJHQXLQHSDFNDJHXQLWPD\QRWHQGXUHPRUHWKDQRQHURXQGWULS,IWKHXQLWLVWUDQVSRUWHGZLWKWKHSDFNDJHXQLWPRUH
than one round trip, it may not be guaranteed.
3XUFKDVHDQRWKHUSDFNDJHXQLWZKHQWUDQVSRUWLQJWKLVXQLWDJDLQ
3DFNWKHXQLWZLWKWKHDFFHVVRULHVLQNULEERQDQGSULQWSDSHUUHPRYHG
&ORVHWKHSULQWLQJXQLW¿UPO\
:KHQFORVLQJWKHSULQWLQJXQLWSXVKLWXQWLODFOLFNLVKHDUG
CAUTION
:KHQWKHSULQWLQJXQLWLVQRWFORVHG¿UPO\RU\RXSUHVVWKH23(1EXWWRQDFFLGHQWDOO\WKHSULQWLQJXQLWPD\RSHQ,WFDQ
cause injury or damage.
3. If the ink ribbon, print paper, or ink cassette can not be taken out, consult with your dealer.
ERROR MESSAGES AND COUNTERMEASURES
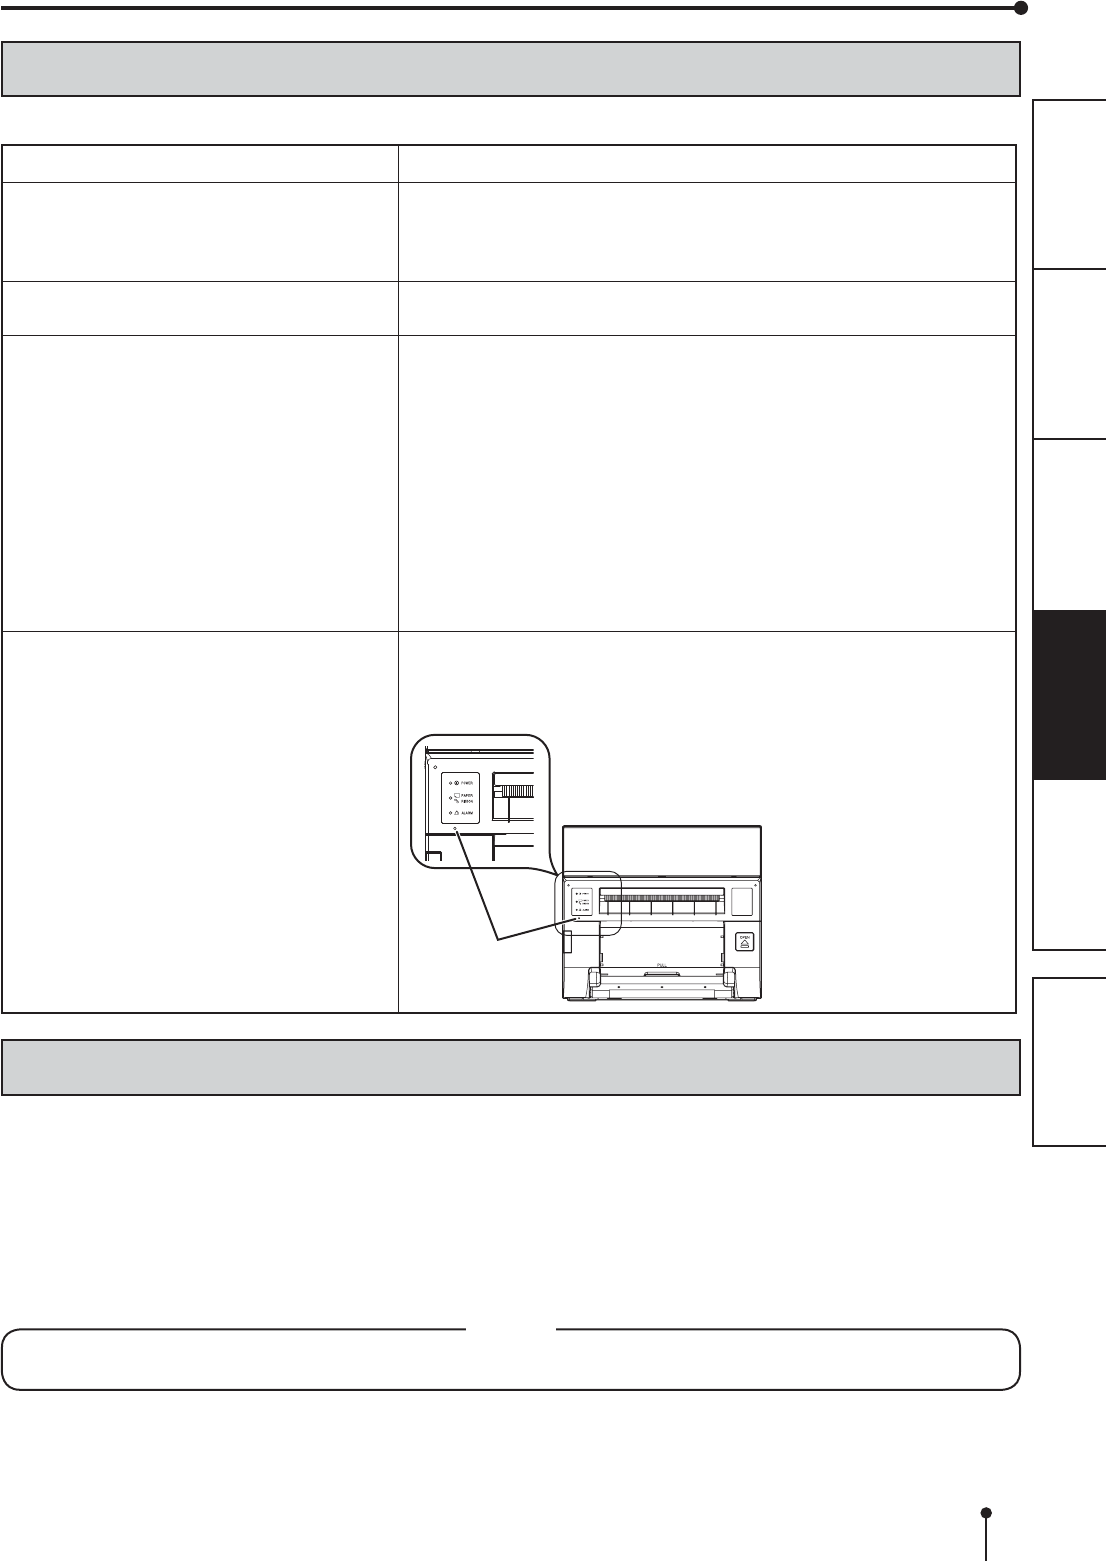
BEFORE CALLING FOR SERVICE
)RUWKHIROORZLQJV\PSWRPVFKHFNWKHXQLWDJDLQEHIRUHFDOOLQJIRUVHUYLFH
Symptom &KHFN5HPHG\
The power is not turned on. Is the power cord plug disconnected from the outlet?
ĺ &RQQHFWWKHSRZHUFRUGSOXJWRWKHRXWOHW¿UPO\
ĺ 7KHSURWHFWLYHFLUFXLWPD\EHZRUNLQJ7XUQRIIWKHSRZHUDQGZDLWIRU
about two minutes. Then turn on the power again.
The printing unit doesn’t open. Are you turning off the power during printing procedure?
ĺ 7XUQRQWKHSRZHUDQGWKHQRSHQWKHSULQWLQJXQLW
The image is not printed. Is the PAPER RIBBON indicator or the ALARM indicator illuminating or
EOLQNLQJ"
ĺ 5HIHUWR³2YHUFRPLQJSDSHUMDPV´
Is the appropriate size of data sent to this unit?
ĺ 0DNHVXUHWKDWWKHDSSURSULDWHVL]HRILPDJHGDWDLVVHQWWRWKLVXQLW
,VWKHSULQWSDSHURUWKHLQNULEERQXVHGXS"
ĺ &KHFNWKHP
,VWKHSULQWLQJXQLWVHW¿UPO\"
ĺ 6HWWKHSULQWLQJXQLW¿UPO\
ĺ :KHQWKHLQGLFDWRUVNHHSLOOXPLQDWLQJRUEOLQNLQJWKRXJKWKHDERYH
RSHUDWLRQVDUHSHUIRUPHGUHPRYHWKHLQNULEERQDQGSULQWSDSHUDQG
reinstall them.
An error can not be resolved. ĺ 7XUQRIIDQGRQWKHSRZHURIWKHSULQWHUZLWKWKHSULQWLQJXQLWVHW¿UPO\
This printer starts initialization.
ĺ 3UHVVWKHVZLWFKLQVLGHRIWKHKROHRIWKHIURQWSDQHOZLWKDWKLQVWLFNRU
WKHOLNHIRUVHFRQGVRUPRUH
Switch
19
PREPARATION TROUBLE-
SHOOTING
FEATURESPRECAUTIONS OTHERS CONTENTS
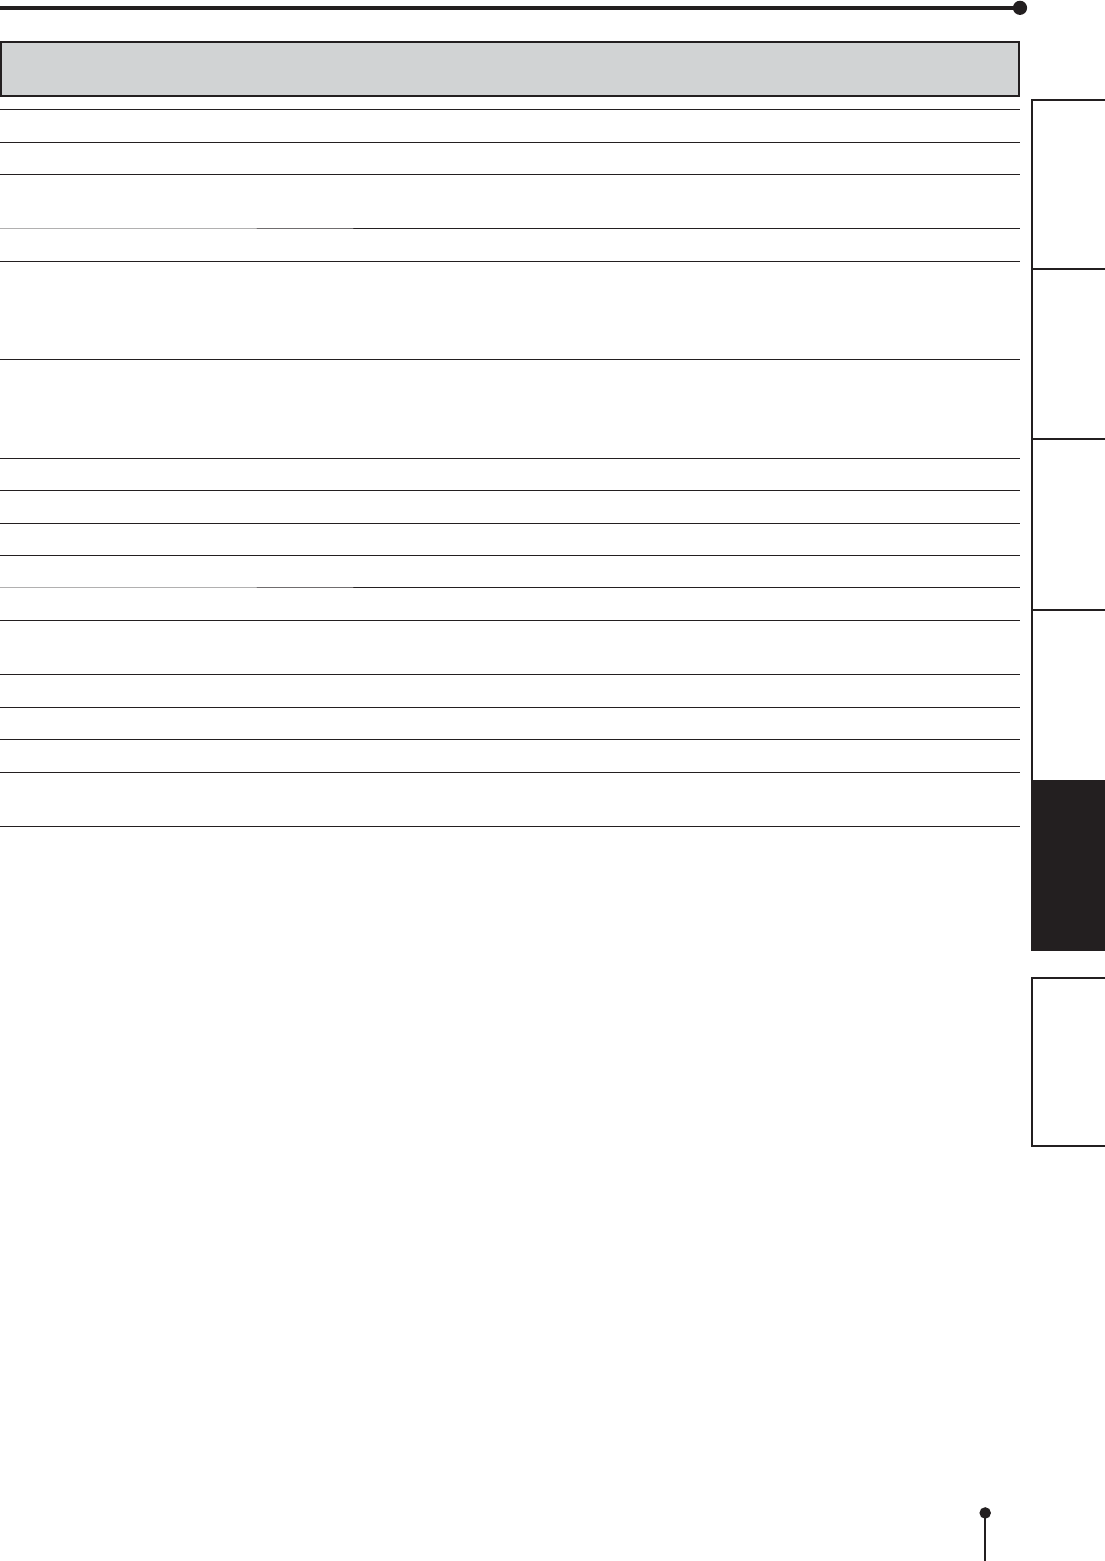
FILTER CLEANING
&OHDQWKH¿OWHUSDUWDQGWKHYHQWLODWLRQLQOHWZLWKDYDFXXPDVVKRZQULJKW
THERMAL HEAD CLEANING
Press the OPEN button to open the printing unit.
Take the ink cassette out of the printer.
Preparations
Alcohol (ethyl alcohol, etc.)
Soft and clean cloth
When lines appear on the printed images, clean the thermal head.
Wipe the head cleaning part (as shown right) carefully with cloth dampened with a
small amount of alcohol.
NOTE
'RQRWGDPDJHWKHWKHUPDOKHDG
:KHQWKHSRRUSULQWTXDOLW\LVQRWFRUUHFWHGHYHQLIWKHKHDGKDVEHHQFOHDQHG
replacement of the thermal head may be required. Contact your dealer.
CAUTION
Thermal head is hot right after printing. Wait until the head cools before
cleaning the thermal head.
NOTE
The thermal head may be damaged if you touch it while static electricity builds
up on your body.
NOTE
:KHQ\RXFOHDQWKHWKHUPDOKHDGPDNHVXUHQRWWRDSSO\H[FHVVLYHIRUFHWRWKH
peeling roller on the bottom of the thermal head. When the excessive force is
applied to the roller, the roller may be deformed, resulting in deterioration of the
printing quality.
Cleaning as indicated below will help maintain stable printer operation and extend the printer’s life.
Wearing gloves at cleaning is recommended to prevent injury.
Make sure to turn off the power before cleaning.
CLEANING
Cleaning part of thermal head
Printing
surface
about 12 mm about 12 mm
lines
152 mm
Filter (inside)
Thermal head
Ventilation inlet
Peeling roller
20
PREPARATION TROUBLE-
SHOOTING
FEATURESPRECAUTIONS OTHERS CONTENTS
CLEANING
PLATEN ROLLER CLEANING
Preparations
Alcohol (ethyl alcohol, etc.)
Soft and clean cloth
&OHDQWKHEODFNSDUWRIWKHUROOHU
:LSHWKHEODFNSDUWFDUHIXOO\ZLWKFORWKGDPSHQHGZLWKDVPDOODPRXQWRIDOFRKRO
Wipe the whole roller by turning it.
Cleaning part
PAPER FLANGE CLEANING
Clean the parts that contact the print paper sides as shown right.
Wipe the parts carefully with cloth dampened with a small amount of alcohol.
Platen roller
21
PREPARATION TROUBLE-
SHOOTING
FEATURESPRECAUTIONS OTHERS CONTENTS
SPECIFICATIONS
SPECIFICATIONS
Class Digital Color Printer
Model CP-C60DW-WE
Printing method Sublimation Dye Thermal Transfer line print
3-color faces progressive printing (yellow, magenta, and cyan) and surface lamination
Print’s resolution 300 x 300 dpi (dpi : dots per inch)
Dot resolution 10x15 (4x6”)
5x15 (2x6”) 2 pieces
15x20 (6x8”)
15x15 (6x6”)
1218 x 1864 dots
1218 x 1864 dots
1864 x 2422 dots
xxxx x yyyy dots
Print size 10x15 (4x6”)
5x15 (2x6”)
15x20 (6x8”)
15x15 (6x6”)
102 x 152 mm (without frame)
51 x 152 mm (without frame)
152 x 203 mm (without frame)
152 x152 mm (without frame)
Gradations 256 (8 bits) for each color
Supply method Automatic
Interface Hi-Speed USB (Ver.2.0)
Power supply 100 - 240 V AC 50/60 Hz
Power consumption 5.5 - 2.4 A
Operating conditions Temperature : 10°C - 35°C
Humidity : 30% - 80% RH (no dewing)
Installation conditions Operating attitude : Horizontal ±5°
Outside dimensions 275(W) x 373(D) x 242(H) mm
Weight $SSUR[NJH[FOXGLQJDFFHVVRULHV
Standard accessories 3RZHUFRUGIRU9,QNFDVVHWWH3DSHUÀDQJHVHW4XLFNVHWXSJXLGH
Paper strip bin (1), Securing band (1), Screw for securing band (2), Washer(1)
Print size and outside dimensions show typical value.
'HVLJQDQGVSHFL¿FDWLRQVDUHVXEMHFWWRFKDQJHZLWKRXWQRWLFH
MITSUBISHI ELECTRIC EUROPE B.V.
Spanish Branch (Barcelona)
Ctra. de Rubí, 76-80 - Apdo. 420
08190-Sant Cugat del Vallés - (Barcelona) Spain
Phone +34 93 565 3154 FAX +34 93 589 4388
German Branch
Gothaer Strasse 8, 40880 Ratingen ; Postfach 1548, 40835 Ratingen ; Germany
Phone +49 (2102) 486-9250 FAX +49 (2102) 486-7320
Manufactured by Mitsubishi Electric (Malaysia) Sdn. Bhd.
3/2.DZDVDQ3HULQGXVWULDQ6HQDL,,6HQDL-RKRU'DUXO7DN]LP0DOD\VLD
Please contact the nearest Mitsubishi sales branch to get DOC (Declaration of Conformity) of the EC Directive
1999/5/EC.
WE919C182A9