Mitsubishi Electric CP-D90DW Digital Color Printer User Manual 2
Mitsubishi Electric Corp Digital Color Printer 2
Contents
- 1. User Manual-1
- 2. User Manual-2
- 3. User Manual-3
- 4. User Manual-4
User Manual-2
9
OTHERSPRECAUTIONS FEATURES PREPARATION TROUBLE-
SHOOTING CONTENTS
BEFORE OPERATION
PRINTER SETUP PROCEDURE
Before printing, follow the printer setup listed below.
Position the adjustable paper guides. (See page 10.)
Install the print paper to this printer. (See pages 11 to 12.)
Install the ink ribbon to this printer. (See pages 13 to 14.)
Connect the printer to a personal computer. (See page 16.)
Make sure to close the printing unit when the setup procedure is completed.
10
OTHERSPRECAUTIONS FEATURES PREPARATION TROUBLE-
SHOOTING CONTENTS
BEFORE OPERATION
POSITIONING OF ADJUSTABLE PAPER GUIDE
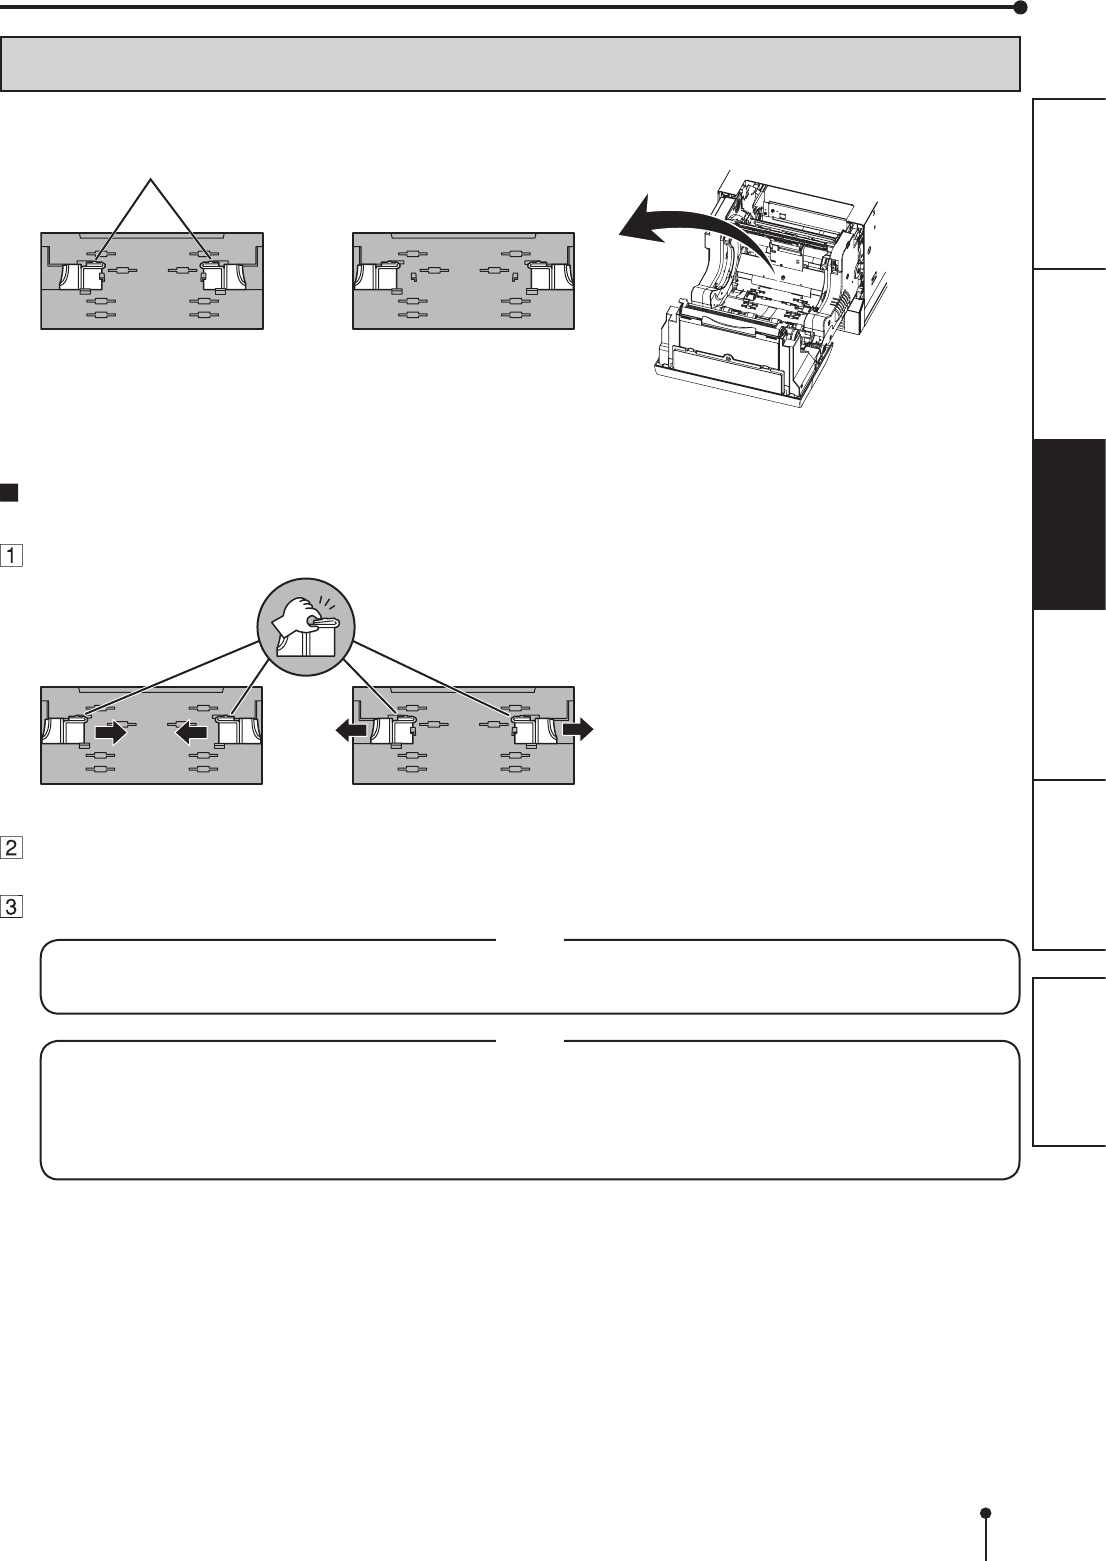
Adjust the paper guides according to the paper width.
For 9x13(3.5x5”) or 13x18(5x7”)
size paper (5”-width)
For 10x15(4x6”), 15x20(6x8”)
or 15x23(6x9”) size paper
(6”-width)
Adjustable paper guides
HOW TO SET THE ADJUSTABLE PAPER GUIDES
Pinch the tab on the adjustable paper guide and slide it right or left.
Tab
Slide the paper guide until it stops. The paper guide will snap into place.
Slide other paper guide in the similar way.
• Make sure to set the adjustable paper guides to the size of the paper width. When they are not positioned
properly, a malfunction such as paper jam and misaligned printing position may occur.
NOTE
• When you use 10x15 (4x6”), 15x20 (6x8”) or 15x23 (6x9”) size paper (having width of 152 mm) after using 9x13
(3.5x5”) or 13x18 (5x7”) size paper (having width of 127 mm) for a long time or printing such paper in large
quantities, thermal head cleaning may be required. For cleaning of the thermal head, see page 21.
In some cases, the print quality is not improved though thermal head cleaning is carried out. In this case,
replacement of the thermal head is required. For detail, consult your dealer.
NOTE
11
OTHERSPRECAUTIONS FEATURES PREPARATION TROUBLE-
SHOOTING CONTENTS
PRINT PAPER INSTALLATION
Spacers
See the Quick Setup Guide on how to use the spacers.
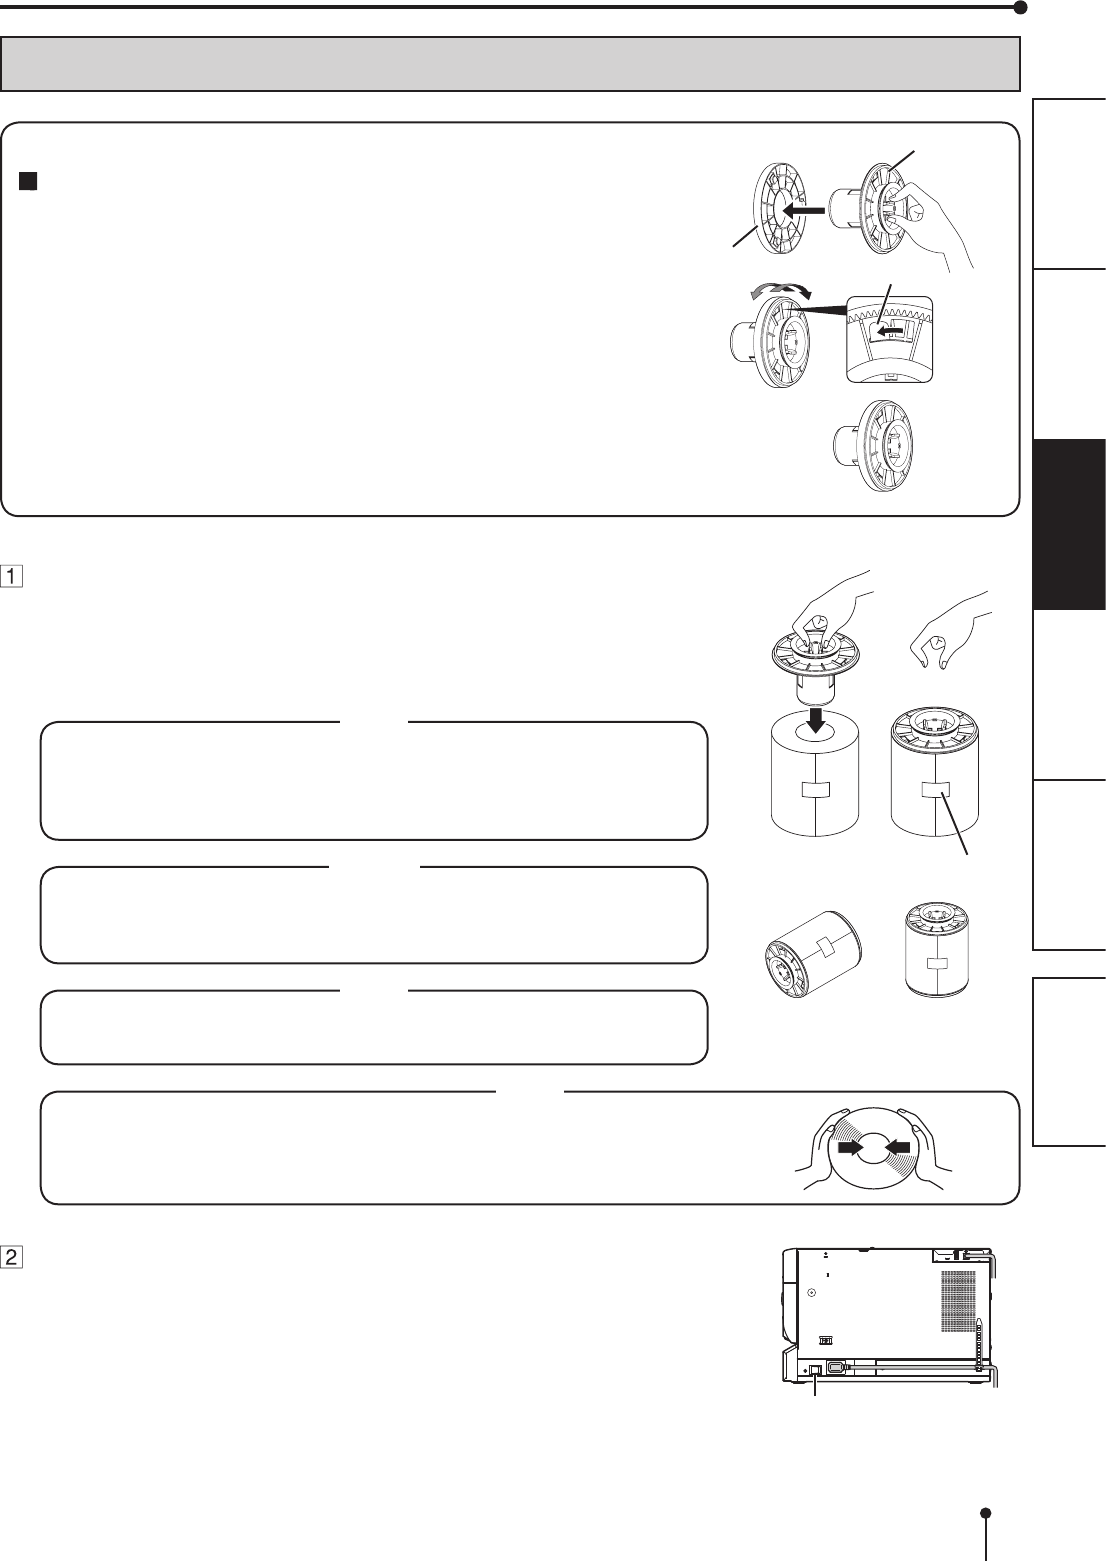
How to attach the spacers
1. Insert the spacer with the paper ange’s stoppers retracted.
2. Turn the spacer until the latches are locked.
When you remove the spacers from the paper anges, follow the above
procedure in reverse.
Spacer
Latch
Paper
ange
BEFORE OPERATION
Attach the supplied paper anges to both sides of the print
paper.
When you pinch the latches on the paper ange, the stoppers retract into the shaft.
Attach the anges to the print paper with the stoppers retracted.
Make sure that the anges are attached to the print paper securely, and release the
latches.
• Take care not to pinch your ngers.
• Do not remove the sticker on the print paper roll yet.
• Do not loosen the paper roll. Any slack in the print paper may degrade
the print quality.
NOTE
• When placing the print paper, keep the print paper upright.
• When you put the print paper sideways, it may roll and fall. This may
cause injury.
CAUTION
INCORRECT CORRECT
• Fingerprints or dust on the paper’s surface may degrade print quality and
cause paper jams.
NOTE
• When the paper ange cannot be attached due to the deformation of the
print paper, reshape the print paper manually before attaching the ange.
NOTE
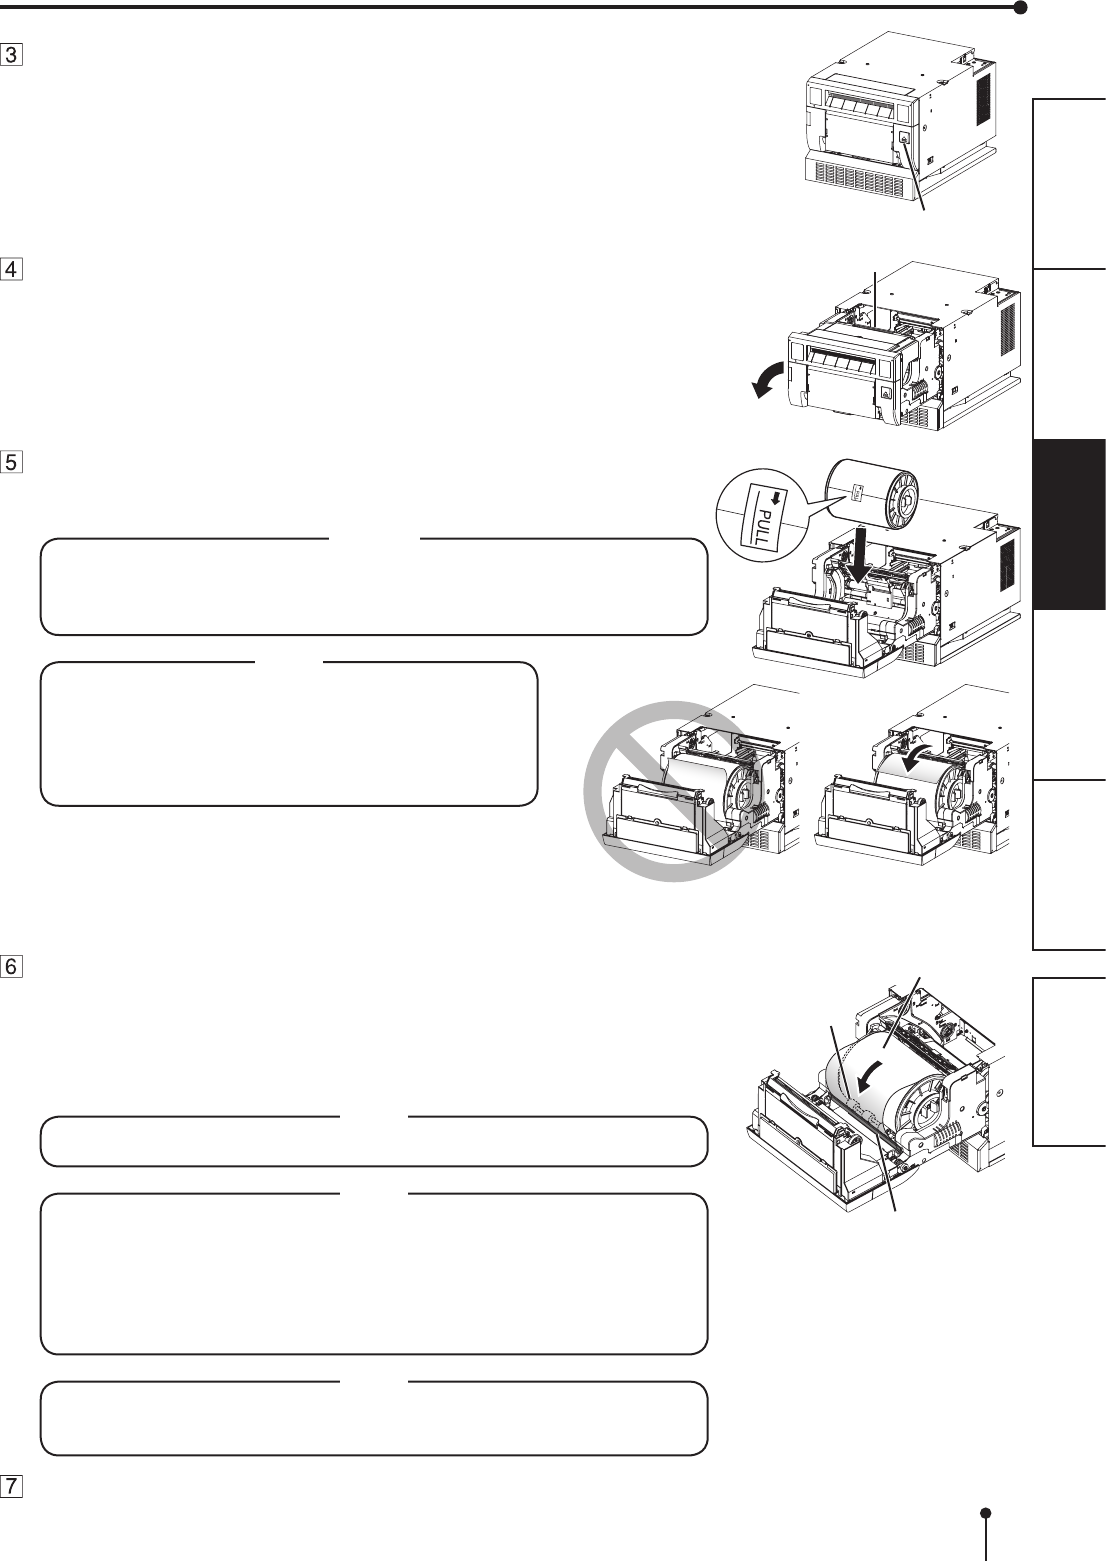
Press the POWER switch on the right side panel to turn on the
power.
Sticker
POWER switch
12
OTHERSPRECAUTIONS FEATURES PREPARATION TROUBLE-
SHOOTING CONTENTS
After the POWER indicator’s color has changed from orange to
green, press the OPEN button to release the printing unit out.
Remove the paper strip bin and then pull the knob to open the
door.
Install the print paper into the unit.
Place the printing paper in the correct orientation.
Make sure the paper roll is rmly installed.
• Do not push down on the printing unit or the door.
If you push down on the printing unit or the door when they are open, this
unit may fall and it can cause damage or injury.
CAUTION
• Make sure to turn on the power before installing the
print paper. Otherwise, a paper jam may occur.
• Load the paper roll slowly into the unit. If it is
dropped along the ditches, the unit or accessories
may be damaged.
NOTE
Remove the sticker and insert the print paper between the roller
and guide as shown right to feed it. When the buzzer sounds,
stop the paper feeding.
Remove the sticker before inserting the print paper between roller and guide. Make
sure to insert the paper straight.
Buzzer continues to sound until the printing unit is closed.
• Keep the rollers clean. Dirt on the rollers may produce poor print quality.
NOTE
• When taking the print paper out, pull it up toward you by holding the
paper anges.
• Make sure to turn on the power before replacing the print paper.
• Make sure to eliminate any slack from the print paper. If you carry out
the following steps without eliminating the slack, the print paper may be
damaged.
NOTE
• If you continue to feed the print paper inward after the buzzer sounds, it
may cause a paper jam.
NOTE
Close the door.
OPEN button
Knob
Direction of paper insertion
Roller
Print paper
Guide
BEFORE OPERATION
13
OTHERSPRECAUTIONS FEATURES PREPARATION TROUBLE-
SHOOTING CONTENTS
BEFORE OPERATION
INK RIBBON INSTALLATION
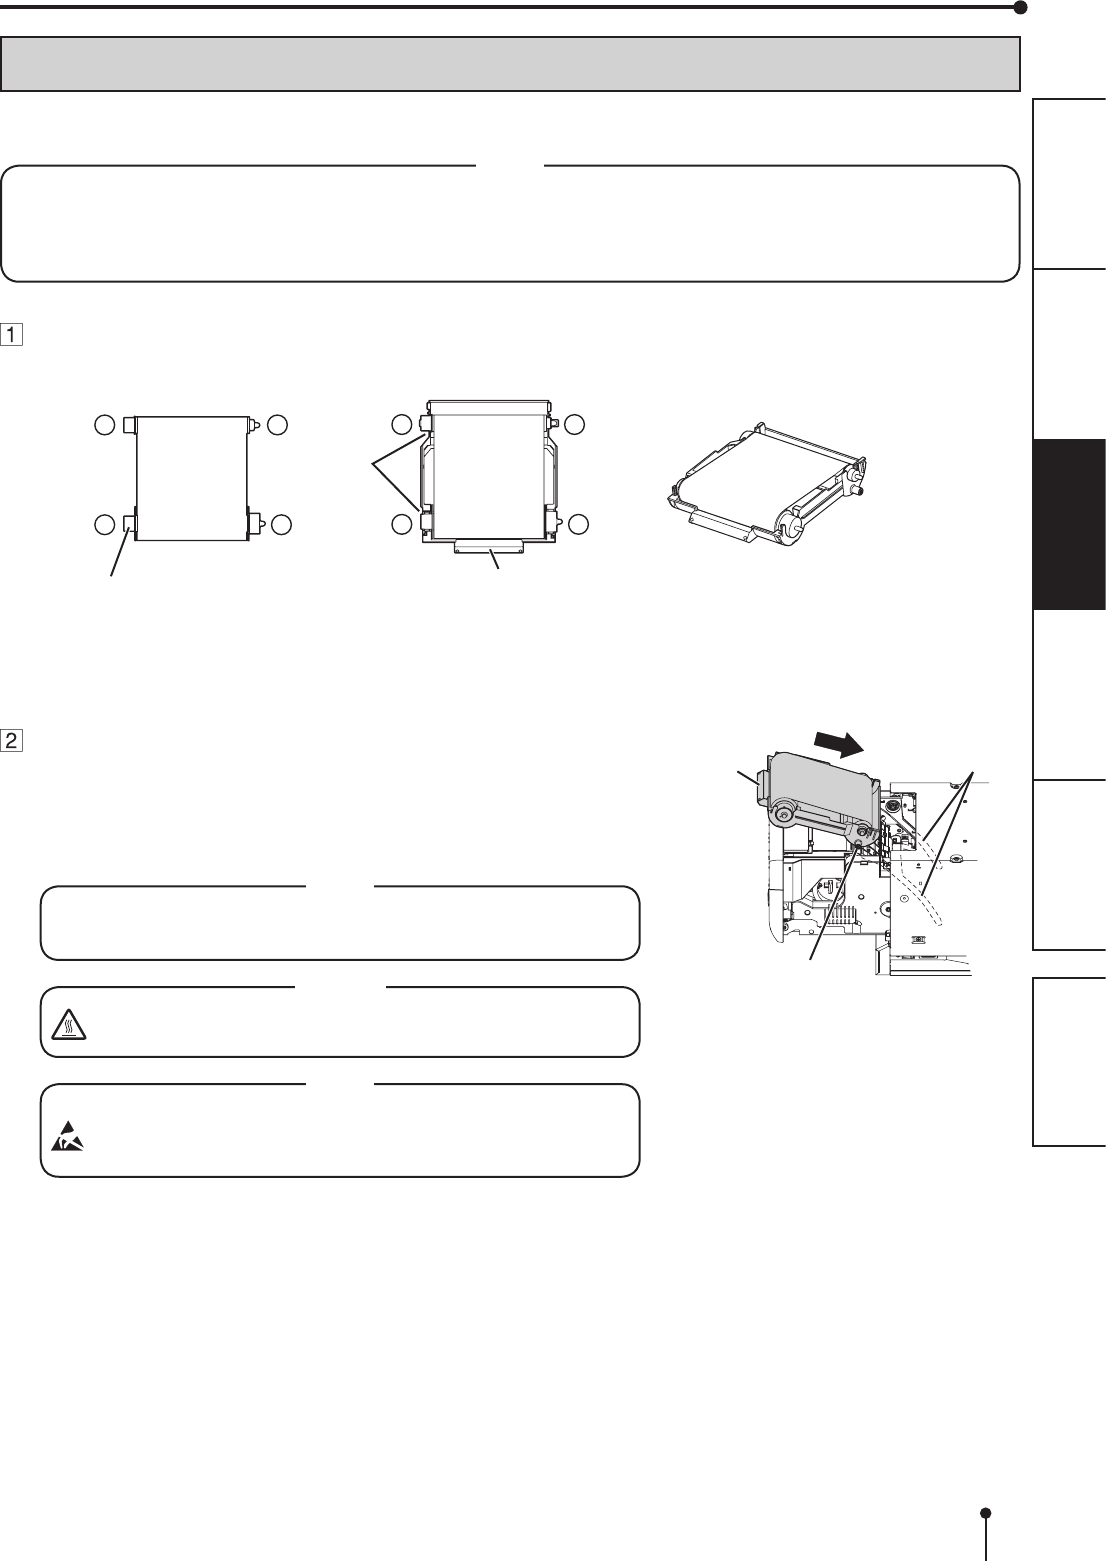
After installing the print paper, install the ink cassette into this unit.
Before installing the ink cassette into this unit, load the ink ribbon in the ink cassette.
• Place the ink cassette on a at surface, when loading the ink ribbon.
• Select a place that is free of dust when loading the ink ribbon. Dust or dirt settling on the ink ribbon results in poor
print quality.
• Make sure that the shafts of the ink ribbon t into the ink cassette rmly.
NOTE
Load the ink ribbon in the ink cassette as shown below.
Make sure to load it in the correct position.
34
1 2
34
1 2
Ink ribbon
Shaft
Ink cassette
Handle
Ditch
Make sure to set the ink ribbon roller to the ditches rmly.
Turn the shaft to eliminate any slack.
Place the ink cassette containing the ink ribbon in the
position as shown in the illustration.
To insert the ink cassette, align the protrusions on both sides of the
cassette with the right and left guides inside the printing unit and slide it in
a slanting direction.
Mount the ink cassette to the back rmly by holding the handle.
• Do not touch the thermal head. Fingerprints or dust on the
thermal head will degrade the print quality.
NOTE
Do not touch the thermal head right after printing because it is
extremely hot. Otherwise you may get burned or injured.
CAUTION
Note that the thermal head is quite sensitive to static electricity.
When you touch the thermal head while carrying static electricity
on your body, the thermal head may be damaged.
NOTE
Handle
Protrusion
Guides
14
OTHERSPRECAUTIONS FEATURES PREPARATION TROUBLE-
SHOOTING CONTENTS
BEFORE OPERATION
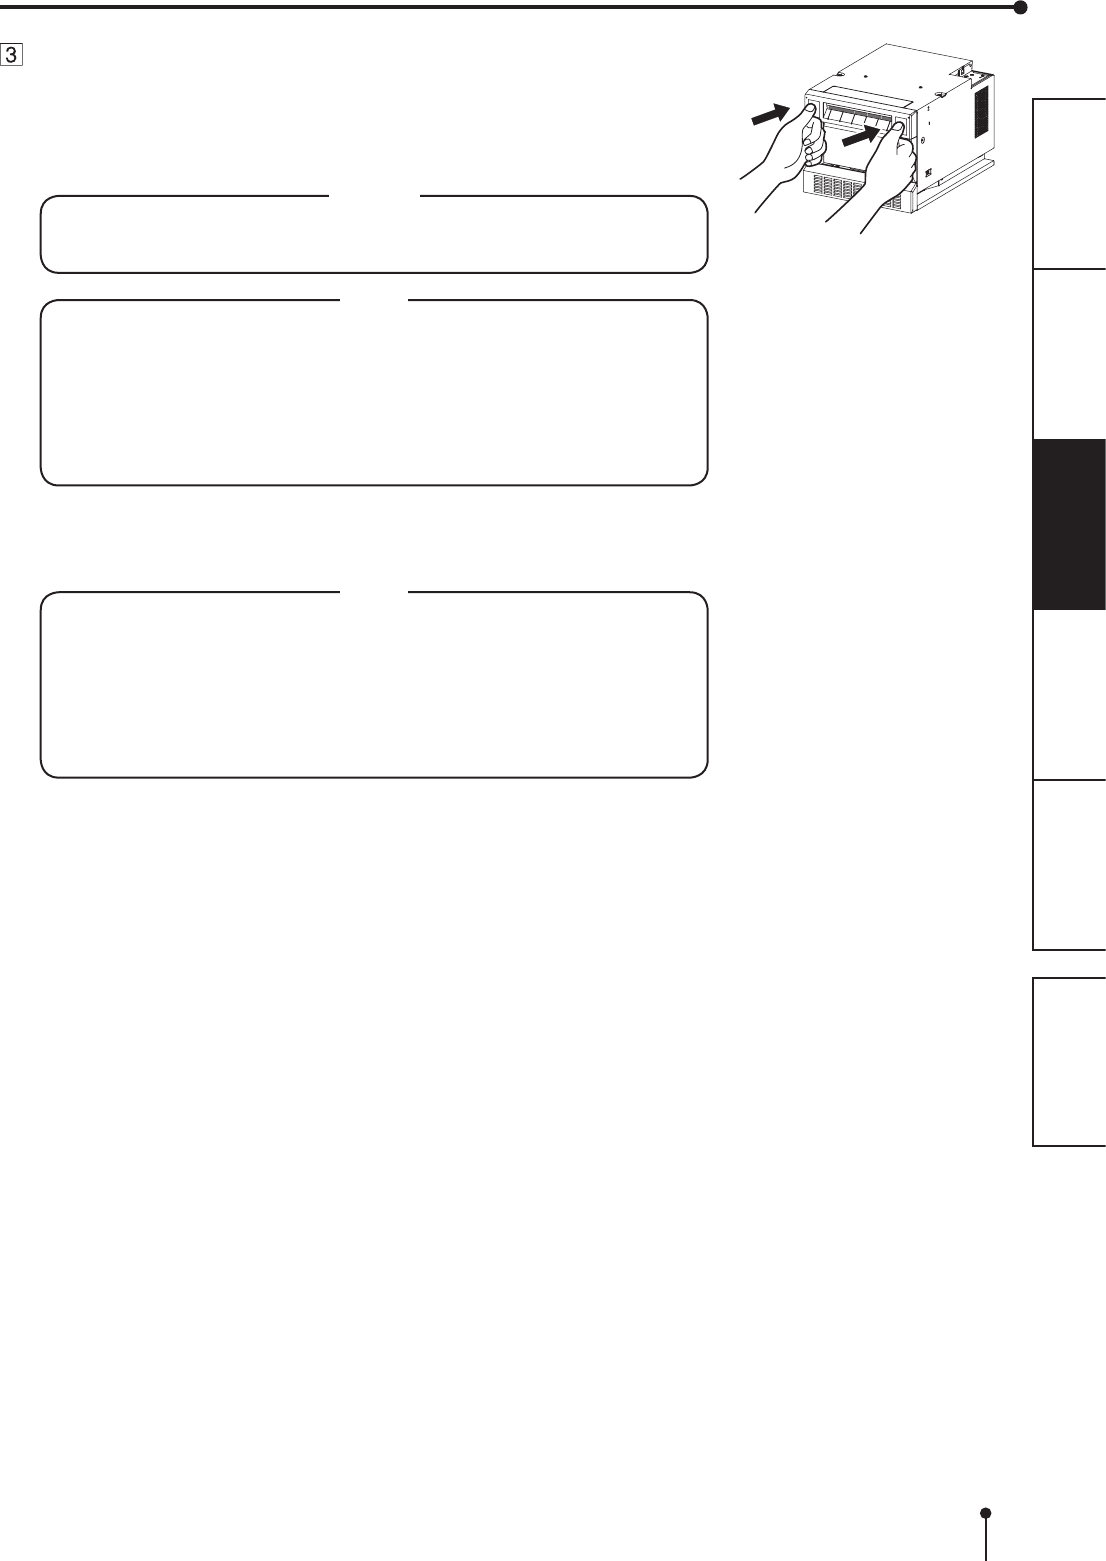
Push the printing unit to close.
Close the printing unit by pushing the right and left sides of the unit from the front
with both hands.
When a new paper is loaded and the printing unit is closed with the power turned
on, the paper will be automatically fed and cut.
• When closing the printing unit, be careful not to get your hands caught
between the printer and the printing unit. Otherwise, you may get injured.
CAUTION
• When closing the printing unit, push it until a click is heard.
• If the PAPER RIBBON indicator illuminates when the printing unit is
closed, the print paper may have not been installed correctly.
In this case, open the printing unit to make sure that the print paper has
been installed correctly. Then close the printing unit again.
• When the paper roll is reinstalled more than three times, the print paper
may be used up earlier than the ink ribbon.
NOTE
Installation of the print paper and the ink ribbon is completed.
• Make sure to replace the print paper and the ink ribbon simultaneously.
• Empty the paper strip bin frequently to prevent jamming the strips at the
print outlet. Whenever you replace the paper and ink ribbon, make sure
to throw away the paper strips in the paper strip bin.
• Whenever you replace the print paper and the ink ribbon, clean the
thermal head and the platen roller. For the cleaning procedures, see
“CLEANING” (on pages 21 and 22).
NOTE

15
OTHERSPRECAUTIONS FEATURES PREPARATION TROUBLE-
SHOOTING CONTENTS
BEFORE OPERATION
HANDLING OF PAPER / INK RIBBON SET
BEFORE PRINTING
• Fingerprints or dust on the paper printing surface may produce poor print quality and cause paper jams.
• When the print paper or ink ribbon is abruptly transferred from a cool place to a hot place, vapor or dew is generated
on the surface, which causes paper jams or degraded print quality. Leave the print paper in the room to stabilize its
temperature before use.
• If you repeat the PRINT PAPER INSTALLATION procedure more than the designated number of times, the indicated
number of prints may not be made. In addition, if you replace the print paper before it is used up, the indicated number of
prints may not be made.
AFTER PRINTING
• If the paper absorbs nonvolatile organic solvents (alcohol, ester, ketone, etc.) the print may be discolored.
• Discoloration of prints is accelerated if the print paper comes into contact with soft vinyl chloride such as transparent
tape.
• Avoid storing prints in direct sunlight or places with high humidity.
STORAGE OF PAPER / INK RIBBON SET
• Do not store the print paper and ink ribbon in the container made of soft polyvinyl chloride. They may be discolored
because of chemical reaction.
• Store the print paper and ink ribbon out of direct sunlight and away from heating appliances in a cool, dark place where
the temperature is 5˚C to 30˚C and the humidity is 20% to 60% RH.