Mitutoyo Quick Scope Non Contact Vision Measuring Machine Qs L1020Af Users Manual
2015-02-09
: Mitutoyo Mitutoyo-Quick-Scope-Non-Contact-Vision-Measuring-Machine-Qs-L1020Af-Users-Manual-557235 mitutoyo-quick-scope-non-contact-vision-measuring-machine-qs-l1020af-users-manual-557235 mitutoyo pdf
Open the PDF directly: View PDF ![]() .
.
Page Count: 14
Coordinate Measuring Machines
Small Tool Instruments and
Data Management
Digital Scale and DRO Systems
Hardness Measuring
Sensor Systems
Optical Measuring
Surface, Form and Contour
Measurement
Vision Measuring Systems
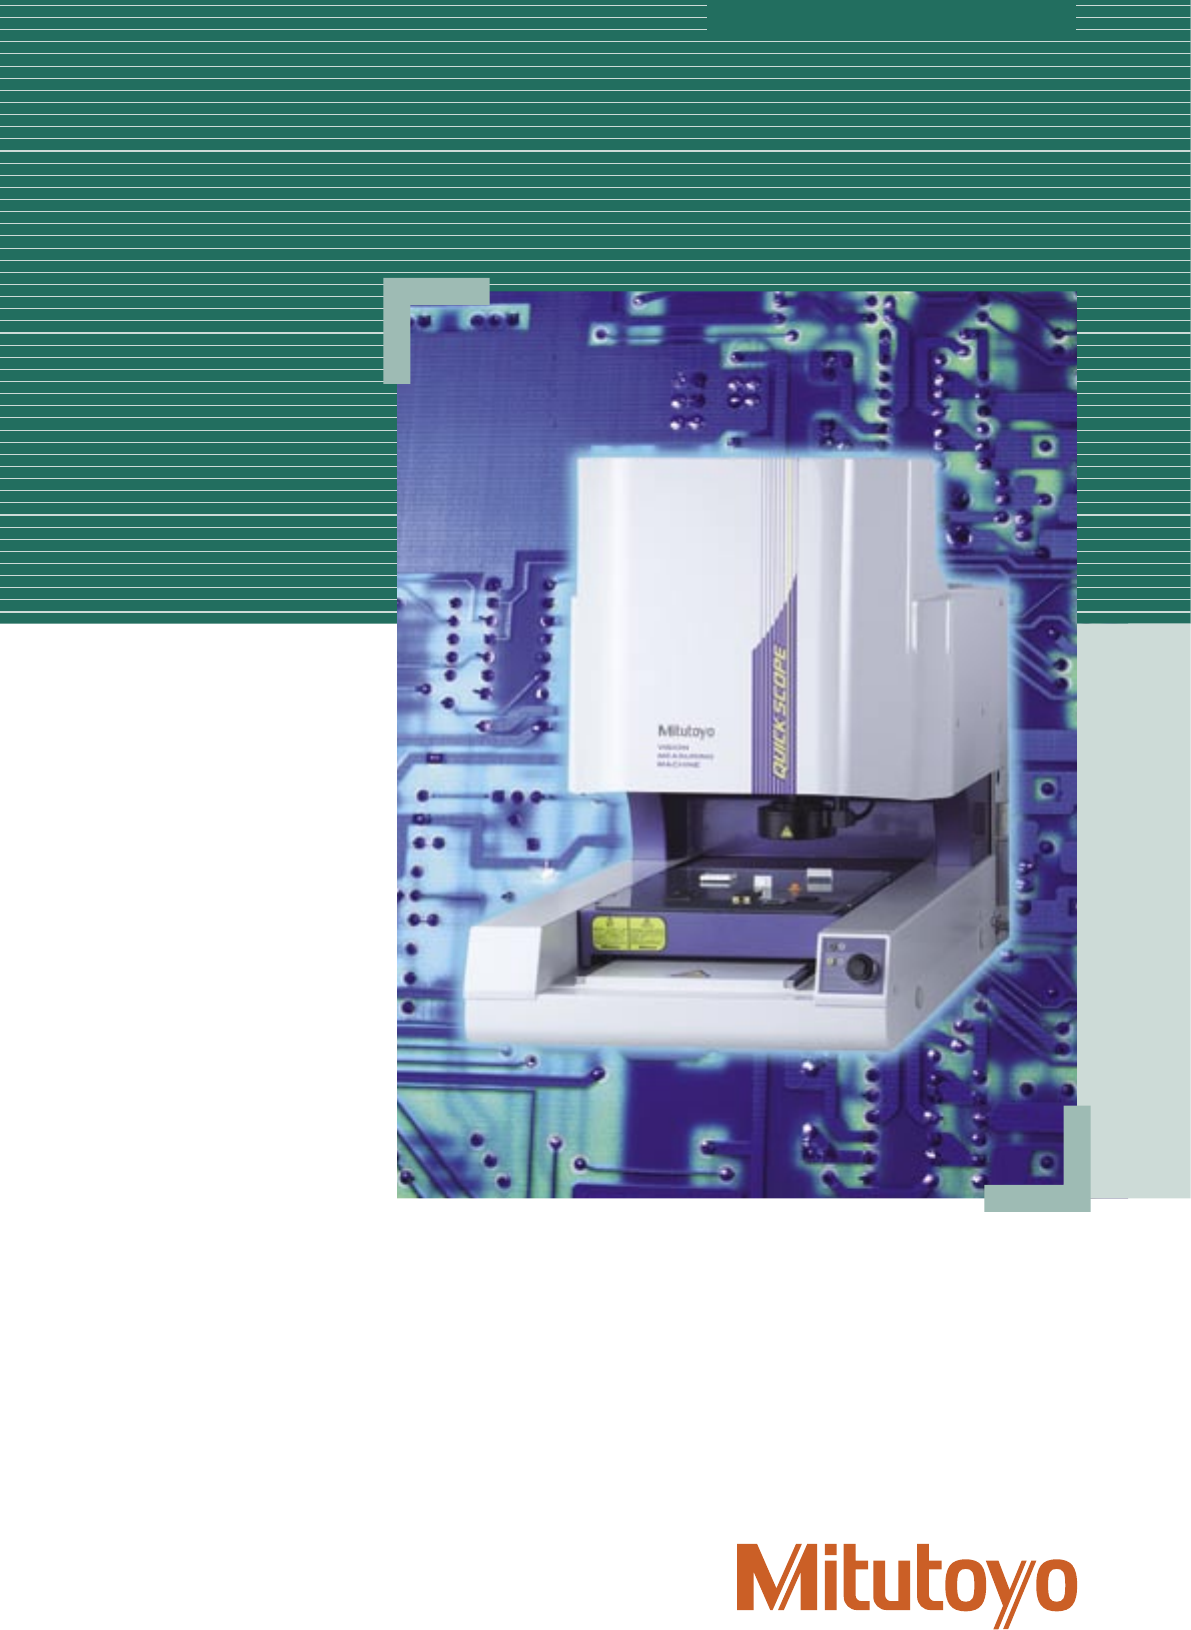
QUICK SCOPE
Catalog No. E4142-359
Vision Measuring Systems
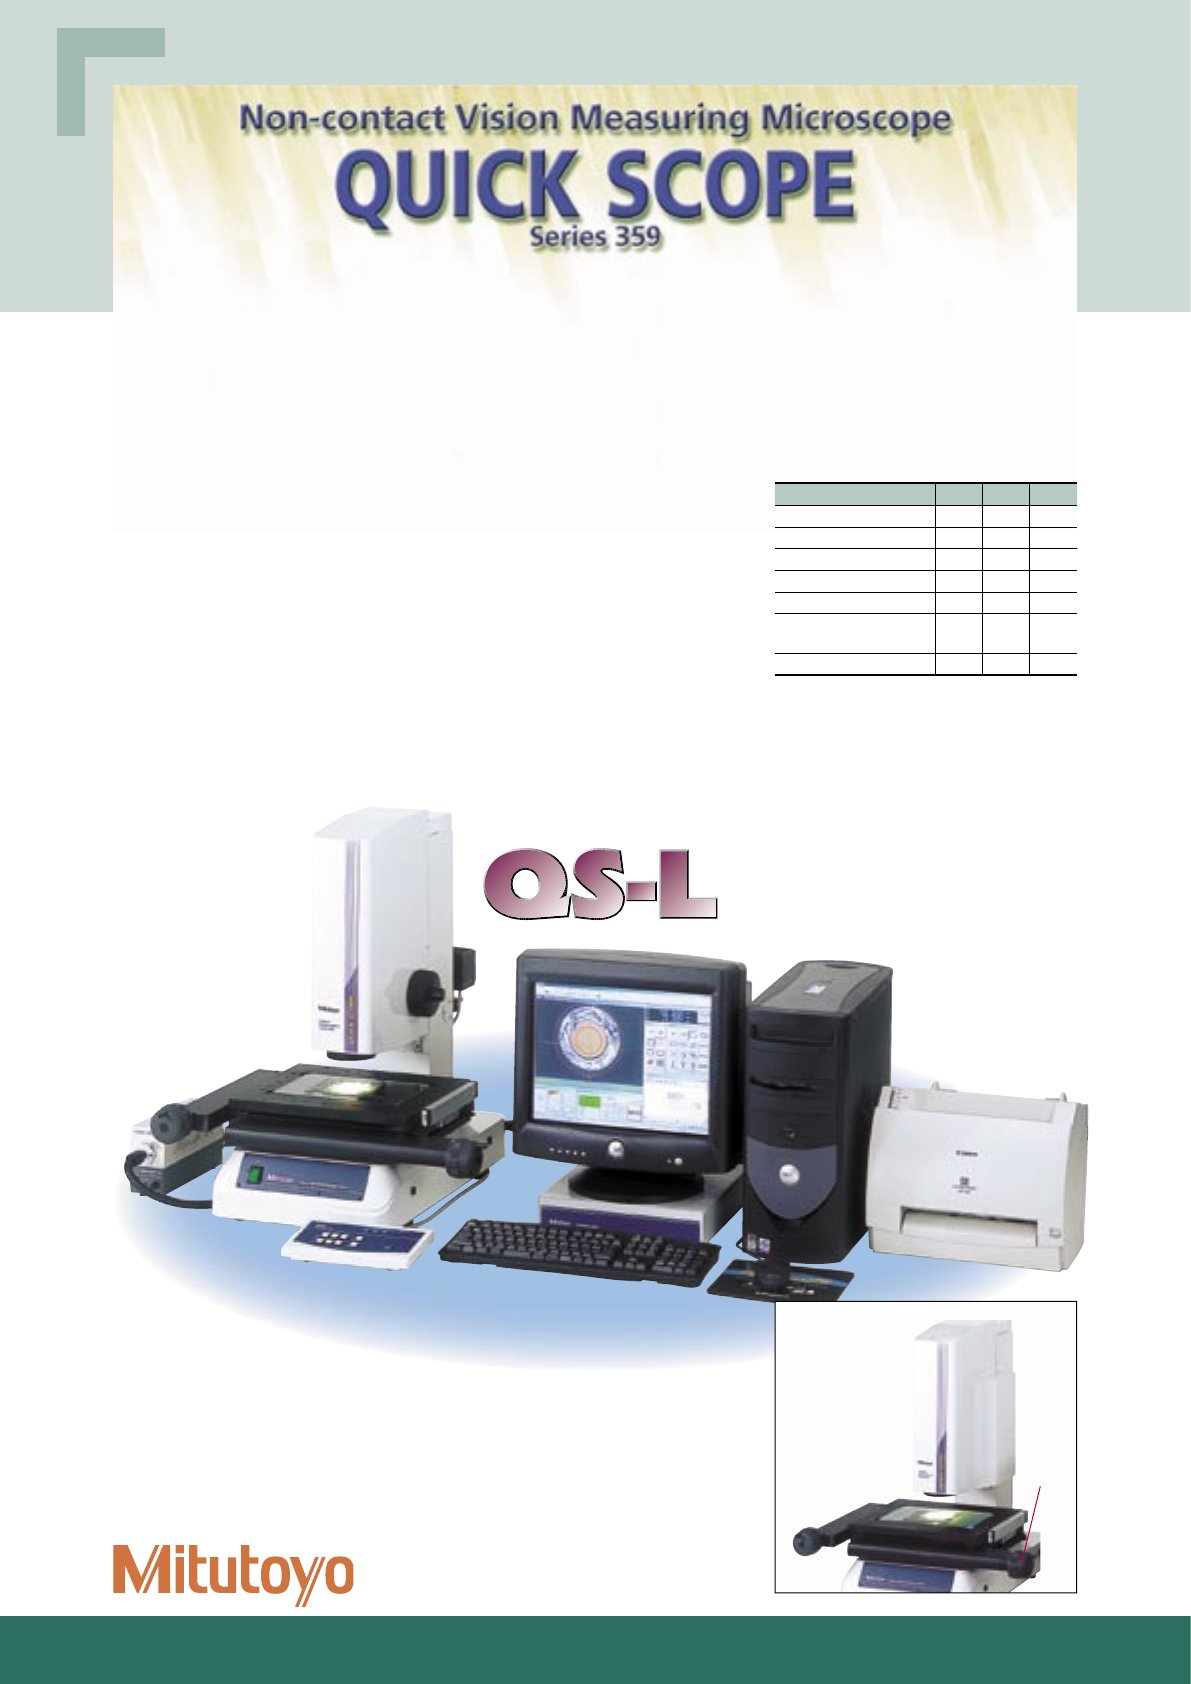
Quick Scope Non-contact Vision Measuring
Machine Offer High Accuracy, Excellent
Affordability and Powerful Capabilities!
2
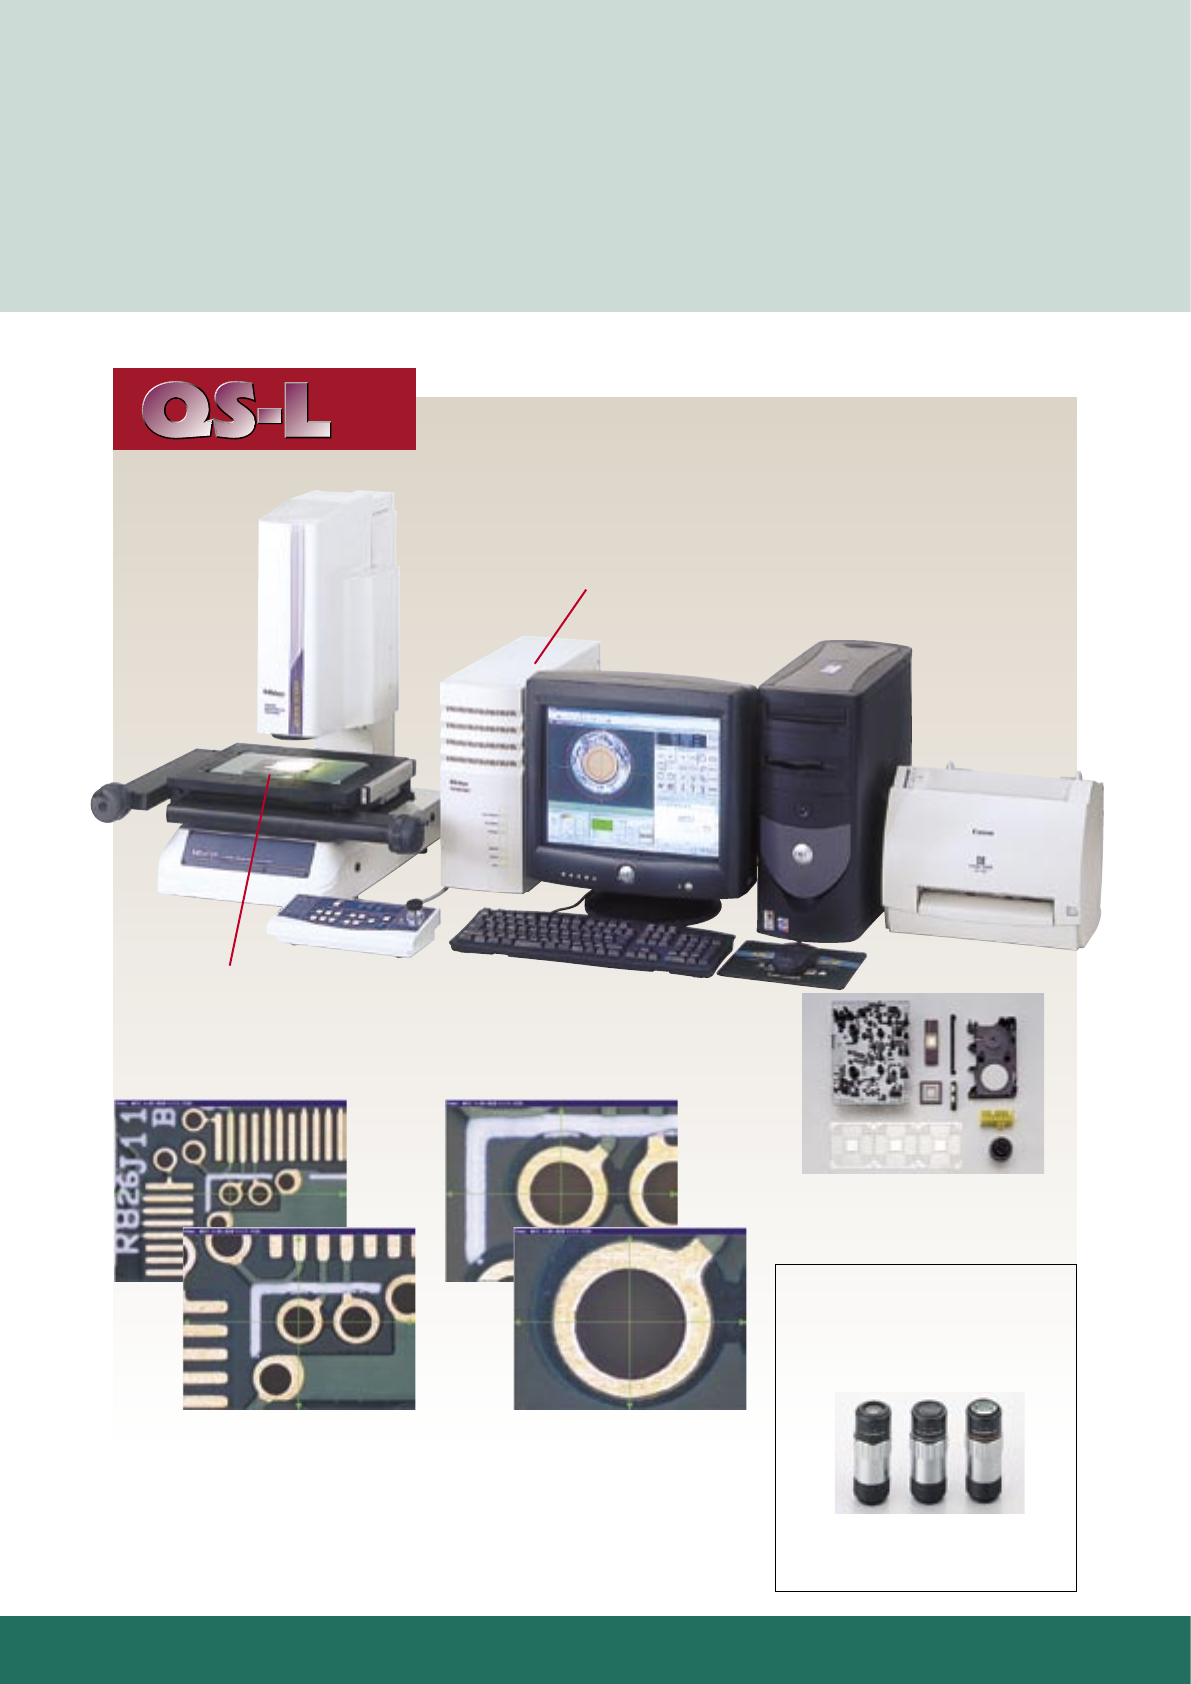
Quick Scope has been developed through Mitutoyo’s extensive experience
and leading-edge technologies in optics and precision measuring. It performs
complex, automatic measurements of batches of workpieces or prototype
work with more measuring and analysis capability than a profi le projector or
traditional microscope.
• A color CCD camera provides real-life, sharp workpiece images.
• Available in CNC or manual version, with zoom or fi xed magnifi cation.
• Multiple lighting options allow users to customize their Quick Scopes
to meet their particular lighting needs.
• Navigation and Graphic functions allow easy operation and movement
around the part.
• One-click edge detection.
• Macro icon tools for many common measuring routines.
• Compact and light weight design fi ts where you need it.
• Powerful, Windows® based software is easy-to-use and intuitive.
Windows is a reg istered trademark of Microsoft Corporation.
Features/benefi ts
• Excellent surface observation model for a wide variety of workpieces.
• 0.1µm resolution and 150mm (6") Z-axis range.
• Power zoom allows for easy and fast magnifi cation change.
(QS-L1020AF is a fi xed-magnifi cation type)
• Fine illumination capability allows for lighting changes to match workpiece requirements.
• The quick release system in the stage allows instant switching between a coarse
movement and a fi ne movement.
• Quick Navigation function allows the user to do repeat measurements quickly.
• An auto-focus function is available for QS-L1020AF and QS-L1020ZAF.
Easy-to-use Manually-operated System
QS-L1020Z
QS-L1020AF
QS-L1020ZAF
with auto-focus unit
Quick
release
system
Model QS QS-L QS-E
CNC O — —
Auto-focus O O*1—
Ring light illumination O O ▲
Zoom lens O O*2—
Control box ▲O —
Programmable
illumination adjustment
O O —
QSPAK O O O
O: Provide ▲: Available as option —: Not available
*1QS-L1020AF, QS-L1020ZAF
*2QS-L1020Z, QS-L1020ZAF
3
Features/benefi ts
• Surface, contour and fi ber-optic ring light illumination options allow users to confi gure the
QS lighting to meet a variety of measurement needs.
• Powerful, Windows® based QSPAK software is easy to use and offers a wide spectrum of
measuring and analysis capabilities.
• Functions include zoom, auto-focus, measurement playback, one-click edge detection,
graphic display, 48 different macros, and a pattern matching function for several common
part features.
• X,Y stage can be controlled by mouse or through the optional multi-function control box.
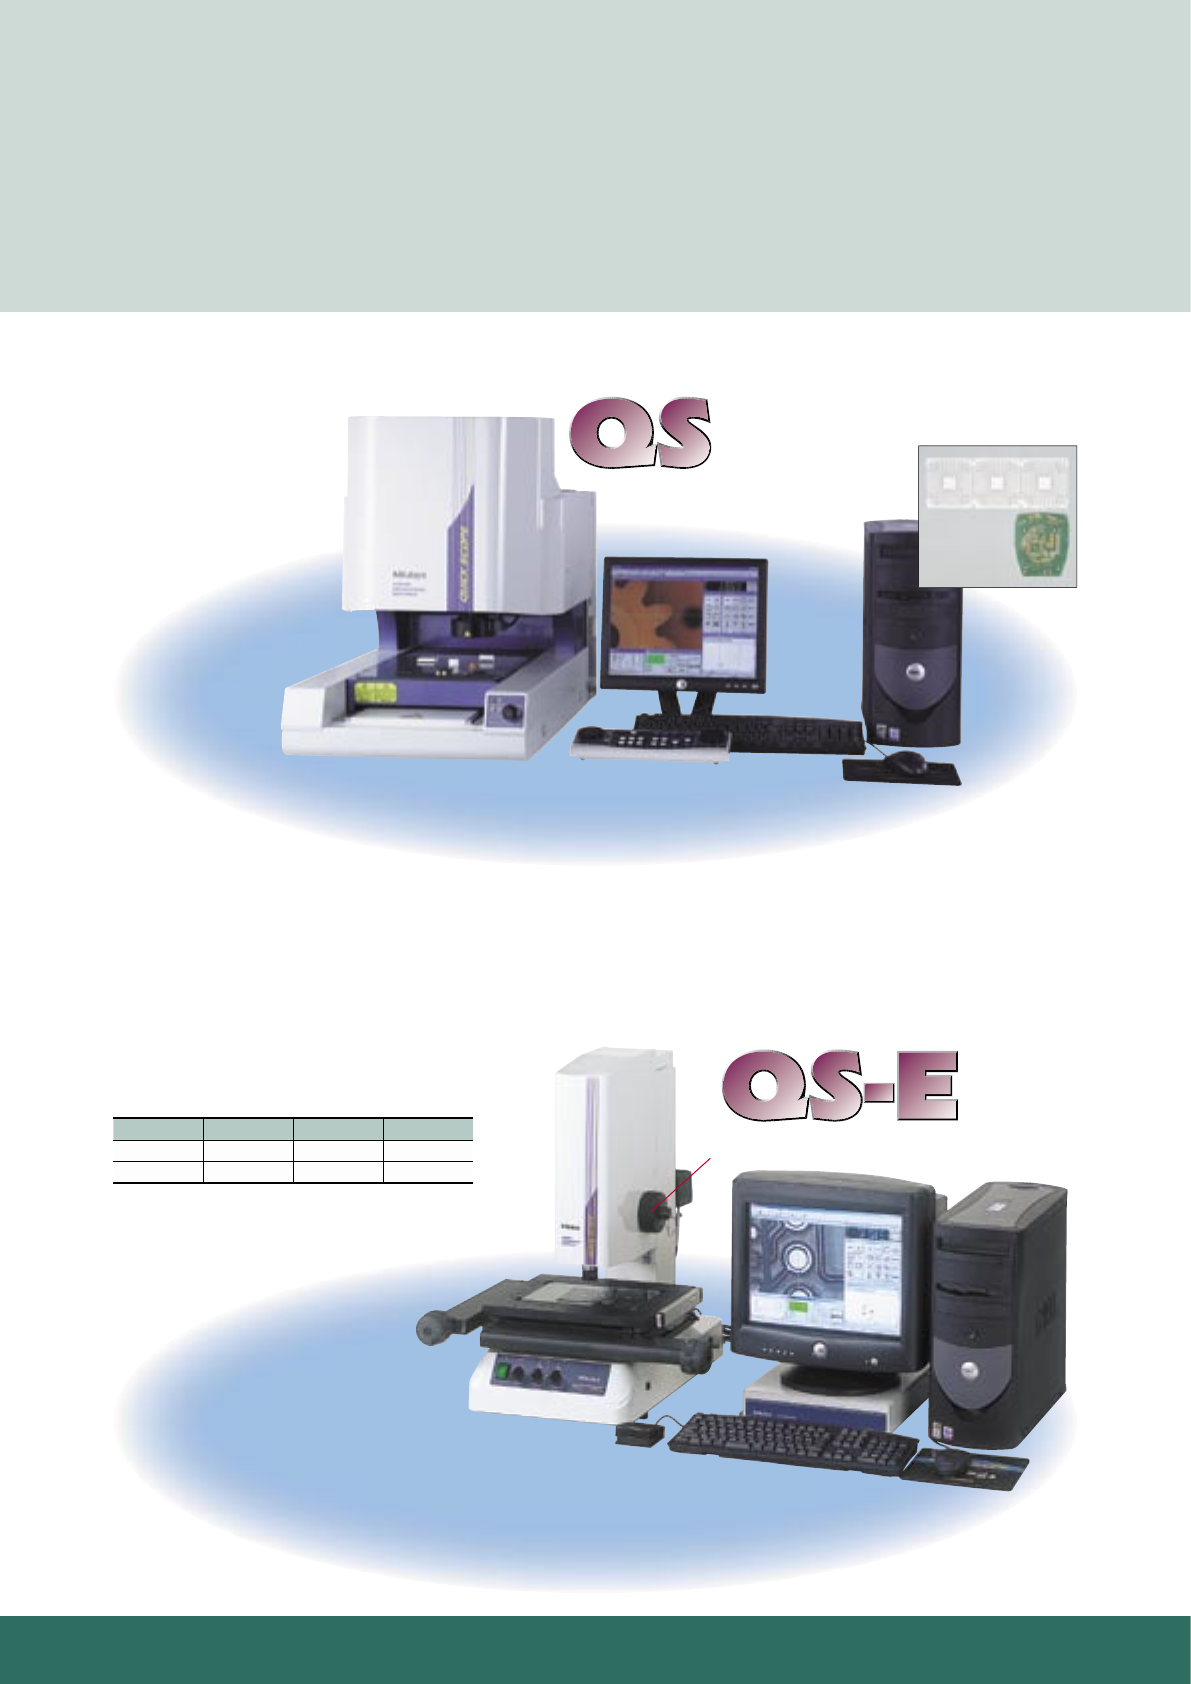
Excellent Performance-cost Ratio CNC System
Most Affordable Manually-operated System
Features/benefi ts
• The most affordable Quick Scope model.
• 0.1µm resolution and 150mm (6") Z-axis range.
• Magnifi cation can be adjusted by changing objectives.
• Excellent observation/measurement for a single workpiece.
• The quick release system in the stage allows instant switching between a coarse movement
and a fi ne movement.
• An optional fi ber-optic ring light is available.
• Graphic and Navigation functions allow for quick maneuvering around the workpiece.
• Part programs are easily created in the Windows® based QSPAK software.
QS200Z
QS-E1020
Estimated times to measure common
workpieces with Quick Scope
compared to a traditional microscope:
Workpiece QS (CNC) QS-L Microscope
Lead frame 9 minutes 18 minutes 60 minutes
P.C.B. 6 minutes 20 minutes 60 minutes
Z-axis focus grip
4
Space Saving and Compact Design Makes Quick
Scope Easy-to-use and Affordable!
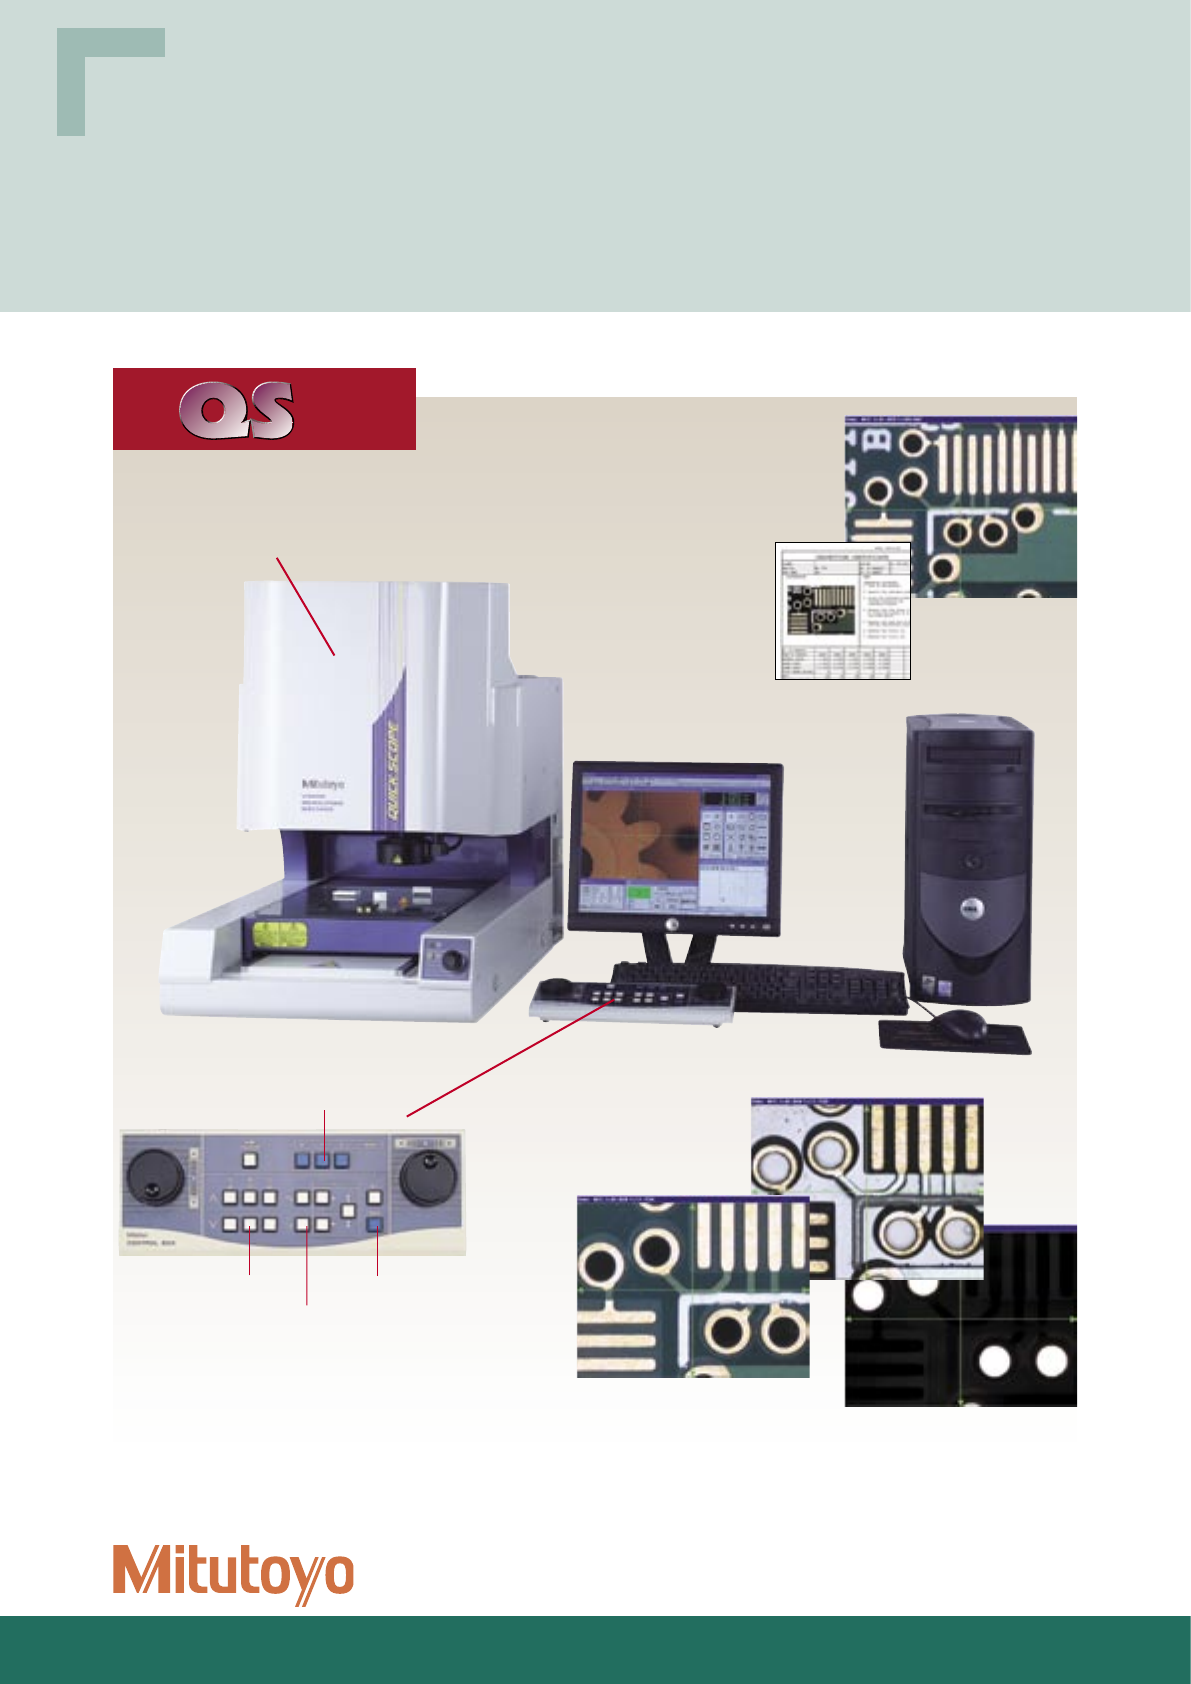
Built-in control unit for QS
The illumination intensity and zoom lens control
unit is built-in to the housing for protection.
True color image processing function
A color CCD camera is used to provide
for realistic workpiece observation and
measurement. The color image can be captured
and stored as a bitmap image for other uses and
can be printed out.
Fiber-optic ring light provides sharp, clear
images of your workpiece (QS and QS-L models)
In addition to surface and contour illumination, the QS and QS-L models of Quick Scope are equipped
with a fiber-optic ring light as standard equipment, providing clear color images without shadows.
Print sample
of video printer
Surface (coaxial)
illumination
Easy operation with multi-function
control box (optional accessory)
Data entry key
Counter zero-set key
Zoom lens magnification control key
Illumination control key
Fiber-optic ring light
illumination
Contour (stage) illumination
Series
QS250Z
5
Series
Power controller unit for the Auto-focus type
The Auto-focus type includes a separate power controller that controls
illumination and zoom. In the repeat mode, the power unit automatically
recalls and sets the illumination and zoom magnification according to
settings created in the learn mode. This means automatic measuring for
batches of the same part can be performed with very high repeatability.
8-Step programmable power zoom lens (QS & QS-L* models)
The programmable power zoom lens provides zoom magnifications from 21X to 147X and
variable illumination intensity for tailoring your part measurement routines. Image gap and
pixel calibration take place automatically.
*QS-L1020AF is a fixed-magunification type.
0.5X
1.0X
2.0X
3.5X
200x100mm X,Y table
with linear scales
Examples of workpieces
QS-L1020ZAF
Optional objectives
The QS-E1020 and QS-L1020AF allow for
three different magnification settings (42X,
105X, and 210X) through the simple and
easy changing out of objectives.
02ALA400 1X objective
02ALA410 2.5X objective
02ALA420 5X objective
6
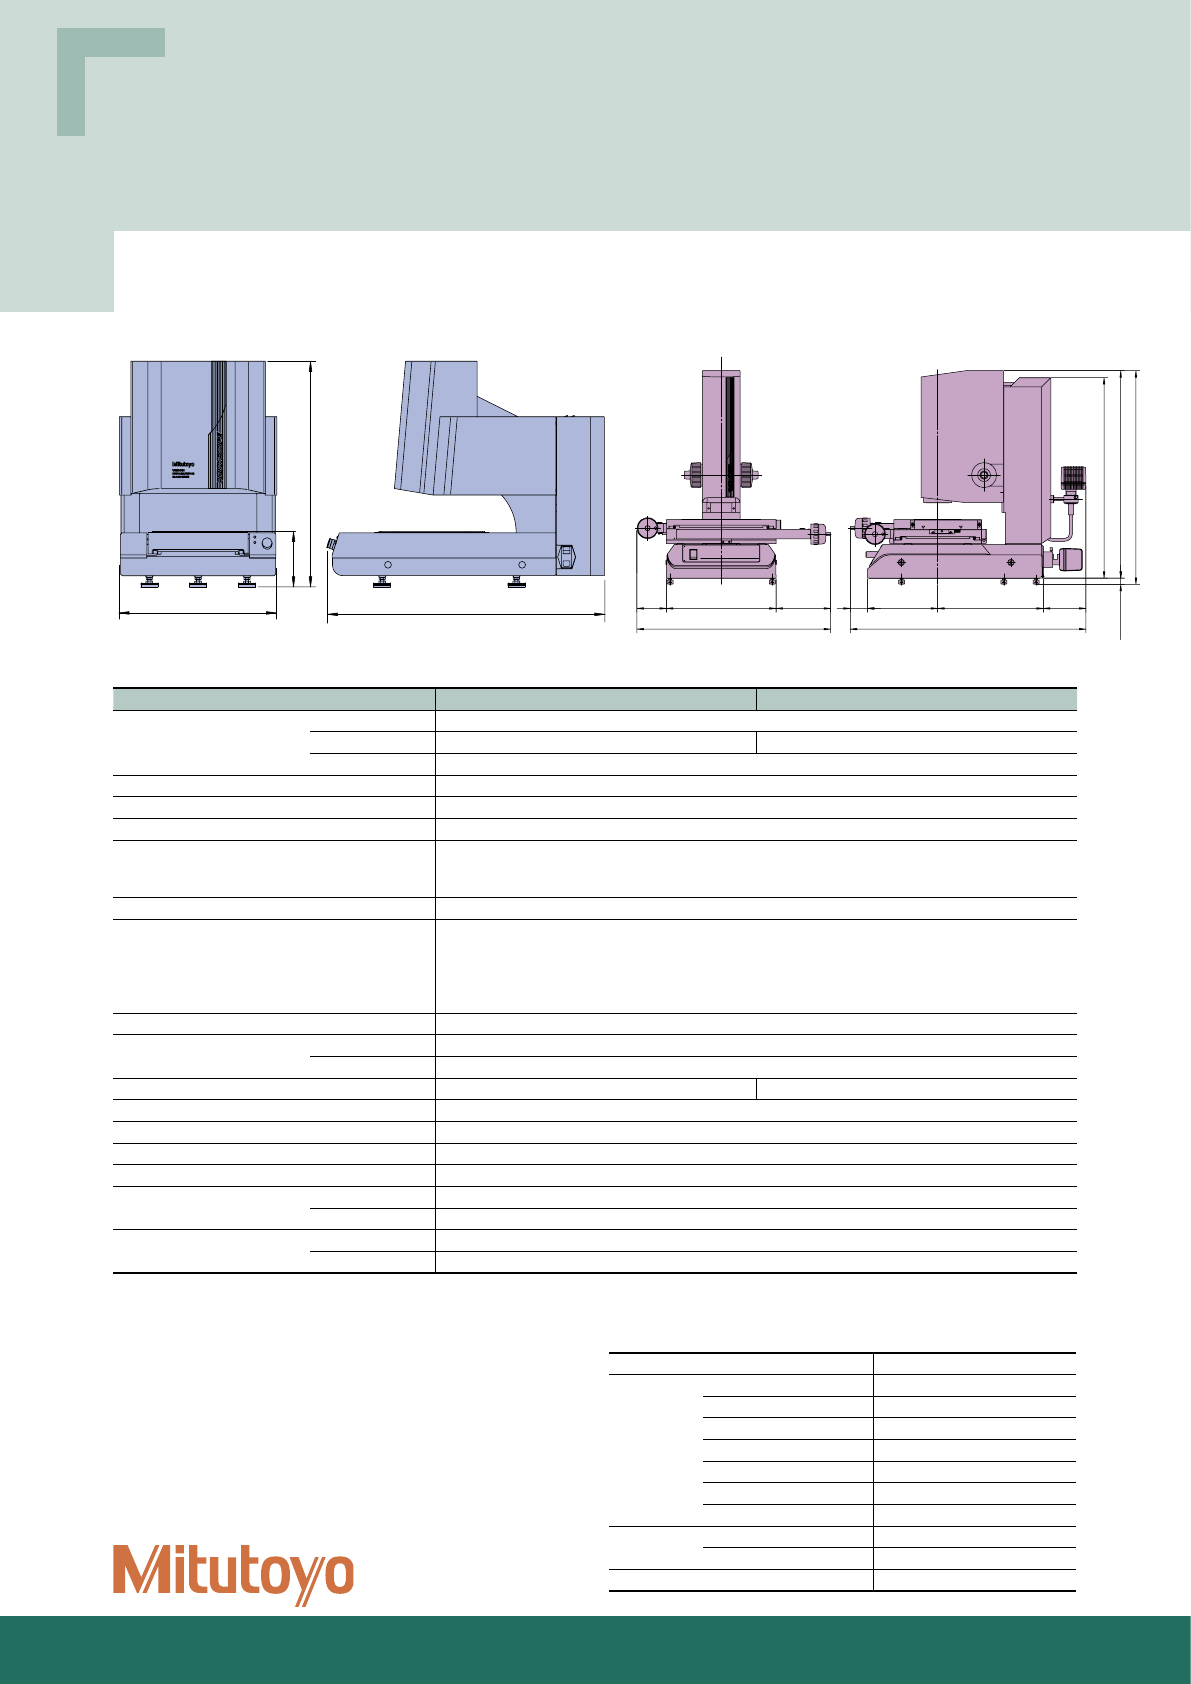
QSPAK—A unique vision measuring software system
that provides powerful measuring capabilities and
comprehensive measurement analysis
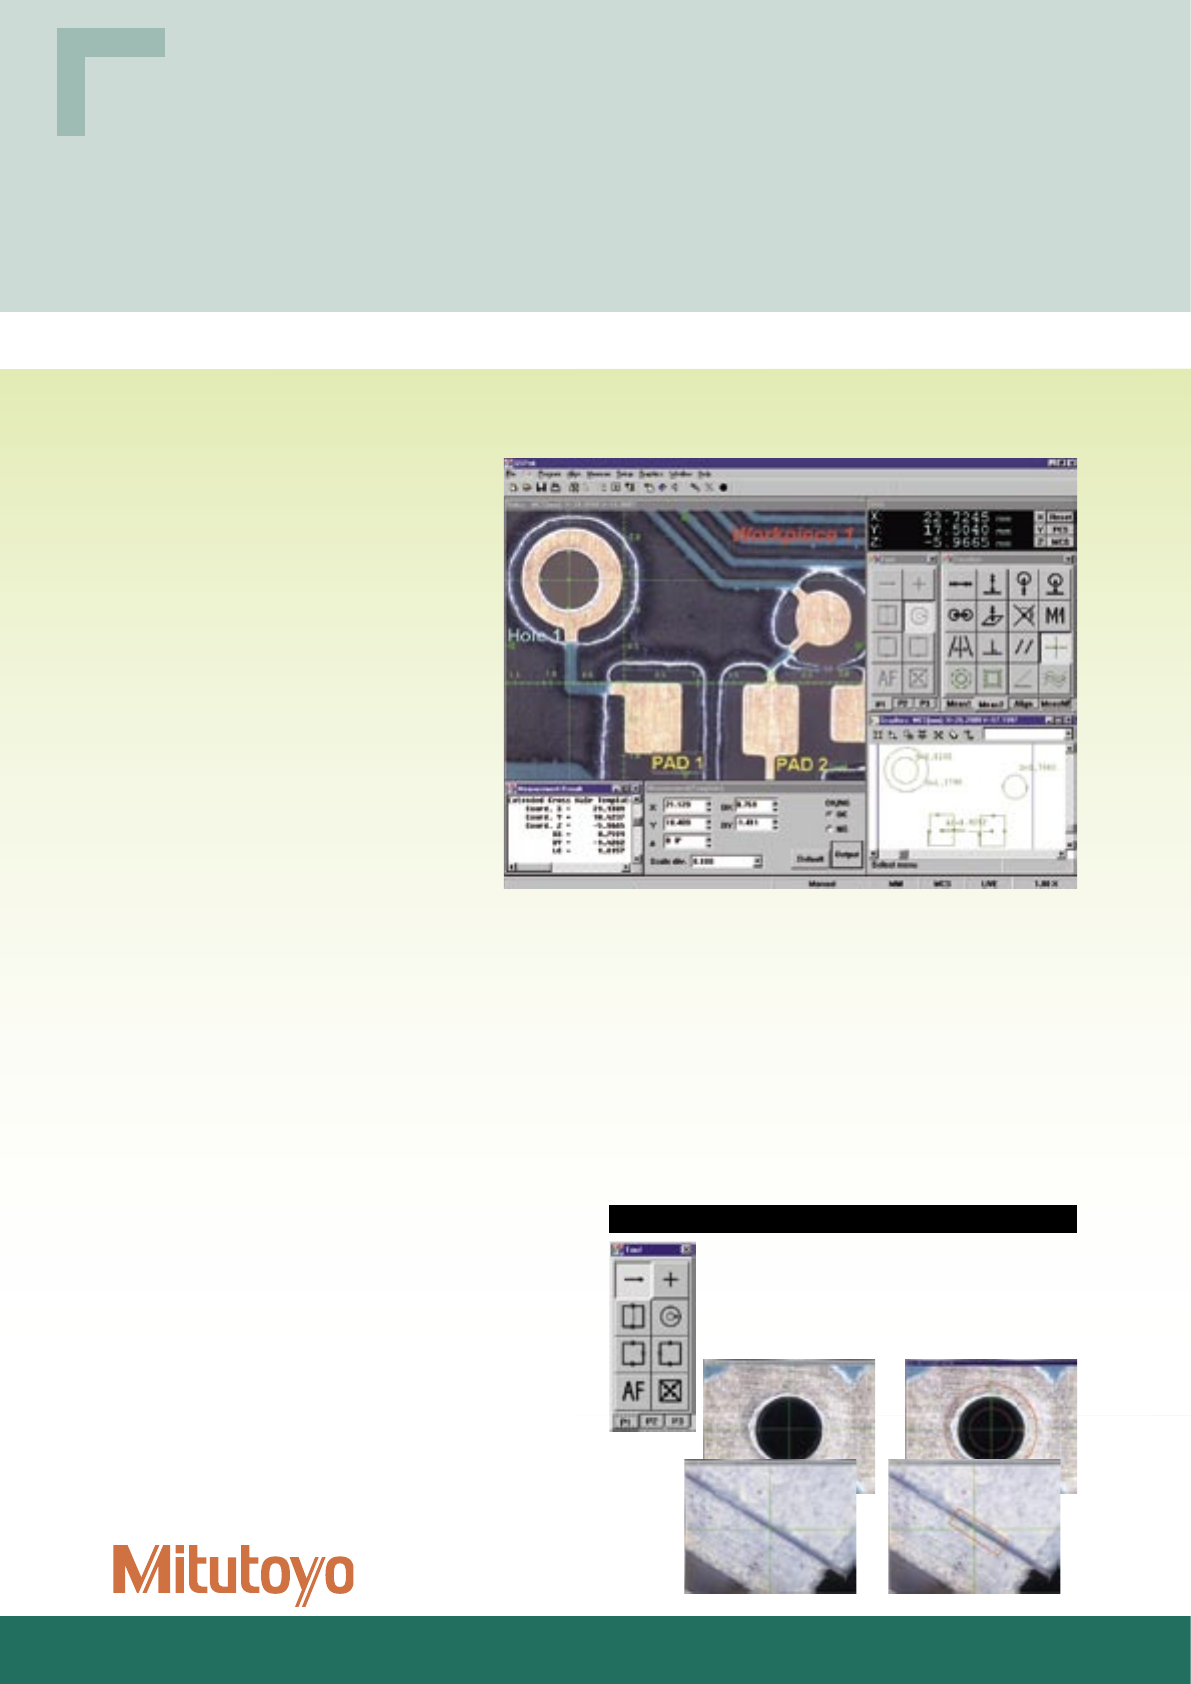
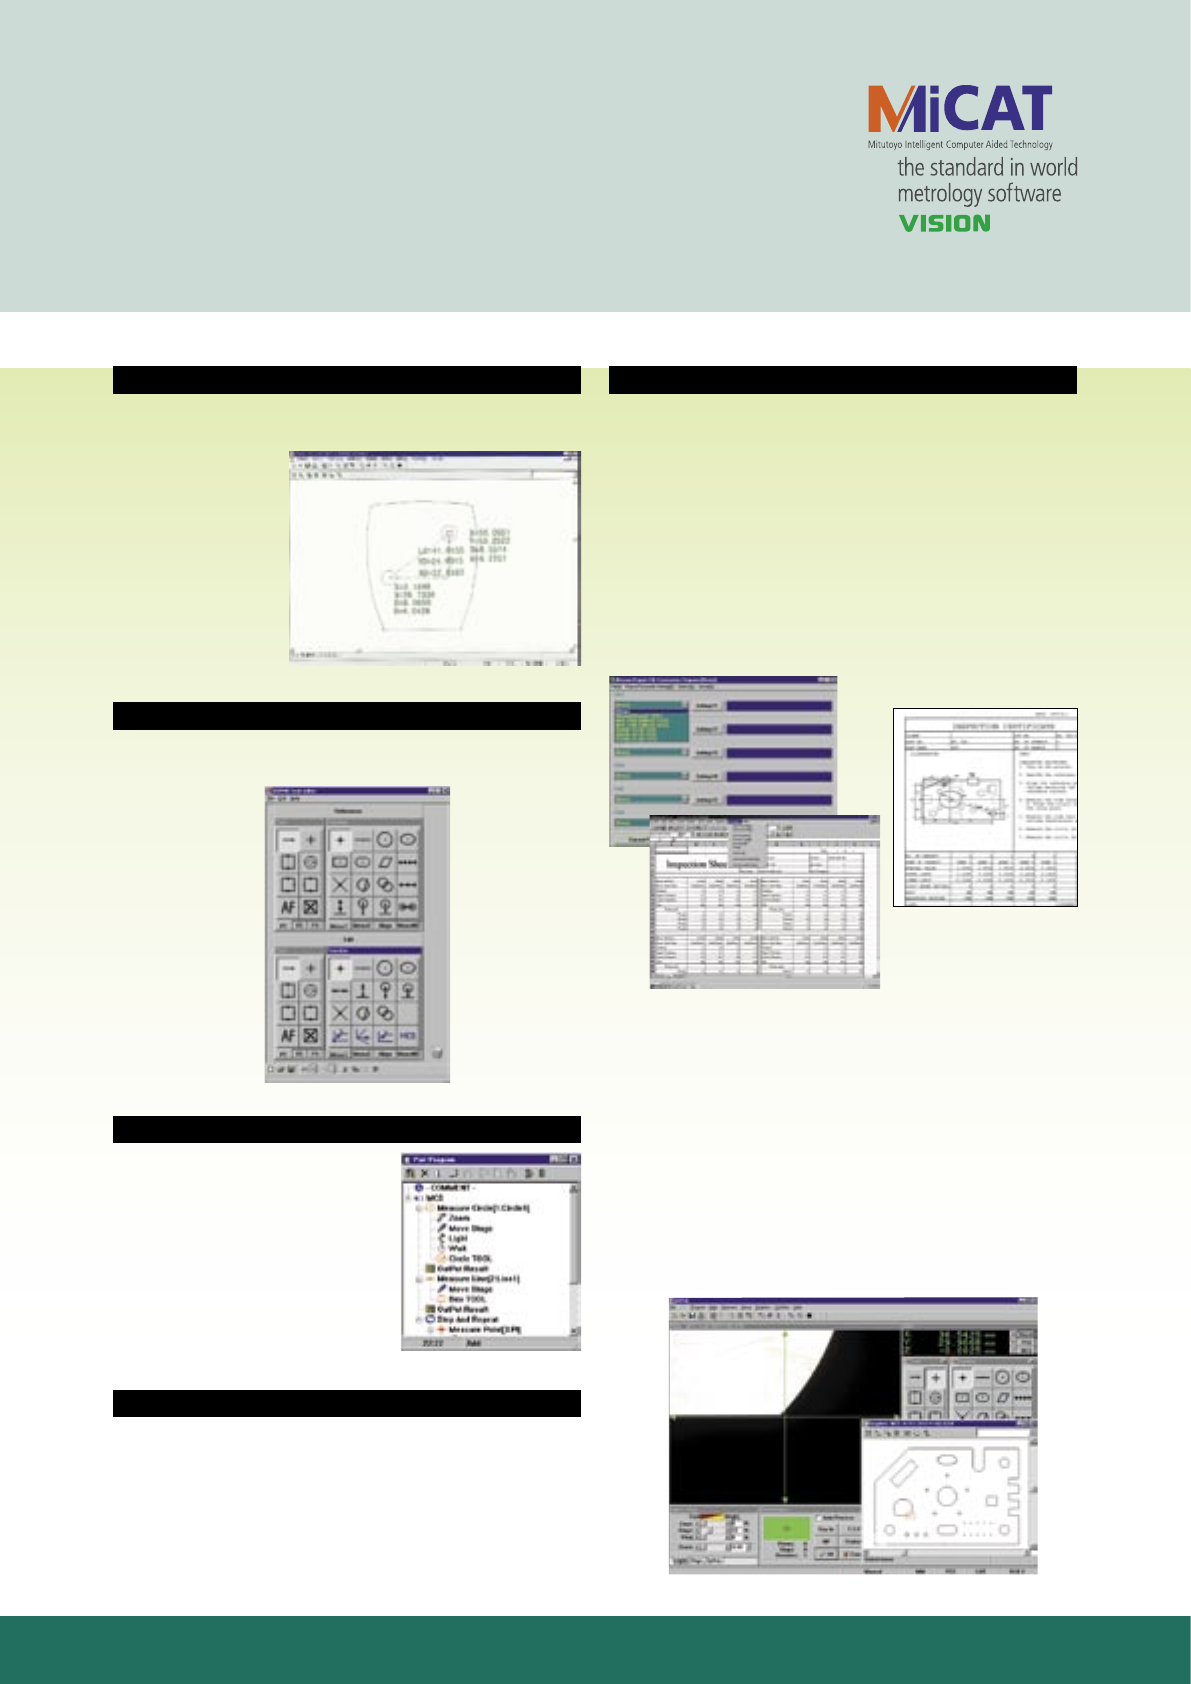
One click edge detection
Just by clicking the mouse near the edge of a
workpiece, QSPAK automatically scans the edge and
detects it, showing its coordinates. This function also
works with the point tool, box tool, circle tool and
auto-focus tool.
• QSPAK operates in a Windows® based operating system for easy operation with on-screen dialog.
• All operations can be performed on-screen for maximum operator efficiency: measuring, workstage drive,
zoom control, illumination, data processing, and printing.
• Macros include one-click edge detection
for fast distance and angle calculation, and
circle measurement—
just by clicking on the icon and then the
feature on the screen.
• Easy X,Y table navigation function provides
on-screen instructions for automatic
measurement or repeat
measurements.
• Template matching and manual pattern
matching functions allow for comparison to
many common part forms.
• Bit-map image storage capability.
For observation/comparison of a form
• Template matching function
• Manual pattern matching function
For simple measurement
• One-click edge detection tool function
• Smart tool function
• User macro function
➧
➧
For repeated measurement/auto-measurement
• Stage navigation function (QS)
• Quick navigation function (QS-L, QS-E)
• Graphic function
• External data output function
• Statistical calculation function
7
Smart tool
By moving an image into the central measuring circle,
QSPAK automatically scans and detects the clearest
edge and centers it in the circle. It’s faster and more
accurate than using a profile projector or microscope
with cross-hairs.
Manual pattern matching
Different templates can be generated from the master workpiece
which are not included in the standard and extended template
sections. Upper and lower tolerance levels can be added onto the
master workpiece template by entering the tolerance values via the
keyboard. This allows the user to customize templates for individual
workpieces.
Template tools
Standard templates
The standard templates function as reticles of
microscope.
Extended templates
Four other templates are available as extended template: cross,
circle, square and angle. The size of a diameter, a distance, an
angle, etc. can be changed just by entering a desired value with the
keyboard. It allows simple comparison measurements, only much
faster and more accurately than with a profile projector.
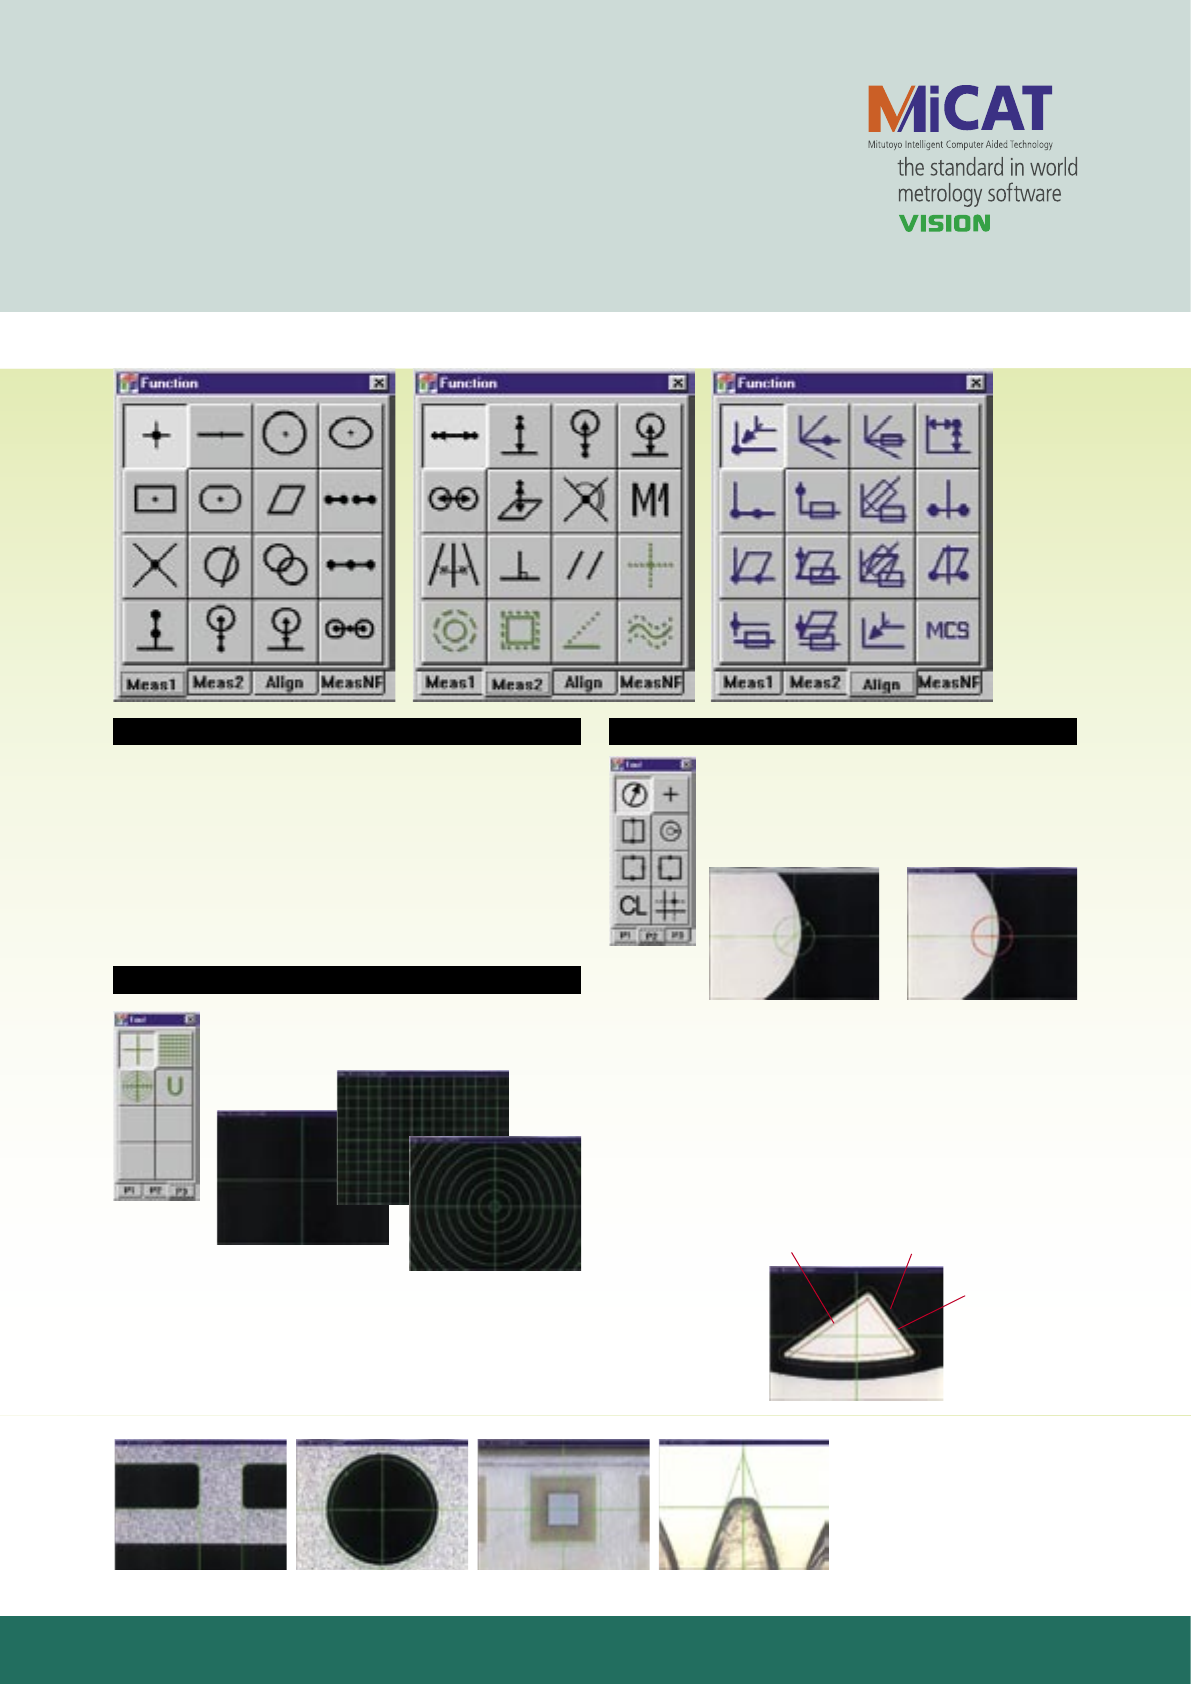
Macro functions
The function window allows easy selection of macro icons for 48
different measurements. Macros are shown on three different
pages, easily accessed by tabs located along the bottom edge of the
window. Using the macro function,
QSPAK automatically selects the appropriate measuring tool to
detect workpiece edge and calculate the appropriate feature:
diameter, radius, etc.
Upper limit value
Design value
Lower limit value
Input the edges by using
the manual tool.
Join the input points to
complete the template.
Upper and lower
tolerance limits can
be added.
Cross AngleSquareCircle
Cross hair
Concentric circles
Grid
➧
8
1
2
3
Stage navigation function (QS CNC model)
The stage navigation function allows X,Y stage movement with the mouse. It speeds
measurement and shortens part programming time by reducing stage overrun and short run.
For long travel, the user can click on the drawing image in the graphic window; short travel
is accomplished by clicking on the video window.
Step feeding is also possible on the QS model. By setting a desired value and clicking an
arrow (up, down, right, left) the stage will move by the entered value. In addition to the
machine coordinate system, the stage can be moved using the workpiece coordinate system.
The user can measure the workpiece without worrying about its positioning on the table.
Stage control through graphic
window
Center coordinate
X: 0.000mm,
Y: 0.000mm
Even though the workpiece is not placed
in parallel with the machine coordinate
system, after setting the workpiece
coordinate system, the stage can be
moved along the workpiece coordinate
system.
Stage movement in the
workpiece coordinate system
In addition to the machine coordinate
system, when moving the stage by step
feeding, the workpiece coordinate system is
available. The stage can be moved along the
workpiece coordinate system set.
Center coordinate
X: 5.000mm,
Y: 0.000mm
Center coordinate
X: 2.500mm,
Y: 0.000mm
Stage control through video
window
Current position
Target position
1. Start repeat-mode. 3. As the green cross-hairs
approach the red cross-hairs
the next measurement point
comes into the screen.
2. Move the stage to place the
green cross-hairs on top of
the red cross-hairs.
Click the mouse with "Ctrl" key, Quick
Scope moves to the position clicked.
Click the mouse with "Ctrl" key, the clicked
point will be centered on the display.
➧
➧
➧
➧
Output of measurement results
The measurement results obtained in the
Repeat mode can be output via the CSV
format which is compatible with application
software such as Microsoft Excel®. QSPAK
can help the operator create an inspection
chart.
➧➧
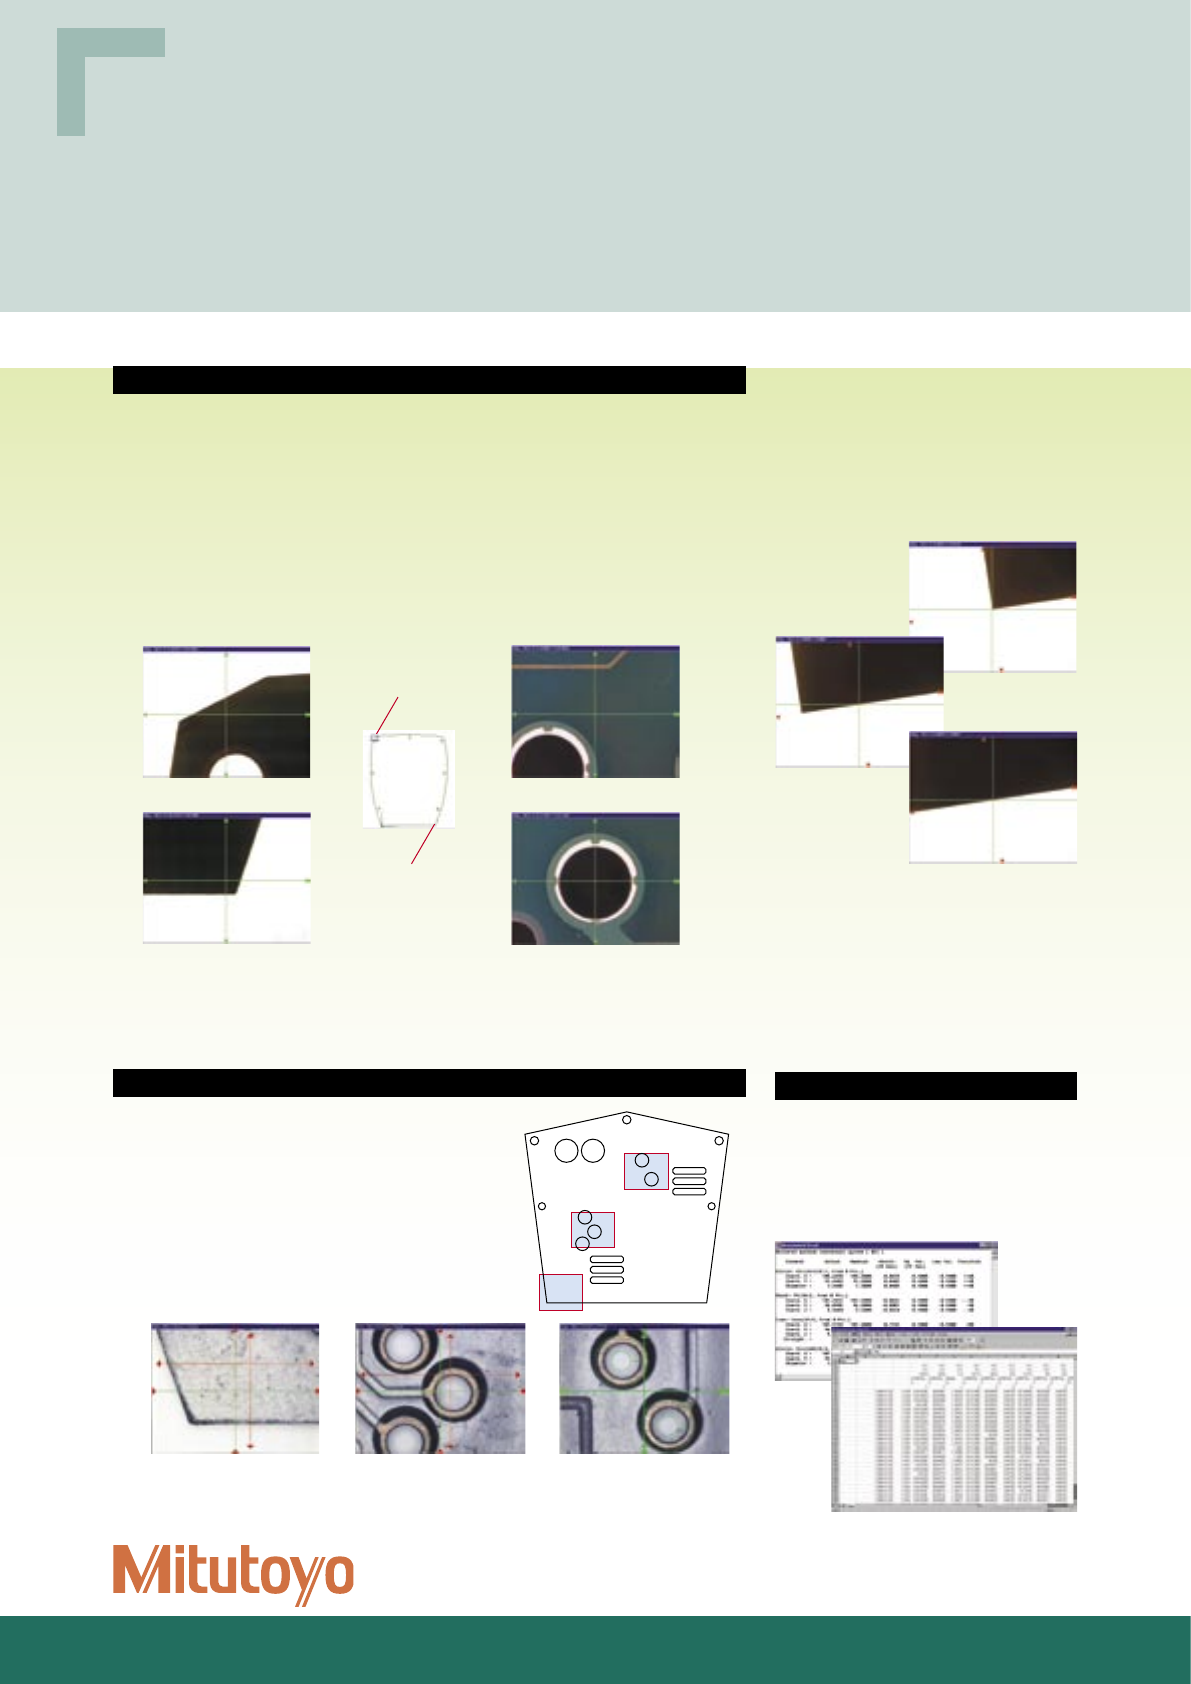
Repeat measurement navigation (QS-L model)
The Quick Scope QS-L can repeat measurement routines
(measuring commands, illumination settings, zoom lens
magnification, etc.) set in the Learn mode. The distance
from the current position (green cross-hairs at the center)
to the next target point (red cross-hairs) are indicated by
the counter above the screen. When moving to the next
measurement point, all the operator has to do is move the
X,Y table until either the counter reads zero or by laying
the green cross-hairs on top of the red cross-hairs.
9
Application software (optional)
MeasureReport/E
MeasureReport/E is a Microsoft Excel® based inspection report
creation software, capable of formatting the measured data from
Quick Scope into an inspection report that can be automatically
printed out. Statistical calculation, GO/NG judgment and printing
out can be dealt with macro commands. Thus, the time and cost
involved in creating an inspection report can be reduced dramatically
over the conventional way. Furthermore, the layout of inspection
report forms can be arranged as required with graphical/image
pasting functions.
Note) MeasureReport/E does not include Microsoft Excel
It needs to be provided by the user.
Graphic window
The measurement results and measured elements are plotted in the
graphic window in real-time. By using this function the operator
can check the current
measuring position at
a glance. The graphic
window can be used for
geometrical
calculation between
features to speed up
measurement.
CAD-Import & Export
The CAD-Import & Export program converts the workpiece CAD
data (IGES or DXF format) so that it can be brought into QSPAK.
This allows part programs to be created in
QSPAK directly from the CAD data, saving time and eliminating data
entry errors.
• Nominal values for each measurement are automatically converted
and imported into QSPAK.
• The X,Y stage can be quickly moved to a position specified in the
CAD data.
• Dimensional calculations between elements can be done in the
graphic window.
Icon editor function
The layout for the macro icons in the function window and the
tool icons in the tool window can be easily changed by the user for
increased efficiency.
Security function
This function limits access to the QSPAK operation by requiring
a password for access. This prevents unauthorized users from
changing part programs, measuring conditions, etc.
Smart editor function
A series of operation procedures such
as moving the X,Y table, changing
magnifications, etc., can be displayed
as a flow chart for quick reference or
teaching new operators measuring
routines. This function also allows part
programs to be edited by using the edit
screen.
10
Unit: mm (inch)
752 (29.61")
55
(2.17")
224 (8.82") 337 (13.27") 136
(5.35")
682 (26.85")
662 (26.60")
640 (25.20")
20 (0.79")
618 (24.33")
94
(3.70")
174
(6.85")
350 (13.78")
700 (27.56")
84
(3.31")
350 (13.78") 174
(6.85")
94
(3.70") 618 (24.33")
20 (0.79")
640 (25.20")
656 (25.83")
676 (26.61")
337 (13.27") 224 (8.82")
55
(2.17")
350 (13.78") 174 (6.85")
94
(3.70") 618 (24.33")
20 (0.79")
640 (25.20")
662 (26.60")
682 (26.85")
136
(5.35")
337 (13.27")224 (8.82")
55
(2.17") 752 (29.61")
465 (18.31") 815 (32.09")
663 (26.10")
160
(6.30")
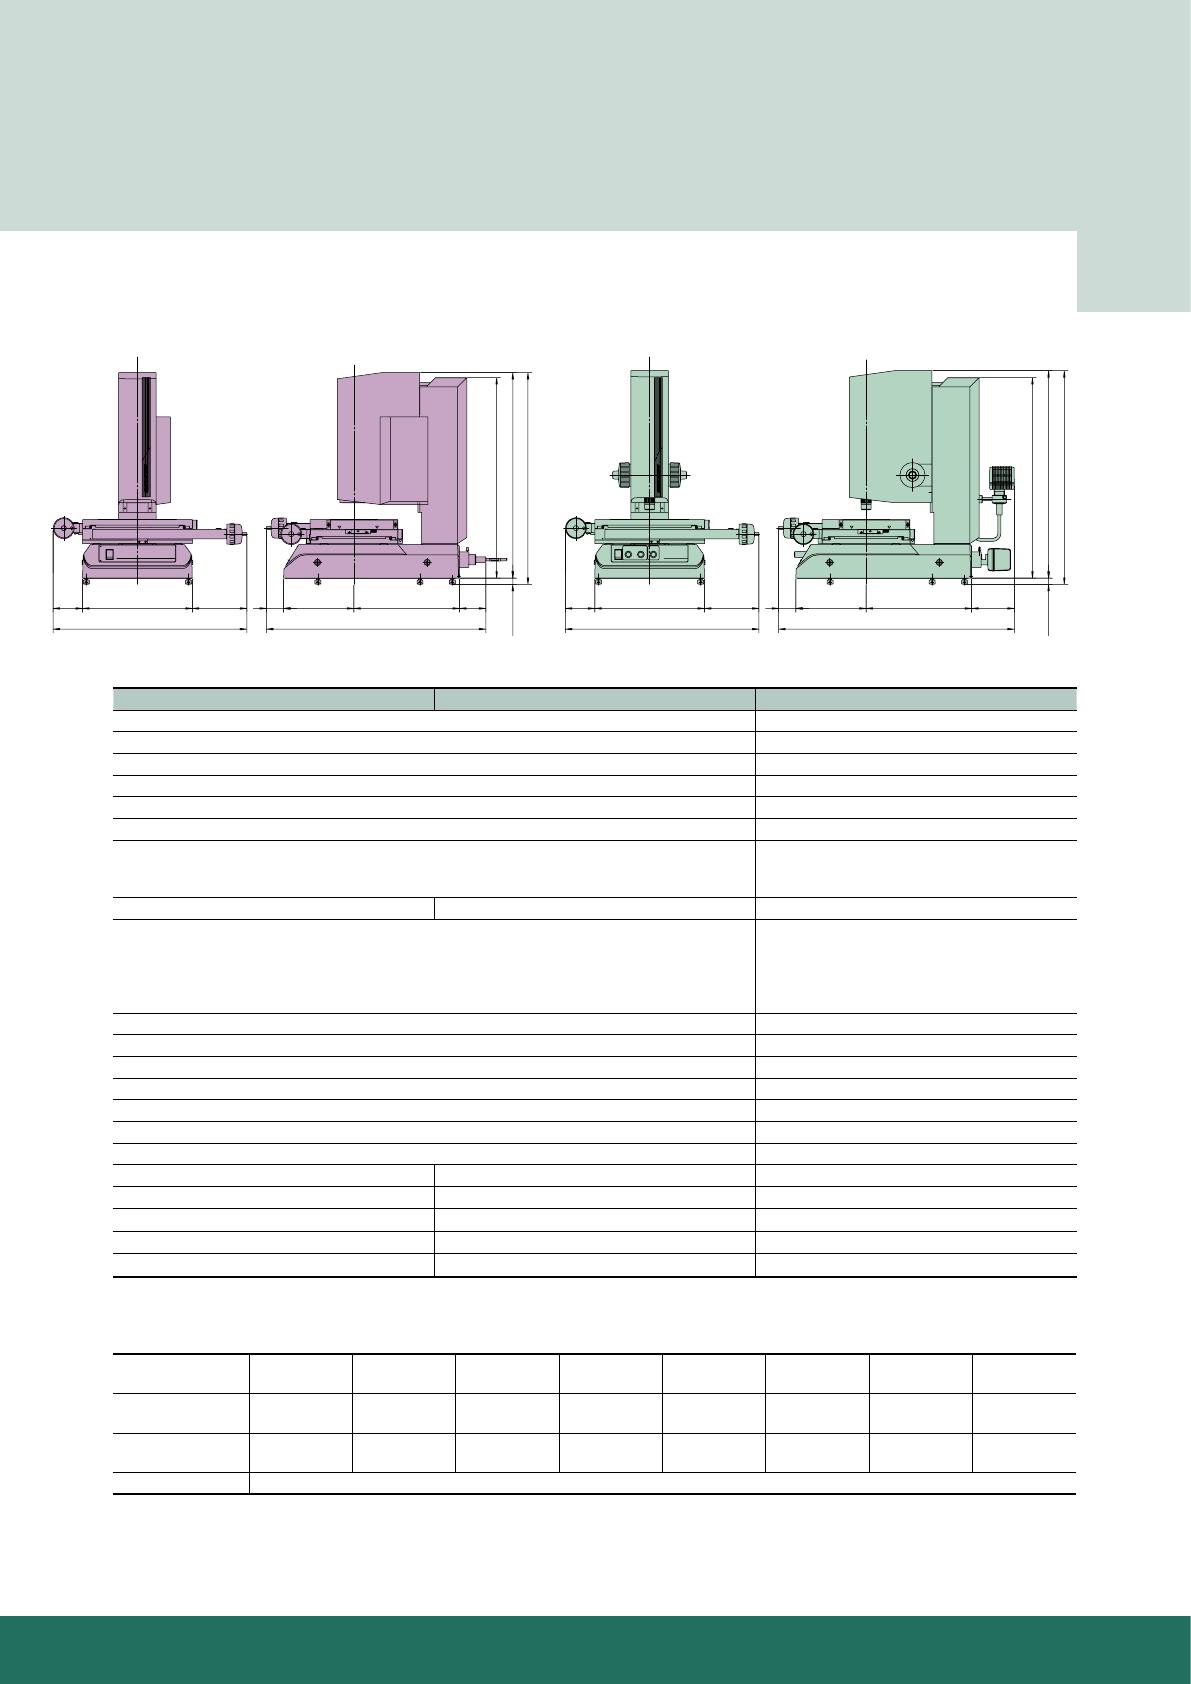
Dimensions
QS200Z (Zoom type)
QS250Z (Zoom type)
QS200 (Fixed-magnification type)
QS250 (Fixed-magnification type) QS-L1020Z (Zoom type)
SPECIFICATIONS
Model QS200Z/QS200 QS250Z/QS250
Range X-axis 200mm (8")
Y-axis 200mm (8") 250mm (10")
Z-axis 100mm (4")
Resolution 0.0005mm
Length standard Reflective linear encoder
Measuring accuracy (at 20°C) XY: (2.5+6L/1000)µm, Z: (5+6L/1000)µm
Machine operation CNC/manual (motor-driven)
Maximum drive speed: 80mm/s
Maximum acceleration: 250mm/s2
Auto-focus function Provided as standard
Magnification on 17" monitor
(Select either the power-zoom lens type
or the fixed-magnification type.)
QS200Z/250Z: 21X - 147X (8-step zoom)
QS200/250: 42X†/105X††/210X†††
†when using 1X objective (02ALA400)
††when using 2.5X objective (02ALA410)
†††when using 5X objective (02ALA420)
Image detecting unit High-resolution 1/3" color CCD camera
Illuminations Surface Co-axial light, fiber-optic ring light
Contour Stage light
Table glass size 269x261mm (10.59"x10.28") 269x311mm (10.59"x12.24")
Maximum workpiece height 110mm (4.33")
Maximum workpiece weight 10kg (22 lbs.)
Power supply 100V - 240V AC
Power consumption 1300VA at max.
Dimensions (WxDxH) Main unit 465x815x663mm (18.31"x32.09"x26.10")
Power unit —
Mass Main unit 76kg (168 lbs.)
Power unit —
*When using 2.5X objective or the zoom lens in 2.5X magnification (Magnification on monitor: 105X), L= Measuring length (mm)
PC Operation Environment
PC type IBM PC-compatible
CPU Processor Intel Pentium III or faster
Memory 128MB or more
Hard disk 10GB or more
3.5" floppy disk drive 1 or more
CD-ROM drive 1 (12X or faster)
Expansion slot (PCI) 2 or more (w/cooling fan)
OS Windows2000
Monitor Screen size 17-inch
Display SVGA-color (1024x768 dots)
Peripherals Keyboard, mouse
11
Unit: mm (inch)
752 (29.61")
55
(2.17")
224 (8.82") 337 (13.27") 136
(5.35")
682 (26.85")
662 (26.60")
640 (25.20")
20 (0.79")
618 (24.33")
94
(3.70")
174
(6.85")
350 (13.78")
700 (27.56")
84
(3.31")
350 (13.78") 174
(6.85")
94
(3.70") 618 (24.33")
20 (0.79")
640 (25.20")
656 (25.83")
676 (26.61")
337 (13.27") 224 (8.82")
55
(2.17")
350 (13.78") 174 (6.85")
94
(3.70") 618 (24.33")
20 (0.79")
640 (25.20")
662 (26.60")
682 (26.85")
136
(5.35")
337 (13.27")224 (8.82")
55
(2.17") 752 (29.61")
465 (18.31") 815 (32.09")
663 (26.10")
160
(6.30")
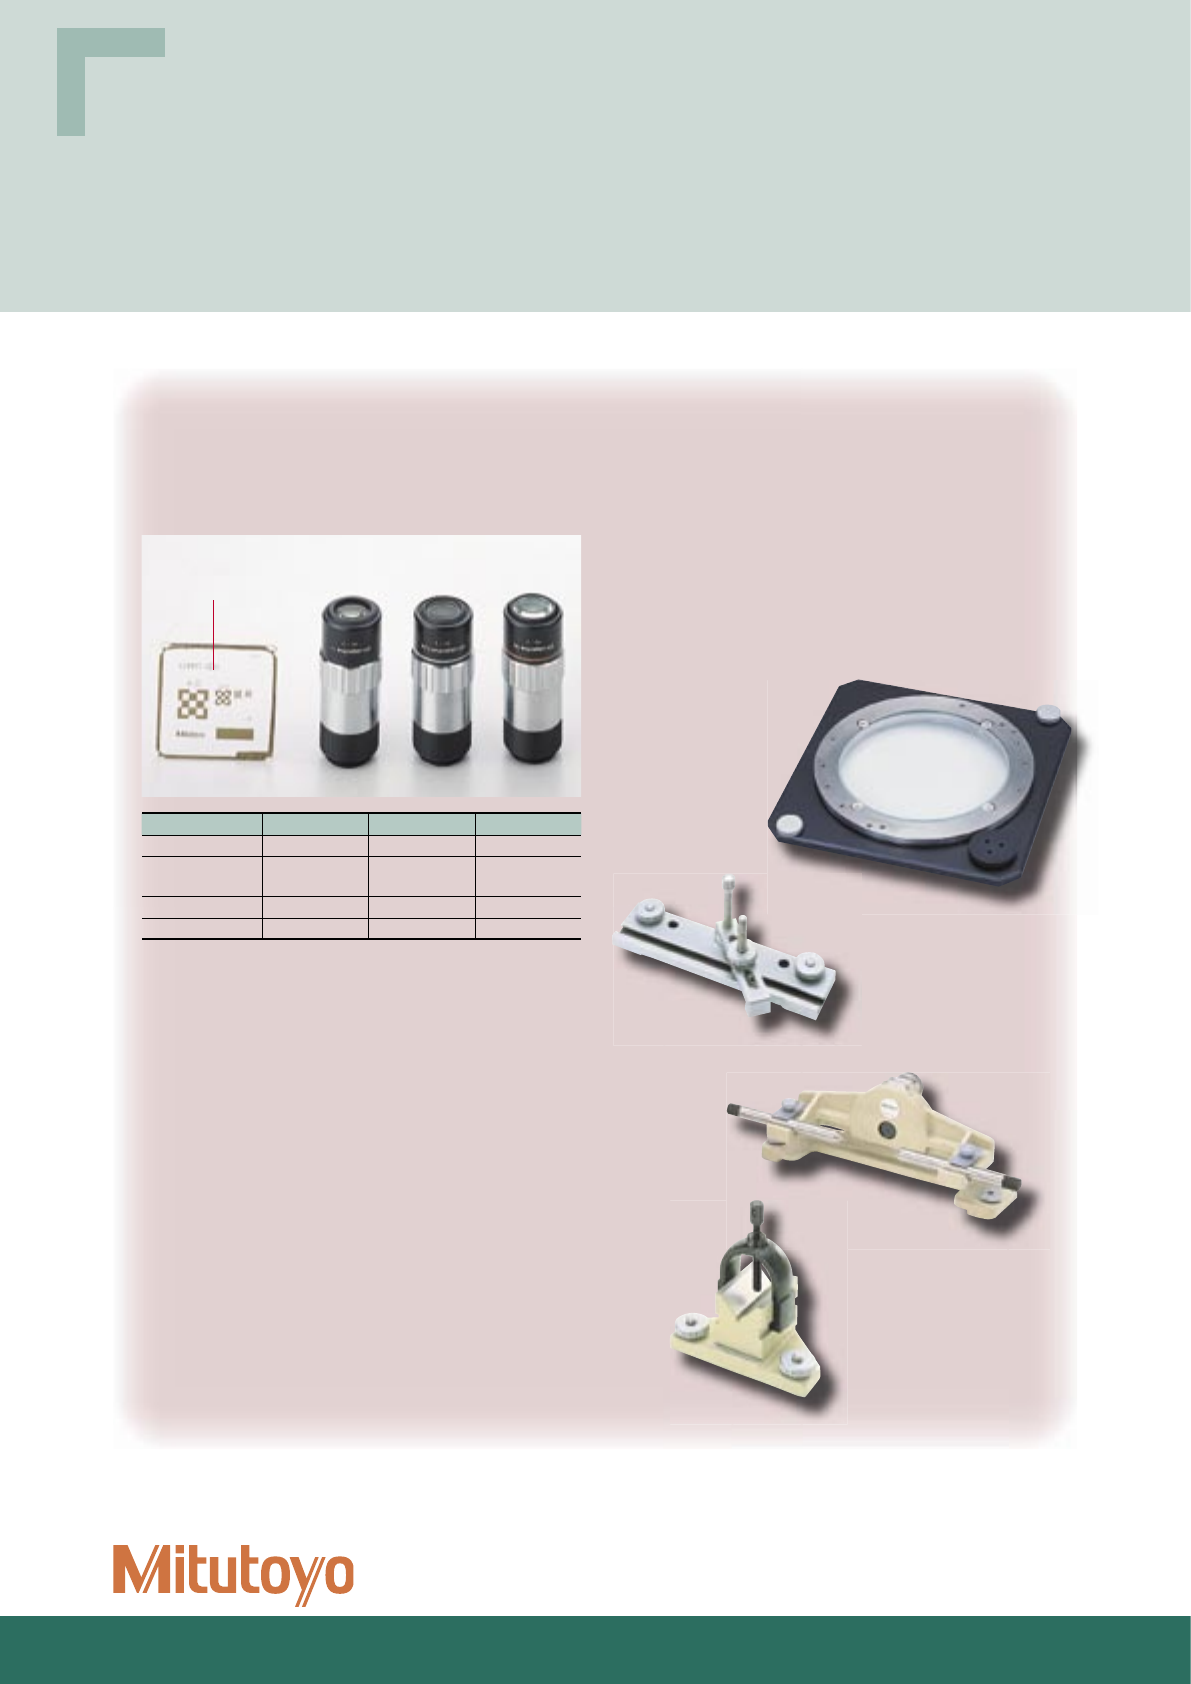
SPECIFICATIONS
QS-L1020Z QS-L1020ZAF/QS-L1020AF QS-E1020
200mm (8") 200mm (8")
100mm (4") 100mm (4")
150mm (6") 150mm (6")
0.0001mm 0.0001mm
Reflective linear encoder Reflective linear encoder
XY: (3+20L/1000)µm, Z: (5+6L/1000)µm (3+20L/1000)µm
Manual Manual
Not available Provided as standard Not available
QS-L1020Z, QS-L1020ZAF
: 21X - 147X (8-step zoom)
QS-L1020AF: 42X†/105X††/210X†††
†when using 1X objective (02ALA400)
††when using 2.5X objective (02ALA410)
†††when using 5X objective (02ALA420)
42X†/105X††/210X†††
†when using 1X objective (02ALA400)
††when using 2.5X objective (02ALA410)
†††when using 5X objective (02ALA420)
High-resolution 1/3" color CCD camera High-resolution 1/3" color CCD camera
Co-axial light, fiber-optic ring light Co-axial light
Stage light Stage light
240x140mm (9.44"x5.51") 240x140mm (9.44"x5.51")
150mm (5.90") 150mm (5.50")
10kg (22 lbs.) 10kg (22 lbs.)
100-120V/220-240V AC ±10% 100-120V/220-240V AC ±10%
160VA at max. 500VA at max. 160VA at max.
618x752x682mm (24.33"x29.60"x26.85") 618x700x676mm (24.33"x27.55"x26.61") 618x752x682mm (24.33"x29.60"x26.85")
300x300x66mm (11.81"x11.81"x2.59") 188x430x380mm (7.40"x16.92"x14.96")
—
63kg (139 lbs.) 58kg (128 lbs.) 57kg (126 lbs.)
3kg (6.6 lbs.) 14kg (31 lbs.)
—
QS-E1020
QS-L1020AF (Auto-focus type)
QS-L1020ZAF (Zoom and Auto-focus type)
Zoom Lens Specifications for QS200Z, QS250Z, QS-L1020Z, and QS-L1020ZAF
Lens magnification
(8-step)
0.5X 0.65X 0.85X 1X 1.5X 2X 2.5X 3.5X
Magnification
on monitor
21X 27X 36X 42X 63X 84X 105X 147X
View fields 9.6x7.2mm
(.378"x.283")
7.47x5.6mm
(.294"x.22")
5.6x4.2mm
(.22"x.165")
4.8x3.6mm
(.189"x.142")
3.2x2.4mm
(.126"x.094")
2.4x.1.8mm
(.094"x.071")
1.92x1.44mm
(.076"x.057")
1.4x1mm
(.055"x.039")
Working distance 55mm (2.17")
12
02APW610 Control box for QS CNC
02ATD415 Joystick box for QS CNC
937179T Foot switch
12AAA645 Color fi lter (GIF) for QS-E
12AAA646 Color fi lter (LB80) for QS-E
12AAA643 Color fi lter (ND2) for QS-E
12AAA644 Color fi lter (ND8) for QS-E
359-643❚ Fiber-optic ring light unit for QS-E
(Suffi x code according to AC line voltage: C for 110V AC,
A for 120V AC, D for 120V AC, E for 240V AC, no suffi x for 100V AC)
176-305 Rotary table Ø183mm
176-310 Stage adapter (B)
172-197 Swivel center support**
176-107 Holder with clamp**
172-378 V-block**
**Can be used with Stage adapter (B) (176-310) for QS-L and QS-E.
02ATE760 Machine table
02AKN020 Calibration glass chart
02ALA400 Objective 1X*
02ALA410 Objective 2.5X*
02ALA420 Objective 5X*
Calibration
glass chart
172-197
176-107
176-305
Order No. 02ALA400 02ALA410 02ALA420
Magnifi cation 1X 2.5X 3.5X
Magnifi cation
on monitor
42X 105X 147X
View fi eld 4.8x3.6mm 1.92x1.44mm 0.96x0.72mm
Working distance 34mm 34mm 33.5mm
*Can not be used for the power zoom type Quick Scope.
172-378
OPTIONAL ACCESSORIES
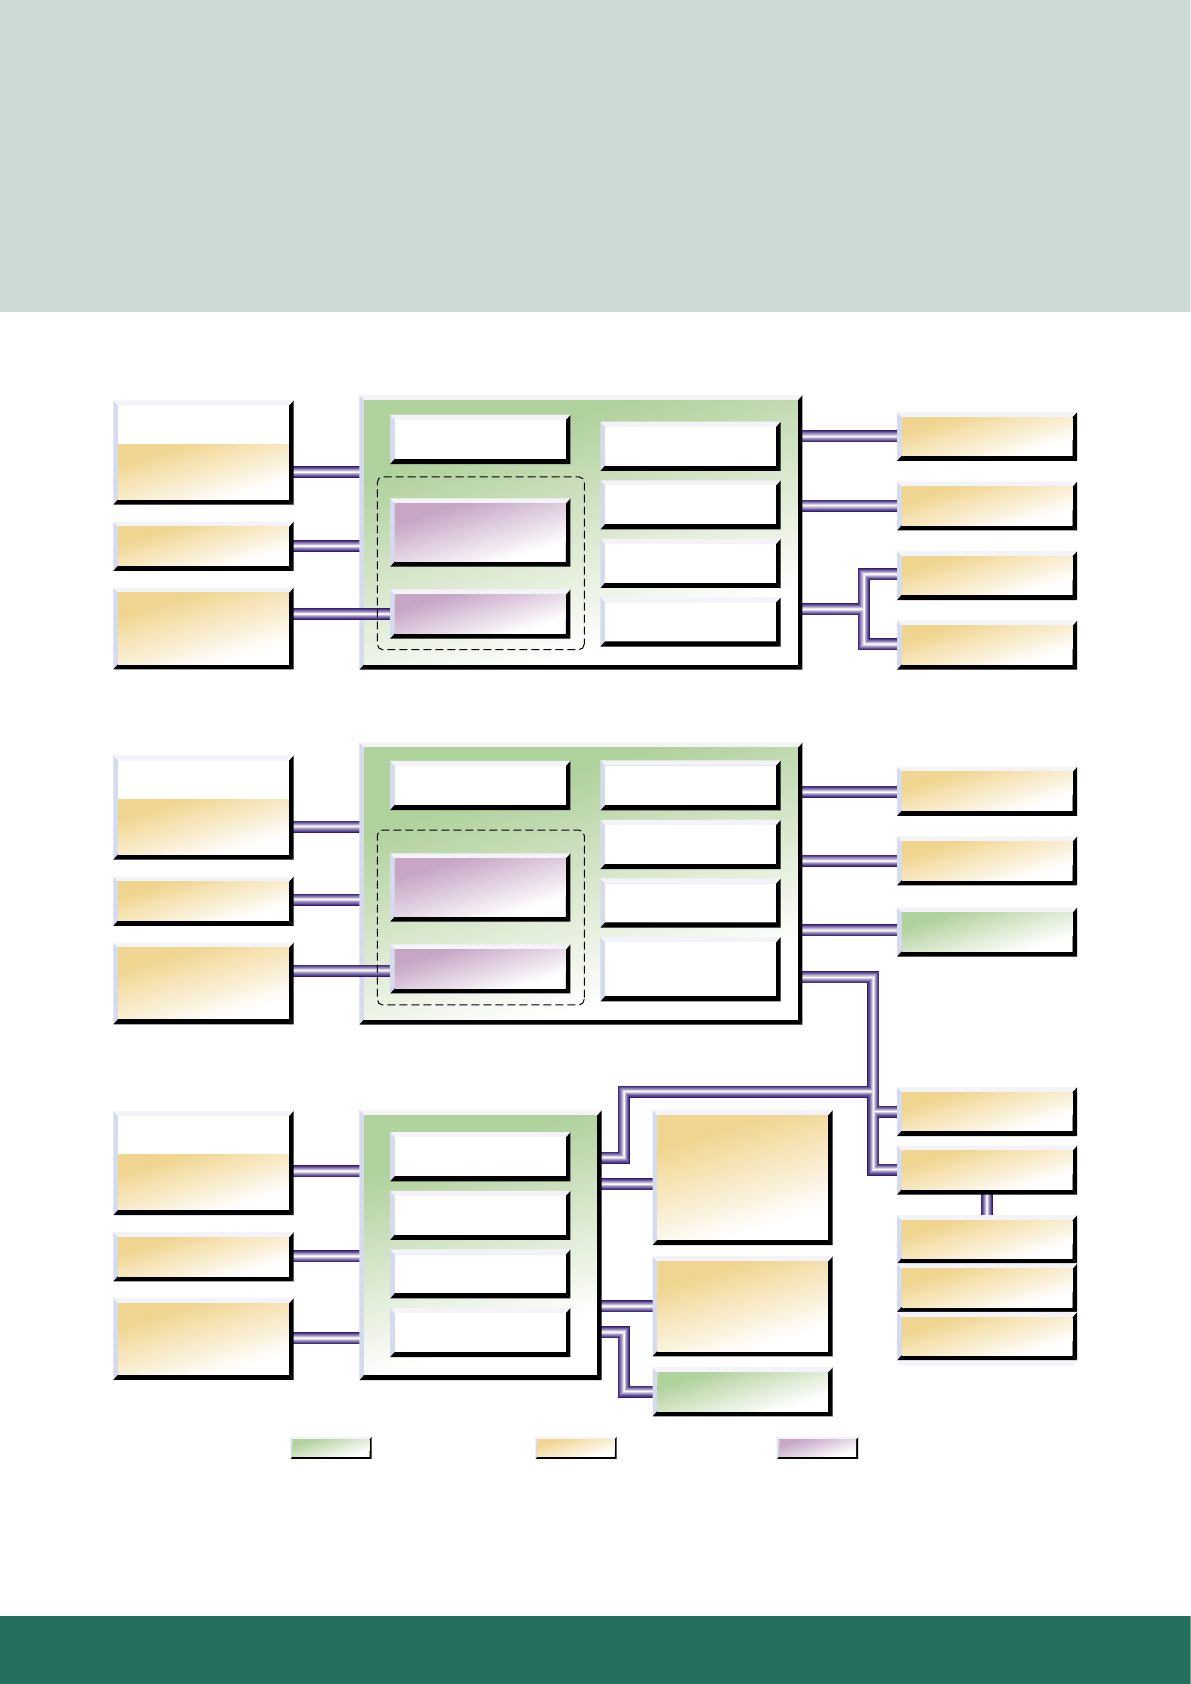
13
Programmable
Power Zoom Lens
(0.5X - 3.5X)
1X Tube Lens
: Standard accessory : Optional accessory : Select either when ordering
Fiber-optic Ring Light Unit
100V AC (359-643)
110V AC (359-643C)
120V AC (359-643A)
220V AC (359-643D)
240V AC (359-643E)
High-resolution
Color CCD Camera
QS CNC Series
Contour Illumination
(Stage Light)
Surface Illumination
(Coaxial Light)
Foot Switch
Color Filters
GIF (12AAA645)
LB80 (12AAA646)
ND2 (12AAA643)
ND8 (12AAA644)
Stage adapter (B)
(176-310)
Swivel Center Support
(172-197)
Holder with Clamp
(176-107)
V-block
(172-378)
Rotary Table Ø183mm
(176-305)
Surface Illumination
(Coaxial Light)
Fiber-optic Ring Light
Power Controller Unit
for Auto-focus Type
(Light Source Unit)
QSPAK
High-resolution
Color CCD Camera
Contour Illumination
(Stage Light)
Foot Switch
(937179T)
Control Box
Machine Table
(02ATE760)
High-resolution
Color CCD Camera
QS200/250
Quick Scope Main Unit
Quick Scope Main Unit
Quick Scope Main Unit
Contour Illumination
(Stage Light)
Surface Illumination
(Coaxial Light)
Fiber-optic Ring Light Joystick Box
(02ATD415)
Foot Switch
(937179T)
Machine Table
(02ATE760)
QS Controller Unit
(Light Source Unit) Control Box
(02APW610)
1X Tube Lens
QS200Z/250Z
Programmable
Power Zoom Lens
(0.5X - 3.5X)
QS-L1020AF
1X Tube Lens
QS-L1020Z, QS-L1020ZAF
Calibration Glass Chart
(02AKN020)
Objectives
1X (02ALA400)
2.5X (02ALA410)
5X (02ALA420)
Personal Computer
(Keyboard, mouse,
17-inch display, printer)
QSPAK
Calibration Glass Chart
(02AKN020)
Objectives
1X (02ALA400)
2.5X (02ALA410)
5X (02ALA420)
Personal Computer
(Keyboard, mouse,
17-inch display, printer)
QSPAK
Calibration Glass Chart
(02AKN020)
Objectives
1X (02ALA400)
2.5X (02ALA410)
5X (02ALA420)
Personal Computer
(Keyboard, mouse,
17-inch display, printer)
QS-L Series
QS-E Series
SYSTEM DIAGRAM
Specifications are subject to change without notice.
Coordinate Measuring Machines
Small Tool Instruments and
Data Management
Digital Scale and DRO Systems
Hardness Measuring
Sensor Systems
Optical Measuring
Surface, Form and Contour
Measurement
Vision Measuring Systems
Note: All information regarding our products, and in particular the illustrations, drawings, dimensional and performance data contained
in this pamphlet, as well as other technical data are to be regarded as approximate average values. We therefore reserve the right to
make changes to the corresponding designs, dimensions and weights. The stated standards, similar technical regulations, descriptions and
illustrations of the products were valid at the time of printing. In addition, the latest applicable version of our General Trading Conditions
will apply. Only quotations submitted by ourselves may be regarded as defi nitive.
Mitutoyo Corporation
20-1, Sakado 1-Chome,
Takatsu-ku, Kawasaki-shi,
Kanagawa 213-8533, Japan
T +81 (0) 44 813-8230
F +81 (0) 44 813-8231
http://www.mitutoyo.co.jp
47.000511 (5) CNE, Printed in Japan