Mobi Technologies DW700TX MOBICAM DXR User Manual
Mobi Technologies, Inc. MOBICAM DXR
UserManual.wiki
>
Mobi Technologies
>
DW700TX User Manual
Users Manual
Navigation menu
Upload a User Manual
Namespaces
Wiki Guide
HTML
PDF
Info
Views
User Manual
Discussion / Help
Navigation
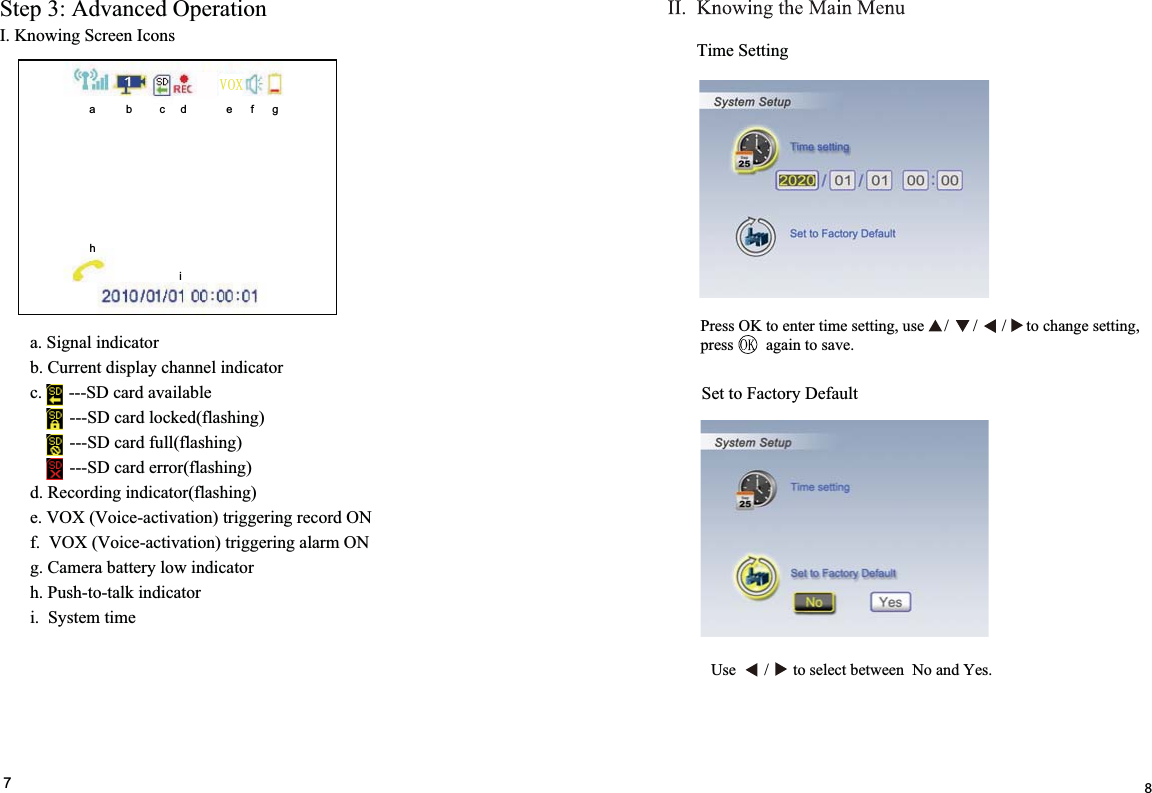
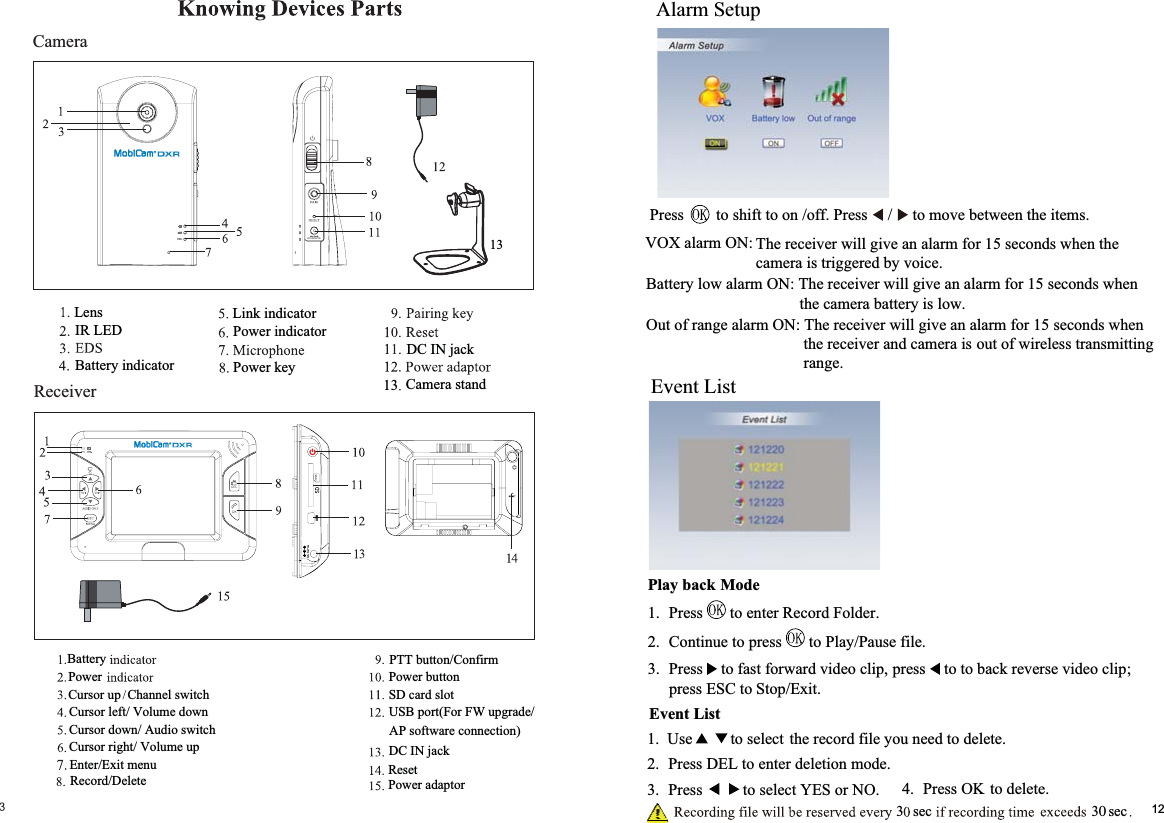
![cameracamera3.5 receiverReceiver7020414cameracamera cameracameracamera cameracameracameraCamerabatteryreceiverreceiverreceiverreceiverreceiverreceiverpairing operationPower save mode onCamera and receiver are too closeThe camera has a high sensitivity microphoneKeep the camera at least 10 feet away from thereceiver. If the camera must be within 10 feetof the receiver, keep the volume downPress power key to resume receiver image, please refer to [Power Saving] section at page12 for details.Black screen &Buttons no functionAudio feedbackVOX Record&Alarmdoes not workVOX Menu set to “OFF”Set VOX Sensitivity/VOX Alarm/VOX Recordto ONand receiver2Camera standUSB cableMounting kitand Installation](https://usermanual.wiki/Mobi-Technologies/DW700TX/User-Guide-1397122-Page-2.png)
![Camera Connection1122LCD Monitor ConnectionNIrewopgnihctiwsnogulpnehtNICDs’aremacotelbacrewoptcennoC.teltuollawotretpadaylppus.aremacehtNOnrutotecno]nottuBrewoP[PgniggulpybyllacitamotuastratsssecorpgnigrahcyrettabmuihtiLni-tliuBOnly use 5V/1A power adaptor provided in the package.llufyrettabegrahcesaelp,yticapacllufevahoT.ylppusrewopgnihctiwsni.ffoseog]rotacidnIyrettaB[neerglitnu1211232Only use 5V/1A power adaptor provided in the package.egrahcotretpadarewopnigniggulp,derpusthgil]rotacidnIyrettaB[nehW.yrettabrewopstinostigulpnehtNICDs’revieceRotelbacrewoptcennoC.teltuollawotretpada.reviecerehtNOnrutot]nottuBrewoP[sserPgniggulpybyllacitamotuastratsssecorpgnigrahcyrettabmuihtiLni-tliuByrettabegrahcesaelp,yticapacllufevahoT.ylppusrewopgnihctiwsni.esuelbatroprofregrahctuohtiwreviecerehtgnitarepoerofebDC IN 5V/1AushVOX SensitivityVOX Activate RecordingBrightness11OFF --VOX funtion will be disabled.level 3 means high sensitivity,level 1 means low sensitivityUse / to adjust VOX sensitivity level.System will auto record for 30 sec once camera is triggered by voice whenset “VOX activate recording” to ON.Please set VOX sensitivity to level 1~3 before proceed with this function.Press to enter camera brightness adjustment bar, press / to adjust brightness of current channel.and Installation360Screw the camera onto the bracketAdjust camera to the proper view angle. Make sure the lens is uprightrelative to your subject. Tighten the nut. Adjust the antenna to an upright position.Select the position for the camera and secure the camera stand.Screws and anchors are supplied. Use an appropriate screw typefor the mounting surface.](https://usermanual.wiki/Mobi-Technologies/DW700TX/User-Guide-1397122-Page-5.png)
![Step 2: Basic Operation srotacidnIdnasnottuBnoitcnuFaremaCgniwonKI.Pairing CameraPower Saving105SD Card Format]onttuBrewoP[litnusdnoces2rofnottubdloh,aremacehtFFOrewopoT.aremacehtNOrewopotecnoPush.ffoseog]rotacidnIrewoP[]yeKkniL[.]aremaCgniriaP–noitarepOdecnavdA[eeS.reviecerhtiwaremacriapotsserP]rotacidnIyrettaB[.ffoseogDELneerGlitnuyrettabegrahcesaelp;gnigrahCyrettaB=DELneerGgnihciwsnogulpesaelp,emitetunim-3niFFOgninrutsiaremaC;woLyrettaB=DELdeR.esusuounitnocdnagnigrahcrofylppusrewop.degrahCylluFyrettaB=FFODEL]rotacidnIkniL[]aremaCgniriaP–noitarepOdecnavdA[eeS.gnissecorpnisiecneuqesgniriaP=DELgniknilB.ediugasanoitces.reviecerehtybpudekcipsiaremaC=DEL.edomyb-dnatsnisiaremaC=FFODEL]rotacidnIrewoP[.NOderewopsiaremacnehwNOseogDEL12345Blue1. Use to select a channel.2. Press to start system countdown from 60 seconds.3. Within 60-second countdown, press PAIR at the camera side. Image willdisplay when pairing is complete.Use / to turn [Power Saving] mode On/Off.By setting [Power Saving] mode On, both receiver and camera will enterstandby mode after 2-minute idle time and speaker volume will be mute.Press power key of the receiver to resume monitor and camera .Press / to select No or Yes. For first time use, it is strongly recommended to format the SD card.DC IN 5V/1APWR.](https://usermanual.wiki/Mobi-Technologies/DW700TX/User-Guide-1397122-Page-6.png)
![Know Receiver Function Buttons and Indicators BSU16]nottuBrewoP[.rotinomehtFFOrewopotsdnoces2roftidlohneht,norewopotnottubPush]rotacidnIyrettaB[.ffoseogDELneerGlitnuyrettabegrahcesaelp;gnigrahCyrettaB=DELneerGrewopgnihctiwsnogulpesaelp,emitetunim-3niFFOgninrutsiaremaC;woLyrettaB=DELdeR.esusuounitnocdnagnigrahcrofylppus.degrahCylluFyrettaB=FFODEL]rotacidnIrewoP[.NOderewopsiaremacnehwNOseogDEL.edoM]evaSrewoP[niFFOsirotinomelihwNOsniamerDEL][Manual Channel Switch )edoM(/]PUrosruC[)edoMuneM(/]2HCyektoH[)edoMweiVDAUQ(/]1HCyektoH[)edoMweiVDAUQ(/]NWODrosruC[)edoMuneM(]4HCyektoH[)edoMweiVDAUQ(/]+loV/thgiRrosruC[)edoMuneM(][)edoMweiV(/][)edoM(]3HCyektoH[)edoMweiVDAUQ(/]-loV/LeftrosruC[)edoMuneM(]nottuBretnE/uneM[)edoMuneMuneM(12364578901View[Turn on/off audio] )edoM(ViewManual Record Delete Record File][ Confirm )edoMweiV(/][ Push to Talk )edoM( uneMII.69Camera On/OffScan PeriodUse / to select the camera you need to turn off,press to change ON/OFF status.Make sure available cameras are set to ON for SCAN or QUAD modeUse / to change Scan Time interval from OFF / 5 sec / 15 sec / Quad, to confirm the settings.To leave QUAD display, simply press directional keys to enter single channel.When system enter into power save mode from QUAD, press any key to resume monitor= CAM1; = CAM2; = CAM3; = CAM4;pressPress to turn on/off audio when setting VOX sensitivity to OFF.](https://usermanual.wiki/Mobi-Technologies/DW700TX/User-Guide-1397122-Page-7.png)