User Manual

1/13
(Model:FM2000M)

2/13
Contents
1. Direction before Use
1.1. Direction for safety usage
1.2. Product packing and contents
1.3. Parts name and function
1.4. Fingerprint identification process
2. Product Specifications and Function
2.1. Specification
2.2. Function Buttons
2.3. Voice Work
3. Manager Registeration and Change
3.1. Master Fingerprint Regiateration
3.2. Master Card Registeration
3.3. Chaing Master Fingerprint
3.4. Chaing Master Card
4. User Management
4.1. User Registeration
4.2. User Deletion
4.3. All User Deletion
5. Entrance/Exit Setup
5.1. Access Mode
5.2. Set how to recognize
6. Product initialization and Reset
6.1. Product initialization
6.2. Product resetting
7. Product installation
8. Others
8.1. Checking matters before request for A/S
8.2. Terminology explanation
1
1
1
1
1
. Direc
.1 Directi
◆ Do no
: In ca
s
be
b
cas
e
◆ Do no
: The
s
◆ Do no
: This
if
yo
or o
.2 Produ
c
a. fm200
0
b. RF Car
d
c. Accesa
r
d. CD(har
d
z *
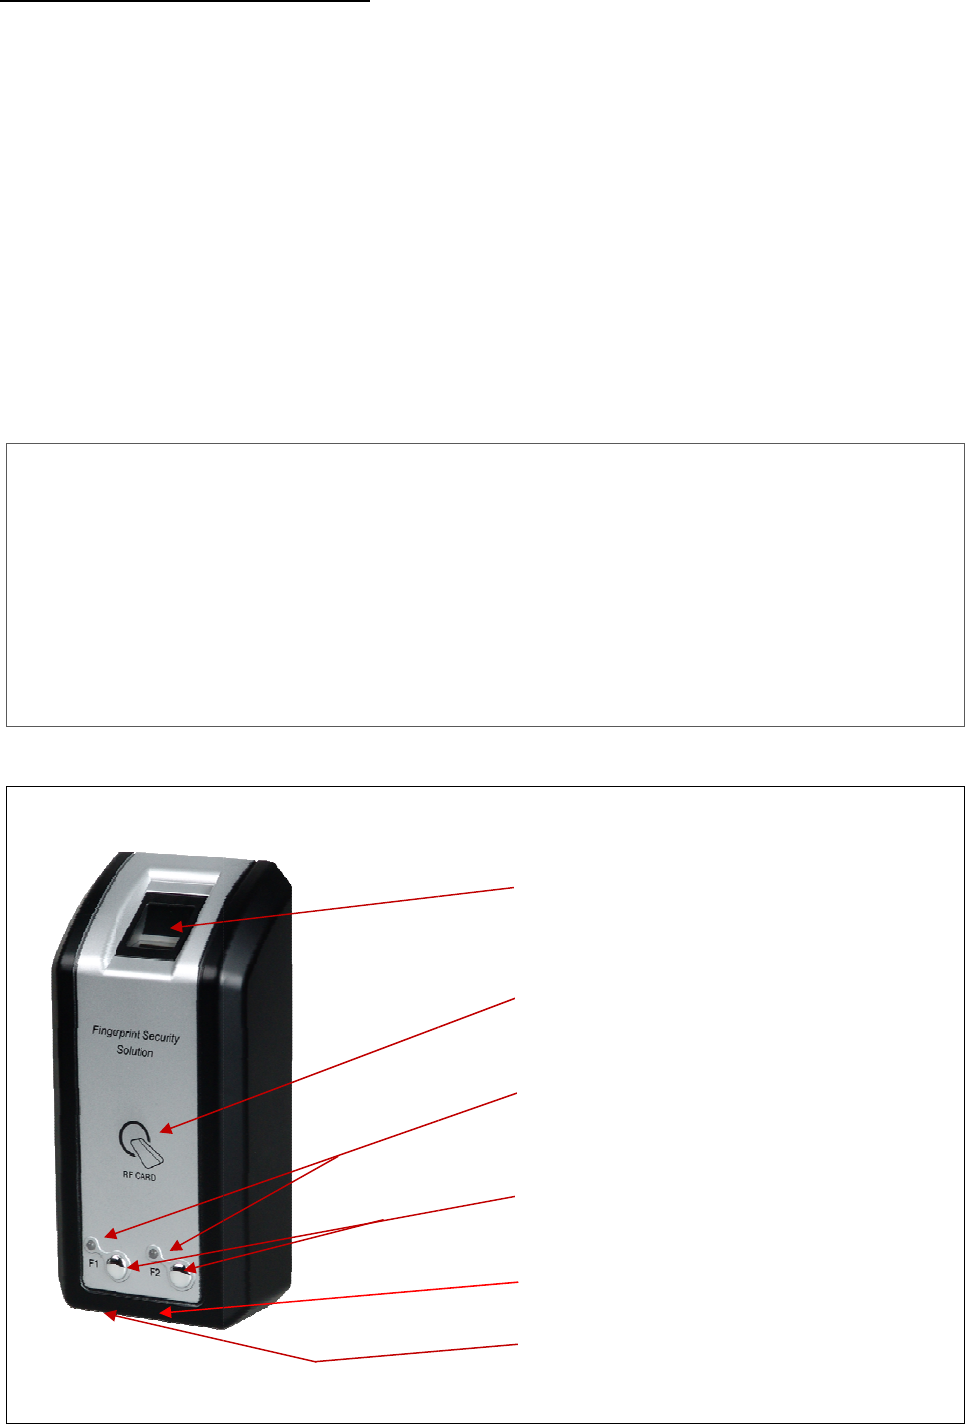
.3 Parts
n
tion be
f
on for sa
f
t move or
s
e of arbi
b
roken do
w
e
, call the
t
p
lace th
sy
stem m
a
t o
p
en/cl
o
s
y
stem is
o
u arbitrar
i
p
erator if
c
t
p
ackin
g
0
Finger
p
ri
n
d
(13.56M
H
r
ies(Conn
e
d
ware/soft
w
* Select O
n
ame and
f
ore Us
i
f
et
y
usa
ge
reinstall
t
traril
y
mo
v
w
n due t
o
o
p
erator.
e e
q
ui
p
m
e
ay
receiv
e
o
se or re
p
a hi
g
h-
p
i
l
y
o
p
en/
c
needed.
g
and con
t
n
t Control
U
H
z)
e
ctor, Scre
w
w
are man
u
rder : AC
P
Function
i
ng
e
t
he s
y
ste
m
v
in
g
or in
s
o
an ele
c
e
nt aroun
d
e
electrica
p
air the s
ys
recision
e
c
lose or re
t
ents
U
nit
w
and etc)
u
al,
p
c
p
ro
g
P
ower Ada
p
3/13
m
arbitraril
y
s
tallin
g
th
e
c
trical sh
o
d
p
laces
w
l effect d
u
s
tem arbi
t
e
lectronic
p
air it. M
a
g
ram)
p
tor(DC12
V
F
i
(f
i
C
(
c
L
F
(
R
S
(
B
R
y
.
e
s
y
stem,
o
ck or in
a
w
here hi
gh
u
e to hi
g
h
t
raril
y
.
p
roduct.
S
a
ke sure t
o
1ea
2ea
1ea
1ea
V
, 2.5~3A)
i
ngerprint
i
ngerprint
ontact poi
n
c
ontact wi
t
ED(green,
1, F2 func
t
R
egistratio
n
peaker
B
eep, Voi
c
R
eset butto
the s
y
st
e
a
de
q
uate
h
volta
g
e
f
volta
g
e.
S
o, it can
o
call the
window
recognitio
n
t of RF c
a
t
hin 4cm)
red)
t
ion butto
n
n
,Commut
e
c
e prompts
n
e
m ma
y
n
o
connecti
o
f
lows.
be dama
g
sales co
m
n window)
a
rd
n
e
manage
m
)
o
t work o
r
o
n. In thi
s
g
ed
mp
an
y
m
ent)
r
s
4/13
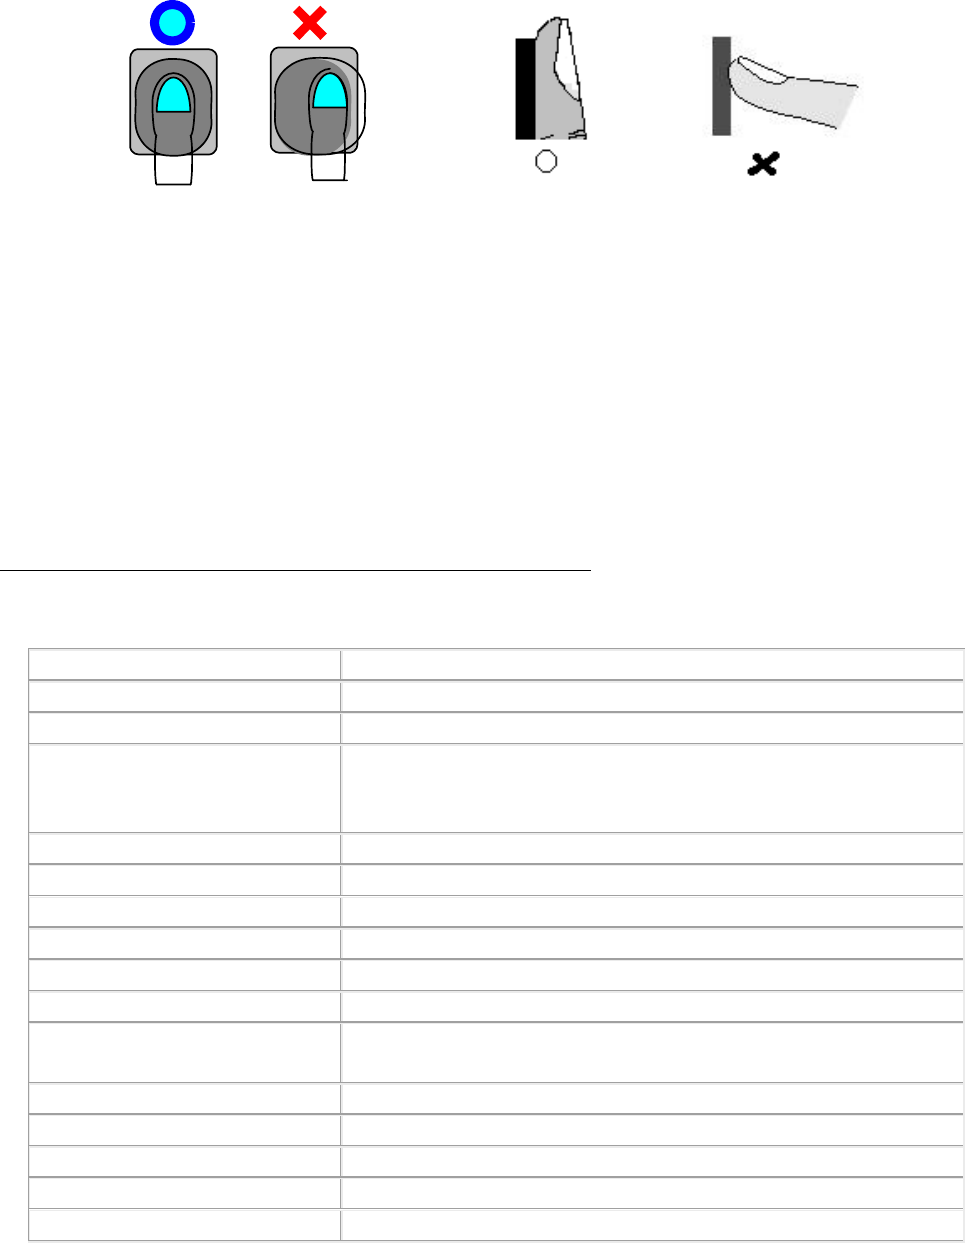
1.4 Fingerprint identification process
picture1 picture2
☺ Finger should be kept clean, so that a correct recognition is possible.
☺ If the finger is wet, recognition may be impossible.
☺ Make sure that there is no alien substance on the fingerprint recognizer.
☺ Place the finger correctly at the center of the fingerprint recognizer
as shown in <Picture 1>.
☺ All fingerprint should be touching the fingerprint recognizer as shown
in <Picture 2>.
2. Product Specifications and Function
2.1 Specification
CPU ARM9 400MHz
RAM 32MByte
FLASH(Program & Data) 64MByte
User Registration 4Fingerprint + 1Card : 5,000Users
Card : 50,000 Users
Total 55,000 Users
Event Log 200,000 Events
Communication RS422, Ethernet, Wiegand
In/Out 4 Signal Inputs, 1 Relay Output
Card Reader 13.56MHz Mifare
Audio Speaker
System Software Access Control and Time Attendance
Operating Environment -20 ~ 50°C / Lower than 90%
RH(Non-Condensing)
Power Consumption DC 12 ± 3 V 300 mA
Sensor Type Optical Sensor
1:1 Verification Time 800 ms
1: 1,000 Identification Time < 1sec
Template Size MAX 490Bytes
2.2 Function button and explanation on LED
** This product is designed to work using function buttons and LEDs alone
without numeral buttons.
For convenient use, read carefully how to work function buttons and LEDs)

5/13
2,2,1 Function button
Press F1 2 times and F2
once
Function to have master finger print registered and
Changed
Press each F1 and F2 2 times Function to have master card registered and Changed.
Press F2 2 times and F1
once.
User registration and deletion (F1:ongoing
F2:completed)
Press F1+F2+F1 Setting mode of how to access(incoming/outgoing)
(F1:Menu change, F2:setting completed and closed)
Press F2+F1+F2 Setting how to recognize
Press F1 & F2 at the same
time
Back to original position(initial state) or Cancellation
Press F1+fingerprint (or card) After a voice “Attendance” is heard, save the time to
work
F1 + F2 + fingerprint (or
card)
After a voice “Go out” is heard, save the time to go
out in the office.
F2 + F1 + fingerprint (or
card)
After a voice “Return to the office” is heard, save the
time to get back to the office
F2 + fingerprint (or card) After a voice “Leave Office” is heard, save time to go
home
Recognition of registered
finger print (or card)
After a voice “Door opened” is heard, Fingerprint (card)
ID is stored with green LED on F1 & F2 turned on.
Unregistered finger print
(card) is authenticated or
Unauthenticated
A sound “Beep” is heard once with red LED on F1 &
F2 turned On.
Press F1 or F2 key Whenever F1 or F2 is pressed, a voice “beep” is
heard once.
Setting wrong function A voice “Set back” is heard and back to an original
position
The product is in an
Abnormal condition
Red LED on F1 & F2
2.2.2 LED explanation
Alternately flashing F1 & F2 Indicates normal standby conditon
Green light on F1 Indicates Menu change, or Go ahead when F1 is
pressed
Green light on F2 Function setting completed and finished when F2 is
pressed.
Green light on F1 and F2 at
The same time
Indicates normal working condition
Red light on F1 and F2 at
The same time
Indicates abnormal working condition
2.3 Operating prompts by voice
한글음성(Korean speech) English voice(영어음성)
관리자에게 문의하세요 Please contact security manager
다시 설정하세요 Reset please
닫힘모드입니다 Closed mode

6/13
등록되었습니다 Registered
등록완료합니다 Registration completed
마스터지문 등록하세요 Register master fingerprint
마스터카드 등록하세요 Register master card
변경 마스터지문 등록하세요 Change master fingerprint
변경 마스터카드 등록하세요 Change master card
변경되었습니다 Changed
복귀합니다 Return to office
사용자 등록입니다 User registration!
사용자 삭제입니다 User deletion!
사용자 전체 삭제입니다 All users deleted
삭제합니까? Delete?
삭제되었습니다 Deleted
삭제완료합니다 Deletion completed
열림모드입니다 Open mode
외출합니다 Go out
인증되었습니다 Authenticated
인식방법 설정합니다 Please set how to recognize
일반모드입니다 General mode
지문 혹은 카드로 출입합니다 Access via fingerprint or card
지문등록하세요 Regiser fingerprint
지문으로 출입합니다 Access via fingerprint
지문과 카드로 출입합니다 Access via fingerprint and card
출근합니다 Attendance
출입모드 설정합니다 Set access mode
출입문이 열렸습니다. Door opened
초기화되었습니다. Initialized
카드등록하세요 Register card
카드로 출입합니다 Access via card
퇴근합니다 Leave office
3.Administrator registration and change
** After opening the product package and applying electrical power on the
terminal for the first time, register administrator’s master fingerprint and
card.
Administrator is required to have 4 fingerprints and 1 card registered at the
same time.
If either only fingerprint or card is registered, an outsider may register for
unauthorized use, Thus causing very dangerous situation.
3.1 Master fingerprint registeration
Press F1 button
twice and F2
button once
A voice “Register Master fingerprint!”⇒ Master fingerprint
registeration ⇒ A voice “Registered”⇒ 2nd fingerprint
registeration ⇒ A voice “Registered”(4 registerations) ⇒ A
voice “Registeration completed”⇒ Normal standby
state(Green LEDs on F1 and F2 button flicker alternately)

7/13
** If one made mistake in operation or wants to start again while
registeration(master or user) is under way, press F1 & F2 button at the same
time, thus putting the terminal in normal standby state(Green LEDs on
button and F2 button flicker alternately)
** When registering finerprint(Maste, User), have 1~2 digits registered for 4
finerprints, Therby reducing error in fingerprint registeration.
3.2 Master card registeration
Press F1 twice +
F2 once
A voice “Register master fingerprint”⇒ Card registeration ⇒
A voice “Registered”(1 card registered) ⇒ A voice
“Registeration completed”
3.3 Master fingerprint change
Press F1 twice + F2
once
A voice “Register master fingerprint”⇒ Registered Master
Fingerprint(card) authenticated ⇒ A voice“Authenticated”,
“Register change in Master fingerprint”⇒ Registration of
change in Master fingerprint ⇒ A voice“Registered”⇒
Registration of 2nd change in Master fingerprint ⇒ A voice
“Registered”(4 fingerprints registered) ⇒ A voice
“Registration completed”
3.4 Mastercard Change
Press F1 twice +
F2 twice
A voice “Register Mastercard”⇒ Registered Mastercard
(fingerprint) authenticated ⇒ “Authenticated”and a voice
“Register change in Mastercard”⇒ Change in Mastercard
registered ⇒ A voice “Registered”and “Registration
completed”.
4. User(finger print or card) registration and deletion
** A total of 55,000 users can have fingerprints or cards registered : the first
5,000 users can have both 4 fingerprints and 1 card registered while
remaining 50,000 users can have only cards registered.
4.1 User registration
4.1.1.User registration(4 fingerprints & 1 card )
Press F2 twice +
F1 once
A voice “User registration!”⇒ Touch master fingerprint(card)
on Terminal ⇒ A voice “Register fingerprint”⇒ User fingerprint
registered ⇒ A voice “Registered”⇒ User fingerprint (2nd)
registration ⇒ A voice “registered”(4 fingerprints registered)
⇒ A voice “Register card ⇒ Card registered ⇒ A voice
“Registered”⇒ F2 ⇒ A voice “User registration completed”
** When one has only fingerprint registered, press F2 button without card
registeration and one wants to register card alone, after a voice “Register
fingerprint”is heard, press F1 button to hear a voice “Register card”
** Each user is given one ID of his own which includes 4 fingerprints and 1 card
registered.
** A total of 55,000 users can have fingerprints or cards registered : the first

8/13
5,000 users can have both both fingerprints and card, and remaining 50,000
can have only card registered.
4.1.2. User registeration(4 fingerprint only)
Press F2 twice
+ F1 once
A voice “User registration”⇒ Master fingerprint(or card) ⇒ A
Voices “Authenticated””Register fingerprint”⇒ User A has his
Fingerprint registered ⇒ A voice “Registered”⇒ User A’s
fingerprint(2nd) registered ⇒ A voice “Registered”(4 fingerprints
registered) ⇒ A voice “Register card”⇒ Press F2 ⇒ A voice
“Registration completed”
## A voice “Registered”(4 fingerprints registered) ⇒ A
“Register card” is heard, press F1, then registration of 2nd user
B’s fingerprint is under way ⇒ A voice “Registered”⇒ User
B’s fingerprint(2nd) registered ⇒ A voice “Registered”(4
fingerprints registered) ⇒ A voice “Register Card”is heard,
press again F1 to go ahead with 3rd users registration and if F2
is pressed, user’s registration is completed.
** When one wants to have fingerprint alone registered, after 4 fingerprints are
registered and a voice “Register card”is heard, without having card
recognized, press F1 key to go ahead with registration of 2nd user’s
fingerprint. Whenever F1 key is pressed, other user’s registrations continue
and then, press F2 to complete registration.
4.1.3. User registration(one card only)
Press F2 twice +
F1 once
A voice “User registration!”⇒ Master fingerprint(or card) ⇒
A voices “Authenticated””Register fingerprint”⇒ Press F1 ⇒
A voice “Register card”⇒ A card registered ⇒ A voice
“Registered”⇒ Press F2 ⇒ A voice “Registration completed”
## After A card is registered and a voice “Registered”is heard,
press F1 key to go ahead with registration of 2
nd user and a
voice “Register fingerprint”⇒ F1 ⇒ A voice “Register card
⇒ B card registered ⇒ A voice “Registered”is heard and
user registrations continue and press F2 to complete
registration.
4.2 User deletion
Press F2 twice +
F1 once
A voice “User deletion!” ⇒ master fingerprint(card)
authenticated ⇒ A voice “Authenticated” ⇒ registered user
fingerprint(or card) ⇒ A voice “Deleted” ⇒ Press F2 ⇒ A voice
“deletion completed”
## (When repeting deletion) After a voice “Deleted” is heard,
Continue registered card(fingerprint) wanting to be deleted and
when a voice “Deleted” is heard, it is deleted and when deletion
is completed, press F2.
** When a particular user deletes one of his fingerprints(or 1 card), all of his
fingerprints(4) and card registered are deleted.

9/13
4.3 Deletion of all users
Press F2 twice +
F1 twice
A voice “User deletion!” ⇒ Master fingerprint(or card) ⇒ A
Voice “Authenticated” ⇒ F1 ⇒ A voices “All users deleted”,
”Delete?” ⇒ F1 ⇒ A voice “Deletion completed”
** If all fingerprints(or card) of users are deleted, master fingerprint(card)
remains and be careful that once they are deleted, they cannot be reinstated.
5. Setting how to access
5.1 Access mode setting
General mode
(registered user’s
access)
Press F1+F2+F1 ⇒ A voice “Set access mode”⇒ Master
fingerprint(or card) ⇒ A voice “Authenticated”⇒ F1 ⇒ A
voice “General mode”⇒ F2 ⇒ A voice “Registeration
completed, and into normal stanby (greenLED on F1 and F2
flicker alternately)
Open mode
(Access door
remaining open)
Press F1+F2+F1 ⇒ A voice “Set access mode”⇒ Master
fingerprint(or card) ⇒ A voice “Authenticated”⇒ F1 ⇒ A
voice “General mode”⇒ F1 ⇒ A voice “Open mode”⇒ F2
⇒ A voice “Registeration completed”
## At open mode, green LEDs on F1 and F2 flicker alternately,
finerprint light is extished and fingerprint/card except function
key are not recognized..
Closed mode
(no access allowed
except for adminis
-trator)
Press F1+F2+F1 ⇒ A voice “Set access mode” ⇒ Master
fingerprint(or card) ⇒ A voice “Authenticated”⇒ F1 ⇒ A
voice “General mode”⇒ F1 ⇒ A voice “Open mode”⇒ F1
⇒ A voice “Closed mode”⇒ F2 ⇒ A voice “Registeration
completed”
## At closed mode, green LEDs on F1 and F2 flicker alternately,
finerprint light is extished and fingerprint/card except function
key are not recognized
** When the product left factory, access mode was set at general mode.
5.2 Set how to recognize
Access via
finerprint of card
Press F2+F1+F2 ⇒ A voice “Please set how to recognize” ⇒
Master fingerprint(or card) ⇒ A voice “Authenticated” ⇒ F1 ⇒
“Access via card” ⇒ F1 ⇒ A voice “Access via fingerprint” ⇒
F1 ⇒ A voice “Access via fingerprint and card” ⇒ F1 ⇒ A
voice “Access via fingerprint or card” ⇒ F2 ⇒ A voice
“Registration completed” and into normal standby state(Green
LEDs on F1 and F2 flicker alternately)
Access via
fingerprint only
Press F2+F1+F2 ⇒ A voice “Please set how to recognize”⇒
Master fingerprint(or card) ⇒ A voice “Authenticated” ⇒ F1 ⇒
“Access via card” ⇒ F1 ⇒ A voice “Access via fingerprint” ⇒
F2 ⇒ A voice “Registration completed” and into normal
standby state(Green LEDs on F1 and F2 flicker alternately) and
registered card is not recognized.

10/13
Access via
card only
Press F2+F1+F2 ⇒ A voice “Please set how to recognize” ⇒
Master fingerprint(or card) ⇒ A voice “Authenticated” ⇒ F1 ⇒
“Access via card” ⇒ F2 ⇒ A voice “Registration completed”
and into normal standby state(Green LEDs on F1 and F2 flicker
alternately) and fingerprint light is extinguished.
Dual recognition
via card and
fingerprint
Press F2+F1+F2 ⇒ A voice “Please set how to recognize”⇒
Master fingerprint(or card) ⇒ A voice “Authenticated” ⇒ F1 ⇒
“Access via card” ⇒ F1 ⇒ A voice “Access via fingerprint” ⇒
F1 ⇒ A voice “Access via fingerprint and card” ⇒ F2 ⇒ A
voice “Registration completed” and into normal standby state
(Green LEDs on F1 and F2 flicker alternately)
## For access via card and finerprint, have card first recognized
and then, have fingerprint recognized.
** When the product left the factory, access mode is set via fingerprint or
card.
6. Product initialization and Reset
6.1. Product initialization(Factory mode)
When it is necessary to delete registered master fingerprint(card) and all of user
registrations to operation problem or reinstallation and the terminal is handled as
if it is for the first time, have the product initialized.
How to initialize : With DIP Ni. 8 switch at OFF and power switched ON, a voice
“Initialized”is heard repeatedly and when FIP No. 8 whitch is put at ON, the
terminal will be in a normal standby state.
After the terminal is initialized, be sure that DIP Switch is always to be put at ON
position.
Registration and status of events stored at fingerprint terminal are deleted by
Product initialization.
Be careful.
6.2. Product resetting(reactivation)
If something goes wrong with the product while in operation, press reset switch to
Restore it back to normal.
Registrations and events stored remain undeleted.
7. Product installation
11/13
7.1. Connection to CN1 Ethernet
connect Ethernet line to CN1
7.2. J2 Connection to J2 power and I/O
- Power connection : Connect +12V, 0V to No.2pin and No.4 pin irrespective
of their respective
Polarity.
- Connection to Wiegand : Connect No.6 pin to Wiegand D0 and connect
No.8 pin to Wiegand D1.
- RS422 connection : TX+(No.12pin), TX-(No.14pin). Rx+(No.16pin), RX-
(No.18pin)
- Connection to Relay output : Normal Open(No.1pin), Common(No.3pin),
Normal Close(No.5pin)
- Connection to Sensor : Sensor 0(No.9pin, Exit), sensor1(No.11pin, Door
Status), sensor2(No. 13pin), Sensor4(No.15pin)
- Signal ground : No.7pin, No.10pin, No.17pin
18 16 14 12 10 8 6 4 2
17 15 13 11 9 7 5 3 1

12/13
7.3. FM2000 local Address setting
- Use SW1No. 1 ~ 5to set Llocal Address
- If SW1No. 1 ~ 5were set at OFF when leaving factory, local address is No.1
- To set address, set SW1 pin No. 1 ~ 5 as shown in below table..
Address No.1 No.2 No.3 No.4 No.5 Address No.1 No.2 No.3 No.4 No.5
1 OFF OFF OFF OFF OFF 17 OFF OFF OFF OFF ON
2 ON OFF OFF OFF OFF 18 ON OFF OFF OFF ON
3 OFF ON OFF OFF OFF 19 OFF ON OFF OFF ON
4 ON ON OFF OFF OFF 20 ON ON OFF OFF ON
5 OFF OFF ON OFF OFF 21 OFF OFF ON OFF ON
6 ON OFF ON OFF OFF 22 ON OFF ON OFF ON
7 OFF ON ON OFF OFF 23 OFF ON ON OFF ON
8 ON ON ON OFF OFF 24 ON ON ON OFF ON
9 OFF OFF OFF ON OFF 25 OFF OFF OFF ON ON
10 ON OFF OFF ON OFF 26 ON OFF OFF ON ON
11 OFF ON OFF ON OFF 27 OFF ON OFF ON ON
12 ON ON OFF ON OFF 28 ON ON OFF ON ON
13 OFF OFF ON ON OFF 29 OFF OFF ON ON ON
14 ON OFF ON ON OFF 30 ON OFF ON ON ON
15 OFF ON ON ON OFF 31 OFF ON ON ON ON
16 ON ON ON ON OFF 32 ON ON ON ON ON
7.4. Enable to output Wiegand
- Set pin No.6 of SW11 at ON, enabling the terminal to output Wiegand.
- Where user card is registered, if user is authenticated irrespective of
access mode, registered card ID is out put.
- Where fingerprint alone is registered, if user is authenticated, user ID
is output. Where fingerprint is registered in FM2000 terminal.
user ID is automatically set sequentially starting with 1.
7.5. Selecting type of signal input as required
- SW1 No.7 pin is set at OFF when leaving the factory. Signal is input by
normal open.
- Where signal is input by normal close, change SW1 No.7 pin to ON
position.

13/13
8. Others
8.1. Checking matters before request for A/S
¤ Input does not act well or response speed is slow
- Check whether there is moisture in finger
- Check whether Alien substance is on the surface of fingerprint reader
- Check whether fingerprint was input exactly
¤ Fingerprint registration does not act
- Confirm fingerprint registration availability
- Confirm fingerprint registration method
- Confirm state of fingerprint reader
8.2. Terminology explanation
¤ LAN (Local Area Network) :
LAN is linked with communication line fewer than 300m, and it means
linkage of PC, main frame, workstation. LAN is distance that electric
current or radio signal can be passed correctly between computer and
LAN is linked high speed communication
network established in building of a certain organization so that
employees can use computer equipments most effectively
¤ IP address :
It is Internet Protocol Address of 32 bits that provided as the concept
agreeing with physical network address, on the Internet, to make Routing
efficiently
¤ Gateway(GW) :
It is a network point that act as entrance which enter other network
¤ Subnet Mask(SM) :
Subnet is abbreviated word of "sub-network", it is network that is
belonged to certain organization but it means network that can be
realized to a part detached apart
14/13
15/13