Montana Woodworks Table Double Pedestal
2014-07-06
: Montana-Woodworks Table-Double-Pedestal table-double-pedestal montana-woodworks pdf
Open the PDF directly: View PDF ![]() .
.
Page Count: 2

MONTANA WOODWORKS, INC.
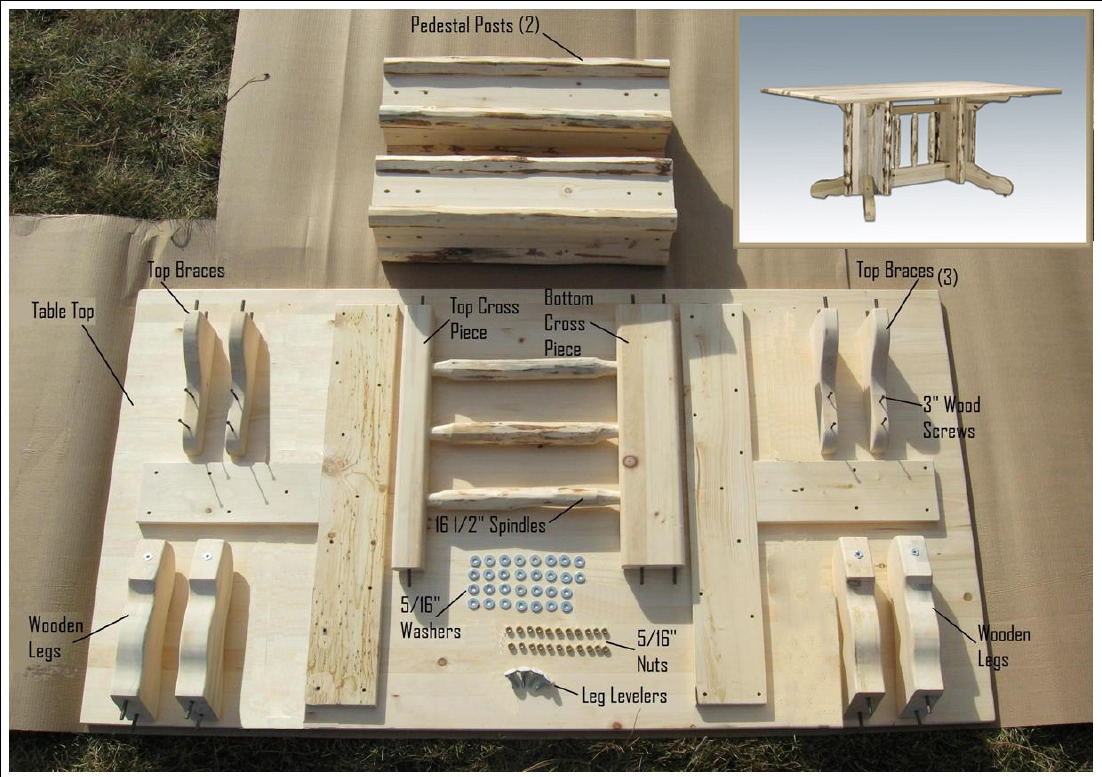
Assembly Instrucons for Double Pedestal Table
Thank you very much for purchasing our heirloom quality double pedestal table. Should you have any quesons or need
to contact sales or support, please do not hesitate to contact our corporate oces at 888.889.3728 or via E-Mail at:
cs@montanawoodworks.com
Before beginning assembly please take a few moments to read the instrucons carefully, understanding each step. Likewise please
also ensure that the hardware package contains the items as described here. Note: a ratcheng wrench can be a considerable
mesaver during the assembly process.
Tools Needed: ½ ” Wrench, Phillips Screw Driver
Parts List: (2) Pedestal Posts (4) Wooden Legs (4) Top Braces (1) Table Top
2 ¼” x 2 ¼” Top Cross Piece (1) 2 ¼” x 4 ¾ ” Boom Cross Piece
(3) 16 ½” Spindles
Hardware List: (22) 5/16” Course Thread Nuts (22) 5/16” Flat Washers
(4) Leg Levelers (8) 3” Wood Screws (Phillips)
STEPS: 1. Place pedestal posts upright on the oor. (Hole locaons are the same. Either end up works.)
2. Aach 2 wooden legs to each post using 5/16” washers and nuts.
3. Screw Leg Levelers in each leg. Ensure they are completely seated.
4. Build center assembly by inserng the three spindles between top and boom cross pieces.
5. Taking completed center piece assembled in step 4, insert the threaded studs into each
pedestal posts being careful not to scratch the posts with exposed studs. Secure studs on top
end of pedestal with 5/16” washers and nuts.
6. Carefully turn pedestal assembly over by reaching over pedestal assembly, grasping each
cross piece and gently turn over so that legs are now resng on the oor.
7. Finish fastening center assembly using 5/16” washers and nuts.
8. Aach the four top braces to the pedestal posts ensuring they are even with top of pedestals.
9. Gently place table top face down on clean and padded surface being very careful not to
scratch or dent it. Using technique described in step 6, turn pedestal assembly over carefully
placing it onto the table top, aligning top braces with outline drawn on underside of table
top.
10. Using 3” Phillips head screws, secure the top braces to the table top making certain that the
braces are ush against table top.
11. You are now ready to turn table over. With the assistance of another person, turn table
upright. You may want to place a clean padded surface under the table edge to protect it
from damage.
12. Adjust the four leg levelers on legs so that table is level and does not wobble.
PROUDLY MADE IN THE U.S.A.
*Pine requires a good sealant. We recommend two coats of varnish being applied per manufactures direcons. The table may be
stained prior to nishing with varnish.